


 Loading...
EN 2.7_m1

Contents |
|
|
Welcome.................................................... |
3 |
|
Setup ............................................................ |
4 |
|
Scope of delivery ......................................... |
4 |
|
Safety............................................................ |
4 |
|
Caution: Lithium batteries (internal)............ |
4 |
|
Fuse |
.............................................................. |
4 |
Installation - Safety advice.......................... |
5 |
|
Safety measures .......................................... |
6 |
|
Regulations pertaining to the unit............... |
7 |
|
S119/ S120 Front panel................................ |
8 |
|
Display colours: Status LED ........................ |
9 |
|
S119/ S120 Connection panel .................... |
10 |
|
Explanation of the connections................. |
11 |
|
S208 Remote control............................... |
12 |
|
Initial operation.......................................... |
12 |
|
|
One S208 controls several receivers 12 |
|
|
Two S208s for one receiver................ |
12 |
|
Lithium battery information................. |
12 |
S208 Overview............................................ |
13 |
|
Explanation of the Remote control............ |
14 |
|
Charging the battery .................................. |
15 |
|
|
Charging control / status display ....... |
15 |
Battery care ............................................... |
16 |
|
|
Keep the number of charging cycles to |
|
|
a minimum............................................. |
16 |
|
Store in a cool environment ............... |
16 |
|
Total discharge protection ................. |
16 |
Useful facts: Revox Joy radio system....... |
16 |
|
S208 Basic settings................................. |
17 |
|
|
Remote control............................. |
17 |
|
Select device ............................... |
20 |
|
Change zone................................. |
20 |
|
Information................................... |
20 |
|
Start Pairing ................................. |
20 |
First contact ............................................... |
21 |
|
|
Speakers and outputs ......................... |
21 |
|
Power cable.......................................... |
21 |
|
LAN/WLAN connection....................... |
21 |
|
Headphone operation.......................... |
22 |
|
FM/ DAB+.............................................. |
23 |
|
CD player via CD-Link.......................... |
23 |
Establishing the connection to the network |
||
.................................................................... |
|
24 |
network receiver |
|
Establishing the connection to the remote |
|
control using pairing................................... |
25 |
Establishing the connection to the remote |
|
control ......................................................... |
26 |
First steps in the Main menu ............ |
27 |
Radio not available!?.................................. |
28 |
S119/S120 Basic settings ....................... |
29 |
Speaker Setup ............................................ |
30 |
FM Tuner..................................................... |
32 |
DAB+ ........................................................... |
35 |
Bluetooth ................................................ |
37 |
Status .................................................... |
37 |
Unpairing devices................................ |
38 |
Audio format......................................... |
39 |
Basic volume........................................ |
39 |
Quick Connect...................................... |
40 |
CD-Player .................................................... |
41 |
CD player switch-on behaviour ......... |
41 |
Local Inputs ................................................ |
42 |
Rename Input ....................................... |
42 |
Adjusting levels.................................... |
43 |
Network ................................................. |
44 |
Network Status .................................... |
44 |
WLAN status ........................................ |
44 |
IP Settings ............................................ |
45 |
WLAN Settings..................................... |
45 |
Network Restart................................... |
45 |
MAC Address ....................................... |
45 |
Quick start function ............................. |
45 |
Software...................................................... |
46 |
Internet.................................................. |
46 |
USB........................................................ |
46 |
Further settings........................................... |
47 |
Preout.................................................... |
47 |
Remote access .................................... |
48 |
Auto Standby........................................ |
48 |
USB supply ........................................... |
49 |
Clock...................................................... |
49 |
Operation - Start-up process................. |
50 |
The configuration options .......................... |
51 |
Operation .................................................... |
52 |
1

network receiver |
|
Main menu ............................................... |
53 |
Last Music .................................................. |
53 |
Queue.......................................................... |
54 |
Managing the Queue........................... |
54 |
Creating a Queue ................................. |
55 |
My Music .................................................... |
56 |
Online Services........................................... |
57 |
Internet Radio....................................... |
58 |
Podcasts ............................................... |
60 |
TIDAL ..................................................... |
61 |
Tuner ........................................................... |
64 |
DAB+ / FM Tuner................................. |
64 |
Bluetooth .............................................. |
66 |
Comfort start using Quick Connect.... |
66 |
CD-Player.................................................... |
67 |
Comfort functions................................. |
67 |
Playback display .................................. |
68 |
Error display.......................................... |
68 |
USB/ iPod .................................................. |
69 |
USB ........................................................ |
69 |
iPod ...................................................... |
69 |
iPod selection ..................................... |
70 |
Audio Server ............................................... |
71 |
Control functions ........................................ |
72 |
Cover display ........................................ |
72 |
Local inputs................................................. |
73 |
Settings and comfort functions.................. |
74 |
Sound Setting ....................................... |
74 |
Alarm Clock 1 / 2......................................... |
75 |
Deactivating the alarm clock ............. |
75 |
Switching the alarm clock off ............ |
76 |
Short Time Alarm........................................ |
77 |
Sleep-Timer ................................................ |
78 |
Change My Music ...................................... |
78 |
Device info .................................................. |
79 |
Basic settings ............................................. |
79 |
Propose new iRadio station ....................... |
80 |
Error messages........................................... |
81 |
|
Contents |
|
Status messages ..................................... |
84 |
|
A. |
Switching the device on ......... |
84 |
B. |
Waiting for the network .......... |
84 |
C. |
Switching the device off ......... |
84 |
Network terminology ........................... |
85 |
|
General.................................................. |
85 |
|
DNS ....................................................... |
|
85 |
LAN........................................................ |
|
85 |
Gateway................................................ |
85 |
|
Client ..................................................... |
|
86 |
DHCP ..................................................... |
|
86 |
IP Address ............................................ |
86 |
|
MAC Address ....................................... |
86 |
|
NAS ....................................................... |
|
86 |
Power Line – LAN................................ |
86 |
|
Proxy Server......................................... |
86 |
|
Router (WLAN Router) ........................ |
87 |
|
Server |
.................................................... |
87 |
SSID....................................................... |
|
87 |
UPnP-AV ............................................... |
87 |
|
WLAN |
.................................................... |
88 |
WPA ...................................................... |
|
88 |
WEP....................................................... |
|
88 |
Wi-Fi ...................................................... |
|
88 |
Network: Questions & Answers ............ |
89 |
|
Appendix................................................... |
|
92 |
Warranty..................................................... |
|
92 |
Copyright advice ........................................ |
92 |
|
Technical data 1/2..................................... |
93 |
|
Technical data 2/2..................................... |
94 |
|
2

Introduction |
network receiver |
Welcome
The Second generation Revox S119 and S120 network receivers not only combine elegant streaming technology with an audiophile HighEnd output, they also form the bridge from sophisticated CD player integration right up to the latest aptX-standard Bluetooth technology. With Software 2.3 the music service TIDAL is directly integrated in the device.
When you see the compact construction, it is easy to forget that there are full-blown torodial transformers and heavy duty power supplies at work in the network receivers, so that if required, up to 240 watts (S120) are available at the speaker terminals. Combined with the DSP professional speakers and space correction, you, in the company of your Revox speakers, will reach a musical zenith, which need fear no comparison with its peers.
For the benefit of audiophile music lovers, Revox deliberately avoided the use of fans. So that nonetheless, the S119/S120 can keep a cool head, even when the temperatures outside top the 40°C mark, a heat coupler has been used. This aluminium heat pipe dissipates the heat away from the network processor over a gold-plated coating on a large area of copper. The heat can then escape from the inside of the housing through the convection openings. In this way, we achieve a processor temperature that is lower by
up to 30°C, which impacts positively on the processor stability and ensures a long working life.
In order to keep the operation on a par with the sophisticated technology, a lot of time and effort was invested in the detail of the optional remote control. You will feel it and see it.
The Apps S232 (for iOS) and S235 (for Android) allow additionally the control of your Joy receiver by means of your smart phone / tablet and thus browse thousands of music tracks.
This product innovation from Revox stands out as a true system for life, thanks to its legendary robustness and longevity, which the brand is known for throughout the world.
3
network receiver |
Introduction |
Setup |
Safety |
Please check the unit and accessories after unpacking, to ensure that everything is there and that there are no signs of transit damage. Read the User manual through carefully before starting to use the unit. Keep the manual for later reference.
A unit that shows signs of mechanical damage or which has had liquid in it should not be connected to the mains supply.
Only use the mains cable supplied. When using an alternative power cord, the ratings must meet 10A/125V. The alternative power cord requires a certification (UL / CSA / VDE).
The unit’s power supply and connections values (mains voltage, frequency) must be checked before connecting it to the mains. Fuses used in the device must comply with the factory definitions in the “Technical Data” section.
Take note of the label on the back of the unit.
In order to avoid the risk of an electric shock, do not open the housing. Maintenance and repairs should only be carried out by qualified experts.
Caution: Lithium batteries (internal)
Danger of explosion if battery is incorrectly replaced. Replace only with the same or equivalent type – CR2032 3V.
Batteries shall not be exposed to excessive heat such as sunshine, fire or the like.
Take note of the disposal hints within the chapter Appendix.
Scope of delivery
Network receiver (1x)
WLAN antenna (1x)
Power cable (1x)
Network cable (1x)
Quick Reference Guide
Network receiver User manual CD *
App S232 / S235 (AppStore/ PlayStore)
* Contains the complete S119/S120 German/English User manual in PDF format. A PDF Reader is required.
Fuse
The S119/S120 is equipped with a primary fuse located inside the housing. This internal fuse may not be changed by the user.
In this case of a fault, please contact your nearest Revox Service Point.
4

Introduction |
network receiver |
Installation - Safety advice
Please follow the instructions in the User manual supplied.
Do not position the unit close to strong heat sources or in direct sunlight.
Please take note of the following, if the receiver is to be installed in a cabinet or closed shelves. Allow at least 5 cm of free space around the device, so that the air can circulate freely and that there is no build up of heat. Do not cover openings on the back wall or in the base of the unit.
It must be ensured that the correction functioning of the unit's ventilation openings is not affected by being covered, e.g. by curtains, newspapers, table cloths, or similar.
This unit conforms to protection class 2. This means that with this unit, the ground cable is not connected to the housing, in order to effectively eliminate sound-damaging groundloops. With these network receivers however, Revox uses the ground cable for the reduction of noise fields. For this reason, both the supplied cable and the connection panel are fitted with a ground cable.
The power plug should be removed from the socket during longer periods of non-use, for instance during an absence.
Unplug the unit from the mains during storms. Voltage peaks through the mains power supply caused by lightning strikes can damage the unit.
There must be easy access to the power plug so that the unit can be unplugged at all times.
Lay the power cable such that it cannot be damaged. The power cable should not have kinks or be laid over sharp edges. It should not be walked on or be exposed to any chemicals. The last point is valid for the whole unit. A power cable with damaged insulation can lead to electric shocks and represents a fire hazard.
Never pull on the cable when plugging the unit in or out. Always hold the plug.
Liquids, flammable or other objects should not be inserted in the unit’s openings as this can lead to faults, fire or an electrical shock.
Do not expose the device to splash water or high levels of humidity. Do not stand containers filled with liquid, e.g. flower vases, on the device.
It is only designed for operation in temperate, non-tropical climates.
Take note of and follow the safety advice on the following pages.
5

network receiver
Safety measures
Read and take note of the following safety advice for your own safety and to avoid unnecessary damage to your equipment. Please keep this safety advice in a safe place for future reference.
Avoid locating the unit in a position which:
-is exposed to direct sunlight
-is directly next to a source of heat
-has poor ventilation
-has a dusty atmosphere
-is unstable
-has high humidity
The guarantee covers the intended usage of the unit.
High build-ups of dust and humidity cause creepage current in the unit that can cause a risk of shocks when touching the unit or lead to a fire.
If you have moved the unit from a cold to a warm environment, leave it switched off for about two hours because of a possible build up of condensation dampness.
You should always switch your S119/ S120 off before connecting or disconnecting other devices or speakers.
Introduction
Protect your unit from:
-damp, dripping water and steam
-impacts and mechanical loads
-magnetic and electrical fields
-cold, heat, direct rays of the sun and severe changes of temperature.
-dust
-accesses to the inside of the device
Do not stand any articles with open flames, e.g. lit candles on the unit.
Please note
In order to exclude the risk of an electric shock, do not remove the housing. Only have repair work carried out by a Revox specialist dealer.
Volume
Loud music can cause hearing damage. Avoid extremes of volume, particularly over longer periods of time.
Supervision
Do not allow children to handle the equipment without supervision. Do not allow children in close proximity to the unit. Do not operate the S119/S120 without supervision. Switch the power switch off or unplug the unit if you are going to be absent for a longer period of time.
Cleaning
The unit should be cleaned using just a damp, soft and clean cloth without any abrasive cleaning agents.
6

Introduction |
network receiver |
Regulations pertaining to the unit
In EU and EEC countries, Revox offers a guarantee on units bought in the EU, over and above the statutory rights of guarantee claims against the seller. The guarantee covers material and labour during the period of the guarantee, which is defined by the Revox Sales Partners in the individual countries that make up the EU.
In all countries, the guarantee services offered by the Revox Sales Agents are over and above the statutory regulations. They are only valid in the country of purchase. Proof of purchase from an authorised Revox Partner must be produced to make a claim on the guarantee.
The guarantee is made null and void in the case of incorrect intervention measures or non-professionally executed repairs.
7
network receiver
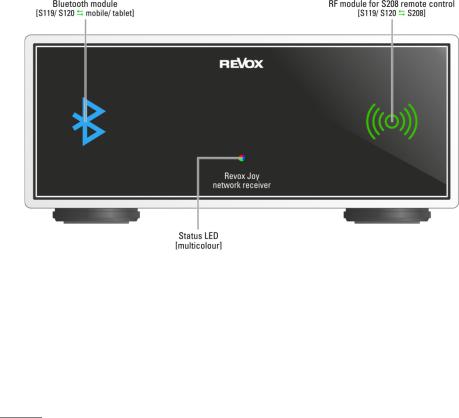
S119/ S120 Front panel
As well as housing the multi-colour status LED, the front panel of the receiver also conceals a radio module for the bidirectional data traffic with the optional S208 remote control as well as the Bluetooth receiver. The receiver is controlled either using the S208 Remote control or the S232 Apple App or the S235 for Android devices.
Presentation
Advice about the installation location
As the radio module is located directly behind the glass panel on the front of the unit, the S119/S120 should be installed so that it is aligned in the direction of the remote control. This guarantees the maximum distance for operating use the S208. Walls and ceilings, particularly those made out of brick or concrete (with reinforcement), significantly reduce the distance.
Front view of the S119 network receiver
8
Presentation
Display colours: Status LED
Dark-blue
Quickstart function [off]:
In this standby mode, all functions, with the exception of the radio module, are deactivated.
Power consumption: < 0.6 W*
Light-blue
Quickstart function [on]:
Unit is in standby mode. If the Quickstart function is activated, the network processor is switched on permanently. This significantly reduces the switch-on phase, as the connection to the network doesn't have to be built up again. All other sub-assemblies, such as the audio signal processing or the outputs, including the main transformer are switched off, as with normal standby mode. Quickstart mode is also a requirement, in order to be able to control the receiver with a networkbased Revox App S232 / S235.
The Quickstart function is automatically activated in the CD Link combination with the Joy CD player.
Power consumption: approx. 4.0 W*
Through the “internal - Joy” Setup setting, the USB input also supports the loading of external devices, e.g. iPhone in standby mode.
* without USB feed
network receiver
Green (flashing)
After switching on at the power switch, the status LED flashes green for about 10 seconds. During this time, the S208 remote control can be paired/ synchronised with the receiver, i.e. these two devices can be connected with each other, functionally. You will find the necessary steps for this procedure explained in the S208 Remote control chapter.
Red (flashing)
A non-defined fault has occurred. If necessary, switch the unit off and on using the power switch.
Red (permanent)
The timer in the network receiver is active. This can be the case, for example, if the timer function is activated, with which the receiver switches itself on automatically after a certain time.
White
The receiver is in operation.
9

network receiver |
Presentation |
S119/ S120 Connection panel
Please take note of the connection information on the following pages.
USB information
Revox recommends that you only use the USB connection for data carriers up to 32 GB as with large data quantities, the reading time increases greatly or it can be impossible to record data. With a large music collection, we recommend using a network hard disc (NAS) with an UPnP service e.g. the Revox S37 audio server with integrated rip function.
DAB+/ FM combiner information
A DAB+/FM combiner is needed for the parallel reception of DAB and FM signals through the tuner module's F socket. In this way, the two inputs, FM (87.5 - 108 MHz) and DAB+ (174 - 230 MHz), are combined onto a joint HF output. Revox offers an optimised FM/DAB combiner under the order number 1.561.091.01.
10

Presentation |
network receiver |
|
Explanation of the connections |
||
|
|
|
Name |
Function |
|
|
|
|
AC Power |
Power cable connection (class 2 with ground cable) The |
|
voltage definition [V~] on the unit label must be adhered to. |
||
|
||
Aux 1 / Aux 2 |
Analogue audio inputs, max. input voltage: 2.0 V pp |
|
|
|
|
CD-Link |
Control-audio-connection to the Joy CD Player. RJ45 plug. |
|
|
|
|
Coax 1 / Coax 2 |
Digital audio inputs through coaxial cable (SPDIFF, max. 192 kHz) |
|
|
|
|
DAB+/FM |
Antenna input (F socket) for the FM/DAB module. |
|
Optimised for cable reception. |
||
|
||
Factory1 |
Reset button for restoring factory defaults. Can be activated |
|
|
using a paper clip. |
|
Loudspeaker (Right + Left) |
Speaker connection / Impedance: at least 4Ω |
|
|
|
|
|
RJ45 network connection for wired audio streaming (iRadio, |
|
Network |
NAS) and for App control |
|
Power switch
Optical 1/ Optical 2
Output Analog
Output Digital2
Output Sub (Subwoofer)
Start up
USB / iPod / iPhone
 Wi-Fi
Wi-Fi
Power switch - no power consumption when in off position
Please note: If the power cable is connected, certain internal switching areas are live, even if the switch is in the off position.
Digital audio inputs through fibre optic – TOSLink (SPDIFF, max. 96 kHz)
Controlled analogue audio output (e.g. for headphone operation, external amplifier) – see also chapter Preout, page 47
Digital audio output over coaxial cable (potential-free)
Controlled analogue audio output for active subwoofer
Pilot signal for subwoofer wakeup available in the S119/S120 basic settings
Start button for start-up from the standby state. Quick Start function is activated for permanent control through an App.
USB B input for the USB memory stick (< 32 GB ) or iPod/iPhone connection.
WLAN antenna connection for wireless audio streaming (iRadio, NAS) and App control, supplied with the unit
1Switch off the S119/ S120 via Power switch – Press and hold the Factory button. Switch the device back on with the power switch. Release the Factory button after 5 seconds
2SPDIFF Sampling rate 48 kHz for Aux1/2; 96 kHz SPDIFF (all other sources) The Output Digital is permanently active and is not muted with the output.
11

network receiver
S208 Remote control
The optional S208 Remote control offers you the optimum way to control the S119/S120 network receiver. All information is displayed clearly on the TFT colour display, through the bidirectional wireless connection. Additionally, the control of third-party devices with an IR Code can be integrated through a database. The remote control is configured using the free-of-charge S208 EasyCreator PC software that can be downloaded from the Revox homepage.
Initial operation
The remote control battery should be charged up for at least 3 hours before you start to use it. Please refer to Page 15 of this User manual for information on how to do this.
The charger supplied with the remote control is used to charge the lithium ion battery in the S208.
The operation of the S119/S120 using the S208 Remote control is described in the next chapter. The setting options of the remote itself, such as the background colour of the display, are defined in the S208. On the other hand, the menus and setting options that affect the network receiver itself depend on the corresponding device. As a result, the description is split between the S208 and the S119/S120.
Presentation
One S208 controls several receivers Up to 24 network receivers can be controlled with one S208 Remote control. However, it can only communicate or have a wireless connection with one receiver at a time. If a connection to a second receiver is established (Select device hotkey), the connection to the first receiver is automatically closed.
Two S208s for one receiver
If you are using several S208 remotes, it should be noted that one receiver can only have a wireless connection to one remote controller at a time. If for example, there is already a connection to remote control 1, remote control 2 cannot establish a connection to the receiver. Remote control 2 can only establish a connection once remote control 1 has ended the connection to the receiver with the  button or has established a connection to another receiver.
Lithium battery information
The remote control, with the battery in it, should not be exposed to sources of great heat such as the direct rays of the sun or to fire. Please also read the information concerning the disposal of this product in the Appendix at the end of this User manual.
12
Presentation |
network receiver |
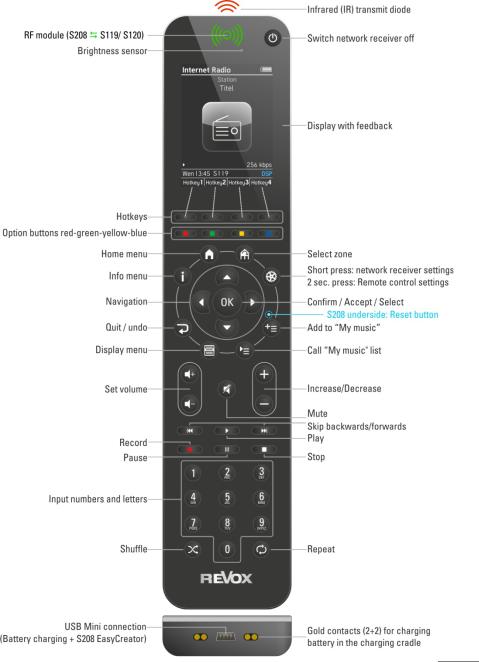
S208 Overview
13

network receiver |
Presentation |
||
Explanation of the Remote control |
|
||
|
|
|
|
Button |
|
Function with S119/S120 network receiver (not IR operation) |
|
|
|
|
|
|
|
Switch S119/S120 off |
|
|
|
|
|
|
|
hotkey to switch between/switch on network receivers and IR devices. |
|
|
|
|
|
|
|
Menu-dependant option buttons - (number input : lower/upper case) |
|
|
|
|
|
|
|
Main menu with source selection (radio, USB, local sources, etc...) |
|
|
|
|
|
|
|
Access to (basic) settings. Short press: S119/S120 settings (only if there is |
|
|
|
already a connection to the receiver) Long press: S208 settings |
|
|
|
Displays the information screen about the currently selected source |
|
|
|
|
|
|
|
Adds the track that is currently playing to the My music list |
|
|
|
|
|
|
|
Calls the My music list |
|
|
|
|
|
|
|
Quit menu / Up one level / Back |
|
|
|
|
|
|
|
Change zone. Displays all available zones |
|
|
|
|
|
|
|
Displays the source's Home menu, e.g. radio, music server, ... |
|
|
|
|
|
|
|
Confirm / Accept / Select |
|
|
|
|
|
|
|
Right-Left / Decrease-Increase / Delete-Cursor to the right |
|
|
|
|
|
|
|
Up-Down / Decrease-Increase |
|
|
|
|
|
|
|
Volume control. Volume level can be set from 0 to 40. Comfort start-up volume* |
|
|
|
|
|
|
|
Mute / Un-mute (only loudspeakers, subwoofer output) ** |
|
|
|
|
|
|
|
Decrease-Increase / Down-Up |
|
|
|
|
|
|
|
Stop |
|
|
|
|
|
|
|
Short: Track down-up / Down-Up |
Long: fast forward/ - backward |
|
|
|
|
|
|
Record [currently without function] |
|
|
|
|
|
|
|
Play |
|
|
|
|
|
|
|
Pause |
|
|
|
|
|
|
|
Digits 0-9 / Letters A-Z and direct access to the MyMusic entries 1-10 (s.p. 56) |
|
|
|
|
|
|
|
Start/end SHUFFLE |
|
|
|
|
|
|
|
Start/end REPEAT (track/all) |
|
|
|
|
|
|
* |
If the volume is set to a level higher than [Vol 20] when it is switched off, a |
|
|
lower volume level [Vol 10] is used when the device is switched on again. |
14 |
|
|
** |
Preout will be controlled according to the headphone setting |
Presentation
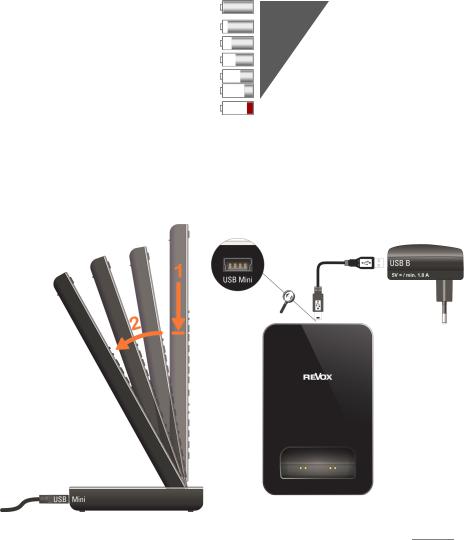
Charging the battery
The S208 remote control has a rechargeable lithium ion battery that can be charged using either the supplied charger or a mini-USB connection.
Use the charger with the supplied USB cable and the pluggable power supply. Insert the S208 vertically in the charger cradle (Step 1) and then let it slope backwards (step 2). This ensures that there is good contact between the 4 gold contact-connections on the charging cradle and the remote control.
Alternatively, the charger can also be connected to the network receiver's USB output if this is not needed for any other purpose. In this case, the pluggable power supply is not required.
network receiver
Charging control / status display
 Battery is being charged - do not interrupt the charging process
 Battery is fully charged - charging process can be ended
Battery full
Battery almost empty
Battery empty - please recharge
The USB pluggable power supply consumes no power [0.0W] when the S208 Remote control is not in the charging cradle.
Connecting charger to the power supply
15

network receiver
Battery care
Keep the number of charging cycles to a minimum
The working life of a lithium ion battery is largely determined by the number of times it is charged, irrespective of whether it is charged from 90% to 100% or from 10% to 100%. For this reason, it makes sense to charge the remote only once the charge-level display is showing [Almost empty] or [Empty]. This will lengthen the working life of the battery with the same number of charging cycles.
Store in a cool environment
If possible, don't place or keep the remote control in warm or hot locations, e.g. on a window sill or other places that get hot. At temperatures above 40°C, the rate of self-discharge increases and irreversibly shortens the overall working life and capacity. Particularly if the remote control is not going to be used for several weeks, it should be kept in a cool location with the battery at 50% to 80% charge.
Total discharge protection
The S208 remote control has a total discharge protection feature that switches the battery that provides its power off, as soon as this is completely discharged either through usage or through longterm storage. Once the S208 is in this state, it no longer reacts to button-presses. In this case, the remote control has to be completely recharged using the charger or the USB connection. This takes at least 3 hours.
Presentation
Useful facts: Revox Joy radio system
The transmitting power of the S208 remote control and the receiver unit in the Joy device is in the μW or mW range, depending on the data traffic. Is the S208 in standby mode, there is even no radio communications between the devices - no polling at short intervals.
The S119 / S120 is the off-mode only in a receiving mode, which means that he "hears" only, whether data for him are sent. No active sending.
Conclusion: The Revox Joy receiver behaves exemplary in electric smog.
16
Configuration
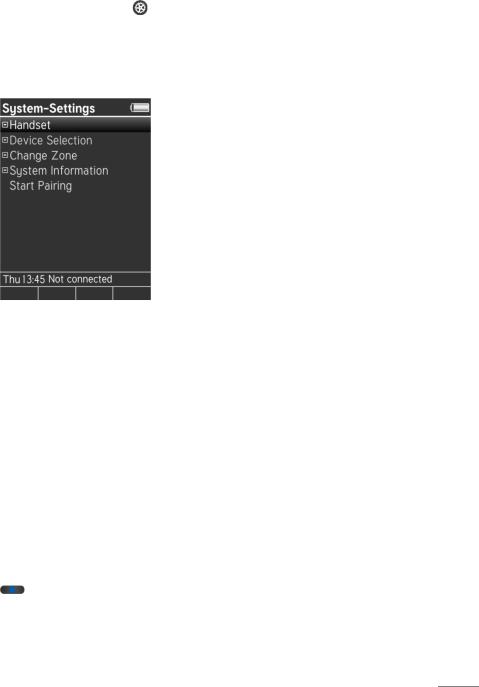
S208 Basic settings
The Basic settings for the S208 are called up by pressing and holding the  button for > 2 seconds.
Then, you can select from the following basic settings:
Remote control
Select device
Change zone
Information Start pairing
You can make your inputs and selections in the individual menus using the navigation buttons, OK and the number pad.
|
Decrease / Delete - Increase |
|
Up-Down |
OK |
Confirm |
0-9 |
Direct input of numbers/letters |
|
Uppercase-Lowercase |
network receiver
Remote control
Name [Re:control S208]
Time: Hours (0-23) |
[13] |
Time: Hours (0-59) |
[45] |
Stand-by (0-300) |
[60] |
Time in cradle |
[On] |
Weekday
Brightness
Background colour
Hotkeys
Change language
Rename device
Delete device
Add zone
Delete zone
Transport lock
Name [Re:control S208]
Editing options for the remote control's name, which is displayed in the Home menu.
Time: Hours (0-23) |
[13] |
Time: Hours (0-59) |
[45] |
Time setting in hours and minutes, in case there is no connection to the network through the receiver. Otherwise, the time is updated over the network (Internet).
Stand-by (0-300) |
[60] |
Timeout in seconds until the remote control, not the receiver, switches to standby. A longer timeout shortens the battery life accordingly.
17

network receiver
Time in cradle [On] / [Off]
The S208 Remote control can display the current time [On], when it is in the charging cradle in standby mode. The timeout until the time is shown, depends on the
Stand-by (0 - 300s) setting. The power consumption while the time is being displayed and while trickle charging is happening (battery 100% charged), is 0,8W.
There is no time display if charging (fast / trickle charging) is done directly through the USB socket.
Weekday
Weekday selection, which appears as an abbreviation (Mo, Tu, We ...) in the status bar at the bottom of the display. This is also important for the receiver's alarm clock function.
Brightness
The TFT colour display can be operated at three different brightness settings, low / medium / high, as well as in automatic mode In this case, the integrated brightness sensor (see S208 overview) measures the ambient brightness and adjusts the background lighting accordingly.
The brighter the background lighting selection, the shorter the battery life.
Configuration
Background colour
Five colours are available as background colour: Dark grey / Walnut / Blue / Red / Moss green. On the one hand, this gives you the option of choosing a colour that matches your personal preference but it also makes it easier to differentiate between them, if several remotes are being used.
Hotkeys
Four hotkeys are available per Zone/Room that can have network receivers or IR devices assigned to them from the list of available devices. Network receivers are integrated into this list by being paired with the S208. IR devices are integrated through the S208 EasyCreator PC program. You can now assign these devices to the hotkeys in the corresponding zones through the hotkey menu. This function is also available in the S208 EasyCreator PC program.
Change language
Here, you can select the remote control's menu language. You can choose between: English, German, French, Italian, Spanish, Dutch.
Note
When changing the menu language My Music entries of Internet radio stations are no longer valid, since the Internet radio service for the new language has a new address. In this case the entries of My Music need to be created newly.
Other categories of My Music, such as USB or audio server, remain still valid when changing the menu language.
18
Configuration
Rename device
This menu allows you to change the names of all devices that are currently available in the remote control. This function is also available in the S208 EasyCreator PC program.
Delete device
Devices can be deleted through this menu. Deleted IR devices can only be added back in again using S208 EasyCreator. Network receivers can be made available again through the remote control's pairing process.
network receiver
Add zone
Zones can be added and named through this menu. In the simplest case, a Zone/Room consists of one network receiver or one IR device. Combinations are also possible of course. This function is also available in the S208 EasyCreator PC program.
Rename zone
This menu allows you to change the names of all zones that are currently available in the remote control. This function is also available in the S208 EasyCreator PC program.
Delete zone
Zones that have been created can be deleted through this menu. A deleted zone can be added back in again either through the Add zone option in the S208 menu or through S208 EasyCreator.
Transport lock
The motion detector is disabled when the transport lock option is activated, so that if you are transporting the S208 by car, for example, it won't remain permanently switched on and discharge the battery. The transport lock option is activated with the OK button. Pressing any other button deactivates the transport lock again.
19

network receiver
Select device
You select a device that is available in the remote control and that you want to control, through this menu. All devices are listed here, irrespective of whether they are assigned to a zone or not. The devices can be S119/S120 network receivers or third-party devices that are controlled by infrared (IR).
S119/S120 network receivers are added to the device list through the pairing process.
IR devices are added to the device list through the S208 EasyCreator PC program.
Change zone
This menu enables you to change to or call up another zone. This function can also be called directly through the  button.
Information
This menu gives you various details such as serial number, software states or the number of integrated devices.
The USB login is also done through this menu of the S208 is to be configured through the S208 EasyCreator PC program. For this purpose, a USB connection (USB Mini <-> USB B) is set up between the remote control and a PC running Windows. Then, the red button
 is pressed in the Information menu. This initiates the S208 connection. If connection is successful, "Connected" appears in the S208 display.
Configuration
Start Pairing
Background information to pairing
A fixed communication must be created for the bidirectional wireless connection between the S208 remote control and the network receiver, in order that they can communicate securely with each other again after a restart or power outage. This is also necessary because there may be several network receivers and remote controls in one system. The exchange of information for the purpose of uniquely identifying the devices is called Pairing. An S208 remote control can be deployed for the control of several network receivers and as a result can also be paired with several network receivers.
Pairing process
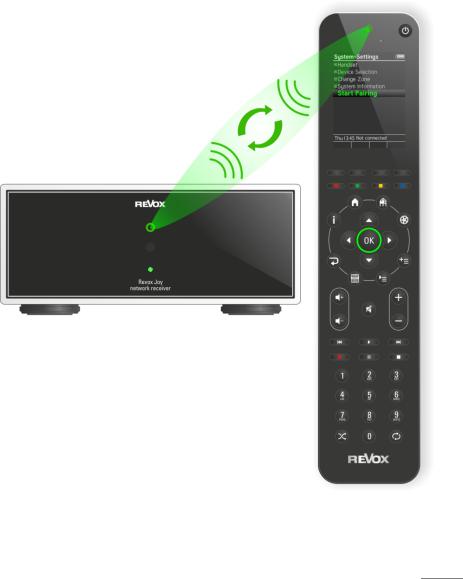
To prepare for the pairing of an S208 and S119/S120, switch the network receiver off at the power switch and wait until the status LED on the front panel has gone out. If you now switch the receiver back on, the LED flashes green for about 10 seconds. During this time, you have the chance to start the pairing process [Start Pairing], using the OK button. Once a network receiver is recognised, its name appears in the S208 display. Now the name and the preferred hotkeys can be selected. This completes the pairing process.
20

Configuration
First contact
Various connections have to be made before setting up your S119/S120 for the first time.
Speakers and outputs
Use cables with sufficient cross section profile to connect your speakers to the S119/S120.
The Revox recommendation:
Length 0 - 5 m: min. 2.5 mm2 / AWG 13 Length 5 - 10 m: min. 4.0 mm2 / AWG 11
Each speaker must have an impedance of at least 4Ω. You must ensure that all the cable strands are located correctly in the speaker connection terminal and that no individual strand is touching another connector or has contact with the S119/S120 housing.
Fully-insulated banana plugs provide an elegant solution for making speaker connections. The screw connectors must be fully tightened to ensure a secure contact.
Ensure correct polarity when connecting the cables in order to ensure perfect stage sound reproduction. Crossed polarity doesn't cause any damage to the speaker or the amplifier, but it leads to an imprecise and somewhat diffused sound picture that is weak in the bass ranges.
network receiver
Power cable
Only use the power cable supplied by Revox. It must also be ensured that the voltage value printed on the type plate corresponds to the available mains voltage. If required, the S119/S120 can be reconfigured for a different mains voltage. This should however only be done by an authorised specialist dealer.
LAN/WLAN connection
The S119/S120 network receiver is designed for network-based functions, such as playing Internet radio or as a streaming client for your music library that is located on a network hard drive. The receiver needs access to your network for these functions. This can be done preferably through a wired LAN connection, using the supplied RJ45 network cable or wirelessly through a WLAN.
The reason for preferring a wired LAN connection to a WLAN connection is its reduced susceptibility to failures and the option of being able to transmit highresolution audio formats (≥ 96 kHz) without any interruptions. If a LAN connection is used, the WLAN function is switched off. In this case, the supplied WLAN antenna is not needed. The wireless connection to the S208 remote control is done through the radio module integrated in the glass front panel, which is independent of the WLAN.
21
network receiver
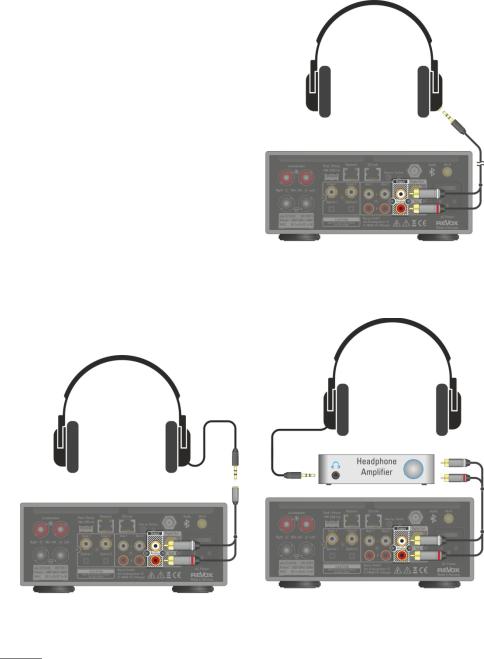
Headphone operation
It is possible to use headphones with the Joy receiver. Instead of the common 3,5 mm jack bush you can use the pre-out RCA socket of the S119/S120 receiver, which thanks to its powerful output is capable of driving headphones as well as external amplifiers. It is possible to operate headphones with low (16 - 80 Ω) and high (250 - 600 Ω) impedance.
The pre-out is always active, even when the loudspeaker output inclusive of the sub out is muted by the Mute button. During the muted mode the volume function will be maintained to control the volume of the headphones. Each mute activity is acknowledged by a short fadeout of the pre-out signal. See also page 47.
Connection via adapter „RCA-jack bush“, e.g. Cordial CFY 0,3 YCC
Configuration
Direct connection via adapter „RCAphone jack“, e.g. Cordial CFY 3 WCC.
Headphone operation via external headphone amplifier.
22
Configuration |
network receiver |
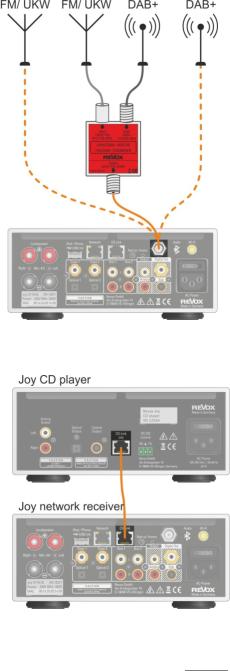
FM/ DAB+
As an option, the Joy Receiver can be ordered with a DAB+/FM module or it can have one fitted retrospectively.
If only one of the two reception methods is required, the antenna signal can be fed directly into the F socket on the rear of the device as shown by the dotted line in the graphic on the right.
A DAB+/FM switch is needed for the parallel reception of DAB and FM signals through the tuner module's F socket. In this way, the two inputs, FM (87.5 - 108 MHz) and DAB+ (174 - 230 MHz), are combined onto a joint HF output, as shown by the solid line in the graphic on the right. Revox offers an optimised FM/DAB switch under the order number 1.561.097.01.
CD player via CD-Link
If you own a Joy CD player, these can easily be integrated into the Joy system. To do this, you simply have to connect the CD player to the Joy Receiver using the RJ45 patch cable that is supplied with the CD player. Both the symmetrical audio data and the control data are digitally exchanged over the connection cable. No further connections are necessary.
Only high quality CAT6A or CAT7 patch cables with double screening should be used as alternatives. Please refer also to Page 38.
23
network receiver |
Configuration |
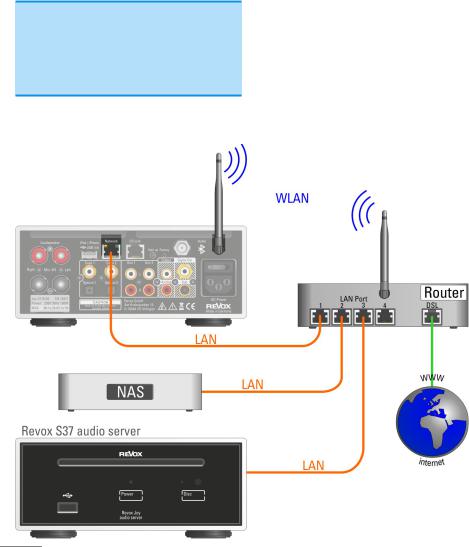
The first Step - Establishing the connection to the network
Your network
The following description for the cabling and the setup of the S119/S120 makes the assumption that there is a functioning network with router available and that the network is operational.
If you have any questions about the setup and configuration of your network or Internet access, please refer to your System administrator or an IT specialist of your choosing.
WLAN Wireless communication
An access point is required for the wireless communication between the S119/S120 and the router. This can be an external unit or it can be integrated in the WLAN router.
Internet Radio
If you want to use the S119/S120 to receive Internet radio, there must be a broadband Internet access to the router. Setting up the Internet access may involve further costs. The management and use of the Revox Internet Radio Portal is free-of-charge and already included in the purchase price.
24
Configuration network receiver
The first Step - Establishing the connection to the remote control using pairing
All the functions of the S119/S120 network receiver are controlled through the S208 remote control. Through the bidirectional wireless connection, the S208 can display content and operating state, keeping you up to date at all times.
Control is not just limited to one network receiver. Actually, up to 24 receivers can be controlled.
To make this possible, each network receiver has to be "introduced" to the remote control one time. This is called pairing.
The picture below shows the pairing process between the S208 and a network receiver. You will find an exact description of this process on the next page.
The S208 remote control can only communicate or have a wireless connection with one receiver at a time. If a connection to a second receiver is established, the connection to the first receiver is automatically closed.
25

network receiver |
Configuration |
The first step - Establishing the connection to the remote control
Once all connections are in place, the network receiver can be switched on using the power switch.
After switching on, the green status LED on the front panel flashes for about 10 seconds. Pairing between the network receiver and an S208 remote control can be carried out during this green phase. In the case of a combipackage consisting of network receiver and S208 remote control, Revox will already have carried out the pairing. You can switch the S119/S120 on directly by pressing the hotkey on the remote control with the name S119 or S120. In the example on the right, that would be hotkey A.
Carrying out a pairing with a new S208 In the case of a new S208 remote control that has not been paired, the pairing process is started by confirming the Start Pairing option during the green phase . Now, the S208 tries to connect to the network receiver. If one is recognised, it transmits its name to the S208. This can now be edited and assigned at a later stage to a hotkey. This successfully completes the pairing process and the receiver is automatically switched on.
If the  battery icon is already visible on the S208 or if there is no display at all, the battery needs to be charged - see Chapter Charging the battery.
26
Configuration
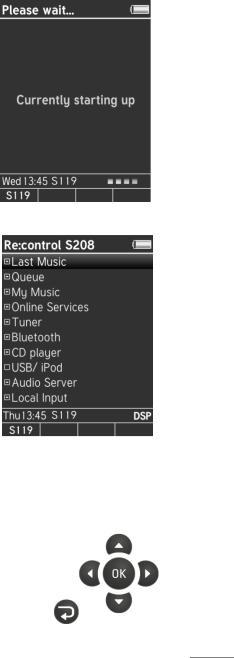
First steps in the Main menu 
While the connection is being established to the network, "Please wait... Currently starting up" appears in the display. Then, the S208 Home menu, with the sources is displayed. Sources identified with a  are sources that are available or present. On the other hand,
  indicates that these sources are currently not yet available or cannot be reached. In the example on the right, there is a connection to (Internet) radio. A USB device (iOS products/USB memory) or a music server (NAS) on the other hand has not been identified or is not available.
The local inputs are always available even if they are not being used or have not been assigned.
The first item, "Last listened to" stores the last 40 sources or paths to have been selected. These can be Internet radio stations or tracks from a USB mass storage. Local inputs are not taken into account. When the system is first setup, this folder is of course empty.
This completes the first steps. In order to be able take full advantage of the quality and comfort functions of the Revox network receiver, we would invite you to get to know all the details and nuances through our User manual.
network receiver
Start screen
Home menu
You can now make your choice at the remote control, through the four navigation buttons and the OK button.
27

network receiver |
Configuration |
Radio not available!?
If Internet radio is not available to you, it was probably not possible to establish an Internet connection. There can be several reasons for this.
•The network cable to the router is not plugged in or a crossover network cable has been used.
•As a factory setting, the S119/S120 is set to DHCP, which means that it gets its IP address automatically from the router. DHCP must therefore be possible and/or activated in the router settings. If this is not wanted, the receiver can also be assigned a fixed IP address. See Chapter
Network settings
•The firewall is blocking access.
See Chapter NETWORK QUESTIONS / TIPS
•WLAN connection. The WLAN antenna at the receiver / the WLAN router is not available. The WLAN function is deactivated at the router or the router is switched off.
See Chapter Network settings and WLAN status.
The main menu is called by pressing the  Home button on the S208.
You will find more information about setting up and operating the network receiver in the two main chapters "Settings" and "Operation".
28
Loading...