

Page 1

Introduction Symphony
1
E 1.0
E 1.3
Page 2

Page 3

Contents Symphony
1
Welcome .................................................... 3
Setup ............................................................ 4
Scope of delivery ......................................... 4
Safety............................................................ 4
Caution: Lithium batteries (internal) ............ 4
Installation - Safety advice .......................... 5
Safety measures .......................................... 6
Regulations pertaining to the unit ............... 7
Positioning .................................................... 7
Front of the Symphony ................................. 8
Operating panel............................................ 9
Display colours: Status LED ...................... 10
Connection panel Symphony ..................... 11
S208 Remote control .................................. 13
Initial operation .......................................... 13
One S208 controls several receivers 13
Two S208s for one Symphony ............ 13
Lithium battery information ................. 13
S208 Overview ............................................ 14
Explanation of the Remote control ............ 15
Charging the battery .................................. 16
Charging control / status display ....... 16
Battery care ............................................... 17
Keep the number of charging cycles to
a minimum ............................................. 17
Store in a cool environment ............... 17
Total discharge protection ................. 17
Useful facts: Revox Joy radio system ....... 17
S208 Basic settings ................................. 18
Remote control ............................. 18
Select device ................................ 21
Change zone ................................. 21
Information .................................... 21
Start Pairing .................................. 21
First contact ................................................ 22
Power cable ................................................ 22
LAN/WLAN network connection ....... 22
Establishing the connection to the network
..................................................................... 23
Establishing the connection to the remote
control using pairing ................................... 24
Establishing the connection to the remote
control ......................................................... 25
First steps in the Main menu ........... 26
Radio not available!? .................................. 27
Symphony - Basic settings .................... 28
Audio Setup .................................. 29
FM Tuner ....................................... 31
DAB+ ............................................. 34
Network .................................. 36
Network Status .................................... 36
WLAN status ........................................ 36
IP Settings ............................................ 37
WLAN Settings ..................................... 37
Network Restart ................................... 37
MAC Address ....................................... 37
Quick start function ............................. 37
Software........................................ 38
Internet .................................................. 38
USB ........................................................ 38
Remote access ............................. 39
Clock .............................................. 39
Auto Standby ................................ 40
Page 4

Symphony Contents
2
Operation - Start-up process ................. 41
The configuration options .......................... 42
Operation via S208 ...................................... 43
Main menu ............................................... 44
Last Music .................................................. 44
Queue .......................................................... 45
Managing the Queue ........................... 45
Creating a Queue ................................. 46
My Music .................................................... 47
Shortening access times .................... 48
Change menu language ...................... 48
Radio ........................................................... 49
DAB+ / FM Tuner ....................................... 53
USB/ iPod .................................................. 54
USB ........................................................ 54
iPod ...................................................... 54
iPod selection ..................................... 55
Music server ............................................... 56
Control functions ........................................ 57
Cover display ........................................ 57
Local inputs ................................................. 58
Rename Input ....................................... 59
Settings and comfort functions.................. 60
Sound Setting ............................... 60
Alarm Clock 1 / 2 ........................... 61
Short Time Alarm .......................... 63
Sleep-Ttimer ................................. 64
Change My Music ........................ 64
Device info .................................... 66
Basic settings ............................... 66
Setting up Internet Radio ....................... 67
Internet Audio Portal - IAP ..................... 68
Initial login .................................................. 69
IAP Registration page ................................ 70
Managing the Revox IAP............................ 71
Adding radio stations to Favorits ............... 72
Synchronising Joy devices ........................ 73
Error messages........................................ 74
Status messages ..................................... 77
A. Switching the device on ......... 77
B. Waiting for the network .......... 77
C. Switching the device off ......... 77
Network terminology ........................... 78
General .................................................. 78
DNS ....................................................... 78
LANLocal Area Network ..................... 78
Gateway ................................................ 78
Client ..................................................... 79
DHCP ..................................................... 79
IP Address ............................................ 79
MAC Address ....................................... 79
NAS ....................................................... 79
Power Line – LAN ................................ 79
Proxy Server ......................................... 79
Router (WLAN Router) ........................ 80
Server .................................................... 80
SSID ....................................................... 80
UPnP-AV ............................................... 80
WLAN .................................................... 81
WPA ...................................................... 81
WEP ....................................................... 81
Wi-Fi ...................................................... 81
Network: Questions & Answers ............ 82
Appendix ................................................... 85
Warranty ..................................................... 85
Copyright advice ........................................ 85
Environmental protection .......................... 85
Technical data 1/2 ..................................... 86
Technical data 2/2 ..................................... 87
Page 5

Introduction Symphony
3
Welcome
The audiophile active system Symphony
from Revox connects the latest
streaming technology with a soundmature output, which drives a 2-way
speaker pair using a digital signal
processor (DSP).
With its multi-braced wooden housing,
the Symphony matches up in every
respect to the expectations that Revox
places on all its speakers. A full-function
stereo speaker united in one housing is
the result of this symbiosis. This can be
heard through the solid bass
underpinning and the uniform emission
characteristics over the whole frequency
range. And the raised volume levels
called for by a Saturday evening party
are not an issue for the Symphony. The
long-stroke bass speaker provides
enough reserves to take the volume up
to a level of 105 dB.
For the benefit of audiophile music
lovers, Revox has deliberately avoided
the use of fans. So that nonetheless, the
Symphony can keep a cool head, even
when the temperatures outside top the
40°C mark, a heat coupler has been
used. This aluminium heat pipe
dissipates the heat away from the
network processor over a gold-plated
coating on a large area of copper. The
heat can escape from the inside of the
housing through the convection
openings on the base and the rear. In
this way, we achieve a processor
temperature that is lower by up to 30°C,
which impacts positively on the
processor stability and ensures a long
working life.
In order to keep the operation on a par
with the sophisticated technology, a lot
of time and effort was invested in the
detail of the optional S208 Remote
control. It can also be used as a system
remote control for television, BluRay
player and other entertainment electronics
or for the Joy range of Revox network
receivers.
Operation through Revox Apps running
on Apple or Android devices is of course
also possible.
This product innovation from Revox
stands out as a true system for life,
thanks to its legendary robustness and
longevity, which the brand is known for
throughout the world.
Page 6

Symphony Introduction
4
Setup
Please check the unit and accessories
after unpacking, to ensure that
everything is there and that there are no
signs of transit damage. Read the User
manual through carefully before starting
to use the unit. Keep the manual for later
reference.
A unit that shows signs of mechanical
damage or which has had liquid in it
should not be connected to the mains
supply.
Only use the mains cable supplied. When
using an alternative power cord, the
ratings must meet 10A/125V. The
alternative power cord requires a
certification (UL / CSA / VDE).
The unit’s power supply and connections
values (mains voltage, frequency) must
be checked before connecting it to the
mains.
Scope of delivery
Symphony (1x)
Wi-Fi antenna (1x)
Power cable (1x)
Network cable (1x)
Quick Reference Guide
User manual CD 1
F-socket adapter for FM
2
Antenna cabel
2
1
Contains the complete Symphony German/English
User manual in PDF format. A PDF Reader is required.
2
Optional accessory for t he DAB+/ FM module
Safety
Take note of the label on the back of the
unit.
In order to avoid the risk of an electric
shock, do not open the housing.
Maintenance and repairs should only be
carried out by qualified experts.
Caution: Lithium batteries (internal)
Danger of explosion if battery is
incorrectly replaced. Replace only with
the same or equivalent type –
CR2032
3V.
Batteries shall not be exposed to
excessive heat such as sunshine, fire
or the like.
Batteries that are incorrectly used or
that are inserted the wrong way round
can explode!
Take note of the disposal hints within
the chapter
Appendix.
.
Page 7

Introduction Symphony
5
Installation - Safety advice
Please follow the instructions in the
User manual supplied.
Do not position the unit close to strong
heat sources or in direct sunlight.
Please take note of the following, if the
Symphony is to be installed in a
cabinet or closed shelves. Allow at
least 5 cm/ 2 inches of free space
around the device, so that the air can
circulate freely and that there is no
build up of heat. Do not cover openings
on the back wall or in the base of the
unit.
It must be ensured that the correction
functioning of the unit's ventilation
openings is not affected by being
covered, e.g. by curtains, newspapers,
table cloths, or similar.
This unit conforms to protection class
2. This means that with this unit, the
ground cable is not connected to the
housing, in order to effectively eliminate
sound-damaging ground-loops.
The power plug should be removed
from the socket during longer periods
of non-use, for instance during an
absence
.
Unplug the unit from the mains during
storms. Voltage peaks through the
mains power supply caused by
lightning strikes can damage the unit.
There must be easy access to the
power plug so that the unit can be
unplugged at all times.
Lay the power cable such that it
cannot be damaged. The power cable
should not have kinks or be laid over
sharp edges. It should not be walked
on or be exposed to any chemicals.
The last point is valid for the whole
unit. A power cable with damaged
insulation can lead to electric shocks
and represents a fire hazard.
Never pull on the cable when plugging
the unit in or out. Always hold the plug.
Liquids, flammable or other objects
should not be inserted in the unit’s
openings as this can lead to faults, fire
or an electrical shock.
Do not expose the device to splash
water or high levels of humidity. Do not
stand containers filled with liquid, e.g.
flower vases, on the device.
It is only designed for operation in
temperate, non-tropical climates.
Take note of and follow the safety
advice on the following pages.
Page 8

Symphony Introduction
6
Safety measures
Read and take note of the following
safety advice for your own safety and to
avoid unnecessary damage to your
equipment. Please keep this safety
advice in a safe place for future
reference.
Avoid locating the unit in a position
which:
- is exposed to direct sunlight
- is directly next to a source of heat
- has poor ventilation
- has a dusty atmosphere
- is unstable
- has high humidity
The guarantee covers the intended
usage of the unit.
High build-ups of dust and humidity
cause creepage current in the unit that
can cause a risk of shocks when
touching the unit or lead to a fire.
If you have moved the unit from a cold to
a warm environment, leave it switched
off for about two hours because of a
possible build up of condensation
dampness.
You should always unplug your
Symphony before connecting or
disconnecting other devices or
speakers.
Protect your unit from:
- damp, dripping water and steam
- impacts and mechanical loads
- magnetic and electrical fields
- cold, heat, direct rays of the sun and
severe changes of temperature.
- dust
- accesses to the inside of the device
Do not stand any articles with open
flames, e.g. lit candles on the unit.
Please note
In order to exclude the risk of an electric
shock, do not remove the housing. Only
have repair work carried out by a Revox
specialist dealer.
Volume
Loud music can cause hearing damage.
Avoid extremes of volume, particularly
over longer periods of time.
Supervision
Do not allow children to handle the
equipment without supervision. Do not
allow children in close proximity to the
unit. Do not operate the Symphony
without supervision. Unplug the unit if
you are going to be absent for a longer
period of time.
Cleaning
The unit should be cleaned using just a
damp, soft and clean cloth without any
abrasive cleaning agents.
Page 9

Introduction Symphony
7
Regulations pertaining to the unit
In EU and EEC countries, Revox offers a
guarantee on units bought in the EU,
over and above the statutory rights of
guarantee claims against the seller. The
guarantee covers material and labour
during the period of the guarantee,
which is defined by the Revox Sales
Partners in the individual countries that
make up the EU.
In all countries, the guarantee services
offered by the Revox Sales Agents are
over and above the statutory regulations.
They are only valid in the country of
purchase. Proof of purchase from an
authorised Revox Partner must be
produced to make a claim on the
guarantee.
The guarantee is made null and void in
the case of incorrect intervention
measures or non-professionally executed
repairs.
Positioning
The positioning of the speakers has an
important influence on the quality of the
reproduction. For this reason, a lot of
attention was paid during the
development of the Symphony so that it
could be deployed flexibly in different
positions. Thanks to its good, uniform allround emission characteristics, the
Symphony doesn't have to be positioned
at ear level or directed towards the
listener.
If you want to place the Symphony on a
table or a similar flat surface, you should
select the corresponding position option
in the Audio Setup menu. You will find
more information in the chapter
Audio
Setup/Placement
.
You should avoid placing objects in front
of the Symphony, in order to obtain the
best musical reproduction and the
maximum operating distance between
the wireless module and the bidirectional S208* Remote control.
If you are controlling the Symphony
through the S232 (Apple) or S235
(Android) Revox Apps, it is only the
network access that influences the
reception quality, not the wireless
module. If there is insufficient reception
quality with a WLAN connection, an
antenna extension or a WLAN Repeater
can improve matters.
*optional
Page 10

Symphony Presentation
8
Front of the Symphony
Function
1 Lefthand coaxial speaker (2-way principle) with bass reflex opening
2
Wireless module for bi-directional data traffic with the optional S208 Remote
control
3
Loud-Quiet (+/-). Volume level can be set from 0 to 40; with comfort switch-on
volume.
4 Righthand coaxial speaker (2-way principle) with bass reflex opening
5 Multi-colour status LED
6 On/off button
7 Selection buttons () for MyMusic entries
Page 11

Presentation Symphony
9
Operating panel
The Symphony's operating front panel is
divided up into a button panel for the
most important everyday functions
without remote control, an on/off button
with multi-colour status LED and the
concealed wireless module for the bidirectional S208 Remote control.
Volume +/Volume setting with comfort switch-on
volume. If the volume is set to a level
higher than [Vol 20] or if the volume is set
to [VOL 0] when it is switched off, a
discreet volume level [Vol 10] is used
when the device is switched on again.
MyMusic
Using the and buttons, you can
scroll through the occupied
MyMusic
folder entries without a remote control.
Any of the possible total of 18 entry
positions that are empty are skipped.
By pressing on either of the buttons,
you can always switch from what is
currently playing, e.g iPod, optical, Audio
server, etc., to the MyMusic entries.
On/off button with status LED
You can switch the Symphony on and off
with the circular button. The LED within
the button indicates the current
operating status of the Symphony.
Please refer to the next page for more
details.
Page 12

Symphony Presentation
10
Display colours: Status LED
Dark-blue
Quickstart function [off]:
In this standby mode, all functions,
with the exception of the RF module,
are deactivated.
Power consumption: < 0.6 W
A deactivated quickstart mode [off]
does not support the USB input for
charging external devices, e.g. an
iPhone.
Light-blue
Quickstart function [on]:
Unit is in standby mode. If the
Quickstart function is activated, the
network processor is switched on
permanently. This significantly reduces
the switch-on phase, as the
connection to the network doesn't
have to be built up again. All other
sub-assemblies, such as the audio
signal processing or the outputs, are
switched off, as with normal standby
mode. Quickstart mode is also a
requirement, in order to be able to
control the receiver with a networkbased Revox App
S232 (Apple)/ S235
(Android).
Power consumption: approx. 4.5 W*
The USB input supports the charging
of external devices, e.g. an iPhone in
quickstart mode [on].
* without USB feed
Green (flashing)
After plugging in the power cord, the
status LED flashes green for about 10
seconds. During this time, the S208
remote control can be paired/
synchronised with the Symphony, i.e.
these two devices can be connected
with each other, functionally. You will
find the necessary steps for this
procedure explained in the
S208
Remote control
chapter.
Software-Update
The green status LED flashes during
a software update, whether via USB
or over the Internet.
Red (flashing)
A non-defined fault has occurred. If
necessary, briefly disconnect the device
from the mains.
Red (permanent)
The timer in the Symphony is active. This
can be the case, for example, if the timer
function is activated, with which the
Symphony
switches itself on automatically
after a certain time.
White
The Symphony
is in operation.
Page 13

Presentation Symphony
11
Connection panel Symphony
Name
Function
1 AC Power Power cable connection (Class 2). 100 - 240 VAC ~ / 50 - 60 Hz
2 Wi-Fi
WLAN antenna connection for wireless audio streaming
(iRadio, NAS) and App control, supplied with the unit
3 Ventilation Ventilation opening through to the base of the unit
4 DC input
DC connection (12 - 18 VDC) for a power supply from the onboard power network of a caravan, camper or boat.
5 Rating plate Unit-specific data such as serial number, etc.
6
USB1 / iPod /
iPhone
USB B input for USB memory stick (< 32 GB) or iPod/iPhone
connection.
7
Digital IN
Optical
Coax
Digital audio inputs:
- through fibre optic - TOSLink - max. 96 kHz
- through coaxial cable - max 192 kHz
8 Network
RJ45 network connection for wired audio streaming (iRadio,
NAS) and for App control
9 Start up
On/off button.
Identical function as power button on the front panel.
10 Factory2
Reset button for restoring factory defaults. Can be activated
using a paper clip.
11 DAB/ FM3
Antenna input for an optional FM/DAB module.
Optimised for cable reception.
Page 14

Symphony Presentation
12
Connection panel info
1
USB storage*
Use the USB connection only for USB
storage up to 32 GB, as large amount of
data can lead to long read-in terms.
Sometimes a capturing of content is even
impossible.
A network hard drive (NAS) with UPnP
service is recommended for a large music
collection.
*with FAT16/32 formatting
2
Unplug the Symphony from the mains –
keep pressing the Factory button –
plug in the Symphony power cord to the
mains. Release the Factory button after 5
secondes.
3
not supplied with the Symphony
Power supply info
The Symphony can be powered through
mains power (100 - 240 VAC ~ / 50 - 60
Hz) or through a DC source (12 - 18 VDC,
3A). Only one power source should be
selected at any one time, even though an
internal control prevents any damage
being caused by parallel power
operation.
USB information
Revox recommends that you only use the
USB connection for data carriers up to
32 GB as with large data quantities, the
reading time increases greatly or it can
be impossible to record data. With a
large music collection, we recommend
using a network hard disc (NAS) with an
UPnP service e.g. the Revox S37 audio
server with integrated rip function.
DAB+/ FM combiner information
As an option, the Joy Symphony can be
ordered with a DAB+/FM module or it
can have one fitted retrospectively.
If only one of the two reception methods
is required, the antenna signal can be
fed directly into the F socket on the rear
of the device as shown by the dotted line
in the graphic below.
A DAB+/FM switch is needed for the
parallel reception of DAB and FM signals
through the tuner module's F socket. In
this way, the two inputs, FM (87.5 - 108
MHz) and DAB+ (174 - 230 MHz), are
combined onto a joint HF output, as
shown by the solid line in the graphic
below.
Revox offers an optimised
FM/DAB switch under the order number
1.561.097.01.
Page 15

Presentation Symphony
13
S208 Remote control
The optional S208 Remote control offers
you the optimum way to control the
Symphony. All information is displayed
clearly on the TFT colour display, through
the bi-directional wireless connection.
Additionally, the control of third-party
devices with an IR Code can be
integrated through a database. The
remote control is configured using the
free-of-charge
S208 EasyCreator
PC
software that can be downloaded from
the Revox homepage.
Initial operation
The remote control battery should be
charged up for at least 3 hours before
you start to use it. Please refer to Page
16 of this User manual for information on
how to do this.
The charger supplied with the remote
control is used to charge the lithium ion
battery in the S208.
The operation of the Symphony using the
S208 Remote control is described in the
next chapter. The setting options of the
remote itself, such as the background
colour of the display, are defined in the
S208. On the other hand, the menus and
setting options that affect the Symphony
itself depend on the corresponding
device. As a result, the description is
split between the S208 and the
Symphony.
One S208 controls several receivers
Up to 24 Symphonys can be controlled
with one S208 Remote control.
However, it can only communicate or
have a wireless connection with one
Symphony
at a time. If a connection to a
second Symphony
is established (
Select
device
hotkey), the connection to the
first Symphony
is automatically closed.
Two S208s for one Symphony
If you are using several S208 remotes, it
should be noted that one Symphony
can
only have a wireless connection to one
remote controller at a time. If for
example, there is already a connection
to remote control
1 remote control 2
cannot establish a connection to the
Symphony. Remote control
2 can only
establish a connection once remote
control
1 has ended the connection to
the Symphony
with the button or has
established a connection to another
Symphony.
Lithium battery information
The remote control, with the battery in it,
should not be exposed to sources of
great heat such as the direct rays of the
sun or to fire. Please also read the
information concerning the disposal of
this product in the Appendix at the end
of this User manual.
Page 16

Symphony Presentation
14
S208 Overview
Page 17

Presentation Symphony
15
Explanation of the Remote control
Button
Function with Symphony
(not IR operation)
Switch Symphony off
hotkey to switch between/switch on Symphonys and IR devices.
Menu-dependant option buttons - (number input
:
lower/upper case)
Main/ Home menu with source selection (radio, USB, local sources, etc...)
Access to (basic) settings.
Short
press: Symphony settings (only if there is
already a connection to the receiver)
Long
press: S208 settings
Displays the information screen about the currently selected source
Adds the track that is currently playing to the
My music
list
Calls the
My music
list
Quit menu / Up one level / Back
Change zone. Displays all available zones
Displays the source's Home menu, e.g. radio, music server, ...
Confirm / Accept / Select
Right-Left / Decrease-Increase / Delete-Cursor to the right
Up-Down / Decrease-Increase
Volume control. Volume level can be set from 0 to 40. Comfort start-up volume*
Mute / Un-mute
Decrease-Increase / Down-Up
Stop
Short:
Track down-up / Down-Up
Long:
fast forward/ - backward
Record [currently without function]
Play
Pause
Digits 0-9 / Letters A-Z
Start/end SHUFFLE
Start/end REPEAT (track/all)
* If the volume is set to a level higher than [Vol 20] when it is switched off, a
lower volume level [Vol 10] is used when the device is switched on again.
Page 18

Symphony Presentation
16
Charging the battery
The S208 remote control has a
rechargeable lithium ion battery that can
be charged using either the supplied
charger or a mini-USB connection.
Use the charger with the supplied USB
cable and the pluggable power supply.
Insert the S208 vertically in the charger
cradle (Step 1) and then let it slope
backwards (step 2). This ensures that
there is good contact between the 4 gold
contact-connections on the charging
cradle and the remote control.
Alternatively, the charger can also be
connected to the Symphony's USB
output if this is not needed for any other
purpose. In this case, the pluggable
power supply is not required.
Charging control / status display
Battery is being charged -
do not interrupt the charging process
Battery is fully charged -
charging process can be ended
Battery full
Battery almost empty
Battery empty - please recharge
The USB pluggable power supply
consumes
no power [0.0W] when the
S208 Remote control is not in the
charging cradle.
Connecting charger to the power supply
Page 19

Presentation Symphony
17
Battery care
Keep the number of charging cycles to a
minimum
The working life of a lithium ion battery is
largely determined by the number of
times it is charged, irrespective of
whether it is charged from 90% to 100%
or from 10% to 100%. For this reason, it
makes sense to charge the remote only
once the charge-level display is showing
[Almost empty] or [Empty]. This will
lengthen the working life of the battery
with the same number of charging
cycles.
Store in a cool environment
If possible, don't place or keep the
remote control in warm or hot locations,
e.g. on a window sill or other places that
get hot. At temperatures above 40°C, the
rate of self-discharge increases and
irreversibly shortens the overall working
life and capacity. Particularly if the
remote control is not going to be used
for several weeks, it should be kept in a
cool location with the battery at 50% to
80% charge.
Total discharge protection
The S208 remote control has a total
discharge protection feature that
switches the battery that provides its
power off, as soon as this is completely
discharged either through usage or
through longterm storage. Once the S208
is in this state, it no longer reacts to
button-presses. In this case, the remote
control has to be completely recharged
using the charger or the USB
connection. This takes at least 3 hours.
Useful facts: Revox Joy radio system
The transmitting power of the S208
remote control and the receiver unit in
the Joy device is in the μW or mW range,
depending on the data traffic. Is the S208
in standby mode, there is even no radio
communications between the devices no polling at short intervals.
The Symphony
is in off-mode only in a
receiving mode, which means that he
"hears" only, whether data for him are
sent. No active sending.
Conclusion: The Revox Symphony
behaves exemplary in electric smog.
Page 20

Symphony Configuration
18
S208 Basic settings
The Basic settings for the S208 are
called up by pressing and holding the
button for > 2 seconds.
Then, you can select from the following
basic settings:
Remote control
Select device
Change zone
Information
Start pairing
You can make your inputs and selections
in the individual menus using the
navigation buttons, OK and the number
pad.
Decrease / Delete - Increase
Up-Down
OK Confirm
0-9 Direct input of numbers/letters
Uppercase-Lowercase
Remote control
Name [Re:control S208]
Time: Hours (0-23) [13]
Time: Hours (0-59) [45]
Stand-by (0-300) [60]
Time in cradle [On]
Weekday
Brightness
Background colour
Hotkeys
Change language
Rename device
Delete device
Add zone
Delete zone
Transport lock
Name [Re:control S208]
Editing options for the remote control's
name, which is displayed in the
Home
menu.
Time: Hours (0-23) [13]
Time: Hours (0-59) [45]
Time setting in hours and minutes, in
case there is no connection to the
network through the receiver. Otherwise,
the time is updated over the network
(Internet).
Stand-by (0-300) [60]
Timeout in seconds until the remote
control, not the receiver, switches to
standby. A longer timeout shortens the
battery life accordingly.
Page 21

Configuration Symphony
19
Time in cradle [On] / [Off]
The S208 Remote
control can display
the current time
[On], when it is in
the charging
cradle in standby
mode. The timeout
until the time is
shown, depends
on the
Stand-by
(0 - 300s) setting. The
power consumption while the time is
being displayed and while trickle
charging is happening (battery 100%
charged), is 0,8W.
There is no time display if charging (fast /
trickle charging) is done directly through
the USB socket.
Weekday
Weekday selection, which appears as an
abbreviation (Mo, Tu, We ...) in the status
bar at the bottom of the display. This is
also important for the receiver's alarm
clock function.
Brightness
The TFT colour display can be operated
at three different brightness settings,
low
/
medium
/
high
, as well as in
automatic
mode. In this case, the
integrated brightness sensor (see S208
overview) measures the ambient
brightness and adjusts the background
lighting accordingly.
The brighter the background lighting
selection, the shorter the battery life.
Background colour
Five colours are available as background
colour:
Dark grey / Walnut / Blue / Red /
Moss green.
On the one hand, this gives
you the option of choosing a colour that
matches your personal preference but it
also makes it easier to differentiate
between them, if several remotes are
being used.
Hotkeys
Four hotkeys are available per
Zone/Room that can have Symphonys or
IR devices assigned to them from the list
of available devices. Symphonys are
integrated into this list by being paired
with the S208. IR devices are integrated
through the S208 EasyCreator PC
program. You can now assign these
devices to the hotkeys in the
corresponding zones through the hotkey
menu. This function is also available in
the
S208 EasyCreator
PC program.
Page 22

Symphony Configuration
20
Change language
Here, you can select the remote
control's menu language. You can
choose between: English, German,
French, Italian, Spanish, Dutch.
Note
When changing the menu language
My
Music entries of Internet radio stations
are no longer valid, since the Internet
radio service for the new language has a
new address. In this case the entries of
My Music need to be created newly.
Other categories of
My Music, such as
USB or audio server, remain still valid
when changing the menu language.
Rename device
This menu allows you to change the
names of all devices that are currently
available in the remote control. This
function is also available in the
S208
EasyCreator
PC program.
Delete device
Devices can be deleted through this
menu. Deleted IR devices can only be
added back in again using
S208
EasyCreator
. Symphonys can be made
available again through the remote
control's pairing process.
Add zone
Zones can be added and named through
this menu. In the simplest case, a
Zone/Room consists of one Symphony or
one IR device. Combinations are also
possible of course. This function is also
available in the
S208 EasyCreator
PC
program.
Rename zone
This menu allows you to change the
names of all zones that are currently
available in the remote control. This
function is also available in the
S208
EasyCreator
PC program.
Delete zone
Zones that have been created can be
deleted through this menu. A deleted
zone can be added back in again either
through the
Add zone
option in the S208
menu or through
S208 EasyCreator
.
Transport lock
The motion detector is disabled when
the transport lock option is activated, so
that if you are transporting the S208 by
car, for example, it won't remain
permanently switched on and discharge
the battery. The transport lock option is
activated with the OK button. Pressing
any other button deactivates the
transport lock again.
Page 23

Configuration Symphony
21
Select device
You select a device that is available in
the remote control and that you want to
control, through this menu. All devices
are listed here, irrespective of whether
they are assigned to a zone or not. The
devices can be Revox Joy Symphonys or
third-party devices that are controlled by
infrared (IR).
Symphonys are added to the device list
through the pairing process.
IR devices are added to the device list
through the
S208 EasyCreator
PC
program.
Change zone
This menu enables you to change to or
call up another zone. This function can
also be called directly through the
button.
Information
This menu gives you various details such
as serial number, software states or the
number of integrated devices.
The USB login is also done through this
menu of the S208 is to be configured
through the
S208 EasyCreator
PC
program. For this purpose, a USB
connection (USB Mini <-> USB B) is set
up between the remote control and a PC
running Windows. Then, the red button
is pressed in the Information
menu. This initiates the S208 connection.
If connection is successful, "Connected"
appears in the S208 display.
Start Pairing
Background information to pairing
A fixed communication must be created
for the bidirectional wireless connection
between the S208 remote control and
the Symphony, in order that they can
communicate securely with each other
again after a restart or power outage.
This is also necessary because there
may be several Symphonys and remote
controls in one system. The exchange of
information for the purpose of uniquely
identifying the devices is called Pairing.
An S208 remote control can be deployed
for the control of several Symphonys and
as a result can also be paired with
several Symphonys.
Pairing process
To prepare for the pairing of an S208 and
and Symphony, switch the Symphony off
by unplugging the plug from the mains
and wait until the status LED on the front
panel has gone out. If you now plug in
the cable to the mains again, the LED
flashes green for about 10 seconds.
During this time, you have the chance to
start the pairing process [Start Pairing],
using the OK button. Once a Symphony is
recognised, its name appears in the S208
display. Now the name and the preferred
hotkeys can be selected. This completes
the pairing process.
Page 24

Symphony Configuration
22
First contact
Various connections have to be made
before setting up your Symphony
for the
first time.
Power cable
Only use the power cable supplied by
Revox.
The Symphony has an adaptive power
unit that is designed for mains voltages
between 100 and 240 VAC (50-60 Hz).
Alternatively, the Symphony can also be
operated with a DC power source
(12 - 18 VDC, 3A) as is found, for
example, in caravans, campers or boats.
LAN/WLAN network connection
The Symphony is designed for networkbased functions, such as playing
Internet radio or as a streaming client for
your music library that is located on a
network hard drive. The Symphony
needs access to your network for these
functions. This can be done preferably
through a wired LAN connection, using
the supplied RJ45 network cable or
wirelessly through a WLAN (WLAN
antenna suppied).
The reason for preferring a wired LAN
connection to a WLAN connection is its
reduced susceptibility to failures and the
option of being able to transmit highresolution audio formats (≥ 96 kHz)
without any interruptions. If a LAN
connection is used, the WLAN function
is switched off. In this case, the supplied
WLAN antenna is not needed. The
wireless connection to the S208 remote
control is done through the radio (RF)
module integrated in the glass front
panel, which is independent of the
WLAN.
Page 25

Configuration Symphony
23
Your network
The following description for the cabling
and the setup of the Symphony
makes
the assumption that there is a functioning
network with router available and that
the network is operational.
If you have any questions about the
setup and configuration of your network
or Internet access, please refer to your
System administrator or an IT specialist
of your choosing.
WLAN Wireless communication
An access point is required for the
wireless communication between the
Symphony
and the router. This can be
an external unit or it can be integrated in
the WLAN router.
Internet Radio
If you want to use the Symphony to
receive Internet radio, there must be a
broadband Internet access to the router.
Setting up the Internet access may
involve further costs. The management
and use of the Revox Internet Radio
Portal is free-of-charge and already
included in the purchase price.
Establishing the connection to the network
The first step -
Page 26

Symphony Configuration
24
All the functions of the Symphony are
controlled through the S208 remote
control. Through the bi-directional
wireless connection, the S208 can
display content and operating state,
keeping you up to date at all times.
Control is not just limited to one
Symphony. Actually, up to 24 units can
be controlled.
To make this possible, each Symphony
has to be "introduced" to the remote
control one time. This is called pairing.
The S208 remote control can only
communicate or have a wireless
connection with one Symphony
at a time.
If a connection to a second Symphony
is
established, the connection to the first
Symphony
is automatically closed.
The picture below shows the pairing
process between the S208 and a
Symphony. You will find an exact
description of this process on the next
page.
Establishing the connection to the remote control using pairing
The first step -
Page 27

Configuration Symphony
25
Once all connections are in place, the
Symphony can be connected to the
mains
After switching on, the green status
LED on the front panel flashes for about
10 seconds. Pairing between the
Symphony and an S208 remote control
can be carried out during this green
phase. In the case of a combi-package
consisting of Symphony and S208 remote
control, Revox will already have carried
out the pairing. You can switch the
Symphony
on directly by pressing the
hotkey on the remote control with the
name Symphony. In the example on the
right, that would be hotkey
A.
Carrying out a pairing with a new S208
With a new S208 Remote control without
pairing, the pairing process is started by
unplugging the Symphony from the
power source and waiting until the
status LED on the front panel has gone
out. If you now connect the Symphony to
the power again, the LED flashes green
for about 10 seconds. You should confirm
Start pairing by pressing th e OK button
on the S208 during this green-LED phase.
Now, the S208 tries to connect to the
Symphony. If one is recognised, it
transmits its name to the S208. This can
now be edited and assigned at a later
stage to a hotkey. This successfully
completes the pairing process and the
Symphony is automatically switched on.
If the battery icon is already visible
on the S208 or if there is no display at all,
the battery needs to be charged - see
Chapter
Charging the battery
.
Establishing the connection to the remote control
The first step -
Page 28

Symphony Configuration
26
While the connection is being
established to the network, "
Please
wait... Currently starting up" appears in
the display. Then, the S208
Home menu,
with the sources is displayed. Sources
identified with a are sources that are
available or present. On the other hand,
indicates that these sources are
currently not yet available or cannot be
reached. In the example on the right,
there is a connection to (Internet) radio.
A USB device (iOS products/USB
memory) or a music server (NAS) on the
other hand has not been identified or is
not available.
The local inputs are always available
even if they are not being used or have
not been assigned.
The first item, "Last listened to" stores the
last 40 (each 10 Radio, USB, iPod, Audio
Server) sources or paths to have been
selected. These can be Internet radio
stations or tracks from a USB mass
storage. Local inputs are not taken into
account. When the system is first setup,
this folder is of course empty.
This completes the first steps. In order to
be able take full advantage of the quality
and comfort functions of the Revox
Symphony, we would invite you to get to
know all the details and nuances
through our User manual.
Start screen
Home menu
You can now make your choice at the
remote control, through the four
navigation buttons and the OK button.
First steps in the Main menu
Page 29

Configuration Symphony
27
Radio not available!?
If Internet radio is not available to you, it
was probably not possible to establish
an Internet connection. There can be
several reasons for this.
• The network cable to the router is not
plugged in or a crossover network
cable has been used.
• As a factory setting, the Symphony
is
set to DHCP, which means that it gets
its IP address automatically from the
router. DHCP must therefore be
possible and/or activated in the
router settings. If this is not wanted,
the Symphony
can also be assigned
a fixed IP address. See Chapter
Network settings
• The firewall is blocking access.
See Chapter
NETWORK QUESTIONS / TIPS
• WLAN connection. The WLAN antenna
at the Symphony
/ the WLAN router is
not available. The WLAN function is
deactivated at the router or the router
is switched off.
See Chapter
Network settings
and
WLAN status
.
The main menu is called by pressing
the Home button on the S208.
You will find more information about
setting up and operating the Symphony
in the two main chapters "Settings" and
"Operation".
Page 30

Symphony Configuration
28
Symphony - Basic settings
The
Basic settings menu offers all those
settings that are not needed every day,
e.g. automatic switch-off, audio setup or
renaming of the device.
The Symphony
must have a wireless
connection to the S208 in order for basic
settings to be made and it must have
been selected as a device, e.g. over the
corresponding hotkey.
Now press the Setup button and
select the option
Basic settings in the
Device menu. Confirming your choice
with the
OK button opens the Basic
settings menu.
Then, you can select from the following
basic settings:
Audio Setup
FM Tuner *
DAB+ *
Network
Software
Remote Access
Clock
Auto Standby
You can make your inputs and selections
in the individual menus using the
navigation buttons, OK and the number
pad.
Decrease / Delete - Increase
Up-Down
OK Confirm
0-9 Direct input of numbers/letters
Uppercase-Lowercase (blue)
* only availabe, if the optional DAB+/ FM tuner
module is installed
Page 31

Configuration Symphony
29
Audio Setup
You can make the basic settings in the
Audio Setup menu, in order to adjust
your Symphony optimally to your
positioning environment and your
listening habits.
Amient sound
As well as the linear stereo reproduction,
the Symphony also offers an ambient
sound option that delivers a 3-D listening
experience, with a virtually larger stereo
bandwidth.
This can be activated through the
Ambient sound setting [on]. An active
spatial sound mode is indicated in the
display by the colour change of the
DSP
icon to
DSP.
When the unit is delivered, the
ambient sound option is switched off.
DSP:
Digitaler Signal Processor
Page 32

Symphony Configuration
30
Placement
Placing the Symphony on a table or
similar large surface leads to an
unnatural exaggeration in the fundamental
tone range. The crucial factor that leads
to this phenomenon is the surface
in
front of the Symphony, that is to say the
distance
X between the front operating
panel and the edge of the table. If the
distance
X is greater than 30 cm/ 12 in.,
we recommend using the [Table] setting,
which carries out a corresponding
correction using the digital signal
processor (DSP).
If the distance is under 30 cm/ 12 in., the
setting [Free] is the better choice as a
rule.
[Free] is the factory setting.
Limiter
If the limiter is activated, the output
signal is limited in order to keep
distortions as low as possible. The
maximum volume level that can be
achieved is therefore somewhat lower
with an active limiter than without.
The Limiter is active when the unit is
delivered.
Page 33
Configuration Symphony
31
FM Tuner
If the optional DAB+/FM Tuner module is
installed, this menu can be used for
searching for, sorting or deleting tuner
stations. It is a module with an RDS tuner
that has been optimised for cable
reception.
The tuner signal can either be received
through a roof-mounted antenna with
antenna-amplifier or over the cable
network. We do not recommend using
an indoor antenna.
FM =
Frequency Modulated (VHF)
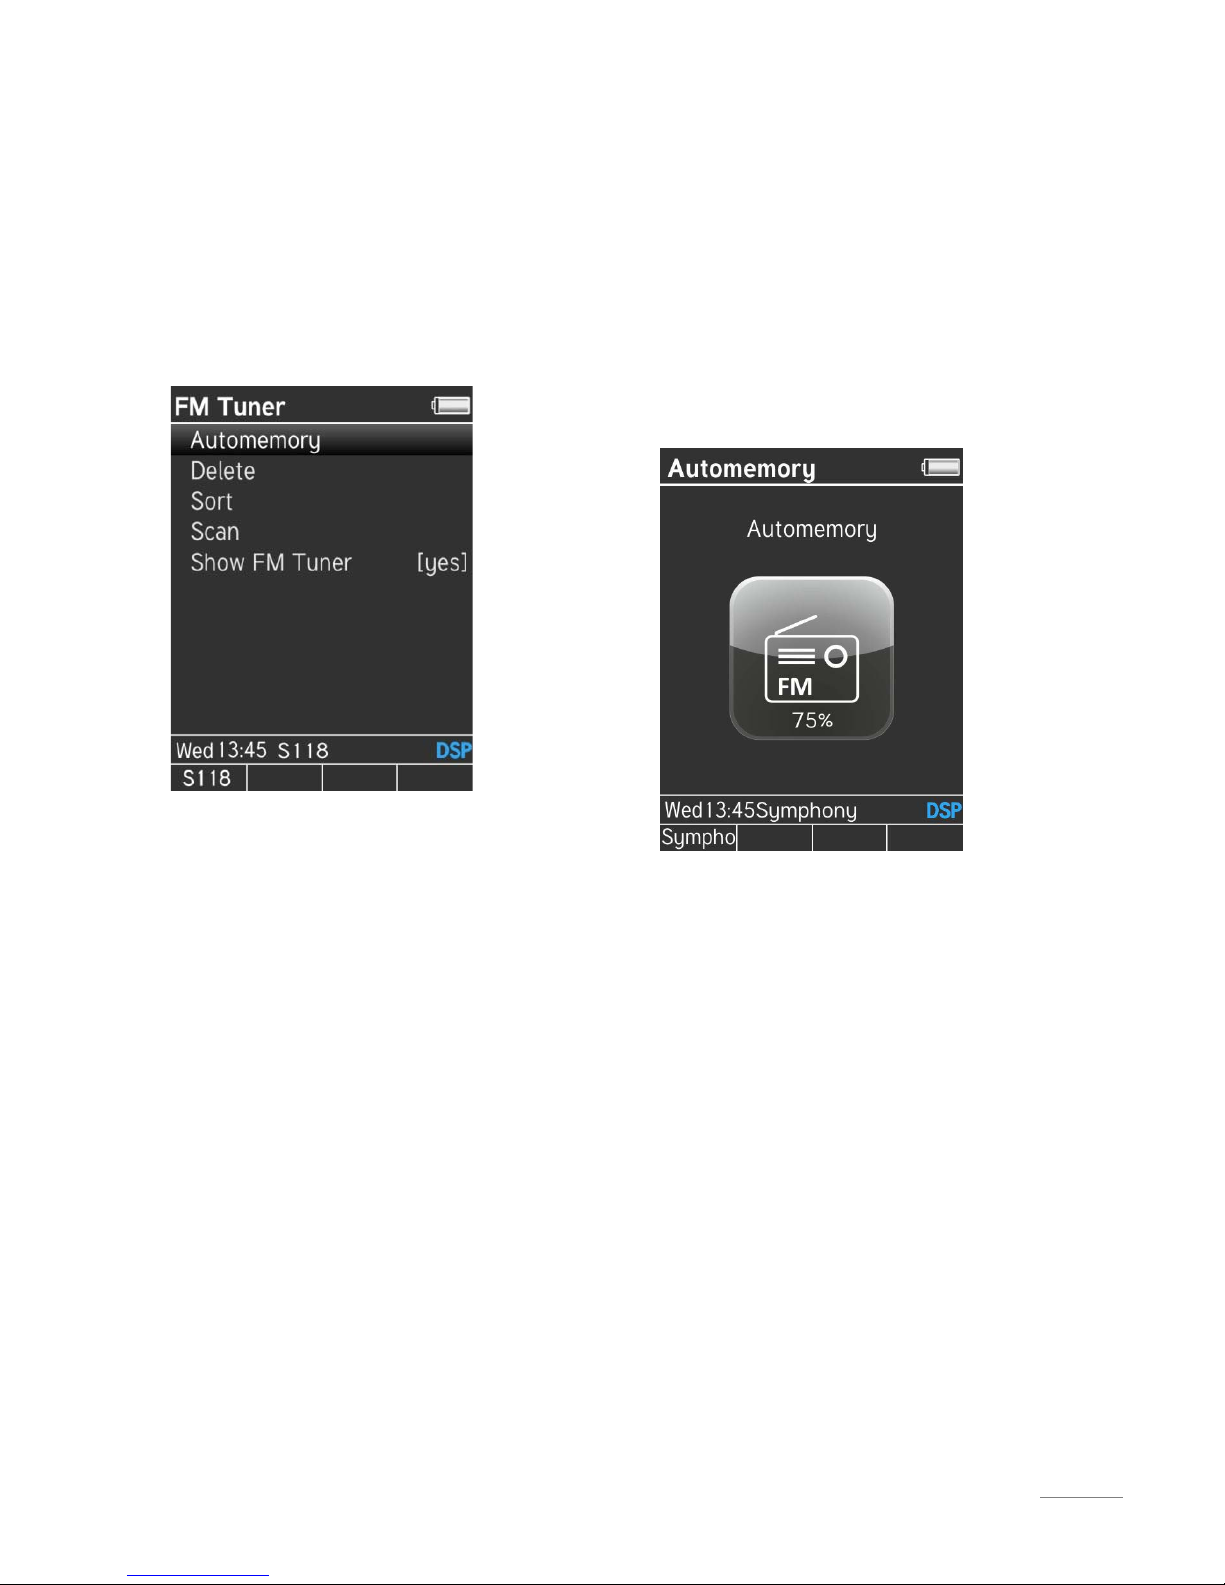
Automemory
The Automemory function searches for
all receivable stations and then stores
them in ascending order of their
frequency.
Automemory has been
developed especially for cable reception
as this offers many stations with
optimum transmission performance. A
maximum of 100 stations can be stored.
Carrying out an automatic station search
deletes all previously stored stations.
The system advises you of this fact
before starting Automemory, in order to
avoid accidental deletions.
A percentage progress display in the
Tuner icon shows you how much of the
station search has been completed.
The automatic station search cannot be
interrupted.
Page 34

Symphony Configuration
32
Delete
The station list is displayed after calling
the "Delete" option. The stations to be
deleted can be selected with the "Up"
and "Down" buttons. "OK" then deletes
the stations without any further
confirmation dialogue. The text "delete”
is shown in the Info bar while the
deletion process is running.
The "Back" button ends the deletion
process and returns you to the FM
Setup.
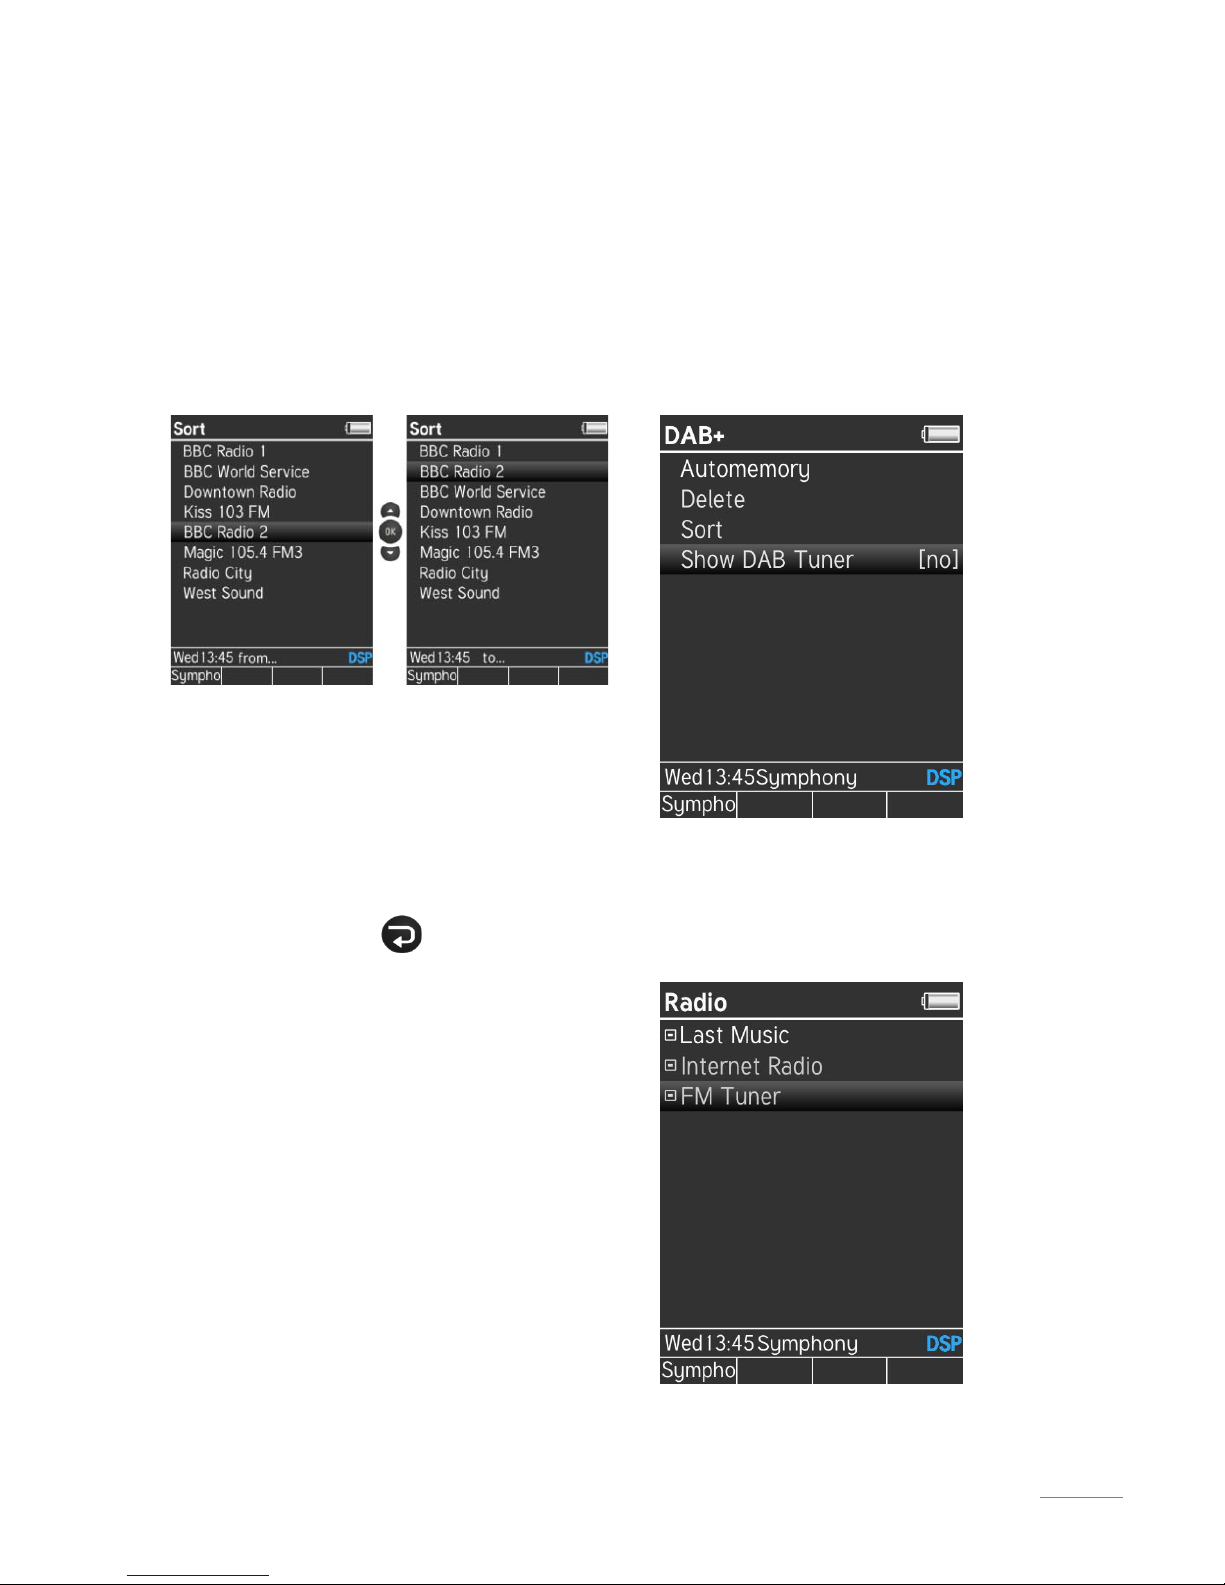
Sort
Stations can be sorted in the Station list.
The corresponding stations are selected
with the "Up" and "Down" buttons and
highlighted with "OK". During the
selection phase,
"from ..." is displayed in
the Info bar, which changes to
"to ..."
after highlighting.
The selection bar is now moved to the
required position in the list with the "Up"
and "Down" buttons. The new station
position is confirmed with "OK". The
status display in the Info bar now returns
to "from ...".
The "Back" button ends the sorting
process and returns you to the FM
Setup.
Page 35

Configuration Symphony
33
Scan
The Scan selection opens an Info menu
and the scan process starts with the
/ button at the lower frequency
range. "Station search..." appears in the
Display field during the search process.
Depending on the scan direction, the
status display shows either "
Scan >" or
"
<Scan". When the first station is found,
the scan process stops and the station is
displayed and played. The station can
now be added to the Station list with
"OK" or the scan process can be
restarted with the / button. The new
station is added to the end of the Station
list. The message "Station added"
appears as a confirmation in the Display
field for 2 seconds.
The "Back" button ends the deletion
process and returns you to the FM
Setup.
A maximum of 100 FM stations can be
stored.
Display FM tuner [ ]
The broadcasting sector changes and
with it, our preferences change. If you
don't want to or can't use the FM tuner,
it is possible to hide it in the radio
selection in the Main menu. Depending
on your selection, the Setup menu
shows [yes] or [no].
The FM tuner entry in the Basic settings
is of course retained, irrespective of this
setting.
Radio selection menu with FM tuner
hidden
Page 36
Symphony Configuration
34
DAB+
If the optional DAB+/FM Tuner module is
installed, this menu can be used for
searching for, sorting or deleting DAB+
stations.
Automemory
The Automemory function searches for
all receivable stations and then stores
them in ascending order of their
frequency. A maximum of 100 stations
can be stored.
Carrying out an automatic station search
deletes all previously stored stations.
The system advises you of this fact
before starting Automemory, in order to
avoid accidental deletions.
A percentage progress display in the
Tuner icon shows you how much of the
station search has been completed. The
automatic station search cannot be
interrupted.
Delete
The station list is displayed after calling
the "Delete" option. The stations to be
deleted can be selected with the "Up"
and "Down" buttons. "OK" then deletes
the stations without any further
confirmation dialogue. The text "delete”
is shown in the Info bar while the
deletion process is running.
The "Back" button ends the deletion
process and returns you to the FM
Setup.
Page 37
Configuration Symphony
35
Sort
Stations can be sorted in the Station list.
The corresponding stations are selected
with the "Up" and "Down" buttons and
highlighted with "OK". During the
selection phase,
"from ..." is displayed in
the Info bar, which changes to
"to ..."
after highlighting.
The selection bar is now moved to the
required position in the list with the "Up"
and "Down" buttons. The new station
position is confirmed with "OK". The
status display in the Info bar now returns
to "from ...".
The "Back" button ends the sorting
process and returns you to the FM
Setup.
Display DAB+ tuner [ ]
The broadcasting sector changes and
with it, our preferences change. If you
don't want to or can't use the DAB+
tuner, it is possible to hide it in the radio
selection in the Main menu. Depending
on your selection, the Setup menu
shows [yes] or [no].
The DAB+ tuner entry in the Basic settings
is of course retained, irrespective of this
setting.
Radio selection menu with DAB+ tuner
hidden
Page 38

Symphony Configuration
36
Network
All the relevant settings for the network
communication are defined/ displayed in
this menu.
Network Status
Status display of:
• Connection
• IP Address
• Subnet mask
• Gateway IP
Network name-ID
As the factory-setting, each Revox
Symphony identifies itself inside a
network as Symphony. If you are
deploying several Symphonys however,
it can be beneficial to be able to assign
them different names.
The network name can be edited
through the
Network name-ID menu,
using the following button functions:
Delete
Cursor to the right
OK Confirm
0-9 Direct input of numbers/letters
0, 1 Special characters
Uppercase-Lowercase (blue)
This function should not be confused
with "Rename device", in which the
Symphony (hardware) can be fitted with
a new name – see also page 18.
WLAN status
(deactivated if LAN used)
Status display of:
• WiFi Signal
• WiFi Channel
• Encryption
Page 39

Configuration Symphony
37
IP Settings
Here you can choose whether you want
to assign a fixed IP address or whether
the Symphony will obtain an automatic
IP address from the router using DHCP.
Factory setting is DHCP.
Selection options:
• Automatic (DHCP)
• Manual input
In the case of a manual input, you can
make the following settings:
o IP Address
o Subnet mask
o Gateway IP
o DNS Server 1
o DNS Server 2
Pressing the
OK button moves you from
one input field to the next. After the DNS
Server 2 input has been made, the data
is applied and the system attempts to
establish a connection.
WLAN Settings
Here, you can make the settings for a
WLAN connection. If there is no LAN
connection, any wireless networks that
are found, are displayed in a list. Select
the WLAN network you want to use and
allow the system to guide you through
the connection menu.
If there is already a LAN connection, you
can enter the network name (SSID) and
establish a connection by inputting the
password, the encryption type and the
DHCP definitions.
Network Restart
Carry out a restart after modifying the
network settings (IP/ WLAN) or when
swapping the LAN/WLAN network.
MAC Address
Display of the MAC address that has been
uniquely assigned to this Symphony.
Quick start function
If the Quickstart function is activated
[on], the network processor is switched
on permanently. This significantly
reduces the switch-on phase, as the
connection to the network doesn't have
to be built up again. All other subassemblies, such as the audio signal
processing or the outputs, including the
main transformer are switched off, as
with normal standby mode.
Quickstart mode [on] is also a
requirement, in order to be able to
control the receiver with a networkbased Revox App
S232(Apple)/ S235
(Andoid).
Standby consumption goes up < 0,6 watts
to 4,5 watts, if the Quickstart function is
activated.
Page 40

Symphony Configuration
38
Software
This menu displays the status of the
software version with date and enables
an update to be carried out.
If you want to update your Symphony
software, select
Update and confirm
your intention with the
OK button. The
following menu appears:
Here, you now have the option of
selecting whether the update should be
done over the Internet or using a USB
stick.
Do not execute any actions at the
Symphony while an update is running.
Internet
This is a quick and easy option for
carrying out an update. Start the update
with the OK button.
USB
[with FAT/ FAT32 formatting]
Download the bin file from the Revox
Homepage and save it to the root folder
of your USB stick. Do not put the bin file
in a sub-folder. Plug the USB stick into
the USB socket on the back of the
Symphony and start the update with the
OK button.
NTFS-formatted USB sticks
are not
recognised by the Symphony.
The progress of the update is visible on
the S208 display while the update is
running. Additionally the status LED is
flashing green. Wait until the update is
completed.
Page 41

Configuration Symphony
39
Remote access
If Remote access is activated, UPnP
commands from UPnP Control points are
accepted. This means that the
Symphony can be externally controlled
through the network (LAN/WLAN), e.g.
by UPnP-based apps like the
Plug
Player
.
If Remote access is deactivated, the
Symphony can only be controlled through
the S208 remote control respectively the
Revox Apps S232/ S235.
Clock
Normally, the Symphony gets its time
setting from the Internet. In order that it
can display the right time for your
location, with or without daylight saving,
based on the Universal Coordinated
Time (UTC), it needs the offset from UTC
and the definition of whether daylight
saving is currently active or not.
Example offsets from UTC:
0:00 England, Ireland, Portugal
1:00 Germany, Switzerland, Austria,
Sweden, Norway, France, Spain,
Italy, The Netherlands, Belgium
2:00 Finland
This menu should not be confused with
the Time menu for the S208 remote
control on Page 18, which only runs
there in the background as a backup
security system in the event of a power
outage, etc.
Page 42

Symphony Configuration
40
Auto Standby
The automatic standby function can be
activated through this menu. In this way,
the Symphony is automatically switched
to standby mode if the network
connection is interrupted for more than 5
minutes or the playback from USB/iPod
media is ended. The same applies for the
Music server as well.
Automatic switch off has no effect on
the following sources:
• Coax
• Optical
• Radio
Page 43

Operation Symphony
41
Operation - Start-up process
Once all the basic settings for the S208
remote control and the Symphony have
been made, you can start with the actual
operation.
Switch the Symphony on directly by
pressing the hotkey on the remote
control with the name Symphony. In the
example on the right, that would be
hotkey
A. Alternatively, if no hotkey is
assigned, the Symphony can also be
started with the button combination
(
System) Device Selection [Figure 1]
Several Symphony present
If you are deploying several Symphonys,
it makes sense to give them different
names, so that they can be uniquely
identified in the device list or through the
hotkey assignment when calling or
starting them.
Now the S208 remote control initiates a
connection query to the corresponding
Symphony. [Figure 2]
Once a connection to the Symphony
could be established, but the network
connection is not yet completed, the
S208 remote control shows: [Figure 3]
The Symphony always starts up with
the source that had been selected
before it was last switched off.
[Figure 1]
[Figure 2]
[Figure 3]
Page 44

Symphony Operation
42
The configuration options
Essentially, the following relationships
exist between multiple S208 remote
controls and Symphonys:
One S208 can control a maximum of 24
different devices. These devices can be
Symphony, S118, S119, S120 or Infraredcontrolled third-party devices - see Page
21 "Select device".
One Symphony can be paired with and
controlled by up to six S208 remote
controls - see Page 24 / 25. If the pairing
process for a seventh remote control is
carried out, the pairing identifier for the
first remote control is deleted.
Up to eight zones can be created. The
creation and renaming of zones can be
done directly at the S208 remote control
or by using the
S208 EasyCreator
PC
program.
Up to four four hotkeys can have devices
(Symphonys or IR devices) assigned in
each zone.
Zone
Usually, one zone covers one room to
which several devices (Symphonys + IR
devices) are assigned. This can, for
example, be a Symphony that plays the
sound from a connected television. Both
devices (Symphony + TV) would be
assigned to the "Living room" zone.
IR devices can only be added and
assigned to a zone using the
S208
EasyCreator
PC program.
Page 45

Operation Symphony
43
Operation via S208
All the functions and information from
the selected Symphony are shown on
the S208 remote control colour display.
The picture below shows a basic view
where a source has been selected and
playback has started. This of course can
vary from one source to another. As well
as the status display for source name,
battery, playback function and various
alarm clock services, in the centre of the
display you have information about the
source that is currently playing.
The next pages give you information
about the individual sources and the
additional functions.
The functions and content are displayed
specifically for the selected Symphony
[see picture below:
Controlled device
]. If
no device is active/ selected the S208
remote control just shows its own
System menu.
Page 46

Symphony Operation
44
Main menu
The main menu is called with the
button on the remote control and
displays the source overview and the
"Last listened to":
Last Music
Queue
My music
Radio
USB/ iPod
Audio Server
Local input
Sources identified with a are sources
that are available or present. On the
other hand, indicates that these
sources are currently not yet available or
cannot be reached.
The local inputs are always available
even if they are not being used or have
not been assigned.
ABC search
The alphabetic search function is
available in all menus that have
alphabetic lists. These can be for
example, Internet radio station lists or an
album list in a USB folder. To start the
ABC search, just press the required
letter or number using the number pad,
while in the list view. The selected letter
is shown at the start of the list. After a
short waiting time, dependent on the
number of list entries, the S208 shows
the search results.
Last Music
The first item, "Last Music" stores the last
40 sources or paths to have been
selected. 10 entries are reserved for
each of Radio, USB and Music server.
iPod and the local inputs are not taken
into account.
As some sources may no longer be
available because, for example, the USB
stick was unplugged, it can happen that
the path is no longer valid / no longer
exists. This is shown in the display with
the message "
Can’t play music. Press
"OK"".
When the system is first setup, this
folder is of course empty.
Page 47

Operation Symphony
45
Queue
The Queue represents a playlist that can
be put together quickly and easily using
the remote control or the Joy App.
Similar to normal playlists, tracks are
selected from the Music Server or USB
area and added to the list. The list is
stored directly in the Joy Symphony and
can contain up to 250 tracks. With the
S232/S235 Joy Apps, it is even possible
to create and manage several Queues.
You can call the previously created
playlist through the
Queue option in the
Main menu. Select the track where
playback should start from. Start the
Queue playback with the
OK button.
Playback is only interrupted if another
source is selected or when the last track
in the Queue finishes. The track that is
currently being played is shown in blue.
Queue
Also known as PlayQueue
Managing the Queue
The opened Queue list can be managed
through the Menu button .
The following options are available:
Remove Track
Removes the last track to have been
selected from the Queue. If this happens
to be the track that is currently playing
(marked in blue), playback continues
automatically with the next entry in the
list.
Clear Queue
All tracks are removed from the Queue.
This is done without any further
confirmation being required.
Import/export Queue
Using the S232/S235 Revox Apps, a
Queue can be transferred from one Joy
Symphony to another Joy Symphony. A
pre-requirement for this is that all tracks
in the Queue can be reached from both
receivers, i.e. all tracks must originate
from a common NAS, for example. Local
tracks from a USB stick do not fulfil this
requirement.
Page 48

Symphony Operation
46
Creating a Queue
Navigate to the track selection (list) in
the
Music Server or USB source where
the desired track is located. In the
example below, this is the ABBA album
“Arrival” with the selected track
“Money, Money, Money”.
Using the
Add to queue button , the
selected track is added to the end of the
Queue.
There are more options in the
Source
menu that you can get to through the
button.
These are:
Add to Queue
Adds the selected track to the end of the
Queue. A Queue list sort order can only be
changed using the Revox S232/S235 Apps.
Clear Queue and Play
Remove all previous tracks from the
Queue* and add the selected track as
the first entry and play it.
Clear Queue
All tracks are removed from the Queue*.
* This is done without any further
confirmation being required.
Page 49
Operation Symphony
47
My Music
The My Music selection covers all your
favourite stations or tracks that you have
added through the button [
Add to My
music]. These can be stations or
podcasts from the Internet radio or they
can be tracks and playlists from a USB
stick or a network drive. iPod tracks
cannot be stored in
MyMusic.
My Music can also be called directly
through the button [
Call My music
list] on the S208 remote control. There
can be a maximum of 18 entries.
When changing the menu language
(page 20) or as some sources may no
longer be available because, for
example, the USB stick was unplugged,
the entry/path is no longer valid / does
no longer exist. This is shown in the
display with the message "
Can’t play
music. Press "OK"".
When the system is first setup, this
folder is of course empty.
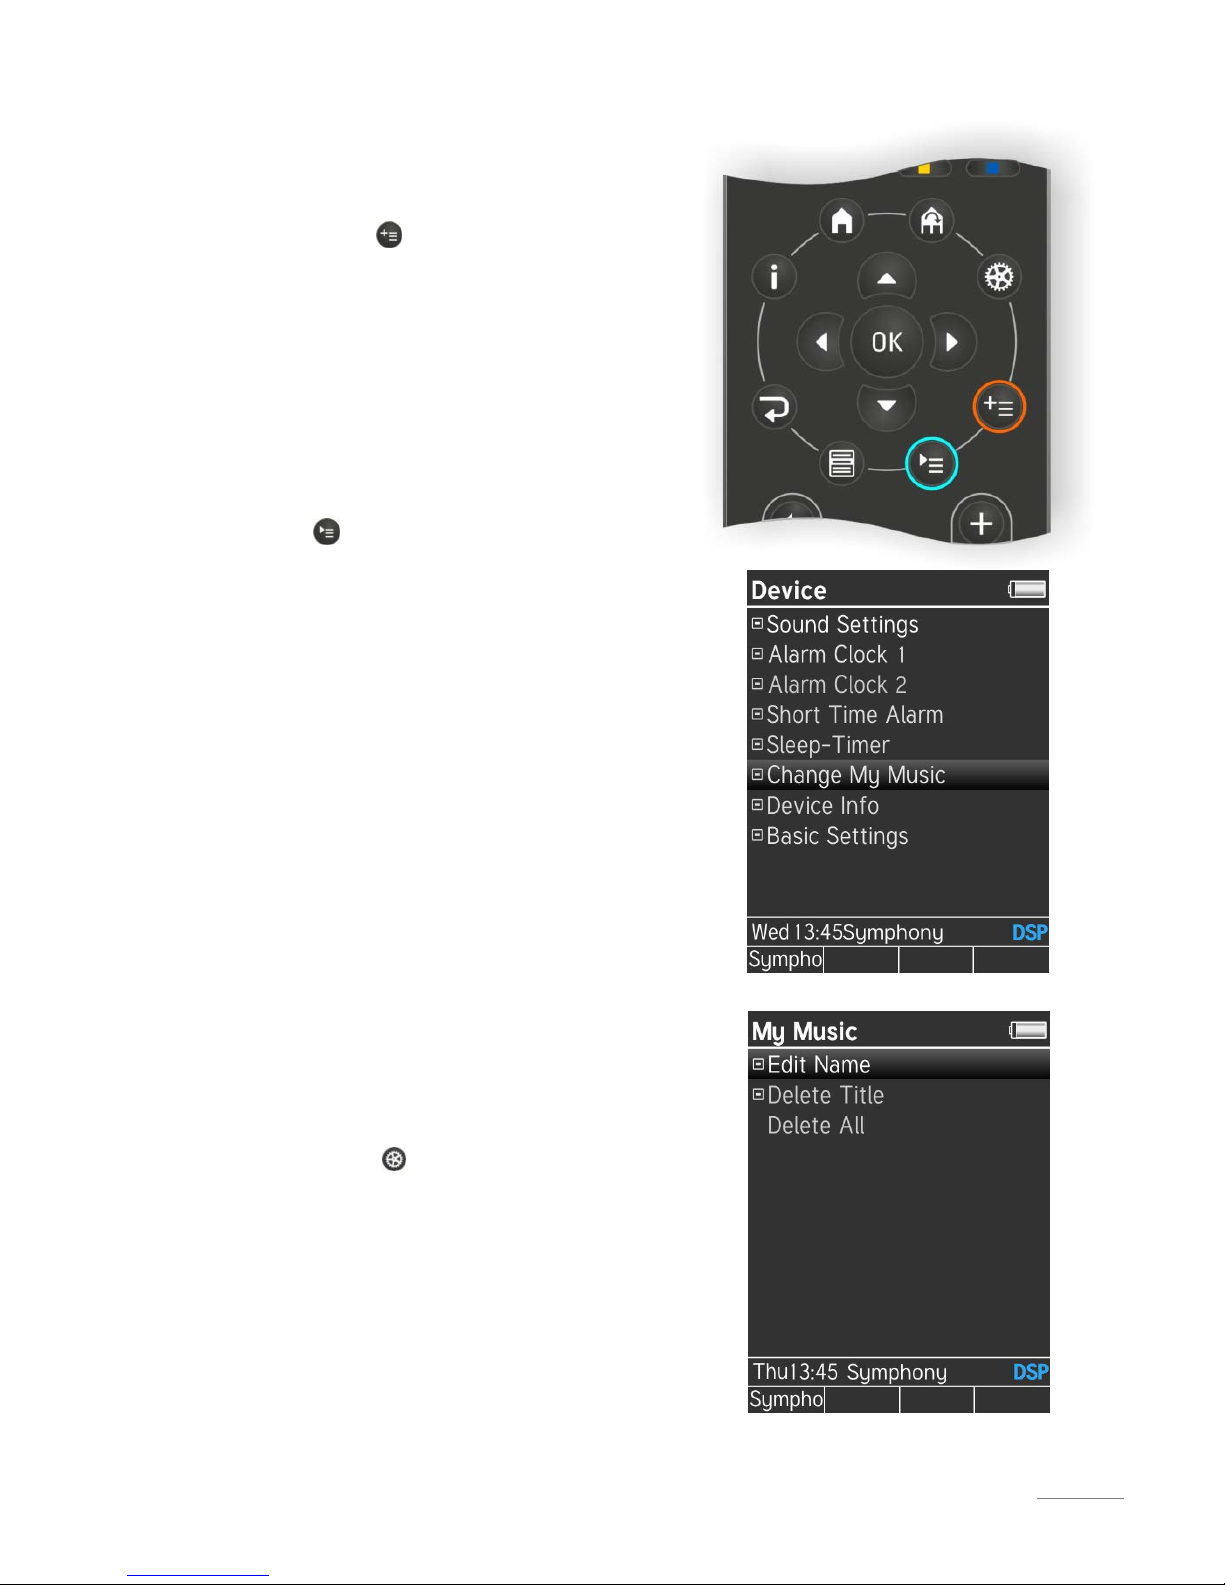
You can rename or also delete the
existing
My Music
entries through the
Change My Music menu item. To do this,
press briefly on the
button and select
this menu item. [Figure 1]
The name of the entry can be changed
through corresponding item in the
following menu [Figure 2]. You can also
delete individual or all entries. You will
find an exact description of this on Page
62.
Figure 1
Figure 2
Page 50

Symphony Operation
48
My Music – iRadio
Shortening access times
When you store stations or podcasts
through the Internet radio option into the
My Music folder, a list path is created in
the background.
If a
My Music entry is now called, the
receiver uses this list path as the route
to find the corresponding radio station.
The more sub-folders there are in the
list, the more time the receiver needs to
find the entry again.
It makes sense then to select the
shortest list path when adding a
My
Music entry for radio stations or
podcasts that you call up on a daily
basis.
As a rule this is a call that is made
through the Favourites list that you
create in the (
Online Services)
option in
the Revox Internet Audio Portal (see
Page 65).
Path: Internet Radio > Favourites >
Favourites Group
A good alternative without the Internet
Portal is:
Path: Internet Radio > Device Location
[Country] > Genre
The longest access times result from
using the following selection to search
for the station:
Path: Internet Radio > Countries >
Continent > Country > All Stations
By employing a more elegant call-up
strategy, you can achieve access times
that are 5-times faster.
Change menu language
When changing the menu language of
the remote control and thus also in the
receiver,
My Music entries of Internet
radio stations are no longer valid, since
the Internet radio service for the new
language has a new address. In this
case the entries of
My Music need to be
created newly.
Other categories of
My Music, such as
USB or audio server, remain still valid
when changing the menu language.
Page 51
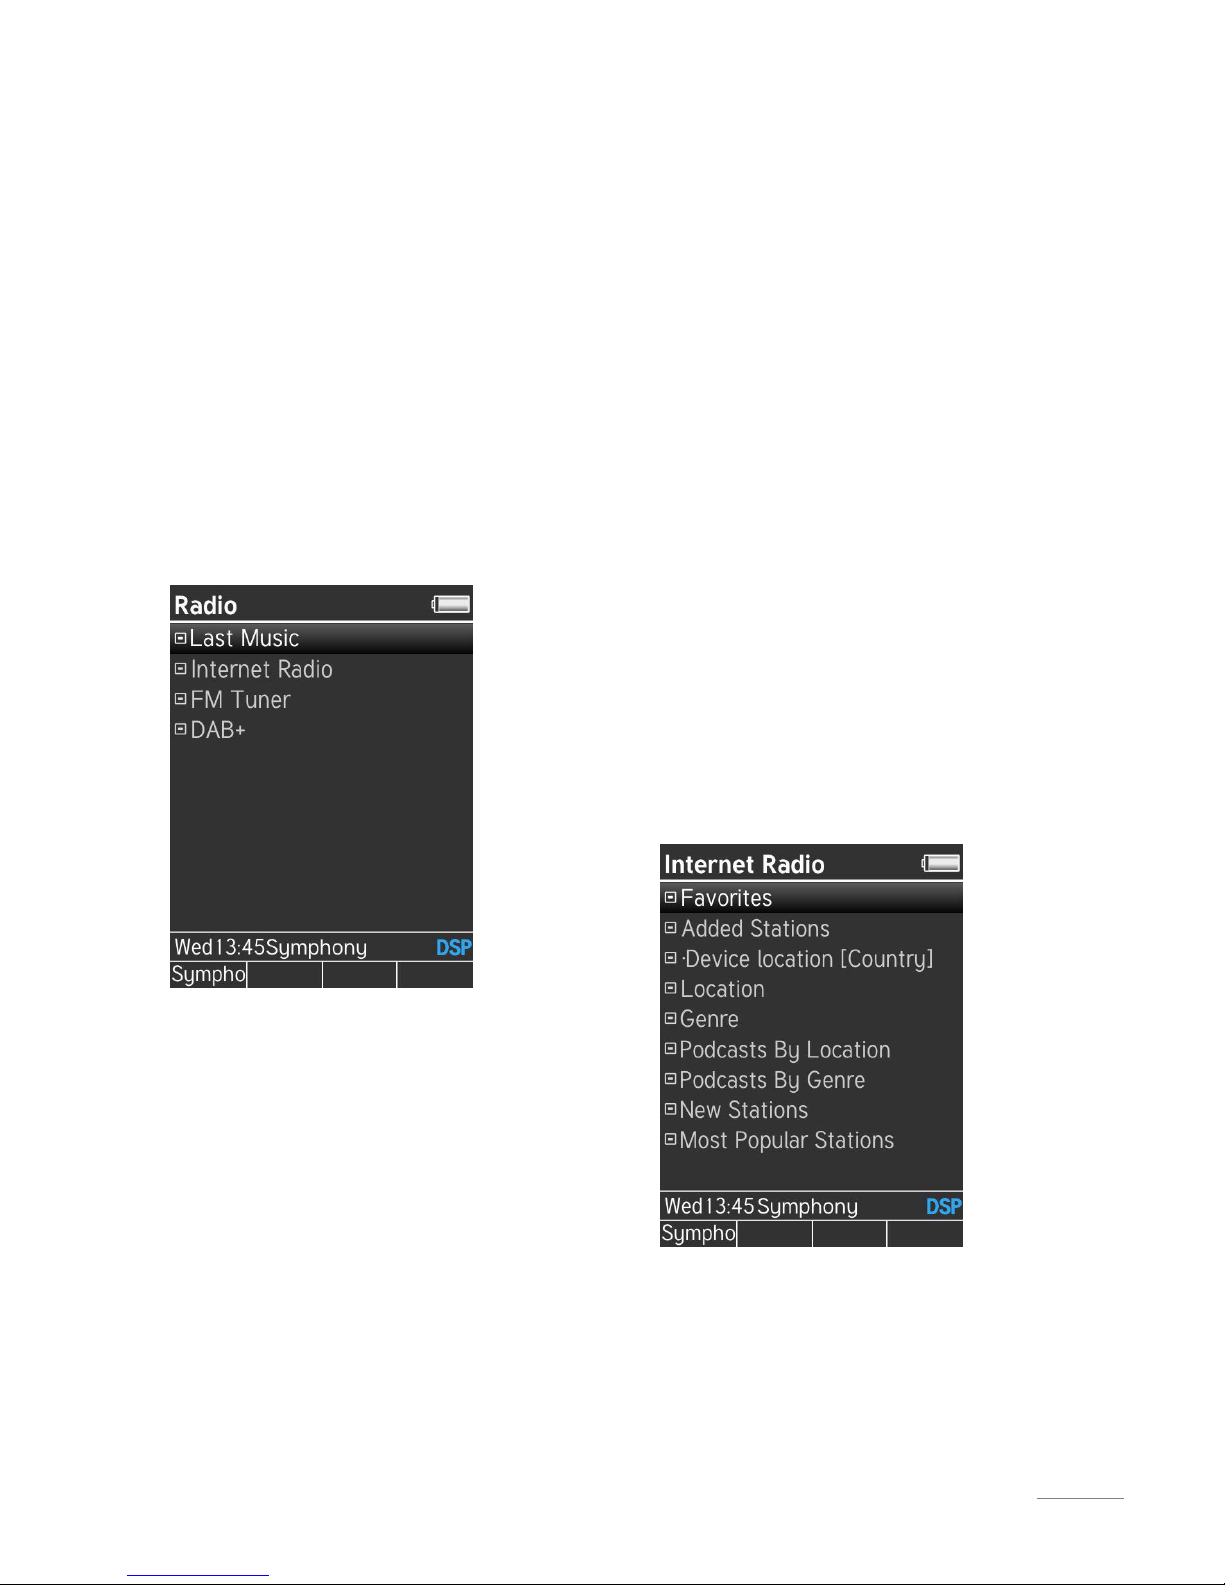
Operation Symphony
49
Radio
Selecting Radio gives you two options to
choose from:
• Last Music
• Internet radio
• FM Tuner
1
• DAB+
1
1
The DAB+ and FM Tuner selection is
only available if the optional Tuner
module is installed. A DAB+/FM Tuner
module can be retrofitted as an option to
all Joy streaming devices.
Last Music
The "Last Music" selection saves the last
10 Internet radio stations / podcasts to
have been selected. It can occur that a
station or a podcast transmission is no
longer available or has been removed
from the programme. This is then shown
in the display with the message "
Can’t
play music. Press "OK"". When the
system is first setup, this folder is of
course empty.
• Internet Radio
The selection Internet Radio gives you
access to thousands of radio stations
available from around the world. As well
as the linguistic diversity available, you
can also make specific selection based on
particular musical directions (Genres).
Podcasts offer even more individuality.
Podcasts are broadcasts such as news
programmes, magazine shows, crime
dramas, comedies, etc. that are started
when you select them. You don't switch
onto a program that is currently running
as is usual when listening to (Internet)
radio. You actively start the playback of a
program.
Currently, the following selection options
are available under the Internet radio
section:
Page 52

Symphony Operation
50
The selection options in the Internet
radio menu are constantly being adapted
to meet customer requirements. It can
occur therefore, that new or modified
selection options are added.
At the time of printing this manual, the
following selection criteria were
available:
• Favourites
• Added Stations
• Device location (country)
• Location
• Genres
• Podcasts By Location
• Podcasts By Genre
• New Stations
• Most Popular Stations
Favourites
Under
Favourites
you will find a list of
your preferred radio stations and/or
groupings, which you had previously
organised through the
Revox Internet
Audio Portal
(see Chapter
IAP
). How to
do this and what you have to take into
account is described in the Chapter
Setting up Internet Radio
on page 65.
Added Stations
The
Added Stations
selection lists those
radio stations that you added yourself in
the
Revox Internet Audio Portal
(see
Chapter
IAP
, page 58), as these are not
listed by default. You need the URL, the
Internet path, of the operator of the radio
station to be able to add a new Internet
radio station in the IAP. You will usually
find this on the provider's homepage or
you can display them in a media player,
e.g.
RealPlayer
.
Example of an URL:
http://213.251.170.124:80
Device location (country)
Your Symphony knows which country it is
in through its IP address. Using this
information, it offers the user direct
access to the selection of national radio
stations. This shortens the time needed to
make your selection as you don't have to
go through the continent and country
selections first.
Correspondingly, a Symphony
that is
located in London (UK), will show
United
Kingdom here.
Locations
Selection of radio station by countries.
Searching for the required radio stations
is made quick and specific through the
classification into Continents Countries.
Page 53

Operation Symphony
51
Genre
Listing of radio stations based on certain
music genres, such as rock, jazz, folk, etc.
Within the genre, the individual radio
stations are either listed alphabetically
(
All Stations
) or by the countries offering
this type of music.
Podcasts By Location
Listing of podcast transmissions based on
the country/continent where the provider
is located.
Podcasts By Genre
Listing of podcast transmission based on
the genre these transmissions are
assigned to.
New Stations
New radio stations are being added
somewhere in the world every day. As you
won't want to go to the effort of searching
for new radio station arrivals every day
yourself, these are listed in the selection
New Stations
.
Most Popular Stations
Listing of the Internet radio stations that
are currently being most listened to.
Page 54
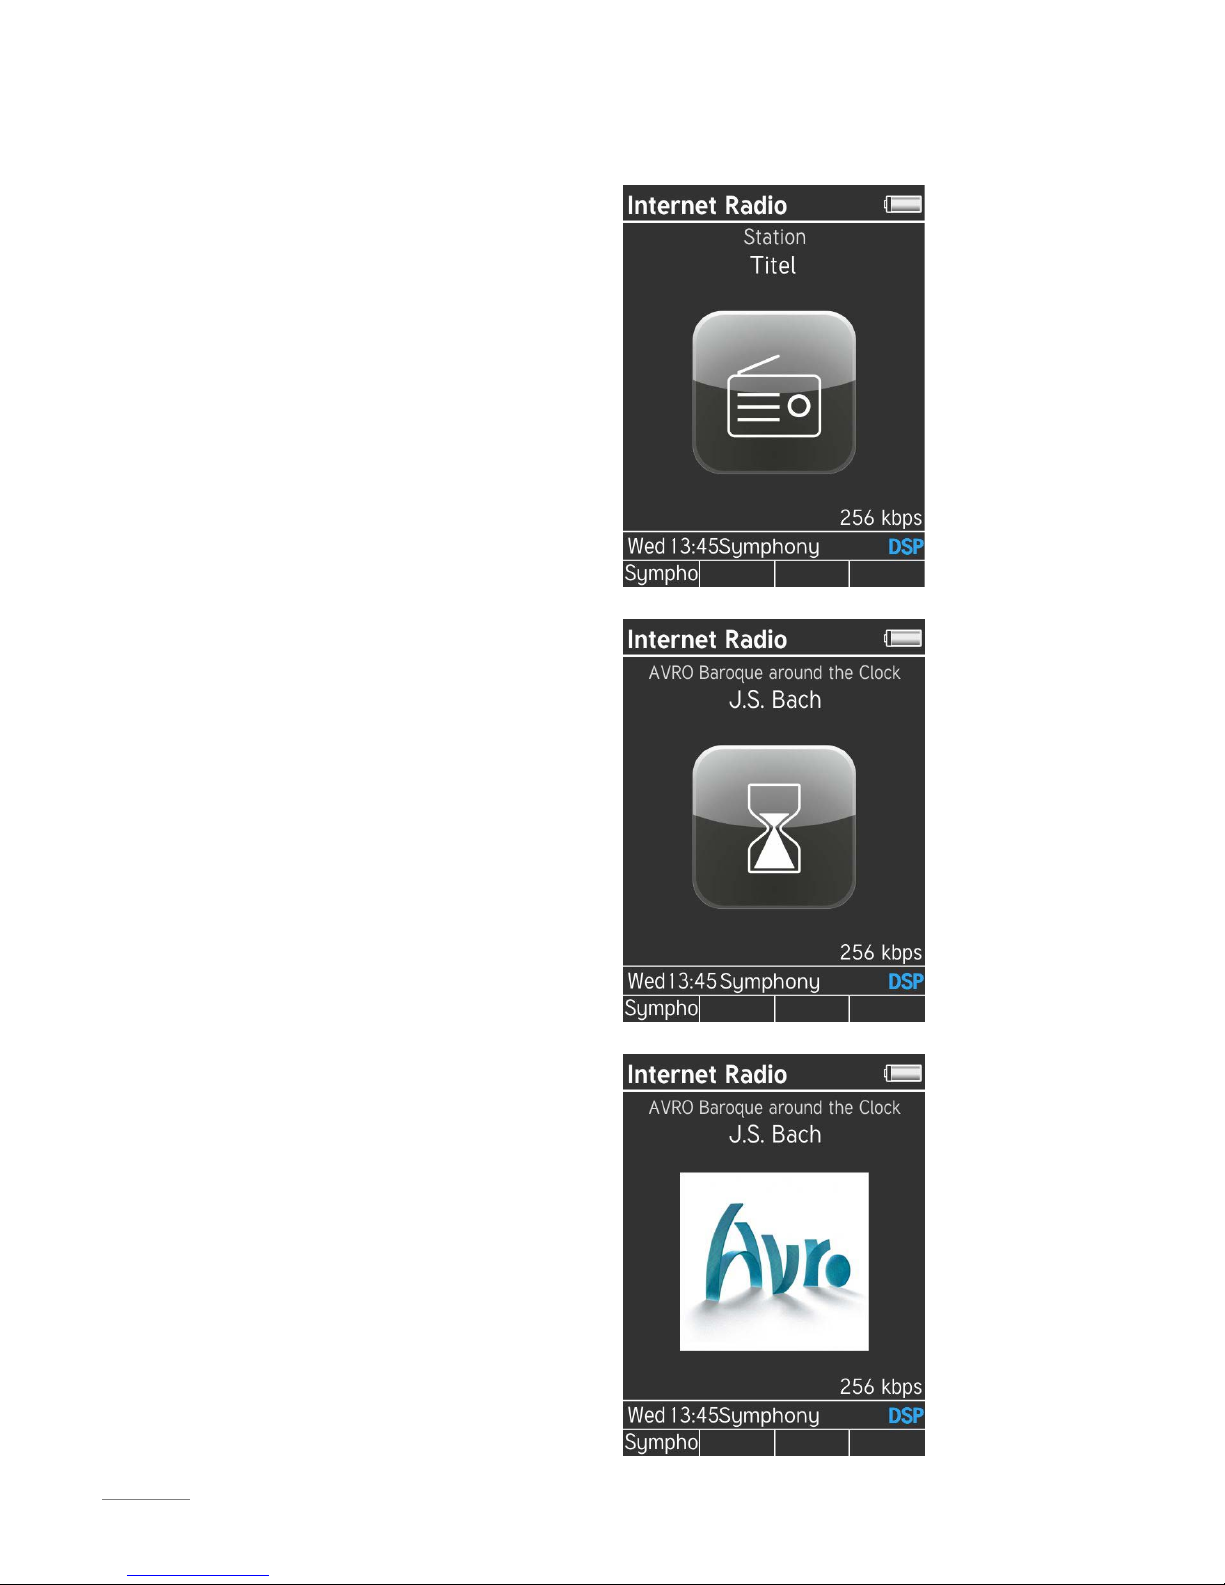
Symphony Operation
52
Internet radio display
Track and radio station are displayed
when playing Internet radio. In the case
of a podcast, the corresponding
programme name is shown. If the station
doesn't have its own station logo, the
SYMPHONY shows a default logo (130 x
130 pixels).
If the station does have its own station
logo, the Symphony
shows the egg-timer
icon until the logo is fully available. (130 x
130 pixel).
Once the station logo has been
transmitted in it entirety, it is shown in a
larger resolution of up to 150 x 150 pixels.
The example shown here is the AVRO
station from the Netherlands, which is
known for its high quality broadcasting.
Page 55

Operation Symphony
53
DAB+ / FM Tuner
If the Symphony is equipped with a
DAB+/FM Tuner
1
module, the DAB+ or
FM Tuner selection appears.
After the initial set-up, no stations are
stored and the Station list is empty.
Please refer to the Basic Settings on
pages 30 - 34 for information on
searching for and organising DAB+ and
FM stations.
After the stations have been organised
in the Basic settings and are in the
Stations list, the desired station can be
selected using the button (Select
bar). You confirm your choice with the
OK button and the Status menu appears
with the Detail information about the
selected station.
1
optional special equipment
FM Tuner/ DAB+ Status menu
Status info with RDS FM Tuner
Station name
(PS= Programme Service Name)
Radio text, programme information
(RT = Radio Text)
FM Logo
Mono/stereo switching with
Shuffle button
PTY = Programme Type
Additional station information
(station frequency, signal strength)
(selection through button)
Status info with DAB+
Station name
(SL= Station Label)
Programme information
(DLS = Dynamic Label Segment)
DAB+ Logo
Mono/stereo display
PTY = Programme Type
Additional station information
(station frequency, signal strength)
(selection through button)
Page 56
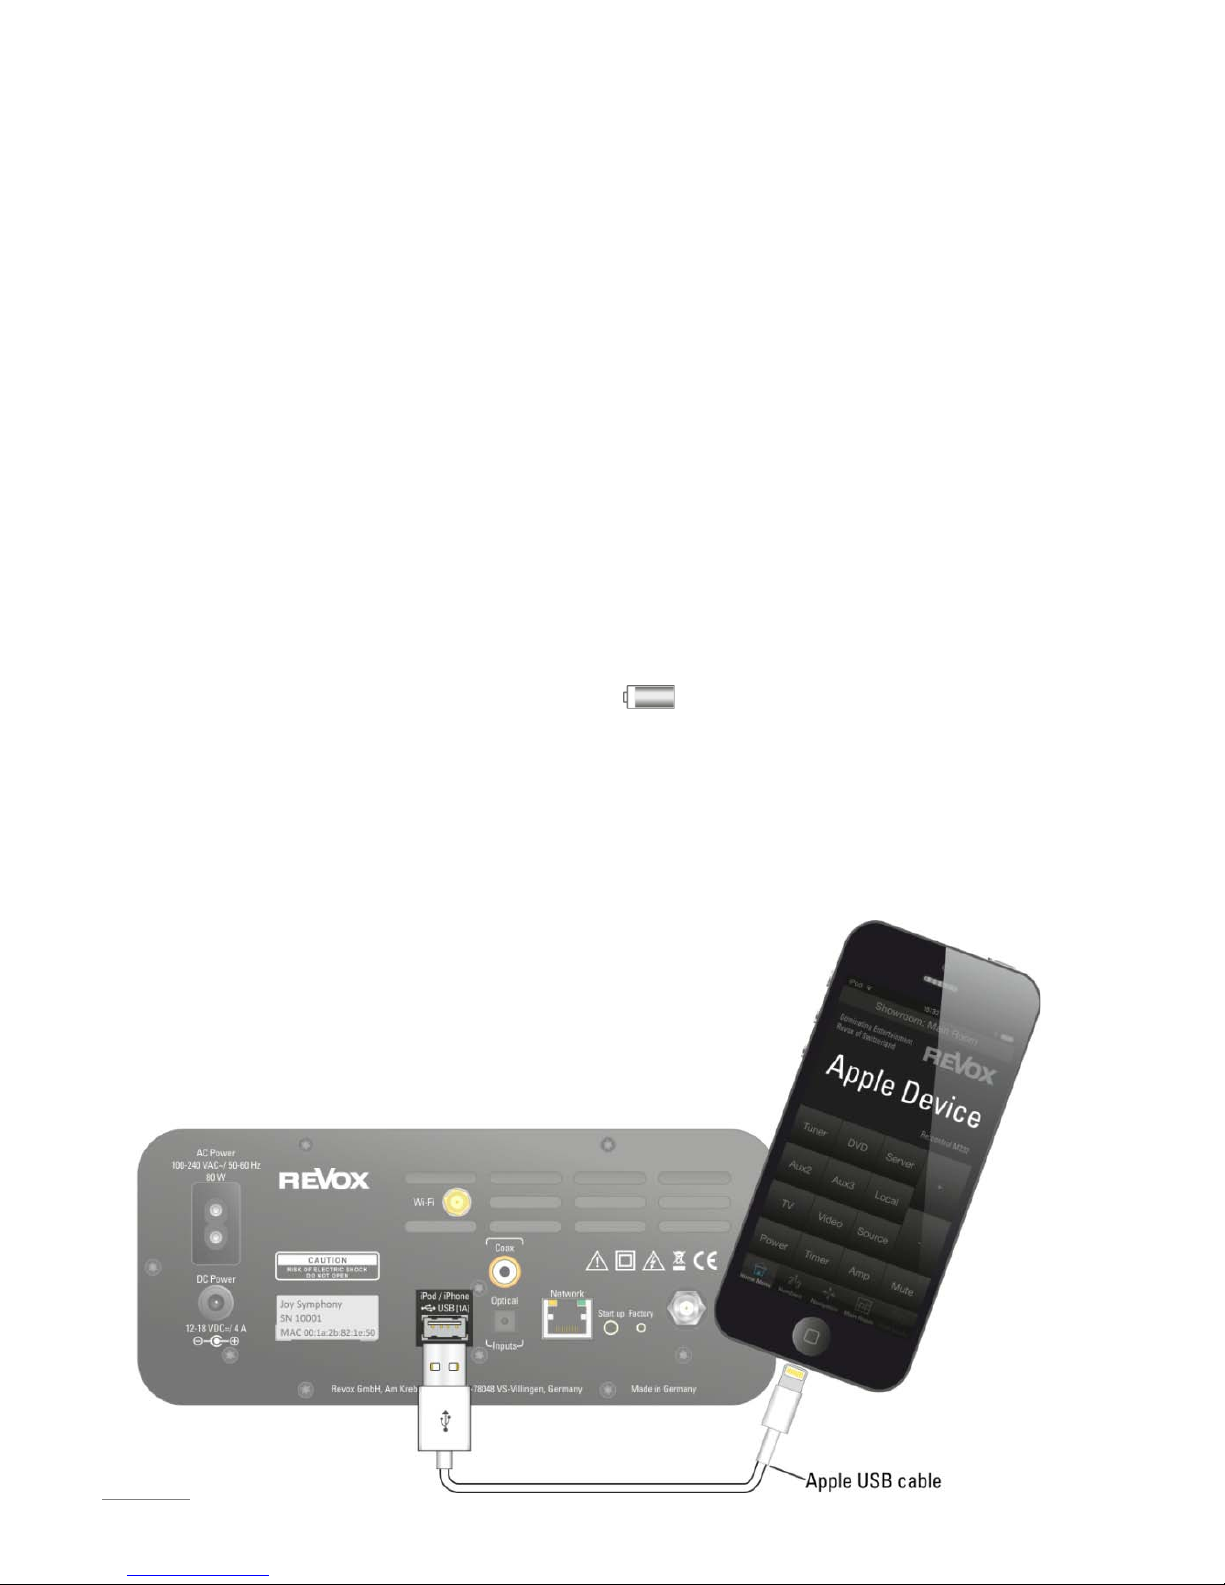
Symphony Operation
54
USB/ iPod
The USB/iPod selection menu enables
access to devices/content connected to
the Symphony’s
USB input. That can be
either an iPod or iPhone from the Apple
Company or a USB storage.
Recommendation: USB memory stick up
to 32 GB
USB
USB storage with FAT/ FAT32 formating.
Here, all tracks and music folders from the
USB storage medium are displayed. You
can make your choice using the
navigation buttons. NTFS- or MACformatted USB sticks
are not recognised
by the Symphony.
Cover display (tagged) is supported with
the
USB selection. You can find out what
pre-requirements are necessary for this
on page 55.
Cnnection to Apple device
iPod
Connect the Apple product (see next
page for Apple product list) with the
Symphony
using a USB cable as shown
in the figure below. You should use the
original Apple USB cable for this
purpose. In addition, Revox offers an
iPod Docking station (30-pole) in the
same design as the S208 charging cradle
(Part no. 1.561.096.00).
After a short time for the connection to
be established, the USB/iPod selection
can be made. The message "Accessory
connected" appears in the display of the
Apple product.
Note Battery charging
The battery of your connected iPod or
iPhone will be charged by the Symphony
only in Quick start mode enabled.
Maximum charging current 1,0 A. The
power consumption of the Symphony
increases accordingly during the
charging process.
Page 57
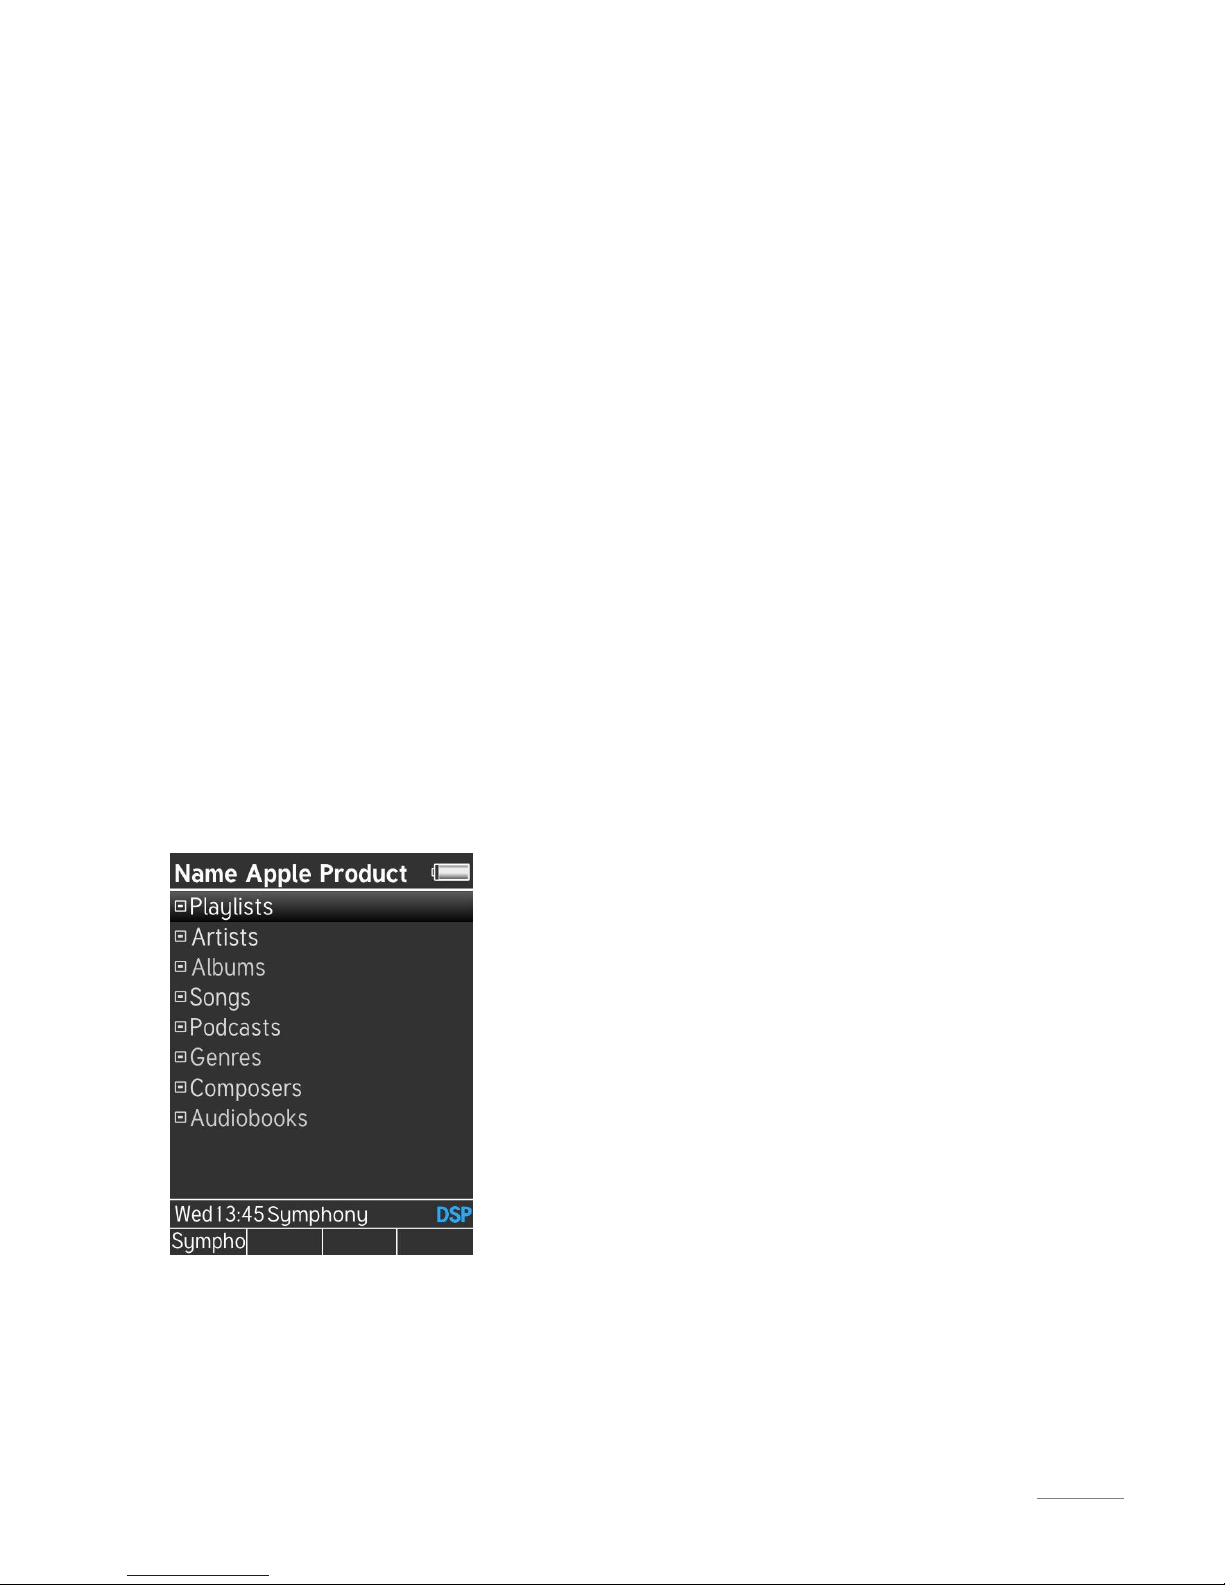
Operation Symphony
55
iPod selection
At the time of printing this manual, the
following selection criteria were
available with Apple products:
• Playlists
• Artists
• Albums
• Songs
• Podcast
• Genres
• Composers
• Audiobooks
Use the navigation buttons to make your
choice. You can choose the shuffle or
repeat options at the playback level.
Cover display is not an option in the
iPod
selection. For this reason, the standard
cover is displayed.
The selection displayed only reflects the
Apple software options that were
available for a particular iPod model at the
time of printing. This can however vary,
depending on the model and software
version.
Page 58

Symphony Operation
56
Music server
The Revox Symphony creates order in
your beloved CD collection. Just pack all
the tracks that make up your CD
collection onto a NAS drive in the
highest quality and then browse through
them at your leisure, looking for long-lost
tracks or rediscovering some old
favourites. No more looking for CDs that
have been put back into the wrong box!
Network servers that support the UPnPAV standard can be accessed through
the network (LAN or WLAN). The most
usual instance of such a server is a NAS
hard disc. The name of a media server is
defined at the server itself.
It is however possible to use a normal PC
as a network server. This however
requires an UPnP-AV software so that
the Symphony can find and play stored
music files. Such a software is offered,
for example, by the company
Twonky
Vision
with the software
TwonkyMusic
.
The display of the selection menu of
such an UPnP-AV server can vary
greatly.
Music server display
The S208 remote control has an adaptive
cover display in the Music server menu
field. If no cover is available for the
selected track, a standard 130 x 130 pixel
icon is displayed:
If a cover does exist however, this shown
in a higher resolution of 176 x 176 pixels.
As well as showing the current playing
time 03:45, the total playing time [66:46]
is shown under the cover. The control
functions are described on the next page.
Important: Music folder name
The Symphony can only find your music
tracks on the media server if they are
located in a folder called
Music. Other
folder names are not recognised. This
folder can be shown with a different
name than "Music" in the Symphony
display. This depends greatly on the
settings and on the various models of
this media server.
Page 59

Operation Symphony
57
Control functions
for USB/iPod/Music server
Play
Pause
Stop
Track forwards/back
Fast forward/ - backward
Skip forwards/back
Shuffle
Track shuffle. Depending on which
selection criterion you activated the
Shuffle function at, either only the tracks
within an album (
Albums
) or all the tracks
in the music folder are played in a random
order.
Repeat function - Track
With the track repeat function, individual
tracks can be repeated.
Repeat function - All
With the all repeat function, complete
folders (albums, songs, etc.) can be
repeated.
Cover display
The Symphony supports cover display
with the iRadio, USB and Music server
selections. In the case of iRadio, the
station logo from the broadcasting
organisation is sent automatically.
With the USB and Music server selection,
there can be a cover display if one of the
following conditions is met:
• The track contains the cover image as
a jpg or a bmp file. PNG files cannot be
displayed. Inserting or tagging a cover
in a music track can be done for
example, using the
Mp3tag
software.
•
! Only Music Server: The album folder
contains the cover image in the file
cover.jpg
. Make sure that lowercase
lettering and the correct file format are
used.
Cover
Whether a cover can be displayed and in what quality, depends on the UPnP server
software. A resolution of 500 x 500 pixels has proved to be favourable in terms of
transmission speed and display quality.
Page 60

Symphony Operation
58
Local inputs
The Symphony offers 2 digital inputs.
• Coax (digital, coaxial)*
• Opto (digital, optical)*
If your device only offers an analog
output, we recommend using an external
analog-digital converter, e.g. from the
Lindy or Ligawo Company.
Rear view "Local sources"
The selected source is shown in the
display. Each source name can be
renamed in order to provide better
orienteering - see next page.
* Supports uncompressed digital audiostereo input signals, such as PCM Audio
or S/PDIF up to 96 kHz/ 24 bit [optical]
and coaxial even up to 192 kHz/ 24 bit.
Doesn't support any compressed audio
formats such as Dolby Digital, DTS, 5.1,
etc. If necessary, change the output
format in the source device's Setup
menu.
Page 61

Operation Symphony
59
Rename Input
The Symphony offers the option of
assigning freely definable names to its
digital inputs. You no longer have to
remember which external device is
connected to which input. You can
simply give each input a name that
makes the assignment obvious.
To do this, select the field "Rename
Input" on the remote control. Both inputs
are displayed. You can now change
each input using the following buttons
on the S208:
Delete
Cursor to the right
OK Select/Confirm
0-9 Direct input of numbers/letters
0, 1 Special characters
Uppercase-Lowercase (blue)
After you have renamed an input and
confirmed the change with the
OK
button, it is displayed in the Play view as
follows, for example:
The newly assigned name, "CD Player" in
this example, is shown within the source
logo, while the original name or the input
used, is shown above the logo. These
means you always have both pieces of
information available.
Page 62

Symphony Operation
60
Settings and comfort functions
The Symphony
offers a wide range of
comfort functions to make the daily
usage easier. This includes various
alarm clock and timer functions as well
as sound control and preferred settings.
As these functions are directly
connected with the Symphony, the
Symphony must have a connection to
the S208 and it must have been selected
as a device, e.g. over the corresponding
hotkey.
By pressing briefly on the button, the
Device menu opens with the following
selection options
:
Sound setting
Alarm Clock 1
Alarm Clock 2
Short Time Alarm
Sleep-Timer
Change My Music
Device Info
Basic Settings (Page 27)
Sound Setting
In this menu, you can raise and lower the
base and treble settings in the range of ±
12dB. Outside the neutral mid-range
setting, the indicator changes colour
from blue to grey.
By pressing
Linear, you can restore the
neutral mid-range setting with a single
key press, which deactivates the sound
control again.
The
Balance (the level ratio between the
left and right speaker channels) can also
be adjusted to the installation requirements
through the Sound menu. The
Linear
function has no influence on the balance
controller.
Page 63

Operation Symphony
61
Alarm Clock 1 / 2
The Symphony has two independent
alarm clocks (1/2) that can be set simply
and intuitively.
Using the navigation compass, you can
set the switch-on time, the sound
source, the wake-up volume [max.
volume 40] as well as the days of the
week when the receiver should wake
you up.
The following options are available as
the sound source:
• Beep (classical)
• Radio (iRadio, FM Tuner*, DAB+*)
• Audio server
• USB
• iPod
• My Music (No. 1-18)
With all sources, except the beep, you
must ensure that the source is available
at the preset time. If the Symphony
identifies that it is not possible to play
the desired source, it automatically
selects one that is available. If none of
the audio sources
can be played, the beep is used as the
last option.
The weekday selection is done simply by
using the buttons and OK. The blue
bar indicates the currently selected
day. The day can be activated with OK. A
large icon with a blue border indicates a
day when the alarm clock will operate. A
small black & white icon indicates a day
when the alarm clock will remain silent.
In the example shown here, the alarm
clock is active on Tuesday, Wednesday,
Thursday and Friday and is switched off
on the other three days of the week.
You can use the
Test option to check the
alarm clock setting in terms of the
volume and the source and correct them
if necessary. Selecting OK ends the test.
Otherwise, the test stops automatically
after 30 seconds.
Deactivating the alarm clock
In the "Switch-on time" line, you can
activate/deactivate the alarm clock
through the
OK button.
The two icons in the status line
towards the bottom of the S208 display
show which alarm clock is currently
active.
The Status LED on the Symphony shows
permanently red after being switched
off if an alarm clock is active.
* with optional DAB+/FM Tuner module
Page 64

Symphony Operation
62
Switching the alarm clock off
When the Symphony switches on at the
preset time, there are 3 options when it
comes to turning it off:
1. Do nothing. The Symphony
switches
off automatically after a predefined
time of 60 minutes.
2. The Symphony
was turned off
manually using the button prior
to the alarm clock being activated.
In order to switch the alarm clock/
unit off, connect to it using the
hotkey. The following screen is
displayed:
Now you can switch the receiver
off using the button.
3. The Symphony
was turned off
automatically using the
Sleep timer
(see page 55) prior to the alarm
clock being activated. In this case,
a connection is automatically
established to the remote control
that activated the Sleep timer,
when the alarm clock/ unit
switches on. The same display as
shown under point 2 appears and
you can switch the Symphony
off
with the button.
Page 65
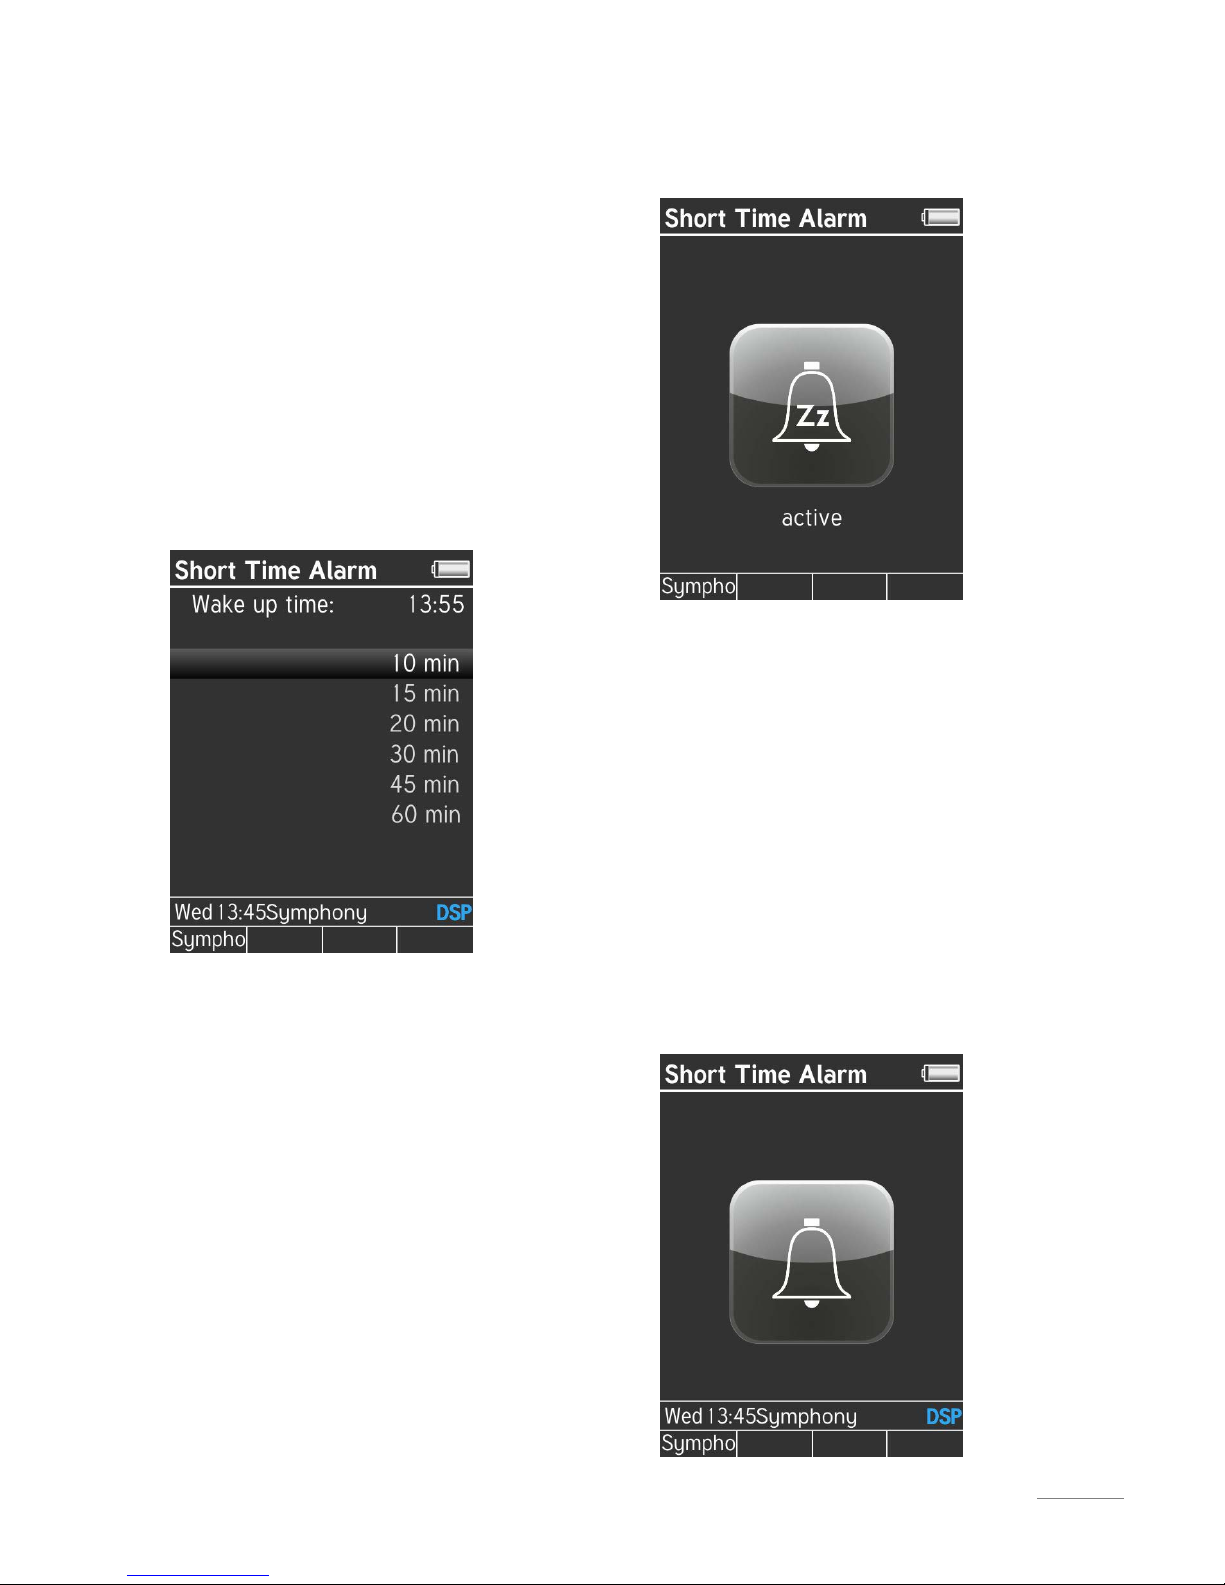
Operation Symphony
63
Short Time Alarm
Using the Symphony's timer, you can
enjoy a short nap or a siesta. Start up the
Symphony as usual and select a music
source. Now using the the timer, you can
define how long it should be before the
Symphony
switches itself back on again.
You can choose a time between 10 and
60 minutes. The time shown as
Wake-up
time indicates when the Symphony will
switch back on.
Confirm your settings with the OK button.
The following display appears on the
S208 remote control for about 5 seconds
as confirmation: see figure top right.
Then the connection to the receiver is
dropped and the Symphony
switches
itself off.
The Status LED on the Symphony shows
permanently red after being switched
off if a timer is active.
After the pre-defined time, the Symphony
starts up automatically with the
previously selected source. Now, using
the
hot keys
or "
Select device
", you can
establish a connection to the unit. The
Symphony
displays the following as a
welcome screen:
Page 66

Symphony Operation
64
Sleep-Ttimer
The Sleep timer is a countdown timer
that automatically switches the
Symphony off, after the time that you
define. This function is ideal for getting
the Symphony
to send you off to sleep.
The time shown as the
Remaining time
indicates how many more minutes the
Symphony
will continue to play until it
switches itself off.
Deactivating the sleep timer
If the Sleep timer needs to be ended/
deactivated, you just select the option
Off in the Sleep timer menu and confirm
with the OK button.
This icon in the status line towards the
bottom of the S208 display shows that
the Sleep timer is active at the moment.
Change My Music
You can change the names or delete
entries in
My Music
through the My
Music menu. Also, the complete My
Music list can be deleted in this menu.
Edit Name
Select the option "Edit Name". The
My
Music list is displayed. Select the entry
you want to change. The following
buttons on the S208 are available for
editing:
Delete
Cursor to the right
OK Select/Confirm
0-9 Direct input of numbers/letters
0, 1 Special characters
Uppercase-Lowercase (blue)
Page 67

Operation Symphony
65
Delete Titles from
My Music
Select the option "Delete Title". The
My
Music list is displayed. Select the
entry/title you want to delete. The
deletion process is completed with the
OK button. The space created can now
be filled with a new entry.
The
My Music
entries do not automatically
realign to fill the space because, for
example, the alarm clock may be
programmed with a specific entry in the
range from 1 - 18.
Delete All
Select the option "Delete All". The
complete
My Music
list will be
irretrievably deleted. Confirm the
intention to delete with the OK button.
Inserting entries, quickly & simply
If you should accidently have deleted all
entries or if they have been deleted
automatically by a software update, you
can restore them quickly, if they were
Internet radio stations. Create a folder
through the "
Online Services Internet
Portal on www.revox.com that contains
all your favourite stations. Next time you
start the Symphony
with Internet access,
this folder will transfer automatically to
your Symphony. You will find the folder in
the Internet radio
Favourites selection
(see also page 48, Chapter
Internet
radio
, section
Favourites
). Here you can
call each station directly and add them
back to
My music
quickly and easily,
with the [
Add to My music] .
Page 68

Symphony Operation
66
Device info
The Symphony is controlled by 2 microprocessors that handle different tasks,
e.g. network activity, audio processing,
safety monitoring, wireless connection,
timer activity, etc.
The
Device info menu shows the
different software and hardware
versions. This display is principally
intended for the Revox Development and
Service departments and doesn't
contain any functions that are needed
for day-to-day use.
Basic settings
The
Basic settings menu offers all those
settings that are not needed every day,
e.g. automatic switch-off, audio setup or
renaming the device.
You will find a detailed description of the
options within the Symphony
Basic
settings starting, Chapter
Basic settings
.
Page 69
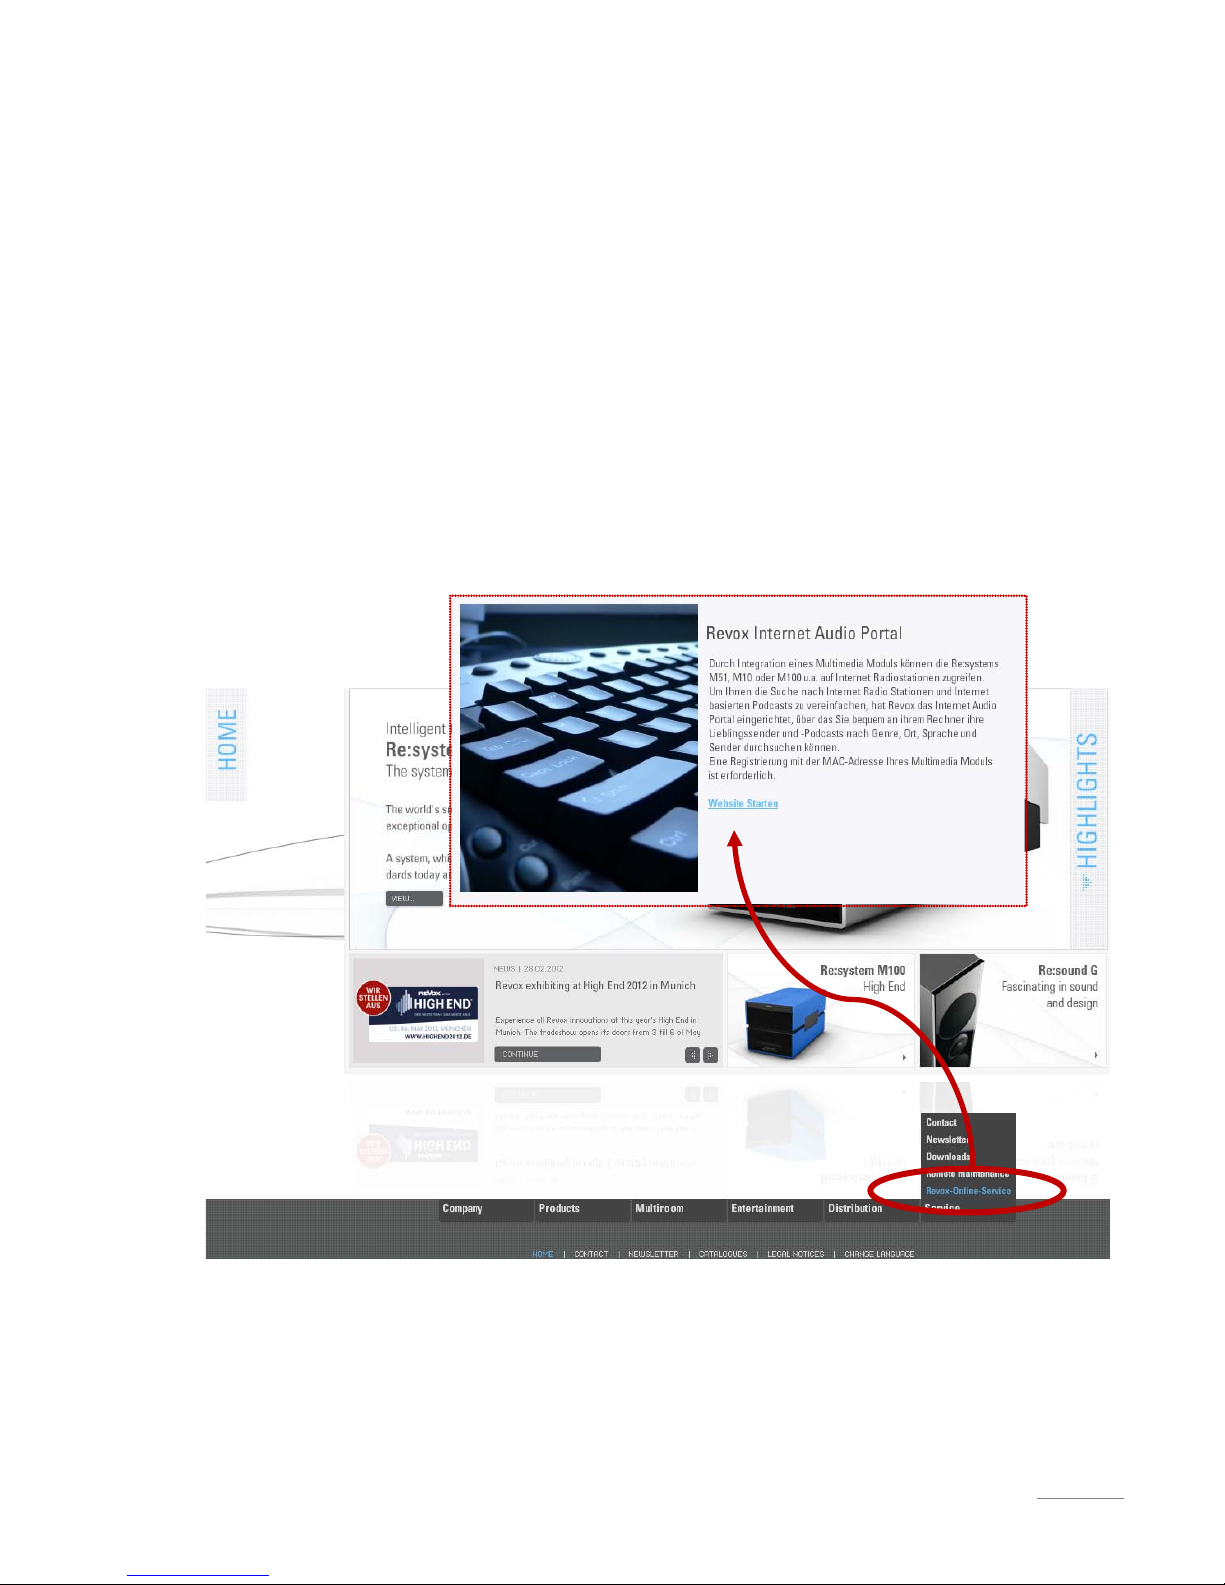
Internet Audio Portal Symphony
67
Setting up Internet Radio
The list of radio stations that appears in
the
Internet Radio section of your
Symphony
is made available by a
service provider and transferred to your
Symphony through the Internet
connection. You can extend and edit the
Favourites and Added radio stations lists
in the Internet-Radio menu as you wish,
through
Support Revox- Online-
Services in Revox's Internet Portal.
This is done as follows: Open your
Internet browser and call the Revox
Homepage under:
www.revox.de Germany
www.revox.ch Switzerland
www.revox.com English
Clicking on Revox-Online-Service calls
the Revox
Internet Audio Portal where
you can register and configure your
Symphony.
Page 70

Symphony Internet Audio Portal
68
Internet Audio Portal - IAP
In the Internet Audio Portal (IAP) you
can login in (
Member Login
) if your
Symphony
is already registered. If this is
not the case, you can register with little
effort. How to do this is described in the
next chapter:
Initial login
Revox Internet Audio Portal start page
Page 71
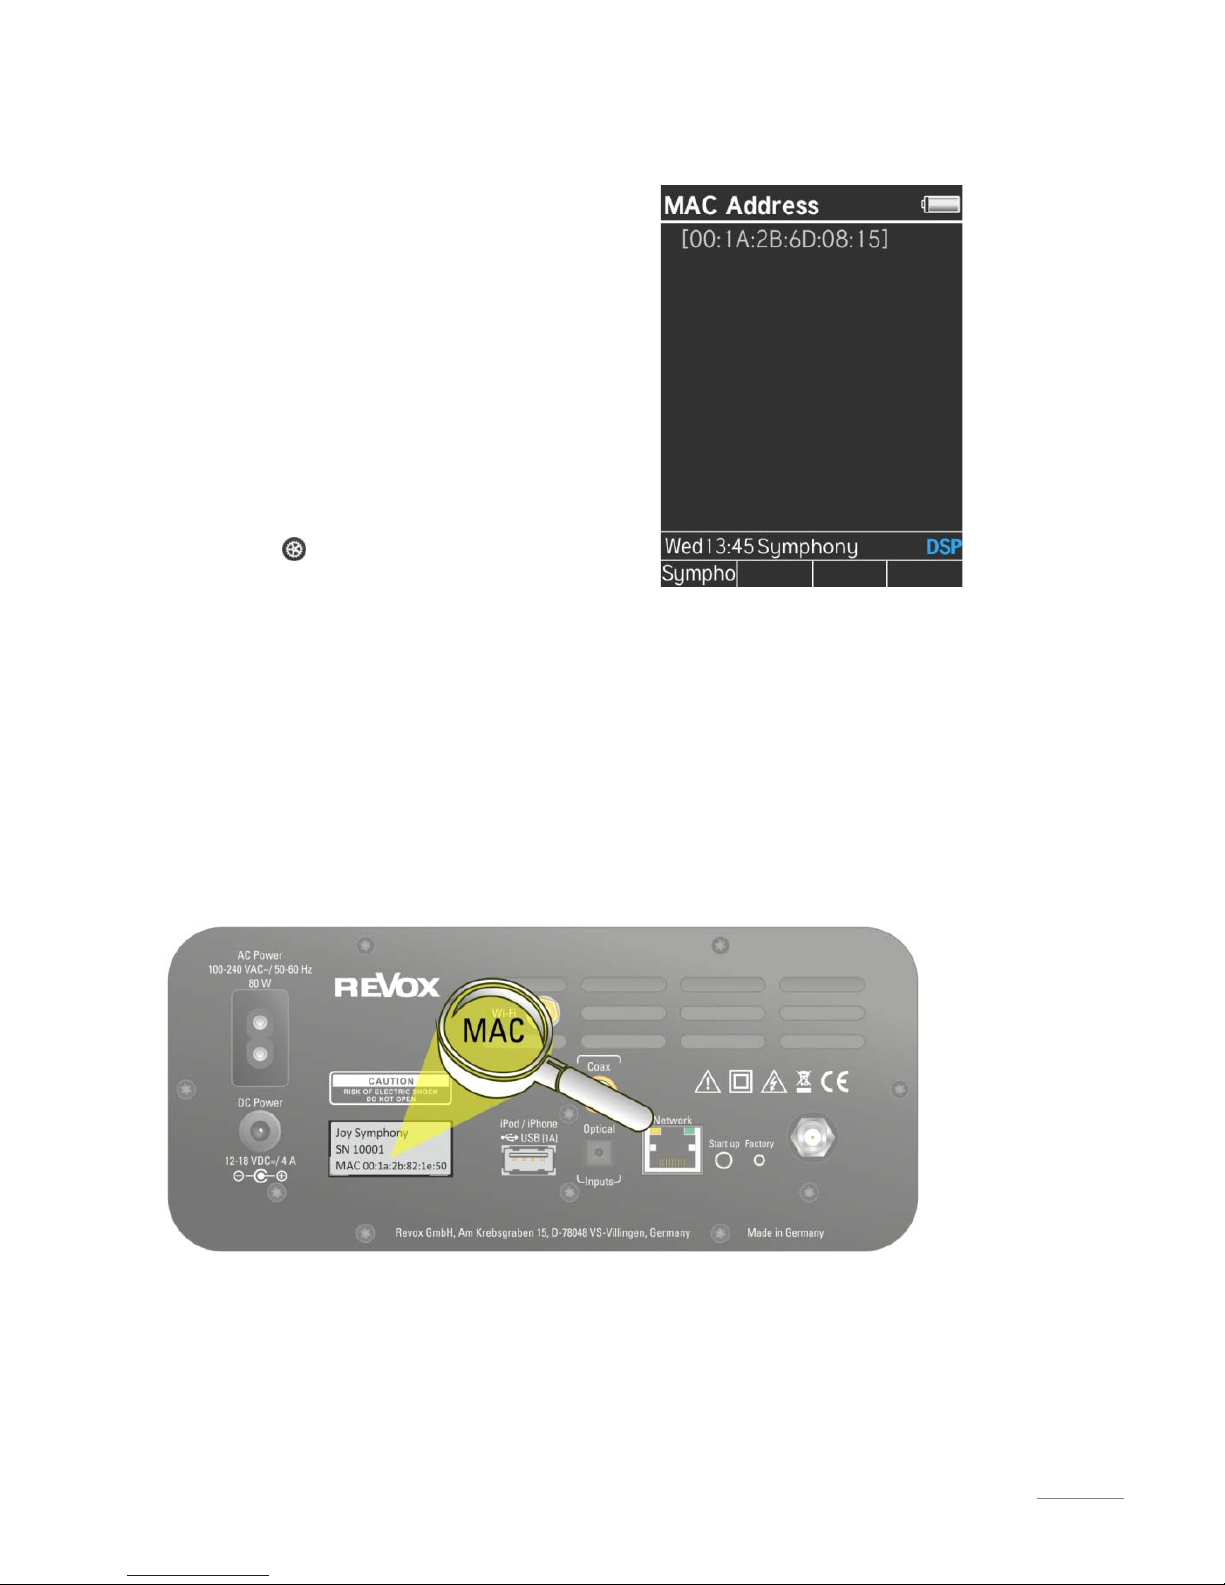
Internet Audio Portal Symphony
69
Initial login
You must register your Symphony in
order to be able to use the
IAP service.
Registration is done using the MAC
address of your Symphony, your e-mail
address and a password that you define
yourself.
Please enter the
MAC address of your
Symphony
when making your initial
login. This uniquely identifies your
Symphony. You can display the MAC
address by calling the following menu:
Press the
button briefly Device
Basic settings Network MAC
address (see figure to the right).
Alternatively, you can read off the MAC
address from the label on the rear of the
device (see figure below).
The MAC address is made up of six pairs
of characters, e.g.:
00:1A:2B:6D:08:15.
Don't enter the separators when
inputting the address and do use lowercase letters. For the example shown
above, the correct input in the IAP would
be:
001a2b6d0815
Page 72
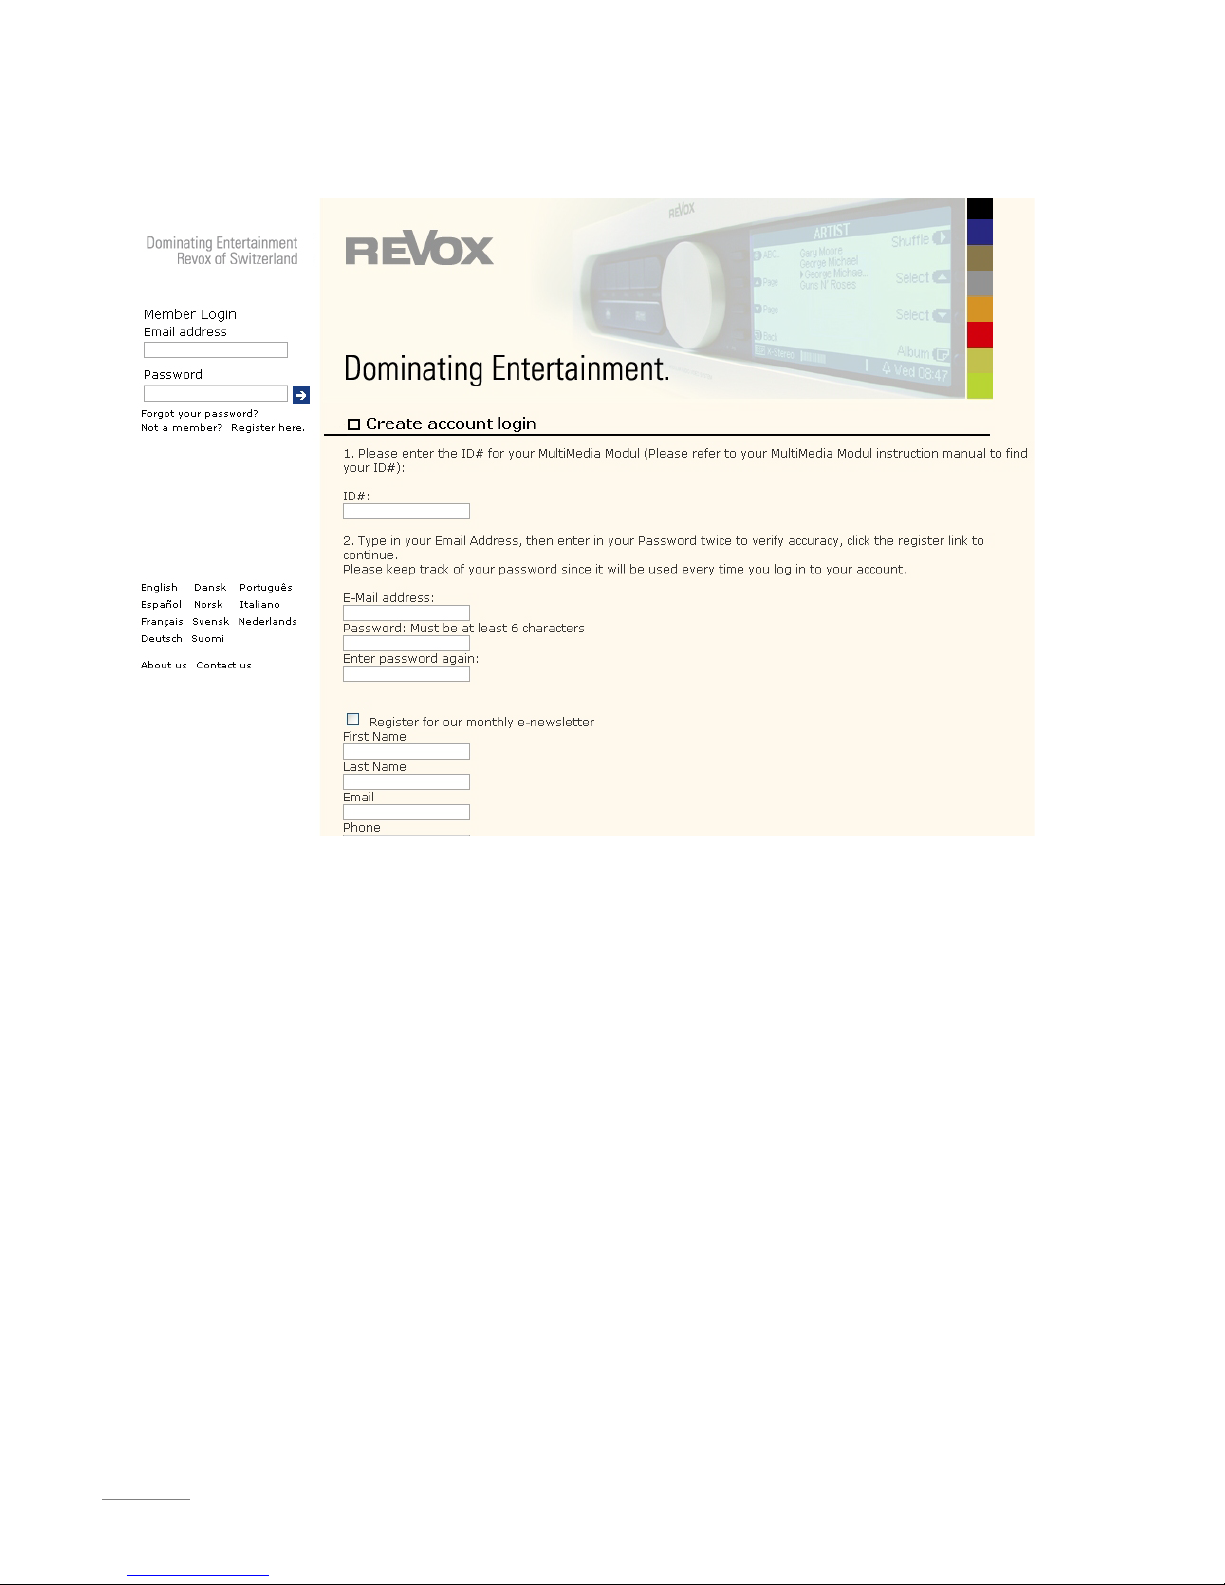
Symphony Internet Audio Portal
70
IAP Registration page
IAP registration form
Note
If you are using several Symphonys,
each one has to be registered
individually.
Register for online newsletter
If required, you can subscribe to the
free-of-charge Revox Newsletter, which
is sent by e-mail. To do this, you just
have to complete the corresponding
fields and set the checkbox in the
corresponding field.
You can transfer a one-time generated
Favorites list from one Symphony all
others. This is also done in the IAP under
the section:
My account
My preferences
Page 73
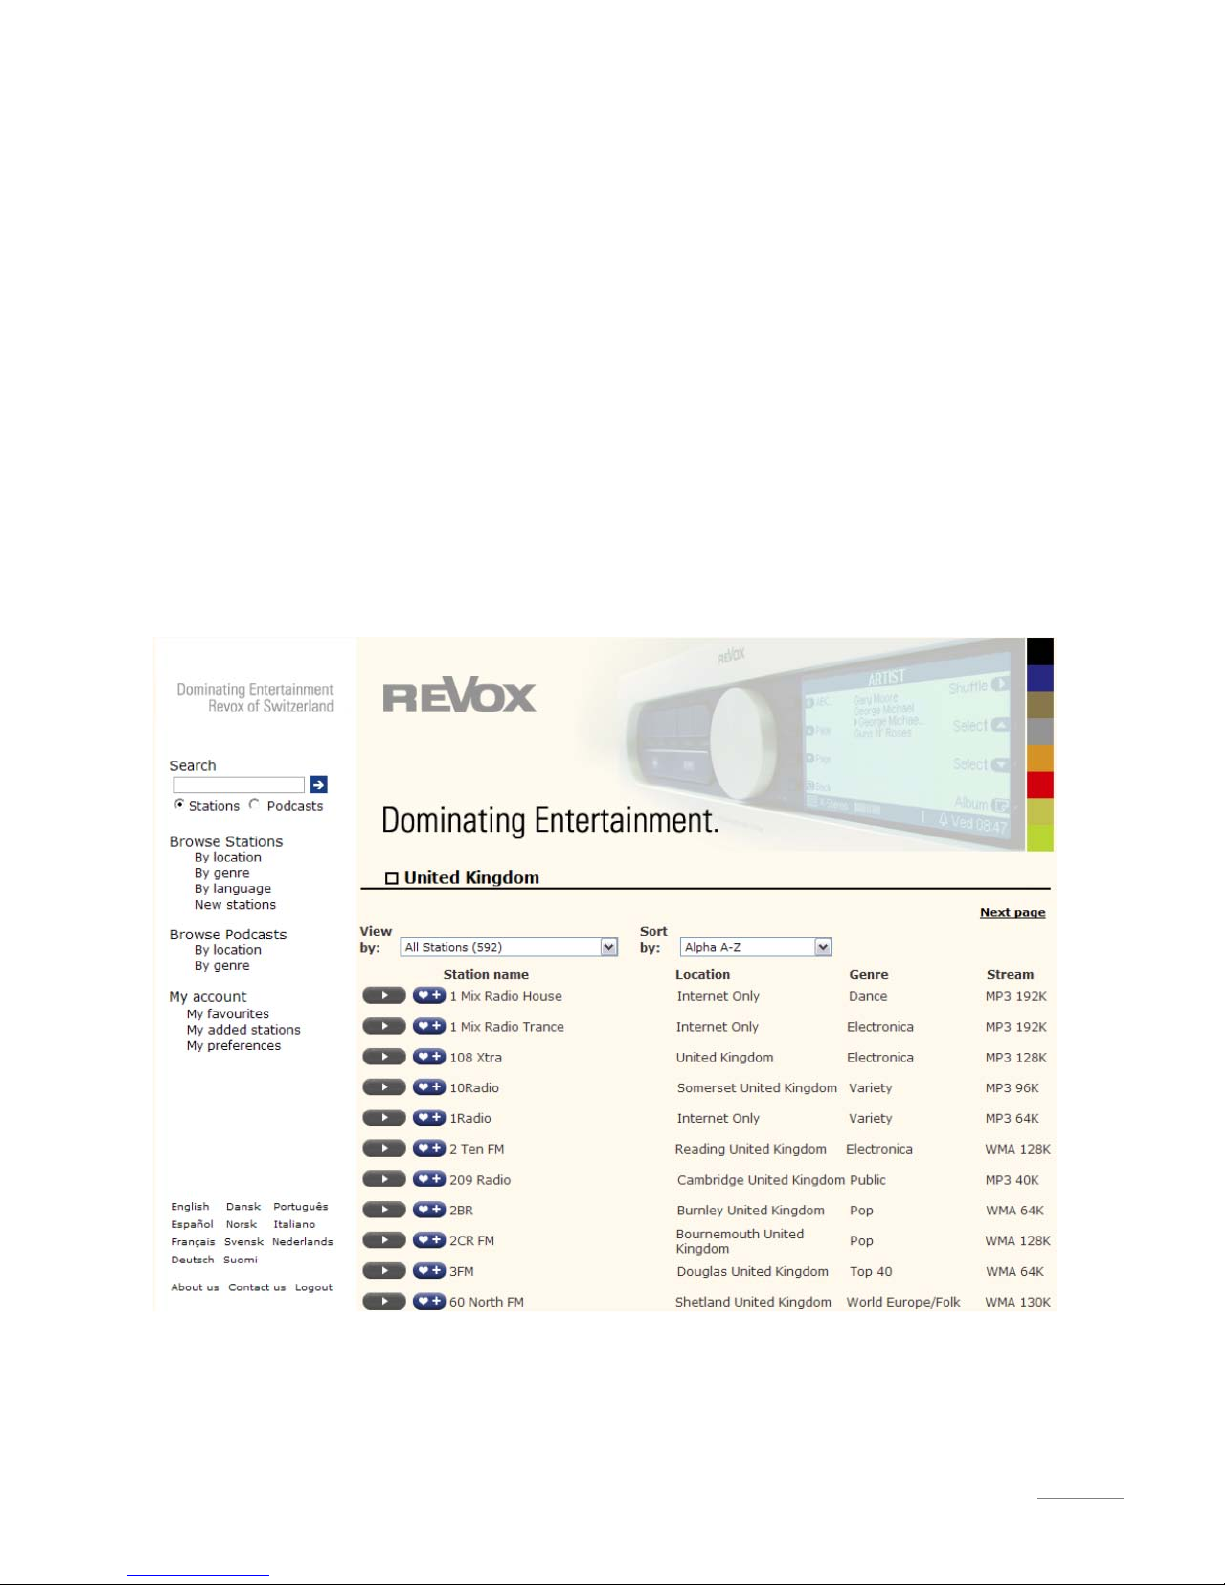
Internet Audio Portal Symphony
71
Managing the Revox IAP
Once you have registered, you can make
a selection for the extensive pool of
radio stations and add it to the favourites
list (
Favorites
), add new radio stations to
Added Stations
or search for podcasts.
The transfer of the lists to your
Symphony happens automatically over
the Internet connection. Shortly after
editing your list or adding new stations in
the IAP, you will find these changes on
your Symphony.
Radio station listing in the IAP
Currently, you can make selections on
the Internet Audio Portal according to
the following criteria:
Browse Stations
By location
By genre
By language
New stations
Browse Podcasts
By location
By genre
Page 74

Symphony Internet Audio Portal
72
Clicking on the in the station list
adds the corresponding radio station to
the
Favourites in the receivers
Internet
Radio
selection.
This opens the window shown on the
right where you can decide which
favourite group the radio station should
be added to or if you want to create a
new favourites group for it.
A maximum of 9 groups can be generated
to organise your favourites.
Adding radio stations to Favorits
Page 75

Internet Audio Portal Symphony
73
Synchronising Joy devices
If you own several Revox devices
(Symphony, S118, S119,S120, Multimedia
Module from the M series), you can
synchronise your Favourites list and
added radio stations with each other.
This means you create your Favourites
list one time and it can then be called
from all registered Joy devices.
Several devices, one account
The easiest way is to enter the individual
MAC addresses the first time you
register each device but give the
same
e-mail address and the same password
for all devices (see the red box below).
Several devices, different accounts
If you have generated several devices
with different accounts (e-mail address
+ password), you can retrospectively
synchronise them with each other (see
the blue box below). Here, you simply
enter the accounts of the devices, which
should also use these Favourites. If
Favourites have already been created for
the other devices, these are not
displayed. If you use an individual
account for the devices, only
one device
should also be assigned to this, as
otherwise there can be link-up conflicts.
Page 76

Symphony Status displays
74
Error messages
A. Music content not available
Music content has been selected that is
no longer available, e.g. a
My Music
entry that points to a track on a USB
stick that has been removed from the
Symphony.
The Symphony
tries for a few seconds to
start the music.
The following message appears if it was
not possible to start the choice:
B. Music source not available
A music source has been selected that is
no longer available, e.g. an iPod from
Apple that is no longer connected to the
Symphony.
Non-available sources are indicated
in the Main menu by the character. If
the source is available, the square is
filled in . At the beginning of the startup process, not all sources are available
even though they are present. Please
wait until the Status LED on the front
panel of the Symphony lights up white.
The local inputs are always available in
the Source menu, even when they have
no connection to another device.
Page 77

Status displays Symphony
75
C. Device doesn't respond
The following display appears after you
have started a Symphony
using the
hotkey or through "Select device":
Possible causes:
• The Symphony
is outside the range of
the remote control. Try to establish a
connection again from within sight of
the Symphony.
• The Symphony already has a
wireless connection to another
remote control and therefore cannot
connect with your S208.
• The pairing identification has been
lost. If necessary, carry out another
pairing process - see page 23.
• A radio transmitter is causing
massive interference in the 2.4 GHz
range and preventing a wireless
connection between the Revox
devices.
D. Radio not available
The following display appears after
selecting Internet radio:
As a rule, this display is caused because
no Internet connection could be
established. There can be several
reasons for this.
• The network cable to the router is not
plugged in or a crossover network
cable has been used.
• As a factory setting, the Symphony
is
set to DHCP, which means that it gets
its IP address automatically from the
router. DHCP must therefore be
possible and/or activated in the
router settings. If this is not wanted,
the Symphony
can also be assigned
a fixed IP address. See Chapter
Network settings
• The firewall is blocking access.
See Chapter
NETWORK QUESTIONS / TIPS
Page 78

Symphony Status displays
76
• WLAN connection. The WLAN
antenna at the Symphony
/ the WLAN
router is not available. The WLAN
function is deactivated at the router or
the router is switched off.
See Chapter
Network settings
and
WLAN status
.
The Main menu is called by pressing
the Home button on the S208.
You will find more information about
setting up and operating the Symphony
in the chapters
Settings
and
Operation
.
Page 79

Status displays Symphony
77
Status messages
A. Switching the device on
This display appears shortly after the
Symphony is switched on. The remote
control is trying to establish a connection
to the selected receiver.
B. Waiting for the network
A wireless connection between the
remote control and the Symphony is in
place. However, there is not yet an
Internet connection for the selected
source, e.g. Internet radio.
C. Switching the device off
The S208 remote control has switched
the Symphony off and the wireless
connection to it is interrupted.
Page 80

Symphony Network terminology glossary
78
Network terminology
General
The network switch ensures the correct
connections between the individual
components. In order to make this possible,
each device within a network must be
capable of being uniquely identified. Each
component therefore, is given its own
address, the so-called IP address. The IP
address is made up four blocks of numbers,
each of which can contain up to three digits.
These blocks of numbers are separated by a
full stop, e.g. 192.168.1.1.
Each of the individual blocks of digits can
have a value between 1 and 254. The values 0
and 255 are in part reserved for special
functions and therefore shouldn't be used. In
order to ensure a secure function of your
network, addresses from the pre-defined
range should be used, i.e.: fundamentally, the
first two blocks should be 192.168.xxx.xxx; the
third block can be selected from the values in
the range mentioned above (must be the
same for all the devices within a network
however) and the fourth block should be
used to differentiate each device,
e.g.: Symphony 192.168.001.001
NAS: 192.168.001.002
PC: 192.168.001.003
If you don't just want to use devices within
the local network but also music sources
from the Internet (Internet radio), the
Symphony must have the possibility of being
able to access the Internet. This can be
achieved, for example, through a router with
a connection to a DSL network. This router is
also a part of the network and will be
assigned its own IP address. In order to
enable this connection to the outside world
actually to be established, the Symphony
must additionally be informed of the address of
the router (Gateway).
It must be ensured that the first three blocks
of the Device IP, the Gateway IP and the DNS
1 are within the same address range, e.g.
192.168.0.xxx. The fourth block assigns a
unique address ("house number") to the
components in the local network. This
number may only occur once within the local
network. The Device IP mask should always
be given the address 255.255.255.0.
DNS
The Domain Name System (DNS) is one of
the most important services in the Internet.
Its main task is that of converting Internet
address like www.revox.de for example, into
its corresponding IP address. As a rule, the
router in home networks fulfils the function of
the DNS.
If you should decide for the manual network
configuration (without DHCP), just enter the
address of your router as the DNS address
during network configuration.
LANLocal Area Network
Local cabled network
A LAN connection to the Symphony is the
most fault-tolerant and problem free
transmission technology, which offers much
more security against eavesdropping than
WLANs or Power LANs.
Gateway
The computer or router in your network
through which the data traffic with the world
outside your network, i.e. the Internet is
handled.
Page 81

Network terminology glossary Symphony
79
Client
Network device that draws data out of the
network, decodes it and converts it for
example, into analogue music signals, which
then can be played through amplifiers and
speakers. Streaming clients also contain
functions for displaying media content and
for navigating in the Internet or on servers.
DHCP
DHCP is an abbreviation for Dynamic Host
Configuration Protocol. DHCP is primarily
used to enable clients to fetch their network
configuration automatically from a server or
router. The Symphony supports DHCP.
IP Address
Network address. Each device in the network
needs an IP address through which it can be
reached and uniquely identified. Network
addresses may not occur twice. This is
important if network addresses are assigned
manually. If addresses are issued in your
network through DHCP, you don't need to
worry about the IP address assignment as
the DHCL server automatically handles the
question of address management.
MAC Address
The MAC address (Media Access Control) is
the unique hardware address that is used for
the unambiguous identification of the device
in the network.
With the Symphony the MAC address can
either be read out in the basic Settings/
Network or alternatively, from the MAC
sticker on the back of the Symphony.
NAS
Network Attached Storage. As a rule, this is a
storage device with a very large capacity >
500 GB, which other devices can access. If
the NAS server contains an UPnP-AV server
service, the Symphony can access and play
media files that are stored on the NAS.
Recommendations NAS
- Revox S37 RipNAS
- Synology
- QNAP with
Twonky Media Server
- Buffalo
Link Station
Power Line – LAN
With the Power Line LAN, data is transmitted
through the existing power cable network.
So-called Power Line Modems are required
on the transmitter and receiver side. As a
rule, Power Line LANs offer reasonably faultfree data transmission with a data rate
sufficient for audio streaming. We
recommend Power Line Modems with bit
rates of 85 or 200 MBit/s.
Proxy Server
A proxy or proxy server is a computer in the
network that makes data transfer quicker and
more efficient and that can also increase
security by deploying access control
mechanisms. Usually, you do not find proxy
servers in home networks. TheSymphony does
not support the use of a proxy server.
Page 82

Symphony Network terminology glossary
80
Router (WLAN Router)
A central network device that establishes
and manages the communication between
the network devices. Current devices
increasing combine the function of the router
with the function of an access point for
wireless data communication. These combidevices are often referred to as WLAN
routers.
Normally, the (WLAN) router in a network
takes on the function of the gateway to the
outside world.
Server
A network device that makes data and
services available for other devices in the
network. A UPnP-AV server stores for
example, audio and video media data and
makes this data available to other devices,
the streaming clients. Often, UPnP-AV
servers also offer functions for the
cataloguing and easy identification of medial
content according to criteria such as artist,
album name, genre, etc.
SSID
Service Set Identifier / Network name. SSID
designates the identification of a radio
network that is based on IEEE 802.11. Each
WLAN has a configurable, so-called SSID or
ESSID (Extended Service Set IDentifier), to
identify the radio network.
The SSID character string can be up to 32
characters long. It is configured in the base
station (WLAN router / Access point) of a
wireless LAN and defined on all the clients
that should have access to it. Do not use
SSID names with blanks / special characters.
UPnP-AV
Universal Plug and Play – Audio Video
Network standard that makes media content,
e.g. on PCs or NAS discs accessible in
networks. A UPnP-AV software must be
installed on PCs /NAS storage so that the
Symphony can access the stored media
data.
Below, you will find a short overview of UPnP
software that is suitable for the different
operating systems:
Windows
:
Twonky Media Server
http://www.twonkyvision.com/
Windows Media Player
11
http://www.microsoft.com/windows/windows
media/de/default.aspx
Mac:
Twonky Media Server for Mac
http://www.twonkyvision.com/
Linux:
Mediatomb
http://mediatomb.cc/
GmediaServer
http://www.gnu.org/software/gmediaserver/
Page 83

Network terminology glossary Symphony
81
WLAN
(W-LAN, Wireless LAN)
Radio network. Network connection is done
using radio waves in the 2.4 GHz frequency
range. Radio networks are easy to install as
no cables have to be laid but are often
problematic and unreliable, particularly over
longer transmission distances. In many
cases, Power Line networks that also don't
require any cabling are a better choice.
In each case, the installation of a network
cable is the most fault-tolerant and problem
free transmission technology. An additional
point is that cabled networks don't produce
any electro smog.
WPA
Wi-Fi Protected Access (WPA)
WPA contains the architecture of WEP, but
offers additional protection through dynamic
keys that are based on the following (
Cipher
)
standards:
- Temporal Key Integrity Protocol
(TKIP) -
Advanced Encryption Standard
(AES)
WPA offers Pre- Shared Keys (PSK) for
authentication or Extensible Authentication
Protocol (EAP) through IEEE 802.1x.
The Symphony is based on the authentication
PSK and supports both the WPA encryption
TKIP and AES.
WEP
Wired Equivalent Privacy (WEP) is the
previously used standard encryption
algorithm for WLANs. It should control
access to the network as well as ensuring
the confidentiality and integrity of the data.
Because of various weak spots, the process
is considered to be unsafe. For this reason,
WLAN installations should use the more
secure WPA encryption. See WPA.
With WPE authentication, a distinction is
drawn between two processes:
Open
Open System Authentication
is the standard
authentication. The WEP key is used at the
same time for authentication: Each client
with the correct WEP key gets access to the
network.
Shared
Shared Key Authentication
is reputed to be
the more secure version. In this case,
authentication is done through the
Challenge-Response authentication, with a
secret key. However, the ChallengeResponse process is also based on WEP and
demonstrates the same weaknesses.
The Symphony offers both
Open
and
Shared
WEP authentication.
Wi-Fi
Certificate for WLAN products that work
according to IEEE802.11 standards and are
compatible with other products.
Page 84

Symphony Questions & Tips
82
Network: Questions & Answers
NETWORK IS OK BUT THERE IS NO SOUND.
You should be aware that the Symphony
cannot support all data formats that are
available on the Internet. It can occur
that a station cannot be played. See
Technical data
Other reasons why your Internet radio
doesn't play:
• Not all radio stations broadcast 24/7
• Radio stations may not be available
any more
• The Revox equipment is muted
• The provider's (Radio Sender/
Provider) server capacity is fully
utilised
Transmission within your network breaks
down because:
• (Internet) network problems
• Server capacity fully utilised
NETWORK QUESTIONS / TIPS
The connection is lost after a few
minutes:
System-based characteristic of the
UPnP standard. Useful communication
starts at a port numbered above 1024
and changes this regularly during
operation. Not all firewall programs
recognise this knocking on different
doors as a continuous connection.
Depending on the configuration, the
firewall decides, in a case of doubt,
against an unknown client.
Depending on the firewall software, this
can be resolved through the following
actions:
• By using a fixed IP and without DHCP,
define the Symphony
as a so-called
Trusted Host, i.e. a device from which
all communication is considered to be
trustworthy.
• Allow the server to accept incoming
and outgoing communication with the
Symphony
over ports 1024 - 65535.
Activate the exception setting for "UPnP
Framework", e.g. Windows XP Firewall or
activate "Permit UPnP communication".
Page 85

Questions & Tips Symphony
83
NETWORK QUESTIONS / TIPS
The Symphony finds my Access Point,
however my computer is not displayed.
• Make sure you have installed an UPnP
server on your computer and that this
is also activated. Depending on the
amount of data and the software, it can
take a few seconds before the option
appears as a selection on the
Symphony.
• You have activated a MAC address
filter on your router. In this case, add
the Symphony
MAC address to you
router configuration.
• Your router only assigns fixed IPs.
Deactivate DHCP and enter in this
case, a fixed IP address in the
Symphony.
My Access Point (SSID) is not listed.
• The Symphony can only find your
Access Point if it is within range.
Reduce the distance to the Access
Point and try again.
• Depending on the configuration, the
router's SSID may be hidden. If this
option is activated, the SSID must be
entered manually in the Symphony
Network menu.
NETWORK QUESTIONS / TIPS
A lot of Access Points are displayed that
are unknown to me.
If several Access point, for example
those installed in neighbouring buildings
are available to the Symphony, these will
also be listed. Select your Access Point
and continue with the configuration.
The Symphony indicates to me that my
network is encrypted.
Your network is protected against
external attacks with an encryption
(WEP / WPA(2)). Enter your key in the
Symphony
Setup so that the Symphony
is identified as a "User" in the network.
Where do I get my key from?
If you installed your network yourself,
you will have defined it as part of that
work. Otherwise, you will get it from your
System Administrator.
Can other data on my network hard disc
or server by read or viewed?
No, the Symphony can only receive data
that is released by the UPnP server. In
this way, the Symphony
only accesses
your files. Other data on your server is
not transferred and cannot be viewed.
Page 86

Symphony Questions & Tips
84
NETWORK QUESTIONS / TIPS
Network activity?
Two LEDs are integrated in the
Symphony
network socket, which
display the bus activity. If the network
connection is working, the orange LED
lights up permanently while the flashing
of the green LED indicates that data
exchange is taking place.
Point-to-Point
If the Symphony is connected directly to
a PC without using a router, cabling is
done using a
Crossover Cable.
Distribution with Router
If the Symphony is connected to the
network through a router, a
Patch cable
(1:1) is to be used.
Network setting?
Have all the Symphony Setup settings
been correctly applied and has a restart
been carried out following any changes?
Ping test?
Does the Symphony respond to a Ping
attempt? Is it recognised in the network?
The Symphony’s deployed or assigned IP
address can be seen in the device Basic
settings/Network.
NETWORK QUESTIONS / TIPS
Encryption protocol?
Is the implemented encryption protocol
(WEP, WPA-SK) and/or the corresponding
key correct?
My WLAN connection?
Was my Access Point/WLAN router or
one from a neighbouring system selected,
which because of its locational proximity,
can also be received?
Page 87
Appendix Symphony
85
Appendix
Warranty
Warranty covers a period of 24 months
from the purchasing date. Your specialist
dealer is your first contact if you need
service help. If he is unable to assist you,
send your device, carriage free, without
accessories to your national Sales
Office.
Please supply a complete description of
the fault together with your address.
Copyright advice
iPod is a registered trademark of Apple
Inc. in the USA and/or other countries.
iPhone is a registered trademark of
Apple Inc. All other brand and product
names cited are trademarks or
registered trademarks of their respective
holders.
Environmental protection
Packaging
We recommend keeping the original box
and packaging material so that if
required, the device can be transported
safely.
Symphony
Please note: The EU Directive
2002/96/EC governs the correct
return, handling and recycling of
used electronic devices. For this reason,
electronic used devices must be
disposed of separately. This device
should not be disposed of with normal
domestic waste. You can take your used
device free-of-charge to recognised
disposal points. You can get further
information about the return of such
devices from your local authority, also in
non-EU countries.
Disposal of the S208 Remote control
The S208 remote control must
be disposed of in accordance
with valid legislation and
regulations. As this product contains a
rechargeable battery, it should not be
disposed of with normal domestic waste.
You must dispose of your S208 remote
control when it reaches the end of its
working life, in accordance with the
corresponding regulations and
legislation.
Page 88
Symphony Appendix
86
Technical data 1/2
Output
Measurement Measuring conditions
Output performance RMS 2 x 25 W 1 kHz at 4 Ohm load
Damping factor 20 1 kHz at 8 Ohm load
Dynamic range 100dB A-weighted
Channel separation > 55 dB 1 kHz, 1 Watt at 4 Ohms
Harmonic distortion
0,05 %
> 0,5 %
1 W at 4 Ohm
25W at 4 Ohm
Device data
Speakers
2 x 108mm coaxial-chassis
2-Way bass reflex principle
Max. SPL 105 dB 1m / Pink Noise / Stereo
Frequency range 42 Hz – 22 kHz IEC
Symphony-S208
distances
65m Open space
Dimensions with feet
141 x 500 x 300
1
H x W x D1 (without sockets)
Weight 7,3 kg Without packaging
Temperature range +10°...40°C DIN 40040
AC-Power 100-240 VAC/ 50-60Hz
Power consumption 2
80 W
5,5 W
< 4.5 W
0.6 W
Maximum power
Normal operation
Quickstart: On
Quickstart: Off
External inputs
Digital inputs 1 x Optical 16, 20, 24 bit PCM S/PDIF up to 96 kHz
1 x Coaxial 16, 20, 24 bit PCM S/PDIF up to 192 kHz
1
Please allow for another 50 - 60 mm for cable and plug
2
Measured without external devices
Page 89

Appendix Symphony
87
Technical data 2/2
FM-Part / Tuner module
3
Measurement Measuring conditions
Frequency range 87,5 – 108,0 MHz
SN ratio
(Stereo)
> 44 dB
> 46 dB
> 54 dB
25 dBμV / 1 kHz
42 dBμV / 1 kHz
65 dBμV / 1 kHz
Distortion THD+N < 0,35% 65 dBμV / 1 kHz
Crosstalk > 37 dB 65 dBμV / 1 kHz
DAB-Part / Tuner module
3
Frequency range 174,0 – 230,0 MHz
Distortion THD+N < 0,006% 65 dBμV / 1 kHz
Crosstalk > 90 dB 65 dBμV / 1 kHz
Playable formats
Streaming Client 4: WAV (192 kHz,32 bit), FLAC (192 kHz, 24 bit), AIFF (32 bit), AAC,
MP3 (cbr +vbr, 320 kB), OGG-Vorbis, WMA
Supported Gapless
formats
WAV, FLAC, AIFF, MP3 (requires Lame gapless tags:
MP3_ACCURATE_LENGTH, ENC_DELAY, ENC_PADDING) and
AAC (requires gapless tag "iTunSMPB" as set by iTunes)
Playlists: M3U, PLS
Internet Radio Data Base Revox Internet Audio Portal (Online Services)
Supported Mediaserver UPnP-AV 1.1 and DLNA compatible Server
Microsoft Windows Media
3
Optional accessory
4
The audio formats listed must be supported by the UPnP server so that the Symphony
can play them. It is not enough for the audio files simply to exist on the server
Software Revox Joy Symphony: Version1.8
Firmware Revox Joy S208: Version 1.19 with EasyCreator 1.31
Page 90

Symphony Appendix
88
User manual Revox Joy Symphony
 Loading...