

REVELL 1985 Fiero GT User Manual [en, fr, nl, it, gr, da, no, fi, sv, es, pt, de, en, hr, et, fi, hu, lv, lt, nl, pl, ro, ru, sr, sk, sl, cs, tr, gr, bg, uk, ch, he, ar, ja, ch, ch, ko, hi, id, kk, ms, fa, pt, es, th, vi, sq, mk]
Page 1
KIT 2242 85224200200
‘85 Fiero GT
The Pontiac Fiero had a history of only five model years-1984 through
1988. Even though over fifteen years have passed since the last Fiero rolled
off the production line, the car still has a sizable following of fiercely loyal
enthusiasts.
The story behind the Fiero’s development actually started with then
Pontiac general manager John DeLorean in 1967. Still fresh from the success of the Pontiac GTO™, another car he championed, DeLorean liked the
that the car did not have nearly enough power, for many others it was just
perfect as it was. While Pontiac hoped to sell 80,000 units in the car’s first
year, actual sales turned out to be over 100,000, insuring the Fiero’s profitability. Another high point was the announcement that the Fiero would be
the Pace Car for the following year ’s Indy 500®, the only mid-engined car
and one of the very few 4 cylinder cars to pace the race. In addition, 2,000
Pace Car replicas were offered to the public.
idea of a mid-engined small car with a non-metal body. GM management,
already dealing with issues in the development of the already delayed next
generation Corvette®, killed the idea.
That’s where things stayed until 1978, when the Pontiac division revived
the mid-engined car idea. At this time, the US was in the middle of a gaso-
introduced early in 1985. The GT, the subject of this Revell kit, included a
2.8 liter V6 engine for more power, larger wheels and tires and the rounded
front end that first appeared on the Pace Car. A year later, the fastback body
style was introduced.
line shortage and American car manufacturers found themselves low on fuel
efficient cars that the public actually wanted to buy. The Fiero was to be
positioned as an exciting car that still was an economy car. Names considered at the time for the new car included Pegasus, Sprint and Fiamma, that
last name an Italian word that the marketing staff thought would not go over
well with the public. Still, when a GM employee stumbled upon "Fiero" in an
Italian dictionary (it means "very proud"), everyone gave it a thumbs up.
When the Fiero first appeared in late 1983 as a ’84 model, it had but one
engine choice, a 2.5 liter 4 cylinder. While many immediately complained
* REPEAT SEVERAL TIMES
* A REPETER PLUSIEURS FOIS
READ THIS BEFORE YOU BEGIN LIRE CE QUI SUIT AVANT DE COMMENCER
* Study the assembly drawings.
* Each plastic part is identified by a number.
* In the assembly drawings, some parts will be
marked by a star (★) to indicate chrome
plated plastic.
* For better paint and decal adhesion, wash
the plastic parts in a mild detergent solution.
Rinse and let air dry.
* Check the fit of each piece before
cementing in place.
* Use only cement for polystyrene plastic.
* Scrape plating and paint from areas
to be cemented.
* Allow paint to dry thoroughly before
handling parts.
* Any unused parts may be discarded.
DECAL APPLICATION INSTRUCTIONS
1. Cut desired decal from sheet.
2. Dip decal in water for a few seconds.
3. Place wet decal on paper towel.
4. Wait until decal is movable on paper backing.
5. Place decal in position on model, face up and
slide backing away.
6. Press out air bubbles with a soft damp cloth.
7. Milkiness that may appear is for better decal
adhesion and will dry clear. Wipe away any
excess adhesive.
8. Do not touch decal until fully dry.
9. Allow the decals 48 hours to dry before
applying clear coat.
NOTE: Decals are compatible with
setting solutions or solvents.
* OPTIONAL PARTS
* PIECES EN OPTION
* DECAL
* DECAL COMANIE
* Etudier les schémas de montage.
* Chaque pièce en plastique est identifiée par un numéro.
* Sur les schémas de montage, certaines pièces sont
marquées d'une étoile (★) pour indiquer qu'elles sont en
plastique chromé.
* Pour une meilleure prise de la peinture et des autocollants,
laver les pièces en plastique avec une solution détergente
peu concentrée. Les rincer et les laisser sécher à l'air.
* Vérifier que chaque pièce s'ajuste bien avant
de la coller en place.
* N'utiliser que de la colle pour polystyrène.
* Gratter les parties à coller pour enlever le chrome et la peinture.
* Laisser la peinture bien sécher avant de manipuler les pièces.
* Toute pièce inutilisée peut être jetée.
DIRECTIVES D'APPLICATION DES AUTOCOLLANTS
1. Découper l'autocollant désiré de la feuille.
2. Tremper l'autocollant dans de l'eau pendant quelques secondes.
3. Placer l'autocollant mouillé sur une serviette en papier.
4. Attendez que l'autocollant puisse être déplacé sur son support
en papier.
5. Mettre l'autocollant en position sur le modèle face sur
le dessus et faire glisser le support pour l'enlever.
6. Appuyer avec un chiffon doux humide pour éliminer les bulles d'air.
7. La substance laiteuse qui peut apparaître est destinée à
améliorer l'adhésion de l'autocollant et devient incolore au
séchage. Essuyer pour enlever tout excédent d'adhésif.
8. Ne pas toucher l'autocollant tant qu'il n'est pas bien sec.
9. Laisser l'autocollant sécher pendant 48 heures avant
d'appliquer une couche transparente.
REMARQUE: Les autocollants sont compatibles avec
* ALTERNATIVE ASSEMBLY
* ENSEMBLAGE ALTERNATIVE
les solutions de fixage ou les solvants.
‘88s were the best Fieros yet and new colors and options including leather
interior and the rare T-Tops (only 1,250 built) were made available. A prototype ’89 model was even built. Yet, GM discontinued the Fiero suddenly
after the 1988 models. To this day, many Fiero enthusiasts debate as to
why the car was dropped. The last two Fieros were produced on August 16,
1988 and were both given to employees at the plant. The Fiero story didn’t
end on that day, however, and many clubs and companies offering parts and
technical assistance still abound.
Development moved along quickly after that, with the GT model being
Things took a strange turn in the 1988 model year. Many thought the
* CEMENT TOGETHER
* A COLLER
* REMOVE AND THROW AWAY
* A RETIRER ET JETER
This optional paint guide is provided if you
choose to detail paint your model.
Ce guide de peintures vous sera fourni si vous choisissez de
peindre votre modèle en détail.
Aluminum
Flat Black
Gloss Black
Red
Silver
Steel
Tan
Transparent Red
Turn Signal Amber
White
* DO NOT CEMENT
* NE PAS COLLER
Aluminium
Noir mat
Noir brilliant
Rouge
Argent
Acier
Havane
Transparent Red
Feu clignotant de
direction ambre
Blanc
If you have any questions or comments, call our hotline at: (800) 833-3570
or, please write to:
Revell-Monogram Consumer Service Department, 725 Landwehr Road, Northbrook, Illinois 60062
Be sure to include the plan number (85224200200), part number, description, your return address and phone number.
Visit our website: www.revellmonogram.com
REVELL-MONOGRAM, LLC Northbrook, IL. Copyright © 2004. All rights reserved. Made in China
Page 2
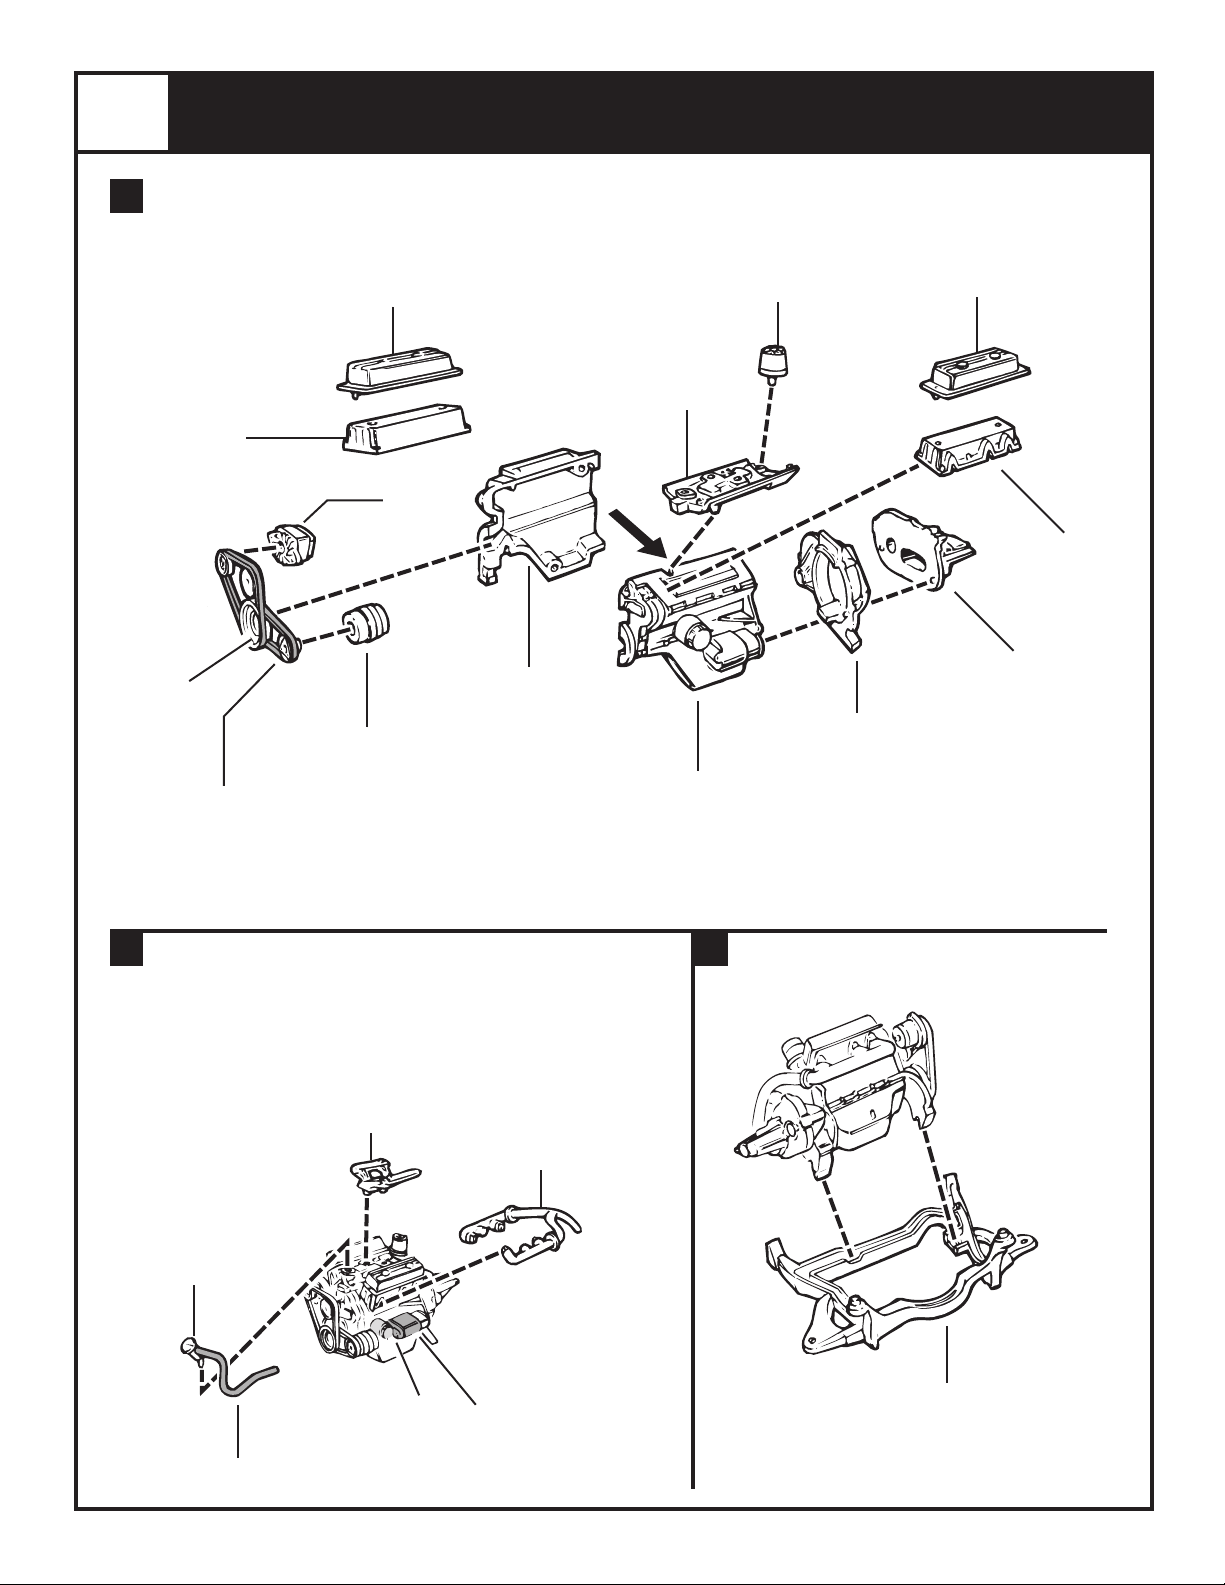
1
A
ENGINE ASSEMBLY
40
CYLINDER HEAD
GLOSS BLACK
ALUMINUM
53
PULLEY ASSEMBLY
FLAT BLACK BELTS
★42
VALVE COVER
CHROME
★57
ALTERNATOR
CHROME
54
AIR CONDITIONER
ALUMINUM
39
ENGINE HALF
GLOSS BLACK
49
INTAKE MANIFOLD
GLOSS BLACK
38
ENGINE HALF
GLOSS BLACK
32
DISTRIBUTOR
GLOSS BLACK
TRANSMISSION HALF
★41
VALVE COVER
CHROME
40
CYLINDER HEAD
GLOSS BLACK
51
TRANSMISSION HALF
ALUMINUM
50
ALUMINUM
RADIATOR FILLER HOSE
46
ALUMINUM
FLAT BLACK
★44
INTAKE PLENUM
BOTTOM
CHROME
WHITE
HEADER ASSEMBLY
37
STEEL
ALUMINUM
CB
47
ENGINE CRADLE
FLAT BLACK
Page 3
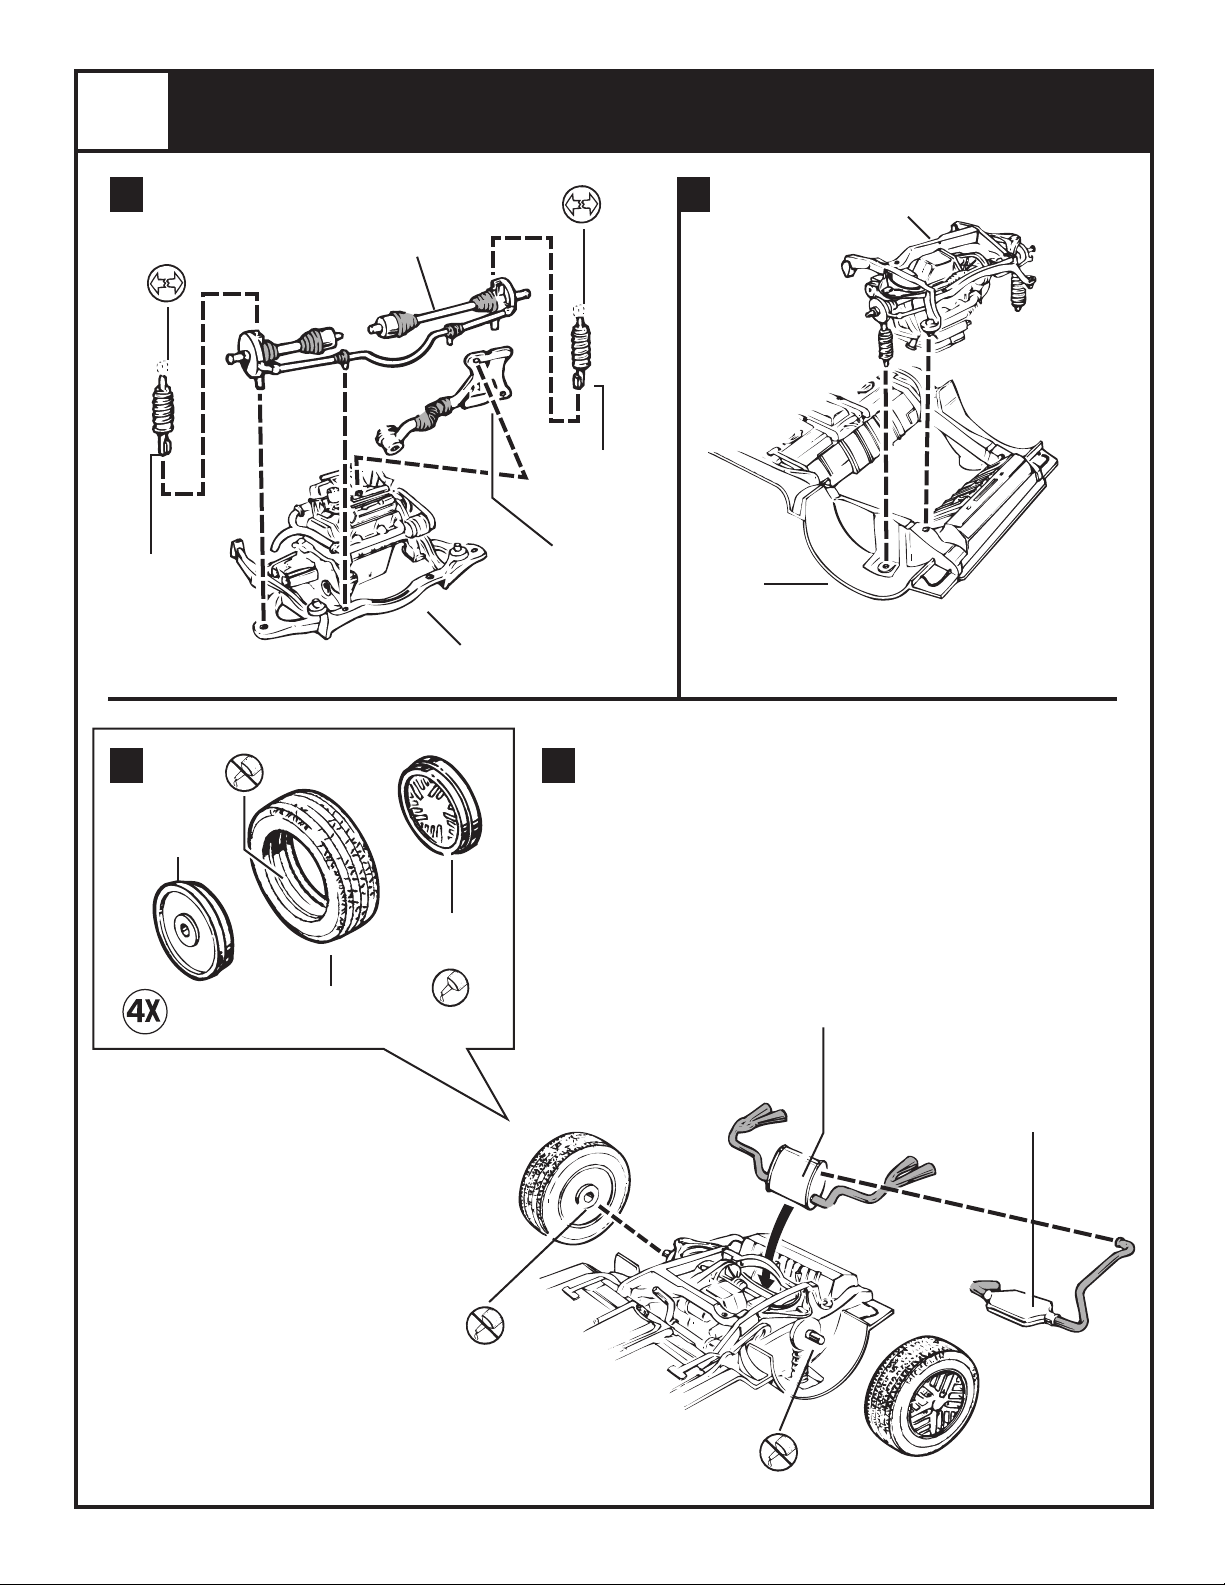
2
A
REAR CHASSIS ASSEMBLY
48
REAR AXLE
STEEL
(PAINT SHADED AREA
FLAT BLACK)
58
SHOCK
ABSORBER
FLAT BLACK
B
COMPLETED ASSEMBLY
FROM STEP A
58
SHOCK ABSORBER
FLAT BLACK
C
14
INNER WHEEL
FLAT BLACK
100
TIRES
INTAKE PLENUM TOP
STEEL
(PAINT SHADED AREA
FLAT BLACK)
COMPLETED ASSEMBLY
FROM STEP 1
D
★13
WHEEL OUTER
CHROME
45
16
CHASSIS
FLAT BLACK
43
MUFFLER ASSEMBLY
ALUMINUM
(PAINT SHADED AREA STEEL)
20
CATALYTIC CONVERTER
ALUMINUM
(PAINT SHADED AREA STEEL)
Page 4

3
FRONT CHASSIS ASSEMBLY
A
17
FRONT SUSPENSION
FLAT BLACK
C
B
COMPLETED ASSEMBLY
FROM STEP 2
27
AXLE ARM
FLAT BLACK
19
COIL SPRING
FLAT BLACK
D
28
TORSION BAR
ALUMINUM
18
STEERING ASSEMBLY
ALUMINUM
(PAINT SHADED AREA FLAT BLACK)
E
26
AXLE ARM
FLAT BLACK
COMPLETED ASSEMBLY
FROM STEP 2
19
COIL SPRING
FLAT BLACK
Page 5

4
A
8
INSTRUMENT
PANEL
TAN
21
PANEL BACK
TAN
INTERIOR ASSEMBLY
60
GAUGE POD
TAN
TAN
B
7
DASHBOARD
TAN
10
STEERING WHEEL
GLOSS BLACK
25
ARM REST
TAN
9
SHIFTER
GLOSS BLACK
SEAT FRONT
24
ARM REST
TAN
6
INTERIOR
TAN
11
TAN
COMPLETED ASSEMBLY
FROM STEP A
12
SEAT BACK
TAN
Page 6

5
BODY ASSEMBLY
A
B
★15
REAR VIEW MIRROR
CHROME
2
56
WINDOWS
CLEAR
TURN SIGNAL AMBER OVER
SILVER
1
BODY
COMPLETED ASSEMBLY
FROM STEP 4
COMPLETED ASSEMBLY
FROM STEP A
C
COMPLETED ASSEMBLY
FROM STEP B
COMPLETED ASSEMBLY
FROM STEP 3
Page 7

6
REAR BODY ASSEMBLY
A
B
22
SIDE PANEL
66
SIDE PANEL
2
DECK LID
OPEN
HOLES
23
SIDE PANEL
65
SIDE PANEL
5
REAR PAN
1
33
SCOOP HALF
55
SCOOP HALF
52
34
LOUVERED PANEL
FLAT BLACK
35
LOUVERED PANEL
FLAT BLACK
4
59
TAILLIGHT PANEL
TRANSPARENT RED OVER SILVER
4
FLAT BLACK
TURN SIGNAL AMBER OVER SILVER
(REPEAT FOR OTHER SIDE)
2
DECK LID
3
36
SPOILER SUPPORT
SCOOP BASE
4
REAR SPOILER
77
SPOILER SUPPORT
Page 8

7
FINAL ASSEMBLY
★30
MIRROR FACE
CHROME
SIDE MIRROR FAIRING
3
FLAT BLACK
SIDE MIRROR FAIRING
29
FLAT BLACK
85224200200
★31
MIRROR FACE
CHROME
 Loading...