

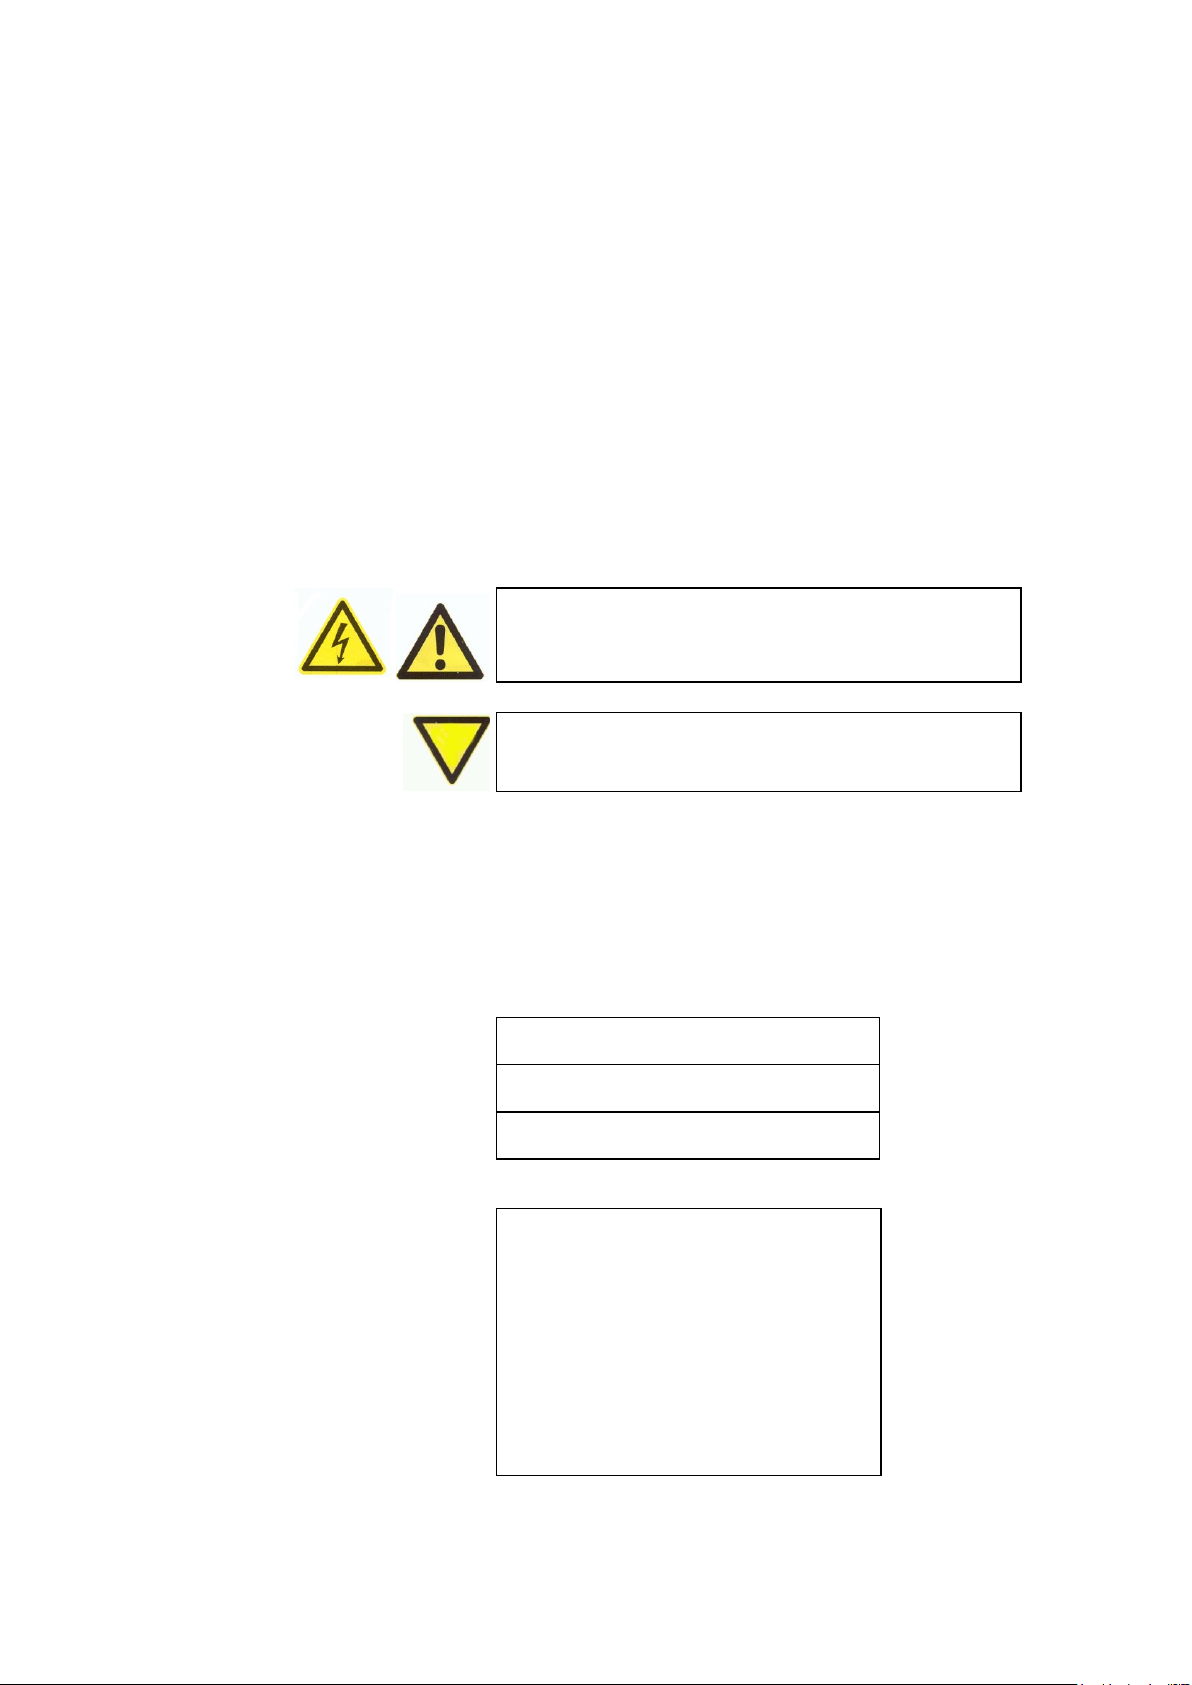
Page 1
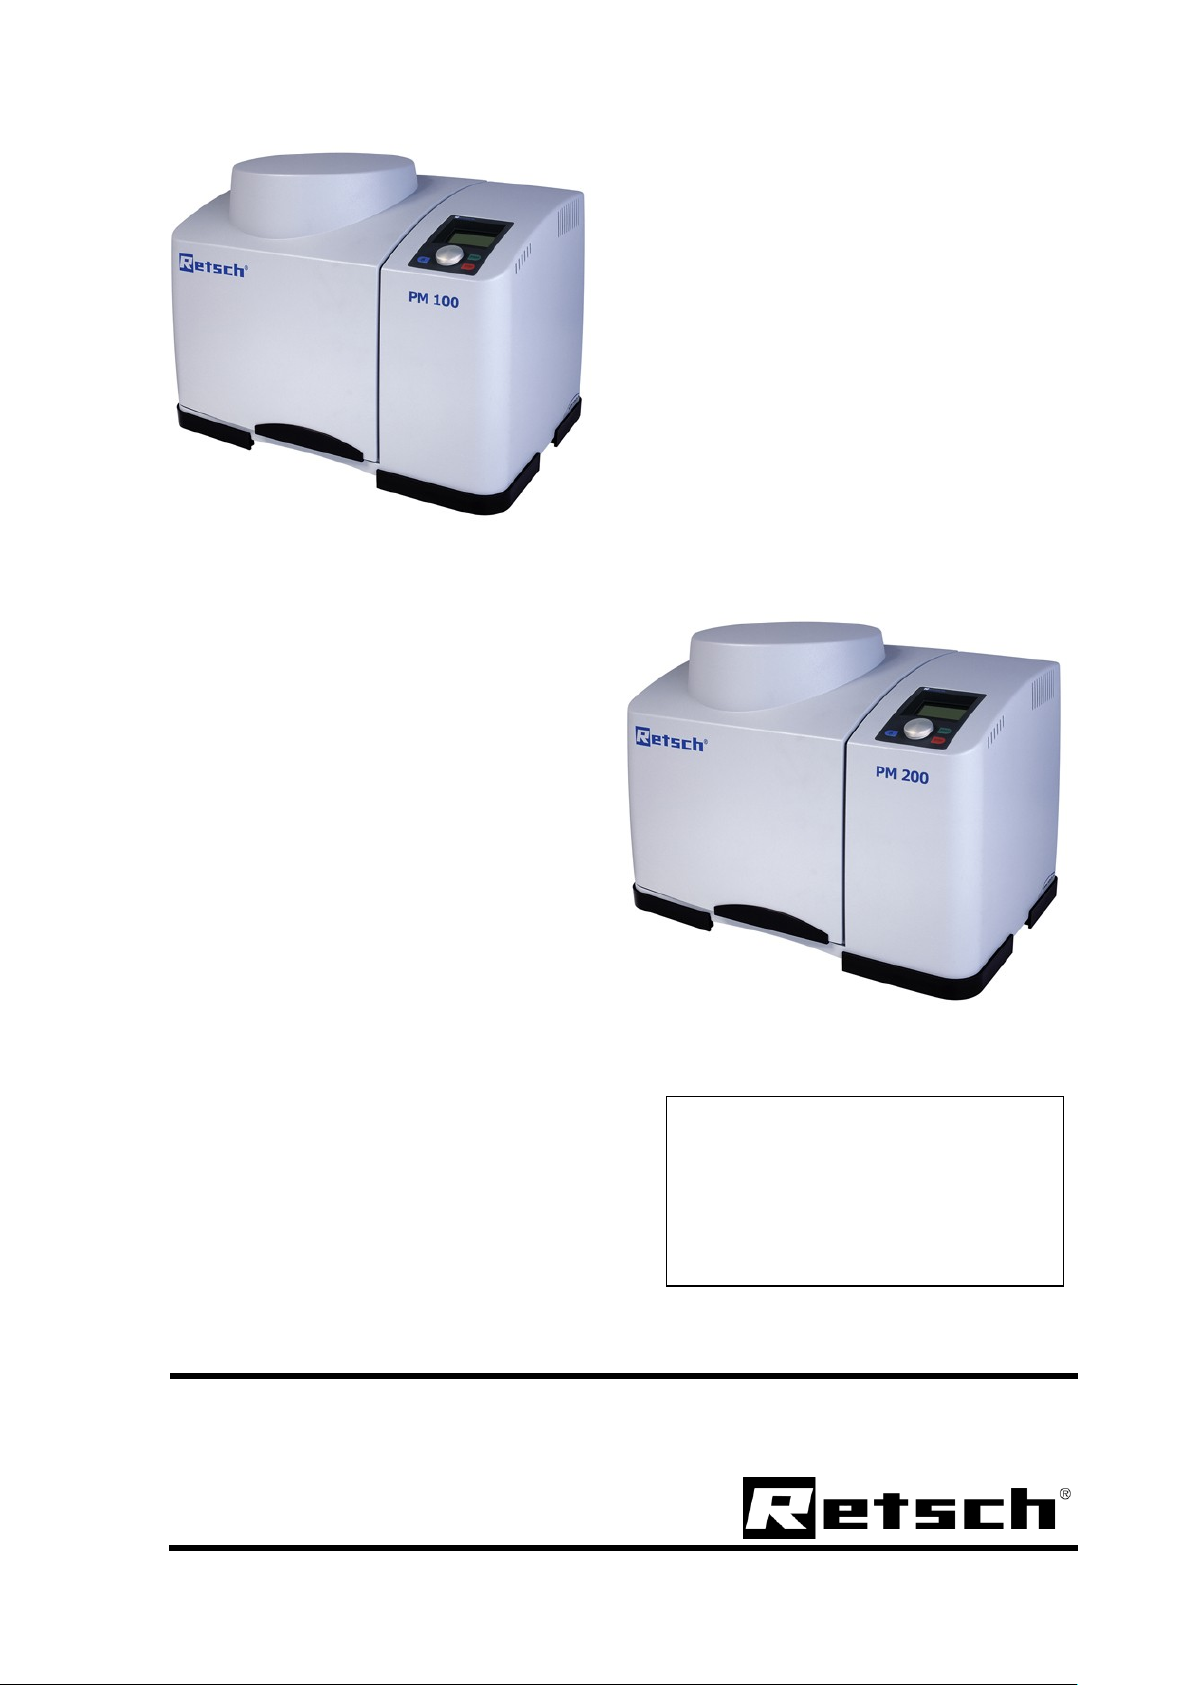
Operating Instructions Ball Mills
Type PM100 / PM200 / PM100cm
Retsch GmbH, 42781 Haan, Retsch-Alle 1-5, Germany, 10/31/2014 0006
Page 2

Information on these operating instructions .................................. 4
Warnings ..................................................................................... 4
Repairs ........................................................................................ 4
Safety .................................................................................................. 5
Safety instructions ....................................................................... 5
Safety directives summarised, part 2 .......................................... 7
Confirmation ...................................................................................... 8
Technical specifications ................................................................... 9
Intended use ............................................................................... 9
Maximum feed volume ................................................................ 9
Maximum feed grain size ............................................................ 9
Drive output ................................................................................. 9
Emissions .................................................................................... 9
Materials and analyses of the grinding tools ............................... 9
Protection systems ...................................................................... 9
Protective equipment .................................................................. 10
Operating mode .......................................................................... 10
Device dimensions ...................................................................... 10
Base area required ...................................................................... 10
Transport and assembly ................................................................... 11
Packaging ................................................................................... 11
Transport ..................................................................................... 11
Temperature fluctuations ............................................................ 11
Intermediate storage ................................................................... 11
Assembly ..................................................................................... 11
Requirements for the assembly site ............................................ 12
Electrical connection ................................................................... 12
Serial interfaces .......................................................................... 13
Operation ............................................................................................ 14
Connect the power ...................................................................... 14
Opening / closing / emergency unlocking of
the grinding chamber .................................................................. 14
Inserting and clamping grinding bowls in the PM100 .................. 16
Removing the grinding bowl fastening device in the PM100 ....... 17
Tightening and unscrewing the grinding bowl fastening
device using a counter spanner .................................................. 17
Safety Instructions for starting the PM 100 ................................. 18
Balancing – only required for the PM100 .................................... 20
Balancing – only for PM 100 with additional balance weight ....... 20
Inserting and clamping grinding bowls in the PM200 .................. 21
Tightening and loosening the grinding bowl clamping
fixture using the counter spanner ................................................ 21
Safety instructions for starting the PM 200 .................................. 22
Suitable grinding bowls for the PM100 ........................................ 23
Grinding bowl filling level ............................................................. 23
Guide values for material volumes and balls .............................. 23
Stacking of 50 ml milling cups of type “C” ................................... 23
Stacking of milling cups less than 50 ml ..................................... 23
Suitable grinding bowls for the PM200 ........................................ 24
Grinding bowl filling level ............................................................. 24
Guide values for material volumes and balls .............................. 24
Stacking 50ml grinding bowls of type "C" .................................... 24
Handling grinding bowls of type "C" ............................................ 24
Carrying and holding ................................................................... 24
Torsion lock ................................................................................. 24
Heating the grinding bowls .......................................................... 24
Grinding bowl identification ......................................................... 25
Customer marking of grinding bowls ........................................... 25
Cleaning the grinding bowls ........................................................ 25
Drying the grinding bowls ............................................................ 25
Tips for ultra-fine milling .............................................................. 25
Use of the closing device for milling cups ................................... 26
Operation via the PM100/200 display unit ................................... 27
Symbols in the display unit .......................................................... 27
Menu structure of the display unit ............................................... 28
Adjustment options via the display menu .................................... 29
Languages .................................................................................. 29
Incorrect language selection ....................................................... 29
Manual mode............................................................................... 29
Grinding program 01 .................................................................. 29
Grinding time ............................................................................... 29
Retsch GmbH 2
Page 3

Speed .......................................................................................... 29
Interval ........................................................................................ 30
Start time ..................................................................................... 31
Opening mechanism ................................................................... 31
Energy ......................................................................................... 31
Alarm ........................................................................................... 32
Service ........................................................................................ 32
Contrast / brightness ................................................................... 33
Date / Time .................................................................................. 33
Stand-by monitor ......................................................................... 33
Error messages on the display ......................................................... 34
F01 to F12 ................................................................................... 34
F13 to F26 ................................................................................... 35
General points .................................................................................... 36
Cleaning ...................................................................................... 36
Maintenance ................................................................................ 36
Parts subject to wear and tear..................................................... 37
Copyright ..................................................................................... 38
Changes ...................................................................................... 38
Appendix ..................................................................... following pages
Retsch GmbH 3
Page 4
Information on these operating
Personal injuries
Material damage
Your local Retsch representative
Your supplier
Retsch GmbH direct
instructions
The present operating instructions for the ball mills of type
PM100/200 provide all the necessary information on the
headings contained in the table of contents.
They act as a guide for the target group(s) of readers defined
for each topic for the safe use of the PM100/200 in accordance
with its intended purpose. Familiarity with the relevant
chapters on the part of each target group(s) of readers is
essential for the safe and proper use of the equipment.
The present technical documentation has been designed both
as a source of reference and as a learning tool. Each chapter is
a self-contained unit.
The operating instructions do not contain any repair
instructions. Should repairs ever become necessary, please
contact your supplier or talk directly to Retsch GmbH.
http://www.retsch.de
Warnings
The following signs are used to warn of hazards:
Repairs
These operating instructions do not contain any repair
instructions. In the interests of your own safety, repairs
should only be performed by Retsch GmbH, an authorised
representative or by Retsch service technicians.
In this case, please notify the following:
Your address for service:
Retsch GmbH 4
Page 5
Safety
We reject herewith any and all claims relating to personal injury or
material damage that result from the failure to comply with the
following safety instructions.
The PM100/200 is a modern, high-performance product
manufactured by Retsch GmbH. It incorporates the latest
technology. The machine is entirely safe in its operation
when used for the intended purpose and in accordance with
the present technical documentation.
Safety instructions
You, as the owner/operator, must ensure that the persons
who are entrusted to work on the PM100/200:
have read and understood all the regulations contained in
the chapter on safety,
have made themselves familiar, before starting work, with
all the operating instructions and regulations relevant to
that particular target group,
have unrestricted access to the technical documentation for
this machine at all times,
new personnel must have familiarised themselves with the
safe use of the PM100/200 and its intended purpose before
starting work with the machine, either through verbal
instruction by a competent person and / or with the help of
the present technical documentation.
Incorrect operation can result in injuries to persons and
damage to property. You bear the responsibility for your
own safety and that of your staff.
Ensure that no unauthorised persons have access to the
PM100/200.
As a precaution, have your staff certify in writing that they
have received instruction in the operation of the ZM200. A
draft for such a form can be found at the end of the chapter
on safety.
Retsch GmbH 5
Page 6
Safety directives summarised, part 1
We reject herewith any and all claims relating to personal injury or material damage that result from the
failure to comply with the following safety instructions.
Do not make any modifications to the machine and only use Retsch approved spares and accessories.
The conformity to the European guidelines declared by Retsch otherwise loses its validity.
It furthermore leads to the loss of all warranty claims.
Please retain the packaging for the duration of the warranty since, in case of complaint, returning in unsuitable packaging
can jeopardize your warranty claims.
During transportation, do not subject the PM100/PM200 to impacts, jolts or vibrations. The electronic and mechanical
components could otherwise be damaged.
In case of wide temperature fluctuations (during shipment by air, for instance), protect the PM100/PM200 from condensation. The electronic components could otherwise be damaged.
If the shipment is incomplete and / or has suffered transport damage, you must notify the forwarder and Retsch GmbH
immediately (within 24 hours). Under certain circumstances, claims lodged at a later date may not be considered valid.
When the ambient temperature exceeds or falls below that specified, the electronic and mechanical components may be
damaged, and performance data changed to an unknown extent.
At a higher air humidity, electronic and mechanical components may be damaged, and performance data changed to an
unknown extent.
Failure to observe the values on the data plate can cause damage to electronic and mechanical components.
Only use grinding bowls of type "C".
This, in conjunction with the grinding bowl fixture, is a safety component.
Working with old or third-party grinding bowls in the PM100/PM200 risks unforeseeable hazards.
Never allow threaded spindle 3 to lie loose in the grinding bowl fixture without the grinding bowls clamped in.
Danger of being hurled out!
Always ensure that the red sleeve has latched in properly. Otherwise the grinding bowl is not securely clamped.
Danger of being hurled out!
Only use grinding bowl of the type "C".
This, in conjunction with the grinding bowl fixture, is a safety component.
Working with old or third-party grinding bowls in the PM100/PM200 risks unforeseeable hazards.
Never allow threaded spindle 4 to lie loose in the grinding bowl fixture without the grinding bowls clamped in.
Danger of being hurled out!
Always ensure that the red sleeve has latched in properly. Otherwise the grinding bowl is not securely clamped.
Danger of being hurled out!
Only use grinding bowls of type "C" and only up to a nominal volume of 125ml
The PM200 will otherwise be overloaded and mechanical components could be damaged!
Only ever use 2 grinding bowls with the same gross weight.
Otherwise the PM200 generates unpleasant vibrations!
Safety instructions
Intended use
Packaging
Transport
Temperature fluctuations
Scope of supply
Ambient temperature :
Air humidity :
Electrical connection / Connecting the power
Inserting and clamping grinding bowls in the PM100
Inserting and clamping grinding bowls in the PM200
Retsch GmbH 6
Page 7
Safety directives summarised, part 2
If the filling level of the grinding bowl is too high or too low, the end result will be impaired and the milling set could become
damaged (increased wear and tear).
It is not possible to stack 50ml grinding bowls in the PM200.
Please take the action necessary - depending on how dangerous the material you are grinding is - to ensure that people are
not exposed to danger.
It is essential to wear protective gloves when removing and opening heated grinding bowls.
Danger of burning hands.
Do not expose grinding bowls with ceramic inserts to temperature fluctuations during rinsing.
The ceramic inserts can crack if subject to sudden changes of temperature.
Before deploying easily inflammable materials as milling aids, compile explosion protection documentation in
accordance with articles 118 and 118a of EC directive 89/391/EEC
Make certain that the grinding bowls have been securely clamped and balanced before letting the machine start unattended.
Even though it is not possible to start the machine without the cover closed, ensure that the cover is closed before letting
the machine start unattended.
Do not clean the PM100/200 with flowing water.
Mortal danger from electric shock
Only use a cloth dampened with water.
Solvents are not permitted.
The easy running of the threaded spindle and the locking sleeve is essential for secure clamping of the grinding bowl
Locking sleeves which do not move downwards solely by spring power cannot properly prevent the threaded spindle from
working loose. The grinding bowls could be hurled out.
The easy running of roller 1 on the locking block is essential for secure closing of the PM100/200 via the automatic closure
mechanism.
If the values D1 and H1 are undershot, operational safety is no longer assured.
The grinding bowls could be hurled out.
The operating instructions do not contain any repair instructions. In the interests of your own safety, repairs should only be
performed by Retsch GmbH, an authorised representative or by Retsch service technicians.
Grinding bowl filling level
Stacking 50ml grinding bowls of type "C"
Heating the grinding bowls
Cleaning the grinding bowls
Wet grinding with easily inflammable materials
Start time
Cleaning
Maintenance
Parts subject to wear and tear
Retsch GmbH 7
Page 8

Confirmation
I have read and understood the
chapters Foreword and Safety.
__________________________________
Signature of operator/owner
__________________________________
Signature of service technician
Retsch GmbH 8
Page 9

Technical specifications
Do not make any modifications to the machine and only use
Retsch approved spares and accessories.
The conformity to the European guidelines declared by
Retsch will otherwise lose its validity.
It will furthermore lead to the loss of all warranty claims.
Machine type designation: PM100/PM200
Intended use
Retsch ball mills are used to grind and mix materials that are soft,
medium hard to extremely hard, brittle or fibrous. Dry and wet
grinding is possible, grinding with solvents is permissible, although
in this case it is essential to observe the supplementary instructions
given in the chapter "Wet grinding with easily inflammable
materials". Minerals, ores, alloys, chemicals, glass, ceramics,
vegetable matter, soil, slurry, domestic and industrial waste
and many other substances can be comminuted simply, quickly
and without loss. The ball mills are successfully deployed in
virtually all fields of industry and research, particularly where
there are high requirements on cleanliness, speed, fineness and
reproducibility.
Only type "C" grinding bowls may be used.
In the PM100 1x of 50-500ml, 2x50ml, 2x25ml and 2x12ml can be
stacked.
In the PM200 the 12ml and 25ml grinding bowls can be stacked but
the 50ml and 125ml are not stackable.
They are not designed as production machines, but rather as
laboratory devices intended for single-shift, 8-hour operation.
Maximum feed volume
PM100 = up to 300ml, depending on the grinding bowl volume.
PM200 = up to 2x50ml, depending on the grinding bowl volume.
Maximum feed grain size
PM100 up to <10 mm, but dependent on the material
PM200 up to <4 mm, but dependent on the material
Drive output
750 W / power draw approx. 1250 W
Emissions
Noise levels PM100:
Noise measured in accordance with DIN 45635-31-01-KL3
The noise levels are basically influenced by the speed of the
machine, the size of the grinding bowl and the diameter of
the grinding balls used.
Workplace related emission value L
Noise levels PM200:
Noise measured in accordance with DIN 45635-31-01-KL3
The noise levels are basically influenced by the speed of the
machine, the size of the grinding bowl and the diameter of
the grinding balls used.
Workplace related emission value L
= up to 85 dB(A)
pAeq
= up to 80 dB(A)
pAeq
Materials and analyses of the grinding tools
See :
www.retsch.de/english/docs/grinding_tools.pdf
Protection systems
IP20
Retsch GmbH 9
Page 10

Protective equipment
The PM100 and PM200 are equipped with fixtures to automatically
close the cover. This prevents the devices being started in an
unsafe state.
The machines cannot be started unless the cover is closed.
It is only possible to open the cover when the machines are at
standstill.
Operating mode
S1
An operating mode with constant loading, the duration of which
suffices to reach the state of thermal rigidity. (DIN VDE 0530 T1)
Device dimensions
Height: Up to approx. 835 mm / Width: 630 mm / Depth : Up to
approx. 505 mm
Weight : PM100 net approx. 86 kg / PM200 net approx. 80 kg
Base area required
630 mm x 505 mm;
A safe distance of 200mm is required at the rear to allow the fan
to fulfil its function.
Retsch GmbH 10
Page 11
Transport and assembly
Please retain the packaging for the duration of the
warranty since, in case of complaint, returning in
unsuitable packaging can jeopardize your warranty
claims.
During transportation, do not subject the PM100/PM200
to impacts, jolts or vibrations. The electronic and
mechanical components could otherwise be damaged.
In case of wide temperature fluctuations (during
shipment by air, for instance), protect the
PM100/PM200 from condensation. The electronic
components could otherwise be damaged.
Packaging
The packaging has been adapted to the mode of transport.
It corresponds to the generally applicable packaging
guidelines.
Transport
Temperature fluctuations
Intermediate storage
Likewise for intermediate storage, ensure that the
PM100/PM200 are stored in a dry place.
Assembly
If the device is transported with a forklifter or lift truck, it must
be placed on the transport pallet.
4 people are required to carry the device.
Only place the PM100 or PM200 on a stable laboratory bench, as
they might otherwise be subjected to disagreeable vibrations.
The table base must be clean and skid-resistant.
The net weight of the PM100 is approx. 86 kg
The net weight of the PM200 is approx. 80 kg
Retsch GmbH 11
Page 12
Requirements for the assembly site
When the ambient temperature exceeds or falls below that
specified, the electronic and mechanical components may be
damaged, and performance data changed to an unknown
extent.
At a higher air humidity, electronic and mechanical
components may be damaged, and performance data
changed to an unknown extent.
Failure to observe the values on the data plate can cause
damage to electronic and mechanical components.
Ambient temperature :
5°C to 40°C
Air humidity :
Maximum relative humidity 80% at temperatures up to 31°C,
declining in linear manner down to 50% relative humidity at 40°C
Assembly height :
Max. 2000 m above sea level
Electrical connection
The voltage and frequency for the PM100 or PM200 are
shown on the data plate.
Ensure that these values agree with the mains power
supply.
Connect the PM100 or PM200 to the mains power supply
with the power cable supplied.
When connecting the power cable to the mains supply, use
an external fuse which complies with the regulations
applicable to the assembly site.
Important notes :
1. Electrical connections must use PE conductors !
2. A frequency converter is fitted to the drive unit of your PM100 /
PM200. In order to fulfil the EMV directive, this is equipped with a
mains filter and screened cables to the motor. If your mains power
installation for the PM100 / PM200 contains a residual-current
protective device, then when the frequency converter switched on
(switched on each time the grinding chamber hood is closed), its
interference suppression circuit can cause spurious tripping of the
residual-current protective device, without this being due to a
defect in your PM100 / PM200 or mains power supply.
The state-of-the-art recommends selective, all-current sensitive
residual-current protective devices in such cases. The trip current
needs to be sufficiently dimensioned because short-lived, capacitive
transient currents generated at switch on (screened cables, mains
filter) can easily cause spurious tripping.
Under certain conditions, it may be necessary to operate the PM100
/ PM200 without a residual-current protective device. It must
nevertheless then first be ensured that this does not contradict the
regulations of the local electricity supply utility, or those of other
institutions or applicable standards.
Retsch GmbH 12
Page 13
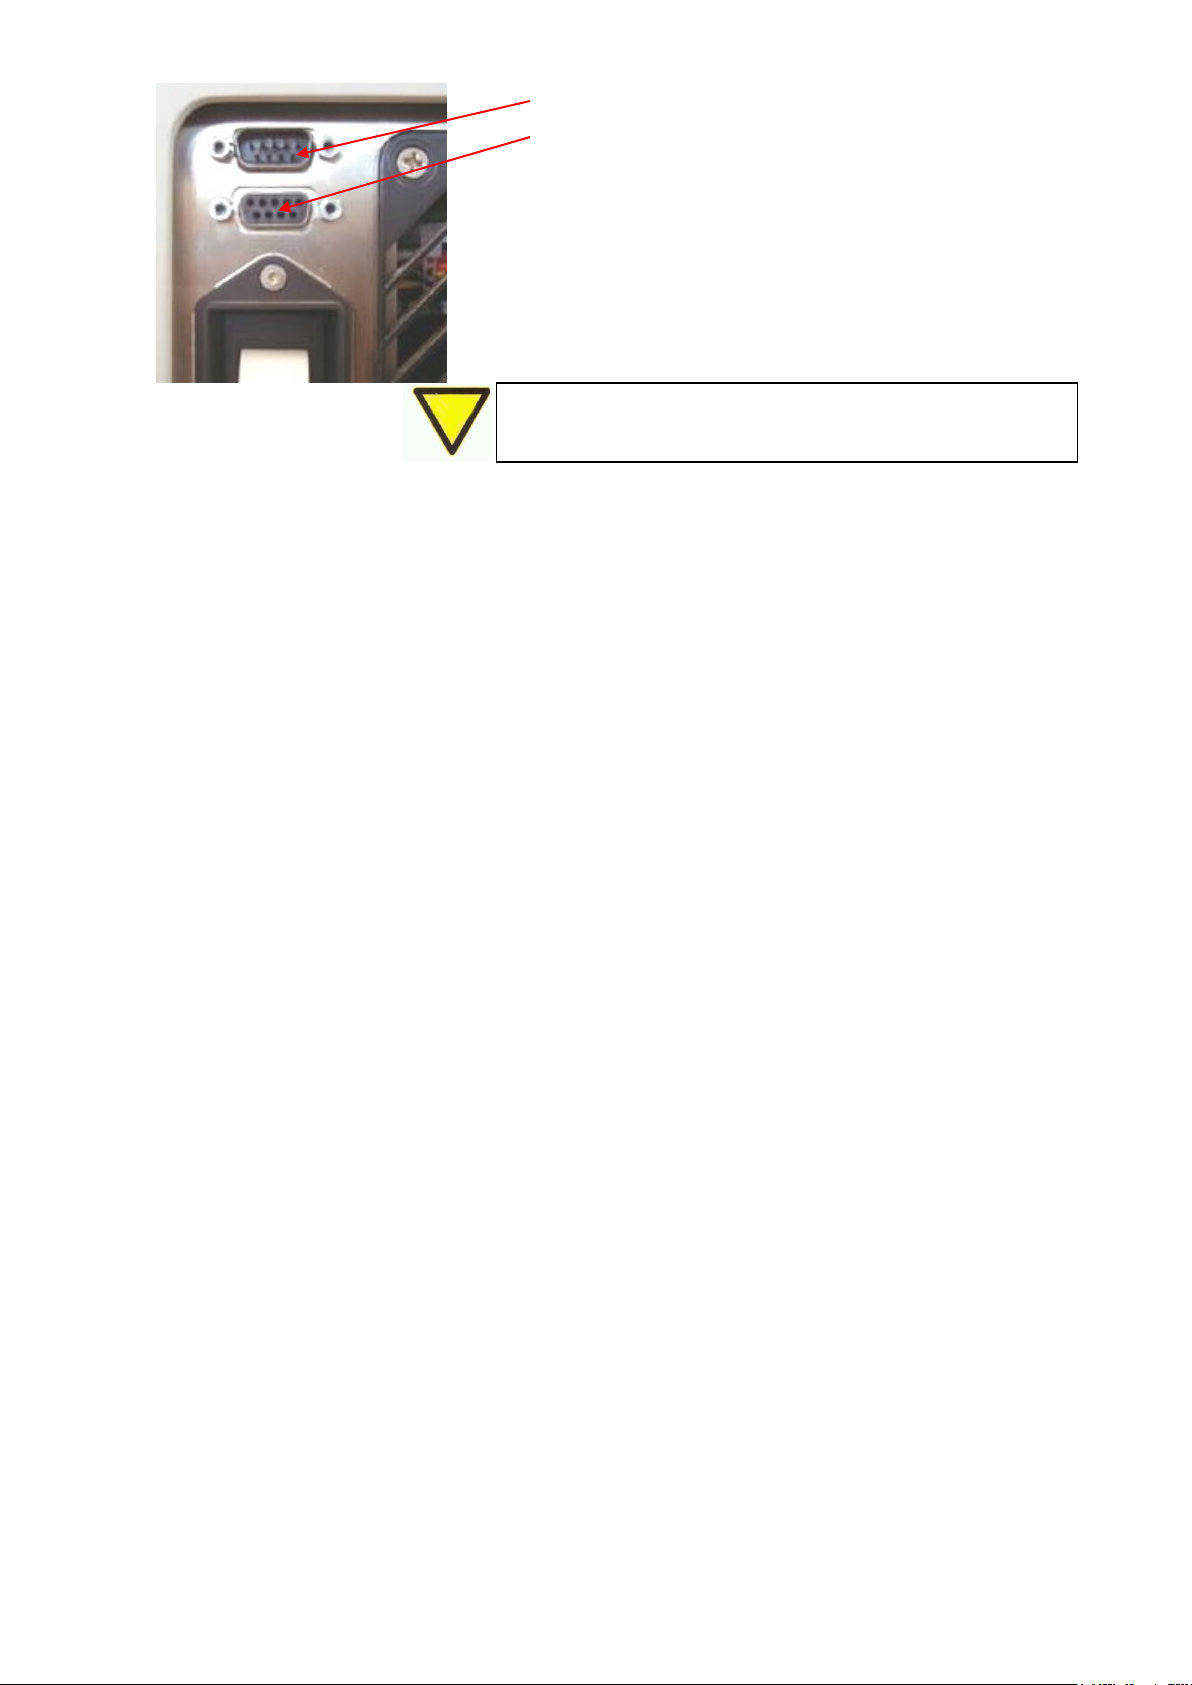
Serial interfaces
Interface to update the software
Inactive interface for optional data communication
with an external device. Software update required.
The interface cables may not be longer than 2.5 m.
Longer cables can cause faults in the transmission of data.
Retsch GmbH 13
Page 14

Operation
Ensure that the voltage and frequency of your mains power
supply agree with the data plate of the PM100 or PM200.
Plug the power cable into the socket at the rear of the
device
Plug the cable into the mains power socket
Turn the main switch on
Failure to observe the values on the data plate can cause
damage to electronic and mechanical components.
A E D
Opening
The following are necessary before the grinding bowl(s) can
be inserted and clamped.
Plug the PM100/200 into the mains power supply
Switch on the main switch at the rear
Press button A -
The safety lock opens and cover D can be folded back. The
grinding chamber is now freely accessible.
Closing
The grinding chamber cannot be closed unless the PM100 or
PM200 is connected to the mains power supply and the main
switch at the rear of the device is switched on.
Close the housing cover
A sensor recognises the locking block on the housing cover
and the motorised cover closure is switched on.
The housing cover is locked automatically
The PM100/PM200/PM100CM may be operated only if the housing
cover is free of any damage.
If the housing cover is damaged mechanically, it must be
replaced for safety reasons.
Never actuate the emergency unlocking feature whilst the machine is
running, only do so with the machine at standstill and the mains
power disconnected.
Considerable danger of injuries from a long drive run-on time
without braking.
Connect the power
The language menu is displayed the first time the
PM100/200 is switched on.
The language required can be selected here by turning
operating button E. The selection is confirmed by pressing it
and the display shows "Open cover".
Opening / closing / emergency unlocking of the grinding chamber
Retsch GmbH 14
Page 15

S
Emergency unlocking
A key is fixed underneath the unit. This can be used to open
the PM100 or PM200 manually in case of a power failure.
Lift the unit
Remove key S
(I) Insert the (S) key into the (O) opening on the
right-hand side.
(II) To unlock the gear, the key must be pushed in
further with some degree of force. While pushing the
key in, turn it in a clockwise direction as far as it will
go.
The cover can now be opened.
S S O
O
S
Retsch GmbH 15
Page 16

Inserting and clamping grinding bowls in the PM100
Before starting the machine ensure that the milling cup
is clamped.
Milling cup can be ejected, danger of injury and damage to
equipment.
Wear of safety slider
In case of wear at the screws and/or slits as well as an
substantially increased play of the safety slider, it should be
replaced. (See chapter on wearing parts)
3 4 5 1 2
6
Retsch GmbH 16
Page 17

5 Up = free 5 Down = locked
Clean the grinding bowl disk with torsion lock pin 1
Turn the label on the grinding bowl 2 to the same side as
the torsion lock pin, the borehole in the grinding bowl is
located here.
Insert the grinding bowl into the grinding bowl fixture
Pay attention to the torsion lock in 250 and 500 ml grinding
bowls. The borehole in the base of the grinding bowl to take
up the torsion lock pin is located on the side of the marking
areas.
Insert grinding bowl clamping arrangement 3 into latching
brackets 4
Pull red sleeve 5 upwards and clamp the grinding bowl by
turning the three-point grip to the right
Let red sleeve 5 latch audibly downwards, if necessary,
retighten gently from the three-point grip
The three-point grip should now not be able to be turned
Should the red locking sleeve not move completely
downwards when released (audible clacking), briefly retighten
from the three-point grip.
The red locking sleeve, which is now in the locked position,
prevents the threaded spindle from working loose.
Removing the grinding bowl fastening device in the PM100
Pull the red sleeve 5 upwards and unscrew the
grinding bowl by turning the three star grip to the
left.
Continue to turn the three star grip to the left until
the grinding bowl fastening device can be removed.
Using a counter spanner prevents the drive from turning, which can otherwise easily occur when
tightening or loosening the grinding bowl.
Retsch GmbH 17
Tightening and unscrewing the grinding bowl
fastening device using a counter spanner
Page 18

Insert the counter spanner 6
under the red sleeve 5. The
spindle is now unlocked.
Turn the three star grip to the right (clockwise) for
tightening and to the left (anticlockwise) for
loosening. The drive now turns only until a latched
bracket 4 is in contact with the counter spanner 6.
Easy tightening or loosening is then possible.
For the PM200 the counter spanner 6 must be turned
180° and inserted when the grinding bowl fastening
device is in the highest lock-in position.
Only use type "C" grinding bowls.
This, in conjunction with the grinding bowl fixture, is a safety
component.
Unforeseen risks may arise if third-party or old grinding
bowls are used in the PM100.
Never allow grinding bowl clamping arrangement 3 to lie
loose in the grinding bowl fixture without the grinding bowls
being clamped in.
Danger of being hurled out!
Especially in cases of lengthy grinding periods, check at the
intervals in the following schedule that the grinding bowl is
sitting securely:
after 3 mins, after 1h, after 5h and then every 10-12h. A
gripping force of 10Nm is the optimum for the grinding bowl
clamping fixture.
Risk of being hurled out!
6 4 6
Safety Instructions for starting the PM 100
The grinding bowl clamping fixture has proven its worth over many years as an easy-to-manage and
reliable appliance. A precondition here both for the operator’s safety and also to ensure that the
components have a long service life is that the grinding bowl must be clamped conscientiously.
Please bear in mind that the PM 100/200 is a grinder that inputs a very high level of energy into the
material being ground and the grinding bowl must therefore be clamped conscientiously.
To avoid operating errors, the correct grinding bowl clamping is queried each time before the
machine starts.
Personnel who are particularly well trained and very familiar with how the PM is operated may hide
this safety instruction permanently. However, we particularly advise against this if the operating
personnel vary!
The software for the PM 100/200 is set up in such a way that each time before the machine starts
up, when the starting button is activated, it is necessary to confirm in the following display that the
grinding bowl has been clamped.
Retsch GmbH 18
Page 19

Make sure the grinding bowl is clamped before you start the
machine.
The grinding bowl can be hurled out, risk of injury and
damage to property!
Our recommendation is that you do not hide the safety instruction.
Yes
GRINDING BOWL CLAMPED?
NO
The grinding process starts after this confirmation.
This safety instruction can be hidden in the “settings” menu.
Retsch GmbH 19
Page 20

Balancing – only required for the PM100
K
S
In order to ensure that the machine runs smoothly, the
PM100 must be balanced after the grinding bowl has been
inserted and clamped in.
Weight the grinding bowl with cover, ball filling and
the material to be ground
Move the balancing weight using the knob until edge
K on scale S shows the determined weight.
Caution:
When using the following grinding bowls with safety locking
device an additional balance weight of 1 kg is necessary.
Combination 1:
- 250 ml grinding bowl of tungsten carbide
01.462.0222
- Safety locking device 22.867.0004
- Grinding bowl lid for gassing 22.107.0006
Combination 2:
- 500 ml grinding bowl of zirconium oxide 01.462.0227
- Safety locking device 22.867.0005
When the additional balance weight is used please note that
the scale no longer shows the correct weight.
(See below)
Order number for additional weight: 22.221.0002
Additional balance weight 1kg
Balancing – only for PM 100 with additional balance weight
In order to fix the additional weight both protective caps on the
top side of the counterweight must be removed.
Screw the additional weight onto the counterweight with the
two cheese-head screws. Tightening torque for the cheesehead screws = 20 Nm.
After mounting the additional weight the extra weight of 1.0 kg
must be taken into account when reading the scale.
Example:
If the grinding bowl weighs 8.2 kg the counterweight must be
set to a scale reading of 7.2 kg.
Note:
When using light (small) grinding bowls the additional weight
must be removed again.
Retsch GmbH 20
Page 21

Inserting and clamping grinding bowls in the PM200
1 2 3 4
5 Up = free 5 Down = locked
Only operate the PM200 with grinding bowls up to a
maximum nominal volume of 125ml. In order to avoid
unpleasant vibrations, 2 grinding bowls with the same gross
weight must always be inserted.
Clean grinding bowl disk 1
Insert grinding bowl 2 into the grinding bowl fixture
Insert threaded spindle 4 with pressure piece into the
latching brackets 3
Pull red sleeve 5 upwards and clamp the grinding bowl by
turning the three-point grip to the right
Let red sleeve 5 latch audibly downwards, if necessary,
retighten gently
It should now be impossible to turn the three-point grip.
Should the red locking sleeve not move completely
downwards when released (audible clacking), briefly retighten
threaded spindle 4.
The red locking sleeve, which is now in the locked position,
prevents the threaded spindle becoming loose.
Push the counter spanner 6
under the red sleeve 5, the
spindle is now released
To clamp, pull the three-point grip to the right
(clockwise direction) and to loosen, pull to the left
(anticlockwise). The drive now turns only as far as till
a latching bracket 4 rests against the counter spanner
6. Easy tightening or loosening is then possible.
For the PM200 the counter spanner 6 must be turned
180° and inserted when the grinding bowl fastening
device is in the highest lock-in position.
6 4 6
Tightening and loosening the grinding bowl clamping fixture using the counter spanner
The counter spanner prevents the drive turning while the grinding bowl clamping fixture is being
tightened or loosened!
Retsch GmbH 21
Page 22

Safety instructions for starting the PM 200
Make sure the grinding bowl is clamped before you start the
machine.
The grinding bowl can be hurled out, risk of injury and
damage to property!
Our recommendation is that you do not hide the safety
instruction.
Only use “C” type grinding bowls.
This, in conjunction with the grinding bowl fixture, is a safety
component.
Unforeseen risks may arise if third-party or old grinding
bowls are used in the PM200.
Never allow threaded spindle 4 to lie loose in the grinding
bowl fixture without the grinding bowls clamped in.
Danger of being hurled out!
Only use grinding bowls of type "C" and only up to a nominal
volume of 125ml
The PM200 will otherwise be overloaded and
mechanical components could be damaged!
YES
GRINDING BOWL CLAMPED ?
NO
The grinding bowl clamping fixture has proven its worth over many years as an easy-to-manage and
reliable appliance. A precondition here both for the operator’s safety and also to ensure that the
components have a long service life is that the grinding bowl must be clamped conscientiously.
Please bear in mind that the PM 100/200 is a grinder that inputs a very high level of energy into the
material being ground and the grinding bowl must therefore be clamped conscientiously.
To avoid operating errors, the correct grinding bowl clamping is queried each time before the
machine starts.
Personnel who are particularly well trained and very familiar with how the PM is operated may hide
this safety instruction permanently. However, we particularly advise against this if the operating
personnel vary!
The software for the PM 100/200 is set up in such a way that each time before the machine starts
up, when the starting button is activated, it is necessary to confirm in the following display that the
grinding bowl has been clamped.
The grinding process starts after this confirmation.
This safety instruction can be hidden in the “settings” menu.
Retsch GmbH 22
Page 23

Suitable grinding bowls for the PM100
The PM100 is only suitable for grinding bowls of the type
"Comfort" with a nominal volume of 12-500 ml.
They are available in the following materials:
Agate
Sintered corundum
Zirconium oxide
Stainless steel
Special steel
Tungsten carbide
The "Comfort" grinding bowl program was developed
especially for extreme test conditions, such as long-term
trials, high mechanical loadings, maximum speeds and for
mechanical alloying.
Nominal
volume
Utility
volume
Max. feed
grain size
Recommended ball filling
10mm
20mm
30mm
40mm
12 ml
- 5 ml
1 mm
5 pieces
- - -
25 ml
- 10 ml
1 mm
8 pieces
- - -
50 ml
5 – 20 ml
3 mm
10 pieces
3 pieces
- - 80 ml
10 – 35 ml
4 mm
25 pieces
5 pieces
- - 125 ml
15 – 50 ml
4 mm
30 pieces
7 pieces
- - 250 ml
25 – 120 ml
6 mm
50 pieces
15 pieces
6 pieces
-
500 ml
75 – 220 ml
10 mm
100 pieces
25 pieces
8 pieces
4 pieces
If the filling level of the grinding bowl is too high or too low,
the end result will be impaired and the milling set could
become damaged (increased wear and tear).
It is possible to stack two 50 ml milling cups one on top of the
other. For stacking an adapter is required, which is available as
an accessory.
Stacking procedure
Place milling cup M1 in the milling cup plate
Place the adapter A1 on the lid of M1
Place milling cup M2 in position
Clamp the milling cups as described in the section “Clamping the
milling cups”.
Stacking of milling cups less than 50 ml
It is also possible to stack milling cups with a capacity of less
than 50 ml one on top of the other.
Stacking procedure
Place milling cup M2 on milling cup M1
Clamp milling cups as described in the section “Clamping the
milling cups”.
M2
M1
A1
M2
M1
Grinding bowl filling level
Guide values for material volumes and balls
Stacking of 50 ml milling cups of type “C”
Retsch GmbH 23
Page 24

Suitable grinding bowls for the PM200
The PM200 is only suitable for grinding bowls of type
"Comfort" with a nominal volume of 50-125 ml.
Nominal
volume
Utility
volume
Max. feed
grain size
Recommended ball filling
10mm
20mm
30mm
40mm
12 ml
- 5 ml
1 mm
5 pieces
- - -
25 ml
- 10 ml
1 mm
8 pieces
- - -
50 ml
5 – 20 ml
3 mm
10 pieces
3 pieces
- - 80 ml
10 – 35 ml
4 mm
25 pieces
5 pieces
- - 125 ml
15 – 50 ml
4 mm
30 pieces
7 pieces
-
-
If the filling level of the grinding bowl is too high or too low,
the end result will be impaired and the milling set could
become damaged (increased wear and tear).
It is not possible to stack 50ml grinding bowls in the PM200.
X
H
Carrying and holding
The gripping edges X on the grinding bowl itself and its
cover provide secure handling.
Torsion lock
All 250 and 500ml grinding bowls of type "C" also have a
torsion lock borehole to the steel shell in the bottom of the
grinding bowl. This is only deployed in the PM100 and is
located on the labelled side of the grinding bowl shell.
Heating the grinding bowls
Depending on the grinding time and the filling level, the
grinding bowl can be heated up to 150°C during
comminution.
When the fixture is undone, the pressure which builds up in
the bowl during grinding escapes, and can also take
powered ground material with it.
When the grinding bowls are put to one side to cool, a
vacuum develops inside the bowl, which can make it difficult
to open. Grinding bowls of type "C" can therefore be levered
open by inserting a wooden bar H, for example, between
the gripping edges of the cover and the bowl.
Please take the action necessary - depending on how
dangerous the material you are grinding is - to ensure that
people are not exposed to danger.
It is essential to wear protective gloves when removing and
opening heated grinding bowls.
Danger of burning hands.
Grinding bowl filling level
Guide values for material volumes and balls
Stacking 50ml grinding bowls of type "C"
Handling grinding bowls of type "C"
Retsch GmbH 24
Page 25

Grinding bowl identification
All grinding bowls of type "C" are easily identified by a
marking area SCH1, including the article No. and material.
Customer marking of grinding bowls
In addition to the aforesaid marking area, you can affix one
of the labels supplied (or available as accessories) to an
area SCH2 on the grinding bowl; this makes it possible to
apply extra markings, such as grinding bowl capacity etc.
The label is heat-resistant up to 150°C and the markings
you apply can be removed using alcohol, benzene or
acetone, for example.
Cleaning the grinding bowls
To clean the grinding bowls, the O-ring can be easily levered
out of groove Z on the underside of the cover.
Grinding bowls, including those with adhered ceramic
inserts, can be cleaned with alcohol, benzene or with normal
household washing-up liquid.
Do not expose grinding bowls with ceramic inserts to
temperature fluctuations during rinsing.
The ceramic inserts can crack if subject to sudden
changes of temperature.
Drying the grinding bowls
Grinding bowls can be dried at any time after cleaning in the
drying cabinet at the temperature indicated below.
Grinding bowl material
Temperature
Special steel
Up to 200°C
Stainless steel
Up to 200°C
Tungsten carbide
Up to 150°C
Sintered corundum
Up to 120°C
Agate
Up to 120°C
Zirconium oxide
Up to 120°C
Silicon nitride
Up to 120°C
Tips for ultra-fine milling
In many cases high finenesses can be achieved only by wet
milling.
In dry milling processes an improved fineness of milling can be
achieved by the addition of a few drops of stearic or acetic acid,
and use of milling balls with a diameter < 10 mm and a filling
level of 70-80% of the milling cup volume.
Retsch GmbH 25
Page 26

Use of the closing device for milling cups
For wet milling in milling cups with material inserts do
not use old closing devices which clamp only the
gripping edges of the milling cups. The material inserts
can be pressed out by possible internal pressure.
After filling the milling cups these must be closed with
closing devices available as accessories.
For milling cups with material inserts, ceramics or
tungsten carbide use only closing devices which support
the material insert of the milling cup lid. This is
absolutely essential owing to the anticipated internal
pressure.
Use of agate milling cups for wet milling with solvents
should be particularly carefully considered owing to the
internal pressures produced and the non-homogeneous
material properties of this natural product.
Tighten the clamping screws of the closing device with
a torque of 2.5 Nm. Internal pressures of up to max. 5
bar are permissible only with this preliminary tension.
NOTE
Damage to the grinding chamber cover and to the
device
The three screws on the safety clamp on the aeration
cover can become loose and damage the inside of the
device.
After tightening the clamping mechanism, check if the
three screws on the safety clamp are still tight.
Please note that the milling cups can easily be heated
to above 100°C, depending on the milling cup size, ball
filling, speed and milling time.
The PM400 is fitted with a ventilator which sucks the
waste heat produced during milling directly out of the
milling chamber.The suction volume per hour is greater
than 20 times the milling chamber volume. The
ventilator has a standstill monitor with signalling.
If necessary the air stream of the ventilator should be
carried off into a duct during milling.
Check firm fitting of the closing device before removing
the milling cups.
Remove the milling cups only with closing device and
open only in a safe position (extraction unit) after
cooling.
Retsch GmbH 26
Page 27

Operation via the PM100/200 display unit
The mills offer new, very userfriendly operating functions. All
relevant data can be entered or
called up from a graphic display
operated with a single button.
The menu is multi-lingual.
D E
A
B
C
Designation
Function
A
Display
Displays the menu, the parameter settings, operating information and error
messages.
B
START key
Starts the grinding process
C
STOP key
Stops the grinding process
D
Key
Opens the grinding chamber hood
E
Setting button
All menu items can be selected and parameters adjusted by turning and
pressing this button.
Turn 1
The different menu items can be selected by turning.
Selected menu items are shown inversely.
Turn 2
Adjust parameters in opened menu items (see Press 1)
Press 1
Selected menu items are opened
Press 2
A short press confirms the adjustment of the parameters
Press 3
Return to the 1st level menu by continuously pressing the button.
°C
°C
Symbols in the display unit
Reverse rotation switched on
Program mode – Store parameters
Program mode – Edit program
Program mode – Delete program
Opening mechanism off
Alarm off
Retsch GmbH 27
Motor or frequency converter too hot
Page 28

Menu structure of the display unit
1. Level
2. Level 3. Level 4. Level 5. Level
1 MANUAL OPERATION
GRINDING PROGRAM 01 bis 09
2 TIME
3 SPEED
4
INTERVAL
REVERSE ROTATION
YES / NO
INTERVAL BREAK 00:00
5
PROGAM MODE
STORE PARAMETERS
EDIT PROGRAM
DELETE PROGRAM
6 SET START TIME START IN XXX h
7 MENU SETTINGS
OPENING MECHANISM
YES / NO
ENERGY
DETERMINE
IDLING NERGY
INSERT JAR
START=MACHINE START
STOP=CANCEL
PREPARE JAR
BALANCED ?
CLOSE COVER
PRESS START TO CONTINUE
ENERGY INPUT
MEASURE
SET
ALARM
SERVICE SERVICE HELP
DETAILS IN MANUAL
CLEAN SREW
CHECK RUBBER DISK
UNDER
CLAMPING SYSTEM
CHECK CLOAMPING ARMS
AND FASTENING BRACKET
FOR WEAR AND TEAR
CLEAN LUBRICATE
LOCK WHEEL
SERVICE INTERVAL
SET SERVICE INTERVAL
SET TIME xx h
REMANING TIMET xx h
TOTAL OPERATION HOURS
TOTAL GRINDING TIME:: xxx h
SOFTWARE VERSION
SOFTWARE VERSION: V 1.03
SOFTWAREUPDATE? YES/NO
BACK
BACK
DISPLAY CONTRAST LOW - HIGH
BRIGTHNESS LOW - HIGH
LANGUAGES SET
BACK
DATE 01.04.03 SET
TIME 12:05:00 SET
BACK
E
All menu items can be selected and parameters adjusted by turning and pressing
setting button E.
Turn 1
The different menu items can be selected by turning.
Selected menu items are shown inversely.
Turn 2
Adjust parameters in opened menu items (see Press 1)
Press 1
Selected menu items are opened
Press 2
A short press confirms the adjustment of the parameters
Press 3
Return to the 1st level menu by continuously pressing the button.
Retsch GmbH 28
Page 29

Adjustment options via the display menu
Languages
Menu
Display
Languages
Incorrect language selection
If the wrong language has been selected, switch the device off at the main switch.
Hold down the keys simultaneously and switch the device back on.
Once the correct language has been selected, switch the device off and immediately back on again.
Confirm your selection by pressing the setting button.
The device is now permanently set to your language and you should see the main menu
Manual mode
If this function is set, all parameters and functions can be called up and changed at
any time. This is also possible during comminution.
Grinding
program 01
In order to access the "Grinding program" function, press the setting button
whilst in "Manual mode". The display flashes showing grinding program 1. Any
data already stored in grinding program 1 are also displayed.
Turn the setting button to the right to select the further grinding programs 2-
10, any parameters stored in these are likewise displayed.
The machine can be started directly with the selected grinding program.
Return to "Manual mode“ by turning the setting button fully to the left and
confirm with the setting button.
Grinding time
00:00:01 to 99:59:59
Hours:Minutes:Seconds
The PM100/200 is started at the pre-selected grinding time and a speed of 100 rpm.
Reverse rotation with interval break is not switched on
Speed
100 to 650 rpm
The PM100/200 is started at the pre-selected grinding time and speed.
Reverse rotation with interval break is not switched on
Please consult the menu structure on this page for the setting options on the display explained below. The
selection bar in the display is operated as follows:
Move vertically through the structure by turning the setting button
Move horizontally through the menu structure by pressing the setting button
Adjust numeric values / options by turning the setting button
Confirm settings by pressing the setting button
Return to the previous level of the menu structure with "BACK"
Return to the start screen by prolonged pressing of the setting button
This allows you to select your language. After making the selection and pressing the setting button the
complete menu structure will be displayed in your language.
Retsch GmbH 29
Page 30

Interval
00:01 to 59:59
Minutes:Seconds
Reverse rotation cannot be set until an interval is set.
Reverse rotation
YES
NO
The PM100/200 is started at the pre-selected grinding time, speed and reverse rotation. The
machine rotates with the specified interval time in one direction, runs down and then starts
immediately after coming to a stand still, without interval break, in the other direction.
Interval break
BACK
00:01 to 59:59
Minutes:Seconds
The interval break can be set here from 00:01 to 59:59
Minutes:Seconds.
An interval break cannot be set until an interval is set.
The PM100/200 is started at the pre-selected grinding time, speed, reverse rotation and
specified interval break. The machine rotates with the specified interval time in one direction, runs
down, after coming to a stand still the previously specified interval break is displayed in the
interval and counted down to 00:00.
Once the interval break has expired, the machine starts in the other direction.
Program mode
Store parameters
All previously specified parameters, such as grinding
time, speed, interval and pause can be stored to memory
here.
Set the desired parameters.
In the menu, change to "Program mode", press the setting button and confirm "Store
parameters" again, the menu shows "Grinding program" and the storage place number on
the right.
Turn the setting button to the right until you find a grinding program with free storage
places or one which you want to overwrite.
Press the setting button to reserve the selected storage place.
You can now choose between "Save parameters?" or "Cancel".
You are then returned to the "Program mode" level.
Program mode
Edit program
All previously specified parameters, such as grinding time,
speed, interval and pause can be edited here.
It is likewise possible to enter new parameters.
Select "Program mode", "Edit program“ and confirm with the setting button, the display
shows grinding program again with the storage place number.
Select the "Grinding program" to be edited by pressing the setting button, only the storage
place figures are inverted, change the grinding program by turning the setting button.
Confirm the grinding program to be edited by pressing the button, the parameters can now
be edited.
You can subsequently choose between "Save parameters" or "Cancel"
You are then returned to the program mode level.
Program mode
Delete program
All previously stored parameters can be deleted here.
Select "Program mode", press the setting button, and confirm "Delete program“ again.
Select the grinding program to be deleted by turning the setting button and confirm by
pressing.
You can now choose between "Delete program" or "Cancel"
You are then returned to the program mode level.
Retsch GmbH 30
Page 31

Start time
Start in xx h
Cancel
The start can be pre-selected from 01 to 99 h here.
The PM100/200 is started at the pre-selected grinding time, speed and reverse rotation after the
specified start time has expired.
Make certain that the grinding bowls have been securely clamped
and balanced before letting the machine start unattended.
Even though it is not possible to start the machine without the
cover closed, ensure that the cover is closed before letting the
machine start unattended.
Once running, the start time can be interrupted at any time with the STOP button and from the
main switch at the rear of the machine. The start time must then subsequently be re-programmed.
Opening mechanism
MENU
SETTINGS
OPENING MECHANISM
Energy
MENU
SETTINGS
ENERGY
This allows you to pre-select whether the grinding chamber cover should be raised automatically after grinding
has ended or may only be opened after pressing the button. If the function is switched off the
pictogram appears on the display for confirmation.
This function enables the total energy input into the grinding bowl (comminution energy + loss energy) to be
determined.
This total energy input into the grinding bowl is defined as the difference between the energy drawn from the
machine's drive unit when the grinding bowl is empty and when it is filled with material to be ground and
grinding balls.
Thus it is first necessary to determine the idling energy drawn by the machine when the grinding bowl is empty.
The idling energy level is established over a relatively short period and is taken as the zero point by the
electronics, in a similar way to taring scales.
During subsequent grinding with material, the only energy input taken into account is that which exceeds the
level of idling energy. This difference can be regarded as equal to the energy input into the grinding bowl(s) by
the grinding media and the material being ground.
For the purpose of comparing different combinations of parameters, the energy input can be specified instead
of the grinding time (only the volume of the material being ground and the feed grains need to be the same to
allow a proper comparison to be made). In this case, the grinding process is not ended after a specified time,
but rather after the input of the pre-set energy.
The energy menu is divided into three sub-menus:
DETERMINE IDLING ENERGY
MEASURE
SET
In order to determine the energy input into the grinding bowl during the grinding process, please proceed as
follows:
Specify all the parameters - speed, grinding time, interval - required for the intended grinding process.
Determine the weight of the grinding bowl intended for the subsequent grinding process but still
without the material to be ground and the grinding media.
Set the balancing weight accordingly.
Then change to the sub-menu:
DETERMINE IDLING ENERGY
Clamp the grinding bowl securely into the machine, but still without the material to be ground and the
grinding media.
Retsch GmbH 31
Page 32

Start the machine. The process now started takes about 45 seconds. During this time the PM 100 / PM
Service
MENU
SETTINGS
SERVICE
Alarm
MENU
SETTINGS
Alarm
200 determines the idling energy with the grinding bowl empty at the later operating speed.
The PM 100 stops automatically after the idling energy has been recorded and you are requested to fill
it with the material to be ground and grinding balls.
Determine the increased weight of the grinding bowl filled with material and grinding media.
Please note that the balancing of the PM 100 must be corrected accordingly.
After pressing the start button again, you are requested to choose between "MEASURE“ and "SET" the
energy.
MEASURE
Once the idling energy has been determined, only that energy is determined which is additionally input
into the grinding bowl by the movement of balls and material during the grinding time.
SET
Enter the energy to be input into the grinding bowl in kJ. It is not yet possible to stipulate the grinding
time at the same time. The machine stops once the specified energy has been input.
The error messages generated by false operation can be acoustically supported by an alarm.
If the function is switched off, the appropriate pictogram appears
The service menu is sub-divided into four sub-menus:
SERVICE HELP
Service help is stored here in the form of a check list. This is intended to make effective and regular
service work easier and increase the operational reliability of the unit. Also refer to the chapter
General/Maintenance!
TOTAL OPERATION HOURS
This counts the number of grinding hours, thus the sum of the times between START and STOP. The
times cannot be manipulated.
SOFTWARE VERSION
The version of the operating software can be called up and updated as required. If necessary, get in
touch with your Retsch distributor.
Should you have reached this menu by mistake and cannot return to the previous menu, switch the
device off at the main switch and re-start it.
Retsch GmbH 32
Page 33

Contrast / brightness
MENU
DISPLAY
CONTRAST
BRIGHTNESS
Date / Time
MENU
DATE
TIME
The contrast and brightness can be adapted to the particular user or ambient conditions (sunlight, glare etc.).
If the contrast or brightness has been incorrectly set (the display can no longer be read), switch the device off
at the main switch, simultaneously hold down the START, STOP and COVER OPEN keys and switch it on again.
You will now see the language menu and the values for CONTRAST and BRIGHTNESS have returned to the
default settings.
The current data and time can be entered here.
The time then appears on the stand-by monitor.
The power to the device can be turned off for up to 30 days without losing the settings.
Stand-by monitor
The stand-by monitor switches on automatically after the device has been inactive for 15 minutes (timed from a
STOP command).
The stand-by monitor disappears after a key is pressed or the setting button activated without executing the
command issued.
Should you be in a sub-menu when the stand-by monitor is activated, you will be returned automatically to this
selection window.
The stand-by monitor cannot be adjusted, it therefore cannot be switched off.
Retsch GmbH 33
Page 34

Error messages on the display
F02
The display shows
F01
Lock indicator
Close cover
The error appears when the cover
has not been fully closed, or if the
trannion magnets have not been
recognised.
Close the cover
The display shows
The display shows
F03
F04
Problem in the
Close or open cover,
safety circuit of
should problem remain
the interlock
then interlock faulty
Service required!
Service required!
The error appears when the
interlock is defective.
Turn the device off at the
main switch, there is a
safety problem.
The error appears when the
interlock is defective.
Turn the device off at the
main switch, there is a
safety problem.
F05
F06
The display shows
The display shows
F07
F08
Faulty motor
Please select
control
grinding time
Service required!
The display shows
The display shows
F09
F10
Cooling fan is off
Sun wheel does
not rotate
Service required!
Service required!
F12
The display shows
F11
Sun wheel rotate
to slow
Service required!
F01 to F12
Retsch GmbH 34
Page 35

F13 to F26
F13
The display shows
F14
Fault speed sensor
Service required!
The display shows
The display shows
F15
F16
Problem in the
Motor has overheated
safety circuit of the
No START possible
frequency converter
Let motor cool down
Service required!
The display shows
The display shows
F17
F18
Motor has overheated
Problem in the
Was switched off
safety circuit of
Let motor cool down
the transformer
Continue with STOP
Service required!
F19
F20
The display shows
Overload
110% F21
The display shows
The display shows
Overload 120 %
F22
Due to overload
Please reduce to ??? rpm
speed automatically
reduced to ??? rpm
The display shows
The display shows
F23
F24
Problem in the
Balance control is
safety circuit of
out of tolerance
balance control
Please rebalance
Service required!
F25
The display shows
The display shows
F26
Parameters OK?
Frequency converter
START = Machine START
has overheated
STOP = Check
No START possible
Allow to cool down
Retsch GmbH 35
Page 36

General points
Do not clean the PM100/200 with flowing water.
Mortal danger from electric shock
Only use a cloth dampened with water.
Solvents are not permitted.
1 2 3 4 5
The following service work should be performed from time to
time, although at the latest once per month, in order to
guarantee the operational reliability of your PM100/200:
Check roller 1 of the locking trannion for easy running
and oil, if necessary, e.g. with sewing machine oil
Clean magnets 2 on the locking trannion
Check threaded spindle 3 and locking sleeve 4 for easy
running. A drop of oil helps in most cases.
The easy running of the threaded spindle and the locking
sleeve is essential for secure clamping of the grinding bowl
Locking sleeves which do not move downwards solely by spring
power cannot properly prevent the threaded spindle from
working loose. The grinding bowls could be hurled out.
The easy running of roller 1 on the locking trannion is essential
for secure closing of the housing cover of the PM100/200.
The thickness D1 of the three spider feet should be
checked for wear from time to time, although at the
latest every month.
It may not be less than 7.5 mm for the PM100.
It may not be less than 5.5 mm for the PM200.
The heights H1 of the latching brackets should be
checked for wear from time to time, although at the
latest every month.
They may not be less than 17mm.
Check rubber washer 5 in the pressure piece for wear
and ensure that it is securely in place (sticking). At
temperatures up to 120°C use temperature-resistant
rapidly-acting adhesive DELO 2256.
If the values D1 and H1 are undershot, operational safety is no
longer assured.
The grinding bowls could be hurled out.
Cleaning
Maintenance
Retsch GmbH 36
Page 37

Parts subject to wear and tear
The operating instructions do not contain any repair
instructions. In the interests of your own safety,
repairs should only be performed by Retsch GmbH,
an authorised representative or by Retsch service
technicians.
Spider with pressure piece PM100
Art. No. 22.661.0002
Only deployable for PM100.
Spider with pressure piece PM200
Art. No. 22.661.0003
Only deployable for PM200.
For PM100
2x latching brackets
Art.No. 22.623.0001
1x latching brackets SafetySlider
Art.No. 22.623.0008
For PM200
4x latching brackets
Art.No. 22.623.0002
2x latching brackets SafetySlider
Art.No. 22.623.0011
For PM100 and PM200
1x pressure piece with rubber washer
Art. No. 02.108.0073
Retsch GmbH 37
Page 38

Safety slider replacement interlock lug
PM 100: 22.623.0010
PM 200: 22.623.0011
Copyright
Reproducing or distributing this documentation, or utilizing and
distributing the contents is not permitted unless Retsch GmbH has
given express permission to do so.
Violations against this are subject to claims for damages.
Changes
Technical changes are reserved.
Retsch GmbH 38
Page 39

Page 40

Page 41

Authorized person for the compilation of technical documents:
J. Bunke (technical documentation)
The following records are held by Retsch GmbH in the form of Technical Documentation:
Detailed records of engineering development, construction plans, study (analysis) of the measures required for
conformity assurance, analysis of the residual risks involved and operating instructions in due form according to
the approved regulations for preparation of user information data.
The CE-conformity of the Retsch Planetary Ball Mills Type PM 100 and PM 200 is assured herewith.
In case of a modification to the machine not previously agreed with us as well as the use of not
licensed spare parts and accessories this certificate will lose its validity.
Retsch GmbH Haan, January 2010
Dr. Stefan Mähler
Manager technical services
R e t s c h G m b H R e t s c h - Al l e e 1 - 5 4 2 7 8 1 H a a n G e r m a n y w w w . r e t sc h .c o m
PLANETARY BALL MILL
PM 100 and PM 200
FB-EW-805-046 (E) Änderungsstand D 01.2012
CERTIFICATE OF CE-CONFORMITY
Translation
Certificate of CE-Conformity according to:
EC Mechanical Engineering Directive 2006/42/EC
Applied harmonized standards, in particular:
DIN EN ISO 12100 Security of machines
EC Directive Electromagnetic Compatibility 2004/108/EC
Applied standards, in particular:
EN 61236 Electrical equipment for measurement, control and laboratory use in
conjunction with EN 55011 and EN 61000
Additional applied standards, in particular
DIN EN 61010 Safety prescriptions concerning measuring-, operating-, controlling- and
laboratory equipment
Page 42

Page 43

Page 44

Copyright
® Copyright by
Retsch GmbH
Haan, Retsch-Allee 1-5
D-42781 Haan
Federal Republic of Germany
 Loading...