

Page 1
Manual
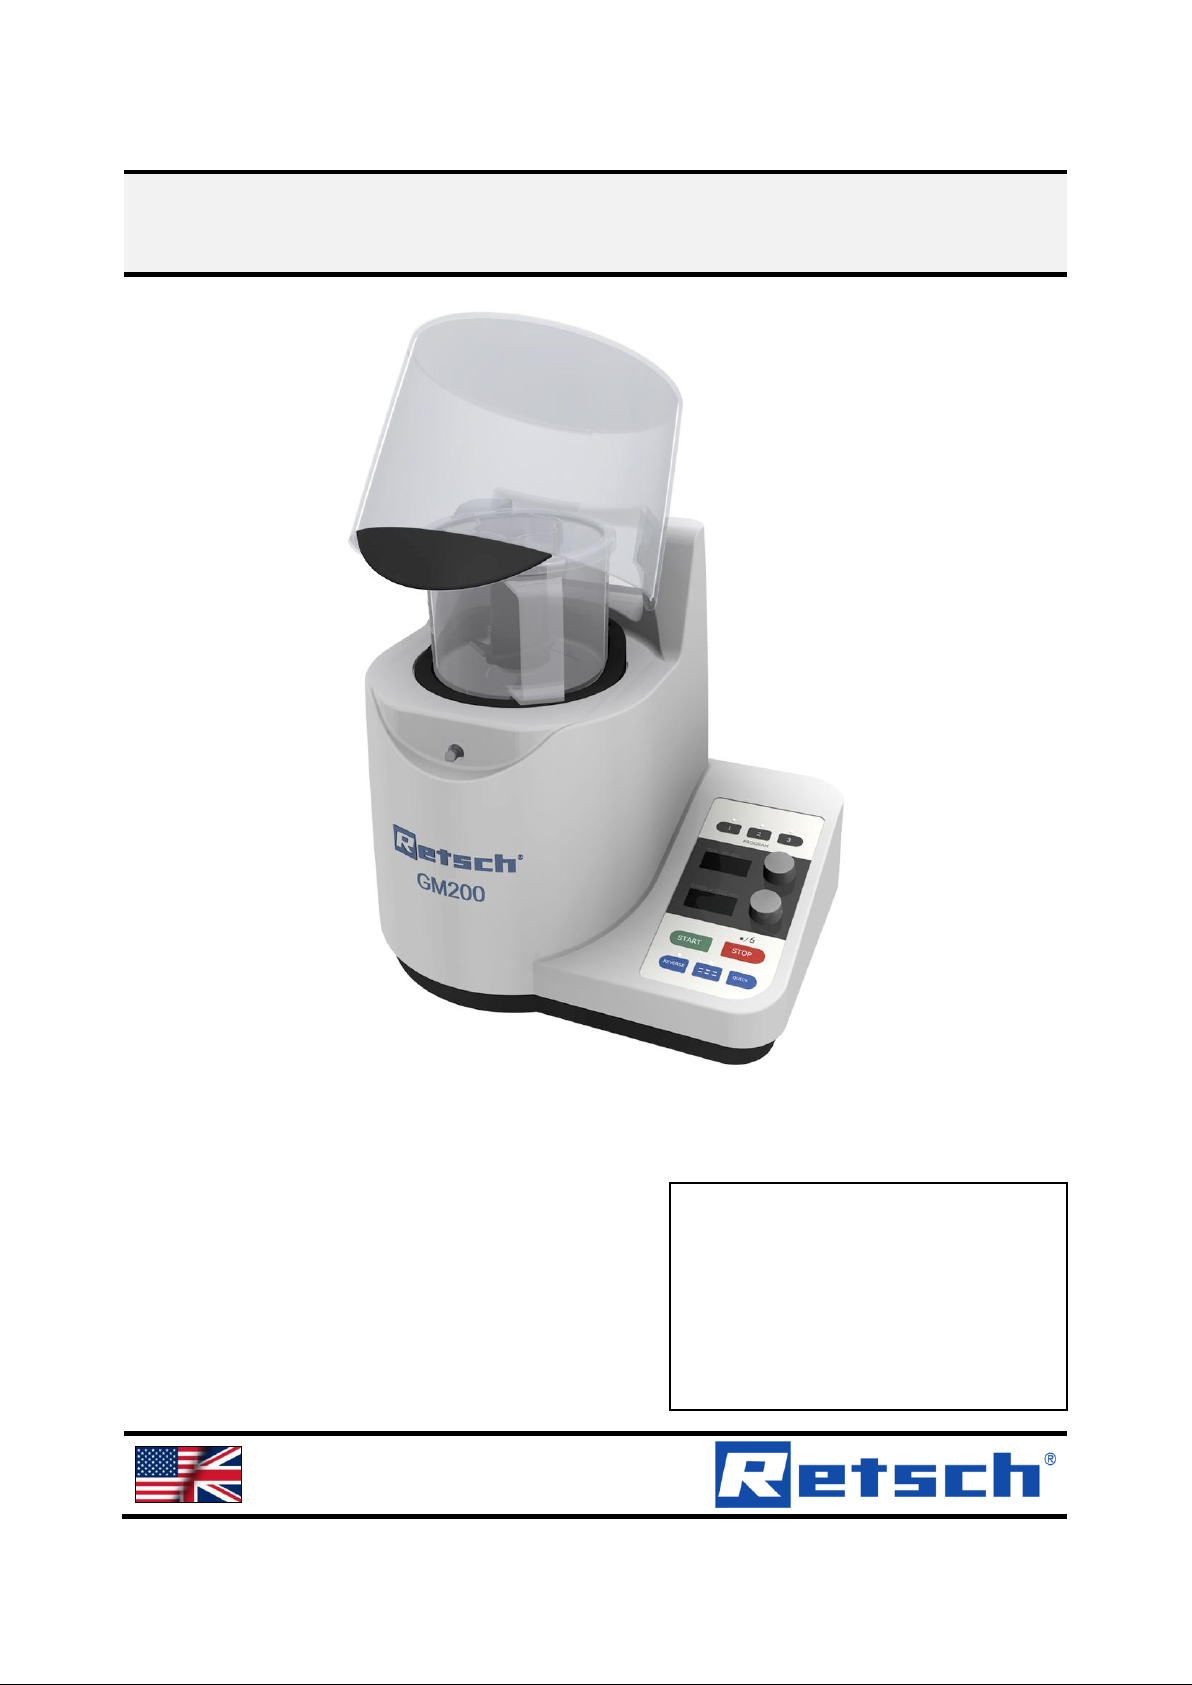
Knife Mill Grindomix GM200
Translation
© Retsch GmbH, 42781 Haan, Retsch-Allee 1-5, Germany 21.12.2012 0010
Page 2

Copyright
© Copyright by
Retsch GmbH
Haan, Retsch-Allee 1-5
D-42781 Haan
Federal Republic of Germany
2
Page 3

1 Notes on the Operating Manual ............................................................................................................ 5
1.1 Explanations of the safety warnings .................................................................................................. 6
1.2 General safety instructions ................................................................................................................ 7
1.3 Repairs ............................................................................................................................................... 8
2 Confirmation ........................................................................................................................................... 9
3 Transport, scope of delivery, installation .......................................................................................... 10
3.1 Packaging ........................................................................................................................................ 10
3.2 Transport.......................................................................................................................................... 10
3.3 Temperature fluctuations and condensed water ............................................................................. 10
3.4 Conditions for the place of installation ............................................................................................. 10
3.5 Installation of the machine ............................................................................................................... 10
3.6 Electrical connection ........................................................................................................................ 10
3.7 Type plate description ...................................................................................................................... 11
4 Technical data ....................................................................................................................................... 12
4.1 Use of the machine for the intended purpose.................................................................................. 12
4.2 Working instructions ........................................................................................................................ 13
4.3 Protective equipment ....................................................................................................................... 13
4.4 Drive output...................................................................................................................................... 13
4.5 Rated power .................................................................................................................................... 13
4.6 Motor rotation speed ........................................................................................................................ 13
4.7 Rated voltage ................................................................................................................................... 13
4.8 Emissions......................................................................................................................................... 14
4.8.1 Noise measurement Example 1:.................................................................................................. 14
4.8.2 Noise measurement Example 2:.................................................................................................. 14
4.9 Degree of protection ........................................................................................................................ 14
4.10 Dimensions and weight .................................................................................................................... 14
4.11 Required floor space ........................................................................................................................ 15
5 Operating the machine ........................................................................................................................ 16
5.1 Views of the Instrument ................................................................................................................... 16
5.2 Overview table of the parts of the device ........................................................................................ 18
5.3 Overview Table of the Operating Elements and the Display ........................................................... 19
5.4 Operating the Device ....................................................................................................................... 20
5.5 Switching On and Off ....................................................................................................................... 20
5.6 Opening and closing of the grinding chamber ................................................................................. 21
5.7 Inserting the grinding jar .................................................................................................................. 21
5.8 Use of grinding jugs depending on different materials .................................................................... 21
5.8.1 Grinding jars – plastic jugs (PP) .................................................................................................. 22
5.8.2 Grinding jars – glass jugs (borosilicate glass 3.3) ....................................................................... 22
3
Page 4

5.8.3 Grinding jars – stainless steel jugs .............................................................................................. 22
5.9 Lid and jug combinations ................................................................................................................. 22
5.9.1 Lid 1000ml ................................................................................................................................... 23
5.9.2 Lid 500ml ..................................................................................................................................... 24
5.9.3 Gravitation lid ............................................................................................................................... 24
5.10 Filling the vessel .............................................................................................................................. 25
5.10.1 Filling – within the device ......................................................................................................... 25
5.10.2 Fílling – outside the device ...................................................................................................... 26
5.11 Setting the grinding time .................................................................................................................. 27
5.12 Setting the Speed ............................................................................................................................ 28
5.13 Switching on interval or continuous mode ....................................................................................... 28
5.14 Reverse grinding .............................................................................................................................. 29
5.15 Store functions ................................................................................................................................. 30
5.15.1 Saving programs ...................................................................................................................... 30
5.15.2 Starting a saved program ........................................................................................................ 30
5.16 Start – Pause – Stop ........................................................................................................................ 30
5.16.1 Pause function ......................................................................................................................... 30
5.16.2 Premature termination of grinding ........................................................................................... 30
5.17 Resetting the overload protection .................................................................................................... 30
6 Cleaning and service ........................................................................................................................... 31
6.1 Cleaning the Grinding Tools ............................................................................................................ 32
6.2 Check the sealing lip ........................................................................................................................ 33
7 Fault messages ..................................................................................................................................... 34
8 Disposal ................................................................................................................................................. 35
9 Index ...................................................................................................................................................... 36
Appendix ............................................................................................................................... following pages
4
Page 5

Notes on the Operating Manual
Pos: 1.1 /00005 Überschriften/1. Überschri ften/1 Hinweise zur Bedienungsanleitung @ 0\mod_1222347415287_9.doc @ 26 31 @ 1 @ 1
1 Notes on the Operating Manual
Pos: 1.2 /00010 Bedienungsanleitungen Kapitelsammlungen/CryoMill/0001 Hinweis e zur Bedienungsanleitung/Modul Hinweis zur Bedienungsanleitung @ 0\mod_122 2347341773_9.doc @ 2540 @ @ 1
This operating manual is a technical guide on how to operate the device safely and
it contains all the information required for the areas specified in the table of
contents. This technical documentation is a reference and instruction manual. The
individual chapters are complete in themselves.
Familiarity (of the respective target groups defined according to area) with the
relevant chapters is a precondition for the safe and appropriate use of the device.
This operating manual does not contain any repair instructions. If faults arise or
repairs are necessary, please contact your supplier or get in touch with Retsch
GmbH directly.
Application technology information relating to samples to be processed is not
included but can be read on the Internet on the respective device’s page at
Pos: 1.3 /00010 Bedienungsanleitungen Kapitelsammlungen/CryoMill/0001 Hinweis e zur Bedienungsanleitung/Modul Änderung en @ 0\mod_1222347341241_9.doc @ 2 526 @ @ 1
www.retsch.com.
Changes
Pos: 1.4 /00010 Bedienungsanleitungen Kapitelsammlungen/CryoMill/0001 Hinweis e zur Bedienungsanleitung/Modul Urheberrech t @ 0\mod_1222347342038_9.doc @ 2 547 @ @ 1
Subject to technical changes.
Pos: 2.1 /00010 Bedienungsanleitungen Kapitelsammlungen/------- Seitenumbruch ----------- @ 0\mod_1222344373758_0.doc @ 2386 @ @ 1
Copyright
Disclosure or reproduction of this documentation, use and disclosure of its contents
are only permitted with the express permission of Retsch GmbH.
Infringements will result in damage compensation liability.
5
Page 6

Notes on the Operating Manual
WARNING
Type of danger / personal injury
Source of danger
– Possible consequences if the dangers are not observed.
• Instructions on how the dangers are to be avoided.
WARNING
CAUTION
Type of danger / personal injury
Source of danger
– Possible consequences if the dangers are not observed.
• Instructions on how the dangers are to be avoided.
CAUTION
NOTICE
Nature of the property damage
Source of property damage
– Possible consequences if the instructions are not observed.
• Instructions on how the dangers are to be avoided.
Pos: 2.2 /00005 Überschriften/1.1 Überschrif ten/1.1 Überschriften BDA/11 Erklärunge n zu den Sicherheitswarnungen @ 0\m od_1222344569771_9.doc @ 2484 @ 2 @ 1
1.1 Explanations of the safety warnings
Pos: 2.3 /00003 Standard Kapitel/General Modul Warnhinweise Erklärung neu @ 0\ mod_1234858329746_9.doc @ 6190 @ @ 1
In this Operating Manual we give you the following safety warnings
Serious injury may result from failing to heed these safety warnings. We give you
the following warnings and corresponding content.
We also use the following signal word box in the text or in the instructions on action
to be taken:
Moderate or mild injury may result from failing to heed these safety warnings.
We give you the following warnings and corresponding content.
Pos: 2.4 /00010 Bedienungsanleitungen Kapitelsammlungen/------- Seitenumbruch ----------- @ 0\mod_1222344373758_0.doc @ 2386 @ @ 1
We also use the following signal word box in the text or in the instructions on action
to be taken:
In the event of possible property damage we inform you with the word
“Instructions” and the corresponding content.
We also use the following signal word in the text or in the instructions on action to
be taken:
NOTICE
6
Page 7
Notes on the Operating Manual
CAUTION
Read the Operating Manual
Non-observance of these operating instructions
– The non-observance of these operating instructions can
result in personal injuries.
• Read the operating manual before using the device.
• We use the adjacent symbol to draw attention to the
necessity of knowing the contents of this operating
manual.
CAUTION
Changes to the machine
– Changes to the machine may lead to personal injury.
• Do not make any change to the machine and use spare parts and
accessories that have been approved by Retsch exclusively.
NOTICE
Changes to the machine
– The conformity declared by Retsch with the European Directives will lose
its validity.
– You lose all warranty claims.
• Do not make any change to the machine and use spare parts and
accessories that have been approved by Retsch exclusively.
Pos: 2.5 /00005 Überschriften/1.1 Überschrif ten/1.1 Überschriften BDA/11 Generelle Sicherheitshinweise @ 0\mod_12223445 68974_9.doc @ 2463 @ @ 1
1.2 General safety instructions
Pos: 2.6 /00004 Warnhinweise/V0002 VORS ICHT Bedienungsanleitung lesen @ 2\ mod_1263894982815_9.doc @ 18630 @ @ 1
Pos: 2.7 /00003 Standard Kapitel/General Modul Zielgruppe und Sicherheit @ 0\mo d_1228722955300_9.doc @ 4100 @ @ 1
Target group : All persons concerned with the machine in any form
This machine is a modern, high performance product from Retsch GmbH and
complies with the state of the art. Operational safety is given if the machine is
handled for the intended purpose and attention is given to this technical
Pos: 2.8 /00003 Standard Kapitel/General Modul Sicherheitshinweise @ 0\mod_12 28722954800_9.doc @ 4086 @ @ 1
Pos: 2.9 /00004 Warnhinweise/V0015 VORS ICHT + HINWEIS Sach- und Person enschäden @ 1\mod_1236238456676_9.doc @ 7642 @ @ 1
documentation.
You, as the owner/managing operator of the machine, must ensure that the people
entrusted with working on the machine:
• have noted and understood all the regulations regarding safety,
• are familiar before starting work with all the operating instructions and
specifications for the target group relevant for them,
• have easy access always to the technical documentation for this machine,
• and that new personnel before starting work on the machine are familiarised
with the safe handling of the machine and its use for its intended purpose,
either by verbal instructions from a competent person and/or by means of
this technical documentation.
Improper operation can result in personal injuries and material damage. You are
responsible for your own safety and that of your employees.
Make sure that no unauthorised person has access to the machine.
Pos: 2.10 /00010 Bedienungsanleitungen K apitelsammlungen/------- Seitenumbruch ----------- @ 0\mod_1222344373758_0.d oc @ 2386 @ @ 1
7
Page 8

Notes on the Operating Manual
The Retsch representative in your country
Your supplier
Retsch GmbH directly
Pos: 2.11 /00005 Überschriften/1.1 Übersc hriften/1.1 Überschriften BDA/11 Reparat uren @ 0\mod_1223624336511_9.doc @ 2978 @ @ 1
Reperaturen
1.3 Repairs
Pos: 2.12 /00003 Standard Kapitel/Gen eral Modul Reparaturen @ 0\mod_12287229 54535_9.doc @ 4079 @ @ 1
This operating manual does not contain any repair instructions. For your own
safety, repairs may only be carried out by Retsch GmbH or an authorized
representative or by Retsch service engineers.
In that case please inform:
Your Service Address:
Pos: 3.1 /00020 BDA Software/20005 PM GC Kapitelsammlung/- - - - Seitenumbruc h - - - - @ 0\mod_1208857688413_0.doc @ 337 @ @ 1
8
Page 9
Confirmation
I have read and taken note of the contents of all chapters in this operating
manual as well as all safety instructions and warnings.
User
Surname, first name (block letters)
Position in the company
Signature
Service technician or operator
Surname, first name (block letters)
Position in the company
Place, date and signature
Pos: 3.2 /00020 BDA Software/20005 PM GC Kapitelsammlung/Überschriften/1. Überschrif ten/1 Bestätigung (Formular für den Be treiber) @ 0\mod_1208870841095_9.d oc @ 430 @ 1 @ 1
Bestätigung
2 Confirmation
Pos: 3.3 /00003 Standard Kapitel/General Modul Bestätigung @ 0\mod_122872296 2707_9.doc @ 4114 @ @ 1
This operating manual contains essential instructions for operating and maintaining
the device which must be strictly observed. It is essential that they be read by the
operator and by the qualified staff responsible for the device before the device is
commissioned. This operating manual must be available and accessible at the
place of use at all times.
The user of the device herewith confirms to the managing operator (owner) that
(s)he has received sufficient instructions about the operation and maintenance of
the system. The user has received the operating manual, has read and taken note
of its contents and consequently has all the information required for safe operation
and is sufficiently familiar with the device.
As the owner/managing operator you should for your own protection have your
employees confirm that they have received the instructions about the operation of
the machine.
Pos: 4.1 /00010 Bedienungsanleitungen Kapitelsammlungen/------- Seitenumbruch ----------- @ 0\mod_1222344373758_0.doc @ 2386 @ @ 1
9
Page 10

Transport, scope of delivery, installation
NOTICE
Transport
– Mechanical or electronic components may be damaged.
• The machine may not be knocked, shaken or thrown during
transport.
NOTICE
Temperature fluctuations
The machine may be subject to strong temperature fluctuations during transport
(e.g. aircraft transport)
– The resultant condensed water may damage electronic components.
• Protect the machine from condensed water.
NOTICE
Ambient temperature
– Electronic and mechanical components may be damaged and the
performance data alter to an unknown extent.
• Do not exceed or fall below the permitted temperature range of the
machine (5°C to 40°C / ambient temperature).
WARNING
Pos: 4.2 /00005 Überschriften/1. Überschri ften/1 Verpackung, Transport und Aufst ellung @ 0\mod_1226494451893_9.doc @ 3380 @ 1 @ 1
3 Transport, scope of delivery, installation
Pos: 4.3 /00005 Überschriften/1.1 Überschrif ten/1.1 Überschriften BDA/11 Verpackung @ 0\mod_1226495088973_9.doc @ 33 92 @ 2 @ 1
3.1 Packaging
Pos: 4.4 /00003 Standard Kapitel/General Modul Verpackung @ 0\mod_12289846 18355_9.doc @ 4892 @ @ 1
Pos: 4.5 /00005 Überschriften/1.1 Überschrif ten/1.1 Überschriften BDA/11 Transport @ 0\mod_1226495164391_9.doc @ 3398 @ 2 @ 1
3.2 Transport
Pos: 4.6 /00004 Warnhinweise/H0017 H INWEIS Transport @ 0\mod_1228918883 019_9.doc @ 4802 @ @ 1
Pos: 4.7 /00005 Überschriften/1.1 Überschrif ten/1.1 Überschriften BDA/11 Temperatursc hwankungen @ 0\mod_1226495190 738_9.doc @ 3404 @ 2 @ 1
3.3 Temperature fluctuations and condensed water
Pos: 4.8 /00004 Warnhinweise/H0016 H INWEIS Temperaturschwankungen @ 0\ mod_1233564121287_9.doc @ 5570 @ @ 1
The packaging has been adapted to the mode of transport. It complies with the
generally applicable packaging guidelines.
Pos: 4.9 /00005 Überschriften/1.1 Überschrif ten/1.1 Überschriften BDA/11 Bedingung en für den Aufstellort @ 0\mod_1226497 029322_9.doc @ 3428 @ 2 @ 1
3.4 Conditions for the place of installation
Pos: 4.10 /00003 Standard Kapitel/Gen eral Modul Umgebungstemperatur 5°C - 40°C @ 0\mod_1228918538881_9.doc @ 47 45 @ @ 1
Pos: 4.11 /00004 Warnhinweise/H0021 HIN WEIS Umgebungstemperatur 5°C bis 40°C @ 0\mod_1228918883441_9.doc @ 4 816 @ @ 1
Pos: 4.12 /00005 Überschriften/1.1 Übersc hriften/1.1 Überschriften BDA/11 Aufstell en des Gerätes @ 0\mod_1226498849756 _9.doc @ 3464 @ 2 @ 1
3.5 Installation of the machine
Pos: 4.13 /00003 Standard Kapitel/Gen eral Modul Aufstellungshöhe @ 0\mod_122 8918538349_9.doc @ 4724 @ @ 1
Pos: 4.14 /00005 Überschriften/1.1 Übersc hriften/1.1 Überschriften BDA/11 Ele ktrischer Anschluss @ 0\mod_122656506744 5_9.doc @ 3500 @ 2 @ 1
Installation height: maximum 2000 m above sea level
3.6 Electrical connection
Pos: 4.15 /00003 Standard Kapitel/Gen eral Modul Elektrischer Anschluss @ 0\m od_1228918538521_9.doc @ 4731 @ @ 1
When connecting the power cable to the mains supply, use an external fusethat
complies with the regulations applicable to the place of installation .
• Please check the type plate for details on the necessary voltage and
frequency for the device.
• Make sure the levels agree with the existing mains power supply.
10
Page 11
Transport, scope of delivery, installation
1 2 3 4 5 6 7 8 9
10
11
12
14
13
• Use the supplied connection cable to connect the device to the mains power
Pos: 5.1 /00005 Überschriften/1.1 Überschrif ten/1.1 Überschriften BDA/11 Typenschil d Beschreibung @ 3\mod_1280933953 941_9.doc @ 22302 @ 2 @ 1
supply.
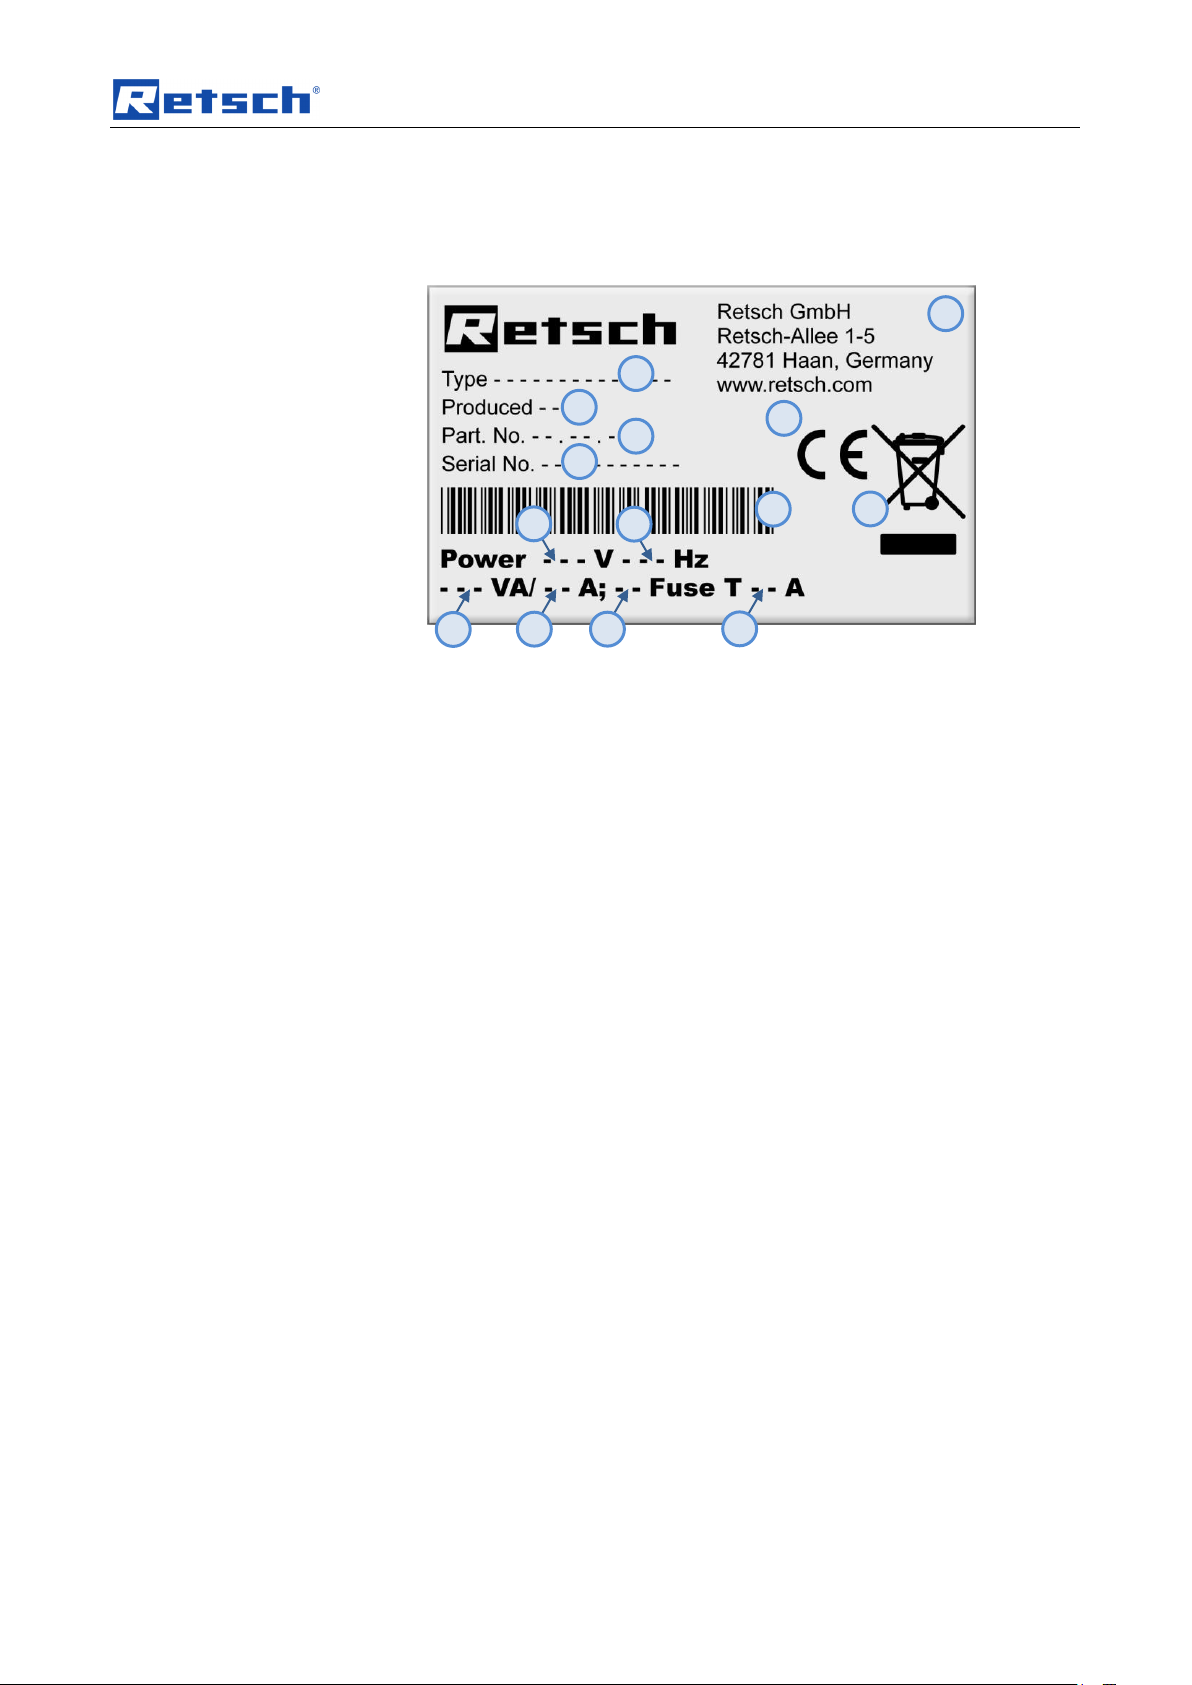
3.7 Type plate description
Pos: 5.2 /00003 Standard Kapitel/General Modul Typenschild @ 3\mod_12809310 92443_9.doc @ 22278 @ @ 1
Fig. 1: Type plate lettering
Pos: 6 /00010 Bedienungsanleitungen Kapitelsammlungen/------- Seitenumbruch ----------- @ 0\mod_1222344373758_0.doc @ 2386 @ @ 1
1 Device designation
2 Year of production
3 Part number
4 Serial number
5 Manufacturer’s address
6 CE marking
7 Disposal label
8 Bar code
9 Power version
10 Mains frequency
11 Capacity
12 Amperage
13 Number of fuses
14 Fuse type and fuse strength
In the case of questions please provide the device designation (1) or the part
number (3) and the serial number (4) of the device.
11
Page 12
Technical data
CAUTION
Risk of explosion or fire
Changing sample characteristics
– Note that the characteristics and accordingly the danger presented by a
sample can change during sieving.
• Do not sieve any potentially explosive or combustible materials in
this device.
CAUTION
Risk of explosion or fire
– On account of its design, the device is not suitable for use in hazardous
(potentially explosive) atmospheres.
• Do not operate the device in a hazardous atmosphere.
CAUTION
Danger of personal injury
Dangerous nature of the sample
– Depending on the dangerous nature of your sample, take the
necessary measures to rule out any danger to persons.
• Observe the safety guidelines and datasheets of your
sample material.
Pos: 7.1 /00005 Überschriften/1. Überschri ften/1 Technische Daten @ 0\mod_12 22344525522_9.doc @ 2407 @ 1 @ 1
4 Technical data
Pos: 7.2 /00005 Überschriften/1.1 Überschrif ten/1.1 Überschriften BDA/11 Einsatz d er Maschine bei bestimmungsgemäßer Ver wendung @ 0\mod_1226476732248_9.do c @ 3243 @ 2 @ 1
4.1 Use of the machine for the intended purpose
Pos: 7.3 /00004 Warnhinweise/V0003 VORS ICHT Explosions- oder Brandgefahr Si eben @ 1\mod_1243924323407_9.doc @ 1 0360 @ @ 1
Pos: 7.4 /00004 Warnhinweise/V0005 VORS ICHT explosionsgefärdete Atmosphäre @ 1\mod_1239868668923_9.doc @ 814 0 @ @ 1
Pos: 7.5 /00004 Warnhinweise/V0006 VORS ICHT Gefahr von Personenschäden Ge fährliche Stoffe @ 1\mod_123623845626 9_9.doc @ 7634 @ @ 1
Pos: 7.6 /00010 Bedienungsanleitungen Kapitelsammlungen/GM200 (2010)/0005 GM2 00N Technische Daten/0510 GM200_2 010 Modul Einsatz bei bestimmungsgem äßer Verwendung @ 3\mod_12797027206 57_9.doc @ 20888 @ @ 1
Target group: operators
Machine type designation: GM 200
This device is suitable for analytical grinding, homogenisation and mixing of soft to
medium-hard, aqueous, fatty, fibrous and dry materials in seconds. This device is
designed for quantities of approximately 700ml, large volume materials up to
1000ml.
The feed size is < 30 - 40 mm.
The device is specially designed for the grinding of the following materials :
Fish, meat, vegetables, cheese, preserves, seeds, bacon, sausage, dry baked
goods and pastries, all aqueous, fatty and fibrous products and similar materials.
The device is designed as a laboratory device for 8-hour one-shift operation with a
30% ON duration.
It is not intended for use as production machine and not intended for the mixing
and homogenisation of liquids with low viscosity (emulsions and suspensions) .
12
Page 13

Technical data
Pos: 7.7 /00005 Überschriften/1.1 Überschrif ten/1.1 Überschriften BDA/11 Funktions weise @ 0\mod_1222344568271_9.doc @ 2442 @ 2 @ 1
Arbeitsweise
4.2 Working instructions
Pos: 7.8 /00010 Bedienungsanleitungen Kapitelsammlungen/GM200 (2010)/0005 GM2 00N Technische Daten/0535 GM200_2 010 Modul Funktionsweise @ 3\mod_1279 706968586_9.doc @ 20996 @ @ 1
The grinding process of the device is effected through cutting and, in reverse
operation, through impact effect.
The cutters are straight and are arranged at right-angles to the direction of rotation.
The cutters are slim with a cutting angle of 15° and a pre-cut (pre-grind) of 30°.
With this cutting geometry the entire inertia resulting from the speed difference
between the sample material particles and the cutters can be used as cutting force.
The speed is between 2000 - 10000min-1 and is altered in stages of 500min-1 and
displayed digitally.
The preselected speed is kept constant during grinding by a speed regulator.
Interval operation has proved to be advantageous in the pre-grinding and
homogenisation of large-piece, tough, fibrous and very soft and elastic products.
The grinding duration can be set up to 3 minutes. After expiry of the grinding
duration the motor automatically switches off and the housing lid opens.
3 memories permit the storage and retrieval of frequently used speed/time
Pos: 7.9 /00005 Überschriften/1.1 Überschrif ten/1.1 Überschriften BDA/11 Schutzei nrichtungen @ 0\mod_1226486316130_9 .doc @ 3304 @ @ 1
combinations by the press of a button.
4.3 Protective equipment
Pos: 7.10 /00010 Bedienungsanleitungen K apitelsammlungen/GM200 (2010)/0005 GM200N Technische Daten/0530 GM200_ 2010 Modul Schutzeinrichtung @ 3\mod_ 1279702722142_9.doc @ 20915 @ @ 1
The grinding chamber of this device is interlocked by a resistant protective hood.
It is only possible to start the device when the protective hood is closed. The motor
must have come to a standstill to open the device.
In the event of fault there is also an electric emergency brake which brings the
cutters to a standstill in fractions of a second from the highest speed.
If the achievable current speed deviates from the setpoint speed by more than 5%
Pos: 7.11 /00005 Überschriften/1.1 Übersc hriften/1.1 Überschriften BDA/11 Antrieb @ 1\mod_1240475743011_9.doc @ 8557 @ @ 1
due to an overload, this is shown by flashing displays.
4.4 Drive output
Pos: 7.12 /00010 Bedienungsanleitungen Kapitelsammlungen/GM200 (2010)/0005 GM200N Technische Daten/0540 GM200_ 2010 Modul Antrieb @ 3\mod_1279706969 133_9.doc @ 21005 @ @ 1
Pos: 7.13 /00005 Überschriften/1.1 Übersc hriften/1.1 Überschriften BDA/11 Nennleistu ng @ 0\mod_1226491873164_9.doc @ 3334 @ @ 1
Universal electric motor
4.5 Rated power
Pos: 7.14 /00010 Bedienungsanleitungen K apitelsammlungen/GM200 (2010)/000 5 GM200N Technische Daten/0520 GM200_ 2010 Modul Nennleistung @ 3\mod_1279 702721142_9.doc @ 20897 @ @ 1
Pos: 7.15 /00005 Überschriften/1.1 Übersc hriften/1.1 Überschriften BDA/11 Motordre hzahl @ 1\mod_1241508280705_9.doc @ 8763 @ @ 1
Motor performance: approx. 1000 watts
4.6 Motor rotation speed
Pos: 7.16 /00010 Bedienungsanleitungen K apitelsammlungen/GM200 (2010)/0005 GM200N Technische Daten/0545 GM200_ 2010 Modul Motordrehzahl @ 3\mod_127 9706969649_9.doc @ 21014 @ @ 1
Pos: 7.17 /00005 Überschriften/1.1 Übersc hriften/1.1 Überschriften BDA/11 Nennspa nnungen @ 1\mod_1240476024494_9.do c @ 8571 @ @ 1
Speed: 2000 rpm-1.... 10,000 rpm-1 ( can be altered in steps of 500 Umin-1)
4.7 Rated voltage
Pos: 7.18 /00010 Bedienungsanleitungen K apitelsammlungen/GM200 (2010)/0005 GM200N Technische Daten/0550 GM200_ 2010 Modul Nennspannungen @ 3\mod _1279706970164_9.doc @ 21023 @ @ 1
Rated voltages: 230 V 50 Hz (+/- 5%)
100-120V 50/60 Hz (+/- 5%)
13
Page 14

Technical data
CAUTION
Possibility of acoustic signals not being heard
Loud grinding noises
- Acoustic alarms and voice communication might not be heard.
• Consider the volume of the grinding noise in relation to other
acoustic signals in the work environment. You may wish to use
additional visual signals.
Pos: 7.19 /00005 Überschriften/1.1 Übersc hriften/1.1 Überschriften BDA/11 Emmisi onen @ 0\mod_1226487095021_9.doc @ 3310 @ @ 1
4.8 Emissions
Pos: 7.20 /00004 Warnhinweise/V0020 VOR SICHT Überhören von akustischen Sign alenLaute Mahlgeräusche @ 1\mod_12 48185838858_9.doc @ 11740 @ @ 1
Pos: 7.21 /00010 Bedienungsanleitungen K apitelsammlungen/GM200 (2010)/0005 GM200N Technische Daten/0510 GM200_ 2010 Modul Emmisionen @ 3\mod_1279 702725923_9.doc @ 20969 @ 33 @ 1
Noise values: ~ 56 dB(A) (without sample material, beaker, cutters)
Noise measurement in accordance with DIN 45635-031-01-KL3
The noise values are also influenced by the properties of the sample medium.
4.8.1 Noise measurement Example 1:
Intensity of sound LWA
Workplace-related emission value LpAeq
Operating conditions:
Jug = glass jug with gravitation lid
Grind unit = cutter made of stainless steel
Feed material = tomatoes, quartered approx. 40 x 25mm
Feed quantity = 100g
4.8.2 Noise measurement Example 2:
Intensity of sound LWA
Workplace-related emission value LpAeq
Operating conditions:
jug = glass jug with gravitation lid
Grind unit = cutter made of stainless steel
Feed material = cheese approx. 20 x 20mm
Pos: 7.22 /00005 Überschriften/1.1 Übersc hriften/1.1 Überschriften BDA/11 Schutzart @ 0\mod_1226491839164_9.doc @ 332 8 @ @ 1
Feed quantity = 100g
4.9 Degree of protection
Pos: 7.23 /00010 Bedienungsanleitungen K apitelsammlungen/GM200 (2010)/0005 GM200N Technische Daten/0525 GM200_ 2010 Modul Schutzart @ 3\mod_12797027 21626_9.doc @ 20906 @ @ 1
– Grinding chamber and keypad - IP 42
Pos: 7.24 /00005 Überschriften/1.1 Übersc hriften/1.1 Überschriften BDA/11 Abmessu ngen und Gewicht @ 0\mod_1226492 212173_9.doc @ 3352 @ @ 1
– In the area of the ventilation slits - IP 20
4.10 Dimensions and weight
Pos: 7.25 /00010 Bedienungsanleitungen K apitelsammlungen/GM200 (2010)/0005 GM200N Technische Daten/0505 GM200_ 2010 Modul Abmessungen und Gewicht @ 3\mod_1279702720126_9.doc @ 20879 @ @ 1
Closed:
Height: up to approx. 390mm
Width: 350mm
Depth : 250mm
14
Page 15

Technical data
with open hood:
Height: up to approx. 540mm
Width: 350mm
Depth : 410mm
Pos: 7.26 /00005 Überschriften/1.1 Übersc hriften/1.1 Überschriften BDA/11 Erforderlich e Standfläche @ 0\mod_12264926784 14_9.doc @ 3364 @ 2 @ 1
Weight: approx. 10.1kg (without plastic container and cutter)
4.11 Required floor space
Pos: 7.27 /00010 Bedienungsanleitungen K apitelsammlungen/GM200 (2010)/0005 GM200N Technische Daten/0515 GM200_ 2010 Modul Erforderliche Standfläche @ 3\ mod_1279702726470_9.doc @ 20978 @ @ 1
Pos: 8.1 /00010 Bedienungsanleitungen Kapitelsammlungen/------- Seitenumbruch ----------- @ 0\mod_1222344373758_0.doc @ 2386 @ @ 1
200 mm x 400 mm; no safety distances required.
15
Page 16

Operating the machine
A B C
D
E
F
H
G J O
Pos: 8.2 /00005 Überschriften/1. Übersc hriften/1 Bedienung des Gerätes @ 0\mod_ 1226565880211_9.doc @ 3519 @ 1 @ 1
5 Operating the machine
Pos: 8.3 /00005 Überschriften/1.1 Überschrif ten/1.1 Überschriften BDA/11 Ansichte n des Gerätes @ 0\mod_1228990581782_ 9.doc @ 4966 @ 2 @ 1
5.1 Views of the Instrument
Pos: 8.4 /00010 Bedienungsanleitungen Kapitelsammlungen/GM200 (2010)/0015 GM2 00N Bedienung/1504 GM200_2010 Mo dul Grafische Ansichten des Gerätes @ 3\ mod_1279722275778_9.doc @ 21703 @ @ 1
Fig. 2: Front view of the machine
16
Page 17

Operating the machine
F
K
L K L1
L3
M
Fig. 3: Rear view of the machine
Fig. 4: Detail view of the socket for non-heating apparatus
Pos: 8.5 /00010 Bedienungsanleitungen Kapitelsammlungen/------- Seitenumbruch ----------- @ 0\mod_1222344373758_0.doc @ 2386 @ @ 1
17
Page 18

Operating the machine
Element
Description
Function
A
Jar lid
Seals the grinding jar
B
Knife cylinder
Cuts and grinds the sample material
C
Grinding jar
Holds the sample material
D
Jar holder
Holder for the grinding jar
E
Operating panel with displays
Start / stop / program memory and displays
F
Grinding chamber hood
Protective hood for safe grinding operations
G
Pin for knife cylinder
Drive shaft for knife cylinder
H
Support for grinding jar
Centres the grinding jar and the jar holder
J
Grinding chamber hood interlock
Locks the grinding chamber hood into place
K
Thermal fuse
Protective switch against overheating
L1
On/off switch
Separates the machine completely from the mains
L3
Socket for non-heating apparatus
Connection for mains cable
M
Vent
Ventilation of motor and inside chamber
O
O ring
Fixes the grinding chamber holder
Pos: 8.6 /00005 Überschriften/1.1 Überschrif ten/1.1 Überschriften BDA/11 Übersichtsta belle der Geräteteile @ 0\mod_122899 0616846_9.doc @ 4972 @ @ 1
5.2 Overview table of the parts of the device
Pos: 8.7 /00010 Bedienungsanleitungen Kapitelsammlungen/GM200 (2010)/0015 GM2 00N Bedienung/1505 GM200_2010 Mod ul Tabelle der Geräteteile @ 3\mod_1279 721225379_9.doc @ 21541 @ @ 1
Pos: 8.8 /00010 Bedienungsanleitungen Kapitelsammlungen/------- Seitenumbruch ----------- @ 0\mod_1222344373758_0.doc @ 2386 @ @ 1
18
Page 19

Operating the machine
Element
Description
Function
E1
Program 1
Memory for program function
E2
Program 2
Memory for program function
E3
Program 3
Memory for program function
E4
Time display
Display of the remaining grinding time
E5
Time knob
Grinding time setting (1 second to 3 minutes)
E6
Speed display
Display of the set speed
E7
Speed knob
Speed setting
E8
START button
Start of grinding
E9
STOP / open button
End of grinding / opening of the protective hood
E10
REVERSE button
Direction reversal
E11
INTERVAL button
Grinding with short intervals
E12
QUICK button
Manually controlled grinding
E2
E3
E1
E4
E6
E8
E10
E5
E7
E9
E11
E12
Pos: 8.9 /00005 Überschriften/1.1 Überschrif ten/1.1 Überschriften BDA/11 Bedien elemente und Funktionen @ 1\mod_12415 10466399_9.doc @ 8819 @ @ 1
Pos: 8.10 /00010 Bedienungsanleitungen Kapitelsammlungen/GM200 (2010)/0015 GM200N Bedienung/1506 GM200_2010 Mo dul Grafische Ansicht Bedienelemente un d Anzeigen @ 3\mod_1280911038179_9. doc @ 22270 @ @ 1
Fig. 5: Operating elements and displays
Pos: 8.11 /00005 Überschriften/1.1 Übersc hriften/1.1 Überschriften BDA/11 Übersic htstabelle der Bedienelemente und der Anzeig e @ 0\mod_1228990697273_9.doc @ 4 978 @ @ 1
5.3 Overview Table of the Operating Elements and the Display
Pos: 8.12 /00010 Bedienungsanleitungen K apitelsammlungen/GM200 (2010)/0015 GM200N Bedienung/1503 GM200_2010 Mo dul Tabelle Bedienfeldbenennung @ 3\m od_1281606340030_9.doc @ 22310 @ @ 1
Pos: 8.13 /00010 Bedienungsanleitungen K apitelsammlungen/------- Seitenumbruch ----------- @ 0\mod_1222344373758_0.d oc @ 2386 @ @ 1
19
Page 20

Operating the machine
CAUTION
Device falling down
Incorrect assembly or unsuitable workplace
- The appliance is very heavy and can therefore cause serious personal injuries if
it falls down.
Operate the device only on a sufficiently large, firm, skid-resistant and
steady workplace.
Make sure that all equipment feet are steady.
CAUTION
Damage to hearing
The level of noise can be high depending on the type of material,
the knife used, the speed set and the duration of the grinding
process.
- Noise that is excessive in terms of level and duration can cause
impaired or permanently damaged hearing.
• Ensure suitable sound-proofing measures or wear
hearing protection.
L1
Pos: 8.14 /00005 Überschriften/1.1 Übersc hriften/1.1 Überschriften BDA/11 Bedienung des Gerätes @ 0\mod_12294164657 74_9.doc @ 5052 @ @ 1
5.4 Operating the Device
Pos: 8.15 /00004 Warnhinweise/V0007 VOR SICHT Herabfallen des Gerätes / Stan dfestigkeit @ 1\mod_1248178329919_9.d oc @ 11690 @ @ 1
Pos: 8.16 /00004 Warnhinweise/V0044 VOR SICHT Gehörschaden (GM300, SM200, SM 300) @ 1\mod_1248181519795_9.d oc @ 11731 @ @ 1
Pos: 8.17 /00005 Überschriften/1.1 Übersc hriften/1.1 Überschriften BDA/11 Ein- / A usschalten @ 0\mod_1229416527496_9.d oc @ 5058 @ @ 1
5.5 Switching On and Off
Pos: 8.18 /00010 Bedienungsanleitungen K apitelsammlungen/GM200 (2010)/0015 GM200N Bedienung/1515 GM200_2010 Mo dul Ein und Ausschalten @ 3\mod_1279 721702190_9.doc @ 21559 @ @ 1
The main switch is located on the reverse side of the device (L1).
• Switch the main switch on.
The grinding time last used appears in the TIME display.
The speed last used appears in the SPEED display.
Fig. 6: Main switch
20
Page 21

Operating the machine
CAUTION
Crushed or bruised fingers
Falling grinding chamber protective hood
– The protective hood of the grinding chamber can cause crushed or bruised
fingers if it falls down.
• Hold the flap tight when closing.
O
E9
Pos: 8.19 /00005 Überschriften/1.1 Übersc hriften/1.1 Überschriften BDA/11 Öffnen und schließen des Gerätes @ 1\mod_1241 510544133_9.doc @ 8826 @ 2 @ 1
5.6 Opening and closing of the grinding chamber
Pos: 8.20 /00004 Warnhinweise/V0008 VOR SICHT Klappe beim Schließen festhalte n (CryoMill) @ 2\mod_1278054213505 _9.doc @ 20549 @ @ 1
Pos: 8.21 /00010 Bedienungsanleitungen K apitelsammlungen/GM200 (2010)/0015 GM200N Bedienung/1520 GM200_2010 Mo dul Öffnen und Schließen des Gerätes @ 3\mod_1279721707768_9.doc @ 21640 @ @ 1
• Briefly press the STOP button (E9).
The hood is unlocked and opens.
Pos: 8.22 /00005 Überschriften/1.1 Übersc hriften/1.1 Überschriften BDA/11 Mahlbe hälter einsetzen @ 0\mod_1226569844414 _9.doc @ 3555 @ @ 1
Fig. 7: Opening hood
5.7 Inserting the grinding jar
Pos: 8.23 /00010 Bedienungsanleitungen K apitelsammlungen/GM200 (2010)/0015 GM200N Bedienung/1525 GM200_2010 Mo dul Mahlbehälter einsetzen @ 3\mod_1 279721702862_9.doc @ 21568 @ @ 1
• Open the hood.
• Insert the jug.
Pay attention to the position of the jug when it is inserted.
N.B.
Ensure the correct position of the O ring (O).
Pos: 8.24 /00005 Überschriften/1.1 Übersc hriften/1.1 Überschriften BDA/11 Verwen dungen der Mahlbehälter in Abhängigkeit unters chiedlicher Materialien @ 3\mod_128 3172657446_9.doc @ 22938 @ @ 1
Fig. 8: Inserting jug
5.8 Use of grinding jugs depending on different materials
Pos: 8.25 /00004 Warnhinweise/H0053 HIN WEIS Vermahlung mit flüssigem Stic kstoff (N2) oder Trockeneis (CO2 @ 3\mod_1 283176096576_9.doc @ 22954 @ @ 1
NOTICE
1.H0053
Grinding with liquid nitrogen (LN2) or dry ice (CO2) is not permitted in any
variation of the GM.
Danger from brittleness and breakage of grinding tools or the glass and plastic
Pos: 8.26 /00010 Bedienungsanleitung en Kapitelsammlungen/GM200 (2010)/0015 GM200N Bedienung/1526 GM200_2010 Mo dul Verwendungen der Mahlbehälter in Abhä ngigkeit unterschiedlicher Materialien @ 3\mod_1283172508524_9.doc @ 22930 @ 333 @ 1
containers.
21
Page 22

Operating the machine
CAUTION
1.V0028
Danger of injuries caused by cuts
Moving parts – jug, rotor and grinding jar lid
– The jug and the rotor may fall down after removal and cause injury.
• Be aware and put down the components safely.
• Do not place any objects on the device.
5.8.1 Grinding jars – plastic jugs (PP)
Suitable for the following sample materials:
soft, medium-hard, elastic, aqueous, fatty and oily.
Unsuitable for the following sample materials:
hard, hard-brittle,
e.g. cereals, pellets, gelatine sweets.
(increased friction in the plastic jug)
5.8.2 Grinding jars – glass jugs (borosilicate glass 3.3)
Suitable for the following sample materials:
soft, medium-hard, elastic, aqueous, fatty and oily.
Unsuitable for the following sample materials:
hard, hard-brittle,
e.g. cereals, pellets, gelatine sweets.
(glass jugs can break)
5.8.3 Grinding jars – stainless steel jugs
Suitable for the following sample materials:
soft, medium-hard, elastic, aqueous, fatty and oily, hard to medium-hard
Pos: 8.27 /00005 Überschriften/1.1 Übersc hriften/1.1 Überschriften BDA/11 Dec kel und Behälterkombinationen @ 3\mod_12 79714539556_9.doc @ 21437 @ @ 1
e.g. cereals, frozen food, sweets, hard cheese and cold meat/sausage products
5.9 Lid and jug combinations
Pos: 8.28 /00004 Warnhinweise/V0028 VOR SICHT Schnittverletzungen Bewegliche T eile – Behälter, Rotor und Mahlbecherd eckel @ 3\mod_1282896982588_9.doc @ 2 2908 @ @ 1
Pos: 8.29 /00010 Bedienungsanleitungen Kapitelsammlungen/GM200 (2010)/0015 GM200N Bedienung/1535 GM200_2010 Mo dul Deckel und Behälterkombinationen @ 3 \mod_1279721704065_9.doc @ 21586 @ @ 1
The different lid / jug combinations will accommodate the different tasks.
NOTE
Pay attention to the maximum feed quantity of 300ml.
In the case of aqueous materials the jug may otherwise overflow during grinding.
Exceeding the non-recommended feed quantities.
22
Page 23

Operating the machine
Pos: 8.30 /00005 Überschriften/1.1.1 Ü berschriften/111 Deckel 1000ml @ 3\mod_ 1279716204123_9.doc @ 21445 @ @ 1
5.9.1 Lid 1000ml
Pos: 8.31 /00010 Bedienungsanleitungen K apitelsammlungen/GM200 (2010)/0015 GM200N Bedienung/1594 GM200_2010_ keinText_Deckel_Handling @ 5\mod_13558 39207125_0.doc @ 37020 @ @ 1
Pos: 8.32 /00010 Bedienungsanleitungen K apitelsammlungen/GM200 (2010)/0015 GM200N Bedienung/1540 GM200_2010 Mo dul Deckel 1000ml @ 3\mod_1279721 704627_9.doc @ 21595 @ @ 1
The 1000ml lid is used for larger quantities of small-piece material. The feed
quantity ranges between 300 and a maximum of 700ml.
The lid is snapped on to the edge of the jug and can be released again by pulling
up the flap.
NOTE
The 1000ml lid may be used both on the plastic and on the glass jug.
Fig. 2: 1000ml lid
23
Page 24

Operating the machine
Pos: 8.33 /00005 Überschriften/1.1.1 Ü berschriften/111 Deckel 500ml @ 3\mod_1 279716246155_9.doc @ 21453 @ @ 1
5.9.2 Lid 500ml
Pos: 8.34 /00010 Bedienungsanleitungen K apitelsammlungen/GM200 (2010)/0015 GM200N Bedienung/1545 GM200_2010 Mo dul Deckel 500ml @ 3\mod_12797217 05174_9.doc @ 21604 @ @ 1
The 500ml lid is used for smaller quantities of small-piece material. The feed
quantity is a maximum of 300ml, depending on the material to be ground.
• Position the 500ml lid such that the edge is over the top edge of the jug.
During grinding the 500ml lid is held down by the hood.
NOTE
The 500ml lid can only be used with the plastic jug.
Pos: 8.35 /00005 Überschriften/1.1.1 Ü berschriften/111 Schwerkraftdeckel @ 3\m od_1279716276921_9.doc @ 21461 @ @ 1
5.9.3 Gravitation lid
Pos: 8.36 /00010 Bedienungsanleitungen K apitelsammlungen/GM200 (2010)/0015 GM200N Bedienung/1550 GM200_2010 Mo dul Schwerkraftdeckel @ 3\mod_1279 721705752_9.doc @ 21613 @ @ 1
Fig. 3: 500ml lid
The gravitation lids permit an exact adjustment of the useful volume to the
respective feed quantity. They move downwards during grinding, thereby
optimising the grinding chamber volume. The feed quantity is a maximum of 300ml.
The gravitation lid with overcurrent channels ( ) is used for aqueous materials.
Fig. 4: Gravitation lid with overcurrent channels
24
Fig. 5: Graviation lid
Page 25

Operating the machine
CAUTION
2.V0039
Danger of injuries caused by cuts
Sharp cutters
– The cutters are very sharp and may lead to injuries caused by cuts if
handled incorrectly.
• Do not directly take hold of the cutters.
• Only reach into the grinding jar if it is outside the device.
• Do not reach into the grinding jar if the sample material still covers
the cutter.
• Before taking out the cutter remove as much sample material to
safely grip the cutter.
NOTE
The gravitation lids for the plastic jug differ from the gravitation lids for the glass
Pos: 8.37 /00005 Überschriften/1.1 Übersc hriften/1.1 Überschriften BDA/11 Füllen des Behälters @ 2\mod_1267774868556_9. doc @ 18870 @ 2 @ 1
and steel grinding jugs.
5.10 Filling the vessel
Pos: 8.38 /00004 Warnhinweise/V0039 VOR SICHT Schnittverletzung Scharfe Mess erklinge (GM200_2010) @ 3\mod_128289 8421988_9.doc @ 22916 @ @ 1
Pos: 8.39 /00004 Warnhinweise/H0054 HIN WEIS Haube muss sicher in den Verrieg elungsbolzen einrasten @ 3\mod_12831 76291349_9.doc @ 22962 @ @ 1
NOTE
The hood must safely latch into the interlock pin so that the motor can start or so
that no emergency brake is triggered during grinding.
3.H0054
Insert the cutter cylinder before adding the sample material because otherwise it
Pos: 8.40 /00005 Überschriften/1.1.1 Ü berschriften/111 Füllen – innerhalb des Gerät es @ 3\mod_1279716876335_9.doc @ 21 485 @ @ 1
may fall between cutter cylinder and jug.
5.10.1 Filling – within the device
Pos: 8.41 /00010 Bedienungsanleitungen K apitelsammlungen/GM200 (2010)/001 5 GM200N Bedienung/1560 GM200_2010 Mo dul Füllen innerhalb @ 3\mod_1279721 707174_9.doc @ 21631 @ @ 1
• Insert the jug.
• Position the cutter cylinder and push it down as far as it will go.
• Add the sample material.
• Put on the lid.
• Close the hood until it latches into the interlock pin (J).
25
Page 26

Operating the machine
J
Pos: 8.42 /00005 Überschriften/1.1.1 Ü berschriften/111 Füllen – außerhalb des G erätes @ 3\mod_1279716797287_9.doc @ 2 1477 @ @ 1
Fig. 6: Filling inside the device
5.10.2 Fílling – outside the device
Pos: 8.43 /00010 Bedienungsanleitungen K apitelsammlungen/GM200 (2010)/0015 GM200N Bedienung/1555 GM200_2010 Mo dul Füllen außerhalb @ 3\mod_12797217 06643_9.doc @ 21622 @ @ 1
The jug can also be filled before positioning in the device. This means that you can
work without problem with several jugs without intermediate cleaning.
The jugs can only be charged outside the machine with the 500ml and 1000ml lids;
the gravitation lid is not suitable for this purpose.
• Place the cutter cylinder into the jug.
• Add the sample material.
• Position the lid.
• Press the lid in the centre downwards and place the jug into the device.
In the case of the 500ml lid it is essential to push it down so that the cutter cylinder
reaches its final position.
Do not use the gravitation lid when filling the jug outside the machine since
otherwise the cutter will not interlock.
• Close the hood until it latches in the interlock pin.
26
Page 27

Operating the machine
with 1000ml lid
with 500ml lid
Pos: 8.44 /00005 Überschriften/1.1 Übersc hriften/1.1 Überschriften BDA/11 Mahlda uer einstellen @ 0\mod_1226908456965_9. doc @ 3582 @ @ 1
Fig. 7: Filling outside the device
5.11 Setting the grinding time
Pos: 8.45 /00010 Bedienungsanleitungen K apitelsammlungen/GM200 (2010)/0015 GM200N Bedienung/1565 GM200_2010 Mo dul Mahldauer einstellen @ 3\mod_12797 22271278_9.doc @ 21649 @ @ 1
The grinding duration can be set from 1 second to 3 minutes in steps of 1 second.
• Turn the knob (E5) to the left to reduce the grinding duration.
• Turn the knob (E5) to the right to increase the grinding duration.
Turning slowly increases the time in steps of 1 second.
Turning quickly increases the grinding duration in steps of 1 minute.
27
Page 28

Operating the machine
E11
E7
E5
Pos: 8.46 /00005 Überschriften/1.1 Übersc hriften/1.1 Überschriften BDA/11 Drehz ahl einstellen @ 1\mod_1250081022665_9. doc @ 13816 @ @ 1
Fig. 8: Setting grinding duration
5.12 Setting the Speed
Pos: 8.47 /00010 Bedienungsanleitungen K apitelsammlungen/GM200 (2010)/0015 GM200N Bedienung/1570 GM200_2010 Mo dul Drehzahl einstellen @ 3\mod_127972 2271888_9.doc @ 21658 @ @ 1
The speed can be set from 2000 min-1 to 10.000 min-1 in steps of 500 min-1.
• Turn the knob (E7) to the left to reduce the speed.
• Turn the knob (E7) to the right to increase the speed.
Slow turning alters the speed in steps of 500 min-1.
Fast turning alters the speed in steps of 3000 min-1.
Pos: 8.48 /00005 Überschriften/1.1 Übersc hriften/1.1 Überschriften BDA/11 Inter vall oder Dauerbetrieb @ 0\mod_122941942 7823_9.doc @ 5094 @ @ 1
Fig. 9: Setting the speed
5.13 Switching on interval or continuous mode
Pos: 8.49 /00010 Bedienungsanleitungen K apitelsammlungen/GM200 (2010)/0015 GM200N Bedienung/1575 GM200_2010 Mo dul Intervall oder Dauerbetrieb @ 3\mod_ 1279722272435_9.doc @ 21667 @ @ 1
• Press the interval button (E11).
Fig. 10: Switching on interval operation
28
Page 29

Operating the machine
E12
E10
The LED over the button lights up. The set speed is shown in the display if it is not
larger than 4000 rpm.
• Press the START button.
Grinding now takes places in the interval mode.
• To end interval grinding press the interval button (E11) once again.
The LED above the interval button goes out and the speed maintains the value of
Pos: 8.50 /00005 Überschriften/1.1 Übersc hriften/1.1 Überschriften BDA/11 Reverse - Vermahlung @ 3\mod_12797177236 14_9.doc @ 21493 @ @ 1
4000 rpm. The device is in continuous mode again .
5.14 Reverse grinding
Pos: 8.51 /00010 Bedienungsanleitungen K apitelsammlungen/GM200 (2010)/0015 GM200N Bedienung/1580 GM200_2010 Mo dul Reverse - Vermahlung @ 3\mod_12 79722273044_9.doc @ 21676 @ @ 1
• Press the REVERSE button (E10).
Pos: 8.52 /00005 Überschriften/1.1 Übersc hriften/1.1 Überschriften BDA/11 Quick St art - Tastenfunktion @ 1\mod_12403132 33592_9.doc @ 8229 @ 2 @ 1
Pos: 8.53 /00010 Bedienungsanleitungen K apitelsammlungen/GM200 (2010)/0015 GM200N Bedienung/1585 GM200_2010 Mo dul Quick Start - Tastenfunktion @ 3\ mod_1279722273888_9.doc @ 21685 @ @ 1
Fig. 11: Switching on interval operation
The LED above the REVERSE button lights up.
• Press the START button.
Grinding takes place in reverse mode and the motor runs against the cutting
direction. Grinding takes place by impact unlike normal mode (cutting).
• Press the REVERSE button (E11) to leave the reverse mode again.
The LED above the REVERSE button lights up. The device is in normal mode once
again – grinding by cutting .
• Press the QUICK button (E12).
Pos: 8.54 /00005 Überschriften/1.1 Übersc hriften/1.1 Überschriften BDA/11 Speicher – Funktionen @ 3\mod_1279718043115_9.doc @ 21517 @ @ 1
Fig. 12: QUICK grinding
The LED above the button lights up and grinding starts immediately.
• Release the QUICK button, grinding is ended immediately and the LED
above the button goes out.
29
Page 30

Operating the machine
E1; E2; E3
5.15 Store functions
Pos: 8.55 /00005 Überschriften/1.1.1 Ü berschriften/111 Programme speichern @ 0\ mod_1229424145211_9.doc @ 5124 @ @ 1
5.15.1 Saving programs
Pos: 8.56 /00010 Bedienungsanleitungen K apitelsammlungen/GM200 (2010)/0015 GM200N Bedienung/1590 GM200_2010 Mo dul Programme speichern @ 3\mod_1279 722274919_9.doc @ 21694 @ @ 1
• Keep the button E1, E2 or E3 pressed until the segment displays no longer
flash.
The values for time and speed as well as the setting for REVERSE and INTERVAL
operation are stored in the memory of the corresponding button.
Pos: 8.57 /00005 Überschriften/1.1.1 Ü berschriften/111 Starten eines gespeicherten Programms @ 0\mod_1229424036698_ 9.doc @ 5118 @ @ 1
Fig. 13: Memory buttons
5.15.2 Starting a saved program
Pos: 8.58 /00010 Bedienungsanleitungen K apitelsammlungen/GM200 (2010)/0015 GM200N Bedienung/1595 GM200_2010 Mo dul Starten eines gespeicherten Progra mms @ 3\mod_1279722524325_9.doc @ 21 712 @ @ 1
• Press the E1, E2 or E3 button.
The last saved values appear on the “TIME“ and “SPEED“ segment displays. The
LEDs above the REVERSE and INTERVAL buttons light up depending on default.
Pos: 8.59 /00005 Überschriften/1.1 Übersc hriften/1.1 Überschriften BDA/11 Start – Pause – Sto p @ 3\mod_1279719602650_9.doc @ 21525 @ @ 1
Press the START button to start grinding with the default parameters.
5.16 Start – Pause – Stop
Pos: 8.60 /00010 Bedienungsanleitungen Kapitelsammlungen/GM200 (2010)/0015 GM200N Bedienung/1596 GM200_2010 Mo dul Start - Pause - Stop @ 3\mod_1279 722525044_9.doc @ 21721 @ @ 1
5.16.1 Pause function
• Press the STOP button during grinding.
Grinding is interrupted and the hood remains closed.
It is not possible to move the set parameters (speed, time, interval, reverse). The
current time display is suspended.
• Press the START button to continue grinding.
Grinding is restarted and the time display runs again.
5.16.2 Premature termination of grinding
• Press the STOP button during grinding.
Grinding is interrupted and the hood remains closed.
• Press the STOP button again.
The device is switched off and the hood opens automatically. The parameters
Pos: 8.61 /00005 Überschriften/1.1 Übersc hriften/1.1 Überschriften BDA/11 Überlastsic herung zurücksetzen @ 3\mod_12797 19797635_9.doc @ 21533 @ @ 1
chosen for grinding (speed, time, interval, reverse) are displayed.
5.17 Resetting the overload protection
Pos: 8.62 /00010 Bedienungsanleitungen K apitelsammlungen/GM200 (2010)/0015 GM200N Bedienung/1598 GM200_2010_TM 100_Modul Überlastsicherung zurücksetze n @ 3\mod_1279722532575_9.doc @ 21811 @ @ 1
The overload protection switch (K) is situated on the rear panel.
30
Page 31

Cleaning and service
WARNING
Risk of a fatal electric shock
- An electric shock can cause injuries in the form of burns and cardiac
arrhythmia, respiratory arrest or cardiac arrest.
• Do not clean the blender under running water. Use only a cloth dampened
with water.
• Disconnect the power supply plug before cleaning the blender.
D
Db
K
This overload protection switch disconnects the device from the power supply if the
machine is overloaded.
• After allowing the device to cool down it can be used with the power supply
again by pressing the overload protection switch (K).
Pos: 9.1 /00005 Überschriften/1. Übersc hriften/1 Reinigung und Wartung @ 0\mod_ 1231167007723_9.doc @ 5450 @ @ 1
Fig. 14: Overload protection switch
6 Cleaning and service
Pos: 9.2 /00004 Warnhinweise/W0003 WARNUNG Reinigung Stromstoß neu @ 1\ mod_1236239978437_9.doc @ 7686 @ @ 1
Pos: 9.3 /00010 Bedienungsanleitungen Kapitelsammlungen/GM200 (2010)/0025 GM2 00N Reinigung und Wartung/2505 Mod ul Becheraufnahme reinigen @ 4\mod_13 35509265798_9.doc @ 27606 @ @ 1
Fig. 15: Cleaning the jar support
NOTE
Sample material may get underneath the jar support (Db) where the jar support (D)
frequently gets very dirty as a result of liquid or greasy samples.
• Where necessary also clean the area underneath the jar support (Db).
Material may otherwise, under unfavourable circumstances, get inside the device.
31
Page 32

Cleaning and service
Material/device part
Dishwasher-proof
Autoclavable
Knife (stainless steel)
yes
yes
Knife (pure titanium)
yes
yes
Standard lid
yes
yes
Gravitation lid
yes
yes
Gravitation lid with overcurrent
channels
yes
yes
Reduction lid
yes
yes
Plastic container (PP)
yes
no
Plastic container (PC)
yes
yes
Glass container
yes
yes
Stainless steel container
yes
yes
Pos: 9.4 /00005 Überschriften/1.1 Überschrif ten/1.1 Überschriften BDA/11 Reinigung der Mahlwerkzeuge @ 5\mod_1352705 569001_9.doc @ 34940 @ 2 @ 1
6.1 Cleaning the Grinding Tools
Pos: 9.5 /00010 Bedienungsanleitungen Kapitelsammlungen/GM200 (2010)/0025 GM2 00N Reinigung und Wartung/2515 GM20 0N Reinigung Mahlwerkzeuge @ 5\ mod_1352705504586_9.doc @ 34950 @ @ 1
NOTICE
• Pay attention to the position of parts in the dishwasher.
H0052
• Do not place the plastic container, plastic lid or the knife near the heating
element. Deformation can otherwise not be ruled out and further use of the
parts will no longer be possible.
32
Page 33

Cleaning and service
Gs
Pos: 9.6 /00010 Bedienungsanleitungen Kapitelsammlungen/GM200 (2010)/0025 GM2 00N Reinigung und Wartung/2510 Mod ul Dichtlippe tauschen @ 5\mod_13438208 79046_9.doc @ 32850 @ 2 @ 1
6.2 Check the sealing lip
Fig. 16: Sealing lip (Gs)
Check the sealing lip (Gs) for damage at regular intervals.
• Replace the sealing lip (Gs) if damaged. [No. 05.111.0239]
Notice
Moisture can penetrate the inside of the housing if the sealing lip (Gs) is
damaged.
33
Page 34

Fault messages
F01
Motor is not running
F02
Motor is switched off due to overload
Restart grinding process with small
feed quantity.
F03
Motor speed too low / high
F04
Hood open
F05
Braking time too high
F06
Motor overheated
Allow motor to cool and restart.
F07
Hood monitoring defective
Check the fault message:
Press the START button when the
hood is open.
The “time“ and "speed“ segment
displays flash evenly.
Close the hood to rectify fault.
F08
Overspeed through hardware
Pos: 10.1 /00005 Überschriften/1. Überschrif ten/1 Fehlermeldungen @ 2\mod_1259 056589728_9.doc @ 17580 @ @ 1
7 Fault messages
Pos: 10.2 /00010 Bedienungsanleitungen Kapitelsammlungen/GM200 (2010)/0035 GM200N Fehlermeldungen/3505 GM200_20 10 Modul Fehlermeldungen @ 3\mod_1 279783114219_9.doc @ 21850 @ @ 1
Pos: 11.1 /00010 Bedienungsanleitungen K apitelsammlungen/------- Seitenumbruch ----------- @ 0\mod_1222344373758_0.d oc @ 2386 @ @ 1
34
Page 35

Disposal
Pos: 11.2 /00005 Überschriften/1. Überschrif ten/1 Entsorgung @ 0\mod_123425874 6831_9.doc @ 6173 @ @ 1
8 Disposal
Pos: 11.3 /00003 Standard Kapitel/Gen eral Modul Entsorgung @ 0\mod_1234269 404935_9.doc @ 6180 @ @ 1
Please observe the respective statutory requirements with respect to disposal.
Information on disposal of electrical and electronic machines in the European
Community.
Within the European Community the disposal of electrically operated devices is
regulated by national provisions that are based on the EU Directive 2002/96/EC on
Waste Electrical and Electronic Equipment (WEEE).
Accordingly, all machines supplied after 13.08.2005 in the business-to-business
area to which this product is classified, may no longer be disposed of with
municipal or household waste. To document this they have the following label:
=== Ende der Liste für Textmarke Inhalt ===
Fig. 17: Disposal label
Since the disposal regulations within the EU may differ from country to country we
would request you to consult your supplier.
35
Page 36

9 Index
1
1000ml lid ........................................................... 24
5
500ml lid ............................................................. 24
A
Amperage ........................................................... 11
aqueous .............................................................. 22
B
Bar code ............................................................. 11
Borosilicate glass ................................................ 22
C
Capacity .............................................................. 11
CE marking ......................................................... 11
Changes ............................................................... 5
Cleaning and service .......................................... 31
Cleaning the Grinding Tools ............................... 32
E
elastic ................................................................. 22
Electrical connection .......................................... 10
Emissions ........................................................... 14
Emulsions .......................................................... 12
Explanations of the safety warnings .................... 6
External fuse ...................................................... 10
F
F01 ..................................................................... 34
F02 ..................................................................... 34
F03 ..................................................................... 34
F04 ..................................................................... 34
F05 ..................................................................... 34
F06 ..................................................................... 34
F07 ..................................................................... 34
F08 ..................................................................... 34
fatty .................................................................... 22
Conditions for the place of installation ................ 10
Confirmation ......................................................... 9
Connection cable ................................................ 11
Continuous grinding ............................................ 29
Continuous mode ................................................ 29
Copyright .............................................................. 5
D
dB(A) ................................................................... 14
Degree of protection ........................................... 14
Detail view of the socket for non-heating
apparatus ........................................................ 17
Device designation ............................................. 11
Dimensions and weight....................................... 14
DIN 45635-031-01-KL3....................................... 14
Disposal .............................................................. 35
Disposal label ..................................................... 11
Disposal label ..................................................... 35
Drive output ........................................................ 13
Fault messages .................................................. 34
Feed size ........................................................... 12
Filling – outside the device ................................ 26
Filling – within the device ................................... 25
Filling inside the device ...................................... 26
Filling outside the device ................................... 27
Filling the vessel ................................................ 25
Front view of the machine .................................. 16
Fuse strength ..................................................... 11
Fuse type ........................................................... 11
G
General safety instructions .................................. 7
Glass jugs .......................................................... 22
Gravitation lid ..................................................... 24
H
hard .................................................................... 22
hard-brittel .......................................................... 22
36
Page 37

I
Inserting jug ........................................................ 21
Inserting the grinding jar ..................................... 21
Installation height ................................................ 10
Installation of the machine .................................. 10
Interval grinding .................................................. 29
L
Lid 1000ml .......................................................... 23
Lid 500ml ............................................................ 24
Lid and jug combinations .................................... 22
LWA .................................................................... 14
M
Main switch ......................................................... 21
Mains frequency ................................................. 11
Manufacturer’s address ...................................... 11
Materials ............................................................. 12
P
Packaging .......................................................... 10
Part number ....................................................... 11
Pausen function ................................................. 30
Plastic jugs ......................................................... 22
Power version .................................................... 11
Premature termination of grinding ..................... 30
property damage .................................................. 6
Protective equipment ......................................... 13
Q
QUICK grinding .................................................. 29
R
Rated power ....................................................... 13
Rated voltage ..................................................... 13
Rear view of the machine .................................. 17
Regulations for the place of installation ............. 10
medium-hard ....................................................... 22
Memory buttons .................................................. 30
Moderate or mild injury ......................................... 6
Motor rotation speed ........................................... 13
N
Noise measurement ............................................ 14
noise values ........................................................ 14
Notes on the Operating Manual ............................ 5
Number of fuses ................................................. 11
O
oily ....................................................................... 22
Opening and closing of the grinding chamber .... 21
Opening hood ..................................................... 21
Operating elements and displays ....................... 19
Operating the Device .......................................... 20
Operating the machine ....................................... 16
Overcurrent channels ......................................... 24
Overload protection switch ................................. 31
Overview Table of the Operating Elements and
the Display ...................................................... 19
Repairs ................................................................. 8
Required floor space .......................................... 15
Resetting the overload protection ...................... 30
Reverse grinding ................................................ 29
S
Safety warnings ................................................... 6
Sample materials ............................................... 22
Saving programs ................................................ 30
Sealing lip .......................................................... 33
Serial number ..................................................... 11
serious injury ........................................................ 6
Service Address ................................................... 8
Setting grinding duration .................................... 28
Setting the grinding time .................................... 27
Setting the speed ............................................... 28
Setting the Speed .............................................. 28
soft ..................................................................... 22
Sound level ........................................................ 14
Stainless steel jugs ............................................ 22
Start – Pause – Stop .......................................... 30
Overview table of the parts of the device ........... 18
Starting a saved program .................................. 30
Store functions ................................................... 30
37
Page 38

Suspensions ....................................................... 12
Switching On and Off .......................................... 20
Switching on interval operation ..................... 28, 29
Switching on interval or continuous mode .......... 28
T
Target group ......................................................... 7
Technical data .................................................... 12
Temperature fluctuation and condensed water .. 10
Transport ............................................................ 10
Transport, scope of delivery, installation ............ 10
Type plate ........................................................... 10
type plate description .......................................... 11
Type plate lettering ............................................. 11
U
Use of grind jegs depending on different materials
....................................................................... 21
Use of the machine for the intended purpose .... 12
V
Views of the Instrument ..................................... 16
Viscosity ............................................................. 12
W
Working instructions ........................................... 13
Workplace-related emission value ..................... 14
Y
Year of production .............................................. 11
38
Page 39

Page 40

Page 41

Authorized person for the compilation of technical documents:
J. Bunke (technical documentation)
The following records are held by Retsch GmbH in the form of Technical Documentation:
Detailed records of engineering development, construction plans, study (analysis) of the measures required for
conformity assurance, analysis of the residual risks involved and operating instructions in due form according to
the approved regulations for preparation of user information data.
The CE-conformity of the Retsch Laboratory Knife Mill GM 200 is assured herewith.
In case of a modification to the machine not previously agreed with us as well as the use of not
licensed spare parts and accessories this certificate will lose its validity.
Retsch GmbH Haan, March 2011
Ralf Eisenbach Dipl.-Ing.
Ret sch Gm bH Retsch-Allee 1-5 427 81 Haan Germany www.retsch. com
Certificate of CE-Conformity according to:
EC Mechanical Engineering Directive 2006/42/EC
Applied harmonized standards, in particular:
DIN EN ISO 12100 Security of machines
DIN EN ISO 12852–5.1.1 Food processors and blenders
DIN EN ISO 13849-1 Safety related parts of control systems
EC Directive Electromagnetic Compatibility 2004/108/EC
Applied standards, in particular:
DIN EN 55011 Emission
DIN EN 61000-3-2 DIN EN 61000-3-3 Emission
DIN EN 61326-1 Immunity
Additional applied standards, in particular
DIN EN 61010-1 Safety prescriptions concerning measuring-, operating-, controlling- and
laboratory equipment
LABORATORY KNIFE MILL
GM 200 - GRINDOMIX
FB-EW-805-072 (E) Änderungsstand B 01.2012
CERTIFICATE OF CE-CONFORMITY
Translation
39
Page 42

Page 43

Page 44

Copyright
® Copyright by
Retsch GmbH
Haan, Retsch-Allee 1-5
D-42781 Haan
Federal Republic of Germany
 Loading...