

Rev.1.00 Sep 2019
Renesas RA Family
RA6 Series
www.renesas.com
All information conta ined in these materi als, includin g products and pr oduct specificat ions, represent s
Corp. without notice. Please review the latest information published by Renesas Electronics Corp.
RA6M3 Group
Microcontroller Grou p
3
Quick Start Guide
Quick Start Guide
Evaluation Kit f or RA6M3
EK-RA6M
information on the product at the time of publication and is subject to change by Renesas Electronics
through various means, in cluding the Renesas Electronics Corp. website (htt p://www.renesas.com).

Corporate Headquarters
Contact information
www.renesas.com
Trademarks
of their respective owners.
Notice
1. Descriptions of circuits, software and other related information in this document are provided only to illustrate the operation of semiconductor products
and application examples. You are fully responsible for the incorporation or any other use of the circuits, software, and information in the design of your
product or system. Renesas Electronics disclaims any and all liability for any losses and damages incurred by you or third parties arising from the use
of these circuits, software, or information.
2. Renesas Electronics hereby expressly disclaims any warranties against and liability for infringement or any other claims involving patents, copyrights,
or other intellectual property rights of third parties, by or arising from the use of Renesas Electronics products or technical information described in this
document, including but not limited to, the product data, drawings, charts, programs, algorithms, and application examples.
3. No license, express, implied or otherwise, is granted hereby under any patents, copyrights or other intellectual property rights of Renesas Electronics
or others.
4. You shall not alter, modify, copy, or reverse engineer any Renesas Electronics product, whether in whole or in part. Renesas Electronics disclaims any
and all liability for any losses or damages incurred by you or third parties arising from such alteration, modification, copying or reverse engineering.
5. Renesas Electronics products are classified according to the following two quality grades: “Standard” and “High Quality”. The intended applications for
each Renesas Electronics product depends on the product’s quality grade, as indicated below.
"Standard": Computers; office equipment; communications equipment; test and measurement equipment; audio and visual equipment; home
"High Quality": Transportation equipment (automobiles, trains, ships, etc.); traffic control (traffic lights); large-scale communication equipment; key
Unless expressly designated as a high reliability product or a product for harsh environments in a Renesas Electronics data sheet or other Renesas
Electronics document, Renesas Electronics products are not intended or authorized for use in products or systems that may pose a direct threat to
human life or bodily injury (artificial life support devices or systems; surgical implantations; etc.), or may cause serious propert y dam age (sp ace
system; undersea repeaters; nuclear power control systems; aircraft control systems; key plant systems; military equipment; etc.). Renesas Electronics
disclaims any and all liability for any damages or losses incurred by you or any third parties arising from the use of any Renesas Electronics product
that is inconsistent with any Renesas Electronics data sheet, user’s manual or other Renesas Electronics document.
6. When using Renesas Electronics products, refer to the latest product information (data sheets, user’s manuals, application notes, “General Notes for
Handling and Using Semiconductor Devices” in the reliability handbook, etc.), and ensure that usage conditions are within the ranges specified by
Renesas Electronics with respect to maximum ratings, operating power supply voltage range, heat dissipation characteristics, installation, etc.
Renesas Electronics disclaims any and all liability for any malfunctions, failure or accident arising out of the use of Renesas Electronics products
outside of such specified ranges.
7. Although Renesas Electronics endeavors to improve the quality and reliability of Renesas Electronics products, semiconductor products have specific
characteristics, such as the occurrence of failure at a certain rate and malfunctions under certain use conditions. Unless designated as a high reliability
product or a product for harsh environments in a Renesas Electronics data sheet or other Renesas Electronics document, Renesas Electronics
products are not subject to radiation resistance design. You are responsible for implementing safety measures to guard against the possibility of bodily
injury, injury or damage caused by fire, and/or danger to the public in the event of a failure or malfunction of Renesas Electronics products, such as
safety design for hardware and software, including but not limited to redundancy, fire control and malfunction prevention, appropriate treatment for
aging degradation or any other appropriate measures. Because the evaluation of microcomputer software alone is very difficult and impractical, you
are responsible for evaluating the safety of the final products or systems manufactured by you.
8. Please contact a Renesas Electronics sales office for details as to environmental matters such as the environmental compatibility of each Renesas
Electronics product. You are responsible for carefully and sufficiently investigating applicable laws and regulations that regulate the inclusion or use of
controlled substances, including without limitation, the EU RoHS Directive, and using Renesas Electronics products in compliance with all these
applicable laws and regulations. Renesas Electronics disclaims any and all liability for damages or losses occurring as a result of your no ncom pliance
with applicable laws and regulatio ns.
9. Renesas Electronics products and technologies shall not be used for or incorporated into any products or systems whose manufacture, use, or sale is
prohibited under any applicable domestic or foreign laws or regulations. You shall comply with any applicable export control laws and regulations
promulgated and administered by the governments of any countries asserting jurisdiction over the parties or transactions.
10. It is the responsibility of the buyer or distributor of Renesas Electronics products, or any other party who distributes, disposes of, or otherwise sells or
transfers the product to a third party, to notify such third party in advance of the contents and conditions set forth in this document.
11. This document shall not be reprinted, reproduced or duplicated in any form, in whole or in part, without prior written consent of Renesas Electronics.
12. Please contact a Renesas Electronics sales office if you have any questions regarding the information contained in this document or Renesas
Electronics products.
(Note1) “Renesas Electronics” as used in this document means Renesas Electronics Corporation and also includes its directly or indirectly controlled
(Note2) “Renesas Electronics product(s)” means any product developed or manufactured by or for Renesas Electronics.
subsidiaries.
electronic appliances; machine tools; personal electronic equipment; industrial robots; etc.
financial terminal systems; safety control equipment; etc.
(Rev.4.0-1 Novembe r 201 7)
TOYOSU FORESIA, 3-2-24 Toyosu,
Koto-ku, Tokyo 135-0061, Japan
Renesas and the Renesas logo are trademarks of Renesas Electronics
Corporation. All trademarks and registered trademarks are the property
For further information on a product, technology, the most up-to-date
version of a document, or your ne are s t sales office, please visit:
www.renesas.com/contact/
.
© 2019 Renesas Electronics Corporation. All rights reserved.

Renesas EK-RA6M3 Disclaimer
By using this EK-RA6M3, the User accepts the following terms, which are in addition to, and control in the event of disagreement, with Renesas’ General
Terms and Conditions available at https://www.renesas.com/en-us/legal/disclaimer.html
The EK-RA6M3 is not guaranteed to be error free, and the entire risk as to the results and performance of the EK-RA6M3 is assumed by the User. The
EK-RA6M3 is provided by Ren esas on an “as is” basis without warra nt y of an y ki nd wheth er e xp ress or im plie d, incl ud ing but not limited to the implied
warranties of good workmanship, fitness for a particular purpose, title, merchantability, and non-infringement of intellectual property rights. Renesas
expressly disclaims any implied warranty.
Renesas does not consid er the EK-RA6M3 to be a finished product and therefore the EK-RA6M3 may not comply with some requirements applicable to
finished products, including, but not limited to recycling, restricted substances and electromagnetic compatibility regulations. Refer to Certifications section,
for information about certifications and compliance information for the EK-RA6M3. It is the kit User’s responsibility to make sure the kit meets any local
requirements applicable to their region.
Renesas or its affiliates shall in no event be liable for any loss of profit, loss of data, loss of contract, loss of business, damage to reputation or goodwill, any
economic loss, any reprogramming or recall costs (whether the foregoing losses are direct or indirect) nor shall Renesas or its affiliates be liable for any
other direct or indirect special, incidental or consequential damages arising out of or in relation to the use of this EK-RA6M3, even if Renesas or its affiliates
have been advised of the possibil it y of such dam a ges.
Renesas has used reasonable care in preparing the information included in this document, but Renesas does not warrant that such information is error free
nor does Renesas guarantee an exact match for every application or parameter to part numbers designated by other vendors listed herein. The information
provided in this document is intended solely to enable the use of Renesas products. No express or implied license to any intell ect ual pro pe rt y right is
granted by this document or in connection with the sale of Renesas products. Renesas reserves the right to make changes to specifications and product
descriptions at any time without notice. Renesas assumes no liability for any damages incurred by you resulting from errors in or omissions from the
information included herein. Renesas cannot verify, and assumes no liability for, the accuracy of information available on another company’s website.
Precautions
This Evaluation Kit is only intended for use in a laboratory environment under ambient temperature and humidity conditions. A safe separation distance
should be used between this and any sensitive equipment. Its use outside the laboratory, classroom, study area, or similar such area invalidates conformity
with the protection requirements of the Electromagnetic Compatibility Directive and could lead to prosecution.
The product generates, uses, and can radiate radio frequency energy and may cause harmful interference to radio communications. There is no guarantee
that interference will not occur in a particular installation. If this equipment causes harmful interference to radio or television reception, which can be
determined by turning the equipment off or on, you are encouraged to try to correct the interference by one or more of the following measures:
• Ensure attached cables do not lie across the equipment.
• Reorient the receiving antenna.
• Increase the distance between the equipment and the receiver.
• Connect the equipment into an outlet on a circuit different from that whic h the receiver is connected.
• Power down the equipment wh en no t i n use.
• Consult the dealer or an experienced radio/TV technician for help.
Note: It is recommended that wherever possible shielded interface cables are used.
The product is potentially susceptible to certain EMC phenomena. To mitigate against them it is recommended that the following measures be undertaken:
• The user is advised that mobile phones should not be used within 10 m of the product when in use.
• The user is advised to take ESD precautions when handling the equipment.
The Evaluation Kit does not represent an ideal refe ren c e design for an end product and does not fulf ill the regulatory standards for an end pr oduct.
.

Quick Start Guide
Renesas RA Family
EK-RA6M3
Contents
1. Introduction .............................................................................................................................. 6
1.1 Assumptions and Advisor y Notes ............................................................................................................ 6
2. Kit Contents ............................................................................................................................. 6
3. Overview of the Quick Start Example Project........................................................................... 7
3.1 Quick Start Example Project Flow ........................................................................................................... 7
4. Running the Quick Start Example Project ................................................................................ 8
4.1 Connecting and Powering Up the EK-RA6M3 Board .............................................................................. 8
4.2 Running the Quick Start Example Project .............................................................................................. 9
5. Customizing the Quick Start Example Project ........................................................................ 12
5.1 Downloading and Installing Software and Development Tools ............................................................. 12
5.2 Downloading and Importing the Quick Start Example Project .............................................................. 12
5.3 Modifying, Generating, and Building the Quick Start Example Project ................................................. 16
5.4 Setting Up Debug Connection between the EK-RA6M3 board and Host PC ....................................... 18
5.5 Downloading and Running the Modified Quick Start Example Project ................................................. 19
6. Next Steps ............................................................................................................................. 20
7. Website and Support ............................................................................................................. 21
Revision History ............................................................................................................................ 22
Figures
Figure 1. EK-RA6M3 Kit Contents ................................................................................................................... 6
Figure 2. Quick Start Example Project Flow .................................................................................................... 7
Figure 3. Connecting the EK-RA6M3 Board to the Host PC via USB Full Speed Port ................................... 8
Figure 4. USB Serial Device in Windows Device Manager ............................................................................. 9
Figure 5. Selecting the Serial Port on Tera Term ........................................................................................... 10
Figure 6. Welcome Message ......................................................................................................................... 10
Figure 7. Kit Information ................................................................................................................................ 11
Figure 8. Next Steps ...................................................................................................................................... 11
Figure 9. Creating a New Workspace ............................................................................................................ 12
Figure 10. Launching the Workspace ............................................................................................................ 13
Figure 11. Importing the Project .................................................................................................................... 13
R20QS0011EU0100 Rev.1.00 Page 4 of 22
Sep.17.19

Renesas RA Family EK-RA6M3 – Quick Start Guide
Figure 12. Importing Existing Projects into the Workspace ........................................................................... 14
Figure 13. Clicking Next to Import Existing Projects into the Workspace ..................................................... 14
Figure 14. Selecting the Root Directory ......................................................................................................... 15
Figure 15. Finishing Importing the Quick Start Example Project ................................................................... 15
Figure 16. Opening the Configurator ............................................................................................................. 16
Figure 17. Modifying the Configuration Settings ........................................................................................... 16
Figure 18. Saving the Configuration Changes .............................................................................................. 17
Figure 19. Building the Project ...................................................................................................................... 17
Figure 20. Successful Build Output ............................................................................................................... 17
Figure 21. Connecting the EK-RA6M3 Board to the H ost PC via USB Deb ug Port ..................................... 18
Figure 22. Selecting the Debug Option ......................................................................................................... 19
Figure 23. Opening the Debug Perspective .................................................................................................. 19
Figure 24. Executing the Project ................................................................................................................... 19
R20QS0011EU0100 Rev.1.00 Page 5 of 22
Sep.17.19
Renesas RA Family EK-RA6M3 – Quick Start Guide
1. Introduction
This Quick Start Guide (QSG) provides:
• An overview of the Quick Start example project that the EK-RA6M3 board comes pre-programmed with.
• Instructions for running the Quick Start example project.
• Instructions for importing , modifying, and building the Quick Start example project using Flexible Software
Package (FSP) and e
2
studio Integrated Development Environment (IDE).
1.1 Assumptions and Advisory Notes
1. Tool experience: It is assumed that the user has prior experience work ing with IDEs such as e2 studio
and terminal emulation programs such as Tera Term.
2. Subject knowledge: It is assumed that the user has basic knowledge about microcontrollers, embedded
systems, and FSP to modify the example project described in this document.
3. Prior to running the Quick Start example project or programming the EK-RA6M3 board, default jumper
settings must be used. Refer to the EK-RA6M3 user’s manual for the default jumper settings.
4. The screen shots provided throughout this document are for reference. The actual screen content may
differ depending on the version of software and development tools used.
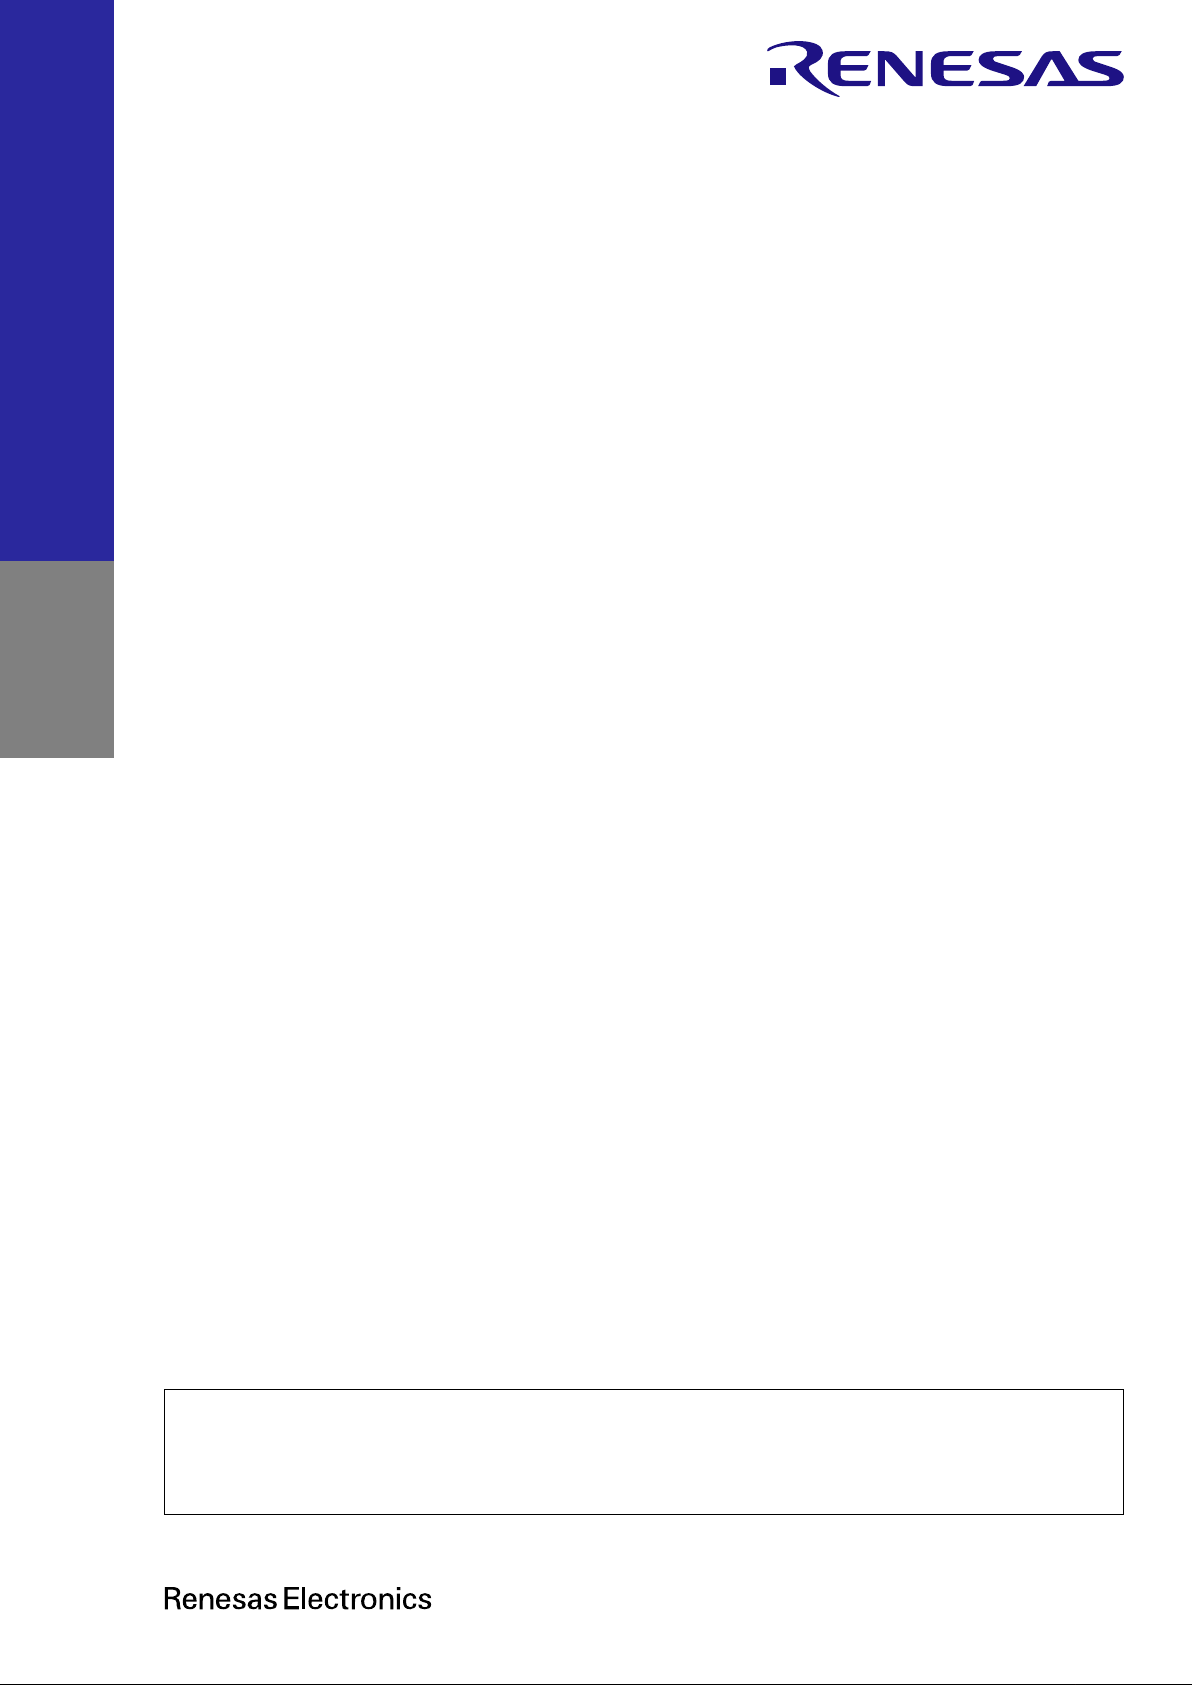
2. Kit Contents
The following components are included in the kit:
1. EK-RA6M3 board
2. Micro USB device cable (type-A male to micro-B male)
3. Micro USB host cable (type-A female to micro-B male)
4. Ethernet patch cable
Figure 1. EK-RA6M3 Kit Contents
R20QS0011EU0100 Rev.1.00 Page 6 of 22
Sep.17.19
Renesas RA Family EK-RA6M3 – Quick Start Guide
Next steps are
displayed
No
Power ON/Reset
Is the
S1 (USER BTN)
pressed?
User LEDs
continue to blink at
the same
frequency
Kit Information, MCU
Die Temperature, and
LED Frequency are
displayed
No
No
Yes
2 is pressed
1 is pressed
Yes
User LEDs are blinking
at 1 Hz and 90% intensity
Frequency of the
user LEDs is
changed
Is the
USB connection
established
between the
board and PC?
Welcome
message is
displayed
Enter key is pressed
No
Is the
S2 (USER BTN)
pressed?
User LEDs
continue to blink
at the same
intensity
Yes
Intensity of the
user LEDs is
changed
Yes
Is the Enter key
pressed?
Is a key pre ssed?
3. Overview of the Quick Start Example Project
The Quick Start example project allows the user to change the frequency and intensity of the on-board user
LEDs (LED1, LED2, and L ED3) using the user buttons (S1 and S2). The supported frequencies are 1 Hz,
5 Hz, and 10 Hz and the supported intensities are 10%, 50% and 90%.
When the EK-RA6M3 board running the Quick Start example project is connected to a host PC vi a USB as a
Full Speed CDC Device, the kit information, MCU die temperature, user LED blinking frequency, and so
forth, can be displayed on a terminal console.
3.1 Quick Start Example Project Flow
Figure 2. Quick Start Example Project Flow
R20QS0011EU0100 Rev.1.00 Page 7 of 22
Sep.17.19
Renesas RA Family EK-RA6M3 – Quick Start Guide
4. Running the Quick Start Example Proj ect
This section lists the requirements and instructions to power up the EK-RA6M3 board and run the Quick
Start example project.
Hardware Requirements
• EK-RA6M3 board
• Micro USB device cable
• A PC with at least 1 USB port
Software Requirements
• Windows
• USB Serial Drivers (included in Windows 10)
• Tera Term (or similar) terminal console application
®
10 operating system
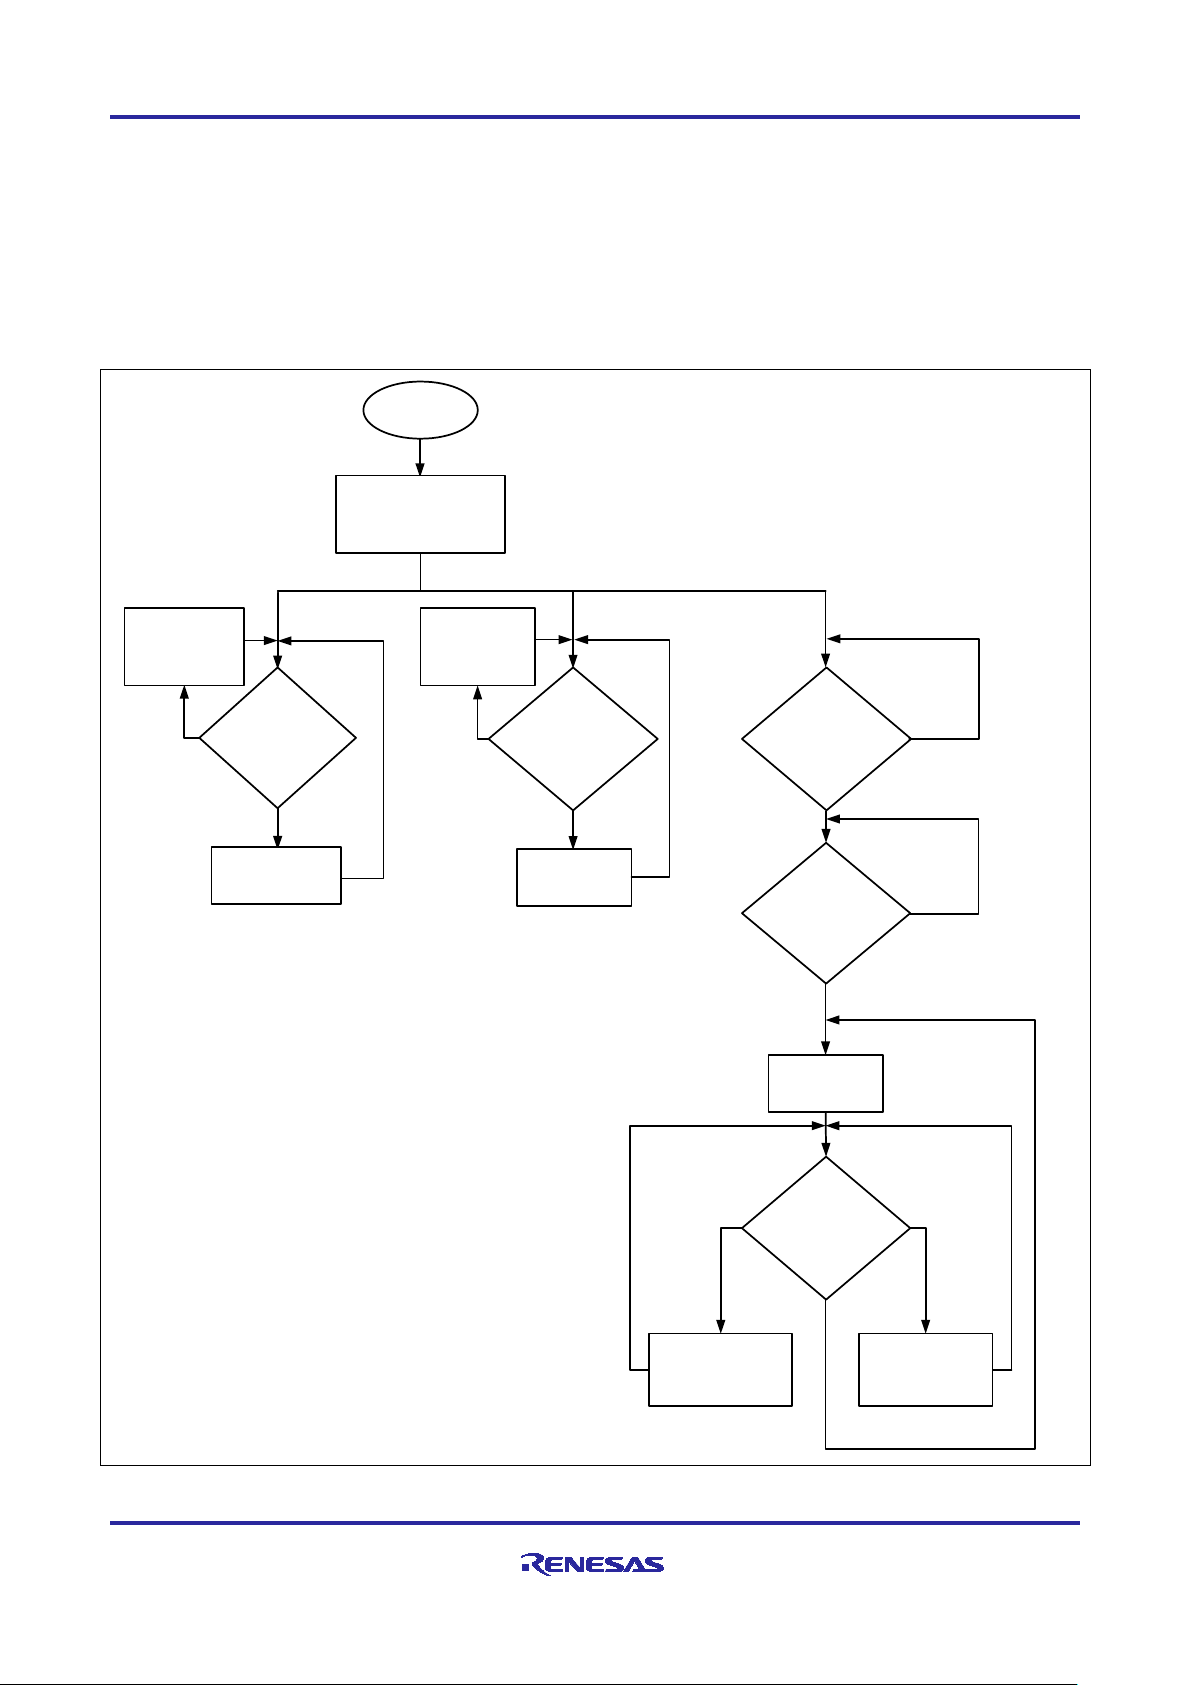
4.1 Connecti ng and Powering Up the EK-RA6M3 Board
1. Connect the micro USB end of the micro USB device cable to micro-AB USB Full Speed port (J11) of the
EK-RA6M3 board.
2. Connect the other end of this cable to the USB port of the host PC. Power LED (LED4) on the EK-RA6M3
board lights up white, indicating that the EK-RA6M3 board is powered on.
Note: If the EK-RA6M3 board is not power ed throu gh micro-AB USB Full Speed port (J11) and the host PC,
then USB CDC functionality of the Quick Start example project cannot be demonstrated because of
the absence of a US B Full Speed D evic e con necti on with the hos t PC.
Figure 3. Connecting the EK-RA6M3 Board to the Host PC via USB Full Speed Port
R20QS0011EU0100 Rev.1.00 Page 8 of 22
Sep.17.19

Renesas RA Family EK-RA6M3 – Quick Start Guide
4.2 Running the Quick Start Example Project
To run the Quick Start example project, use the following instructions:
1. On power up or RESET, the three user LEDs (blue LED1, green LED2, and red LED3) start blinking at
1 Hz frequency and at 90% intensity.
Note: The debug LED (LED5) will blink or light up orange; this can be ignored for now.
2. Press the first user button (S1) on the EK-RA6M3 board to change the blinking frequency of the user
LEDs. With every press of the first user button (S1), the frequency will switch from 1 Hz to 5 Hz to 10 Hz
and cycle back.
3. Press the second user button (S2) on the board to change the intensity of the user LEDs. With every
press of the user button (S2), the intensity will switch from 90% to 50% to 10% and cycle back.
4. On the host PC, open Windows Device Manager. Expand Ports (COM & LPT), locate USB Serial
Device (COMxx) and note down the COM port number for reference in the next step.
Note: USB Serial Device drivers are required to communicate between the EK-RA6M3 board and the
terminal application on the host PC.
Figure 4. USB Serial Device in Windows Device Manager
R20QS0011EU0100 Rev.1.00 Page 9 of 22
Sep.17.19

Renesas RA Family EK-RA6M3 – Quick Start Guide
5. Open Tera Term, select Serial and COMxx: USB Serial Device (COMxx) and click OK.
Figure 5. Selecting the Serial Port on Tera Term
6. Press Enter key. The welcome message will be displayed .
Figure 6. Welcome Message
R20QS0011EU0100 Rev.1.00 Page 10 of 22
Sep.17.19

Renesas RA Family EK-RA6M3 – Quick Start Guide
7. Press 1 to display the kit name, part number, MCU die temperature, and the user LEDs’ current blinking
frequency.
8. Press 2 to dis p lay Next Steps.
Figure 7. Kit Information
Figure 8. Next Steps
Note: At any point, the user can press the Enter key to return to the welcome message.
R20QS0011EU0100 Rev.1.00 Page 11 of 22
Sep.17.19

Renesas RA Family EK-RA6M3 – Quick Start Guide
5. Customizing the Quick Start Example Project
This section lists the requirements and instructions for customizing the Quick Start example project.
Hardware Requirements
• EK-RA6M3 board
• Micro USB device cable
• A PC with at least 1 USB port
Software Requirements
• Windows
2
• e
studio IDE
• SEGGER J-Link
®
10 operating system
®
USB drivers
• FSP
• Quick Start example project
5.1 Downloading and Installing Software and Development Tools
Before the Quick Start example project can be modified, it is necessary to download and install software and
development tools on the h os t PC.
2
The FSP, J-Link USB drivers, and e
the FSP webpage at renesas.com/ra/fsp
provided in the installation wizard, to minimize the amount of manual configuration needed.
studio are bundled in a downloadable platform installer available on
. New users are recommended to use the Quick Install option
There is no need to download and install software, development tools, and drivers separately.
5.2 Downloading and Importing the Quick Start Example Project
1. Download the Quick Start example project (quickstart_ek_ra6m3_ep) from Renesas GitHub
webpage at renesas.com/ra/example-projects
2. Launch e2 studio.
3. Browse to the Workspace where the project file is to be imported to. Enter the name in the Workspace
dialog box to create a new workspace.
to a local directory on the host PC.
Figure 9. Creating a New Workspace
R20QS0011EU0100 Rev.1.00 Page 12 of 22
Sep.17.19

Renesas RA Family EK-RA6M3 – Quick Start Guide
4. Click Launch.
Figure 10. Launching the Workspace
5. Click Import from the File drop-down menu.
Figure 11. Importing the Project
R20QS0011EU0100 Rev.1.00 Page 13 of 22
Sep.17.19

Renesas RA Family EK-RA6M3 – Quick Start Guide
6. In the Import dialog box, select General, and then select Existing Projects into Workspace.
7. Click Next.
Figure 12. Importing Existing Projects into the Workspace
Figure 13. Clicking Next to Import Existing Projects into the Workspace
R20QS0011EU0100 Rev.1.00 Page 14 of 22
Sep.17.19

Renesas RA Family EK-RA6M3 – Quick Start Guide
8. Click Select root directory and click Browse to go to the location of the Quick Start example project
folder.
Figure 14. Selecting the Root Directory
9. Select the Quick Start example project and click Finish.
Figure 15. Finishing Importing the Quick Start Example Project
R20QS0011EU0100 Rev.1.00 Page 15 of 22
Sep.17.19

Renesas RA Family EK-RA6M3 – Quick Start Guide
5.3 Modifying, Generating, and Building the Quick Start Example Project
This section provides instructions to modify the Quick Start example project. The Quick Start example project
can be modified by editing the source code and reconfiguring the properties of the MCU peripherals, pins,
clocks, interrupts, and so forth.
Note: The specific modifications that can be performed to the Quick Start example project are not
prescribed in this QSG. User discretion is advised while modifying the Quick Start example project.
1. Once the Quick Start example project is imported, click the configuration.xml file to open the
configurator. The configurator provides an easy to use interface to configure the properties of MCU
peripherals, pins, clocks, and so forth.
Figure 16. Opening the Configurator
2. For example, in the Stacks tab of the configurator, the us er can click to select modules to modify the
configuration settings, as required. The following screen shot illustrates modifying the ADC driver
configuration.
Figure 17. Modifying the Configurati on Settings
R20QS0011EU0100 Rev.1.00 Page 16 of 22
Sep.17.19

Renesas RA Family EK-RA6M3 – Quick Start Guide
3. After the desired modifications are made, click Generate Project. A dialog box m ay appear with an optio n
of saving the configuration changes. Click Proceed.
Figure 18. Saving the Configuration Changes
4. Modify the source files in the /src folder as needed and save the changes.
5. Build the project by clicking the build icon.
Figure 19. Building the Proje ct
6. A successful build produces an output as follows.
Figure 20. Successful Build Output
R20QS0011EU0100 Rev.1.00 Page 17 of 22
Sep.17.19

Renesas RA Family EK-RA6M3 – Quick Start Guide
5.4 Setting Up De bug Connection between the EK-RA6M3 board and Host PC
To program the modified Quick Start example project on to the EK-RA6M3 board, a debug connection is
necessary between the EK-RA6M3 board and host PC.
1. Disconnect the USB cable from micro-AB USB Full Speed port (J11) and connect it to micro-B USB
debug port (J10) of the EK-RA6M3 board.
Note: The EK-RA6M3 board supports 3 debugging modes. In this section and the following sections, default
debugging mode, Debug On-Board, is used. More information on debugging modes is available in
EK-RA6M3 user’s manual.
Figure 21. Connecting the EK-RA6M3 Board to the Host PC via USB Debug Port
2. Verify that the debug LED (LED5) stops blinking and lights up orange indicating that the J-Link drivers are
detected by the EK-RA6M3 board.
Note: The debug LED (LED5) continues to blink when J-Link drivers are not detected by the EK-RA6M3
board. In that case, make sure that the EK-RA6M3 board is connected to the host PC through the
micro-B USB debug port (J10) and that J-Link drivers are installed on the host PC by checking in the
Windows Device Manager (expand Universal Serial Bus controller, and locate J-Link driver)
R20QS0011EU0100 Rev.1.00 Page 18 of 22
Sep.17.19

Renesas RA Family EK-RA6M3 – Quick Start Guide
5.5 Downloading and Running the Modified Quick Start Example Project
1. In e2 studio, click the drop-down menu for the debug icon, select Debug As option, and choose Renesas
GDB Hardware Debugging.
Figure 22. Selecting the Debug Option
2. A d ialog box m a y appear. Click Yes.
Figure 23. Opening the Debug Perspective
3. Press F8 or click Resume icon to begin executing the proj ec t.
Figure 24. Executing the Project
4. The modified Quick Start example project is programmed into the EK-RA6M3 board and is running. The
project can be paused, stopped, or resumed using the debug controls.
R20QS0011EU0100 Rev.1.00 Page 19 of 22
Sep.17.19

Renesas RA Family EK-RA6M3 – Quick Start Guide
6. Next Steps
1. To learn more about the EK-RA6M3 board, refer to the EK-RA6M3 user’s manual and design package
available on the EK-RA6M3 webpage at renesas.com/ra/ek-ra6m3
2. Renesas provides several example projects that demonstrate different capabilities of the RA MCUs. These
example projects can serve as a good starting point for the user to develop custom applications. Example
projects for the RA kits are available on the R enes as GitHub web pag e at
projects.
Every example project includes the project files and a readme file.
Once example projects are downloaded, they must be built using the supported tool chain and FSP
before they can be downloaded on to the kit.
.
renesas.com/ra/example-
R20QS0011EU0100 Rev.1.00 Page 20 of 22
Sep.17.19

Renesas RA Family EK-RA6M3 – Quick Start Guide
7. Website and Support
Visit the following URLs to learn about the kit and the RA family of microcontrollers, download tools and
documentation, and get support.
EK-RA6M3 Resources renesas.com/ra/ek-ra6m3
RA Product Information renesas.com/ra
RA Product Support Forum renesas.com/ra/forum
Renesas Support renesas.com/support
R20QS0011EU0100 Rev.1.00 Page 21 of 22
Sep.17.19

Renesas RA Family EK-RA6M3 – Quick Start Guide
Rev.
Date
Description
Page
Summary
1.00
Sep.17.19
—
Initial release
Revision History
R20QS0011EU0100 Rev.1.00 Page 22 of 22
Sep.17.19

Published by: Renesas Electronics Corporation
EK-RA6M3 – Quick Start Guide
Publication Date: Sep.17.19

R20QS0011EU0100
EK-RA6M3 – Quick Start Guide
 Loading...