

Page 1
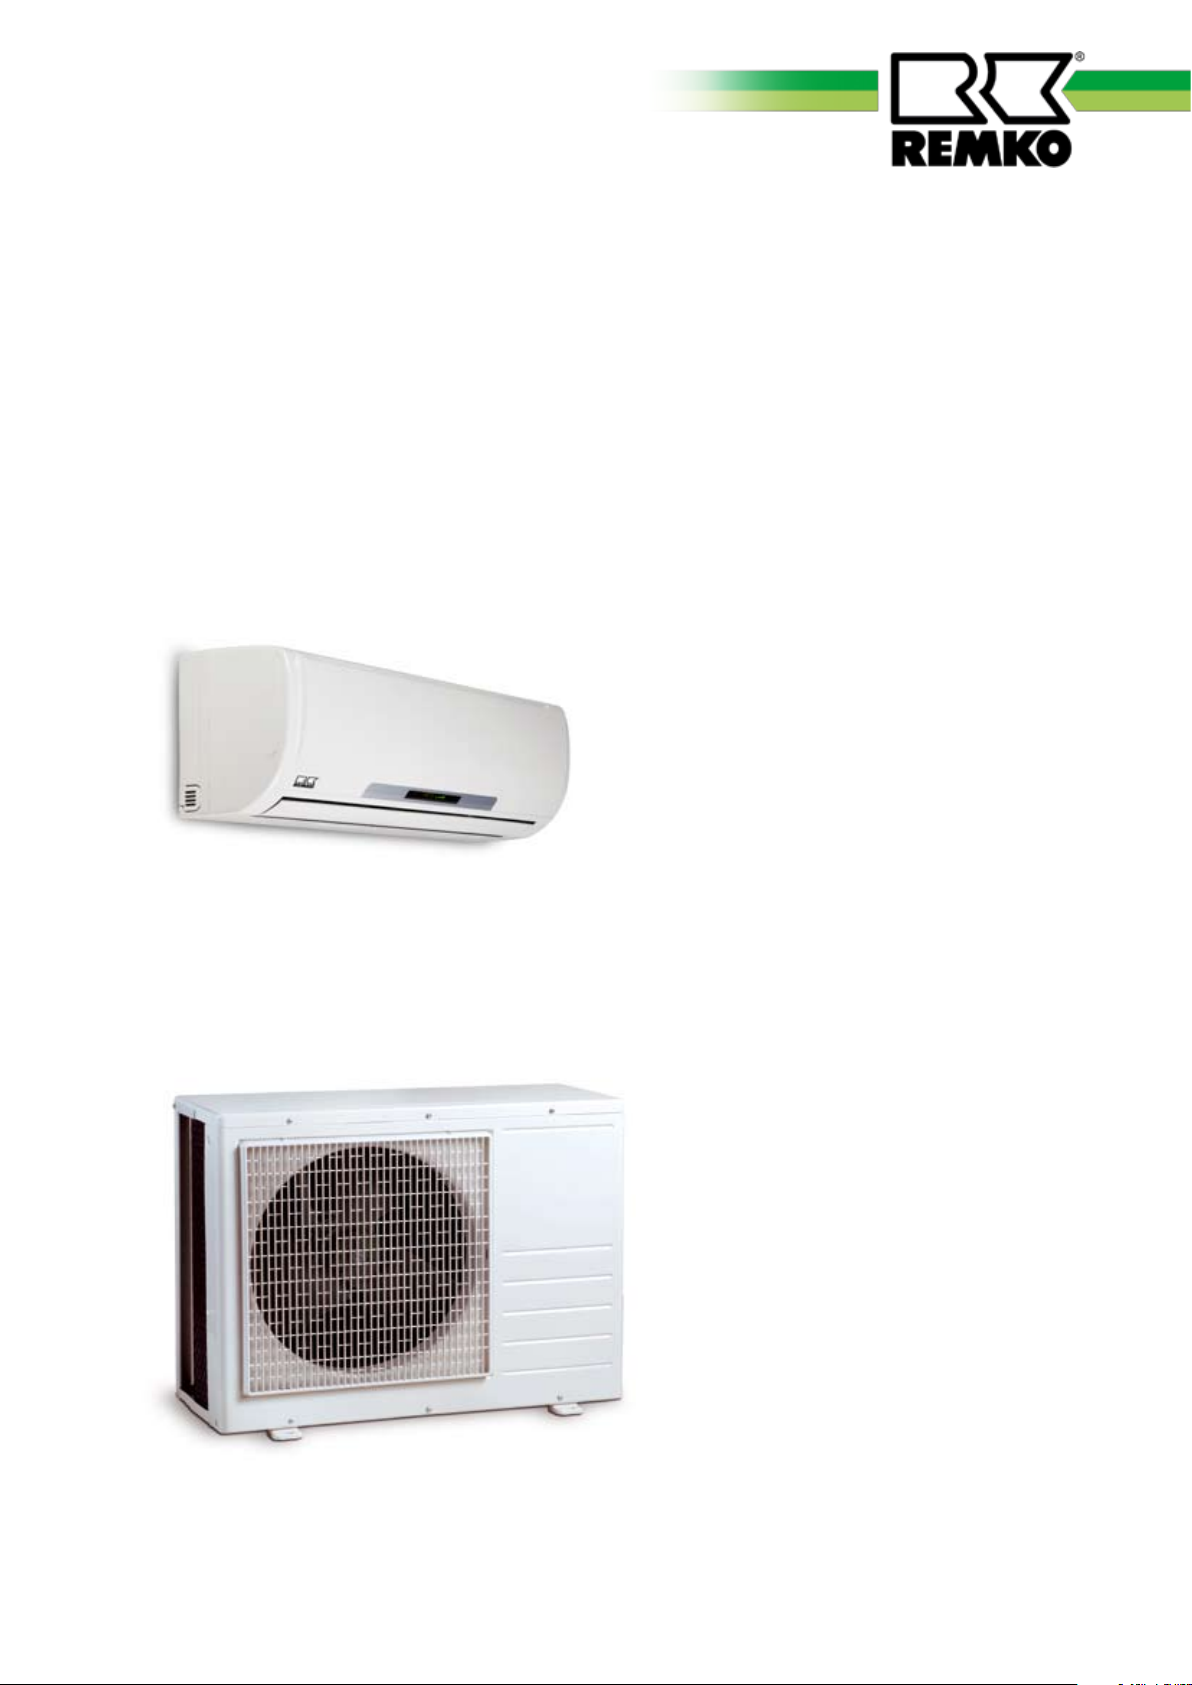
REMKO MD
MD 261, MD 351
Inverter wall - room air conditioner in split design
Operation · Technology · Spare parts
Issue GB – T11
Page 2

Page 3
Contents
Safety notes
Environmental protection and recycling
Warranty
Transport and packaging
Description of the equipment
Operation
Shutdown
Care and maintenance
Troubleshooting and customer service
Installation instructions for qualified personnel
Installation
Tightness check
Condensation connection
4
4
4
5
5
6-12
13
13-14
15-16
16-19
19-21
21
22
Electrical connection
Electrical connection diagram
Electrical circuit diagram
Before start up
Add refrigerant
Commissioning
Unit dimensions
Product illustration
Spare parts list
Technical data
22-23
23
24
25
25
25-26
27
28-29
28-29
30
Made by REMKO
These operating instructions are to be read carefully
prior to commissioning / operation of the device!
These instructions are part of the unit and must always
be kept in the vicinity of the installation site or on the device.
Subject to modifications; No liability accepted for errors or misprints!
3
Page 4
REMKO MD
4
Safety notes
Carefully read this manual before
starting the unit for the first
time. They contain useful tips,
information as well as hazard
warnings to prevent injury or
material damage. Non-observance
of this manual may endanger
persons, the environment as well as
the equipment itself and will void
any claims for liability.
■ Store this manual as well as
the refrigerant datasheet in the
vicinity of the unit.
■ The unit should only be set
up and installed by qualified
personnel.
■ The setup, connection and
operation of the unit and
its components must be in
accordance with the operating
conditions stipulated in this
manual and comply with all
applicable local regulations.
■ Units designed for mobile use
should be safely set up on a
suitable floor and in a vertical
position. Units designed for
stationary use should only be
operated in their permanently
installed state.
■ It is prohibited to make
modifications or changes to
equipment or components
supplied by REMKO as this may
cause malfunctions.
■ Equipment and components
should not be operated in areas
where there is a heightened
damage risk. Observe the
minimum clearances.
■ The electrical supply should
be adapted to fulfil the
requirements of the unit.
■ The operational safety of
equipment and components is
only assured providing they are
used as intended and in a fully
assembled state. Safety devices
should not be modified or
bypassed.
■ Do not operate equipment
or components with obvious
defects or signs of damage.
■ All housing parts and openings,
e.g. air inlets and outlets, must
not be blocked by foreign items,
fluids or gases.
■ The equipment and components
must be kept a safe distance
from inflammable, explosive,
combustible, aggressive and
dirty areas or atmospheres.
■ Persons coming into contact
with equipment parts may suffer
burns or injury.
■ Installation, repair and
maintenance work should only
be carried out by authorised
specialists. Inspection and
cleaning can be performed
by the operator providing the
equipment is not under voltage.
■ Take appropriate hazard
prevention measures when
performing installation, repair or
maintenance work or cleaning
the equipment.
■ The equipment or components
should not be exposed to any
mechanical stresses, extreme
levels of humidity or direct
exposure to sunlight.
Environmental
protection
and recycling
Disposal of packaging
All products are packed for
transport in environmentally
friendly materials. Make a valuable
contribution to reducing waste
and sustaining raw materials. Only
dispose of packaging at approved
collection points.
Disposal of old
equipment
Our Production department is
under constant quality control.
Only top quality materials are
processed, the majority of which
are recyclable. Do your part
to protect the environment by
ensuring that your old unit is
disposed of according to regionally
valid regulations, for example in
authorised disposal and recycling
centres or collection points.
Warranty
Prerequisite for any warranty claims
is that the purchaser or his client
has completely filled out the
"warranty registration card"
included with any unit within the
relevant time period of sale and
initial operation and returned the
completed card to REMKO GmbH
& Co. KG.
The warranty conditions are
listed in the „General business
and delivery conditions“. The
contractual parties can also agree
additional terms beyond the scope
of the above. For this reason please
contact your direct contracting
partner first.
Page 5
Transport and
M
M
5
packaging
The equipment is shipped in sturdy
transport packaging. Immediately
check the equipment on delivery
and make a note of any damage
or missing parts on the delivery
note. Inform the forwarding agent
and contractual partner. Warranty
claims at a later date will not be
accepted.
Unit description
The MD 261-351 room air
conditioning units have a REMKO
MD...AT outdoor component as
well as an indoor unit MD...IT.
The outdoor component serves
to output the heat extracted by
the indoor unit from the room
being cooled. In heater operation,
the heat taken up by the outdoor
component can be discharged
by the indoor unit into the room
to be heated. In both operating
modes, the performance of the
compressor is adjusted precisely
to the requirement which thereby
regulates the set temperature with
minimal temperature variation.
This "inverter-technology" enables
power saving over a conventional
split-system and also reduces noise
emissions to a particularly low
level.
The outdoor component can be
installed outside or in indoor areas,
if certain requirements are met.
The indoor unit is designed for the
upper wall area in the interior. It
is operated via an infrared remote
control.
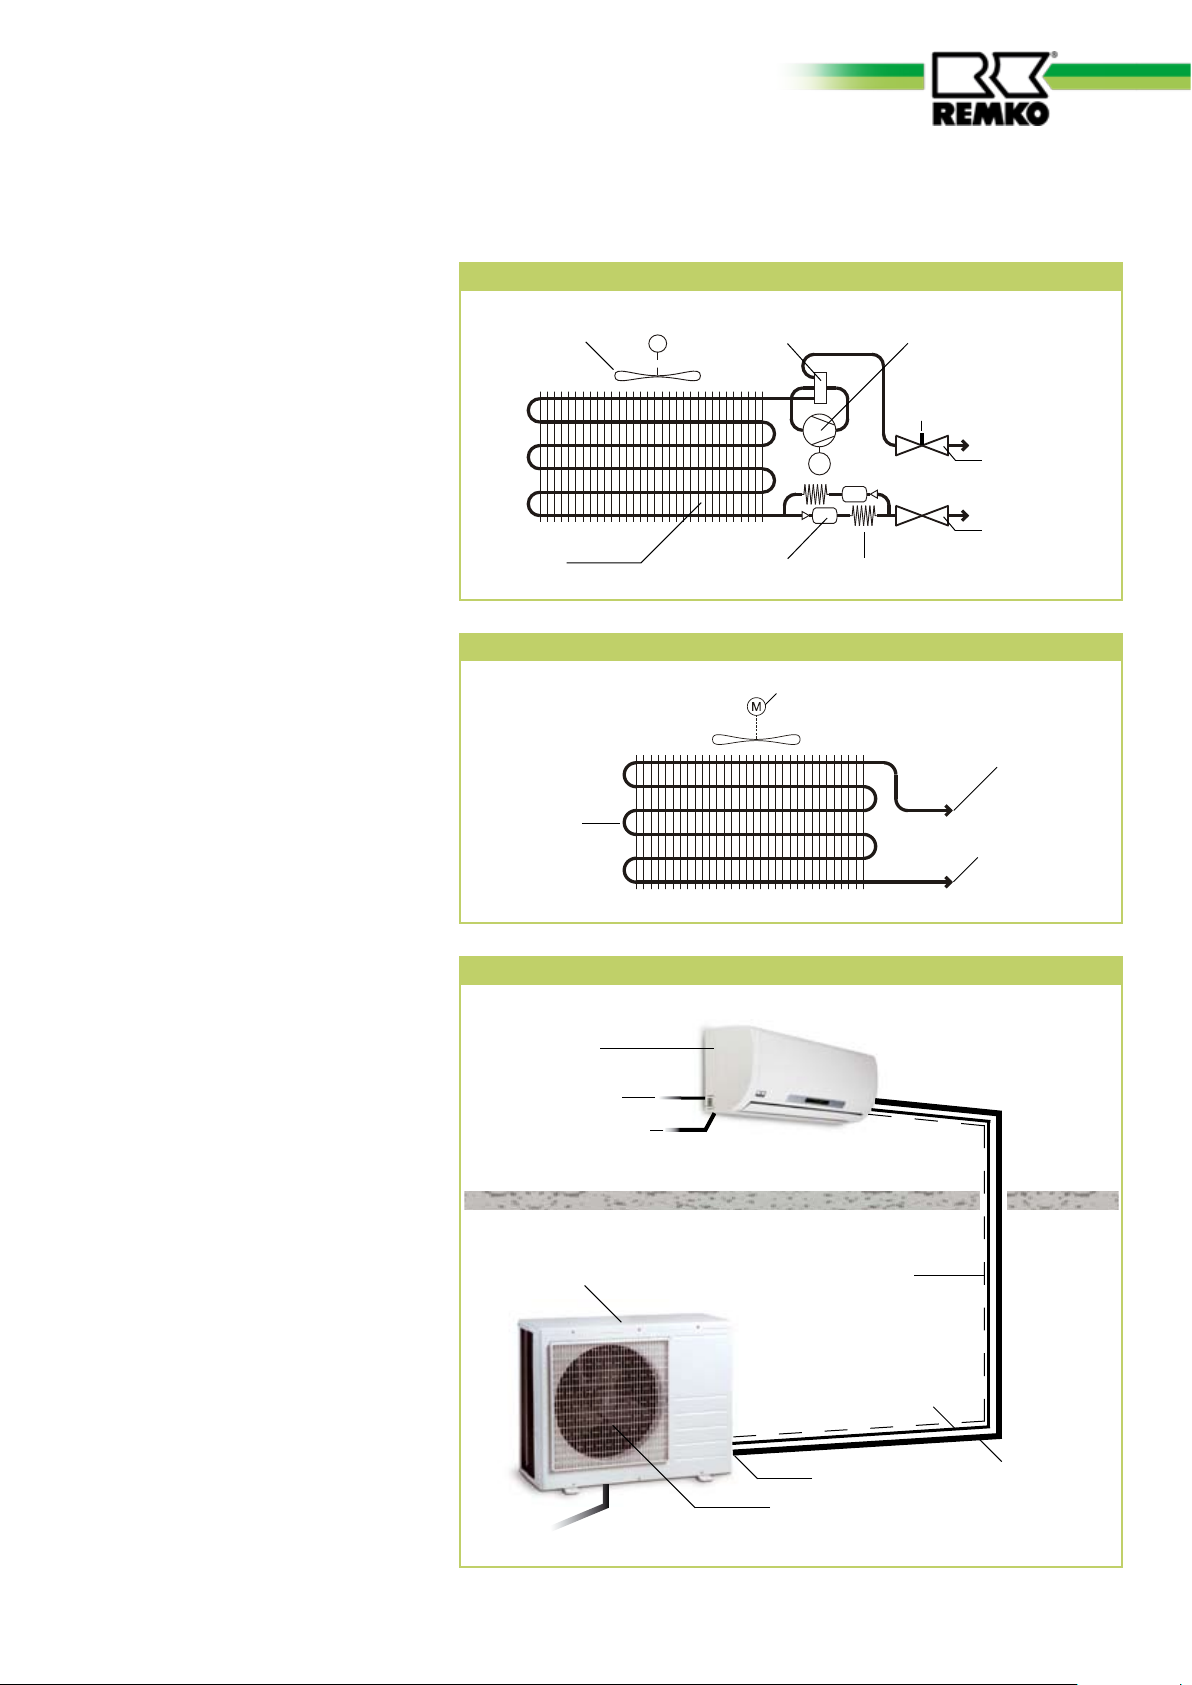
The outdoor component consists
of a refrigerant circuit with
compressor, fin liquefier, liquefier
fan, reverse flow valve and flow
regulator. The outdoor component
is controlled via the regulation of
the indoor unit.
The indoor unit consists of
a fin evaporator, evaporator
fan, regulation system and
condensation pan.
Floor consoles, wall consoles,
refrigerant pipes and condensation
pumps are available as accessories.
Schematic of exterior refrigerant circuit
Liquefier fan
Liquefier
Schematic of refrigerant circuit in indoor unit - cooling
Vaporiser
System layout
Indoor area
Indoor unit
Mains cable
Condensation pipe
Outdoor area
Outdoor
component
Condensation pipe
Reverse flow valve
Filter dryer Capillary tube flow regulator
Vaporiser fan
Control cable
Injection pipe
Stop valve
Liquefier fan
Compressor
Connection
Manometer
Connection
valve
Suction pipe
Connection
valve
Injection pipe
Connection to suction pipe
Connection to injection pipe
Suction pipe
The connection between the indoor unit and the outdoor component
made with refrigerant pipes.
Page 6

REMKO MD
6
Operation
The indoor unit is easy to operate using an infrared remote control. This is supplied as standard. The indoor unit
beeps to acknowledge the correct transmission of data. If it is not possible to program
the indoor unit using the remote control, it can also be manually operated.
Manual operation
The indoor unit can also be started
manually. After the air inlet screen
has been opened, the inner
recessed button can be pressed and
automatic mode can be activated.
In manual operation, the following
settings apply:
Cooling mode: 24°C,
Fan speed AUTO
Heating mode: 26°C,
Fan speed AUTO
By pressing the button of the infrared remote control, the manual
operation is interrupted.
Display on indoor unit
The display lights up according to the settings.
Display on indoor unit
Display
Automatic mode
Timer
activated/deactivated
Defrosting / heating
Display for setpoint
and gauge
Compressor speed
Infrared remote control
The infrared remote control sends
the programmed settings over
a distance of up to 6 m to the
receiver of the indoor unit. Data
will only be received correctly if
the remote control is pointed at
the receiver and no objects are
obstructing the transmission path.
First insert the supplied batteries
(2 x type AAA) into the remote
control. To do so, pull off the flap
of the battery compartment and
insert the batteries according to
their polarization (see marks).
Maximum distance
max. 6 m
CAUTION
Problems are shown in code
(see chapter Troubleshooting
and Customer service).
NOTE
Immediately replace flat batteries with a new set, otherwise
there is a risk of leakage. It is
recommended that the batteries
are removed if the equipment is
shut down for long periods.
Page 7

Buttons on the remote control
7
Buttons on the remote control
"ON/OFF" Button
Press this button to start the
unit.
"MODE" button
Press this button to select the
operating mode. The indoor unit
has 5 modes:
1. Automatic mode
In this mode, the unit works in
cooling or in heating mode.
2. Cooling mode
In this mode, the warm room
air is cooled to the desired
temperature.
3. Dehumidifying mode
In this mode the room is mainly
dehumidified, the adjusted
temperature is retained.
4. Heating mode
In this mode, the warm air in
the room is warmed up to the
desired temperature.
"FAN" button
Press this button to set the
required fan speed.
4 settings are available:
automatic, high, medium and
low fan speed.
"SLEEP/TURBO" Button
Pressing this button will
automatically increase or
decrease the target temperature
by 1 °C within an hour in
cooling and heating mode
respectively.
With the TURBO function, the
the maximum fan speed can be
activated.
"SWING" Button
This button directly activates
the oscillating function of the
fins for better air distribution in
the room.
"AIR DIRECTION" Button
With this button, the desired fin
position can be set. There are
5 positions and an oscillating
function available.
5. Circulation mode
In this mode, the air in the room
is recirculated.
Temperature selection is not
possible.
Button "▲"
With this button, the desired
temperature can be increased
up to 30 °C.
Button "▼"
With this button, the desired
temperature can be reduced
down to 17 °C.
"TIMER-ON" Button
This button serves to program
the automatic activation time
for the device within the next
24 hours.
"TIMER-OFF" Button
This button serves to program
the automatic switch-off time
for the device within the next
24 hours.
Page 8
Auto
Aut o
SET TEMP
Auto
SET TEMP
SET TEMP
SET TEMP
SET TEMP
SET TEMP
Aut o
SET TEMP
Auto
SET TEMP
SET TEMP
SET TEMP
SET TEMP
SET TEMP
Auto
Auto
REMKO MD
8
Button functions
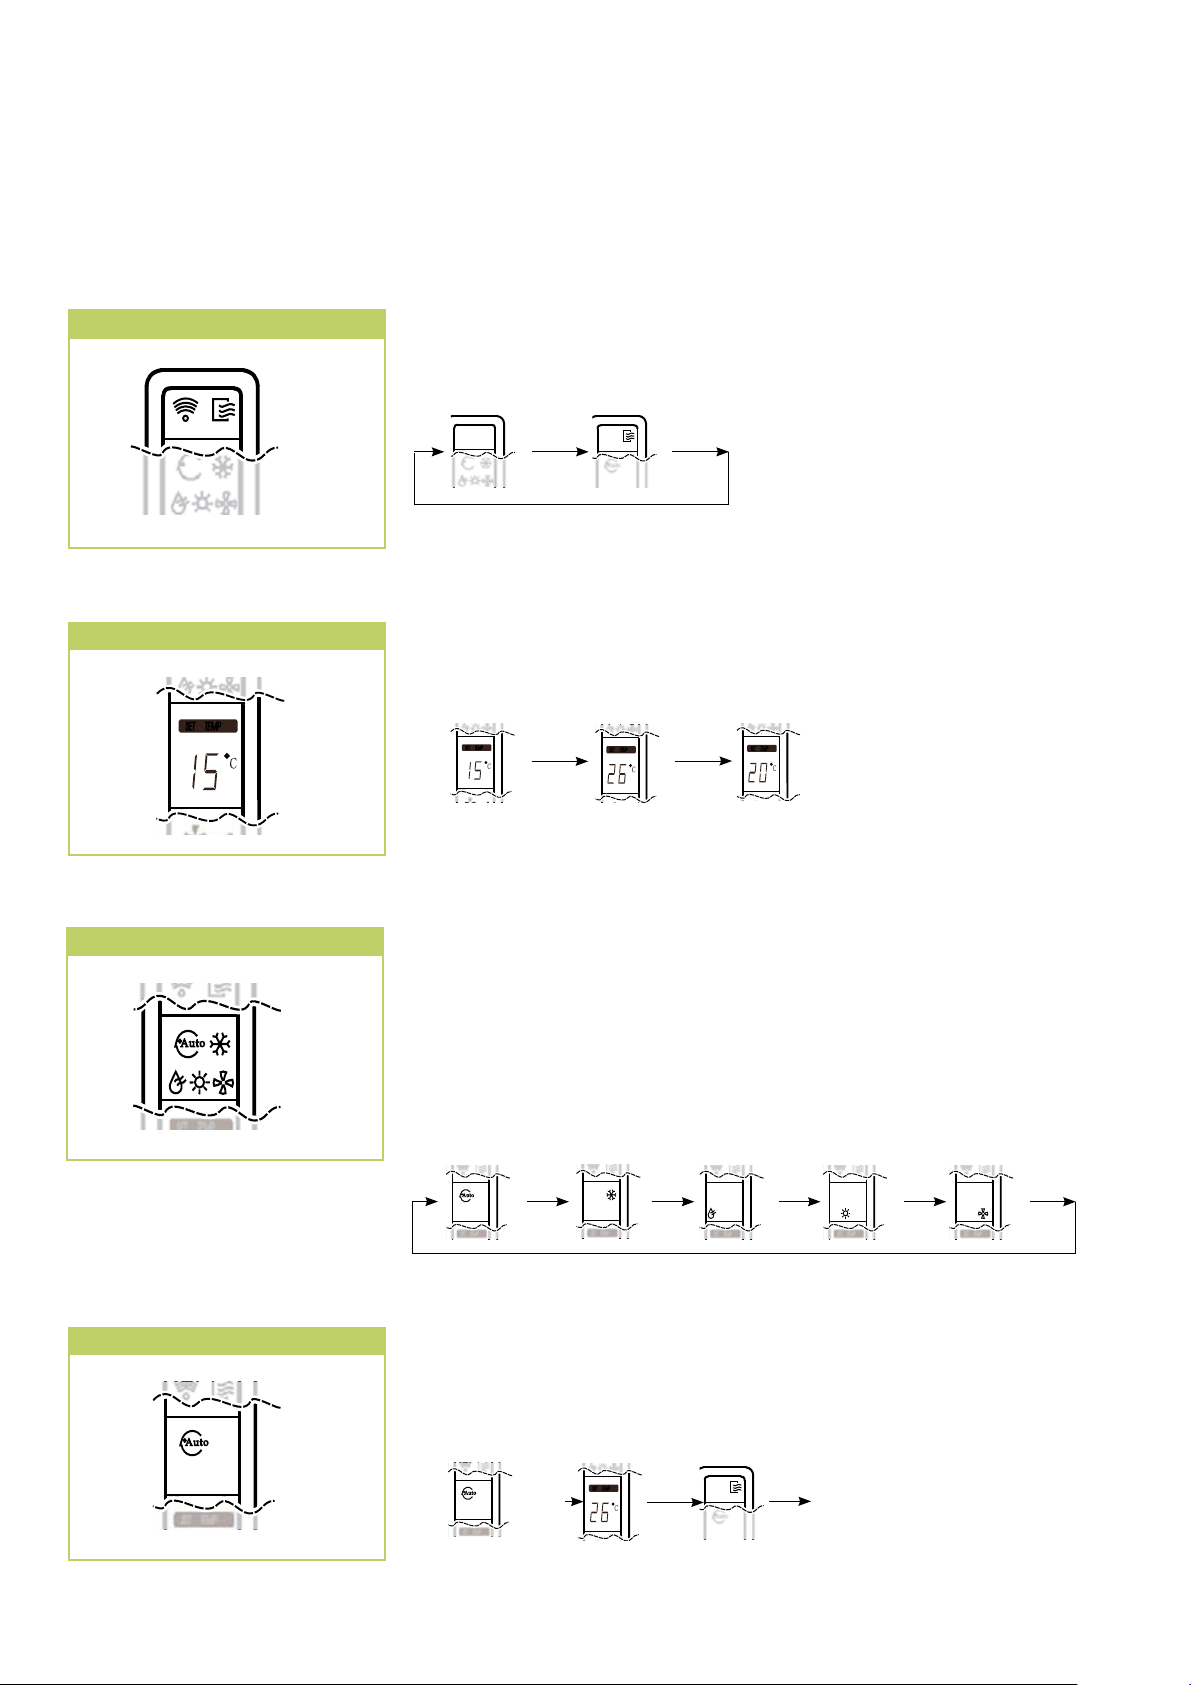
A symbol is shown on the display to indicate that the settings are being transferred.
ON/OFF Button
pq
Buttons
By pressing the ON / OFF button, you can activate or deactivate your
unit. The programmed settings and adjustment values before the unit
was turned off will appear on the display.
ON/OFF ON/OFF
The
p/q
buttons can be used to reduce and increase the desired nominal
temperature.
p
q
MODE Button
AUTOMATIC Mode
Use the MODE button to select between the individual operating modes.
A total of 5 modes are available:
1. Automatic automatic selection of cooling or heating operation
2. Cooling predominantly summer operating mode
3. Dehumidification summer or winter operating mode
4. Heating predominantly winter operating mode
5. Air circulation only for circulation of air
Automatic Cooling Dehumidification Heating
MODE
MODE MODE MODE MODE
Air circulation
In automatic mode, the control system autonomously selects between
heating, cooling and circulating modes. The nominal temperature
can only be preselected in a different mode and is then assumed by
automatic mode.
The nominal temperature is
under the room temperature
The nominal temperature is
above the room temperature
OR
▲
▼
ON/OFF
Cooling
or
Heating
or
AIR
CIRCULATION
Page 9
COOLING Mode
SET TEMP
SET TEMP
SET TEMP
SET TEMP
SET TEMP
SET TEMP
Auto
Auto
SET TEMP
Auto
Turbo
9
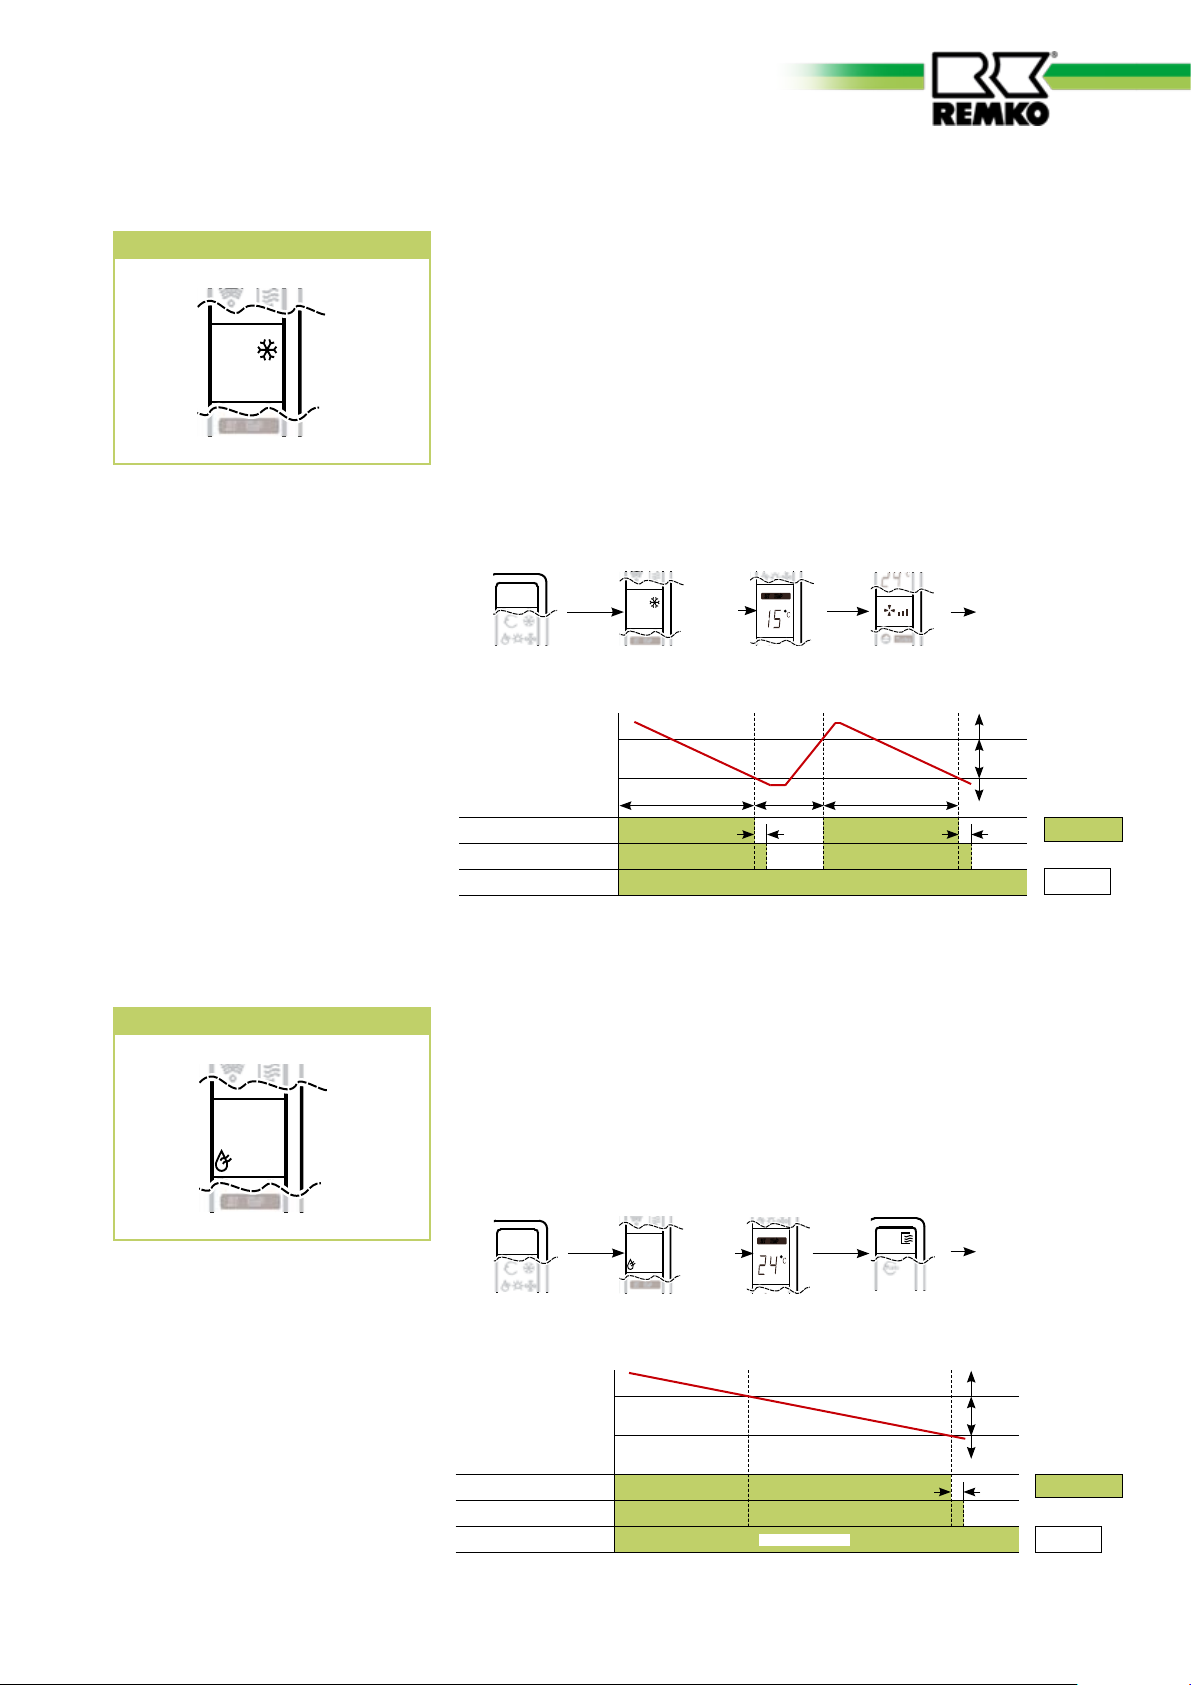
In cooling mode, the air in the room is cooled down to the adjusted
nominal temperature. The desired room temperature is set with the
▲/▼buttons in 1 °C increments. If the room temperature is 1 °C
above the selected nominal temperature, then the indoor unit starts
to cool down the air in the room. The inverter controller checks the
difference between the adjusted nominal temperature and the actual
room temperature. In the event of a greater difference, a higher cooling
performance is created. In the event of a smaller difference, a lower
cooling performance is created. This serves to maintain the air discharge
temperature and the room temperature.
If the adjusted room temperature is lower than approx. 2 °C, then the
control system turns the cooling function off. To protect the compressor,
the regulation only turns the cooling on again after a waiting period of 3
minutes.
DEHUMIDIFICATION MODE
MODE
▲
OR
▼
COOLING
OPERATION
Functional diagram
Actual
Nominal temperature
Nominal temperature
-2°C
Compressor operation AT
Fan operation AT
Fan operation IT
temperature
> 6 Min.
> 6 Min.> 3 Min.
30 sec. 30 sec.
Start cooling mode
Cooling mode
Stop cooling mode
Operation
Stop
In dehumidification mode, the room temperature is set to 24 °C. Due to
the low temperature of the refrigerant, the dew point of the air on the
evaporator is lower. The excess moisture in the air is condensed by the
evaporator, the room is dehumidified. The fan speed should be set to
automatic in order to achieve a maximum level of dehumidification. In
automatic mode, the fan is switched on and off in intervals.
MODE
Functional diagram
Nominal temperature
Nominal temperature
-2°C
Compressor operation AT
Fan operation AT
Fan operation IT
▲
OR
▼
Actual
temperature
ON/OFF
Low fan speed
DEHUMIDIFICATION
MODE
Start
Dehumidifying mode
Dehumidifying mode
Stop
Dehumidifying mode
30 sec.
Operation
Stop
Page 10
SET TEMP
SET TEMP
SET TEMP
Auto
Turbo
SET TEMP
REMKO MD
10
HEATING Mode
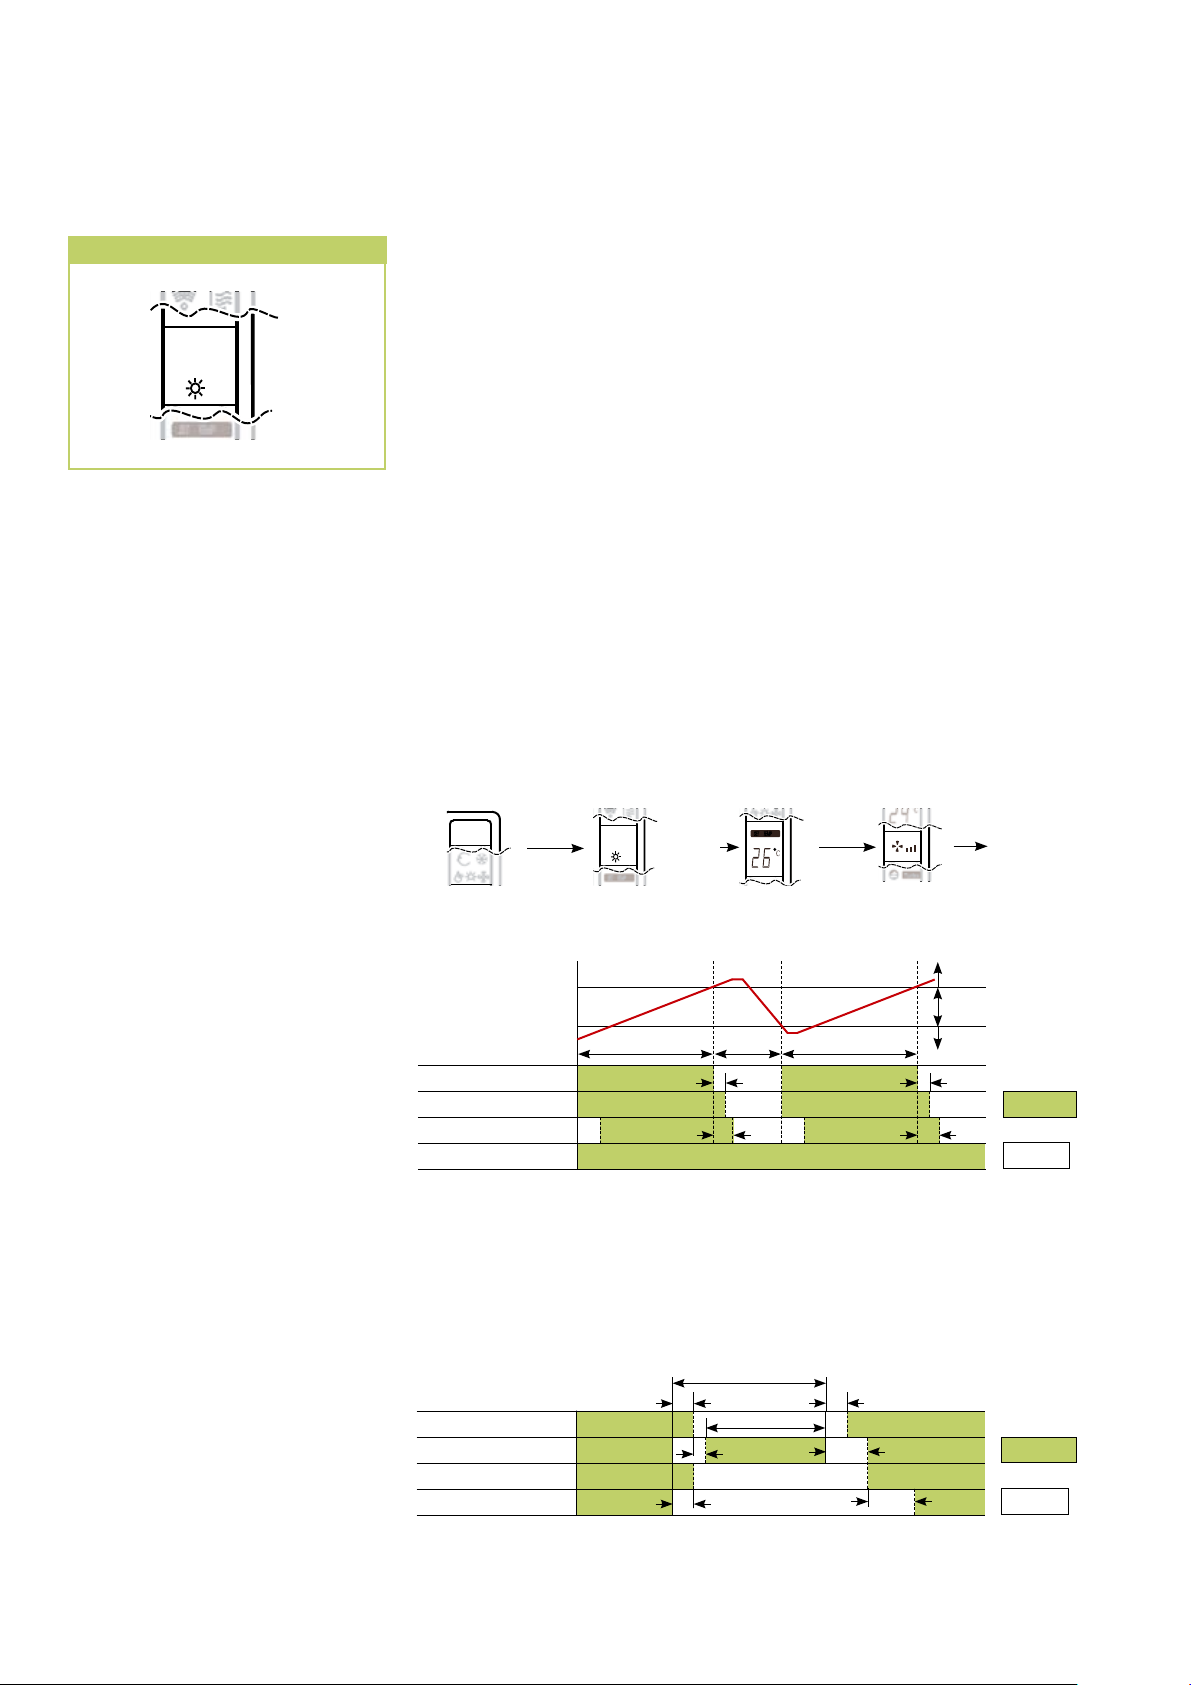
In the heating mode, you can heat the room in spring or fall. The desired
room temperature is set with the ▲/▼buttons in 1 °C increments. If
the room temperature is 1 °C below the selected nominal temperature,
then the indoor unit starts to warm up the air in the room. The
inverter controller checks the difference between the adjusted nominal
temperature and the actual room temperature.
In the event of a greater difference, a higher cooling performance is
created.
In the event of a smaller difference, a lower cooling performance is
created.
This serves to maintain the air discharge temperature and the room
temperature.
If the adjusted room temperature is still exceeded by approx. 2 °C,
then the control system turns the heating function off. To protect the
compressor, the regulation only turns the heater on again after a waiting
period of 3 minutes.
In heating mode, the indoor unit fan motor is switched on after a delay,
in order to prevent the discharge of cold air.
The outdoor unit fins could crack at low external temperatures.
The reversal of the cooling circuit undertakes defrosting in intervals. The
display shows "H1" during the defrosting period.
Heating mode operational sequence
MODE
▲
OR
FAN
▼
Functional diagram
Nominal temperature
+5 °C
Nominal temperature
+2 °C
Compressor operation AT
Fan operation AT
Fan operation IT
Reverse flow valve
Actual
temperature
> 6 Min.
> 6 Min.> 3 Min.
30 sec. 30 sec.
30 sec. 30 sec.
Stop heating
operation
Heating mode
Start heating
mode
During the defrosting cycle, the indoor unit vaporiser fan and the
outdoor component liquefier fan are switched off.
After the cycle is concluded, the fans are switched to their previous
settings.
Reverse flow valve
Compressor operation AT
Fan operation AT
Fan operation IT
Defrost period
30 sec.
< 7 Min.
15 sec.
30 sec.
30 sec.
60 sec.
3 Min.
HEATINGMODE
Operation
Stop
Operation
Stop
Page 11
AIR CIRCULATION Mode
SET TEMP
SET TEMP
SET TEMP
Auto
Turbo
SET TEMP
Aut o
Tur bo
SET TEMP
Auto
Turbo
SET TEMP
Auto
Turbo
SET TEMP
Auto
Turbo
SET TEMP
Auto
Turbo
SET TEMP
Aut o
Tur bo
SET TEMP
Auto
Turbo
SET TEMP
Auto
Turbo
SET TEMP
Auto
Turbo
SET TEMP
Auto
Turbo
ON TIM ER
SET TEMP
Aut o
Tur bo
ON T IMER
SET TEMP
Auto
Turbo
SET TEMP
Auto
Turbo
11
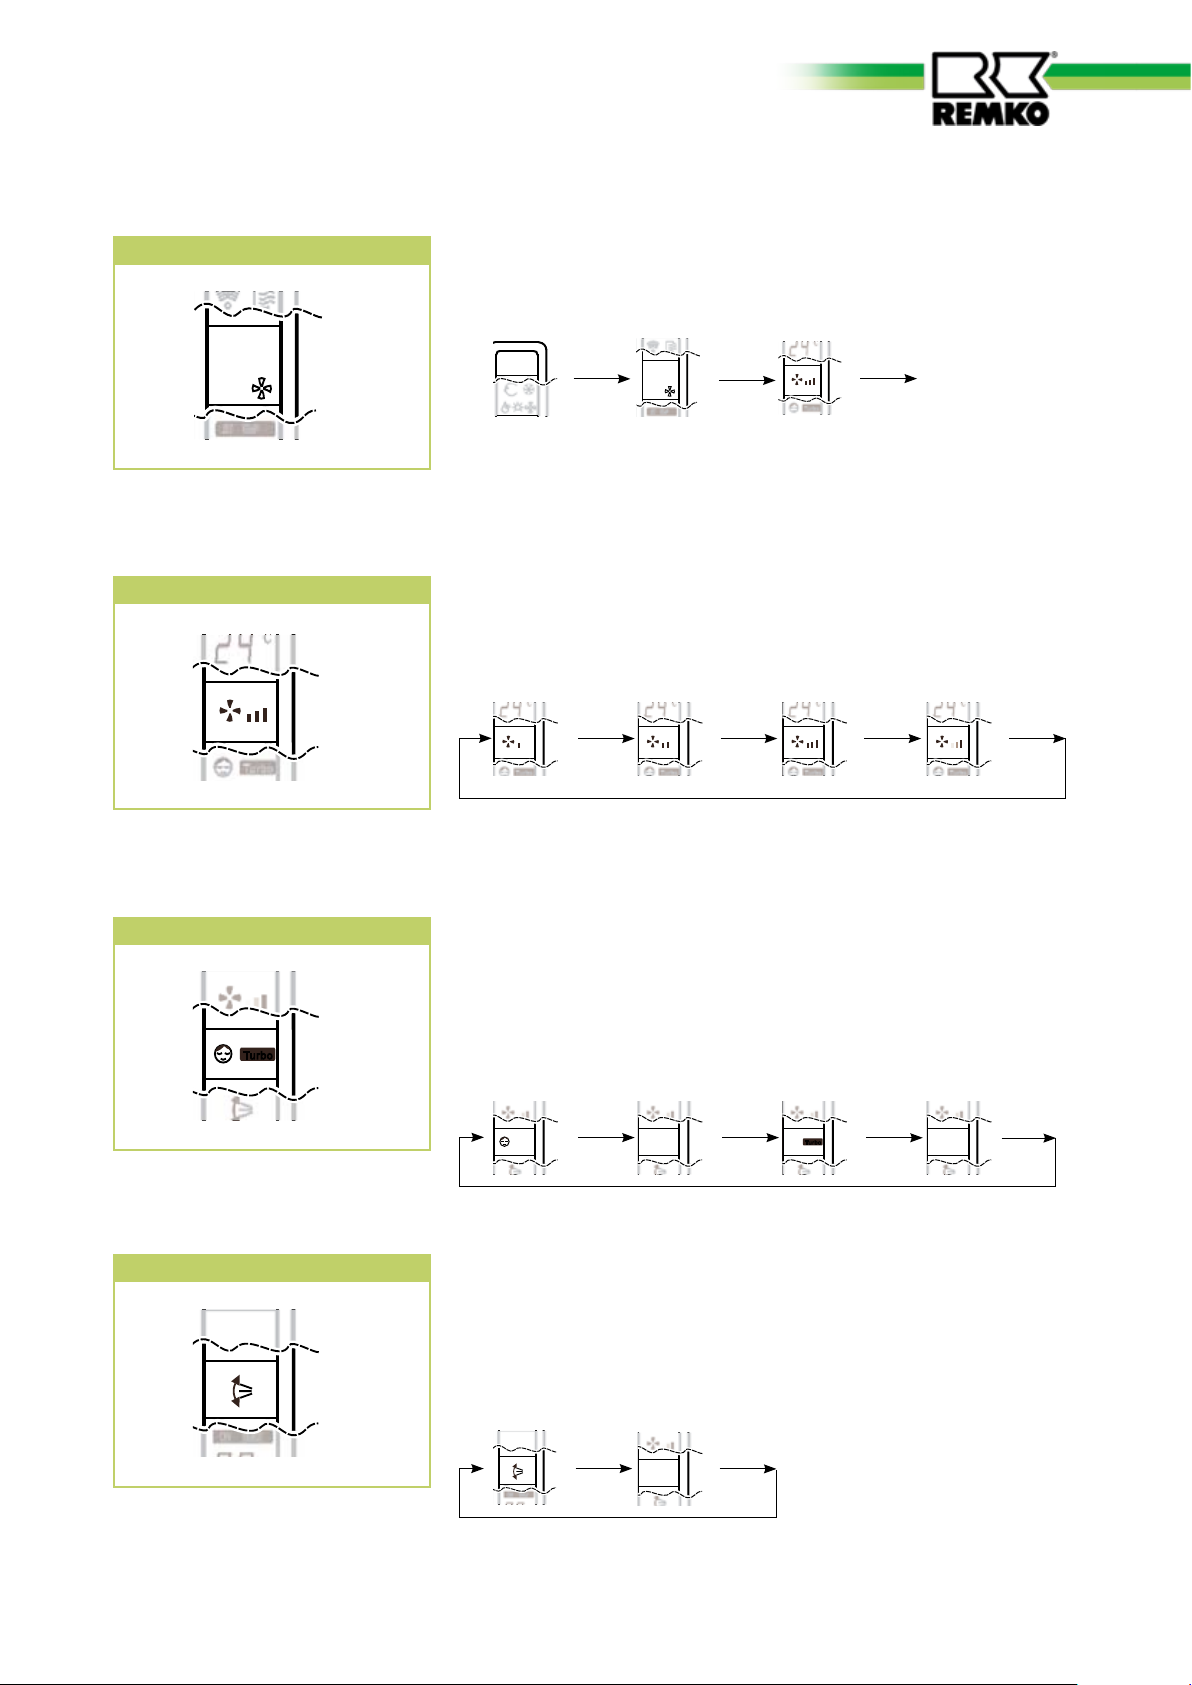
In ventilation mode, the air in the room is only circulated.
The room temperature cannot be changed in this mode.
The cooling or heating operation is not activated.
FAN Button
SLEEP/TURBO Button
MODE
FAN
AIR CIRCULATION
The fan speed can be adjusted with this button. A selection can be made
between low, medium, high and automatic fan speed.
FAN
FAN
FAN
FAN
With the button a programming function is activated, which causes the
nominal temperature in the cooling mode to increase after one hour
by 1°C and after two hours by 2 °C. In heating mode, the nominal
temperature is decreased after one hour by 1 °C and after 2 hours by 2 °C.
The display on the indoor unit goes out.
With the TURBO function, the maximum fan speed can be activated
SWING and AIR DIRECTION Buttons
SLEEP/
TURBO
SLEEP/
TURBO
SLEEP/
TURBO
The oscillating function of the air discharge fins can be adjusted with
this button. The air distribution in the room is improved with the swing
function. In order to adjust the aim the air discharge fins to a particular
direction, the AIR DIRECTION button must be pressed briefly. In order to
activate the automatic swing function, the AIR DIRECTION button must
be pressed for longer than 2 seconds.
deactivated
deactivated deactivated
SWING
SWING
Page 12
Hr.
ON TIM ER
Hr.
Off TI MER
SET TEMP
Aut o
Tur bo
Hr.
ON TIME R
Off TIM ER
SET TEMP
Auto
Turbo
Hr.
ON TIME R
Off TIM ER
SET TEMP
Auto
Turbo
Hr.
ON TIME R
Off TIM ER
SET TEMP
Auto
Turbo
Hr.
ON TIME R
Off TIM ER
SET TEMP
Auto
Turbo
Hr.
ON TIME R
Off TIM ER
SET TEMP
Auto
Turbo
Hr.
ON TIME R
Off TIM ER
SET TEMP
Auto
Turbo
REMKO MD
12
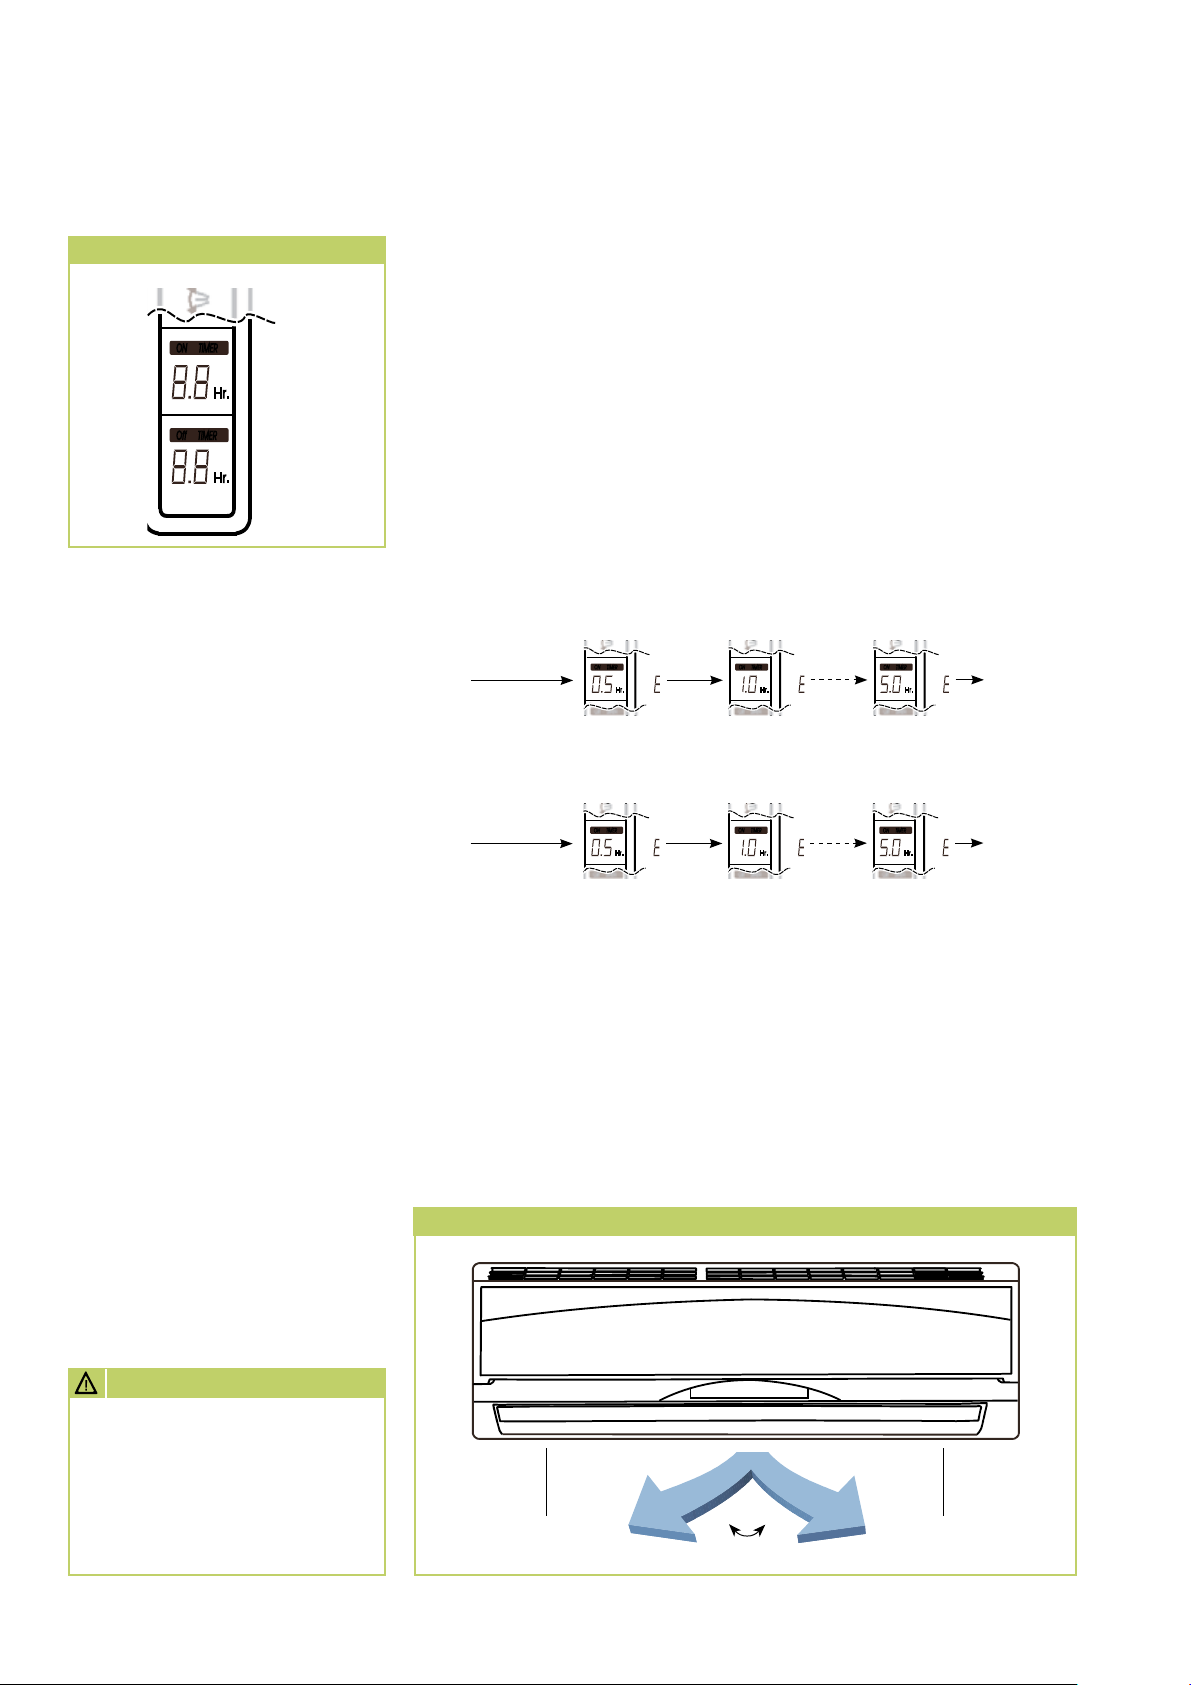
TIMER Button • TIMER-ON / OFF
The activation and switch-off time can be programmed with this button.
The timer is activated/deactivated by means of pressing the timer on
and the timer off button. The timer symbol ON TIMER or OFF TIMER
appears. The desired activation or switch-off time for the display up to
9.5 (hours) in 30 minute intervals and from displayed 10 in 60-minute
intervals can be adjusted by means of pressing the Timer on or the Timer
off buttons.
When the programmed time has been reached, the device is
automatically turned on or off. If the indoor unit is automatically
switched on, then the mode, the temperature and the fan speed of the
last settings is reactivated.
The prior deletion of the on and off time can be achieved by pressing
On/Off button. The timer display on the indoor unit goes out.
TIMER ON button - activation delay
TIMER ON
TIMER
ON
TIMER
ON
Activationdelay
TIMER OFF button - switch-off delay
TIMER OFF
TIMER
OFF
TIMER
OFF
Switch-off
delay
Manual air distribution
There are individually adjustable
fins for adjusting the horizontal air
distribution on the air discharge
side.
CAUTION
Moving indoor machinery,
e.g. fans, have the potential to
cause injury during operation!
Only make adjustments when
swing operation is switched
off.
Manual air distribution
Shift lever left
Shift lever right
Page 13
Shutdown
13
Care and maintenance
Temporary shutdown
1. Allow the indoor unit to run for
2 to 3 hours in air circulation
mode or in cooling mode at the
maximum temperature setting
in order to remove any residual
moisture from the unit.
2. Shut down the unit using the
remote control.
3. Switch off the voltage supply to
the unit.
4. Cover the unit as far as possible
with plastic foil in order to
protect it from the influences of
weather.
Permanent shutdown
Ensure that equipment and
components are disposed of in
accordance with local regulations,
e.g. through authorised disposal
and recycling specialists or at
collection points.
Regular care and maintenance
serves to ensure trouble-free
operation and long service life of
the unit.
CAUTION
Prior to performing any
work, ensure the equipment
is isolated from the voltage
supply and secured to prevent
accidental switch-on!
Care
■
Ensure the indoor unit and
outdoor component are
protected against dirt, mould
and other deposits.
■
Clean the equipment using a
damp cloth. Do not use any
caustic, abrasive or solventbased cleaning products. Do
not use a jet of water.
■
Clean the fins on the indoor
unit and outdoor component
prior to long shutdown periods.
Maintenance
■
It is recommended that
you take out a maintenance
contract with an annual service
from an appropriate specialist
firm.
TIP
This ensures the operational
reliability of your equipment!
NOTE
The statutory regulations
require an annual sealing test
for the refrigerant circuit in
relation to the refrigerant
filling level. The inspection
and documentation is to be
carried out by corresponding
specialist engineers.
Contact REMKO GmbH & Co. KG
or your contract partner for a list
of specialist companies near you.
Type of task
Checks/Maintenance/Inspections
General
Measure voltage and current
Check compressor/fans are functioning
correctly
Check fan is functioning correctly
Dirt on liquefier/vaporiser
Check refrigerant fill quantity
Check condensation drain
Test insulation
Check moving parts
Sealing test for refrigerant circuit
Commissioning
Monthly
Six-monthly
• •
• •
• •
• •
• •
• •
• •
• •
• •
• •
Yearly
Page 14
REMKO MD
14
Cleaning the housing
of the indoor unit
1. Disconnect the supply voltage
to the equipment.
2. Open the intake grille of the
cover and fold it upwards.
3. Clean the guard using a soft,
damp cloth.
4. Switch the supply voltage back
on.
Air filter for indoor unit
Clean the air filter at intervals of
no more than 2 weeks. Reduce this
interval in case of heavily soiled air.
5. Any dirt can be cleaned off
using lukewarm water and mild
cleaning agents. In order to do
so, turn the dirty side upward
(Fig. 3).
6. If water is used, let the filter
dry out properly in air before
replacing it in the unit.
7. Carefully insert the filter. Make
sure it is seated correctly.
8. Close the front side in reverse
order as described above.
9. Switch the supply voltage back
on.
10.
Switch the unit back on.
Cleaning the condensation
pump (optional equipment)
An optional integrated or separate
condensation pump may included
on the indoor unit, which pumps
out any accumulated condensation
into higher positioned drains.
Observe the care and maintenance
instructions given in the separate
operating instructions manual
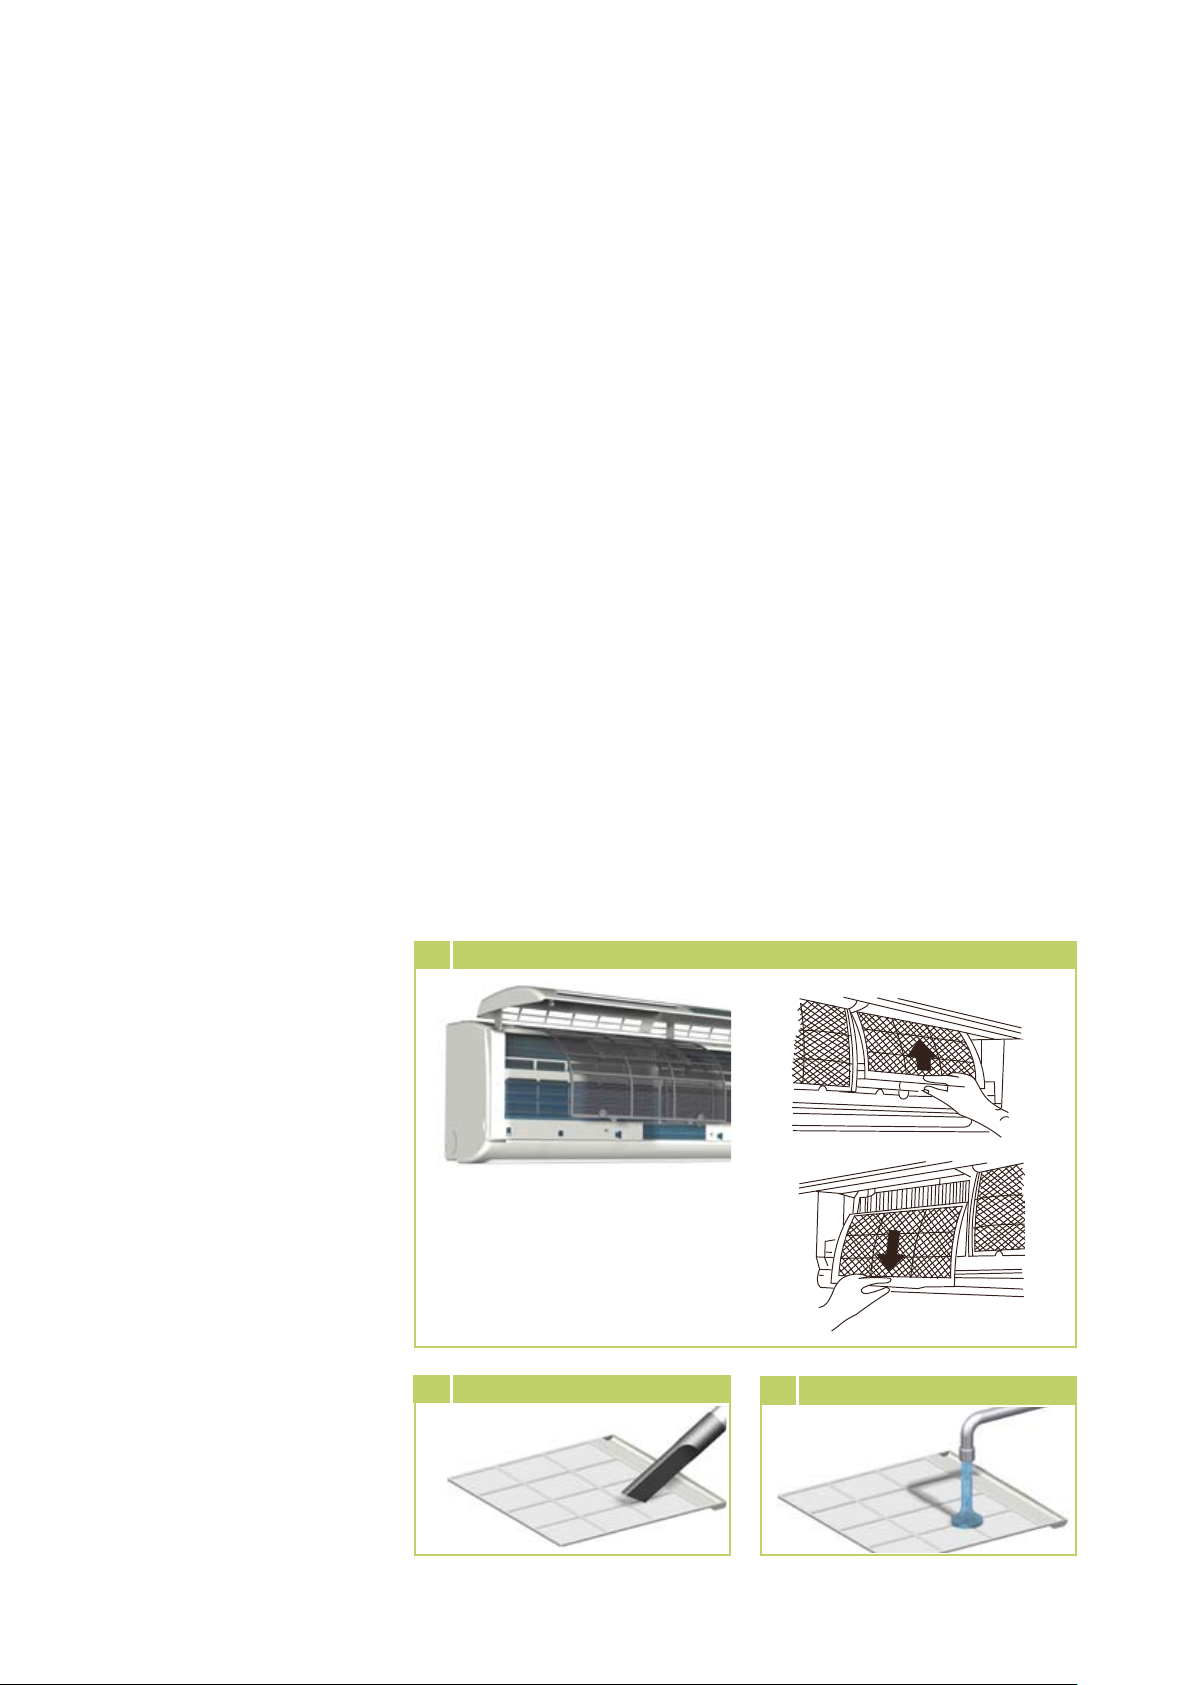
Cleaning the filter
of the indoor unit
1. Disconnect the supply voltage
to the equipment.
2. Open the front side of the
device by means of folding
up the grille and allowing it to
engage (figure 1).
3. Lift the filter up slightly and pull
it out from underneath.
4. Clean the filter with a
commercially available vacuum
cleaner. In order to do so, turn
the dirty side upward (Fig. 2).
1 Fold grille upwards
2 Clean with a vacuum cleaner
3
Cleaning with lukewarm water
Page 15
Troubleshooting and customer service
15
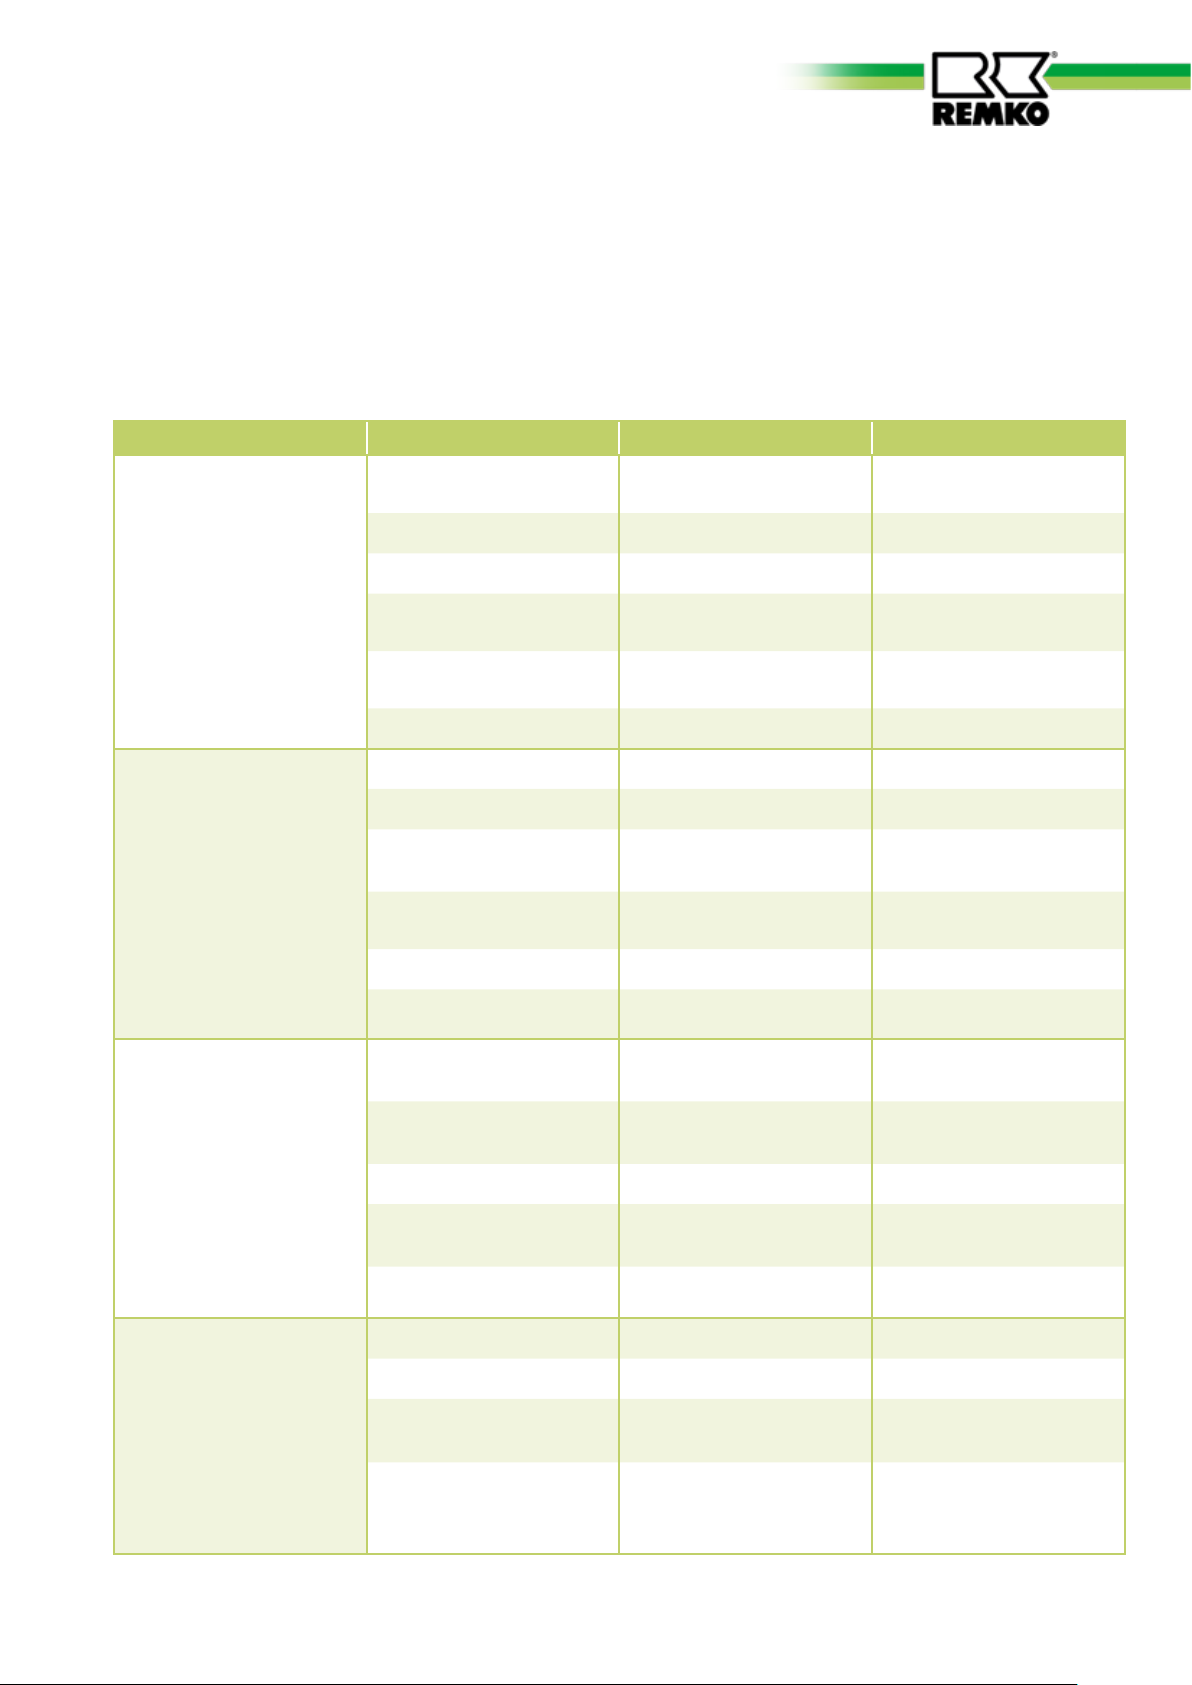
The equipment and components are manufactured using state-of-the-art production methods and tested several
times to verify their correct function. If malfunctions should occur, please check the functions as detailed in the
list below. Please inform your dealer if the unit is still not working correctly after all the functional checks have
been performed!
Malfunction
Fault Possible cause Checks Remedial measures
Check voltage,
possible wait until turned on
again.
Repair by a certified service centre
Plan for longer waiting period
Take into account the temperature
range for the indoor unit and
outside component
Switch off the mains protection
and switch it back on / have it
checked by a specialist
Check and if necessary clean the
pump
Reduce the distance to less than 6
m or change position
Replace the remote control
Place the receiver & transmitter
unit in the shade
Signal is not transmitted
when interference sources are
operational
Release the button / only press
one button
Insert new batteries
The unit does not start
or switches itself off
The unit does not respond
to the remote control
Power outage, undervoltage,
defective mains fuse / main circuit
breaker switched off
Damaged mains cable
Waiting time after switch-on too
short
Temperate outside operating
temperature range
Overvoltages caused by thunder
storms
Fault in external condensation
pump
Transmission distance too far /
receiver affected by interference
Defective remote control
Receiver or transmitter unit
exposed to excessive solar
radiation
Electromagnetic fields are
interfering with transmission
Button on remote control jammed /
two buttons pressed at same time
Batteries in remote control are flat
Are all other electrical installations
functioning correctly?
Are all other electrical installations
functioning correctly?
Have approx. 5 minutes elapsed
since the restart?
Are the fans in the indoor unit
and outside component working
correctly?
Has there recently been lightning?
Did the pump shut down due to
a fault?
Does the indoor unit beep when
pressing a button?
Is the unit running in manual
mode?
Does it function correctly in the
shade?
Does it function when
switching off possible sources of
interference?
Does the “Send” symbol appear
on the display?
Have new batteries been inserted?
Is the display incomplete?
The unit is running
but only provides
reduced cooling or heating
performance
Condensation is leaking out
Filter is unclean / air inlet / outlet
blocked by foreign items
Windows and doors open.
Heating/cooling output increases
Neither cooling nor heating mode
has been set
Fins on outdoor component
blocked by foreign items
Leaking refrigerant circuit
of the collection container
drainage pipe Blocked / damaged
Faulty external condensation
pump or float
Condensation has not drained
away and has collected in the
condensation pipe
Condensation does not drain off
Have the filters been cleaned? Clean the filters
Have there been any
constructional /
application-related changes?
Is the cooling/heating symbol
shown on the display?
Is the fan on the outdoor
component running
and are the fins unobstructed?
Are there signs of frost on the fins
of the indoor unit?
Is unrestricted condensation
discharge ensured?
Is the condensation tray full and
the pump running?
Is there a steady fall on the
condensation pipe? Check there is
no blockage in the pipe.
Are the condensation pipes
unblocked and is there a steady
fall? Are the condensation pump
and float switch functioning
correctly?
Close windows and doors / install
additional units
Correct the settings for the unit
Check the fan or winter controller,
reduce the air resistance
Repair by specialist
Cleaning of drain pipe and
collector reservoir.
Call out a specialist to replace the
pump
The condensation pipe must have a
fall. If necessary, clean the pipe
The condensation pipe must have
a fall. If necessary, clean the pipe.
A faulty condensation pump and
float switch should be replaced.
Page 16
REMKO MD
16
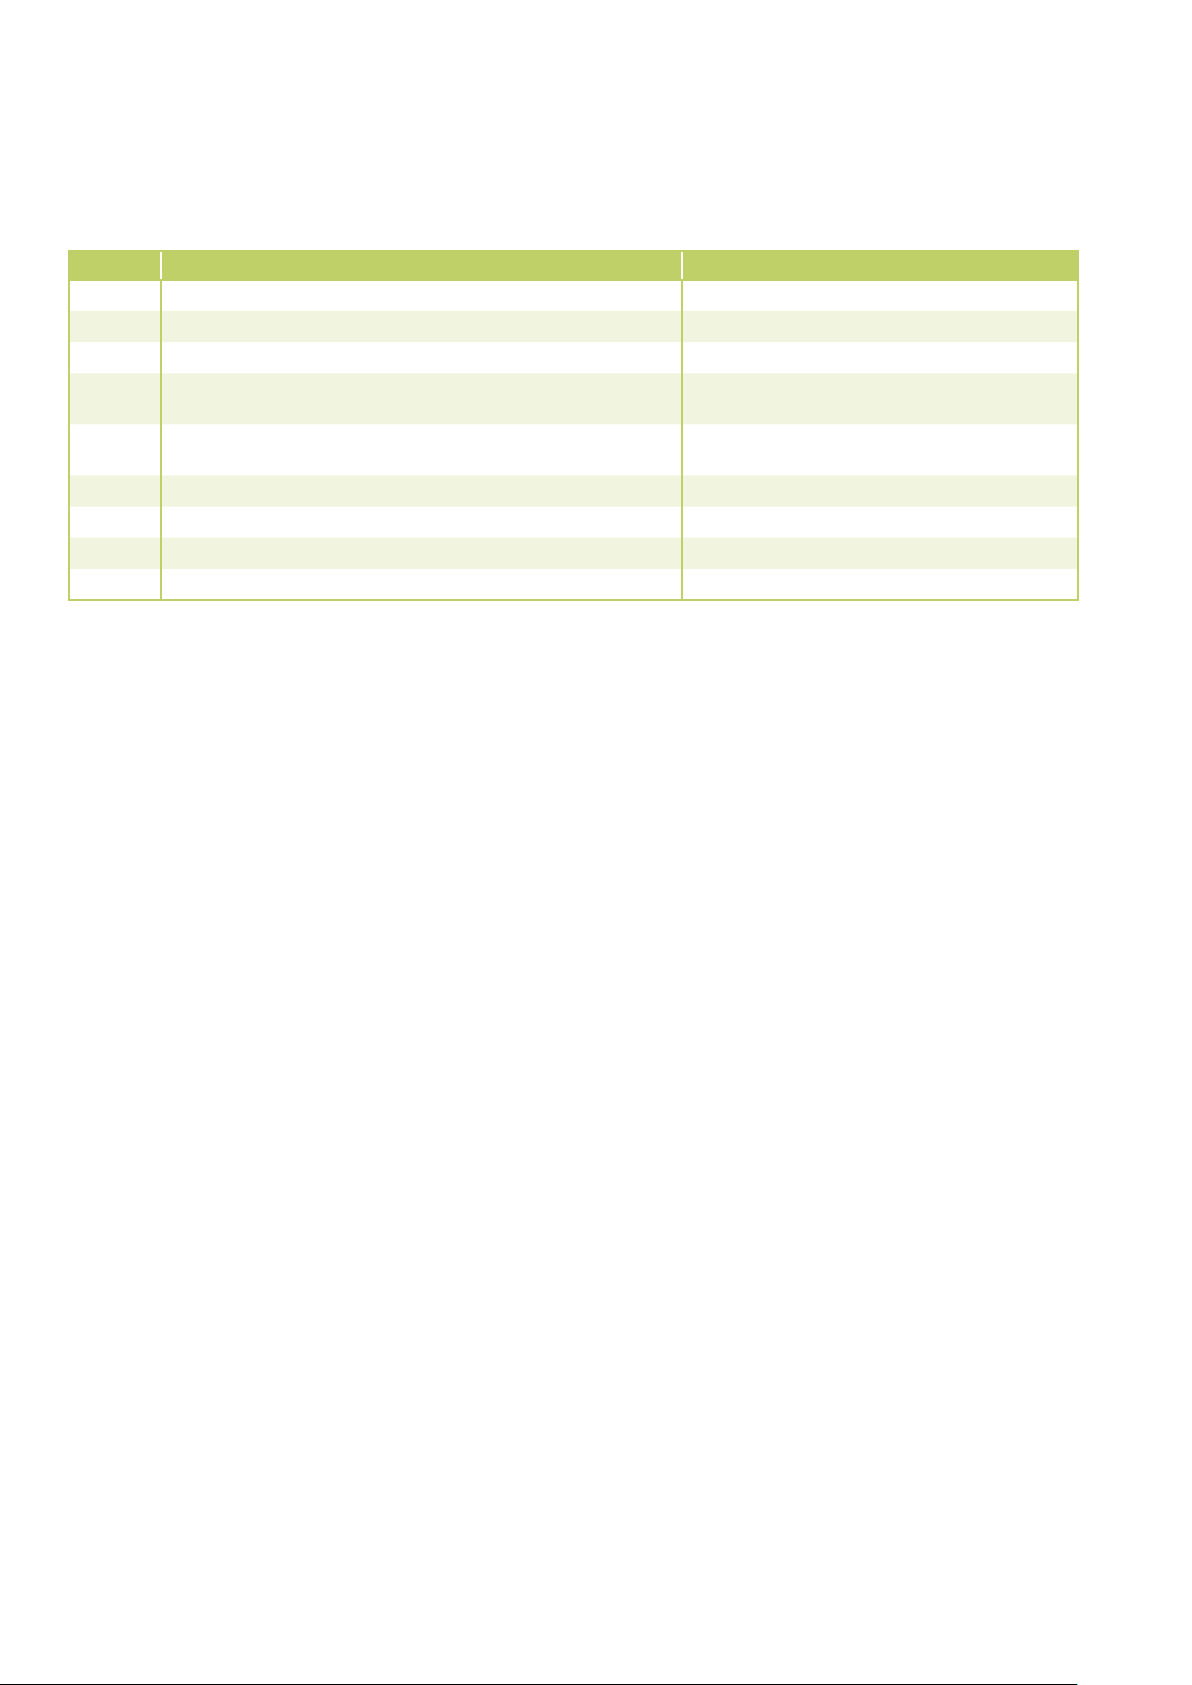
Problem display by blinker code
Display Cause Required action
E1
E3 Liquefier fan controller faulty Contact specialist firm
E5 Sensor evaporator temperature faulty / short-circuited Contact specialist firm
E6
H4
P0 IGBT overvoltage protection Contact specialist firm
P1 Undervoltage protection Switch system voltage-free and switch on again
P2 Compressor overload protection Contact specialist firm
P4 Power board IPM shutdown system Contact specialist firm
Communication error between outdoor component and indoor unit
Sensor air circulation faulty / short-circuited or
sensor evaporator faulty / short-circuited
Operating limits of outdoor component or indoor unit
exceeded
Contact specialist firm
Contact specialist firm
Switch system off
Installation instructions for qualified personnel
Important points prior to
installation
■
Locate the unit in original
packaging as close as possible
to the installation point to avoid
transport damage.
■
Check the contents of the
packaging for completeness
and check the unit for visible
transport damage. Report
any damage immediately to
your contracting party and the
shipping company.
■
Lift the unit at the corners
and not on the refrigerant or
condensation connections
■
The refrigerant pipes
(injection and suction pipe),
valves and connections must be
insulated impervious to vapour
diffusion. If necessary, insulate
the condensation pipe also
■
Select an installation location
which allows air to freely
flow through the inlet and
outlet. (See section "Minimum
clearances").
■
Do not install the unit in
the immediate vicinity of
devices with intensive thermal
radiation. Installation near
sources of thermal radiation
reduces the unit output.
■
Open the blocking valves of the
refrigerant pipes only after the
installation is complete.
■
Seal off open refrigerant pipes
with suitable caps or adhesive
strips to avoid infiltration of
moisture and never kink or
compress the refrigerant pipes.
■
Avoid unnecessary bends
. This minimises the pressure
loss in the refrigerant pipes and
ensures that the compressor
oil can flow back without
obstruction.
■
Make special preparations
regarding the oil return if the
outdoor unit is located above
the indoor unit. (See section
"Oil return flow measures").
■
Add refrigerant if the basic
length of the refrigerant pipe
exceeds 5 metres.
For the quantity of additional
refrigerant, refer to chapter
"Add refrigerant".
■
Only use the union nuts for
the refrigerant pipes provided
in the delivery scope, and
remove them just shortly before
connecting them with the
refrigerant pipes.
■
Make all electrical connections
according to valid DIN and DE
regulations.
■
See electrical connection
diagram. Always attach
electrical cables properly in
electrical clamps. Otherwise a
fire could result.
Page 17
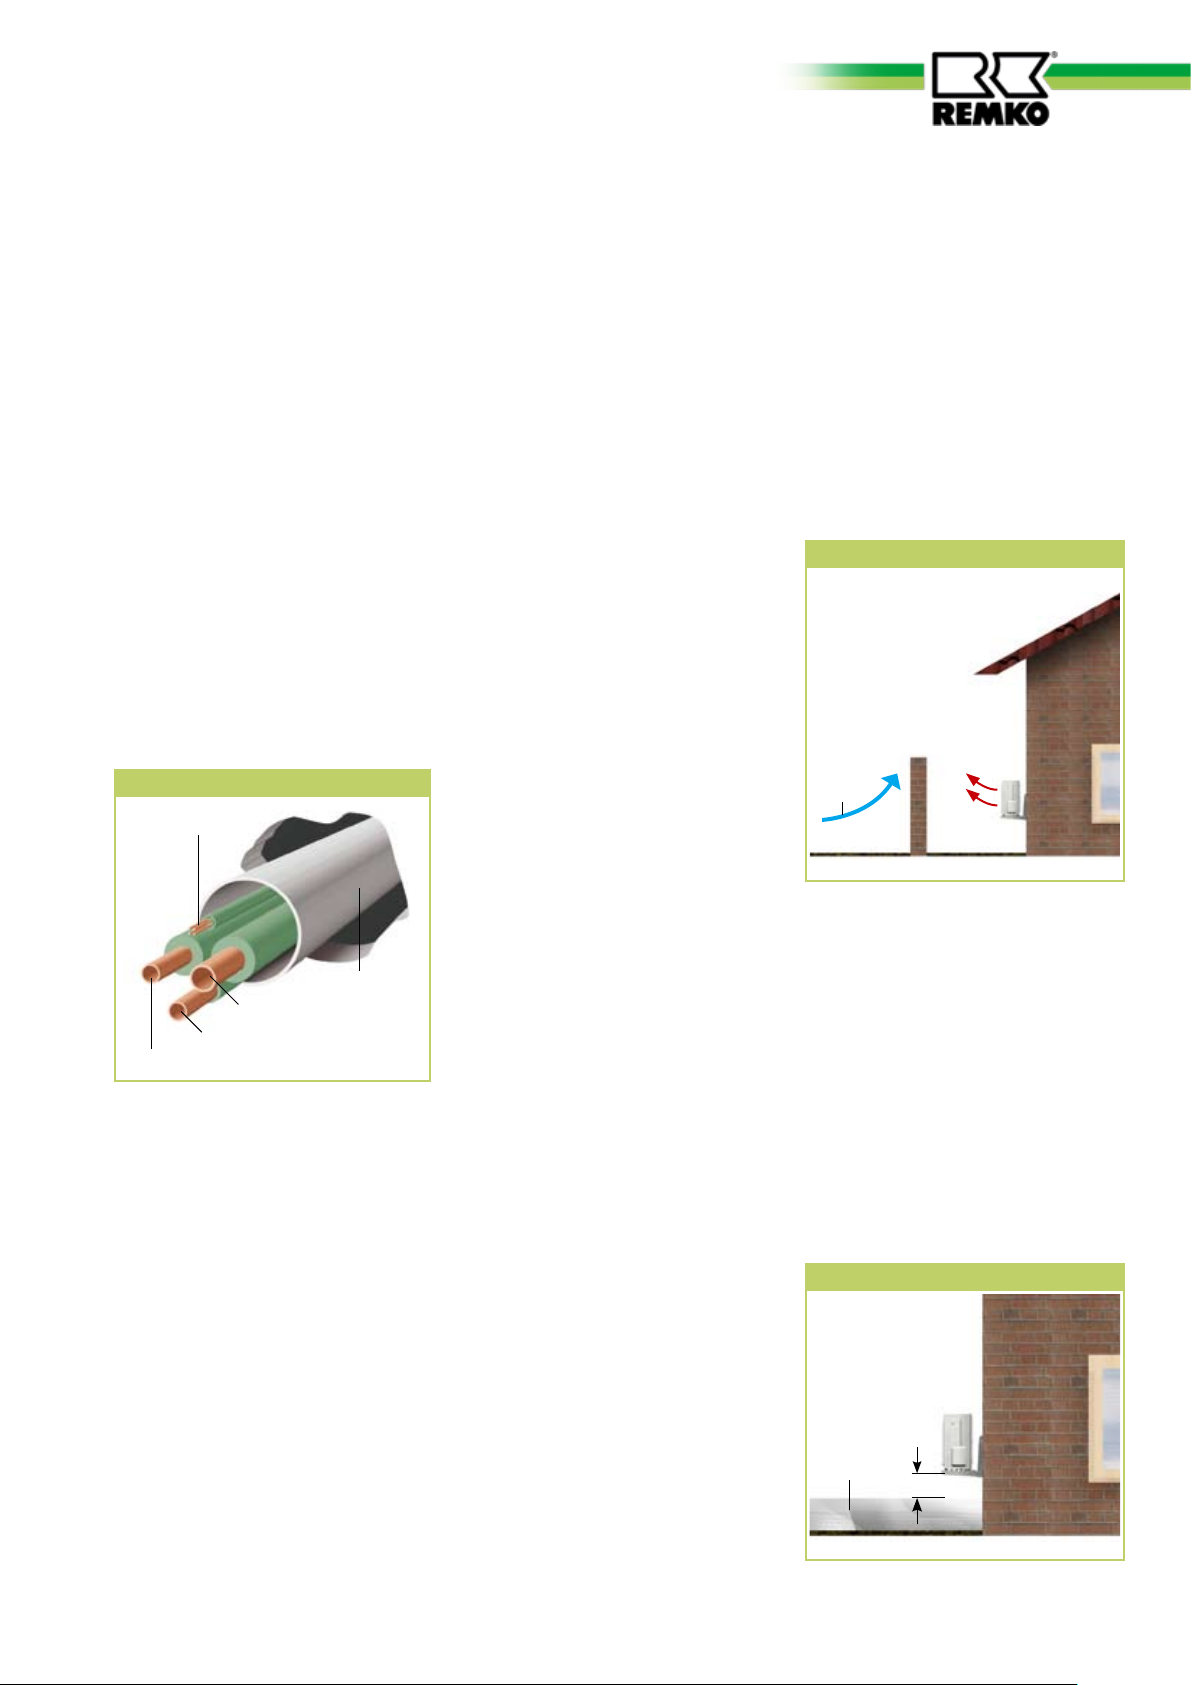
Wall openings
17
■
A wall opening of at least 70
mm diameter and 10 mm slope
from the inside to the outside
must be made for each indoor
unit
■
We recommend that the
inside of the hole is padded or
lined, e.g. using a PVC tube,
to prevent the pipes being
damaged.
■
After installation, the wall
opening should be closed off on
the building side with a suitable
sealant. Do not use substances
containing cement or lime!
Pipes and cables in wall breakthrough
Control cable
Selection of the installation
location
Indoor unit
The indoor unit is designed for
horizontal wall installation above
doors. However, it can also be
used on the upper wall area
(min. 1.75 m from upper edge of
floor).
Outdoor component
The outdoor component is
designed for horizontal base
installation outdoors. It should
be placed on level, flat and firm
ground. The unit should also
be secured to prevent toppling.
The outdoor component can be
set up outside as well as inside a
building. For external installation,
please observe the following notes
to protect the unit from weather
conditions.
Wind
If the unit is being installed in
windy areas, ensure that the
warm outlet air discharges in the
main wind direction. If this is not
the case it may be necessary to
install a windbreak (provided by
the customer). Ensure that the
windbreak does not adversely
affect the air intake to the unit.
Windbreak
Wind
PVC tube
Suction pipe
Condensation pipe
Injection pipe
Installation material
The indoor unit is fastened using a
wall bracket and 4 threaded screws
(provided by the customer).
The outdoor component is
attached with 4 screws via a wall
bracket on the wall or a floor
bracket on the ground.
Rain
The unit should be at least 10 cm
off the ground when mounted on
the roof or ground. A floor bracket
is optionally available.
Sun
The liquefier on the outdoor
component radiates heat.
Exposure to direct sunlight will
further increase the temperature
of the fins and reduce the
heat output of the finned
heat exchanger. The outdoor
component should therefore be
installed as near as possible to
the north side of the building.
If necessary, take measures
to provide sufficient shade
(responsibility of customer). One
possible solution is to build a small
roof. These measures should not
affect the flow of warm outlet air.
Snow
The unit should be wall-mounted
in areas of heavy snowfall.
Installation should be at least
20 cm above the expected level
of snow to prevent snow from
entering the outdoor component.
An optional wall bracket is
available as an accessory.
Minimum clearance to snow
Snow
20 cm
Page 18

REMKO MD
18
Installation inside buildings
■
Ensure there is adequate heat
dissipation when placing the
outdoor component in cellars,
attics, adjoining rooms or halls
(Fig 4).
■
Install an additional fan with
a rated flow comparative to
that of the outdoor component
being installed in the room.
This is used in conjunction with
ventilation ducts to compensate
any pressure losses
(Figure 4)
■
Ensure a continuous and
unobstructed air flow from
outside, preferably using
sufficiently large air intakes
placed opposite each other
(Figure 4).
4 Installation inside buildings
Warm air
Additional
fan
Light
well
Warm air
■
Comply with any regulations
and conditions affecting
the statics of the building.
If necessary, fit acoustic
installation.
Outdoor component
Cold
Fresh air
Light
well
Minimum clearances
Observe the minimum clearances
to allow access for maintenance
and repair work and facilitate
optimum air distribution.
Minimum clearances
120
Air intake
120
200
A 150 mm
B 700 mm
C 400 mm
D 150 mm
E 200 mm
Air outlet
120
1500
MD 261 / 351 AT
Air intake
D
A
E
B
Air outlet
C
All values in mm
Page 19
Installation
19
Oil return measures
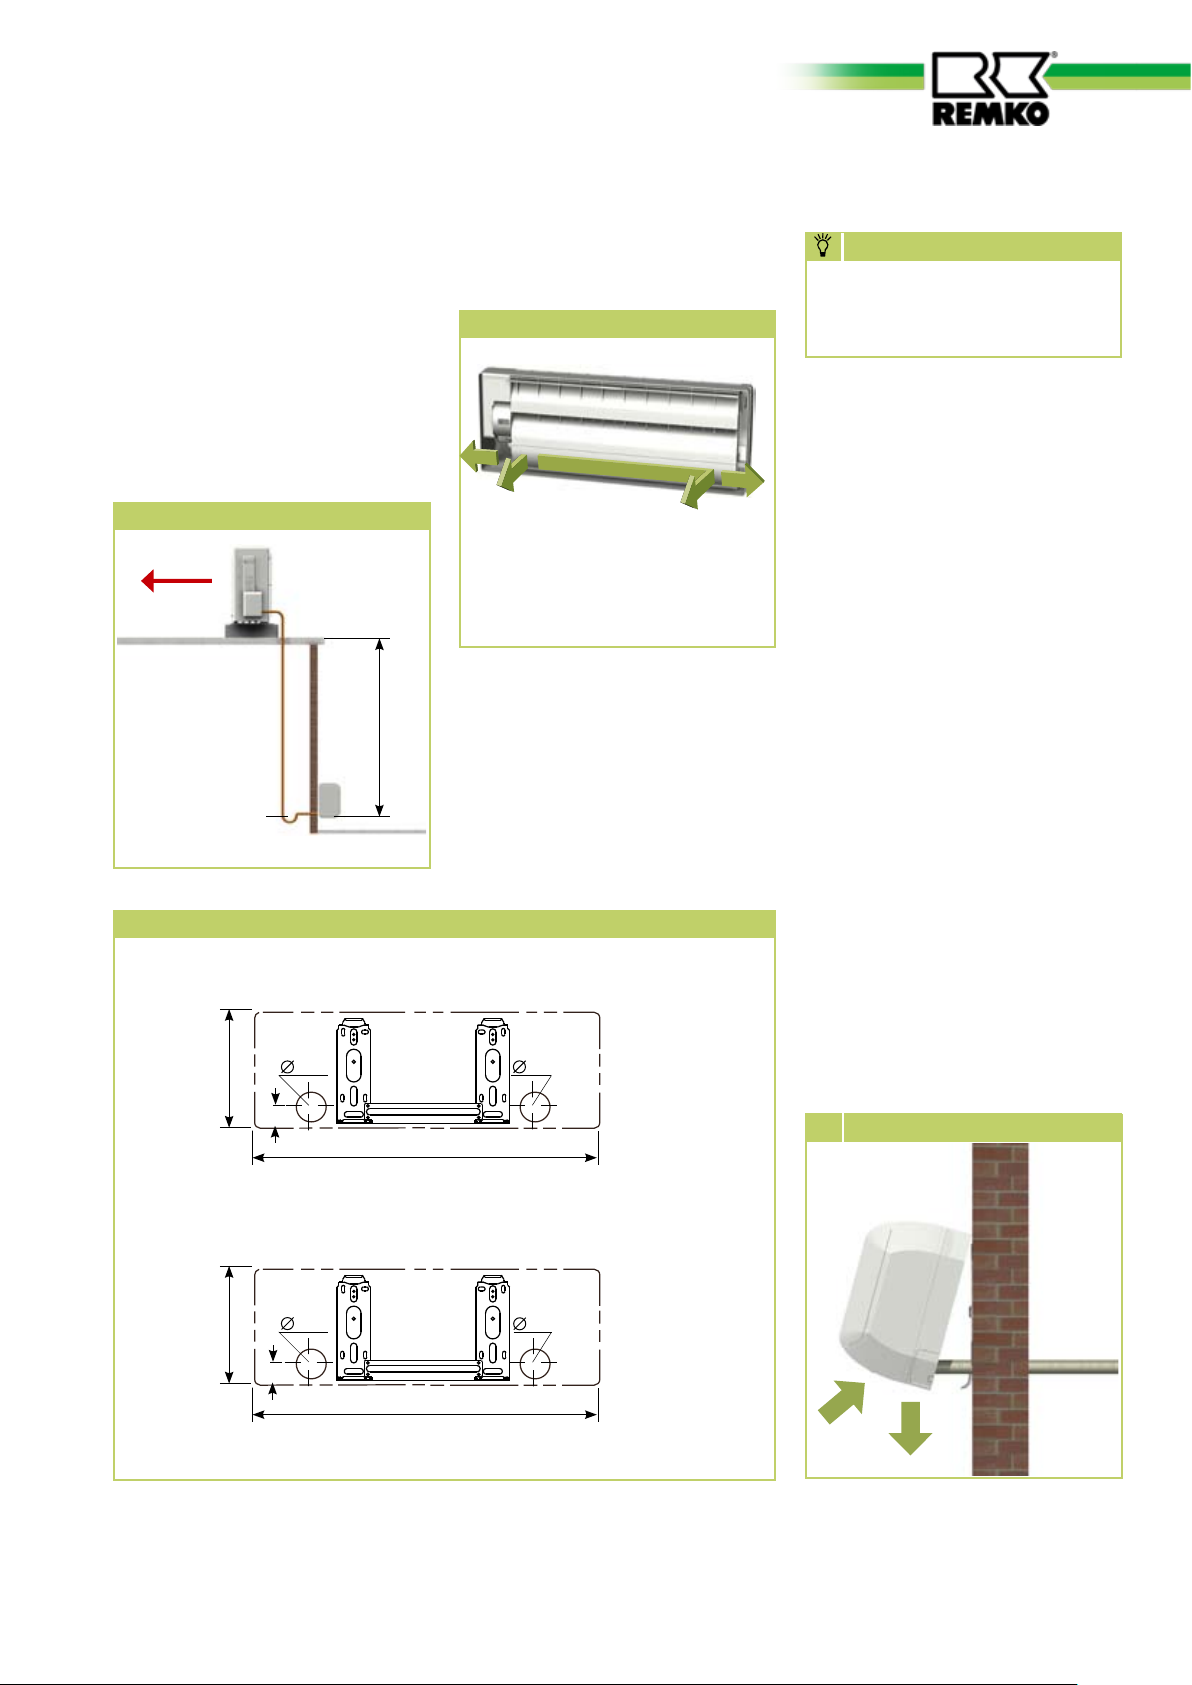
If the outdoor component is
installed at a higher level than
the indoor unit, suitable oil return
measures must be taken. Usually
an oil pump bend is installed
for every 2.5 metres of height
difference.
Oil return measures
Outdoor
component
Oil pump bend
in suction pipe to
outdoor component
1 x every 2.5
metres of rising
pipe
Radius:
min. 50 mm
max. 15 m
Indoor unit
Connection variations of
inner unit
Connection variations
1
2
3
1 Outlet on the wall, right
2 Outlet through the wall, right
3 Outlet through the wall, left
4 Outlet on the wall, left
Wall bracket for indoor unit
The wall bracket for the unit must
be attached with suitable screws
and anchors.
NOTE
Installation should only be
performed by authorised
specialists.
Unit installation
The indoor unit is attached by
means of a wall bracket, under
consideration of air discharge side
4
located in the lower part.
1. Mark the mounting points
on the statically permissible
building sections according to
the dimensions of the unit.
2. If necessary, remove the break
out opening on the housing.
3. Connect the refrigerant
pipes, electrical cables and
condensation pipe to the indoor
unit as described below.
Mounting points for wall bracket
MD 261 IT
250
65
45
MD 351 IT
270
65
45
750
815
65
65
All dimensions in mm
4. Hang the indoor unit onto the
wall bracket by tilting it back
slightly and by pressing the
bottom part of the unit against
the bracket (Figure 5).
5. Check that the unit is level.
5
Hooking in
Page 20
REMKO MD
20
Connection of refrigerant
pipes
The on site connection of the
refrigerant pipes is made inside the
unit.
It may be necessary to fit a reducer
or flared adapter to the indoor
unit. These fittings are included
as standard. Once installed, the
connections should be made tight
against vapour diffusion.
CAUTION
The units are factory filled with
dry nitrogen to check for leaks.
The pressurised nitrogen is
released when loosening the
union nuts.
The following instructions describe
the installation of the refrigerant
circuit and the assembly of the
indoor unit and the outdoor
component.
1.
The required pipe diameters are
given in the table "Technical
data".
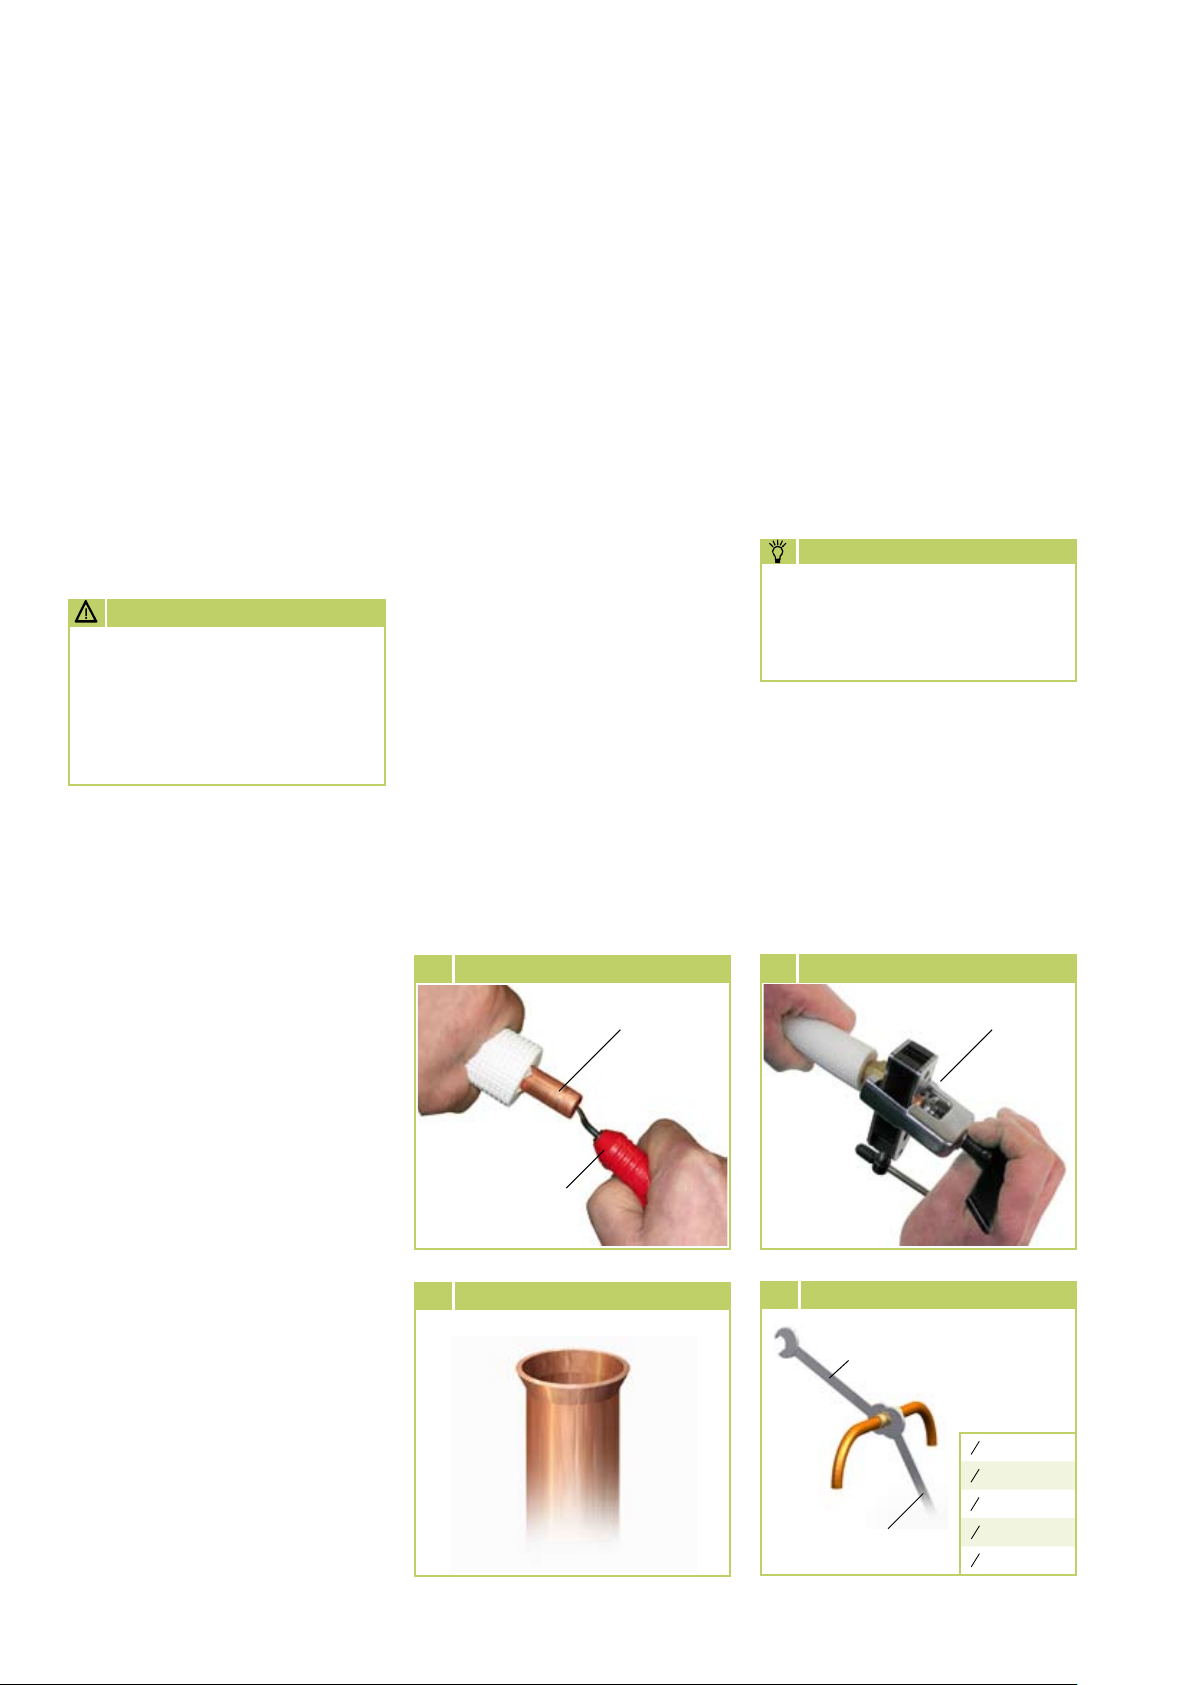
5. Verify that the shape of the
flange is correct(Figure 8).
6. First connect and hand-tighten
the refrigerant connections
to ensure they are correctly
seated.
7. Now fully tighten the fittings
using 2 suitably sized openended spanners. Use one
spanner to counter the force
when tightening the fitting
(Figure 9).
8. Use insulation hoses which are
designed for this temperature
range and diffusion tight.
9. Lay the refrigerant pipes from
the indoor unit to the outdoor
component. In doing so, ensure
6 Deburring the refrigerant pipe
Refrigerant pipe
that they are sufficiently
attached and take measures for
the oil return, if necessary!
10.
Observe the permitted bending
radius for the refrigerant pipes
during installation. Never bend
a pipe twice in the same place.
Brittle pipes and potential
cracking are the consequences.
NOTE
Only employ tools and
components suitable for
refrigeration applications.
11.
Use the wall or floor brackets
to fit the outdoor component
against structural parts
approved to support the static
load (refer to the installation
instructions for the brackets).
7 Flanging the refrigerant pipe
Flanging tool
2. Remove the factory-fitted
protective caps and union
nuts on the connections.
These should be used during
installation.
3. Before flanging the refrigerant
pipes, ensure that the union nut
is fitted on the pipe.
4. Prepare the laid refrigerant
pipes as shown below
(Figure 6+7).
Deburrer
8 Correct flange shape
9 Tighten the fitting
Tighten 1. spanner
Counter
2. spanner
Tightening
torque:
1
4
15-20 Nm
“
3
8
33-40 Nm
“
1
2
50-60 Nm
“
5
8
65-75 Nm
“
3
4
95-105 Nm
“
Page 21
12.
21
Ensure that structure-borne
sound is not transferred to parts
of the building. Use vibration
dampers to reduce the effects
of structure-borne sound!
13.
Prepare the refrigerant pipe
for the outdoor component as
described above.
Supplementary information
for Installation
■
For the combination of the
outdoor component with some
indoor units, the connection of
the refrigerant pipes may differ.
In that case, install the provided
reducer or expansion fittings to
the indoor unit.
■
If the basic length of the
refrigerant pipe exceeds
5 m, add refrigerant when
commissioning the system for
the first time. (See chapter
"Add refrigerant").
Tightness check
Once all the connections have
been established, the pressure
gauge station is attached as
follows to the Schrader valve (if
fitted):
red = small valve
= injection pressure
blue = large valve
= suction pressure
Once connected, perform a
tightness test using dried nitrogen.
The tightness test involves
spraying a leak detection spray
onto the connections. If bubbles
are visible, the connections have
not been properly made. Retighten the connection or prepare
a new flange.
If the tightness test is successfully
completed, depressurise the
refrigerant pipes and start a
vacuum pump with an absolute
final partial pressure of min. 10
mbar to remove the air in the pipe.
Any humidity present in the pipes
is also removed.
CAUTION
A vacuum of min. 20 mbar
must be created!
The time required to generate
the vacuum is dependent on the
pipework volume
of the indoor unit and the length
of the refrigerant pipes. This
always takes at least 60 minutes.
Once any foreign gases and
humidity have been completely
extracted from the system, the
valves on the pressure gauge
station are closed and the valves
on the outdoor component are
opened as described in the chapter
on "Commissioning".
Page 22
REMKO MD
22
Condensation
connection
Due to the dew point shortfall,
condensation forms on the
evaporator during the cooling
operation and on the liquefier
during heating operation.
Below the evaporator is a catch
pan, which must be connected
with a drain.
The lower part of the outdoor
component housing is formed in
the shape of a collection tray. The
condensate connection included
in the scope of delivery is to be
attached here.
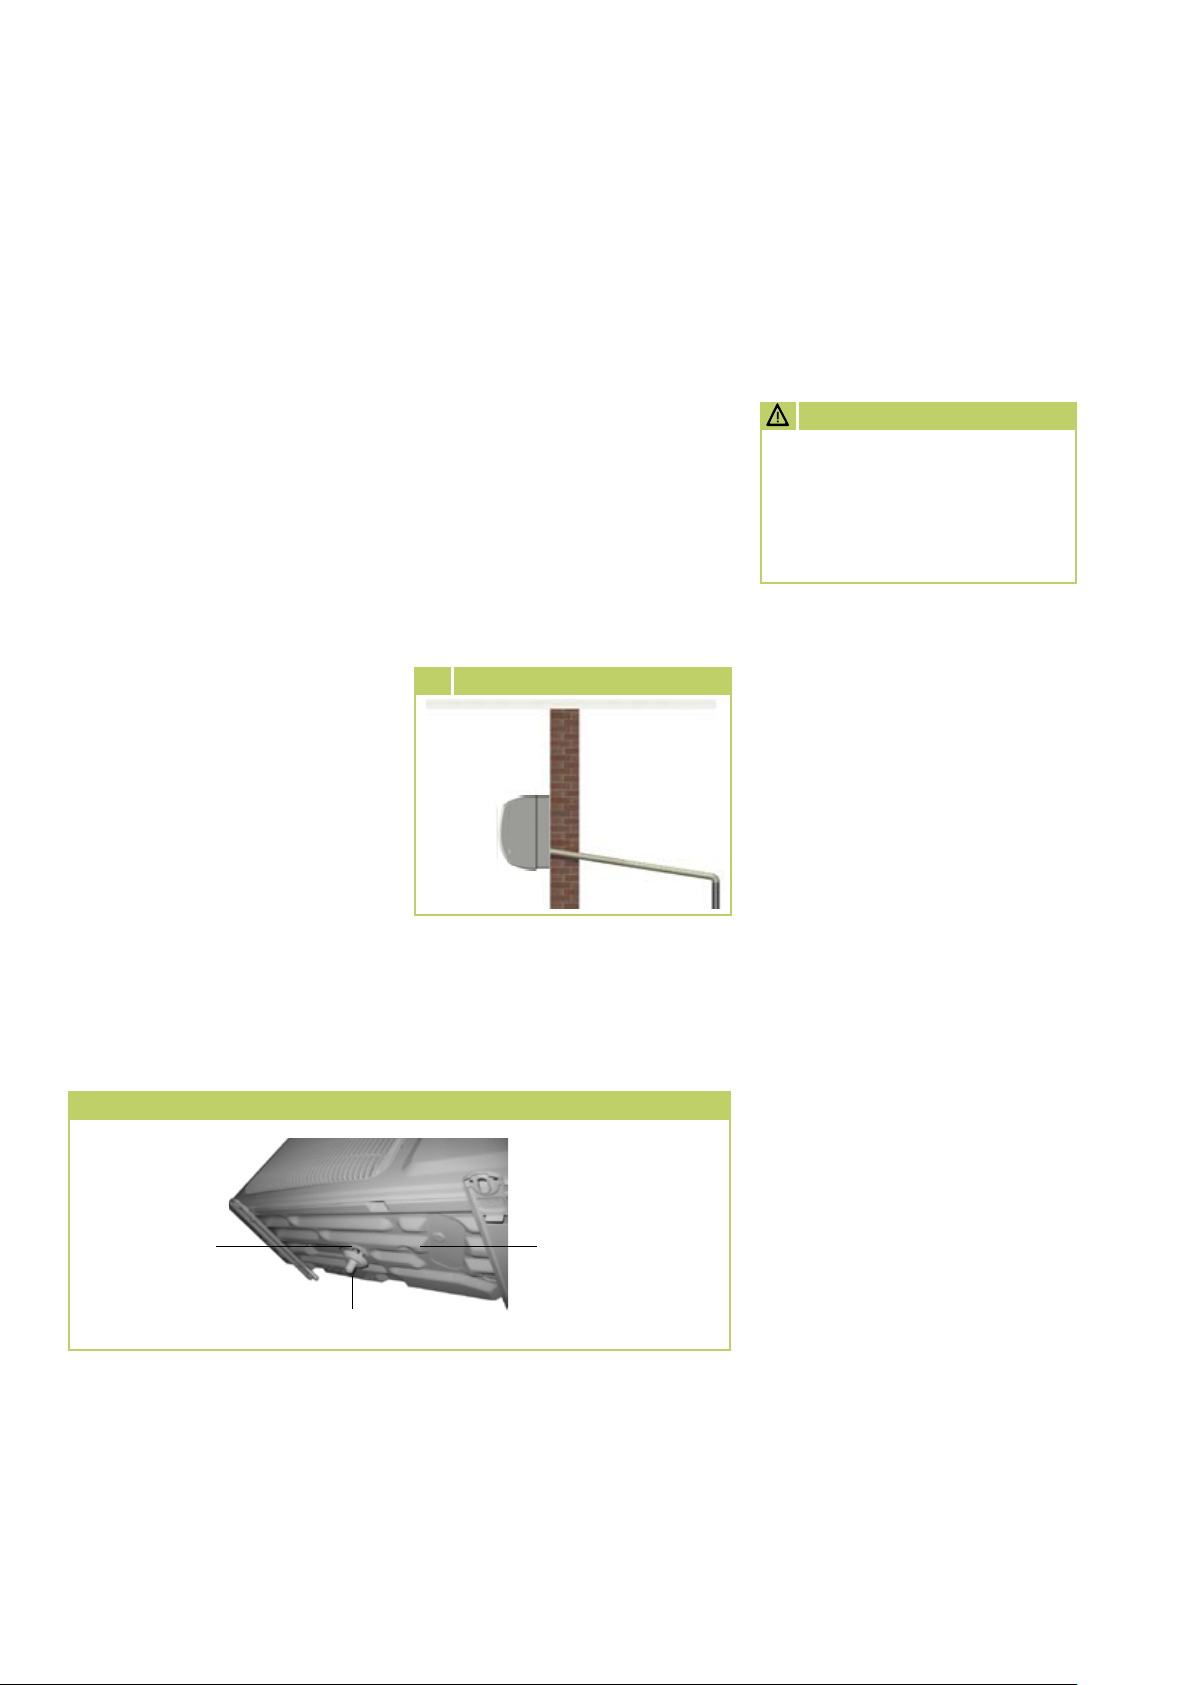
■
The condensation pipe should
have a fall of min. 2 %.
(Fig. 10).
If necessary, fit vapour diffusion
tight insulation.
■
The condensation pipe from
the unit should run freely
into the drainage pipe. If the
condensation runs directly
into a sewer pipe, fit a trap to
prevent any unpleasant odours.
■
When operating the unit at
ambient temperatures below
0 °C , make sure to route the
condensation pipe freeze proof.
The lower part of the housing
is also to be kept frost free by
the customer, in order to ensure
permanent draining of the
condensate.
If necessary, fit supplementary
pipe heating.
■
After completed routing, check
for unobstructed condensation
discharge and ensure that a
permanent seal is provided.
10
Fall of condensation pipe
minimum
2% fall
The condensation hose is designed
to be installed on the left side
(view from front).
Electrical connection
Mains cable must be installed as
voltage supply to the indoor unit
and a control cable to the outdoor
component, with appropriate
safeguards.
CAUTION
All electrical installation work
should be performed by specialist contractors. Isolate the
voltage supply when connecting the electrical terminals.
The device's scope of delivery
includes a five metre long, fourcore control cable for connecting
the indoor unit to the outdoor
component. The control cable to
the outdoor component contains
a data line which serves to realise
communication between the
indoor unit and the outdoor
component. This is used for
controlling the cooling and heating
performance and for forwarding
fault indications to the indoor unit.
Condensation connection - outdoor unit
Opening for
condensation
connection
Condensation connection
Condensation pan of
outdoor component
Connecting the indoor unit
■
We recommend installing a
master / repair switch on the
building near the indoor unit.
■
Voltage is supplied to the
indoor unit, the outdoor unit
is supplied through the control
cable from the indoor unit to
the outdoor unit.
■
The terminal blocks for making
the connections are located on
the front of the unit. When the
unit is installed, measurements
can be made from the front by
removing the cover.
Page 23
■
23
If an optionally available
condensation pump is used on
the unit, then - for the shut
off contact of the pump - an
additional relay to increase the
switching power to shut off the
compressor might be needed.
■
Control cables should be
screened if laid in areas exposed
to strong magnetic fields.
■
Details concerning the electrical
protection of the system are
given in the section on technical
data.
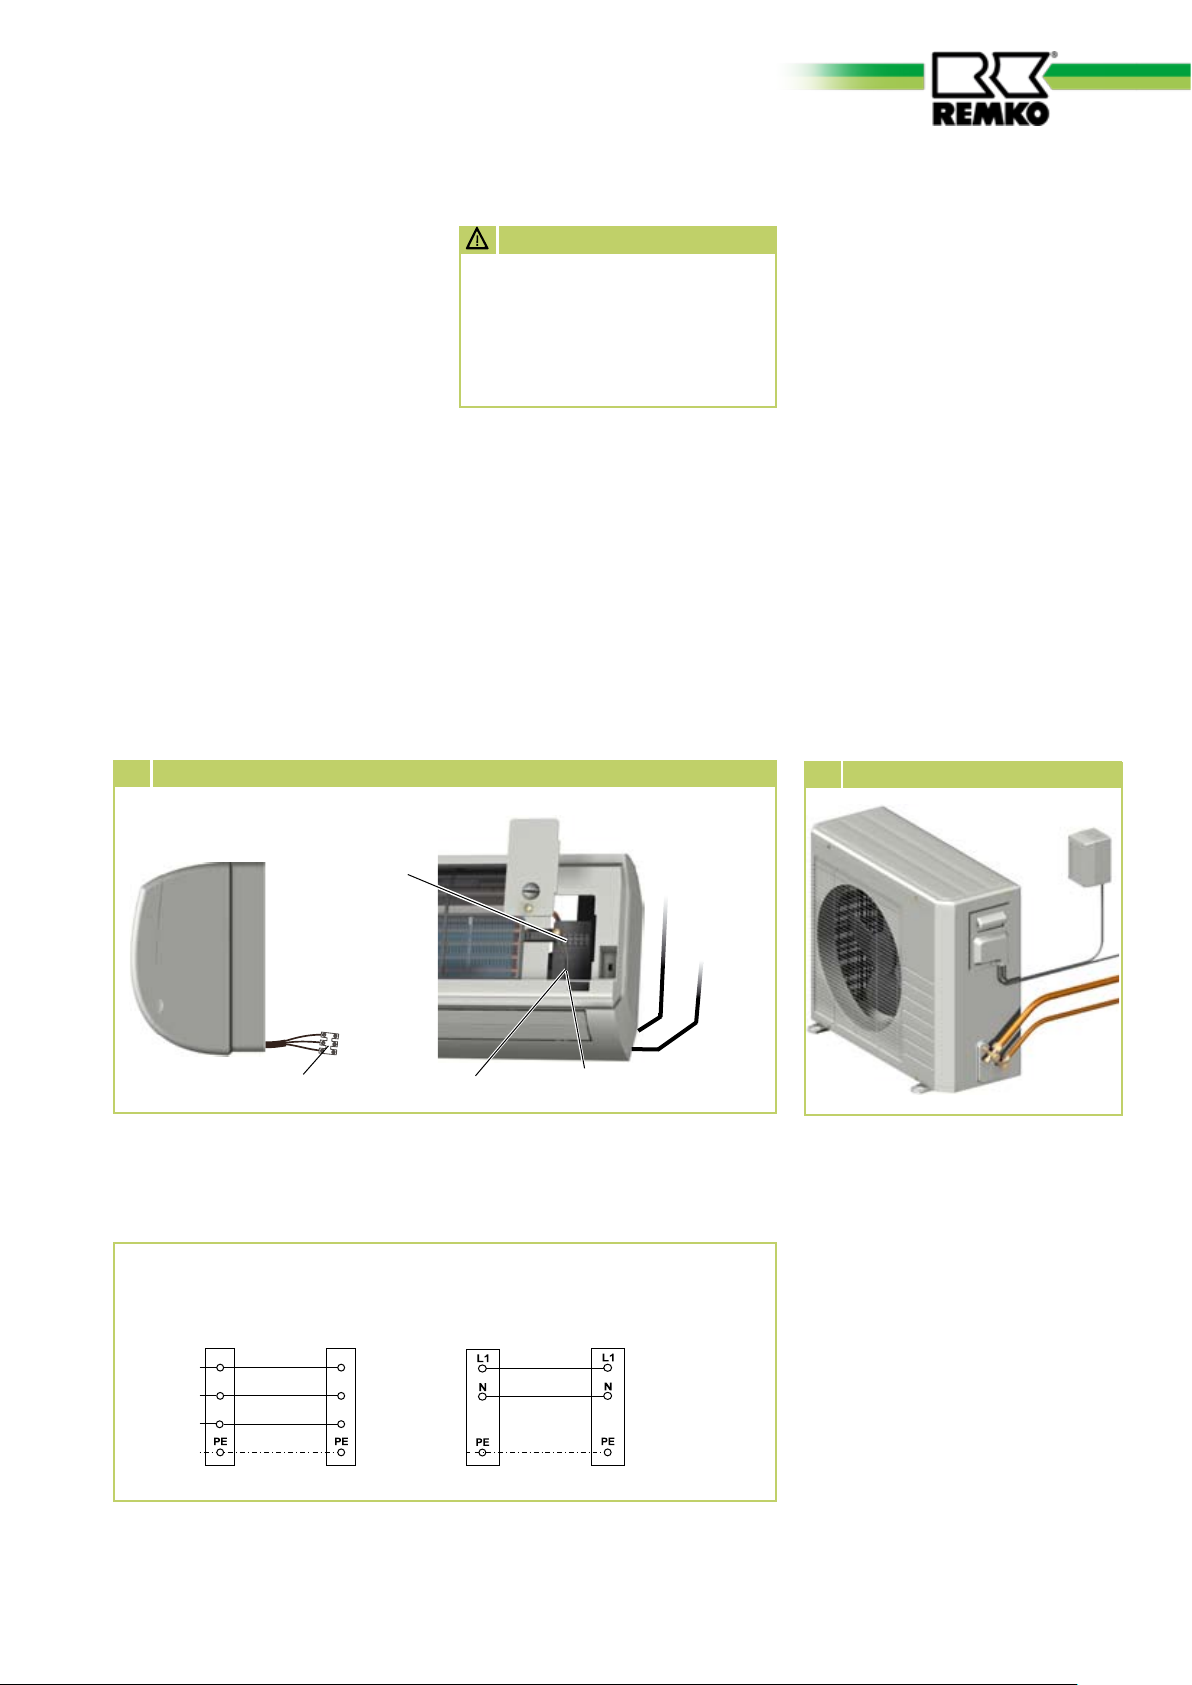
11
Connecting the indoor unit
CAUTION
Check all plugged and clamped
terminals to verify they are
seated correctly and making a
permanent contact. Re-tighten
as required.
Connecting the outdoor
component
Proceed as follows to connect the
cable:
1. Remove the cover from the side
wall.
2. Select the cable cross-section
according to the relevant
standards.
3. Terminate the cables as shown
on the electrical connection
diagram.
6. Support the cable in the strain
relief and re-assemble the unit.
12
Connecting the outdoor component
Cover
Terminal block
Control cable
Terminal block
Voltage supply
Strain relief
Control cable to outdoor
component
Electrical connection diagram
Connection MD 261 / 351
Outdoor component Indoor unit Mains cable
L1
L1
N
S
Phase conductor
N
Neutral conductor
S
Data line
Earth conductor
Indoor unit
Control cable
to outdoor
component
Voltage
supply
230 V~,
50 Hz,
L1 / N / PE
Page 24
R
S
C
U
V
W
RY3
4
CN6
CN7
CN5
CN4
CN28
Cn26
N-B
CN3
CN2
CN1
CN15
CN14
CN16
L2
N-A
3
~
~
Cn10
REMKO MD
24
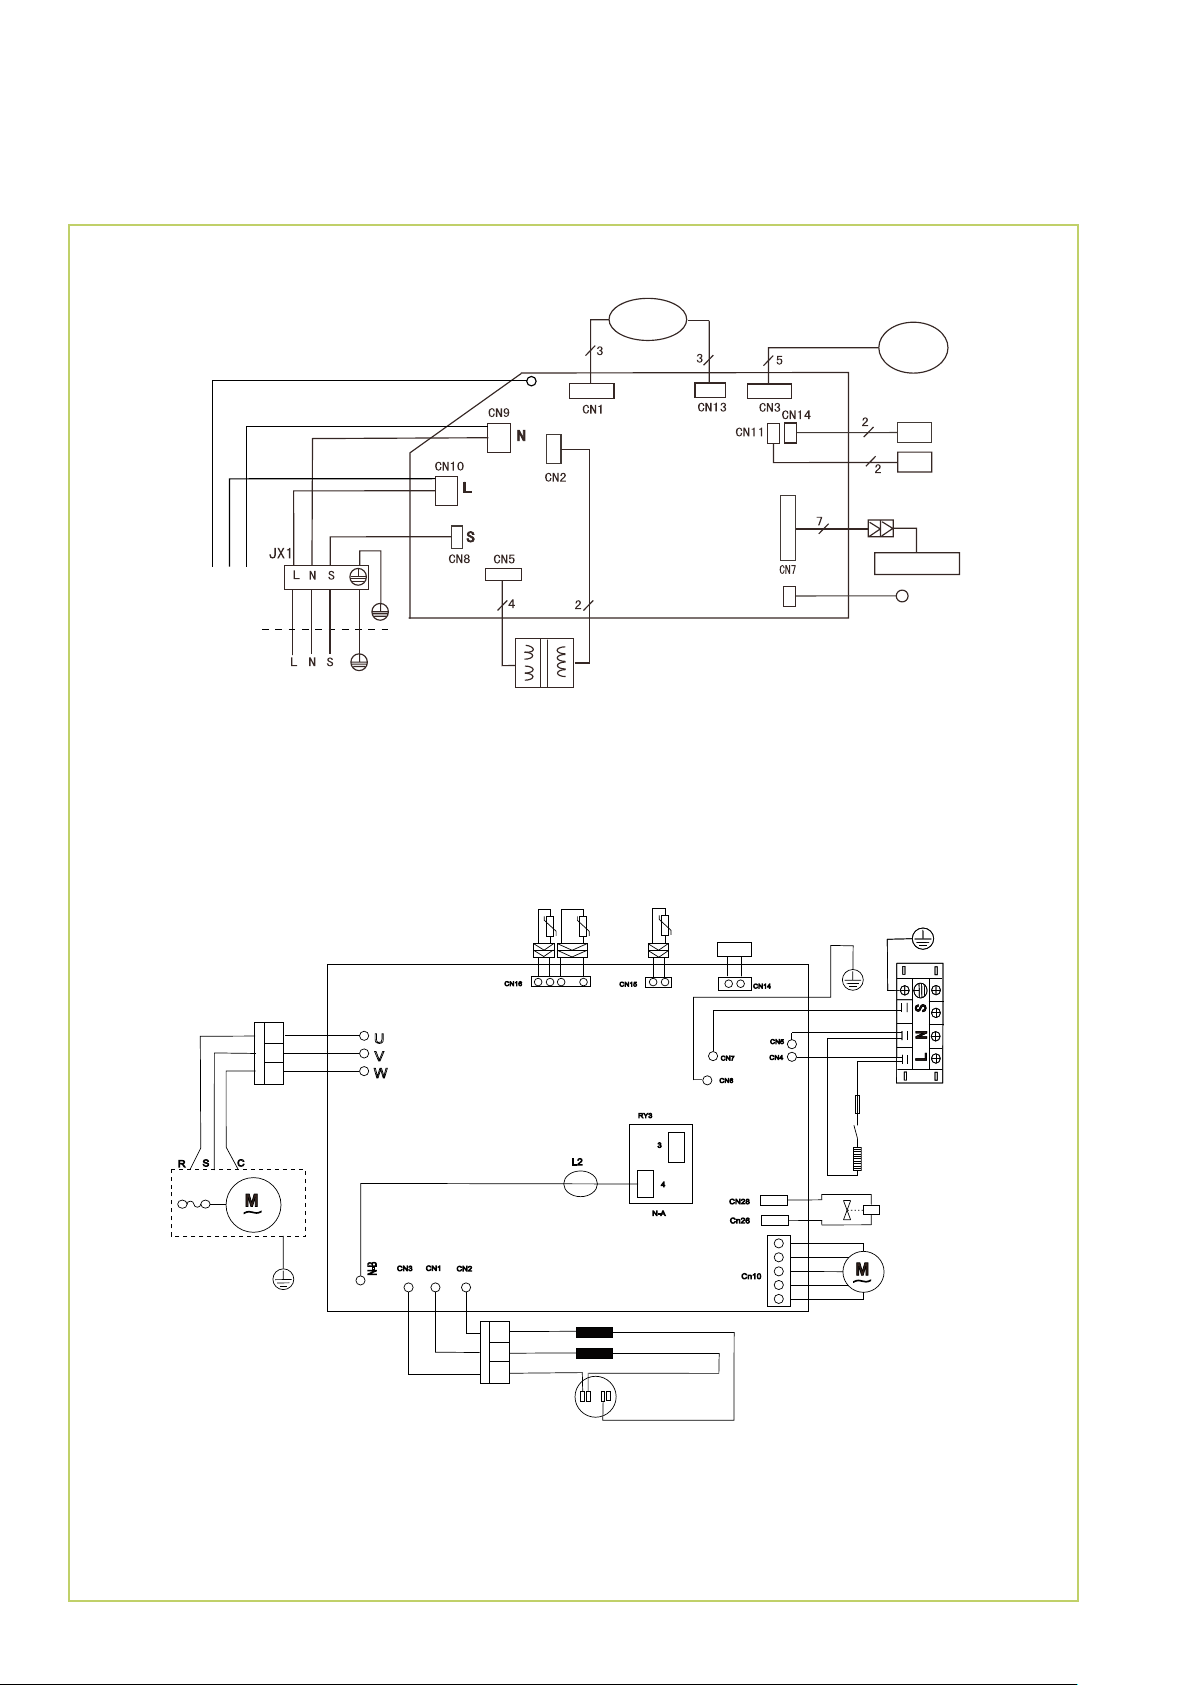
Electrical circuit diagram
MD 261-351 IT
Vaporiser fan
Swing motor
Mains cable
230V / 1~ /50 Hz
MD 261-351 AT
C
R
Y
Y/G
to outdoor component
B
R
C
Transformer
Sensor air inlet
Liquefier sensor
Sensor SL
BW
Y/G
Sensor OLP
W
R
Y/G
Air circulation
sensor
Sensor Vaporiser
Displayscreen
Auto Restart
Sensor
Vaporiser
Y
B
A
Displayscreen
Fuse 1A 250V
Thermostat
Crankcase heater
Reverse flow valve
Compressor
Y/G
R O Y
Colour code
A = brown
B = blue
C = black
Y = yellow
Liquefier fan
R
Condenser
O
Choke R6025C
Choke R1310/1514
Y
R = red
W = white
Y/G = yellow/green
O = orange
Page 25
Before
25
commissioning
Add refrigerant
Commissioning
After the tightness check has
been successfully completed,
connect the vacuum pump via
the pressure gauge station to
the valve connections on the
outdoor component (see chapter
"Tightness check") and create a
vacuum.
Perform the following checks
prior to commissioning the
unit for the first time and after
any interventions affecting the
refrigerant circuit. Record the
results in the commissioning
report:
■
Check of all refrigerant
pipes and valves with leak
detection spray or soapy water
for leaks and for inadvertent
mix up of suction and injection
pipe, with the unit at a
standstill.
■
Check of all refrigerant
pipes and insulation for
damage.
CAUTION
Note that the employed
refrigerant is always filled in
liquid form!
NOTE
Check the overheating to
determine the refrigerant fill
quantity
CAUTION
Wear protective clothing when
handling refrigerant.
The equipment contains a basic
quantity of refrigerant. Beyond
these conditions, for refrigerant
pipe lengths of more than 5 meters
per circuit, an additional amount
of refrigerant must be added,
according to the following chart:
RVT 261 / 351
NOTE
Commissioning should only
be performed
and documented by specially
trained personnel.
The system can be commissioned
once all the components have
been connected and tested.
A functional check should be
performed to verify its correct
function and identify any unusual
operational behaviour prior to
handing it over to the operator.
NOTE
Check that the stop valves
and valve caps are tight after
carrying out any work on the
refrigerant circuit. If necessary,
use appropriate sealant
products.
Function test and test run
■
Check of all electrical
connections between indoor
unit and outdoor component
for correct polarity.
■
Check that all fastenings,
mountings etc. are firm and at
the correct level.
Basic pipe length
Up to and incl.
5m
5m to max. 15m 30 g/m
Additional fill
quantity
0 g/m
Check the following points:
■
Leak tightness of refrigerant
pipes.
■
Compressor and fan running
smoothly.
■
In cooling mode, cold air should
be output by the indoor unit,
and warm air should be output
by the outdoor component.
■
Functional test of the indoor
unit and all program sequences
■
Check of the surface
temperature of the suction
pipe and determination of
vaporiser overheating. To
measure the temperature, hold
the thermometer to the suction
Page 26

REMKO MD
26
pipe and subtract the boiling
point temperature reading on
the pressure gauge from the
measured temperature.
■
Record the measured
temperatures in the
commissioning report.
Functional test for cooling
and heating modes
1. Remove the caps from the
valves.
2. Begin the commissioning
process by briefly opening the
blocking valves of the external
section until the manometer
displays a pressure of approx.
2 bar.
3. Use leak detection spray or
suitable devices to check that all
the connections are tight.
4. If no leaks are found, fully open
the stop valves by turning
them anti-clockwise using a
spanner. If leaks are found,
repair the faulty connection. It
is imperative that the vacuum
creation and drying steps are
repeated!
5. Switch off the main circuit
breaker or remove the fuse
(provided by the customer).
8. Check the indoor unit
control system using the
functions described in the
chapter "Operation". Timer,
temperature setting, fan speeds
and switching to ventilation or
dehumidifying mode.
9. Check the correct function
of the condensation pipe by
pouring distilled water into the
condensation tray.
A bottle with a spout is
recommended for pouring the
water into the condensation
tray.
10.
Switch the indoor unit to
cooling mode.
11.
Check the correct function
and settings of all regulation,
control and safety devices
during the test run.
12.
Check the control system in the
indoor unit using the functions
described in the manual.
Timer, temperature settings and
all mode settings.
13.
Check the overheating,
outdoor, indoor, outlet and
vaporisation temperatures and
record the measured values in
the commissioning report.
14.
Switch the indoor unit to
heating mode.
Final tasks
■
Re-fit all the dismantled parts.
■
Familiarize the operator with
the system.
6. Use the remote control to
switch on the unit and select
the cooling mode, maximum
fan speed and lowest target
temperature.
7. Measure and record all
the required values in the
commissioning report and
check the safety functions.
15.
Check all the previously
described safety devices and
functions during the test run.
16.
Enter the measured data in the
commissioning report.
17.
Remove the pressure gauge.
Check that seals have been
fitted in the sealing caps.
Page 27
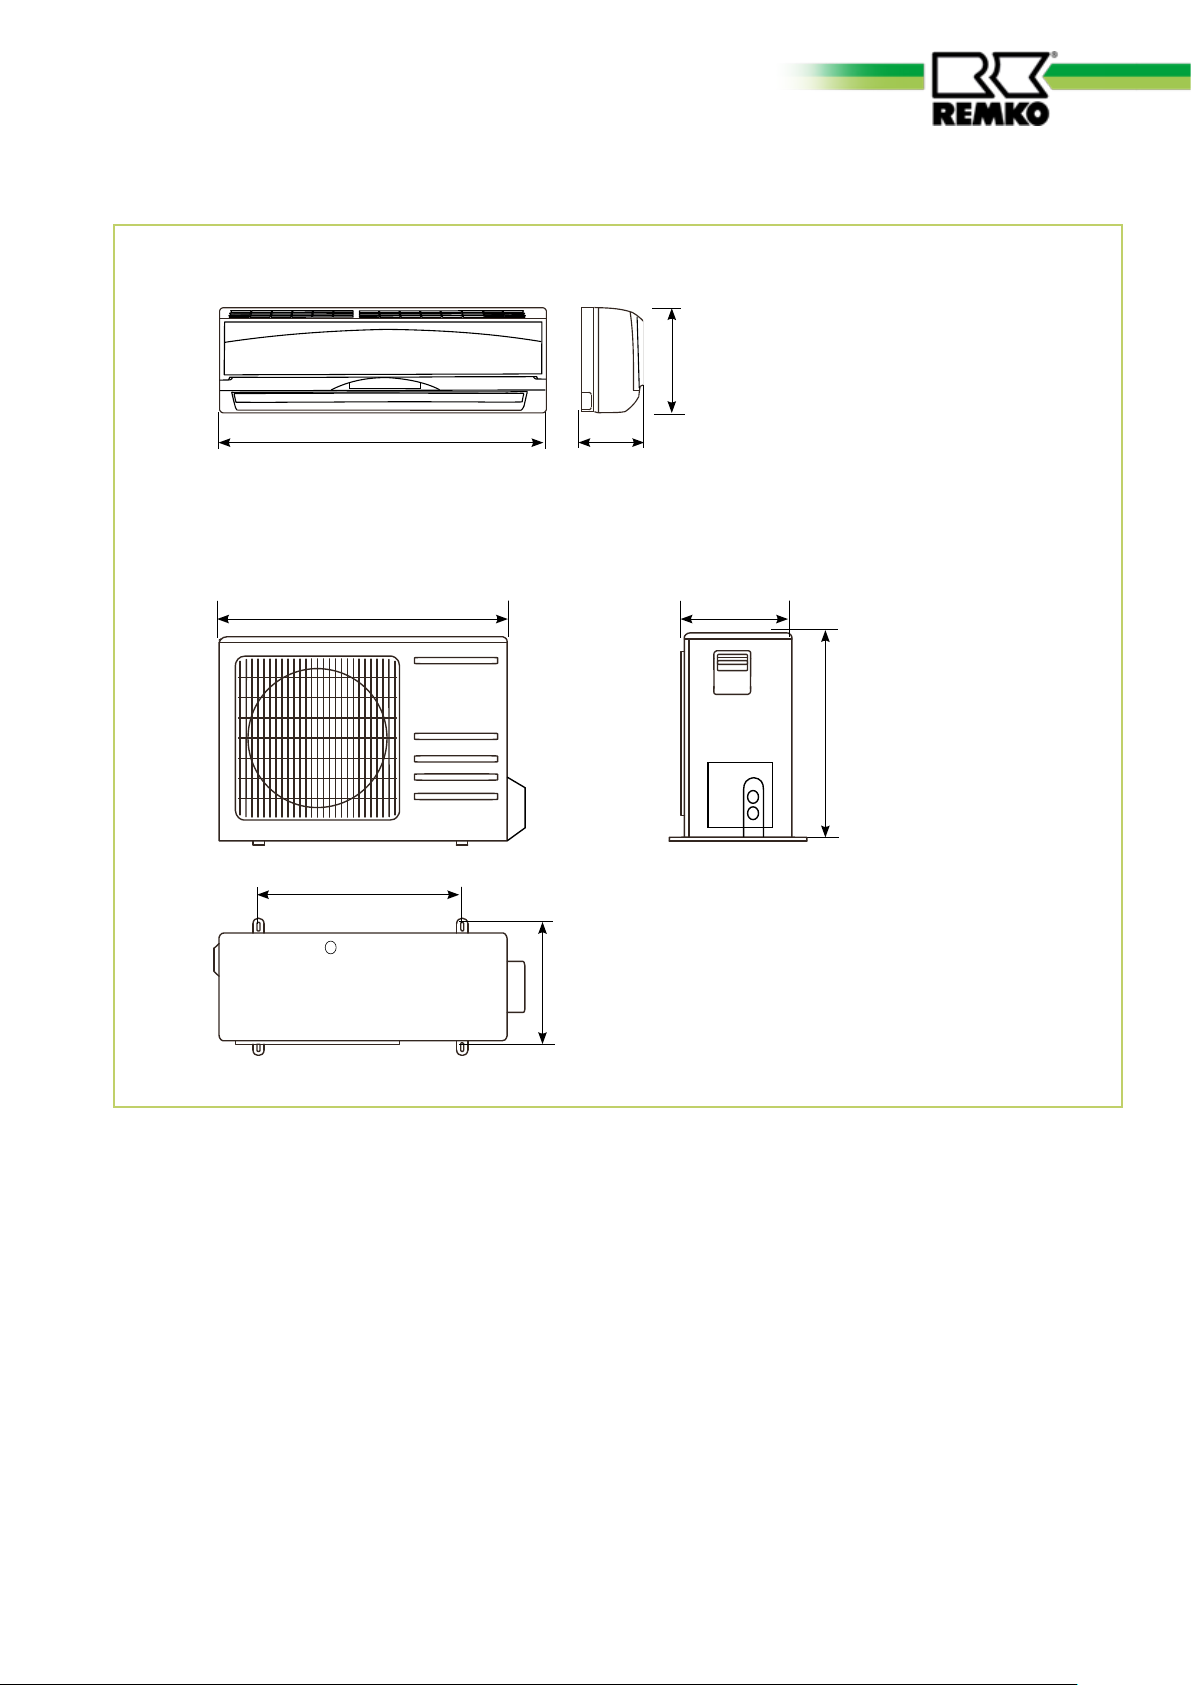
Unit dimensions
27
MD 261 IT / MD 351 IT
280
MD 261 AT / MD 351 AT
760
530
815
215
270
590
290
Dimensional and design changes to advance technical progress are reserved.
Page 28
REMKO MD
28
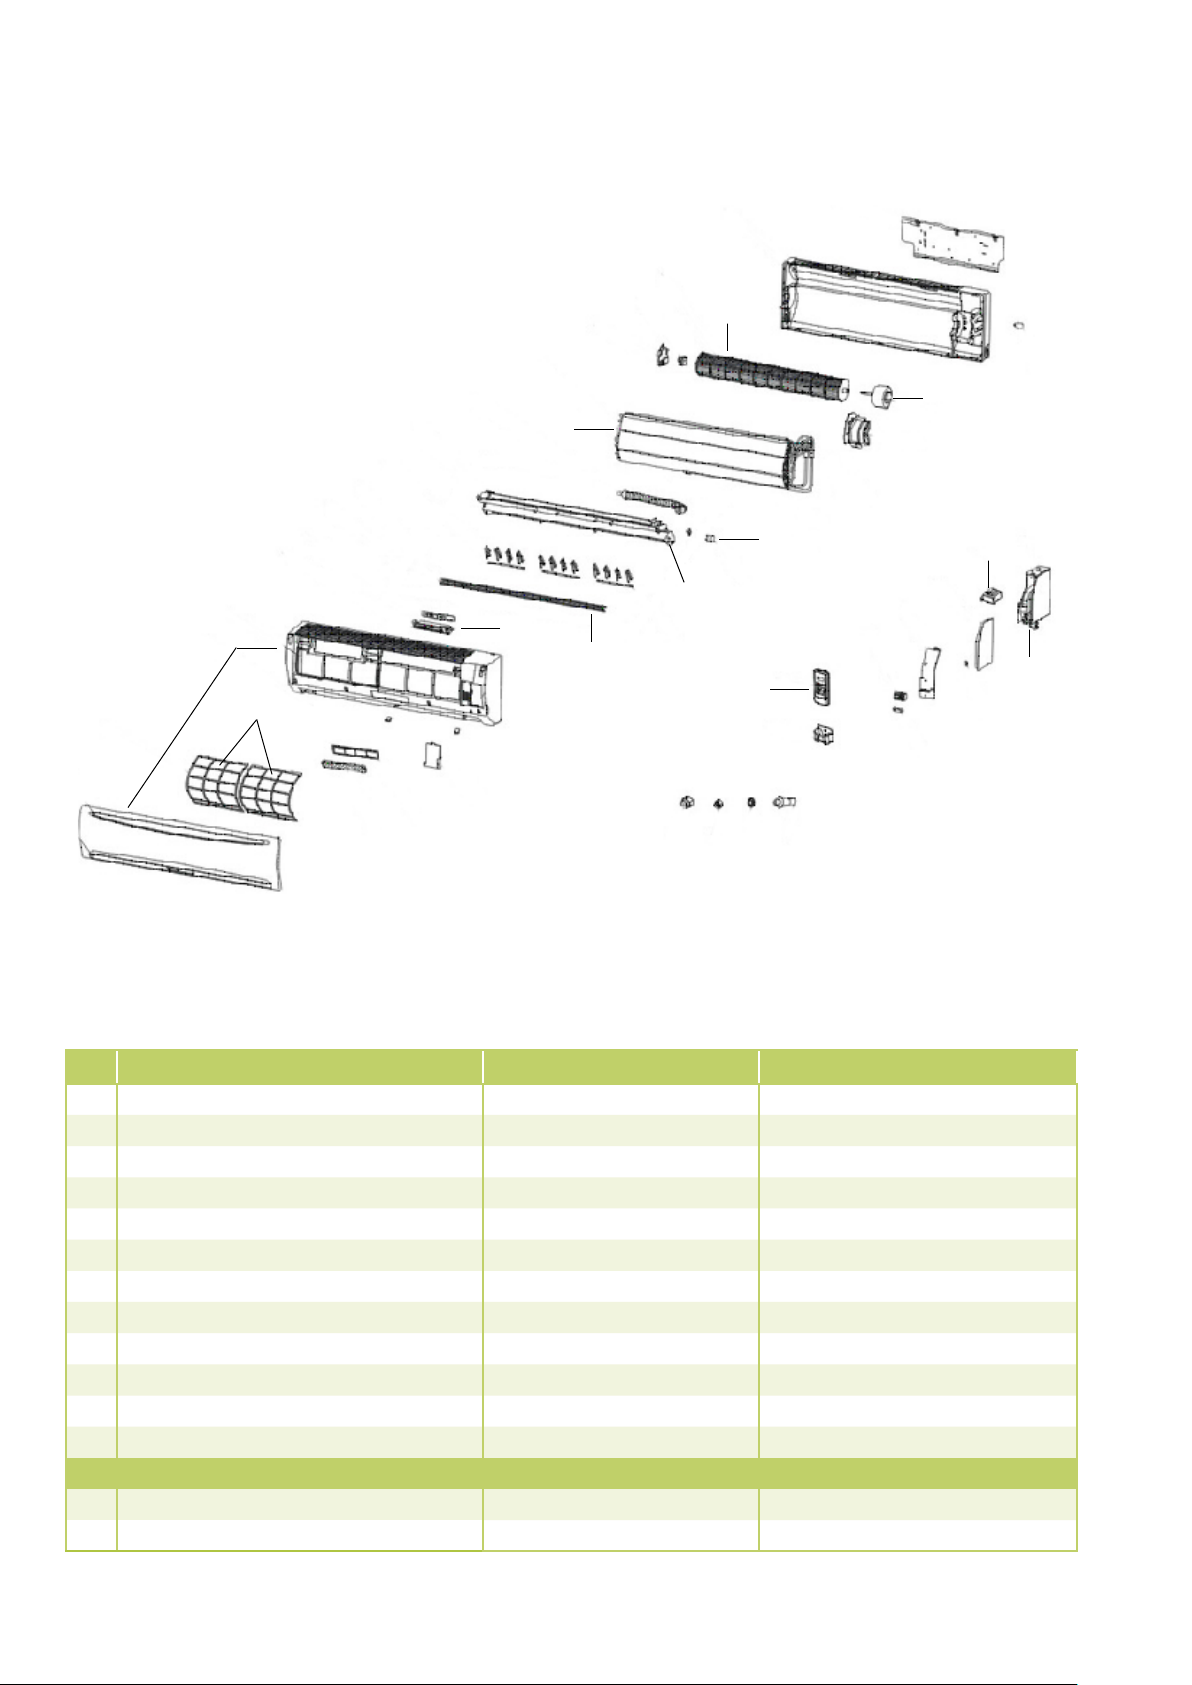
Exploded view MD 261-351 IT
8
9
7
4
6
1
2
3
5
12
We reserve the right to modify the dimensions and constructional
design as part of the ongoing technical development process.
Spare parts list
No. Designation MD 261 IT MD 351 IT
1 Complete front face
2 Air filter, set
3 Board, display
4 Swing motor
5 Air outlet fins, set
6 Condensation tray
7 Vaporiser
8 Fan wheel
9 Fan motor
10 Control board
11 Transformer
12 IR remote control
Spare parts (not illustrated)
Air circulation sensor
Vaporiser sensor
1109700 1109714
1109701 1109715
1109702 1109716
1109703 1109717
1109704 1109718
1109705 1109719
1109706 1109720
1109707 1109721
1109708 1109722
1109709 1109723
1109710 1109724
1109711 1109725
1109712 1109726
1109713 1109727
11
10
When ordering spare parts, please state the computerised part no., unit number and type (see identification plate)!
Page 29
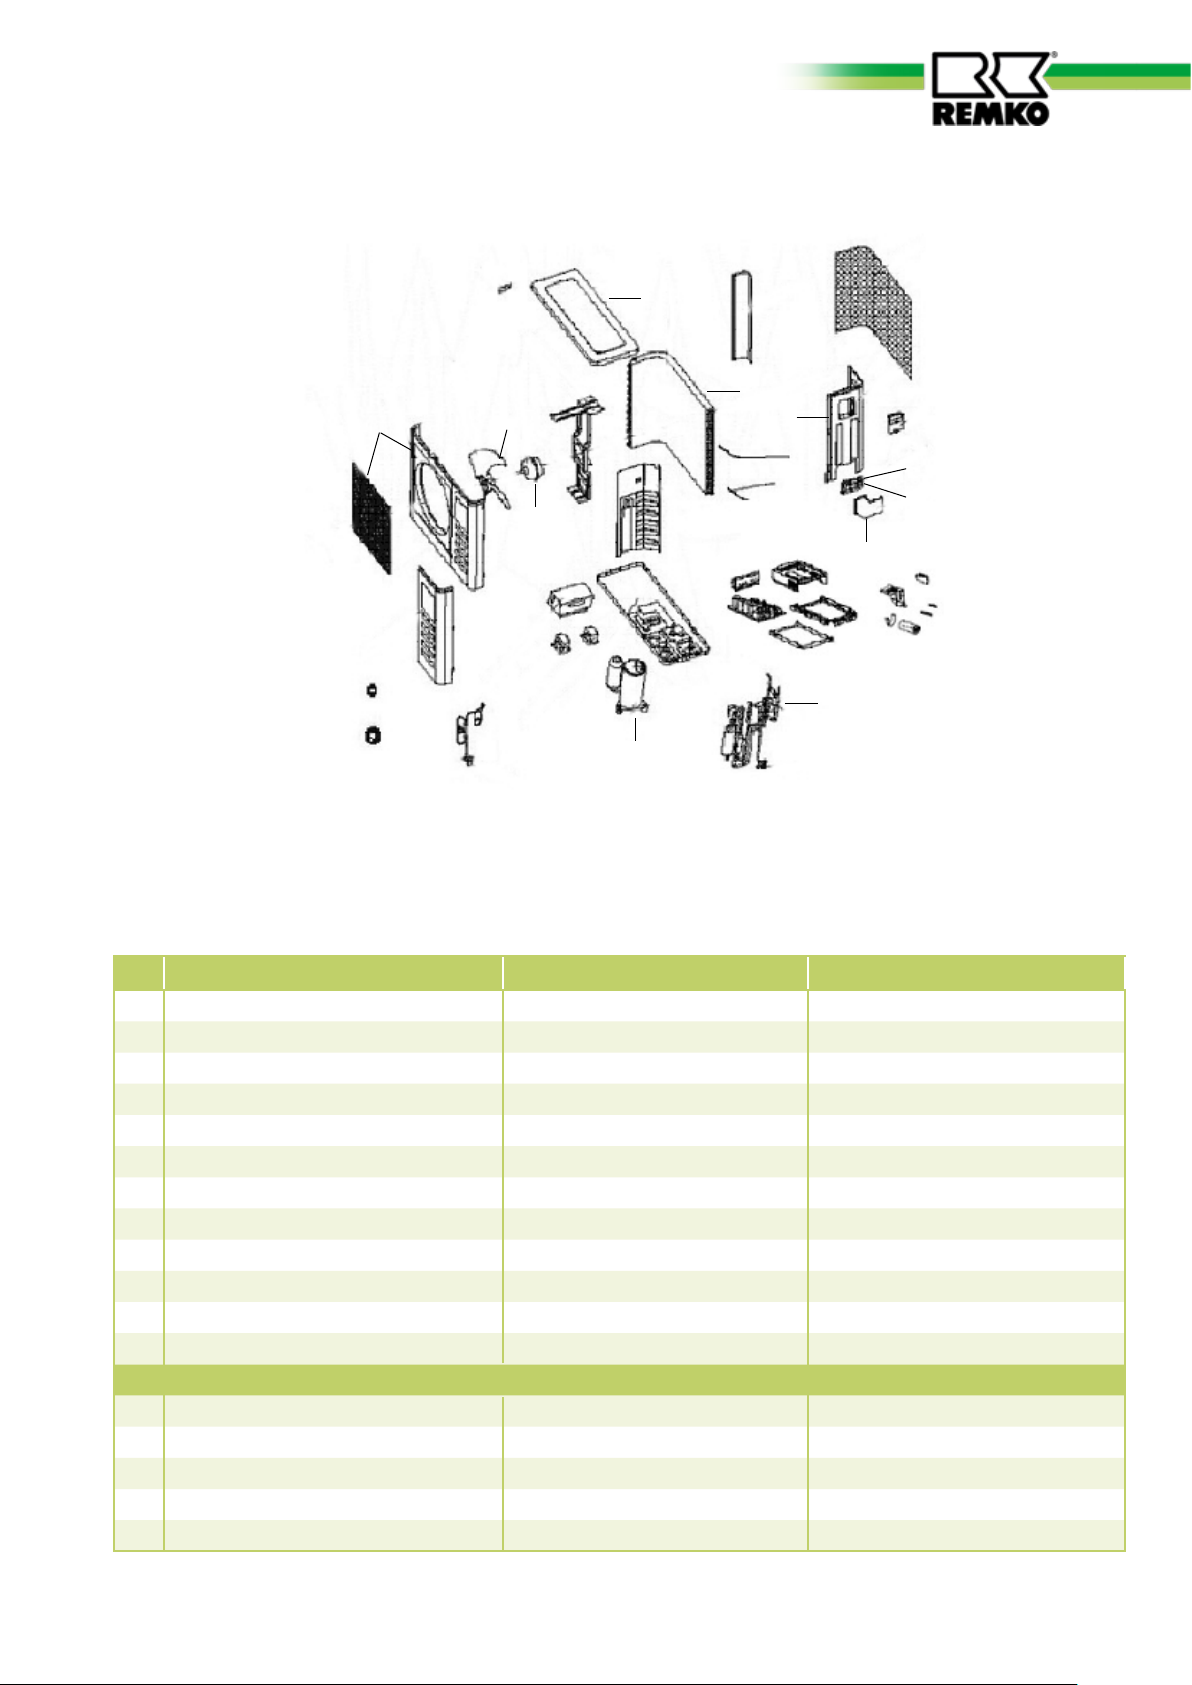
Exploded view MD 261-351 AT
29
1
2
3
5
4
6
9
10
11
12
7
We reserve the right to modify the dimensions and constructional
design as part of the ongoing technical development process.
Spare parts list
No. Designation MD 261 AT MD 351 AT
1 Front panel
2 Fan blade, liquefier
3 Fan motor, liquefier
4 Liquefier
5 Cover panel
6 Side part
7 Compressor, cpl.
8 Condenser, liquefier fan
9 Stop valve, suction pipe
10 Stop valve, injection pipe
11 Valve cover
12 Reverse flow valve
Spare parts (not illustrated)
Control board
Condenser, compressor
Choke CN1
Choke CN2
Temperature sensors, set
1109761 1109778
1109762 1109779
1109763 1109780
1109764 1109781
1109765 1109782
1109766 1109783
1109767 1109784
1109768 1109785
1109769 1109786
1109770 1109787
1109771 1109788
1109772 1109789
1109773 1109790
1109774 1109791
1109775 1109792
1109776 1109793
1109777 1109794
When ordering spare parts, please state the computerised part no. and unit number (see identification plate) !
Page 30
REMKO MD
30
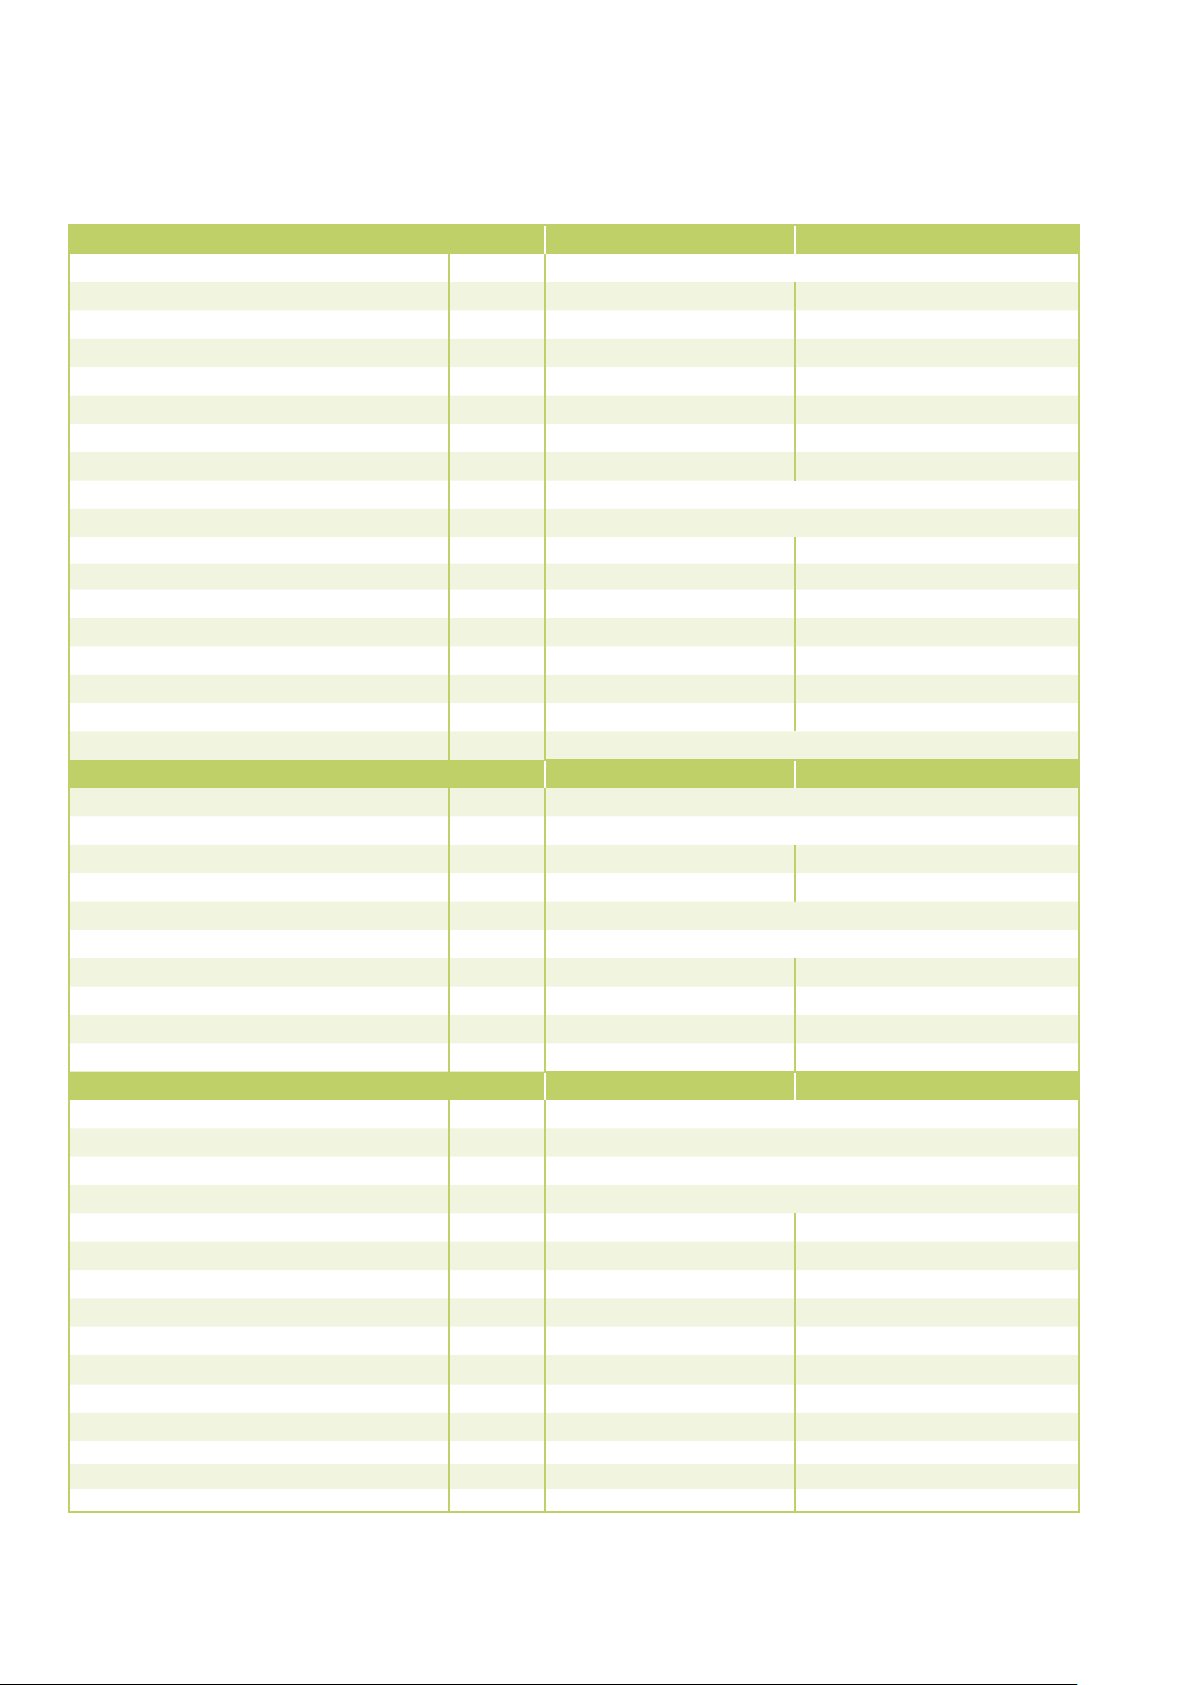
Technical data
Series MD 261 MD 351
Operating mode
Nominal cooling output
Nominal heating output
Energy efficiency class, cooling
Energy efficiency ratio EER
Energy efficiency class, heating
Coefficient of performance COP
1)
2)
1)
1)
2)
2)
kW 2.68 (0.82 to 3.41) 3.56 (1.05 to 4.53)
kW 2.96 (0.98 to 3.64) 3.86 (1.14 to 4.78)
Operating range (room volume), approx. m³ 80 110
Refrigerant R 410A
Voltage supply V/Hz 230 / 1~ / 50
1)
Nom. electrical power consumption, cooling
Nom. electrical power consumption, heating
Electr. nominal power consumption cooling
Electr. nominal power consumption heating
1)
2)
kW 0,63 (0,32-1,10) 0,91 (0,41-1,48)
2)
kW 0,67 (0,35-1,15) 0,96 (0,43-1,56)
Electr. starting current, max. A 17 20
Refrigerant connection, injection pipe Inches
Refrigerant connection, suction pipe Inches
Max. operating pressure kPa
Data specific to
indoor unit
Adjustment range, room temperature °C +17 to +30
Working range °C +17 to +32
Air flow rate per stage m³/h 375/515/650 375/500/675
Noise output per stage
3)
dB(A) 30/35/39 30/37/40
Protection degree IP X0
Condensation connection mm 16
Dimensions Height mm 280 280
Width mm 815 815
Depth mm 215 215
Weight kg
Data specific to
outdoor component
Working range, cooling °C -15 to +50
Working range, heating °C -15 to +34
Air flow rate, max. m³/h 1900
Protection degree IP 24
Noise output max.
3)
dB(A) 49 50
Refrigerant, basic quantity kg 1,23 1,23
Refrigerant, additional quantity > 5 m g/m 30 30
Refrigerant pipe, max. length m 15 15
Refrigerant pipe, max. length m 10 10
Dimensions Height mm 590 590
Width mm 820 820
Depth mm 290 290
Weight kg 41,0 41,0
Serial number 757... 758...
Computerised part no. 1631260 1631350
Inverter-wall room air conditioner combination for cooling and heating
A A
4,25 3,75
A A
4,42 4,02
A 3,00 (1,42-4,87) 4,25 (1,84-6,52)
A 3,09 (1,55-5,10) 4,34 (1,92-6,93)
(mm) 1/4 (6,35) 1/4 (6,35)
(mm) 3/8 (9,52) 1/2 (12,70)
4200 / 4200
MD 261 IT MD 351 IT
10,0 10,0
MD 261 AT MD 351 AT
1) Air inlet temperature TK 27°C / FK 19°C, outdoor temperature TK 35 °C, FK 24 °C, max. air volume, 5m pipe length
2) Air inlet temperature TK 20°C, outdoor temperature TK 7°C, FK 6°C, max. air volume, 5m pipe length
3) Distance 1 m free air
Page 31
Notes
31
Page 32
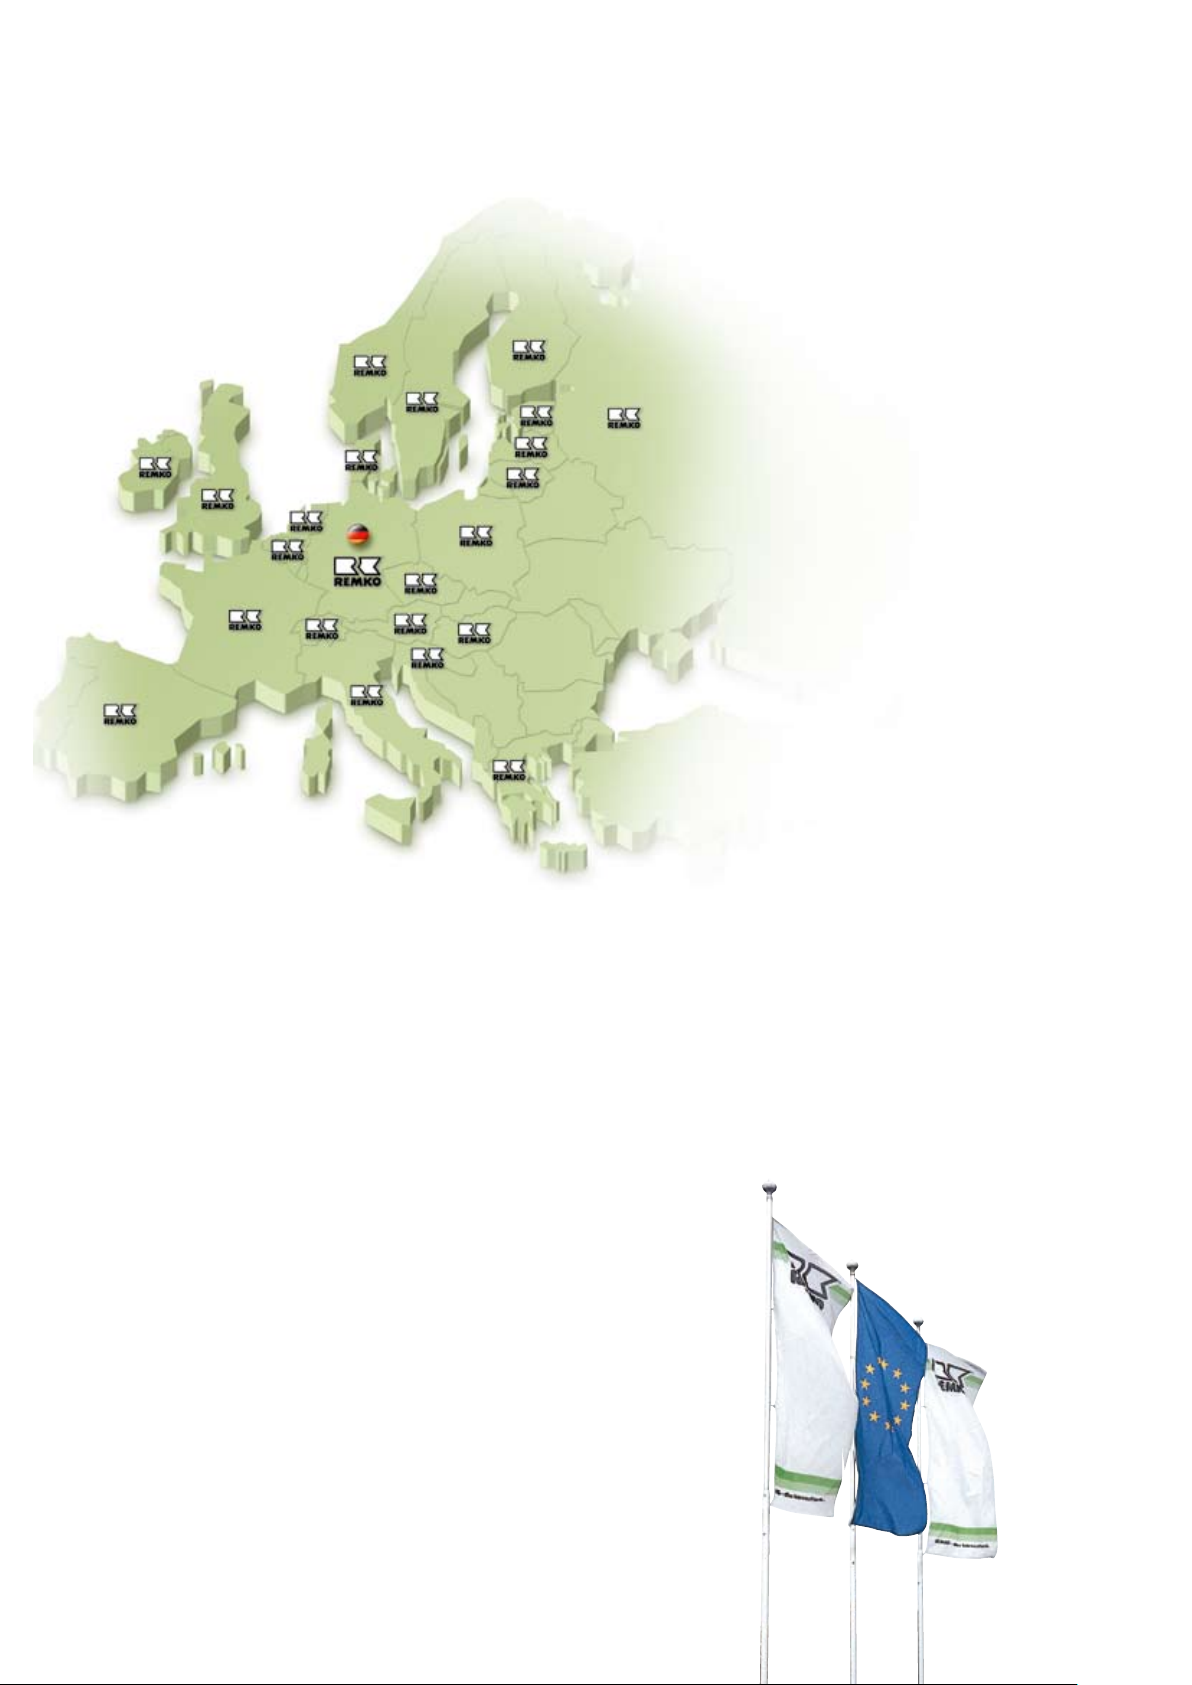
REMKO ACROSS EUROPE
… and in your area!
Profit from our experience and advice
REMKO GmbH & Co. KG.
Klima- und Wärmetechnik
Im Seelenkamp 12 · 32791 Lage
Postfach 1827 · 32777 Lage
Telephone +49 5232 6 06-0
Fax +49 5232 606-2 60
E-mail [email protected]
Internet www.remko.de
Hotline
Consulting, cooling technology sales
+49 5232 606-160
Consulting, heating technology sales
+49 5232 606-100
Export
+49 5232 606-130
Service
+49 5232 606-200
Consultancy
Intensive training means our
consultants are always up-to-date
with the latest developments. This
has given us the reputation of being
more than just a good and reliable
supplier:
REMKO, a partner who helps solve
problems.
Sales
REMKO not only has a well-
established sales network at home
and abroad, it also employs highly
trained sales specialists.
REMKO Our field staff are more
than just salesmen: above all, they
must advise our clients in the areas
of air conditioning and heating
technology.
Customer Service
Our equipment is precise and
reliable. However, should a fault
should occur REMKO customer
service is quickly at your side.
Our comprehensive network of
experienced dealers guarantees
quick and reliable service.
Subject to technical modifications, no responsibility taken for the correctness of information!
 Loading...