

Remington RM5124TH Operator's Manual
24 in. Electric Hedge Trimmer
RM5124TH
Operator’s Manual
TABLE OF CONTENTS
Service Information ...............................................................................................................................1
Safety Information .................................................................................................................................1
Know Your Unit .....................................................................................................................................2
Assembly Instructions ...........................................................................................................................2
Starting and Stopping Instructions .......................................................................................................2
Operating Instructions ..........................................................................................................................2
Maintenance and Repair Instructions ...................................................................................................2
Cleaning and Storage ...........................................................................................................................2
Troubleshooting ....................................................................................................................................2
Specifi cations .......................................................................................................................................2
Warranty Information ............................................................................................................................8
SAFETY INFORMATION
c) Do not expose power tools to rain or wet conditions. Water entering a power tool will increase
the risk of electric shock.
d) Do not abuse the cord. Never use the cord for carrying, pulling or unplugging the power tool.
Keep cord away from heat, oil, sharp edges or moving parts. Damaged or entangled cords
increase the risk of electric shock.
e) When operating a power tool outdoors, use an extension cord suitable for outdoor use. Use
of a cord suitable for outdoor use reduces the risk of electric shock.
f) If operating a power tool in a damp location is unavoidable, use a residual current
device(RCD) protected supply. Use of an RCD reduces the risk of electric shock.
NOTE : The term “ residual current device (RCD) ”may be replaced by the term ”ground fault circuit
interrupter (GFCI)” or “earth leakage circuit breaker (ELCB)”.
• Make sure the extension cord is heavy enough to carry the current drawn by the unit. An undersized
cord will cause a drop in line voltage resulting in loss of power and overheating. If in doubt, use the
next heavier gauge cord. The smaller the gauge number, the heavier the cord.
MINIMUM WIRE SIZE FOR EXTENSION CORDS
FOR 120 VOLT APPLIANCES USING 12-16 AMPS
CORD LENGTH (FEET) 25 50 100 150
WIRE SIZE (AWG) 14 12 * *
*Cord lengths of 100 or 150 feet are not recommended for units using 12 to 16 amps.
WARNING: To reduce the risk of electric shock, only use extension cords
suitable for outdoor use, such as SW-A, SOW-A, STW-A, STOW-A, SJW-A, SJOW-A,
SJTW-A or SJTOW-A cord types.
3) PERSONAL SAFETY
a) Stay alert, watch what you are doing and use common sense when operating a power
tool. Do not use a power tool while you are tired or under the infl uence of drugs, alcohol or
medication. A moment of inattention while operating power tools may result in serious personal
injury.
b) Use personal protective equipment. Always wear eye protection. Protective equipment
such as dust mask, non-skid safety shoes, hard hat, or hearing protection used for appropriate
conditions will reduce personal injuries.
c) Prevent unintentional starting. Ensure the switch is in the off-position before connecting to
power source and/or battery pack, picking up or carrying the tool. Carrying power tools with
your fi nger on the switch or energising power tools that have the switch on invites accidents.
d) Remove any adjusting key or wrench before turning the power tool on. A wrench or a key left
attached to a rotating part of the power tool may result in personal injury.
e) Do not overreach. Keep proper footing and balance at all times. This enables better control of
the power tool in unexpected situations.
f) Dress properly. Do not wear loose clothing or jewellery. Keep your hair, clothing and gloves
away from moving parts. Loose clothes, jewellery or long hair can be caught in moving parts.
g) If devices are provided for the connection of dust extraction and collection facilities, ensure
these are connected and properly used. Use of dust collection can reduce dust-related hazards.
4) POWER TOOL USE AND CARE
a) Do not force the power tool. Use the correct power tool for your application. The correct
power tool will do the job better and safer at the rate for which it was designed.
b) Do not use the power tool if the switch does not turn it on and off. Any power tool that cannot
be controlled with the switch is dangerous and must be repaired.
c) Disconnect the plug from the power source and/or the battery pack from the power tool
before making any adjustments, changing accessories, or storing power tools. Such
preventive safety measures reduce the risk of starting the power tool accidentally.
d) Store idle power tools out of the reach of children and do not allow persons unfamiliar with
the power tool or these instructions to operate the power tool. Power tools are dangerous in
the hands of untrained users.
e) Maintain power tools. Check for misalignment or binding of moving parts, breakage of parts
and any other condition that may affect the power tool’s operation. If damaged, have the
power tool repaired before use. Many accidents are caused by poorly maintained power tools.
f) Keep cutting tools sharp and clean. Properly maintained cutting tools with sharp cutting edges
are less likely to bind and are easier to control.
g) Use the power tool, accessories and tool bits etc. in accordance with these instructions,
taking into account the working conditions and the work to be performed. Use of the power
tool for operations different from those intended could result in a hazardous situation.
5) SERVICE
a) Have your power tool serviced by a qualifi ed repair person using only identical replacement
parts. This will ensure that the safety of the power tool is maintained.
Hedge trimmer safety warnings:
• Keep all parts of the body away from the cutter blade. Do not remove cut material or hold material
to be cut when blades are moving. Make sure the switch is off when clearing jammed material.
Blades coast after turn off. A moment of inattention while operating the hedge trimmer may result
in serious personal injury.
• Carry the hedge trimmer by the handle with the cutter blade stopped. Proper handling of the
hedge trimmer will reduce possible personal injury from the cutter blades.
DO NOT RETURN THIS UNIT TO THE RETAILER. PROOF OF PURCHASE WILL BE REQUIRED
FOR WARRANTY SERVICE.
For assistance regarding the assembly, controls, operation or maintenance of the unit, please call the
Customer Support Department at 1-866-206-2707 in the United States or 1-877-696-5533 in Canada.
Additional information about the unit can be found on our website at www.remingtonpowertools.com.
Please call the Customer Support Department for replacement parts. When servicing, use only identical
replacement parts.
All information, illustrations and specifi cations in this manual are based on the latest product information
available at the time of printing. We reserve the right to make changes at any time without notice.
Copyright© 2015 MTD SOUTHWEST INC, All Rights Reserved.
SAFETY INFORMATION
• IMPORTANT SAFETY INSTRUCTIONS •
GENERAL POWER TOOL SAFETY WARNINGS
WARNING: Read all safety warnings and instructions. Failure to follow the
warnings and instructions may result in electric shock, fi re and/or serious injury.
Save all warnings and instructions for future reference.
The term “ power tool ” in the warnings refers to your mains-operated (corded) power tool .
1) WORK AREA SAFETY
a) Keep work area clean and well lit. Cluttered or dark areas invite accidents.
b) Do not operate power tools in explosive atmospheres, such as in the presence of fl ammable
liquids, gases or dust. Power tools create sparks which may ignite the dust or fumes.
c) Keep children and bystanders away while operating a power tool. Distractions can cause you
to lose control.
2) ELECTRICAL SAFETY
a) Power tool plugs must match the outlet. Never modify the plug in any way. Do not use any
adapter plugs with earthed (grounded) power tools. Unmodifi ed plugs and matching outlets will
reduce risk of electric shock.
b) Avoid body contact with earthed or grounded surfaces such as pipes, radiators, ranges and
refrigerators. There is an increased risk of electric shock if your body is earthed or grounded.
DANGER: Keep hands away from blade. Contact with blade will result in
serious personal injury.
• Keep cable away from cutting area. During operation the cable may be hidden in shrubs and can
be accidentally cut by the blade.
• Use both hands when operating the hedge trimmer. Using one hand could cause loss of control
and result in serious personal injury.
WARNING: Only use with handle and guard properly assembled to hedge
trimmer. The use of the hedge trimmer without the proper guard or handle provided may
result in serious personal injury.
SAFETY INFORMATION
• SAFETY AND INTERNATIONAL SYMBOLS •
This operator’s manual describes safety and international symbols and pictographs that may appear
on this product. Read the operator’s manual for complete safety, assembly, operating, maintenance
and repair information.
SYMBOL MEANING
• SAFETY ALERT SYMBOL
Indicates danger, warning or caution. May be used in conjunction with other
symbols or pictographs.
• READ OPERATOR’S MANUAL
WARNING: Read the operator’s manual(s) and follow all warnings and safety
instructions. Failure to do so can result in serious injury to the operator and/or
bystanders.
• WEAR EYE AND HEARING PROTECTION
WARNING:
loss. Wear eye protection meeting ANSI Z87.1-1989 standards and ear protection when
operating this unit. Use a full face shield when needed.
• WEAR SAFETY GLOVES
Wear non-slip, heavy-duty protective gloves when handling the unit.
• WEAR SAFETY FOOTWEAR
Wear non-slip safety footwear when using this equipment.
Thrown objects and loud noise can cause severe eye injury and hearing
769-10381 / 00 01/15
SAFETY INFORMATION
SYMBOL MEANING
• KEEP BYSTANDERS AWAY
WARNING: Keep all bystanders, especially children and pets, at least 50 feet
(15 m) from the operating area. If anyone enters the work area, stop the unit!
• SHARP BLADE
WARNING: The blade on this unit is sharp. To prevent serious injury, do not
touch the blade. Keep both hands away from the blade while operating the unit.
• DO NOT EXPOSE TO RAIN
WARNING: Avoid dangerous environments. Never operate your unit in the rain
or in damp or wet conditions. Moisture is a shock hazard.
• DO NOT USE A DAMAGED CORD
Remove plug from mains immediately if the cable is damaged.
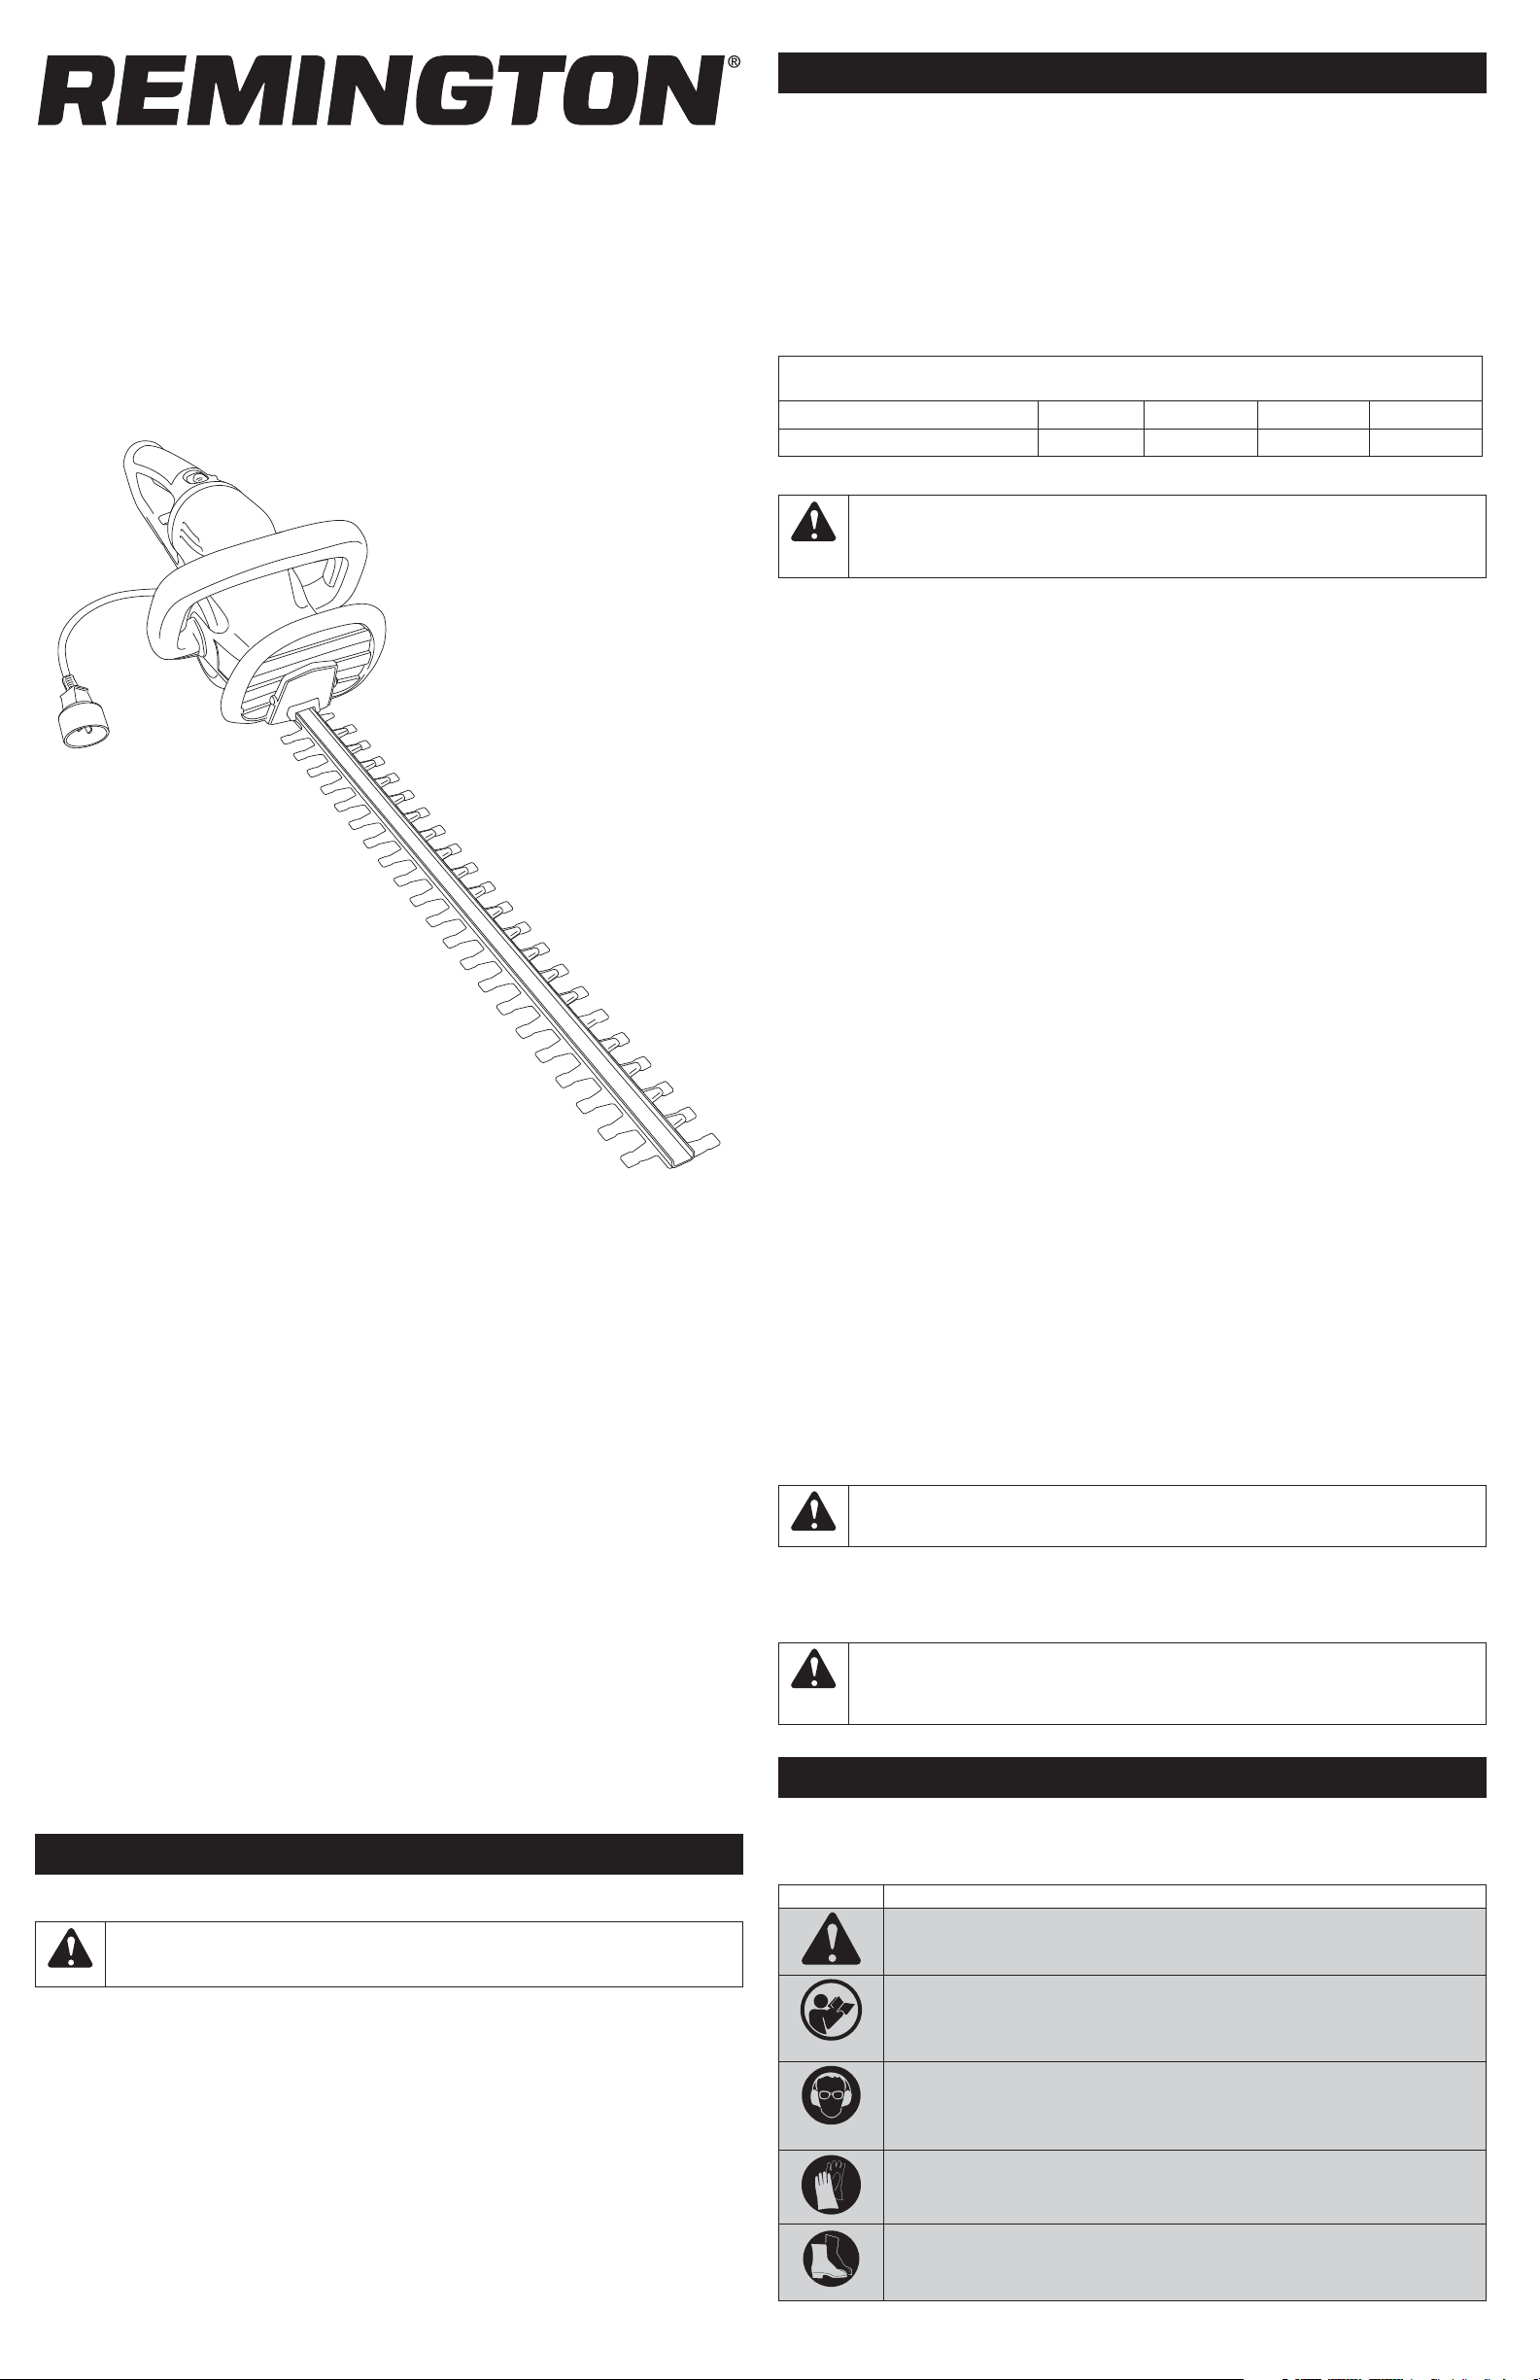
APPLICATION
• For trimming of bushes and hedges.
Blade
KNOW YOUR UNIT
Blower Tube
Handle Switch
Grip Lock
Switch Lock
Grip
OPERATING INSTRUCTIONS
BASIC OPERATING PROCEDURES
IMPORTANT: Lubricate the trimmer blade before and
• Use the hedge trimmer for trimming and forming
• Work slowly, while maintaining a proper grip and
• Allow the unit to do the cutting. Forcing the unit through dense growth, or attempting to trim too
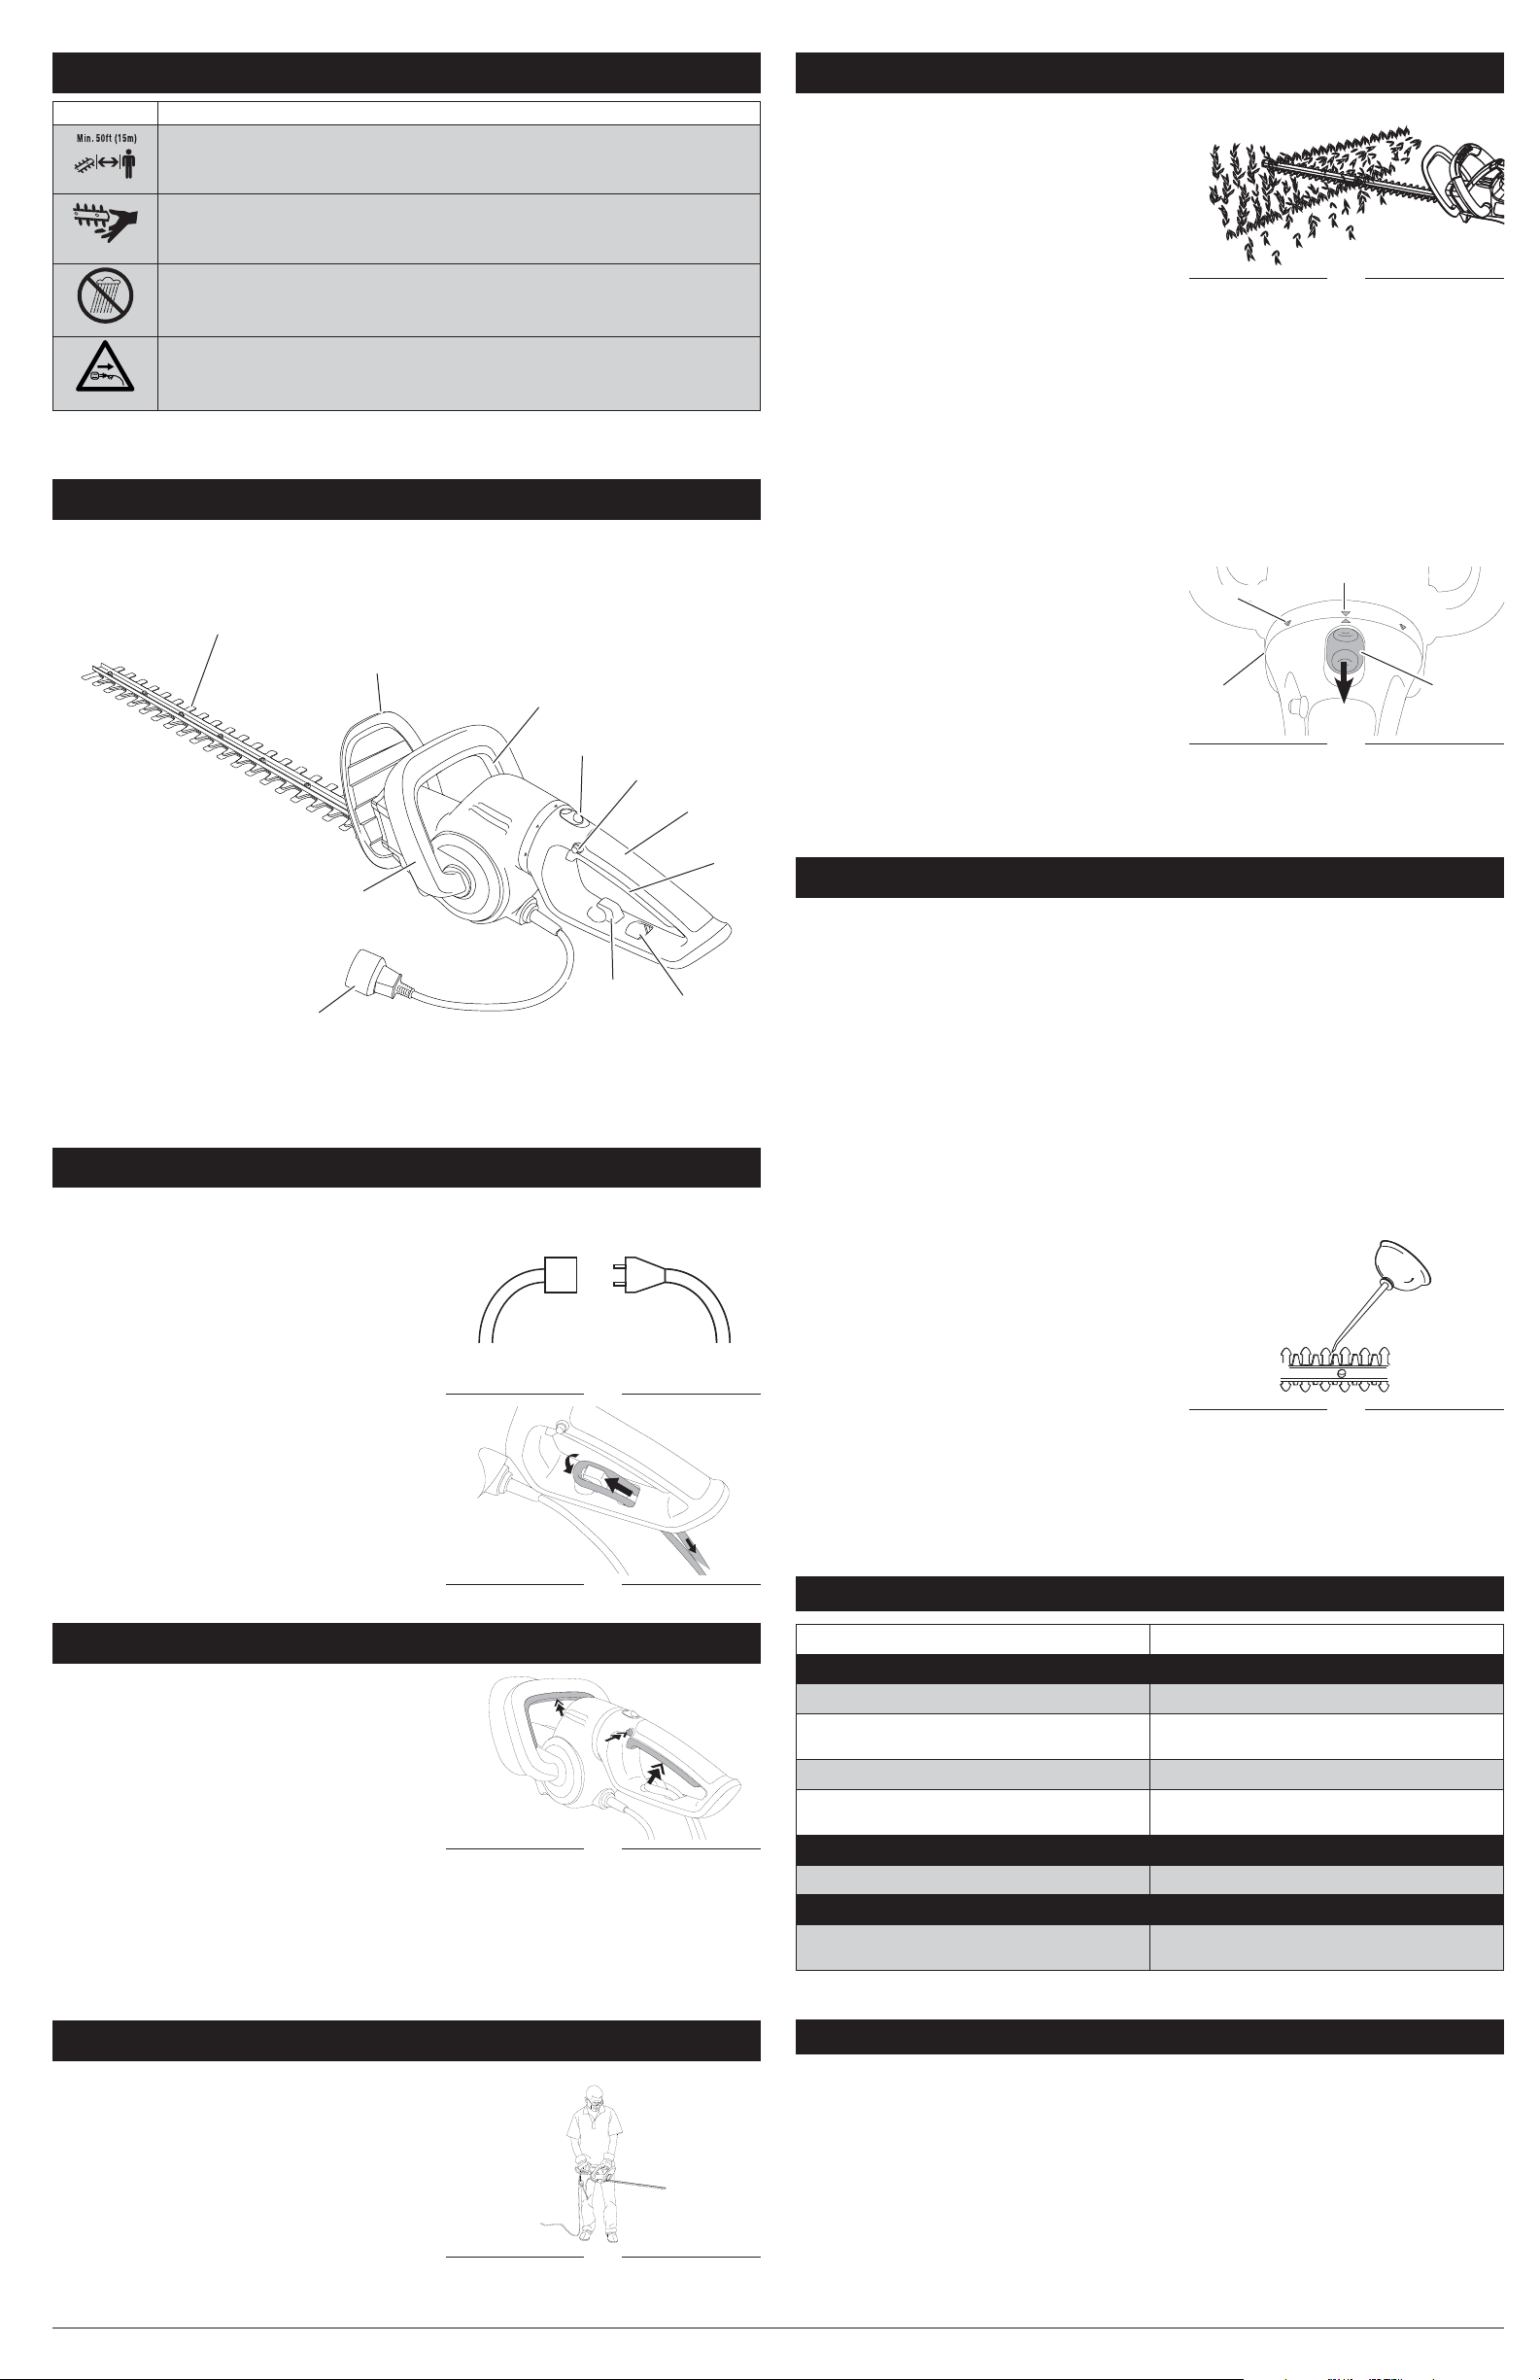
• When trimming new growth, use a wide sweeping action, so that stems are fed directly into the
• Release the switch trigger as soon as the cut is completed. Allow the trimmer blade to come to a
• After completing the cut, wait for the trimmer blade to stop before moving the unit. Always stop
• If desired, use a string to help cut hedges level. Determine the desired height of the hedge, then
• Do not cut from a ladder; this is extremely
• Do not cut above shoulder height, as a hedge
ROTATING THE GRIP
The unit’s grip may be rotated either to the left or right
in 45º degree increments, up to a 90º degree angle. This
is to allow for better trimming and greater control of the
unit.
1. With a fi rm grip on the handle and using the thumb
2. Rotate the grip, either to the left or right, to the desired angle (Fig. 6).
NOTE: The grip lock should click into place once the arrows align (Fig. 6).
after each use. Ignoring this step will decrease
the life of the trimmer blade and hamper
operation. Refer to Maintenance and Repair
Instructions.
hedges, shrubs and bushes with a branch diameter
of up to 1/2 of an inch (12.7 mm). For larger
branches, use a non-powered saw or pruning saw.
Fig. 5
stance.
much at one time, can cause the blade to bind and slow, reducing the cutting effi ciency. Forcing
the unit can also result in damage to the blade and can increase the chance of personal injury.
trimmer blade (Fig. 5). Older growth will have thicker stems and will be trimmed easiest by using a
sawing motion.
complete stop. Unnecessary wear may occur if the unit is run without a cutting load.
the motor before moving from hedge to hedge.
stretch a length of string along the hedge at that height. Trim the hedge to just above the string
line. Trim the side of the hedge so that it will be slightly narrower at the top. More of the hedge will
be exposed when shaped this way, and it will appear more uniform.
dangerous.
45º Arrow
0º Arrow
trimmer held higher is more diffi cult to control.
Grip Lock
of the grip hand, pull back the grip lock (Fig. 6).
90º Arrow
Fig. 6
Handle
Plug
ASSEMBLY INSTRUCTIONS
CONNECTING AND DISCONNECTING THE POWER SOURCE
Connecting the Power Source
1. Connect the power cord plug to the extension cord
(Fig. 1).
2. Make a narrow loop with the extension cord and
push the loop through the cord hole in the unit grip
(Fig. 2).
Move the loop over and onto the cord hook and pull
3.
the cord gently to secure the loop into the hook (Fig. 2).
This helps prevent accidental disconnection.
4. Connect the extension cord plug to the outlet.
Disconnecting the Power Source
1. Disconnect the extension cord plug from the outlet.
NOTE: DO NOT pull the cord out of the wall. Always
2. Remove the loop in the extension cord from the cord
3. Disconnect the power cord plug from the extension
remove the cord from the power source by the
plug head.
hook (Fig. 2).
cord (Fig. 1).
Cord Hook
Fig. 1
Fig. 2
Trigger Switch
Grip Hole
MAINTENANCE INSTRUCTIONS
MAINTENANCE
Follow all maintenance instructions in this manual.
NOTE: All service, other than the maintenance procedures described in this manual, should be
performed by an authorized service center. Do not attempt to repair; there are no user
serviceable parts inside.
Before inspecting, servicing, cleaning, storing, transporting or replacing any parts on the unit, make
sure:
1. The switches are in the OFF position.
2. All moving parts have stopped.
3. The unit is disconnected from the power source.
4. The unit is cool.
SHARPENING THE BLADE
The cutting blades are made from high-quality, hardened steel and with normal usage will not require
sharpening. However, if the trimmer blade accidentally hits wire fencing, stones, glass, nails or other
hard objects, the blade may become nicked. There is no need to remove this nick unless it interferes
with the movement of the trimmer blade. If it does interfere, or if the performance of the unit has
diminished due to blade dullness, have the trimmer blade sharpened by an authorized service center.
LUBRICATING THE BLADE
• For easier operation and longer blade life, lubricate
the trimmer blade before and after each use.
• During use, occasionally stop the motor and
lubricate the trimmer blade as needed. Ensure that
the switch lock is in the locked or OFF position and
the unit is unplugged prior to lubricating the blade.
1. Apply light machine oil along the edge of the top
blade (Fig. 7).
CLEANING, STORAGE & TRANSPORTING
• When not in use, store the unit indoors in a locked and dry, or high and dry, place to prevent
Fig. 7
unauthorized use or damage. Keep out of the reach of children.
• Keep the handles dry, clean and free from debris, oil and grease. Clean the unit after each use.
Never douse or spray the unit with water or any other liquid. Do not use solvents or strong
detergents.
• Be sure to secure the unit while transporting.
TROUBLESHOOTING
STARTING/ STOPPING INSTRUCTIONS
STARTING THE UNIT
To help prevent accidental start-ups, this unit has a
handle switch, switch lock and grip trigger switch that
must be used together to start the unit.
1. Plug the unit in. Refer to the Connecting the Power
Source.
2. Press and hold the switch lock (Fig. 3). This makes
the trigger switch operational.
3. While holding the switch lock, press and hold the
trigger switch and the handle switch.
Fig. 3
4. Release the switch lock and continue to squeeze the
switch trigger and handle switch for continued operation.
STOPPING THE UNIT
1. Release the trigger switch.
NOTE: It is normal for the trimmer blade to coast to a stop once the switch trigger is released.
NOTE: Upon release of the switch trigger, the switch lock will automatically lock the grip trigger
switch.
OPERATING INSTRUCTIONS
HOLDING THE UNIT
• Hold the unit fi rmly with both hands. Always keep
one hand on the handle and the other hand on the
grip (Fig. 4).
• Maintain a proper grip on the unit whenever the
motor is running. The fi ngers should encircle the
handle and the thumb should wrap under the
handlebar. This grip is least likely to be broken. Any
grip in which the thumb and fi ngers are on the same
side of the handle is dangerous because a slight kick
of the unit can cause loss of control.
• Keep hands away from the trimmer blade. Keep both
hands on the handles and behind the protective guard whenever the motor is running.
Fig. 4
PROBLEM SOLUTION
MOTOR WILL NOT START
Trigger/ switches are not fully pressed
Grip is not locked into position
Make sure all switches/ triggers are fully pressed
Make sure the arrows are aligned and the grip
switch is in the lock position.
Extension cord connection is loose Check cord connections
Household circuit breaker is tripped or open
line fuse
Check circuit breaker or line fuse
MOTOR RUNS, BUT BLADES DO NOT MOVE
Blades damaged Replace blades.
UNIT SMOKES DURING OPERATION
Unit damaged
DO NOT USE. Contact an authorized service
center.
SPECIFICATIONS*
Motor Type ..............................................................................................................AC, 120 Volt Electric
Amperage ..................................................................................................................................... 5 amps
Operating RPM ......................................................................................................................1,700/ min.
Blade Length ...................................................................................................................... 24 in. (61 cm)
Maximum Cutting Diameter .............................................................................................3/4 in. (19 mm)
Approximate Unit Weight ................................................................................................... 6.6 lbs. (3 kg)
* All specifi cations are based on the latest product information available at the time of printing. We
reserve the right to make changes at any time without notice.
2

Taille-haie électrique de 61 cm (24 po)
Manuel de l’utilisateur
RM5124TH
INFORMATIONS SUR LA SÉCURITÉ
2) SÉCURITÉ ÉLECTRIQUE
a) La fi che de l’outil doit correspondre à la prise de courant. Ne modifi ez en aucune manière la
fi che électrique. N’utilisez jamais un adaptateur de fi che avec des outils munis d’une mise
à la terre. Des fi ches électriques non modifi ées et une prise de courant correspondante réduiront
les risques de chocs électriques.
b) Évitez tout contact avec les surfaces utilisées pour la mise à la terre, notamment les tuyaux
de plomberie, les radiateurs, les cuisinières et les réfrigérateurs. TVous courrez un risque de
choc électrique accru lorsque votre corps est mis à terre ou touche le sol.
c) Ne laissez pas vos outils électriques sous la pluie ou dans un environnement humide. Si de
l’eau pénètre dans un outil électrique, cela augmentera le risque de choc électrique.
d) Ménagez le cordon. Ne portez jamais un outil par le cordon électrique et ne tirez pas
sur le cordon électrique pour débrancher l’outil de la prise de courant. Gardez le cordon
d’alimentation à l’écart des sources de chaleur, d’huile, de bords acérés ou d’objets en
mouvement. Vous courrez un risque de choc électrique accru lorsque votre corps est mis à terre
ou touche le sol.
e) Lorsque vous utilisez des outils électriques à l’extérieur, n’utilisez que des rallonges
conçues pour une utilisation en extérieur. vous diminuerez ainsi le risque de choc électrique
vous diminuerez ainsi le risque de choc électrique.
f) S’il est absolument nécessaire d’utiliser un outil électrique dans un environnement humide,
utilisez une prise de courant protégée par un disjoncteur. afi n de diminuer le risque de choc
électrique.
REMARQUE : Le terme « prise de courant avec disjoncteur » peut être remplacé par le terme
• Assurez-vous que votre rallonge est suffi samment résistante pour supporter le courant requis par
l’appareil. Un câble de calibre trop petit entraînera une baisse de tension, une perte de puissance,
ainsi qu’une surchauffe. En cas de doute, utilisez une rallonge de calibre plus élevé. Plus le calibre
est petit, plus le câble est résistant.
LONGUEUR DU CORDON
(PIEDS)
CALIBRE DU FIL (AWG) 14 12 * *
« disjoncteur différentiel » ou « disjoncteur de fuite de terre ».
TAILLE MINIMUM DE FIL POUR DES RALLONGES
D’APPAREILS DE 120 V DE 12-16 A
25 50 100 150
TABLE DES MATIÈRES
Informations sur l’entretien et le service après-vente ...........................................................................3
Informations sur la sécurité ...................................................................................................................3
Familiarisez-vous avec votre outil .........................................................................................................4
Instructions de montage .......................................................................................................................4
Instructions de démarrage et d’arrêt ....................................................................................................4
Instructions d’utilisation ........................................................................................................................4
Entretien et réparations .........................................................................................................................4
Nettoyage et rangement .......................................................................................................................4
Résolution des problèmes ....................................................................................................................5
Spécifi cations .......................................................................................................................................5
Garantie ................................................................................................................................................8
NE RAMENEZ PAS CET APPAREIL CHEZ LE DÉTAILLANT. UNE PREUVE D’ACHAT SERA EXIGÉE
POUR TOUTE PRISE EN CHARGE DANS LE CADRE DE LA GARANTIE.
Si vous éprouvez des diffi cultés à assembler ce produit ou si vous avez des questions sur les
commandes, l’utilisation ou l’entretien de cet appareil, veuillez contacter le service à la clientèle en
composant le 1-866-206-2707 aux États-Unis ou le 1-877-696-5533 au Canada. Des informations
supplémentaires sont disponibles sur notre site web : www.remingtonpowertools.com.
Veuillez appeler le service à la clientèle pour obtenir des renseignements sur les pièces de rechange.
Utilisez uniquement des pièces de rechange identiques.
L’ensemble des informations, illustrations et caractéristiques sont basées sur les toutes dernières
informations disponibles sur le produit à l’impression de ce guide. Nous nous réservons le droit
d’effectuer des modifi cations à tout moment sans notifi cation préalable.
Copyright© 2015 MTD SOUTHWEST INC. Tous droits réservés.
INFORMATIONS SUR LA SÉCURITÉ
• CONSIGNES DE SÉCURITÉ IMPORTANTES •
CONSIGNES DE SÉCURITÉ GÉNÉRALES POUR LES OUTILS ÉLECTRIQUES
AVERTISSEMENT : Lisez toutes les instructions ainsi que les
consignes de sécurité. Le non respect des avertissements et des consignes peut entraîner
des risques d’incendie, de décharge électrique et des blessures graves.
Conservez les consignes et avertissements de sécurité pour pouvoir vous y référer
ultérieurement.
Le terme « outil électrique » utilisé dans les consignes de sécurité fait référence à votre outil (avec
cordon électrique) qui fonctionne à l’électricité.
1) SÉCURITÉ SUR LA ZONE DE TRAVAIL
a) Veillez à ce que la zone de travail soit dégagée et bien illuminée. Une zone de travail
encombrée ou sombre favorise les accidents.
b) N’utilisez pas les outils dans un environnement sensible aux explosions, par exemple en
présence de produits infl ammables, gaz, ou poussière. Les outils électriques produisent des
étincelles qui peuvent prendre feu au contact de fumées ou de poussières.
c) Gardez toutes les personnes et les enfants à distance lorsque vous utilisez un outil
électrique. Les distractions peuvent vous faire perdre le contrôle de l’appareil.
*Il est déconseillé d’utiliser des cordons d’une longueur de 30 ou 45 mètres (100 ou 150 pieds)
pour les appareils de 12 à 16 ampères.
AVERTISSEMENT : Pour réduire les risques de chocs
électriques, utilisez uniquement une rallonge pour usage extérieur, telle que les rallonges
de type SW-A, SOW-A, STW-A, STOW-A, SJW-A, SJOW-A, SJTW-A, ou SJTOW-A.
3) SÉCURITÉ PERSONNELLE
a) Soyez attentif ; faites attention à ce que vous faites et faites preuve de bons sens lorsque
vous utilisez un outil électrique. N’utilisez pas un outil électrique lorsque vous êtes fatigué
ou sous l’infl uence de l’alcool, de drogues, ou de médicaments. Une seconde d’inattention
lorsque vous utilisez un outil électrique peut résulter en une blessure grave.
b) Utilisez un équipement de protection. Portez toujours des lunettes de protection.
L’utilisation d’un équipement de sécurité, tel que masque antipoussière, chaussures de sécurité
antidérapantes, casque de sécurité ou casque antibruit diminueront le risque de blessures.
c) Évitez les démarrages accidentels. Assurez-vous que l’interrupteur Marche/Arrêt est
en position arrêt (OFF) avant de brancher sur courant électrique et/ou sur batterie, de
ramasser ou de transporter l’outil. Transporter les outils électriques en tenant votre doigt sur
l’interrupteur ou le bouton d’actionnement de l’outil augmente le risque d’accident.
d) Enlevez toute pince ou clé d’ajustement avant d’allumer l’outil électrique. Une clé ou une
pince qui serait restée accrochée à une partie rotative peut provoquer une blessure grave.
e) N’essayez pas d’atteindre des espaces trop éloignés. Assurez-vous de toujours garder une
position stable et un bon équilibre. Cela vous confère un meilleur contrôle de l’outil dans des
situations inattendues.
f) Portez des vêtements appropriés. Ne portez pas de vêtements amples ou de bijoux. Gardez
vos cheveux, vos vêtements et gants hors de portée des parties en mouvement. Les
vêtements et les bijoux trop lâches ou des cheveux longs peuvent se prendre dans les pièces en
mouvement.
g) Si des ustensiles pour l’extraction de poussières sont fournis avec l’outil, assurez-vous
qu’ils sont installés et utilisés correctement. L’utilisation d’un extracteur de poussière peut
réduire les accidents dus à la poussière.
4) UTILISATION ET ENTRETIEN D’UN OUTIL ÉLECTRIQUE
a) Ne forcez pas l’outil électrique. Utilisez l’outil approprié pour la tâche. L’outil approprié
exécutera mieux la tâche, plus en sécurité et à la vitesse pour laquelle il a été conçu.
b) N’utilisez pas l’outil si l’interrupteur ne parvient pas à le démarrer ni à l’arrêter correctement.
Tout outil qui ne peut être contrôlé par l’interrupteur Marche/Arrêt est dangereux et doit être
réparé.
c) Débranchez la fi che de la prise de courant et/ou batterie de l’outil avant d’effectuer des
réglages, de changer d’accessoires ou de ranger l’outil. De telles mesures de sécurité
préventives éviteront des démarrages accidentels.
d) Rangez vos outils hors de la portée des enfants et ne laissez pas les personnes qui ne sont
pas familiarisées avec l’outil ou ses instructions utiliser celui-ci. Les outils électriques sont
dangereux dans les mains d’utilisateurs inexpérimentés.
e) Entretenez vos outils électriques. Vérifi ez l’alignement et la fi xation de toutes les pièces
mobiles, assurez-vous qu’aucune pièce n’est brisée et qu’aucun autre problème n’est
susceptible d’affecter le fonctionnement de l’appareil. Si vous constatez des dommages,
faites réparer l’outil avant de l’utiliser. Beaucoup d’accidents surviennent avec des outils mal
entretenus.
f) Gardez les lames des outils de coupe bien aiguisées et propres. Des outils de coupe bien
entretenus avec des lames bien affûtées et propres sont moins propices au calage et sont plus
faciles à contrôler.
g) Utilisez l’outil, les accessoires, les douilles, etc. conformément à ces instructions, en tenant
compte des conditions de travail et des tâches à accomplir. L’utilisation de l’outil pour une
tâche autre que celle pour laquelle il a été conçu peut être dangereuse.
5) RÉPARATION
a) Faites entretenir votre outil par un technicien qualifi é en utilisant des pièces de rechange
identiques. Ceci assurera la sécurité de votre outil.
Consignes de sécurité pour le taille-haie :
• Gardez la lame de coupe bien éloignée de votre corps. Vous ne devez en aucun cas enlever le
matériel de coupe ou tenir les articles à couper lorsque les lames sont en marche. Assurez-vous
que l’interrupteur de l’appareil est en position arrêt avant d’enlever des matériaux qui y sont
coincés. Les lames continuent de fonctionner par inertie lorsque vous arrêtez l’outil. Une seconde
d’inattention lorsque vous utilisez le taille-haie peut résulter en une blessure grave.
• Portez le taille-haie par la poignée, avec la lame de coupe à l’arrêt. Une manipulation correcte du
taille-haie permettra de réduire les risques de blessure par les lames.
DANGER : N’approchez pas vos mains de la lame. Tout contact avec la
lame entraînera des blessures graves pour l’utilisateur.
• Maintenez le cordon à l’écart de la zone de coupe. Pendant le fonctionnement, le cordon peut être
caché dans les arbustes et accidentellement coupé par la lame.
• Servez-vous de vos deux mains pour utiliser le taille-haie. Tenir le taille-haie d’une main peut
provoquer une perte de contrôle, ce qui peut entraîner des blessures graves pour l’utilisateur.
AVERTISSEMENT : Utilisez le taille-haie uniquement avec la
poignée et le protège-lame correctement mis en place. L’utilisation du taille-haie avec
une poignée et un protège-lame mal installés peut provoquer des blessures graves pour
l’utilisateur.
3
 Loading...