

Remington RM40BST Owner's Manual

®
18VOLT CORDLESS TRIMMER/EDGER
OWNER’S MANUAL
ENGLISH
MODELS: RM40BST
IMPORTANT: Read and understand this manual before assembling or
operating this tool. Improper use of this tool can cause severe injury or death. Keep
this manual for future reference.
PART NO. 769-05191 P00 (07/09)

DO NOT RETURN THIS UNIT TO THE RETAILER. PROOF OF PURCHASE WILL BE REQUIRED FOR
WARRANTY SERVICE.
THIS PRODUCT IS COVERED BY ONE OR MORE U.S. PATENTS. OTHER PATENTS PENDING.
For assistance regarding the assembly, controls, operation or maintenance of the unit, please call the Customer
Support Department. Additional information about the unit can be found on our website.
For service, please call the Customer Support Department to obtain a list of authorized service dealers near
you. Service on this unit, both within and after the warranty period, should only be performed by an authorized
and approved service dealer. When servicing, use only identical replacement parts.
NO DEVUELVA ESTA UNIDAD AL VENDEDOR. PARA SOLICITAR SERVICIO POR LA GARANTÍA, DEBERÁ
PRESENTAR PRUEBA DE SU COMPRA.
ESTE PRODUCTO ESTÁ CUBIERTO POR UNA O MÁS PATENTES DE EE.UU., OTRAS PATENTES ESTÁN
PENDIENTES.
Para solicitar asistencia en relación con el ensamblaje, los controles, la operación o el mantenimiento de la
unidad, llame al Departamento de Atención al Cliente. Puede encontrar más información sobre la unidad en
nuestro sitio Web.
Para mantenimiento, llame al Departamento de Apoyo al Cliente para obtener una lista de distribuidores de
servicio autorizados de su localidad. El mantenimiento y reparación de este equipo, ya sea durante o después
del período cubierto por la garantía, deben ser realizados solamente por un proveedor de servicios autorizado
y aprobado. Cuando vaya a dar mantenimiento al equipo, utilice solo piezas de repuesto originales.
NE RAMENEZ PAS CET APPAREIL CHEZ LE DÉTAILLANT. UNE PREUVE D’ACHAT SERA EXIGÉE POUR
TOUTE PRISE EN CHARGE DANS LE CADRE DE LA GARANTIE.
CE PRODUIT EST COUVERT PAR UN OU PLUSIEURS BREVETS AUX ÉTATS UNIS. AUTRES BREVETS EN
INSTANCE.
Si vous éprouvez des difficultés à assembler ce produit ou si vous avez des questions sur les commandes,
l'utilisation ou l'entretien de cet appareil, veuillez contacter le service à la clientèle. Des informations
supplémentaires sont disponibles sur notre site web.
Pour un entretien ou une réparation, veuillez appeler le service à la clientèle pour obtenir une liste complète des
concessionnaires agrées près de chez vous. L’entretien de cet appareil doit être confié exclusivement à un
concessionnaire agrée pendant et après la période de garantie. Lors de l’entretien, utilisez uniquement des
pièces de rechange identiques.
Copy the serial number here:
Copie el número de serie aquí:
Copiez ici le nº de série :
Copy the model and parent part numbers here:
Copie el modelo y los números de piezas del fabricante aquí:
Copiez ici le modèle ainsi que le nº de l’article :
DO NOT RETURN THIS PRODUCT
NO DEVUELVA ESTE PRODUCTO
NE RAMENEZ PAS CET APPAREIL AU MAGASIN
U.S. - EE.UU. - aux États Unis
1-866-206-2707
Canada - Canadá - au Canada
1-877-696-5533
Please call the Customer Support Department or visit our website for assistance:
Llame al Departamento de Atención al Cliente o visite nuestro sitio Web para solicitar asistencia:
Pour obtenir de l’aide, veuillez appeler le service à la clientèle ou visitez notre site web :
or - o - ou
www.remingtonpowertools.com
Before beginning, locate the unit’s model plate, which lists the model and serial numbers of your unit. Refer to
the sample plate below and copy the information for future reference.
Antes de comenzar, localice la placa correspondiente al modelo de la unidad, la cual indica el modelo y los
números de serie de la misma. Vea la placa de muestra debajo y copie la información para consultarla en el futuro.
Avant de commencer, cherchez la plaque mentionnant le modèle et le numéro de série de votre appareil.
Reportez-vous à l’exemple ci-dessous et notez-y les informations pour pouvoir vous y référer ultérieurement.
Serial Number
Número de serie
Numéro de série
Parent Part Number
Número de la pieza del
fabricante
Numéro de pièce mère
Model Number - Número del modelo - Numéro de modèle
2

CONTENTS
IMPORTANT SAFETY INFORMATION ................................................................ 4
Before Operating Trimmer ................................................................................................4
While Operating Trimmer ..................................................................................................4
Maintenance and Storage of Trimmer...............................................................................4
PRODUCT IDENTIFICATION ............................................................................... 5
RECHARGEABLE BATTERY ......... ..................................................................... 6
Protective Battery Terminal Cap ....................................................................................... 6
Charging Battery................................................................................................................7
TRIMMER/EDGER ASSEMBLY ........................................................................... 8
Cutting Guard/Edging Wheel ............................................................................................ 8
Adjustable Front Handle ....................................................................................................8
TRIMMER OPERATION ........................................................................................9
Converting to Edger/Trimmer ............................................................................................9
Starting Edger/Trimmer .....................................................................................................9
ENGLISH
Trimming ...........................................................................................................................9
Advance Trimmer Line ....................................................................................................10
Replace Trimmer Line .....................................................................................................10
Edger ..............................................................................................................................10
TRIMMER MAINTENANCE ................................................................................ 11
Cleaning and Maintenance ............................................................................................. 11
Replacement Parts .........................................................................................................11
BATTERY DISPOSAL AND RECYCLING .......................................................... 11
TROUBLE SHOOTING ....................................................................................... 12
WARRANTY INFORMATION .............................................................................. 13
Thank you for purchasing this Remington 18Volt Cordless Trimmer/Edger. We are proud to offer this quality product to assist you
in keeping your property neat and well-groomed.
This owner’s manual provides complete instructions for safely assembling, operating, and maintaining your Trimmer/Edger. Read
and save these instructions. Refer to this manual each time before using your Trimmer/Edger.
This manual is your guide to safe and proper operation of the trimmer.
SAVE THESE INSTRUCTIONS
All information, illustrations and specifications in this manual are based on the latest product information available at the time of printing.
We reserve the right to make changes at any time without notice.
Copyright© 2009 MTD SOUTHWEST INC, All Rights Reserved.
3

IMPORTANT SAFETY INFORMATION
READ ALL INSTRUCTIONS BEFORE OPERATING TRIMMER.
SAFETY WARNINGS
WARNING
When using electric gardening
appliances, basic safety precautions should always be followed
to reduce the risk of fi re, electric
shock, and personal injury, including the following:
WARNING
This product contains
chemicals known to the
State of California to cause
cancer or birth defects, or other
reproductive harm.
BEFORE OPERATING
TRIMMER/EDGER
1. Avoid Dangerous Environments
• Do not operate trimmer/edger in rain
or in damp or wet locations.
• Do not charge battery in rain or in damp
or wet locations.
• Do not operate trimmer/edger while
under the infl uence of alcohol, medications, or drugs.
• Do not operate trimmer/edger when
you are tired.
• Do not operate trimmer/edger if it is
damaged or not securely and fully assembled.
2. Keep children away. Keep all bystanders
a safe distance from work area.
3. Do not use trimmer/edger for any job
except that for which it is intended.
4. Only well instructed adults should operate
trimmer/edger. Never allow children to
operate trimmer/edger.
5. Dress properly when operating trimmer/
edger.
• Do not wear loose clothing or jewelry
that can get caught in the moving parts
of the trimmer/edger.
• Use of rubber gloves and substantial
footwear is recommended when working outdoors.
• Always wear protective hair covering
to contain long hair.
• Always wear a face or dust mask if
operation is dusty.
6. Always wear eye protection that meets
accepted standards in your country.
7. Wear long pants and shoes when operating this tool.
WHILE OPERATING TRIMMER/
EDGER
1. Stay alert. Watch what you are doing. Use
common sense.
2. Avoid unintentional starting. Do not
carry trimmer/edger with fi nger on trigger switch. Be sure switch is OFF when
placing battery in trimmer/edger.
3. Do not overreach. Keep proper footing
and balance at all times when operating
trimmer/edger.
4. Remove battery from trimmer.
• when not in use
• before servicing
5. Do not force trimmer/edger. It will do
the job better and with less likelihood of
a risk of injury at the rate for which it was
designed.
6. Keep hands and feet away from cutting
area.
MAINTENANCE AND STORAGE
OF TRIMMER/EDGER
1. Maintain trimmer/edger with care.
•
Inspect trimmer/edger periodically,
and if damaged, call the Customer
Support Department.
• If trimmer/edger is not working properly, has been dropped, damaged, left
outdoors, or dropped into water, call the
Customer Support Department.
• Keep handles dry, clean, and free from
oil and grease.
• Keep guards in place and in working
order.
2. Check damaged parts.
• If a part is damaged, carefully check the
damaged part before using the trimmer/
edger. Make sure the part will operate
properly and perform its intended function.
• Check for alignment of moving parts,
binding of moving parts, breakage of
parts, mounting, and any other condition that may affect its operation.
• A guard or other part that is damaged
should be properly repaired or replaced
unless indicated elsewhere in this manual.
• Use only geniune Remington replacement parts and accessories. These are
available from your local dealer. Use
of any non-Remington parts or accessories could lead to injury to the user,
damage to the unit, and void your warranty.
3. Store idle trimmer/edger indoors. When
not in use, store trimmer/edger indoors in
a dry location. Store trimmer/edger above
the reach of children or in a locked area
out of the reach of children.
SAVE THESE
INSTRUCTIONS.
4
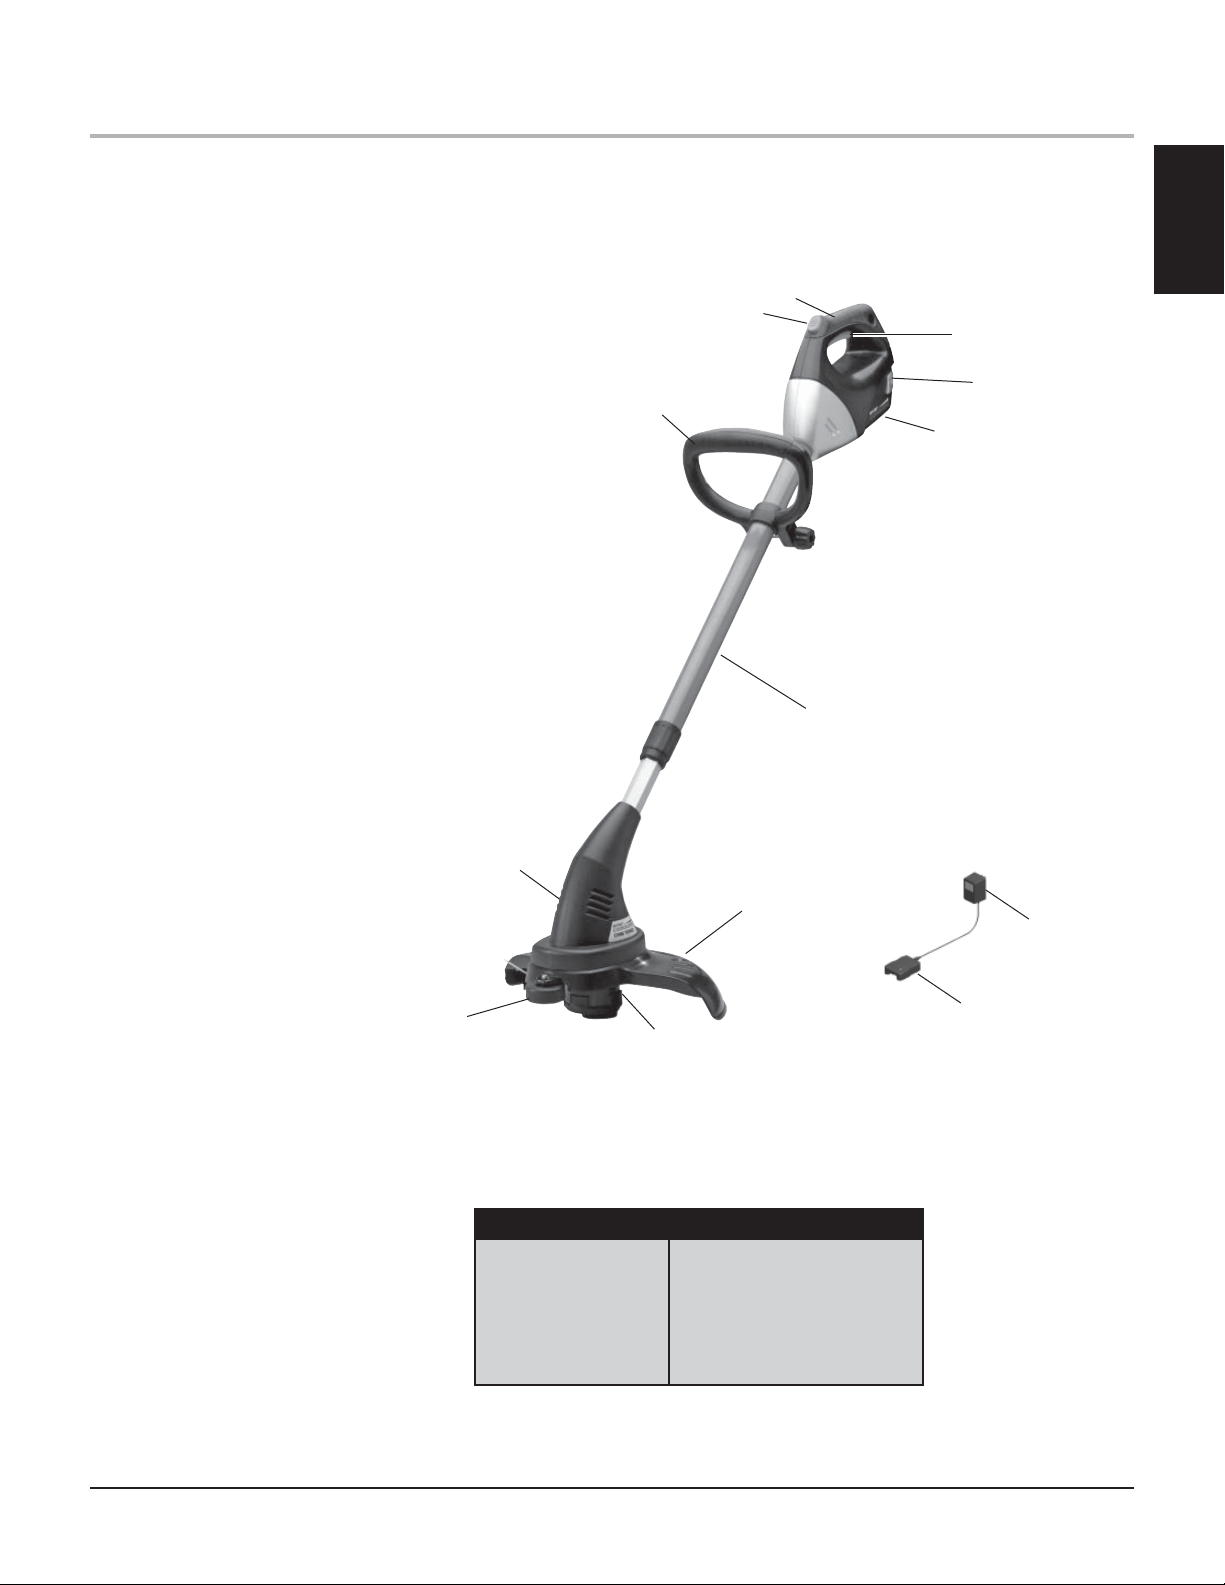
PRODUCT IDENTIFICATION
A. Motor Housing
B. Spool Housing
C. Cutting Guard
D. Edging Wheel
E. Adjustable Front Handle
F. Rear Handle
G. Trigger Switch
H. Trigger Lockout Button
I Telescoping Shaft
J. Battery
K. Battery Release Buttons
L. Line Advance Button
M Battery Charger
N. Charger Base
ENGLISH
F
H
G
K
E
J
A
D
L
Input
No Load Speed
Cutting Width
Net Weight
Line Diameter
I
C
M
N
B
SPECIFICATIONS
RM40BST
18VDC
9600 rpm
12 inches (45.7cm)
7.35 lbs. (3.33 Kg)
0.065 inch
5
RECHARGEABLE BATTERY
PROTECTIVE BATTERY
TERMINAL CAP
WARNING
Do not store or carry battery so that
metal objects can contact exposed
battery terminals. For example,
do not place battery in aprons,
pockets, tool boxes, product kit
boxes, drawers, etc. with loose
nails, screws, keys, jewelry etc.
without battery cap. The battery
or conductor may overheat and
case burns
A protective battery terminal cap is provided
for use whenever the battery is out of the tool
or charger. Remove cap before placing battery
in charger or tool.
SAFETY WARNINGS
1. This manual contains important safety
and opertaing instructions.
2. Before using battery charger, read all
instructions and cautionary markings on
battery charger, battery pack, and product
using battery pack.
CAUTION:
To reduce the risk of injury,
charge only Remington brand
batteries. Other types of batteries may burst causing personal
injury and damage.
3. Do not expose charger to rain or snow.
4. Use of an attachment not recommended
or sold by Remington brand may result in
a risk of fi re, electric shock, or injury to
persons.
5. To reduce risk of damage to electric plug
and cord, pull by plug rather than cord
when disconnecting charger.
6. An extension cord should not be used unless absolutely necessary. Use of improper
extension cord could result in a risk of fi re,
electric shock or electrocution.
a. Two-wire cords can be used with 2-
wire or 3-wire extension cords. Only
round jacketed extension cords should
be used, and we recommend that they
be listed by Underwriters Laboratories
(U.L.). If the extension is to be used
outside, the cord must be suitable for
outdoor use. Any cord marked for
outdoor use can also be used for indoor
work. The letters “W” or “WA” on the
cord jacket indicate that the cord is suitable for outdoor use.
b. An extension cord must have adequate
wire size (AWG or American Wire
Gauge) for safety, and to prevent loss of
power and overheating. The smaller the
gauge number of the wire, the greater
the capacity of the cable; that is, 16
gauge has more capacity than 18 gauge.
When using more than one extension to
make up the total length, be sure each
extension contains at least the minimum
wire size.
CHART FOR MINIMUM WIRE SIZE (AWG)
OF EXTENSION CORDS NAMEPLATE
RATING AMPS – 0 – 10.0
Cord
Length
25 feet 18 AWG
50 feet 18 AWG
100 feet 16 AWG
150 feet 14 AWG
7. Use only the supplied charger (P/N
725-05031 when charging. The use of any
other charger could damage the battery or
create a hazardous condition.
8. Use only one charger when charging.
9. Use only Remington 725-05032 pack with
this product.
10. Do not attempt to open the charger. There
are no customer serviceable parts inside. If
damaged, call the Customer Support
Department.
11. DO NOT incinerate the battery pack even
if they are severely damaged or completely
worn out. The batteries can explode in a
fi re.
12. A small leakage of liquid from the battery
pack cells may occur under extreme usage,
charging, or temperature conditions. This
does not indicate a failure. However, if
the outer seal is broken and this leakage
gets on your skin:
• Wash quickly with soap and water.
• Neutralize with a mild acid such as
lemon juice or vinegar.
• If the battery liquid gets in your eyes,
fl ush them with clean water for a minimum of 10 minutes and seek immediate
medical attention.
13. DO NOT open or mutilate the batteries.
Released electolyte is corrosive and may
cause damage to the eyes and skit. It may
be toxic if swallowed.
AWG Cord
Size
MEDICAL NOTE: The liquid is a
25-35% solution of potassium
hydroxide.
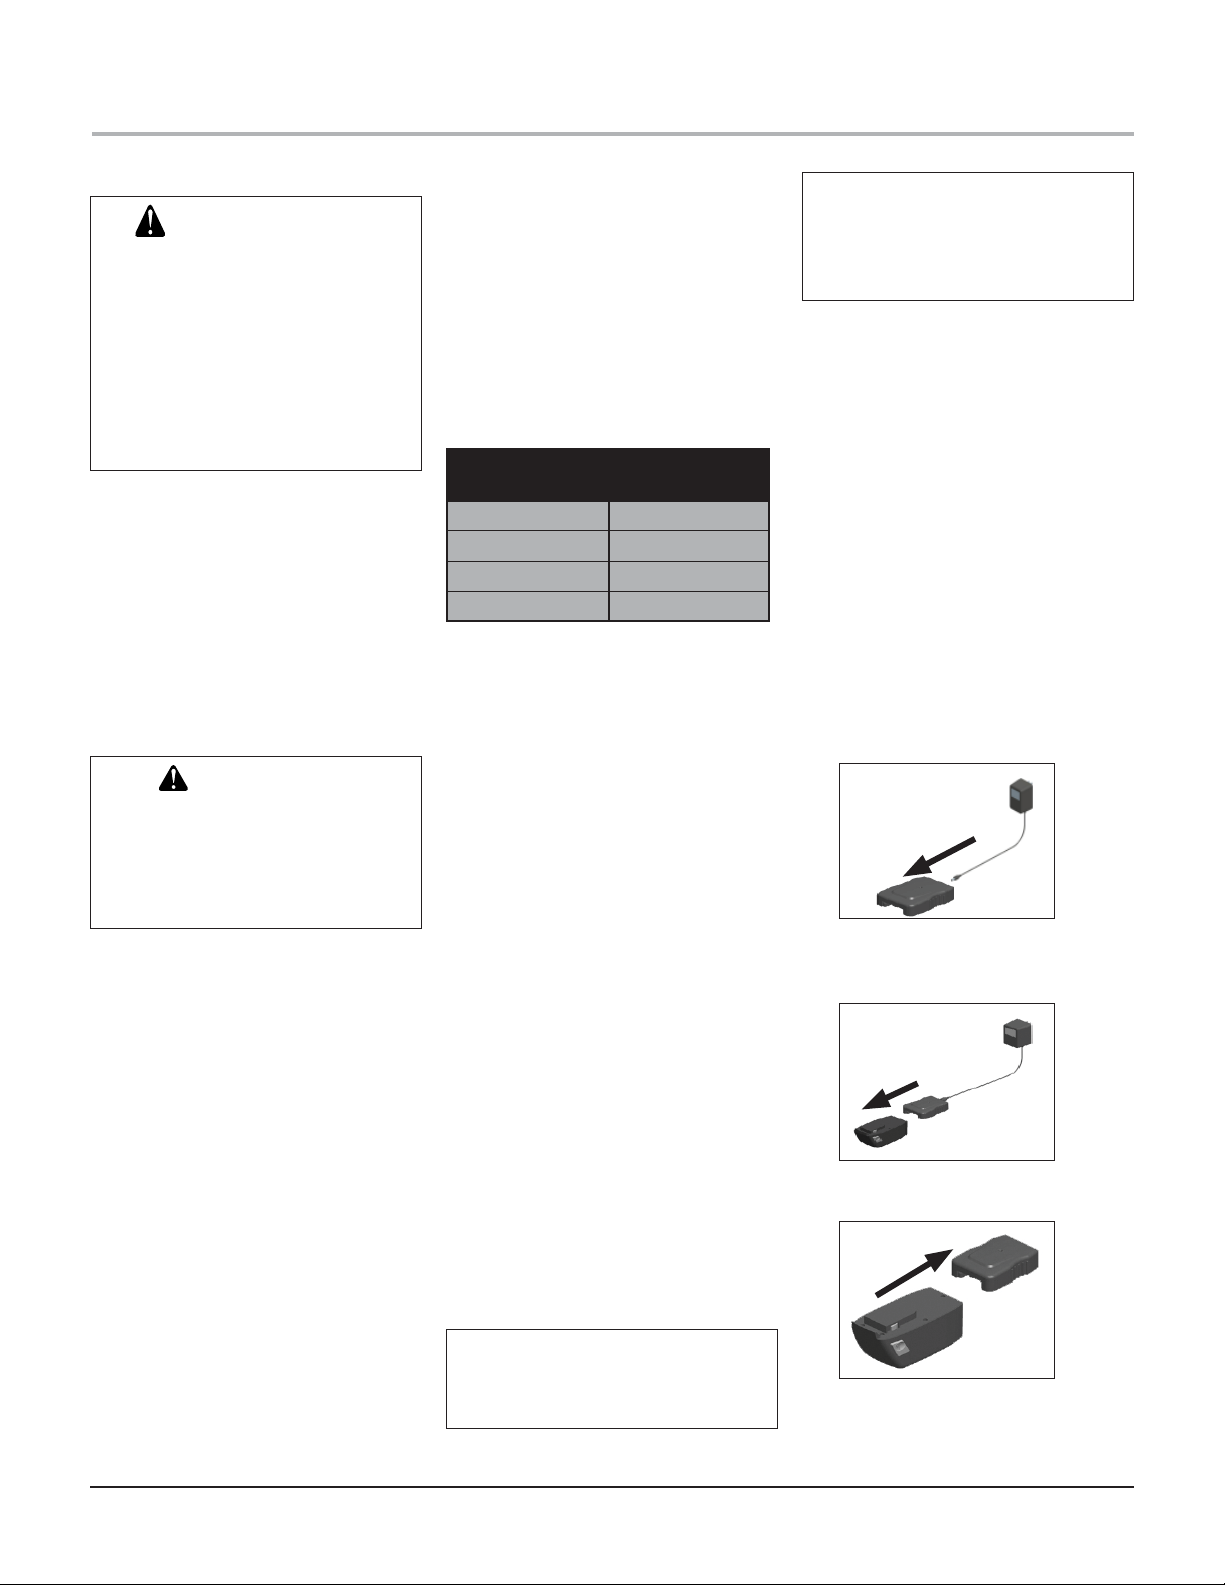
CHARGING BATTERY
The battery pack is not fully
charged at the factory. Before
attempting to charge the battery
pack, thoroughly read all Safety
Instructions.
The charger is designed to use standard household 120 volt 60 Hz power
1. Plug cord from charger into charger base.
(See Figure 1)
2. Plug the charger into any standard 120
Volt 60 Hz electrical outlet. Important: Do
not charge by means of an engine generator or DC power source. Use only 120V
AC.
3. Slide the charger onto the battery pack as
shown in Figure 2. The LED will light up,
Let the battery pack charge until red LED
turns off. After the initial charge, under
normal usage, your battery pack should be
fully charged in 3 to 9 hours.
4. Unplug charger. Remove the battery pack
by sliding out (See Figure 3).
5. Place the battery pack in the tool and be
certain that it is inserted fully into the tool
cavity until it “clicks” into place.
Figure 1 - Plug Charger into Base
Figure 2 - Sliding Charger onto Battery
Figure 3 - Remove Charger
6

RECHARGEABLE BATTERY
IMPORTANT CHARGING NOTES
ENGLISH
1. After normal usage, your battery pack
should be fully charged in 3 to 9 hours. If
the battery pack is run-down completely,
it may take up to 9 hours to become fully
charged. Your battery pack was sent from
the factory in an uncharged condition.
For best performance charge battery until
red LED turns off. Allow the battery to
cool down 30 minutes before charging
after using the trimmer/edger. NOTE: A
hot battery placed in the charger will not
charge.
2. DO NOT charge the battery pack in an
air temperature below 40°F (4,5 °C) or
above 105°F (40,5 °C). This is important
and will prevent serious damage to the
battery pack. Longest life and best performance can be obtained if battery pack
is charged when air temperature is about
75°F (24°C).
3. While charging, the charger may hum and
become warm to touch. This is a normal
condition and does not indicate a problem.
4. If the battery pack does not charge properly
• Check current at receptacle by plugging
in a lamp or other appliance.
• Check to see if receptacle is connected
to a light switch which turns power off
when you turn out the lights.
• Move charger and battery pack to a
surrounding air temperature of 40°F
(4,5°C) to 105°F (40,5 °C)
• If the receptacle and temperature are
OK, and you do not get proper charging,
call the Customer Service Department.
5. The battery pack should be recharged
when it fails to produce suffi cient power
on jobs which were easily done previously.
DO NOT CONTINUE using product with
its battery pack in a depleted condition.
6. To prolong battery life, avoid leaving the
battery pack on charger for extended periods of time (over 30 days without use).
Although overcharging is not a safety
concern, it can signifi cantly reduce overall
battery life.
7. The battery pack will reach optimum performance after being cycled 5 times during
normal usage. There is no need to run the
batteries down completely before recharging. Normal usage is the best method of
discharging and recharging the batteries.
7
TRIMMER ASSEMBLY
ASSEMBLING TRIMMER/
EDGER
WARNING:
Do not operate trimmer/edger
without guard or handle in
place.
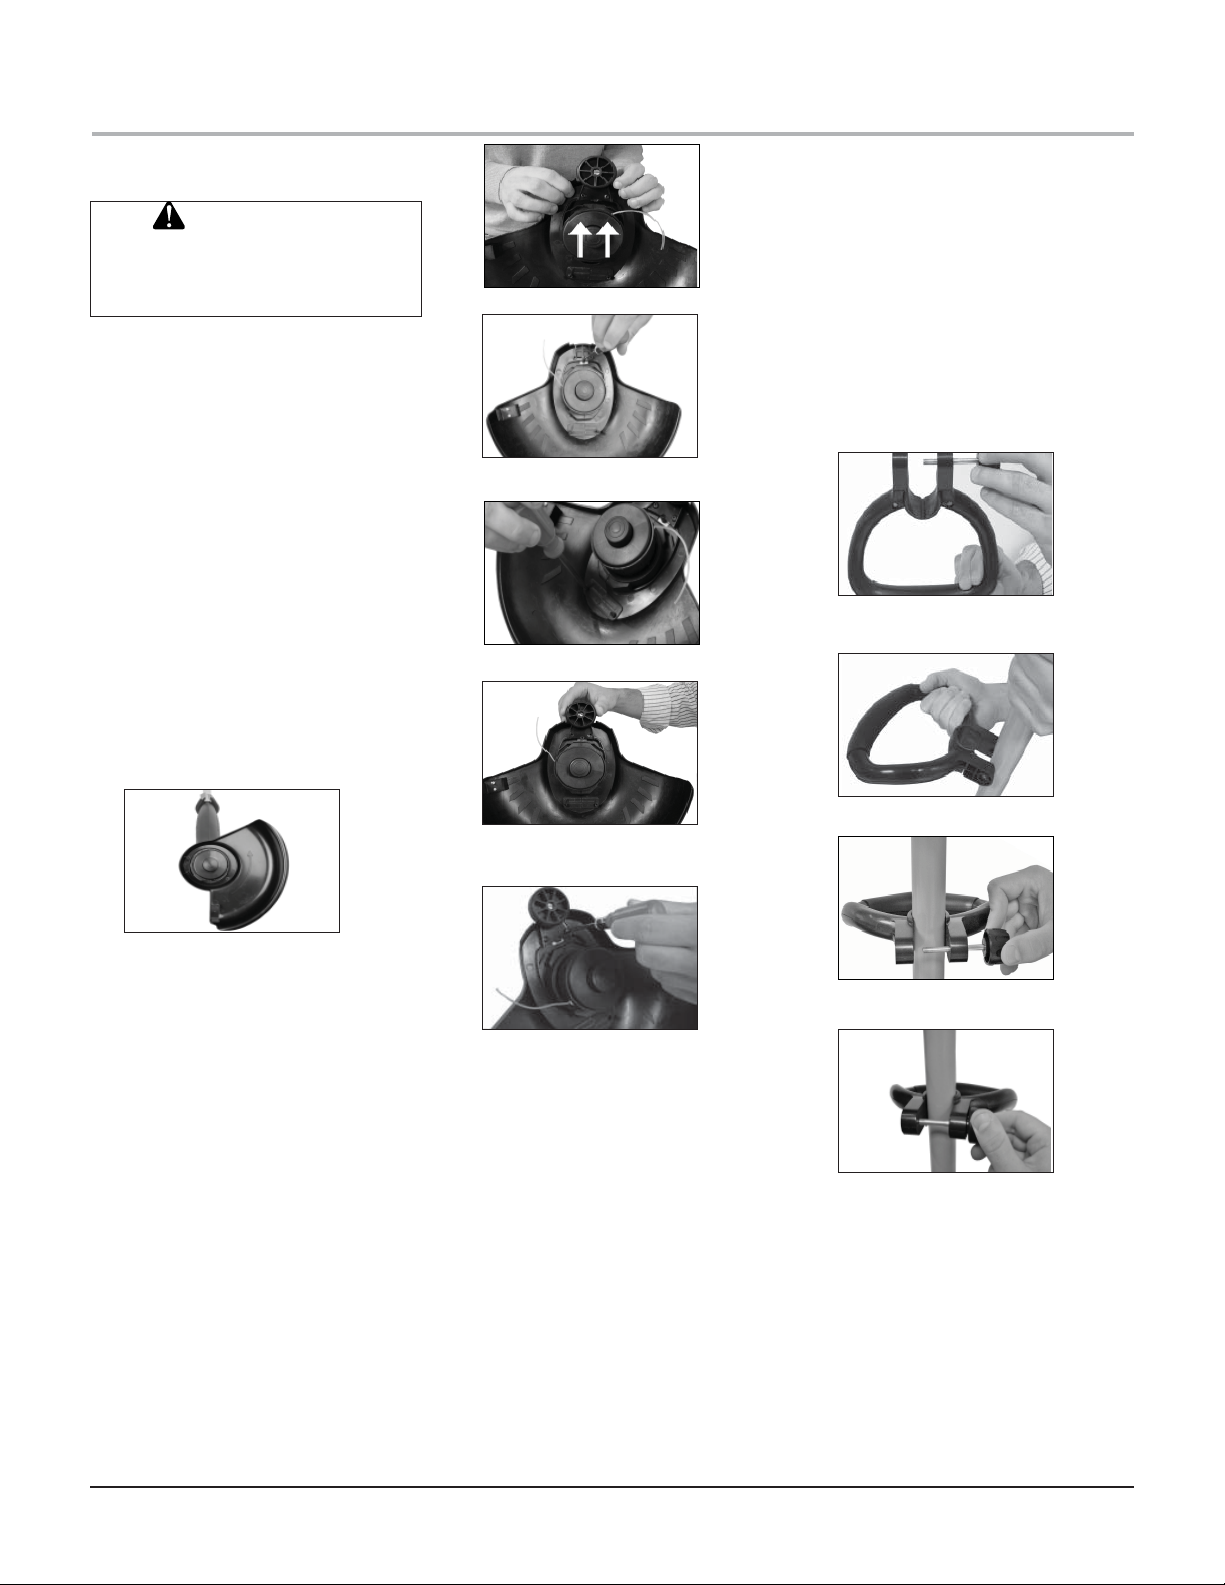
Attaching Cutting Guard
and Edging Wheel
1. Remove fi ve mounting screws taped to
underside of cutting guard.
2. Place cutting guard over spool housing at
a slight angle. Push guard back depressing
tabs toward front of cutting guard. (See
fi gure 4). Drop back of cutting guard into
place.
3. Slide cutting guard forward. (See fi gure
5)
4. Insert mounting screw into hole nearest tabs in cutting guard. Tighten screw
fi rmly. (See Figure 6)
5. Insert two mounting screws into holes at
back of cutting guard. (See Figure 7)
6. Place edging wheel over remaining two
screw holes at front of cutting guard. Attach edging wheel using two mounting
screws. (See Figures 8 and 9)
Figure 5 - Slide cutting guard forward
Figure 6 - Insert mounting screw
Figure 7 - Insert two mounting screws
ATTACHING ADJUSTABLE
FRONT HANDLE
1. Remove the knob and bolt from front
handle (see Figure 10).
2. Place the handle on the trimmer/edger
shaft between the rear handle and shaft
collar. Snap handle onto shaft (see Figure
11).
3. Insert bolt back into the front handle (see
Figure 12).
3. Adjust handle to the most comfortable position and tighten the knob fi rmly. Do not
overtighten the knob. (See Figure 13).
Figure 10 - Removing knob and bolt from
handle
FPO
Figure 4 - Placing cutting guard over cutting head
FPO
Figure 11 - Placing handle onto shaft
Figure 8 - Placing edging wheel over
screw holes
Figure 12 - Inserting bolt into handle
Figure 9 - Attaching edging wheel
Figure 13 - Tighten the knob
8
TRIMMER/EDGER OPERATION
OPERATING THE TRIMMER/
EDGER
WARNING:
Read and understand this
owner’s manual before operating trimmer/edger. Make certain
you read and understand all
Safety Warnings of this manual.
Improper use of this trimmer/
edger can result in severe injury or death from fi re, electric
shock, or body contact with
moving parts.
WARNING:
The trimmer/edger can throw
debris, causing injury to those
nearby.
• Wear approved eye protection, long pants, and shoes
while operating this tool
WARNING:
Keep away from cutting
line and cutting head while
trimmer/edger is running.
Contact with cutting line can
cause serious injury.
• Keep cutting head away
from your hands and feet
and bystanders when in
use.
• Keep cutting guard in place
and in proper working order.
• Wear long pants and shoes
while operating this trimmer/edger.
• Stop trimmer/edger before
servicing or examining
power head.
COUNTER CLOCKWISE.
3. When desired pole height is reached,
TWIST motor houusing 90º CLOCKWISE to lock in place.
NOTE: Shaft has internal limits to stop
rotation - this is considered the locked
position.
4. For edger function, hold collar and TWIST
motor housing 180º to lock into position.
Trimming
Figure 14 - Adjusting shaft length
Edging
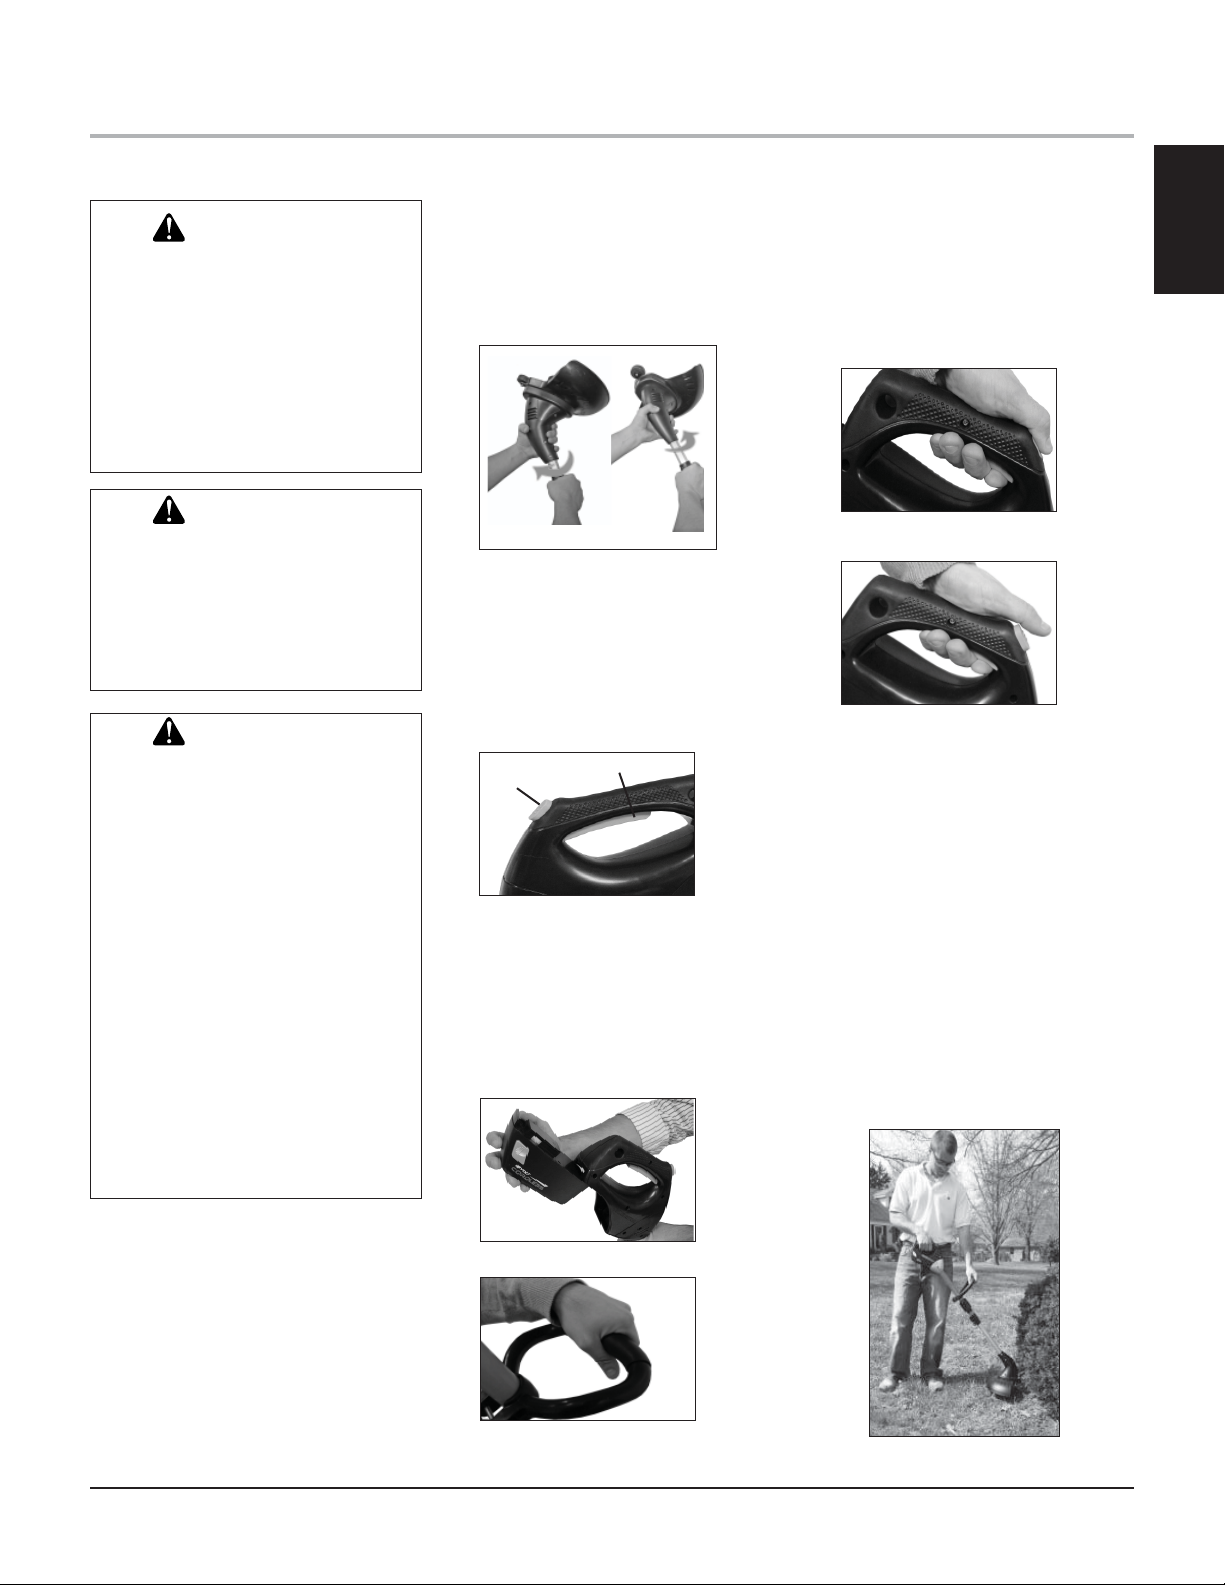
STARTING THE TRIMMER/
EDGER
Basic Trimmer Operation
As a safety feature, this trimmer/edger requires
the trigger lockout button to be drepressed prior
to squeezing the trigger. (See Figure 15)
Trigger Lockout button
Figure 15 - Front and rear trigger switches
This tool is designed to trim grass and weeds
with ease. Follow the steps below to start and
stop the trimmer.
1. Place fully charged battery in trimmer.
(See Figure 16)
2. Hold the front handle with one hand. (See
Figure 17)
Trigger Switch
3. While grasping the rear handle, with the
other hand, depress the trigger lockout
button. (See fi gure 18)
4. Squeeze trigger, the trimmer will start
immediately. (See Figure 19)
5. While squeezing trigger, release trigger
lockout button. Trimmer will remain on.
6. To stop the trimmer, release the trigger.
The trimmer will coast to a stop.
Figure 18 - Depress lockout button and
squeeze trigger
Figure 19 - Release lockout button
TRIMMING
To reduce excessive line wear and improve
trimming performance, follow the steps below
to trim grass and weeds.
1. Remove any string, wire, or other materials
that could become entangled in the trimmer/edger from the trimming area.
2. Hold trimmer/edger using both front and
rear handles (See Figure 20).
3. Slowly sweep the trimmer/edger from side
to side or front to back.
4. Do not force the trimmer/edger. Allow
only the tip of the trimmer/edger line to
cut the grass or weeds.
5. If grass or weeds are tall, cut them in
several increments, starting from the top
and working to the bottom.
ENGLISH
ADJUSTING SHAFT LENGTH
- CONVERTING TO EDGER/
TRIMMER
1. Adjustments to length and location of the
cutting head is performed by gripping the
shaft collar with one hand and the motor
housing with the other. (See Figure 14)
NOTE: Wrenches and pliers are not re-
quired for shaft adjustment and should
never be used.
2. To adjust pole height up and down, hold
collar and TWIST motor housing 90º
Figure 16 - Placing battery in trimmer
Figure 17 - Positioning hand on front
handle.
9
Figure 20 - Holding trimmer/edger
TRIMMER/EDGER OPERATION
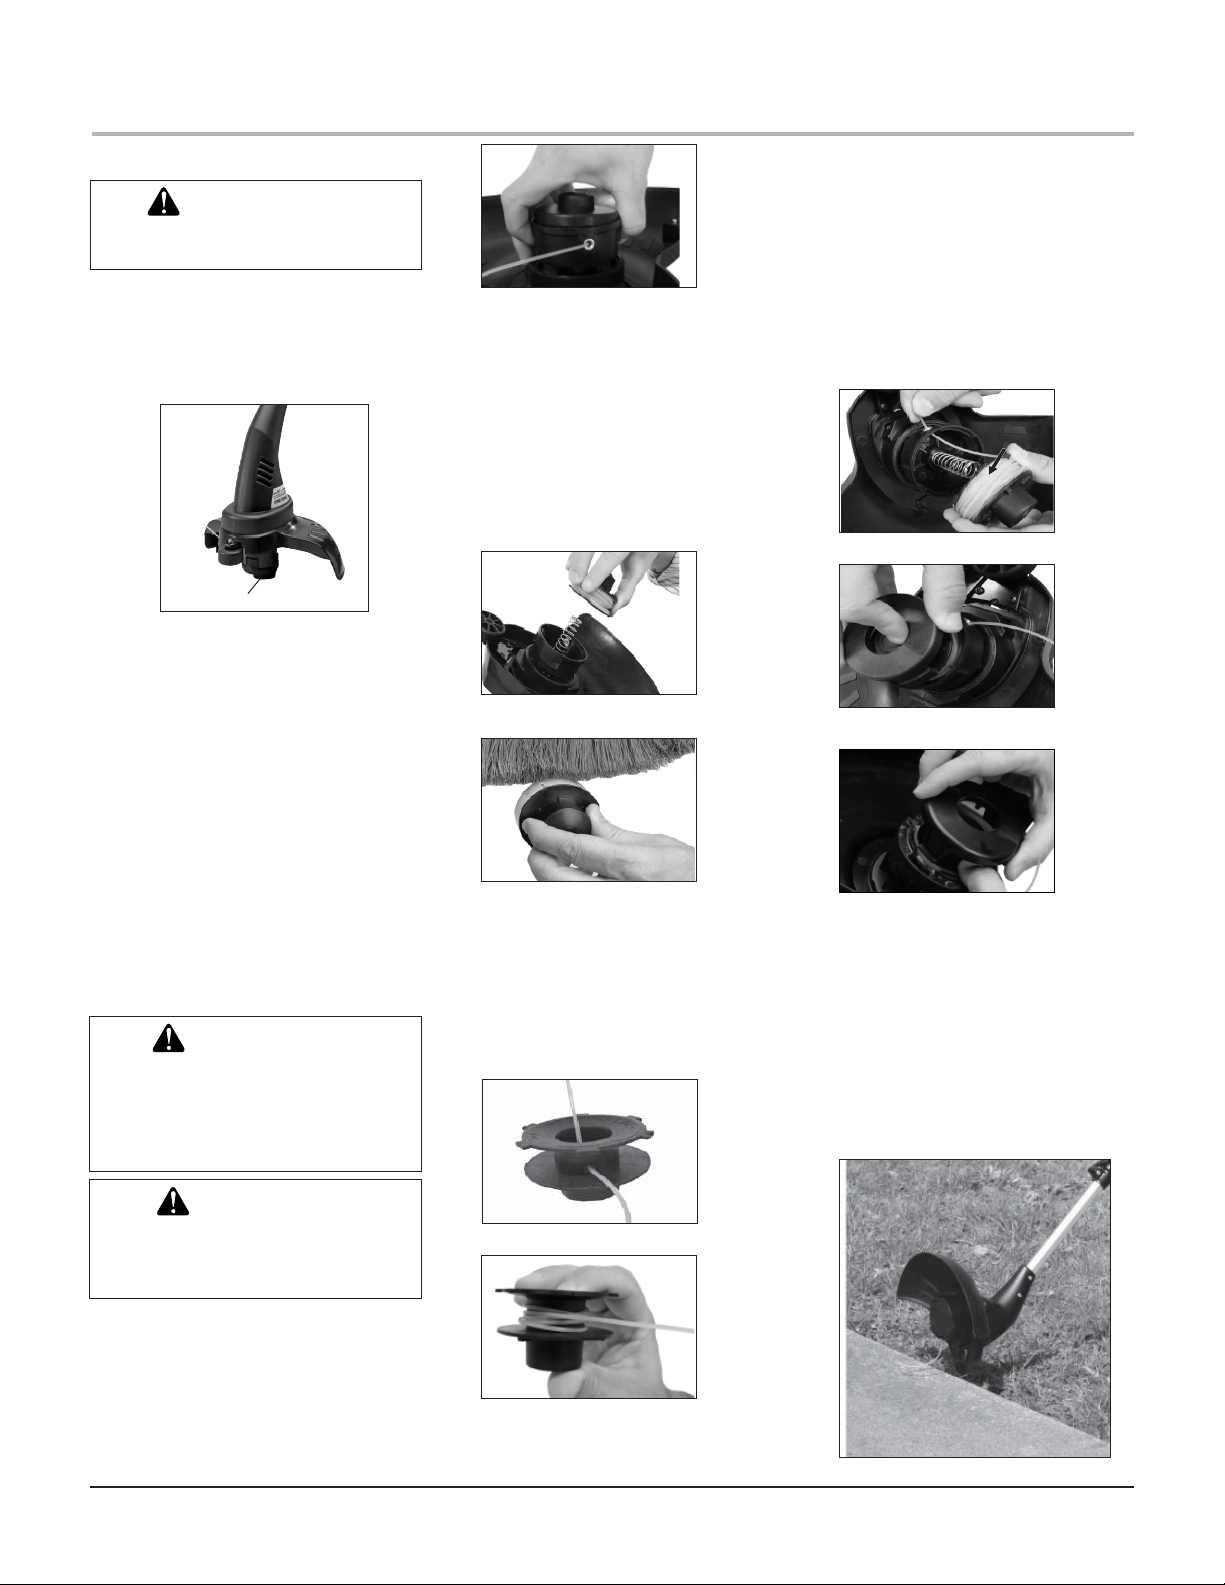
ADVANCING TRIMMER LINE
WARNING:
Blade is sharp. To prevent serious injury, do not touch blade.
To advance new trimmer/edger line, tap the
line advance button on the ground while the
trimmer/edger is running (See Figure 21). The
blade attached to the cutting guard will cut the
line to the proper length.
Line Advance Button
Figure 21 - Advancing trimmer/edger line
Follow the precautions below to ensure top line
performance.
• Do not hold the line advance button on the
ground. This will allow trimmer/edger line
to constantly feed off the spool.
• Tap the line advance button only once to
advance line. If more line is needed, wait a
few seconds and tap again.
• Be sure to advance the line as it wears down.
If you wait too long to advance new line, the
existing line will wear down too short and
can retract into the spool. If this happens,
remove the spool and reroute the line out
of the spool. Reinstall the spool to the spool
housing.
REPLACING TRIMMER/EDGER
LINE
WARNING:
To prevent serious personal injury, never use metal-reinforced
line, wire, or rope, etc. These can
break off and become a dangerous projectile.
Figure 22 - Unlocking spool cover
Remove the spool cover and spool
2.
from spool housing (See Figure
23). Note: If spool spring comes off of spool
housing, replace spring into center of spool
housing. Note: If installing replacement
spool and line (P/N 731-07483), skip to step
8. Remove and discard any remaining line
in the spool.
3. Clean grass and other debris from the
spool and spool housing using a brush (See
Figure 24).
Figure 23 - Removing spool cover and
spool
Figure 24 - Cleaning spool
4. Insert 1 inch of line through small hole at
the base of spool (See Figure 25).
5. Evenly and tightly wind line around spool
in the direction shown on bottom of spool.
Continue winding until line is just below
rim of spool. (See fi gure 26). Do not over
fi ll. Overfi lling can cause jams.
Direction of Line Feed
6. Cut the line. Keep tension on line so line
does not unwind.
7. Insert cut end through eyelet in spool
housing. (See Figure 27)
8. Replace spring and spool into spool housing making sure line is not caught under
spool. (See Figure 28)
9. Align tabs on spool cover with slots in
spool housing. Replace spool cover onto
spool housing and snap into place. (See
Figure 29)
Figure 27 - Inserting line through housing
Figure 28 - Replacing spool into spool
housing
Figure 29 - Replacing spool cover onto
spool housing
Direction of Line Direction of Line
FeedFeed
USING EDGER
1. Make sure trimmer/edger line is advanced
to full cutting length.
2. Roll the trimmer/edger using the edging
wheel attached to the cutting guard (see
Figure 30).
3. Start the trimmer/edger and trim along
edging lines. Be sure to keep the cutting
lines vertical.
CAUTION:
Use of line other than specifi ed
could cause personal injury or
product failure.
Removing the Spool
For replacement line, use a nylon monofi lament line of 0.065 inch in diameter. You can
purchase replacement line at most lawn and
garden stores.
1. Press in the two locking tabs holding the
spool cover to the spool housing (See
Figure 22).
Figure 25 -Inserting line through eyelet
Figure 26 -Winding Line Around Spool
Figure 30 - Edging
10
TRIMMER/EDGER MAINTENANCE
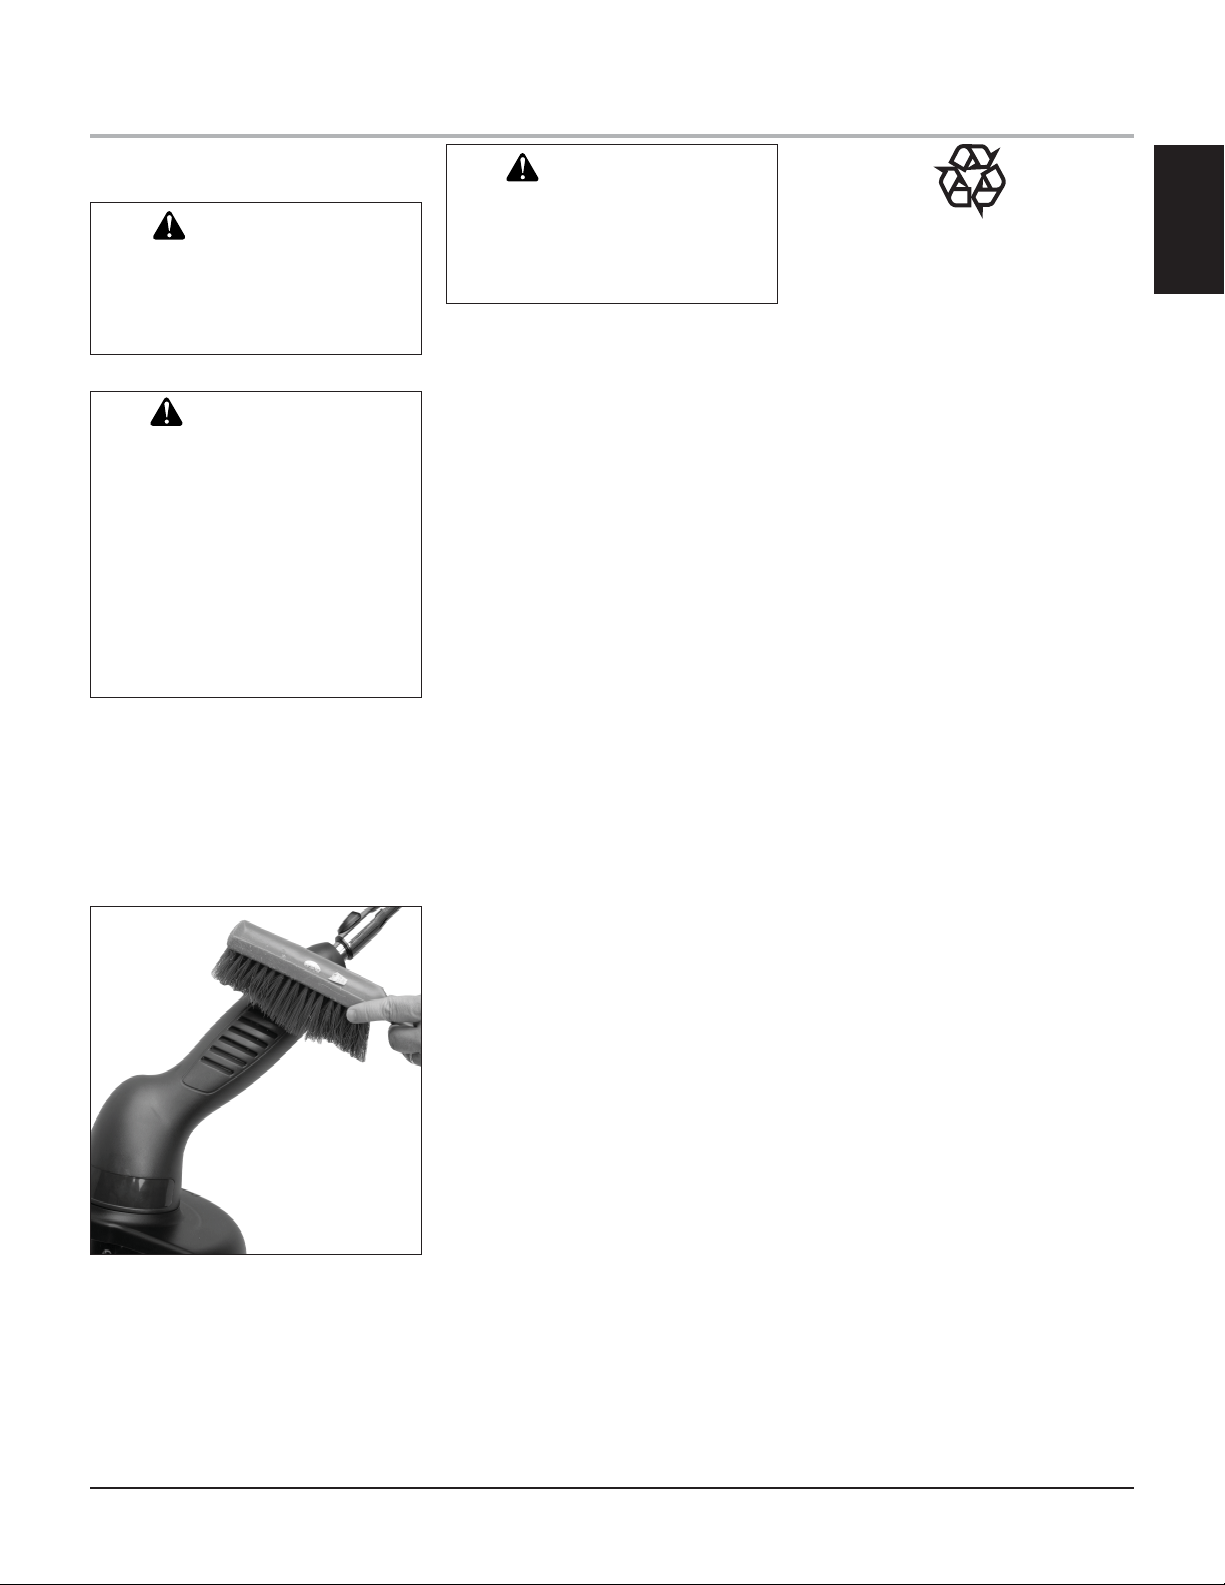
CLEANING AND
MAINTENANCE
WARNING:
Remove battery before cleaning
or servicing. Severe injury or
death could occur from fi re, elec-
trical shock, or rotating string.
WARNING:
When cleaning trimmer/
edger:
• Do not submerse in any
liquids
• Do not use products that
contain Ammonia, Chlorine, or abrasives
• Do not use chlorinated
cleaning solvents, Carbon
Tetrachloride, Kerosene, or
Gasoline.
Use a soft cloth dampened with a mild soap and
water mixture to wipe trimmer/edger housing.
Do not spray or pour water directly onto trimmer/edger.
Use a stiff bristled brush to clean air intake
openings on housing (see Figure 31).
When not in use, store the trimmer/edger indoors
in a dry location.
WARNING:
Use of non-Remington parts or
accessories may cause personal
injury or damage to the unit.
REPLACEMENT PARTS
1. Battery 725-05032
2. Battery Charger 725-05031
3. Replacement Spool 731-07483
(Includes line)
For original replacement parts and accessories,
call 1-866-206-2707 (in Canada call 1-877696-5533) or visit
www.remingtonpowertools.com.
ENGLISH
BATTERY DISPOSAL AND
RECYCLING
This product uses nickel-cadnium batteries.
Local, state, or federal laws prohibit disposal of
nickel-cadnium batteries in the ordinary trash.
To help protect the environment and conserve
natural resources, please dispose of batteries
properly. You may contact your local recycling center for information on where to drop
off the batteries.
Figure 31 - Cleaning trimmer/edger housing
11

TROUBLESHOOTING
WARNING: Remove battery before servicing. Severe injury or death could occur from fi re, elec-
trical shock or rotating line.
Note: For additional help, visit www.remingtonpowertools.com.
OBSERVED FAULT POSSIBLE CAUSE REMEDY
Trimmer/Edger does not start wen you
squeeze the trigger.
Trimmer/Edger runs slowly or stalls
easily.
Line does not feed when you tap the
line advance button.
Battery discharges quickly. 1. Battery not fully charged.
Battery not charging. 1. Charger not plugged in.
1. Battery not installed properly.
2. Battery not charged.
3. Trigger lockout button not
depressed prior to squeezing trigger.
1. Battery is nearly depleted. 1. Recharge battery completely.
1. All the line has been used on spool.
2. Line has retracted into spool.
3. Line is caught or tangled on spool and
will not feed.
2. Battery worn and will not hold
charge.
2. Battery not fully inserted into charger
base.
3. Charger cord not properly connected
to charger base.
4. Charger damaged.
1. Verify proper installation of battery.
2. Insure battery is charged per requirements.
3. Follow directions outlined in basic
trimmer operation.
1. Install new line on spool.
2. Remove spool and pull line out,
then replace spool.
3. Remove spool, loosen and untangle line, then replace spool.
1. Recharge battery completely.
2. Replace battery.
1. Plug charger into 120V 60Hz AC
source.
2. Insure battery is inserted correctly
in charger base.
3. Insure charger cord is fully inserted
into charger base.
4. Replace charger.
SAVE THESE
INSTRUCTIONS
12

WARRANTY INFORMATION
The limited warranty set forth below is given by Remington LLC (“Remington”) with respect with new
merchandise purchased and used in the United States, its possessions and territories.
Remington warrants this product against defects in material and workmanship for a period of two (2)
years commencing on the date of original purchase and will, at its option, repair or replace, free of charge,
any part found to be defective in material or workmanship. This limited warranty shall only apply if this
product has been operated and maintained in accordance with the Operator’s Manual furnished with the
product, and has not been subject to misuse, abuse, commercial use, neglect, accident, improper
maintenance, alteration, vandalism, theft, fire, water, or damage because of other peril or natural disaster.
Damage resulting from the installation or use of any accessory or attachment not approved by Remington
for use with the product(s) covered by this manual will void your warranty as to any resulting damage.
Standard Warranty Battery:
Remington LLC warrants this new battery and any parts thereof to be free
from defects in material and workmanship for a period of six (6) months from the date of first purchase
from an authorized dealer provided the product has been maintained and operated in accordance
with Remington LLC’s warnings and instructions.
HOW TO OBTAIN SERVICE: Warranty service is available, WITH PROOF OF PURCHASE THROUGH
YOUR LOCAL AUTHORIZED SERVICE DEALER. To locate the dealer in your area, please check for a
listing in the Yellow Pages or contact the Customer Service Department of Remington by calling 1-866-
206-2707 or writing to P.O. Box 361032, Cleveland, OH 44136 or if in Canada call 1-877-696-5533. No
product returned directly to the factory will be accepted unless prior written permission has been
extended by the Customer Service Department of Remington.
This limited warranty does not provide coverage in the following cases:
A. Wear items - Bump Knobs, Outer Spools, Cutting Line, Inner Reels, Starter Pulley, Starter Ropes,
Drive Belts, Saw Chains, Guide Bars
B. Remington does not extend any warranty for products sold or exported outside of the United
States of America, its possessions and territories, except those sold through Remington’s
authorized channels of export distribution
Remington reserves the right to change or improve the design of any Remington Product without
assuming any obligation to modify any product previously manufactured.
No implied warranty, including any implied warranty of merchantability or fitness for a particular
purpose, applies after the applicable period of express written warranty above as to the parts as
identified. No other express warranty or guaranty, whether written or oral, except as mentioned
above, given by any person or entity, including a dealer or retailer, with respect to any product shall
bind Remington. During the period of the Warranty, the exclusive remedy is repair or replacement
of the product as set forth above. (Some states do not allow limitations on how long an implied
warranty lasts, so the above limitation may not apply to you.)
The provisions as set forth in this Warranty provide the sole and exclusive remedy arising from
the sales. Remington shall not be liable for incidental or consequential loss or damages
including, without limitation, expenses incurred for substitute or replacement lawn care
services, for transportation or for related expenses, or for rental expenses to temporarily
replace a warranted product. (Some states do not allow limitations on how long an implied warranty
lasts, so the above limitation may not apply to you.)
In no event shall recovery of any kind be greater than the amount of the purchase price of the product
sold. Alteration of the safety features of the product shall void this Warranty. You assume the risk and
liability for loss, damage, or injury to you and your property and/or to others and their property arising
out of the use or misuse or inability to use the product.
This limited warranty shall not extend to anyone other than the original purchaser, original lessee or the
person for whom it was purchased as a gift.
How State Law Relates to this Warranty: This warranty gives you specific legal rights, and you may
also have other rights which vary from state to state.
To locate your nearest service dealer dial 1-866-206-2707 in the United States or 1-877-696-5533 in
Canada.
REMINGTON LLC
P.O. Box 361032
Cleveland, OH 44136
MANUFACTURER’S LIMITED WARRANTY FOR:
ENGLISH
13

NOTES/NOTAS ___________________________
________________________________________
________________________________________
________________________________________
________________________________________
________________________________________
________________________________________
________________________________________
________________________________________
________________________________________
________________________________________
________________________________________
________________________________________
________________________________________
________________________________________
________________________________________
________________________________________
________________________________________
________________________________________
________________________________________
________________________________________
________________________________________
________________________________________
14
 Loading...