

Remington RM4030, RM4030B Operator's Manual

Operator’s Manual
ORIGINAL INSTRUCTIONS
RM4030 / RM4030B
Cordless Blower
BC
SAVE THESE INSTRUCTIONS
IMPORTANT: Read this manual thoroughly before using this product. Follow all instructions.
769-12206 / 00 06/17
TABLE OF CONTENTS
Service . . . . . . . . . . . . . . . . . . . . . . . . . . . . . . . . . . . . . . . . . . . . . .2
Safety . . . . . . . . . . . . . . . . . . . . . . . . . . . . . . . . . . . . . . . . . . . . . . .2
Know Your Unit . . . . . . . . . . . . . . . . . . . . . . . . . . . . . . . . . . . . . . . .8
Specifications . . . . . . . . . . . . . . . . . . . . . . . . . . . . . . . . . . . . . . . . .9
ssembly . . . . . . . . . . . . . . . . . . . . . . . . . . . . . . . . . . . . . . . . . . . . .9
A
Starting and Stopping . . . . . . . . . . . . . . . . . . . . . . . . . . . . . . . . . .11
Operation . . . . . . . . . . . . . . . . . . . . . . . . . . . . . . . . . . . . . . . . . . .12
Maintenance . . . . . . . . . . . . . . . . . . . . . . . . . . . . . . . . . . . . . . . . .13
Cleaning and Storage . . . . . . . . . . . . . . . . . . . . . . . . . . . . . . . . . .14
roubleshooting . . . . . . . . . . . . . . . . . . . . . . . . . . . . . . . . . . . . . .15
T
Warranty . . . . . . . . . . . . . . . . . . . . . . . . . . . . . . . . . . . . . . . . . . . .16
NOTE: This operator's manual covers multiple models. Features
may vary by model. Not all features in this manual are applicable
to all models. The model depicted may differ from yours.
All information, illustrations, and specifications in this manual are based
on the latest product information available at the time of printing. We
reserve the right to make changes at any time without notice.
The product may vary slightly from the illustrations contained in this
manual.
Copyright© 2017 MTD SOUTHWEST INC, All Rights Reserved.
SERVICE
DO NOT RETURN THIS UNIT TO THE RETAILER. PROOF OF
PURCHASE WILL BE REQUIRED FOR WARRANTY SERVICE.
For assistance regarding the assembly, operation or maintenance of
the unit, please call 1-866-206-2707 (in the United States) or 1-877-
696-5533 (in Canada). Additional information can be found at
www.remingtonpowertools.com.
Warranty service is available through an authorized service center.
To locate a service center in your area, please visit our website or
call the number listed above. Service on this unit, both within and
after the warranty period, should only be performed by an
authorized and approved service center. When servicing, use only
identical replacement parts.
The purpose of safety symbols is to attract your attention to
possible dangers. The safety symbols, and their explanations,
deserve your careful attention and understanding. The safety
warnings do not by themselves eliminate any danger. The
instructions or warnings they give are not substitutes for proper
accident prevention measures.
SYMBOL MEANING
DANGER:
Failure to obey a safety DANGER symbol WILL result in
serious injury or death to yourself or to others.
WARNING:
Failure to obey a safety WARNING symbol CAN result in
serious injury to yourself or to others.
Signals an EXTREME hazard.
Signals a SERIOUS hazard.
CAUTION:Signals a MODERATE hazard.
Failure to obey a safety CAUTION symbol MAY result in
property damage or injury to yourself or to others.
NOTE: Advises you of information or instructions vital to the
operation or maintenance of the equipment.
SAFETY
Read the operator’s manual and follow all warnings and safety
instructions. Failure to do so can result in serious injury to the
operator and/or bystanders.
CALIFORNIA PROPOSITION 65
WARNING:
known to the state of California to cause cancer, birth defects
or other reproductive harm.
This product contains a chemical
2
• IMPORTANT SAFETY INSTRUCTIONS •
WARNING:Read all safety warnings and all
instructions. Failure to follow the warnings and instructions
ay result in electric shock, fire and/or serious injury.
m
READ ALL INSTRUCTIONS BEFORE OPERATING
1. SAVE THESE INSTRUCTIONS - This manual contains
important safety and operating instructions.
2. Before using this product, read all instructions and cautionary
arkings on the battery, battery charger, and the unit(s) powered
m
by the battery.
3. Do not handle the charger, including the charger plug and
charger terminals, with wet hands.
4. Do not charge the unit outdoors.
WARNING:
RM4150 batteries with this unit. DO NOT use any other type
of battery, attachment or accessory with this unit. Other
types of batteries, attachments or accessories could lead to
serious injury, property damage or damage to the unit.
Only use RM4130, RM4140 or
ENERAL SAFETY WARNINGS
G
Read the instructions carefully. Be familiar with the controls and
•
proper use of the unit. Know how to stop the unit and disengage
the controls quickly.
• Stay alert. Do not operate this unit when tired, ill or under the
nfluence of alcohol, drugs or medication.
i
• Never allow children to operate the unit. Teens must be trained,
accompanied and supervised by an adult. Never allow adults to
operate the unit without proper instruction.
• All guards and safety attachments must be installed properly
before operating the unit.
• Inspect the unit before use. Check for damaged parts. Make sure
all parts operate properly. Make sure all fasteners are in place
and secure. Make sure all moving parts are properly aligned and
are not bound. Replace parts that are cracked, chipped, or
damaged in any way. Have all damaged or improperly working
parts repaired or replaced by an authorized service center. Do
not operate the unit with loose or damaged parts.
• Be aware of risk of injury to the head, hands and feet.
• Carefully inspect the area before starting the unit. Remove
rocks, broken glass, nails, wire, string and other objects that
may be thrown or become entangled with the unit.
• Clear the area of children, bystanders and pets; keep them
outside a 50-foot (15 m) radius, at a minimum. Even then, they are
still at risk from thrown objects. Encourage bystanders to wear
eye protection. If you are approached, stop the unit immediately.
• This unit is intended for occasional, household use only.
• Do not allow the unit to be used as a toy.
WARNING:
or RM4150 batteries with an RM4110 battery charger. DO
NOT attempt to use any other battery charger to charge
RM4130, RM4140 or RM4150 batteries. Other types of
battery chargers may cause the batteries to burst, resulting
in fire, personal injury or property damage.
WARNING:
charger to charge RM4130, RM4140 or RM4150 batteries.
DO NOT attempt to charge any other batteries with an
RM4110 battery charger. Other types of batteries may
burst, causing fire, personal injury or property damage.
Only charge RM4130, RM4140
Only use an RM4110 battery
SAFETY WARNINGS FOR ELECTRIC UNITS
General Electric Safety
• Do not expose the unit to rain or wet conditions. Store the unit
indoors.
• Do not handle the unit with wet hands.
• Avoid dangerous environments. Do not operate the unit in the
rain, in wet conditions or on wet surfaces. Moisture is a shock
hazard.
• To reduce the risk of electric shock, avoid body contact with
grounded conductors, such as metal pipes or wire fences.
• Do not operate the unit in explosive atmospheres, such as in the
presence of flammable liquids, gases or dust.
Battery Charger Safety
• Follow all charging instructions. Do not charge the battery
outside the temperature range specified in these instructions.
Improperly charging the battery or charging the battery outside
of the specified temperature range may damage the battery and
increase the risk of fire.
• A nameplate on the unit indicates the voltage used. Never
connect the unit to an AC voltage that differs from this voltage.
• An extension cord should not be used unless absolutely
necessary. Use of an improper extension cord could result in a
risk of fire, electric shock or electrocution.
• Do not use multiple extension cords.
• Make sure the extension cord is heavy enough to carry the
current drawn by the unit. An undersized extension cord will
cause a drop in line voltage, resulting in a loss of power and
overheating. If in doubt, use the next heavier gauge cord. The
smaller the gauge number, the heavier the cord.
3
MINIMUM WIRE SIZE FOR EXTENSION CORDS FOR
120 VOLT APPLIANCES USING 0-6 AMPS
Cord Length (ft.) 25 50 100 150
Wire Size (AWG) 16 16 16 14
• Make sure the cords are in good condition. Inspect the power
cord and extension cord periodically. Look closely for
eterioration, cuts or cracks in the insulation. If a cord is
d
damaged in any manner while plugged in, disconnect the cord
from both the outlet and the unit. Do not use a damaged cord.
Damaged cords should be repaired or replaced.
• Do not abuse cords. Never pull or carry the unit by a cord. Keep
cords away from heat, oil, water, sharp edges, and moving
objects. Always grasp the plug when disconnecting a cord.
• Never modify a plug, cord or outlet in any way.
Ground Fault Circuit Interrupter (GFCI) protection should be
•
provided on the circuit(s) or outlet(s) to be used with this unit.
For an extra measure of safety, use receptacles with built-in
GFCI protection.
• Do not place the battery charger where cords might be stepped
on, tripped over or subjected to damage.
• Do not charge batteries in the rain or in wet conditions. Keep the
battery charger in a cool and dry area.
• Keep the battery charger away from all liquid.
• Do not allow small metal items or material such as steel wool,
aluminum foil or other foreign particles into the charger port.
• Do not probe the charger with conductive material. There is a
risk of electric shock.
• Do not cover the battery charger. The battery charger may
overheat.
• Do not allow the battery or battery charger to overheat. If they
are warm, allow them to cool down. Only charge batteries in
temperatures between 32° and 104° F (0° and 40° C).
• Always unplug the battery charger before cleaning it. Always
unplug the battery charger when it is not in use.
Battery Safety
• Do not expose the battery to fire or to temperatures over 176º F
(80º C). Doing so could cause an explosion.
• Handle batteries with care. Do not short the battery with
conductive materials, such as rings, bracelets, keys, etc.
Shorting the battery may cause personal injury, damage to the
battery or a fire.
• When the battery is not in use, keep it away from small metal
objects, such as paper clips, coins, nails, etc. These items could
connect one terminal to another and short the battery.
• Do not attempt to charge a cracked or damaged battery.
• Do not use a damaged or modified battery. Doing so could result
in a fire, explosion or personal injury.
DISPOSING OF DAMAGED OR WORN-OUT BATTERIES
WARNING:
corrosive material is used in this unit's battery:
LITHIUM-ION, a toxic material.
WARNING:
environment, contact your local waste disposal agency for
specific instructions before disposing of damaged or wornout lithium-ion batteries. Take batteries to a local recycling
nd/or disposal center, certified for lithium-ion battery
a
disposal.
The following toxic and
To prevent contamination of the
WARNING:Do not use broken or cracked
batteries, even if there isn't leakage. Replace damaged or
worn-out batteries with new batteries. DO NOT ATTEMPT
TO REPAIR BATTERIES! Repair attempts may result in
severe personal injury, due to explosion or electrical shock.
To avoid personal injury and damage to the environment:
• Do not attempt to remove or destroy any of the battery
components. Do not open or mutilate the battery. If a leak
develops, released electrolytes are corrosive and toxic. Do not get
the solution in your eyes or on your skin, and do not swallow it.
• Do not dispose of the battery in the regular household trash.
• Do not dispose of the battery in a fire. The cell may explode.
• Do not dispose of the battery where it will become part of any
waste landfill or municipal solid waste stream.
• Cover the battery terminals with heavy-duty adhesive tape.
• Dispose of the battery according to local, state and federal
regulations.
• Dispose of the battery promptly.
WARNING:
fire or chemical burn if mistreated. Do not disassemble,
overheat or incinerate the battery. The battery may develop a
small leak under extreme usage or temperature conditions.
If battery fluid contacts skin:
- Immediately wash the area with soap and water.
- Neutralize the battery fluid with a mild acid (lemon
juice, vinegar, etc.).
- Seek immediate medical attention.
If battery fluid gets in the eyes:
- Immediately flush the eyes with clean water for at
least 15 minutes.
- Seek immediate medical attention.
The battery may present a risk of
4
About Call2Recycle Battery Seals
Call2Recycle’s industry steward program helps
battery and product manufacturers fulfill recycling
equirements in the U.S. and Canada, including
r
compliance with extensive state, provincial and
federal regulations, such as the MercuryContaining and Rechargeable Battery Act (The
Battery Act). Call2Recycle
Stewards, participating battery and product manufacturers and
marketers, purchase the rights to imprint the Call2Recycle Battery
Seals on their rechargeable batteries and products. When you see the
Call2Recycle Battery Seal, you can feel confident knowing that your
attery or product can be safely and responsibly recycled.
b
About Call2Recycle
Since 1994, Call2Recycle has diverted more than 75 million pounds
of rechargeable batteries from local landfills and established a
network of 30,000 recycling drop-off locations. More than 200 battery
and/or product manufacturers, Call2Recycle Industry Stewards, have
united to ensure that batteries are responsibly recycled when they
reach their end of life and fund the program that is operated by
Call2Recycle, Inc., a 501(c)4 nonprofit public service organization.
To locate the nearest recycling center, please call 1-800-822-8837.
®
Licensees/Industry
FCC STATEMENT
CAUTION:Changes or modifications not
expressly approved by the party responsible for compliance
could void the user's authority to operate the equipment.
NOTE: This equipment has been tested and found to comply with the
limits for a Class B digital device, pursuant to part 15 of the FCC
Rules. These limits are designed to provide reasonable protection
against harmful interference in a residential installation. This
equipment generates, uses and can radiate radio frequency
energy and, if not installed and used in accordance with the
instructions, may cause harmful interference to radio
communications. However, there is no guarantee that interference
will not occur in a particular installation. If this equipment does
cause harmful interference to radio or television reception, which
can be determined by turning the equipment off and on, the user
is encouraged to try to correct the interference by one or more
of the following measures:
— Reorient or relocate the receiving antenna.
— Increase the separation between the equipment and receiver.
— Connect the equipment into an outlet on a circuit different
from that to which the receiver is connected.
— Consult the dealer or an experienced radio/TV technician for help.
WHILE OPERATING
WARNING:
shock, do not expose the unit to rain or wet conditions.
Store the unit indoors.
• Wear safety glasses or goggles that meet current ANSI / ISEA
Z87.1 standards and are marked as such. Wear ear/hearing
protection when operating this unit. Wear a face mask or dust
mask if the operation is dusty.
• Wear heavy long pants, boots, gloves and a long sleeve shirt. Do
not wear loose clothing, jewelry, short pants, sandals or go
arefoot. Secure hair above shoulder level.
b
• Use the unit only in daylight or good artificial light.
• Use the right tool. Only use this tool for its intended purpose.
• Always hold the unit with a firm grip when operating.
• Do not overreach. Always keep proper footing and balance. Take
extra care when working on stairs, steep slopes or inclines. To
avoid serious injury, do not operate the unit while on a ladder or
a roof.
• Keep hair, face, hands, feet and all other body parts away from
moving parts and openings. Do not touch or try to stop moving
parts.
• Do not operate the unit faster than the speed needed to do the
job. Do not run the unit at high speed when not in use.
• Do not force the unit. It will do a better, safer job when used at
the intended rate.
• Always turn the unit off when operation is delayed or when
carrying the unit from one location to another.
• Before setting the unit down, always turn the unit off and wait for
all moving parts to come to a complete stop.
• Avoid starting the unit unintentionally. Make sure your fingers are
off the trigger before installing or removing the battery. Never
carry the unit with fingers on the trigger.
• Remove the battery from the unit when it is not in use.
• Do not use the unit if the trigger does not start and stop the unit.
• If the unit strikes or becomes entangled with a foreign object,
stop the motor immediately, remove the battery and check for
damage. If damaged, do not restart or operate the unit until it is
repaired. Do not operate the unit with loose or damaged parts.
• Use only original equipment manufacturer (OEM) replacement
parts and accessories for this unit. These are available from your
authorized service dealer. Use of any other parts or accessories
could lead to serious injury to the user, or damage to the unit,
and void the warranty.
• Keep the unit clean. Stop the motor, remove the battery and
allow the unit to cool. Carefully remove vegetation and other
debris that could block moving parts.
• If the unit starts to vibrate abnormally, stop the motor, remove the
battery and allow the unit to cool. Inspect the unit for the cause of
the vibration. Vibration is generally an indicator of trouble.
To reduce the risk of electric
5

BLOWER SAFETY
• Stop the motor, wait for all moving parts to stop, remove the
attery and allow the unit to cool before installing or removing
b
the blower tube.
Do not insert anything into the air openings or blower tube. Do
•
not operate the unit if any of the air openings or tubes are
blocked. Keep the air openings free from dust, lint, hair and
anything else that may reduce airflow.
Do not operate the unit without the blower tube securely attached.
•
• Do not use the unit to spray liquids, especially flammable or
ombustible liquids, such as gasoline. Do not use the unit in
c
areas where such liquids are present.
• Do not use the unit for spreading chemicals, fertilizer or any
other substance that may contain toxic materials.
• Do not set the unit down on any surface while the unit is
running. Debris can be picked up by the air intake and thrown
ut the discharge opening, resulting in damage to the unit or
o
property or causing serious injury to bystanders or the operator.
• During operation, never point the unit in the direction of people,
animals, windows or automobiles. Always direct blowing debris
away from people, animals, windows or automobiles.
• Use extra caution when blowing debris near solid objects, such
as trees, walls, fences, etc. When possible, blow away from
such objects, not toward them.
• Take care when working near valuable plants. The force of the
blown air could damage tender plants.
• Never attempt to clear a clogged air intake opening while the
unit is running.
OTHER SAFETY WARNINGS
• Maintain the unit with care. Follow all maintenance instructions
n this manual.
i
• Do not perform maintenance procedures other than those
escribed in this manual. Do not attempt to repair the unit; there
d
are no user-serviceable parts inside. All service, other than the
maintenance procedures described in this manual, should be
performed by an authorized service center.
Do not use the unit if it is not working correctly, has been
•
dropped, damaged, left outdoors or dropped into water. Have the
unit serviced by an authorized service center.
• Never remove, modify or make inoperative any safety device
furnished with the unit.
• Before inspecting, maintaining, cleaning, storing, transporting or
eplacing any parts on the unit:
r
1. Stop the motor. Refer to Starting and Stopping.
2. Wait for all moving parts to stop.
3. Remove the battery.
4. Allow the unit to cool.
• Secure the unit while transporting.
• Store the unit in a dry place, secured or at a height to prevent
unauthorized use or damage. Keep the unit out of the reach of
children.
• Never douse or squirt the unit with water or any other liquid.
Avoid getting water in the motor and electrical connections.
Keep handles dry and clean (free from debris, oil and grease).
Clean the unit after each use. Refer to Cleaning and Storage. Do
not use solvents or strong detergents.
• Keep these instructions. Refer to them often and use them to
instruct other users. If you loan this unit to others, also loan
them these instructions.
SAVE THESE INSTRUCTIONS
6
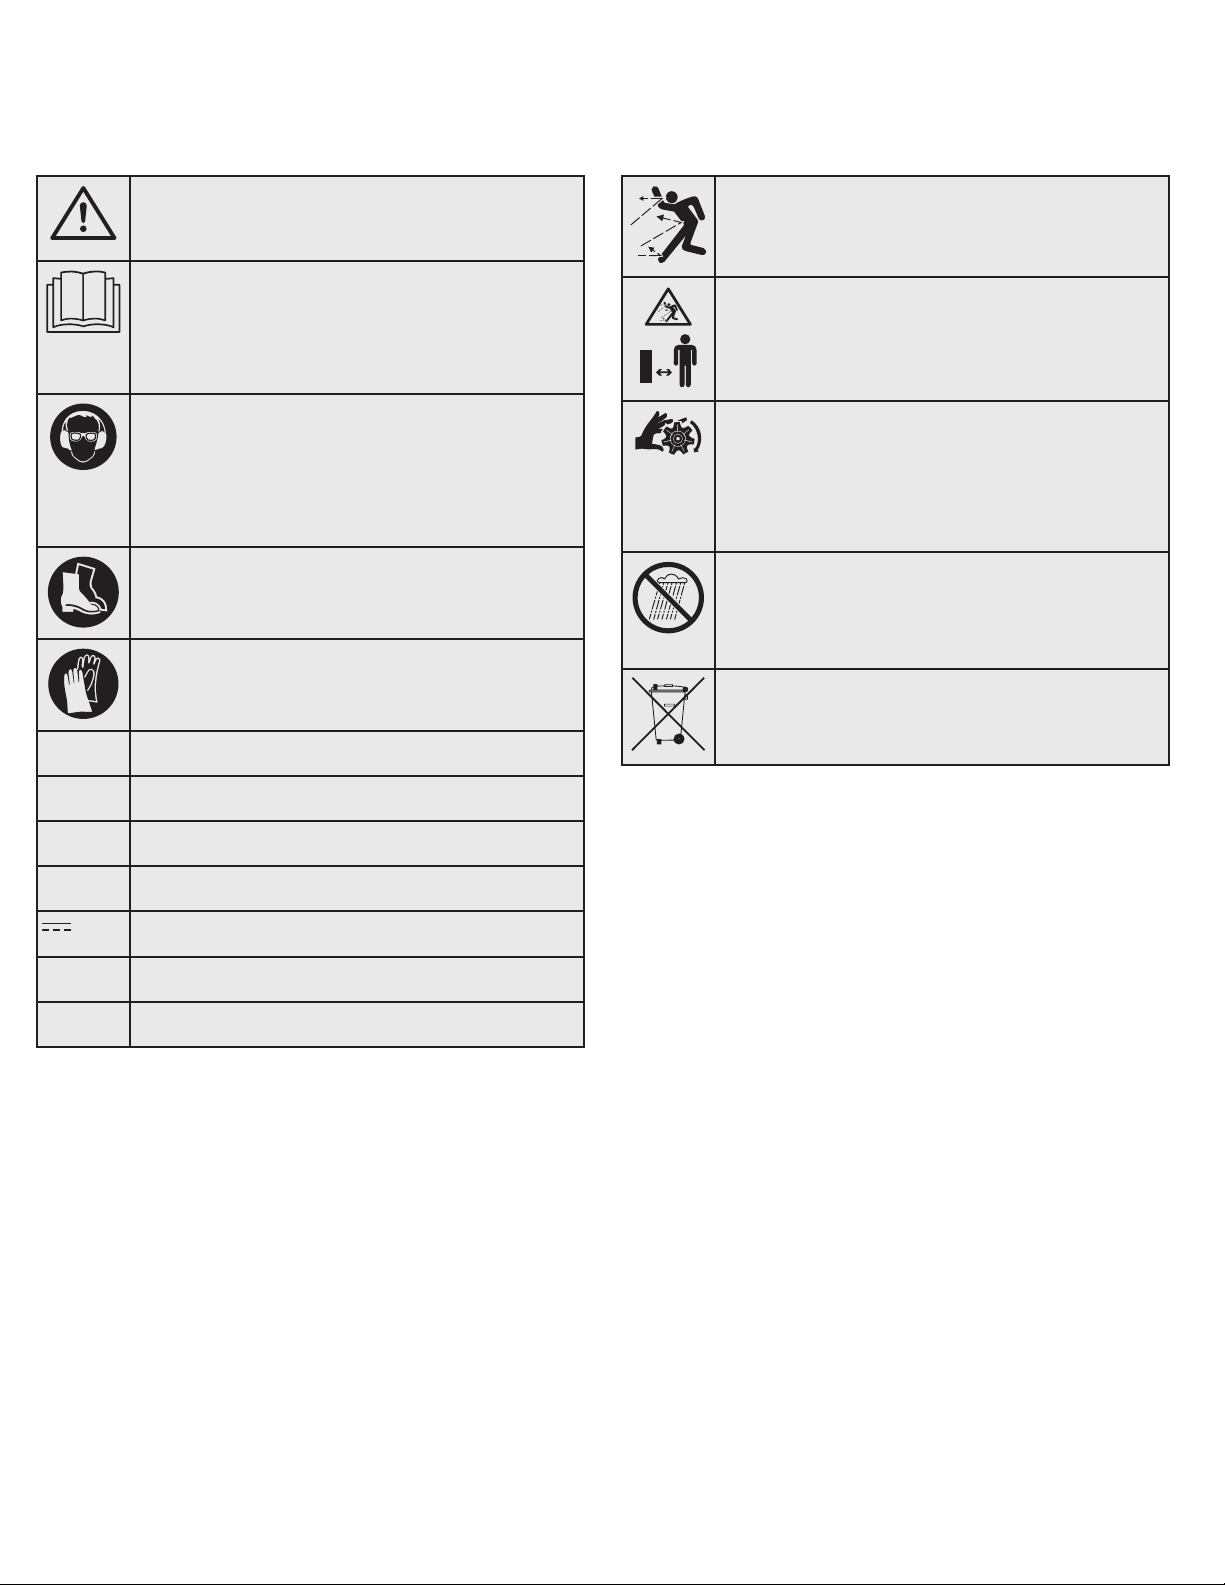
• SAFETY & INTERNATIONAL SYMBOLS •
or DC
This operator's manual describes safety and international symbols and pictographs that may appear on this product. Read the operator's
manual for complete safety, assembly, operating and maintenance and repair information.
SYMBOL MEANING SYMBOL MEANING
• SAFETY ALERT SYMBOL
Indicates danger, warning or caution. May be used in
conjunction with other symbols or pictographs.
• READ OPERATOR'S MANUAL
WARNING:
manual(s) and follow all warnings and safety
instructions. Failure to do so can result in serious
injury to the operator and/or bystanders.
• WEAR EYE AND HEARING PROTECTION
Read the operator’s
WARNING:Thrown objects and loud
noise can cause severe eye injury and hearing loss.
Wear eye protection meeting current ANSI / ISEA
Z87.1 standards and ear protection when operating
this unit. Use a full face shield when needed.
• WEAR FOOT PROTECTION
Always wear heavy-duty, non-slip footwear when
operating this unit.
• WEAR HAND PROTECTION
Always wear heavy-duty, non-slip gloves when
handling this unit.
• VOLTS - Voltage
V
• THROWN OBJECTS CAN CAUSE SEVERE INJURY
mall objects can be
WARNING:
propelled at high speed, causing injury.
• KEEP BYSTANDERS AWAY
WARNING:
especially children and pets, at least 50 feet (15 m)
from the operating area.
• BLOWERS – ROTATING IMPELLER BLADES CAN
CAUSE SEVERE INJURY
S
Keep all bystanders,
WARNING:Stop the unit and allow the
impeller to stop before changing tubes, cleaning or
performing any maintenance. Keep hands and feet
away from moving parts.
• DO NOT USE IN THE RAIN
WARNING:
environments. Never operate the unit in the rain or in
damp or wet conditions. Moisture is a shock hazard.
• DO NOT DISPOSE IN HOUSEHOLD TRASH
Recycle the battery or dispose of the battery
according to local, state and federal regulations.
Avoid dangerous
A
Hz
AC
Ah
Wh
• AMPERES - Current
• HERTZ - Frequency (cycles per second)
• ALTERNATING CURRENT - Type of current
• DIRECT CURRENT - Type of current
• AMPERE-HOUR - Measure of charge capacity
• WATT-HOUR - Measure of energy
7

KNOW YOUR UNIT
APPLICATIONS
Cleaning yards, garages, driveways, porches, patios, around
•
walls, fences and more
Battery*
Charge Meter Button
Shoulder Strap / Harness Loop
Blower
NO ASSEMBLY TOOLS REQUIRED
Charge Meter
Lights
Boost Button
Handle
Shoulder Strap / Harness Loop
Battery Port
Terminals
Battery Release
Button
Blower Tube
Trigger
Terminals
LED
Power Cord
Charging Dock
Battery Charger*
* The battery and battery charger are not included with model RM4030B.
8
SPECIFICATIONS
Approximate Unit Weight (without the battery). . . . . . . . . . . . . . . . . . . . . . . . . . . . . . . . . . . . . . . . . . . . . . . . . . . . . . . . 5.5 - 6.5 lbs. (2.5 - 3.0 kg)
ir Volume* (normal / boost) . . . . . . . . . . . . . . . . . . . . . . . . . . . . . . . . . . . . . . . . . . . . . . . . . . . . . . . . . . . . . . . . . . . 345 / 415 cfm (9 / 11 m
A
Air Speed (Peak)* (normal / boost) . . . . . . . . . . . . . . . . . . . . . . . . . . . . . . . . . . . . . . . . . . . . . . . . . . . . . . . . . . . . 110 / 135 mph (175 / 215 km/h)
Air Speed (Average)* (normal / boost) . . . . . . . . . . . . . . . . . . . . . . . . . . . . . . . . . . . . . . . . . . . . . . . . . . . . . . . . . . . 90 / 110 mph (140 / 175 km/h)
Battery Type (Model RM4130) . . . . . . . . . . . . . . . . . . . . . . . . . . . . . . . . . . . . . . . . . . . . . . . . . . . . . . . . . . . . . . . . . . . . . . 40V, 2.5 Ah Lithium-Ion
Battery Type (Model RM4140) . . . . . . . . . . . . . . . . . . . . . . . . . . . . . . . . . . . . . . . . . . . . . . . . . . . . . . . . . . . . . . . . . . . . . . 40V, 4.0 Ah Lithium-Ion
attery Type (Model RM4150) . . . . . . . . . . . . . . . . . . . . . . . . . . . . . . . . . . . . . . . . . . . . . . . . . . . . . . . . . . . . . . . . . . . . . . 40V, 5.0 Ah Lithium-Ion
B
Approximate Battery Weight (Model RM4130) . . . . . . . . . . . . . . . . . . . . . . . . . . . . . . . . . . . . . . . . . . . . . . . . . . . . . . . 1.9 - 2.4 lbs. (0.9 - 1.1 kg)
Approximate Battery Weight (Model RM4140) . . . . . . . . . . . . . . . . . . . . . . . . . . . . . . . . . . . . . . . . . . . . . . . . . . . . . . . 2.9 - 3.4 lbs. (1.3 - 1.5 kg)
Approximate Battery Weight (Model RM4150) . . . . . . . . . . . . . . . . . . . . . . . . . . . . . . . . . . . . . . . . . . . . . . . . . . . . . . . 3.0 - 3.5 lbs. (1.4 - 1.6 kg)
Optimum Battery Charging Temperature . . . . . . . . . . . . . . . . . . . . . . . . . . . . . . . . . . . . . . . . . . . . . . . . . . . . . . . . . . . . 32° to 104° F (0° to 40° C)
ptimum Battery Storage Temperature . . . . . . . . . . . . . . . . . . . . . . . . . . . . . . . . . . . . . . . . . . . . . . . . . . . . . . . . . . . . . 64° to 73° F (18° to 23° C)
O
Optimum Battery In-Use Temperature . . . . . . . . . . . . . . . . . . . . . . . . . . . . . . . . . . . . . . . . . . . . . . . . . . . . . . . . . . . . . . 32° to 113° F (0° to 45° C)
Battery Charger Input . . . . . . . . . . . . . . . . . . . . . . . . . . . . . . . . . . . . . . . . . . . . . . . . . . . . . . . . . . . . . . . . . . . . . . . . . . . . . . . 120 V 60 Hz AC only
Battery Charger Output . . . . . . . . . . . . . . . . . . . . . . . . . . . . . . . . . . . . . . . . . . . . . . . . . . . . . . . . . . . . . . . . . . . . . . . . . . . . . . . . . . 1.8 A 40 V DC
Approximate Charging Time (Model RM4130). . . . . . . . . . . . . . . . . . . . . . . . . . . . . . . . . . . . . . . . . . . . . . . . . . . . . . . . . . . . . . . . . . . 105 minutes
Approximate Charging Time (Model RM4140). . . . . . . . . . . . . . . . . . . . . . . . . . . . . . . . . . . . . . . . . . . . . . . . . . . . . . . . . . . . . . . . . . . 135 minutes
Approximate Charging Time (Model RM4150). . . . . . . . . . . . . . . . . . . . . . . . . . . . . . . . . . . . . . . . . . . . . . . . . . . . . . . . . . . . . . . . . . . 162 minutes
Approximate Battery Charger Weight. . . . . . . . . . . . . . . . . . . . . . . . . . . . . . . . . . . . . . . . . . . . . . . . . . . . . . . . . . . . . 1.25 - 1.75 lbs. (0.6 - 0.8 kg)
All specifications are based on the latest product information available at the time of printing. We reserve the right to make changes at any
time without notice.
* Measured per ANSI B175.2.
3
/
min)
WARNING:
damage to the unit, never assemble, disassemble or adjust
the unit while it is running. Always turn the unit off and
remove the battery to prevent the unit from starting
accidentally. Always allow the unit to cool before
assembling, disassembling or making any adjustments.
To prevent serious personal injury and
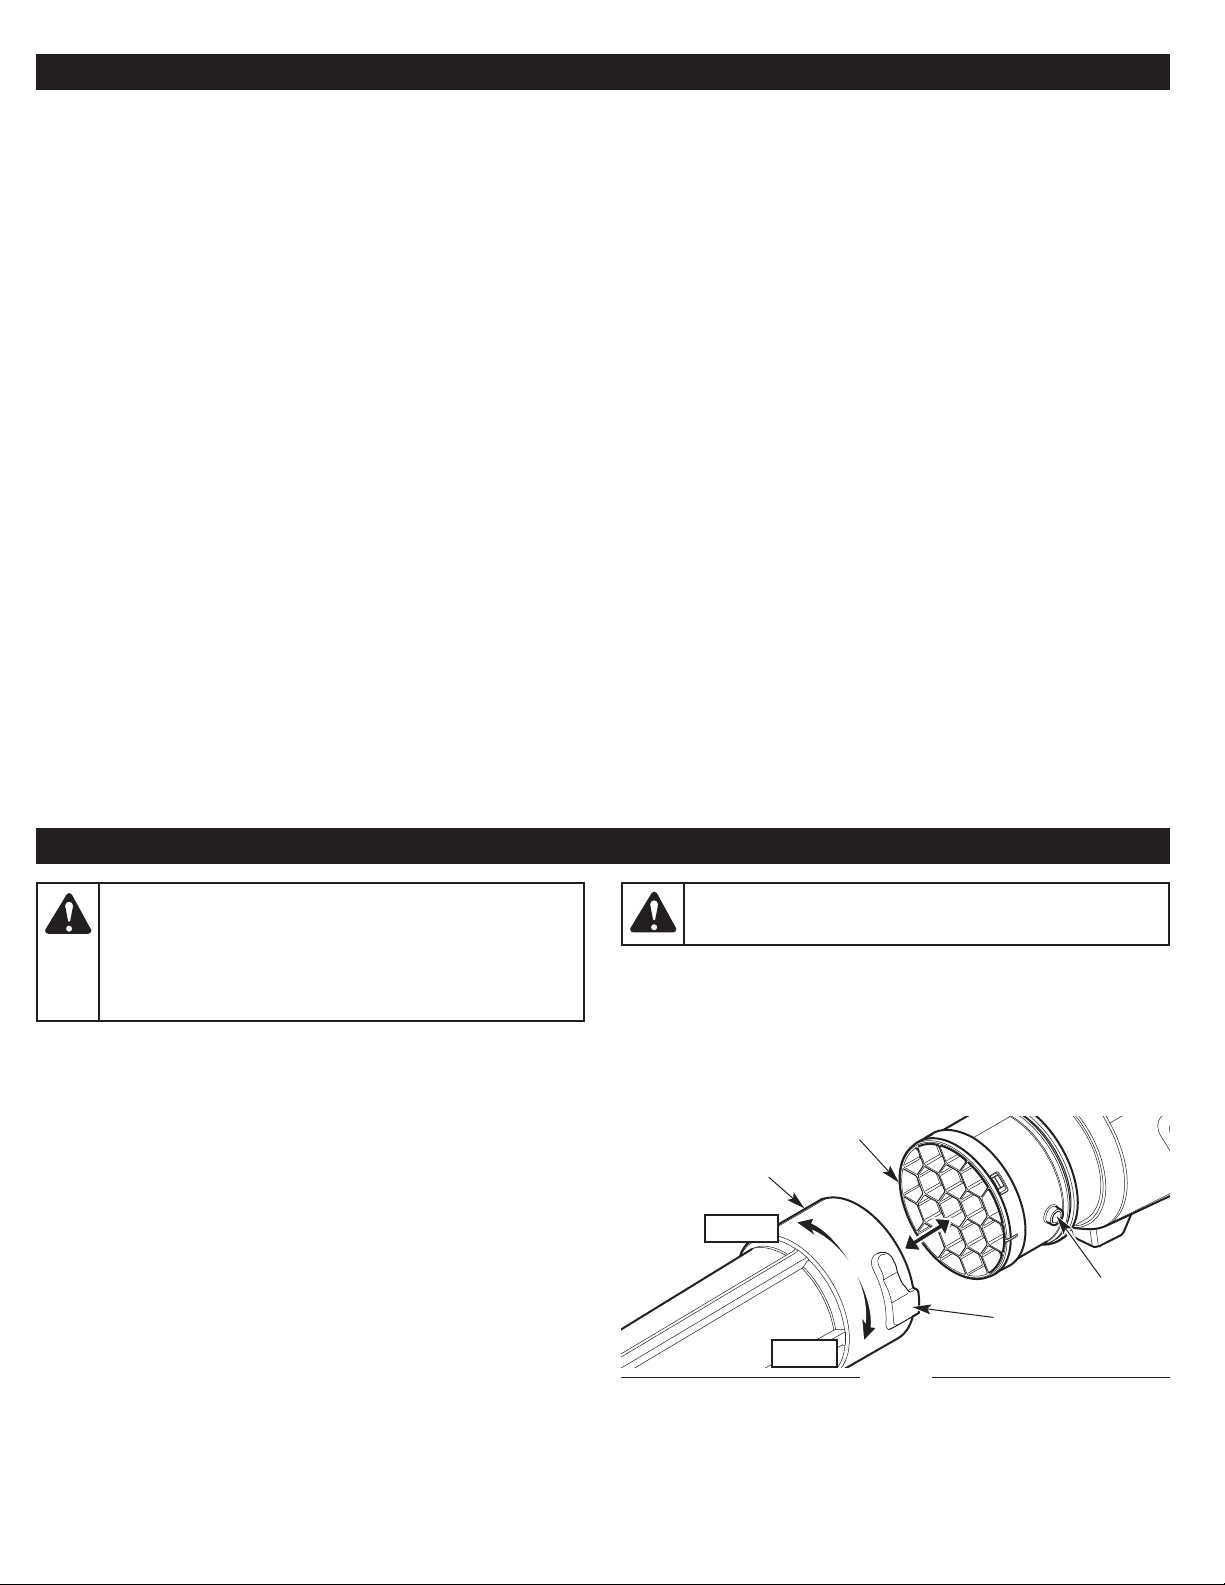
INSTALLING AND REMOVING THE BLOWER TUBE
Installing the Blower Tube
1. Set the unit on a flat, level surface.
2. Align the slot on the blower tube with the tab on the blower
outlet (Fig. 1).
3. Push the blower tube onto the blower outlet.
4. Hold the handle firmly for leverage. Turn the blower tube
clockwise until it locks into place (Fig. 1).
Removing the Blower Tube
1. Set the unit on a flat, level surface.
2. Hold the handle firmly for leverage. Turn the blower tube
counterclockwise to unlock it from the blower outlet (Fig. 1).
3. Remove the blower tube from the blower outlet.
ASSEMBLY
WARNING:
operate the unit without the blower tube firmly installed.
Blower Tube
Unlock
To prevent serious personal injury, never
Blower Outlet
Slot
Lock
Fig. 1
Tab
9
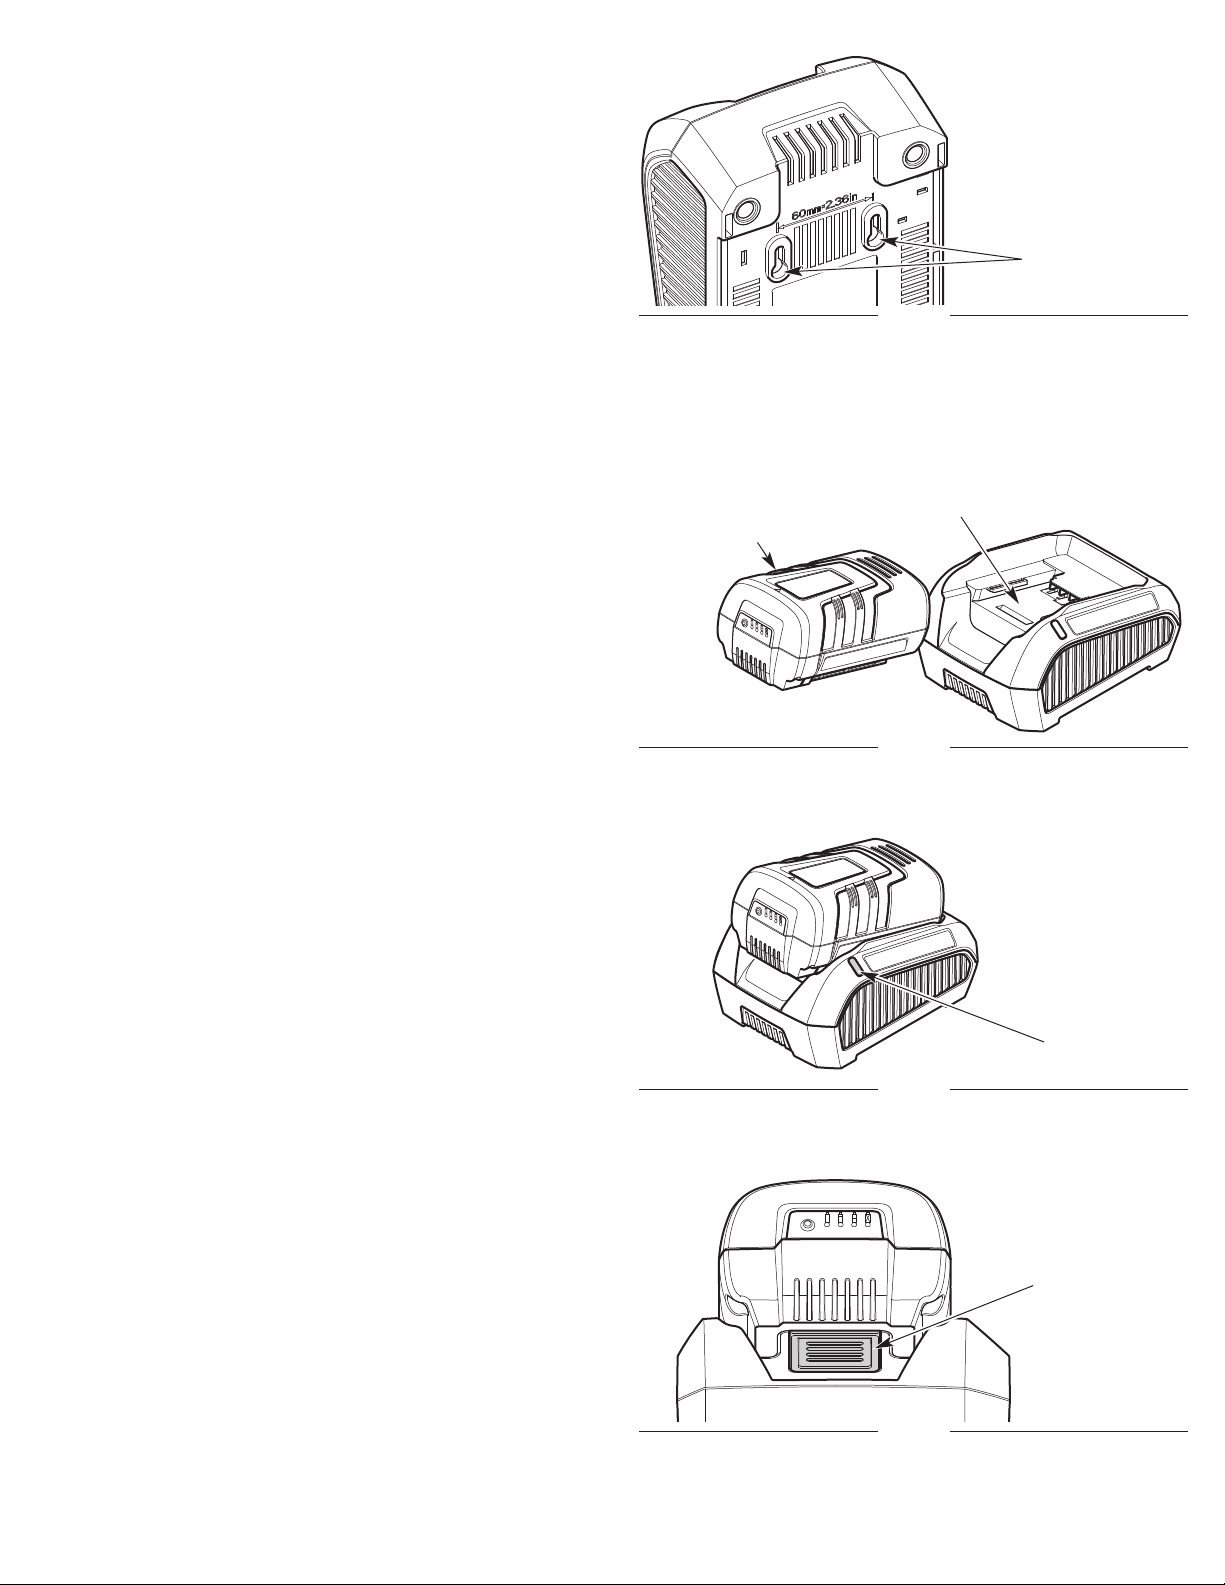
WALL-MOUNTING THE CHARGER (OPTIONAL)
The battery charger can be mounted to a permanent surface, such
s a wall or work bench. Use mounting fasteners (not included)
a
capable of supporting the combined weight of the battery and
battery charger. Wall-mounting holes are located on the bottom of
the charger (Fig. 2).
Wall-Mounting
Holes
Fig. 2
CHARGING THE BATTERY
NOTE: The battery is not shipped fully charged.
NOTE: Lithium-ion batteries will not develop a memory and may be
charged at any time.
For maximum run time, fully charge the battery before each use.
1. Plug the battery charger into an appropriate power outlet. The
LED should turn red (constant) (Fig. 4). If it does not:
• Make sure the battery charger is fully plugged into an
appropriate power outlet.
• Make sure the power outlet is functioning by testing it with
another electrical device.
2. Insert the battery into the charging dock (Fig. 3). Push the
battery firmly until it locks into place.
3. Examine the LED. The LED will indicate the battery status:
• Green (blinking): The battery is charging. Charge the battery
until the green light stops blinking.
• Green (constant): The battery is fully charged.
• Red (blinking - slow): The battery and/or charger are too hot
or too cold. Make sure the battery and charger are in an
environment between 32° and 104° F (0° and 40° C). Allow
time for the battery and/or charger to warm up or cool down.
• Red (blinking - fast): The battery is no longer functional. Refer
to the Warranty section for replacement information.
• Red (constant): The battery is not charging. Remove the
battery. Make sure the terminals on the battery and battery
charger are clean. Re-insert the battery into the charging dock.
Push the battery firmly until it locks into place.
4. To maximize the life of the battery, the battery charger will turn
off when charging is complete. Once the battery is fully charged,
remove it from the battery charger. Optionally, the battery can be
stored in the battery charger, but the battery charger should be
unplugged from the power outlet.
To remove the battery: Hold the battery charger in place with
one hand. Press the battery release button with the other hand
(Fig. 5). Slide the battery out of the charging dock.
Charging Dock
Battery
Fig. 3
LED
Fig. 4
Battery Release
Button
10
Fig. 5
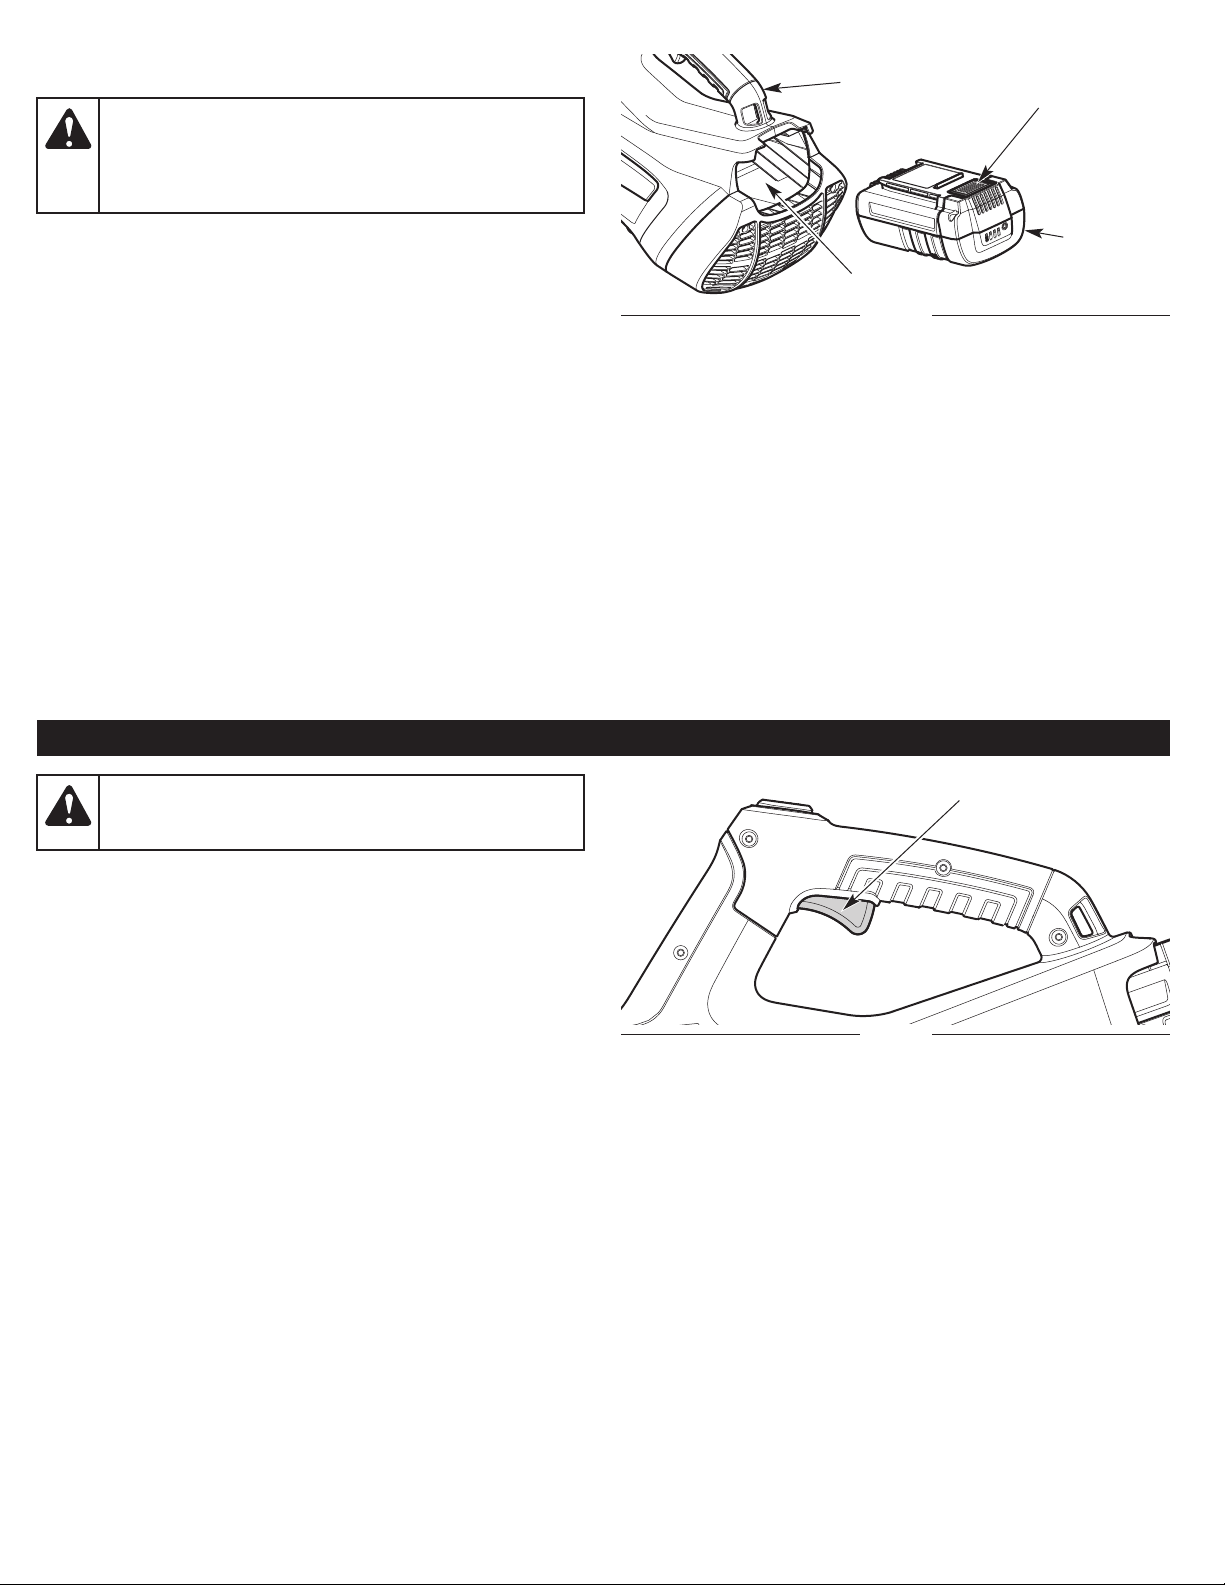
INSTALLING AND REMOVING THE BATTERY
WARNING:
prevent serious injury, DO NOT squeeze the trigger when
installing or removing the battery. Refer to Starting and
Stopping. Remove the battery from the unit when it is not
in use.
Avoid accidentally starting the unit. To
Handle
Battery Release
Button
Installing the Battery
1. Grasp the handle firmly (Fig. 6). DO NOT squeeze the trigger.
Refer to Starting and Stopping.
2. Slide the battery into the battery port (Fig. 6). Push the battery
irmly until the battery locks into place (Fig. 6). There should be
f
an audible “click.”
. Gently pull the battery to make sure it is securely locked in place.
3
Removing the Battery
1. Grasp the handle firmly (Fig. 6). DO NOT squeeze the trigger.
Refer to Starting and Stopping.
2. Press the battery release button to unlock the battery (Fig. 6).
3. Pull the battery out of the battery port (Fig. 6).
NOTE: It may require a strong pull to remove the battery.
STARTING AND STOPPING
WARNING:
directed toward people, animals, windows, automobiles or
loose debris.
When starting the unit, make sure it is not
Battery
Battery Port
Fig. 6
Trigger
STARTING INSTRUCTIONS
1. Install the battery. Refer to Installing the Battery.
2. Squeeze and hold the trigger to start the unit (Fig. 7).
3. Squeeze the trigger to the degree needed for the operation.
STOPPING INSTRUCTIONS
1. Release the trigger (Fig. 7).
2. Wait for all moving parts to come to a complete stop.
Fig. 7
11
OPERATION
WARNING:
conditions.
Do not expose power tools to rain or wet
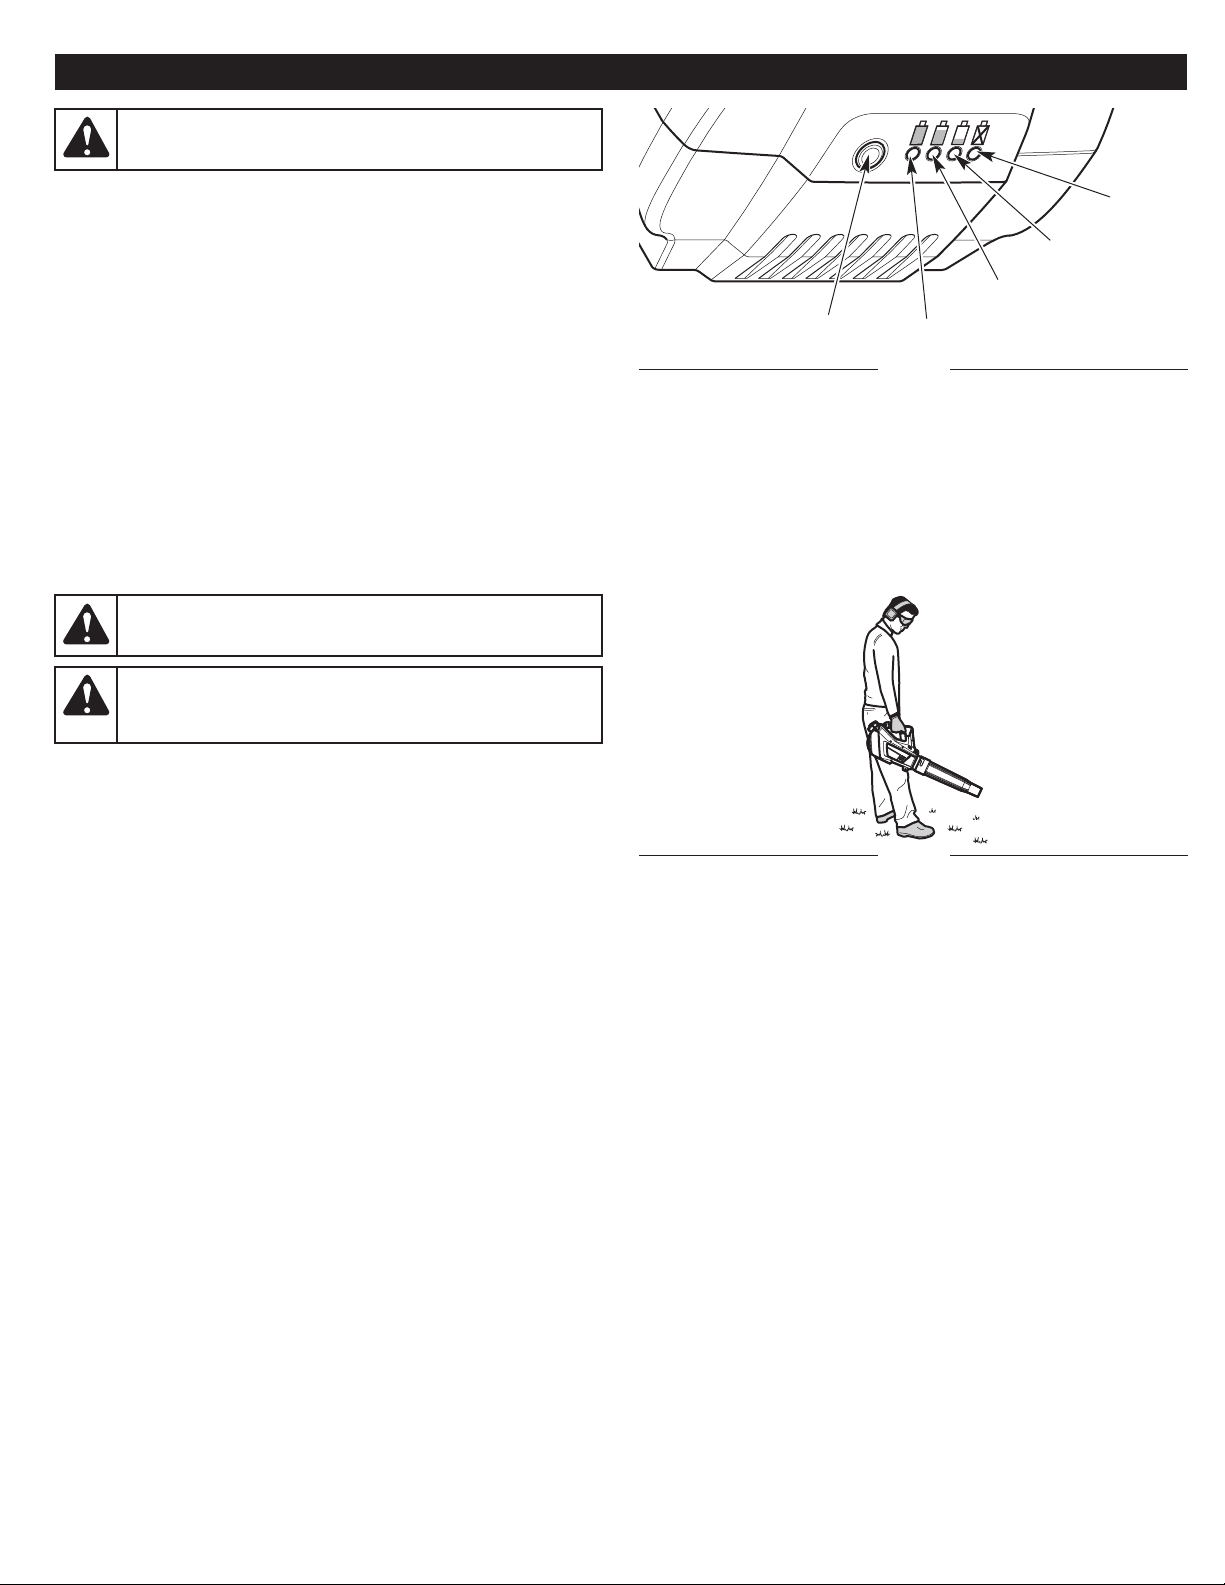
CHECKING THE BATTERY CHARGE LEVEL
1. Press the charge meter button (Fig. 8).
2. One or more of the charge meter lights should illuminate (Fig. 8).
The number and color of the lights will indicate the current
battery charge level:
• 3 Green Lights = 66 - 100% Charge
• 2 Green Lights = 33 - 66% Charge
1 Green Light = 1 - 33% Charge
•
• 1 Red Light = 0% Charge
3. If the red light illuminates, charge the battery before any further use.
NOTE: While in use, lithium-ion batteries provide power with
minimal power fade. When the battery is fully discharged, it will
immediately cut power to the unit and require charging.
WARNING:
operate the unit without the blower tube firmly installed.
WARNING:
protection to reduce the risk of injury when operating this unit.
Wear a face mask or dust mask if the operation is dusty.
To prevent serious personal injury, never
Always wear eye, hearing, hand, foot and body
Charge Meter Button
0%
1% - 33%
33% - 66%
66% - 100%
Fig. 8
HOLDING THE UNIT
• Stand in the operating position (Fig. 9). Stand up straight. Do not
bend over.
• Keep feet apart and firmly planted.
• Hold the unit with a firm grip.
• Hold the unit at waist level.
TIPS FOR BEST RESULTS
• Conserve water by using the blower instead of a hose to
perform many outdoor cleaning actions.
• Operate the unit only at reasonable hours, not early in the
morning or late at night when people might be disturbed. Comply
with times listed in local ordinances. Usual recommendations are
9:00 a.m. to 5:00 p.m., Monday through Saturday.
• To reduce noise levels, operate the unit at the lowest speed
needed to do the job. Limit the number of pieces of power
equipment used at any one time.
• Use rakes or brooms to loosen debris before operation.
• In dusty conditions, slightly dampen surfaces.
• Watch out for children, pets, open windows and freshly washed
cars. Blow debris safely away. Never direct the unit toward
anyone while the unit is in operation.
• Sweep the unit from side to side with the blower tube several
inches above the ground. Slowly advance, keeping the
accumulated debris in front of the operator.
• Clean up after operation. Dispose of debris appropriately.
• Remove the battery from the unit when it is not in use.
Fig. 9
12

SING THE BOOST BUTTON
U
• For tough jobs: Press and hold the boost button for maximum
power.
• For most jobs: Release the boost button to conserve energy
and maximize runtime.
MAINTENANCE
Boost Button
Fig. 10
WARNING:
maintenance on the unit while it is running. Always remove
the battery to prevent the unit from starting accidentally.
Always allow the unit to cool before maintaining the unit.
Before maintaining the battery charger, always unplug it
from the power outlet.
To prevent serious injury, never perform
MAINTAINING THE BATTERY CHARGER
• Keep the battery charger clean and clear of debris. Do not allow
foreign material into the charging dock or onto the terminals (Fig.
11). Inspect the battery charger for foreign material before each use.
• Make sure the charger has not been shorted by debris. Inspect
the terminals for soot and signs of melting. Do not attempt to
use a shorted charger.
Charging Dock
Terminals
Fig. 11
13
CLEANING AND STORAGE
CLEANING
ARNING:
W
unit while it is running. Always remove the battery to
prevent the unit from starting accidentally. Always allow the
unit to cool before cleaning the unit. Always unplug the
battery charger before cleaning the battery charger.
WARNING:
to clean the unit, battery or battery charger. Do not douse
the unit with water. Do not submerge the unit in water or
any other liquid. Do not use strong detergents. Household
leaners that contain aromatic oils such as pine and lemon,
c
and solvents such as kerosene, can damage plastic.
• Use a small brush or clean, dry cloth to clean the outside of the
unit, battery and battery charger.
To prevent serious injury, never clean the
To prevent serious injury, do not use water
STORAGE
• Remove the battery from the unit.
• Allow the unit, battery and/or battery charger to cool.
• Thoroughly clean the unit, battery and battery charger. Inspect
them for any loose or damaged parts. Replace damaged parts
nd tighten loose screws, nuts or bolts.
a
• Lock up the unit, battery and battery charger to prevent
unauthorized use or damage.
• Store the unit, battery and battery charger indoors, in a dry, wellventilated area.
• Store the battery and battery charger in an area that is between
5 and 75˚ F (18 and 24˚ C).
6
• Always unplug the battery charger when it is not in use.
• Store the unit, battery and battery charger out of the reach of
children.
• If the battery is left unused for more than two months, fully
charge the battery before use.
14

TROUBLESHOOTING
PROBLEM SOLUTION
THE BATTERY WILL NOT CHARGE
The battery charger is not plugged in Plug the battery charger into a 120V 60hz AC source
The battery is not fully inserted into the battery charger
he battery and/or charger are too hot or too cold
T
The battery and/or battery charger are no longer functional Refer to the Warranty section for replacement information
THE BATTERY DIES QUICKLY
The battery is not fully charged Charge the battery completely
The battery and/or battery charger are no longer functional Refer to the Warranty section for replacement information
THE MOTOR WILL NOT RUN
The battery lacks sufficient charge Charge the battery completely
The battery is not installed correctly Remove and reinstall the battery
Remove and then reinsert the battery into the battery charger
completely
Make sure the battery and charger are in an environment between
2° and 104° F (0° and 40° C). Allow time for the battery and/or
3
charger to warm up or cool down.
THE MOTOR STOPS WHILE IN USE, BUT THE BATTERY STILL HAS SUFFICIENT CHARGE
Device protection systems have engaged
If further assistance is required, contact an authorized service center.
Remove the battery, allow it to cool for 30 seconds, then reinstall
the battery
15

WARRANTY
REMINGTON LLC
LIMITED WARRANTY
Limited Warranty
The limited warranty set forth herein is given by Remington LLC with respect to new battery-powered, Remington-branded products
(hereinafter “Product”) purchased and used in the United States and/or Canada to the Initial Purchaser (as defined herein). This Product is
not intended for rental or commercial use.
Scope Of The Limited Warranty
Remington LLC offers the following limited warranty to the Initial Purchaser for residential or otherwise non-commercial use: except for the
Exclusions (defined herein), during the Warranty Period (as defined herein), this Product (exclusive of the battery and the battery charger) will
be free from manufacturing defects, including workmanship and materials. The “Initial Purchaser” is the first person to purchase this new
Product from an authorized Remington dealer, distributor and/or retailer of such products. This limited warranty is non-transferable. Subject
to the Exclusions and except as otherwise set forth herein, the limited warranty period for this new Product purchased by the Initial
Purchaser is three (3) years from the date of purchase, as shown on the original sales receipt for the Product (“Warranty Period”).
Defects In Workmanship Or Materials
Subject to the Exclusions and except as otherwise set forth herein, this Product is warranted to be free from manufacturing defects in either
workmanship or materials for the Warranty Period. During the Warranty Period, Remington LLC will, at its option, either repair or replace any
original part that is covered by this limited warranty and is determined to be defective in workmanship or material.
To Qualify For This Limited Warranty, This Product:
1. Must have been purchased from an authorized retailer.
2. Must have been purchased within the United States or Canada by the Initial Purchaser.
3. Must have been used for residential (non-commercial) purposes only.
4. Must have been used in a manner consistent with the normal and proper intended use for this Product.
Who Can Perform Repairs Under This Warranty?
In order to qualify for the limited warranty as set forth herein, the repairs made under this warranty must be performed by an authorized
Remington warranty service provider.
How To Get Service Under This Limited Warranty.
To locate a Remington warranty service provider, contact your authorized Remington dealer, distributor, or retailer or contact Remington LLC
at P.O. Box 361032, Cleveland, Ohio 44136-0019 or call 1-866-206-2707 or log on to our website at www.remingtonpowertools.com. In
Canada, contact MTD Products Limited, 97 Kent Avenue, Kitchener, ON N2G 3R2, or call 1-877-696-5533 or log on to the above website.
This limited warranty is provided by Remington LLC and is the only product warranty provided by Remington LLC for this Product. A COPY
OF YOUR SALES RECEIPT IS REQUIRED FOR WARRANTY SERVICE.
What This Limited Warranty Does Not Cover.
This Limited Warranty Does Not Cover The Following (the “Exclusions”):
1. Product purchased outside of the United States or Canada.
2. Damage due to lack of maintenance and/or improper maintenance as described in the operator’s manual.
3. Normal wear and tear resulting from use of the Product.
16

4. Normal Wear Parts (as defined herein) are warranted to be free from defects in material and workmanship for a period of thirty (30) days
from the date of original purchase by the Initial Purchaser. For the purpose of this Limited Warranty, “Normal Wear Parts” include, but are
not limited to items such as: bump knobs, outer spools, cutting line, inner reels, starter pulleys, starter ropes, drive belts, saw chains,
guide bars, cultivator tines and/or blades.
5. Use of the Product that is not consistent with the intended use thereof, as described in the operating instructions, including, but not
limited to, abuse, misuse and/or neglect of the Product or any use inconsistent with and/or non-compliant with instructions contained in
the operator’s manual.
6. Any Product that has been altered or modified in a manner not consistent with the original design of the Product or in a manner not
approved by Remington LLC.
7. Wheel rims (when so equipped), are covered for a period of three (3) months from the date of original purchase by the Initial Purchaser for
manufacturing defects.
8. The battery supplied with this Product is warranted to be free from defects in material and workmanship for a period of three (3) years
from the date of original purchase by the Initial Purchaser.
9. The battery charger supplied with this Product is warranted to be free from defects in material and workmanship for a period of three (3)
years from the date of original purchase by the Initial Purchaser.
This Warranty Does Not Cover And Remington LLC Disclaims Any Responsibility For Matters Including, But Not Limited To, The
Following:
1. Loss of time or loss of use of the Product.
2. Transportation costs and other expenses incurred in connection with the transport of the Product to and from the authorized Remington
warranty service provider.
3. Any loss or damage to other equipment or personal items.
4. Damages caused by improper maintenance or the use of other than the specified fuel, oil or lubricants as approved in the operator’s
manual.
5. Damage resulting from the installation or use of any accessory or part not approved by Remington LLC for use with the Product.
Limitations:
1. THERE ARE NO IMPLIED WARRANTIES, INCLUDING, BUT NOT LIMITED TO, ANY IMPLIED WARRANTY OF MERCHANTABILITY OR
FITNESS FOR A PARTICULAR PURPOSE. NO WARRANTY SHALL APPLY AFTER THE APPLICABLE WARRANTY PERIOD AS SET
FORTH ABOVE AS TO THE PARTS AS IDENTIFIED. NO OTHER EXPRESS WARRANTY OR GUARANTY, WHETHER WRITTEN OR ORAL,
EXCEPT AS MENTIONED ABOVE, GIVEN BY ANY PERSON OR ENTITY, INCLUDING A DEALER OR RETAILER, WITH RESPECT TO ANY
PRODUCT SHALL BIND REMINGTON LLC. DURING THE WARRANTY PERIOD, THE EXCLUSIVE REMEDY IS REPAIR OR
REPLACEMENT OF THE DEFECTIVE PART, AS SET FORTH ABOVE. (SOME STATES DO NOT ALLOW LIMITATIONS ON HOW LONG AN
IMPLIED WARRANTY LASTS, SO THE ABOVE LIMITATION MAY NOT APPLY TO YOU.)
2. THE PROVISIONS AS SET FORTH HEREIN PROVIDE THE SOLE AND EXCLUSIVE REMEDY ARISING FROM THE SALE. REMINGTON
LLC SHALL NOT BE LIABLE FOR INCIDENTAL OR CONSEQUENTIAL LOSS OR DAMAGES INCLUDING, WITHOUT LIMITATION, FOR
TRANSPORTATION OR FOR RELATED EXPENSES, OR FOR RENTAL EXPENSES TO TEMPORARILY REPLACE A WARRANTED
PRODUCT. (SOME STATES DO NOT ALLOW THE EXCLUSION OR LIMITATION OF INCIDENTAL OR CONSEQUENTIAL DAMAGES, SO
THE ABOVE EXCLUSION OR LIMITATION MAY NOT APPLY TO YOU.)
3. In no event shall recovery of any kind be greater than the amount of the purchase price of the Product sold. Alteration of the safety
features of the Product shall void this limited warranty. You assume the risk and liability for loss, damage, or injury to you and your
property and/or to others and their property arising out of the use or misuse or inability to use the Product.
How State Law Relates To This Warranty.
This limited warranty gives you specific legal rights, and you may also have other rights, which vary from state to state.
17
 Loading...