

Page 1
SAFETY
• SAFETY ALERT SYMBOLS •
Safety alert symbols are used to draw your attention to possible dangers. These symbols, and
their explanations, deserve your careful attention and understanding. The safety warnings do not
by themselves eliminate any danger. The instructions or warnings they give are not substitutes
for proper accident prevention measures. These safety instructions are not meant to cover every
possible condition that may occur. If questions arise, please call the Customer Support Department
at 1-866-206-2707 (U.S.) or 1-877-696-5533 (Canada).
Operator’s Manual
RM115ST
Electric Trimmer
SYMBOL MEANING
DANGER: Signals an EXTREME hazard.
Failure to obey a safety DANGER signal WILL result in serious injury or death to
yourself or to others.
WARNING: Signals a SERIOUS hazard.
Failure to obey a safety WARNING signal CAN result in serious injury to yourself or
to others.
CAUTION: Signals a MODERATE hazard.
Failure to obey a safety CAUTION signal MAY result in property damage or injury to
yourself or to others.
IMPORTANT! Signals special mechanical information.
NOTE: Signals additional important general information.
• IMPORTANT SAFETY INSTRUCTIONS •
READ ALL INSTRUCTIONS BEFORE OPERATING
WARNING: When using an electric unit, basic safety precautions should
always be followed to reduce the risk of fi re, electric shock and injury to persons,
including the following:
TABLE OF CONTENTS
Service ................................................................................................................................................... 1
Safety ..................................................................................................................................................... 1
Know Your Unit ...................................................................................................................................... 2
Assembly ............................................................................................................................................... 3
Starting and Stopping ............................................................................................................................ 3
Operation ............................................................................................................................................... 3
Line Installation ...................................................................................................................................... 4
Cleaning and Storage ............................................................................................................................ 4
Troubleshooting ..................................................................................................................................... 4
Specifi cations ........................................................................................................................................ 4
Warranty ............................................................................................................................................... 16
All information, illustrations and specifi cations in this manual are based on the latest product information
available at the time of printing. We reserve the right to make changes at any time without notice.
Copyright© 2011 MTD SOUTHWEST INC, All Rights Reserved.
SERVICE
DO NOT RETURN THIS UNIT TO THE RETAILER. PROOF OF PURCHASE WILL BE REQUIRED
FOR WARRANTY SERVICE.
For assistance regarding the assembly, controls, operation or maintenance of the unit, please call the
Customer Support Department: 1-866-206-2707 (U.S.) or 1-877-696-5533 (Canada)
Additional information about the unit can be found on our website:
www.remingtonpowertools.com
Please call the Customer Support Department for replacement parts. When servicing, use only
identical replacement parts.
CALIFORNIA PROPOSITION 65
WARNING: Battery posts, terminals and certain fi nished components
contain lead, lead compounds and chemicals known to the State of California to cause
cancer and birth defects or other reproductive harm. Wash hands after handling.
GENERAL SAFETY
• DO NOT rely exclusively upon the safety devices built into the unit.
• DO NOT allow the unit to be used as a toy.
• DO NOT use the unit in the presence of fl ammable liquids or gases.
• DO NOT attempt operations beyond the operator’s capacity or experience.
• DO NOT over reach.
• DO NOT operate the unit on unstable surfaces, such as trees, ladders, slopes or rooftops. Be very
careful when using the unit on stairs.
• DO NOT force the unit. It will do a better, safer job when used at the intended rate.
• Please read the entire operator’s manual carefully before attempting to assemble, operate or
maintain the unit.
• Follow all safety instructions. Failure to do so can result in property damage or serious injury to
yourself and/or others.
• Be thoroughly familiar with the controls and the proper use of the unit. Know how to stop the unit
and disengage the controls quickly.
• Stay alert! Do not operate the unit when tired, ill or under the infl uence of alcohol, drugs or medication.
• Never allow children or teens under the age of 15 to operate the unit, except teens guided by an
adult. Never allow adults to operate the unit without proper instruction.
• Keep these instructions. Refer to them often and use them to instruct other users. If loaning
someone this unit, also loan them these instructions.
• Keep bystanders, especially children and pets, at least 50 feet (15 m) away. If anyone enters the
work area, stop the unit!
• Never allow bystanders to contact the unit or extension cord.
• Keep the work area clean. Cluttered areas invite injuries. Do not start the operation until the work
area is clear and free from obstructions and there is secure footing.
• Always wear appropriate eye and ear protection when operating this unit. Wear safety goggles, or
safety glasses with side shields, that are marked as meeting ANSI Z87.1-1989 standards. Failure
to do so could result in serious eye injury caused by thrown objects. If the operation is dusty, wear
a face mask or dust mask.
• Dress appropriately. Wear non-slip protective gloves and boots. Do not wear loose clothing,
jewelry, short pants, sandals or go barefoot. Secure hair above shoulder level to prevent
entanglement in moving parts.
• Only use the unit in daylight or good artifi cial light.
• Use the right tool. Only use the unit for its intended purpose. Only use the unit as described in this
manual.
• Always hold the unit with both hands when the motor is running. Use a fi rm grip with thumbs and
fi ngers encircling the handle(s) and/or grip(s).
• Keep hands, face and feet away from openings and moving parts. Do not touch or try to stop any
moving parts while they are in motion.
• Keep proper footing and balance at all times.
• Always stop the motor when operation is delayed, before setting down the unit or when walking
from one location to another. Make sure the unit comes to a complete stop.
• To avoid accidental starting, never carry the unit with fi ngers on the switch trigger.
• Always carry the unit by the handle(s) with the unit disconnected from the power source.
• Always make sure the switch trigger is disengaged before connecting or disconnecting the unit
from the power source.
• Make sure that all guards and safety attachments are properly installed before operating the unit.
• This unit is intended for infrequent use by homeowners. It is not intended for prolonged use.
MAINTENANCE AND STORAGE SAFETY
• DO NOT operate a unit that is damaged, improperly adjusted or not completely and securely
assembled. Be sure that the unit stops when the switch trigger is released. Do not use the unit if
the switch trigger does not turn the unit on and off properly.
• DO NOT perform maintenance procedures other than those described in this manual. Do not
attempt to repair; there are no user serviceable parts inside.
• If the unit is not working as it should, has been dropped, damaged, left outdoors or dropped into
water, do not use the unit.
• If the unit strikes or becomes entangled with a foreign object, stop the unit immediately and check
for damage.
• Follow all maintenance instructions in this manual.
• Before inspecting, servicing, cleaning, storing, transporting or replacing any parts on the unit:
1. Make sure the motor is off.
2. Make sure all moving parts have stopped.
3. Disconnect the unit from the power source.
4. Allow the unit to cool.
• Never remove, modify or make inoperative any safety device furnished with the unit.
• Frequently inspect the unit for damage. Before further use, any damaged part should be carefully
checked to determine that it will operate properly and perform its intended function. Check for
alignment of moving parts, binding of moving parts, breakage of parts and any other conditions
that may affect its operation. Damaged parts should be properly repaired or replaced.
769-06403 P00 01/11
Page 2
SAFETY
SAFETY
• If the unit starts to vibrate abnormally, stop the motor, disconnect the unit from the power source
and allow the unit to cool. Then inspect the unit for the cause of the vibration. Vibration is generally
an indicator of trouble.
• Use only original manufacturer replacement parts and accessories, which are designed
specifi cally to enhance the performance and maximize the safe operation of the product. Failure
to do so may cause poor performance and possible injury.
• Be sure to secure the unit while transporting.
• When not in use, store the unit indoors in a locked-up and dry, or high and dry, place to prevent
unauthorized use or damage. Keep out of the reach of children.
• To avoid serious personal injury and/or damage to the unit, keep the unit clean of vegetation and
other materials that may clog, gum or bind moving parts. Keep the handles dry, clean and free from
debris, oil and grease. Clean the unit after each use.
• Never douse or spray the unit with water or any other liquid. Do not wash the unit with a hose; avoid
getting water in the motor and electrical connections. Do not use solvents or strong detergents.
ELECTRICAL SAFETY
• DO NOT handle the unit, plug(s) or cord(s) with wet hands.
• DO NOT expose the unit to rain. Do not use the unit in damp or wet locations or conditions.
• DO NOT operate the unit on wet surfaces.
• DO NOT abuse the extension cord or the power cord on the unit. Never pull or carry the unit by
the cord(s), use the cord(s) as a handle, close a door on a cord, pull the cord(s) around sharp
edges or corners or yank the cord(s) to disconnect the unit. Grasp the plug(s), not the cord(s), to
disconnect the unit.
• DO NOT modify the power cord, extension cord, power cord plug, extension cord plug or wall
outlet in any way.
• DO NOT use multiple extension cords.
• Keep the cords away from oil, water, sharp objects and heated surfaces.
• Keep the cords away from the cutting area and position the cords so that they will not be caught
on branches or other obstacles that may bind or entangle the cords during operation.
• Keep the cords away from the operator’s feet to prevent tripping.
• Make sure the cords are in good condition. Inspect the power cord and extension cord
periodically. Look closely for deterioration, cuts or cracks in the insulation. If the power cord is
damaged, have it repaired by an authorized service center. If the extension cord is damaged,
replace it. Do not use a damaged cord or plug.
• If the extension cord is damaged in any manner while plugged in, disconnect the extension cord
from the receptacle.
• Since the unit is double-insulated, a 2-wire extension cord (one without a ground) may be used.
However, a 3-wire extension cord (one with a ground) that uses a NEMA-type connector (parallel
blade, U ground) is recommended. Extension cords are available from local retailers. Use only
round-jacketed extension cords approved for outdoor use.
• Make sure the extension cord is heavy enough to carry the current drawn by the unit. An
undersized cord will cause a drop in line voltage resulting in loss of power and overheating. If in
doubt, use the next heavier gauge cord. The smaller the gauge number, the heavier the cord.
MINIMUM WIRE SIZE FOR EXTENSION CORDS
FOR 120 VOLT APPLIANCES USING 0-6 AMPS
Cord Length (feet) 25 50 100 150
Wire Size (AWG) 18 16 16 14
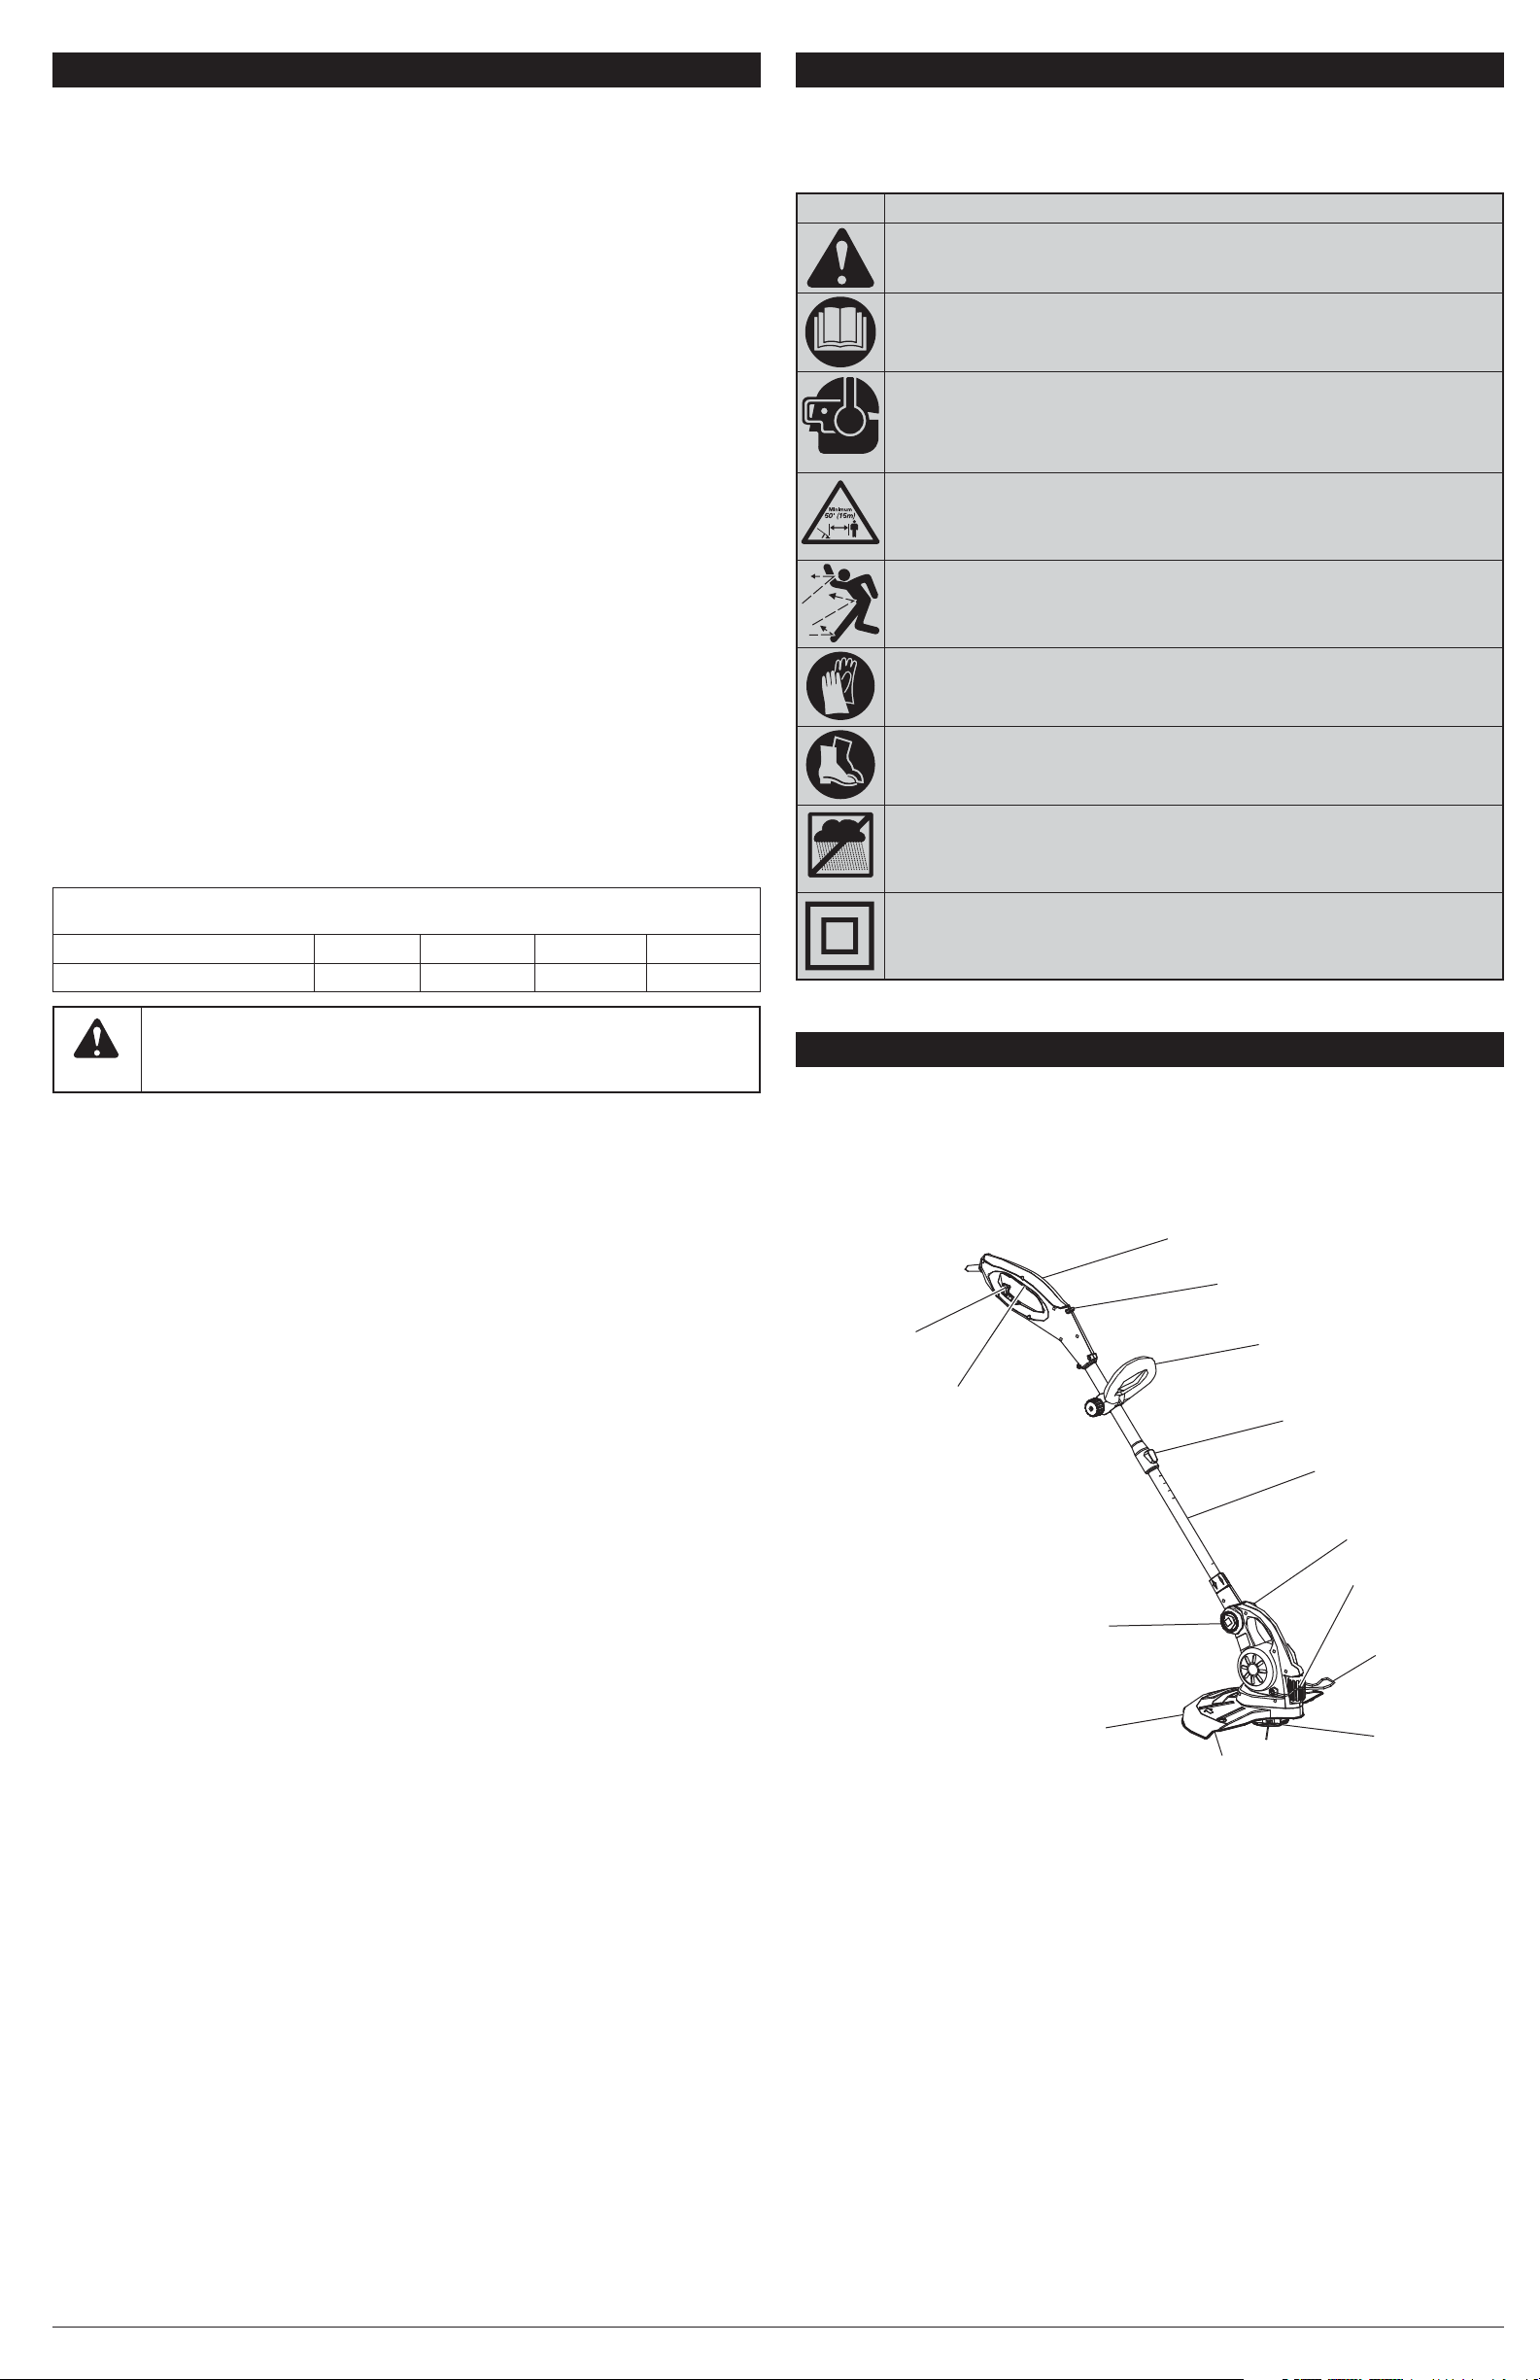
• SAFETY AND INTERNATIONAL SYMBOLS •
This operator’s manual describes safety and international symbols and pictographs that may appear
on this product. Read the operator’s manual for complete safety, assembly, operating, maintenance
and repair information.
SYMBOL MEANING
• SAFETY ALERT SYMBOL
Indicates danger, warning or caution. May be used in conjunction with other symbols
or pictographs.
• READ OPERATOR’S MANUAL
WARNING: Read the operator’s manual(s) and follow all warnings and safety
instructions. Failure to do so can result in serious injury to the operator and/or bystanders.
• WEAR EYE AND HEARING PROTECTION
WARNING: Thrown objects and loud noise can cause severe eye
injury and hearing loss. Wear eye protection meeting ANSI Z87.1-1989 standards and
ear protection when operating this unit. Use a full face shield when needed.
• KEEP BYSTANDERS AWAY
WARNING: Keep all bystanders, especially children and pets, at least
50 feet (15 m) from the operating area. If anyone enters the work area, stop the unit!
• THROWN OBJECTS AND ROTATING CUTTER CAN CAUSE SEVERE INJURY
WARNING: Small objects can be propelled at high speed, causing
injury. Keep away from the rotating rotor.
• WEAR SAFETY GLOVES
Wear non-slip, heavy-duty protective gloves when handling the unit.
• WEAR SAFETY FOOTWEAR
Wear non-slip safety footwear when using this equipment.
• DO NOT USE IN THE RAIN
WARNING: Avoid dangerous environments. Never operate your unit
in the rain, or in damp or wet conditions. Moisture is a shock hazard.
• DOUBLE INSULATED
Two systems of insulation are provided instead of grounding. There is no grounding
provided and no means of grounding should be added to the unit.
WARNING: To reduce the risk of electric shock, only use extension cords
suitable for outdoor use, such as SW-A, SOW-A, STW-A, STOW-A, SJW-A, SJOW-A,
SJTW-A or SJTOW-A cord types.
• To reduce the risk of electrical shock, this unit has a polarized plug (one blade is wider than the
other) and will require the use of a polarized extension cord. The power cord plug will fi t into
a polarized extension cord only one way. If the plug does not fi t fully into the extension cord,
reverse the plug. If the plug still does not fi t, obtain another polarized extension cord. A polarized
extension cord will require the use of a polarized wall outlet. This plug will fi t into the polarized wall
outlet only one way. If the plug does not fi t fully into the wall outlet, reverse the plug. If the plug
still does not fi t, contact a qualifi ed electrician to install the proper wall outlet.
• A nameplate on your unit indicates the voltage used. Never connect the unit to an AC voltage that
differs from this voltage.
• Ground Fault Circuit Interrupter (GFCI) protection should be provided on the circuit(s) or outlet(s)
that will be used with the unit. For an extra measure of safety, use receptacles with built-in GFCI
protection.
• To reduce the likelihood of disconnecting the extension cord from the unit, be sure to use the cord
restraint provided.
• To reduce the risk of electric shock, avoid body contact with grounded conductors, such as metal
pipes or wire fences.
• Unplug the unit from the power source when not in use.
Servicing a Double-Insulated Unit
• This is a double-insulated unit. Two systems of insulation are provided instead of grounding.
There is no grounding provided and no means of grounding should be added to the unit. Servicing
a double-insulated unit requires extreme care and knowledge of the system and should only
be done by qualifi ed service personnel. Replacement parts for a double-insulated unit must
be identical to the parts they replace. Failure to have a double-insulated unit repaired by an
authorized service technician with identical replacement parts could result in serious injury.
TRIMMER SAFETY
• The cutting head shield must always be in place while operating the unit. Do not operate the unit
without both trimming lines extended and the proper line installed. Do not extend the trimming line
beyond the length of the shield.
• Adjust the position of the D-handle to provide the best grip.
• Be sure the cutting head is not in contact with anything before starting the unit
• Use only 0.065 inch (1.65 mm) diameter replacement line. Never use metal-reinforced line, wire,
chain or rope. These can break off and become dangerous projectiles.
KNOW YOUR UNIT
APPLICATIONS
This unit may be used for the purposes listed below:
• Cutting grass and light weeds
• Edging
• Decorative trimming around trees, fences, etc.
No Tools Required!
Cord Hook
Switch Trigger
Shaft Angle
Adjustment Button
Rear Handle
Edging Conversion Button
D-Handle
Shaft Length
Adjustment Button
Shaft Housing
Shaft Angle
Adjustment Button
Edge Guide Wheel
Wire Guard
SAVE THESE INSTRUCTIONS
Cutting Head Shield
Cutting Head
Line Cutting Blade
2
Page 3
ASSEMBLY STARTING AND STOPPING
WARNING: Make sure the unit is disconnected from the power source before
assembling, disassembling or adjusting any components.
This unit requires assembly.
UNPACKING
• Carefully remove the product and any accessories from the box.
• Inspect the product carefully to make sure no breakage or damage occurred during shipping.
• Do not discard the packing material until you have carefully inspected and satisfactorily operated
the product.
• If any parts are damaged or missing, please call 1-866-206-2707 (U.S.) or 1-877-696-5533
(Canada) for assistance.
ASSEMBLING THE SHAFT
1. Remove and discard the rubber grommet (Fig. 1).
2. Align the arrows on the upper and lower shafts (Fig. 2).
3. While pushing the shaft length adjustment button up
toward the rear handle, slide the upper shaft over
the lower shaft until they lock together (Fig. 2).
NOTE: Once assembled, the upper and lower shafts
will not separate again.
Adjusting the Shaft Length
1. Grip the shaft housing fi rmly.
2. While pushing the shaft length adjustment button up
toward the rear handle, move the upper shaft up or
down to the desired length.
3. Release the shaft length adjustment button.
INSTALLING THE CUTTING HEAD SHIELD
1. Align the arrow on the cutting head shield with the
arrow on the motor housing (Fig. 3).
2. Twist the cutting head shield counterclockwise, in
the LOCK direction (Fig. 3), until it snaps into place.
Make sure the cutting head shield is assembled as
shown in the Know Your Unit section.
INSTALLING THE D-HANDLE
1. Remove the knob and bolt from the D-handle.
2. Push the D-handle down onto the upper shaft (Fig. 4).
Some force is required. The hex bolt hole in the handle
should be on the left side.
3. Insert the bolt into the hex hole in the handle and
push it through (Fig. 4). Screw the knob onto the
bolt. Do not tighten the knob completely.
4. While holding the unit in the operating position (Fig.
11), move the D-handle to the location that provides
the best grip. Place it a minimum of 6 inches (15.24
cm) from the end of the rear handle.
5. Tighten the knob until the D-handle is secure.
ADJUSTING THE SHAFT ANGLE
1. Squeeze the shaft angle adjustment buttons on both
sides of the motor housing (Fig. 5).
2. Rotate the shaft to one of the four settings, as
needed to reach under decks, bushes, etc.
CONVERTING TO EDGER MODE
1. Grip the shaft housing fi rmly.
2. Press the edger conversion button and rotate the
rear handle until it locks in place (Fig. 6 and 7).
3. Make sure the wire guard is fl ipped up against the
motor housing (Fig. 8).
ADJUSTING THE WIRE GUARD
1. Rotate the wire guard up or down to the desired
position (Fig. 8). The wire guard helps keep the
trimmer line away from fences, curbs, fl owers, etc.
CONNECTING AND DISCONNECTING THE POWER
SOURCE
Follow these instructions in order to avoid injury and to
reduce the risk of electric shock or fi re:
• Verify that the switch trigger is disengaged before
connecting or disconnecting the power source.
Refer to the Starting and Stopping section.
• Verify that the unit is disconnected from the power
source and the switch trigger is disengaged before
inspecting, adjusting or performing maintenance on
any part of the unit.
Connecting the Power Source
1. Connect the power cord plug to the extension cord
(Fig. 9).
2. Make a narrow loop with the extension cord and
push the loop through the opening for the cord hook
(Fig. 9).
3. Move the loop onto the cord hook and pull the cord
gently to secure the loop over the hook. This helps
prevent accidental disconnection.
4. Connect the extension cord plug to the outlet.
Disconnecting the Power Source
1. Disconnect the extension cord plug from the outlet.
2. Remove the loop in the extension cord from the cord
hook.
3. Disconnect the power cord plug from the extension
cord (Fig. 9).
Lower
Shaft
Lower
Shaft
Motor
Housing
Cutting
Head
Shield
Shaft Angle
Adjustment Button
Edger
Conversion
Button
Extension
Cord
Rubber Grommet
Upper
Shaft
Fig. 1
Shaft Length Adjustment Button
Upper
Shaft
Fig. 2
Fig. 3
D-Handle
Bolt
Knob
Fig. 4
Fig. 5
Fig. 6
Trimmer
Mode
Fig. 7
Wire Guard
Fig. 8
Cord Hook
Power Cord
Fig. 9
Arrows
Edger
Mode
STARTING THE MOTOR
1. Connect the unit to the power source. Refer to
Connecting and Disconnecting the Power Source in
Switch
Trigger
the Assembly section.
2. Squeeze and hold the switch trigger (Fig. 10).
STOPPING THE MOTOR
1. Release the switch trigger (Fig. 10).
Fig. 10
OPERATION
WARNING: Do not allow familiarity with this unit to promote carelessness.
Remember that a careless fraction of a second is enough to infl ict serious injury.
WARNING: If any parts are damaged or missing, do not operate the unit until the
parts are replaced. Failure to heed this warning could result in serious personal injury.
WARNING: Always wear appropriate eye and ear protection when operating this
unit. Wear safety goggles, or safety glasses with side shields, that are marked as
meeting ANSI Z87.1-1989 standards. Failure to do so could result in serious eye injury
caused by thrown objects. If the operation is dusty, wear a face mask or dust mask.
WARNING: Wear non-slip gloves for maximum grip and protection. Refer to the
Safety section for appropriate safety equipment.
PROPER GRIP
• Always maintain a proper grip on the handles
whenever the motor is running. Grip the unit
fi rmly with both hands. Keep the left hand on the
D-handle and the right hand on the rear handle. The
fi ngers should encircle the handles and the thumbs
should wrap under the handles. The left arm should
be straight and the right arm slightly bent.
PROPER STANCE
• Balance body weight securely, with both feet on
solid ground.
Fig. 11
• Hold the unit at waist level. The cutting head should easily contact the grass without the need to
bend over (Fig. 11).
WORK AREA PRECAUTIONS
WARNING: Do not expose the unit to rain. Do not use the unit in damp or wet
locations or conditions.
• Keep everyone – helpers, bystanders, children and animals – at least 50 feet (15 m) away from the
work area. If anyone enters the work area, stop the unit!
• Only operate the unit when visibility and light are adequate to see clearly.
• Remove stones, nails, glass and wire from the area before operating the unit.
• Only operate the unit during reasonable hours. Comply with times listed in local ordinances.
OPERATING THE UNIT AS A TRIMMER
1. Start the motor. Refer to the Starting and Stopping section.
2. Slowly move the cutting head into and out of the cutting area at the desired height.
• Move either in a forward-backward or side-to-side motion. When cutting from side-to-side,
cut from right to left whenever possible. This improves the unit’s cutting effi ciency and directs
clippings away from the operator.
• Keep the cutting head parallel to the ground.
• Cutting shorter lengths produces the best results.
• Cut grass over 8 inches (200 mm) by working from top to bottom in small increments to avoid
premature line wear or motor drag.
• Do not force the cutting head. Allow the tip of
the line to do the cutting, especially along walls.
Cutting with more than the tip will reduce cutting
effi ciency and may overload the motor.
• Only trim when grass or weeds are dry.
3. Dispose of debris appropriately.
Decorative Trimming
Decorative trimming is accomplished by removing all
vegetation around trees, posts, fences and more.
• Rotate the whole unit so that the cutting head is at a
30° angle to the ground (Fig. 12).
OPERATING THE UNIT AS AN EDGER
Tips for Best Edging Results
• Convert the unit to edger mode.
• Hold the unit with the motor to the operator’s left
side so that debris is thrown to the rear (Fig. 13).
• Place the edge guide wheel on the sidewalk,
driveway, etc. and the trimmer line in the grass.
ADJUSTING THE TRIMMING LINE LENGTH
The trimming line wears down and becomes shorter
with use. This unit is equipped with an EZ Line Advance cutting head. The cutting head will
automatically dispense more line whenever the unit is stopped and restarted.
NOTE: DO NOT bump the cutting head; this will damage the unit and void the warranty.
NOTE: Always keep the trimming line fully extended. Line release becomes more diffi cult when the
cutting line gets shorter.
If the line becomes too short:
1. Stop the motor. See the Starting and Stopping section.
2. Wait two seconds and then restart the motor.
3. Repeat this process until the line length reaches the line cutting blade on the cutting head shield.
The line cutting blade will cut the line to the proper length if any excess line is released. Remove the
protective material from the line cutting blade before using the unit.
The trimming line can also be extended manually:
1. Stop the motor
2. Disconnect the unit from the power source.
3. Press and release the manual line release button
while gently pulling both lines until they reach the
line cutting blade (Fig. 14).
The life of the cutting line is dependent upon:
• Following the trimming techniques previously
explained
• What vegetation is cut
• Where the vegetation is cut.
For example, the line will wear faster when trimming
against a foundation wall as opposed to trimming
around a tree.
Fig. 12
Fig. 13
Fig. 14
Manual Line
Release Button
3
Page 4
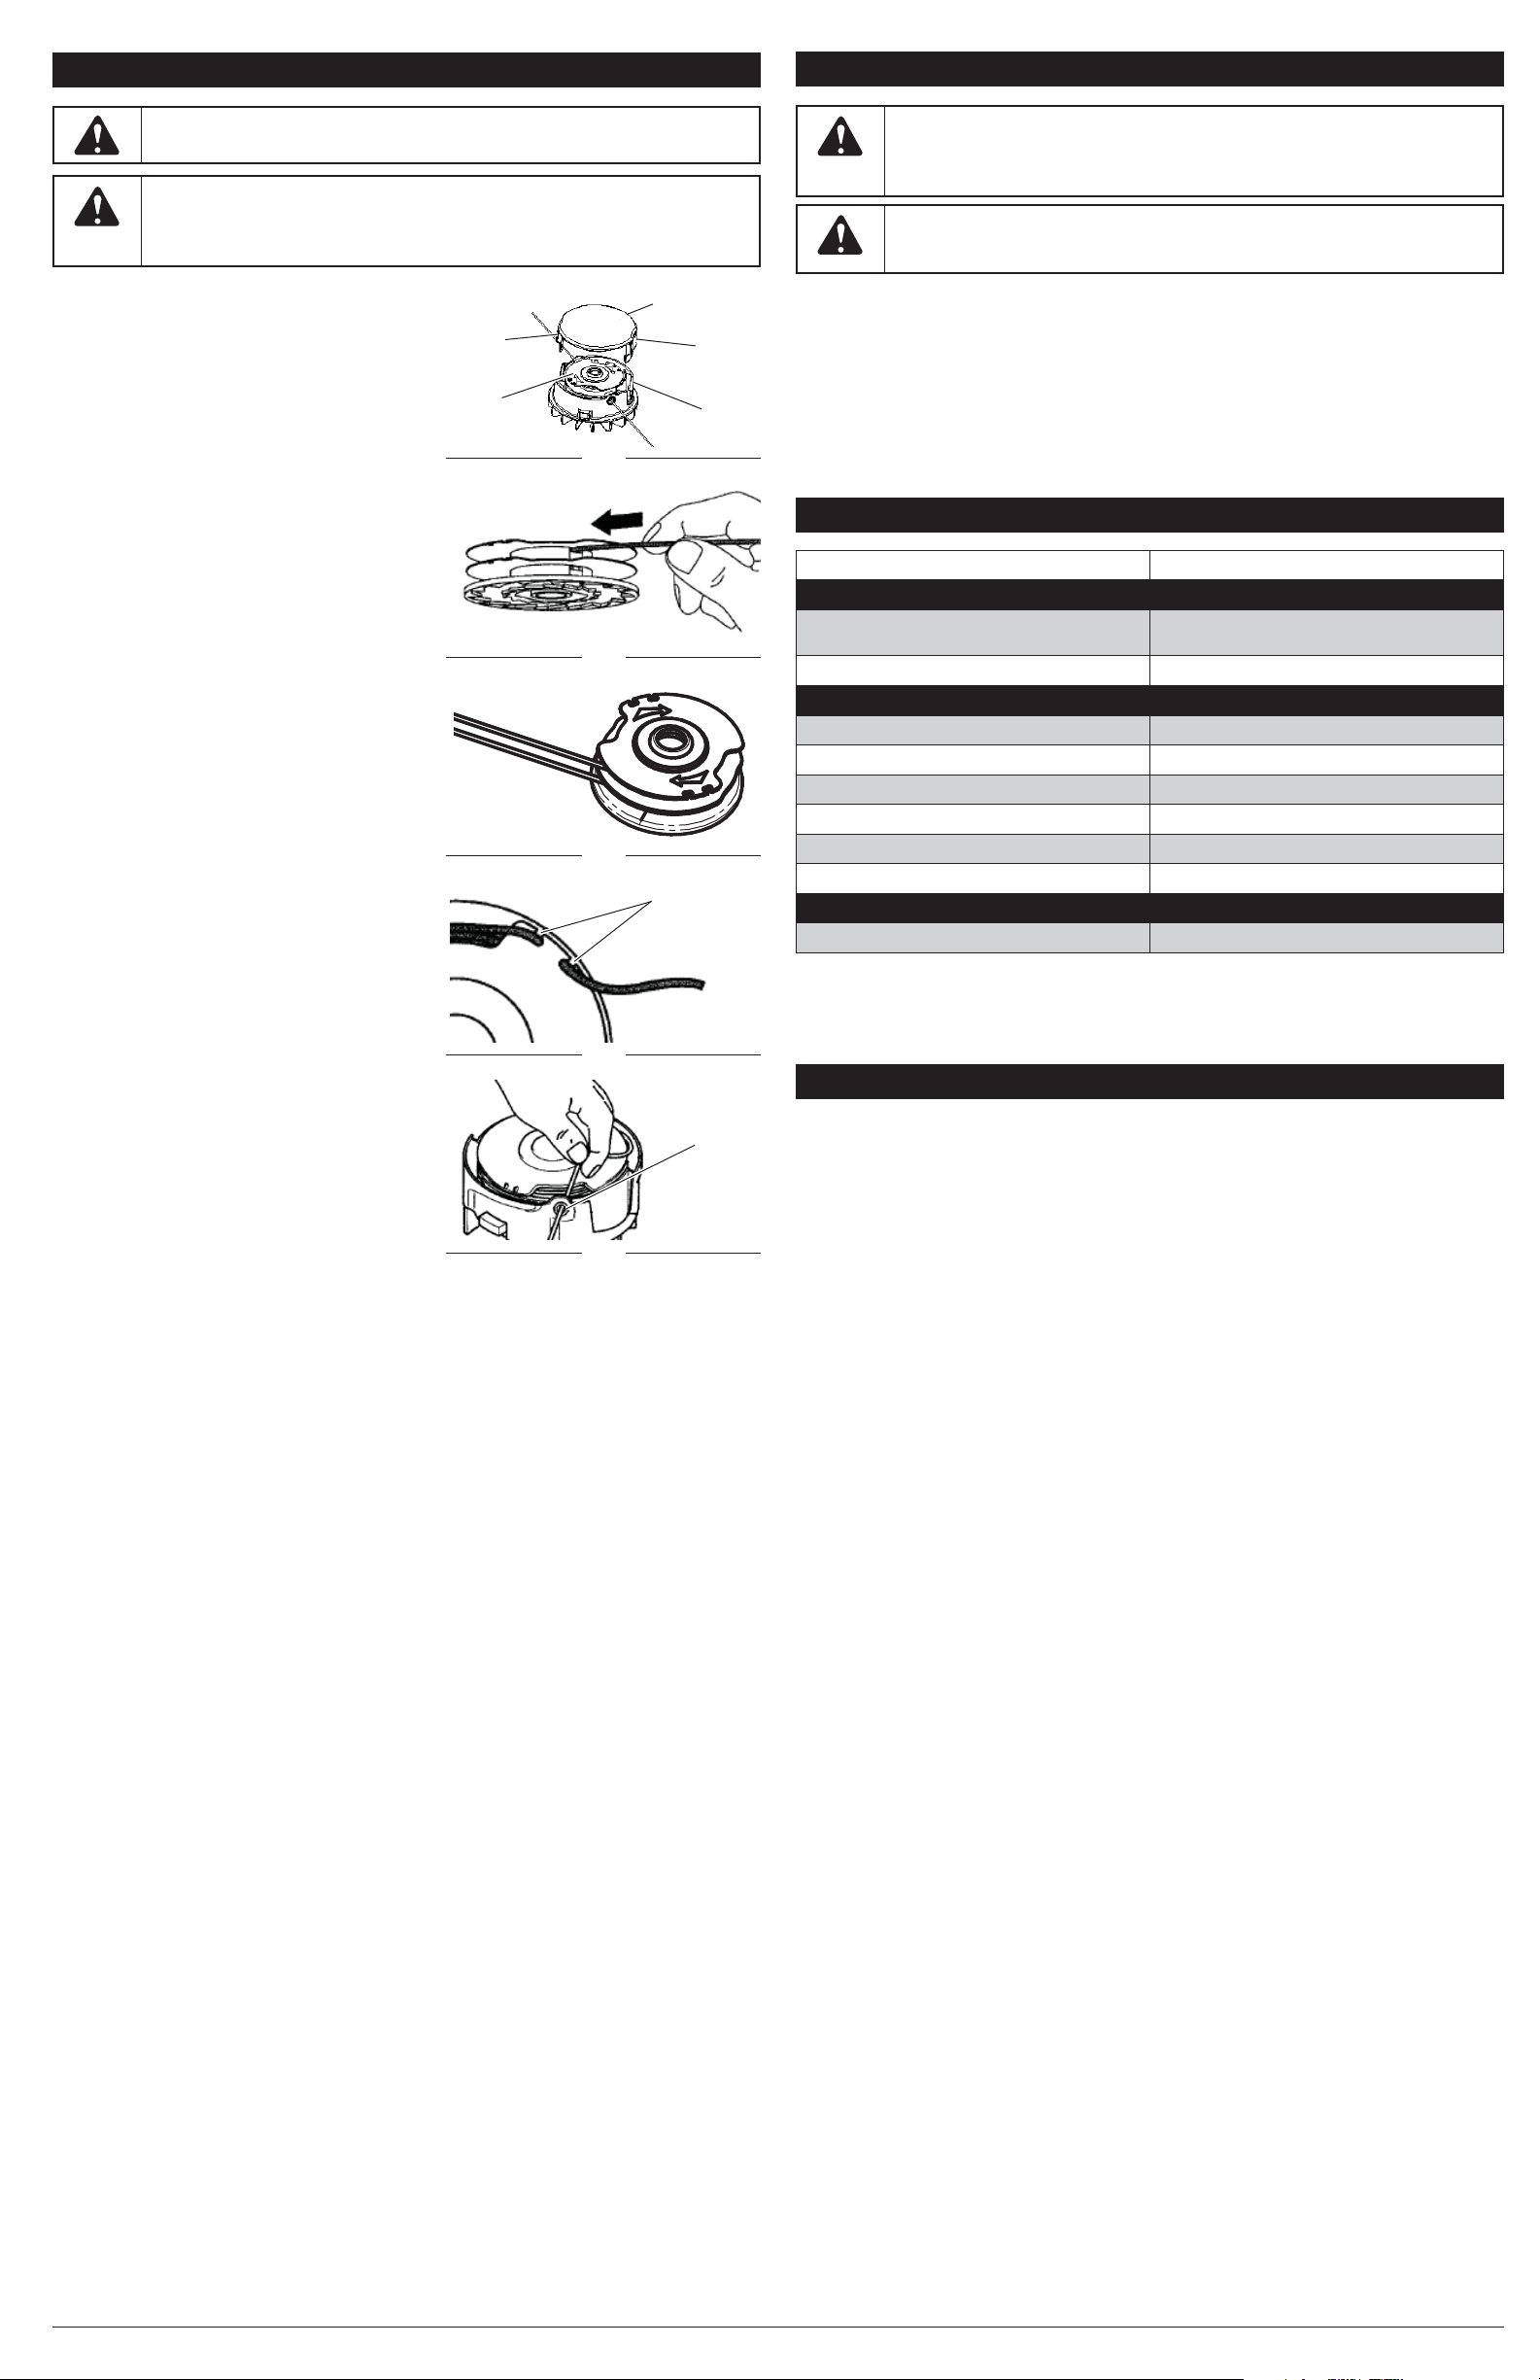
LINE INSTALLATION
CLEANING AND STORAGE
WARNING: Never use metal-reinforced line, wire, chain or rope. These can break off
and become dangerous projectiles.
WARNING: Before inspecting, cleaning or servicing the unit, stop the motor, wait
for all moving parts to stop, disconnect the unit from the power source and allow it to
cool. Failure to follow these instructions can result in serious personal injury or property
damage.
ADDING NEW LINE
1. Press and hold the two cap release latches (Fig. 15).
2. Pull the cap away from the hub.
3. Remove the spool.
4. Use a clean cloth to clean the spool and inner
surface of the hub.
5. Cut two 10.5 feet lengths of replacement line.
NOTE: Always use original equipment manufacturer
0.065 in. (1.65 mm) replacement line. Other line
may make the motor overheat or fail.
NOTE: Always use the correct line length. The line
may not release properly if it is too long.
6. Insert one line into each of the two slots on the spool
(Fig. 16).
7. Wind the line onto the spool by turning the spool
clockwise (Fig. 17). The line should wrap snugly
around the spool. Do not twist or cross the line.
Wind the line until there are approximately 4 inches
remaining.
8. Lock the ends of the lines in the two notches on the
spool (Fig. 18).
9. Put the spool back into the hub.
10. Insert a line through each of the two eyelets on the
hub (Fig. 19).
11. Straighten the lines by removing them from the
notches. Make sure the lines feed smoothly.
12. Securely place the cap back onto the hub.
13. Manually extend the lines to the line cutting blade.
See Adjusting the Trimming Line Length in the
Operation section.
Cap
Release
Latch
Spool
Fig. 15
Fig. 16
Fig. 17
Cap
Notches
Cap
Release
Latch
Hub
WARNING: Before inspecting, cleaning or servicing the unit, stop the motor, wait
for all moving parts to stop, disconnect the unit from the power source and allow it to
cool. Failure to follow these instructions can result in serious personal injury or property
damage.
WARNING: Do not let brake fl uids, gasoline, petroleum-based products, penetrating
oils, etc., come in contact with plastic parts. These chemicals may damage, weaken
and destroy plastic, which may result in serious personal injury.
Cleaning Instructions
• Use a fi rm-bristled, non-wire, brush to remove debris from the unit.
• Wipe the unit down with a damp cloth. Do not douse the unit with water. Do not use solvents or
strong detergents.
Storage Instructions
• Follow the Cleaning Instructions listed above.
• Store the unit indoors in a dry, high and/or locked location, out of the reach of children and other
unauthorized persons.
TROUBLESHOOTING
CAUSE SOLUTION
THE MOTOR WILL NOT RUN
The cord is not securely connected to the unit
or power sour
ce
The GFCI in the outlet has tripped (if used) Reset the GFCI
THE CUTTING HEAD WILL NOT ADVANCE LINE
The cutting head is bound with grass
The cutting head is out of line Refi ll the cutting head with new line
The spool is bound up Replace the spool
The cutting head is dirty Clean the spool and hub
The line is welded
The line twisted when it was refi lled Rewind the line
THE CUTTING HEAD ADVANCES LINE UNCONTROLLABLY
The cutting head is broken Refer to the Service section
NOTE: For maintenance beyond the minor adjustments listed above, or for replacement parts, please
call the Customer Support Department at 1-866-206-2707 (U.S.) or 1-877-696-5533 (Canada).
Make sure each plug is securely connected
Clean the cutting head
Remove the welded section and rewind the line
Fig. 18
Fig. 19
Eyelet
SPECIFICATIONS
Motor Type ..................................................................................................................... Electric, Corded
Motor Voltage ...................................................................................................................120 VAC, 60HZ
Motor Amperage .......................................................................................................................5.5 Amps
Motor Speed (no load) .............................................................................................................7,000 rpm
Trimming Line Diameter .............................................................................................0.065 in. (1.65 mm)
Cutting Path Diameter .....................................................................................................14 in. (35.6 cm)
Weight ....................................................................................................................................7 lb (3.2 kg)
* All specifi cations are based on the latest product information available at the time of printing. We
reserve the right to make changes at any time without notice.
4
Page 5

SÉCURITÉ
• SYMBOLES D’ALERTE DE SÉCURITÉ •
L’objectif de ces symboles d’alerte de sécurité est d’attirer votre attention sur les dangers possibles.
Ces symboles et leurs explications méritent toute votre attention et votre compréhension.
À eux seuls, les avertissements de sécurité n’éliminent aucun danger. Les consignes ou
avertissements de sécurité ne remplacent pas les mesures appropriées de prévention des
accidents. Ces consignes de sécurité ne sauraient couvrir toutes les éventualités susceptibles de se
produire. Si vous avez des questions, veuillez appeler le service à la clientèle au
1-866-206-2707 (E.U.) ou 1 877 696-5533 (Canada).
Manuel de l’utilisateur
RM115ST
Débroussailleuse électrique
SYMBOLE SIGNIFICATION
DANGER : Signale un risque EXTRÊME.
Le non respect d’une consigne de sécurité relative à un signal de DANGER
ENTRAÎNERA des blessures graves ou mortelles pour vous-même ou pour les autres.
AVERTISSEMENT : Signale un risque GRAVE.
Le non respect d’un AVERTISSEMENT de sécurité PEUT entraîner des blessures
graves pour vous-même ou pour les autres.
ATTENTION : Signale un risque MOYEN.
Le non-respect d’une consigne de signal d’ATTENTION PEUT entraîner des dégâts
matériels ou des blessures graves pour vous-même ou pour les autres.
IMPORTANT ! Signale une information technique spécifi que.
REMARQUE : Signale une information générale importante supplémentaire.
• CONSIGNES DE SÉCURITÉ IMPORTANTES •
LISEZ TOUTES LES INSTRUCTIONS AVANT L’UTILISATION
AVERTISSEMENT : Lors de l’utilisation d'appareils
électriques, respectez toujours les précautions de sécurité élémentaires afi n de réduire
les risques d’incendie, de décharge électrique et de blessures graves, y compris :
TABLE DES MATIÈRES
Service technique .................................................................................................................................. 5
Sécurité .................................................................................................................................................. 5
Familiarisez-vous avec votre appareil .................................................................................................... 6
Montage ................................................................................................................................................. 7
Démarrage et arrêt ................................................................................................................................. 7
Utilisation ............................................................................................................................................... 7
Installation de la ligne de coupe ............................................................................................................ 8
Nettoyage et rangement ........................................................................................................................ 8
Résolution des problèmes ..................................................................................................................... 8
Spécifi cations ........................................................................................................................................ 8
Garantie ............................................................................................................................................... 16
Toutes les informations, illustrations et spécifi cations contenues dans ce manuel sont basées sur les
informations disponibles sur le produit les plus récentes au moment de la publication. Nous nous
réservons le droit d’apporter des modifi cations à tout moment sans avis préalable.
Copyright© 2011 MTD SOUTHWEST INC. Tous droits réservés.
SERVICE TECHNIQUE
NE RAMENEZ PAS CET APPAREIL CHEZ LE DÉTAILLANT. UNE PREUVE D’ACHAT SERA
EXIGÉE POUR TOUTE PRISE EN CHARGE DANS LE CADRE DE LA GARANTIE.
Si vous éprouvez des diffi cultés à assembler ce produit ou si vous avez des questions sur les
commandes, l'utilisation ou l'entretien de cet appareil, veuillez contacter le service à la clientèle :
1-866-206-2707 (U.S.) ou 1-877-696-5533 (Canada)
Des informations supplémentaires sur le produit sont disponibles sur notre site web :
www.remingtonpowertools.com
Veuillez appeler le service à la clientèle pour obtenir des pièces de rechange. Utilisez uniquement des
pièces de rechange identiques pour les réparations.
PROPOSITION 65 DE L’ÉTAT DE CALIFORNIE
AVERTISSEMENT : Les cosses et bornes de batterie et
certains composants fi nis contiennent du plomb, des composés du plomb et des
produits chimiques considérés par l'état de Californie comme pouvant provoquer des
cancers, des malformations congénitales ou d'autres effets nocifs sur la reproduction.
Lavez vous les mains après utilisation.
CONSIGNES DE SÉCURITÉ D’ORDRE GÉNÉRAL
• NE vous fi ez PAS exclusivement aux protections de sécurité incorporées dans l’appareil.
• Ne permettez PAS que l’appareil soit utilisé comme un jouet.
• N’utilisez PAS l'appareil en présence de liquides infl ammables ou de gaz.
• N’effectuez PAS de tâches qui dépassent les capacités ou l’expérience de l’utilisateur.
• N’essayez PAS d’atteindre des espaces trop éloignés.
• N’utilisez PAS cet appareil sur des surfaces instables telles que des arbres, des échelles, des talus
ou des toits. Soyez extrêmement prudent lorsque vous utilisez cet appareil dans des escaliers.
• Ne forcez PAS l’appareil. Il sera plus effi cace et plus sûr si vous l’utilisez à la vitesse pour laquelle
il a été conçu.
• Veuillez lire ce manuel de l’utilisateur attentivement et dans sa totalité avant d’essayer de monter,
d’utiliser ou d’entretenir l’appareil.
• Conformez-vous à toutes les consignes de sécurité. Le non respect de ces consignes peut
entraîner des dégâts matériels ou des blessures graves pour vous-même et/ou pour les autres.
• Familiarisez-vous complètement avec les commandes et la marche à suivre pour une utilisation
correcte de cet appareil. Apprenez à rapidement couper le moteur de l’appareil et mettre les
commandes en position neutre.
• Restez vigilant! N’utilisez pas cet appareil lorsque vous êtes fatigué, malade, ou sous l’infl uence de
l’alcool, de drogues, ou de médicaments.
• L'appareil ne doit jamais être utilisé par des enfants ou adolescents de moins de 15 ans, à moins
que les adolescents soient sous la surveillance d’un adulte. Ne laissez jamais des adultes utiliser
cet appareil sans qu’ils aient reçu une formation appropriée.
• Conservez ces instructions. Consultez-les régulièrement et utilisez-les pour donner des consignes
aux autres utilisateurs. Si vous prêtez cet appareil à quelqu’un, prêtez-lui également ces instructions.
• Faites reculer les personnes se trouvant à proximité, en particulier les enfants, et les animaux,
d’au moins 50 pieds (15 m). Si quelqu’un pénètre dans la zone de travail, arrêtez l’appareil !
• Ne permettez jamais aux autres personnes de toucher l’appareil ou la rallonge.
• Gardez la zone de travail propre et dégagée. Les zones encombrées favorisent les accidents. Ne
démarrez pas l’appareil tant que la zone de travail n’est pas complètement dégagée et que votre
position n’est pas parfaitement stable.
• Portez toujours des protections oculaires et auditives adéquates lorsque vous utilisez cet appareil.
Portez des lunettes de sécurité ou des lunettes de protection avec écrans latéraux qui sont
conformes aux normes ANSI Z87.1-1989 Le non-port de ces protections peut entraîner de graves
lésions oculaires suite à la projection d’objets ou de débris. Si la tâche est poussiéreuse, portez
un masque de protection du visage ou anti-poussière.
• Portez des vêtements appropriés. Mettez des gants et bottes protecteurs antidérapants. Ne
portez pas de vêtements amples, de bijoux, pantalons courts, sandales et ne marchez pas les
pieds nus. Attachez-vous les cheveux au dessus du niveau des épaules pour éviter qu’ils ne se
prennent dans les parties en mouvement de l’appareil.
• Utilisez l’appareil uniquement à la lumière du jour ou sous un éclairage artifi ciel satisfaisant.
• Utilisez l’outil correct. N’utilisez cet appareil que pour des fonctions pour lesquelles il a été conçu.
Utilisez l’appareil uniquement tel qu’indiqué dans ce manuel.
• Tenez toujours l’appareil fermement des deux mains lorsque le moteur tourne. Gardez une prise
ferme avec le pouce et les doigts autour de la (des) poignée(s) et/ou prise(s).
• Gardez les mains, le visage et les pieds éloignés des pièces en mouvement. Ne touchez pas et
n’essayez pas d’arrêter l'une quelconque des parties mobiles lorsqu'elles sont en mouvement.
• Assurez-vous de toujours garder une position stable et un bon équilibre.
• Arrêtez toujours le moteur lorsque le fonctionnement est interrompu, avant de déposer l’appareil
ou lorsque vous vous déplacez vers une autre aire de coupe. Assurez-vous que l’appareil s’arrête
complètement.
• Pour éviter les démarrages accidentels ne portez jamais l’appareil avec les doigts sur l’interrupteur
à gâchette.
• Portez toujours l’appareil par la(les) poignée(s) et une fois que l’appareil est débranché du courant
électrique.
• Vérifi ez toujours que l'interrupteur à gâchette est en position débrayée avant de brancher
l’appareil à la prise électrique ou de le débrancher de celle-ci.
• Assurez-vous que toutes les protections et tous les dispositifs de sécurité ont été correctement
installés avant d’utiliser l’appareil.
• Cet appareil est conçu pour un usage domestique et peu fréquent. Il n’est pas conçu pour une
utilisation prolongée.
PRÉCAUTIONS CONCERNANT L’ENTRETIEN ET LE RANGEMENT
• N’utilisez PAS cet appareil lorsqu’il est endommagé, mal réglé ou mal assemblé. Assurez-vous
que l’appareil s’arrête lorsque vous relâchez l’interrupteur à gâchette. N’utilisez pas l’appareil si
l’interrupteur à gâchette ne parvient pas à le démarrer ni à l’arrêter correctement.
• N’effectuez PAS de procédures d’entretien autres que celles décrites dans ce manuel. N’essayez
pas de réparer vous-même l’appareil ; il ne contient aucune pièce remplaçable par l’utilisateur.
• Si l’appareil ne fonctionne pas normalement, s’il est tombé, a été endommagé, a été laissé dehors
ou est tombé dans l’eau, ne l’utilisez pas.
• Si l’appareil heurte ou s’emmêle avec un objet étranger, coupez le moteur immédiatement et
vérifi ez que l’appareil n’a pas été endommagé.
769-06403 P00 01/11
Page 6

SÉCURITÉ
SÉCURITÉ
• Suivez toutes les consignes d’entretien décrites dans ce manuel.
• Avant de vérifi er, d’entretenir, de nettoyer, de ranger, de transporter ou de remplacer une pièce
quelconque de l’appareil :
1. Vérifi ez que le moteur est à l’arrêt.
2. Assurez-vous que toutes les pièces mobiles se sont arrêtées.
3. Débranchez l’appareil de la prise de courant électrique.
4. Laissez l’appareil refroidir.
• Ne retirez, ne modifi ez ou ne désactivez jamais un dispositif de sécurité qui est fourni avec l’appareil.
• Inspectez régulièrement l’appareil pour vous assurer qu’il n’est pas endommagé. Avant d’utiliser
l’appareil, toute pièce endommagée devrait être inspectée pour déterminer si elle fonctionnera
correctement et remplira sa fonction comme il se doit. Vérifi ez l’alignement et la fi xation de toutes
les pièces mobiles, assurez-vous qu’aucune pièce n’est brisée et qu’aucun autre problème n’est
susceptible d’affecter le fonctionnement de l’appareil. Les pièces endommagées devraient être
correctement réparées ou remplacées.
• Si l’appareil commence à vibrer de façon anormale, arrêtez le moteur, débranchez l’appareil de la
prise électrique et laissez l’appareil refroidir. Examinez ensuite l’appareil pour trouver la cause de
la vibration. Une vibration indique généralement un problème.
• N’utilisez que des pièces de rechange et accessoires de la marque du fabricant d’origine qui sont
spécifi quement conçus pour améliorer les performances et maximiser la sûreté de fonctionnement de
l’appareil. À défaut, l’appareil risque de produire des performances médiocres et même des blessures.
• Assurez-vous de bien attacher l’appareil lorsque vous le transportez.
• Quand l’appareil n’est pas utilisé, rangez-le à l’intérieur, dans un endroit sec et sous clé ou sec et
en hauteur pour éviter tout usage non autorisé ou des dommages. Gardez toujours l’appareil hors
de la portée des enfants.
• Afi n d’éviter les blessures personnelles graves et/ou d’endommager l’appareil, nettoyez
bien l’appareil en éliminant toute trace de végétaux ou d’autres matériaux qui peuvent obstruer,
coller ou coincer les pièces mobiles. Veillez à ce que les poignées restent sèches, propres et
dépourvues de débris, d’huile et de graisse. Nettoyez l’appareil après chaque utilisation.
• N’aspergez ni ne vaporisez jamais l’appareil avec de l’eau ou tout autre liquide. Ne nettoyez pas
l’appareil avec un tuyau d’arrosage, évitez la pénétration d’eau dans le moteur et les branchements
électriques. N’utilisez pas de solvants ou de détergents agressifs.
SÉCURITÉ ÉLECTRIQUE
• NE manipulez PAS l’appareil, la (les) prise(s) ou le(s) cordon(s) avec des mains mouillées.
• NE laissez PAS l’appareil sous la pluie. N’utilisez pas l’appareil dans des conditions ou des
endroits humides ou mouillés.
• N’utilisez PAS l’appareil sur des surfaces mouillées.
• Ménagez la rallonge ou le cordon électrique de l’appareil. Vous ne devez jamais soulever ou porter
l’appareil par le(s) cordon(s), ou utiliser le(s) cordon(s) en guise de poignée, refermer une porte sur
le(s) cordon(s), tirer le(s) cordon(s) autour de rebords ou de coins coupants ou tirer le(s) cordon(s)
d’un coup sec pour débrancher l’appareil. Saisissez la (les) prise(s) et non le(s) cordon(s) pour
débrancher l’appareil.
• NE modifi ez d’aucune façon le cordon électrique, la rallonge, la prise du cordon électrique ou de
la rallonge ou la prise murale.
• N’utilisez PAS plusieurs rallonges.
• Gardez les cordons éloignés de l’huile, de l’eau, des objets pointus et des surfaces chaudes.
• Gardez les cordons éloignés de la zone de coupe et placez les cordons de façon à ce qu’ils ne
s’accrochent pas aux branches ou autres obstacles susceptibles de coincer ou d’emmêler les
cordons au cours de l’utilisation.
• Gardez les cordons éloignés des pieds de l’utilisateur pour éviter qu’il ne trébuche.
• Assurez-vous que les cordons sont en bon état. Inspectez régulièrement le cordon électrique et
la rallonge. Examinez de près pour détecter toute détérioration, coupure ou fi ssure au niveau de
l’isolation. Si le cordon électrique est endommagé, faites-le réparer par un centre de services
agréé. Si la rallonge est endommagée, remplacez-la. N’utilisez pas un cordon ou une prise
endommagé(e).
• Si la rallonge est endommagée de manière quelconque tandis qu’elle est branchée, débranchez la
rallonge de la prise de courant.
• Cet appareil étant équipé d’une double isolation, une rallonge à deux conducteurs (une rallonge
sans mise à la terre) peut être utilisée. L’utilisation d’une rallonge à trois conducteurs (une rallonge
avec mise à la terre) disposant d’un connecteur de type NEMA (broche parallèle, mise à la terre
U) est toutefois recommandée. Les rallonges sont disponibles auprès des revendeurs locaux.
N’utilisez que des rallonges à gaine ronde homologuées pour une utilisation en extérieur.
• Assurez-vous que votre rallonge est suffi samment résistante pour supporter le courant requis par
l’appareil. Un câble de rallonge de calibre trop petit entraînera une baisse de tension, une perte
de puissance, ainsi qu’une surchauffe. En cas de doute, utilisez une rallonge de calibre plus élevé.
Plus le calibre est petit, plus le câble est résistant.
TAILLE MINIMUM DE FIL POUR DES RALLONGES
D’APPAREILS DE 120 V DE 0-16 A
Longueur du cordon (en mètres) 7,6 15 30 45,7
Calibre du fi l (AWG) 18 16 16 14
AVERTISSEMENT : Pour réduire les risques de chocs
électriques, utilisez uniquement une rallonge pour usage extérieur, telle que les rallonges
de type SW-A, SOW-A, STW-A, STOW-A, SJW-A, SJOW-A, SJTW-A, ou SJTOW-A.
• Pour réduire le risque d’électrocution, cet appareil dispose d’une prise polarisée (une broche
est plus large que l’autre) et nécessite l’utilisation d’une rallonge polarisée. La prise du cordon
électrique de l’appareil ne peut s’insérer dans une rallonge polarisée que dans un sens. Si la
prise ne se branche pas entièrement dans la rallonge, inversez le sens de la prise. Si la prise
ne se branche toujours pas, procurez-vous une autre rallonge polarisée. Une rallonge polarisée
nécessitera l’utilisation d’une prise murale polarisée. Cette prise ne se branchera dans la
prise murale polarisée que dans un sens. Si la prise ne se branche pas entièrement dans la
prise murale, inversez le sens de la prise. Si la prise ne se branche toujours pas, contactez un
électricien qualifi é pour installer une prise murale correcte.
• La tension utilisée est indiquée sur une plaque signalétique située sur votre appareil. Ne branchez
jamais l’appareil sur une tension de courant alternatif différente de cette tension.
• Une protection de disjoncteur de fuite à la terre (GFCI) doit être fournie sur le(s) circuit(s)
électrique(s) ou prise(s) qui sera (seront) utilisé(es) avec l’appareil. Pour ajouter un degré de
sécurité, utilisez des prises disposant d’une protection GFCI intégrée.
• Pour réduire le risque de débranchement de la rallonge de l’appareil, assurez-vous d’utiliser le
dispositif de retenue de rallonge fourni.
• Pour réduire le risque d’électrocution, évitez tout contact avec des conducteurs de mise à la terre,
tels que des tuyaux métalliques ou des grillages.
• Débranchez l’appareil de la prise électrique lorsqu’il n’est pas utilisé.
Entretien et réparation d’un appareil à double isolation
• Cet appareil est équipé d’une double isolation. Deux systèmes d’isolation sont fournis au lieu
d’une mise à la terre. Aucune mise à la terre n’est fournie et aucun dispositif de mise à la terre ne
doit être ajouté à l’appareil. L’entretien et la réparation d’un appareil à double isolation nécessitent
une attention extrême et une connaissance approfondie du système et ne doivent être effectués
que par des professionnels qualifi é. Les pièces de rechange pour un appareil à double isolation
doivent être identiques à celles qu’elles remplacent. Un manquement à faire réparer un appareil
à double isolation par un technicien agréé en utilisant des pièces de rechange identiques peut
entraîner des blessures graves.
CONSIGNES DE SÉCURITÉ POUR LA DÉBROUSSAILLEUSE
• L’écran de protection de la tête de coupe doit toujours être en place lors de l’utilisation de
l’appareil. N’utilisez pas l’appareil sans une longueur suffi sante des deux lignes de coupe, ces
dernières devant être celles recommandées par le fabricant. La longueur de la ligne de coupe ne
doit jamais dépasser celle de l’écran.
• Réglez la position de la poignée en D de manière à avoir la meilleure prise possible.
• Assurez-vous que la tête de coupe n’est en contact avec rien avant de démarrer l’appareil.
• Utilisez uniquement une ligne de coupe de rechange de 1,65 mm (0,065 po) de diamètre.
N’utilisez jamais de ligne, de fi l, de chaîne ou de cordon à renfort métallique. Ils peuvent casser et
se transformer en projectiles dangereux.
• SYMBOLES INTERNATIONAUX ET DE SÉCURITÉ •
Ce manuel de l’utilisateur décrit les symboles et pictogrammes de sécurité et internationaux qui
peuvent apparaître sur ce produit. Lisez ce manuel de l’utilisateur pour obtenir une information
complète sur la sécurité, le montage, l’utilisation, l’entretien et les réparations.
SYMBOLE SIGNIFICATION
• SYMBOLE D’ALERTE DE SÉCURITÉ
Indique un danger, un avertissement ou une mise en garde. Peut être utilisé de
concert avec d'autres symboles ou pictogrammes.
• LISEZ LE MANUEL DE L’UTILISATEUR
AVERTISSEMENT :
toutes les consignes de sécurité et de prévention. Tout manquement peut entraîner des blessures
graves pour les utilisateurs et/ou pour les personnes à proximité.
• PORTEZ UNE PROTECTION OCULAIRE ET AUDITIVE
Lisez le(s) manuel(s) de l’utilisateur et suivez
AVERTISSEMENT : Les objets projetés et le bruit peuvent
entraîner des lésions oculaires et des pertes auditives. Portez toujours des protections
oculaires conformes aux normes ANSI Z87.1-1989 et des protections auditives lorsque
vous utilisez cet appareil. Protégez-vous le visage avec un masque intégral au besoin.
• ÉLOIGNEZ LES PERSONNES SE TROUVANT À PROXIMITÉ
AVERTISSEMENT : Faites reculer les personnes se trouvant
à proximité, en particulier les enfants et les animaux domestiques, d’au moins 15 m
(50 pieds) de la zone de travail. Si quelqu’un pénètre dans la zone de travail, arrêtez
l’appareil !
• LES OBJETS PROJETÉS ET LA TÊTE DE COUPE PEUVENT ENTRAÎNER DES
BLESSURES GRAVES
AVERTISSEMENT :
à grande vitesse et entraîner des blessures. Tenez-vous à l’écart du rotor tournant.
• PORTEZ DES GANTS DE PROTECTION
Portez des gants de protection, robustes et antidérapants lorsque vous manipulez
l’appareil.
• PORTEZ DES CHAUSSURES DE SECURITÉ
Portez des chaussures de sécurité antidérapantes lorsque vous utilisez cet appareil.
• N’UTILISEZ PAS CET APPAREIL SOUS LA PLUIE
AVERTISSEMENT :
N’utilisez jamais cet appareil sous la pluie ou dans des conditions humides ou
mouillées. L’humidité représente un risque de choc électrique.
• DOUBLE ISOLATION
Deux systèmes d’isolation sont fournis au lieu d’une mise à la terre. Aucune mise à la
terre n’est fournie et aucun dispositif de mise à la terre ne doit être ajouté à l'appareil.
FAMILIARISEZ-VOUS AVEC VOTRE OUTIL
UTILISATIONS
Cet appareil peut être utilisé pour les tâches suivantes :
• Coupe d’herbe et de mauvaises herbes peu épaisses
• Coupe de bordures
• Coupe décorative autour des arbres, des clôtures, etc.
Aucun outil nécessaire !
Crochet
d'enroulement
du cordon
Interrupteur à
gâchette
Bouton de réglage de
l’angle du manche
Écran de protection
de la tête de coupe
De petits objets peuvent être propulsés
Évitez les environnements dangereux.
Poignée arrière
Bouton de conversion en
mode coupe-bordures
Poignée en D
Bouton de réglage de la
longueur du manche
Logement du manche
Bouton de réglage de
l’angle du manche
Roue de guidage
du coupe-bordure
Guide de lignes
Lame de coupe de la ligne de coupe
de coupe
Tête de coupe
CONSERVEZ CES INSTRUCTIONS
6
Page 7

MONTAGE DÉMARRAGE ET ARRÊT
AVERTISSEMENT : Assurez-vous que l’appareil est débranché de la prise de
courant avant d’en assembler, démonter ou régler tout élément.
Cet appareil doit être assemblé.
DÉBALLER
• Retirez soigneusement le produit et ses accessoires du carton.
• Inspectez soigneusement l’appareil pour vous assurer qu’il n’a pas été endommagé pendant le
transport.
• Ne jetez pas l’emballage tant que vous n’avez pas inspecté et testé le produit de façon satisfaisante.
• Si des pièces sont endommagées ou manquantes, veuillez appeler le 1-866-206-2707 (E.U.) ou le
1-877-696-5533 (Canada) pour une assistance.
MONTAGE DU MANCHE
1. Retirez et jetez la rondelle en caoutchouc (Fig. 1).
2. Alignez les fl èches sur les sections supérieure et
inférieure du manche (Fig. 2).
3. Tout en poussant le bouton de réglage de la
longueur du manche vers le haut et vers la poignée
arrière, faites glisser la section supérieure du
manche sur la section inférieure jusqu'à ce qu'elles
se verrouillent ensemble (Fig. 2).
REMARQUE : Une fois qu’elles sont assemblées, les
sections supérieure et inférieure du manche ne se
sépareront plus.
Réglage de la longueur du manche
1. Empoignez fermement le logement du manche.
2. Tout en poussant le bouton de réglage de la
longueur du manche vers le haut vers la poignée
arrière, déplacez le manche vers le haut ou vers le
bas, à la longueur désirée.
3. Relâchez le bouton de réglage de la longueur du
manche.
INSTALLER L’ÉCRAN DE PROTECTION DE LA TÊTE
DE COUPE
1. Alignez la fl èche sur l’écran de protection de la tête
de coupe avec la fl èche sur le logement du moteur
(Fig. 3).
2. Tournez l’écran de protection de la tête de coupe
dans le sens inverse des aiguilles d’une montre,
dans la direction VERROUILLER (Fig. 3), jusqu’à ce
qu’il s'enclenche en place. Assurez-vous que l’écran
de protection de la tête de coupe est assemblé
conformément aux instructions de la section
Familiarisez-vous avec votre appareil.
INSTALLER LA POIGNÉE EN D
1. Retirez le bouton et le boulon situés sur la poignée
en D.
2. Rabaissez la poignée en D sur la section supérieure
du manche (Fig. 4). Vous devrez forcer. L'orifi ce du
boulon hexagonal de la poignée doit se trouver du
côté gauche.
3. Insérez le boulon de la poignée dans l’orifi ce
hexagonal de la poignée et enfoncez-le (Fig. 4).
Vissez le bouton sur le boulon. Ne serrez pas
complètement le bouton.
4. Tout en maintenant l’appareil en position d’utilisation
(Fig. 11), déplacez la poignée en D pour la
positionner de manière à avoir la meilleure prise
possible. Placez-la à au moins 15,24 cm (6 po) de
l’extrémité de la poignée arrière.
5. Serrez le bouton jusqu’à ce que la poignée en D soit
bien fi xée.
RÉGLER L’ANGLE DU MANCHE
1. Appuyez sur les boutons de réglage de l’angle du
manche des deux côtés du logement du moteur
(Fig. 5).
2. Tournez le manche pour le positionner à l’un des
quatre niveaux de réglage, selon les besoins (pour
pouvoir passer sous les terrasses, les buissons, etc.).
CONVERTIR EN MODE COUPE-BORDURES
1. Empoignez fermement le logement du manche.
2. Appuyez sur le bouton de conversion en coupebordures et tournez la poignée arrière jusqu’à ce
qu’elle se verrouille en place (Fig. 6 et 7).
3. Assurez-vous que le guide de lignes de coupe est
relevé contre le logement du moteur (Fig. 8).
RÉGLER LE GUIDE DE LIGNES DE COUPE
1. Tournez le guide de lignes de coupe vers le haut ou
le bas pour le mettre à la position souhaitée
(Fig. 8). Le guide de lignes de coupe vous aide à
garder les lignes de coupe écartées des clôtures,
des courbes de trottoirs, des fl eurs etc.
BRANCHER ET DÉBRANCHER LE COURANT
ÉLECTRIQUE
Observez ces instructions pour éviter des blessures et
réduire le risque d’électrocution ou d’incendie :
• Vérifi ez que l’interrupteur à gâchette est en position
débrayée avant de brancher ou de débrancher le
courant électrique. Consultez la section Démarrage
et Arrêt.
• Assurez-vous que l'appareil est débranché de la
prise de courant et que l’interrupteur à gâchette est
en position débrayée avant d’examiner, de régler ou
d’effectuer l’entretien d’une partie quelconque de
l’appareil.
Brancher le courant électrique
1. Branchez la prise du cordon électrique sur la
rallonge (Fig 9).
2. Faites une boucle étroite avec la rallonge et enfi lez
la boucle dans l’orifi ce du crochet d’enroulement du
cordon (Fig. 9).
3. Amenez la boucle sur le crochet d'enroulement du
cordon et tirez doucement sur le cordon pour fi xer
la boucle sur le crochet. Ceci permet d’éviter les
débranchements accidentels du cordon.
4. Branchez la prise de la rallonge dans la prise de
courant.
Débrancher le courant électrique
1. Débranchez la prise de la rallonge de la prise de
courant.
2. Retirez la boucle de la rallonge du crochet
d'enroulement du cordon.
3. Débranchez la prise du cordon électrique de la
rallonge (Fig. 9).
Section
inférieure
du manche
Bouton de réglage de la longueur du manche
Section
inférieure
du manche
Logement
du moteur
Écran de
protection de la
tête de coupe
réglage de l’angle
conversion en mode
coupe-bordures
Rallonge
Rondelle de caoutchouc
Section supérieure
Fig. 1
Section supérieure
Fig. 2
Fig. 3
Poignée en D
Bouton
Fig. 4
Bouton de
du manche
Fig. 5
Bouton de
Fig. 6
Mode
débroussailleuse
Fig. 7
Fig. 8
Crochet d’enroulement du cordon
Fig. 9
du manche
du manche
Flèches
Boulon
Mode
coupe-bordures
Guide de lignes
de coupe
Cordon
électrique
DÉMARRER LE MOTEUR
1. Branchez l’appareil sur la prise de courant.
Consultez Brancher et Débrancher le courant
Interrupteur à
gâchette
électrique dans la section Montage.
2. Appuyez sur l’interrupteur à gâchette et tenez-le
enfoncé (Fig. 10).
ARRÊTER LE MOTEUR
1. Relâchez l’interrupteur à gâchette (Fig. 10).
Fig. 10
UTILISATION
AVERTISSEMENT : Restez vigilant et concentré même lorsque vous êtes
parfaitement familiarisé avec l’appareil. N’oubliez pas qu’une fraction de seconde
d’inattention suffi t pour entraîner une blessure grave.
AVERTISSEMENT : Si des pièces sont endommagées ou manquantes, n’utilisez
pas l’appareil avant de les avoir remplacées. Le non respect de cet avertissement peut
entraîner des blessures graves.
AVERTISSEMENT : Portez toujours des protections oculaires et auditives
adéquates lorsque vous utilisez cet appareil. Portez des lunettes de sécurité ou des
lunettes de protection avec écrans latéraux qui sont conformes aux normes ANSI
Z87.1-1989. Le non-port de ces protections peut entraîner de graves lésions oculaires
suite à la projection d’objets ou de débris. Si la tâche est poussiéreuse, portez un
masque de protection du visage ou anti-poussière.
AVERTISSEMENT : Portez des gants antidérapants pour garantir une prise
parfaite et votre sécurité. Consultez la section Sécurité pour en savoir plus sur les
équipements de sécurité adéquats.
PRISE CORRECTE
• Tenez toujours fermement les poignées lorsque le
moteur tourne. Empoignez fermement l’appareil des
deux mains. Gardez la main gauche sur la poignée en
D et la main droite sur la poignée arrière. Les doigts
devraient encercler la poignée avec les pouces calés
en dessous des poignées. Le bras gauche devrait
être tendu et le bras droit légèrement plié.
APLOMB CORRECT
• Positionnez votre corps bien en équilibre avec vos
pieds fermement sur le sol.
Fig. 11
• Tenez l’appareil à hauteur de votre taille. La tête de
coupe devrait facilement toucher l’herbe sans que vous ayez besoin de vous pencher (Fig. 11).
PRÉCAUTIONS CONCERNANT LA ZONE DE TRAVAIL
AVERTISSEMENT : Ne laissez pas l’appareil sous la pluie. N’utilisez pas l'appareil
dans des conditions ou des endroits humides ou mouillés.
• Faites reculer toutes les personnes se trouvant à proximité - assistants, enfants et animaux ou
autres - d’au moins 15 mètres (50 pi) de la zone de travail. Si quelqu’un pénètre dans la zone de
travail, arrêtez l’appareil !
• N’utilisez l’appareil que lorsque la lumière du jour ou l’éclairage vous permettent une visibilité
suffi sante.
• Retirez les pierres, les clous, les morceaux de verre et de fi l présents sur la zone de travail avant
d'utiliser l'appareil.
• N’utilisez l’appareil qu’à des heures raisonnables. Conformez-vous aux horaires indiqués par les
autorités locales.
UTILISER L’APPAREIL EN TANT QUE DÉBROUSSAILLEUSE
1. Démarrez le moteur. Consultez la section Démarrage et Arrêt.
2. Déplacez lentement la tête de coupe à l’intérieur et hors de l'espace de coupe à la hauteur désirée.
• Déplacez-vous d’avant en arrière ou d'un côté à l'autre. Lorsque vous coupez d’un côté à l’autre,
tâchez, dans la mesure du possible, de couper de droite à gauche. Ceci améliore l’effi cacité de
coupe de l’appareil et les résidus de coupe sont projetés loin de l’utilisateur.
• Gardez la tête de coupe parallèle au sol.
• Couper moins long produit les meilleurs résultats.
• Pour couper des herbes plus hautes que 200 mm (8 po), commencez par le haut et travaillez
petit à petit vers le bas pour éviter une usure prématurée de la ligne ou une surcharge du moteur.
• Ne forcez pas la tête de coupe. Coupez avec le bout de la ligne, notamment le long des murs. Couper
avec plus que le bout de la ligne réduira l’effi cacité de la coupe et risque de surcharger le moteur.
• Ne débroussaillez que lorsque l’herbe ou les mauvaises herbes sont sèches.
3. Éliminez les débris de façon appropriée.
Coupe décorative
La coupe décorative consiste à déblayer la végétation
autour des arbres, des poteaux, des clôtures, etc.
• Tournez l'appareil entier de manière à ce que la tête
de coupe soit à un angle de 30° par rapport au sol
(Fig. 12).
UTILISER L’APPAREIL EN TANT QUE COUPEBORDURES
Conseils pour les meilleurs résultats de coupe de
bordures
• Convertissez l’appareil en mode coupe-bordures.
• Tenez l’appareil avec le moteur du côté gauche de
l’utilisateur de sorte que les débris soient projetés
vers l’arrière (Fig. 13).
• Placez la roue de guidage du coupe-bordures sur le
trottoir, allée, etc. et les lignes de coupe dans l’herbe.
RÉGLAGE LA LONGUEUR DE LA LIGNE DE COUPE
La ligne de coupe s’use et devient plus courte avec
chaque utilisation. Cet appareil est équipé d’une tête de
coupe avec une ligne EZ Line Advance. La tête de coupe
dispensera automatiquement plus de ligne de coupe à
chaque fois que l'appareil est arrêté et redémarré.
REMARQUE : NE cognez PAS la tête de coupe; ceci
endommagera l’appareil et annulera la garantie.
REMARQUE : Gardez toujours la ligne de coupe complètement déroulée. Relâcher la ligne devient
plus diffi cile à mesure que la ligne de coupe se raccourcit.
Si la ligne devient trop courte :
1. Arrêtez le moteur. Consultez la section Démarrage et Arrêt.
2. Attendez deux secondes et puis remettez le moteur en marche.
3. Répétez ces étapes jusqu’à ce que la longueur de
ligne atteigne la lame de coupe de ligne de coupe
sur l’écran de protection de la tête de coupe.
La lame de coupe de ligne de coupe coupera la ligne
à la longueur correcte si un excès de ligne est libéré.
Retirez le matériau de protection de la lame de coupe
de la ligne de coupe avant d’utiliser l’appareil.
La ligne de coupe peut également être déroulée
manuellement.
1. Arrêtez le moteur
2. Débranchez l’appareil de la prise de courant électrique.
3. Appuyez sur et relâchez le bouton de relâchement
manuel de la ligne de coupe tout en tirant délicatement sur les deux lignes de coupe jusqu’à ce
qu’elles atteignent la lame de coupe de ligne de coupe (Fig. 14).
La durée de vie de la ligne de coupe dépend :
• Du suivi des techniques de débroussaillage mentionnées ci-dessus
• Du type de végétation coupée
• De l’endroit où la végétation est coupée.
Par exemple, la ligne s’usera plus vite quand vous débroussaillez contre un mur de fondation que
lorsque vous débroussaillez autour d’un arbre.
Fig. 12
Fig. 13
Fig. 14
Bouton de
relâchement
manuel de la
ligne de coupe
7
Page 8

INSTALLATION DE LA LIGNE DE COUPE
NETTOYAGE ET RANGEMENT
AVERTISSEMENT : N’utilisez jamais de ligne, de fi l, de chaîne ou de cordon à
renfort métallique. Ils peuvent casser et se transformer en projectiles dangereux.
AVERTISSEMENT : Avant d’inspecter, de nettoyer ou d'entretenir l’appareil,
arrêtez le moteur, attendez que toutes les pièces en mouvement se soient arrêtées,
débranchez l’appareil de la prise électrique et laissez-le refroidir. Le non respect de ces
instructions peut entraîner des dégâts matériels ou des blessures graves.
AJOUTER UNE NOUVELLE LIGNE DE COUPE
1. Appuyez sur les deux languettes de fermeture du
couvercle et maintenez-les enfoncées (Fig. 15).
2. Retirez le couvercle du moyeu.
3. Retirez la bobine
4. Nettoyez la bobine et la surface intérieure du moyeu
avec un linge propre.
5. Coupez deux longueurs de 3,20 mètres (10,5 pieds)
de ligne de remplacement.
REMARQUE : Utilisez toujours une ligne de
remplacement d’un diamètre de 1,65 mm
(0,065 po), fournie par le fabricant de l’équipement
d’origine. Toute autre ligne peut entraîner une
surchauffe ou une panne du moteur.
REMARQUE : Utilisez toujours la longueur de ligne
correcte. La ligne risque de ne pas se dérouler
correctement si elle est trop longue.
6. Insérez une ligne dans chacune des deux fentes de
la bobine (Fig. 16).
7. Enroulez la ligne sur la bobine en tournant la bobine
dans le sens des aiguilles d’une montre (Fig. 17).
La ligne devrait s'enrouler bien serrée autour de
la bobine. Ne tordez et ne croisez pas la ligne.
Enroulez la ligne jusqu’à ce qu’il en reste environ
10,2 cm (4 po).
8. Coincez les extrémités des lignes dans les deux
encoches de la bobine (Fig. 18).
9. Replacez la bobine sur le moyeu.
10. Insérez une ligne dans chacun des deux œillets du
moyeu (Figure 19).
11. Rectifi ez les lignes en les retirant des encoches.
Vérifi ez que les lignes avancent sans heurt.
12. Replacez le couvercle fermement en place sur le
moyeu.
13. Tirez manuellement sur les lignes jusqu’à la lame de
coupe de ligne de coupe. Consultez Régler la longueur
de la ligne de coupe dans la section Utilisation
Languette de
fermeture du
couvercle
Bobine
Fig. 15
Fig. 16
Fig. 17
Fig. 18
Couvercle
Languette de
fermeture du
couvercle
Moyeu
Encoches
AVERTISSEMENT : Avant d’inspecter, de nettoyer ou d'entretenir l’appareil,
arrêtez le moteur, attendez que toutes les pièces en mouvement se soient arrêtées,
débranchez l’appareil de la prise électrique et laissez-le refroidir. Le non respect de ces
instructions peut entraîner des dégâts matériels ou des blessures graves.
AVERTISSEMENT : Ne laissez pas du liquide de frein, de l’essence, des produits
à base de pétrole, de l’huile pénétrante, etc. entrer en contact avec des pièces en
plastique. Ces produits chimiques peuvent endommager, affaiblir ou détruire le
plastique, ce qui peut entraîner des blessures graves.
Instructions de nettoyage
• Utilisez une brosse dure, non métallique pour enlever les débris de l’appareil.
• Essuyez l’appareil avec un linge humide. N’éclaboussez pas l’appareil avec de l’eau. N’utilisez pas
de solvants ou de détergents agressifs.
Instructions pour le rangement
• Suivez les instructions de nettoyage mentionnées ci-dessus.
• Rangez l’appareil dans un endroit sec et en hauteur et/ou sous clé, hors de la portée des enfants
et autres personnes non autorisées.
RÉSOLUTION DES PROBLÈMES
CAUSE SOLUTION
LE MOTEUR NE TOURNE PAS
Le cordon n’est pas bien branché à l’appareil
ou à la prise électrique
La protection GFCI de la prise a sauté (si elle
est utilisée)
LA TÊTE DE COUPE NE RELÂCHE PAS DE LIGNE DE COUPE
La tête de coupe est engorgée d’herbes
Il n’y a plus de ligne de coupe dans la tête de
coupe
La bobine est emmêlée Remplacer la bobine
La tête de coupe est sale Nettoyez la bobine et le moyeu
La ligne est soudée
La ligne a été tordue lorsqu’elle a été
remplacée
LA TÊTE DE COUPE RELÂCHE DE LA LIGNE DE FAÇON INCONTRÔLÉE
La tête de coupe est cassée Consultez la section Ser
REMARQUE : Pour un entretien au-delà des petits réglages mentionnés ci-dessus, ou pour obtenir
des informations sur les pièces de rechange, veuillez appeler le service à la clientèle au
1-866-206-2707 (E.U.) ou 1 877 696-5533 (Canada).
ez-vous que chaque prise est solidement
Assur
branchée
Réinitialisez la protection GFCI
Nettoyez la tête de coupe
Rechargez la tête de coupe avec une ligne de
coupe neuve
Retirez la partie soudée et rembobinez la ligne
Rembobinez la ligne
vice technique
Fig. 19
Oeillet
SPÉCIFICATIONS
Type de moteur ........................................................................................................Électrique, à cordon
Tension du moteur ...........................................................................................................120 VAC, 60HZ
Ampérage du moteur ........................................................................................................... 5,5 ampères
Vitesse du moteur (sans charge) ............................................................................................. 7000 t/min
Diamètre de la ligne de coupe .................................................................................. 1,65 mm (0,065 po)
Diamètre du chemin de coupe ........................................................................................ 35,6 cm (14 po)
Poids ......................................................................................................................................3,2 kg (7 lb)
* Toutes les spécifi cations sont basées sur les informations sur le produit les plus récentes
disponibles au moment de la publication. Nous nous réservons le droit d’apporter des
modifi cations à tout moment sans avis préalable.
8
Page 9

SEGURIDAD
• SÍMBOLOS DE ALERTA DE SEGURIDAD •
Los símbolos de alerta de seguridad se utilizan para llamar su atención sobre posibles peligros.
Estos símbolos y sus explicaciones merecen toda su atención y comprensión. Las advertencias
de seguridad no eliminan por sí mismas ningún peligro. Las instrucciones o advertencias que
dan no sustituyen a las medidas adecuadas de prevención de accidentes. El objetivo de estas
instrucciones de seguridad no consiste en abarcar cada una de las posibles situaciones que
puedan ocurrir. Si surgen preguntas, llame al Departamento de Atención al Cliente al
1-866-206-2707 (EE.UU.) o al 1-877-696-5533 (Canadá).
Manual del Operador
RM115ST
Recortadora Eléctrica
SÍMBOLO SIGNIFICADO
PELIGRO: Indica un peligro EXTREMO.
El no obedecer una señal de PELIGRO de seguridad TRAERÁ como consecuencia
que usted u otras personas sufran lesiones graves o fatales.
ADVERTENCIA: Indica un peligro GRAVE.
El no obedecer una señal de ADVERTENCIA de seguridad PUEDE llevar a que
usted u otras personas sufran lesiones graves.
PRECAUCIÓN: Indica un peligro MODERADO.
El no obedecer una señal de PRECAUCIÓN de seguridad PUEDE conducir a daños
a la propiedad o a que usted u otras personas se lesionen.
¡IMPORTANTE! Indica información mecánica especial.
NOTA: Indica información general importante adicional.
• INSTRUCCIONES IMPORTANTES DE SEGURIDAD •
LEA TODAS LAS INSTRUCCIONES ANTES DE OPERAR LA UNIDAD
ADVERTENCIA: Al usar esta unidad, se deben tomar siempre
las precauciones básicas de seguridad para reducir el riesgo de incendio, descarga
eléctrica y lesiones personales, entre ellas:
PROPOSICIÓN 65 DEL ESTADO DE CALIFORNIA
ADVERTENCIA: Los bornes y terminales de las baterías, así
como determinados productos terminados contienen plomo, compuestos de plomo
y otros productos químicos de los que el estado de California tiene conocimiento
provocan cáncer, malformaciones congénitas u otros daños al sistema reproductor.
Lávese las manos después de manipularlos.
SEGURIDAD GENERAL
• NO se confíe exclusivamente en los dispositivos de seguridad incorporados a la unidad.
• NO permita que la unidad se utilice como juguete.
• NO utilice la unidad en presencia de líquidos o gases infl amables.
• NO intente ninguna operación por encima de la capacidad o experiencia del operador.
• NO intente llegar demasiado lejos.
• NO la opere estando en superfi cies inestables como árboles, escaleras de mano, declives o
techos. Tenga mucho cuidado cuando la use en escaleras de edifi caciones.
• NO fuerce la unidad. Hará un trabajo mejor y más seguro a la velocidad para la que fue diseñada.
• Lea cuidadosamente el manual del operador por completo antes de intentar ensamblar, operar o
dar mantenimiento a la unidad.
• Siga todas las instrucciones de seguridad. No hacerlo puede ocasionar daños a la propiedad o a
TABLA DE CONTENIDO
Llamadas a apoyo al cliente .................................................................................................................. 9
Seguridad ............................................................................................................................................... 9
Conozca su unidad .............................................................................................................................. 10
Ensamblaje ........................................................................................................................................... 11
Arranque y parada ............................................................................................................................... 11
Operación ............................................................................................................................................ 11
Instalación de la línea ........................................................................................................................... 12
Limpieza y almacenamiento ................................................................................................................ 12
Localización y solución de problemas ................................................................................................. 12
Especifi caciones .................................................................................................................................. 12
Garantía ............................................................................................................................................... 16
Toda la información, las ilustraciones y especifi caciones que contiene este manual se basan en la
información más reciente del producto, existente en el momento de la impresión. Nos reservamos el
derecho de hacer cambios en cualquier momento, sin previo aviso.
Copyright© 2011 MTD SOUTHWEST INC. Todos los derechos reservados.
LLAMADAS A APOYO AL CLIENTE
NO DEVUELVA ESTA UNIDAD AL VENDEDOR. PARA SOLICITAR SERVICIO POR LA GARANTÍA,
DEBERÁ PRESENTAR PRUEBA DE SU COMPRA.
Para asistencia en relación con el ensamblaje, los controles, la operación o el mantenimiento de la
unidad, llame al Departamento de Atención al Cliente: 1-866-206-2707 (EE.UU.) o 1-877-696-5533
(Canadá)
Puede encontrar más información sobre la unidad en nuestro sitio Web:
www.remingtonpowertools.com
Llame al Departamento de Atención al Cliente para solicitar piezas de repuesto. Cuando le dé
mantenimiento al equipo, utilice solo piezas de repuesto idénticas.
769-06403 P00 01/11
769-06403 P00 01/11
que usted y/u otras personas sufran lesiones de gravedad.
• Familiarícese completamente con los controles y el uso apropiado de la unidad. Aprenda a apagar
la unidad y desconectar los controles con rapidez.
• ¡Manténgase alerta! No opere esta unidad si está cansado, enfermo, o bajo los efectos del alcohol,
drogas o medicamentos.
• Los niños y adolescentes menores de 15 años no deben usar la unidad. Los adolescentes pueden
hacerlo bajo la supervisión de un adulto. No permita nunca que operen la unidad adultos sin los
debidos conocimientos.
• Guarde estas instrucciones. Consúltelas con frecuencia y utilícelas para instruir a otros usuarios.
Si le presta esta unidad a alguna otra persona, préstele también estas instrucciones.
• Mantenga alejados a los presentes, especialmente a los niños y animales domésticos, a una
distancia de al menos 50 pies (15 m). Si alguien entra al área en la que se está trabajando,
¡apague la unidad!
• No permita que los presentes entren en contacto con la unidad ni el cable de extensión.
• Mantenga limpia el área de trabajo. Las áreas de trabajo desorganizadas atraen los accidentes.
No arranque ni opere la unidad hasta que el área de trabajo esté despejada y libre de
obstrucciones y la pisada sea fi rme.
• Utilice protección adecuada para los ojos y oídos siempre que opere la unidad. Lleve puestas gafas
o lentes de seguridad protegidas a ambos lados que estén marcados como que cumplen con las
normas ANSI Z87.1-1989. Si no lo hace así, los objetos lanzados podrían ocasionar lesiones graves
a los ojos. Si la operación levanta polvo, lleve puesta una máscara facial o contra el polvo.
• Vístase correctamente. Póngase guantes protectores antideslizantes y botas. No use ropa
holgada, alhajas, pantalones cortos, sandalias ni ande descalzo. Asegure su cabello por encima
de los hombros para evitar que se enrede con las piezas en movimiento.
• Use la unidad únicamente con la luz del día o buena luz artifi cial.
• Use la herramienta correcta. Use la unidad solamente con el propósito previsto. Úsela solamente
como se indica en este manual.
• Agarre la unidad fi rmemente con las dos manos cuando el motor esté funcionando. Sujete
fi rmemente con el pulgar y los dedos rodeando la o las manijas y/o empuñaduras.
• Mantenga las manos, la cara y los pies lejos de todas las partes móviles. No trate de tocar ni
detener ninguna de las piezas móviles mientras estén girando.
• Mantenga en todo momento la posición y equilibrio adecuados.
• Apague siempre el motor cuando la operación se demore, al colocar la unidad en el piso o al
caminar de un lugar a otro. Esté seguro que la unidad se detuvo por completo.
• Para evitar un arranque accidental, no transporte nunca la unidad con los dedos sobre el gatillo
interruptor.
• Mueva siempre la unidad agarrándola por las manijas y desconectada de la alimentación.
• Asegúrese siempre de haber soltado el gatillo antes de conectar o desconectar la unidad de la
alimentación eléctrica.
• Asegúrese de que todos los accesorios de protección y seguridad estén bien instalados antes de
operar la unidad.
• Esta unidad está prevista para el uso ocasional de propietarios de viviendas. No está diseñada
para uso prolongado.
SEGURIDAD DEL MANTENIMIENTO Y ALMACENAJE
• NO opere una unidad dañada, incorrectamente ajustada o que no esté fi rme y completamente
ensamblada. Asegúrese de que la unidad se detiene al soltar el gatillo. No use la unidad si el
gatillo interruptor no enciende y apaga la unidad adecuadamente.
• NO lleve a cabo trabajos de mantenimiento que no sean los descritos en esta manual. No trate de
repararla; la unidad no tiene piezas dentro que puedan ser reparadas por el usuario.
• Si la unidad no funciona como debe, se cayó o dañó, se dejó a la intemperie o se dejó caer sin
querer al agua, no la use.
• Si la unidad golpea o se enreda con un objeto extraño, pare inmediatamente el motor y busque si
hay algún daño.
• Siga todas las instrucciones de mantenimiento de este manual.
• Antes de inspeccionar, dar mantenimiento, limpiar, guardar, transportar o reemplazar cualquier
pieza de la unidad:
1. Asegúrese de que el motor esté apagado.
2. Asegúrese de que todas las piezas móviles estén detenidas.
Page 10

SEGURIDAD
SEGURIDAD
3. Desconecte la unidad de la alimentación eléctrica.
4. Espere a que la unidad se enfríe.
• Nunca quite, modifi que ni deje inoperante ningún dispositivo de seguridad incluido en la unidad.
• Inspeccione frecuentemente la unidad en busca de daños. Antes de volverla a utilizar, revise
con cuidado cualquier pieza dañada para determinar que trabajará adecuadamente y cumplirá
su función. Compruebe la alineación y atasco de las partes en movimiento, la rotura de piezas
y cualquier otra condición que pueda afectar su operación. Las piezas dañadas deben ser
debidamente reparadas o reemplazadas.
• Si la unidad comienza a vibrar de manera anormal, detenga el motor, desconéctela de la
alimentación eléctrica y deje que se enfríe. Después, inspeccione la unidad para encontrar la
causa de la vibración. Generalmente, la vibración es un indicador de problemas.
• Utilice solamente piezas de repuesto y accesorios del fabricante original, las que están
específi camente diseñadas para mejorar el rendimiento y maximizar la operación segura del
producto. No hacerlo puede ocasionar un mal funcionamiento y posibles lesiones.
• Cerciórese de asegurar la unidad al transportarla.
• Cuando no la esté utilizando, guarde la unidad bajo llave, o en alto, en un lugar adecuado y seco,
para evitar su uso no autorizado o que se dañe. Manténgala fuera del alcance de los niños.
• Para evitar lesiones personales graves y/o el daño de la unidad, manténgala limpia de vegetación
y otros materiales que puedan obstruir, pegar o atorar las piezas en movimiento. Mantenga las
empuñaduras secas, limpias y libres de residuos, aceite y grasa. Limpie la unidad después de usarla.
• No moje nunca ni rocíe la unidad con agua ni con ningún otro líquido. No lave la unidad con
manguera; evite que el agua penetre en el motor y las conexiones eléctricas. No utilice solventes ni
detergentes fuertes.
SEGURIDAD ELÉCTRICA
• NO manipule la unidad, los enchufes o cables con las manos mojadas.
• NO exponga la unidad a la lluvia. No utilice la unidad en lugares húmedos o mojados ni en esas
condiciones.
• NO opere la unidad sobre superfi cies mojadas.
• NO maltrate el cable de alimentación ni el de extensión de la unidad. Nunca tire del equipo ni lo
agarre por los cables ni use los cables como asa, tenga cuidado de no pellizcarlos al cerrar una
puerta y no los hale cerca de bordes o esquinas cortantes ni tire de ellos para desconectar el
equipo. Tire del enchufe y no del cable para desconectar la unidad.
• NO modifi que el cable de alimentación, el cable de extensión ni tampoco sus enchufes o el
tomacorriente de cualquier manera.
• NO utilice varios cables de extensión.
• Mantenga los cables lejos del aceite, el agua, los objetos afi lados y las superfi cies calientes.
• Mantenga los cables alejados del área de corte y colóquelos de manera que no se enganchen en
las ramas u otros obstáculos que puedan atorarlos o enredarlos durante la operación.
• Mantenga los cables alejados de los pies del operador para evitar tropezones.
• Asegúrese del buen estado de los cables. Inspecciónelos con frecuencia. Fíjese bien en que el
aislamiento no esté deteriorado, cortado ni agrietado. Si el cable de alimentación está dañado,
lleve la unidad a un centro de servicio autorizado para que lo reparen. Si el cable de extensión
está dañado, reemplácelo. No use ningún cable ni enchufe dañado.
• Si el cable de extensión se daña de alguna manera mientras está conectado, desconéctelo del
receptáculo.
• Dado que la unidad es de doble aislamiento, se puede utilizar un cable de extensión de 2
conductores (uno sin tierra). No obstante, lo que se recomienda es un cable de extensión de 3
conductores (con tierra) con un conector tipo NEMA (patas paralelas, tierra en U). Su distribuidor
local tiene cables de extensión disponibles. Use solamente cables de extensión redondos
forrados aprobados para uso en exteriores.
• Asegúrese de que el cable de extensión sea lo sufi cientemente resistente como para soportar
la corriente que consume la unidad. Un cable de bajo calibre provocará una caída del voltaje de
línea que acabará en una pérdida de potencia y sobrecalentamiento. Si tiene duda, utilice el cable
de mayor calibre que siga. A menor número de calibre, más grueso el cable.
CALIBRE MÍNIMO PARA CABLES DE EXTENSIÓN
DE EQUIPOS DE 120 V CON 0-6 A
Longitud del cable (pies) 25 50 100 150
Calibre (CAE) 18 16 16 14
ADVERTENCIA: Para reducir el riesgo de una descarga eléctrica,
use únicamente extensiones adecuadas para uso en exteriores como cables tipo
SW-A, SOW-A, STW-A, STOW-A, SJW-A, SJOW-A, SJTW-A o SJTOW-A
• Para reducir el riesgo de descarga eléctrica, esta unidad tiene un enchufe polarizado (una pata es
más ancha que la otra) y será necesario utilizar un cable de extensión polarizado. El enchufe se
podrá conectar al cable de extensión polarizado solamente de una forma. Si el enchufe no entra
del todo en el cable de extensión, inviértalo. Si aún así el enchufe no entra, busque otro cable
de extensión polarizado. Un cable de extensión polarizado requerirá el uso de un tomacorriente
polarizado. Este enchufe encajará en el tomacorriente polarizado solamente de una forma.
Si el enchufe no entra del todo en el tomacorriente, inviértalo. Si aún así el enchufe no entra,
comuníquese con un electricista califi cado para instalar el tomacorriente adecuado.
• La placa de datos de la unidad indica el voltaje a utilizar. Nunca conecte la unidad a un voltaje CA
diferente.
• Los circuitos o tomacorrientes que se usen con esta unidad deben tener interruptores con
detección de falla a tierra (GFCI). Utilice receptáculos con protección GFCI incorporada como
medida adicional de seguridad.
• Para reducir la probabilidad de que se desconecte el cable de extensión de la unidad, asegúrese
de utilizar el sujetacables.
• Para disminuir el riesgo de descarga eléctrica, evite el contacto con conductores a tierra como
tuberías de metal o cercas de alambre.
• Desenchufe la unidad de la alimentación eléctrica cuando no la esté utilizando.
Mantenimiento a una unidad de doble aislamiento
• Esta unidad es de doble aislamiento. En vez de conexión a tierra, tiene dos sistemas de
aislamiento. No viene con conexión a tierra y no se le debe agregar a la unidad ninguna forma de
conexión a tierra. Para dar mantenimiento a una unidad de doble aislamiento se exigen extremo
cuidado y conocimiento del sistema, por lo que solo debe llevarlo a cabo personal de servicio
califi cado. Las piezas de repuesto que se usen en una unidad con doble aislamiento deben ser
idénticas a las que van a reemplazar. No cumplir estas advertencias de que sea un técnico de
servicio autorizado quien repare la unidad y que se usen piezas de repuesto idénticas puede
ocasionar lesiones graves.
SEGURIDAD DE LA RECORTADORA
• Al operar la unidad, el protector del cabezal de corte debe estar siempre en su sitio. No opere la
unidad sin las dos líneas de corte extendidas y la línea correcta instalada. No extienda la línea de
corte más allá de la longitud del protector.
• Ajuste la manija en D para facilitar el mejor agarre.
• Antes de arrancar la unidad, asegúrese de que el cabezal de corte no esté en contacto con
ningún objeto.
• Use solo la línea de repuesto de 0.065 pulg. (1.65 mm) de diámetro. No use nunca la línea
reforzada con metal, alambre, cadena o soga. Estas líneas pueden romperse y convertirse en
proyectiles peligrosos.
• SÍMBOLOS INTERNACIONALES Y DE SEGURIDAD •
Este manual del operador describe símbolos y pictografías internacionales y de seguridad que
posiblemente aparezcan en este producto. Lea el manual del operador para informarse bien sobre la
seguridad, ensamblaje, operación, mantenimiento y reparación.
SÍMBOLO SIGNIFICADO
• SÍMBOLO DE ALERTA DE SEGURIDAD
Indica peligro, advertencia o precaución. Puede utilizarse junto a otros símbolos o
pictografías.
• LEA EL MANUAL DEL OPERADOR
ADVERTENCIA:
todas las advertencias e instrucciones de seguridad. No hacerlo puede ocasionar lesiones graves
al operador y/o a las personas presentes.
• USE PROTECCIÓN PARA LOS OJOS Y OÍDOS
ADVERTENCIA:
ocasionar lesiones graves a los ojos y pérdida de la audición. Al operar esta unidad,
lleve puestas gafas o lentes de seguridad que cumplan con las normas ANSI Z87.11989 y protección para los oídos. De ser necesario, use una careta protectora.
• MANTENGA ALEJADOS A LOS PRESENTES
ADVERTENCIA:
a los niños y animales domésticos, a una distancia de al menos 50 pies (15 m). Si
alguien entra al área en la que se está trabajando, ¡apague la unidad!
• LOS OBJETOS LANZADOS Y LA CUCHILLA GIRATORIA PUEDEN
OCASIONAR LESIONES GRAVES
Lea el manual o los manuales del operador y siga
Los objetos lanzados y el ruido fuerte pueden
Mantenga a todos los presentes, especialmente
ADVERTENCIA: Los objetos pequeños pueden ser lanzados a
gran velocidad y ocasionar lesiones. Manténgase alejado del rotor cuando esté girando.
• PÓNGASE GUANTES DE SEGURIDAD
Póngase guantes protectores antideslizantes para trabajo pesado al manipular la
unidad.
• LLEVE PUESTOS ZAPATOS DE SEGURIDAD
Póngase zapatos de seguridad antideslizantes al utilizar este equipo.
• NO LA USE CUANDO LLUEVA
ADVERTENCIA:
unidad bajo la lluvia ni en lugares húmedos ni mojados. Humedad signifi ca peligro de
descarga eléctrica.
• DOBLE AISLAMIENTO
En vez de conexión a tierra, tiene dos sistemas de aislamiento. No viene con conexión
a tierra y no se le debe agregar a la unidad ninguna forma de conexión a tierra.
CONOZCA SU UNIDAD
USOS
Esta unidad se puede utilizar con los fi nes que se enumeran a
continuación:
• Cortar césped y malas hierbas escasas
• Orillar (bordear)
• Hacer recortes decorativos alrededor de árboles, cercas, etc.
¡No se requieren herramientas!
Gancho
del cable
Gatillo
interruptor
Botón de ajuste de
longitud del eje
Protector del
cabezal de corte
Evite ambientes peligrosos. No opere nunca la
Empuñadura posterior
Botón de conversión
a bordeadora
Manija en D
Botón de ajuste de
longitud del eje
Cuerpo del eje
Botón de ajuste de
longitud del eje
Rueda guía
de bordear
Protector
de línea
Cabezal
Cuchilla de línea
de corte
GUARDE ESTAS INSTRUCCIONES
10
Page 11

ENSAMBLAJE ARRANQUE Y PARADA
ADVERTENCIA: Asegúrese de que la unidad esté desconectada de la fuente
de alimentación eléctrica antes de ensamblar, desarmar o ajustar cualquiera de sus
componentes.
Esta unidad necesita ensamblaje.
DESEMPAQUE
• Saque con cuidado el producto y los accesorios de la caja.
• Inspeccione minuciosamente el producto para tener la seguridad de que no se rompió ni dañó
nada durante el envío.
• No deseche los materiales de envase y embalaje hasta tanto no haya inspeccionado
minuciosamente y operado satisfactoriamente el producto.
• Si hay alguna pieza dañada o que falta, llame al 1-866-206-2707 (EE.UU.) o al 1-877-696-5533
(Canadá) para solicitar ayuda.
ENSAMBLAR EL EJE
1. Saque y deseche la arandela de goma (Fig. 1).
2. Alinee las fl echas situadas en los ejes inferior y
superior (Fig. 2).
3. Mientras empuja el botón de ajuste de longitud
del eje hacia arriba, en dirección a la empuñadura
posterior, deslice el eje superior sobre el inferior
hasta que traben (Fig. 2).
NOTA: Una vez ensamblados, los ejes superior e inferior
no se separarán de nuevo.
Ajustar la longitud del eje
1. Agarre fi rmemente el cuerpo del eje.
2. Mientras empuja el botón de ajuste de longitud
del eje hacia arriba, en dirección a la empuñadura
posterior, mueva el eje superior arriba o abajo hasta
la longitud deseada.
3. Suelte el botón de ajuste de longitud del eje.
INSTALACIÓN DEL PROTECTOR
DEL CABEZAL DE CORTE
1. Alinee la fl echa del protector del cabezal de corte
con la fl echa en la caja del motor (Fig. 3).
2. Dé vuelta al protector del cabezal de corte en
sentido anti horario, en dirección LOCK (traba) (Fig.
3), hasta que encaje en su lugar. Cerciórese de que
esté ensamblado como se muestra en la sección
Conozca su unidad.
INSTALAR LA MANIJA EN D
1. Quítele la perilla y el perno a la manija en D.
2. Empuje la manija en D hacia abajo sobre el eje
superior (Fig. 4). Habrá que hacer alguna fuerza. El
orifi cio del perno hexagonal de la manija debe quedar
a la izquierda.
3. Inserte el perno en el orifi cio hexagonal de la manija
y páselo de un lado al otro (Fig. 4). Enrósquele la
perilla al perno. No apriete completamente la perilla.
4. Mientras sujeta la unidad en la posición de
funcionamiento (Fig. 11), mueva la manija en D
hacia el lugar que le proporcione el mejor agarre.
Colóquela a una distancia mínima de 6 pulgadas
(15.24 cm) de la base de la empuñadura posterior.
5. Apriete la perilla hasta que la manija en D esté segura.
AJUSTAR EL ÁNGULO DEL EJE
1. Apriete los botones de ajuste del ángulo del eje
situados a ambos lados de la caja del motor (Fig. 5).
2. Según sea necesario, gire el eje hasta uno de los
cuatro ajustes para llegar a lugares debajo de
terrazas, arbustos, etc.
CONVERTIR A BORDEADORA
1. Agarre fi rmemente el cuerpo del eje.
2. Oprima el botón de conversión a bordeadora y gire
la empuñadura posterior hasta que trabe en su lugar
(Fig. 6 y 7).
3. Cerciórese de que la cubierta protectora de la línea
esté levantada contra la caja del motor (Fig. 8).
AJUSTAR LA CUBIERTA PROTECTORA DE LA LÍNEA
1. Mueva la cubierta protectora de la línea arriba o
abajo a la posición deseada (Fig. 8). Este protector
ayuda a mantener la línea de la recortadora alejada
de cercas, bordes de aceras, fl ores, etc.
CONECTAR Y DESCONECTAR
LA ALIMENTACIÓN ELÉCTRICA
Siga estas instrucciones a fi n de evitar lesiones y reducir
el riesgo de descarga eléctrica o incendio:
• Verifi que que el gatillo interruptor esté
desenganchado antes de conectar o desconectar la
alimentación. Consulte la sección Arranque y parada.
• Antes de inspeccionar, ajustar o darle mantenimiento
a cualquier parte de la unidad, verifi que que la unidad
esté desconectada de la alimentación eléctrica.
Conectar la alimentación eléctrica
1. Conecte el enchufe de corriente al cable de
extensión (Fig. 9).
2. Haga un lazo estrecho con el cable de extensión y
empújelo a través de la abertura para el gancho del
cable (Fig. 9).
3. Acerque el lazo al gancho del cable y tire de él con
moderación para fi jarlo al gancho. Esto ayuda a
evitar que la unidad se desconecte por accidente.
4. Conecte el cable de extensión al tomacorriente.
Desconectar la alimentación eléctrica
1. Desconecte el cable de extensión del tomacorriente.
2. Saque el lazo del cable de extensión del gancho.
3. Desconecte el enchufe del cable de extensión (Fig. 9).
Eje
inferior
Eje
inferior
Caja del
motor
Protector del
cabezal de corte
Botón de ajuste de
longitud del eje
Botón de
conversión a
bordeadora
Cable de
extensión
Arandela de goma
Eje
superior
Fig. 1
Botón de ajuste de longitud del eje
Eje
superior
Fig. 2
Flechas
Fig. 3
Manija en D
Perno
Perilla
Fig. 4
Fig. 5
Fig. 6
Modo
recortadora
Fig. 7
Fig. 8
Gancho del cable
Fig. 9
Modo
bordeadora
Protector
de línea
Cable de
alimentación
ARRANQUE DEL MOTOR
1. Conecte la unidad a la alimentación eléctrica.
Consulte Conectar y desconectar la alimentación
Gatillo
interruptor
eléctrica en la sección Ensamblaje.
2. Oprima el gatillo interruptor y no lo suelte (Fig. 10).
PARADA DEL MOTOR
1. Suelte el gatillo interruptor (Fig. 10).
Fig. 10
OPERACIÓN
ADVERTENCIA: No deje que la familiaridad con esta unidad propicie el descuido.
Recuerde que un descuido de fracción de segundos es sufi ciente para producir una
lesión grave.
ADVERTENCIA: Si hay alguna pieza dañada o que falta, no opere la unidad hasta
que no se reemplace la pieza. No acatar esta advertencia puede ocasionar lesiones
personales graves.
ADVERTENCIA: Utilice protección adecuada para los ojos y oídos siempre que
opere la unidad. Lleve puestas gafas o lentes de seguridad protegidas a ambos lados
que estén marcados como que cumplen con las normas ANSI Z87.1-1989. Si no
lo hace así, los objetos lanzados podrían ocasionar lesiones graves a los ojos. Si la
operación levanta polvo, lleve puesta una máscara facial o contra el polvo.
ADVERTENCIA: Póngase guantes antideslizantes para lograr el máximo agarre y
protección. Consulte los medios de seguridad adecuados en la sección Seguridad.
AGARRE CORRECTO
• Siempre que el motor esté funcionando, mantenga
bien agarradas las manijas. Sujete fi rmemente
la unidad con ambas manos. Mantenga la mano
izquierda en la manija en D y la derecha, en la
empuñadura posterior. Los dedos deberán rodear
la empuñadura y los pulgares doblados por debajo
de la manija y empuñadura. El brazo izquierdo debe
estar recto y el derecho, ligeramente arqueado.
POSTURA ADECUADA
• Equilibre bien el peso del cuerpo con ambos pies
Fig. 11
fi rmes sobre el piso.
• Sujete la unidad a la altura de la cintura. El cabezal de corte deberá hacer contacto fácilmente
con la hierba sin necesidad de inclinarse (Fig. 11).
PRECAUCIONES EN EL ÁREA DE TRABAJO
ADVERTENCIA: No exponga la unidad a la lluvia. No utilice la unidad en lugares
húmedos o mojados ni en esas condiciones.
• Mantenga a todos alejados – ayudantes, personas presentes, niños y animales – a una distancia de
al menos 50 pies (15 m). Si alguien entra al área en la que se está trabajando, ¡apague la unidad!
• Solo opere la unidad cuando la visibilidad e iluminación sean las adecuadas para ver con claridad.
• Antes de operar la unidad, retire del área las piedras, clavos, vidrios y alambres.
• Solo utilice la unidad en horarios razonables. Aténgase a los horarios indicados por los
reglamentos de la localidad.
OPERAR LA UNIDAD COMO RECORTADORA
1. Arranque el motor. Consulte la sección Arranque y parada.
2. Mueva lentamente el cabezal de corte dentro y fuera del área de corte, a la altura deseada.
• Haga movimientos de avance y retroceso o de lado a lado. Al hacer cortes de lado a lado, corte
de derecha a izquierda siempre que sea posible. Esto mejora la efi ciencia de corte de la unidad y
envía los recortes de yerba lejos del operador.
• Mantenga el cabezal de corte paralelo al suelo.
• El corte en pequeñas longitudes da mejores resultados.
• Corte el césped de más de 8 pulg. (200 mm) trabajando de arriba abajo, en pequeños
incrementos, para evitar el desgaste prematuro
de la línea y el arrastre del motor.
• No fuerce el cabezal de corte. Deje que sea la punta de la línea la que haga el corte, en especial
a lo largo de paredes. Si corta con un tramo de línea mayor que la punta reducirá la efi cacia del
corte y puede sobrecargar el motor.
• Corte solo cuando el césped o las malas hierbas estén secas.
3. Elimine los residuos como se debe.
Recorte decorativo
El recorte decorativo se logra eliminando toda la vegetación
alrededor de árboles, postes, cercas y otros objetos.
• Gire toda la unidad de manera que el cabezal de
corte quede a un ángulo de 30° respecto al suelo
(Fig 12).
OPERAR LA UNIDAD COMO BORDEADORA
Consejos para mejores resultados al orillar
• Convertir la unidad a bordeadora.
• Sujete la unidad con el motor a la izquierda del
operador, de modo que los residuos caigan hacia
atrás (Fig. 13).
• Coloque la rueda guía de bordear sobre la acera,
entrada de autos, etc., y la línea de corte en el césped.
AJUSTAR LA LONGITUD DE LA LÍNEA DE CORTE
La línea de corte se desgasta y acorta con el uso. Esta
unidad está equipada con un cabezal de corte de avance
EZ Line. El cabezal soltará automáticamente más línea
cada vez que la unidad se apague y vuelva a arrancar.
NOTA: NO golpee el cabezal de corte; esto dañará la
unidad y anulará la garantía.
NOTA: Mantenga siempre la línea de corte
completamente extendida. Resulta más difícil soltar
línea al acortarse la línea de corte.
Si la línea se acorta demasiado:
1. Pare el motor. Consulte la sección Arranque y parada.
2. Espere dos segundos y vuelva a arrancar el motor.
3. Repita este procedimiento hasta que la longitud
de la línea llegue a la cuchilla en el protector del
cabezal de corte.
La cuchilla del cabezal cortará la línea a la longitud
correcta si se suelta demasiada línea. Quítele el material
protector a la cuchilla de la línea antes de usar unidad.
La línea de corte también se puede alargar manualmente:
1. Pare el motor.
2. Desconecte la unidad de la alimentación eléctrica.
3. Apriete y suelte el botón de alimentación manual, mientras tira ligeramente de una de las líneas
hasta llegar a la cuchilla de línea (Fig. 14).
La duración de su línea de corte depende:
• Del cumplimiento de las técnicas de corte explicadas anteriormente
• De la vegetación que se corte
• Del lugar en que se corte la vegetación.
Por ejemplo, la línea se desgastará más rápido cuando corte contra un muro que cuando corte
alrededor de un árbol.
Fig. 12
Fig. 13
Fig. 14
Botón de
alimentación
manual de línea
11
Page 12

INSTALACIÓN DE LA LÍNEA
LIMPIEZA Y ALMACENAMIENTO
ADVERTENCIA: No use nunca la línea reforzada con metal, alambre, cadena o
soga. Estas líneas pueden romperse y convertirse en proyectiles peligrosos.
ADVERTENCIA: Antes de inspeccionar, limpiar o dar mantenimiento a la
unidad, apague el motor, espere a que todas las partes en movimiento se detengan,
desconecte la unidad de la alimentación y déjela enfriar. No seguir estas instrucciones
puede traer como consecuencia lesiones personales graves o daños a la propiedad.
PONER UNA NUEVA LÍNEA
1. Oprima y no suelte los dos seguros de cierre de la
tapa (Fig. 15).
2. Tire de la tapa para sacarla del buje.
3. Saque la bobina
4. Use un paño limpio para limpiar la superfi cie interior
del buje.
5. Corte dos largos de 10.5 pies de línea de repuesto.
NOTA: Utilice siempre la línea de repuesto de 0.065
pulg. (1,65 mm) del fabricante original del
equipo. Usar otra línea puede provocar el
recalentamiento o fallo del motor.
NOTA: Use siempre el largo de línea correcta. Es posible
que la línea no se suelte correctamente si es
demasiado larga.
6. Inserte cada uno de los extremos de la línea a través
de las dos ranuras de la bobina (Fig. 16).
7. Enrolle la línea en la bobina girándola en el sentido
de las agujas del reloj (Fig. 17). La línea debe
enrollarse cómodamente alrededor de la bobina. No
tuerza ni entrecruce la línea. Enrolle la línea hasta
que queden 4 pulg. aproximadamente.
8. Trabe los extremos de las líneas en las dos muescas
de la bobina (Fig. 18).
9. Coloque de nuevo la bobina en el buje.
10. Inserte una línea en cada uno de los ojetes del buje
(Fig. 19).
11. Enderece las líneas sacándolas por las muescas.
Asegúrese de que las líneas se alimenten sin problema.
12. Colóquele de nuevo la tapa al buje de modo seguro.
13. Alargue manualmente la línea hasta la cuchilla de
línea. Consulte Ajustar la longitud de la línea de corte
de la sección Operación.
Seguro de
cierre de
la tapa
Bobina
Fig. 15
Fig. 16
Fig. 17
Tapa
Seguro de
cierre de
Muescas
la tapa
Buje
ADVERTENCIA: Antes de inspeccionar, limpiar o dar mantenimiento a la
unidad, apague el motor, espere a que todas las partes en movimiento se detengan,
desconecte la unidad de la alimentación y déjela enfriar. No seguir estas instrucciones
puede traer como consecuencia lesiones personales graves o daños a la propiedad.
ADVERTENCIA: No permita que las piezas plásticas se pongan en contacto con
líquido de frenos, gasolina, productos a base de petróleo, lubricantes penetrantes, etc.
Estos productos químicos pueden dañar, debilitar y destruir el plástico y esto, a su vez,
puede provocar lesiones personales graves.
Instrucciones de limpieza
• Utilice un cepillo de cerdas duras, que no sea de alambre, para limpiar la suciedad de la unidad.
• Limpie toda la unidad con un paño seco. No la lave ni rocíe con agua. No utilice solventes ni
detergentes fuertes.
Instrucciones de almacenamiento
• Siga las Instrucciones de limpieza antes mencionadas.
• Guarde la unidad en interiores, en un lugar seco y bajo llave, o en alto, fuera del alcance de los
niños y otras personas no autorizadas.
LOCALIZACIÓN Y SOLUCIÓN DE PROBLEMAS
CAUSA SOLUCIÓN
EL MOTOR NO ARRANCA
El cable no está bien conectado a la unidad o
a la alimentación eléctrica
Se disparó el GFCI del tomacorriente
(de usarse)
EL CABEZAL DE CORTE NO AVANZA LA LÍNEA
El cabezal de corte está atascado de hierba
El cabezal de corte no tiene línea Rellénelo con línea nueva
La bobina está trabada Reemplace la bobina
El cabezal de corte está sucio Limpie la bobina y el buje
La línea está soldada
La línea se torció al cambiarla Rebobine la línea
EL CABEZAL DE CORTE AVANZA LA LÍNEA SIN CONTROL
El cabezal de corte está roto
Asegúrese de que cada enchufe esté bien
conectado
Restablezca el GFCI
Limpie el cabezal de corte
Saque la sección soldada y rebobine la línea
Consulte la sección Llamadas a apoyo al cliente
Fig. 18
Fig. 19
NOTA: Para mantenimientos más allá de los ajustes menores mencionados anteriormente o para
piezas de repuesto, llame al Departamento de Atención al Cliente al 1-866-206-2707 (EE.UU.)
o al 1-877-696-5533 (Canadá).
Ojete
ESPECIFICACIONES
Tipo de motor ...........................................................................................................Eléctrico, con cable
Voltaje del motor ..............................................................................................................120 VCA, 60Hz
Amperaje del motor .........................................................................................................................5,5 A
Velocidad del motor (en vacío) ..................................................................................................7000 rpm
Diámetro de la línea de corte ................................................................................ 0.065 pulg. (1,65 mm)
Diámetro de la senda de corte .................................................................................... 14 pulg. (35,6 cm)
Peso .................................................................................................................................7 libras (3,2 kg)
* Todas las especifi caciones se basan en la información más reciente del producto, disponible en el
momento de la impresión. Nos reservamos el derecho de hacer cambios en cualquier momento,
sin previo aviso.
12
Page 13

NOTES
13
Page 14

NOTES
14
Page 15

NOTES
15
Page 16

MANUFACTURER’S LIMITED WARRANTY FOR:
GARANTIE LIMITÉE DU FABRICANT POUR:
GARANTÍA LIMITADA DEL FABRICANTE PARA:
The limited warranty set forth below is given by Remington LLC with respect to new merchandise purchased and used in the United States, its possessions and territories.
Remington LLC warrants this product against defects in material and workmanship for a period of two (2) years commencing on the date of original purchase and will, at its option, repair or replace, free of charge, any part found to be defective in material or workmanship. This
limited warranty shall only apply if this product has been operated and maintained in accordance with the Operator’s Manual furnished with the product, and has not been subject to misuse, abuse, commercial use, neglect, accident, improper maintenance, alteration, vandalism,
theft, fi re, water or damage because of other peril or natural disaster. Damage resulting from the installation or use of any accessory or attachment not approved by Remington LLC for use with the product(s) covered by this manual will void your warranty as to any resulting damage.
HOW TO OBTAIN SERVICE: Warranty service is available, WITH PROOF OF PURCHASE THROUGH YOUR LOCAL AUTHORIZED SERVICE DEALER. To locate the dealer in your area, visit our website at www.remingtonpowertools.com, check for a listing in the Yellow Pages,
call 1-866-206-2707 in the United States or 1-877-696-5533 in Canada, or write to P.O. Box 361032, Cleveland, OH 44136.
This limited warranty does not provide coverage in the following cases:
A. Tune-ups - Spark Plugs, Carburetor Adjustments, Filters
B. Wear items - Bump Knobs, Outer Spools, Cutting Line, Inner Reels, Starter Pulley, Starter Ropes, Drive Belts , Saw Chains, Guide Bars, Cultivator Tines.
C. Remington LLC does not extend any warranty for products sold or exported outside of the United States of America, its possessions and territories, except those sold through Remington’s authorized channels of export distribution.
Remington LLC reserves the right to change or improve the design of any Remington Product without assuming any obligation to modify any product previously manufactured.
No implied warranty, including any implied warranty of merchantability or fi tness for a particular purpose, applies after the applicable period of express written warranty above as to the parts as identifi ed. No other express warranty or guaranty, whether written
or oral, except as mentioned above, given by any person or entity, including a dealer or retailer, with respect to any product shall bind Remington LLC. During the period of the Warranty, the exclusive remedy is repair or replacement of the product as set forth
above. (Some states do not allow limitations on how long an implied warranty lasts, so the above limitation may not apply to you.)
The provisions as set forth in this Warranty provide the sole and exclusive remedy arising from the sales. Remington LLC shall not be liable for incidental or consequential loss or damages including, without limitation, expenses incurred for substitute or
replacement lawn care services, for transportation or for related expenses, or for rental expenses to temporarily replace a warranted product. (Some states do not allow limitations on how long an implied warranty lasts, so the above limitation may not apply to you.)
In no event shall recovery of any kind be greater than the amount of the purchase price of the product sold. Alteration of the safety features of the product shall void this Warranty. You assume the risk and liability for loss, damage, or injury to you and your property and/or to
others and their property arising out of the use or misuse or inability to use the product.
This limited warranty shall not extend to anyone other than the original purchaser, original lessee or the person for whom it was purchased as a gift.
How State Law Relates to this Warranty: This warranty gives you specifi c legal rights, and you may also have other rights which vary from state to state.
To locate your nearest service dealer dial 1-866-206-2707 in the United States or 1-877-696-5533 in Canada.
La garantie limitée énoncée ci-après est accordée par Remington LLC et concerne les marchandises neuves achetées et utilisées aux États-Unis, ses possessions et territoires.
Remington LLC garantit ce produit contre tout vice de matière ou de façon pendant une période de deux (2) les années à compter de la date d’achat initiale et elle se réserve le choix de réparer ou de remplacer, à titre gratuit, toute pièce présentant un vice de matière ou de
façon. Cette garantie limitée ne s’appliquera que dans la mesure où le produit aura été utilisé et entretenu conformément au Manuel de l’utilisateur fourni avec le produit et n’aura pas fait l’objet d’un usage inadéquat, abusif, commercial ou négligent, d’un accident, d’un entretien
inadéquat, d’une modifi cation, de vandalisme, d’un vol, d’un incendie, de dégâts d’eau ou d’un endommagement résultant d’un autre péril ou d’un désastre naturel. Les dommages résultats de l’installation ou de l’utilisation de tout accessoire ou équipement non approuvé par
Remington pour une utilisation avec le(s) produit(s) couvert(s) par le présent manuel annuleront la garantie en ce qui concerne les dommages qui en résulteraient éventuellement.
POUR L’OBTENTION DU SERVICE DE GARANTIE: le service au titre de la garantie est disponible, SUR PRÉSENTATION D’UNE PREUVE D’ACHAT, AUPRÈS DU DISTRIBUTEUR AGRÉÉ LOCAL. Pour trouver un distributeur dans votre région, visitez notre site Web
www.remingtonpowertools.com, consultez les Pages Jaunes, appelez le 1-866-206-2707 aux États-Unis ou 1-877-696-5533 au Canada, ou écrivez à l’adresse Remington LLC, PO Box 361032, Cleveland, OH 44136.
La garantie limitée n’offre aucune couverture dans les cas suivants:
A. Mises au point: bougies, réglages de carburateur, fi ltres
B. Éléments pouvant s’user : boutons de butée, bobines extérieures, fi l de coupe, moulinets intérieurs, poulie du démarreur, cordons de démarrage, courroies d’entraînement, chaînes de scie, guide barres, couteaux de motobineuse.
C. Remington LLC n’accorde aucune garantie pour les produits vendus ou exportés des États-Unis d’Amérique, de leurs possessions et territoires, exception faite en ce qui concerne les produits vendus par l’intermédiaire de ses canaux agréés de distribution à l’exportation.
Remington LLC se réserve le droit de modifi er ou d’améliorer la conception de ses produits sans pour autant assumer l’obligation de modifi er tout produit d’une fabrication plus ancienne.
Aucune garantie implicite, y compris toute garantie de valeur marchande ou d’adaptation à une fi n particulière, ne s’applique après la période applicable de garantie expresse écrite ci-dessus concernant les pièces qui sont identifi ées. Aucune autre garantie
ou caution expresse, écrite ou orale, à l’exception de celle mentionnée ci-dessus, accordée par toute personne ou entité, y compris tout distributeur ou détaillant, concernant tout produit n’engagera la responsabilité de Remington LLC. Pendant la période de
garantie, le recours exclusif est la réparation ou le remplacement du produit dans les conditions énoncées ci-dessus. (Certains états ne permettent pas la limitation de la garantie implicite, il est donc possible que la limitation ci-dessus ne s’applique pas à vous.)
Les clauses énoncées dans la présente Garantie constituent le recours unique et exclusif inhérent aux ventes. Remington LLC ne sera en aucun cas tenue pour responsable de tout dommage indirect ou consécutif ou de dommages comprenant, entre autres, les
dépenses encourues du fait du recours à des services de remplacement ou de substitution pour l’entretien des pelouses, le transport ou des frais connexes, ou les frais entraînés par une location destinée à remplacer provisoirement un produit sous garantie.
(Certains états ne permettent pas la limitation de la garantie implicite, il est donc possible que la limitation ci-dessus ne s’applique pas à vous.)
Aucun recouvrement, quel qu’il soit, ne sera d’un montant supérieur au prix du produit vendu. Toute modifi cation des dispositifs de sécurité du produit annulera la présente Garantie. Vous assumez tout risque et toute responsabilité résultant de la perte, de l’endommagement ou
du préjudice que vous et votre propriété et/ou d’autres et leur propriété pourront encourir d’un fait de l’utilisation normale, de la mauvaise utilisation ou de l’incapacité d’utiliser le produit.
La présente garantie limitée n’est accordée qu’à l’acheteur initial, au preneur initial ou à la personne à laquelle le produit a été offert.
Le Droit des États vis à vis de la présente garantie: la présente garantie vous confère certains droits juridiques et vous pouvez bénéfi cier d’autres droits lesquels varient d’un état à l’autre.
Pour obtenir l’adresse du distributeur réparateur le plus proche, composez le : 1-866-206-2707 aux États-Unis ou 1-877-696-5533 au Canada.
Remington LLC concede la garantía limitada establecida debajo para mercancías nuevas que sean compradas y usadas en los Estados Unidos, sus posesiones y territorios.
Remington LLC garantiza este producto contra defectos en el material y la mano de obra durante un período de dos (2) años a partir de la fecha de compra original y a su entera discreción, arreglará o substituirá sin costo alguno cualquier pieza cuyo material o mano de
obra se considere defectuoso. Esta garantía limitada se deberá aplicar únicamente si este producto ha sido manejado y mantenido de acuerdo al Manual del Operario incluido con el producto y, si no ha sido sometido a mal uso, abuso, uso comercial, negligencia, accidente,
mantenimiento inapropiado, alteración, vandalismo, hurto, fuego, agua o daños debidos a otros riesgos o desastre natural. Los daños ocasionados por la instalación o el uso de cualquier accesorio o aditamento que no esté aprobado por Remington y que sea usado con el (los)
producto(s) contemplados en este manual, anularán la garantía con respecto a cualquier daño resultante.
CÓMO OBTENER SERVICIO: El servicio de garantía está disponible A TRAVÉS DE SU DISTRIBUIDOR DE SERVICIO LOCAL AUTORIZADO, AL PRESENTAR EL COMPROBANTE DE COMPRA. Para localizar al distribuidor en su área, visite nuestro sitio en Internet en
www.remingtonpowertools.com, busque el aviso clasifi cado en las Páginas Amarillas, llame al 1-866-206-2707 en EE.UU. o al 1-877-696-5533 en Canada, o escriba a Remington LLC, PO Box 361032, Cleveland, OH 44136.
Esta garantía limitada no ofrece cobertura en los siguientes casos:
A. Sincronizaciones - bujías, ajustes de carburadores, fi ltros.
B. Artículos de desgaste, perillas percusivas, carretes externos, línea de corte, carretes internos, polea de arranque, cuerdas de arranque, correas motoras, vio cadenas, guía bares, dientes de cultivadora.
C. Remington no le ofrece ninguna garantía a los productos que sean vendidos o exportados fuera de los Estados Unidos de América, sus posesiones y territorios, excepto aquellos que se vendan a través de los canales de distribución para exportación autorizados por Remington.
Remington se reserva el derecho a cambiar o mejorar el diseño de cualquier producto Remington, sin adoptar ninguna obligación para modifi car cualquier producto fabricado con anterioridad.
Ninguna garantía implícita es aplicable después del período de aplicabilidad de la garantía expresa escrita con anterioridad, incluyendo cualquier garantía implícita de comerciabilidad o idoneidad para un propósito particular con respecto a las piezas
identifi cadas. Exceptuando lo mencionado anteriormente, ninguna otra garantía expresa bien sea escrita o verbal con respecto a cualquier producto que sea concedida por cualquier persona o entidad, incluyendo al distribuidor o minorista, deberá comprometer
a Remington LLC durante el período de la Garantía, el remedio exclusivo es el arreglo o la sustitución del producto según lo establecido anteriormente. (Algunos estados no permiten limitaciones en cuanto al período de duración de una garantía implícita, de manera
que puede que la limitación anterior no sea aplicable en su caso.)
Las estipulaciones establecidas en esta Garantía ofrecen la solución única y exclusiva que resulte de las ventas. Remington no deberá ser responsable de pérdidas o daños incidentales o consecuentes que incluyan, sin limitación, gastos incurridos debido a
la sustitución de servicios de mantenimiento de prados, transporte o gastos relacionados, o gastos de alquiler para reemplazar temporalmente un producto bajo garantía. (Algunos estados no permiten limitaciones en cuanto al período de duración de una garantía
implícita, de manera que puede que la limitación anterior no sea aplicable en su caso.)
Ningún tipo de recuperación deberá ser superior al precio de compra del producto vendido, en ningún caso. La alteración de las características de seguridad del producto deberá anular esta Garantía. Usted adopta el riesgo y la obligación de la pérdida, daño o lesión en su
persona o a su propiedad y/o la de otras personas y sus propiedades, que se origine a raíz del uso o mal uso, o la incompetencia para usar el producto.
Esta garantía limitada no deberá cubrir a ninguna otra persona distinta al comprador original, arrendatario original, o la persona para la cual se compró en calidad de regalo.
Relación de las leyes estatales con esta Garantía: Esta garantía le confi ere derechos legales específi cos, y puede que usted también tenga otros derechos, los cuales varían en cada estado.
Para localizar al distribuidor de servicio local más cercano, marque el número 1-866-206-2707 en EE.UU. o al 1-877-696-5533 en Canada.
REMINGTON LLC
P.O. Box 361032
Cleveland, OH 44136
 Loading...