

Page 1

Dual Track
Rotary Shaver
R-91
Use and Care Guide
Register Your New Product Today!
By registering your new Remington® product, you will receive these important benefits:
Proof of Ownership • Product Protection • Product Registration • Special Offers
Register online at: www.RemingtonProducts.com
Page 2

IMPORTANT SAFETY
INSTRUCTIONS
When using an electrical appliance, basic precautions should always be observed,
including the following. Read all instructions before using this shaver.
DANGER
To reduce the risk of electric shock:
■ Do not reach for an appliance that has fallen into water. Unplug it immediately.
■ Do not use while bathing or in the shower.
■ Do not place or drop into water or other liquid.
■ Do not place or store this appliance where it can fall or be pulled into a tub
or sink.
■ Except when charging, always unplug this appliance from the electrical outlet
immediately after using.
■ Use only when the shaver is in dry condition.
■ Detach the appliance from the power supply cord before cleaning.
■ Do not submerge in water.
WARNING
To reduce the risk of burns, fire, electrocution, or injury to persons:
■ An appliance should never be left unattended when it’s plugged in, except when
charging a rechargeable appliance.
■ Close supervision is necessary when this appliance is used by, on, or near
children, or individuals with special needs or certain disabilities.
■ Use this appliance only for its intended use as described in this manual. Do not
use attachments not recommended by Spectrum Brands, Inc.
■ Never operate this appliance if it has a damaged cord or plug or if it is not
working properly, if it has been dropped or damaged, or if it has been dropped
into water.
■ Keep the cord away from heated surfaces.
2
Page 3

■ Never drop or insert any object into any of the appliance’s openings.
■ Household use only.
■ Do not use outdoors or operate where aerosol (spray) products are being used
or where oxygen is being administered.
■ Always attach the plug to the appliance, then to outlet. To disconnect, turn all
controls to OFF, then remove plug from outlet.
■ Always pull on cord plug to unplug from wall socket. Never pull on electric cord.
■ Do not plug or unplug this appliance when your hands are wet.
■ Do not use an extension cord or a voltage converter with this appliance.
■ Do not wrap the cord around the appliance.
■ Always store this appliance and cord in a moisture-free area. Do not store it in
temperatures exceeding 140°F (60°C).
■ Detach removable power cords from appliance for storage.
■ Do not use this appliance with a damaged or broken head or cutters, as facial
injury may occur.
■ Shavers are for use on facial hair only. They should not be used for shaving the
hair on your head or any other part of your body.
SAVE THESE INSTRUCTIONS
CONTENTS
English ................................................................................1
French .................................................................................13
3
Page 4
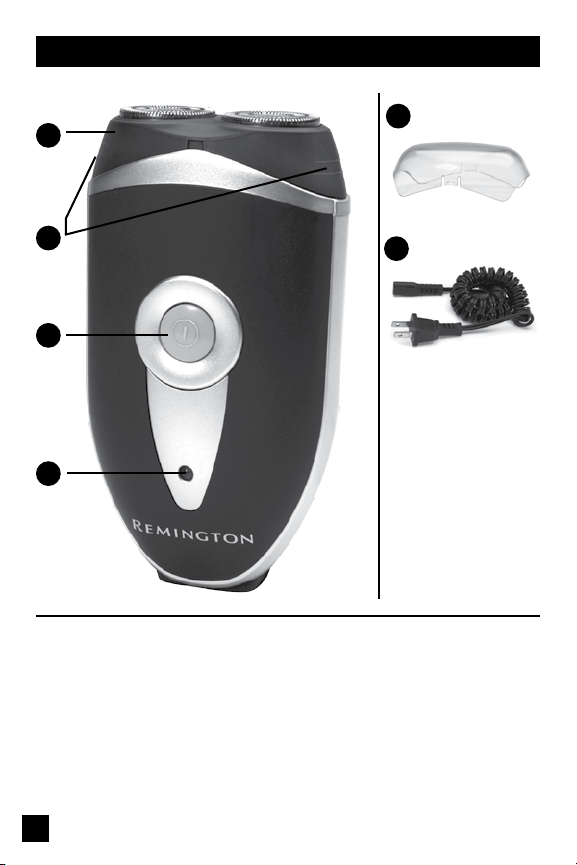
Product Features
B
D
A
C
SHAVER PARTS
A. On/off button
B. Head & cutter assembly
(head frame, cutter carrier)
C. Charging indicator
D. Head release grip
E
F
E. Head guard
F. Recharge cord
4
Page 5

About Your Shaver
Dual Track Rotary Shaver
FEATURE R-91
POWER
SYSTEM
VOLTAGE TYPE 120 VAC, 60 Hz
Power System
Cordless – this shaver can only be used when charged and detached from the
power cord.
Charging
Be sure that your hands, the shaver and the power cord are dry before
charging your shaver.
■ Be sure the shaver is switched off. Connect the shaver to the power cord, then
the power cord to the outlet. Charge for at least 24 hours when using for the first
time. The charging indicator light will glow while charging. Your shaver cannot be
overcharged.
■ Use the shaver until the battery is low. You can use the shaver cordless for up to
30 minutes.
■ Fully recharge for 24 hours every 6 months to maintain battery condition.
■ When empty, the battery will be charged within 16 hours.
■ The shaver can be attached to a outlet voltage of 120V.
**Remington recommends that you use your new shaver daily for up to four
weeks to allow time for your hair and skin to become accustomed to the
new shaving system**
cordless
5
Page 6
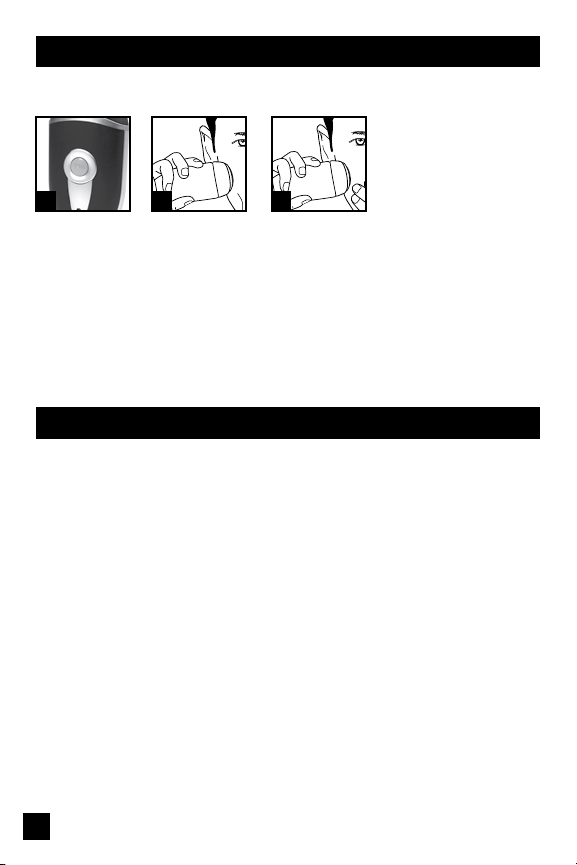
Shaving
Before using, read the important safety instructions in front of the manual.
A B C
1. Switch the shaver on.
2. Hold the shaving head so both heads touch your face simultaneously.
3. Stretch the skin with your free hand so the hairs stand
upright. Use short, circular strokes.
4. When finished, switch shaver off.
NOTE: Only apply light pressure on the shaving head while shaving (pressing too
hard can damage the heads and may cause breakage.)
Shaving Tips
■ Ensure your skin is dry and free of oils.
■ Wait at least 15 minutes after getting up before shaving, to ensure your face is
free of puffiness that may be present from sleeping.
■ Always hold the shaver at a right angle to the skin so that both heads are
touching the skin with equal pressure.
■ Use moderate to slow, circular stroking movement.
■ The use of short, circular motions in stubborn areas may obtain a closer shave,
especially along the neck and chin line.
6
Page 7
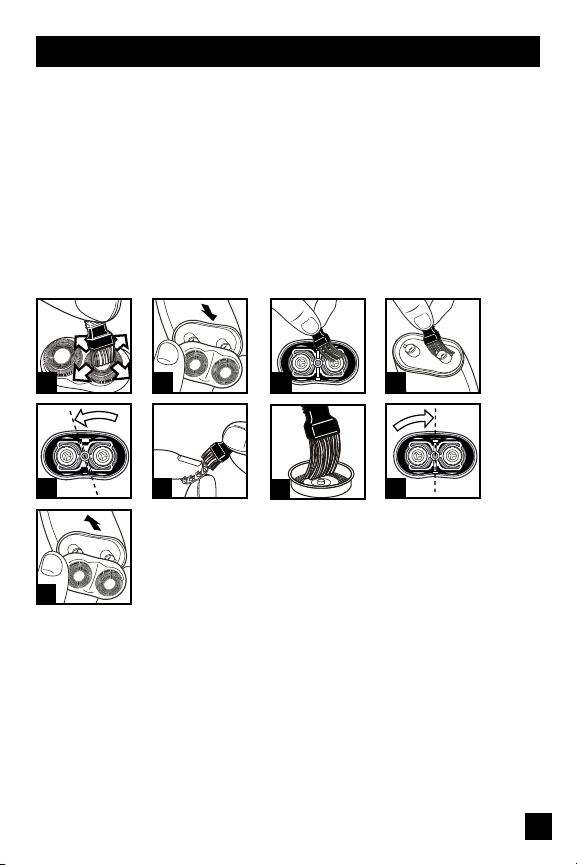
Cleaning & Maintenance
NOTE: **When cleaning your shaver, make sure the shaver is turned off and
disconnected from the power cord.**
CAUTION!
■ This shaver is NOT washable or water resistant. Do not clean or use under
running water.
■ To clean the external surfaces of the shaver, use a damp cloth. Do not use
strong detergents or other chemicals.
■ To dry, wipe the surface of the shaver with a dry towel. Do not use a hair dryer
or heater to dry the shaver.
D E F G
H
I
J
K
L
NOTE: **This appliance does not contain any user-serviceable parts.**
Daily Cleaning:
1. Clean the top of the shaver first. Use the brush supplied. (Diagram D)
2. Grasp tabs on both sides of the hairpocket. A better grip will be achieved if your
hands are dry. (Diagram E)
3. Use the brush to clean the inside of the shaving head unit carefully. (Diagram F)
4. Clean the hairpocket carefully with the brush. (Diagram G)
5. Place the shaving unit back onto the shaver. (Diagram L)
7
Page 8

Monthly Cleaning:
1. Perform Daily Cleaning steps 1-2 first.
2. On the underside of the shaving unit, turn the center switch to the left to release
the frame from the shaving unit. (Diagram H)
3. Take the 2 shaving heads (cutters & guards) carefully out of the shaving unit.
Clean the cutters and guards with the supplied brush. (Diagrams I & J)
4. After cleaning, place the shaving heads back into the shaving unit.
5. Put the frame back into the shaving unit and lock it in place by turning the switch
to the right. (Diagram K)
4. Place the shaving unit back onto the shaver. (Diagram L)
NOTE: **If you clean the shaving unit with alcohol or another degreasing
agent, you need to lubricate the guards with one drop of sewing machine oil
after cleaning. It helps to increase the lifespan of the shaving heads.**
Always keep the protective head guard on the shaving head when the shaver is
not in use.
Battery Removal/Disposal
When your rechargeable shaver reaches the end of its useful life, the Ni-MH
batteries must be removed from the shaver and be recycled or disposed of prop-
erly in accordance with your state and local requirements. If this is not required
by law, you may elect to dispose of the shaver with the batteries.
CAUTION! Do not put in fire or mutilate your batteries when disposing as they
may burst and release toxic materials. Do not short circuit as it may cause burns.
Dispose of properly in accordance with your local and state requirements.
How to Remove the Rechargeable Batteries:
1. Unplug the shaver.
2. Run the shaver until the motor stops.
3. Grab the tabs on each side of the hairpocket to remove the shaver head.
4. Using a small cross head screwdriver remove the screw inside the hairpocket.
5. Pull or gently pry apart the front half of the shaver to expose the 2 screws.
6. Unscrew the 2 screws that hold the rear housing.
7. Remove the rear housing.
7. Pull out the circuit board. Cut the connection plate on both ends of the battery.
8. Dispose of the battery with care.
8
Page 9

Product Registration
By registering your new Remington product you will receive these important
benefits:
■ Proof of ownership
■ Product protection
■ Product registration
■ Special offer
Register online at: www.RemingtonProducts.com
How To Order Shaver Accessories
Please refer to the shaver comparison and features chart near the front of
this manual that lists the correct replacement part number for your shaver.
It is very important to replace your head and cutters when necessary to ensure
a close, comfortable shave without irritation. We recommend they be replaced
every 12 months. Here are some signs of head and cutter wear, indicating that
replacement is needed:
■ Irritation: As the heads get excessively worn you may experience some skin
irritation. This would be especially noticeable when you apply moisturizing lotion.
■ Pulling: When the cutters wear you may feel a sense of pulling and a loss of
closeness when you shave. This is an indication that it is time to replace your
heads and cutters.
Maintain your shaver’s peak performance!
Keep Your Shaver Performing Like New!
■ Because your satisfaction is important to us, we want to make it simple for you
to keep your new shaver performing at its peak.
■ Did you know that for the best possible shave, it is necessary to replace the
heads and cutters on your shaver every 12 months?
■ Remington makes this easy!
Two Easy Ways to Order!
1. Call!
U.S. Residents call 1-800-392-6544
Canadian Residents call 1-800-268-0425
2. Order Online at www.RemingtonProducts.com
9
Page 10

Warranty
Limited Two-Year Warranty
Spectrum Brands, Inc. warrants this product against any defects that are due to faulty
material or workmanship for a two-year period from the original date of consumer
purchase. This warranty does not include damage to the product resulting from acci-
dent or misuse. If the product should become defective within the warranty period, we
will replace it free of charge. Return your product and sales receipt with your name,
address and day time phone number to: Remington Returns Center, 507 Stokely Dr.,
P.O. Box 1, Deforest, WI 53532
800-268-0425 in Canada.
Warranty excludes: Heads and cutters
KEEP ORIGINAL SALES RECEIPT AS PROOF OF PURCHASE FOR WARRANTY
PURPOSES.
This warranty does not cover products damaged by the following:
■ Accident, misuse, abuse or alteration of the product
■ Servicing by unauthorized persons
■ Use with unauthorized accessories
■ Connecting it to incorrect current and voltage
■ Wrapping cord around appliance causing premature wear & breakage
■ Any other conditions beyond our control
SPECTRUM BRANDS, INC. SHALL NOT BE RESPONSIBLE FOR ANY INCIDENTAL,
SPECIAL OR CONSEQUENTIAL DAMAGES RESULTING FROM THE USE OF THIS
PRODUCT. ALL IMPLIED WARRANTIES, INCLUDING BUT NOT LIMITED TO IM PLIED
WARRANTIES OF FITNESS AND MERCHANTABILITY, ARE LIMITED IN DURATION TO
TWO YEARS FROM DATE OF ORIGINAL PURCHASE.
. For more information call 800-736-4648 in the US or
This warranty gives you specific legal rights and you may also have other rights
which vary from state to state or province to province. Some states do not allow
the exclusion or limitation of incidental, special or consequential damages.
10
Page 11

Performance Guarantee
Spectrum Brands, Inc.
If within 30 days after you have purchased your Remington® branded product, you
are not satisfied and would like a refund, return it with the sales slip indicating
purchase price and date of purchase to the retailer from whom it was purchased.
Spectrum Brands, Inc. will reimburse all retailers who accept the product within 30
days from the date of purchase. If you have any questions concerning the moneyback guarantee, please call 800-736-4648 in the US or 800-268-0425 in Canada.
120VAC, 60Hz
Questions or comments: Call 800-736-4648 in the US or 800-268-0425 in
Canada. Or visit www.RemingtonProducts.com
Dist. by: Spectrum Brands, Inc., Madison, WI 53711
Dist. by: Spectrum Brands Canada, Inc., Mississauga, ON L5L OA1
® Registered Trademark of ROVCAL, Inc.
© 2010 ROVCAL, Inc. 03/10 Job #CS35473
Manufactured to Remington's specifications in the PRC. T22-26214
Money-back Offer
11
Page 12

12
Page 13

Dual Track
Rasoir à têtes rotatives
R-91
Guide d’utilisation et d’entretien
Enregistrez votre nouveau produit dès aujourd’hui!
En enregistrant votre nouveau produit Remington® vous profiterez des avantages
importants que voici : Preuve de propriété • Protection du produit •
Enregistrement du produit • Offres spéciales • Enregistrez votre produit
en ligne à l’adresse www.RemingtonProducts.com
Page 14

MESURES DE SÉCURITÉ
IMPORTANTES
Des mesures de sécurité élémentaires, dont les suivantes, s’imposent lors de
l’utilisation d’un appareil électrique. Lisez toutes les directives avant d’utiliser
cet appareil.
DANGER
Afin de réduire le risque de choc électrique :
■ Ne tentez pas de repêcher un appareil tombé à l’eau. Débranchez-le
immédiatement.
■ N’utilisez pas cet appareil en prenant un bain ou une douche.
■ Évitez de déposer et d’échapper cet appareil dans l’eau ou tout autre liquide.
■ Évitez de déposer ou de ranger cet appareil près d’une baignoire ou d’un évier
dans lequel il pourrait tomber.
■ Sauf lorsque vous le rechargez, débranchez toujours cet appareil dès que vous
avez fini de l’utiliser.
■ Utilisez le rasoir uniquement lorsqu’il est sec.
■ Débranchez l’appareil de son cordon d’alimentation avant de le nettoyer.
■ Ne plongez pas le rasoir dans l’eau.
AVERTISSEMENT
Afin de réduire le risque de brûlure, d’électrocution, d’incendie ou de blessure :
■ Ne laissez jamais un appareil sans surveillance s’il est branché, sauf pendant la
recharge d’un appareil rechargeable.
■ Surveillez étroitement les enfants ou les personnes ayant des besoins spéciaux
ou un handicap quelconque qui sont à proximité du rasoir, qui s’en servent ou
sur qui l’on s’en sert.
■ N’utilisez cet appareil que pour l’usage prévu dans ce livret. N’utilisez jamais
d’autres accessoires que ceux recommandés par Spectrum Brands, Inc.
■ N’utilisez jamais cet appareil si le cordon ou la fiche est endommagé, si
l’appareil ne fonctionne pas correctement, s’il a été échappé ou endommagé ou
s’il est tombé dans l’eau.
14
Page 15

■ Tenez le cordon loin des surfaces chauffées.
■ Évitez d’échapper ou d’insérer des objets quelconques dans l’appareil.
■ Cet appareil est destiné à un usage domestique seulement.
■ N’utilisez pas cet appareil à l’extérieur ni là où l’on utilise des produits aérosol
ou administre de l’oxygène.
■ Fixez toujours d’abord la fiche à l’appareil, puis à la prise de courant. Pour
débrancher, placez toutes les commandes en position ARRÊT, puis retirez la
fiche de la prise de courant.
■ Tirez toujours sur la fiche pour débrancher l’appareil de la prise électrique. Ne
tirez jamais sur le cordon.
■ Évitez de brancher ou de débrancher cet appareil avec les mains mouillées.
■ N’utilisez pas de rallonge ni de convertisseur de tension avec cet appareil.
■ Évitez d’enrouler le cordon autour de l’appareil.
■ Rangez toujours cet appareil et son cordon à l’abri de l’humidité. Évitez de les
ranger à des températures dépassant 60 °C (140 °F).
■ Retirez le cordon d’alimentation amovible de l’appareil avant de ranger ce
dernier.
■ N’utilisez pas cet appareil si les têtes ou les couteaux sont endommagés ou
brisés, car vous pourriez vous blesser au visage.
■ Cet appareil est conçu pour raser les poils du visage seulement. Ne l’utilisez pas
pour vous raser la tête ni quelque autre partie du corps.
CONSERVEZ CES DIRECTIVES
TABLE DES MATIÈRES
Anglais ..................................................................................1
Français ..............................................................................13
15
Page 16

Caractéristiques du produit
B
D
A
C
PIÈCES DU RASOIR
A. Interrupteur de mise en marche/
arrêt
B. Assemblage de têtes et de
couteaux (montant de têtes,
porte-couteaux)
C. Voyant de recharge
D. Prise de dégagement de la tête
E
F
E. Protège-tête
F. Cordon de recharge
16
Page 17

À propos de votre rasoir
Rasoir à têtes rotatives Dual Track
CARACTÉRISTIQUE R-91
SYSTÈME
D’ALIMENTATION
TYPE DE TENSION 120 VAC, 60Hz
sans cordon
Système d’alimentation
Sans cordon – ce rasoir peut être employé seulement lorsqu’il est rechargé et
débranché du cordon d’alimentation.
Recharge
Assurez-vous que vos mains, le rasoir et le cordon d’alimentation sont secs
lorsque vous rechargez le rasoir.
■ Assurez-vous que le rasoir est à l’arrêt. Branchez une extrémité du cordon
de recharge dans le rasoir puis l’autre extrémité dans la prise de courant.
Rechargez le rasoir pendant au moins 24 heures avant de l’utiliser pour la
première fois. Le voyant de recharge sera allumé pendant la recharge. Il est
impossible de surcharger les piles.
■ Utilisez le rasoir jusqu’à ce que les piles soient faibles. Le rasoir fonctionnera
sans cordon pendant 30 minutes.
■ Rechargez le rasoir pendant une période complète de 24 heures tous les 6 mois
pour préserver la durée de vie des piles.
■ Lorsque les piles sont complètement mortes, il faut 16 heures pour les recharger.
■ Le rasoir peut être branché à une prise de courant de 120 V.
**Remington vous recommande d’utiliser votre nouveau rasoir tous les
jours pendant jusqu’à quatre semaines pour permettre à la peau et à la
barbe de s’habituer au nouveau système de rasage.**
17
Page 18

Rasage
Avant d’utiliser le rasoir, il est important de lire les consignes de sécurité au
début du guide.
A B C
1. Mettez le rasoir en marche.
2. Tenez le rasoir de manière que les deux têtes touchent le visage simultanément.
3. Étirez la peau avec la main libre pour redresser les poils. Employez de petits
mouvements circulaires.
4. Lorsque vous avez terminé, mettez le rasoir à l’arrêt.
REMARQUE : En rasant, appliquez seulement une légère pression sur la tête du
rasoir (en pesant trop fort vous risquez d’endommager les têtes et de briser le
rasoir).
Conseils de rasage
■ Assurez-vous que vous avez la peau sèche et non huileuse.
■ Attendez au moins 15 minutes après vous être levé avant de vous raser, pour
que le visage ne soit plus boursouflé de sommeil.
■ Tenez toujours le rasoir à angle droit par rapport à la peau pour que les deux
têtes touchent la peau avec une pression égale.
■ Déplacez le rasoir en un mouvement de va-et-vient circulaire lent à modéré.
■ Utilisez de petits mouvements circulaires pour obtenir un rasage de près aux
endroits plus difficiles, en particulier dans le cou et le long de la mâchoire.
18
Page 19

Nettoyage et entretien
REMARQUE : **Avant de nettoyer le rasoir, mettez-le à l’arrêt et débranchez-le du cordon d’alimentation.**
ATTENTION!
■ Ce rasoir n’est PAS lavable ni résistant à l’eau. Ne le nettoyez pas et ne
l’utilisez pas sous l’eau courante.
■ Utilisez un linge humide pour nettoyer les surfaces externes du rasoir. N’utilisez
pas de détergent fort ni d’autres produits chimiques.
■ Pour essuyer le rasoir, passez une serviette sèche sur toute la surface.
N’utilisez pas de séchoir à cheveux ni de chaufferette pour le sécher.
D E F G
H
I
J
K
L
REMARQUE: **Cet appareil ne contient pas de pièces être remplacées par
l'utilisateur.
Tous les jours :
1. Nettoyez d’abord le dessus du rasoir. Utilisez pour ce faire la brosse fournie à cet
effet. (Diagramme D)
2. Saisissez les pattes de chaque côté de la cavité à poils. Vous réussirez mieux si
vous avez les mains sèches. (Diagramme E)
3. Utilisez la brosse pour nettoyer doucement l’intérieur de la tête du rasoir.
(Diagramme F)
4. Nettoyez ensuite doucement la cavité à poils avec la brosse. (Diagramme G)
5. Replacez la tête sur le rasoir. (Diagramme L)
19
Page 20

Tous les mois :
1. Procédez d’abord aux étapes de nettoyage 1 et 2.
2. Tournez le bouton central situé sous la tête du rasoir vers la gauche pour en
détacher le montant. (Diagramme H)
3. Enlevez doucement les deux ensembles de couteaux (avec leurs protecteurs)
de la tête. Nettoyez les couteaux et les protecteurs avec la brosse de nettoyage
fournie à cet effet. (Diagrammes I et J)
4. Lorsque vous avez terminé, replacez les couteaux dans la tête du rasoir.
5. Replacez le montant sur les couteaux dans la tête et verrouillez-le en place en
tournant le bouton vers la droite. (Diagramme K)
6. Replacez la tête sur le rasoir. (Diagramme L)
REMARQUE : **Si vous nettoyez le rasoir avec de l’alcool ou un autre produit
dégraissant, vous devrez ensuite lubrifier les protecteurs avec une goutte
d’huile pour machine à coudre. Ceci aide à prolonger la durée des couteaux.**
Laissez toujours le protège-tête sur le rasoir entre les utilisations.
Retrait/Élimination des piles
Lorsque le rasoir rechargeable aura atteint la fin de sa durée de vie utile, il fau-
dra en retirer les piles NiMH et les recycler ou les jeter de manière appropriée,
conformément aux exigences provinciales et régionales. Si la loi ne vous y oblige
pas, vous pouvez jeter le rasoir sans en enlever les piles.
ATTENTION! Ne pas incinérer les piles ni les endommager en les jetant car elles
peuvent exploser ou libérer des substances toxiques. Ne pas provoquer de court-
circuit sous peine de brûlures. Éliminer les piles de manière appropriée, conformément
aux exigences provinciales et régionales en vigueur.
Marche à suivre pour le retrait des piles rechargeables :
1. Débranchez le rasoir.
2. Faites fonctionner le rasoir jusqu’à ce que le moteur s’arrête.
3. Saisissez les pattes situées de chaque côté de la cavité à poils pour retirer la tête
du rasoir.
4. Au moyen d’un petit tournevis à tête étoilée, retirez la vis à l’intérieur de la cavité.
5. Tirez doucement sur la partie avant du boîtier du rasoir pour exposer les deux vis.
6. Dévissez les deux vis qui retiennent la partie arrière du boîtier du rasoir.
7. Détachez le boîtier.
8. Sortez la carte de circuits imprimés. Coupez la plaque de raccord aux deux
extrémités des piles.
9. Éliminez les piles de manière appropriée.
20
Page 21

Enregistrement du produit
En enregistrant votre nouveau produit Remington vous profiterez des avantages
importants que voici :
■ Preuve de propriété
■ Protection du produit
■ Enregistrement du produit
■ Offres spéciales
Enregistrez votre produit en ligne à l’adresse :
www.RemingtonProducts.com
Comment commander des accessoires pour le rasoir
Veuillez vous référer au tableau de comparaison et de caractéristiques
des rasoirs au début de ce manuel pour trouver le numéro de pièces de
rechange qui correspond à votre modèle.
Il est très important de remplacer les têtes et les couteaux lorsqu’il est nécessaire
de le faire afin d’obtenir un rasage de près et confortable, sans irritation. Nous
recommandons de les remplacer tous les 12 mois. Voici quelques signes d’usure
des têtes et des couteaux qui indiquent qu’il est temps de les remplacer :
■ Irritation : À mesure que les têtes s’usent, vous remarquerez peut-être que la
peau devient irritée après le rasage, en particulier lorsque vous appliquez une
lotion hydratante.
■ Tiraillement : À mesure que les couteaux s’usent, vous remarquerez que le
rasage n’est pas aussi ras et vous aurez l’impression que le rasoir tire sur les
poils. C’est un signe qu’il est temps de remplacer les têtes et les couteaux.
Préservez le fonctionnement exceptionnel de votre rasoir!
Gardez sa mécanique à l’état neuf!
■ Parce que votre satisfaction est primordiale pour nous, nous voulons vous aider
à conserver votre rasoir à son niveau de fonctionnement optimal.
■ Saviez-vous que pour obtenir le meilleur rasage possible, il est nécessaire de
remplacer les têtes et les couteaux du rasoir tous les 12 mois?
■ Remington vous facilite la vie!
Deux moyens simples de commander!
1. Téléphonez! Résidents des États-Unis, composez le
1-800-392-6544. Résidents du Canada, composez le 1-800-268-0425.
2. Commandez en ligne à l’adresse : www.RemingtonProducts.com
21
Page 22

Garantie
Garantie limitée de deux ans
Spectrum Brands, Inc. garantit ce produit contre toute défectuosité due à des vices
matériels et de fabrication pour une période de deux ans à compter de la date
d’achat initiale, à l’exception des dommages résultant d’un accident ou d’un mauvais
usage. Si le produit devait faire défaut au cours de la période de garantie, nous le
remplacerons sans frais. Retournez votre produit accompagné du reçu de caisse avec
vos nom, adresse et numéro de téléphone de jour à : Remington Returns Center, 507
Stokely Dr., P.O. Box 1, Deforest, WI 53532
composez le 800-736-4648 aux É.-U. ou le 800-268-0425 au Canada.
Pièces exclues de la garantie : Têtes et couteaux
CONSERVEZ LE REÇU DE CAISSE ORIGINAL COMME PREUVE D’ACHAT AUX FINS
DE LA GARANTIE.
Cette garantie ne couvre pas les produits endommagés par ce qui suit :
■ Accident, mésusage, usage abusif ou modification du produit
■ Réparation par des personnes non autorisées
■ Utilisation avec des accessoires non autorisés
■ Branchement de l’appareil dans une prise possédant une tension ou un courant
inadéquat
■ Enroulement du cordon autour de l’appareil, provoquant l’usure prématurée et
le bris
■ Toute autre circonstance indépendante de notre volonté
SPECTRUM BRANDS, INC. DÉCLINE TOUTE RESPONSABILITÉ POUR LES DOMMAGES
INDIRECTS, PARTICULIERS OU CONSÉCUTIFS RÉSULTANT DE L’UTILISATION DE CE
PRODUIT. TOUTES LES GARANTIES IMPLICITES, Y COMPRIS SANS TOUTEFOIS S’Y
LIMITER LES GARANTIES DE QUALITÉ MARCHANDE ET D’ADÉQUATION À UN USAGE
PARTICULIER, SONT LIMITÉES À UNE PÉRIODE DE DEUX ANS À COMPTER DE LA
DATE D’ACHAT INITIALE.
. Pour de plus amples renseignements,
La présente garantie vous confère des droits spécifiques, cependant vous pouvez
avoir d’autres droits qui varient d’un État ou d’une province à l’autre. Par exemple,
certains États n’autorisent pas l’exclusion ni la limite des dommages indirects, particuliers et consécutifs.
22
Page 23

Garantie de rendement
Garantie de remboursement de Spectrum Brands, Inc.
Si vous n’êtes pas satisfait et désirez obtenir un remboursement au cours des 30
jours qui suivent l’achat de ce produit de marque Remington®, retournez le produit
avec son reçu de caisse indiquant le prix et la date d’achat au détaillant où vous
l’avez acheté. Spectrum Brands, Inc. remboursera tous les détaillants qui acceptent le produit dans les 30 jours suivant la date d’achat. Si vous avez des questions
concernant la présente garantie de remboursement, veuillez composer le 800-7364648 aux É.-U. ou le 800-268-0425 au Canada.
120 VAC, 60Hz
Questions ou commentaires : Composez le 800-736-4648 aux É.-U. ou le
800-268-0425 au Canada ou visitez www.RemingtonProducts.com
Dist. par : Spectrum Brands, Inc., Madison, WI 53711
Dist. par : Spectrum Brands Canada, Inc., Mississauga, ON L5L OA1
® Marque déposée de ROVCAL, Inc.
© 2010 ROVCAL, Inc. 03/10 Travail #CS35473
Fabriqué selon les spécifications de Remington en RPC T22-26214
23
Page 24

 Loading...