

Page 1
IMPORTANT SAFETY
Product Features
How to Use
Use and
Care Guide
PG-165
Register Your New Product Today!
By registering your new Remington® product, you will receive these important benefits:
Proof of Ownership • Product Protection • Product Registration • Special Offers
Register online at: www.RemingtonProducts.com
INSTRUCTIONS
When using electrical appliances,
especially when children are present, basic safety precautions should
always be followed, including the
following:
READ ALL
INSTRUCTIONS
BEFORE USING.
DANGER
As with most electrical appliances,
electrical parts are electrically live
even when the switch is off. To
reduce the risk of electric shock:
■ Do not use while bathing or in
the shower.
■ Do not place or drop into water
or other liquid.
■ Do not place or store this
appliance where it can fall or
be pulled into a tub or sink.
wARNING
To reduce the risk of burns, fire,
electric shock or injury to persons:
■ This appliance is for household
use only.
■ Close supervision is necessary
when this appliance is used by,
on, or near children or individuals
with certain disabilities or special
needs.
■ Use this appliance only for
its intended use as described
in this manual. Do not use
attachments not recommended by
manufacturer.
■ Never operate this appliance if it
is not working properly, if it has
been dropped or damaged, or if it
has been dropped into water.
■ Never drop or insert any object
into any of the appliance’s openings.
■ Do not use outdoors or operate
where aerosol (spray) products
are being used, or where oxygen
is being administered.
■ Always store this appliance and
cord in a moisture-free area.
Do not store it in temperatures
exceeding 140°F (60°C).
■ Do not use this appliance with a
damaged or broken cutter unit,
as injury may occur. Always make
sure blades are aligned properly.
■ Dispose of used batteries properly. Do not incinerate. Batteries
may explode if overheated. Do not
wrap in metal or aluminum foil.
KEEP AwAY FROM ChILDREN
SAvE ThESE INSTRUCTIONS
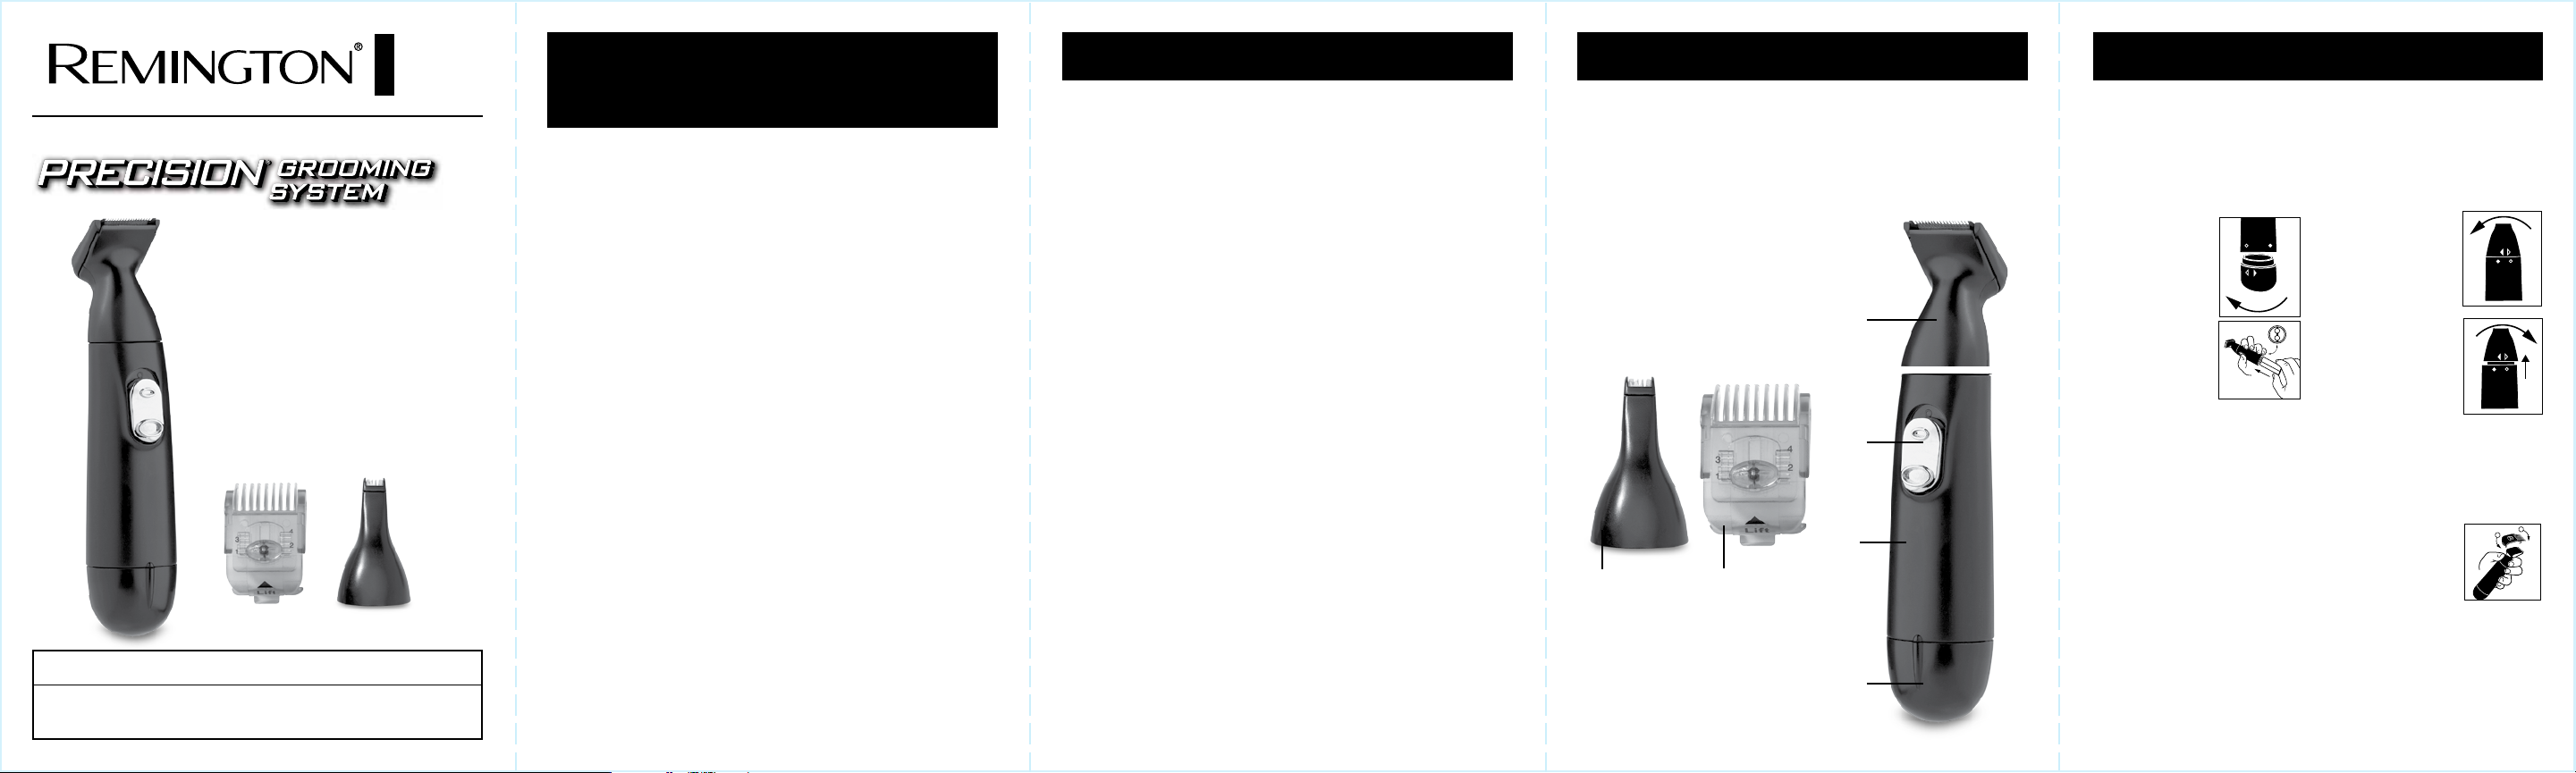
Personal Groomer
Congratulations on your purchase of a Remington® Branded groomer. It contains
all the attachments and accessories you need to maintain a well-groomed look on
your beard, mustache, sideburns, neckline, nose, ears, and eyebrows.
Groomer Parts
(A) ON/OFF switch
(B) Groomer
(C) Battery cap
(D) Trimmer attachment
(E) Nose, ear, trimmer attachment
(F) Hair length comb attachme
(E) (F)
nt
(D)
(A)
(B)
(C)
Inserting Batteries into
the PG-165
The PG-165 requires 2 AAA batteries.
■ Turn the groomer off.
■ Twist the battery cap so the open
arrow aligns with the open circle,
and pull it off.
■ Insert batteries
side by side, as
shown, making
sure the (+) and
(-) markings on
the batteries
match those
inside the battery
compartment.
This is important
because the
groomer will not
operate if batteries are inserted
incorrectly.
■ Replace the battery compartment
cap and turn it so that the solid
arrow aligns with the solid circle
+-
-
+
Battery Cautions
■ Batteries should not be left in the
unit if the unit is not in use for
long periods.
■ To prevent battery corrosion, the
unit should be kept in a dry environment.
■ Dead batteries should be removed
immediately and disposed of
properly.
■ Do not use recharged batteries
with this appliance. The lower
voltage in recharged batteries
impairs the performance of the
cutting unit.
Attachments
■ To attach: Set the
attachment onto
the open end of
the groomer, and
turn it so the solid
arrow aligns with
the solid circle.
■ To remove: Turn
the attachment so
the open arrow
aligns with the
open circle, and
pull it off.
Hair Length Combs
The hair length combs attach onto
the wide trimmer head to control the
.
length of the cut. There are four positions for each attachment:
Hair length comb 1
1- Extra close
2- Close
3- Short
4- Medium short
■ To attach: Place the front hooks
of the hair length attachment
over the front of the wide trimmer
head, and pivot it onto the backside of the trimmer head until it
locks into place.
■ To remove: Push up on the tab on
back of hair length attachment.
LOCK UNLOCK
LOCK UNLOCK
2
1
Page 2
Usage Tips
Grooming
■ Hairs should be dry and free of
lotions when using your groomer.
■ Comb hairs outward so they are
at their maximum height and facing in the same direction.
■ Make sure the groomer does not
have damaged or broken cutter
units, which could cause injury
if used.
Beard
What to use: wide trimmer head +
comb attachment
■ Attach the desired hair length
comb to the
groomer head as
descirbed on the
previous page.
■ Set the comb to
the desired trim
length. It’s usually a good idea to
use a longer setting until you are
familiar with the groomer, to avoid
trimming too much hair.
■ Turn the groomer on.
■ Start under your chin and, follow-
ing your jaw line, trim toward your
ear and upper beard line using an
upward motion. Allow the comb
attachment to follow the contours
of your face.
Thinning and tapering
What to use: wide trimmer
■ Turn the groomer on.
■ Use small comb to hold the beard
hairs in place while trimming.
■ Holding the
groomer with
the cutting unit
facing away from
you, move the
groomer along
the length of the
comb.
Beard line
What to use: wide trimmer head +
comb attachment
■ Turn the groomer on.
■ Hold the groomer with the trim-
mer cutting blades facing you.
■ Lightly touch the cutting blades to
your face and draw the groomer
toward your beard line. For your
neck, draw the groomer away
from desired beard line.
Ear
Ear canal
What to use: nose/ear trimmer head
■ Turn the groomer on.
■ Gently insert groomer’s cutting
unit into the outer
ear canal. For
safe trimming,
avoid inserting
the groomer more
than 1/4 inch into
the ear canal.
■ Rotate the groomer in a circular
motion, gently moving it in and
out as your rotate.
Outer ear
What to use: nose/ear trimmer head
■ Turn the groomer on.
■ Carefully guide the groomer
around surfaces of the ear where
there are unwanted hairs.
Mustache
What to use: wide trimmer
■ Use a small comb to straighten
hairs for trimming.
■ Turn the groomer on.
■ Lightly touch the
cutting blades to
the mustache. Too
much pressure
may trim more hair
than desired.
■ Since all hairs do
not grow in the
same direction,
you may want to try trimming
upwards, downwards, or across.
■ Practice will produce optimum
results.
Nape of Neck
What to use: wide trimmer
■ Use a hand mirror if you are
trimming the nape of your neck
yourself. A mirror is unnecessary
if someone else is trimming it
for you.
■ Lift the hair up off the neck, and
use your index finger to cover
the roots of any hair you DON’T
want to trim. This will serve as a
bumper to prevent accidentally
trimming too much hair.
■ Turn the groomer
on and hold it
base-side up, as
shown.
■ Touch the cutting
edges to your
neck, and move
the groomer slowly up your neck
until it touches the finger that’s
covering the roots of your hair.
Nose
What to use: nose/ear trimmer head
■ Turn the groomer on.
■ Insert the groomer’s cutting unit
gently into the nostril. For safe
trimming, avoid inserting the
groomer more than
1/4 inch into your
nostril.
■ Rotate the groomer
in a circular motion
around the opening
of the nostril, gently
moving it in and out
as your rotate.
What Attachments to Use
Trimmer
Beard linex
Eyebrow
Nape of neck x
Nose/ear
trimmer
xraE
x
xesoN
Hair length
combs
xxdraeB
xxehcatsuM
xxsnrubediS
Cleaning and Maintenance
Clean your Groomer Regularly
Clean your groomer regularly to ensure your unit’s operating life is not prematurely shortened.
Cleaning attachments with water
■ Remove attachments.
■ Rinse attachments
under warm
running water. DO
NOT use hot water,
which may cause
damage to
components.
■ You can use a hair
dryer on a cool or
medium heat setting
to help dry off the
attachments if
desired.
! Do not use harsh or corrosive cleaners on the unit or its cutters.
! Do not apply pressure or hard objects to cutters.
Cleaning with brush
Thoroughly brush and blow out hair clippings from cutter, bottom of attachments,
and top of power handle.
PG-165 Lubricating blades
Lubricate your PG-165’s grooming and nose/ear attachments once a month to
ensure optimum performance.
■ Apply 1-2 drops of blade oil to the attachments’ cutter blades.
■ Spread it lightly over the cutters with your fingertip.
■ Wipe away any excess oil from the cutters or the groomer.
Troubleshooting
? If the cutters do not move
The cutting unit may be dirty and clogged. Clean and lubricate the unit as
described on the previous page.
? If the groomer doesn’t work when turned on
PG-165: One or both of the batteries may simply be inserted upside down. The
groomer will not function if the batteries are positioned incorrectly. Open the battery compartment as instructed previous in this manual, and see if the batteries
need to be turned around.
Warranty
Limited Two-Year Warranty
Spectrum Brands, Inc. warrants this product against any defects that are due
to faulty material or workmanship for a two-year period from the original date
of consumer purchase. This warranty does not include damage to the product
resulting from accident or misuse.
If the product should become defective within the warranty period, we
will replace it free of charge. Return
your product and sales receipt with
your name, address and day time
phone number to: Remington Returns
Center, 507 Stokely Dr., P.O. Box 1,
Deforest, WI 53532. Please call 800736-4648 in the U.S. or 800-2680425 in Canada.
This warranty does not cover products damaged by the following:
■ Accident, misuse, abuse, or
alteration of the product
■ Servicing by unauthorized persons
■ Use with unauthorized
accessories
■ Any other conditions beyond our
control
SPECTRUM BRANDS, INC. SHALL
NOT BE RESPONSIBLE FOR ANY
INCIDENTAL, SPECIAL OR
CONSEQUENTIAL DAMAGES
RESULTING FROM THE USE OF THIS
PRODUCT. ALL IMPLIED
WARRANTIES, INCLUDING BUT NOT
LIMITED TO IM PLIED WARRANTIES
OF FITNESS AND MERCHANTABILITY,
ARE LIMITED IN DURATION TO TWO
YEARS FROM DATE OF ORIGINAL
PURCHASE.
This warranty gives you specific legal
rights and you may also have other
which vary from state to state.
rights
Some states
sion or limitation of
or consequential damages.
do not allow the exclu-
incidental, special,
Spectrum Brands, Inc.
Money-back Offer
If within 30 days after you have purchased your Remington® branded
product, you are not satisfied and
would like a refund,
return it with the sales slip indicating
purchase price and date of purchase
to the retailer from whom it was
purchased. Spectrum Brands, Inc. will
reimburse all retailers who accept the
product within 30 days from the date
of purchase. If you have any questions concerning the money-back
guarantee, please call 800-736-4648
in the U.S. or 800-268-0425 in
Canada.
Questions or comments:
Call 800-736-4648 in the U.S. or
800-268-0425 in Canada.or visit
www.RemingtonProducts.com
®Registered Trademark of Spectrum
Brands, Inc., or one of its
subsidiaries.
©2010 SBI
03/10 Job# CS38552
Spectrum Brands, Inc.
Madison, WI 532711
Manufactured to Remington’s
specifications in the PRC.
T22-28887
 Loading...