

Page 1
STYLE SERIES F4
USE & CARE
MANUAL
PLEASE READ
PRIOR TO USE
To register your product go to
www.remington-products.com.au
www.remington.co.nz
2 YEAR WARRANTY F4500AU
Page 2

IMPORTANT SAFETY INSTRUCTIONS
When using electrical appliances, basic precautions should
always be observed, including the following.
READ ALL INSTRUCTIONS BEFORE USING
DANGER: As with most electrical appliances, electrical parts are
electrically live even when the switch is off.
For additional protection, the installation of a residual current
device (rcd) having a rated residual operating current not
exceeding 30 mA is advisable in the electrical circuit supplying
the bathroom. Ask your installer for advice.
WARNING: TO REDUCE THE RISK OF BURNS, ELECTROCUTION AND
FIRE OR INJURY TO PERSONS
• The appliance should never be left unattended when plugged into a
power outlet, except when charging the appliance.
• This appliance should not be used by children or other persons with
reduced physical, sensory or mental capabilities or lack of experience
and knowledge unless they have been given supervision or instruction
concerning use of the appliance in a safe way and understand the
hazards involved.
• Children shall not play with the appliance.
• Cleaning and user maintenance shall not be made by children without
supervision.
• Never operate this appliance if it has a damaged cord or plug, if it is
not working correctly, if it has been dropped or damaged, or dropped
into water. If the supply cord or plug of the appliance is damaged it
must be replaced by the manufacturer, its service agent or similarly
qualified persons in order to avoid a hazard. It cannot be repaired.
• Keep the cord away from heated surfaces.
• Charge, use and store the product at a temperature between 0°C and
32°C.
• Do not use outdoors or where aerosol (spray) products are being used,
or where oxygen is being administered.
• Do not use this appliance with damaged or broken tracks, foils or
cutters, as injury may occur.
• For use on facial hair only. Not intended for shaving the hair on your
head.
2
Page 3

• Do not plug or unplug the appliance with wet hands.
• For household use only.
• Do not place or store the appliance or charging adaptor where it can
fall or be knocked into a sink or bath.
• Do not place in or drop into water or any other liquid for extended
periods of time.
• If an appliance falls into water, “unplug it” immediately. Do not reach
into the water.
• Unplug the charging adaptor from the electrical outlet immediately after
fully charging.
• Unplug the power adaptor from the appliance before cleaning the
appliance in water.
• Use this appliance only for its intended use as described in this
manual.
• Do not use attachments not recommended by Remington.
• Never drop or insert any object into any opening of this appliance.
• Always store the charging adaptor in a moisture-free location.
• Do not use on people who are asleep.
• Do not use an extension cord or a voltage converter with this
appliance.
• Do not wrap the cord around the appliance.
• Remington strongly recommends that an approved Safety Switch
(Residual current device) be installed to protect all bathroom power
outlets. Ask an electrical contractor for advice.
SAVE THESE INSTRUCTIONS
3
Page 4
F4500AU STYLE SERIES F4
USE & CARE INSTRUCTION MANUAL
Thank you for purchasing your new Remington® Style Series F4 foil shaver.
Inside this manual you will find tips on using and caring for your shaver.
2
4
1
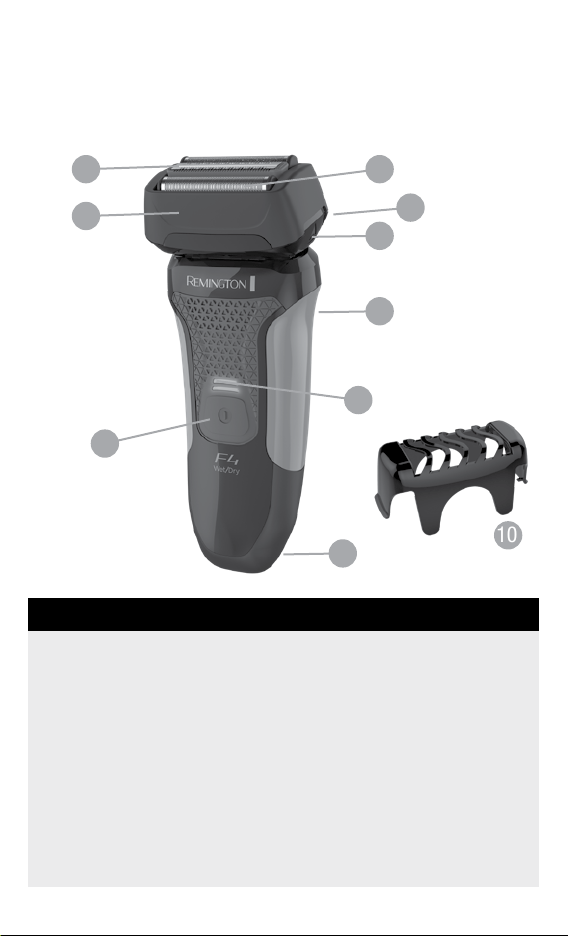
KEY PARTS
1. On/Off Button
2. Intercept Trimmer
3. Shaving Foils
4. Hair Pocket
5. Foil Assembly Release
Buttons
6. Pop Up Trimmer (not shown)
3
9
5
6
8
10
7
7. Power Port (not shown)
8. Charging Indicator Light
9. Head Lock Button (not
shown)
10. Stubble Styler
Also Includes
• Cleaning Brush
• Power Adaptor
4
Page 5
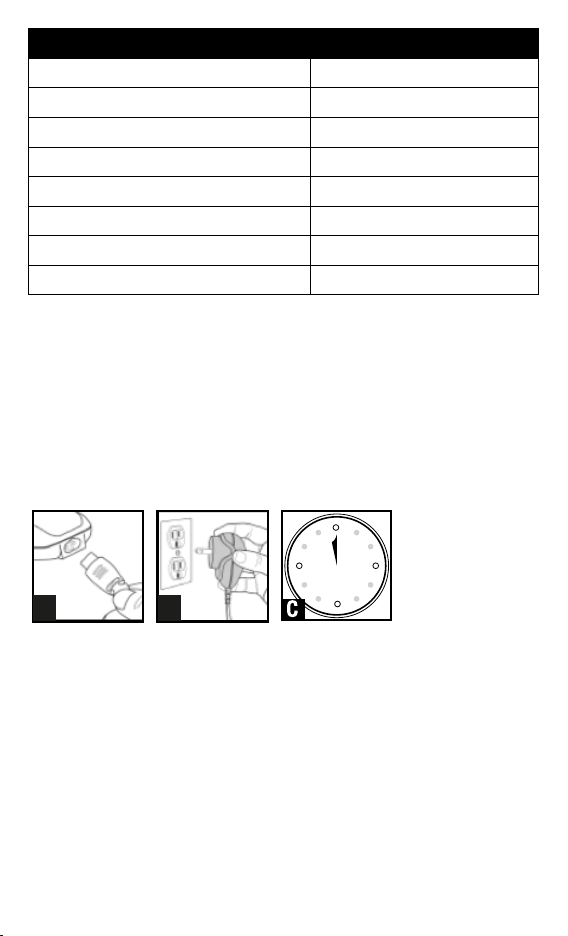
F4500AU SPECIFICATIONS
C
Power System Cordless (Rechargeable)
Initial Charge Time 4 Hours
Full Charge Time 4 Hours
Cordless Shave Time 50 Minutes
Indicators Charging/Low/Full Charge
Volt age Type Worldwide
Waterproof Yes
Replacement Head & Cutters SPF-STYLE
Power System: Cordless – shaver can only be used without the power
cord.
Indicator: LED Display
Voltage Type: Worldwide Voltage – shaver automatically adapts to an
outlet voltage between 100V and 240V.
Note: Some countries will require the use of a plug adaptor that is not
included with your shaver.
CHARGING
4
HOURS
A B
Before using, read the important safety instructions in this manual.
1. Ensure the product is switched off. Connect the shaver to the adaptor
(Diagram A).
2. Connect to the mains (Diagram B) and charge for at least 4 hours
when using for the first time (Diagram C). This first charge is important
to the shaver’s battery life.
3. When plugged, the charging indicator will light up.
4. When empty, the battery should be charged for 4 hours, and will
provide 50 minutes of shaving time.
5. To preserve the life of the batteries, allow them to fully discharge
every six months, and then recharge them for 4 hours
5
Page 6

Caution:
• Make sure the shaver and your hands are dry when charging the
shaver.
• Always charge the shaver in a cool, dry place.
CHARGING INDICATOR LIGHTS
CHARGE LEVEL LIGHTS
Charging The lights will come on one after the
other then go off in a repeating pattern.
Fully Charged Both lights will come on for 5 minutes
then go out.
Low charge/charging required The bottom light will flash rapidly.
Battery capacity 50% or higher Both lights will come on.
Battery capacity 50% or lower The bottom light will come on.
GETTING STARTED
Before operating your shaver, remove the protective head guard, which
protects the foils and cutter assembly. It is important to remove it correctly
to avoid damaging the clips that hold it to the shaver.
1. Press lightly on the top of the protective head guard.
2. Lift the lower rear edge.
3. Pull the protective head guard away from the shaver.
When the shaver is not in use, always keep the protective head guard on
the shaver head and keep the trimmer in the OFF position.
SHAVING
D
1. Press power button to turn on. (Diagram D)
2. Shave face and neck using linear strokes. (Diagram E)
3. Shaver can be used on a dry face or with shave cream or gel.
4. Shaver can be used in the shower.
6
Page 7

SHAVING TIPS (WET) WITH GEL OR FOAM
We recommend that you use the shaver in the shower for optimal
performance.
Note: Normally, the head pivots freely but its movement can be restricted
by sliding the head lock button to the locked position on the back of the
shaver.
Note: In order to ensure optimal performance, thoroughly rinse the shaver
head under water during and after shaving.
• Apply water to face and neck area.
• Apply shave gel or foam to the face and neck.
• Rinse shaver head under water.
• Hold the shaver at 90° to your skin.
• Stretch your skin and shave against the direction of your beard growth
using linear strokes.
• For areas such as the chin and neck where hair grows in different
directions use small circular strokes.
• While shaving do not press hard against the skin to avoid skin irritation
and/or damage to the foils.
• Throughout the shave, regularly rinse shaver head under water to
avoid residue build up.
• When finished shaving, rinse face.
• Thoroughly rinse shaver head of all gel or foam.
• Follow cleaning and care instructions located on page 10
SHAVING TIPS (DRY)
• Ensure your skin is free of oils.
• Wait at least 15 minutes after waking up before shaving, to ensure
your face is free of puffiness that may be present from sleeping.
• Hold the shaver at 90° to your skin.
• Stretch your skin and shave against the direction of your beard growth
using linear strokes.
• For areas such as the chin and neck where hair grows in different
directions use small circular strokes.
• While shaving do not press hard against the skin to avoid skin irritation
and/or damage to the foils.
7
Page 8

Note: As with every shaver, your shave will improve over time. Allow up to
F G H
four weeks of daily shaving to develop effective shaving style and for your
skin to adjust to the new shaver. The adaptation period might take a little
longer if your skin is sensitive, if you are switching from a different method
of shaving, or if you alternate between shaving methods.
TRIMMING
Pop-up Trimmer:
1. Push trimmer release button to engage trimmer. (Diagram F)
2. Trim long, difficult hairs and side burns. (Diagram G)
3. Close trimmer by pressing down. (Diagram H)
Note: Lubricate teeth with oil every 6 months.
Stubble Styler:
The Stubble Styler comb is designed to help you maintain a 3-day stubble
look. Please be aware that you cannot shave a full long beard down to
stubble length with the stubble styler.
To achieve the look:
• Clean shave your face initially and then let your beard grow for two or
three days.
• Attach the stubble styler to the cutting head of the shaver.
• Shave your face with short, linear motions. The stubble guard will only
trim hairs that are over 1.5 mm in length.
• Shave with the stubble styler at least every two days to maintain the
length and do not allow hairs to get too long.
• Detach the stubble styler if you wish to have a clean shave look on
your neck or other areas of your face where you do not want stubble
showing.
Tips: Faster growing areas of your beard will begin to be trimmed first.
Slower growing areas of your beard will fill in over a period of a few days or
weeks.
8
Page 9

Page 10

Price each
handling
Price each
Qty Amount
NZD
AUD
$
$
$14.95 NZD
$44.95 NZD
$11.95 AUD
$39.95 AUD
SP4
7.50
$
$
$
$
Sub Total
SP5 $11.95 AUD $14.95 NZD
TOTAL
Postage &
Spectrum Brands Australia Pty Ltd
Locked Bag 3004
Braeside, VIC 3195
AUSTRALIA
Article
eplacement Shaving Head & Cutters for F4500AU SPF-STYLE
R
Face Saver: Pre-shave Powder Stick
Shaver Saver: Aerosol Spray Cleaner
Remington is a Registered Trademark
of Spectrum Brands, Inc., or one
of its subsidiaries.
Page 11

MONEY BACK OFFER – AUSTRALIA / NEW ZEALAND ONLY
If within 6 0 days you are not fully satisfied with your Remington® shaver, just return the shaver
with this completed coupon and a copy of your Australian/New Zealand purchase receipt to
®
Remington
Please allow 6-8 weeks for your cheque to arrive.
Name:
Address:
City:
State: Postcode: DOB: / /
Contact No: Area Code: Ph:
Product Model number:
Is this the first Remington shaver you have owned /purchased? Yes No
Why are you returning this shaver?
Skin Irritation Shave is not close enough Prefer a rotary/ foil shaver
Other:
. In return, we will send you a cheque for the full purchase price of the shaver.
Spectrum Brands Australia Pty Ltd
Locked B ag 300 4
Braeside, VIC 319 5
AUSTRALIA
Custom er service in Aust ralia: 1800 623 118
E-mail: consumer.enquiry@remington-products.com.au
Website: www.remington-products.com.au
Spect rum Brands New Z ealand L imited
PO Box 98 17
Newmar ket, Auck land 1149
NEW ZEALAND
Custom er service in New Ze aland: 08 00 736 776
E-mail: info@remington.co.nz
Website: www.remington.co.nz
10
Page 12

CLEANING & MAINTENANCE
The shaver is a wet/dry appliance. The shaver may be cleaned under warm
water.
Note: When cleaning your shaver, make sure the shaver is turned off and
disconnected from the power cord.
Caution:
When cleaning the external surfaces of the shaver, use a damp cloth. Do
not use strong detergents or other chemicals.
To dry, wipe the surface of the shaver with a dry towel. Do not use a hair
dryer or heater to dry the shaver.
Note: Lubricate cutters after rinsing with Remington Shaver Saver (SP4).
Cleaning Your Shaver
Note: We recommend following these steps after each use.
1. Remove the foil assembly by pressing the release buttons on both
sides of the head and lifting the foil assembly upwards to remove
from the hair pocket. (Diagram I)
2. Tap out excess hair shavings.
3. Rinse the head of the assembly under running water. (Diagram J)
4. Replace the head assembly by placing the assembly on top of the hair
pocket, press down and click into place. (Diagram K)
Lubricate
®
Remington
Shaver Saver (SP-4) lubricates, cleans and protects your
shaver’s foil and cutter assembly. The lubricant helps remove hair clippings
while reducing wear. Spray on the foil and cutters after each shave to keep
your shaver operating at peak performance.
12
Page 13

Cleaning Stubble Styler
1. Clean the stubble styler with the cleaning brush provided, brush away
hair clippings.
REPLACING THE FOIL & CUTTERS
It is very important to replace the foil and cutters when necessary to
ensure a close, comfortable shave without irritation. We recommend they
be replaced every 6 months. Here are some signs of head and cutter wear,
indicating that replacement is needed:
• Irritation: As the heads get excessively worn you may experience
some skin irritation. This would be especially noticeable when you
apply moisturizing lotion.
• Pulling: When the cutters wear you may feel a sense of pulling and a
loss of closeness when you shave. This is an indication that it is time
to replace your heads and cutters.
Replacement foil & cutters may be obtained from your local retailer, or
directly from Remington
- refer to pages 9 & 10, or alternatively your order can be processed over
the phone via the Remington
®
. Simply fill out the enclosed accessory order form
®
Service Hotline.
HOW TO REPLACE THE FOIL & CUTTERS
Please refer to the specifications’ table on page 5 of this manual that lists
the correct replacement part number of your shaver.
Remove the foil assembly by pressing the foil assembly release buttons on
either side of the head and lifting the assembly upwards to remove from the
hair pocket
• Grasp each cutter between your thumb and forefinger and pull
upwards to remove
• Snap each new cutter into the top of the drive shaft.
Note: Do not push on the ends of the cutters as this may cause damage and
reduce their effectiveness.
• Insert the new foil assembly on top of the hair pocket, press down and
click into place.
13
Page 14

BATTERY DISPOSAL
Note: The battery is not intended to be removed or replaced under normal
use. The only time the battery should be removed or the unit opened
or disassembled, is at the end of the product’s useful life before it is
discarded.
• The F4500AU shaver contains a nickel metal hydride battery. Once the
trimmer has reached the end of its life, to ensure proper disposal of
the product, please take the appliance to a recycling centre, where the
internal rechargeable battery should be removed by a professional and
recycled separately.
• For more information about recycling of electrical and battery operated
appliances, please contact your local council office or your household
waste disposal service.
Caution: Do not put in the fire or mutilate your batteries when disposing as
they may burst and release toxic materials. Do not short circuit as it may
cause burns.
We suggest you use local waste management centres to recycle this
product at end of life.
Suitable for use in bath and shower.
This product conforms to radio frequency interference requirements.
Any product purchased and used commercially carries a limited 90 Day Warranty.
14
Page 15

Spectrum Brands Australia P ty Ltd and Spectrum Brands New Zealand Limited
WARRANTY AGAINST DEFECTS
In this warranty:
Australian Consumer Law means the Australian consumer law set out in Schedule 2 to the
Competition and C onsumer Act 2010;
CGA means the New Zealand C onsumer Guarantees Act 1993;
Goods means the product or equipment which was accompanied by this warrant y and
purchased in Austr alia or New Zealand, as the case may be;
Manufacturer, We or us means:
1. for Goods purchased in Australia, Spectrum Brands Aust ralia Pty Ltd
ACN, 007 070 573; or
2. for Goods purchased in New Zealand, Spec trum Brands New Zealand Limited,
as the case may be, contact details as set out at the end of this warranty;
Supplier means the authorised distributor or retailer of the Goods that sold you the Goods
in Australia or in New Zealand; and
You means you, the original end-user purchaser of the Goods.
1. Our goods come with guarantees that cannot be excluded under the Australian
Consumer Law, or the CGA. You are entitled to a replacement or refund for a major
failure and compensation for any other reasonably foreseeable loss or damage.
You are also entitled to have the goods repaired or replaced if the goods fail to
be of acceptable quality and the failure does not amount to a major failure.
2. The benefits provided by this Warrant y are in addition to all other rights and
remedies in respect of t he Goods which the consumer has under either the
Australian Consumer Law or the CGA. The original purchaser of the Goods is
provided with the following Warr anty subject to the Warranty Conditions:
3. We warrant the Goods for all par ts defective in workmanship or materials for the
period of t wo (2) years from the date of purchase (Warrant y Period). If the Goods
prove defective within the Warranty Period by reason of improper workmanship or
material, we may, at our own discretion, repair or replace the Goods without charge.
Warranty Conditions
4. The Goods must be used in accordance with the manufacturer’s instructions. This
Warranty does not apply should the defect in or failure of the Goods be attributable
to misuse, abuse, accident or non-observance of manufacturer’s instructions on the
part of the user. As far as the law permits, the manufacturer does not accept liability
for any direct or consequential loss, damage or other expense caused by or arising out
of any failure to use the Goods in accordance with the manufacturer’s instr uctions.
5. Consumable parts (such as shaver heads, cutters and foils) of the Goods are included
under this Warrant y only where there is a defect in work manship or materials used.
6. The warr anty granted under clause 3 is limited to repair or replacement only.
7. Any par ts of the G oods replaced during repairs or any product replaced remain the
proper ty of the manufacturer. In the event of the Goods being replaced during the
Warranty Period, the warranty on the replacement Goods will expire on the same
date as for the Warranty Period on the original Goods which are replaced.
15
Page 16

8. In order to claim under the warranty granted under clause 3 you must:
(a) Retain this warranty with your receipt/proof of purchase; and
(b) Return the Goods to us at the relevant address below or to the Supplier by prepaid freight
within the Warrant y Period accompanied with (i) the legible and unmodified original proof
of purchase, which clearly indicates the name and address of the Supplier, the date and
place of purchase, the product name or other product serial number and (ii) this warranty.
9. This warranty is immediately void if:
(a) Any serial number or appliance plate is removed or defaced;
(b) The Go ods have been serviced or other wise repaired by a person not
authorised to do so by us or where non approved replaced par ts are used.
10. The Goods are designed for domestic use only. A limited 90 -day Warranty applies to
any industrial or commercial use of the Goods. The Goods must be connected to the
electrical voltage requirements as specified in the ratings label located on the Goods.
11. This warranty does not cover the cost of claiming under the warranty
or transport of the Goods to and from the Supplier or us.
12. This warrant y is only valid and enforceable in Australia against Spectrum Brands
Australia Pt y Ltd and in New Zealand against Spectrum Brands New Zealand Limited.
Contact us or the Supplier for further details.
Spectrum Brands Australia Pty Ltd
Locked Bag 3004
Braeside, VIC 3195
AUSTRALIA
Customer service in Austr alia: 1800 623 118
E-mail: consumer.enquiry@remington-products.com.au
Website: www.remington-products.com.au
Spectrum Brands New Zealand Limited
PO Box 9817
Newmarket, Auckland 1149
NEW ZEALAND
Customer service in New Zealand: 080 0 736 776
E-mail: info@remington.co.nz
Website: www.remington.co.nz
REMINGTON SERVICE HOTLINE
Australia 1800 623 118 (toll free)
New Zealand 0800 736 776 (toll free)
AUTHORISED REPAIR CENTRES
Visit www.remington-products.com.au for Authorised repair centre details.
® Registered Trade Mark of Spectrum Brands Inc., (SB I) or one of its subsidiaries
© 2019 Spectrum Brands Inc.
Rev. 07/ 19
Part No. T22-700 0859
Type: F 09A
16
 Loading...