

Page 1
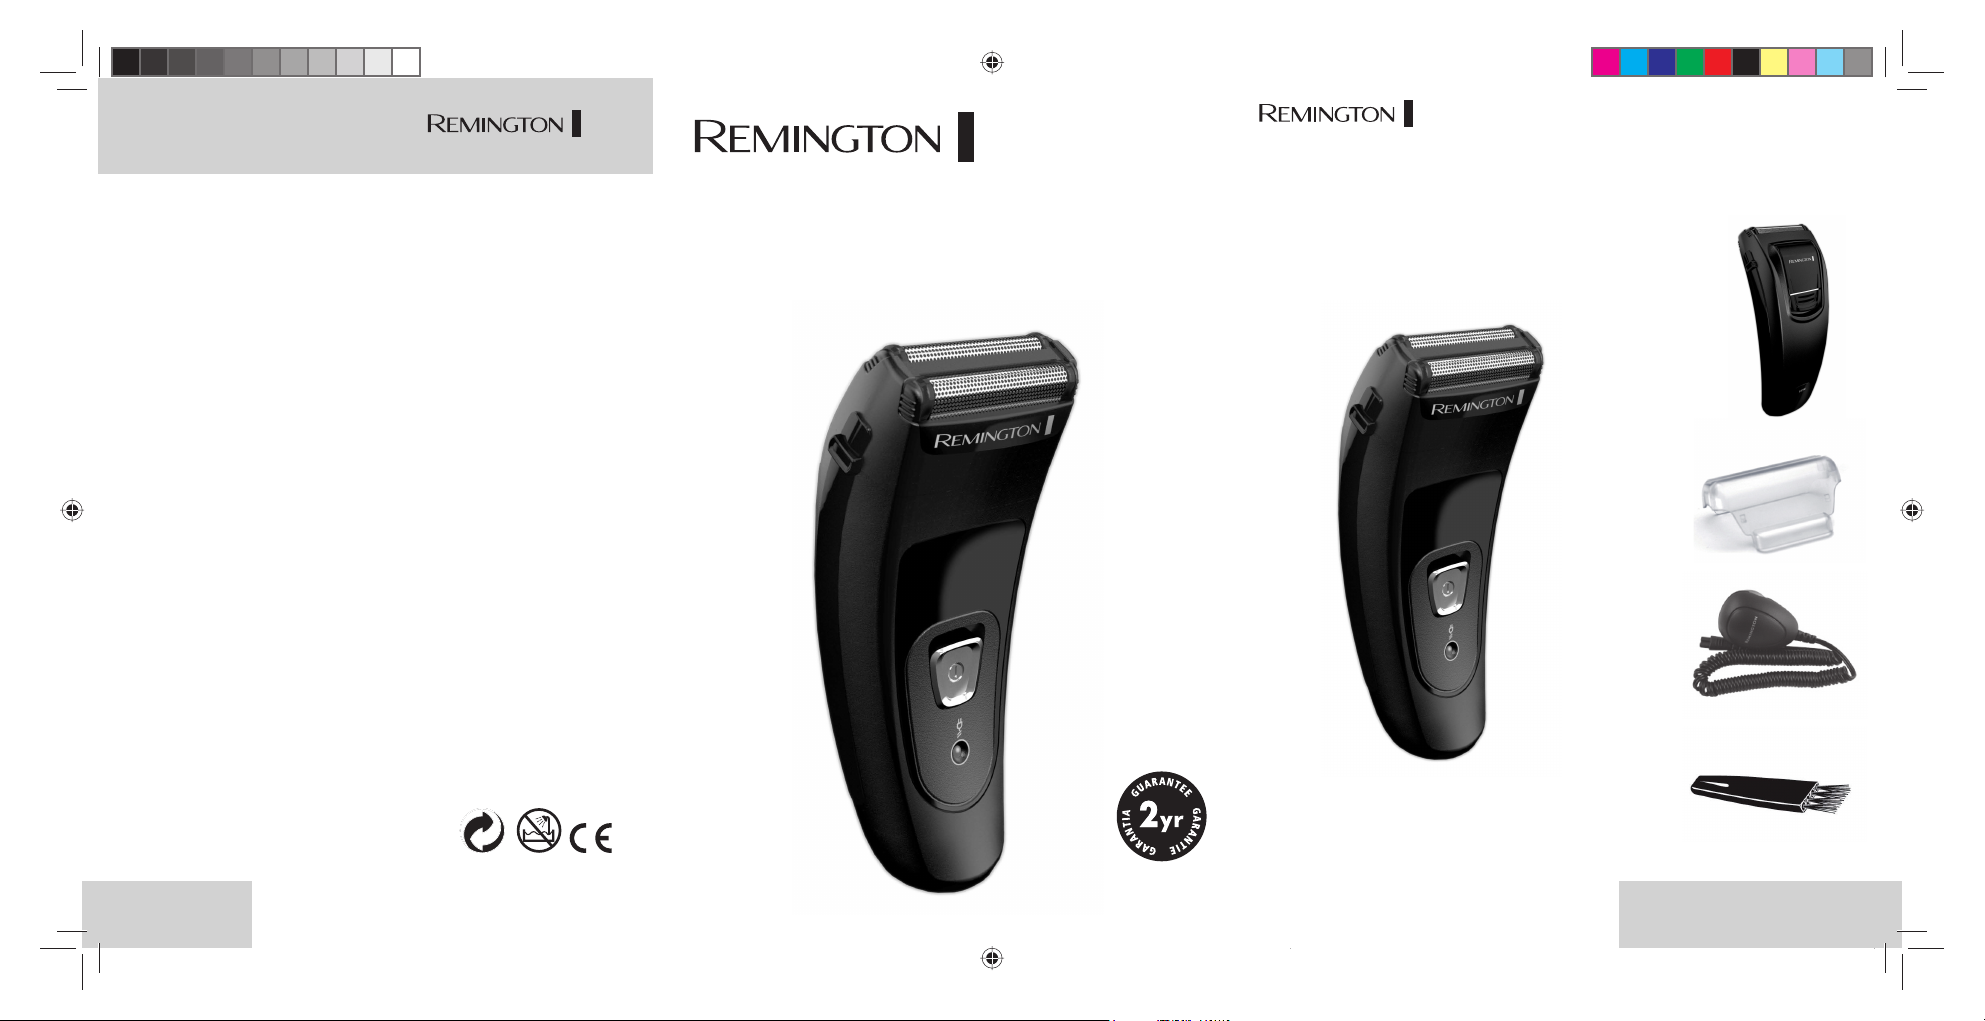
Dual Foil Shaver
09/UK/F3790 Version 02/09 Part No. T22-28181
®
Registered Trade Mark of Spectrum Brands, Inc., or one of its
Remington
subsidiaries.
VARTA Consumer Batteries GmbH & Co. KGaA
Alfred-Krupp-Str. 9
73479 Ellwangen
Germany
www.remington-europe.com
2009 SBI
©
FLEX AND PIVOT TECHNOLOGY
2
6
3
4
7
1
5
8
9
F3790
080141_REME_IFU_FF500_FF600_Cove1-3 1-3080141_REME_IFU_FF500_FF600_Cove1-3 1-3 08.28.2008 7:21:27 Uhr08.28.2008 7:21:27 Uhr
Page 2
United Kingdom
+44 0800 212 438 (free call)
Rayovac Europe Ltd,
Watermans House, Kingsbury Crescent,
The Causeway, Staines, Middlesex,
TW18 3BA, UNITED KINGDOM
www.remington.co.uk
REMINGTON® SERVICE HOTLINE
A
E
C
G
D
F
J
H
080141_REME_IFU_FF500_FF600_Cove4-6 4-6080141_REME_IFU_FF500_FF600_Cove4-6 4-6 08.28.2008 7:21:32 Uhr08.28.2008 7:21:32 Uhr
I
Page 3
ENGLISH
Thank you for choosing Remington®. Our products are designed to meet the
highest standard of quality, functionality and design. We hope you enjoy using
your new Remington® appliance. Please read the instructions for use carefully
and keep in a safe place for future reference.
CAUTION
Use this appliance only for its intended use as described in this manual. Do not use
attachments not recommended by Remington
Do not use this product if it is not working correctly, if it has been dropped or damaged,
or dropped into water.
DESCRIPTION
1
On/Off switch
Screens
2
Cutter assembly
3
Head release button
4
Charging indicator
5
Pop up trimmer
6
Head guard
7
Power cord
8
Cleaning brush
9
®
.
080621_REME_IFU_FF500_FF600_inneGB_1 GB_1080621_REME_IFU_FF500_FF600_inneGB_1 GB_1 08.28.2008 7:25:40 Uhr08.28.2008 7:25:40 Uhr
1
1
Page 4

ENGLISH
F3790
POWER SYSTEM
FULL CHARGE TIME
CORDLESS SHAVING TIME
INDICATOR
VOLTAGE TYPE
GETTING STARTED
For best shaving performance, it is recommended that you use your new shaver daily
for up to four weeks to allow time for your beard and skin to become accustomed to
the new shaving system.
CHARGING YOUR SHAVER
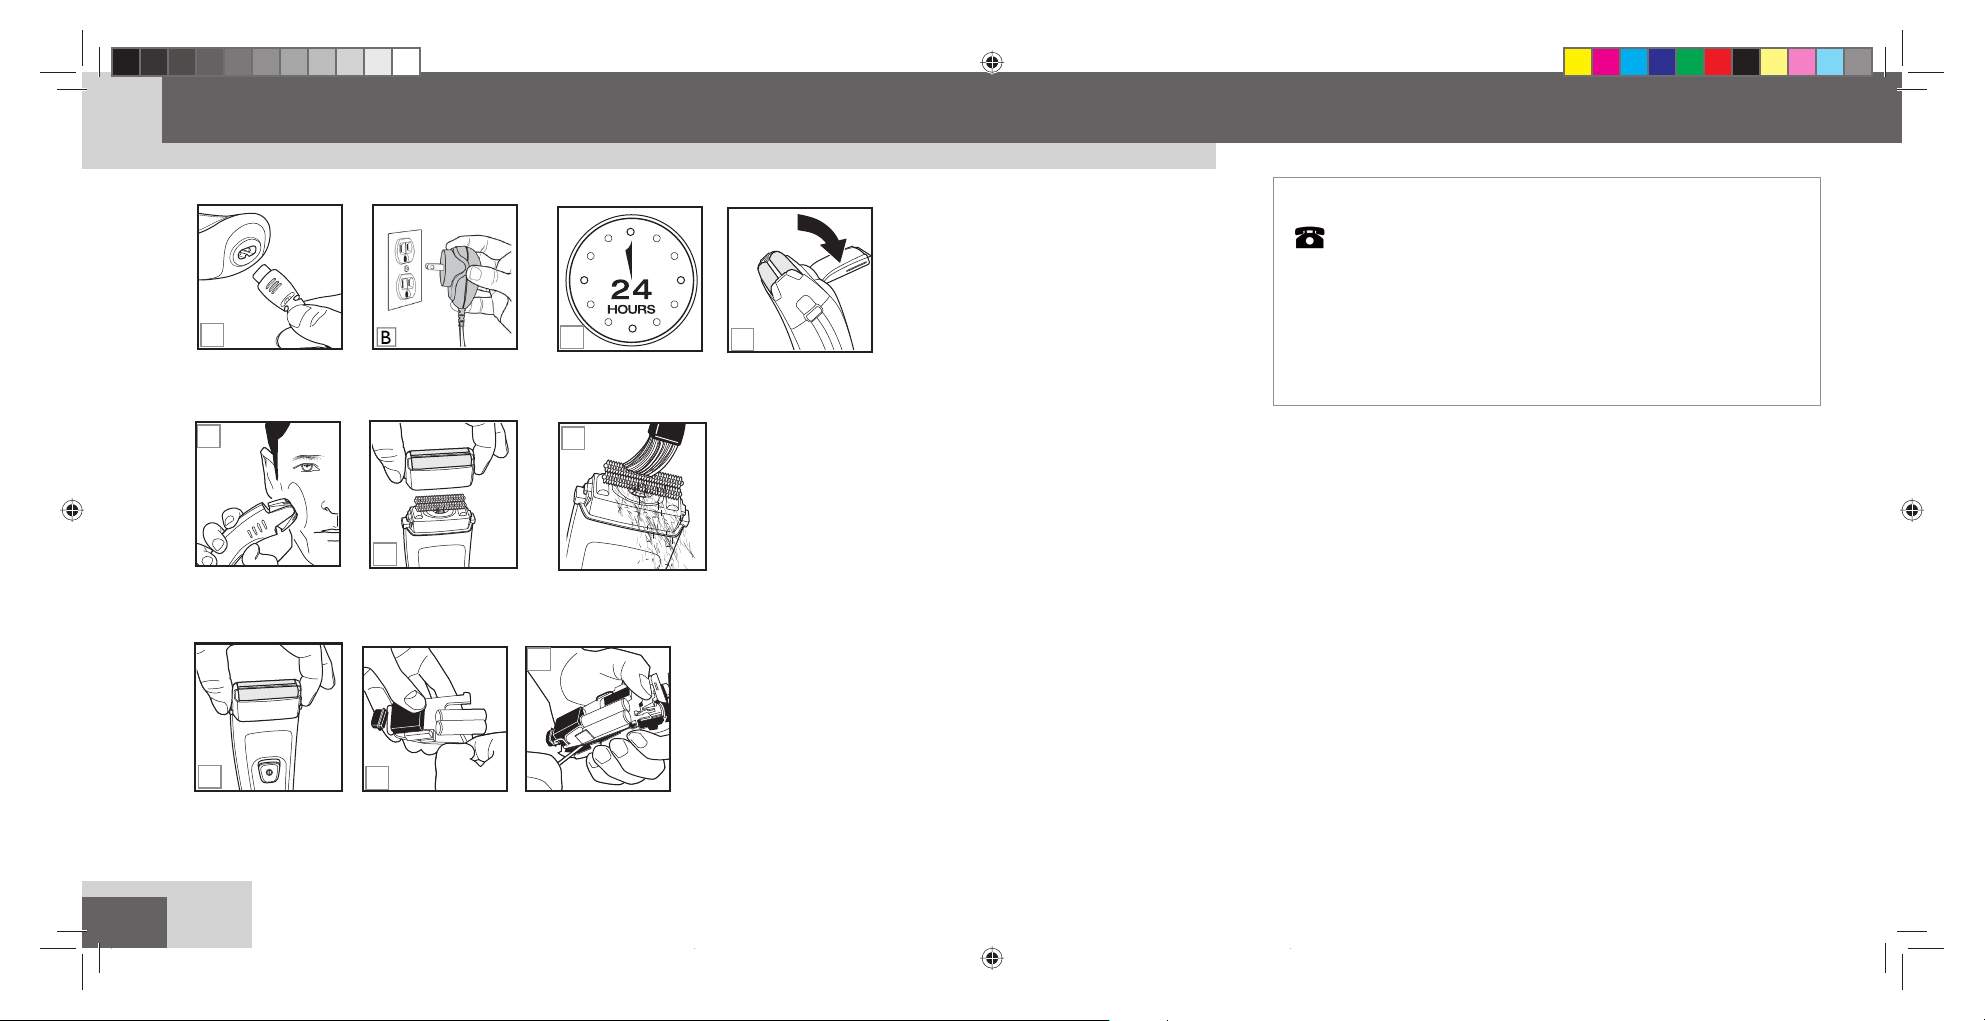
Ensure the product is switched off. Connect the shaver to the adapter (Fig. A), then to
the mains (Fig. B) and charge for at least 24 hours when using for the fi rst time (Fig C).
When plugged, the charging indicator will light up.
Fully recharge for 24 hours every 6 months to maintain battery condition.
When empty, the battery will be charged within 16 hours to provide 40 mins
of shaving time.
Rechargeable
16 hours
40 mins
LED Charging indicator
220-240V
X
X
X
(LED)
X
2
080621_REME_IFU_FF500_FF600_inneGB_2 GB_2080621_REME_IFU_FF500_FF600_inneGB_2 GB_2 08.28.2008 7:25:41 Uhr08.28.2008 7:25:41 Uhr
Page 5

ENGLISH
HOW TO USE
SHAVING
Make sure your shaver is properly charged
Begin by removing the protective head guard from your shaver.
Switch the shaver on.
Push the trimmer button down to release the trimmer and use to remove long hair first.
Then, fold back the trimmer when finished. ( Fig. D )
Stretch the skin with your free hand so the hairs stand upright.
Hold the shaving head so all foils touch your skin simultaneously. The independently
fl oating foils automatically adjust to the contours of your face. Only apply light pressure on
the shaving head whilst shaving and use short, circular strokes. (Fig. )
After shaving turn the shaver off.
TRIMMING
Push the trimmer button down
Place trimmer at desired trim line for a quick, easy, professional trim.
To retract and switch off the trimmer, fold the trimmer back until it locks into position
TIPS FOR BEST RESULTS
Ensure your skin is dry. Always hold the shaver at right angles to the skin so that both foils
are touching the skin with equal pressure. Use moderate to slow stroking movements. The
use of short circular motions in stubborn areas may obtain a closer shave, especially along the
neck and chin line. DO NOT hold the shaver at an angle whereby only one foil is touching the
skin. This will distort the foil and may cause the cutters to damage the foil.
DO NOT press hard against the skin in order to avoid damage to the foil.
E
080621_REME_IFU_FF500_FF600_inneGB_3 GB_3080621_REME_IFU_FF500_FF600_inneGB_3 GB_3 08.28.2008 7:25:41 Uhr08.28.2008 7:25:41 Uhr
3
Page 6

ENGLISH
CARE FOR YOUR SHAVER
Care for your product to ensure a long lasting performance. We recommend you
clean your shaver after each use. Using the brush supplied clean the internal parts of
the head assembly and shaver body. Always keep the protective cap on the shaving
head and keep the trimmer in the “off” position when the shaver is not in use.
CLEANING
Press the head release button to remove the head assembly.
Thoroughly blow out the stubble from the foils and cutters.
Use the cleaning brush to sweep out the cutters. Do not use the cleaning brush on the
foils. Damage may occur to the holes of the foils.
Replace head assembly
CAUTION:
Do not clean the shaving foil with the brush.
Do not remove or replace head assembly while shaver is running as it may cause damage
to the unit’s foils and cutters.
To clean the external surfaces of the shaver, use a damp cloth.
Do not use strong detergents or other chemicals.
To dry, wipe the surface of the shaver with a dry towel.
Never submerge your shaver in water.
REPLACING THE FOILS & CUTTERS
To ensure the continued highest quality performance from your shaver, we recommend that foils
and cutters are replaced regularly.
Signs that your foils and cutters need replacing:
Irritation: As foils get worn, you may experience skin irritation.
Pulling: As the cutters wear, your shave may not feel as close and you may feel your cutter
pulling your hair.
Wear through: You may notice that the cutters have worn through the foils.
(Fig. H
.
)
(Fig. )
G
)
F
(F
ig.
4
080621_REME_IFU_FF500_FF600_inneGB_4 GB_4080621_REME_IFU_FF500_FF600_inneGB_4 GB_4 08.28.2008 7:25:42 Uhr08.28.2008 7:25:42 Uhr
Page 7

ENGLISH
TO REPLACE THE FOIL
Pull the foil assembly to remove from the hair pocket.
Insert new foil assembly in hair pocket until it snaps in place.
TO REPLACE THE CUTTERS
Grasp cutter between thumb and forefi nger
Place the new cutters on the pin at 90 degrees and rotate 90 degrees to lock in place.
Spare Parts F3790
Replacement model :
Note: Do not press on the cutter ends as this may cause damage.
down
and turn the assembly 90 degrees.
SP-62
IMPORTANT SAFETY INSTRUCTIONS
WARNING – TO REDUCE TH E RISK OF BUR NS, E LECTROCUTION, FIRE,
OR INJ URY TO PERSONS:
An appliance should never be left unattended when plugged in to a power outlet, except
when charging.
Keep the power plug and cord away from heated surfaces.
Make sure the power plug and cord do not get wet.
Do not plug or unplug the shaver with wet hands.
Do not use the product with a damaged cord. A replacement can be obtained via the
Remington® Service Center.
tore the product at a temperature between 0°C and 32°C.
S
Only use the parts supplied with this appliance. Use of non Remington® parts with this
product may give rise to a hazardous condition.
Do not submerge or place under running water.
Keep this product out of reach of children. The use of this appliance by persons with
reduced physical, sensory or mental capabilities or lack of experience and knowledge can
give cause to hazards. Persons responsible for their safety should give explicit instructions
or supervise the use of the appliance.
Keep the appliance dry.
080621_REME_IFU_FF500_FF600_inneGB_5 GB_5080621_REME_IFU_FF500_FF600_inneGB_5 GB_5 08.28.2008 7:25:42 Uhr08.28.2008 7:25:42 Uhr
5
Page 8

ENGLISH
PROTECT THE ENVIRONMENT
The shaver contains NiMH cell unit. This cell does not contain any harmful metals.
Do not dispose the shaver in household waste at the end of it s useful life. Disposal
can take place at the Remington
However, if you prefer to dispose the cell unit yourself, please follow the instructions
as shown in Fig. .
CAUTION:
Do not put in fi re or mutilate your battery packs as they may burst or release toxic materials.
For fur ther information on recycling see w ww.remington- europe.com
&
I
BATTERY REMOVAL
When your rechargeable shaver reaches the end of its useful life, the batteries must be
removed from the shaver and be recycled or disposed of properly in accordance with your
state and local requirements. If this is not required by law, you may elect to dispose of the
shaver without the batteries.
CAUTION:
Do not put in fi re or mutilate your batteries when disposing as they may burst and release
toxic materials. Do not short circuit as it may cause burns. Dispose of properly in accordance
with your local and state requirements.
before it is scraped.
when removing the battery
To Remove the Rechargeable B attery:
1
Remove he ad guard and hair pocket from shaver.
Using Phillips screwdriver remove ( ) screws from
2
the top cover plate and (1) screw from the rear housing.
3
Take rear housing of f of shaver to expose batteries.
Cut wires connecting batteries to the circuit board.
4
5
Remove batteries and dispose of properly. (Fig. )
The appliance must be disconnected from the supply mains
J
The battery is
.
®
Service Center or appropriate collection sites.
The
battery must be removed from the appliance
to be disposed of safety.
2
J
I
&
6
080621_REME_IFU_FF500_FF600_inneGB_6 GB_6080621_REME_IFU_FF500_FF600_inneGB_6 GB_6 08.28.2008 7:25:42 Uhr08.28.2008 7:25:42 Uhr
Page 9

ENGLISH
SERVICE AND WARRANTY
This product has been checked and is free of defects. We warrant this product against
any defects that are due to faulty material or workmanship for a 2 year period from the
original date of consumer purchase . If the product should become defective within the
warranty period, we will repair any such defect or elect to replace the product or any part
of it without charge provided there is proof of purchase. This does not mean an extension
of the warranty period.
In the case of a warranty simply call the Remington
This warranty is offered over and above your normal st atutory rights.
The warranty shall apply in all countries in which our product was sold via an authorised
dealer.
This warranty does not include shaving heads / foils and cutters which are consumable
part s. Also not covered is damage to the product by accident or misuse, abuse, alteration
to the product or use inconsistent with the technical and /or safety instructions required.
This warranty shall not apply if the produc t has been dismantled or repaired by a person
not authorised by us.
®
Service Center in your region.
NL
FIN
P
CZPLRUTR SKGRAE
080621_REME_IFU_FF500_FF600_inneGB_7 GB_7080621_REME_IFU_FF500_FF600_inneGB_7 GB_7 08.28.2008 7:25:43 Uhr08.28.2008 7:25:43 Uhr
7
 Loading...