

Page 1
English ............................................................... 02-05
Deutsch ............................................................. 06-09
Français ............................................................. 10-13
Español .............................................................. 14-17
SMART DESKTOP MONITOR SYSTEM WITH WIRELESS INPUT
OPERATION MANUAL
BEDIENUNGSANLEITUNG
MODE D‘EMPLOI
MANUAL DE INSTRUCCIONES
WARNING!
To prevent re or avoid an electric shock
do not expose the device to water or uids!
Never open the housing!
WARNUNG!
Um Feuer oder einen elektrischen Schock zu
vermeiden, setzen Sie dieses Gerät nicht Wasser
oder Flüssigkeiten aus! Öffnen Sie niemals das
Gehäuse!
ATTENTION !
An d‘éviter un incendie ou une décharge
électrique, veillez à tenir cet appareil à l‘écart
des liquides et de l‘humidité ! N´ouvrez jamais le
boîtier !
¡ADVERTENCIA!
Para evitar incendios o descargas eléctricas, ¡no
sumerja este equipo en agua u otras sustancias
líquidas! ¡Nunca abra la carcasa!
Keep information for further reference!
Für weiteren Gebrauch aufbewahren!
Gardez ces instructions pour des utilisations
ultérieurs!
¡Conservar para su uso posterior!
www.reloop.com
DEUTSCH
REV. 1.0
Reloop Trademark
Global Distribution GmbH & Co. KG
Schuckertstr. 28
48153 Muenster / Germany
© 2021
1
Page 2
CAUTION!
For your own safety, please read this operation manual carefully before initial operation! All persons involved in
the installation, setting-up, operation, maintenance and service of this device must be appropriately qualied and
observe this operation manual in detail. This product complies with the requirements of the applicable European
and national regulations. Conformity has been proven. The respective statements and documents are deposited
at the manufacturer.
Please remove the Reloop DSM-3 BT from its packaging. Check before initial operation to make sure that the device
has not been visibly damaged during transport. If you detect any damage to the power cable or the casing, do not
operate the device. Contact your specialised dealer.
SAFETY INSTRUCTIONS
CAUTION!
Please exercise particular caution when handling AC 100 - 240 V, 50/60Hz power voltage. This voltage rating may
lead to a critical electrical shock! Any damage caused by the non-observance of this operation manual excludes
any warranty claims. The manufacturer is not liable for any damage to property or for personal injury caused by
improper handling or non-observance of the safety instructions.
WARNING!
To prevent re or avoid an electric shock do not expose the device to water or uids! Never open the housing!
- This device left the factory in perfect condition. To maintain this condition and to ensure a risk-free operation the
user must observe the safety instructions and warnings contained in this operation manual.
- For reasons of safety and certication (CE) the unauthorised conversion and/or modication of the device
is prohibited. Please note that in the event of damage caused by the manual modication to this device any
warranty claims are excluded.
- The inside of the device does not contain any parts which require maintenance, with the exception of wear parts that
can be exchanged from the outside. Qualied staff must carry out maintenance, otherwise the warranty does not apply!
- The fuse must exclusively be exchanged against fuses of the same class, with the same trigger features and
nominal current rating.
- Ensure that the power will only be supplied after the device has been fully set up.
- Only use cables that comply with regulations. Observe that all jacks and bushes are tightened and correctly
hooked up. Refer to your dealer, if you have any questions.
- Ensure that when setting up the product, the mains cable is not squashed or damaged by sharp edges.
- Prevent the mains cable from coming into contact with other cables! Exercise great care when handling mains
cables and connections. Never touch these parts with wet hands!
- Connect the power cable exclusively to appropriate shock-proof outlets. The only supply point to be used is a
supply outlet in accordance with specications of the public supply network.
- Disconnect the device from the supply outlet when not in use and before cleaning! Be sure to hold the mains plug
by the body. Never pull the mains cord!
- Position the device on a horizontal and stable low-ame base.
- Avoid any concussions or violent impact when installing or operating the device.
- When selecting the location of installation, make sure that the device is not exposed to excessive heat, humidity
and dust. Be sure that no cables lie around openly. You will endanger your own safety and that of others!
- Do not rest any containers lled with liquid that could easily spill onto the device or in its immediate vicinity. If, however,
ENGLISH
uids should access the inside of the device, immediately disconnect the mains plug. Have the device checked by a
qualied service technician before re-use. Damage caused by uids inside the device is excluded from warranty.
- Do not operate the device under extremely hot (in excess of 35° C) or extremely cold (below 5° C) conditions.
Keep the device away from direct exposure to the sun and heat sources such as radiators, ovens, etc. (even during
transport in a closed vehicle). Always ensure sufcient ventilation.
- The device must not be operated after being taken from a cold environment into a warm environment. The
condensation caused hereby may destroy your device. Do not switch on or operate the device until it has reached
ambient temperature!
- Controls and switches should never be treated with spray-on cleaning agents and lubricants. This device should
only be cleaned with a damp cloth. Never use solvents or cleaning uids with a petroleum base for cleaning.
- When relocating, the device should be transported in its original packaging.
- To begin, the volume control on your Reloop DSM-3 BT monitors must be set to „Minimum“ and the device must be
switched off. Wait for 8 to 10 seconds before increasing the volume to prevent damage to the speakers.
- Devices supplied by voltage should not be left in the hands of children. Please exercise particular care when in
the presence of children.
- At commercial facilities the regulations for the prevention of accidents as stipulated by the organization of
professional associations must be observed.
- At schools, training facilities, hobby and self-help workshops the operation of the device must be monitored with
responsibility by trained staff.
- Keep this operation manual in a safe place for later reference in the event of questions or problems.
APPLICATION IN ACCORDANCE WITH REGULATIONS
- This device is a professional 2-channel active monitor system with Bluetooth that you can use to listen to audio
signals. To do so, the device can also be connected to a computer, tablet or smartphone via Bluetooth.
- If the device is used for any other purposes than those described in the operation manual, damage can be caused
to the product, leading to the exclusion of warranty rights. Moreover, any other application that does not comply
with the specied purpose harbours risks such as short circuit, re, electric shock, etc.
- The serial number determined by the manufacturer must never be removed to uphold the warranty rights.
MAINTENANCE
- Check the technical safety of the device regularly for damage to the mains line or the casing, as well as for wear
of wear parts such as rotary and sliding switches.
- If it is to be assumed that the safe operation is no longer feasible, then the device must be disconnected and
secured against accidental use. Always disconnect the mains plug from the outlet!
- It must be assumed that a safe operation is no longer feasible, if the device bears visible defects, if the device no
longer functions, following longer storage under unfavourable conditions or after major transport stress.
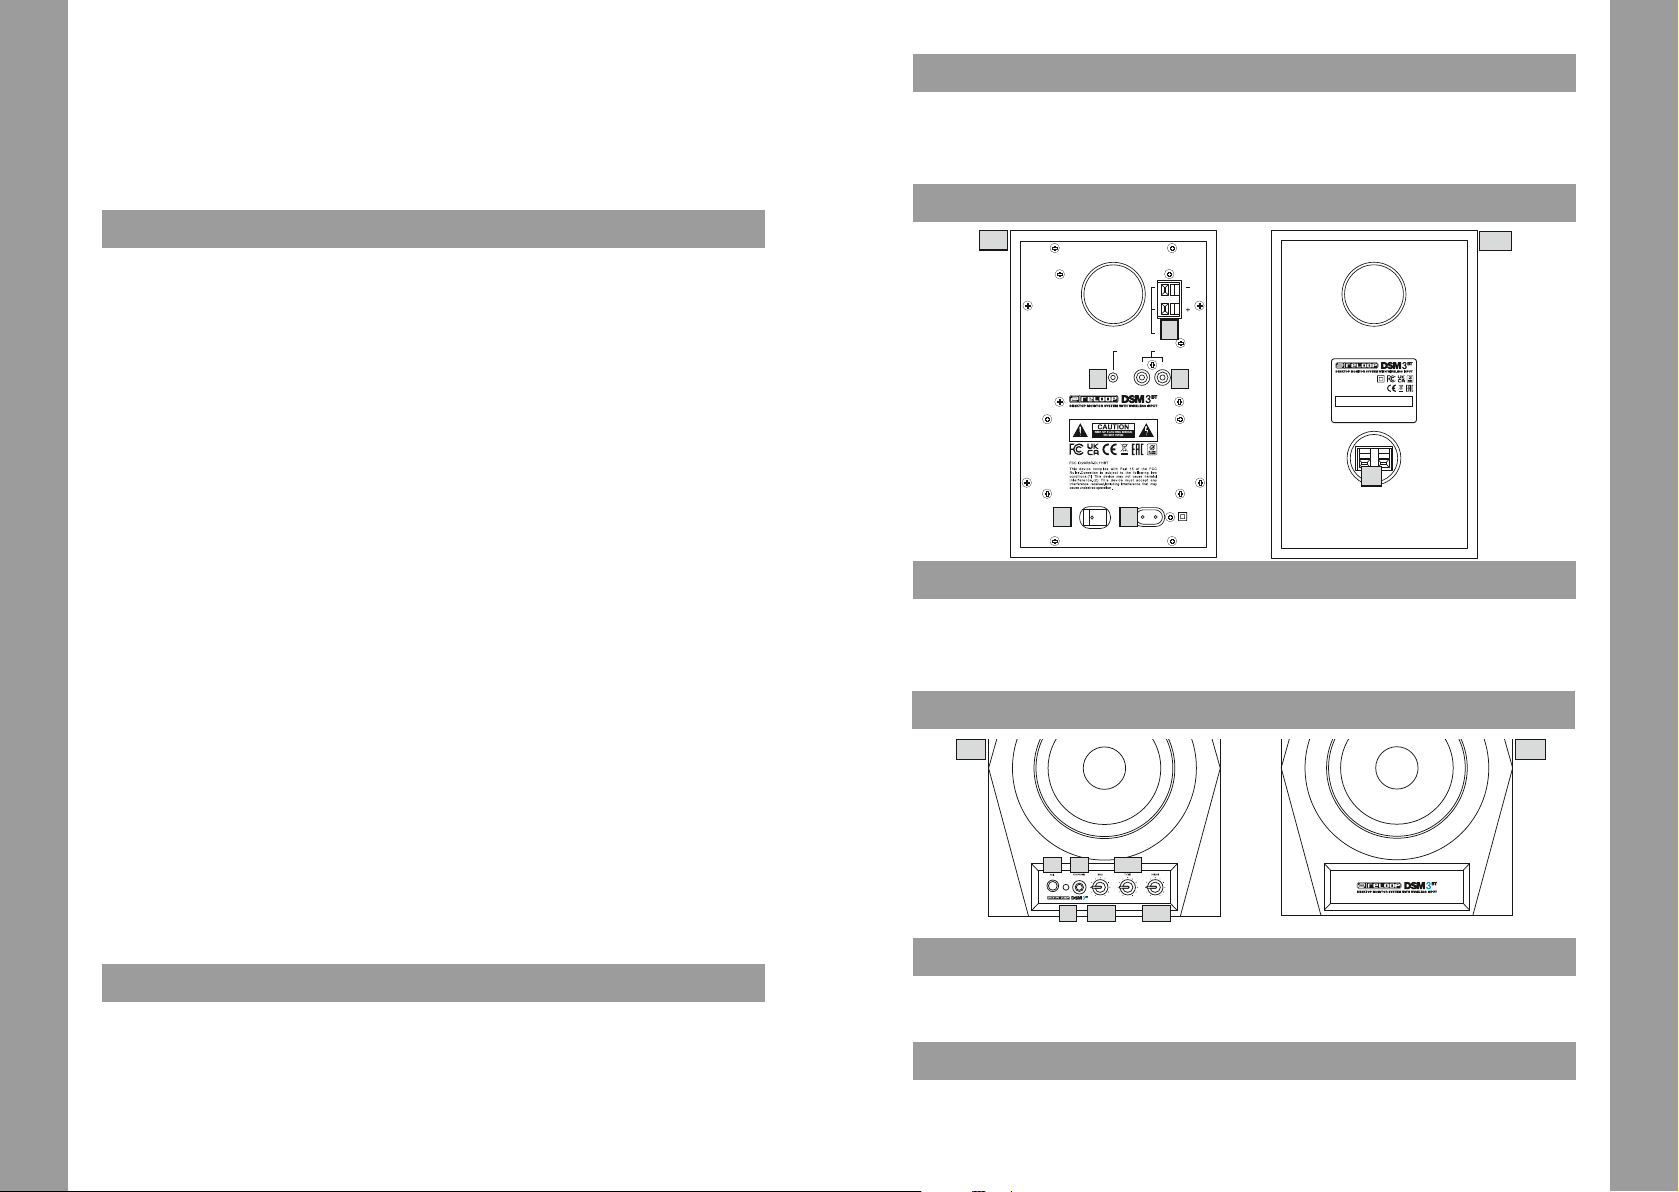
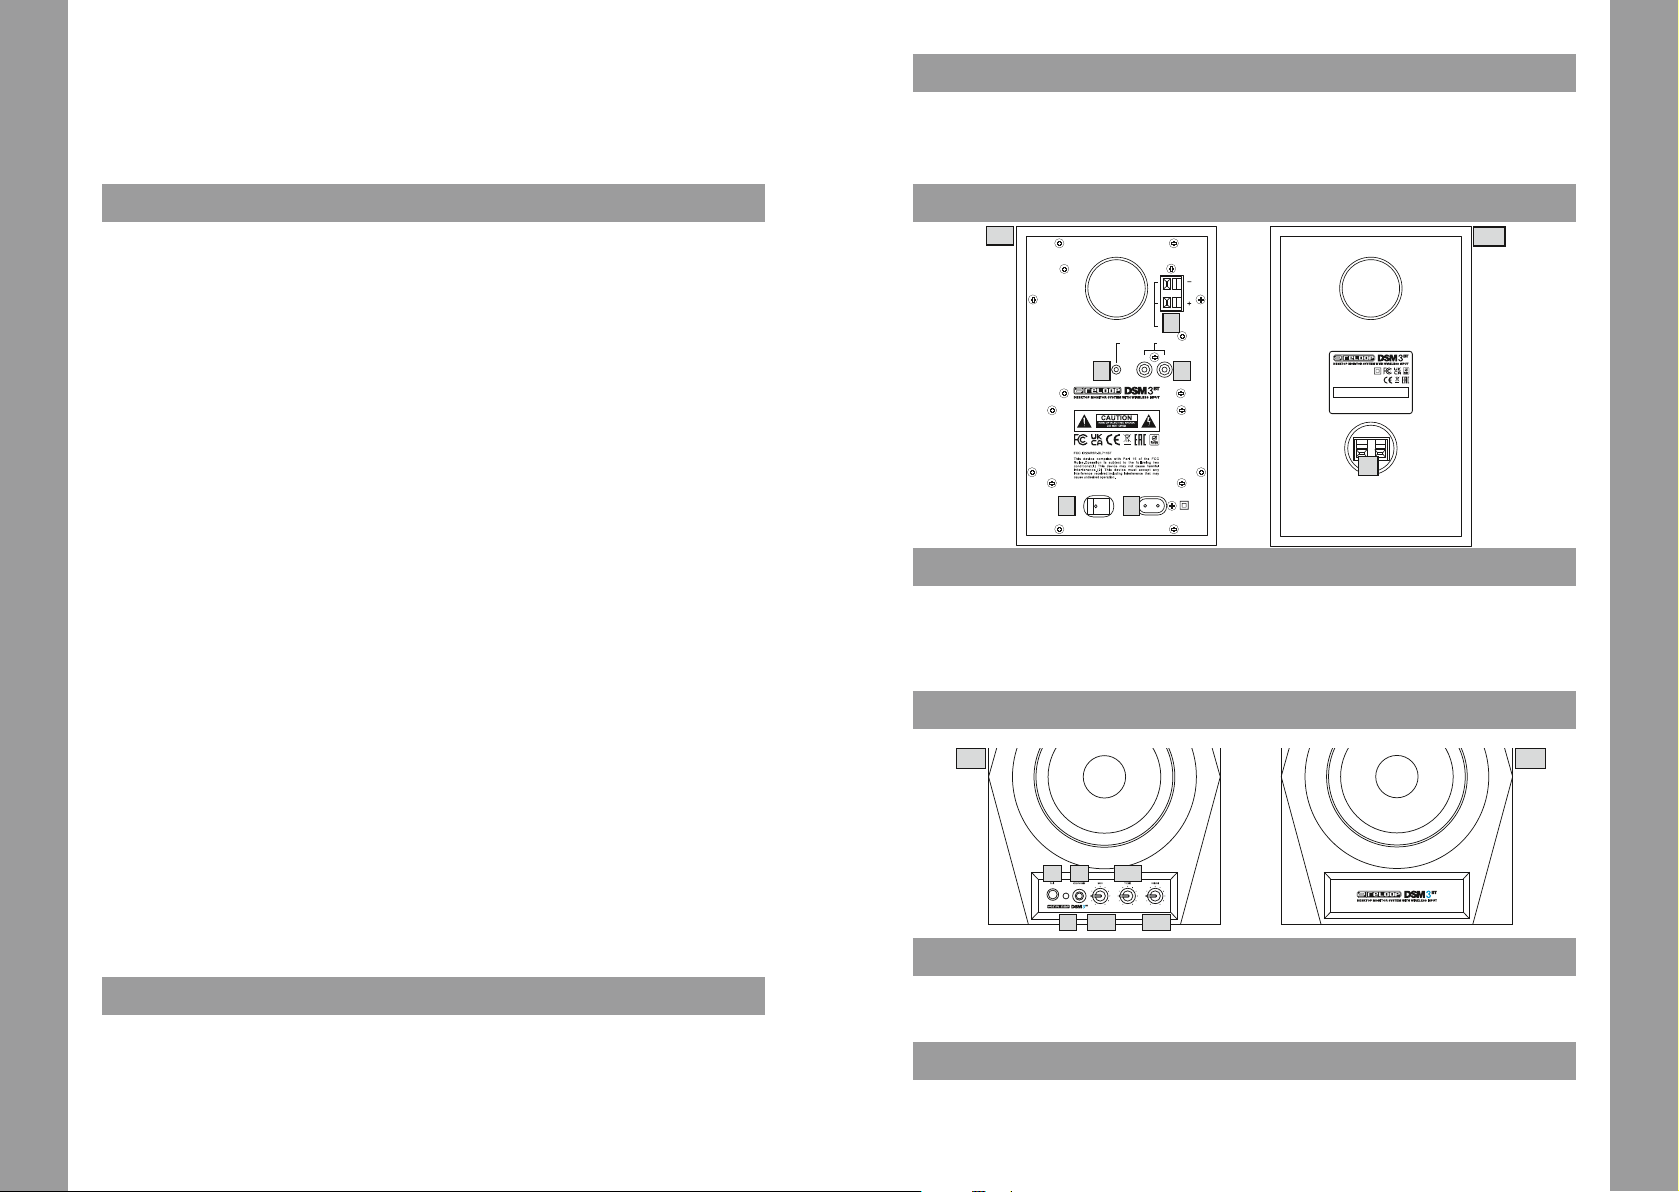
REAR SIDE
M1
POWER 100-240V ~ 50-60Hz
ON OFF
5 4
OUTPUT
POWER RATING: 60W
1
RIGHT SPEAKER
OUTPUT
INPUTSUBWOOFER
RL
23
MODEL: DSM-3BT
OUTPUT: 2x 20W
VOLTAGE: 100-240V ~
50-60Hz
DESIGNED IN GERMANY
ASSEMBLED IN CHINA
6
M2
LABELS
MONITOR 1
1. Terminal connection for speaker 2
2. Signal input connector (cinch)
3. Subwoofer out (optional/3.5 mm jack)
4. Power cable connection
5. On/Off switch
MONITOR 2
6. Terminal connection for speaker 1
FRONT SIDE
M1 M2
7 9
8 10
11
12
LABELS
MONITOR 1
7. Bluetooth pairing button
8. Bluetooth pairing LED
9. Headphones output (3.5 mm jack)
10. Bass control dial
11. Treble control dial
12. Output volume control dial
ACCESSORIES
- Speaker cable (for left/right channel connection)
- Power cable
- Cinch to jack (3.5 mm) adapter cable
- Rubber pads
- Instruction Manual
ENGLISH
32
Page 3
INSTALLATION
1. Please stick 4 of the rubber pads provided to the base of each of your DSM-3 BT monitors to protect them from
vibrations and slipping.
2. For optimum audibility of the high frequencies we recommend installing the tweeter of the studio monitors at face
level; if necessary use an appropriate speaker stand. Be sure to use an even, stable underground; if necessary, use
sound cushioning material.
3. These speakers are near-eld monitors which can be set up at a short distance to the listener.
4. To avoid reection from walls that are too close (e.g. room corners), turn the speakers slightly towards you. To
optimise your ambience acoustics, you may use sound absorbing plates.
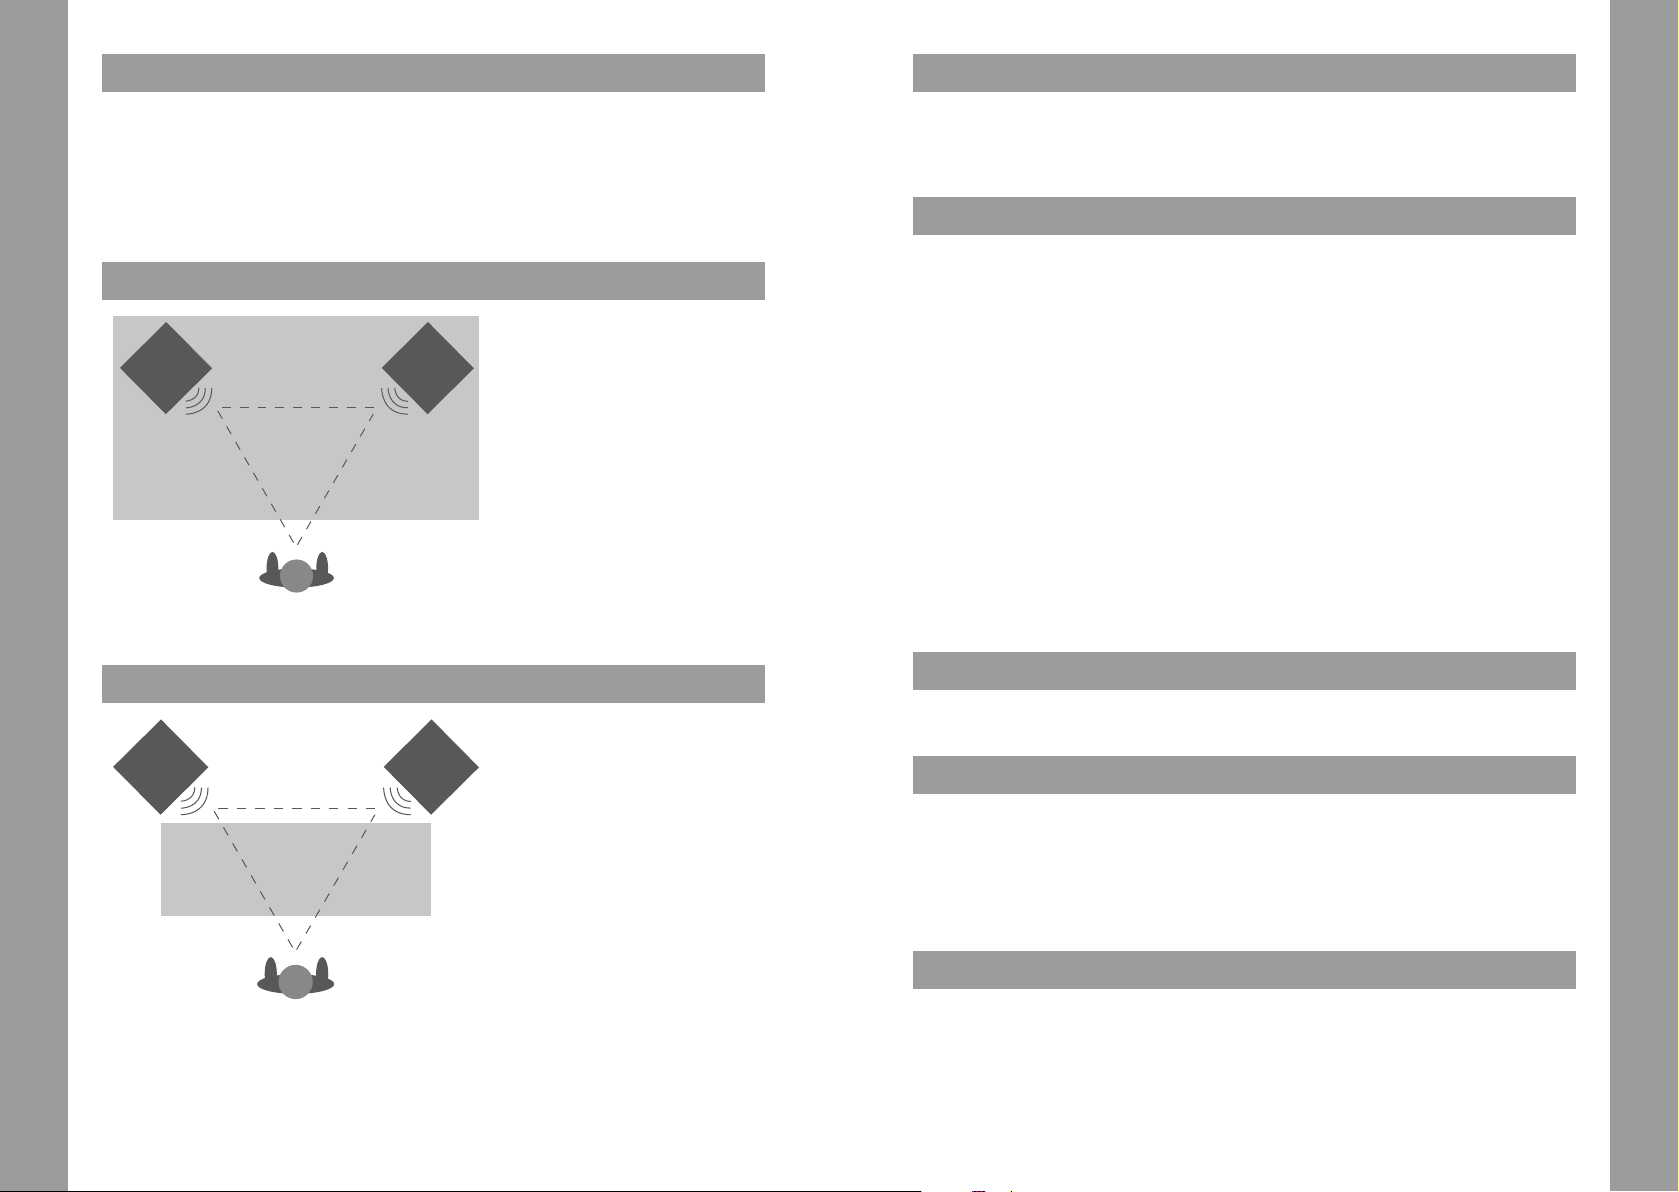
CLOSE-RANGE INSTALLATION
In studios, monitor speakers are usually positioned on the studio console (at head height). The monitors and the
position of the listener should also form an isosceles triangle; in other words place them at an angle of 60° to the
listening position.
CONNECTIONS
1. Connect both speakers using the speaker cable provided and the appropriate terminals (1)/(6). Insert the centre
wires into the sockets by pressing the terminal on the speaker jack.
2. Now connect your signal source using the signal input connector (2) (cinch). You can connect an external subwoofer
using the subwoofer out (3) if required.
3. Connect the power cable supplied to the power cable connection (4) and plug it into your power socket.
OPERATION
1. ENSURE THE VOLUME CONTROL IS AT THE MINIMUM POSITION
Turn the volume control dial (12) to Minimum position (turn controller left) before you switch the device on.
2. TURN ON THE POWER
Once everything is connected, turn the device on using the On/Off switch (5).
3. ADJUST THE VOLUME
Adjust the volume using the volume control dial (12).
4. SELECT SIGNAL INPUT
You have the choice of 2 possible signal input sources:
Cinch (2)
Bluetooth (7)
To connect a playback device via cinch, connect the cinch cable of your playback unit using the cinch socket (2)
on the DSM-3 BT monitor 1.
NOTE
Please ensure that the signal strength of your chosen playback device is sufcient. Many playback devices,
for example various record players, may require an additional preamplier for direct connection to achieve
sufcient signal strength.
When the DSM-3 BT is turned on, the Bluetooth pairing LED (8) glows white. To use a Bluetooth playback device,
rst enable Bluetooth on the chosen playback device and then press the Bluetooth pairing button (7) on your DSM-
3 BT monitor 1. When the DSM-3 BT appears on your Bluetooth device, press „Connect“. While in pairing mode, the
Bluetooth pairing LED (8) will ash blue and white alternately. Once the connection is established, the Bluetooth
pairing LED (8) will glow blue. To connect to a different Bluetooth device, press the Bluetooth pairing button (7)
again to cancel the active Bluetooth connection and return to pairing mode. Repeat the process described above.
ENGLISH
MID-RANGE INSTALLATION
The mid-range installation arrangement should be similar to the close-range installation set-up. This variant is
usually selected for larger monitors where they are too large or too heavy to be placed on the studio console. This
set-up provides a larger „listening position“ and creates better acoustic conditions in the room. With mid-range
installation, the bass for the monitors should be positioned above the studio console.
TONE CONTROL
You can raise or lower the bass and treble using the bass controller (10) and treble controller (11). The ideal setting
will depend on the particular features of the room. A room with excellent sound insulation will need the higher
frequencies increasing. Conversely, higher frequencies need lowering in rooms with reverberation.
TECHNICAL DATA
- Type: 2-channel bass reex, active monitor speaker system
- Tweeter: 0.5“ tweeter (1.30 cm)
- Woofer: 3.5“ bass (8.89 cm)
- Housing dimensions: 140 x 222 x 152.5 mm
- Weight: 2.8kg (pair)
- Frequency range: 80-20,000 Hz
- Amplier power: class A/B amplier: 2 x 20 W RMS
- Magnetic shielding
- Inputs: 1 x line (RCA), 1 x wireless Bluetooth ®
- Outputs: 1 x headphone monitor (3.5 mm jack), 1 x subwoofer (3.5 mm jack)
SUPPORT
If you require further help or have technical questions,
please see our Reloop FAQs or contact our support team:
https://www.reloop.com/faqs.html
https://www.reloop.com/support-ticket-request
In compliance with international safety certication requirements (e.g. CE, UKCA, FCC), all necessary documents are held by our ofcial Importer. You
can nd our current importer for your territory listed as Distributor in the ‘Where To Buy section’ of our website: https://www.reloop.com/dealer-area
ENGLISH
54
Page 4
ACHTUNG! Lesen Sie sich vor der ersten Inbetriebnahme diese Bedienungsanleitung zur eigenen Sicherheit
sorgfältig durch! Alle Personen, die Aufstellung, Inbetriebnahme, Bedienung, Wartung und/oder Instandhaltung
dieses Gerätes durchführen, müssen entsprechend qualiziert sein und diese Betriebsanleitung genau beachten.
Dieses Produkt erfüllt die Anforderungen der geltenden europäischen und nationalen Richtlinien, die Konformität
wurde nachgewiesen, die entsprechenden Erklärungen und Unterlagen sind beim Hersteller hinterlegt.
Nehmen Sie die Reloop DSM-3 BT aus der Verpackung. Bitte überprüfen Sie vor der ersten Inbetriebnahme, ob
ein offensichtlicher Transportschaden vorliegt. Sollten Sie Schäden am Stromkabel oder am Gehäuse entdecken,
nehmen Sie das Gerät nicht in Betrieb und setzen Sie sich bitte mit Ihrem Fachhändler in Verbindung.
SICHERHEITSHINWEISE
ACHTUNG! Seien Sie besonders vorsichtig beim Umgang mit der Netzspannung AC 100 - 240 V, 50/60Hz.
Diese Spannung kann einen lebensgefährlichen, elektrischen Schlag verursachen! Bei Schäden, die durch
Nichtbeachtung dieser Bedienungsanleitung herbeigeführt werden, erlischt jeder Gewährleistungsanspruch. Bei
Sach- oder Personenschäden, die als unsachgemäßer Handhabung oder Nichtbeachtung der Sicherheitshinweise
auftreten, übernimmt der Hersteller keine Haftung.
WARNUNG! Um Feuer oder einen elektrischen Schock zu vermeiden, setzen Sie dieses Gerät nicht Wasser oder
Flüssigkeiten aus! Öffnen Sie niemals das Gehäuse!
- Dieses Gerät hat das Werk in einwandfreiem Zustand verlassen. Um diesen Zustand
- zu erhalten und einen gefahrlosen Betrieb sicherzustellen, muss der Anwender unbedingt die Sicherheitshinweise
und die Warnvermerke beachten, die in dieser Gebrauchsanleitung enthalten sind.
- Aus Sicherheits- und Zulassungsgründen (CE) ist das eigenmächtige Umbauen und/oder Verändern des Gerätes
nicht gestattet. Beachten Sie bitte, dass Schäden, die durch manuelle Veränderungen an diesem Gerät verursacht
werden, nicht unter den Gewährleistungsanspruch fallen.
- Im Inneren des Gerätes benden sich keine zu wartenden Teile, ausgenommen von außen austauschbare Verschleißteile.
Die Wartung darf nur von fachkundigem Personal durchgeführt werden, ansonsten verfällt die Gewährleistung!
- Die Sicherung darf nur gegen Sicherungen des gleichen Typs, der gleichen Auslösecharakteristik und
Nennstromstärke ausgetauscht werden.
- Vergewissern Sie sich, dass die Stromversorgung erst nach dem Aufbau des Gerätes erfolgt.
- Benutzen Sie nur vorschriftsmäßige Kabel. Achten Sie darauf, dass alle Stecker und Buchsen fest angeschraubt
und richtig angeschlossen sind. Bei Fragen wenden Sie sich bitte an Ihren Händler.
- Stellen Sie sicher, dass beim Aufstellen des Produktes das Netzkabel nicht gequetscht oder durch scharfe Kanten
beschädigt wird.
- Lassen Sie das Netzkabel nicht mit anderen Kabeln in Kontakt kommen! Seien Sie vorsichtig beim Umgang mit
Netzkabeln und -anschlüssen. Fassen Sie diese Teile nie mit nassen Händen an.
- SVerbinden das Stromkabel nur mit geeigneten Schuko-Steckdosen. Als Spannungsquelle darf dabei nur eine
ordnungsgemäße Netzsteckdose des öffentlichen Versorgungsnetzes verwendet werden.
- Trennen Sie das Gerät bei Nichtbenutzung und vor jeder Reinigung vom Netz. Fassen Sie dazu den Netzstecker an
der Griffäche an und ziehen Sie bitte nicht an der Netzleitung.
- Stellen Sie das Gerät auf einer horizontalen und stabilen, schwer entammbaren Unterlage auf.
- Vermeiden Sie Erschütterungen und jegliche Gewaltanwendung bei der Installation oder Inbetriebnahme des Gerätes.
- Achten Sie bei der Wahl des Installationsortes darauf, dass das Gerät nicht zu großer Hitze, Feuchtigkeit und Staub
ausgesetzt wird. Vergewissern Sie sich, dass alle Kabel verstaut sind, um Ihre und die Sicherheit Dritter zu gewährleisten.
- Stellen Sie keine instabilen Flüssigkeitsbehälter, auf dem Gerät oder in dessen Nähe ab. Falls doch einmal
Flüssigkeit in das Geräteinnere gelangen sollte, ziehen Sie bitte sofort den Netzstecker. Lassen Sie das Gerät
DEUTSCH
von einem qualizierten Servicetechniker prüfen, bevor es erneut genutzt wird. Beschädigungen, die durch
Flüssigkeiten im Gerät hervorgerufen werden, sind von der Gewährleistung ausgeschlossen.
- Betreiben Sie das Gerät nicht in extrem heißen (über 35° C) oder kalten (unter 5° C) Umgebungen. Halten Sie
das Gerät von direktem Sonnenlicht und von Wärmequellen wie Heizkörpern, Öfen, usw. (auch beim Transport in
geschlossenen Fahrzeugen) fern. Verdecken Sie niemals vorhandene Lüfter oder Lüftungsschlitze. Sorgen Sie
immer für eine ausreichende Ventilation.
- Das Gerät darf nicht in Betrieb genommen werden, wenn es von einem kalten Raum in einen warmen Raum
gebracht wurde. Das dabei entstehende Kondenswasser kann unter Umständen Ihr Gerät zerstören. Lassen Sie
das Gerät solange ausgeschaltet, bis es Zimmertemperatur erreicht hat!
- Regler und Schalter sollten niemals mit Sprühreinigungsmitteln und Schmiermitteln behandelt werden. Die Reinigung des
Gerätes sollte nur mit einem feuchten Tuch erfolgen. Verwenden Sie niemals Lösungsmittel oder Waschbenzin zum Reinigen.
- Bei Umzügen sollte das Gerät im ursprünglichen Versandkarton transportiert werden.
- Zu Beginn müssen die Lautstärkeregler Ihrer Reloop DSM-3 BT Monitore auf Minimum eingestellt und das Gerät
ausgeschaltet sein. Vor dem Lauterstellen bitte 8 bis 10 Sekunden warten, um Lautsprecherschäden zu vermeiden.
- Geräte, die an Netzspannung betrieben werden, gehören nicht in Kinderhände. Lassen Sie deshalb in Anwesenheit
von Kindern besondere Vorsicht walten.
- In gewerblichen Einrichtungen sind die Unfallverhütungsvorschriften des Verbandes der gewerblichen
Berufsgenossenschaft zu beachten.
- In Schulen, Ausbildungseinrichtungen, Hobby- oder Selbsthilfewerkstätten ist das Betreiben des Gerätes durch
geschultes Personal verantwortlich zu überwachen.
- Heben Sie diese Bedienungsanleitung für spätere Fragen und Probleme bitte gut auf.
BESTIMMUNGSGEMÄSSE VERWENDUNG
- Bei diesem Gerät handelt es sich um professionelle 2-Wege Aktiv-Monitore mit Bluetooth, über die Sie
Audiosignale abhören können. Das Gerät kann dazu auch mit einem Computer, Tablet oder Smartphone über
Bluetooth verbunden werden.
- Wird das Gerät anders verwendet, als in dieser Bedienungsanleitung beschrieben, kann es zu Schäden am Produkt
kommen und der Gewährleistungsanspruch erlischt. Außerdem ist jede andere Verwendung mit Gefahren, wie z.B.
Kurzschluss, Brand, elektrischem Schlag, etc. verbunden.
- Die vom Hersteller festgelegte Seriennummer darf niemals entfernt werden, da ansonsten der
Gewährleistungsanspruch erlischt.
WARTUNG
- Überprüfen Sie regelmäßig die technische Sicherheit des Gerätes auf Beschädigungen des Netzkabels oder des
Gehäuses, sowie auf die Abnutzung von Verschleißteilen, wie Dreh- und Schiebereglern.
- Wenn anzunehmen ist, dass ein gefahrloser Betrieb nicht mehr möglich ist, so ist das Gerät außer Betrieb zu
setzten und gegen unbeabsichtigten Betrieb zu sichern. Bitte ziehen Sie den Netzstecker aus der Steckdose.
- Es ist anzunehmen, dass ein gefahrloser Betrieb nicht mehr möglich ist, wenn das Gerät sichtbare Beschädigungen
aufweist, das Gerät nicht mehr funktioniert oder nach längerer Lagerung unter ungünstigen Verhältnissen bzw.
nach schweren Transportbeanspruchungen erneut genutzt werden soll.
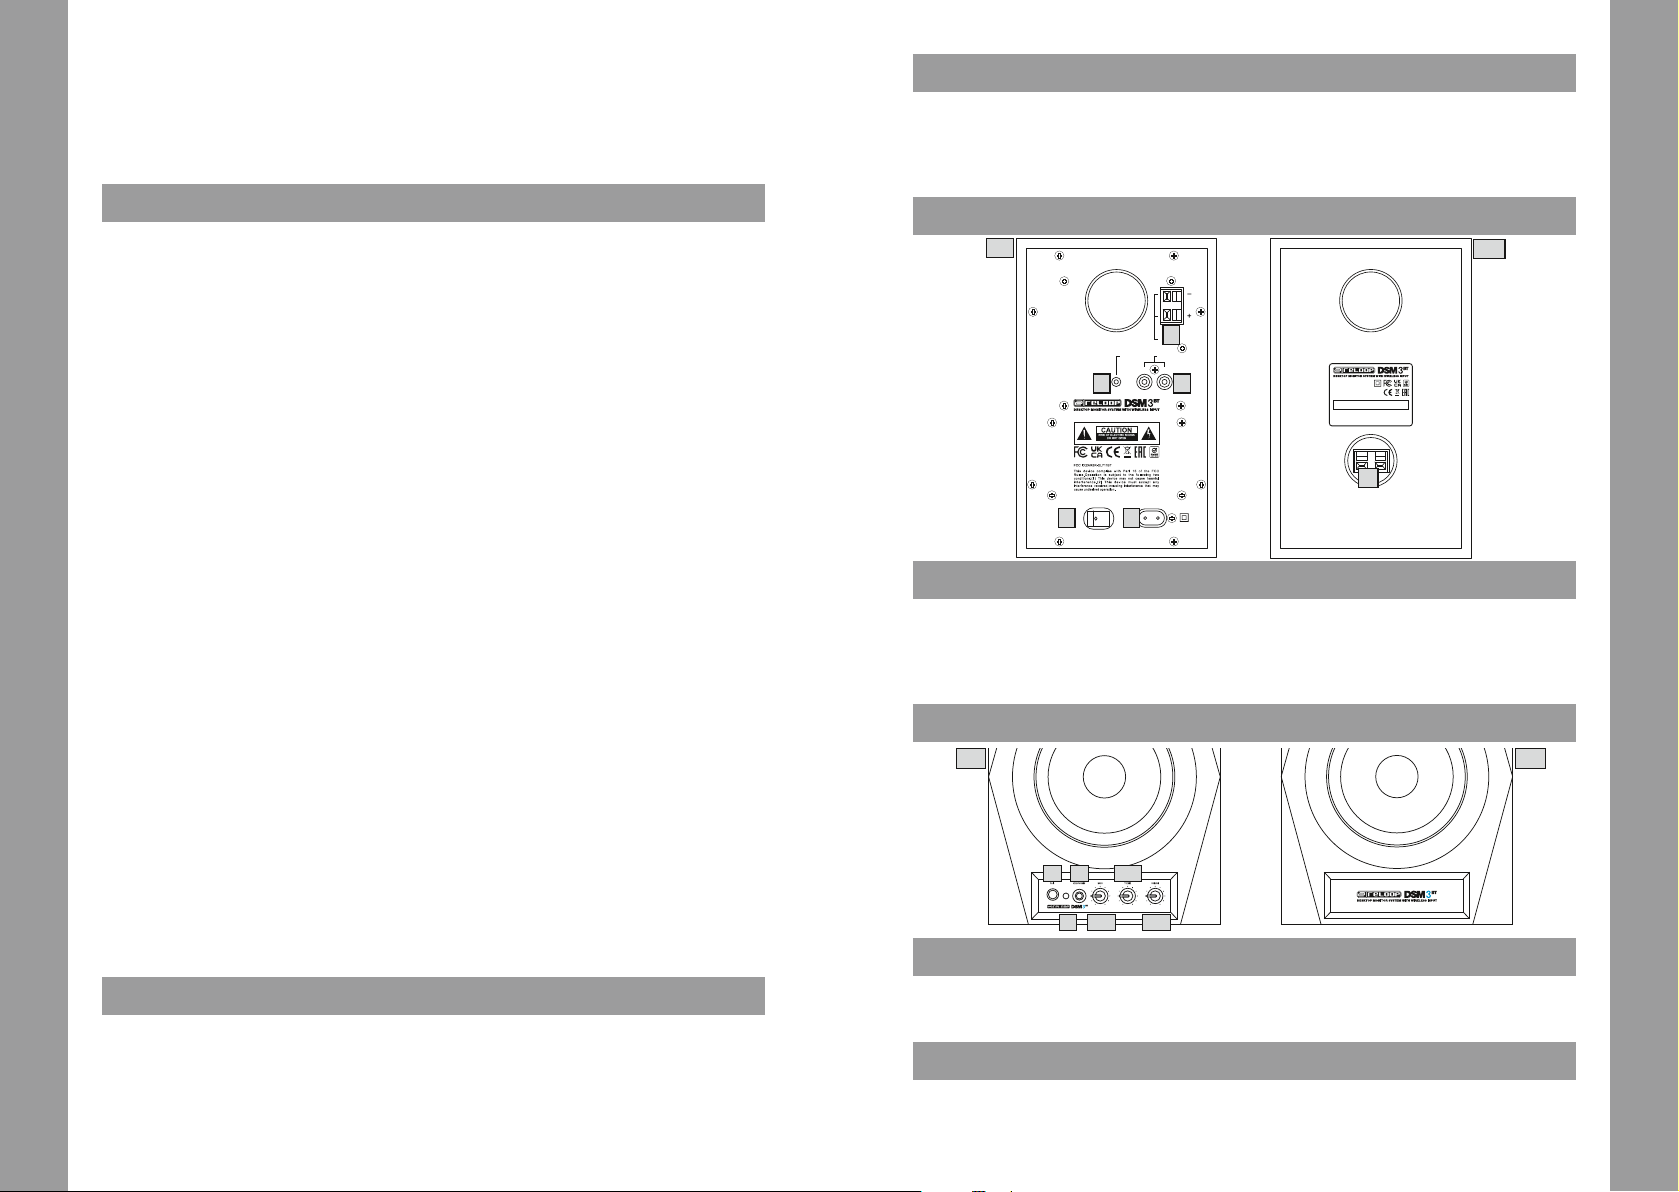
RÜCKSEITE
M1
POWER 100-240V ~ 50-60Hz
ON OFF
5 4
OUTPUT
POWER RATING: 60W
1
RIGHT SPEAKER
OUTPUT
INPUTSUBWOOFER
RL
23
MODEL: DSM-3BT
OUTPUT: 2x 20W
VOLTAGE: 100-240V ~
50-60Hz
DESIGNED IN GERMANY
ASSEMBLED IN CHINA
6
M2
BEZEICHNUNGEN
MONITOR 1
1. Klemmenanschluss für Lautsprecher 2
2. Signaleingangsbuchse (Cinch)
3. Subwoofer-Ausgangsanschlussbuchse
(optional / 3,5 mm Klinke)
4. Netzkabelanschluss
5. An-/Aus-Schalter
MONITOR 2
6. Klemmenanschluss für Lautsprecher 1
VORDERSEITE
M1 M2
7 9
8 10
11
12
BEZEICHNUNGEN
MONITOR 1
7. Bluetooth-Pairing-Taste
8. Bluetooth-Pairing-LED
9. Kopfhörerausgang (3,5 mm-Klinke)
10. Drehregler für Bässe
11. Drehregler für Höhen
12. Drehregler für Ausgangslautstärke
ZUBEHÖR
- Lautsprecherkabel (für Anschluss linker/rechter Kanal)
- Netzkabel
- Cinch-zu-Klinke (3,5 mm)-Adapterkabel
- Gummifüße
- Bedienungsanleitung
DEUTSCH
76
Page 5

INSTALLATION
1. Bitte kleben Sie jeweils 4 der beigelegten Gummifüße unter ihre DSM-3 BT Monitore, um diese gegen Vibrationen
und Verrutschen zu schützen.
2. Um eine optimale Hörbarkeit der hohen Frequenzen zu gewährleisten, empfehlen wir eine Installation der MonitorHochtöner auf Kopfhöhe. Nutzen Sie dazu gegebenenfalls einen geeigneten Lautsprecherständer. Achten Sie auch
auf einen ebenen und stabilen Untergrund und verwenden Sie ggf. Dämpfungsmaterial.
3. Bei diesen Monitoren handelt es sich um Nahfeldmonitore, die Ihnen eine Aufstellung in geringem Abstand zum
Hörer erlauben.
4. Um eine Reektion von zu nahen Wänden (z.B. bei Raumecken) zu verhindern, drehen Sie die Monitore etwas zu sich.
NAHFELD-INSTALLATION
In Studios werden Monitorlautsprecher normalerweise auf der Studiokonsole (in Kopfhöhe) aufgestellt. Dazu sollten
die Monitore und die Position des Hörers in einem gleichschenkeligen Dreieck, also im Winkel von 60° zur Hörposition
aufgebaut werden.
MITTELFELD-INSTALLATION
DEUTSCH
2. Verbinden Sie nun Ihre Signalquelle mit der Signaleingangsbuchse -2- (Cinch). Optional haben Sie die Möglichkeit
einen externen Subwoofer über die Subwoofer-Ausgangsanschlussbuchse -3- zu verbinden.
3. Verbinden Sie den Netzkabelanschluss -4- mit dem mit dem mitgelieferten Netzkabel und schließen Sie ihn an
Ihre Steckdose an.
BEDIENUNG
1. LAUTSTÄRKEREGLER IN MINIMALSTELLUNG BRINGEN
Bevor Sie das Gerät einschalten, drehen Sie den Lautstärke-Drehregler -12- in die minimale Position (Regler nach links).
2. STROM EINSCHALTEN
Nachdem alle Anschlüsse vorgenommen wurden, schalten Sie das Gerät mit dem Ein/Aus-Schalter -5- ein.
3. LAUTSTÄRKEREGELUNG
Regeln Sie die Lautstärke mit dem Lautstärke-Drehregler -12-.
4. SIGNALEINGANG AUSWÄHLEN
Sie haben die Wahl zwischen 2 möglichen Signaleingangsquellen:
Cinch -2-
Bluetooth -7-
Um ein Abspielgerät über Cinch anzuschließen, verbinden Sie das Cinch-Kabel Ihres Zuspielers bitte mit den dafür
vorgesehenen Cinch-Buchsen -2- des DSM-3 BT Monitor 1.
HINWEIS
Beachten Sie bitte, dass die Signalstärke Ihres gewünschten Abspielgerätes ausreichend ist. Manche
Abspieler, bspw. verschiedene Plattenspieler, benötigen für einen direkten Anschluss gegebenenfalls noch
einen Vorverstärker, um eine ausreichende Signalstärke zu erlangen.
Beim Einschalten der DSM-3 BT leuchtet die Bluetooth-Pairing-LED -8- dauerhaft weiß. Um ein Bluetooth-
Abspielgerät zu nutzen, aktivieren Sie bitte zuerst die Bluetooth-Funktion des gewünschten Abspielgerätes und
drücken Sie anschließend die Bluetooth-Pairing-Taste -7- an ihrem DSM-3 BT-Monitor 1. Wenn die DSM-3 BT auf
Ihrem Bluetooth-Gerät erscheint drücken Sie auf Verbinden. Solange sie sich im Pairing-Modus bendet, blinkt
die Bluetooth-Pairing-LED -8- abwechselnd blau und weiß, sobald die Verbindung hergestellt ist, leuchtet die
Bluetooth Pairing LED -8- dauerhaft blau. Um die Verbindung zu einem neuen Bluetooth Gerät herzustellen,
drücken Sie die Bluetooth-Pairing-Taste -7- erneut, um die aktive Bluetooth-Verbindung aufzuheben und zurück in
den Pairing-Modus zu gelangen. Anschließend wiederholen Sie bitte den zuvor beschriebenen Vorgang.
KLANGREGELUNG
Mit den Drehreglern für die Bässe -10- und die Höhen -11- können Sie die Bässe und Höhen absenken oder anheben.
Die ideale Einstellung hängt dabei von den gegebenen Räumlichkeiten ab. Ein stark schallgedämpfter Raum benötigt
eine Erhöhung der hohen Frequenzen. Umgekehrt ist eine Absenkung der hohen Frequenzen in wiederhallenden
Räumen nötig.
DEUTSCH
Die Mittelfeld-Installation gestaltet sich ähnlich wie die Nahfeld Installation. Diese Variante wird normalerweise
bei größeren Monitoren gewählt, wenn sie zu groß oder schwer für eine Positionierung auf der Studiokonsole sind.
Dieses Setup bietet einen größeren „Hörplatz“ und eine verbesserte räumliche Akustikabbildung. Bei der Mittelfeld-
Installation sollte der Bass der Monitore über der Studiokonsole positioniert werden
.
ANSCHLÜSSE
1. Verbinden Sie die beiden Lautsprecher mittels des mitgelieferten Lautsprecherkabels und der dafür
vorgesehenen Klemmen -1- / -6-. Führen Sie die Kerndrähte in die Buchsen ein, indem Sie auf die Klemme an der
Lautsprecherbuchse drücken.
TECHNISCHE DATEN
- Typ: 2-Wege-Bassreex, aktives Monitor-Lautsprechersystem
- Hochtöner: 0,5“-Hochtöner (1,30 cm)
- Tieftöner: 3,5“ Bass (8,89 cm)
- Gehäuse-Abmessungen: 140 x 222 x 152,5 mm
- Gewicht: 2,8 kg (Paar)
- Frequenzbereich: 80-20000 Hz
- Verstärkerleistung: Klasse A/B Verstärker: 2 x 20 W RMS
- Magnetische Abschirmung
- Eingänge: 1x Line (RCA), 1x Wireless Bluetooth ®
- Ausgänge: 1x Kopfhörer Monitor (3,5mm Klinke), 1x Subwoofer (3,5mm Klinke)
SUPPORT
Wenn Sie zusätzliche Hilfe benötigen oder technische Fragen haben,
ziehen Sie bitte unsere Reloop FAQ zu Rate oder kontaktieren Sie unser Support-Team:
https://www.reloop.com/faqs.html
https://www.reloop.com/support-ticket-request
In compliance with international safety certication requirements (e.g. CE, UKCA, FCC), all necessary documents are held by our ofcial Importer. You
can nd our current importer for your territory listed as Distributor in the ‘Where To Buy section’ of our website: https://www.reloop.com/dealer-area
98
Page 6
ATTENTION !
Pour votre propre sécurité, veuillez lire attentivement ce mode d’emploi avant la première utilisation ! Toutes les
personnes chargées de l’installation, de la mise en service, de l’utilisation, de l’entretien et la maintenance de cet
appareil doivent posséder les qualications nécessaires et respecter les instructions de ce mode d’emploi. Ce
produit est conforme aux directives européennes et nationales, la conformité a été certiée et les déclarations et
documents sont en possession du fabricant.
Retirez la Reloop DSM-3 BT de son emballage. Avant la première mise en service, vériez le bon état de l’appareil. Si
le boîtier ou le câble sont endommagés, n’utilisez pas l’appareil et contactez votre revendeur.
MAINTENANCE
- Contrôlez régulièrement le bon état de l’appareil (boîtier, cordon) et l’usure éventuelle des molettes et curseurs.
- Si vous supposez que l’appareil ne peut plus être utilisé en toute sécurité, mettez l’appareil hors-service et
assurez-le contre toute réutilisation involontaire. Débranchez la che électrique de la prise de courant !
- La sécurité d’emploi est susceptible d’être affectée lorsque l’appareil est visiblement endommagé, ne fonctionne
plus correctement, après un stockage prolongé dans des conditions défavorable ou après une forte sollicitation
de transport.
CONSIGNES DE SÉCURITÉ
ATTENTION !
Soyez particulièrement vigilant lors des branchements avec la tension secteur 100-240 V 50/60 Hz. Une décharge
électrique à cette tension peut être mortelle ! La garantie exclu tous les dégâts dus au non-respect des instructions
de ce mode d’emploi. Le fabricant décline toute responsabilité pour les dégâts matériels et personnels dus à un
usage incorrect ou au non-respect des consignes de sécurité.
AVERTISSEMENT !
Pour éviter tout risque d’incendie ou de décharge électrique, n’exposez jamais cet appareil à l’humidité, à l’eau
ou à d’autres liquides ! N’ouvrez jamais le boîtier !
- Cet appareil a quitté l’usine de fabrication en parfait état. An de conserver cet état et assurer la sécurité de
fonctionnement, l’utilisateur doit absolument respecter les consignes de sécurité et les avertissements indiqués
dans ce mode d’emploi.
- Pour des raisons de sécurité et de certication (CE), il est interdit de transformer ou modier cet appareil. Tous
les dégâts dus à une modication de cet appareil ne sont pas couverts par la garantie.
- Le boîtier ne contient aucune pièce nécessitant un entretien, à l’exception de pièces d’usure pouvant être
remplacées de l’extérieur. La maintenance doit exclusivement être effectuée par du personnel qualié an de
conserver les droits de garantie !
- Les fusibles doivent uniquement être remplacés par des fusibles de même type, dotés de caractéristiques de
déclenchement et d’un ampérage identique.
- Veillez à n’effectuer le raccordement secteur qu’une fois l’installation terminée.
- Utilisez uniquement des câbles conformes. Veillez à ce que toutes les ches et douilles soient bien vissées et
correctement connectées. Si vous avez des questions, contactez votre revendeur.
- Veillez à ne pas coincer ou endommager le cordon d’alimentation par des arêtes tranchantes lorsque vous
installez l’appareil.
- Prenez garde à ce que le cordon électrique n’entre pas en contact avec d’autres câbles et soyez prudent lorsque
vous manipulez des lignes ou des prises électriques. Ne touchez jamais ces éléments avec des mains humides !
- Insérez uniquement le cordon d’alimentation dans des prises électriques de sécurité. La source de tension utilisée
doit uniquement être une prise électrique en ordre du réseau d’alimentation publique.
- Débranchez l’appareil lorsque vous ne l’utilisez pas ou pour le nettoyer ! Pour débrancher l’appareil, tirez toujours
sur la prise, jamais sur le câble !
- Placez l’appareil sur une surface plane, stable et difcilement inammable. En cas de larsen, éloignez les enceintes
de l’appareil.
- Évitez tous les chocs et l’emploi de la force lors de l’installation et l’utilisation de l’appareil.
- Installez l’appareil dans un endroit à l’abri de la chaleur, de l’humidité et de la poussière. Ne laissez pas traîner les
câbles pour votre sécurité personnelle et celle de tiers !
- Ne placez jamais des récipients de liquides susceptibles de se renverser sur l’appareil ou à proximité directe. En
FRANÇAIS
cas d’inltration de liquides dans le boîtier, retirez immédiatement la che électrique. Faites contrôler l’appareil
par un technicien qualié avant de le réutiliser. La garantie exclu tous les dégâts dus aux inltrations de liquides.
- N’utilisez pas l’appareil dans un environnement extrêmement chaud (plus de 35°C) ou froid (sous 5° C). N’exposez
pas l’appareil directement aux rayons solaires ou à des sources de chaleur telles que radiateurs, fours, etc.
(également valable lors du transport). Veillez à ne pas obstruer les ventilateurs ou les fentes de ventilation.
Assurez toujours une ventilation convenable.
- N’utilisez pas l’appareil lorsqu’il est amené d’une pièce froide dans une pièce chaude. L’eau de condensation peut
détruire votre appareil. Laissez l’appareil hors tension jusqu’à ce qu’il ait atteint la température ambiante !
- Ne nettoyez jamais les touches et curseurs avec des produits aérosols ou gras. Utilisez uniquement un chiffon
légèrement humide, jamais de solvants ou d’essence.
- Utilisez l’emballage original pour transporter l’appareil.
- Pour commencer, les réglages du volume de vos moniteurs Reloop DSM-3 BT doivent être réglés au minimum et
l‘appareil doit être éteint. Attendez 8 à 10 secondes avant de régler le volume pour éviter d‘endommager les enceintes.
- Les appareils électriques ne sont pas des jouets. Soyez particulièrement vigilants en présence d’enfants.
- Les directives de prévention des accidents de l’association des fédérations professionnelles doivent être
respectées dans les établissements commerciaux.
- Dans les écoles, instituts de formation, ateliers de loisirs etc. l’utilisation de l’appareil doit être effectuée sous la
surveillance de personnel qualié.
- Conservez ce mode d’emploi pour le consulter en cas de questions ou de problèmes.
UTILISATION CONFORME
Cette unité
- Cet appareil comprend des moniteurs actifs professionnels à 2 voies avec Bluetooth qui vous permettent d‘écouter des
signaux audio. L‘appareil peut également être connecté à un ordinateur, une tablette ou un smartphone via Bluetooth.
- Toute utilisation non conforme peut endommager le produit et annuler les droits de garantie. En outre, toute utilisation
autre que celle décrite dans ce mode d’emploi peut être source de courts-circuits, incendies, décharge électrique, etc.
- Le numéro de série attribué par le fabricant ne doit jamais être effacé sous peine d’annuler les droits de garantie.
FACE ARRIÈRE
M1
1
RIGHT SPEAKER
OUTPUT
INPUTSUBWOOFER
OUTPUT
RL
23
MODEL: DSM-3BT
OUTPUT: 2x 20W
VOLTAGE: 100-240V ~
50-60Hz
DESIGNED IN GERMANY
ASSEMBLED IN CHINA
6
POWER 100-240V ~ 50-60Hz
ON OFF
5 4
POWER RATING: 60W
DÉSIGNATIONS
MONITEUR 1
1. Raccordement des bornes pour l’enceinte 2
2. Prise d’entrée de signal (cinch)
3. Prise de connexion de sortie Subwoofer (option/
jack 3,5 mm)
4. Connexion du câble secteur
5. Interrupteur marche/arrêt
MONITEUR 2
6. Raccordement des bornes pour l’enceinte 1
FACE AVANT
M1 M2
7 9
8 10
11
12
DÉSIGNATIONS
MONITEUR 1
7. Touche d’appairage Bluetooth
8. LED d’appairage Bluetooth
9. Sortie du casque (jack 3,5 mm)
10. Bouton rotatif pour les basses
11. Bouton rotatif pour les aigus
12. Bouton rotatif pour volume de sortie
ACCESSOIRES
- câble d‘enceinte (pour la connexion des canaux
gauche/droite)
- câble secteur
- câble adaptateur cinch-jack (3,5 mm)
- pieds de caoutchouc
- mode d’emploi
M2
FRANÇAIS
1110
Page 7

INSTALLATION
1. Veuillez coller 4 des pieds en caoutchouc fournis sous chacun de vos moniteurs DSM-3 BT pour les protéger des
vibrations et des glissements.
2. An d‘assurer une audibilité optimale des aigus, nous recommandons d‘installer les tweeters des moniteurs à hauteur
de tête ; au besoin, utiliser pour cela un support de haut-parleur adapté. Veiller également à ce que la surface
d‘installation soit plane, solide et utiliser un matériau d‘amortissement le cas échéant.
3. Ces moniteurs sont des moniteurs de proximité et peuvent être installés près de l‘écouteur.
4. An de prévenir la réexion par des murs proches (par ex. dans les angles de la pièce), il faut tourner les moniteurs
vers soi. Pour optimiser l‘acoustique du local, vous pouvez utiliser des plaques de mousse acoustique.
INSTALLATION EN CHAMP PROCHE
Dans les studios, les enceintes de moniteurs sont généralement placées sur la console du studio (à hauteur de tête).
Pour ce faire, les moniteurs et la position de l‘auditeur doivent être disposés en triangle isocèle, c‘est-à-dire avec un
angle de 60° par rapport à la position d‘écoute.
2. Connectez maintenant votre source de signal à la prise d‘entrée de signal -2- (cinch). En option, vous avez la
possibilité de connecter un subwoofer externe via la prise de connexion de sortie du subwoofer -3-.
3. Connectez la connexion du câble secteur -4- au câble secteur fourni avec l‘appareil et branchez-le dans votre
prise de courant.
COMMANDE
1. PLACEZ LE RÉGLAGE DU VOLUME EN POSITION MINIMALE
Avant de mettre l‘appareil en marche, mettez le bouton rotatif du volume -12- sur la position minimale (bouton vers la
gauche).
2. METTRE SOUS TENSION
Une fois toutes les connexions effectuées, mettez l‘appareil en marche à l‘aide de l‘interrupteur marche/arrêt -5-.
3. RÉGLAGE DU VOLUME
Vous contrôlez le volume avec le bouton rotatif du volume -12-.
4. SÉLECTIONNEZ L’ENTRÉE DE SIGNAL
Vous avez le choix entre 2 sources d’entrée de signal possibles:
Cinch -2Bluetooth -7-
Pour connecter un lecteur par cinch, veuillez connecter le câble cinch de votre lecteur externe aux prises cinch
-2- du moniteur 1 DSM-3 BT prévu à cet effet.
INDICATION
Veuillez vous assurer que la puissance du signal du lecteur de votre choix est sufsante. Certains lecteurs, tels
que diverses platines, peuvent nécessiter un préamplicateur pour une connexion directe an d‘obtenir une
puissance de signal sufsante.
Lorsque les DSM-3 BT sont en marche, la LED d‘appairage Bluetooth -8- reste allumée en blanc. Pour utiliser un
lecteur Bluetooth, activez d‘abord la fonction Bluetooth du lecteur souhaité, puis appuyez sur le bouton d’appairage
Bluetooth -7- de votre moniteur 1 BT DSM-3. Lorsque le DSM-3 BT apparaît sur votre appareil Bluetooth, appuyez
sur Connecter. Tant qu‘il est en mode d‘appairage, la LED d‘appairage Bluetooth -8- clignote alternativement en
bleu et en blanc; dès que la connexion est établie, la LED d‘appairage Bluetooth -8- reste allumée en bleu. Pour
vous connecter à un nouveau périphérique Bluetooth, appuyez à nouveau sur le bouton d’appairage Bluetooth -7pour annuler la connexion Bluetooth active et revenir au mode d’appairage. Veuillez ensuite répéter la procédure
décrite précédemment.
INSTALLATION EN CHAMP CENTRAL
FRANÇAIS
Cette installation est en principe similaire à l’installation en champ proche. Cette variante est généralement
privilégiée pour les grands moniteurs s‘ils sont trop grands ou trop lourds pour être positionnés sur la console du
studio. Cette conguration offre un plus grand « espace d‘écoute » et une meilleure cartographie acoustique spatiale.
Dans cette installation, les basses des moniteurs doivent être placées au-dessus de la console du studio.
.
RACCORDS
1. Connectez les deux enceintes en utilisant le câble d‘enceinte fourni et les bornes -1- / -6- prévues. Insérez les ls
centraux dans les prises en appuyant sur la borne de la prise de l‘enceinte.
RÉGLAGE DE LA TONALITÉ
Les boutons rotatifs pour les basses -10- et les aigus -11- vous permettent de baisser ou d‘augmenter les basses et les
aigus. Le réglage idéal dépend des lieux. Une pièce fortement insonorisée a besoin d‘une augmentation des hautes
fréquences. Inversement, une diminution des hautes fréquences est nécessaire dans les salles réverbérantes.
CARACTÉRISTIQUES
- Type: Technologie Bass reex à 2 voies, système de haut-parleurs à moniteur actif
- Tweeters : tweeter de 0,5“ (1,30 cm)
- Woofeers : basse de 3,5“ (8,89 cm)
- Dimensions du boîtier : 140 x 222 x 152,5 mm
- Poids : 2,8 kg (paire)
- Plage de fréquence : 80-20000 Hz
- Puissance de l‘amplicateur : amplicateur de classe A/B : 2 x 20 W RMS
- Blindage magnétique
- Entrées : 1x Line (RCA), 1x Wireless Bluetooth ®
- Sorties : 1x moniteur du casque (jack de 3,5 mm), 1x Subwoofer (jack de 3,5 mm)
SUPPORT
Si vous avez besoin d‘une aide supplémentaire ou si vous avez des questions techniques, consultez la FAQ Reloop ou
contactez notre équipe d‘assistance:
https://www.reloop.com/faqs.html
https://www.reloop.com/support-ticket-request
In compliance with international safety certication requirements (e.g. CE, UKCA, FCC), all necessary documents are held by our ofcial Importer. You
can nd our current importer for your territory listed as Distributor in the ‘Where To Buy section’ of our website: https://www.reloop.com/dealer-area
FRANÇAIS
1312
Page 8

¡ATENCIÓN!
En aras de su propia seguridad, ¡lea detenidamente este manual de instrucciones antes de la primera puesta en
marcha! Todas las personas relacionadas con el montaje, la puesta en marcha, la operación, el mantenimiento y
la reparación de este equipo deben estar correctamente cualicadas y haber leído con atención este manual de
instrucciones. Este producto cumple con los requisitos de las directivas europeas y nacionales, se ha comprobado
la conformidad y las declaraciones y los documentos correspondientes están en posesión del fabricante.
Extraiga la Reloop DSM-3 BT de la caja. Antes de la primera puesta en marcha, compruebe si el equipo presenta daños
visibles producidos por el transporte. Si descubre daños en el cable de alimentación o en la carcasa, no ponga en
marcha el equipo y contacte con su distribuidor especializado.
MANTENIMIENTO
- Compruebe regularmente la seguridad técnica del equipo en cuanto a daños del cable de red o de la carcasa, así
como el deterioro de las piezas de desgaste y de los reguladores giratorios y deslizantes.
- Si se sospecha que no es posible un funcionamiento seguro, desconecte el equipo y asegúrelo contra una conexión
involuntaria. ¡Retire el enchufe de la caja de enchufe!
- Es posible que el equipo ya no funcione de manera segura si presenta daños visibles o que ya ni siquiera funcione
después haberlo guardado durante un largo período de tiempo en condiciones desfavorables o después de haberlo
transportado de manera inadecuada.
INDICACIONES DE SEGURIDAD
¡ATENCIÓN!
Tenga especial cuidado al trabajar con tensiones de red de AC 100 - 240 V, 50/60Hz. Con estas tensiones, ¡podría
sufrir una descarga eléctrica mortal! Los daños ocasionados por el incumplimiento de este manual de instrucciones
anulan el derecho a la garantía. El fabricante no se hace responsable de los daños materiales o personales
provocados por el manejo incorrecto del equipo o por el incumplimiento de las indicaciones de seguridad
¡AVISO! ¡Para evitar incendios o descargas eléctricas, no exponga el dispositivo al agua o a ningún tipo de
líquidos! ¡Nunca abra la carcasa!
- Este equipo ha salido de fábrica en perfectas condiciones de funcionamiento. Para conservar el equipo en perfecto
estado y garantizar un funcionamiento seguro, el usuario debe respetar las indicaciones de seguridad y de
advertencia contenidas en este manual.
- Por razones de seguridad y de licencia (CE) no está permitida la reconstrucción y/o modicación del equipo. La
garantía no cubre los daños provocados por las modicaciones manuales realizadas en el equipo.
- En el interior del equipo no hay ninguna pieza que necesite mantenimiento, a excepción de aquellas piezas que
por desgaste deban cambiarse. El mantenimiento debe ser realizado por personal cualicado; de lo contrario, ¡la
garantía queda anulada!
- Los dispositivos de seguridad solo deben reemplazarse por otros dispositivos del mismo tipo, con las mismas
características de activación y la misma corriente nominal.
- Asegúrese de conectar la alimentación después de montar el equipo.
- Utilice siempre y únicamente cables que cumplan con las normativas. Asegúrese de que todos los enchufes y
casquillos estén bien jados y correctamente conectados. En caso de dudas, consulte con su distribuidor.
- Asegúrese de que durante el montaje del producto, el cable de alimentación no se dobla ni sufre daños causados
por cantos alados.
- ¡No permita que el cable de red entre en contacto con otros cables! Tenga extremo cuidado al manejar el cable de
red y otras conexiones. ¡Nunca toque estas piezas con las manos mojadas!
- Inserte el cable de alimentación solo en enchufes de tipo “Schuko”. Como fuente de tensión solo debe emplearse
una toma de corriente adecuada de la red eléctrica pública.
- Desconecte el equipo de la red cuando no lo utilice y antes de los trabajos de limpieza. Nunca toque la supercie
de contacto del enchufe y nunca tire de la línea de red.
- Coloque el equipo sobre una supercie horizontal, estable y difícilmente inamable.
- Evite las vibraciones y cualquier uso violento durante la instalación o la puesta en marcha del equipo.
- Al elegir el lugar de instalación, asegúrese de que el equipo no está expuesto a altas temperaturas, a humedad y/o a polvo.
Asegúrese de que no haya cables tirados por el suelo. ¡Estos cables ponen en peligro su seguridad y la de de terceros!
- No coloque en el equipo o en sus inmediaciones recipientes que contengan líquido y puedan volcar con facilidad.
ESPAÑOL
En caso de que penetre líquido en el interior del equipo, retire de inmediato el enchufe de la red. Haga que
un técnico de servicio cualicado compruebe el equipo antes de volverlo a utilizar. Los daños causados por el
derrame de líquidos quedan excluidos de la garantía.
- No utilice el equipo en ambientes con una temperatura muy alta (superior a 35°) o muy baja (inferior a 5°). Proteja
el equipo de la luz solar directa y de fuentes de calor como radiadores, hornos, etc. (también durante el transporte
en vehículos cerrados). Nunca cubra los ventiladores ni los oricios de ventilación previstos. Asegúrese de que
siempre haya suciente ventilación.
- El equipo no debe ponerse en funcionamiento si se traslada de un lugar frío a otro con altas temperatura. El agua
condensada que se forme puede destruir el equipo en ciertas circunstancias. ¡Deje el equipo desconectado hasta
que alcance la temperatura ambiente!
- Los reguladores e interruptores nunca deben limpiarse con lubricantes o pulverizando soluciones limpiadoras.
Este equipo sólo debe limpiarse con un paño húmedo. No utilice nunca disolventes o bencina de lavado.
- En caso de trasladar el equipo, debe transportarse en el embalaje original.
- Para comenzar y antes de nada, el control de volumen de sus monitores Reloop DSM-3 BT debe estar congurado
en „Mínimo“ y el dispositivo debe estar apagado. Espere de 8 a 10 segundos antes de subir el volumen para evitar
dañar los altavoces.
- Los equipos que funcionan con tensión de red no deben estar al alcance de los niños. Por este motivo tenga
especial cuidado cuando haya niños cerca.
- En establecimientos industriales debe prestarse atención a las disposiciones de prevención de accidentes de la
asociación profesional industrial.
- En escuelas, instituciones de aprendizaje y talleres de tiempo libre o bricolaje, el funcionamiento del equipo debe
estar supervisado por personal capacitado.
- Guarde bien este manual de instrucciones para cuestiones y problemas que puedan surgir posteriormente.
USO CONFORME AL DESTINO PREVISTO
- Este dispositivo es un sistema de monitorización activo profesional de 2 canales con Bluetooth que puede utilizar
para escuchar señales de audio. Para hacerlo, el dispositivo también se puede conectar a un ordeandor, tableta o
teléfono inteligente a través de Bluetooth.
- Si se utiliza el equipo de una manera distinta a la descrita en este manual de instrucciones, podrían producirse
daños que anularán la garantía. Además, cualquier otro uso podría resultar peligroso y provocar cortocircuitos,
incendios, descargas eléctricas, etc.
- Nunca se debe retirar el número de serie del fabricante; de lo contrario, la garantía queda anulada.
ATRÁS
M1
1
RIGHT SPEAKER
OUTPUT
INPUTSUBWOOFER
OUTPUT
RL
23
MODEL: DSM-3BT
OUTPUT: 2x 20W
VOLTAGE: 100-240V ~
50-60Hz
DESIGNED IN GERMANY
ASSEMBLED IN CHINA
6
POWER 100-240V ~ 50-60Hz
ON OFF
5 4
POWER RATING: 60W
ETIQUETAS
MONITOR 1
1. Terminales de conexión para el segundo altavoz
2. Conector de entrada de señal (RCA / Cinch)
3. Salida para subwoofer (opcional / conector de 3,5 mm)
4. Conexión para el cable de alimentación
5. Interruptor de encendido / apagado
MONITOR 2
6. Terminales de conexión para el primer altavoz
PARTE DELANTERA
M1 M2
7 9
8 10
11
12
ETIQUETAS
MONITOR 1
7. Botón de emparejamiento de Bluetooth
8. LED estado del emparejamiento de Bluetooth
9. Salida de auriculares (conector de 3,5 mm)
10. Mando de control de graves
11. Mando de control de agudos
12. Mando de control de volumen de salida
ACCESORIOS
- Cable de altavoz (para conexión entre los canales
izquierdo / derecho)
- Cable de alimentación
- Cable adaptador RCA a jack (3,5 mm)
- Patas de goma
- Manual de instrucciones
M2
ESPAÑOL
1514
Page 9

INSTALLATION
1. Pegue 4 de las patas de goma que se entregan a la base de cada uno de sus monitores DSM-3 BT para protegerlos
de vibraciones y deslizamiento.
2. Para una escucha óptima de las altas frecuencias, recomendamos instalar el tweeter de los monitores de estudio al
nivel de la cara; si es necesario, utilice un soporte de altavoz adecuado para elevarlos. Asegúrese de utilizar una base
estable y uniforme; si es necesario, utilice material de amortiguación acústica debajo del altavoz.
3. Estos altavoces son monitores de campo cercano que se deben usar a una distancia cercana al oyente.
4. Para evitar el reexiones de las paredes demasiado cercanas (por ejemplo, las esquinas de la habitación), gire los
altavoces ligeramente para que apunten hacia su posición. Para optimizar aún más la acústica de su ambiente, puede
utilizar placas absorbentes de sonido en las paredes.
INSTALACIÓN COMO CAMPO CERCANO
En los estudios, los altavoces de monitorozación generalmente se colocan sobre la consola o mesa del estudio (a la
altura de la cabeza). Los monitores y la posición del oyente deben formar un triángulo isósceles; en otras palabras,
colóquelos en un ángulo de 60°con respecto a su posición de escucha.
INSTALACION COMO CAMPO MEDIO
ESPAÑOL
2. Ahora conecte su fuente de señal usando el conector de entrada de señal (2) (RCA/Cinch). Puede conectar un
subwoofer externo utilizando la salida para subwoofer (3) si es necesario.
3. Conecte el cable de alimentación suministrado al conector para el cable de alimentación (4) y enchúfelo a su toma
de corriente en la pared.
OPERACIÓN
1. ASEGÚRESE DE QUE EL CONTROL DE VOLUMEN ESTÉ EN LA POSICIÓN MÍNIMO
Gire el mando de control de volumen (12) a la posición Mínimo (girando el potenciómatro a la izquierda) antes de
encender el dispositivo.
2. ENCIENDA LA ENERGÍA
Una vez que todo esté conectado, encienda el dispositivo mediante el interruptor de encendido / apagado (5).
3. AJUSTA EL VOLUMEN
Ajuste el volumen con el mando de control de volumen (12).
4. SELECCIONE LA ENTRADA DE SEÑAL
Puede elegir entre 2 posibles fuentes de entrada de señal:
RCA (2)
Bluetooth (7)
Para conectar un dispositivo de reproducción a través de los conectores RCA/Cinch, conecte el cable RAC de su
unidad de reproducción utilizando el conector RCA (2) en el monitor DSM-3 BT 1.
NOTA
Asegúrese de que la intensidad de la señal del dispositivo de reproducción elegido sea suciente. Muchos
dispositivos de reproducción, por ejemplo, algunos reproductores de discos de vinilo, pueden requerir un
preamplicador adicional para la conexión directa para lograr una intensidad de señal suciente.
Cuando el DSM-3 BT está encendido, el LED de emparejamiento de Bluetooth (8) se ilumina en blanco. Para usar
un dispositivo de reproducción Bluetooth, primero habilite Bluetooth en el dispositivo de reproducción elegido
y luego presione el botón de emparejamiento Bluetooth (7) en su monitor DSM-3 BT 1. Cuando aparezca DSM3 BT en su dispositivo Bluetooth, presione „Conectar“ . Mientras está en modo de emparejamiento, el LED de
emparejamiento de Bluetooth (8) parpadeará en azul y blanco alternativamente. Una vez establecida la conexión,
el LED de emparejamiento de Bluetooth (8) se iluminará en azul de forma ja. Para conectarse a un dispositivo
Bluetooth diferente, presione el botón de emparejamiento de Bluetooth (7) nuevamente para cancelar la conexión
Bluetooth activa y volver al modo de emparejamiento. Repita el proceso descrito anteriormente.
CONTROL DE TONO
Puede subir o bajar los graves y los agudos utilizando el control de graves (10) y el control de agudos (11). El escenario
ideal dependerá de las características particulares de la habitación. Una habitación con un excelente aislamiento
acústico necesitará aumentar las frecuencias más altas. Por el contrario, las frecuencias más altas deben reducirse
en habitaciones con más reverberación.
ESPAÑOL
La conguración de la instalación de campo medio debe ser similar a la conguración de la instalación de campo
cercano. Esta variante generalmente se utiliza para monitores más grandes cuando estos son demasiado grandes
o demasiado pesados para colocarlos sobre la consola de estudio. Esta conguración proporciona una „posición de
escucha“ más amplia y crea mejores condiciones acústicas en la habitación. En la instalación de campo medio, la
base de los monitores debe colocarse por encima la mesa de estudio.
CONEXIONES
1. Conecte ambos altavoces utilizando el cable de altavoz proporcionado en los terminales apropiados (1) / (6). Inserte
los cables centrales en los enchufes presionando el terminal en el conector del altavoz.
TECHNICAL DATA
- Tipo: Sistema de altavoces de monitorización activos de dos canales con bass reex
- Tweeter: tweeter de 0,5 „(1,30 cm)
- Woofer: graves de 3,5 „(8,89 cm)
- Dimensiones del recinto: 140 x 222 x 152,5 mm
- Peso: 2,8 kg (par)
- Rango de frecuencia: 80-20.000 Hz
- Potencia del amplicador: amplicador clase A / B: 2 x 20 W RMS
- Blindaje magnético
- Entradas: 1 x línea (RCA), 1 x Bluetooth® inalámbrico
- Salidas: 1 x auriculares (conector de 3,5 mm), 1 x subwoofer (conector de 3,5 mm)
SUPPORT
Si necesita más ayuda o tiene preguntas técnicas,
Consulte nuestra sección de preguntas frecuentes sobre Reloop o póngase en contacto con nuestro equipo de
soporte:
https://www.reloop.com/faqs.html
https://www.reloop.com/support-ticket-request
In compliance with international safety certication requirements (e.g. CE, UKCA, FCC), all necessary documents are held by our ofcial Importer. You
can nd our current importer for your territory listed as Distributor in the ‘Where To Buy section’ of our website: https://www.reloop.com/dealer-area
1716
Page 10
Declaration of Conformity with regard to the Radio Equipment Directive 2014/53/EU
DoC.v.10
Manufacturer:
Global Distribution GmbH & CO. KG
Schuckertstraße 28, 48153 Münster, Germany
English:
Hereby, “Global Distribution GmbH & CO. KG” declares that the radio equipment type [*] is in compliance with Directive 2014/53/EU.
The full text of the EU declaration of conformity is available at the following
internet address: https://www.reloop.com/product-compliance
Suomi:
“Global Distribution GmbH & CO. KG” vakuuttaa, että radiolaitetyyppi [*] on
direktiivin 2014/53/EU mukainen.
EU-vaatimustenmukaisuusvakuutuksen täysimittainen teksti on
saatavilla seuraavassa internetosoitteessa:
https://www.reloop.com/product-compliance
Nederlands:
Hierbij verklaar ik, “Global Distribution GmbH & CO. KG”, dat het type radioapparatuur [*] conform is met Richtlijn 2014/53/EU.
De volledige tekst van de EU-conformiteitsverklaring kan worden
geraadpleegd op het volgende internetadres:
https://www.reloop.com/product-compliance
Français:
Le soussigné, “Global Distribution GmbH & CO. KG”, déclare que l’équipement
radioélectrique du type [*] est conforme à la directive 2014/53/UE.
Le texte complet de la déclaration UE de conformité est disponible à l’adresse internet suivante: https://www.reloop.com/product-compliance
Svenska:
Härmed försäkrar “Global Distribution GmbH & CO. KG” att denna typ av
radioutrustning [*] överensstämmer med direktiv 2014/53/EU.
Den fullständiga texten till EU-försäkran om överensstämmelse nns på
följande webbadress: https://www.reloop.com/product-compliance
Dansk:
Hermed erklærer “Global Distribution GmbH & CO. KG”, at radioudstyrstypen
[*] er I overensstemmelse med direktiv 2014/53/EU.
EU-overensstemmelseserklæringens fulde tekst kan ndes på
følgende internetadresse: https://www.reloop.com/product-compliance
Deutsch:
Hiermit erklärt “Global Distribution GmbH & CO. KG”, dass der Funkanlagentyp [*] der Richtlinie 2014/53/EU entspricht.
Der vollständige Text der EU-Konformitätserklärung ist unter der folgenden
Internetadresse verfügbar: https://www.reloop.com/product-compliance
Ελληνικά:
Με την παρούσα ο/η “Global Distribution GmbH & CO. KG”, δηλώνει ότι ο
ραδιοεξοπλισμός [*] πληροί την οδηγία 2014/53/ΕΕ.
Το πλήρες κείμενο της δήλωσης συμμόρφωσης ΕΕ διατίθεται στην
ακόλουθη ιστοσελίδα στο διαδίκτυο:
https://www.reloop.com/product-compliance
Italiano:
Il fabbricante, “Global Distribution GmbH & CO. KG”, dichiara che il tipo di
apparecchiatura radio [*] è conforme alla direttiva 2014/53/UE.
Il testo completo della dichiarazione di conformità UE è disponibile al seguente indirizzo Internet: https://www.reloop.com/product-compliance
Español:
Por la presente, “Global Distribution GmbH & CO. KG” declara que el tipo de
equipo radioeléctrico [*] es conforme con la Directiva 2014/53/UE.
El texto completo de la declaración UE de conformidad está disponible en la
dirección Internet siguiente:
https://www.reloop.com/product-compliance
Português:
O(a) abaixo assinado(a) “Global Distribution GmbH & CO. KG” declara que
o presente tipo de equipamento de rádio [*] está em conformidade com a
Diretiva 2014/53/UE.
O texto integral da declaração de conformidade está disponível no
seguinte endereço de Internet:
https://www.reloop.com/product-compliance
Čeština:
Tímto “Global Distribution GmbH & CO. KG” prohlašuje, že typ rádiového
zařízení [*] je v souladu se směrnicí 2014/53/EU.
Úplné znění EU prohlášení o shodě je k dispozici na této internetové adrese:
https://www.reloop.com/product-compliance
Eesti:
Käesolevaga deklareerib “Global Distribution GmbH & CO. KG”, et käesolev
raadioseadme tüüp [*] vastab direktiivi 2014/53/EL nõuetele.
ELi vastavusdeklaratsiooni täielik tekst on kättesaadav järgmisel internetiaadressil: https://www.reloop.com/product-compliance
Magyar:
“Global Distribution GmbH & CO. KG” igazolja, hogy a [*] típusú rádióberendezés megfelel a 2014/53/EU irányelvnek.
Az EU-megfelelőségi nyilatkozat teljes szövege elérhető a következő
internetes címen:
https://www.reloop.com/product-compliance
Latviešu valoda:
Ar šo “Global Distribution GmbH & CO. KG” deklarē, ka radioiekārta [*] atbilst
Direktīvai 2014/53/ES.
Pilns ES atbilstības deklarācijas teksts ir pieejams šādā interneta
vietnē: https://www.reloop.com/product-compliance
Lietuvių kalba:
Aš, “Global Distribution GmbH & CO. KG”, patvirtinu, kad radijo įrenginių tipas
[*] atitinka Direktyvą 2014/53/ES.
Visas ES atitikties deklaracijos tekstas prieinamas šiuo interneto
adresu: https://www.reloop.com/product-compliance
Malti:
B’dan, “Global Distribution GmbH & CO. KG”, niddikjara li dan it-tip ta’ tagħmir
tar-radju [*] huwa konformi mad-Direttiva 2014/53/UE.
It-test kollu tad-dikjarazzjoni ta’ konformità tal-UE huwa disponibbli
f’dan l-indirizz tal-Internet li ġej:
https://www.reloop.com/product-compliance
Slovenčina:
“Global Distribution GmbH & CO. KG” týmto vyhlasuje, že rádiové zariadenie
typu [*] je v súlade so smernicou 2014/53/EÚ.
Úplné EÚ vyhlásenie o zhode je k dispozícii na tejto internetovej
adrese: https://www.reloop.com/product-compliance
Slovenščina:
“Global Distribution GmbH & CO. KG” potrjuje, da je tip radijske opreme [*]
skladen z Direktivo 2014/53/EU.
Celotno besedilo izjave EU o skladnosti je na voljo na naslednjem
spletnem naslovu: https://www.reloop.com/product-compliance
Română:
Prin prezenta, “Global Distribution GmbH & CO. KG” declară că tipul de
echipamente radio [*] este în conformitate cu Directiva 2014/53/UE.
Textul integral al declarației UE de conformitate este disponibil la
următoarea adresă internet:
https://www.reloop.com/product-compliance
български:
С настоящото “Global Distribution GmbH & CO. KG” декларира, че този тип
радиосъоръжение [*] е в съответствие с Директива 2014/53/ЕС.
Цялостният текст на ЕС декларацията за съответствие може
да се намери на следния интернет адрес:
https://www.reloop.com/product-compliance
Polski:
“Global Distribution GmbH & CO. KG” niniejszym oświadcza, że typ
urządzenia radiowego [*] jest zgodny z dyrektywą 2014/53/UE.
Pełny tekst deklaracji zgodności UE jest dostępny pod następującym
adresem internetowym:
https://www.reloop.com/product-compliance
Norsk:
Herved “Global Distribution GmbH & CO. KG” erklærer at radioutstyr type [*]
er i samsvar med direktiv 2014/53/EU.
Den fullstendige teksten i EU-samsvarserklæringen er tilgjengelig på
følgende internettadresse:
https://www.reloop.com/product-compliance
Íslenska:
Hér með “Global Distribution GmbH & CO. KG” lýsir yr að tegund þráðlausan
búnað [*] er í samræmi við tilskipun 2014/53/ESB.
The fullur texti af ESB-samræmisyrlýsingu er í boði á eftirfarandi
veangi: https://www.reloop.com/product-compliance
Hrvatski:
“Global Distribution GmbH & CO. KG” ovime izjavljuje da je radijska oprema
tipa [*] u skladu s Direktivom 2014/53/EU.
Cjeloviti tekst EU izjave o sukladnosti dostupan je na sljedećoj
internetskoj adresi: https://www.reloop.com/product-compliance
Türk :
Burada. “Global Distribution GmbH & CO. KG” radyo ekipmani turunun [*]
2014/53/EU direktierine uyumlu oldugunu beyan eder.
Avrupa uyumluluk beyaninin tam metni belirtilen internet sitesinde
mevcuttur: https://www.reloop.com/product-compliance
LEARN MORE ABOUT THE FULL
RELOOP PRODUCT RANGE AT
STAND HUB
[*] RELOOP DSM-3 BT
Bluetooth:
Output power ...........+4 dBm Max.
Frequency band(s).... 2441 MHz
1918
Page 11

Reloop Distribution
Global Distribution GmbH & Co. KG,
Schuckertstrasse 28, 48153 Muenster / Germany
Fax: +49.251.6099368
Subject to alterations.
Illustrations similar to original product.
Misprints excepted.
Technische Änderungen vorbehalten.
Alle Abbildungen ähnlich.
Keine Haftung für Druckfehler.
Sous réserve de modications techniques.
Toutes les illustrations sont similaires.
Aucune responsabilité pour les erreurs d‘impression.
Reservado el derecho para realizar modicaciones técnicas.
Todas las imágenes son similares.
No se asumirá la responsabilidad por errores de impresión.
FRANÇAISFRANÇAISESPAÑOL
 Loading...