

Page 1
INSTRUCTION MANUAL
GUIDE D'UTILISATION
MANUAL DE INSTRUCCIONES
ARIA 350SP
DIGITAL STEAM PRESS
PRESSE À VAPEUR NUMÉRIQUE
PLANCHA DIGITAL A VAPOR
Page 2

Page 3

ENGLISH 01
FRANÇAIS 15
ESPAÑOL 29
Page 4

ARIA 350SP
INSTRUCTION MANUAL
ENGLISH
01
Page 5

02
RELIABLE. RIGHT THERE WITH YOU.
At Reliable, we do what we love, and take pride in doing it right.
You want what’s best for the people, places and things that
matter in your life – from where you live to what you wear.
So do we. From the start, we approach every product with a
craftsman’s attention to detail and passion for making it right.
Quality, functionality, design and customer service play an equally
important part in delivering what’s right for you. The Aria's
large pressing surface, impressive steam volume and accurate
digital thermostat ensure that even the toughest fabrics will be
wrinkle-free and pressed just right.
For your safety and to fully enjoy the advantages of this product,
please take a few minutes to read all the important safeguards
and care instructions. Keep this manual handy and review the
product warranty for your reference.
Page 6

03
IMPORTANT SAFETY INSTRUCTIONS
READ ALL INSTRUCTIONS BEFORE USE
1. To protect against the risk of electric shock, do not immerse the appliance
in water.
2. Do not let the cord hang over the edge of counter.
3. Do not allow the cord to touch hot surfaces.
4. Always allow the appliance to cool for at least thirty minutes before storing.
5. Always put the appliance in a secure place on a table or counter when using.
6. Do not move the appliance without unplugging it first.
7. The appliance has very hot surfaces. Do not allow unsupervised children to
use the appliance.
8. Always disconnect the appliance from the outlet before filling with or
removing water. Be careful to avoid spilling water on the appliance when
filling.
9. Use distilled water in the appliance. Do not use perfumed or products
containing alcohol in the appliance.
10. Always disconnect the appliance when not in use.
11. Do not use the appliance if the cord gets damaged. Return the appliance or
have the cord repaired by the manufacturer, his service agent or a similarly
qualified person.
12. Do not operate the appliance if it has been dropped or damaged. Do not
disassemble the appliance. Incorrect reassembly can cause a risk of electric
shock. Send it to an authorized service center for repair.
13. Do not operate another high wattage appliance on the same circuit.
14. This appliance must be grounded. Do not alter the plug or attempt to defeat
this feature.
15. Be careful. Burns can occur from touching hot metal parts, hot water or steam.
16. This appliance is not intended for use by young children or infirm persons
unless they have been adequately supervised by a responsible person to
ensure that they can use the appliance safely.
17. Young children should be supervised to ensure that they do not play with
the appliance.
Page 7

04
FOR HOUSEHOLD USE ONLY.
SAVE THESE INSTRUCTIONS IN A SAFE
PLACE FOR FUTURE REFERENCE.
FEATURES
• Your new Steam Press provides clean, professional results every time!
• Multiple dry-heat and steam settings for all types of fabric
• Burst setting removes stubborn wrinkles
• Variable temperature selection
• Over 100lbs of even pressure ensures sharp, long lasting creases
• Easy-to-use one hand operation
• Protects delicate fabrics like silk
• Non-stick padded ironing board cover
• Locking child-proof handle
IMPORTANT: When you want to dispose of the appliance, NEVER throw it in the
garbage. Instead, go to your closest recycling station or waste collection centre
for subsequent treatment. In this way, you will be contributing to looking after
the environment.
Page 8
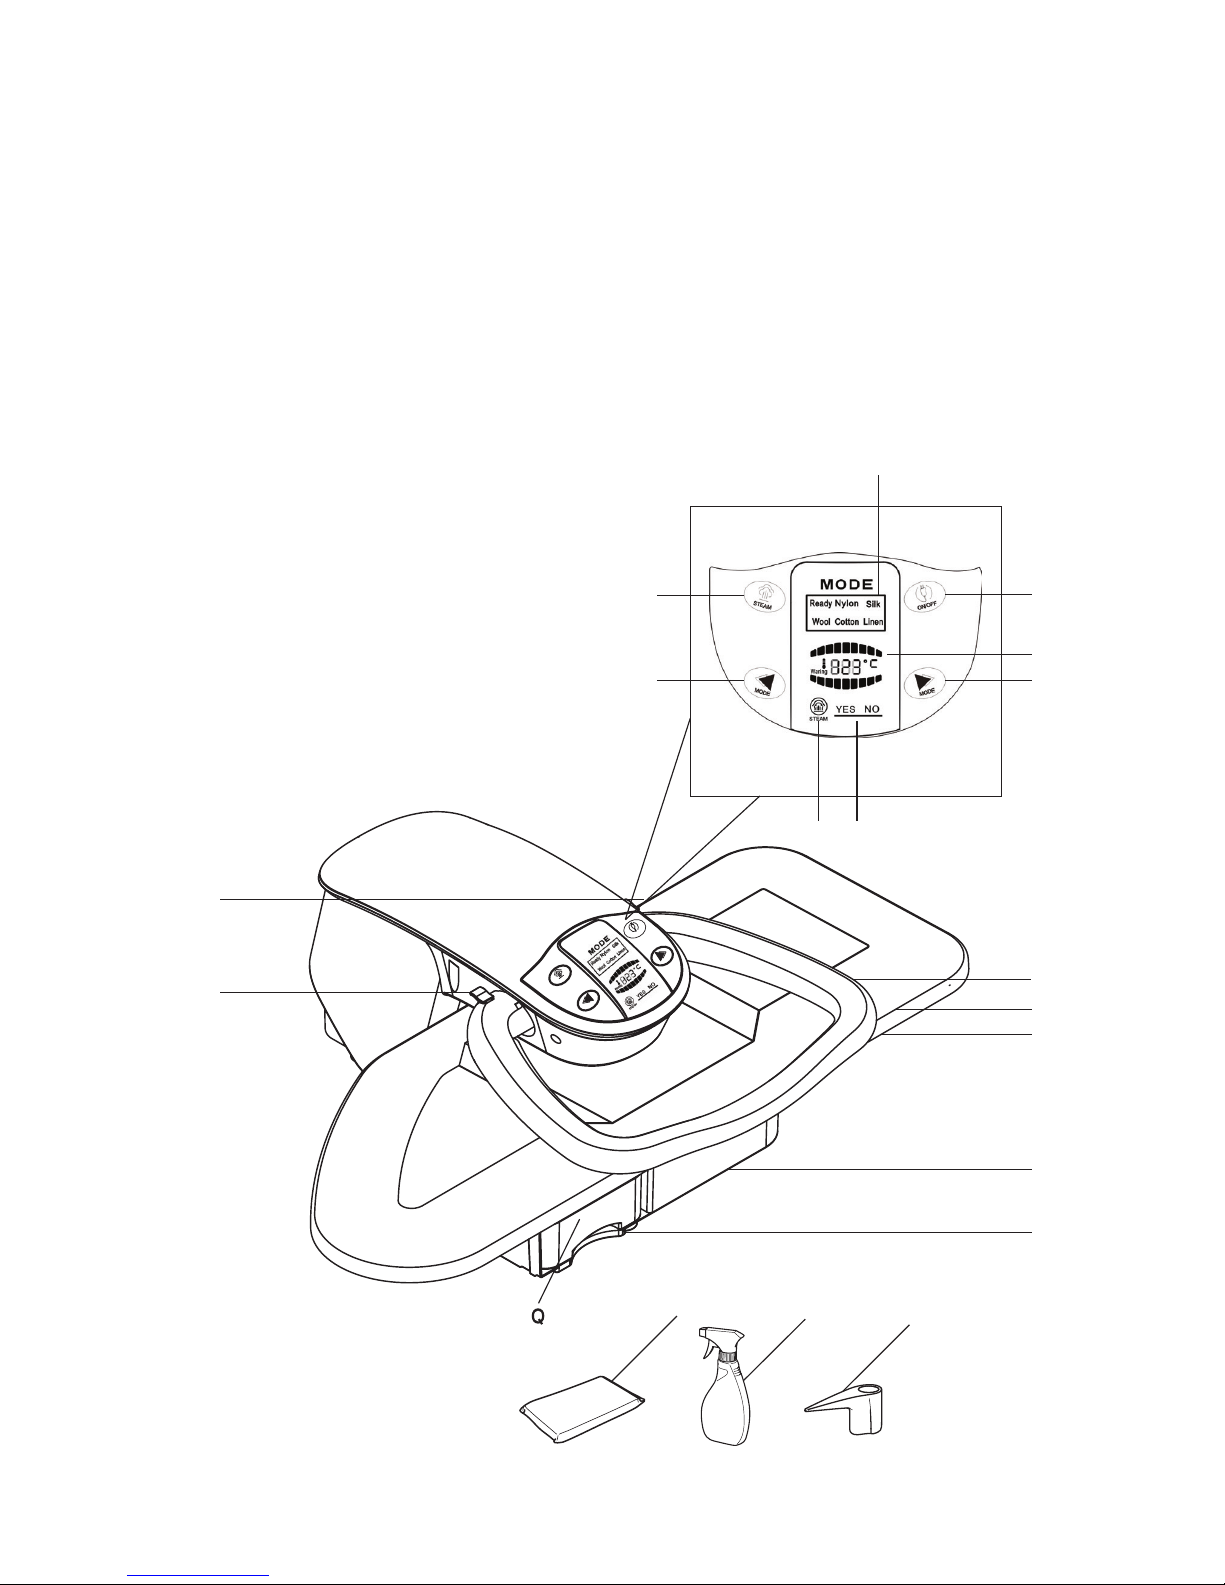
350SP KEY FEATURES
A. STEAM BURST FUNCTION BUTTON
B. FABRIC SELECTION MODE
C. STEAM ON/OFF INDICATOR
D. STEAM READY INDICATOR
E. FABRIC SELECTION INDICATOR
F. POWER ON/OFF BUTTON
G. TEMPERATURE INDICATOR
H. PRESSING HANDLE
I. PRESSING PLATE
J. IRONING BOARD
K. BASE
L. WATER TANK
M. PRESSING CUSHION
N. SPRAY BOTTLE
O. WATER JUG
P. LOCKING KNOBS
Q. WATER FILTER (NOT SHOWN)
05
F
B
G
B
A
E
C D
M
N
O
STEA
M
M
O
DE
M
O
D
E
ON
/
OFF
J
H
I
K
L
P
P
Page 9
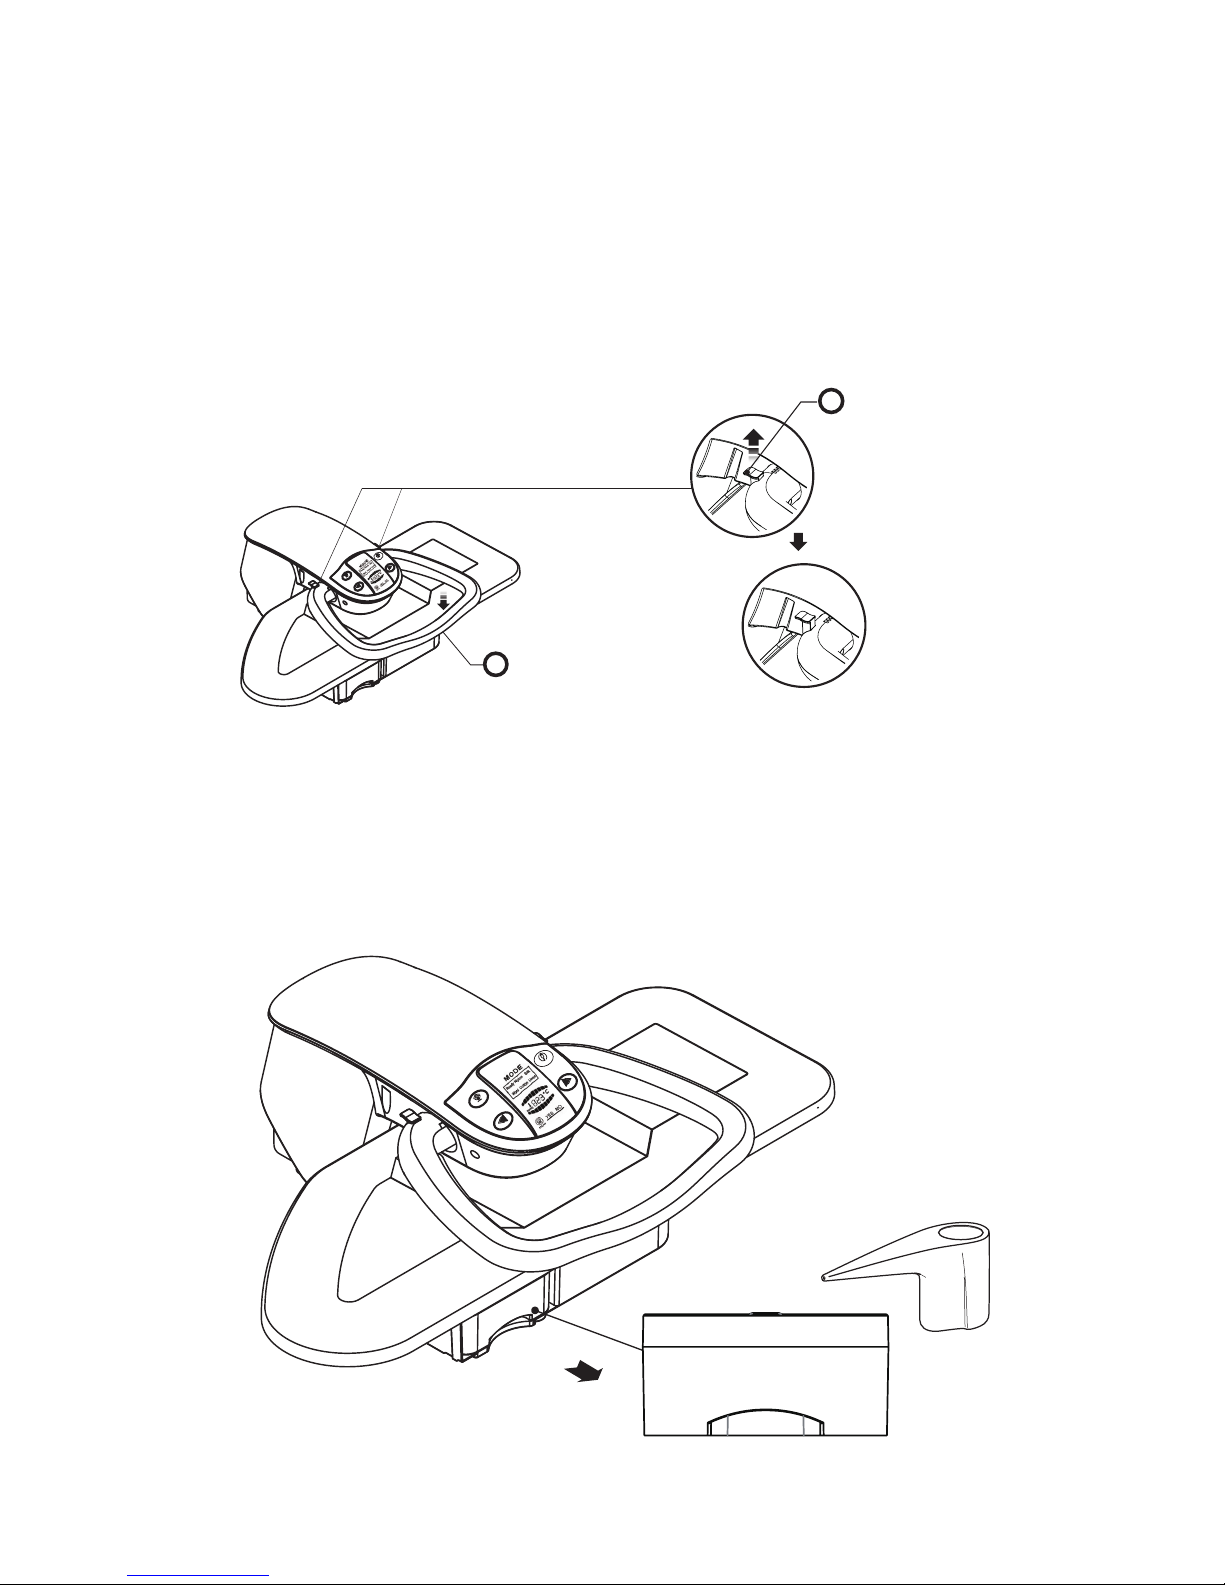
ASSEMBLY AND USE
1. Set press on a flat, level surface.
2. Lift both locking knobs (P) upwards to the "unlock" position.
3. Gently apply downward pressure to the handle, then release. The press will
automatically face upwards and remain in a lifted position.
4. Before plugging in the press, fill the detachable water tank (L) using the water
container (O) provided. When finished, slide the tank back into place. Water is
only necessary when using the steam burst button (A).
NOTE: When filling the water tank, distilled water is preferred, but not
required.
06
S
T
E
A
M
M
O
D
E
M
O
D
E
ON
/
OF
F
MAX: 700ml
MIN: 200ml
MAX--600ml500ml400ml300mlMIN---
S
T
E
A
M
M
O
DE
M
O
DE
ON/
OFF
2
3
PULL UPWARDS
PUSH DOWNWARDS
Page 10

4. Plug in and press the power on/off button (F) located on the LED digital touch
screen control panel. A power on indicator light (H) will appear. Be sure that
the pressing plate (I) is in an open position when the unit is initially turned on.
5. Use the mode buttons (B) to choose the fabric setting. It may take a few
minutes to reach the chosen temperature when decreasing or increasing
settings.
NOTE: It takes approximately 12 minutes for the press to reach the linen
temperature.
WARNING: During initial use, or after a long period of time without use, press the
steam burst button (A) continuously for several seconds to clear the pressing
plate of residual water or calcium buildup in the system before use.
CAUTION: Be sure to examine the garment label before selecting a fabric
setting. If you cannot determine a fabric type, select the lowest setting and
increase as needed. It is best to start with the most delicate fabrics first to
avoid damage to your fabrics.
6. Once the press has reached the desired temperature, the green fabric setting
lights will stop flashing. Begin pressing. Be sure to use the provided pressing
cushion (M) to flatten out gathered areas such as sleeves, darts and yokes. If
needed, use the spray bottle (N) for dampening the fabric before pressing.
7. Pull down the pressing handle (I) and press the pressing plate (H) and the
ironing board (J) together. Hold for a few seconds, then lift to separate the
pressing plate (I) and ironing board (J).
8. To use steam, adjust the fabric selection mode to the wool, cotton or linen
settings. The steam ready light (D) will appear and you will be able to press
the steam burst button (A) for steaming your garments.
9. Pull down the pressing handle directly above the garments (about 1 to
2 inches above the fabric) and press the steam burst button (A). Press
the garment. DO NOT activate the steam burst button (A) with the unit
completely closed; you may damage your press.
CAUTION: Do not hold down the press for longer than 5 seconds. If using the steam
burst button, do not fully close the press down onto fabric. If you hold down the
press for too long, you may cause your garments to wrinkle because they are too
hot. If this should happen, spray down the garment with water and start over.
07
FABRIC NYLON SILK WOOL COTTON LINEN
TEMPERATURE 65°C 95°C 125°C 155°C 185°C
149°F 203°F 257°F 311°F 365°F
STEAM No No Yes Yes Yes
Page 11

CAUTION: When using steam, do not hold the steam button for longer than 3
seconds. If steam is used for too long, you will cause the press temperature to
drop and will have to wait for it to reach the initial desired setting. The drop in
temperature cannot be avoided as the burst of steam cools down the pressing
plate instantly. By using steam in short bursts, you will help to eliminate the
temperature drop and thus be able to press quicker and more efficiently.
WARNING: During initial use or after a long period of time without use, press the
steam burst button continuously for several seconds to clear the pressing plate of
residual water or calcium buildup in system before use.
NOTE: Some garments have details such as darts, curved seams, and shoulder
pads which should not be pressed flat. Use the pressing cushion provided for use in
these areas.
WARNING: Do not attempt to lower the pressing plate to its lowest position or lock
the press with the pressing cushion in between. You may damage your press by
doing so.
08
Page 12

BASIC IRONING
TABLE CLOTH
Fold the length of the fabric in either half or thirds and place on the ironing board.
Accordion pleat the length on the ironing board and move the pleated item into
the large open space behind the ironing board.
Move the tablecloth towards you, then press.
Continue moving forward until the entire item is pressed.
To store, fold it and place it on the ironing board and close the press. Apply
minimal pressure. If necessary, refold the tablecloth to press any areas that were
hanging off the sides of the ironing board. Repeat the pressing procedure.
Hint: Use the same method for most large items, such as duvet covers, bed sheets,
pillowcases, table runners, towels, blankets, quilts, etc.
PANTS
Waistband- Place the top of the pants on the press. Press the pressing board
down over the pants to the ironing board. If using the pressing cushion, place the
waistband of the pants around the board on top of cushion. Arrange pleats. Rotate
pants to press entire waistband.
Side Pockets- Slide pockets over the pressing cushion and over the pressing board
then press.
Inseam- Place the inside of the crotch area on the board facing up. Align with the
slanted left side of the board. Press.
Legs- Place the top of the pant leg half way on the ironing board. Press the front
crease. Then, place the bottom of the pant leg half way on the ironing board. Allow
the hem or cuff to hang off the end of the board. Press. Follow the same method
for pressing back crease.
Note: The hems of the pants can be pressed by placing them both on the ironing
board and applying a small amount of pressure.
SHIRT AND BLOUSES
Yoke- Arrange the shoulders around the slanted left side of the board. Let the
collar hang off the edge. Press.
Cuffs- Place the cuffs and plackets around the edges of the ironing cushion.
Arrange any pleats. Press.
Sleeves- Place the garment to the left side of the press with the collar towards
you. Place the first sleeve on the ironing board with the curve of the garment fitted to the slanted left side of the board (the second sleeve will lay in front of the
press off the board). Press. Remove the first sleeve and place the second sleeve
on the board. Press.
09
Page 13

Body- Put the sleeves together and fold the shirt in half. Place it at the back of the
ironing board away from you, extending the sleeves behind the board on the right.
Bring the shirt front with the buttons forward first. With your right hand, hold
the collar so that the curved edge of the neck opening is flat against the ironing
board. Do not release the collar until you have lowered the pressing plate. Press.
Keep pulling the shirt forward until you have worked the whole way around.
Collar- Place the collar on the board, spray and press. Fold the collar in half, spray
then press.
Shirt Tail- Button the garment and place the shirt tail squarely on the ironing
board. Press. Hang the shirt on a hanger, or fold it. It is a good idea to let it cool
before folding. Use the ironing cushion to retouch any areas.
Hint: Use this same procedure on other fitted garments such as blouses, fitted
shirts, jackets, etc.
T-SHIRT
Place t-shirt flat on the ironing board. Depending on the shape, begin with the
sleeves.
Note: If your t-shirt has rhinestones or an application on it, press with the decorated side face down on the board or turn it inside out.
PLEATED SKIRT
Place the pressing cushion under the waistband and press. Rotate skirt until the
entire waistband is pressed.
Slip the skirt over the board. Arrange the pleats. Press. Pleats may need to be
pinned to the ironing board cover. Do not use plastic head pins when using the
press. Rotate the skirt until all pleats are pressed.
JACKET
Sleeves without creases- Fold the sleeve on the seam line and place the seam
line flat on the board. Allow the top edge of the sleeve to hang off the edge of the
board. Press.
Lapels- Place lapels flat, diagonally on the ironing board. Press. Use the ironing
cushion if needed.
TIES AND RIBBONS
Place the tie lengthwise on the board. Press. You can also place them horizontally
on the board and close the press then pull the tie or ribbon through it.
EMBROIDERY ITEMS
Place the garment face down on the ironing board to reduce wear and prevent
damage.
10
Page 14

If needed, place a towel over the garment then press. This will protect stitching,
rhinestones, etc.
CAUTION: When ironing embroidered, stitched items or garments with rhinestones,
sample an area to see if the steam or heat will affect the area and proceed with
caution.
STORING AND MAINTENANCE
CAUTION: Prior to storing or providing maintenance to your steam press, isolate
the unit by removing the cord from the power socket and avoid immersing the unit
in water.
1. Water may be left in water tank reservoir; however, it is recommended that if
the machine will be stored for a long period of time, any left over water in the
unit should be drained.
2. Wait approximately 30 minutes for the press to cool down before storing.
Once cooled, lower the pressing plate onto the ironing board; pull down the
pressing handle completely, then push the locking knobs in, downwards to the
“locked” position.
3. Wipe the steamer with a soft cloth when/if necessary.
4. Store in a cool, dry place.
5. Replace the water filter when necessary. Additional filters can be ordered at
www.reliablecorporation.com
CLEANING
1. Fill the water tank using water container provided.
2. Place the pressing cushion in the center of the ironing board.
3. Place a clean towel over the pressing cushion and the ironing board.
4. Set the fabric temperature selection control to the highest setting (Linen).
When the steam light illuminates, gently lower the pressing plate onto the
pressing cushion.
5. Press the steam burst button 6 to 7 times. Be careful to avoid touching the
hot metal surfaces and avoid leaving hands under the ironing press when
using the steam burst button.
6. Once the pressing plate has cooled down you can clean the surface with a
damp cloth. DO NOT use any abrasives on the pressing plate. This pressing
plate has a non-stick coating that will assist in cleaning.
7. The ironing board cover is removable and can be rinsed with mild detergent
and warm water. You may purchase replacement covers on our website at:
www.reliablecorporation.com.
11
Page 15

PRODUCT SPECS
ARIA 350SP
Voltage supply: 120, 60 Hz
Output: 1800 W
Water capacity: 23.70 fl oz
Cord: 8 ft.
Weight: 14kg
TROUBLESHOOTING
CAUTION: Prior to maintaining your steam press, isolate the unit by removing the
cord from the power socket.
12
PROBLEM
LED is not on
No heat
No steam
Buttons are not working
properly
The machine cannot be
opened by the handle of the
pressing plate
Steam burst output is weak
SOLUTION
• Ensure that the press power cord is correctly plugged into
a 120V AC power outlet only.
• Ensure circuit breaker is operational.
• Try operating the press from another power outlet.
• Make sure the temperature has been selected.
• Pressing plate has been left in a raised position for more
than 20 minutes and automatic shut-off has engaged.
• Water may be low, refill water tank.
• Temperature setting is too low to activate steam. Select
a higher temperature and wait for the ready light to
illuminate before steaming.
• Unplug the unit from the power outlet for 5 minutes then
plug back in.
• Pull the locking knobs upwards
• Pressing plate needs to be cleaned. Refer to cleaning
section of the manual for the correct procedure.
Page 16

13
Reliable Corporation (“Reliable”) warrants to original purchaser of its products that
every product sold by Reliable (a “Reliable Product”) is free from defects in material
and workmanship for a period of one year from the date of purchase if properly used
and maintained. Subject to the conditions and limitations set forth below, Reliable will
either repair or replace any part of a Reliable Product that proves defective by reason of
improper workmanship or materials. If the defective Reliable Product is no longer available
and cannot be repaired effectively or replaced with an identical model, Reliable shall
replace the defective Reliable Product with a current Reliable Product of equal or greater
value. Repaired parts or replacement products will be provided by Reliable on an exchange
basis, and will be either new or refurbished to be functionally equivalent to new. If Reliable
is unable to repair or replace a Reliable Product, it will refund the current value of that
Reliable Product at the time the warranty claim is made.
This limited warranty does not cover any damage to a Reliable Product that results
from improper installation, accident, abuse, misuse, natural disaster, insufficient or
excessive electrical supply, abnormal mechanical or environmental conditions, wear and
tear resulting from normal use of the product, or any unauthorized disassembly, repair,
or modification. This limited warranty does not extend to any indirect, consequential or
incidental damages that may be suffered by a user or from the use of a Reliable Product,
including without limitation, any liability for third party claims for damage, and is limited
to the amount paid by the original purchaser Reliable Product with respect to which this
limited warranty protection applies. This limited warranty does not apply with respect to
products that have been altered or which are missing serial numbers or for products not
purchased directly from Reliable or a dealer authorized by us to sell Reliable Products.
This limited warranty is the only warranty that applies to any Reliable Product, supersedes
any and all terms that may be contained in any other document or purchase order and
may not be altered or amended except expressly in writing by Reliable.
To obtain a repair or replacement under the terms of this warranty, please contact our
customer service group at 1-800-268-1649 or at support@reliablecorporation.com.
You will be required to submit an original receipt via fax or e-mail. The receipt must reflect
that you are the original purchaser, the product was bought directly from
us or from an authorized Reliable dealer and that the warranty claim is being made within
the warranty period. You will be issued a return authorization number (RA#) and asked to
ship the defective product together with proof of purchase and RA#, prepaid insured to
the following address:
Reliable Corporation, 5-100 Wingold Avenue, Toronto, ON M6B 4K7. Freight collect
shipments will be refused. The risk of loss or damage in transit will be borne by
the customer. Once Reliable receives the defective product, it will initiate the repair or
replacement process.
If you have any questions regarding this warranty, you may write to:
Reliable Corporation
100 Wingold Avenue, Unit 5
Toronto, Ontario
Canada M6B 4K7
www.reliablecorporation.com
RELIABLE PRODUCTS WARRANTY
Page 17

14
Page 18

ARIA 350SP
MANUEL D’INSTRUCTIONS
FRANÇAIS
15
Page 19

16
FIABLE. TOUJOURS LÀ POUR VOUS.
Chez Reliable, nous aimons ce que nous faisons, et nous sommes
fiers de ce que nous accomplissons. Vous voulez ce qu’il y a de
mieux pour les gens, les endroits et les choses qui importent
dans votre vie - depuis l’endroit où vous habitez jusqu’aux
vêtements que vous portez. Nous aussi. Depuis le début, nous
concevons chaque produit avec l’attention qu’un artisan porte
aux détails et sa passion de le réaliser parfaitement. La qualité,
la fonctionnalité, la conception et le service à la clientèle
jouent des rôles également importants pour vous fournir ce
qui vous correspond. La grande surface de presse d’Aria, son
impressionnant volume de vapeur et son thermostat numérique
précis assurent que même les tissus les plus difficiles n’auront
aucun pli et seront parfaitement pressés.
Pour votre sécurité et pour profiter pleinement des avantages
de ce produit, veuillez prendre quelques minutes pour lire toutes
les mises en garde et les instructions d'entretien importantes.
Conservez ce manuel à portée de main et consultez la garantie
du produit à titre de référence.
Page 20

17
CONSIGNES DE SÉCURITÉ IMPORTANTES
LISEZ TOUTES LES CONSIGNES DE SÉCURITÉ AVANT L'UTILISATION DE L'APPAREIL
1. Afin de vous protéger d'un risque de choc électrique, n'immergez pas le fer à
repasser dans l'eau.
2. Ne laissez pas le cordon d’alimentation pendre sur le bord d’un comptoir.
3. Ne laissez pas le cordon d'alimentation toucher des surfaces chaudes.
4. Laissez toujours l’appareil refroidir pendant au moins trente minutes avant de
le ranger.
5. Placez toujours l’appareil en lieu sûr sur une table ou un comptoir lors de son
utilisation.
6. Ne déplacez pas l’appareil sans l’avoir débranché.
7. L’appareil a des surfaces très chaudes. Ne laissez pas des enfants utiliser
l’appareil sans surveillance.
8. Débranchez toujours l’appareil avant de le remplir d’eau ou de le vider. Évitez
de renverser de l’eau sur l’appareil lorsque vous le remplissez.
9. Utilisez de l’eau distillée dans l’appareil. N’utilisez pas des produits parfumés
ou contenant de l’alcool dans l’appareil.
10. Débranchez toujours l’appareil lorsqu’il n’est pas utilisé.
11. N’utilisez pas l’appareil si le cordon d’alimentation est endommagé. Renvoyez
l’appareil ou faites réparer le cordon d’alimentation par le fabricant, son agent
de service ou une personne qualifiée.
12. N’utilisez pas l’appareil s’il est tombé ou a été endommagé. Ne démontez pas
l’appareil. Le remontage inexact peut causer des chocs électriques. Envoyez
l’appareil à un centre de service autorisé pour le faire réparer.
13. Ne faites pas fonctionner simultanément un autre appareil de grande puissance
sur le même circuit.
14. Cet appareil doit être mis à la terre. Ne modifiez pas la prise et ne tentez pas
d’annuler cette caractéristique de sécurité.
15. Soyez prudent. Vous pouvez vous brûler en touchant les parties métalliques
chaudes ou avec l’eau chaude et la vapeur.
16. Cet appareil n’est pas conçu pour être utilisé par de jeunes enfants ou
des personnes handicapées, sauf s’ils sont supervisés par une personne
responsable pour s’assurer qu’ils utilisent l’appareil de façon sécuritaire.
17. Il convient de surveiller les jeunes enfants afin de garantir qu'ils ne jouent
pas avec l'appareil.
Page 21

18
RÉSERVÉ À L’USAGE DOMESTIQUE
UNIQUEMENT.
CONSERVEZ CES INSTRUCTIONS
DANS UN LIEU SÛR POUR TOUTE
CONSULTATION ULTÉRIEURE.
CARACTÉRISTIQUES
• Votre nouvelle presse à vapeur offre un résultat propre et professionnel à
tout coup!
• Multiples réglages de chaleur sèche et de vapeur pour tous les types de tissus
• Le mode en rafale élimine les plis résistants
• Sélection de la température variable
• La pression stable de plus de 45 kilogrammes (100 livres) assure des plis nets
et durables
• Fonctionnement facile à une main
• Protège les tissus délicats comme la soie
• Housse de repassage rembourrée anti-adhésive
• Poignée verrouillable à l’épreuve des enfants
IMPORTANT : Lorsque votre appareil est hors d’usage, NE LE JETEZ PAS à la
poubelle. Confiez-le plutôt à un centre de recyclage ou à la déchetterie la plus
proche afin qu’il soit traité correctement. Vous contribuerez ainsi à la protection
de l’environnement.
Page 22

CARACTÉRISTIQUES PRINCIPALES 350SP
A. BOUTON DE VAPEUR EN RAFALE
B. SÉLECTION DE TISSU
C. TÉMOIN VAPEUR ON/OFF (MARCHE/ARRÊT)
D. TÉMOIN DE VAPEUR PRÊTE
E. TÉMOIN DE SÉLECTION DE TISSU
F. BOUTON DE MISE EN MARCHE
G. INDICATEUR LUMINEUX DE LA TEMPÉRATURE
H. POIGNÉE DE PRESSE
I. PLAQUE DE PRESSE
J. TABLE À REPASSER
K. BASE
L. RÉSERVOIR D’EAU
M. COUSSIN DE PRESSE
N. VAPORISATEUR
O. CONTENANT D’EAU
P. BOUTONS DE VERROUILLAGE
Q. FILTRE À EAU (NON PRÉSENTÉ)
19
F
B
G
B
A
E
C D
M
N
O
STEA
M
M
O
DE
M
O
D
E
ON
/
OFF
J
H
I
K
L
P
P
Page 23

ASSEMBLAGE ET UTILISATION
1. Posez la presse sur une surface plate et plane.
2. Levez les deux boutons de verrouillage (P) en position « déverrouiller ».
3. Appuyez doucement sur la poignée, puis relâchez. La presse sera immédiatement
tournée vers le haut et restera en position levée.
4. Avant de brancher la presse, remplissez le réservoir d’eau détachable (L) en
utilisant le contenant d’eau (O) fourni. Lorsque vous avez terminé, mettez le
réservoir d’eau en place. L’eau est seulement nécessaire lorsque vous utilisez
le bouton de vapeur en rafale (A).
REMARQUE : Lorsque vous remplissez le réservoir d’eau, il est préférable,
mais pas obligatoire, de prendre de l’eau distillée.
20
S
T
E
A
M
M
O
D
E
M
O
D
E
ON
/
OF
F
MAX: 700ml
MIN: 200ml
MAX--600ml500ml400ml300mlMIN---
S
T
E
A
M
M
O
DE
M
O
DE
ON/
OFF
2
3
Page 24

4. Branchez la presse et appuyez sur le bouton de mise en marche (F) situé
sur l’écran de contrôle tactile DEL. Un témoin d’allumage (H) apparaîtra.
Assurez-vous que la plaque de presse (I) est en position ouverte lorsque vous
allumez l’appareil.
5. Utilisez les boutons de mode (B) pour sélectionner le réglage de tissu. Il peut
falloir quelques minutes pour atteindre la température sélectionnée lorsque
vous augmentez ou diminuez les réglages.
REMARQUE : Il faut environ 12 minutes pour que la presse atteigne la température
lin.
AVERTISSEMENT : Pendant la première utilisation, ou après une longue période
pendant laquelle la presse n’est pas utilisée, appuyez sur le bouton de vapeur
en rafale (A) pendant quelques secondes pour retirer toute eau résiduelle ou
accumulation de calcium du système avant l’utilisation.
ATTENTION : Assurez-vous de regarder l’étiquette du vêtement avant de
sélectionner un réglage de tissu. Si vous ne pouvez pas déterminer un type de
tissu, sélectionnez le plus bas réglage et augmentez comme nécessaire. Il vaut
mieux commencer avec les tissus les plus délicats pour éviter d’endommager vos
tissus.
6. Lorsque la presse a atteint la température désirée, les lumières vertes de
réglage de tissus cesseront de clignoter. Commencez à utiliser la presse.
Assurez-vous d’utiliser le coussin de presse fourni (M) pour lisser les zones
rassemblées comme les manches, les plis et les empiècements. Si nécessaire,
utilisez le vaporisateur (N) pour humidifier le tissu avant d’utiliser la presse.
7. Descendez la poignée de presse (I) et appuyez la plaque de presse (H) et la
table à repasser (J) ensemble. Maintenez pendant quelques secondes, puis
levez pour séparer la plaque de presse (I) et la table à repasser (J).
8. Pour utiliser la vapeur, mettez la sélection de tissu sur laine, coton ou lin. La
lumière de vapeur (D) apparaîtra et vous pourrez appuyer sur le bouton de
vapeur en rafale (A) pour vos vêtements.
9. Descendez la poignée de presse au-dessus des vêtements (environ 2,5 ou 5
centimètres, ou 1 à 2 pouces, au-dessus du tissu) et appuyez sur le bouton de
vapeur en rafale (A). Utilisez la presse sur le vêtement. N’activez PAS le bouton
de vapeur en rafale (A) lorsque l’appareil est complètement fermé. Vous pourriez
endommager la presse.
21
TISSU NYLON SOIE LAINE COTON LIN
TEMPÉRATURE 65 °C 95 °C 125 °C 155 °C 185 °C
149 °F 203 °F 257 °F 311 °F 365 °F
VAPEUR Non Non Oui Oui Oui
Page 25

ATTENTION : Ne gardez pas la presse fermée pendant plus de 5 secondes. Si vous
utilisez le bouton de vapeur en rafale, ne fermez pas complètement la presse sur
le tissu. Si vous gardez la presse fermée pendant trop longtemps, vous pouvez
froisser vos vêtements car ils seront trop chauds. Si cela arrive, vaporisez le
vêtement et recommencez.
ATTENTION : Lorsque vous utilisez de la vapeur, ne maintenez pas le bouton de
vapeur enfoncé pendant plus de 3 secondes. Si la vapeur est utilisée pendant trop
longtemps, la température de la presser diminuera et vous devrez attendre qu’elle
revienne au réglage désiré. La baisse de température est inévitable car la vapeur
refroidit immédiatement la plaque de presse. En utilisant la vapeur en courtes
rafales, vous permettrez d’éviter la baisse de température et vous pourrez ainsi
utiliser la presse plus rapidement et de manière plus efficace.
AVERTISSEMENT : Pendant la première utilisation, ou après une longue période
pendant laquelle la presse n’est pas utilisée, appuyez sur le bouton de vapeur
en rafale (A) pendant quelques secondes pour retirer toute eau résiduelle ou
accumulation de calcium du système avant l’utilisation.
REMARQUE : Certains vêtements ont des détails comme des plis, des coutures
courbées et des épaulettes, qui ne devraient pas être pressés. Utilisez le coussin
de presse fourni dans ces zones.
AVERTISSEMENT : N’essayez pas de baisser la plaque de presse dans sa position la
plus basse ou de verrouiller la presse lorsque le coussin de presse s’y trouve. Vous
pourriez endommager la presse.
22
Page 26

REPASSAGE DE BASE
NAPPE
Pliez le tissu en deux ou en trois et placez-le sur la planche à repasser.
Froncez la longueur sur la planche à repasser et déplacez l’objet plissé dans le
grand espace derrière la planche à repasser.
Déplacez la nappe vers vous, puis pressez.
Continuez de déplacer le tissu jusqu’à ce que tout l’objet soit pressé.
Pour ranger, pliez et placez sur la planche à repasser et fermez la presse. Appliquez
une légère pression. Si nécessaire, repliez la nappe pour presser toute zone qui
pendait sur le côté de la planche à repasser. Répéter le processus de presse.
Conseil : Utilisez la même méthode pour la plupart des grands articles, comme
les housses de couette, les draps, les taies d’oreillers, les chemins de table, les
couvertures, les courtepointes, etc.
PANTALONS
Taille : Placez le haut du pantalon sur la presse. Descendez la plaque de presse
au-dessus du pantalon vers la planche à repasser. Si vous utilisez le coussin de
presse, placez la taille du pantalon autour de la planche au-dessus du coussin.
Arrangez les fronces. Tournez le pantalon pour presser toute la taille.
Poches latérales : glissez les poches sur le coussin de presse et la plaque de
presse, puis pressez.
Entrejambe : placez l’entrejambe sur la plaque, vers le haut. Alignez avec le côté
gauche incliné de la plaque. Pressez.
Jambes : Placez le dessus de la jambe à moitié sur la planche à repasser. Pressez
le pli avant. Ensuite, placez le bas de la jambe à moitié sur la planche à repasser.
Laissez le rebord dépasser de la planche. Pressez. Suivez la même méthode pour
le pli arrière.
Remarque : L’ourlet des pantalons peut être pressé en le plaçant sur la planche à
repasser et en appliquant une légère pression.
CHEMISES ET BLOUSES
Empiècement : placez les épaules autour du côté gauche incliné de la planche.
Laissez le col dépasser du bord. Pressez.
Poignets : placez les poignets et pattes autour des bords du coussin de repassage.
Arrangez les plis. Pressez.
Manches : placez le vêtement sur le côté gauche de la presse en orientant le
col vers vous. Placez la première manche sur la planche à repasser, la courbe du
vêtement du côté gauche incliné de la planche (la deuxième manche se trouve
devant la presse, à côté de la planche). Pressez. Retirez la première manche et
placez la deuxième sur la planche. Pressez.
23
Page 27

Corps : placez les manches ensemble et pliez la chemise en deux. Placez-la
derrière la planche à repasser, en tendant les manches derrière la planche, sur la
droite. Approchez d’abord l’avant de la chemise, les boutons vers l’avant. Avec la
main droite, tenez le col pour que le côté rond de l’ouverture se trouve contre la
planche à repasser. Ne lâchez pas le col avant d’avoir baissé la plaque de presse.
Pressez. Continuez de tirer la chemise vers vous jusqu’à ce que vous ayez terminé.
Col : placez le col sur la planche, vaporisez et pressez. Pliez le col en deux, vaporisez
et pressez.
Pan de chemise : boutonnez la chemise et placez le pan sur la planche à repasser.
Pressez. Placez la chemise sur un cintre, ou pliez-la. Il vaut mieux la laisser refroidir
avant de la plier. Utilisez le coussin de repassage pour retoucher certaines parties.
Conseil : Utilisez le même procédé pour les autres vêtements ajustés comme les
blouses, les chemises cintrées, les vestes, etc.
TEE-SHIRT
Placez le tee-shirt sur la planche à repasser. Selon la forme, commencez par les
manches.
Remarque : Si votre tee-shirt comporte des pierres ou un appliqué, pressez avec le
côté décoré contre la planche à repasser, ou mettez-le à l’envers.
JUPE À FRONCES
Placez le coussin de presse sous la taille et pressez. Tournez la jupe jusqu’à ce que
toute la taille soit pressée.
Glissez la jupe sur la planche. Arrangez les fronces. Pressez. Les fronces peuvent
être piquées dans la housse de la planche à repasser. N’utilisez pas d’épingles à
tête en plastique lorsque vous utilisez la presse. Tournez la jupe jusqu’à ce que
toutes les fronces soient pressées.
VESTE
Manches sans fronces : pliez la manche sur la couture et placez celle-ci sur la
planche à repasser. Laissez le haut de la manche dépasser de la planche. Pressez.
Revers : placez les revers à plat, en angle, sur la planche à repasser. Pressez. Si
nécessaire, utilisez le coussin de repassage.
CRAVATES ET RUBANS
Placez la cravate dans le sens de la longueur sur la planche. Pressez. Vous poussez
aussi la placer horizontalement sur la planche et fermer la presse, puis tirer sur la
cravate ou le ruban.
ARTICLES BRODÉS
Placez l’article, le devant contre la planche à repasser, pour réduire l’usure et
prévenir les dommages.
Si nécessaire, placez une serviette sur l’article avant de presser. Cela protégera
les broderies, les pierres, etc.
ATTENTION : Lorsque vous repassez des articles avec des broderie ou des pierres,
faites un essai sur une zone pour voir si la vapeur ou la chaleur affecte la zone,
puis continuez prudemment.
24
Page 28

NETTOYAGE ET ENTRETIEN
ATTENTION : Avant de ranger ou d’entretenir votre presse à vapeur, isolez
l’appareil en débranchant le cordon d’alimentation et évitez de mouiller l’appareil.
1. Il pourrait rester de l’eau dans le réservoir. Il est recommandé, si la machine
va être rangée pendant longtemps, de retirer toute l’eau qui pourrait rester.
2. Attendez environ 30 minutes pour que la presse refroidisse avant de la
ranger. Une fois que la presse a refroidi, baissez la plaque de presse sur la
planche à repasser, baissez complètement la poignée de presse et appuyez
sur les boutons de verrouillage pour les mettre en position « verrouillé ».
3. Lorsque/si nécessaire, essuyez l’appareil à l’aide d’un chiffon doux.
4. Rangez dans un endroit frais et sec.
5. Remplacez le filtre à eau si nécessaire. Des filtres supplémentaires peuvent
être commandés à www.reliablecorporation.com
ENTRETIEN
1. Remplissez le réservoir d’eau à l’aide du contenant d’eau fourni.
2. Placez le coussin de presse au centre de la planche à repasser.
3. Placez une serviette propre sur le coussin de presse et la planche à repasser.
4. Réglez la température au plus haut niveau (lin). Lorsque le témoin de vapeur
s’allume, baissez la plaque de presse sur le coussin de presse.
5. Appuyez 6-7 fois sur le bouton de vapeur en rafale. Évitez de toucher les
surfaces chaudes en métal et évitez de laisser les mains sous la presse
lorsque vous utilisez le bouton de vapeur en rafale.
6. Lorsque la plaque de presse a refroidi, vous pouvez nettoyez la surface à l’aide
d’un chiffon humide. N’utilisez PAS d’abrasif sur la plaque de presse. Cette
plaque de presse a un revêtement anti-adhésif qui facilitera le nettoyage.
7. La housse de planche à repasser est amovible et peut être rincée avec un
détergent doux et de l’eau. Vous pouvez acheter des housses de remplacement
sur notre site Web : www.reliablecorporation.com.
25
Page 29

CARACTÉRISTIQUES DU PRODUIT
ARIA 350SP
Source de tension : 120, 60 Hz
Sortie : 1 1800 W
Capacité d’eau : 680 ml (23,70 oz liq.)
Cordon d’alimentation : 2,4 m (8 pi)
Poids : 14 kg (30 lb)
DÉPANNAGE
ATTENTION : Avant le nettoyage ou l'entretien, isolez l'appareil en débranchant le
cordon d'alimentation de la prise murale.
26
PROBLÈME
La lumière DEL n’allume pas
Pas de chaleur
Pas de vapeur
Les boutons ne fonctionnent
pas correctement
La machine ne peut pas être
ouverte par la poignée de la
plaque de presse
La sortie de vapeur en rafale
est faible
SOLUTION
• Assurez-vous que le cordon d’alimentation de la presse est
bien branché dans une prise de 120 V.
• Assurez-vous que le disjoncteur fonctionne.
• Essayez d’utiliser la presse à partir d’une autre prise.
• Assurez-vous que la température a été sélectionnée.
• La plaque de presse a été laissée en position levée pendant
plus de 20 minutes et s’est automatiquement éteinte.
• Le niveau d’eau est bas, remplissez le réservoir.
• Le réglage de température est trop bas pour activer la
vapeur. Sélectionnez une température plus élevée et attendez que le témoin s’allume avant d’utiliser la vapeur.
• Débranchez l’appareil pendant 5 minutes avant de le
rebrancher.
• Tirez les boutons de verrouillage vers le haut.
• La plaque de presse doit être nettoyée. Référez-vous à la
section du guide concernant le nettoyage pour la marche à
suivre.
Page 30

27
Reliable Corporation (« Reliable ») garantit à l'acheteur original de ce produit que chaque
produit vendu par Reliable (un « Produit Reliable ») est exempt de tout défaut de pièce
et de main d'œuvre pour une période d'un an à compter de la date d'achat, s'il est utilisé
et entretenu correctement. Sous réserve des conditions et des restrictions énoncées
ci-dessous, Reliable réparera ou remplacera toute pièce d'un produit Reliable qui s'avère
défectueuse en raison d'un défaut de fabrication ou de matériaux défectueux. Si le Produit
Reliable défectueux n'est plus disponible et ne peut pas être réparé efficacement ou
remplacé par un modèle identique, Reliable remplacera le Produit Reliable défectueux par
un Produit Reliable actuel de valeur équivalente ou supérieure. Les pièces réparées ou
les produits remplacés seront fournis par Reliable sur la base d'un échange, et seront soit
neufs ou remis à neuf pour être fonctionnellement équivalents aux neufs. Si Reliable n'est
pas en mesure de réparer ou de remplacer le Produit Reliable, elle remboursera la valeur
actuelle du Produit Reliable au moment où la réclamation de garantie est réalisée.
Cette garantie limitée ne couvre aucun dommage subi par un Produit Reliable résultant
d'une installation incorrecte, d'un accident, d'un abus, d'une mauvaise utilisation, d'une
catastrophe naturelle, d'une alimentation électrique insuffisante ou excessive, de conditions
mécaniques ou environnementales anormales, de l'usure et de la détérioration résultant de
l'usure normale du produit, ou de tout démontage, réparation ou modification non autorisé.
Cette garantie limitée ne couvre pas les dommages directs, indirects ou consécutifs dont
peut être victime un utilisateur ou suite à l'utilisation d'un Produit Reliable, y compris mais
sans s'y limiter, toute responsabilité pour des réclamations de tiers pour des dégâts, et se
limite au montant payé par l'acheteur original du Produit Reliable auquel cette protection
de garantie limitée s'applique. Cette garantie limitée ne s'applique pas aux produits qui ont
été modifiés ou dont les numéros de séries sont manquants, ou aux produits non achetés
directement auprès de Reliable ou d'un revendeur agréé pour vendre des Produits Reliable.
Cette garantie limitée est l'unique garantie qui s'applique à tout Produit Reliable, elle remplace
toutes conditions qui peuvent être contenues dans un autre document ou bon de commande
et ne peut être transformée ou modifiée, sauf dérogation expressément écrite de Reliable.
Pour obtenir une réparation ou un remplacement en vertu des conditions de cette
garantie, veuillez contacter notre service à la clientèle au 1-800-268-1649 ou par courriel
à support@reliablecorporation.com.
Il vous sera demandé d'envoyer le reçu original par télécopie ou courriel. Le reçu doit
prouver que vous êtes l'acheteur original, que le produit a été acheté directement chez nous
ou chez un revendeur agréé par Reliable et que la réclamation de garantie est effectuée
pendant la période de garantie. Un numéro d'autorisation de retour (Nº AR) vous sera donné
et il vous sera demandé d'expédier le produit défectueux accompagné de la preuve d'achat
et du Nº AR, les frais d'assurances étant prépayés à l'adresse suivante :
Reliable Corporation, 5-100 Wingold Avenue, Toronto, ON M6B 4K7. Les expéditions
avec fret à destination seront refusées. Le risque de perte ou d'endommagement lors du
transport sera assumé par le client. Une fois que Reliable aura reçu le produit défectueux,
elle initiera la réparation ou le remplacement.
Si vous avez des questions concernant la présente garantie, vous pouvez écrire à :
Reliable Corporation
100 Wingold Avenue, Unit 5
Toronto, Ontario
Canada M6B 4K7
www.reliablecorporation.com
GARANTIE DES PRODUITS RELIABLE
Page 31

28
Page 32

ARIA 350SP
MANUAL DE INSTRUCCIONES
ESPAÑOL
29
Page 33

30
RELIABLE. AHÍ, JUNTO A USTED.
En Reliable hacemos lo que nos gusta, y nos enorgullece hacer
las cosas bien. Usted quiere lo mejor para las personas, los
sitios y las cosas que son importantes en su vida: ya sea el
lugar en el que vive o lo que viste. Nosotros también. Desde el
inicio, abordamos cada producto con la atención al detalle de
un artesano y con la pasión por hacer lo correcto. La calidad,
funcionalidad, diseño y atención al cliente juegan un rol igual de
importante para brindarle lo que usted necesita. La superficie
amplia de planchado de Aria, el impresionante volumen de vapor
y un termostato digital exacto aseguran que hasta las telas más
difíciles quedarán sin arrugas y bien planchadas.
Para su seguridad y con el propósito de disfrutar plenamente
de las ventajas de este producto, dedique algunos minutos a
leer todas las medidas de protección e instrucciones para el
cuidado del aparato. Conserve a mano este manual y consulte
el certificado de garantía del producto.
Page 34

31
INSTRUCCIONES DE SEGURIDAD
IMPORTANTES
LEA TODAS LAS INSTRUCCIONES ANTES DE USAR EL PRODUCTO
1. Para protegerse del riesgo de sufrir una descarga eléctrica, no sumerja el
aparato en agua.
2. Evite que el cable cuelgue por el borde de la encimera.
3. Evite que el cable entre en contacto con superficies calientes.
4. Siempre permita que el aparato se enfríe durante al menos treinta minutos
antes de guardarlo.
5. Colóquelo siempre en lugar seguro, sobre una mesa o encimera mientras lo
está usando.
6. No mueva el aparato sin desenchufarlo primero.
7. El aparato tiene superficies muy calientes. No permita que lo utilicen niños
sin supervisión.
8. Siempre desconéctelo del tomacorriente antes de llenarlo con agua o
vaciarlo. Tenga cuidado y evite derramar agua sobre el aparato al llenarlo.
9. Use agua destilada. No agregue perfumes ni productos que contengan alcohol
al aparato.
10. Siempre desconecte el aparato cuando no lo use.
11. No utilice el aparato si el cable está dañado. Devuelva el producto o solicite
la reparación del cable al fabricante, su agente de servicio técnico o una
persona capacitada similar.
12. No ponga a funcionar el aparato si tuvo una caída o está dañado. No lo
desarme. El armado incorrecto puede ocasionar un riesgo de descarga
eléctrica. Envíelo a un centro de servicio técnico autorizado para su reparación.
13. No utilice otro aparato de alta potencia en el mismo circuito.
14. Este aparato requiere de una conexión a tierra. No altere el enchufe ni intente
retirar esta característica.
15. Tenga cuidado. Puede sufrir quemaduras si toca las piezas metálicas calientes,
el agua caliente o el vapor que emite la plancha.
16. Este aparato no está diseñado para que lo utilicen niños pequeños ni personas
enfermas a menos que estén bajo la supervisión adecuada de una persona
responsable para garantizar que lo puedan usar de manera segura.
17. Los niños pequeños deben ser supervisados para garantizar que no jueguen
con el aparato.
Page 35

32
SOLAMENTE PARA USO DOMÉSTICO.
GUARDE ESTAS INSTRUCCIONES PARA
FUTURAS CONSULTAS.
CARACTERÍSTICAS
• ¡Su nueva Plancha a Vapor ofrece resultados limpios y profesionales cada vez
que la usa!
• Múltiples ajustes de calor seco y vapor para todos los tipos de tela
• El ajuste de ráfaga elimina las arrugas difíciles
• Selección de temperatura variable
• Más de 100 lb de presión uniforme aseguran pliegues precisos y duraderos
• Operación fácil de usar con una mano
• Protege las telas delicadas como la seda
• Forro antiadherente acolchado para la tabla de planchar
• Mango de seguridad a prueba de niños
IMPORTANTE: Cuando desee deshacerse del aparato, NUNCA lo tire a la basura.
En cambio, acérquese a su estación de reciclaje más próxima, o bien, entregue el
aparato en un centro de recolección de residuos para su posterior tratamiento. De
esta forma, estará colaborando en el cuidado del medioambiente.
Page 36

CARACTERÍSTICAS CLAVE DE LA 350SP
A. BOTÓN DE LA FUNCIÓN DE RÁFAGA DE VAPOR
B. MODO DE SELECCIÓN DE TELA
C. INDICADOR DE VAPOR ENCENDIDO Y APAGADO
D. INDICADOR DE VAPOR LISTO
E. INDICADOR DE SELECCIÓN DE TELA
F. BOTÓN DE ENCENDIDO Y APAGADO
G. INDICADOR DE TEMPERATURA
H. MANGO DE PRESIÓN
I. PLACA DE PRESIÓN
J. TABLA DE PLANCHAR
K. BASE
L. DEPÓSITO DE AGUA
M. COJÍN DE PLANCHADO
N. BOTELLA ATOMIZADORA
O. JARRA DE AGUA
P. PERILLAS DE SEGURIDAD
Q. FILTRO DE AGUA (NO SE MUESTRA)
33
F
B
G
B
A
E
C D
M
N
O
STEA
M
M
O
DE
M
O
D
E
ON
/
OFF
J
H
I
K
L
P
P
Page 37

ENSAMBLADO Y USO
1. Coloque la plancha sobre una superficie plana y nivelada.
2. Levante ambas perillas de seguridad (P) hacia la posición "unlock"
(desbloquear).
3. Ligeramente presione el mango hacia abajo, y libérelo. La plancha quedará
automáticamente viendo hacia arriba y permanecerá en una posición levantada.
4. Antes de enchufar la plancha, llene el depósito de agua extraíble (L) con el
envase para agua (O) proporcionado. Al finalizar, deslice el depósito de vuelta
a su lugar. El agua solo se necesita cuando se utiliza el botón de ráfaga de
vapor (A).
NOTA: cuando llene el depósito de agua, es preferible usar agua destilada,
pero no es obligatorio.
34
F
S
T
E
A
M
M
O
D
E
M
O
D
E
ON
/
OF
MAX--600ml500ml400ml300mlMIN---
MÁX: 700ml
MÍN: 200ml
S
T
E
A
M
M
O
DE
M
O
DE
ON/
OFF
2
3
Page 38

4. Enchufe la plancha y presione el botón de encendido y apagado (F) que se
encuentra en el panel de control de la pantalla táctil digital led. Aparecerá
una luz indicadora de aparato encendido (H). Asegúrese de que la placa de
presión (I) esté en la posición abierta al encender la unidad.
5. Utilice los botones de modo (B) para elegir el tipo de tela. Puede tomar algunos
minutos alcanzar la temperatura seleccionada cuando aumenta o reduce los
ajustes.
NOTA: toma aproximadamente 12 minutos para que la plancha llegue a la tem-
peratura necesaria para planchar lino.
ADVERTENCIA: la primera vez que usa la plancha, o después de un largo período
sin uso, presione el botón de ráfaga de vapor (A) de manera continua por
varios segundos para limpiar la placa de presión de la acumulación de calcio
o agua residual en el sistema antes de su uso.
PRECAUCIÓN: asegúrese de revisar la etiqueta de la prenda de ropa antes
de seleccionar el ajuste de la tela. Si no puede determinar el tipo de tela,
seleccione el ajuste más bajo y vaya aumentándolo según sea necesario. Es
mejor comenzar con las telas más delicadas para evitar dañar las prendas.
6. Una vez que la plancha alcanza la temperatura deseada, las luces verdes del
tipo de tela dejarán de parpadear. Comience a planchar. Asegúrese de utilizar
el cojín de planchado proporcionado (M) para planchar las partes fruncidas
como las mangas, pinzas y hombrillos. Si es necesario, use la botella
atomizadora (N) para humedecer la tela antes de planchar.
7. Tire hacia abajo el mango de presión (I) y presione contra la placa de presión
(H) y la tabla de planchar (J) juntas. Sostenga por unos segundos y luego
levante para separar la placa de presión (I) y la tabla de planchar (J).
8. Para usar vapor, ajuste el modo de selección de tela a los ajustes de lana,
algodón o lino. Aparece la luz indicadora de vapor listo (D) y podrá presionar
el botón de ráfaga de vapor (A) para aplicar vapor a sus prendas.
9. Tire hacia abajo el mango de presión directamente sobre las prendas
(aproximadamente 1 a 2 pulgadas sobre la tela) y presione el botón de ráfaga
de vapor (A). Presione la prenda. NO active el botón de ráfaga de vapor (A)
con la unidad completamente cerrada; puede dañar la plancha.
PRECAUCIÓN: no mantenga la plancha cerrada por más de 5 segundos. Si utiliza
el botón de ráfaga de vapor, no cierre completamente la plancha sobre la tela. Si
presiona la plancha demasiado tiempo, puede ocasionar arrugas en la tela porque
están demasiado calientes. Si esto sucede, rocíe la prenda con agua y vuelva a
comenzar.
35
TELA NAILON SEDA LANA ALGODÓN LINO
TEMPERATURA 65 °C 95 °C 125 °C 155 °C 185 °C
149 °F 203 °F 257 °F 311 °F 365 °F
VAPOR No No Sí Sí Sí
Page 39

PRECAUCIÓN: cuando utilice vapor, no sostenga el botón de vapor por más de
3 segundos. Si utiliza vapor por demasiado tiempo, hará que la temperatura de
planchado se reduzca y tendrá que esperar a que alcance el ajuste inicial deseado.
La caída en la temperatura no se puede evitar ya que la ráfaga de vapor enfría
la placa de presión de manera instantánea. Al usar vapor en pequeñas ráfagas,
ayudará a eliminar la caída de la temperatura y así podrá planchar más rápido y
mejor.
ADVERTENCIA: la primera vez que usa la plancha, o después de un largo período
sin uso, presione el botón de ráfaga de vapor de manera continua por varios
segundos para limpiar la placa de presión de la acumulación de calcio o agua
residual en el sistema antes de su uso.
NOTA: ciertas prendas tienen detalles como pinzas, costuras curvas y hombreras,
los cuales no deben plancharse con mucha presión. Utilice el cojín de planchado
especial para usar en estas áreas.
ADVERTENCIA: no intente bajar la placa de presión a su posición más baja ni cierre
la plancha con el cojín dentro. Puede dañar la plancha si lo hace.
36
Page 40

PLANCHADO BÁSICO
MANTEL
Doble la tela a lo largo ya sea a la mitad o en tercios y colóquela sobre la tabla de
planchar.
Pliegue la tela a lo largo tipo acordeón sobre la tabla de planchar y mueva la pieza
plegada hacia el espacio abierto grande detrás de la tabla de planchar.
Mueva el mantel hacia usted y aplique presión.
Continúe moviéndolo hasta haber planchado toda la prenda.
Para guardarla, dóblela y colóquela sobre la tabla de planchar y cierre la plancha.
Aplique presión mínima. Si es necesario, vuelva a doblar el mantel para planchar
cualquier área que haya quedado colgando a los lados de la tabla de planchar.
Repita el procedimiento de planchado.
Consejo: utilice el mismo método para la mayoría de prendas grandes, como fundas
de edredón, sábanas, sobrefundas, caminos de mesa, toallas, frazadas, colchas, etc.
PANTALONES
Cintura: coloque la parte superior del pantalón en la plancha. Presione la placa de
presión sobre el pantalón en la tabla de planchar. Si utiliza el cojín de planchado,
coloque la cintura del pantalón alrededor de la tabla sobre el cojín. Acomode los
pliegues. Gire el pantalón para planchar toda la cintura.
Bolsillos laterales: deslice los bolsillos sobre el cojín de planchado y sobre la tabla
de planchar y luego presione.
Tiro: coloque la parte interior del área de la entrepierna sobre la tabla viendo
hacia arriba. Alinee con el lado izquierdo sesgado de la tabla. Presione.
Piernas: coloque la parte superior de la pierna del pantalón a la mitad sobre la tabla
de planchar. Presione el pliegue delantero. Luego, coloque la parte inferior de la pierna
del pantalón a la mitad sobre la tabla de planchar. Permita que el ruedo cuelgue por el
extremo de la tabla. Presione. Siga el mismo método para planchar el pliegue trasero.
Nota: los ruedos de los pantalones se pueden planchar al colocar ambos sobre la
tabla de planchar y aplicar una pequeña cantidad de presión.
CAMISAS Y BLUSAS
Hombrillo: coloque los hombros alrededor del lado izquierdo sesgado de la tabla.
Deje que el cuello cuelgue por el borde. Presione.
Puños: coloque los puños y las tirillas alrededor de los bordes del cojín de planchado.
Acomode los pliegues. Presione.
Mangas: coloque la prenda hacia el lado izquierdo de la plancha con el cuello hacia
usted. Coloque la primera manga en la tabla de planchar con la curva de la prenda
acomodada en el lado izquierdo sesgado de la tabla (la segunda manga quedará
frente a la plancha, fuera de la tabla). Presione. Retire la primera manga y coloque la
segunda en la tabla. Presione.
37
Page 41

Cuerpo: coloque las mangas juntas y doble la camisa a la mitad. Colóquela en la
parte trasera de la tabla de planchar, alejada de usted, y extienda las mangas
detrás de la tabla a la derecha. Acerque primero la parte delantera de la camisa
con los botones. Con su mano derecha, sostenga el cuello de modo que el borde
curvo de la abertura del cuello quede plano contra la tabla de planchar. No suelte
el cuello hasta haber bajado la placa de presión. Presione. Continúe halando la
camisa hasta que haya planchado todo.
Cuello: coloque el cuello sobre la tabla, rocíe agua y presione. Doble el cuello por
la mitad, rocíe agua y presione.
Cola de la camisa: abotone la prenda y coloque la cola de la camisa directamente
sobre la tabla de planchar. Presione. Cuelgue la camisa en la percha o dóblela. Se
recomienda dejar que se enfríe antes de doblarla. Utilice el cojín de planchado
para retocar cualquier área.
Consejo: utilice este mismo procedimiento para otras prendas ajustadas como
blusas, camisetas, chaquetas, etc.
CAMISETA
Coloque la camiseta plana sobre la tabla de planchar. Según la forma, comience
con las mangas.
Nota: si su camiseta tiene pedrería o una aplicación, plánchela con el lado decorado
hacia abajo sobre la tabla o al revés.
FALDA PLISADA
Coloque el cojín de planchado debajo de la cintura y presione. Gire la falda hasta
haber planchado toda la cintura.
Deslice la falda sobre la tabla. Acomode los pliegues. Presione. Puede ser necesario
sujetar con alfiler los pliegues al forro de la tabla de planchar. No utilice alfileres con
cabeza plástica cuando use la plancha. Gire la falda hasta haber planchado todos los
pliegues.
CHAQUETA
Mangas sin pliegues: doble la manga por la línea de la costura y colóquela plana
sobre la tabla. Permita que el borde superior de la manga cuelgue por el borde de
la tabla. Presione.
Solapas: coloque las solapas planas, en diagonal sobre la tabla de planchar.
Presione. Utilice el cojín de planchado si es necesario.
CORBATAS Y LISTONES
Coloque la corbata a lo largo sobre la tabla. Presione. También puede colocarla
horizontalmente sobre la tabla y cerrar la plancha y luego halar el listón o la corbata.
ARTÍCULOS BORDADOS
Coloque la prenda hacia abajo sobre la tabla de planchar para reducir el desgaste
y evitar daños.
38
Page 42

Si es necesario, coloque una toalla sobre la prenda y presione. Esto protege las
costuras, la pedrería, etc.
PRECAUCIÓN: cuando planche artículos o prendas bordados o cosidos con
pedrería, haga una prueba en un área para ver si el vapor o el calor afectan el área,
y proceda con precaución.
ALMACENAMIENTO Y MANTENIMIENTO
PRECAUCIÓN: antes de almacenar o dar mantenimiento a su plancha a vapor, aísle
la unidad al retirar el cable del tomacorriente y evite sumergir la unidad en agua.
1. Puede quedar agua en el depósito; sin embargo, se recomienda que si la
máquina se va a almacenar por un período prolongado, debe drenarse toda el
agua de la unidad.
2. Espere aproximadamente 30 minutos a que la plancha se enfríe antes de
guardarla. Una vez fría, baje la placa de presión sobre la tabla de planchar;
baje el mango de presión por completo, luego empuje las perillas de seguridad,
hacia abajo a la posición “locked” (bloqueado).
3. Limpie el vaporizador con un paño suave cuando sea necesario.
4. Guarde en un lugar fresco y seco.
5. Reemplace el filtro de agua cuando sea necesario. Se pueden solicitar filtros
adicionales en www.reliablecorporation.com
LIMPIEZA
1. Llene el depósito de agua con el envase de agua proporcionado.
2. Coloque el cojín de planchado en el centro de la tabla de planchar.
3. Coloque una toalla limpia sobre el cojín de planchado y la tabla de planchar.
4. Ajuste el control de selección de temperatura en el valor más alto (lino).
Cuando se prenda la luz indicadora de vapor, baje suavemente la placa de
presión sobre el cojín de planchado.
5. Presione el botón de ráfaga de vapor de 6 a 7 veces. Tenga cuidado de no
tocar las superficies metálicas calientes y evite dejar las manos debajo de la
plancha cuando utilice el botón de ráfaga de vapor.
6. Una vez que la placa de presión se enfríe, puede limpiar la superficie con un
paño húmedo. NO utilice ningún material abrasivo sobre la placa de presión.
Esta tiene un revestimiento antiadherente que ayuda en la limpieza.
7. El forro de la tabla de planchar es removible y se puede lavar con detergente
suave y agua tibia. Puede comprar repuestos del forro en nuestro sitio web en:
www.reliablecorporation.com.
39
Page 43

ESPECIFICACIONES DEL PRODUCTO
ARIA 350SP
Tensión de alimentación: 120, 60 Hz
Salida: 1800 W
Capacidad de agua: 23.70 fl oz
Cable: 8 pies
Peso: 14 kg
DETECCIÓN Y RESOLUCIÓN DE
PROBLEMAS
PRECAUCIÓN: Antes de realizar tareas de mantenimiento a la plancha a vapor,
aísle la unidad al retirar el cable del tomacorriente.
40
PROBLEMA
La luz led no enciende
No hay calor
No hay vapor
Los botones no funcionan
La máquina no se puede abrir
con el mango de la placa de
presión
La salida de la ráfaga de
vapor es débil
SOLUCIÓN
• Asegúrese de que el cable de alimentación de la plancha esté
bien conectado a un tomacorriente de 120 V de corriente
alterna (CA).
• Asegúrese de que el disyuntor funcione.
• Pruebe operar la plancha desde otro tomacorriente.
• Asegúrese de haber seleccionado la temperatura.
• La placa de presión se dejó en la posición elevada por más de
20 minutos y se activó el apagado automático.
• Puede ser que el nivel de agua esté bajo; rellene el depósito de
agua.
• El ajuste de temperatura es demasiado bajo para activar el
vapor. Seleccione una temperatura más alta y espere a que la
luz indicadora de listo se ilumine antes de comenzar a aplicar
vapor.
• Desconecte la unidad del tomacorriente por 5 minutos y
vuelva a enchufarla.
• Tire las perillas de seguridad hacia arriba
• La placa de presión necesita limpieza. Consulte la sección de
limpieza del manual para conocer el procedimiento adecuado.
Page 44

41
Reliable Corporation (“Reliable”) garantiza al comprador original de sus productos que
todas las unidades vendidas por Reliable (un “Producto Reliable”) se encuentran libres de
defectos de material y de mano de obra durante el período de un año a partir de la fecha
de compra, si se utilizan correctamente y reciben el mantenimiento adecuado. En virtud de
las condiciones y limitaciones establecidas a continuación, Reliable reparará o reemplazará
la pieza de un Producto Reliable que demuestre estar defectuosa a causa de material o
fabricación inadecuados. Si el Producto Reliable defectuoso deja de estar disponible y
no puede ser reparado efectivamente o reemplazado por un modelo idéntico, Reliable
cambiará el Producto Reliable defectuoso por un Producto Reliable vigente de igual o
mayor valor. Las piezas de recambio o repuestos serán suministrados por Reliable a cambio
de las piezas originales, y serán piezas nuevas o piezas que estarán reacondicionadas
para convertirse en productos funcionalmente equivalentes a piezas nuevas. Si Reliable
no puede reparar o reemplazar un Producto Reliable, la empresa reembolsará el valor del
Producto Reliable que esté vigente al momento de reclamar la garantía.
Esta garantía limitada no cubre los daños que sufra un Producto Reliable como resultado de
una instalación inadecuada, accidente, abuso, uso incorrecto, desastre natural, suministro de
energía eléctrica insuficiente o excesivo, condiciones mecánicas o ambientales anormales,
desgaste provocado por el uso normal del producto o cualquier desarme, reparación o
modificación no autorizados. Esta garantía limitada no se extiende a ningún daño indirecto,
resultante o accidental que el usuario pueda sufrir o que pueda causar el uso de un
Producto Reliable, incluida, entre otros, la responsabilidad ante los reclamos presentados
por terceros; y se limita al monto pagado por el comprador original del Producto Reliable
respecto del cual se aplica esta protección de garantía limitada. Esta garantía limitada no es
válida para los productos que hayan sido modificados o que no tengan número de serie, ni
para los productos que no hayan sido comprados directamente a Reliable o a través de un
distribuidor autorizado que cuente con nuestra autorización para vender Productos Reliable.
Esta garantía limitada es la única garantía que se aplica a todos los Productos Reliable,
reemplaza todos los términos que puedan estar contenidos en cualquier otro documento
u orden de compra y no puede ser alterada ni modificada excepto que Reliable así lo haya
autorizado expresamente por escrito.
Para obtener una reparación o un reemplazo en virtud de los términos de esta garantía,
póngase en contacto con nuestro grupo de servicio al cliente a través del 1-800-268-1649 o
escriba a support@reliablecorporation.com.
Se le pedirá que mande un recibo original por fax o por correo electrónico. Este
comprobante debe demostrar que usted es el comprador original, que el producto fue
adquirido directamente de nuestras oficinas o de un vendedor de Reliable autorizado y que
el reclamo de la garantía se realiza dentro del período correspondiente. Recibirá un número
de autorización (RA#) y deberá enviar el producto defectuoso, junto con el comprobante de
compra, el RA# y los seguros pagados por adelantado, a la siguiente dirección:
Reliable Corporation, 5-100 Wingold Avenue, Toronto, ON M6B 4K7. Los envíos con costos
por cobrar serán rechazados. El riesgo de sufrir una pérdida o daño en tránsito será
asumido por el cliente. Una vez que Reliable reciba el producto defectuoso, la empresa
iniciará el proceso de reparación o reemplazo.
Si tiene preguntas sobre esta garantía, puede escribir a la siguiente dirección:
Reliable Corporation
100 Wingold Avenue, Unit 5
Toronto, Ontario
Canada M6B 4K7
www.reliablecorporation.com
GARANTÍA DE LOS PRODUCTOS RELIABLE
Page 45

Page 46

Page 47

Page 48

1 800 268 1649
www.reliablecorporation.com
DID YOU KNOW?
We supply thousands of dry
cleaners and major
department store alteration
shops with ironing stations
and ironing tables.
 Loading...