


7000 SERIES
PROFESSIONAL STEAM PRODUCTS
PRODUITS À VAPEUR PROFESSIONNELS
PRODUCTOS PROFESIONALES DE VAPOR
INSTRUCTION MANUAL
GUIDE D’UTILISATION MANUAL DE INSTRUCCIONES
ENGLISH |
01 |
FRANÇAIS |
15 |
ESPAÑOL |
29 |
THE 7000IS
PROFESSIONAL STEAM PRODUCTS INSTRUCTION MANUAL
ENGLISH
01
RELIABLE. RIGHT THERE WITH YOU.
At Reliable, we do what we love, and take pride in doing it right. You want what’s best for the people, places and things that matter in your life – from where you live to what you wear. So do we. From the start, we approach every product with a craftsman’s attention to detail and passion for making it right. Quality, functionality, design and customer service play an equally important part in delivering what’s right for you. With its stainless steel construction, and professional grade components; the 7000 Series will allow you to obtain the benefits of professional pressing or cleaning in a compact and convenient format.
For your safety and to fully enjoy the advantages of this product, please take a few minutes to read all the important safeguards and care instructions. Keep this manual handy and review the product warranty for your reference.
02
IMPORTANT SAFETY INSTRUCTIONS – SAVE THESE INSTRUCTIONS IN A SAFE PLACE FOR FUTURE REFERENCE
READ ALL INSTRUCTIONS BEFORE USE
When using your Reliable™ steam station, basic safety precautions should always be followed. Please read the following instructions carefully as they provide important information concerning how to install, use and care for this product.
1.To protect against the risk of electric shock, do not immerse the appliance in water.
2.Do not allow the cord to touch hot surfaces.
3.Always allow the appliance to cool for at least thirty minutes before storing.
4.Always put the appliance in a secure place on a table or counter when using.
5.Do not move the appliance without unplugging it first.
6.Always disconnect the appliance from the outlet before filling with or removing water. Be careful to avoid spilling water on the appliance when filling.
7.Use tap water or 50/50 tap/distilled water in the appliance. Do not use perfumed or products containing alcohol in the appliance.
8.Always disconnect the appliance when not in use.
9.Do not use the appliance if the cord is damaged. Return the appliance or have the cord repaired by the manufacturer, or their service agent.
10.Do not operate the appliance if it has been dropped or damaged. Do not disassemble the appliance. Incorrect reassembly can cause a risk of electric shock. Send it to an authorized service center for repair.
11.Do not operate another high wattage appliance on the same circuit.
12.This appliance must be grounded. Do not alter the plug or attempt to remove this feature.
13.Be careful. Burns can occur from touching hot metal parts or steam.
14.This appliance is not intended for use by young children.
15.While using the appliance, never unscrew or remove the cap (1) while the boiler is under pressure.
16.Before removing the cap, make sure there’s no more steam in the steam chamber by shutting the boiler switch (4) to the off position, and pressing the steam iron button (7) to release all of the remaining steam.
17.To ensure your safety, the safety cap (1) and all other components must be replaced with original parts only.
03
FEATURES
•Low water light indicator
•Regular tap water or 50/50 tap/distilled water
•Up to 70 p.s.i operating pressure
•Ceramic terminal block
•Ranco pressure control
•12-gauge heavy-duty wiring
•Up to 8 hours of steam
IRONING
•Your new ironing station provides clean, professional results every time
•The professional iron soleplate is made from durable, and fast heating aluminum
•Stainless steel outer shell construction for long life
•Adjustable thermostat allows for accurate temperature settings
•Cork handle iron is comfortable and stays cool
STEAM CLEANING
•Adjustable steam nozzle with foot pedal (7000CJ)
•Steam gun (7000CD)
•Adjustable steam nozzle with foot pedal and steam gun (7500CD)
IMPORTANT: When you want to dispose of the appliance, NEVER throw it in the garbage. Instead, go to your closest recycling station or waste collection centre for subsequent treatment. In this way, you will be contributing to looking after the environment.
04

TECHNICAL DATA
Working voltage: 120V (7000CJ, 7000CD, 7500CD), 120V (7500IS) Nominal capacity of the tank: 9 Liters
Boiler power: 1 heating element 1200W (7000IS, 7000CJ, 7000CD+7500CD) 2 heating elements 800W (7500IS)
Power consumption: 20 amps (7000IS), 15 amps (7000CJ, 7000CD - 7500CD) Service pressure: 3,5 Bar/4 Bar
Maximum pressure: 5,5 Bar
HOW TO ASSEMBLE AND USE
1.Remove the steam station from its packing and make sure all packing has been removed (including the protective bags). Put the station on a flat and solid surface.
2.Your boiler is supplied with a safety cap on the blow-down valve (right side of tank), as well as a plastic hose and fitting to secure the hose. Please remove the safety cap and install the hose and fitting. This will allow you to follow the proper cleaning procedure (ref. step #14). If there is a problem with the blowdown valve (leaking) you can use the safety cap to prevent water from leaking until you have the valve replaced.
3.A) 7000IS – 7500IS: It is recommended to put the iron on the iron pad, (supplied) as the pad will withstand the temperature of the iron. B) 7000CJ
– 7500CD: Screw the nozzle into the steam fitting and plug in the 4-pin receptacle for the electronic foot pedal. C) 7000CD – 7500CD – 7500IS: Connect the steam gun or steam brush the same way using the quick disconnect for the steam hose.
4.Insert the two-piece wand (2) into the flange on top of the boiler, tighten with the side screw and attach the spring on the iron hose to the coil end of the wand (7000IS, 7500IS, 7000CD, 7500CD models only).
5.Before beginning any operation, make sure that the exhaust valve (10) is closed and the drain hose is installed (ref. step #2).
6.Unscrew the safety cap (1). Fill the boiler with a maximum of 1.85 gallons (7 litres) of water for the 7000IS series. Use the funnel supplied, making sure you do not overfill the tank.
7.Insert the plug into the electrical outlet; switch on the boiler (3) and steam button (2). When the two button lights come on, the steam device and boiler are working.
8.For the 7000IS iron system, turn the iron plate’s temperature regulating knob
(6) to the desired temperature.
05
9.Wait approximately 30 minutes for the boiler to reach maximum pressure. Once it reaches 60 psi, the unit is now ready to operate.
10.NOTE: When you call for steam for the first time (after having turned the boiler on) you might notice a fast decrease in pressure. This is normal for the first time.
11.The steam station is ready for use.
12.Push the steam button or the foot pedal for steam.
13.This steam product is equipped with a low water warning light (4). During operation, if the light comes on, it indicates that the unit requires more water to operate. If this occurs, please follow these steps.
a)Turn off the boiler switch (3).
b)Press the steam iron button or foot pedal to ensure there is no more steam in the boiler.
c)Slowly open the pressure cap (1) and refill to the required level with warm water.
d)Replace the cap, tighten and wait for it to build up pressure again.
e)NOTE: Failure to shut off the boiler when the warning light is on may result in damaging the heating element, which will void the warranty.
IMPORTANT
When you are finished using the boiler for the day, unscrew the fill cap one-turn on the unit to release the steam/air from the tank. This will eliminate the vacuum that may cause damage to the pressure gauge.
For a longer life and better machine performance we suggest that you flush out the boiler tank once a week. Flushing the tank will help slow the sediment/mineral buildup that may occur.
TO FLUSH THE BOILER TANK
(Be careful as the water will be very hot as it comes out of the tank):
1.Release the excess steam still inside the boiler at the end of use (see item #13 above).
2.Turn off the steam switch power switch and unplug the boiler unit.
3.Carefully open the filler plug cap.
4.Make sure the clear drain tubing has been installed on to the blow-down valve (drawing reference #10) situated on the lower right side of the tank, and the tubing is draining into something that can hold hot water.
5.Open the blow down valve. Drain the remaining water from the boiler tank.
6.Close the valve.
06
WATER INSTRUCTIONS
Use tap water or 50/50 tap/distilled water in the appliance. Do not use perfume or products containing alcohol in the appliance.
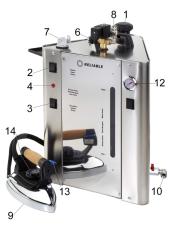
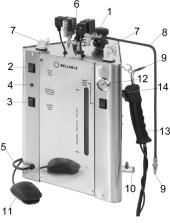
DESCRIPTION OF THE 7000IS/2100IR
1.Safety cap
2.Steam switch
3.Boiler switch
4.Low water red pilot light
5.Power cord and plug
6.Steam regulation knob
7.Female 4-pin plug receptacle
8.Quick connect for steam hose
9.Steam iron (2100IR/120V)
10.Blow down valve
12.Pressure gauge
13.Iron steam switch
14.Temperature regulation knob
07
08
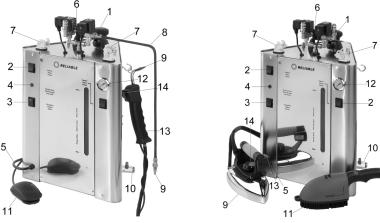
DESCRIPTION OF THE 7500IS
Picture 1. Mod. 7500IS |
Picture 1. Mod. 7500IS + 2100IR + 1800IA |
1.Safety cap
2.Steam switch
3.Boiler switch
4.Low water red pilot light
5.Power cord and plug
6.Steam regulation knob
7.Female 4-pin receptacle plug
8.Quick connect for steam hose
9.Steam iron (2100IR/120V)
10.Blow down valve
11.1800IA steam brush (1800IA/120V)
12.Pressure gauge
13.Iron steam switch
14.Temperature regulation knob (2100IR/120V)
09
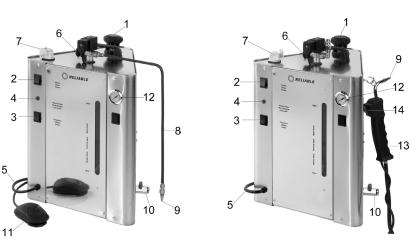
DESCRIPTION OF THE 7000CJ, 7000CD
1.Safety cap
2.Steam switch
3.Boiler switch
4.Low water red pilot light
5.Power cord and plug
6.Steam regulation knob
7.Female 4-pin receptacle plug
8.Adjustable steam nozzle (7000CJ, 7500CD)
9.Steam tip (7000CJ, 7000CD, 7500CD)
10.Blow down valve
11.Foot pedal (7000CJ, 7500CD)
12.Pressure gauge
13.1700DA Steam gun (7000CD, 7500CD)
14.Steam gun switch (7000CD, 7500CD)
10

11
DESCRIPTION OF THE 7500CD
1.Safety cap
2.Steam switch
3.Boiler switch
4.Low water red pilot light
5.Power cord and plug
6.Steam regulation knob
7.Female 4-pin receptacle plug
8.Adjustable steam nozzle (7000CJ, 7500CD)
9.Steam tip (7000CJ, 7000CD, 7500CD)
10.Exhaust valve
11.Foot pedal (7000CJ-7500CD)
12.Pressure gauge
13.1700DA steam gun (7000CD-7500CD)
14.Steam gun switch (7000CD-7500CD)
12
TROUBLESHOOTING
PROBLEM |
POSSIBLE CAUSES |
REMEDY |
||
|
|
|
|
|
The steam from the iron |
1. |
While filling the tank you |
1. |
The problem will go on |
is too wet. |
|
may have poured too much |
|
until the excess water is |
|
|
water into it. |
|
emptied. Keep the steam |
|
2. |
The iron soleplate is not |
|
button pressed until the |
|
|
getting hot enough. |
|
water in the tank is at the |
|
|
|
|
correct level. |
|
|
|
2. |
Please check that the |
|
|
|
|
temperature knob is |
|
|
|
|
on the right position, if |
|
|
|
|
not, increase the iron |
|
|
|
|
temperature. |
|
|
|
|
|
Water is coming out from |
1. |
There might be a leak in the |
1. |
Contact technical support |
the boiler. |
|
heating element gasket. |
|
as in most cases, the |
|
|
|
|
gasket will need to be |
|
|
|
|
replaced. |
|
|
|
|
|
There is no steam coming out |
1. |
The steam knob might |
1. |
Open the steam knob |
of the iron, nozzle or gun. |
|
be closed |
|
anticlockwise. |
|
2. |
The iron switch might be off |
2. |
After the iron switch |
|
3. |
The foot pedal is not |
|
comes on, wait for 4 min- |
|
|
plugged in (7000CJ) |
|
utes so that the iron plate |
|
4. |
The boiler switch might |
|
gets hot. |
|
|
be off |
3. |
Plug the 4-pin receptacle |
|
5. |
If the low water light is on, |
|
into the boiler. |
|
|
the water in the tank is low |
4. |
After the boiler switch |
|
|
or empty. |
|
comes on, wait for 10 min- |
|
|
|
|
utes so the boiler produces |
|
|
|
|
steam. |
|
|
|
5. |
Refill the boiler carefully |
|
|
|
|
following the instructions. |
|
|
|
|
|
The steam is dirty. |
1. |
When using the iron with a |
1. |
Remove and rinse the |
|
|
ironing shoe, if not cleaned |
|
ironing shoe on a regular |
|
|
regularly, calcium will form |
|
(monthly) basis to avoid |
|
|
between the shoe and the |
|
scale build-up. |
|
|
iron base. |
|
|
|
|
|
|
|
13
 Loading...