

Page 1

7000 SERIES
PROFESSIONAL STEAM PRODUCTS
PRODU ITS À VAPEUR PROFES SIONNELS
PRODU CTOS PROFESIO NALES DE VAPOR
INSTRUCTION MANUAL
GUIDE D’UTILISATION
MANUAL DE INSTRUCCIONES
Page 2

Page 3

ENGLISH 01
FRANÇAIS 15
ESPAÑOL 29
Page 4

THE 7000IS
PROFESSIONAL STEAM PRODUCTS
INSTRUCTION MANUAL
ENGLISH
01
Page 5

RELIABLE. RIGHT THERE WITH YOU.
At Reliable, we do what we love, and take pride in doing it right.
You want what’s best for the people, places and things that matter
in your life – from where you live to what you wear. So do we. From
the start, we approach every product with a craftsman’s attention to detail and passion for making it right. Quality, functionality,
design and customer service play an equally important part in
delivering what’s right for you. With its stainless steel construction,
and professional grade components; the 7000 Series will allow
you to obtain the benefits of professional pressing or cleaning in a
compact and convenient format.
For your safety and to fully enjoy the advantages of this product,
please take a few minutes to read all the important safeguards and
care instructions. Keep this manual handy and review the product
warranty for your reference.
02
Page 6

IMPORTANT SAFETY INSTRUCTIONS –
SAVE THESE INSTRUCTIONS IN A SAFE
PLACE FOR FUTURE REFERENCE
READ ALL INSTRUCTIONS BEFORE USE
When using your Reliable™ steam station, basic safety precautions should always
be followed. Please read the following instructions carefully as they provide important information concerning how to install, use and care for this product.
1. To protect against the risk of electric shock, do not immerse the appliance
in water.
2. Do not allow the cord to touch hot surfaces.
3. Always allow the appliance to cool for at least thirty minutes before storing.
4. Always put the appliance in a secure place on a table or counter when using.
5. Do not move the appliance without unplugging it first.
6. Always disconnect the appliance from the outlet before filling with or removing
water. Be careful to avoid spilling water on the appliance when filling.
7. Use tap water or 50/50 tap/distilled water in the appliance. Do not use perfumed or products containing alcohol in the appliance.
8. Always disconnect the appliance when not in use.
9. Do not use the appliance if the cord is damaged. Return the appliance or have
the cord repaired by the manufacturer, or their service agent.
10. Do not operate the appliance if it has been dropped or damaged. Do not disassemble the appliance. Incorrect reassembly can cause a risk of electric shock.
Send it to an authorized service center for repair.
11. Do not operate another high wattage appliance on the same circuit.
12. This appliance must be grounded. Do not alter the plug or attempt to remove
this feature.
13. Be careful. Burns can occur from touching hot metal parts or steam.
14. This appliance is not intended for use by young children.
15. While using the appliance, never unscrew or remove the cap (1) while the boiler
is under pressure.
16. Before removing the cap, make sure there’s no more steam in the steam chamber by shutting the boiler switch (4) to the off position, and pressing the steam
iron button (7) to release all of the remaining steam.
17. To ensure your safety, the safety cap (1) and all other components must be
replaced with original parts only.
03
Page 7

FEATURES
• Low water light indicator
• Regular tap water or 50/50 tap/distilled water
• Up to 70 p.s.i operating pressure
• Ceramic terminal block
• Ranco pressure control
• 12-gauge heavy-duty wiring
• Up to 8 hours of steam
IRONING
• Your new ironing station provides clean, professional results every time
• The professional iron soleplate is made from durable, and fast heating aluminum
• Stainless steel outer shell construction for long life
• Adjustable thermostat allows for accurate temperature settings
• Cork handle iron is comfortable and stays cool
STEAM CLEANING
• Adjustable steam nozzle with foot pedal (7000CJ)
• Steam gun (7000CD)
• Adjustable steam nozzle with foot pedal and steam gun (7500CD)
IMPORTANT: When you want to dispose of the appliance, NEVER throw it in the
garbage. Instead, go to your closest recycling station or waste collection centre
for subsequent treatment. In this way, you will be contributing to looking after the
environment.
04
Page 8

TECHNICAL DATA
Working voltage: 120V (7000CJ, 7000CD, 7500CD), 120V (7500IS)
Nominal capacity of the tank: 9 Liters
Boiler power: 1 heating element 1200W (7000IS, 7000CJ, 7000CD+7500CD)
2 heating elements 800W (7500IS)
Power consumption: 20 amps (7000IS), 15 amps (7000CJ, 7000CD - 7500CD)
Service pressure: 3,5 Bar/4 Bar
Maximum pressure: 5,5 Bar
HOW TO ASSEMBLE AND USE
1. Remove the steam station from its packing and make sure all packing has
been removed (including the protective bags). Put the station on a flat and
solid surface.
2. Your boiler is supplied with a safety cap on the blow-down valve (right side of
tank), as well as a plastic hose and fitting to secure the hose. Please remove
the safety cap and install the hose and fitting. This will allow you to follow the
proper cleaning procedure (ref. step #14). If there is a problem with the blowdown valve (leaking) you can use the safety cap to prevent water from leaking
until you have the valve replaced.
3. A) 7000IS – 7500IS: It is recommended to put the iron on the iron pad,
(supplied) as the pad will withstand the temperature of the iron. B) 7000CJ
– 7500CD: Screw the nozzle into the steam fitting and plug in the 4-pin receptacle for the electronic foot pedal. C) 7000CD – 7500CD – 7500IS: Connect
the steam gun or steam brush the same way using the quick disconnect for
the steam hose.
4. Insert the two-piece wand (2) into the flange on top of the boiler, tighten with
the side screw and attach the spring on the iron hose to the coil end of the
wand (7000IS, 7500IS, 7000CD, 7500CD models only).
5. Before beginning any operation, make sure that the exhaust valve (10) is
closed and the drain hose is installed (ref. step #2).
6. Unscrew the safety cap (1). Fill the boiler with a maximum of 1.85 gallons (7
litres) of water for the 7000IS series. Use the funnel supplied, making sure
you do not overfill the tank.
7. Insert the plug into the electrical outlet; switch on the boiler (3) and steam
button (2). When the two button lights come on, the steam device and boiler
are working.
8. For the 7000IS iron system, turn the iron plate’s temperature regulating knob
(6) to the desired temperature.
05
Page 9

9. Wait approximately 30 minutes for the boiler to reach maximum pressure.
Once it reaches 60 psi, the unit is now ready to operate.
10. NOTE: When you call for steam for the first time (after having turned the
boiler on) you might notice a fast decrease in pressure. This is normal for the
first time.
11. The steam station is ready for use.
12. Push the steam button or the foot pedal for steam.
13. This steam product is equipped with a low water warning light (4). During
operation, if the light comes on, it indicates that the unit requires more water
to operate. If this occurs, please follow these steps.
a) Turn off the boiler switch (3).
b) Press the steam iron button or foot pedal to ensure there is no more
steam in the boiler.
c) Slowly open the pressure cap (1) and refill to the required level with warm
water.
d) Replace the cap, tighten and wait for it to build up pressure again.
e) NOTE: Failure to shut off the boiler when the warning light is on may
result in damaging the heating element, which will void the warranty.
IMPO RTANT
When you are finished using the boiler for the day, unscrew the fill cap one-turn on
the unit to release the steam/air from the tank. This will eliminate the vacuum that
may cause damage to the pressure gauge.
For a longer life and better machine performance we suggest that you flush out
the boiler tank once a week. Flushing the tank will help slow the sediment/mineral
buildup that may occur.
TO FLUSH THE BOILER TANK
(Be careful as the water will be very hot as it comes out of the tank):
1. Release the excess steam still inside the boiler at the end of use
(see item #13 above).
2. Turn off the steam switch power switch and unplug the boiler unit.
3. Carefully open the filler plug cap.
4. Make sure the clear drain tubing has been installed on to the blow-down
valve (drawing reference #10) situated on the lower right side of the
tank, and the tubing is draining into something that can hold hot water.
5. Open the blow down valve. Drain the remaining water from the boiler tank.
6. Close the valve.
06
Page 10
WATER INSTRUCTIONS
Use tap water or 50/50 tap/distilled water in the appliance. Do not use perfume or
products containing alcohol in the appliance.
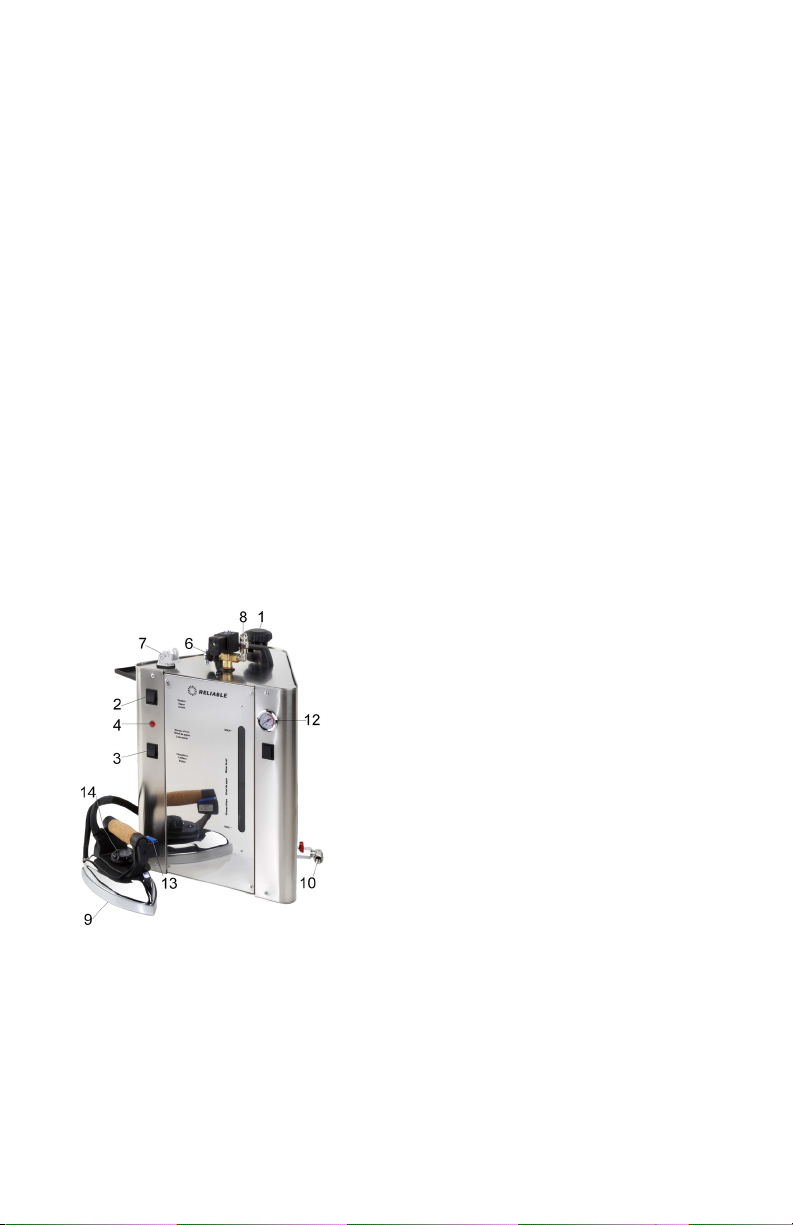
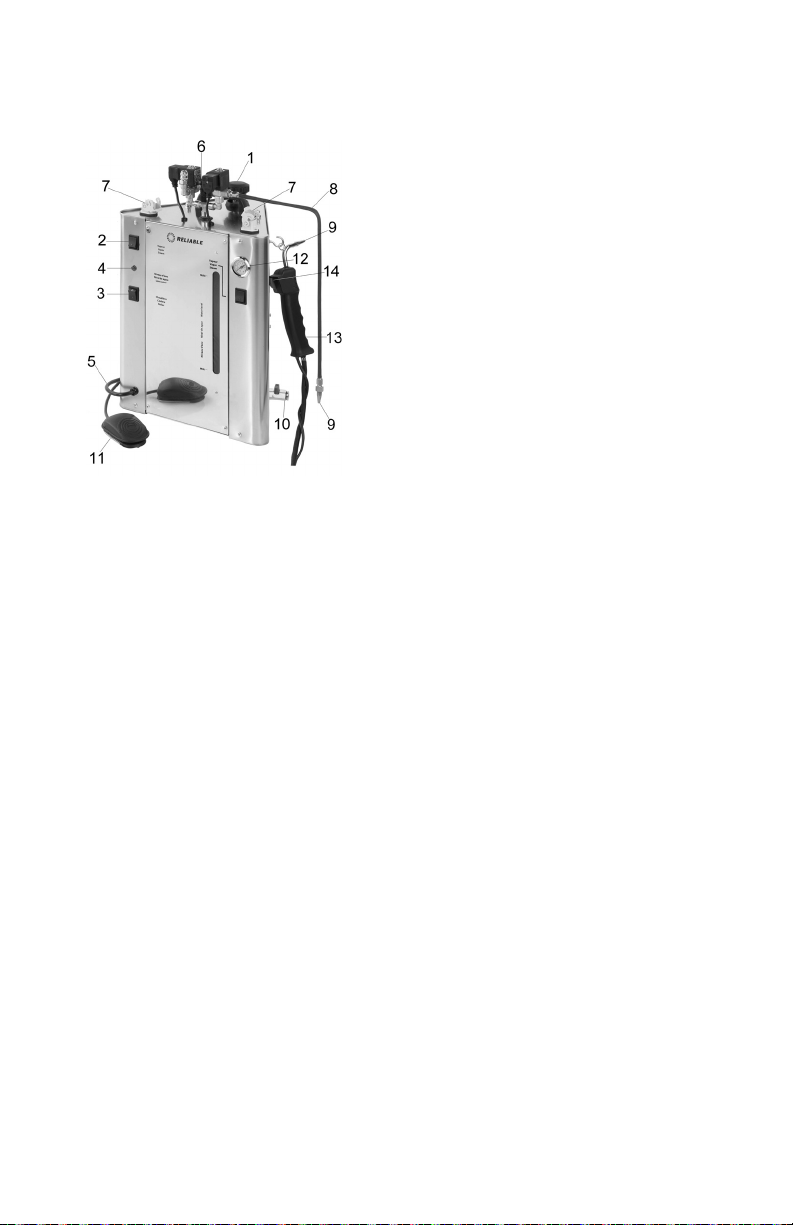
DESCRIPTION OF THE 7000IS/2100IR
1. Safety cap
2. Steam switch
3. Boiler switch
4. Low water red pilot light
5. Power cord and plug
6. Steam regulation knob
7. Female 4-pin plug receptacle
8. Quick connect for steam hose
9. Steam iron (2100IR/120V)
10. Blow down valve
12. Pressure gauge
13. Iron steam switch
14. Temperature regulation knob
070809
Page 11
Page 12
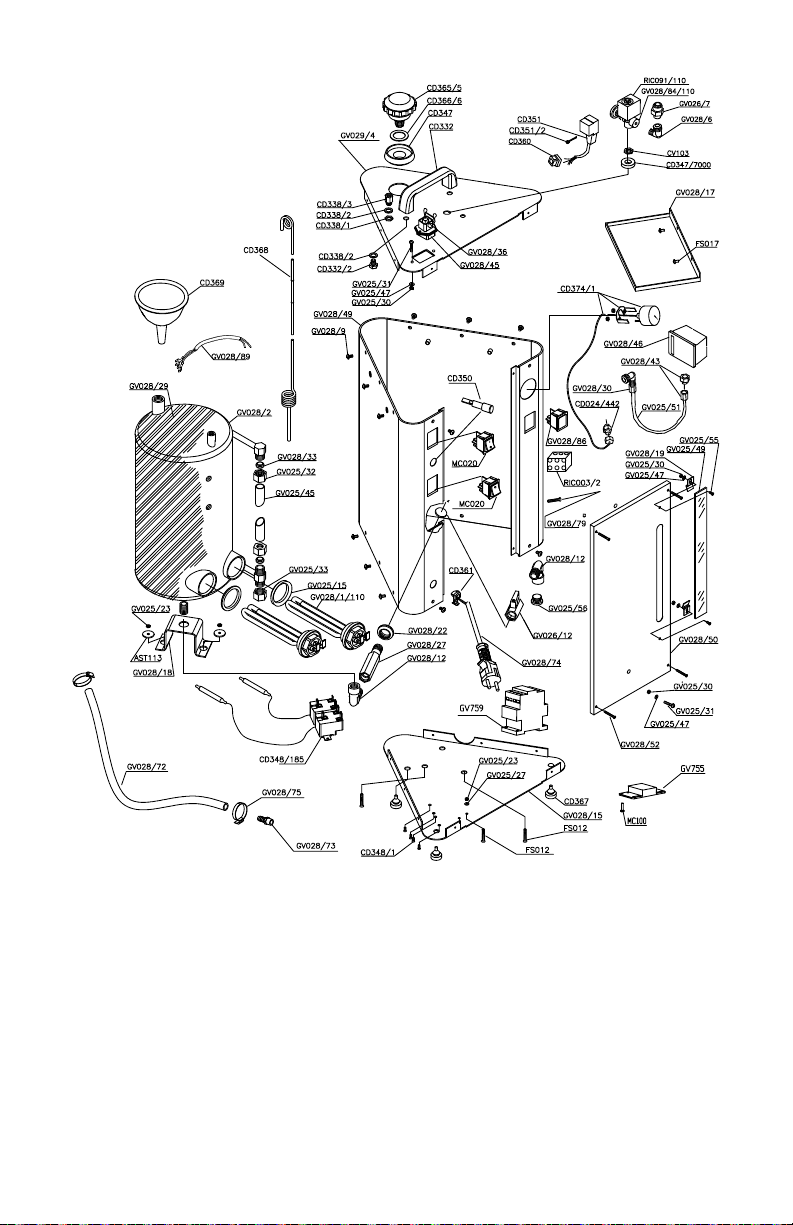
DESCRIPTION OF THE 7500IS
Picture 1. Mod. 7500IS Picture 1. Mod. 7500IS + 2100IR + 1800IA
1. Safety cap
2. Steam switch
3. Boiler switch
4. Low water red pilot light
5. Power cord and plug
6. Steam regulation knob
7. Female 4-pin receptacle plug
8. Quick connect for steam hose
9. Steam iron (2100IR/120V)
10. Blow down valve
11. 1800IA steam brush (1800IA/120V)
12. Pressure gauge
13. Iron steam switch
14. Temperature regulation knob (2100IR/120V)
Page 13
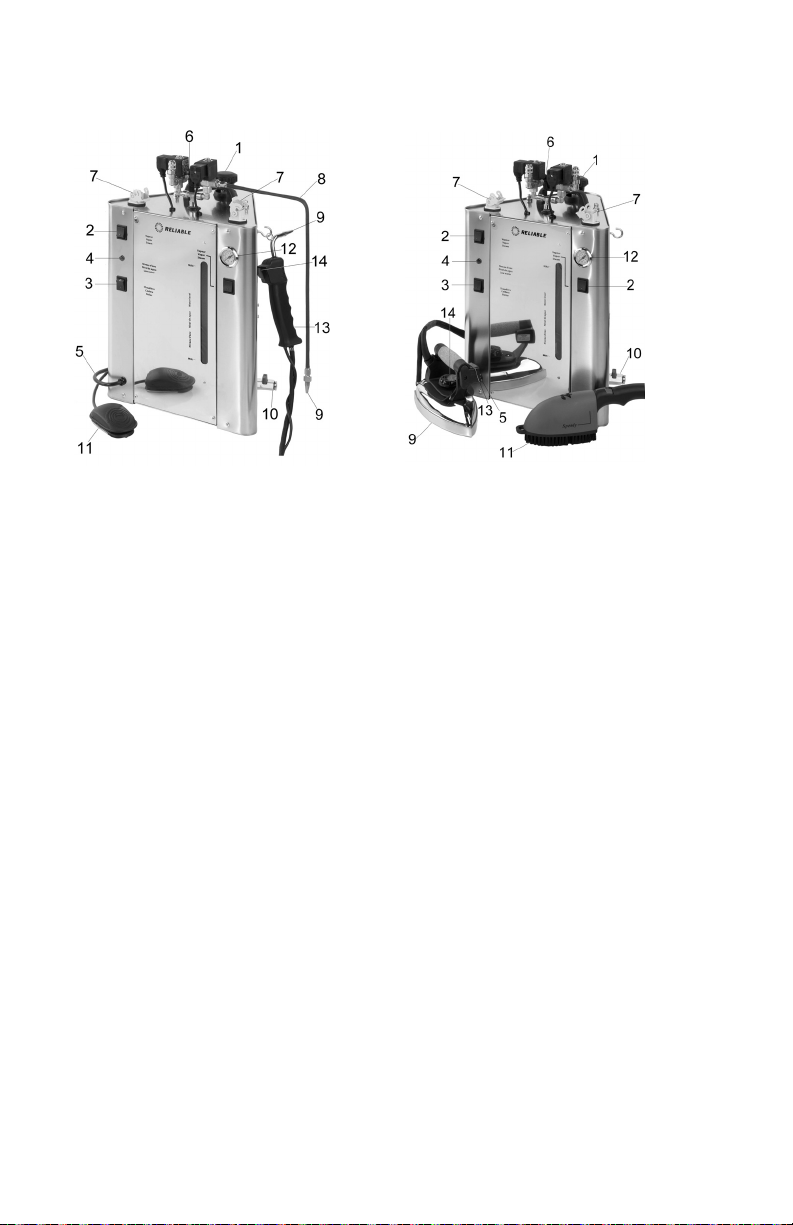
DESCRIPTION OF THE 7000CJ, 7000CD
1. Safety cap
2. Steam switch
3. Boiler switch
4. Low water red pilot light
5. Power cord and plug
6. Steam regulation knob
7. Female 4-pin receptacle plug
8. Adjustable steam nozzle (7000CJ, 7500CD)
9. Steam tip (7000CJ, 7000CD, 7500CD)
10. Blow down valve
11. Foot pedal (7000CJ, 7500CD)
12. Pressure gauge
13. 1700DA Steam gun (7000CD, 7500CD)
14. Steam gun switch (7000CD, 7500CD)
101112
Page 14

Page 15
DESCRIPTION OF THE 7500CD
1. Safety cap
2. Steam switch
3. Boiler switch
4. Low water red pilot light
5. Power cord and plug
6. Steam regulation knob
7. Female 4-pin receptacle plug
8. Adjustable steam nozzle (7000CJ, 7500CD)
9. Steam tip (7000CJ, 7000CD, 7500CD)
10. Exhaust valve
11. Foot pedal (7000CJ-7500CD)
12. Pressure gauge
13. 1700DA steam gun (7000CD-7500CD)
14. Steam gun switch (7000CD-7500CD)
Page 16
TROUBLESHOOTING
PROBLEM
The steam from the iron
is too wet.
Water is coming out from
the boiler.
There is no steam coming out
of the iron, nozzle or gun.
POSSIBLE CAUSES
1. While filling the tank you
may have poured too much
water into it.
2. The iron soleplate is not
getting hot enough.
1. There might be a leak in the
heating element gasket.
1. The steam knob might
be closed
2. The iron switch might be off
3. The foot pedal is not
plugged in (7000CJ)
4. The boiler switch might
be off
5. If the low water light is on,
the water in the tank is low
or empty.
REMEDY
1. The problem will go on
until the excess water is
emptied. Keep the steam
button pressed until the
water in the tank is at the
correct level.
2. Please check that the
temperature knob is
on the right position, if
not, increase the iron
temperature.
1. Contact technical support
as in most cases, the
gasket will need to be
replaced.
1. Open the steam knob
anticlockwise.
2. After the iron switch
comes on, wait for 4 minutes so that the iron plate
gets hot.
3. Plug the 4-pin receptacle
into the boiler.
4. After the boiler switch
comes on, wait for 10 minutes so the boiler produces
steam.
5. Refill the boiler carefully
following the instructions.
The steam is dirty.
13
1. When using the iron with a
ironing shoe, if not cleaned
regularly, calcium will form
between the shoe and the
iron base.
1. Remove and rinse the
ironing shoe on a regular
(monthly) basis to avoid
scale build-up.
Page 17

RELIABLE CORPORATION LIFETIME
PRODUCT WARRANTY POLICY FOR
PRESSURIZED STEAM BOILER TANKS
Reliable Corporation (“Reliable”) warrants to the original purchaser of the boiler noted
above from Reliable (the “Reliable Boiler Tank”) that it will be free from defects in materials
and workmanship when utilized for normal use by the original purchaser only. Should the
Reliable Boiler Tank need replacement, Reliable will do so at no parts and labor cost to the
original purchaser, exclusive of shipping.
Subject to the conditions and limitations set forth below, Reliable will either repair or replace
any part of a Reliable Boiler Tank that proves defective by reason of improper workmanship
or materials. If the defective Reliable Boiler Tank is no longer available and cannot be repaired
effectively or replaced with an identical model, Reliable shall replace the defective Reliable
Boiler Tank with a current Reliable Boiler Tank of equal or greater value. Repaired parts or
replacement products will be provided by Reliable on an exchange basis, and will be either new
or refurbished to be functionally equivalent to new. If Reliable is unable to repair or replace a
Reliable Boiler Tank, it will refund the current value of that Reliable Boiler Tank at the time the
warranty claim is made.
This limited warranty does not cover any damage to a Reliable Boiler Tank that results from
improper installation, accident, abuse, misuse, unreasonable use, natural disaster, insufficient
or excessive electrical supply, abnormal mechanical or environmental conditions or any
unauthorized disassembly, repair or modification. This limited warranty does not extend to
any indirect, consequential or incidental damages that may be suffered by a user from the
use of a Reliable Boiler Tank, including without limitation, any liability for third party claims
for damage, and is limited to the amount paid by the original purchaser for the Reliable Boiler
Tank with respect to which this limited warranty protection applies. This limited warranty does
not apply with respect to products that have been altered or which are missing serial numbers
or for products not purchased directly from Reliable or a dealer authorized by Reliable to sell
the Reliable Boiler Tank.
This limited warranty is the only warranty that applies to the Reliable Boiler Tank, supersedes
any and all terms that may be contained in any other document or purchase order and may
not be altered or amended except expressly in writing by Reliable.
To obtain a repair or replacement under the terms of this warranty, please contact our
customer service group at 1 800 268 1649 or at support@reliablecorporation.com. You will be
required to submit an original receipt via fax or e-mail. The receipt must reflect that you are
the original purchaser, the product was bought directly from Reliable or from an authorized
Reliable dealer and that the warranty claim is being made in compliance with the terms set
out in this document or any subsequent document issued by Reliable in connection with this
policy. You will be issued a return authorization number (RA#) and asked to ship the defective
product together with proof of purchase and RA#, prepaid insured to the following address:
Reliable Corporation, 5–100 Wingold Ave, Toronto, ON M6B 4K7.
Freight collect shipments will be refused. The risk of loss or damage in transit will be borne
by the customer. Once Reliable receives the defective product, it will initiate the repair or
replacement process.
14
Page 18

RELIABLE PRODUCTS WARRANTY
Reliable Corporation (“Reliable”) warrants to original purchaser of its products that
every product sold by Reliable (a “Reliable Product”) is free from defects in material and
workmanship for a period of one year from the date of purchase if properly used and
maintained. Subject to the conditions and limitations set forth below, Reliable will either
repair or replace any part of a Reliable Product that proves defective by reason of improper
workmanship or materials. If the defective Reliable Product is no longer available and cannot
be repaired effectively or replaced with an identical model, Reliable shall replace the defective
Reliable Product with a current Reliable Product of equal or greater value. Repaired parts or
replacement products will be provided by Reliable on an exchange basis, and will be either new
or refurbished to be functionally equivalent to new. If Reliable is unable to repair or replace
a Reliable Product, it will refund the current value of that Reliable Product at the time the
warranty claim is made.
This limited warranty does not cover any damage to a Reliable Product that results from
improper installation, accident, abuse, misuse, natural disaster, insufficient or excessive
electrical supply, abnormal mechanical or environmental conditions, wear and tear resulting
from normal use of the product, or any unauthorized disassembly, repair, or modification. This
limited warranty does not extend to any indirect, consequential or incidental damages that
may be suffered by a user or from the use of a Reliable Product, including without limitation,
any liability for third party claims for damage, and is limited to the amount paid by the original
purchaser Reliable Product with respect to which this limited warranty protection applies.
This limited warranty does not apply with respect to products that have been altered or which
are missing serial numbers or for products not purchased directly from Reliable or a dealer
authorized by us to sell Reliable Products.
This limited warranty is the only warranty that applies to any Reliable Product, supersedes any
and all terms that may be contained in any other document or purchase order and may not be
altered or amended except expressly in writing by Reliable.
To obtain a repair or replacement under the terms of this warranty, please contact our
customer service group at 1-800-268-1649 or at support@reliablecorporation.com.
You will be required to submit an original receipt via fax or e-mail. The receipt must reflect that
you are the original purchaser, the product was bought directly from
us or from an authorized Reliable dealer and that the warranty claim is being made within the
warranty period. You will be issued a return authorization number (RA#) and asked to ship the
defective product together with proof of purchase and RA#, prepaid insured to the following
address:
Reliable Corporation, 5-100 Wingold Avenue, Toronto, ON M6B 4K7. Freight collect shipments
will be refused. The risk of loss or damage in transit will be borne by
the customer. Once Reliable receives the defective product, it will initiate the repair or
replacement process.
If you have any questions regarding this warranty, you may write to:
Reliable Corporation
100 Wingold Avenue, Unit 5
Toronto, Ontario
Canada M6B 4K7
www.reliablecorporation.com
15
Page 19

16
Page 20

LE 7000IS – PRODUITS À VAPEUR
PROFESSIONNELS
MODE D’EMPLOI
FRANÇAIS
17
Page 21

RELIABLE. PROCHE DE VOUS.
Chez Reliable, nous faisons ce que nous aimons et sommes
fiers de bien le faire. Vousvoulez ce qu’il y a de mieux pour les
personnes, les lieux et les choses importantes de votre vie depuis l’endroit où vous vivez jusqu’aux vêtements que vous
portez. Nous aussi. Depuis le début, nous approchons chaque
produit avec une attention aux détails artisanale et la passion
de le fabriquer. La qualité, la fonctionnalité, la conception et
le service à la clientèle jouent des rôles également importants
dans notre mission de vous fournir ce qui vous correspond. Avec
sa fabrication en acier inoxydable et ses composants de qualité
professionnelle ; la 7000 vous permettra d’obtenir les avantages
du repassage ou d’un nettoyage professionnel dans un format
compact et pratique.
Pour votre sécurité et pour profiter pleinement des avantages
de ce produit, veuillez prendre quelques minutes pour lire toutes
les importantes mises en garde et les directives d’entretien.
Gardez ce manuel et la garantie du produit à portée de main
pour vous y référer ultérieurement.
18
Page 22

DIRECTIVES DE SÉCURITÉ IMPORTANTES
– CONSERVEZ CES INSTRUCTIONS
DANS UN ENDROIT SÉCURITAIRE POUR
RÉFÉRENCE FUTURE
LISEZ TOUTES LES INSTRUCTIONS AVANT L’UTILISATION
Lorsque vous utilisez votre poste à vapeur ReliableMC, les directives de sécurité
de base devraient toujours être suivies. Veuillez lire les instructions suivantes attentivement car elles vous donneront de l’information importante sur l’installation,
l’utilisation et l’entretien de ce produit.
1. Pour protéger contre le risque de choc électrique, ne pas immerger l’appareil
dans l’eau.
2. Ne laissez pas le cordon électrique toucher de surfaces chaudes.
3. Laissez toujours l’appareil refroidir pendant au moins trente minutes avant de
le ranger.
4. Installez toujours l’appareil dans un endroit sécuritaire sur une table ou un
comptoir pendant l’utilisation.
5. Ne déplacez pas l’appareil sans l’avoir débranché avant.
6. Débranchez toujours l’appareil de la prise de courant électrique avant de remplir
ou retirer l’eau. Soyez prudent afin d’éviter d’éclabousser l’appareil avec de l’eau
lors du remplissage.
7. Utilisez l’eau du robinet ou un mélange d’eau distillée et du robinet à un mélange
de 50/50. Ne pas utiliser de parfum ou tout autre produit contenant de l’alcool
dans l’appareil.
8. Débranchez toujours l’appareil lorsque celui-ci n’est pas utilisé.
9. N’utilisez pas l’appareil si le cordon électrique est endommagé. Retournez
l’appareil ou faites réparer le cordon électrique par le manufacturier ou un
agent autorisé.
10. Ne faites pas fonctionner l’appareil si celui-ci a été échappé ou endommagé.
Ne pas ouvrir l’appareil. Un réassemblage incorrect peut causer un risque de
choc électrique. Envoyez-le à un centre d’entretien autorisé pour réparation.
11. Ne pas faire fonctionner un autre appareil sur le même circuit électrique si celuici est à haut voltage.
12. Cet appareil doit être mis à la terre. Ne pas modifier ou tenter de retirer cette
caractéristique de la fiche d’alimentation.
13. Soyez prudent. Des brûlures peuvent survenir si vous touchez des pièces
métalliques chaudes ou la vapeur.
14. Cet appareil n’est pas conçu pour être utilisé par des enfants.
19
Page 23

15. Lorsque vous utilisez l’appareil, ne jamais dévisser ou retirer le bouchon (1)
pendant que la bouilloire est sous pression.
16. Avant de retirer le bouchon, assurez-vous qu’il n’y a plus de vapeur présente
dans la chambre à vapeur. Pour ce faire, vous devez fermer l’interrupteur
de la bouilloire (4) et appuyez sur le bouton de vapeur (7) pour libérer toute
la vapeur restante.
17. Pour assurer votre sécurité, le bouchon de sécurité (1) et toutes les autres composantes doivent être remplacées avec des pièces d’origine seulement.
CARACTÉRISTIQUES
• Indicateur de bas niveau d’eau
• Utiliser avec de l’eau du robinet ou un mélange 50/50 d’eau du robinet et distillée
• Pression de fonctionnement à 50 psi
• Bloc terminal en céramique
• Câblage robuste de 12 Ga.
• Jusqu’à 4 heures de vapeur
REPASSAGE
• Votre nouveau poste de repassage vous donnera des résultats propres et
professionnels à chaque fois
• La plaque d’assemblage du fer professionnelle est faite d’un aluminium durable, à
chauffage rapide
• Construction du corps extérieur en acier inoxydable pour une durée de
vie prolongée
• Thermostat ajustable vous permettant de régler avec précision la températuree
• Câblage robuste de 12 Ga.
• La poignée en liège est confortable et demeure froide
NETTOYAGE À LA VAPEUR
• Gicleur à vapeur ajustable avec pédale (7000CJ)
• Pistolet à vapeur (7000CD)
• Gicleur à vapeur ajustable avec pédale et pistolet à vapeur (7500CD)
IMPORTANT : Lorsque vous désirez vous départir de l’appareil, NE JAMAIS le jeter
aux ordures. Rendez-vous plutôt à votre centre de recyclage le plus près ou à un centre d’enlèvement des ordures ménagères pour un traitement adéquat. De cette façon,
vous contribuerez à protéger l’environnement.
20
Page 24

DONNÉES TECHNIQUES
• Voltage de travail : 120V (7000CJ, 7000CD, 7500CD), 120V (7500IS)
• Capacité nominale du réservoir : 9 litres
• Puissance de la bouilloire : 1 élément chauffant de 1200 W (7000IS, 7000CJ,
7000CD et 7500CD)
• 2 éléments chauffants de 800 W (7500IS)
• Consommation de courant : 20 ampères (7000IS), 15 ampères (7000CJ,
7000CD – 7500CD)
• Pression de service : 3,5 à 4 bars
• Pression maximum : 5,5 bars
DIRECTIVES D’ASSEMBLAGE ET D’UTILISATION
1. Retirez le poste à vapeur de son emballage et assurez-vous que toutes
les pièces ont été retirées de l’emballage (y compris les sacs protecteurs).
Installez le poste sur une surface droite et solide.
2. Votre bouilloire est fournit avec un bouchon de sûreté sur le robinet
d’extraction (côté droit du réservoir), de même qu’un tuyau de plastique et
un raccord pour sécuriser le tuyau. Veuillez retirer le bouchon de sûreté et
installez le tuyau et le raccord. Cela vous permettra de suivre la procédure de
nettoyage appropriée (réf. étape no 14). S’il y a un problème avec le robinet
d’extraction (fuite) vous pouvez utiliser le bouchon de sûreté pour empêcher
toute fuite d’eau jusqu’à ce que le robinet soit remplacé.
3. A) 7000IS – 7500IS – Il est recommandé de mettre le fer sur le coussinet
du fer (fourni) puisque le coussinet résistera à la température du fer. B)
7000CJ – 7500CD – Vissez le gicleur dans le raccord à vapeur et branchez le
connecteur à 4 broches pour la pédale électronique. C) 7000CD – 7500CD –
Connectez le pistolet ou la brosse à vapeur de la même façon en utilisant la
déconnexion rapide pour le tuyau de vapeur.
4. Insérez les deux tringles rotatives (2) dans les rebords sur le dessus de la
bouilloire, serrez avec les vis latérales et fixez le ressort sur le tuyau du fer
à l’extrémité du serpentin de la tringle (modèles 7000IS, 7500IS, 7000CD et
7500CD seulement).
5. Avant de commencer, assurez-vous que la soupape d’échappement (10) est
fermée et que le tuyau de purge est installé (réf. étape no 2).
6. Dévissez le bouchon de sûreté (1). Remplissez la bouilloire avec un maximum
de 7 litres (1,85 gallons) d’eau pour la série 7000IS. Utilisez l’entonnoir
fournit en vous assurez de ne pas trop remplir le réservoir.
7. Insérez la fiche d’alimentation dans la prise électrique; allumez la bouilloire
(3) et le bouton de vapeur (2). Lorsque les lumières des deux boutons
s’allument, le dispositif à vapeur et la bouilloire fonctionnent.
21
Page 25

8. Pour les systèmes de repassage 7000IS, tournez le bouton de réglage de la
température de la plaque (6) à la température désirée.
9. Attendez environ 30 minutes afin que la bouilloire atteigne la pression
maximum. Une fois qu’elle a atteint 60 psi, l’appareil est maintenant prêt à être
utilisé.
10. REMARQUE : Lorsque vous demandez de la vapeur pour la première fois (après
avoir allumé la bouilloire) vous pourriez remarquer une baisse de pression. Cela
est normal lors de la première utilisation.
11. Le poste à vapeur est maintenant prêt à être utilisé.
12. Appuyez sur le bouton de vapeur ou la pédale pour obtenir de la vapeur.
13. Ce produit de vapeur est muni d’un témoin d’avertissement de bas niveau d’eau
(4) Pendant le fonctionnement, si la lumière s’allume, cela indique que l’appareil
nécessite davantage d’eau pour fonctionner. Si cette situation se produit,
veuillez suivre les étapes suivantes.
a) Fermez l’interrupteur de la bouilloire (3).
b) Appuyez sur le bouton de vapeur ou la pédale pour vous assurer qu’il n’y
a plus de vapeur dans la bouilloire.
c) Ouvrez lentement le bouchon de pression (1) et remplissez au niveau
requis avec de l’eau tiède.
d) Réinstallez le bouchon, serrez et attendez pour l’accumulation de pression.
e) REMARQUE : À défaut d’arrêter la bouilloire lorsque le témoin
d’avertissement est allumé, pourrait endommager l’élément chauffant,
ce qui annulera la garantie.
14. Pour une durée de vie plus longue et une meilleure performance de l’appareil,
nous vous suggérons de rincer (purger) le réservoir une fois par semaine en
utilisant la soupape située sur le côté du four a vapeur. Assurez-vous qu’aucune
vapeur ne sort du gicleur ou du pistolet avant d’ouvrir la soupape. Laissez toute
l’eau sortir du four à vapeur dans la chaudière (non fournie), et fermez ensuite
la soupape.
IMPO RTANT
Lorsque vous avez terminé d’utiliser la bouilloire pour la journée, dévissez le bouchon
de remplissage un – allumez l’appareil pour libérer la vapeur/air du réservoir. Cela
éliminera l’aspiration pouvant causer des dommages à la jauge de pression.
Pour une durée de vie et une performance améliorée, nous vous suggérons de vider
le réservoir de la boulloire une fois par semaine. Cela aidera à empêcher toute
accumulation de sédiments ou minéraux.
22
Page 26

POUR VIDER LE RÉSERVOIR DE LA BOUILLOIRE
(faites attention car l’eau sera très chaude puisque celle-ci s’échappe du réservoir) :
1. Libérez l’excès de vapeur toujours à l’intérieur de la bouilloire après chaque
utilisation (voir item no 13 ci-dessus).
2. Fermez l’interrupteur d’alimentation de vapeur et débranchez la bouilloire.
3. Ouvrez soigneusement le bouchon.
4. Assurez-vous que le tubage de purge transparent a été installé sur la soupape
de décharge (référence de dessin no 10) située sur le côté inférieur droit du
réservoir, et que la purge est effectuée dans un récipient pouvant contenir de
l’eau chaude.
5. Ouvrez la soupape de décharge. Purgez l’eau restante du réservoir de
la bouilloire.
6. Fermez la soupape.
MODE D’EMPLOI POUR L’EAU
Utilisez l’eau du robinet ou un mélange d’eau distillée et du robinet à un mélange
de 50/50. Ne pas utiliser de parfum ou tout autre produit contenant de l’alcool dans
l’appareil.
DESCRIPTION DU 7000IS/2100IR
1. Bouchon de sûreté
2. Interrupteur à vapeur
3. Interrupteur de la bouilloire
4. Témoin lumineux rouge de bas niveau d’eau
5. Cordon électrique et prise
6. Bouton de réglage de la vapeur
7. Connecteur femelle à 4 broches
8. Raccord rapide pour tuyau à vapeur
9. Fer à vapeur (2100IR/120V)
10. Robinet d’extraction
12. Jauge à pression
13. Interrupteur du fer à vapeur
14. Bouton de réglage de la température (2100IR)
232425
Page 27

Page 28

DESCRIPTION DU 7500IS
Photo 1. Modèle 7500IS Photo 1. Modèle 7500IS, 2100IR et 1800IA
1. Bouchon de sûreté
2. Interrupteur à vapeur
3. Interrupteur de la bouilloire
4. Témoin lumineux rouge de bas niveau d’eau
5. Cordon électrique et prise
6. Bouton de réglage de la vapeur
7. Prise Connecteur femelle à 4 broches
8. Raccord rapide pour tuyau à vapeur
9. Fer à vapeur (2100IR/120V)
10. Robinet d’extraction
11. Brosse à vapeur 1800IA (1800IA/120V)
12. Jauge à pression
13. Interrupteur du fer à vapeur
14. Bouton de réglage de la température (2100IR/120V)
Page 29

DESCRIPTION DU 7000CJ/7000CD
1. Bouchon de sûreté
2. Interrupteur à vapeur
3. Interrupteur de la bouilloire
4. Témoin lumineux rouge de bas niveau d’eau
5. Cordon électrique et prise
6. Bouton de réglage de la vapeur
7. Prise Connecteur femelle à 4 broches
8. Gicleur à vapeur ajustable (7000CJ, 7500CD)
9. Bec à vapeur (7000CJ, 7000CD, 7500CD)
10. Robinet d’extraction
11. Pédale (7000CJ, 7500CD)
12. Jauge à pression
13. Pistolet à vapeur 1700DA (7000CD, 7500CD)
14. Interrupteur du bec à vapeur (7000CD, 7500CD)
26
Page 30

27
Page 31

DESCRIPTION DU 7500CD
1. Bouchon de sûreté
2. Interrupteur à vapeur
3. Interrupteur de la bouilloire
4. Témoin lumineux rouge de bas niveau d’eau
5. Cordon électrique et prise
6. Bouton de réglage de la vapeur
7. Prise Connecteur femelle à 4 broches
8. Gicleur à vapeur ajustable (7000CJ, 7500CD)
9. Bec à vapeur (7000CJ, 7000CD, 7500CD)
10. Robinet d’extraction
11. Pédale (7000CJ, 7500CD)
12. Jauge à pression
13. Pistolet à vapeur 1700DA (7000CD, 7500CD)
14. Interrupteur du bec à vapeur (7000CD, 7500CD)
28
Page 32

DÉPANNAGE
PROBLÈME
La vapeur provenant du fer
est trop humide.
L’eau sort de la bouilloire.
Aucune vapeur ne sort du fer,
du gicleur ou du pistolet.
La vapeur est sale.
CAUSES POSSIBLES
1. Pendant le remplissage du
réservoir, vous pourriez y
avoir mis trop d’eau.
2. La plaque d’assemblage
du fer ne devient pas
suffisamment chaude.
1. Il pourrait y avoir une fuite
dans le joint d’étanchéité
de l’élément chauffant.
1. Le bouton de vapeur pourrait
être fermé
2. L’interrupteur du fer à
repasser pourrait être fermé
3. La pédale n’est pas
branchée (7000CJ)
4. L’interrupteur de la bouilloire
pourrait être fermé
5. Si le témoin lumineux de bas
niveau d’eau est allumé, l’eau
dans le réservoir est à un bas
niveau ou vide.
1. Lorsque vous utilisez la
semelle de fer à repasser, si
vous ne la nettoyez pas, le
calcium se formera entre la
semelle et la base du fer.
SOLUTION
1. Le problème continuera
jusqu’à ce que toute l’eau
soit vidée. Continuez
d’appuyer sur le bouton à
vapeur jusqu’à ce que l’eau
du réservoir soit au bon
niveau.
2. Veuillez vous assurer que le
bouton de température est à
la bonne position. Si ce n’est
pas le cas, augmentez la
température du fer.
1. Contactez le service
technique car, dans la
plupart des cas, le joint
d’étanchéité nécessitera
un remplacement.
1. Ouvrez le bouton de vapeur
dans le sens contraire des
aiguilles d’une montre.
2. Après la mise en marche du
fer, attendez 4 minutes que
la plaque du fer devienne
chaude.
3. Branchez le connecteur à 4
broches dans la bouilloire.
4. Après la mise en marche
de la bouilloire, attendez 10
minutes afin que la bouilloire
produise de la vapeur.
5. Remplissez la bouilloire
soigneusement en suivant les
directives.
1. Retirez et rincez la semelle
de fer à repasser sur une
base régulière (mensuellement) pour éviter toute
accumulation d’écaille.
29
Page 33

POLITIQUE DE GARANTIE À VIE DES
RÉSERVOIRS DE CHAUFFE-EAU SOUS
PRESSION DE RELIABLE CORPORATION
Reliable Corporation (« Reliable ») garantit à l'acheteur original du chauffe-eau susmentionné
de Reliable (le « réservoir de chauffe-eau Reliable ») qu'il sera exempt de tout défaut de
fabrication et de main d'œuvre dans le cadre d'une utilisation normale par l'acheteur original
uniquement. Si un remplacement du réservoir de chauffe-eau Reliable s'avérait nécessaire,
Reliable y procédera sans aucun frais de pièces ni de main d'œuvre pour l'acheteur original, à
l'exclusion des frais d'expédition.
Soumis aux conditions et limitations établies ci-après, Reliable réparera ou remplacera toute
pièce d'un réservoir de chauffe-eau Reliable qui s'avère défectueux en raison d'un défaut de
fabrication ou de matériaux défectueux. Si le réservoir de chauffe-eau Reliable défectueux n'est
plus disponible et ne peut pas être réparé efficacement ou remplacé par un modèle identique,
Reliable remplacera le réservoir de chauffe-eau Reliable défectueux par un réservoir de chauffeeau Reliable actuel de valeur équivalente ou supérieure. Les pièces réparées ou les produits
remplacés seront fournis par Reliable sur la base d'un échange, et seront soit neufs ou remis
à neuf pour être fonctionnellement équivalents aux neufs. Si Reliable n'est pas en mesure de
réparer ou de remplacer un réservoir de chauffe-eau Reliable, elle remboursera la valeur actuelle
dudit réservoir de chauffe-eau Reliable au moment où la réclamation de garantie est réalisée.
Cette garantie limitée ne couvre aucun dommage subi par un réservoir de chauffe-eau Reliable
résultant d'une installation incorrecte, d'un accident, d'un abus, d'une mauvaise utilisation,
d'une utilisation déraisonnable, d'une catastrophe naturelle, d'une alimentation électrique
insuffisante ou excessive, de conditions mécaniques ou environnementales anormales, ou de
tout démontage, réparation ou modification non autorisé. Cette garantie limitée ne s'étend à
aucun dommage indirect ou direct dont peut être victime un utilisateur suite à l'utilisation d'un
réservoir de chauffe-eau Reliable, y compris mais sans s'y limiter, toute responsabilité pour des
réclamations de tiers pour des dégâts, et se limite au montant payé par l'acheteur original du
réservoir de chauffe-eau auquel cette protection de garantie limitée s'applique. Cette garantie
limitée ne s'applique pas aux produits qui ont été modifiés ou dont les numéros de séries sont
manquants, ou aux produits non achetés directement auprès de Reliable ou d'un revendeur
agréé par Reliable pour vendre des réservoirs de chauffe-eau Reliable.
Cette garantie limitée est l'unique garantie qui s'applique au réservoir de chauffe-eau Reliable,
elle remplace toutes conditions qui peuvent être contenues dans un autre document ou bon de
commande et ne peut être transformée ou modifiée, sauf dérogation expressément écrite de
Reliable.
Pour obtenir une réparation ou un remplacement en vertu des conditions de cette garantie,
veuillez contacter notre service à la clientèle au 1 800 268 1649 ou par courriel à support@
reliablecorporation.com. Il vous sera demandé d'envoyer le reçu original par fax ou courriel. Le
reçu doit prouver que vous êtes l'acheteur original, que le produit a été acheté directement chez
Reliable ou chez un revendeur agréé par Reliable et que la réclamation de garantie est effectuée
conformément aux conditions définies dans le présent document ou tout document subséquent
publié par Reliable en rapport avec la présente garantie. Un numéro d'autorisation de retour (Nº
AR) vous sera donné et il vous sera demandé d'expédier le produit défectueux accompagné de la
preuve d'achat et du Nº AR, les frais d'assurances étant prépayés à l'adresse suivante : Reliable
Corporation, 5–100 Wingold Ave, Toronto, ON M6B 4K7.
Les expéditions avec fret à destination seront refusées. Le risque de perte ou
d'endommagement lors du transport sera assumé par le client. Une fois que Reliable aura reçu le
produit défectueux, elle initiera la réparation ou le remplacement.
30
Page 34

GARANTIE DES PRODUITS RELIABLE
Reliable Corporation (« Reliable ») garantit à l'acheteur original de ce produit que chaque produit
vendu par Reliable (un « Produit Reliable ») est exempt de tout défaut de pièce et de main d'œuvre
pour une période d'un an à compter de la date d'achat, s'il est utilisé et entretenu correctement.
Sous réserve des conditions et des restrictions énoncées ci-dessous, Reliable réparera ou remplacera
toute pièce d'un produit Reliable qui s'avère défectueuse en raison d'un défaut de fabrication ou de
matériaux défectueux. Si le Produit Reliable défectueux n'est plus disponible et ne peut pas être
réparé efficacement ou remplacé par un modèle identique, Reliable remplacera le Produit Reliable
défectueux par un Produit Reliable actuel de valeur équivalente ou supérieure. Les pièces réparées
ou les produits remplacés seront fournis par Reliable sur la base d'un échange, et seront soit neufs
ou remis à neuf pour être fonctionnellement équivalents aux neufs. Si Reliable n'est pas en mesure de
réparer ou de remplacer le Produit Reliable, elle remboursera la valeur actuelle du Produit Reliable au
moment où la réclamation de garantie est réalisée.
Cette garantie limitée ne couvre aucun dommage subi par un Produit Reliable résultant d'une
installation incorrecte, d'un accident, d'un abus, d'une mauvaise utilisation, d'une catastrophe
naturelle, d'une alimentation électrique insuffisante ou excessive, de conditions mécaniques ou
environnementales anormales, de l'usure et de la détérioration résultant de l'usure normale du
produit, ou de tout démontage, réparation ou modification non autorisés. Cette garantie limitée ne
couvre pas les dommages directs, indirects ou consécutifs dont peut être victime un utilisateur ou
suite à l'utilisation d'un Produit Reliable, y compris mais sans s'y limiter, toute responsabilité pour des
réclamations de tiers pour des dégâts, et se limite au montant payé par l'acheteur original du Produit
Reliable auquel cette protection de garantie limitée s'applique. Cette garantie limitée ne s'applique pas
aux produits qui ont été modifiés ou dont les numéros de séries sont manquants, ou aux produits non
achetés directement auprès de Reliable ou d'un revendeur agréé pour vendre des Produits Reliable.
Cette garantie limitée est l'unique garantie qui s'applique à tout Produit Reliable, elle remplace toutes
conditions qui peuvent être contenues dans un autre document ou bon de commande et ne peut être
transformée ou modifiée, sauf dérogation expressément écrite de Reliable.
Pour obtenir une réparation ou un remplacement en vertu des conditions de cette garantie,
veuillez contacter notre service à la clientèle au 1-800-268-1649 ou par courriel à support@
reliablecorporation.com. Il vous sera demandé d'envoyer le reçu original par fax ou courriel. Le reçu
doit prouver que vous êtes l'acheteur original, que le produit a été acheté directement chez nous
ou chez un revendeur agréé par Reliable et que la réclamation de garantie est effectuée pendant
la période de garantie. Un numéro d'autorisation de retour (Nº AR) vous sera donné et il vous sera
demandé d'expédier le produit défectueux accompagné de la preuve d'achat et du Nº AR, les frais
d'assurances étant prépayés à l'adresse suivante :
Reliable Corporation, 5-100 Wingold Avenue, Toronto, ON M6B 4K7. Les expéditions avec fret à
destination seront refusées. Le risque de perte ou d'endommagement lors du transport sera assumé
par le client. Une fois que Reliable aura reçu le produit défectueux, elle initiera la réparation ou le
remplacement.
Si vous avez des questions concernant la présente garantie, vous pouvez écrire à :
Reliable Corporation
100 Wingold Avenue, Unit 5
Toronto, Ontario
Canada M6B 4K7
www.reliablecorporation.com
31
Page 35

32
Page 36

EL 7000IS
PRODUCTOS PROFESIONALES
DE VAPOR
MANUAL DE INSTRUCCIONES
ESPAÑOL
33
Page 37

RELIABLE. JUNTO A USTED.
En Reliable, hacemos lo que nos encanta hacer y nos enorgullecemos de hacerlo bien. Quiere lo mejor para las personas, los lugares
y las cosas que importan en la vida: desde dónde vive a la ropa que
viste. Nosotros también. Desde el inicio, abordamos cada producto
con la atención al detalle de un artesano y la pasión por hacerlo
bien. La calidad, la funcionalidad, el diseño y el servicio al consumidor son igual de importantes para ofrecerle algo adecuado para
usted. Con su estructura de acero inoxidable y sus componentes de
calidad profesional, la 7000 le permitirá obtener los beneficios de
un planchado o un lavado al vapor de tipo profesional, en un formato compacto y conveniente.
Por su seguridad y para disfrutar al máximo las ventajas de este
producto, tómese unos minutos para leer todas las precauciones
importantes e instrucciones de cuidado. Conserve este manual a
mano y lea la garantía del producto para su referencia.
34
Page 38

INSTRUCCIONES IMPORTANTES DE
SEGURIDAD – CONSERVE ESTAS
INSTRUCCIONES EN UN LUGAR SEGURO
PARA FUTURA REFERENCIA
LEA COMPLETAMENTE LAS INSTRUCCIONES ANTES DE UTILIZARLO
Siempre debe seguir algunas precauciones básicas de seguridad al utilizar su
estación de vapor Reliable™. Lea cuidadosamente las siguientes instrucciones ya
que le proporcionan información importante con respecto a cómo instalar, usar y
cuidar de este producto.
1. Para protegerse contra el riesgo de sufrir una descarga eléctrica, no sumerja
este artefacto en agua.
2. No deje que el cable entre en contacto con superficies calientes.
3. Siempre permita que el artefacto se enfríe durante al menos treinta minutos
antes de guardarlo.
4. Siempre coloque el artefacto en un lugar seguro sobre una mesa o una mesada
cuando lo utiliza.
5. No mueva el artefacto sin desenchufarlo previamente.
6. Siempre desconecte el artefacto del tomacorriente antes de colocarle o quitarle
el agua. Tenga la precaución de no derramar agua sobre el artefacto cuando lo
llena.
7. Use agua del grifo o 50% agua del grifo y 50% agua destilada en este artefacto.
No utilice perfume ni productos que contengan alcohol en el artefacto.
8. Siempre desenchufe el artefacto cuando no lo utilice.
9. No use el artefacto si el cable está dañado. Devuelva el artefacto o haga
reparar el cable por el fabricante o su agente de reparaciones.
10. No utilice el artefacto si se ha caído o dañado. No desarme el artefacto. Un
armado incorrecto puede provocar el riesgo de una descarga eléctrica. Envíelo
a un centro de servicio técnico autorizado para que lo reparen.
11. No utilice otro artefacto de alto consumo en el mismo circuito.
12. Este artefacto debe ser conectado a tierra. No modifique el cable ni intente
remover este dispositivo.
13. Tenga precaución. El tocar partes metálicas calientes o vapor puede causar
quemaduras.
14. Este artefacto no debe ser utilizado por los niños.
15. Mientras use el artefacto, nunca desenrosque o saque la tapa (1) mientras la
caldera esté con presión.
35
Page 39

16. Antes de sacar la tapa, verifique que no haya más vapor en la cámara de vapor
colocando la llave de la caldera (4) en la posición de apagado y presionando el
botón de planchado con vapor (7) para liberar todo el vapor que haya quedado.
17. Para garantizar su seguridad, la tapa de seguridad (1) y todos los demás
componentes deben ser reemplazados por partes originales únicamente.
FUNCIONES
• Indicador de bajo nivel de agua
• Agua común del grifo o 50% agua del grifo y 50% agua destilada
• Hasta 70 psi de presión de funcionamiento
• Bloque de terminales cerámico
• Control de presión Ranco
• Cableado industrial calibre 12
• Hasta 8 horas de vapor
PLANCHADO
• Su nueva estación de planchado brinda resultados limpios y profesionales cada
vez que se la usa
• La base de plancha profesional está hecha con aluminio duradero y de
calentamiento rápido
• Cubierta exterior hecha de acero inoxidable para mayor durabilidad
• Termostato ajustable que permite ajustar la temperatura con precisión
• Plancha con mango de corcho que es cómodo y se mantiene frío
LIMPIEZA A VAPOR
• Boquilla de vapor ajustable con pedal de control (7000IS)
• Pistola de vapor (1700B)
• Boquilla de vapor ajustable con pedal de control y pistola de vapor (7500CD)
IMPORTANTE: Cuando desee desechar el artefacto, NUNCA lo arroje a la basura.
En su lugar, diríjase a la estación de reciclado o al centro de recolección de residuos mas cercano para su posterior tratamiento. De este modo, estará contribuyendo
con la protección del medio ambiente.
36
Page 40

DATOS TÉCNICOS
• Voltaje de operación: 120V (7000CJ, 7000CD, 7500CD), 120V (7500IS)
• Capacidad nominal del tanque: 9 Litros
• Potencia de la caldera: 1 elemento calefactor de 1200W (7000IS, 7000CJ,
7000CD+7500CD)
• 2 elementos calefactores de 800W (7500IS)
• Consumo de energía: 20 amps (7000IS), 15 amps (7000CJ, 7000CD- 7500CD)
• Presión de funcionamiento: 3,5 Bar/4 Bar
• Presión máxima: 5,5 Bar
CÓMO ARMARLA Y USARLA
1. Saque la estación de vapor de su caja y verifique que haya sacado todo el
material de empaque (incluyendo las bolsas protectoras). Coloque la estación
sobre una superficie plana y sólida.
2. Su caldera viene con una tapa de seguridad en la válvula de purgado (lado
derecho del tanque) así como también con una manguera de plástico y un
adaptador para fijarla. Saque la tapa de seguridad e instale esta manguera
con el adaptador. Esto le permitirá seguir el procedimiento correcto de
limpieza (refiérase al paso #14). Si tiene algún problema con la válvula de
purgado (pérdida) puede usar la tapa de seguridad para evitar que pierda
agua hasta que haga reemplazar la válvula.
3. A) 7000IS – 7500IS – Le recomendamos poner la plancha en su base de
apoyo (incluida) ya que soportará la temperatura de la plancha. B) 7000CJ –
7500CD – Atornille la boquilla en el adaptador de vapor y enchufe el conector
de 4 vías para el pedal electrónico. C) 7000CD – 7500CD – 7500IS – Conecte
la pistola de vapor o el cepillo de vapor de la misma forma usando el conector
rápido para la manguera de vapor.
4. Inserte la varilla de 2 piezas (2) dentro de la pestaña en la parte superior
de la caldera, ajústela con el tornillo del costado y enganche el resorte de la
manguera de la plancha al extremo de la bobina de la varilla (únicamente para
los modelos 7000IS, 7500IS, 7000CD e 7500CD).
5. Antes de iniciar cualquier operación, verifique que la válvula de escape (10)
esté cerrada y que la manguera de drenaje esté instalada (refiérase al
paso #12).
6. Desenrosque la tapa de seguridad (1). Llene la caldera con un máximo de
1,85 galones (7 litros) de agua para la serie 7000IS. Use el embudo incluido,
asegurándose de no llenar de más el tanque.
7. Inserte el enchufe en un tomacorriente; encienda la caldera (3) y el botón de
vapor (2). Cuando las luces de los dos botones sen enciendan, el dispositivo
de vapor y la caldera estarán funcionando.
37
Page 41

8. Para el sistema de planchado 7000IS, gire la perilla de ajuste de temperatura
de la plancha (6) a la temperatura deseada.
9. Espere unos 30 minutos para que la caldera alcance su presión máxima. Una
vez que llegue a los 60 psi, la unidad estará lista para usarse.
10. NOTA: Cuando use el vapor por primera vez (luego de haber encendido la
caldera) puede notar un rápido aumento en la presión. Esto es normal la
primera vez.
11. La estación de vapor está lista para ser usada.
12. Presione el botón de vapor o el pedal de control para obtener vapor.
13. Este producto viene equipado con una luz de advertencia de bajo nivel de
agua (4). Durante el uso, si se enciende esta luz, indica que la unidad necesita
más agua para seguir funcionando. Si pasa esto, haga lo siguiente.
a) Apague la llave de la caldera (3).
b) Presione el botón de vapor de la plancha o el pedal de control para
asegurar que no quede nada de vapor en la caldera.
c) Abra lentamente la tapa de presión (1) y llénela hasta el nivel necesario
con agua tibia.
d) Vuelva a colocar la tapa, ajústela y espere a que vuelva a levantar
presión.
e) NOTA: El no apagar la caldera cuando se enciende la luz de advertencia
puede llegar a dañar el elemento calefactor, lo que anularía la garantía.
14. Para obtener una vida más larga y un mejor rendimiento de la máquina, le
sugerimos enjuagar (purgar) el tanque una vez por semana usando la válvula
del costado del vaporizador. Verifique que no salga más vapor por la boquilla
o la pistola antes de abrir la válvula. Deje que todo el agua fluya hacia afuera
del vaporizador hacia un recipiente (no incluido) y luego cierre la válvula.
IMPORTANTE
Cuando termine de usar la caldera, desenrosque una vuelta de la tapa de llenado
de la unidad para liberar el vapor/aire del tanque. Esto eliminará el vacío que podría
dañar el medidor de presión.
Para una vida útil más larga y un mayor rendimiento de la máquina, le sugerimos
que enjuague el tanque de la caldera una vez por semana. El enjuagar el tanque
ayudará a disminuir la acumulación de sedimento/minerales que pudiera ocurrir.
38
Page 42

PARA ENJUAGAR EL TANQUE DE LA CALDERA
(tenga cuidado ya que el agua estará muy caliente al salir del tanque):
1. Libere el exceso de vapor que quede dentro de la caldera cuando termine
de usarla (vea el paso 13 de arriba).
2. Apague el interruptor del vapor y desenchufe la caldera.
3. Abra la tapa del filtro con mucho cuidado.
4. Verifique que la manguera transparente de drenaje esté instalada en la
válvula de purgado (dibujo de referencia #10) ubicada en la parte inferior
derecha del tanque, y que la manguera esté drenando en algo que pueda contener el agua.
5. Abra la válvula de drenaje. Drene el resto del agua del tanque de la caldera.
6. Cierre la válvula.
INSTRUCCIONES DEL AGUA
Use agua del grifo o 50% agua del grifo y 50% agua destilada en este artefacto.
No utilice perfume ni productos que contengan alcohol en el artefacto.
DESCRIPCIÓN DE LA 7000IS/2100IR
1. Tapa de seguridad
2. Llave de vapor
3. Llave de la caldera
4. Luz roja piloto de bajo nivel de agua
5. Enchufe y cable de alimentación
6. Perilla de regulación de vapor
7. Conector hembra de 4 vías
8. Conector rápido para manguera de vapor
9. Plancha a vapor (2100IR/120V)
10. Válvula de purgado
12. Indicador de presión
13. Llave de vapor de la plancha
14. Perilla de ajuste de temperatura (2100IR)
39
Page 43

40
Page 44

DESCRIPCIÓN DE LA 7500IS
Foto 1. Modelo 7500IS Foto 1. Modelo 7500IS + 2100IR + 1800IA
1. Tapa de seguridad
2. Llave de vapor
3. Llave de la caldera
4. Luz roja piloto de bajo nivel de agua
5. Enchufe y cable de alimentación
6. Perilla de regulación de vapor
7. Conector hembra de 4 vías
8. Conector rápido para manguera de vapor
9. Plancha a vapor (2100IR/120V)
10. Válvula de purgado
11. Cepillo de vapor de la 1800IA (1800IA/120V)
12. Indicador de presión
13. Llave de vapor de la plancha
14. Perilla de ajuste de temperatura (2100IR/120V)
41
Page 45

DESCRIPCIÓN DE LA 7000CJ, 7000CD
1. Tapa de seguridad
2. Llave de vapor
3. Llave de la caldera
4. Luz roja piloto de bajo nivel de agua
5. Enchufe y cable de alimentación
6. Perilla de regulación de vapor
7. Conector hembra de 4 vías
8. Boquilla ajustable de vapor (7000CJ, 7500CD)
9. Punta vaporizadora (7000CJ, 7000CD, 7500CD)
10. Válvula de purgado
11. Pedal de control (7000CJ, 7500CD)
12. Indicador de presión
13. Pistola de vapor de la 1700DA (7000CD, 7500CD)
14. Llave de la pistola de vapor (7000CD, 7500CD)
42
Page 46

43
Page 47

DESCRIPCIÓN DE LA 7500CD
1. Tapa de seguridad
2. Llave de vapor
3. Llave de la caldera
4. Luz roja piloto de bajo nivel de agua
5. Enchufe y cable de alimentación
6. Perilla de regulación de vapor
7. Conector hembra de 4 vías
8. Boquilla ajustable de vapor (7000CJ, 7500CD)
9. Punta vaporizadora (7000CJ, 7000CD, 7500CD)
10. Válvula de escape
11. Pedal de control (7000CJ-7500CD)
12. Indicador de presión
13. Pistola de vapor de la 1700DA (7000CD, 7500CD)
14. Llave de la pistola de vapor (7000CD-7500CD)
44
Page 48

DIAGNÓSTICO DE PROBLEMAS
PROBLEMA
El vapor de la plancha
es demasiado húmedo.
Está saliendo agua de la
caldera.
No sale vapor de la plancha, la
boquilla o la pistola.
POSIBLE CAUSA
1. Puede haber puesto
demasiado agua en el
tanque al llenarlo.
2. La placa base de la plancha
no se calienta lo suficiente.
1. Puede haber una pérdida
en el sello del elemento
calefactor.
1. La perilla del vapor puede
estar cerrada
2. La llave de la plancha puede
estar apagada
3. El pedal de control no está
enchufado (7000CJ)
4. La llave de la caldera puede
estar apagada
5. Si la luz de bajo nivel de
agua está encendida, el
tanque tiene poco agua o
está vacío.
SOLUCIÓN
1. El problema persistirá
hasta que se elimine el
exceso de agua. Mantenga
presionado el botón del
vapor hasta que el agua
del tanque llegue al nivel
correcto.
2. Verifique que la perilla
de temperatura esté en
la posición correcta, si
no lo está, aumente la
temperatura de la plancha.
1. Llame al soporte técnico
ya que en la mayoría de los
casos deberá reemplazar
el sello.
1. Abra la perilla de vapor en
sentido antihorario.
2. Después de que se encienda la llave de la plancha,
espere unos 4 minutos
para que se caliente la
base de la plancha.
3. Enchufe el conector de 4
vías en la caldera.
4. Después de que se encienda la llave de la caldera,
espere unos 10 minutos
para que la caldera genere
vapor.
5. Vuelva a llenar la caldera
con cuidado, siguiendo las
instrucciones.
El vapor está sucio.
45
1. Al usar la plancha con una
base para plancha, si no
la limpia regularmente, se
acumulará calcio entre la
base y la plancha.
1. Saque y enjuague la base
de la plancha de forma
regular (una vez por mes)
para evitar que se acumule
sarro.
Page 49

RELIABLE CORPORATION – GARANTÍA DEL
PRODUCTO DE POR VIDA – PÓLIZA PARA
CALDERAS PRESURIZADAS A VAPOR
Reliable Corporation (“Reliable”) garantiza al comprador original de la caldera descrita arriba
vendida por Reliable (la “Caldera Reliable”) que se encuentra libre de defectos de material
y mano de obra si es utilizada correctamente solo por el comprador original. Si la Caldera
Reliable necesitara algún cambio, Reliable no le cobrará al comprador original el costo de las
piezas y la mano de obra, excepto el envío.
Conforme a las condiciones y limitaciones establecidas a continuación, Reliable reparará o
cambiará la pieza de la Caldera Reliable que demuestre estar defectuosa a causa de material o
fabricación inadecuadas. Si la Caldera Reliable defectuosa deja de estar disponible y no puede
ser reparada con eficacia o reemplazada por un modelo idéntico, Reliable cambiará la Caldera
Reliable defectuosa por otra Caldera Reliable vigente de igual o mayor valor. Las piezas de
recambio o repuestos serán suministrados por Reliable a cambio de las piezas originales, y
serán piezas nuevas o piezas que estarán reacondicionadas para convertirse en productos
funcionalmente equivalentes a piezas nuevas. Si Reliable no puede reparar o reemplazar una
Caldera Reliable, la compañía reembolsará el valor de la Caldera Reliable que esté vigente al
momento de reclamar la garantía.
Esta garantía limitada no cubre los daños que sufra una Caldera Reliable como resultado de
una instalación inadecuada, accidente, abuso, uso incorrecto o irrazonable, desastre natural,
suministro de energía eléctrica insuficiente o excesivo, condiciones mecánicas o ambientales
anormales, o cualquier desarme, reparación o modificación no autorizada. Esta garantía limitada
no se extiende a ningún daño indirecto, resultante o accidental que el usuario pueda sufrir por
el uso de una Caldera Reliable, incluyendo, entre otros, la responsabilidad ante los reclamos
presentados por terceros; y se limita al monto pagado por el comprador original de la Caldera
Reliable respecto del cual tiene aplicación esta protección de garantía limitada. Esta garantía
limitada no es válida para los productos que hayan sido modificados o que no tengan número de
serie, o para los productos que no hayan sido comprados directamente a Reliable o a través de
un vendedor autorizado por Reliable para comerciar la Caldera Reliable.
Esta garantía limitada es la única garantía que se aplica a la Caldera Reliable, reemplaza todos
los términos que puedan estar contenidos en cualquier otro documento u orden de compra, y no
puede ser alterada o modificada, excepto que Reliable así lo haya autorizado expresamente por
escrito.
Para obtener la reparación o cambio según los términos de esta garantía, comuníquese con
nuestro grupo de servicio al cliente al 1 800 268 1649 o escriba a support@reliablecorporation.
com. Usted deberá presentar, por fax o correo electrónico, el comprobante original. Este
comprobante debe demostrar que usted es el comprador original, que el producto fue
adquirido directamente de nuestras oficinas o de un vendedor de Reliable autorizado y que el
reclamo de la garantía se realiza dentro del período establecido en este documento o en un
documento posterior emitido por Reliable en relación con esta póliza. Usted recibirá un número
de autorización (RA#) y deberá enviar el producto defectuoso, junto con el comprobante
de compra, el RA# y los seguros pagados por adelantado, a la siguiente dirección: Reliable
Corporation, 5-100 Wingold Ave, Toronto, ON M6B 4K7.
Los costos de envío por cobrar serán rechazados. El riesgo de sufrir una pérdida o daño en
tránsito será asumido por el cliente. Una vez que Reliable reciba el producto defectuoso, la
compañía iniciará el proceso de reparación o cambio.
46
Page 50

GARANTÍA DE LOS PRODUCTOS RELIABLE
Reliable Corporation (“Reliable”) garantiza al comprador original de sus productos que todas las
unidades vendidas por Reliable (un “Producto Reliable”) se encuentran libres de defectos de material
y de mano de obra durante el período de un año a partir de la fecha de compra, si son utilizadas
correctamente y han recibido el mantenimiento adecuado. En virtud de las condiciones y limitaciones
establecidas a continuación, Reliable reparará o reemplazará la pieza de un Producto Reliable que
demuestre estar defectuosa a causa de material o fabricación inadecuadas. Si el Producto Reliable
defectuoso deja de estar disponible y no puede ser reparado efectivamente o reemplazado por un
modelo idéntico, Reliable cambiará el Producto Reliable defectuoso por un Producto Reliable vigente
de igual o mayor valor. Las piezas de recambio o repuestos serán suministrados por Reliable a cambio
de las piezas originales, y serán piezas nuevas o piezas que estarán reacondicionadas para convertirse
en productos funcionalmente equivalentes a piezas nuevas. Si Reliable no puede reparar o reemplazar
un Producto Reliable, la compañía reembolsará el valor del Producto Reliable que esté vigente al
momento de reclamar la garantía.
Esta garantía limitada no cubre los daños que sufra un Producto Reliable como resultado de una
instalación inadecuada, accidente, abuso, uso incorrecto, desastre natural, suministro de energía
eléctrica insuficiente o excesivo, condiciones mecánicas o ambientales anormales, desgaste provocado
por el uso normal del producto, o cualquier desarme, reparación o modificación no autorizada. Esta
garantía limitada no se extiende a ningún daño indirecto, resultante o accidental que el usuario pueda
sufrir o que pueda causar el uso de un Producto Reliable, incluyendo, entre otros, la responsabilidad
ante los reclamos presentados por terceros; y se limita al monto pagado por el comprador original
del Producto Reliable respecto del cual tiene aplicación esta protección de garantía limitada. Esta
garantía limitada no es válida para los productos que hayan sido modificados o que no tengan número
de serie, o para los productos que no hayan sido comprados directamente a Reliable o a través de un
vendedor certificado que cuente con nuestra autorización para comerciar los Productos Reliable.
Esta garantía limitada es la única garantía que tiene aplicación a todos los Productos Reliable,
reemplaza todos los términos que puedan estar contenidos en cualquier otro documento u orden
de compra, y no puede ser alterada o modificada excepto que Reliable así lo haya autorizado
expresamente por escrito.
Para obtener una reparación o un reemplazo bajo los términos de esta garantía, póngase en
contacto con nuestro grupo de servicio al cliente llamando al 1-800-268-1649 o escriba a support@
reliablecorporation.com. Se le pedirá que mande un recibo original por fax o por correo electrónico.
Este comprobante debe demostrar que usted es el comprador original, que el producto fue adquirido
directamente de nuestras oficinas o de un vendedor de Reliable autorizado y que el reclamo de la
garantía se realiza dentro del período correspondiente. Usted recibirá un número de autorización
(RA#) y deberá enviar el producto defectuoso, junto con el comprobante de compra, el RA# y los
seguros pagados por adelantado, a la siguiente dirección:
Reliable Corporation, 5-100 Wingold Avenue, Toronto, ON M6B 4K7. Los costos de envío por cobrar
serán rechazados. El riesgo de sufrir una pérdida o daño en tránsito será asumido
por el cliente. Una vez que Reliable reciba el producto defectuoso, la compañía iniciará el proceso de
reparación o reemplazo.
Si tiene preguntas sobre esta garantía, puede escribir a la siguiente dirección:
Reliable Corporation
100 Wingold Avenue, Unit 5
Toronto, Ontario
Canada M6B 4K7
www.reliablecorporation.com
47
Page 51

Page 52

1 800 268 1649
www.reliablecorporation.com
 Loading...