

Page 1
SEWQUIET
6000SM
INDUS TRIAL DC BRUSH LESS SERVOMOTOR
SERVOMOT EUR INDUSTRI EL À COURANT CONTI NU SANS BALAI
SERVOMOTO R INDUSTRIAL SI N ESCOBILLA S DE CD
INSTRUCTION MANUAL
GUIDE D’UTILISATION
MANUAL DE INSTRUCCIONES
Page 2

Page 3

ENGLISH 01
FRANÇAIS
ESPAÑOL 15
08
Page 4

SEWQUIET 6000SM
INDUSTRIAL DC BRUSHLESS
SERVOMOTOR
INSTRUCTION MANUAL
ENGLISH
01
Page 5

RELIABLE. RIGHT THERE WITH YOU.
At Reliable, we do what we love, and take pride in doing it right.
You want what’s best for the people, places and things that matter
in your life – from where you live to what you wear. So do we. From
the start, we approach every product with a craftsman’s attention
to detail and passion for making it right. Quality, functionality,
design and customer service play an equally important part in
delivering what’s right for you. Whether you are an advanced
sewer or a beginner, the 6000SM’s microprocessor controller
gives the user an unparalleled connection to the sewing machine,
allowing for speed or detailed work.
For your safety and to fully enjoy the advantages of this product,
please take a few minutes to read all of the important safeguards
and care instructions. Keep this manual handy and review the
product warranty for your reference.
02
Page 6
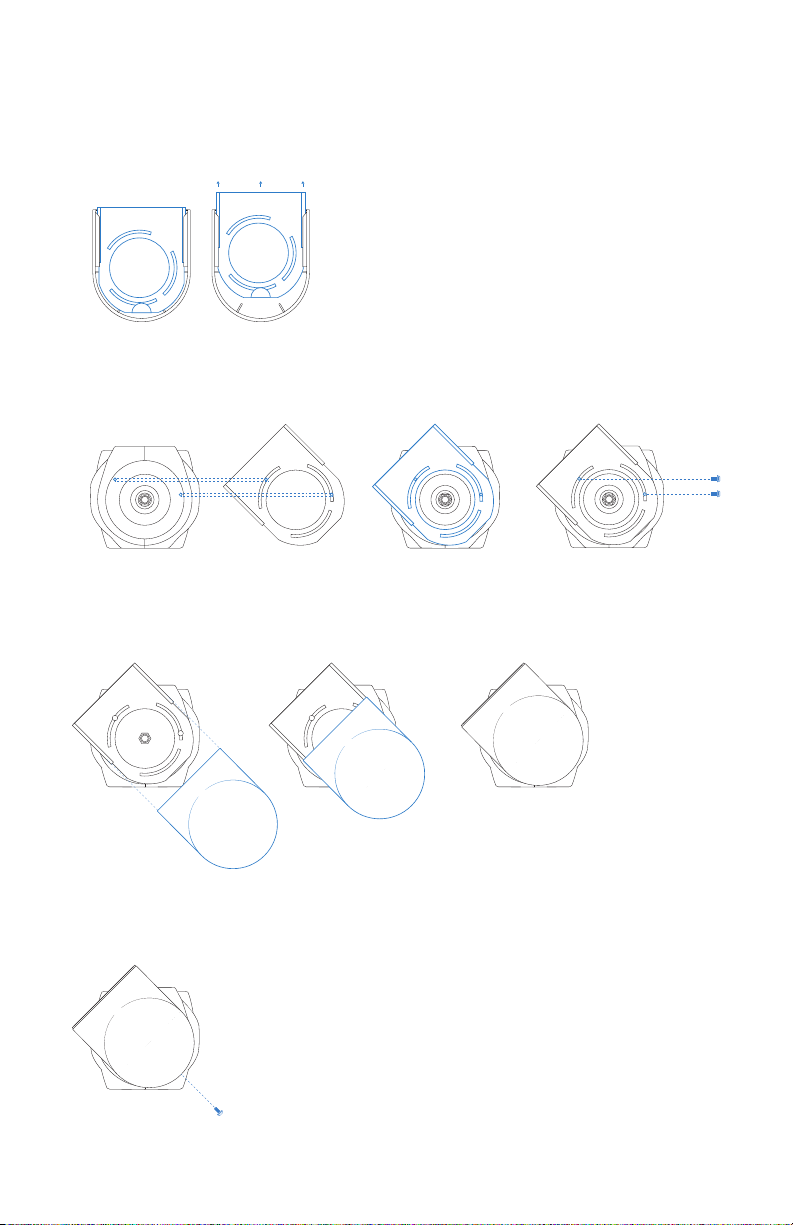
PULLEY COVER INSTALLATION INSTRUCTIONS
1. Slide the pulley cover off of the bracket.
2. Align the bracket to the screw holes on the motor. Place two mounting screws (sup-
plied) onto the bracket and fasten it to the motor. (Required angle indicated).
3. Slide the pulley cover onto the bracket.
4. Fasten the screw on the bottom of the pulley cover to secure it to the bracket.
03
Page 7

PROGRAMMING
MACHINE TYPE
Basic single needle
Basic two needle/needle feed
Walking foot (Except MSK-1541S)
Walking foot auto lubrication
MSK-1541S/4200SW
Sergers – overlock
Blindstitch
Zig-Zag (20U style)
Zig-Zag (High Speed)
Zig-Zag Walking foot
SPEED
SELECTOR
34
22
16
20
29
40
12
16
22
20
PULLEY
SIZE
60MM
60MM
60MM
60MM
60MM
60MM
60MM
60MM
60MM
60MM
APPROX.
SPEED RPM
4500
3000
1500
1720
2160
5260
1200
1650
2000
1925
SPECIFIC
SPEED
5000
3500
1800
2000
2500
6500
2500
2000
3000
2000
In order to prevent possible damage to your machine, if the machine you have
is not on the categories list, please call your dealer to obtain the correct speed
setting and pulley size.
HOW TO CHANGE THE SPEED
• Press the “P” button and the LED will change to n0
• Press the “S” button to change the speed in increments of 100rpm
• Continue to press the “S” button until the desired speed setting is displayed
• Press the “P” button to save the selection
HOW TO CHANGE THE DIRECTION
• Press the “P” button 4 times until the LED reads n3
• Press the “S” button to select between “0” and “1”
• Select “0” and the motor will run counterclockwise
• Select “1” and the motor will run clockwise
• Press the “P” button to save the selection.
04
Page 8

HOW TO ENABLE AND DISABLE THE NEEDLE
POSITIONING FUNCTION
• Press the “P” button 2 times and the LED will change to "n1"
• Press the “S” button to select between “0” and “1”
• Select “0” to disable the needle positioning function
• Select “1” to enable the needle positioning function
• Press the “P” button to save the selection
HOW TO SET THE STOP POSITION OF THE NEEDLE:
This programming should only be used when the OPTIONAL synchronizer is
installed. Order separately.
• Press the “P” button 3 times and the LED will change to "n2"
• Press the “S” button to select between “0” and “1”
• Select “0” and the needle will stop in the down position
• Select “1” and the needle will stop in the up position
• Press the “P” button to save the selection
SETTING THE “F” MODE N5 TO N6
STEP 1:
• First, press and hold the “S” button. Then press and hold the “P” button. Keep
both buttons pressed until “F” appears on the display.
• When “F” appears, release both buttons and then press the “P” button to
advance to parameter “5”.
• When “5” appears, keep pressing only the “S” button to advance to “0” (low
speed start disabled).
• Press the “P” button to save the value.
STEP 2:
• First, press and hold the “S” button. Then press and hold the “P” button and
keep both buttons pressed until “F” appears on the display.
• When “F” appears, release both buttons and then press the “P” button to
advance to parameter “6”.
• When “6” appears, keep pressing the “S” button only to advance to “9” (step
sewing higher value).
• Press the “P” button to save the value.
• Switch the power off and then switch the power back on to complete the
programming.
* Please note: When sewing dense materials (ex. Tooling leather), a size 22 leather
point needle is recommended.
05
Page 9

WHEN THE DISPLAY IS SHOWING E5
• Press and release the "S" button and the display will change to "P"
• Press the "P" button 2 times and the display will changes to "n1"
• Press the "S" button and the display will change to "1"
• Press the "S" button again and the display will change to "0"
• Press the "P" button to save the value
• Turn the power off and then on again to complete the programming.
ERROR CODES
ERROR CODE
E1: Operational failure.
E2: Over current or under voltage.
E3: The board cannot read the
parameter.
E4: Hall signal error.
E5: Needle position problem.
SOLUTION
E1: Machine is locked. Check to see if the
machine is difficult to turn, or if there is a
lack of lubrication.
E2: Check the power source to ensure that
the voltage is within range.
E3: Turn the power off and on twice, and
try again. If the problem still cannot be
solved, contact your dealer.
E4: Replace the main fuse. If the problem
continues to persist, please contact your
dealer.
E5: Check if the synchronizer is connected.
06
Page 10

RELIABLE PRODUCTS WARRANTY
Reliable Corporation (“Reliable”) warrants to original purchaser of its products that
every product sold by Reliable (a “Reliable Product”) is free from defects in material and
workmanship for a period of one year from the date of purchase if properly used and
maintained. Subject to the conditions and limitations set forth below, Reliable will either
repair or replace any part of a Reliable Product that proves defective by reason of improper
workmanship or materials. If the defective Reliable Product is no longer available and
cannot be repaired effectively or replaced with an identical model, Reliable shall replace
the defective Reliable Product with a current Reliable Product of equal or greater value.
Repaired parts or replacement products will be provided by Reliable on an exchange basis,
and will be either new or refurbished to be functionally equivalent to new. If Reliable is
unable to repair or replace a Reliable Product, it will refund the current value of that Reliable
Product at the time the warranty claim is made.
This limited warranty does not cover any damage to a Reliable Product that results from
improper installation, accident, abuse, misuse, natural disaster, insufficient or excessive
electrical supply, abnormal mechanical or envsteamermental conditions, wear and tear
resulting from normal use of the product, or any unauthorized disassembly, repair, or
modification. This limited warranty does not extend to any indirect, consequential or
incidental damages that may be suffered by a user or from the use of a Reliable Product,
including without limitation, any liability for third party claims for damage, and is limited
to the amount paid by the original purchaser Reliable Product with respect to which this
limited warranty protection applies. This limited warranty does not apply with respect to
products that have been altered or which are missing serial numbers or for products not
purchased directly from Reliable or a dealer authorized by us to sell Reliable Products.
This limited warranty is the only warranty that applies to any Reliable Product, supersedes
any and all terms that may be contained in any other document or purchase order and may
not be altered or amended except expressly in writing by Reliable.
To obtain a repair or replacement under the terms of this warranty, please contact our
customer service group at 1-800-268-1649 or at support@reliablecorporation.com.
You will be required to submit an original receipt via fax or e-mail. The receipt must reflect
that you are the original purchaser, the product was bought directly from
us or from an authorized Reliable dealer and that the warranty claim is being made within
the warranty period. You will be issued a return authorization number (RA#) and asked to
ship the defective product together with proof of purchase and RA#, prepaid insured to the
following address:
Reliable Corporation, 5-100 Wingold Avenue, Toronto, ON M6B 4K7. Freight collect
shipments will be refused. The risk of loss or damage in transit will be borne by
the customer. Once Reliable receives the defective product, it will initiate the repair or
replacement process.
If you have any questions regarding this warranty, you may write to:
Reliable Corporation
100 Wingold Avenue, Unit 5
Toronto, Ontario
Canada M6B 4K7
www.reliablecorporation.com
07
Page 11

SEWQUIET 6000SM
SERVOMOTEUR INDUSTRIEL À
COURANT CONTINU SANS BALAI
MANUEL D’INSTRUCTIONS
FRANÇAIS
08
Page 12

RELIABLE. PROCHE DE VOUS.
Chez Reliable, nous faisons ce que nous aimons et sommes fiers de
bien le faire. Vous voulez ce qu’il y a de mieux pour les personnes,
les lieux et les choses importantes de votre vie - depuis l’endroit où
vous vivez jusqu’aux vêtements que vous portez. Nous aussi. Depuis
le début, nous approchons chaque produit avec une attention
aux détails artisanale et la passion de le fabriquer. La qualité, la
fonctionnalité, la conception et le service à la clientèle jouent des
rôles également importants dans notre mission de vous fournir ce
qui vous correspond. Que vous soyez une couturière expérimentée
ou débutante, le régulateur par microprocesseur de la 6000SM
donne à l’utilisateur une connexion incomparable à la machine à
coudre, permettant un travail rapide ou détaillé.
Pour votre sécurité et pour profiter pleinement des avantages de
ce produit, veuillez prendre quelques minutes pour lire toutes les
importantes mises en garde et les directives d’entretien. Gardez
ce manuel et la garantie du produit à portée de main pour vous y
référer ultérieurement.
09
Page 13

INSTALLATION DU CARTER DE COURROIE
1. Faites glisser le carter de courroie hors du support.
2. Alignez le support sur les trous de vis du moteur. Placez deux vis de montage
(fournies) sur le support et fixez-le au moteur. (Angle requis indiqué sur la photo).
3. Faites glisser le carter de courroie dans le support.
4. Serrez la vis située au bas du carter de courroie pour la fixer au support et termi-
nez l’installation.
10
Page 14

PROGRAMMATION
TYPE DE MACHINE
Aiguille simple de base
Deux aiguilles de base/
entrainement par aiguille
Pied portable (sauf MSK-1541S)
Pied portable lubrification
automatique
MSK-1541S/4200SW
Surjeteuses - remailer
Point invisible
Zigzag (style 20U)
Zigzag (haute vitesse)
Pied portable zigzag
SÉLECTEUR
DE VITESSE
34
22
16
20
29
40
12
16
22
20
TAILLE DE
LA POULUIE
60MM
60MM
60MM
60MM
60MM
60MM
60MM
60MM
60MM
60MM
TR/MIN
APPROX.
4500
3000
1500
1720
2160
5260
1200
1650
2000
1925
VITESSE
SPÉCIFIQUE
5000
3500
1800
2000
2500
6500
2500
2000
3000
2000
Afin d’éviter des dommages éventuels à votre machine, si la machine que vous
possédez n’apparaît pas dans la liste des catégories, veuillez appeler votre
revendeur pour obtenir le réglage de vitesse et la taille de poulie appropriés.
COMMENT CHANGER LA VITESSE :
• Appuyez sur la touche « P » et la LED passe à n0
• Appuyez sur la touche « S » pour changer la vitesse par paliers de 100 t/min
• Maintenez la touche « S » enfoncée jusqu’à ce que la vitesse désirée s’affiche
• Appuyez sur la touche « P » pour enregistrer la sélection
COMMENT CHANGER LA DIRECTION :
• Appuyez 4 fois sur la touche « P » jusqu’à ce que la LED affiche n3
• Appuyez sur la touche « S » pour choisir entre « 0 » et « 1 »
• Sélectionnez « 0 » et le moteur tourne dans le sens inverse des aiguilles
d’une montre
• Sélectionnez « 1 » et le moteur tourne dans le sens des aiguilles d’une montre
• Appuyez sur la touche « P » pour enregistrer la sélection
11
Page 15

COMMENT ACTIVER ET DÉSACTIVER LA FONCTION
DE POSITIONNEMENT DE L’AIGUILLE:
• Appuyez 2 fois sur la touche « P » et la LED passe à n1
• Appuyez sur la touche « S » pour choisir entre « 0 » et « 1 »
• Sélectionnez « 0 » pour désactiver la fonction de positionnement de l’aiguille
• Sélectionnez « 1 » pour activer la fonction de positionnement de l’aiguille
• Appuyez sur la touche « P » pour enregistrer la sélection
COMMENT RÉGLER LA POSITION DE L’AIGUILLE:
Cette programmation devrait uniquement être utilisée lorsque le synchroniseur
EN OPTION est installé. À commander séparément.
• Appuyez 3 fois sur la touche « P » et la LED passe à n2
• Appuyez sur la touche « S » pour choisir entre « 0 » et « 1 »
• Sélectionnez « 0 » et l’aiguille s’arrête en position vers le bas
• Sélectionnez « 1 » et l’aiguille s’arrête en position vers le haut
• Appuyez sur la touche « P » pour enregistrer la sélection
RÉGLAGE DU MODE « F » N5 À N6
ÉTAPE 1 :
• D’abord, appuyez et maintenez enfoncée la touche « S ». Puis, appuyez et
maintenez enfoncée la touche « P ». Maintenez les deux touches enfoncées
jusqu’à ce qu’un « F » apparaisse sur l’écran.
• Lorsque le « F » apparaît, relâchez les deux touches puis appuyez sur la touche
« P » pour avancer jusqu’au paramètre « 5 ».
• Lorsque le chiffre « 5 » apparaît, continuez d’appuyer sur la touche « S » pour
avancer jusqu’à « 0 » (désactivation du démarrage à vitesse réduite).
• Appuyez sur la touche « P » pour enregistrer la valeur.
ÉTAPE 2 :
• D’abord, appuyez et maintenez enfoncée la touche « S ». Puis appuyez et
maintenez enfoncée la touche « P » jusqu’à ce qu’un « F » apparaisse sur
l’écran.
• Lorsque le « F » apparaît, relâchez les deux touches puis appuyez sur la touche
« P » pour avancer jusqu’au paramètre « 6 ».
• Lorsque le chiffre « 6 » apparaît, continuez d’appuyer sur la touche « S » pour
avancer jusqu’à « 9 » (la plus haute valeur de couture).
12
Page 16

• Appuyez sur la touche « P » pour enregistrer la valeur.
• Éteignez puis rallumez la machine pour terminer la programmation.
* Veuillez noter : Lorsque vous cousez des tissus denses (par exemple : du cuir à
ciseler), l’utilisation d’une aiguille à pointe effilée 22 pour cuir est recommandée.
LORSQUE L’ÉCRAN AFFICHE E5
• Appuyez et relâchez la touche « S » et l’affichage passera à « P »
• Appuyez 2 fois sur la touche « P » et l’affichage passera à « n1 »
• Appuyez sur la touche « S » et l’affichage passera à « 1 »
• Appuyez à nouveau sur la touche « S » et l’affichage passera à « 0 »
• Appuyez sur la touche « P » pour enregistrer la valeur.
• Éteignez et rallumez l’appareil pour terminer la programmation.
CODES D'ERREUR
CODES D’ERREUR
E1: Défaillance opérationnelle.
E2: Surtension ou sous-tension.
E3: La plaque ne peut pas lire le
paramètre.
E4: Erreur de signal de Hall.
E5: Problème de positionnement
de l’aiguille.
SOLUTION
E1: La machine est verrouillée.Vérifiez si la
machine est difficile à tourner ou s’il y a
un manque de lubrification.
E2: Vérifiez la source électrique pour vous
assurer que la tension se trouve dans la
plage de variation.
E3: Éteignez et rallumez l’appareil deux-
fois, et réessayez. Si le problème n’est
toujours pas résolu, contactez votre
revendeur.
E4: Remplacer le fusible principal. Si le pro-
blème persiste, veuillez contacter votre
revendeur.
E5: Vérifiez si le synchroniseur est connecté.
13
Page 17

GARANTIE DES PRODUITS RELIABLE
Reliable Corporation (« Reliable ») garantit à l'acheteur original de ce produit que chaque
produit vendu par Reliable (un « Produit Reliable ») est exempt de tout défaut de pièce et
de main d'œuvre pour une période d'un an à compter de la date d'achat, s'il est utilisé et
entretenu correctement. Soumis aux conditions et limitations établies ci-après, Reliable
réparera ou remplacera toute pièce d'un produit Reliable qui s'avère défectueuse en raison
d'un défaut de fabrication ou de main d'œuvre. Si le Produit Reliable défectueux n'est plus
disponible et ne peut pas être réparé efficacement ou remplacé par un modèle identique,
Reliable remplacera le Produit Reliable défectueux par un Produit Reliable actuel de
valeur équivalente ou supérieure. Les pièces réparées ou les produits remplacés seront
fournis par Reliable sur la base d'un échange, et seront ou neufs ou remis à neuf pour être
fonctionnellement équivalents aux neufs. Si Reliable n'est pas en mesure de réparer ou de
remplacer le Produit Reliable, elle remboursera la valeur actuelle du Produit Reliable au
moment où la réclamation de garantie est réalisée.
Cette garantie limitée ne couvre aucun dommage subi par un Produit Reliable résultant
d'une installation incorrecte, d'un accident, d'un abus, d'une mauvaise utilisation,
d'une catastrophe naturelle, d'une alimentation électrique insuffisante ou excessive, de
conditions mécaniques ou environnementales anormales, de l'usure et de la détérioration
résultant de l'usure normale du produit, ou de tout démontage, réparation ou modification
non autorisé(e). Cette garantie limitée ne s'étend à aucun dommage indirect ou direct dont
peut être victime un utilisateur ou suite à l'utilisation d'un Produit Reliable, y compris mais
sans s'y limiter, toute responsabilité pour des réclamations de tiers pour des dégâts, et se
limite au montant payé par l'acheteur original du Produit Reliable auquel cette protection
de garantie limitée s'applique. Cette garantie limitée ne s'applique pas aux produits qui ont
été modifiés ou dont les numéros de séries sont manquants, ou aux produits non achetés
directement auprès de Reliable ou d'un revendeur agréé pour la vente de Produits Reliable.
Cette garantie limitée est l'unique garantie qui s'applique à tout Produit Reliable, elle
remplace toutes conditions qui peuvent être contenues dans un autre document ou bon de
commande et ne peut être transformée ou modifiée, sauf dérogation expressément écrite
de Reliable.
Pour obtenir une réparation ou un remplacement en vertu des conditions de cette garantie,
veuillez contacter notre service à la clientèle au 1-800-268-1649 ou par courriel à
support@reliablecorporation.com.
Il vous sera demandé d'envoyer le reçu original par télécopie ou courriel. Le reçu doit
prouver que vous êtes l'acheteur original, que le produit a été acheté directement chez
nous ou chez un revendeur agréé par Reliable et que la réclamation de garantie est
effectuée pendant la période de garantie. Un numéro d'autorisation de retour (Nº AR) vous
sera fourni et il vous sera demandé d'expédier le produit défectueux accompagné de la
preuve d'achat et du Nº AR, les frais d'assurances étant prépayés à l'adresse suivante :
Reliable Corporation, 5-100 Wingold Avenue, Toronto, ON M6B 4K7. Les expéditions avec
fret payable à destination seront refusées. Le risque de perte ou d'endommagement lors du
transport sera assumé par le client. Une fois que Reliable aura reçu le produit défectueux,
elle initiera la réparation ou le remplacement.
Si vous avez des questions concernant la présente garantie, vous pouvez écrire à :
Reliable Corporation
100 Wingold Avenue, Unit 5
Toronto, Ontario
Canada M6B 4K7
www.reliablecorporation.com
14
Page 18

SEWQUIET 6000SM
SERVOMOTOR INDUSTRIAL SIN
ESCOBILLAS DE CD
MANUAL DE INSTRUCCIONES
ESPAÑOL
15
Page 19

CONGRATULATIONS
En Reliable, hacemos lo que nos encanta hacer y nos
enorgullecemos de hacerlo bien. Quiere lo mejor para las personas,
los lugares y las cosas que importan en la vida: desde dónde vive
a la ropa que viste. Nosotros también. Desde el inicio, abordamos
cada producto con la atención al detalle de un artesano y la
pasión por hacerlo bien. La calidad, la funcionalidad, el diseño y
el servicio al consumidor son igual de importantes para ofrecerle
algo adecuado para usted. Sin importar si usted es un costurero
avanzado o principiante, el controlador del microprocesador de
la 6000SM le da al usuario una conexión sin incomparable con la
máquina de coser, permitiendo velocidad y trabajo detallado.
Por su seguridad y para disfrutar al máximo las ventajas de este
producto, tómese unos minutos para leer todas las precauciones
importantes e instrucciones de cuidado. Conserve este manual a
mano y lea la garantía del producto para su referencia.
16
Page 20

INSTALACIÓN DE LA CUBIERTA DE LA POLEA
1. Deslice la cubierta de la polea del soporte.
2. Alinee el soporte con los orificios para tornillos en el motor. Coloque dos tornillos de
montaje (provistos) en el soporte y ajústelos al motor. (En la fotografía, se indica el
ángulo requerido).
3. Deslice la cubierta de la polea en el soporte.
4. Ajuste el tornillo en la parte inferior de la cubierta de la polea para asegurarlo al
soporte y completar la instalación.
17
Page 21

PROGRAMACIÓN
TIPO DE MÁQUINA
Aguja simple básica
Aguja doble básica/
alimentación de la aguja
Pie móvil (excepto MSK-1541S)
Pie móvil automático de
lubricación
MSK-1541S/4200SW
Sobrehiladora - overlock
Puntada escondida
Zig-zag (style 20U)
Zig-zag (alta velocidad)
Pie móvil zig-zag
SELECTOR DE
VELOCIDAD
34
22
16
20
29
40
12
16
22
20
TAMAÑO DE
LA BOBINA
60MM
60MM
60MM
60MM
60MM
60MM
60MM
60MM
60MM
60MM
VELOCIDAD
APROX. EN
RPM
4500
3000
1500
1720
2160
5260
1200
1650
2000
1925
VELOCIDAD
ESPECÍFICA
5000
3500
1800
2000
2500
6500
2500
2000
3000
2000
Para evitar posibles daños en su máquina, llame a su distribuidor para obtener la
configuración de velocidad adecuada y el tamaño de la bobina, si la máquina que
tiene no está en la lista de categorías.
CÓMO CAMBIAR LA VELOCIDAD:
• Presione el botón «P» y el LED cambiará a n0
• Presione el botón «S» para cambiar la velocidad en incrementos de 100 rpm
• Continúe presionando el botón «S» hasta que se muestre la configuración de
velocidad deseada
• Presione el botón «P» para guardar la selección
18
Page 22

CÓMO CAMBIAR LA DIRECCIÓN:
• Presione el botón «P» 4 veces hasta que el LED indique n3
• Presione el botón «S» para seleccionar entre «0» y «1»
• Seleccione «0» y el motor funcionará en sentido antihorario
• Seleccione «1» y el motor funcionará en sentido horario
• Presione el botón «P» para guardar la selección
CÓMO HABILITAR Y DESHABILITAR LA FUNCIÓN DE
POSICIONAMIENTO DE LA AGUJA:
• Presione el botón «P» 2 veces y el LED cambiará a n1
• Presione el botón «S» para seleccionar entre «0» y «1»
• Seleccione «0» para deshabilitar la función de posicionamiento de la aguja
• Seleccione «1» para habilitar la función de posicionamiento de la aguja
• Presione el botón «P» para guardar la selección
CÓMO FIJAR LA POSICIÓN DE DETENCIÓN DE LA
AGUJA:
Solo debe utilizarse esta programación cuando se haya instalado el sincronizador
OPCIONAL. Realice el pedido por separado.
• Presione el botón «P» 3 veces y el LED cambiará a n2
• Presione el botón «S» para seleccionar entre «0» y «1»
• Seleccione «0» y la aguja se detendrá en la posición hacia abajo
• Seleccione «1» y la aguja se detendrá en la posición hacia arriba
• Presione el botón «P» para guardar la selección
CONFIGURACIÓN DEL MODO “F” DEL NÚMERO 5 AL
NÚMERO 6
PASO 1:
• Primero, mantenga presionado el botón “S”. Luego, mantenga presionado el
botón “P”.
• Mantenga presionados ambos botones hasta que aparezca “F” en la pantalla.
• Cuando aparezca “F”, libere ambos botones y luego presione el botón “P” para
avanzar al parámetro “5”.
19
Page 23

• Cuando aparezca “5”, solo mantenga presionado el botón “S” para avanzar a
“0” (inicio de velocidad baja desactivado).
• Presione el botón “P” para guardar la selección.
PASO 2:
• Primero, mantenga presionado el botón “S”. Mantenga presionado el botón “P”,
y mantenga presionados ambos botones hasta que aparezca “F” en la pantalla.
• Cuando aparezca “F”, libere ambos botones y luego presione el botón “P” para
avanzar al parámetro “6”.
• Cuando aparezca “6”, mantenga presionado el botón “S” para avanzar a “9”
(paso de costura con valor más alto).
• Presione el botón “P” para guardar la selección.
• Apague el dispositivo y luego vuelva a encenderlo para completar la
programación.
* Observe: Cuando cosa materiales densos (por ejemplo, cuero para estampado),
se recomienda una aguja con punta para cuero tamaño 22.
CUANDO APARECE EN LA PANTALLA “E5”:
• Presione y libere el botón “S” y la pantalla cambiará a “P”.
• Presione el botón “P” 2 veces y la pantalla cambiará a “n1”.
• Presione el botón “S” y la pantalla cambiará a “1”.
• Presione el botón “S” nuevamente y la pantalla cambiará a “0”.
• Presione el botón “P” para guardar la selección.
• Apague y vuelva a encender para completar la programación.
20
Page 24

CÓDIGOS DE ERROR
CODES D’ERREUR
E1: Fallo operativo
E2: Sobrecorriente o baja tensión
E3: El tablero no puede leer el
parámetro
E4: Señal de error de Hall
E5: Problema de posicionamiento de
la aguja
SOLUTION
E1: La máquina está trancada. Verifique
si es difícil girar la máquina o si hay
falta de lubricación.
E2: Verifique la fuente de energía para
asegurarse de que el voltaje esté
dentro del rango.
E3: Apague y encienda la máquina dos
veces, y vuelva a intentarlo. Si aún
no puede resolver el problema, contacte a su distribuidor.
E4: Reemplace el fusible principal. Si el
problema continúa, contacte a su
distribuidor.
E5: Verifique si el sincronizador está
conectado.
21
Page 25

GARANTÍA DE LOS PRODUCTOS RELIABLE
Reliable Corporation (“Reliable”) garantiza al comprador original de sus productos que todas
las unidades vendidas por Reliable (un “Producto Reliable”) se encuentran libres de defectos
de material y de mano de obra durante el período de un año a partir de la fecha de compra,
si son utilizadas correctamente y han recibido el mantenimiento adecuado. En virtud de las
condiciones y limitaciones establecidas a continuación, Reliable reparará o reemplazará
la pieza de un Producto Reliable que demuestre estar defectuosa a causa de material o
fabricación inadecuadas. Si el Producto Reliable defectuoso deja de estar disponible y no se
lo puede reparar en forma eficaz ni reemplazar por un modelo idéntico, Reliable cambiará el
Producto Reliable defectuoso por un Producto Reliable vigente de igual o mayor valor. Reliable
proporcionará piezas reparadas o de repuesto a cambio de las piezas originales, y serán piezas
nuevas o reacondicionadas para convertirse en productos funcionalmente equivalentes a piezas
nuevas. Si Reliable no puede reparar ni reemplazar un Producto Reliable, reembolsará el valor
del Producto Reliable que esté vigente al momento de reclamar la garantía.
Esta garantía limitada no cubre los daños que sufra un Producto Reliable como resultado de una
instalación inadecuada, accidente, abuso, uso incorrecto, desastre natural, suministro de energía
eléctrica insuficiente o excesivo, condiciones mecánicas o ambientales anormales, desgaste
provocado por el uso normal del producto, o cualquier desarme, reparación o modificación no
autorizada. Esta garantía limitada no se extiende a ningún daño indirecto, resultante o accidental
que el usuario pueda sufrir o que pueda causar el uso de un Producto Reliable, incluyendo,
entre otros, la responsabilidad ante los reclamos presentados por terceros; y se limita al monto
pagado por el comprador original del Producto Reliable respecto del cual tiene aplicación
esta protección de garantía limitada. Esta garantía limitada no es válida para productos que
hayan sido modificados o que no tengan número de serie, o para productos que no hayan sido
comprados directamente a Reliable o mediante un vendedor certificado que cuente con nuestra
autorización para vender Productos Reliable.
Esta garantía limitada es la única que se aplica a todos los Productos Reliable, reemplaza todos
los términos que puedan estar contenidos en cualquier otro documento u orden de compra, y no
puede ser alterada ni modificada excepto que Reliable así lo haya autorizado expresamente por
escrito.
Para obtener una reparación o cambio según los términos de esta garantía,
comuníquese con nuestro grupo de atención al cliente al 1-800-268-1649 o escriba a
support@reliablecorporation.com.
Usted deberá presentar, por fax o correo electrónico, el comprobante original. Este comprobante
debe demostrar que usted es el comprador original, que el producto fue adquirido directamente
en nuestras oficinas o a un vendedor de Reliable autorizado y que el reclamo de la garantía se
realiza dentro del período correspondiente. Usted recibirá un número de autorización (RA#) y
deberá enviar el producto defectuoso, junto con el comprobante de compra, el RA# y seguros
pagados por adelantado, a la siguiente dirección:
Reliable Corporation, 5-100 Wingold Avenue, Toronto, ON M6B 4K7. Los costos de envío por
cobrar serán rechazados. El riesgo de sufrir una pérdida o daño en tránsito será asumido por el
cliente. Una vez que Reliable reciba el producto defectuoso, la compañía iniciará el proceso de
reparación o reemplazo.
Si tiene preguntas sobre esta garantía, puede escribir a la siguiente dirección:
Reliable Corporation
100 Wingold Avenue, Unit 5
Toronto, Ontario
Canada M6B 4K7
www.reliablecorporation.com
22
Page 26

Page 27

Page 28

1 800 268 1649
www.reliablecorporation.com
 Loading...