

video cassette recorder
user's guide.
VR626H] _
Caution: To reduce the risk of electric shock, match
wide blade of plug to wide slot, fully insert.
Attention: Pour dviter les chocs dlectriques, introduire
la lame la plus large de la fiche dans la borne
correspondante de la prise et pousserjusq0 au fond.
Refer to the identification/rating label located on the back panel of your
product for its proper operating voltage.
FCCRegulations state that unauthorized changes or modifications to this
equipment may void the user's authority to operate it.
Cable TV Installer: This reminder is provided to call your attention to
Article 820-40• of the National Electrical Code (Section 54 of the Canadian
Electrical Code, Part 1) which provides guidelines for proper grounding
and, in particular, specifies that the cable ground shall be connected to the
grounding system of the building as close to the point of cable entry as
practical.
To reduce the risk of fire or
shock hazard, do not expose
_._/ARNING ]
this product to rain or moisture.
Product Registration
Please fill out the product registration card and return it immediately.
Returning this card allows us to contact you if needed.
Keep your sales receipt to obtain warranty parts and service and for
proof of purchase. Attach it here and record the serial and model
numbers in caseyou need them. The numbers are located on the back
of the product.
Model No. VR626HF
Serial No.
Purchase Date:
Dealer/Address/Phone:
IMPORTANT SAFEGUARDS
In addition to the careful attention devoted to quality standards in the mahufacture of your product, safety is a major
factor in the design of every product. However, safety is your responsibility too.
This sheet lists important information that will help to assure your enjoyment and proper use of.the product and
accessory equipment. Please read them carefully before operating and using your product.
Installation
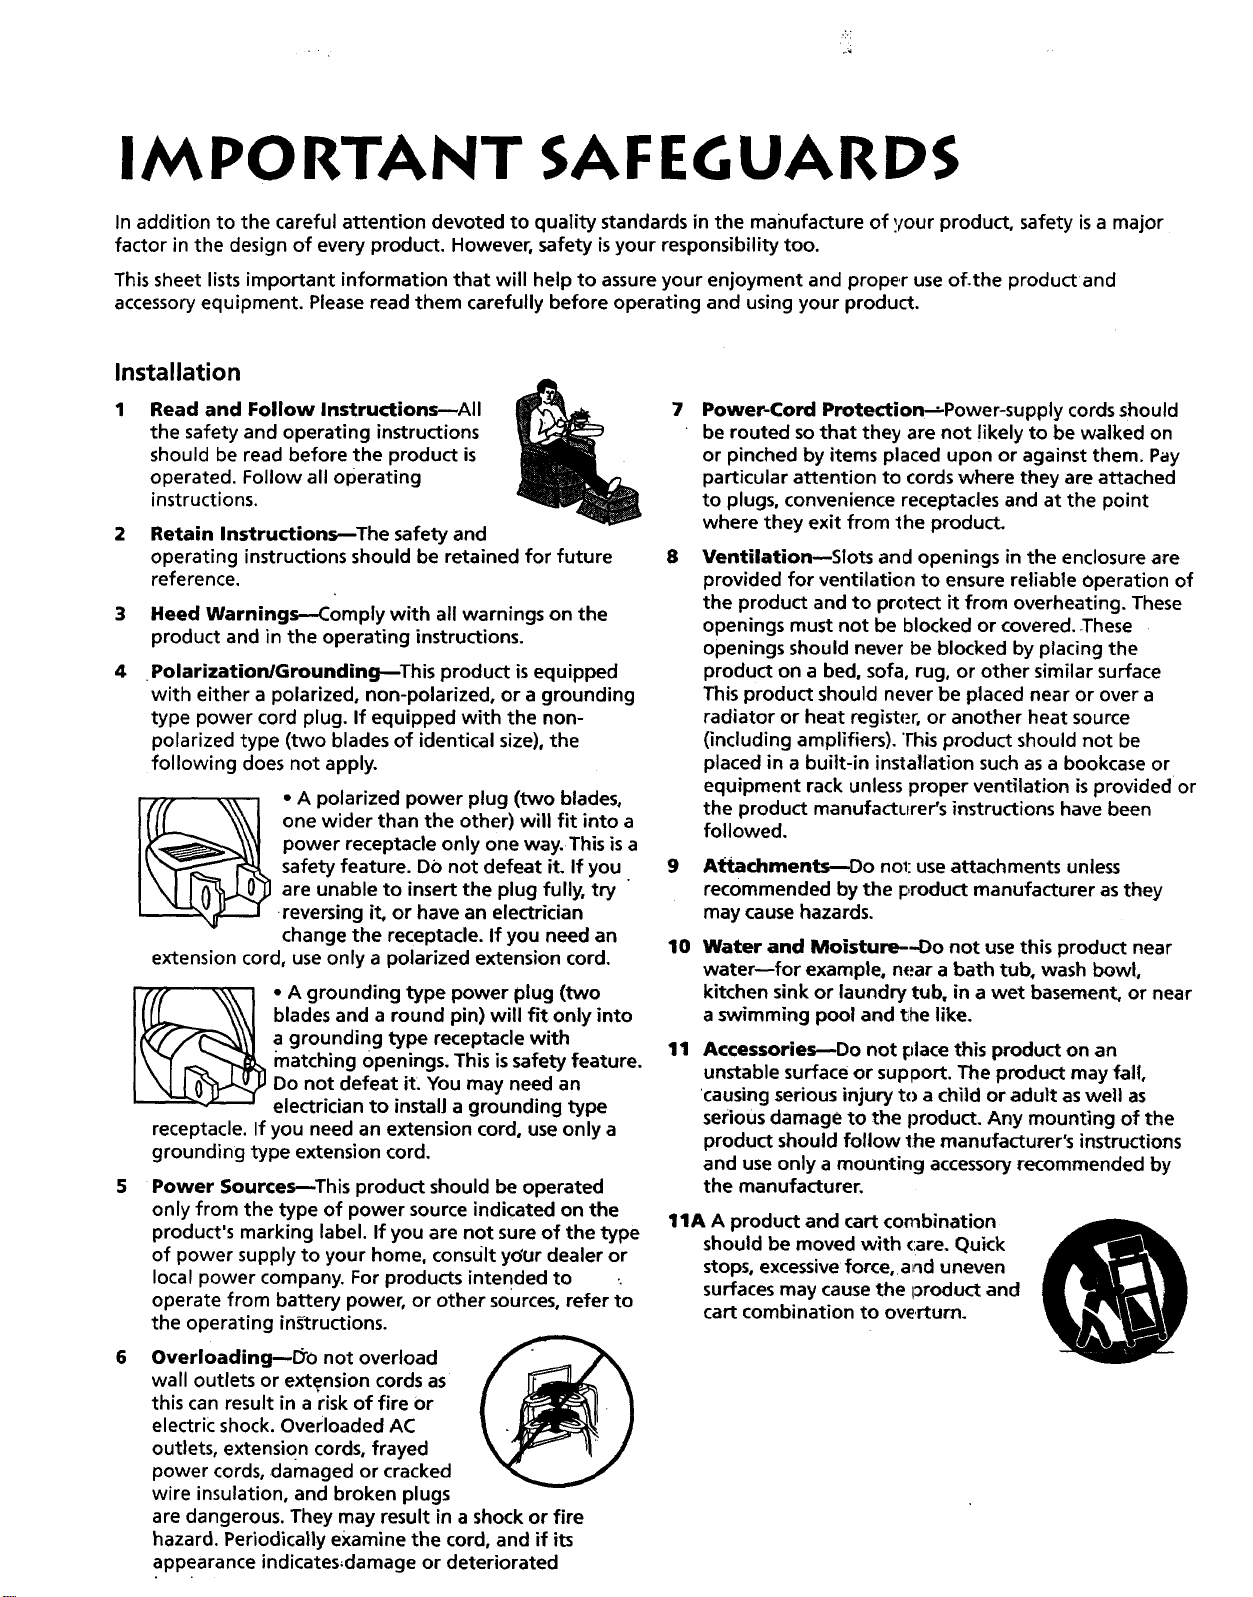
Read and Follow Instructions--All
the safety and operating instructions
should be read before the product is
operated. Follow all operating
instructions.
2
Retain Instructions--The safety and
operating instructions should be retained for future
reference.
Heed Warnings--Comply with all warnings on the
product and in the operating instructions.
4
•Polarization/Grounding--This product isequipped
with either a polarized, non-polarized, or a grounding
type power cord plug. If equipped with the non-
polarized type (two blades of identical size), the
following does not apply.
• A polarized power plug (two blades,
one wider than the other) will fit into a
power receptacle only one way. Thisis a
safety feature. DO not defeat it. If you.
are unable to insert the plug fully, try
reversing it, or have an electrician
change the receptacle. If you need an
extension cord, use only a polarized extension cord.
• A grounding type power plug (two
blades and a round pin) will fit only into
a grounding type receptacle with
matching Openings.This issafety feature.
Do not defeat it: You may need an
electrician to install a grounding type
receptacle. If you need an extension cord, use only a
grounding type extension cord.
Power Sources---This product should be operated
only from the type of power source indicated on the
product's marking label. If you are not sure of the type
of power supply to your home, consult your dealer or
local power company. For products intended to :
operate from battery power, or other sources, refer to
the operating instructions.
Power-Cord Protection-'-Power-supply cords should
be routed so that they are not likely to be walked on
or pinched by items placed upon or against them. Pay
particular attention to cords where they are attached
7
to plugs, convenience receptacles and at the point
where they exit from the product.
8
Ventilation--Slots and openings in the enclosure are
provided for ventilation to ensure reliable operation of
the product and to protect it from overheating. These
openings must not be blocked or covered. -These
openings should never be blocked by placing the
product on a bed, sofa, rug, or other similar surface
This product should never be placed near or over a
radiator or heat register, or another heat source
(including amplifiers). This product should not be
placed in a built-in installation such as a bookcase or
equipment rack unless proper ventilation is provided or
the product manufacturer's instructions have been
followed.
9
Attachments_Do not use attachments unless
recommended by the product manufacturer as they
may cause hazards.
10
Water and Moisture--Do not use this product near
water--for example, near a bath tub, wash bow!,
kitchen sink or laundry tub, in a wet basement, or near
a swimming pool and t_he like.
11
Accessories---Do not place this product on an
unstable surface or support. The product may fal!,
causing serious injury to a child or adult as well as
serious damage to the product. Any mounting of the
product should follow the manufacturer's instructions
and use only a mounting accessory recommended by
the manufacturer.
11A A product and cart combination
should be moved with (:are. Quick
stops, excessive force, a_d uneven
surfaces may cause the i3roduct and
cart combination to overturn.
Overloading--_o not overload
wall outlets or extension cords as
this can result in a risk of fire or
electric shock. Overloaded AC
outlets, extension cords, frayed
power cords, damaged or cracked
wire insulation, and broken plugs
are dangerous. They may result in a shock or fire
hazard. Periodically examine the cord, and if its
appearance indicates=damage or deteriorated

12 Outdoor Antenna Grounding--If an outside
antenna or cable system isconnected to the product,
be sure the antenna or cable system is grounded so as 17
to provide some protection against voltage surges and
built-up static charges. Section 810 of the National
Electrical Code, ANSI/NFPA No. 70-1984 (Section 54 of
Canadian Electrical Code, Part 1) provides information 18
with respect to proper grounding of the mast and ....
supporting structure, grounding of the lead-in wire to
an antenna-discharge unit, size of grounding
conductors, location of antenna-discharge unit, A.
connection to grounding electrodes, and requirements B.
for the grounding electrode. See example below.
Example of Antenna Grounding
LEAD IN
WIRE
CLAMP
ANTENNA
(NEC SECTION Sf(_-20)
GROUNDING CONDUCTORS F.
(NEC SECTION 810-21)
ELECTRIC SERVICE POWER SERVICE GROUNDING
EQUIPMENT ELECTRODE SYSTEM
(NEC ART 250. PART H)
13 Power Lines---An outside antenna system should not
be located in the vicinity of overhead power lines,
other electric light or power circuits, or where it can
fall into such power lines or circuits. When installing an
outside antenna system, extreme care should be taken
to keep from touching or approaching such power
lines or circuits as contact with them might be fatal.
Installing an outdoor antenna can be hazardous and
should be left to a professional antenna installer.
Use
Service
Servicing--Do not attempt to service this product
yourself as opening or removing covers may expose
you to dangerous voltage or other hazards. Refer all
servicing to qualified service personnel.
Conditions Requiring Service--Unplug this product
from the wall outlet and refer servicing to qualified
service personnel under tbqe following conditions.
When the power-supply cord or plug is damaged.
If liquid has been spilled, or objects have fallen into the
product.
Co
If the product has been exposed to rain or water.
D.
If the product does not operate normally by following
the operating instructions. Adjust only those controls
that are covered by the operating instructions.
Improper adjustment of .other controls may result in
damage and will often require extensive work by a
qualified technician to restore the product to its
normal operation.
E.
If the product has been dropped or the cabinet has
been damaged.
When the product exhibits a distinct change in
performance, such as the inability to perform basic
functions--this indicate.,, a need for service.
19
Replacement Parts--When replacement parts are
required, have the service technician verify that the
replacement parts he uses have the same safety
characteristics as the oMginal parts. Use of
replacements specified by the product manufacturer
can prevent fire, electric: shock, or other hazards.
20
Safety Check--Upon completion of any service or
repairs to this product, .ask the service technician to
perform safety checks recommended by the
manufacturer to determine that the product is in safe
operating condition.
14
Cleaning--Unplug this product from the wall outlet
before cleaning. Do not useliquid cleaners or aerosol
cleaners. Usea damp cloth for cleaning.
15
Object and Liquid Entry--Never push objects of any
kind into this product through openings as they may
touch dangerous voltage Or "short-out" parts that
could result in a fire or electric shock. Never spill liquid
of any kind on the product.
16
Lightning--For added protection for this product
during a lightning storm, or when it is left unattended
and unused for long
periods of time, unplug
it from the wall outlet
and disconnect the
antenna or cable
system. This will
prevent damage to the
product due to
lightning and power
line surges.

First Things First .............................................................. 3
Setting up the VCR ......................................................... 7
Using the Menu to Set Up Features ................................................. 8
Language .......................................................................................... 8
Digital Satellite System Setup ...................................................... 8
Cable Box Setup .......................................................................... 0
VCR Channels List ....................................................................... 2
To Auto Channel Search ...................................................... 3
To Change the Signal Type ................................................... 4
To Add or Remove Channels ............................................. 4
Time and Date .............................................................................. 4
Set Daylight-Saving Time ...................................................... 14
Set the Time and Date ......................................................... 15
VCR Plus+ Channels ................................................................... 16
Additional Set-Up Features in the PREFERENCES Menu .......... 18
Remote VCR I/VCR2 Option .................................................... 18
Auto Play ........................................................................................ 19
Auto TV/VCR ................................................................................ 19
Front Panel (VCR Display) ......................................................... 20
VCR Basics ..................................................................... 21
Remote Buttons .................................................................................. 22
Component Buttons ................................................................... 22
VCR Function Buttons ................................................................ 22
TV Function Buttons ................................................................... 23
Playing aTape ....................................................................................... 24
Automatic Rewind .............................................................................. 24
Tape Eject ............................................................................................. 25
Recording ............................................................................................. 25
Check the SafetyTab ................................................................... 25
Recording ............................................................... 27
Recording Features ............................................................................ 28
Express Recording ....................................................................... 28
Timer Recording .......................................................................... 29
Timer Recording with VCR Plus+ ............................................ 30
Stopping aTimer Recording ....................................................... 32
Reviewing and Clearing Programs ........................................... 32
Recording Broadcast Stereo "IV or SAP
(Second Audio Program) ...................................................... 32
Recording Audio Only ................................................................ 33
Using Two VCRs for Copying and Editing Tapes .................... 34
Programming the Remote ............................................ 35
To Control a'lV ................................ .................................................. 36
Other Features .............................................................. 37
Picture Search Options ..................................................................... 38
Forward and Reverse Search .................................................... 38
Slow Motion .................................................................................. 38
Commercial Scan (SEARCH Button) ...................................... 38
Frame Advance ............................................................................. 39
Index Search .................................................................................. 39
Go-To Search ................................................................................ 40
Tracking ................................................................................................. 40
Time Counter ...................................................................................... 40
On-Screen Displays ............................................................................ 4 I
Audio Set-Up Features .................... _................................................. 42
Reception ....................................................................................... 42
Tape Playback ................................................................................ 43
Connections .................................................................. 45
Things to Know Before Connecting Components ..................... 45
ConnectingYourVCR ........................................................................ 46
Jacks and Cables ........................................................................... 46
Choosing a VCR Connection ................................................... 47
Advantages of Audio/Video Cable Connections ................. 47
Don't Forget About the Auto TV/VCR Feature ................... 47
TV with RF Jack Only ................................................................. 48
TV with Audio/Video Jacks ........................................................ 49
TV with Audio/Video Jacks and Cable Box to
Unscramble Pay Channels Only .......................................... 50
TV with RF Jack and Satellite Receiver ................................... 5 I
TV with Audio/Video Jacks and Satellite Receiver ............... 52
Appendix A: Reference ................................................ 53
Front Panel ........................................................................................... 54
Display Panel ........................................................................................ 55
Back Panel ............................................................................................ 56
Troubleshooting Tips .......................................................................... 57
Specifications ....................................................................................... 60
Cleaning theVCR ................................................................................ 60
Limited Warranty ................................................................................ 61
Index .............................................................................. 62
2

HI, MY NAME IS ROGER...
and I wrote this User's Guide. It's my job to see
that you have a rewarding user manual experience.
And, I think you'll be pleased with the features that
can be accessed through the on-screen menus.
FIRSTTHINGS FIRST
1
V
I
READ THE FIRSTTHREE SECTIONS
The first three sections of the manual introduce
you to yourVCR, and show you how to set theVCR
up and use the on-screen menus. Reading these
sections gives you the basic information you need
to use yourVCR.
WHAT'S LEFT?.
The rest of the book highlights playback and
recording information, contains a detailed
connections section, and a reference section that
includes troubleshooting tips, limited warranty, and
index.
¥
¥
V
¥
V
READ ME!
These note boxes give you tips for
[ )
your new video cassette recorder.
3
STEP 1: UNPACK THE BOX
The following items come packed in the box:
• VCR
• Remote control
• RF coaxial cable
STEP 2: INSTALL BATI'ERIES IN THE
REMOTE CONTROL
Follow these steps whenever you need to install or change the
batteries in your VCR remote.
1. Remove the cover of the battery compartment.
2. Place batteries in the remote, matching the + and - ends of
each battery to the diagram inside the compartment.
3. Replace the cover.
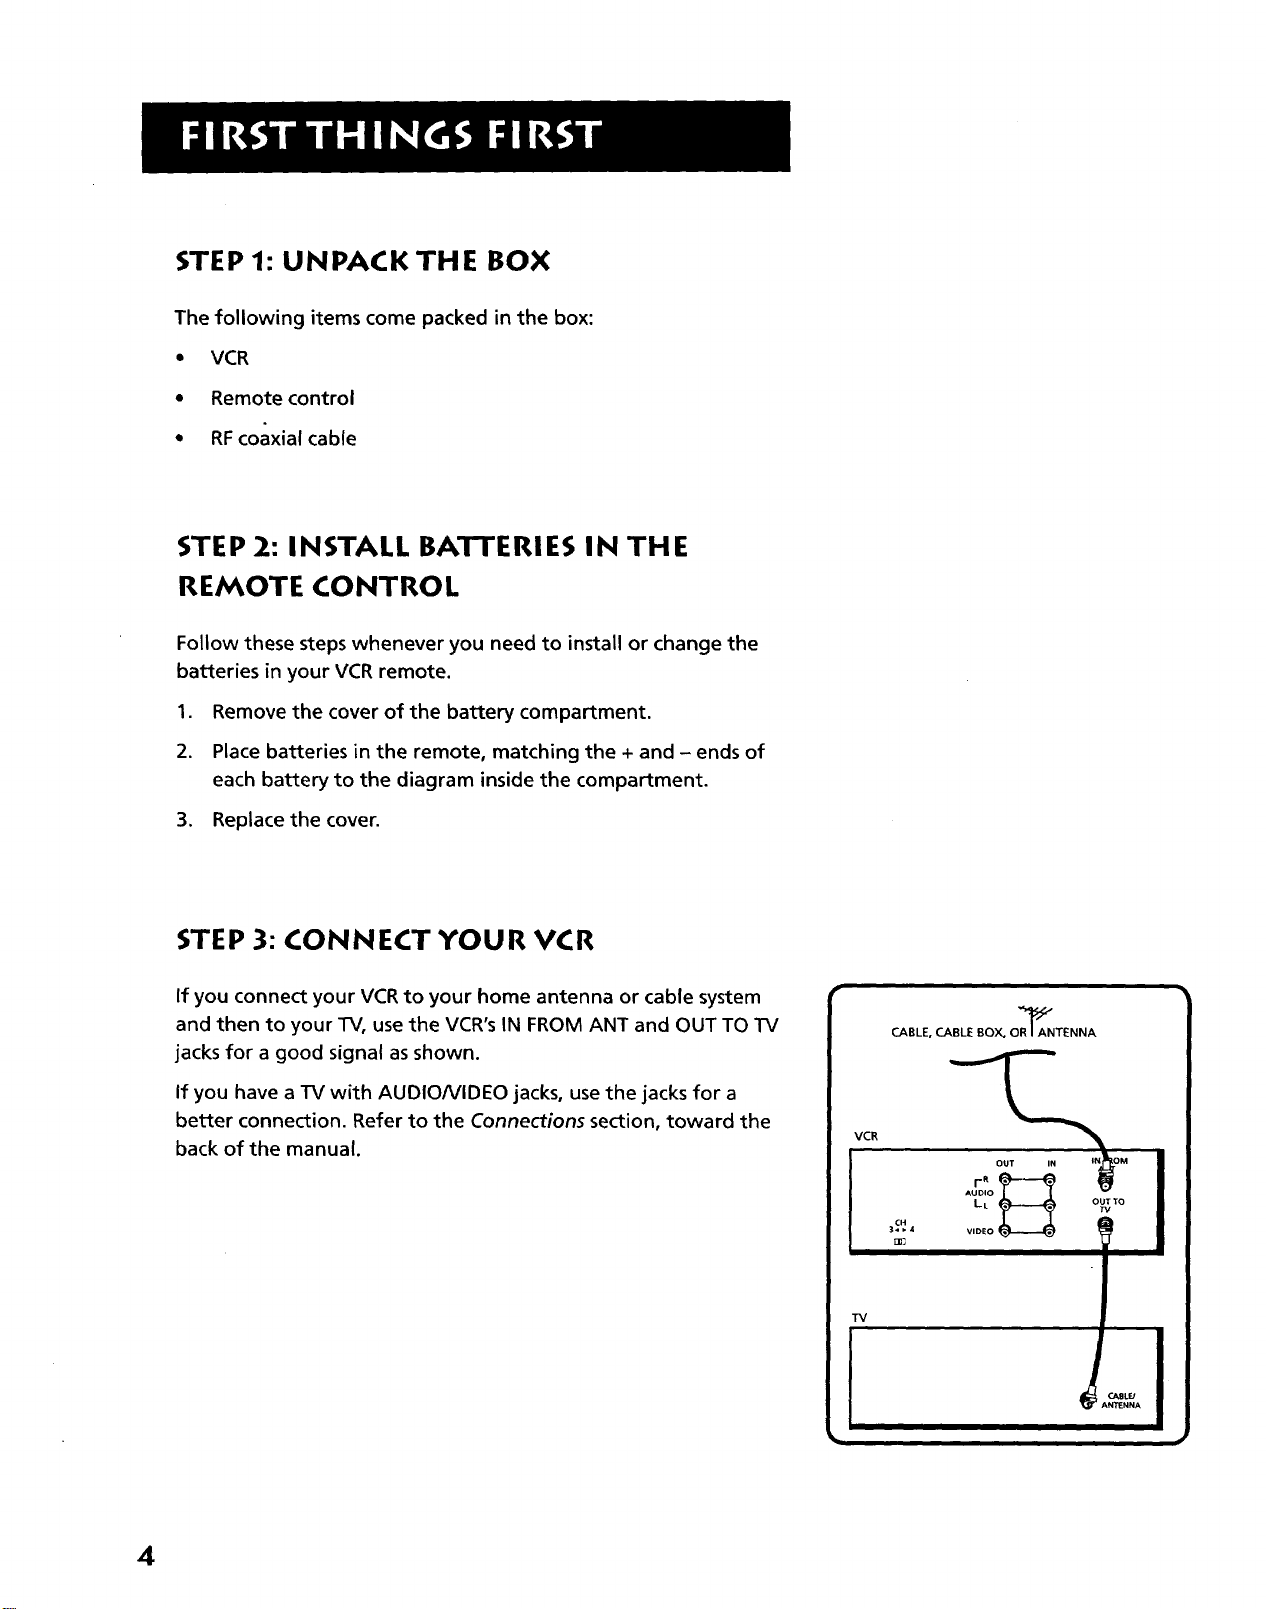
STEP 3: CONNECT YOUR VCR
If you connect your VCR to your home antenna or cable system
and then to your TV, use the VCR's IN FROM ANT and OUT TO TV
jacks for a good signal asshown.
If you have a TV with AUDIO/VIDEO jacks, use the jacks for a
better connection. Refer to the Connections section, toward the
back of the manual.
CABLE, CABLE BOX, oR_'ANTENNA
VCR
LL OUT "tO
3c'._,
_3
TV
VIDEO
OUT IN M
4
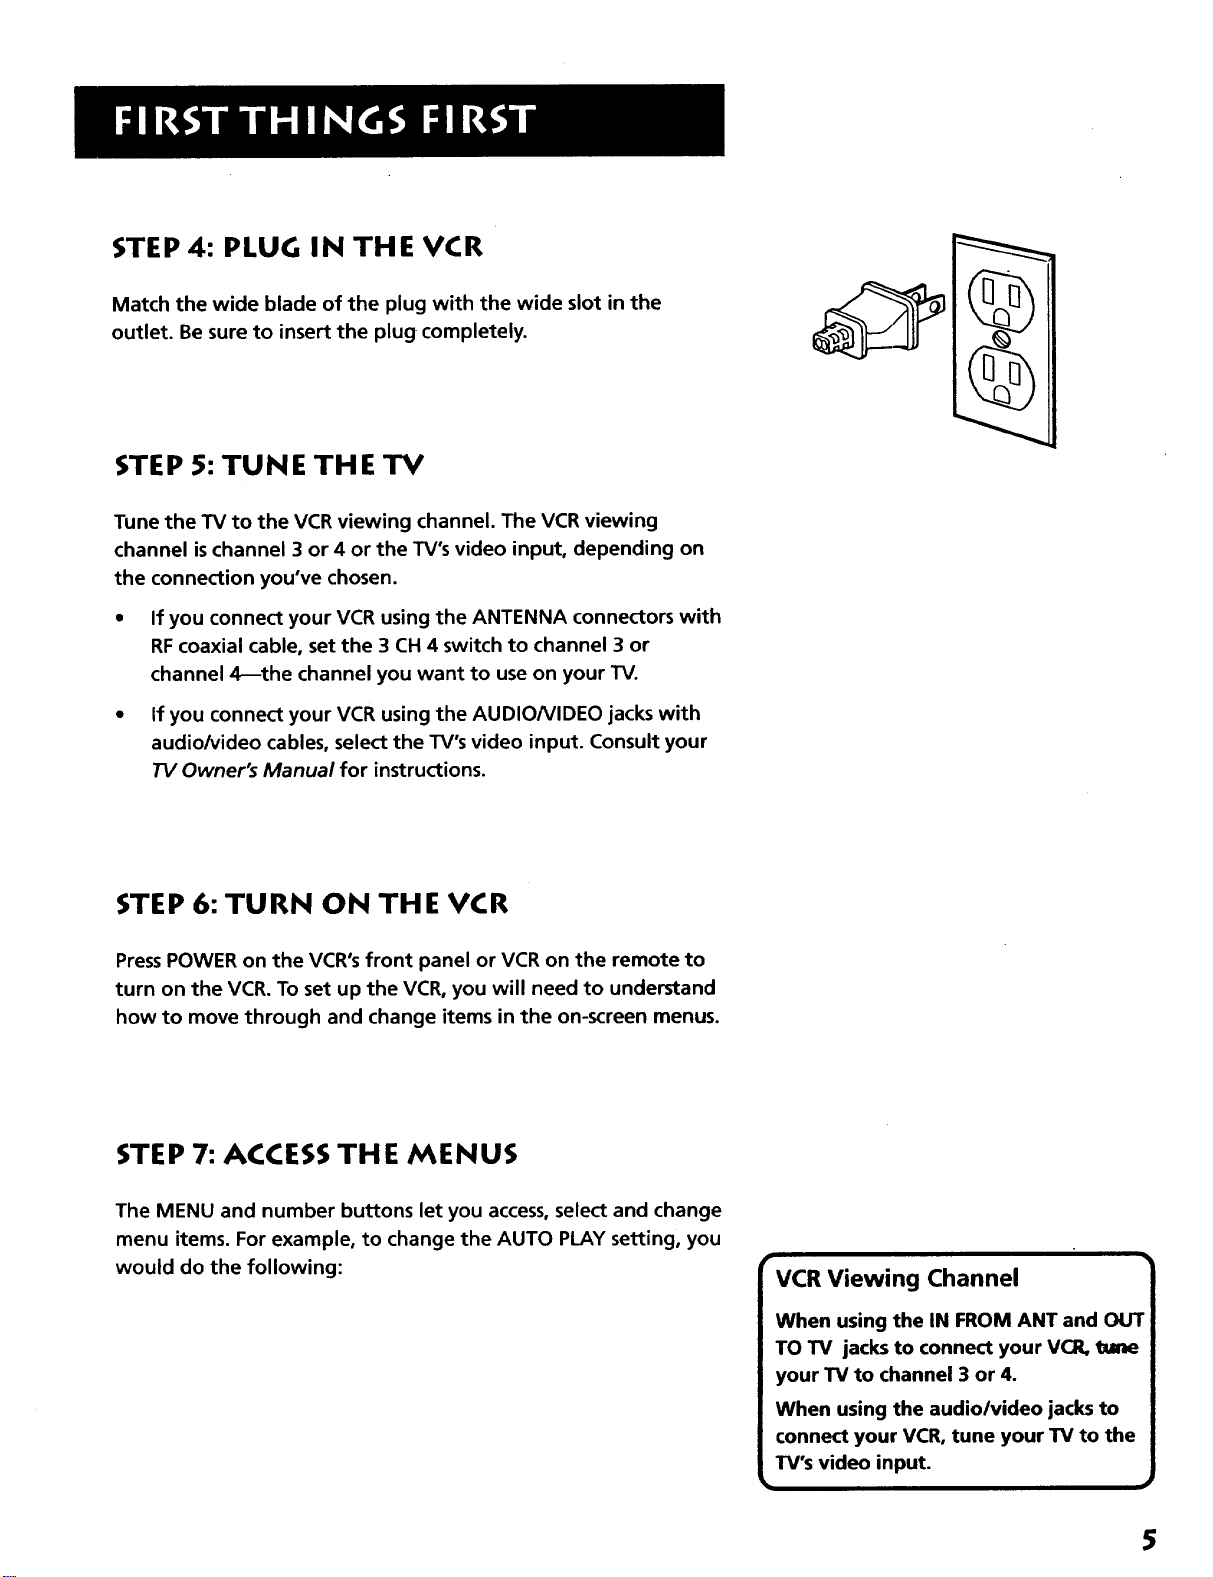
STEP 4: PLUG IN THE VCR
Match the wide blade of the plug with the wide slot in the
outlet. Be sure to insert the plug completely.
STEP 5: TUNE THE TV
Tune the TV to the VCR viewing channel. The VCR viewing
channel is channel 3 or 4 or the TV's video input, depending on
the connection you've chosen.
• If you connect your VCR using the ANTENNA connectors with
RF coaxial cable, set the 3 CH 4 switch to channel 3 or
channel 4_the channel you want to use on your TV.
• If you connect your VCR using the AUDIONIDEO jacks with
audio/video cables, select the TV's video input. Consult your
TV Owner's Manual for instructions.
STEP 6: TURN ON THE VCR
PressPOWER on the VCR's front panel or VCR on the remote to
turn on the VCR. To set up the VCR, you will need to understand
how to move through and change items in the on-screen menus.
STEP 7: ACCESS THE MENUS
The MENU and number buttons let you access,select and change
menu items. For example, to change the AUTO PLAY setting, you
would do the following:
i
VCR Viewing Channel
When using the IN FROM ANT and OLfl
TO TV jacks to connect your VCR, tune
your TV to channel 3 or 4.
When using the audio/video jacks to
connect your VCR, tune your TV to the
TV's video input.
5
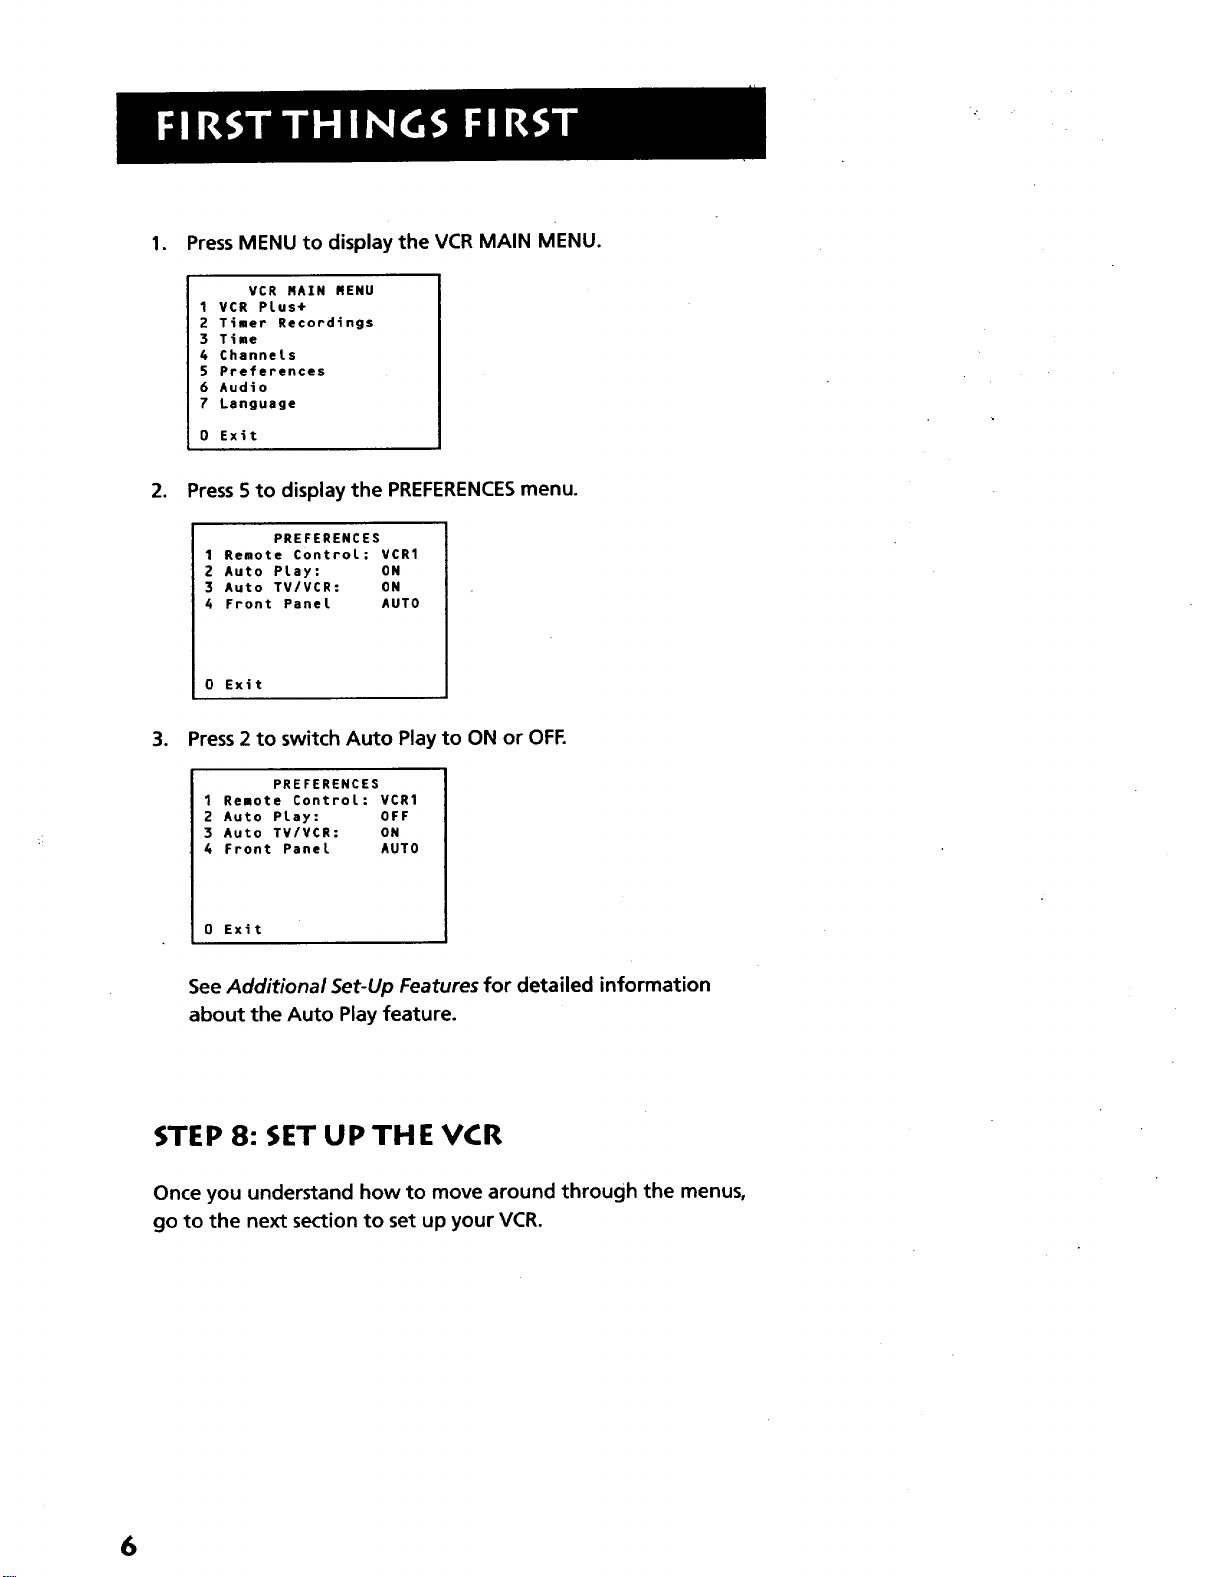
1. PressMENU to display the VCR MAIN MENU.
VCR MAIN MENU
1VCR PLus+
2 Timer Recordings
3 Time
4 Channels
5 Preferences
6 Audio
7 Language
0 Exit
2. Press5 to display the PREFERENCESmenu.
1 Remote ControL: VCR1
2 Auto PLay: ON
3 Auto TV/VCR: ON
4 Front Panel AUTO
0 Exit
PREFERENCES
3. Press2 to switch Auto Play to ON or OFF.
1 Remote ControL: VCR1
2 Auto PLay: OFF
3 Auto TV/VCR: ON
4 Front Panel AUTO
0 Exit
PREFERENCES
See Additional Set-Up Features for detailed information
about the Auto Play feature.
STEP 8: SET UP THE VCR
Once you understand how to move around through the menus,
go to the next section to set up your VCR.
6

SET-UP FEATURES
Below is a list of features that you may want to set
up before you begin using yourVCR for the first
time.
¥
• Select a Language 12
Set Up a Digital Satellite System
Set Up for a Cable Box
Set upVCR Channel List (Auto
Channel Search)
• Set Daylight-SavingTime
• Set theTime and Date
• Set upVCR Plus+ Channels
• Set the RemoteVCRI/VCR2 feature
• Set the Auto Play feature
• Set theAuto TV/VCR feature
SETTING UP THE VCR
V
¥
V
V
I
Set the Front Panel Brightness feature
¥
7

USING THE MENU TO SET UP FEATURES
You can set up features by using the menu system. The features
you may want to set up before you begin using your VCR are
explained in this section.
LANGUAGE
Select your preferred language, and the on-screen displays will
appear in that language.
1. PressMENU to display the VCR MAIN MENU.
VCR MAIN MENU
1 VCR Plus+
2 Timer Recondings
3 Time
4 ChanneLs
5 Preferences
6 Audio
7 Language
0 Exit
2. Press7 to select the LANGUAGE menu.
LANGUAGE
Select a language.
1>English
2 Fran;ais
Pness MENU to continue
3. Select English or Frangais (French).
DIGITAL SATELLITE SYSTEM SETUP
With this setup, the VCR turns on an RCA, ProScan, or GE digital
satellite receiver and tunes it to the desired channel at the start
time of a timer recording. Position the satellite receiver on top of
the VCR as shown in the Connections section.
For other brands, the VCR tunes the receiver to the desired
channel only if the receiver is turned on.
1. Press MENU to display the VCR MAIN MENU
Not all the VCR screens are shown in this
On-Screen Menus
manual when explaining the fe_l_Jres.
8
VCR MAIN MENU
1 VCR Plus+
2 Timer Recordings
3 Time
4 Channels
5 Preferences
6 Audio
7 Language
0 Exi t
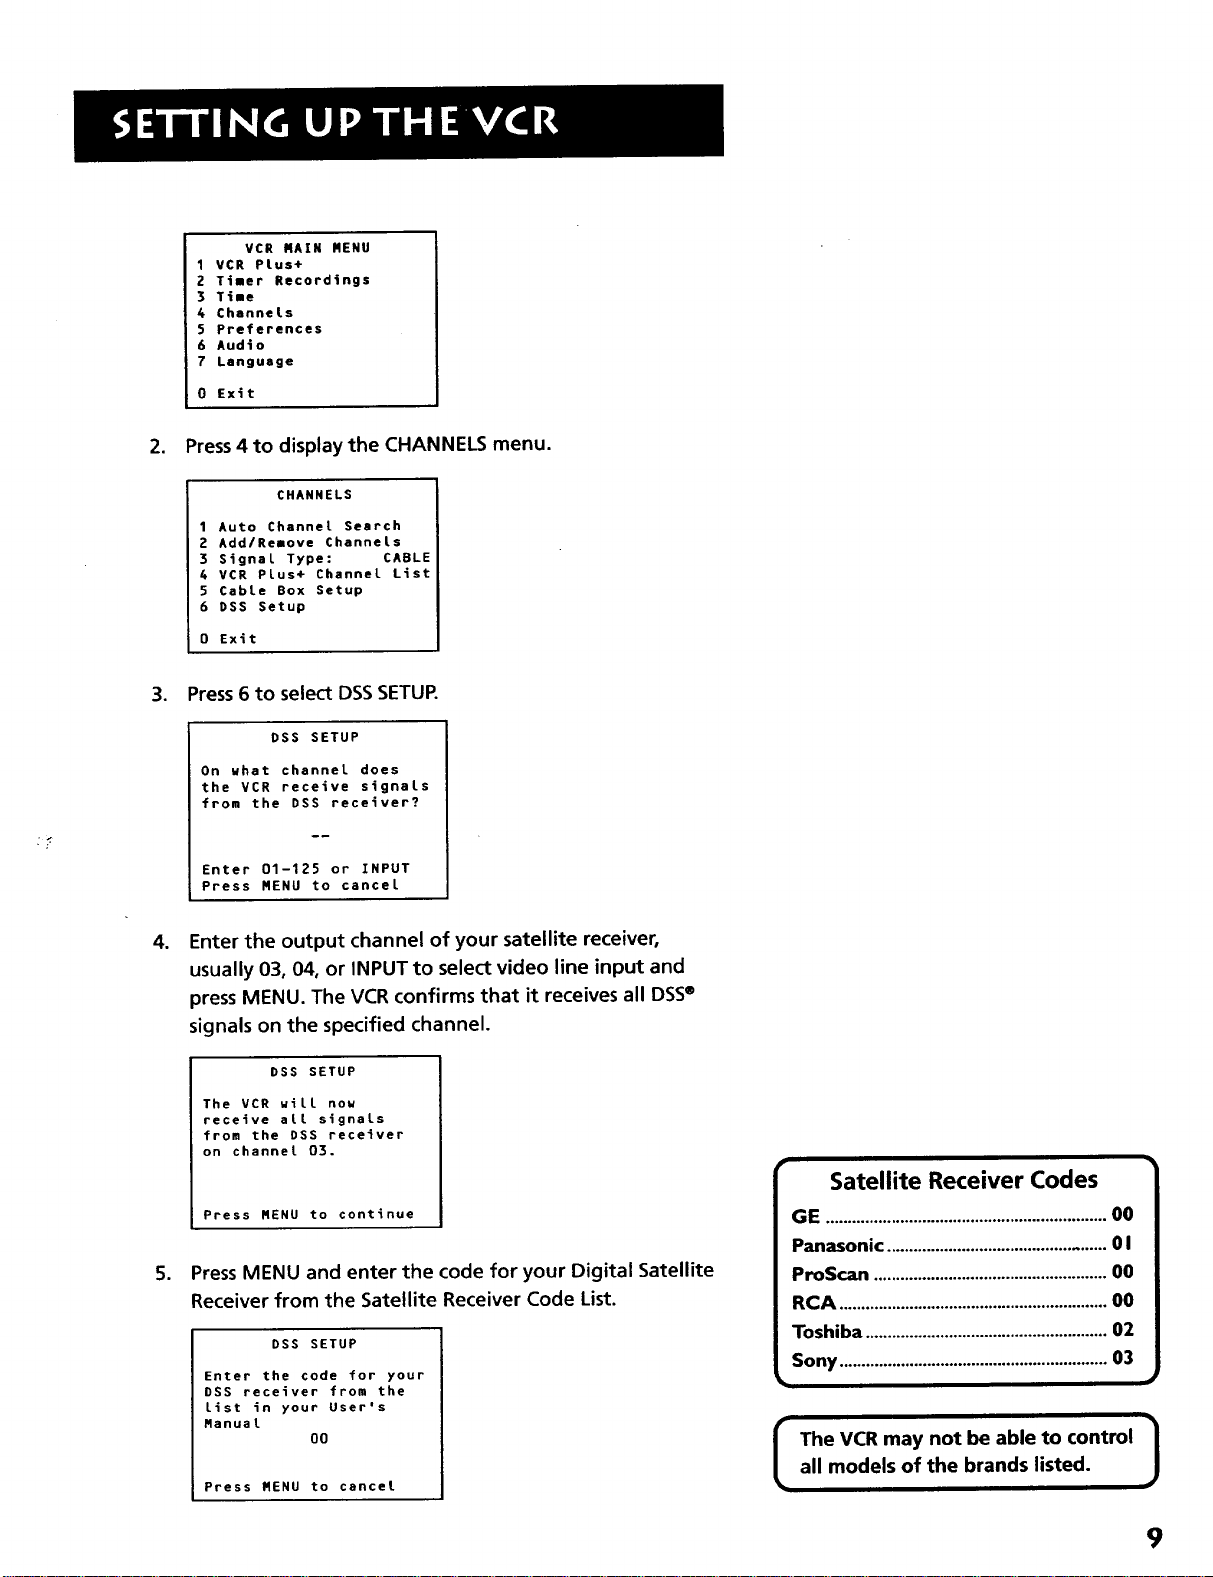
2. Press4 to display the CHANNELS menu.
CHANNELS
1 Auto Channel Search
2 Add/Remove Channels
3 Signal Type: CABLE
4 VCR Plus+ Channel List
5 Cable Box Setup
6 DSS Setup
0 Exit
3. Press6 to select DSSSETUP.
DSS SETUP
On what channel does
the VCR receive signals
from the DSS receiver?
Enter O1-125 or INPUT
Press MENU to cancel
, Enter the output channel of your satellite receiver,
usually 03, 04, or INPUT to select video line input and
press MENU. The VCR confirms that it receives all DSS®
signals on the specified channel.
DSS SETUP
The VCR will now
receive alL signaLs
from the DSS receiver
on channel 03.
Press MENU to continue
S, Press MENU and enter the code for your Digital Satellite
Receiver from the Satellite Receiver Code List.
DSS SETUP
Enter the code for your
DSS receiver from the
List in your User's
Ranual
Press MENU to cancel
O0
Satellite Receiver Codes
GE ................................................................00
Panasonic .................................................0 I
ProScan .....................................................00
RCA .............................................................00
Toshiba .......................................................02
Sony .............................................................03
The VCR may not be able to control
all models of the brands listed. ]
9

.
Turn on your satellite receiver and tune it to channel 100 and
then press MENU. Follow the on-screen directions.
DSS SETUP
PLease turn on your
DSS Receiver and tune
it to channel 100.
Press MENU to continue
Once you have completed the setup, the VCR confirms the
DSSSetup is completed or canceled.
CABLE BOX SETUP
This setup applies only when all channels are received through
the cable box. There are two options:
The first sets up the VCR for the output channel of the cable
box signal.
The second sets up the VCR for remote-controllable cable
boxes so it can control the cable box by changing channels
for timer or VCR Plus+ recordings. Position the remote-
controllable cable box on top of the VCR as shown in the
Connections section.
1. Press MENU to display the VCR MAIN MENU.
VCR RAIN MENU
1 VCR Plus+
2 Timer Recordings
3 Time
4 Channels
5 Preferences
6 Audio
7 Language
0 Exit
2. Press 4 to display the CHANNELS menu.
CHANNELS
1 Auto Channel Search
2 Add/Remove Channels
3 Signal Type: CABLE
4 VCR PLus+ Channel List
5 Cable Box Setup
6 DSS Setup
0 Exit
DSSe is a registered trademark of DIRECTV0 Inc., a unit of GM Hughes Electronics
10

.
Press 5 to display CABLE BOX SETUR Then select one of the
three choices:
CABLE BOX SETUP
Do you use your cable
box to receive ALL
channels or only SORE
Channels?
1 ALL channels
2 Only SORE channels
3 Cancel setup
o
If you selected ALL channels, enter the output channel of
your cable box (usually 03 or 04), or press INPUT for video
lineinput and press MENU.
CABLE BOX SETUP
On uhat channel does
the VCR receive signals.
from the cable box?
(usually 3. 4. or Video)
Enter 01-13 or INPUT
Press RENU to cancel
Once you complete the setup, the VCR confirms that the VCR
will now receive all signals on the designated channel.
.
PressMENU and select whether your cable box isremote
controllable.
CABLE BOX SETUP
Can your cable box be
operated with a remote
control?
1 Yes
2 No
.
If your cable box is remote-controllable, turn it on and tune it
to channel 2. Press MENU to continue.
CABLE BOX SETUP
Please turn on your
Cable Box and tune
it to channel 2.
Press RENU to continue
Cable Box Setup
ALL channels: enter two numbers for
output channel of your cable box or
press INPUT.
Only SOME channels: if you only use
the cable box to tune premium
channels.
Cancel setup: select to cancel.
11
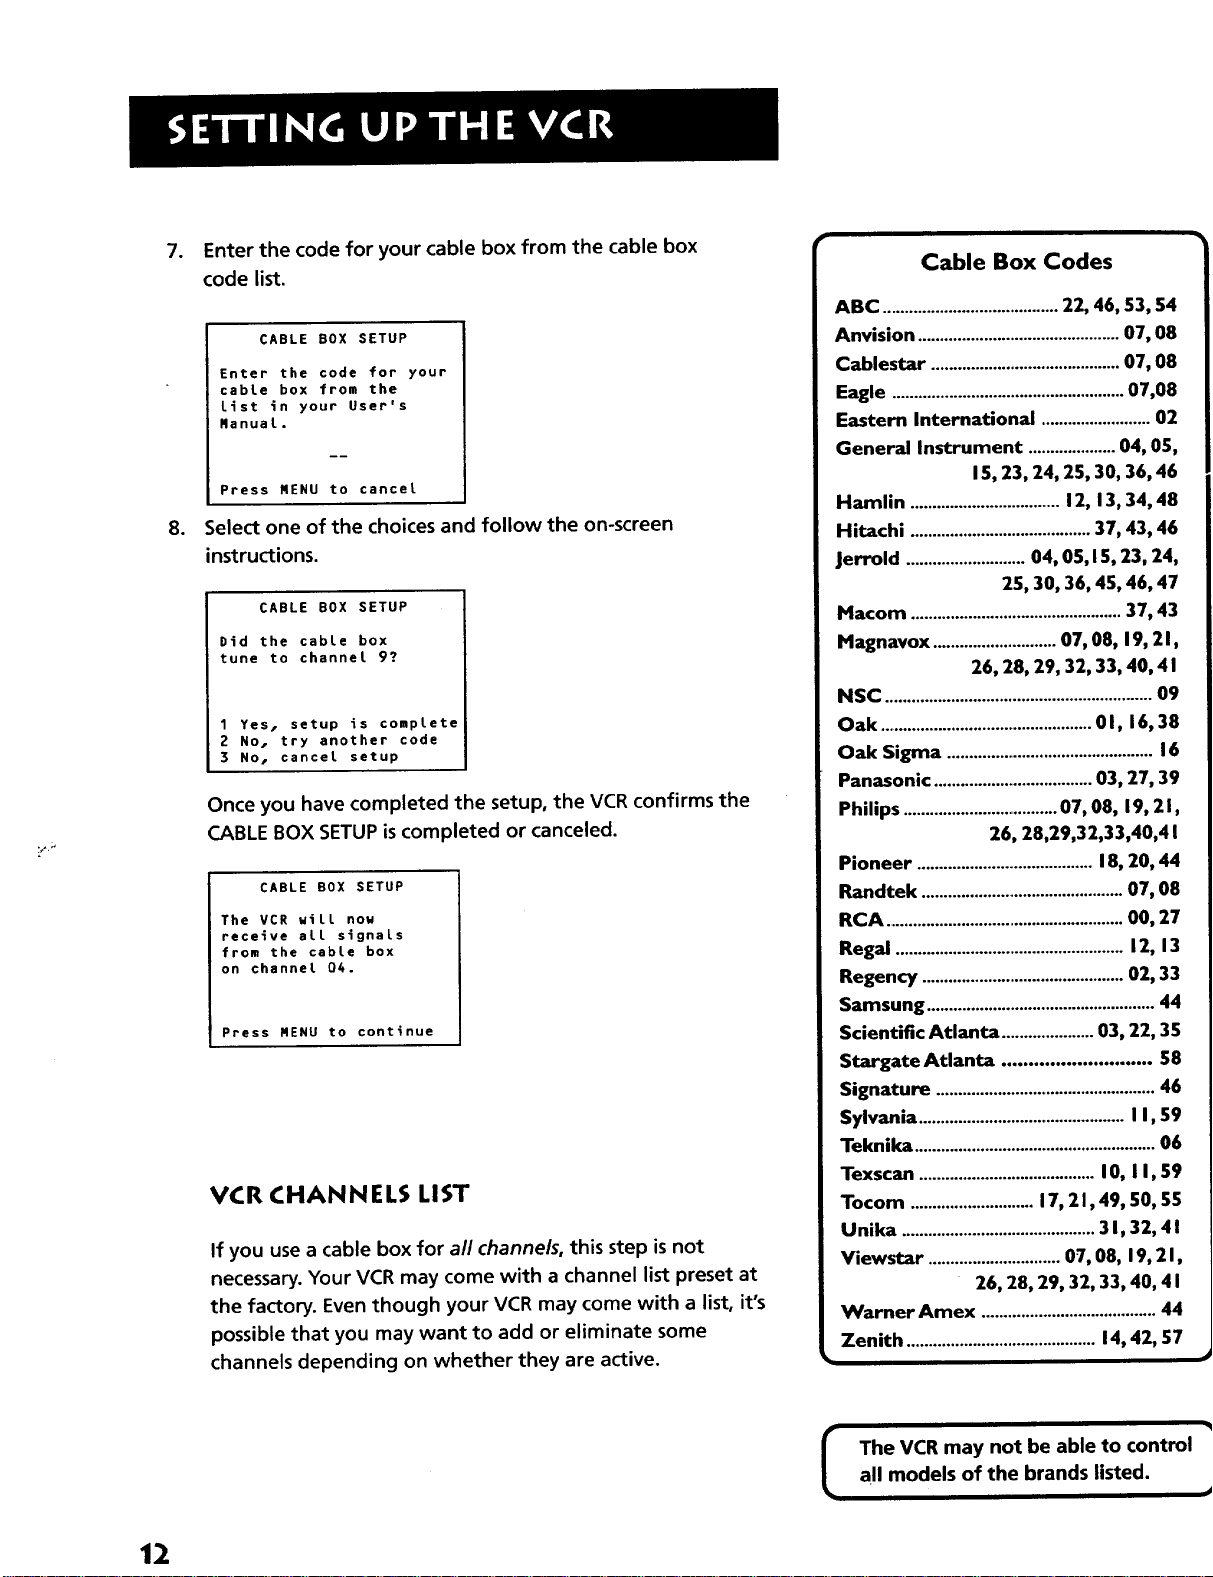
o
Enter the code for your cable box from the cable box
code list.
CABLE BOX SETUP
Enter the code for your
cable box from the
List in your User's
RanuaL.
Press MENU to cancel
°
Select one of the choices and follow the on-screen
instructions.
CABLE 80X SETUP
Did the cable box
tune to channel 9?
1 Yes, setup is complete
2 No, try another code
3 No. cancel setup
Once you have completed the setup, the VCR confirms the
CABLE BOX SETUP iscompleted or canceled.
CABLE BOX SETUP
The VCR will now
receive all signals
from the cable box
on channel 04.
Press MENU to continue
VCR CHANNELS LIST
If you use a cable box for all channels, this step is not
necessary. Your VCR may come with a channel list preset at
the factory. Even though your VCR may come with a list, it's
possible that you may want to add or eliminate some
channels depending on whether they are active.
Cable Box Codes
ABC ........................................22, 46, 53, 54
Anvision ..............................................07, 08
Cablestar ...........................................07, 08
Eagle .....................................................07,08
Eastern International ......................... 02
General Instrument ....................04, 05,
15, 23, 24, 25, 30, 36, 46
Hamlin .................................. 12, 13, 34, 48
Hitachi .........................................37, 43, 46
Jerrold ........................... 04, 05,15, 23, 24,
25, 30, 36, 45, 46, 47
Macom ................................................37, 43
Magnavox ............................ 07, 08, 19, 2 I,
26, 28, 29, 32, 33, 40, 4 I
NSC .............................................................09
Oak ................................................01, 16,38
Oak Sigma ...............................................16
Panasonic ....................................03, 27, 39
Philips ....................................07, 08, 19, 2 I,
26, 28,29,32,33,40,4 I
Pioneer ........................................ 18, 20, 44
Randtek ..............................................07, 08
RCA .......................................................00, 27
Regal .................................................... 12, 13
Regency ..............................................02, 33
Samsung .................................................... 44
Scientific Atlanta .....................03, 22, 35
Stargate Atlanta ............................ 58
Signature .................................................. 46
Sylvania ...............................................I I, 59
Teknika .......................................................06
Texscan ........................................ I 0, I I, 59
Tocom ............................ 17, 2 I, 49, 50, 55
Unika ............................................3 I, 32, 4 I
Viewstar .............................. 07, 08, 19, 21,
26, 28, 29, 32, 33, 40, 4 I
Warner Amex ........................................44
Zenith ........................................... 14, 42, 57
12
I The VCR may not be able to control
all models of the brands listed.
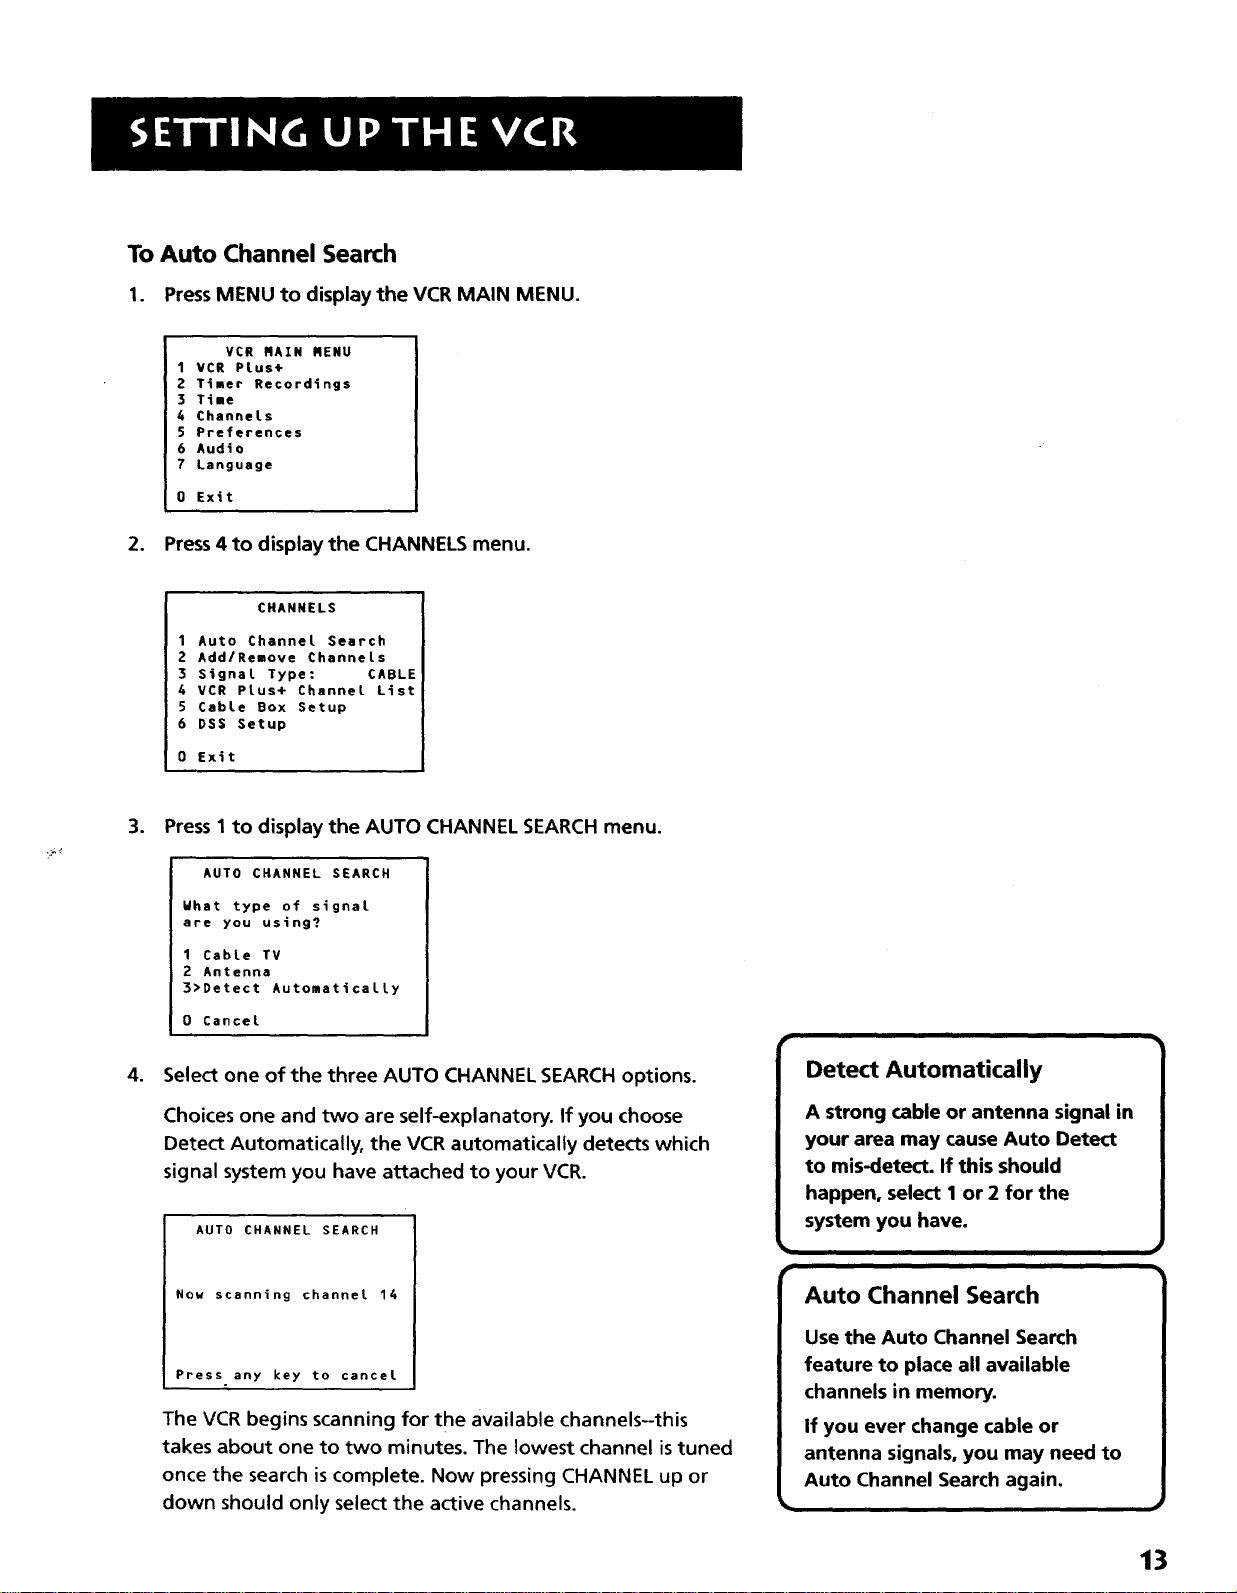
To Auto Channel Search
1. PressMENU to display the VCR MAIN MENU.
VCR MAIN MENU
1VCR PLus+
2 Timer Recordings
3 Time
4 Channels
5 Preferences
6 Aud4o
7 Language
0 Exit
2. Press4 to display the CHANNELS menu.
CHANNELS
1 Auto Channel Search
2 Add/Remove Channels
3 Signal Type: CABLE
4 VCR PLus+ Channel List
5 Cable Box Setup
6 DS$ Setup
0 Exit
3. Press1 to display the AUTO CHANNEL SEARCH menu.
AUTO CHANNEL SEARCH
What type of signal
are you using?
1 Cable TV
2 Antenna
3>Detect Automatically
0 Cancel
4. Select one of the three AUTO CHANNEL SEARCH options.
Choices one and two are self-explanatory. If you choose
Detect Automatically, the VCR automatically detects which
signal system you have attached to your VCR.
AUTO CHANNEL SEARCH
Nou scanning channel 14
Press any key to cancel
The VCR begins scanning for the available channels--this
takes about one to two minutes. The lowest channel istuned
once the search is complete. Now pressing CHANNEL up or
down should only select the active channels.
Detect Automatically
A strong cable or antenna signal in
your area may cause Auto Detect
to mis-detect. If this should
happen, select I or 2 for the
system you have.
13

To Change the Signal Type
1. Press MENU to display the VCR MAIN MENU.
2. Press 4 to display the CHANNELS menu.
3. Press 3 to change the Signal Type between CABLE and
ANTENNA.
To Add or Remove Channels
You may want to add or remove channels after you Auto Channel
Search, especially if some of the channels have weak signals or
you don't want to watch them.
1. Press MENU to display the VCR MAIN MENU.
2. Press 4 to display the CHANNELS menu.
3. Press 2 to display the ADD/REMOVE CHANNELS screen. Use
CHANNEL up or down or number buttons to go to the
channels you want to remove or add.
ADD/REMOVE CHANNELS
Channel 115
is presently ADDED
Press CLEAR to remove
Press MENU to exit
ADD/REMOVE CHANNELS
Channel 115
is presently REMOVED
Press INF0 to add
Press MENU to exit
TIME AND DATE
Before you set the time and date, set the Auto DST (Daylight-
Saving Time) feature to ON or OFF for your area.
Set Daylight-Saving Time
1. Press MENU to display the VCR MAIN MENU.
VCR MAIN MENU
I VCR Plus+
2 Timer Recordings
3 Time
4 Channels
5 Preferences
6 Audio
7 Language
0 Exit
Selecting Channels
The CHANNEL up and down buttons
access those channels active in your
VCR channel list.
You can still access channels not in
the channel list by using the number
buttons on the remote.
14
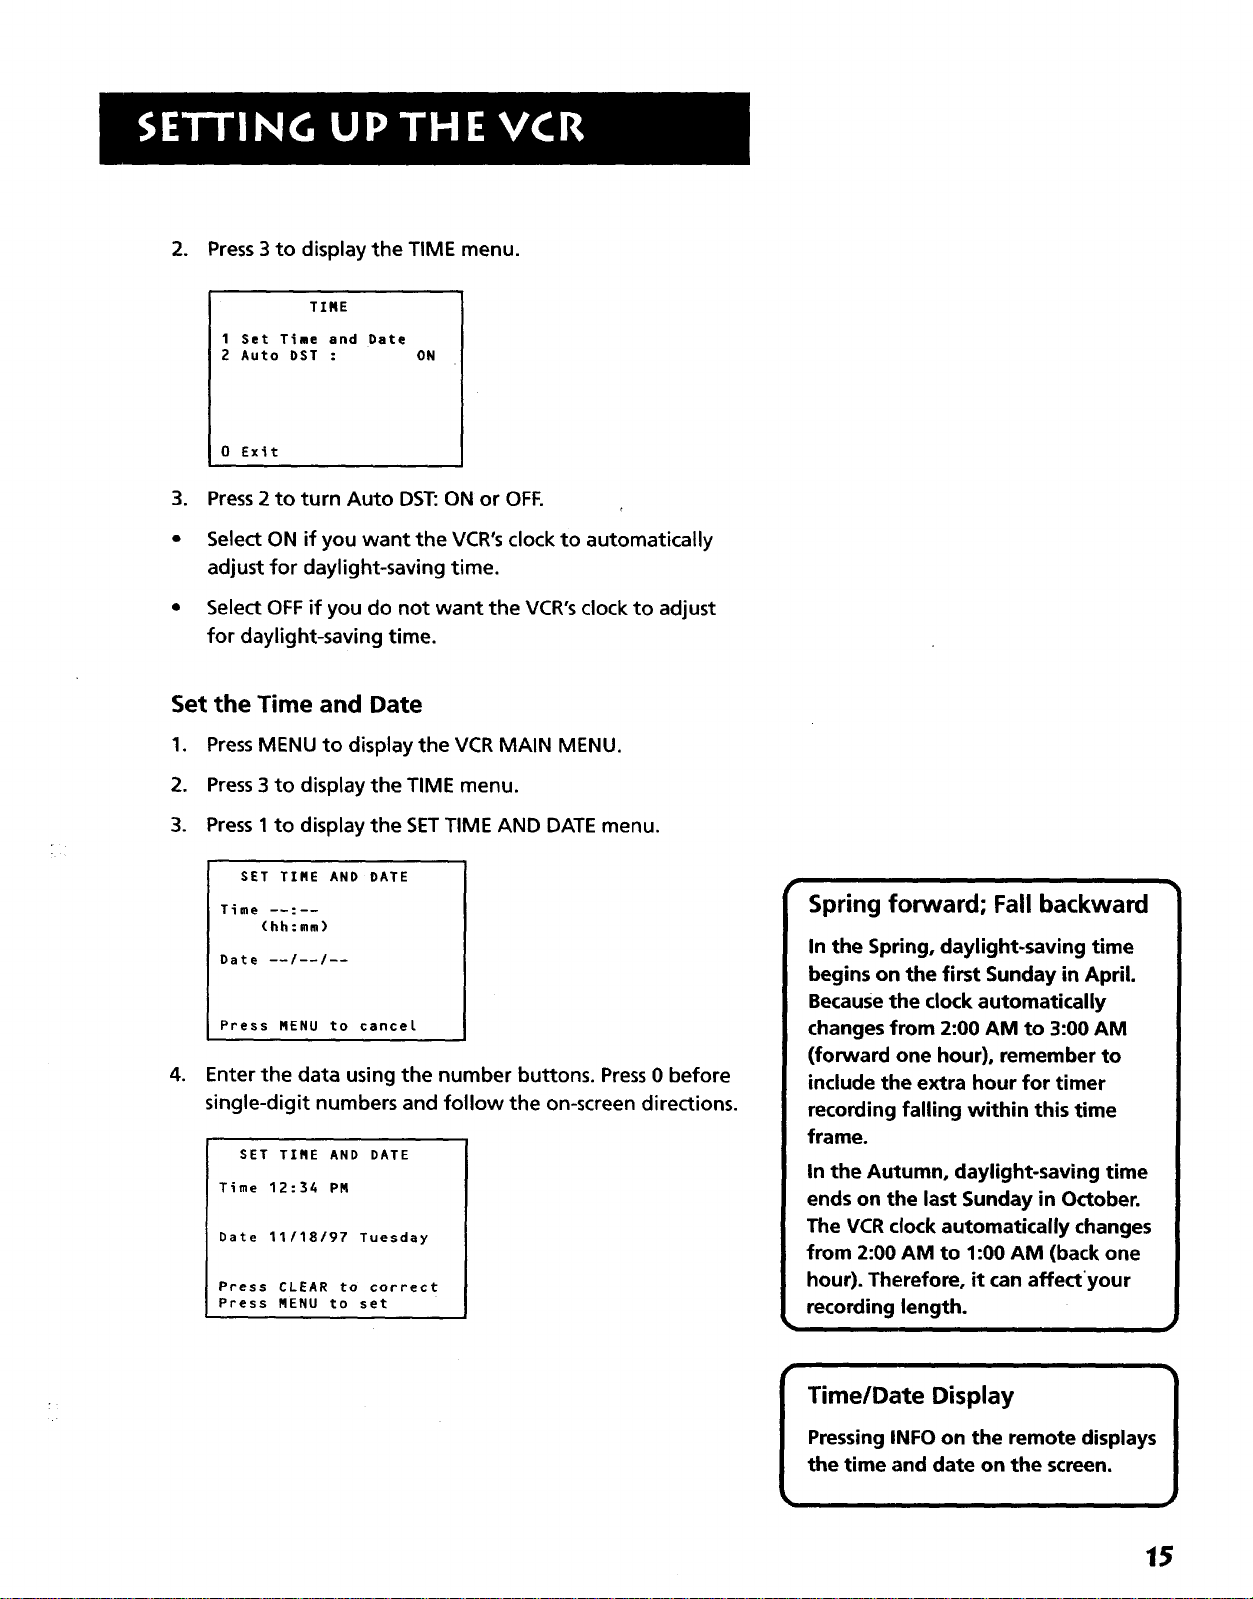
2. Press3 to display the TIME menu.
TIME
1 Set Time and Date
2 Auto DST : ON
0 Exit
3. Press2 to turn Auto DST: ON or OFF.
• Select ON if you want the VCR's clock to automatically
adjust for daylight-saving time.
• Select OFF if you do not want the VCR's clock to adjust
for daylight-saving time.
Set the Time and Date
1. PressMENU to display the VCR MAIN MENU.
2. Press3 to display the TIME menu.
3. Press1 to display the SET TIME AND DATE menu.
SET TIRE AND DATE
Time --:--
(hh:mm)
Date --/--/--
Press MENU to canceL
.
Enter the data using the number buttons. Press0 before
single-digit numbers and follow the on-screen directions.
SET TIRE AND DATE
Time 12:34 PR
Date 11/18/97 Tuesday
Press CLEAR to correct
Press MENU to set
Spring forward; Fall backward
In the Spring, daylight-saving time
begins on the first Sunday in April.
Because the clock automatically
changes from 2:00 AM to 3:00 AM
(forward one hour), remember to
include the extra hour for timer
recording falling within this time
frame.
In the Autumn, daylight-saving time
ends on the last Sunday in October.
The VCR clock automatically changes
from 2:00 AM to 1:00 AM (back one
hour). Therefore, it can affectyour
recording length.
n
Pressing INFO on the remote displays
the time and date on the screen.
15
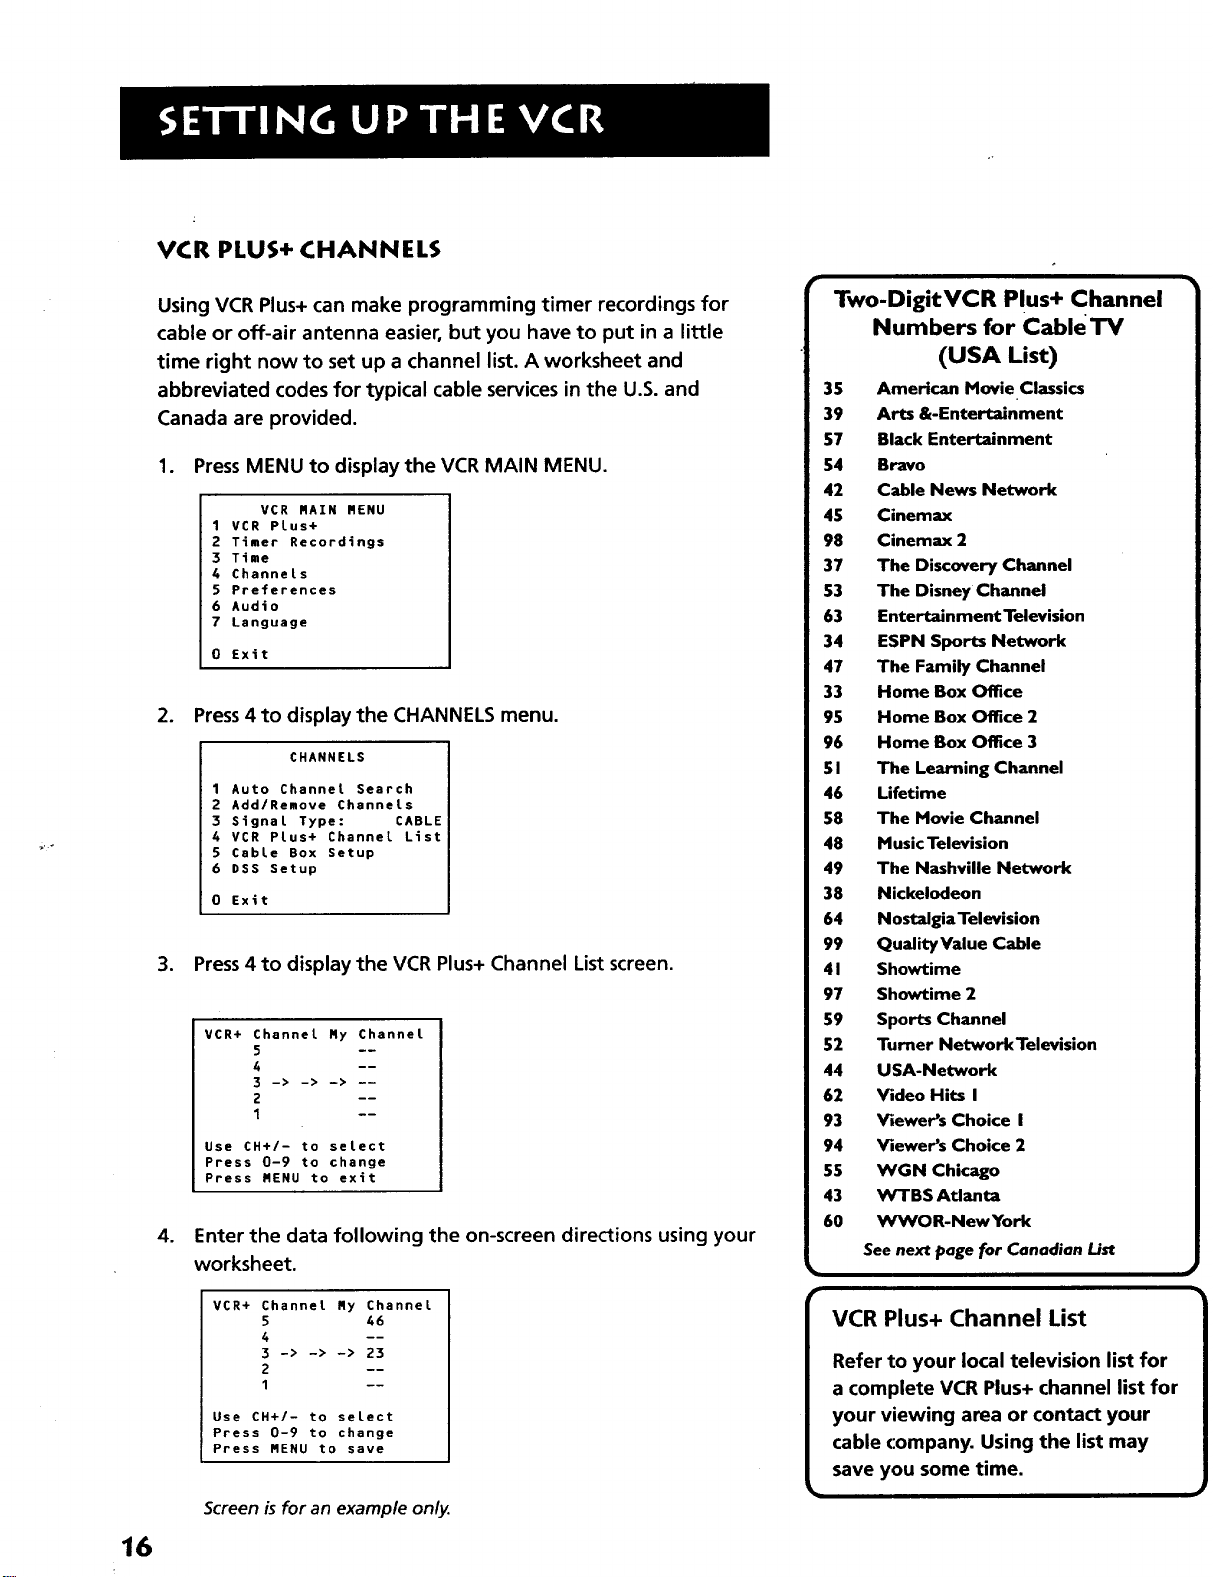
VCR PLUS+ CHANNELS
Using VCR Plus+ can make programming timer recordings for
cable or off-air antenna easier, but you have to put in a little
time right now to set up a channel list. A worksheet and
abbreviated codes for typical cable services in the U.S. and
Canada are provided.
1. PressMENU to display the VCR MAIN MENU.
VCR MAIN MENU
1 VCR Plus+
2 Timer Recordings
3 Time
4 Channels
5 Preferences
6 Audio
7 Language
0 Exit
2. Press 4 to display the CHANNELS menu.
CHANNELS
1 Auto Channel Search
2 Add/Remove Channels
3 Signal Type: CABLE
4 VCR Plus+ Channel List
5 Cable Box Setup
6 DSS Setup
0 Exit
3. Press 4 to display the VCR Plus+ Channel List screen.
VCR+ Channel By Channet
5 --
4 --
3->->->--
2 --
Use CH+/- to select
Press 0-9 to change
Press MENU to exit
.
Enter the data following the on-screen directions using your
worksheet.
Two-DigitVCR Plus+ Channel
Numbers for CableTV
(USA List)
35 American Movie Classics
39 Arts &-Entertainment
57 Black Entertainment
54 Bravo
42 Cable Hews Network
45 Cinemax
98 Cinemax 2
37 The Discovery Channel
53 The Disney Channel
63 Entertainment Television
34 ESPH Sports Network
47 The Family Channel
33 Home Box OflEce
95 Home Box Office 2
96 Home Box Office 3
51 The Learning Channel
46 Lifetime
58 The Movie Channel
48 Music Television
49 The Nashville Network
38 Nickelodeon
64 NostalgiaTelevision
99 QuaJityValue Cable
41 Showtime
97 Showtime 2
59 Sports Channel
52 Turner NetworkTelevision
44 USA-Network
62 Video Hits I
93 Viewer's Choice I
94 Viewer's Choice 2
55 WGN Chicago
43 WTBS Atlanta
60 WWOR-New York
See next page for Canadian List
16
VCR+ Channel Ry Channel
5 46
4 --
3 -> -> -> 23
2 --
Use CH+/- to select
Press 0-9 to change
Press MENU to save
Screen is for an example only.

VCR PLUS+ WORKSHEET
Broadcast or VCR Plus+ Channel Channel Number
Cable-TV Station Number** You Receive the
Name Station On*
HBO 33
ESPN 34
TwoIDigitVCR Plus+ Channel
Numbers for Cable TV
(Canadian List)
67 Allarcom PayTelevision/
Superchannel
44 Am & Entertainment
72 Cable News Network-Headline
News
61 Cable News Network
70 Canadian Home Shopping Network
56 Canal Famille
69 Cathay InternationaITelevision Inc
68 Chinavision Canada Corp
60 Country MusicTelevision
63 Family Channel
62 First Choice
96 First ChoiceTwo
97 First Choice Three
99 First Choice Four
90 House of Commons
91 La Chalne Francalse
51 The Learning Channel
65 MeteoMedia/TheWeather Network
48 MuchMusic Network
55 MusiquePlus
52 Nashville Network
73 Newsworld/CBC
53 Le Reseau des Sports
43 The Sports Network
64 Super Ecran
37 Super Ecran B
98 Super Ecran C
66 Telatino Network
46 TV5 Montreal
92 Viewer's Choice I
93 Viewer's Choice 2
94 Viewer's Choice 3
95 Viewer's Choice 4
71 VisionTV: Canada's Faith Network
38 YouthTV, Canada Inc.
k
*Check your local or cable listing for the channel number you receive this station on.
**Check your local listing for broadcast or VCR Plus+ channel number assigned.
17
 Loading...