

RCA S25 SERIES, S2501 Quick Start Manual
Press and hold on the earphones. The
LED indicator first remains lit in white.
Release the button when it starts to blink.
The indicator keeps blinking during
operation
First turn on the player and then the
earphones. The player will search for the
earphones and complete the connection
automatically. If there is no connection
after 10 seconds, press on the player and
select the Pair Up option to search for the
earphones again. See User Manual or visit
RCA website for more information
Press and hold on the earphones.
Release the button when the LED indicator
stops blinking and remains lit.
Press the reset button on the earphones
with a non-metal pointed object (e.g.
toothpick)
click
1
2
Learn more about the player
Read the user manual on the CD for more information on the player’s features
(such as stopwatch, pedometer, BMI), safety and warranty information, and answers
to Frequently Asked Questions (FAQ).
Need more help?
Visit www.rcaaudiovideo.com/downloads for the latest firmware, driver
downloads and FAQ.
JET-STREAM
Getting started
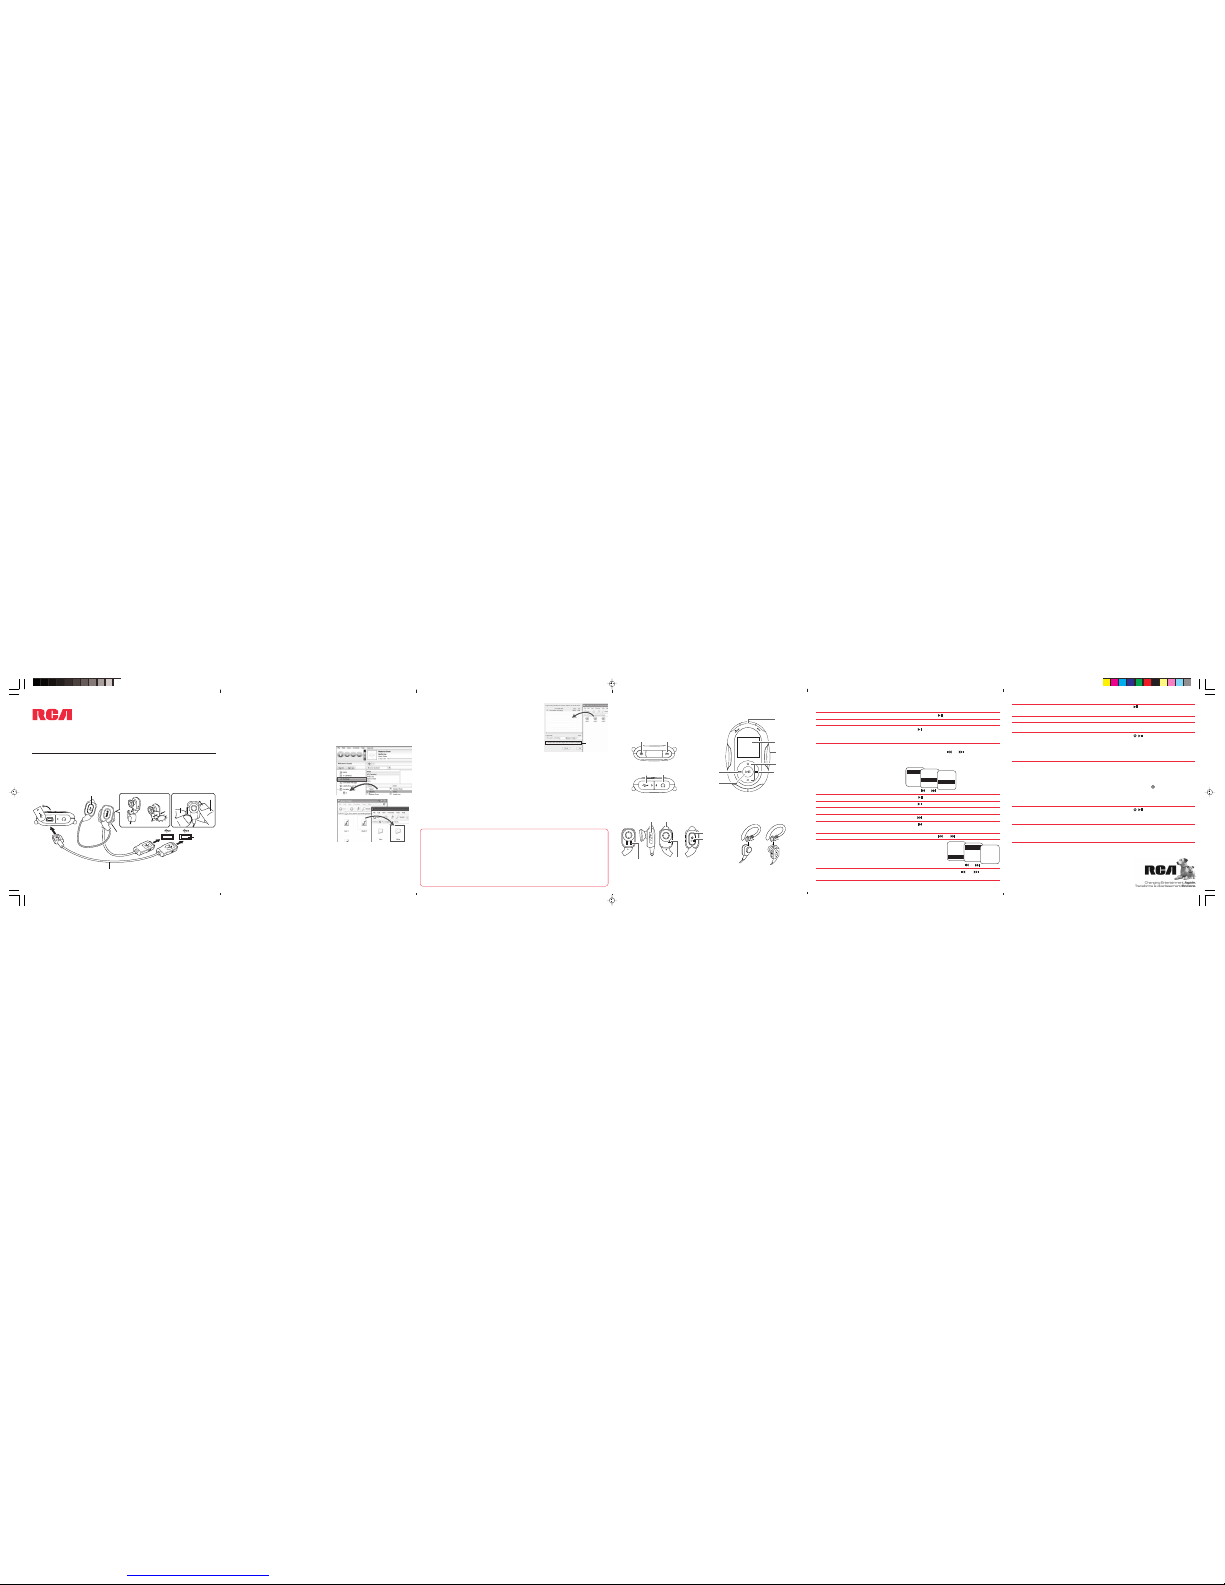
1. Install the PC software from the CD-ROM* before connecting your player.
2. Connect your player and wireless earphones to your computer.
JET-STREAM
Press and hold
Press and hold m
Press and then press and hold m while
the message “Press and hold m to unlock”
is displayed
During playback, press m to access the
player menu. Press or to go back or
advance in the menu and press + or – to
scroll up or down to the desired audio file
Press
Press , press again to resume
Press + or – during playback
Press
Press within the beginning 4 seconds of
the current audio file
Press and hold or during playback
Select “Radio”
and then “Listen”
in the player
menu
In the radio mode, press or to select
frequency
The player
To open
the cover:
lift it up
and rotate
USB port
of your
computer
USB cable*
Tocom: 5643 096C (EN/E)
3. Transfer audio files to your player with either of the two methods below:
• The player is also compatible with most PC music management software.
• For details on file transfer, refer to Transferring files to the player in the user
manual on the CD.
4. Transfer image files (photos) to the Internal Storage folder (Windows VistaTM)
or the Media folder (Windows® XP) or to the root directory (Windows® 2000)
of your player by Windows Explorer as shown in step 3.
• Windows Explorer: drag-and-drop audio
files to the Internal Storage folder (Windows
VistaTM) or the Media folder (Windows® XP)
of the player. For Windows® 2000 users, dragand-drop files to the player’s drive letter.
• Yahoo! MusicTM Jukebox (in Windows® XP
or Windows VistaTM, installed from the CD):
drag-and-drop audio files from your Yahoo
My Music library to the player.
General controls
Menu button
USB jack
Earphone jack
Go back/rewind
button
On/off and
Play/pause
button
Armband/
wristband ring
Volume buttons
Advance/fast
forward button
Turn ON or OFF the player
Lock or unlock the keys
Unlock the keys after the screensaver
has activated
Browse for an audio file
Play an audio file
Pause the playback
Adjust the volume
Skip to the next audio file
Skip to the previous audio file
Rewind or fast forward an audio file
Listen to the radio (wired earphones
must be used)
Select radio frequency
Reset the player
Delete files from the player
Press and hold for longer than 10
seconds to reset the player
Refer to page 15 of the user manual
Thomson Inc.
P.O. Box 1976
Indianapolis, IN 46206-1976
© 2007 Thomson Inc.
*accessory supplied
Display
QuickStartGuide
S25 series
www.rcaaudiovideo.com
Congratulations on purchasing your new RCA Player.
Please read these instructions for quick tips on using the player.
For information on new and upcoming products and to register your new player, visit
www.rcaaudiovideo.com.
Do not return this product to the store.
Wireless button
(refer to page 35 of the
user manual for details)
Windows is a registered trademark of Microsoft Corporation in the United States and other countries.
Charger for wireless
earphones*
To place the left earphone
in the charger:
To detach from the charger:
Push
Push
Hold the
charger
Push earphone forward
Volume buttons
Reset button
On/off and
Play/pause
button
Charging contacts
Left Right
Ear clips (optional)
Orange LED lights during charging and turns off
when charging is completed. If it is blinking quickly
in white during use, please recharge the earphones.
or
+
or
–
Music
Pictures V
Video
Radio >
Artists
Albums V
Titles
Genres >
Song 1
Song 2 V
Song 3
Song 4 >
or
LED indicator
Music
Pictures V
Video
Radio >
Listen
Playback
Stereo
FM 99.10MHz
check
here
Top
Bottom
The player
Wireless earphones
Basic operations of the player:
Turn ON the wireless earphones
Connect the wireless earphones with
the player
Turn OFF the wireless earphones
Reset the wireless earphones
Basic operations of the wireless earphones:
Tips for the wireless earphones:
• For best reception:
• The FM radio feature is not available for wireless earphone use. Use the wired
earphones for listening to the FM radio.
Tips for the pedometer:
• Use the player on your arm with the armband provided for best pedometer
accuracy.
5. Convert and transfer video files to your player
by using the RCA Video Converter (installed from
the CD): drag-and-drop video files from Windows
Explorer to the converter and check the box as
shown on the right before clicking “Convert”.
6. Disconnect the player from the computer and
enjoy music/video on the go.
Wireless antenna
Wireless antenna
• The player and wireless earphones charge automatically every time you connect
them to your computer. They should charge for at least 3 hours before using
for the first time.
• Please find more information on how to operate your player (including the use
of your wireless earphones) in the General Controls section of this Quick Start
Guide.
1) Wear the player on your right side.
2) Make sure the distance between the earphones and the player is less than 15
feet (about 5 meters).
3) Make sure there are no obstructions between the earphones and player.
4) Avoid covering the wireless antenna on both the player and the earphones.
5) Avoid placing the player near metal objects or walls.
Trademark Registered
Marca Registrada
Marque Deposée
www.rcaaudiovideo.com
click
1
2
Presione y sostenga
Presione y sostenga m
Presione y luego presione y sostenga m
mientras el mensaje “Press and hold m to
unlock” se visualiza
Durante la reproducción, presione m para
accesar el menú del reproductor. Presione
ó para retroceder o avanzar el menú y
presione + ó –
para desplazarse
arriba o abajo del
archivo de audio
deseado
Presione
Presione , presione otra vez para
reanudar
Presione + ó – durante la reproducción
Presione
Presione dentro de los primeros 4
segundos del archivo de audio actual
Presione y sostenga ó durante la
reproducción
Seleccione
“Radio” y luego
“Oir” en el menú
del reproductor
En el modo radio, presione ó para
seleccionar frecuencia
Aprenda más sobre el reproductor
Lea el manual del usuario en el CD para más información sobre las características
(por ejemplo: cronómetro, podómetro, IMC), seguridad, información de garantía del
reproductor, y Respuestas a Preguntas Frecuentes (FAQ).
¿Necesita más ayuda?
Visite www.rcaaudiovideo.com/downloads para el más reciente firmware, descargas
de controladores y respuestas a preguntas frecuentes (FAQ).
Para comenzar
1. Instale el software de PC desde el CD-ROM* antes de conectar su reproductor.
2. Conecte su reproductor y audífonos inalámbricos a su computadora.
el reproductor
para abrir la
cubierta:
levántela y gire
puerto USB de
su computadora
cable* USB
* accesorio suministrado
Guía de InicioRápido
S25 series
www.rcaaudiovideo.com
Felicitaciones por la compra de su nuevo Reproductor RCA.
Por lea estas instrucciones para tips rápidos sobre el uso del reproductor.
cargador para
audífonos
inalámbricos*
Para colocar el audífono
izquierdo en el cargador:
Para desconectar del
cargador:
empuje
empuje
Sostenga el
cargador
Tocom: 5643 096C (EN/E)
JET-STREAM
JET-STREAM
3. Transfiera archivos de audio a su
reproductor con alguno de los dos métodos
siguientes:
• El reproductor es compatible también con la mayoría del software de
administración de música de PC.
• Para detalles sobre transferencia de archivo, consulte Transferencia de archivos
al reproductor en el manual del usuario en el CD.
4. Transferencia de archivos de imagen (fotos) a la carpeta Almacenamiento
Interno (Windows VistaTM) o a la carpeta Medios (Windows® XP) o al directorio
raíz (Windows® 2000) de su reproductor mediante el Explorador de Windows
como se muestra en el paso 3.
• Explorador de Windows Explorer: arrastre
y suelte archivos de audio a la carpeta
Almacenamiento Interno, (Windows VistaTM)
o a la carpeta Medios (Windows® XP) del
reproductor.
Para usuarios de Windows® 2000, arrastre y
suelte archivos a la letra de la unidad del
reproductor.
• Yahoo! MusicTM Jukebox (en Windows®
XP o Windows VistaTM, instalado desde el
CD): arrastre y suelte archivos de audio
desde su librería Yahoo My Music library al
reproductor.
Windows es una marca registrada de Microsoft Corporation en los Estados Unidos y otros países.
No regrese este producto a la tienda.
Cheque
aquí
5. Conversión y transferencia de archivos de
vídeo a su reproductor usando el Convertidor
de Vídeo RCA (instalado desde el CD): arrastre y
suelte los archivos de video desde el Explorador
de Windows al convertidor y cheque la casilla
como se muestra a la derecha antes de hacer clic
en “Convertir”.
6. Desconecte el reproductor de la computadora y
disfrute de música/ video portátiles.
Controles generales
botón de menú
receptáculo USB
receptáculo para
audífono
botón retroceder/
rebobinar
botón On/off y
Reproducir/pausa
anillo para banda
del brazo/
muñequera
botones de
volumen
botón avance/
avance rápido
pantalla
botones de volumen
botón de reinicio
botón On/
off y
Reproducir/
pausa
contactos de
carga
izquierdo derecho
Clips para oído (opcionales)
indicador LED
El reproductor
Audífonos inalámbricos
antena
inalámbrica
antena inalámbrica
Operaciones básicas del reproductor:
Reinicio del reproductor
Elimina archivos del reproductor
Presione y sostenga por más de 10
segundos para reiniciar el reproductor
Consulte la página 15 del manual del
usuario
Operaciones básicas de los audífonos inalámbrico:
El LED naranja se ilumina durante la carga y se apaga cuando
la carga está terminada. Si está parpadeando rápidamente en
blanco durante el uso, por favor recargue los audífonos.
Empuje hacia adelante el audífono
Tips para los audífonos inalámbricos:
• Para mejor excepción, considere:
• La característica de radio FM no está disponible para uso con el audífono
inalámbrico. Utilice los audífonos inalámbricos para escuchar el radio.
Tips para el podómetro:
• Use el reproductor en su brazo con la banda para el brazo suministrada para mejor
precisión del podómetro.
botón inalámbrico
(Consulte la página 35
para detalles.)
Arriba
Parte inferior
Enciende y apaga el reproductor
Bloquea o desbloquea las teclas
Desbloquea las teclas después de que el
protector de pantalla se ha activado
Navega por un archivo de audio
Reproduce un archivo de audio
Pausa la reproducción
Ajusta el volumen
Salta al siguiente archivo de audio
Salta al archivo de audio anterior
Rebobinado o avance rápido de un
archivo de audio
Para escuchar el radio (se debe usar
audífonos alámbricos)
Para seleccionar la frecuencia de radio
ó
+
ó
–
Music
Pictures V
Video
Radio >
Artists
Albums V
Titles
Genres >
Song 1
Song 2 V
Song 3
Song 4 >
ó
Music
Pictures V
Video
Radio >
Listen
Playback
Stereo
FM 99.10MHz
Presione y sostenga en los audífonos.
El indicador LED primero permanece
encendido en blanco. Libere el botón
cuando comience a parpadear. El indicador
se mantiene parpadeando durante la
operación
Primero encienda el reproductor y luego
los audífonos. El reproductor buscará los
audífonos y completará la conexión
automáticamente. Si no hay conexión
después de 10 segundos, presione en el
reproductor y seleccione la opción Nivelar
para buscar los audífonos otra vez. Para
más información vea el Manual del Usuario
o visite el sitio web RCA
Presione y sostenga en los audífonos.
Libere el botón cuando el indicador LED
deje de parpadear y permanezca
encendido.
Presione el botón de reinicio en los
audífonos con un objeto puntiagudo no
metálico (por ejemplo, un palillo)
Enciende los audífonos inalámbricos
Conecta los audífonos inalámbricos con
el reproductor
Apaga los audífonos inalámbricos
Reinicia los audífonos inalámbricos
• El reproductor y los audífonos inalámbricos cargan automáticamente cada vez
que usted los conecta a su computadora. Ellos deberán cargar por al menos 3
horas antes de usarlos por primera vez.
• Por favor consulte la sección Controles generales para operar este reproductor
(incluyendo audífonos inalámbricos).
1) Use el reproductor en su lado derecho.
2) Asegúrese de que la distancia entre los audífonos y el reproductor sea menor a 15
pies (unos cinco metros).
3) Asegúrese de que no haya obstrucciones entre los audífonos y el reproductor.
4) Evite cubrir la antena inalámbrica tanto en el reproductor como en los audífonos.
5) Evite colocar el reproductor cerca de objetos metálicos o paredes.
Para información sobre nuevos productos y para registrar
su nuevo reproductor, visite www.rcaaudiovideo.com.
Thomson Inc.
P.O. Box 1976
Indianapolis, IN 46206-1976
© 2007 Thomson Inc.
Trademark Registered
Marca Registrada
Marque Deposée
www.rcaaudiovideo.com
 Loading...