

Page 1

Page 2

Be sure to read all the safety infimnation before you begin to use this product.
WARN|NG]: To reduce the risk of fire or electric shock, do not
expose this product to rain or moisture.
This symbol indicates "dangerous voltage"
inside the product that presents a risk of
electric shock or personal injury.
This symbol indicates important instruc-
tions accompanying the product.
To reduce the risk of electric shock, do not remove cover (or back). No use>serviceable pans
inside. Refer servicing to qualified service i?ersonneI.
CAUTION: To prevent electric shock, match wide blade of
plug to wide slot, fully insert.
ATTENTION: Pour 6viter les chocs 61ectriques, introduire la
lame la plus large de la fiche dans la borne correspondante de la
prise et lxmsser jusqu au fond.
This device complies with part 15 of FCC rules. Operation is subject to the
condition that this device does not cause harmful interference. FCC ReguLations
state that unauthorized changes or modifications to this equipment may void the
user's authority to operate it.
Note to Cable TV Installer:This reminder is provided to call your attention to
Article 820-40 of the National Electrical Code (Section 54 of the Canadian
Electrical Code, Part t) which provides guidelines for proper grounding and, in
particular, specifies that the cable ground shall be connected to the grounding
system of the building as close to the point of cable entry as practical.
Please fill out the product registration card and return it immediately. Return-
ing this card allows us to contact you if needed.
Keep your sales receipt for proof of purchase to obtain warranty parts and service
and attach it here. Record the serial number and model numbers located on the
back of the product.
Model No:
Serial No:
Purchase Date:
Dealer/Address/Phone:
Page 3
Your television is designed to give you years of enjoyment and performance. To
get the most out of your new purchase, we suggest that you take a t)w minutes
right now to read through this instruction manual.
If you have any problems, consult the Troubleshooting section for the solution.
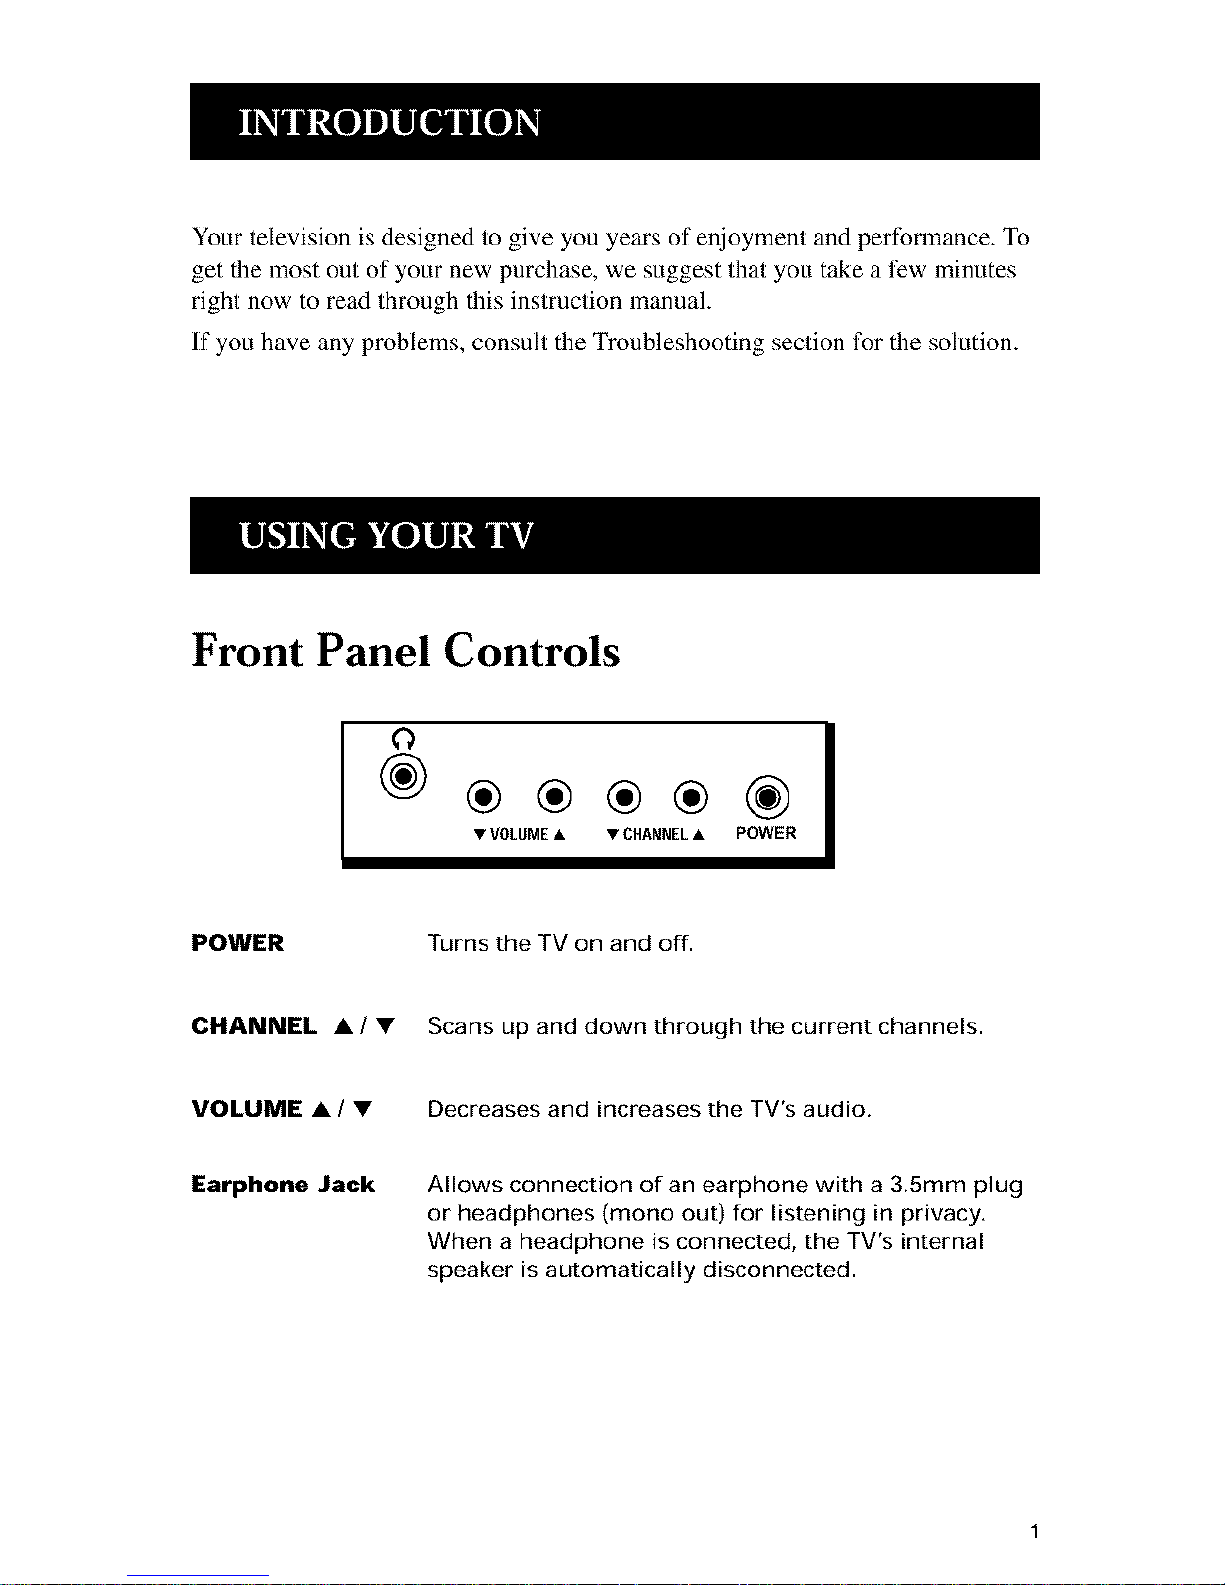
Front Panel Controls
•
POWER Turns the TV on and off.
CHANNEL • / • Scans up and down through the current channels.
VOLUME • / • Decreases and increases the TV's audio.
Earphone Jack Allows connection of an earphone with a 3.5mm plug
or headphones (mono out) for listening in privacy.
When a headphone is connected, the TV's internal
speaker is automatically disconnected.
Page 4

Back Panel Controls
0
ANT
ANT.
Takes the signal input from a cable, cable box, or an
off-air antenna.
AUTO PROGRAM
TVICATV
Searches all channels through the antenna or cable TV
system and automatically stores active channels into
memory.
Selects off-air TV (69 channel capability) or CATV (125
channel capability). Pressing the button cycles
through TV, STD, IRC, or HRC mode which is displayed
on the TV screen.
V-HOLD
CONTRAST
BRIGHT
If picture is rolling, slowly turn the knob until the
picture locks into place.
AdJusts the level of black, grays and white to provide a
sharp, clear picture.
Adjusts the black level of the picture.
Setup and Connection
Step 1: Connect Your TV
Connect the cable from your cable system or off-air antenna to the ANT.
connector on the back of the TV, as shown.
ANTENNA (:ABLE, CABLE BOX OR VCR
S
Iv Back Panel
I
Page 5

Step 2: Connect Dipole Antenna (Optional)
Follow the steps to connect the indoor antenna supplied with your TV (only
if you do not connect an outdoor antenna or a cable-TV system).
Insert the dipole antenna into the pocketed slot on the back of your set.
Stand at the back of your set with the antenna twin-lead facing you, and
press the base of the antenna into the slot until it locks in place.
Connect the ends of the twin-lead to the Antenna Adapter (optional).
Connect the Antenna Adapter to the ANT. connector on the back of the TV.
Later, after you've turned on the TV, adjust the length and position of the
antenna rods for best reception.
• For viewing VHF channels, extend the rods fully.
• For viewing UHF channels, adjust the rods for best reception.
Slot
Dipole Antenna
fwin Lead
Step 3: Plug in Your TV
Plug the end of the power cord into the wall outlet, matching the wide blade
of the plug with the wide slot in the outlet. Be sure to insert the plug
completely.
Step 4: Turn on the TV
Press the POWER button on the front panel.
Step 5: Select the TV signal
Press the TV/CATV button on the back of the TV to select the current
antenna type: TV (off-air for UHF/VHF), Standard cable (STD) IRC cable or
HRC Cable.
Note: If you have cable-TV and don't know the type, contact your cable
company.
Page 6

Step 6: Auto Program Channels
Press the AUTO PROGRAM button on the back of the TV, The TV
automatically searches for all the active channels available through the
antenna input. When the TV finds an active channel, it places it in the
channel list.
Step 7: Adjust Picture
If necessary, use the controls (V-HOLD, CONTRAST, and BRIGHT) on the
back of the TV to adjust your picture.
If you experience any difficulty with your TV, check these basic remedies
before calling your service technician.
TV will not turn on or controls don't work
• Check to make sure it is plugged in.
• Check the wall receptacle (or extension cord) to make sure it is "live"
by plugging in something else.
• Try unplugging set for one minute, plugging it back in, and then
turning it on again.
Turns on or off while playing
• Electronic protection circuit may have been activated because of a
power surge. Wait 30 seconds and then turn on again. If this happens
frequently, the voltage to your TV may be abnormally high.
No sound, picture okay
• Maybe sound is turned down. Try pressing volume up button to
restore sound.
• Remove earphone or headphones if they are attached to the earphone
jack.
No picture, no sound, but power is on
• Maybe cable/air function is in wrong position. Try another channel.
• Maybe a vacant channel is tuned. Try another channel.
Sound okay, picture poor
• Check antenna connections.
• Try adjusting contrast and brightness of the TV.
4
Page 7

What your warranty covers:
• Any defect in materials or workmanship.
For how long after your purchase:
• 90 days for labor charges.
• One year for parts.
• Two years for the picture tube.
The warranty period for rental units begins with the first rental or 45 days from date
of shipment to the rental firm, whichever comes first.
What we will do:
Pay any Authorized Television Service Center the labor charges to repair your
television.
Pay any Authorized Television Service Center for the new or, at our option,
refurbished replacement parts and picture tube required to repair your television.
How you get service:
Request on location service from any Authorized Television Service Center.
• To identify your nearest Authorized Television Service Center call 1-800-336-1900.
• Show the Authorized Service Center Representative your evidence of purchase
date or first rental.
What your warranty does not cover:
• Customer instruction. (Your Owner's Manual clearly describes how to install,
adjust, and operate your television. Any additional information should be
obtained from your dealer.)
Installation and related adjustments.
Signal reception problems not caused by your television.
Damage from misuse or neglect.
Batteries.
Customer replacement fuses.
Images burnt onto the screen.
A television that has been modified or incorporated into other products or is used
for institutional or other commercial purposes.
• A television purchased or serviced outside the U.S.A.
• Acts of God, such as but not limited to lightning damage.
Product Registration:
Please complete and mail the Product Registration Card packed with your
television. It will make it easier to contact you should it ever be necessary. The
return of the card is not required for warranty coverage.
How state law relates to this warranty:
• This warranty gives you specific legal rights, and you also may have other rights
that vary from state to state.
If you purchased your product outside the United States:
• This warranty does not apply, Contact your dealer for warranty information.
Service calls that do not involve defective materials or workmanship are not covered
by this warranty. Costs of such service calls are the sole responsibility of the
purchaser.
Page 8

If your TV needs service, please refer to the warranty page. Please do not
send any products to the address listed below. This only adds delays for
service of your TV.
Visual Security Concepts Inc.
2337 Neshaminy Blvd.
Bensalem, PA 19020
Printed in Malaysia
TOCOM 1561941A
 Loading...