

Page 1

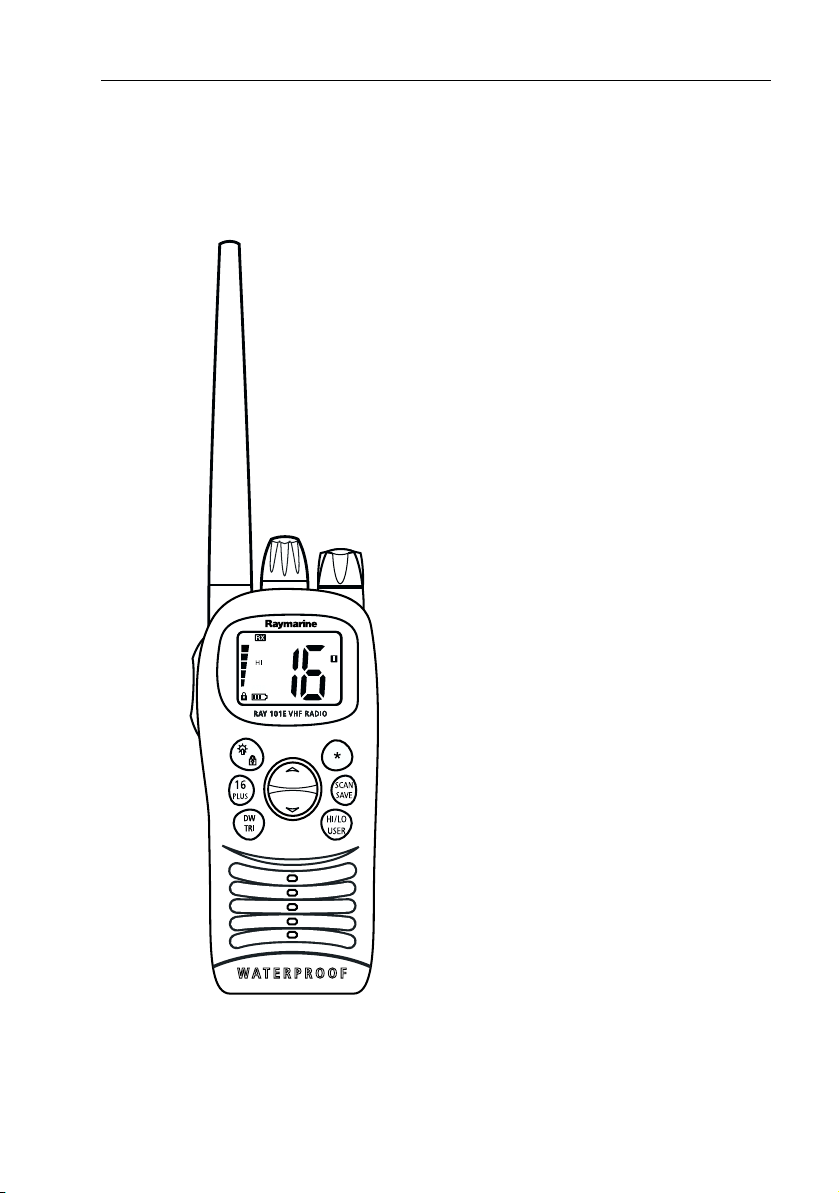
Ray101E
Handheld VHF
Marine Radio
Owner’s Handbook
Document number: 81230-3
Date: January 2005
Page 2

Page 3

3
Contents
About this Handbook .............................................................................................7
Important Information .........................................................................................8
Chapter 1: General Information .......................................................................11
1.1 Introduction ......................................................................................... 11
1.2 Features ............................................................................................... 11
1.3 Licensing Requirements ....................................................................... 12
Chapter 2: Installation .......................................................................................13
2.1 Unpacking and Inspection .................................................................... 13
Equipment Supplied ............................................................................. 13
2.2 Attaching the Antenna ......................................................................... 13
2.3 Using the Belt Clip ................................................................................ 14
2.4 Attaching the Wrist Strap ..................................................................... 14
2.5 Battery Usage ...................................................................................... 14
Battery Tray .......................................................................................... 15
Charging Rechargeable Ni-MH Cells ................................................... 17
Charger LED ................................................................................... 18
Storage .......................................................................................... 19
Chapter 3: Getting Started ................................................................................21
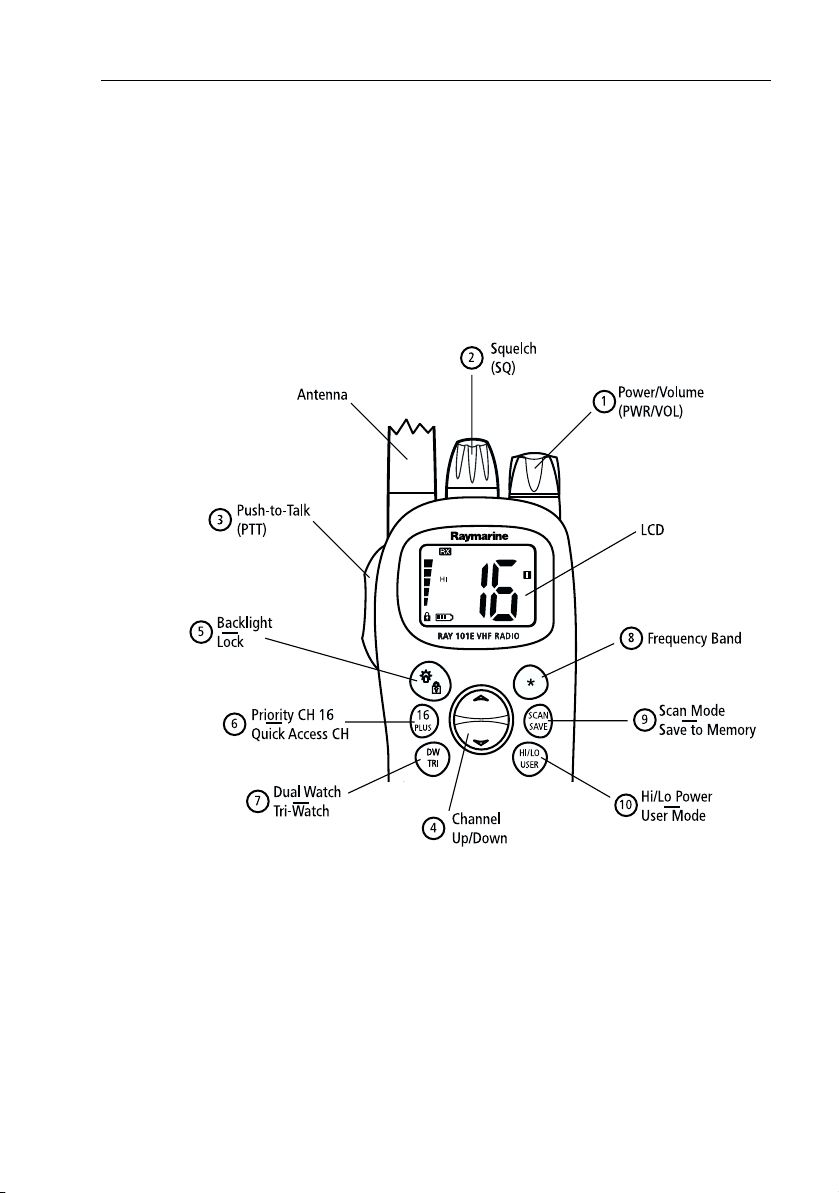
3.1 Keypad and Rotary Knobs .................................................................... 21
Rotary Keys .................................................................................... 22
Push Keys ....................................................................................... 22
Description ........................................................................................... 22
1. PWR/VOL ................................................................................... 22
2. SQ .............................................................................................. 22
3. PTT ............................................................................................. 22
4. UP/DOWN .................................................................................. 23
5. Backlight / Keylock ..................................................................... 23
6. 16/PLUS ..................................................................................... 23
7. DW/TRI ....................................................................................... 23
8. Frequency Band (
9. SCAN / SAVE ............................................................................... 23
10. HI/LO / USER ............................................................................. 23
3.2 LCD Display .......................................................................................... 24
1. (TX) Transmitting .............................................................................. 24
2. (RX) Receiving .................................................................................. 24
3. (USER) Favourite Channel Mode ...................................................... 24
4. (SAVED) Memory Mode .................................................................... 25
5. (P) Priority Mode .............................................................................. 25
6. (SCAN) All Scan/Saved Scan/Priority Scan ........................................ 25
*) .................................................................... 23
Page 4

4 Ray101E Handheld VHF Radio
7. (U I C) Channel Set ............................................................................ 25
8. (B) Receive-only Channel .................................................................. 25
9. (A) Simplex Channel ......................................................................... 25
10. Channel Number ............................................................................25
11. Battery Level ...................................................................................25
12. Keylock ........................................................................................... 26
13. Indicators ........................................................................................26
14. Signal Strength ...............................................................................26
Chapter 4: Operating the Radio ........................................................................27
4.1 Turning the Power ON and OFF .............................................................27
4.2 Setting the Volume ...............................................................................27
4.3 Setting the Squelch ............................................................................... 28
4.4 Setting the Power Output .....................................................................28
4.5 Setting the Channel ..............................................................................29
4.6 Selecting a Weather Channel (If Available) ...........................................29
Weather Alert Operation (If Available) ........................................... 30
4.7 Setting the Frequency Band ..................................................................30
4.8 Selecting Priority Mode ........................................................................31
4.9 Selecting the Favourite (PLUS) Channel ................................................32
Reprogramming the Favourite (PLUS) Channel ..................................... 32
4.10 Transmitting .........................................................................................33
4.11 Turning On the Backlight ......................................................................34
4.12 Turning On the Keylock ......................................................................... 34
4.13 Using the Scan Modes ..........................................................................35
All Scan ................................................................................................. 35
Saved (Memory) Scan ...........................................................................36
Priority All Scan ....................................................................................37
Priority Saved Scan ...............................................................................37
4.14 Adding Channels to Memory ................................................................ 38
4.15 Using the Monitor Modes .....................................................................39
Dual Watch ........................................................................................... 39
Tri Watch ...............................................................................................40
4.16 USER Channel Mode .............................................................................41
4.17 ATIS ID Number .................................................................................... 42
Programming the ATIS ID Number ........................................................42
4.18 Resetting Factory Defaults ....................................................................46
Chapter 5: Customer Service ............................................................................47
5.1 How to Contact Raymarine ...................................................................47
On the Internet .....................................................................................47
Customer Support ..........................................................................47
In Europe ..............................................................................................47
Technical Support ...........................................................................48
Page 5

5
Accessories and Parts ..................................................................... 48
Worldwide Support .............................................................................. 48
Appendix A: Specifications ..............................................................................49
Appendix B: Channel List .................................................................................51
International VHF Marine Radio Channels & Frequencies 51
European Private Channels and Frequencies ........................................ 54
U.S. VHF Marine Radio Channels and Frequencies ............................... 55
Canadian VHF Marine Radio Channels and Frequencies...................... 58
WX Channels (North America only) ...................................................... 63
Appendix C: Glossary ........................................................................................65
Index .............................................................................................67
Page 6

6 Ray101E Handheld VHF Radio
Page 7

7
About this Handbook
Purpose
This handbook describes the Ray101E portable VHF marine radio. The Ray101E
provides communications on all International marine channels, pre-set private
channels, and (if programmed) all US and Canadian and marine channels.
Conventions Used
Throughout this handbook, the dedicated (labelled) keys are shown in bold
capitals (for example: SCAN/SAVE). The LCD indicators and functions are
shown in normal capitals (for example: TX).
➤ Operating procedures, which may consist of a single key-press or a sequence
of numbered steps, are indicated by an arrow icon shown in the margin.
Technical Accuracy
To the best of our knowledge, the information in this handbook was correct as it
went to press. However, our policy of continuous product improvement and
updating may change specifications without prior notice. As a result, unavoidable
differences between the product and handbook may occur from time to time.
Raymarine cannot accept liability for any inaccuracies or omissions it may
contain.
For the latest product information visit our website:
Warranty
To register your new Raymarine product, please take a few minutes to fill out the
warranty registration card found at the end of this handbook. It is very important
that you complete the owner information and return the card to the factory in
order to receive full warranty benefits.
www.raymarine.com
Page 8

8 Ray101E Handheld VHF Radio
Important Information
Intended Use
The Ray101E is a VHF radiotelephone that is intended for general communication
within the Maritime Mobile Service worldwide and is for use on non-SOLAS
vessels.
Safety Warnings
CAUTION: Navigation Aid
Th i s u ni t i s o nly an ai d t o n a vi ga t io n. I ts ac c ur ac y ca n b e a ff e ct ed b y m an y f ac t or s,
including equipment failure or defects, environmental conditions, and improper
handling or use. It is the user’s responsibility to exercise common prudence and
navigational judgments. This radio should not be relied upon as a substitute for
such prudence and judgment.
CAUTION: Battery and Charger Use
• The battery charger is intended for use in 12 VDC systems only.
• Charge the batteries with the radio powered off for at least 24 hours before
using the radio for the first time or if the radio has not been used in several
months.
• Do not operate the radio in the charger when the battery tray is empty as this
may damage the radio.
• Do not transmit with the radio in the charger.
• Do not short terminals in charger base.
• Do not place charger in water.
• Do not use charger if power plug or cable is damaged.
• Do not charge batteries with + and – terminals reversed.
• Do not recharge batteries if physically deformed or leaking.
• Do not charge anything other than AA-size Ni-MH cells in charger.
• Do not mix Alkaline and Ni-MH cells.
• Do not solder cells directly into battery tray.
• Do not dispose of cells in fire.
• Do not dismantle cells.
• Replace all cells at the same time.
• Store cells in a cool, dry place.
Page 9

9
• Charge and discharge under ambient temperature mentioned in cell’s specifications.
• Using batteries in extreme conditions (extreme temperature, deep cycle,
extreme overcharge and over discharge, etc.) may affect their service life.
WARNING: Alkaline Battery Use
When Alkaline cells are used, do not place radio in Charger unless
Charge Switch on radio is set to ALKALINE. Charging Alkaline cells
may cause excessive heat and could result in cell leakage causing
damage or injury.
EMC Conformance
All Raymarine equipment and accessories are designed to the best industry
standards for use in the recreational marine environment. Their design and
manufacture conform to the appropriate Electromagnetic Compatibility (EMC)
standards but correct installation and use is required to ensure that performance
is not compromised.
Raymarine is a registered trademark of Raymarine UK Limited.
© Raymarine UK Limited 2005
Page 10

10 Ray101E Handheld VHF Radio
Certificate No.
RT042
We Raymarine Limited Anchorage Park
declare, under our sole responsibility, that the products identified in this declaration, and to which this
declaration relates, are in conformity with the essential requirements of European Parliament and Council
Directive:
1999/5/EC on radio equipment and telecommunication terminal equipment and the mutual
recognition of their conformity.
Product Name: Raymarine RAY 101E Handheld VHF Radio
Product Number(s): E43028
Product Option: UK power converter
Product Number: E46038
Product Option: European power converter
Product Number: E46041
The products have been assessed to Conformity Procedure Annex IV of the Directive and by application of all or
part of the following standard(s):
Non-Harmonised Standards(s): EN 60945, EN 301 178-1, EN 300 698-1,
The satisfactory assessment of the above, allows a presumption of Conformity to the following Harmonised
standards:
Harmonised Standard(s): EN 301 178-2, EN 300 698-2, EN 300 698-3
The assessment is consistent with a Technical Construction File showing conformity with the essential
requirements of the Directive and has been reviewed by Notified Body No. 0168
The RAY 101E is labelled with the CE conformity marking, the identification number of the Notified Body and
class identifier.
Signatory: Name Adil Abbas
Title International Compliance Manager
Company Name Raymarine Limited
Company Address Anchorage Park
Portsmouth
Hampshire
England P03 5TD
Portsmouth, Hampshire
England PO3 5TD
Signature _________________________
Date February 2004
Page 11
Chapter 1: General Information 11
Chapter 1: General Information
1.1 Introduction
The Ray101E is a microprocessor-controlled,
portable transceiver that provides reliable
simplex (single frequency) and semi-duplex (two
frequency) communications. This handbook
describes the physical and functional
characteristics of the radio.
The Ray101E provides communications on all
International marine channels, pre-set private
channels, and (if programmed) all US and
Canadian and marine channels. Refer to the
Frequency Tables in Appendix B, which list all
marine VHF channels available in the radio. You
should familiarize yourself with these tables as
you are responsible for using the proper channels.
1.2 Features
D6711-1
The Ray101E is designed and manufactured to
provide ease of operation with excellent
reliability. The Ray101E features:
• Waterproof construction to IPX-7 standard
• Saved-channels Scan and Priority Scan
• ATIS operation, if required
• Private Channels (if so licensed)
• Dual/Tri Watch Monitor Modes
• Dedicated Priority Mode Key
• Programmable favourite Channel key
• Ni-MH Batteries, AA-size (included)
• Ni-MH Quick Charger (included)
• 12VDC Cigarette Lighter Adapter (included)
Page 12

12 Ray101E Handheld VHF Radio
1.3 Licensing Requirements
Regulations in some areas require that you obtain an operator license before
operating VHF radio equipment. It is your responsibility to determine whether a
license is required in your area before operating this equipment.
Automatic Transmission Identification System
(ATIS)
If needed, your Ray101E can activate the Automatic Transmission Identification
System (ATIS) feature for use in the inland waterways of European countries that
require automatic identification transmission. An ATIS ID number is required to
operate the ATIS feature. Your ATIS number is derived from your vessel’s call sign.
Your authorized Raymarine dealer can assist you in decoding the number. You can
then program the ATIS number into your Ray101E using the operation described
in this handbook. If regulations in your area do not permit you to program the
ATIS number yourself, you can have your authorized Raymarine dealer program
the number for you.
Page 13

Chapter 2: Installation 13
Chapter 2: Installation
2.1 Unpacking and Inspection
Use care when unpacking the unit from the shipping carton to prevent damage to
the contents. It is also good practice to save the carton and the interior packing
material in the event you must return the unit to the factory.
Equipment Supplied
The following is a list of materials supplied with the Ray101E:
Table 2-1: Supplied Components
Part Number Description
T43029
T43030
T43031
R49086 Antenna
R49088 Battery Tray
R49089 Ni-MH Quick Charger Base
R49092
R49097 Belt Clip
R49098 Wrist Strap
81230 Ray101E Handbook
— Batteries, (6) AA Ni-MH (1300mAh)
1
Connect Cigarette Lighter Adapter to 12VDC system only. Connecting to other voltage
systems can damage the charger.
E43028 Ray101E
with E46038 UK (D type) Power Adapter
E43028 Ray101E
with E46039 AUS/NZ (C type) Power Adapter
E43028 Ray101E
with E46041 European (B type) Power Adapter
12VDC Cigarette Lighter Adapter
2.2 Attaching the Antenna
Rotate the antenna clockwise to securely fasten it to the threaded connector on
the top of the radio.
Do not operate the radio or press PTT without an antenna attached.
Note:
1
Page 14
14 Ray101E Handheld VHF Radio
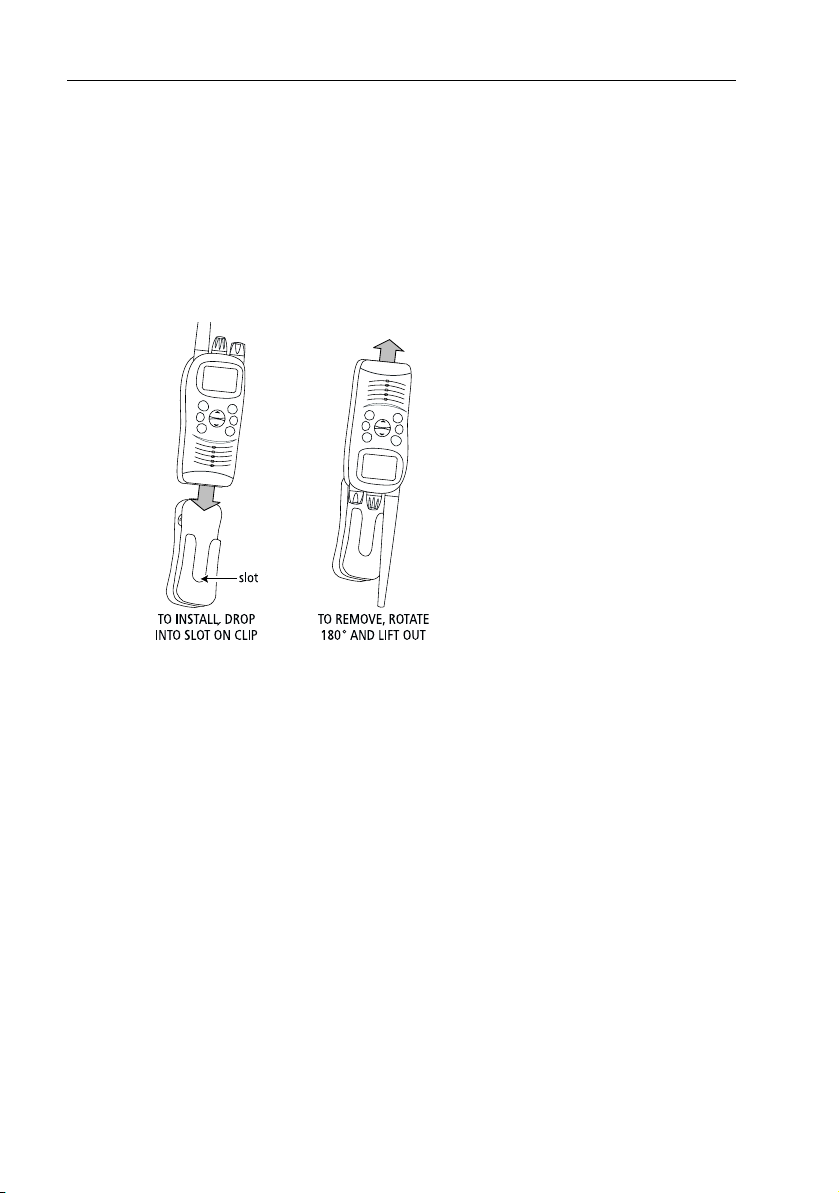
2.3 Using the Belt Clip
➤ To attach the radio to the belt clip:
Slip the Ray101E onto the belt clip so that the adapter button on the rear of the
radio locks into the bottom of the slot on the belt clip.
➤ To remove the radio from the belt clip:
Rotate the radio 180° and pull up and away from the belt clip.
2.4 Attaching the Wrist Strap
1. Using the end of a paper clip, feed the narrow end of the strap through the
two mounting holes at the top of the radio behind the antenna.
2. Continue feeding the strap through the loop and pull tight.
2.5 Battery Usage
The Ray101E can be powered by the supplied six (6) Nickel Metal Hydride (Ni-MH)
batteries or with six (6) regular AA alkaline cells (not supplied), using the supplied
Battery Tray.
Page 15
Chapter 2: Installation 15
Battery Tray
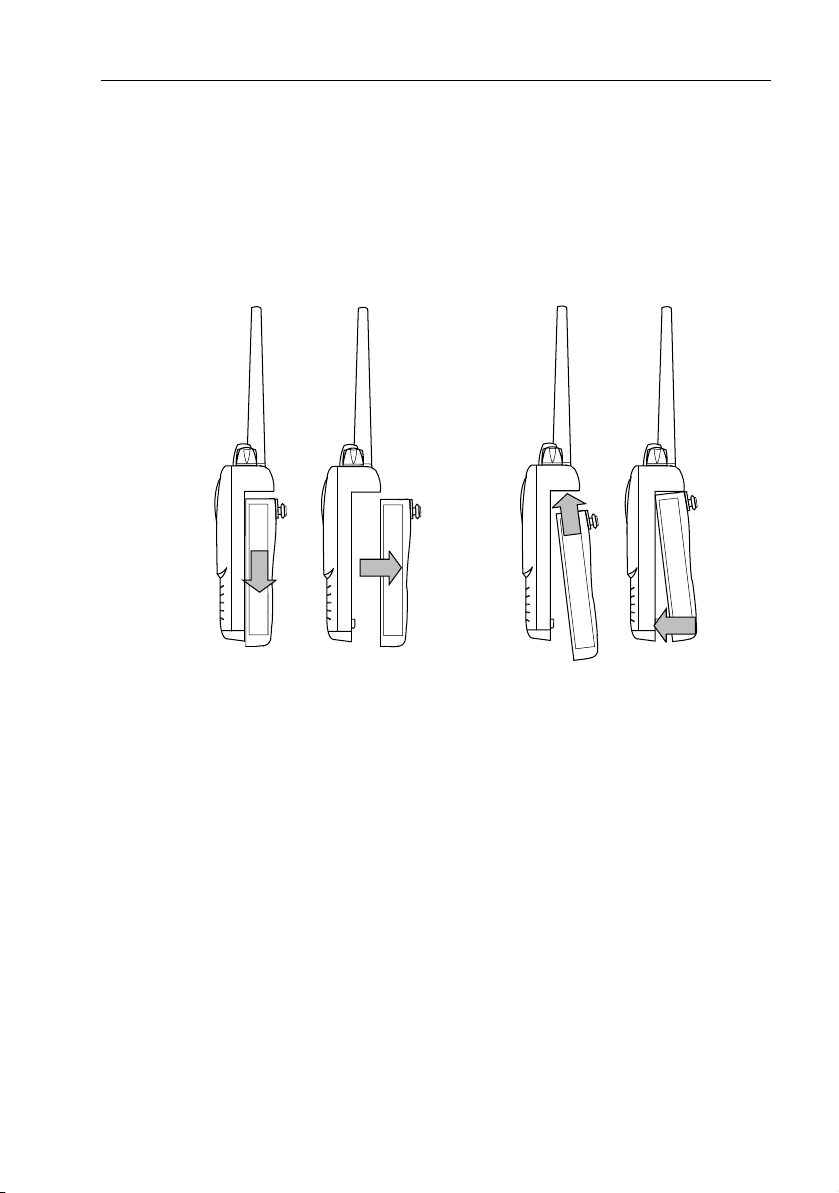
➤ To open the Battery Tray and insert the battery cells:
1. Lift the fastener at the base of the unit and rotate counterclockwise ¼ turn to
the UNLOCK position.
2. While holding the Ray101E in one hand, use the other hand to push the battery tray downward and then away to separate it from the back of the radio.
1
1
REMOVE
2
2
D6696-2
ATTAC H
3. Lift up the tab located on the centre right side of the battery tray cover and
remove it from the battery tray.
4. Locate the Battery Type switch just below the battery compartment and turn
to the appropriate position: ALKALINE or Ni-MH.
Page 16

16 Ray101E Handheld VHF Radio
D6697-1
Battery Type Switch
(under battery cover)
5. Noting the proper orientation, install the AA cells in three rows of two batteries each.
6. Replace the battery tray cover.
WARNING: Alkaline Battery Use
When Alkaline cells are used, do not place radio in Charger unless
Charge Sw it ch o n radi o i s se t t o AL KA LIN E. Ch argi ng A lka lin e c el ls
may cause excessive heat and could result in cell leakage causing
damage or injury.
7. Slide the battery tray up into the rear of the radio and then downward until it
snaps into place.
8. Rotate the fastener at the base of the battery case clockwise ¼ turn to the
LOCK position.
Note:
The battery charger is intended for use in 12 VDC systems only.
Page 17
Chapter 2: Installation 17
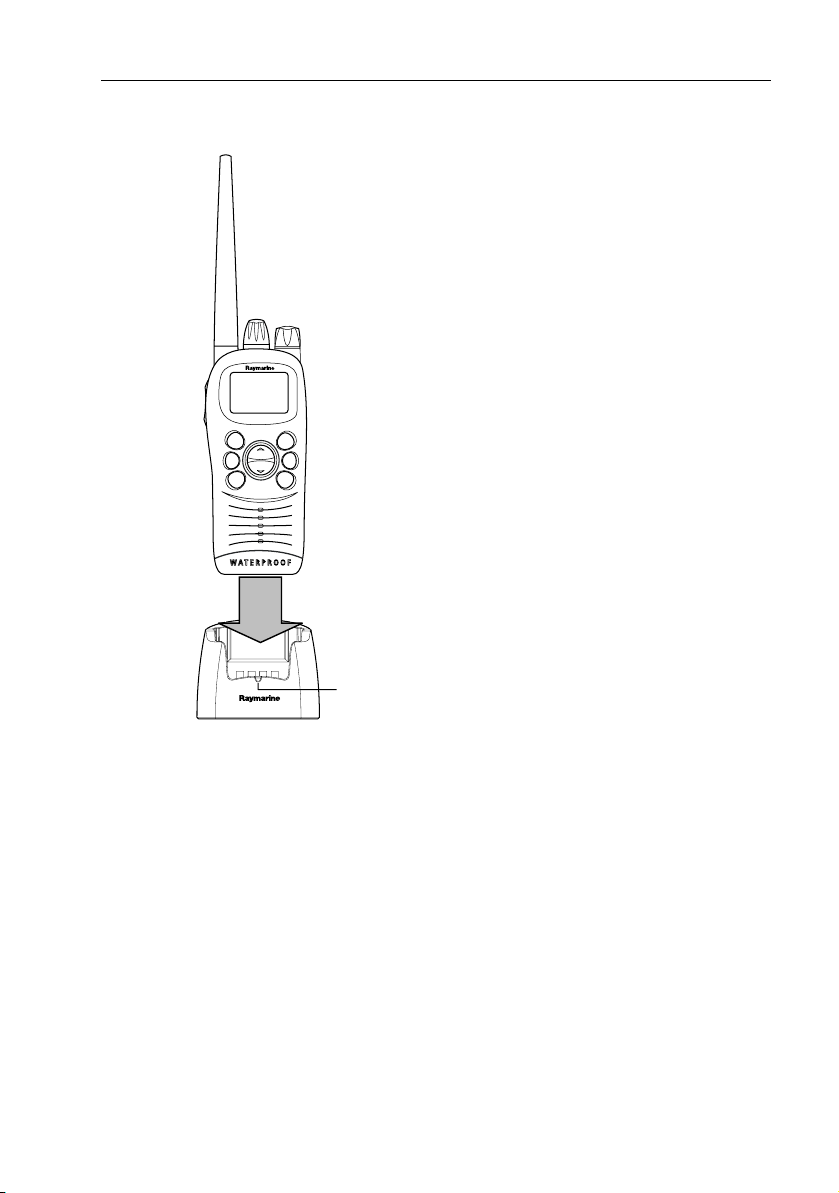
Charging Rechargeable Ni-MH Cells
The Ni-MH batteries must be charged with the radio
powered off for at least 24 hours be fore initial use. To
charge the batteries:
1. Insert the radio with the battery tray attached into
the Ni-MH charger unit.
2. Connect the AC wall adapter into a standard wall
outlet.
—or—
Connect the Cigarette Lighter Adapter into a
standard 12VDC Cigarette Lighter.
3. Insert the moulded plug into the connector on the
side of the battery charger.
The CHARGE indicator LED on the front of the
charger lights when it is receiving voltage from
the AC adapter.
CAUTION:
1. Make sure the switch just below the battery compartment is set to the Ni-MH position.
2. Do not operate radio in charger when battery tray
is empty. This may damage radio.
LED
3. Do not transmit with the radio in the charger as
D6695-1
this may damage the radio.
Charge the batteries with the radio powered off for at least 24 hours before using
the radio for the first time or if the radio has not been used in several months.
Under normal use, you can charge the batteries while the radio is powered on.
With heavy usage, however, the radio should be powered off to maximize
charging efficiency. Normal use is defined as a duty cycle of 5% receive and 95%
standby time.
Page 18

18 Ray101E Handheld VHF Radio
Charger LED
The following describes status of the charger’s LED when it is receiving voltage
from the adapter:
LED Color Status
RED
• Batteries are charging (fast charge)
AMBER/
ORANGE
GREEN
• Input power is too low and the charger has turned off, or
1
• Input power is too high and the charger has turned off.
2
• Batteries are fully charged and the charger is maintaining a trickle
charge, or
• Battery tray is empty and unit is not charging, or
• Battery Type Switch is set to ALKALINE and unit is not charging, or
• Charger is in Standby Mode and is not charging
1
If the charger LED turns AMBER/ORANGE, you should disconnect the charger and
investigate the reason for the overvoltage or undervoltage condition.
2
To protect the batteries, the charger remains in Standby Mode (not charging) if the
batteries are too cold or too hot (hot to the touch). During this time, the unit does
not charge and the LED remains green.
Before initial use, apply power to the charger with the radio removed. Check the
status of the charger’s LED before inserting the radio:
• If the LED is green, the input voltage is OK. Insert the radio into the charger.
The LED should turn red, indicating that the batteries are being charged.
• If the LED is amber/orange, there is an undervoltage or overvoltage condition
in the boat’s power system. Disconnect the charger and investigate the reason
for the power problem before inserting the radio.
During initial charging or if charging when the radio has not been used in several
months, the LED may turn green prematurely (before the batteries are fully
recharged). Continue to charge the batteries for a full 24 hours even if the LED
turns green before this 24 hour period has expired.
If you suspect that the LED may have turned green prematurely, you can perform
a test by powering on the radio, switching to high power and holding the PTT
switch for 1 second. If the Battery Level indicator loses segments in the bar graph,
the batteries are not fully charged.
After the initial charge, it takes about 2 hours to recharge spent batteries and for
the LED to turn green.
Page 19

Chapter 2: Installation 19
Note:
Purchase an additional battery tray and extra batteries so that you will always have
spare charged batteries available.
Storage
It is normal for any battery cell to lose charge even when it is not being used.
Before storing the radio for 6 months or more:
• Fully charge the batteries to help ensure that the cells do not experience a
deep discharge while they are in storage.
• Remove the Battery Tray from the radio and then remove the batteries from
the Battery Tray to help prevent internal current leakage that can result in corrosion.
• Store the batteries in a cool, dry place to further minimize current leakage.
After storage, multiple charge/recharge cycles may be required before maximum
capacity is restored.
Page 20

20 Ray101E Handheld VHF Radio
Page 21
Chapter 3: Getting Started 21
Chapter 3: Getting Started
3.1 Keypad and Rotary Knobs
Several of the keys on the front panel of the base station serve multiple purposes.
For the most part, the function indicated on the first line of the key is accessed by
pressing and releasing that key. The function indicated on the second line of the
key is accessed by pressing and holding the key for three seconds.
D6710-1
Page 22

22 Ray101E Handheld VHF Radio
Rotary Keys
Key Name Function
1. PWR/VOL Power radio ON / OFF and adjust volume level
2. SQ Adjust squelch threshold level
Push Keys
Key Name Press & Release (<3 sec) Press & Hold (>3 sec)
3. PTT Push to talk Push to talk
4. UP/DOWN Channel increment /
decrement
Backlight ON/OFF Keylock ON/OFF
5.
6. 16/PLUS Switches between Priority
and Working Channels
7. DW / TRI Dual Watch Mode Tri Watch Mode
8. * n/a Select frequency band (if available)
9. SCAN / SAVE Scan ON/OFF SAVE/DELETE channel to/from memory
10. HI/LO / USER TX Power High/Low USER (Saved Memory Channel) Mode
Rapid channel change
Switches to favourite (PLUS) channel;
If already tuned to the PLUS channel,
programs a new PLUS channel.
Description
1. PWR/VOL
Use this knob to turn the radio ON and OFF and to set the volume.
2. SQ
Use this knob to set the squelch threshold, which cuts off the receiver when the
signal is too weak for reception of anything but noise.
3. PTT
While pressing this Push-To-Talk key radio transmission is enabled.
Page 23

Chapter 3: Getting Started 23
4. UP/DOWN
Use the arrow keys to change the current channel number. Press and hold for
rapid channel changing.
5. Backlight / Keylock
Press and release this key to toggle on and off the display’s backlight. Press and
hold to toggle the keylock function, which protects the radio from any keypad
entry.
6. 16/PLUS
Press and release this key to toggle on and off Priority Mode, in which the radio
switches to Priority Channel 16 at high power. Press and hold to switch to the
Favourite (PLUS) Channel. If already in Priority Mode, press and hold to change
the Favourite (PLUS) Channel.
7. DW/TRI
Press and release this key to toggle on and off Dual Watch, in which the radio
monitors the current working channel and CH 16 in cycle. Press and hold to toggle
on and off Tri Watch, which monitors CH 16, the current working channel and the
channel you have set as the Favourite (PLUS) Channel in cycle.
8. Frequency Band (*)
Press and hold this key to alternate the frequency band between the USA,
International and Canadian channel sets (if available).
9. SCAN / SAVE
Press and release this key to toggle on and off Scan Mode. Press and hold to save
a channel into the radio’s memory.
10. HI/LO / USER
Press and release this key to toggle the transmit power between HIGH and LOW.
Press and hold to enter User Channel Mode, which displays only the channels that
you have saved to memory.
Page 24

24 Ray101E Handheld VHF Radio
3.2 LCD Display
The following describes the functional characters on the Ray101E’s LCD.
D6699-2
1. (TX) Transmitting
Indicates the PTT is being pressed and the radio is transmitting.
2. (RX) Receiving
Indicates that the radio is receiving a radio signal. If the radio receives a signal but
the squelch threshold is set so high that the signal cannot be heard, the RX
indicator is not displayed but the bar graph on the left side of the LCD is
illuminated to show the appropriate signal strength.
3. (USER) Favourite Channel Mode
Indicates the radio is in USER Mode. USER Mode displays only the channels that
you have saved to memory, enabling you to easily scan your favourite channels
while bypassing unwanted or seldom-used channels.
Page 25

Chapter 3: Getting Started 25
4. (SAVED) Memory Mode
Indicates the current channel has been saved in memory. Appears during Saved
Scan mode. Only saved channels are scanned during USER mode.
5. (P) Priority Mode
P appears during Priority Mode, when the 16PLUS key is pressed. Also appears
with PSCAN during Priority Scan mode.
6. (SCAN) All Scan/Saved Scan/Priority Scan
SCAN appears during All Scan and Saved Scan. (SAVED also appears during Saved
Scan mode.) PSCAN appears during Priority Scan mode.
7. (U I C) Channel Set
Indicates which channel group set is currently selected: US, International or
Canadian.
Note:
US and Canadian channels are available only if your radio has been programmed
to receive them. Special licensing is required to receive the US and Canadian channel sets.
8. (B) Receive-only Channel
Indicates that you cannot transmit on the currently-selected channel; it is receiveonly. Used with Canadian channels only.
9. (A) Simplex Channel
Indicates that the currently-selected channel is simplex in US and Canadian
channels but duplex in the International channel set. Simplex means you transmit
and receive on the same frequency. Used with US and Canadian channels only.
10. Channel Number
Displays the current channel number.
11. Battery Level
Indicates current battery strength. Greater battery strength displays a larger
number of segments in the bar graph.
Fully charged
Normal operation
Normal operation
Needs charging
Page 26

26 Ray101E Handheld VHF Radio
12. Keylock
Indicates the radio is protected from any keypad entry except for PTT and the
backlight function.
13. Indicators
Indicates special conditions:
(WX) Weather Channel
Weather channel mode is active. US and Canada only.
(ALERT) Weather Alert
A weather alert is being received. US and Canada only.
(HI/LO) TX Power
Indicates whether transmit power is set for 5 watts (HI) or 1 watt (LO).
(DUAL) Dual Watch
Indicates the radio is in Dual Watch mode.
(TRI) Tri Watch
Indicates the radio is in Tri Watch mode.
(ATIS) ATIS Active
Indicates that Automatic Transmitter Identification System (ATIS) transmission is
enabled. For use on the inland waterways of certain European countries only. See
“ATIS ID Number” on page 42.
14. Signal Strength
Displays the relative strength of the TX and RX signals.
When the output power is set for 5 watts, the full scale (5 bars) is
displayed during transmission.
When transmit output power is set for 1 watt, only two bars are
displayed during transmission.
When receiving, the bar graph indicates the strength of the signal being received.
A stronger signal displays a larger number of segments in the bar graph.
Page 27

Chapter 4: Operating the Radio 27
Chapter 4: Operating the Radio
4.1 Turning the Power ON and OFF
Turn the PWR/VOL knob clockwise until it clicks.
When the unit powers up in Normal mode it:
1. Beeps, illuminates the backlight at full brightness, and displays all segments
and indicators for 2 seconds.
2. Displays the software version number on the LCD but without the decimal
point. For example, version 4.2 would appear as 42.
3. Recalls the last CH number, TX power settings and operation mode.
If no last-used setting data exists, goes to CH 16 and high TX Power.
➤ To turn the unit OFF:
Rotate the Volume knob completely counter clockwise until it clicks.
4.2 Setting the Volume
Adjust the PWR/VOL knob to control the loudspeaker volume level. Turn
clockwise to increase the volume; counter clockwise to decrease the volume.
Key press beep volume is also controlled by the VOL level.
Note:
D6709-2
Page 28

28 Ray101E Handheld VHF Radio
4.3 Setting the Squelch
The Squelch circuit sets the threshold for cutting off
the receiver when the signal is too weak for
reception of anything but noise.
To properly set the squelch, rotate the
SQ knob
counter clockwise until noise is heard.
Then rotate clockwise until background noise
disappears.
D6714-1
4.4 Setting the Power Output
Press and release the HI/LO / USER key to toggle the TX power from LOW
(1 watt) to HIGH (5 watts). The corresponding LO or HI indicator appears on the
LCD.
Initial contact should always be attempted using low power. You should switch to
high power only when contact can not be made on low power in emergency
situations. This procedure is part of marine communications courtesy and will
save on battery life.
Note: Some channels are limited by regulation to be low power only. If the
HI/LO operation request is denied, an error tone beeps.
Page 29

Chapter 4: Operating the Radio 29
4.5 Setting the Channel
Press and release the UP arrow to increment the
channel number.
Press and release the DOWN arrow to decrement the
channel.
Press and hold either key for rapid channel scrolling.
4.6 Selecting a Weather Channel (If Available)
The US National Oceanic and Atmospheric Administration (NOAA) broadcasts
continuous weather reports and severe weather alerts, as needed. If so equipped,
your Ray101E is programmed to receive10 NOAA weather channels and sound an
alarm if a weather alert is received.
Press and release the
Press Channel UP/DOWN to change the WX channel 1 through channel 10.
key to enter Weather mode. The WX indicator appears.
*
Press and release the * key again to return to normal operation.
Note:
1. Weather broadcasts can only be heard in the North America.
2. The Ray101E can receive these broadcasts only if the unit has been upgraded
by the distributor to use WX Channels.
3. During Weather mode, the PTT, SCAN/SAVE and HI/LO / USER keys are disabled and an error beep sounds if pressed.
Page 30

30 Ray101E Handheld VHF Radio
Weather Alert Operation (If Available)
Weather Alert is toggled ON and OFF by pressing and holding * key in the
weather mode. The ALERT icon illuminates.
When Weather Alert function is enabled and the radio is tuned to the normal
working channel, the last-used weather channel is checked every 30 seconds for
weather alert tone. If the alert tone is detected, the WX and ALERT indicators flash
and a short alarm tone sounds.
The radio automatically turns to the currently-monitored WX channel where the
weather alert has been detected. The alert is detected in all modes of operation
(Standby, Dual and Tri Watch, Scan, etc.)
Note:
The Ray101E can receive weather alert broadcasts in the US or Canada only if the
unit has been upgraded by the distributor to use WX Channels.
4.7 Setting the Frequency Band
The Ray101E can transmit and receive on all available US, Canadian and
International marine VHF radiotelephone channels, if available.
Press and hold the
mode to alternate between the International, US and Canadian channel sets. The
appropriate indicator is illuminated in the LCD: U for US, I for International, or C
for Canadian channel sets.
key for greater than 3 seconds while in normal operation
*
Page 31

Chapter 4: Operating the Radio 31
Note:
The RAY101E requires a software upgrade from the distributor to com municate on
the US or Canadian channel sets. Some countries require special licensing to activate the
US or Canadian channels.
If no other Channel Sets besides International have been programmed for your
Ray101E by the distributor, an error tone sounds when you press the
*
key.
4.8 Selecting Priority Mode
The Ray101E provides you with a dedicated key for selecting Priority Mode, which
instantly switches the radio to Priority Channel 16 at high power.
If not already tuned to the Priority Channel 16,
press and release the
radio into Priority Mode. While in this mode, the
radio is switched to CH16 at high power. The P and
HI indic ato rs appe ar on the LC D.
Note:
When you press the
ways switches to HIGH power. You can use the HI/LO /
USER key to change to LOW power.
The following describes the results of pressing the
various keys during Priority Mode:
•
16/PLUS. Press and release to return to the last-used working channel. Press
and hold to switch to the Favourite (PLUS) Channel.
•
. Press and hold to switch to the other channel sets (if available). The radio
*
remains in Priority Mode even though it switches frequency sets.
•
SCAN / SAVE. Press and release to initiate Scan Mode. When you press
again, the scan halts and the radio returns to Priority Mode. Press and hold to
save CH16 into memory but remain in Priority Mode.
16/PLUS key to place the
16/PLUS
key, the radio al-
Page 32

32 Ray101E Handheld VHF Radio
• HI/LO / USER. Press and release to reduce to low power but remain in Priority
Mode. Press and hold to enter User Mode. The radio switches to the last-used
User Mode channel but exits Priority Mode.
•
DW / TRI. This key is not available during Priority Mode and an error tone
sounds if pressed.
4.9 Selecting the Favourite (PLUS) Channel
The Ray101E enables you to program the 16/PLUS key to switch to a Favourite
(PLUS) Channel. The default is CH 9.
If on a working channel, press and hold the
PLUS
key for greater than 3 seconds to switch to
the Favourite (PLUS) Channel at high power. The
default is CH 9.
If on Priority CH16, press and hold the
key for greater 3 seconds to switch to the Favourite
(PLUS) Channel at HI power. The default is CH 9.
If already on Favourite (PLUS) Channel, press and
release the
Channel 16 at high power.
16/PLUS key to switch to Priority
Reprogramming the Favourite (PLUS) Channel
1. Switch to the Favourite (PLUS) Channel.
2. Press and hold the
mode. An alert tone sounds and the current Favourite (PLUS) Channel flashes.
3. Change the channel number with the UP and DOWN arrow keys.
4. Press and release the
tion. An alert tone sounds to indicate that the Favourite (PLUS) has been
changed.
Note:
While reprogramming the Favourite (PLUS) Channel, the PTT,
DW/TRI and
keys are disabled and an error beep sounds.
*
16/PLUS key for greater 3 seconds to switch to Reprogra m
16/PLUS key to save the new Favourite (PLUS) selec-
16/
16/PLUS
Page 33

Chapter 4: Operating the Radio 33
D6707-1
4.10 Transmitting
Press and hold the Push-To-Talk (PTT) key to transmit on the selected channel,
then release to receive. The TX indicator appears while transmitting.
The radio is equipped with a timeout timer as per regulatory requirements. After
PTT has been held continuously for 5 minutes, transmission is discontinued and
the radio automatically returns to receive mode. An Error beep is emitted 10
seconds before the time out is triggered and TX flashes on the display until
released.
PTT is
PUSH
TO TAL K
D6715-2
The TX time out timer is reset once the PTT key is released.
If the current channel is a TX-prohibited channel, an alarm sounds when PTT is
Note:
pressed, indicating such a transmission is not permitted.
Page 34

34 Ray101E Handheld VHF Radio
4.11 Turning On the Backlight
To toggle the display’s Backlight ON or OFF, press and release the key.
When the Backlight setting is enabled, any key press except
PTT turns on the
backlight for 5 seconds. If a key is pressed within the time frame, the time out is
reset.
4.12 Turning On the Keylock
To toggle the Keylock ON or OFF, press and hold the key for 3 seconds.
When Keylock is enabled, the lock icon appears on the display.
The Keylock setting protects the radio from any keypad entry except for PTT and
the backlight function.
Then, press and hold the key again for 3 seconds to cancel the keylock.
Page 35

Chapter 4: Operating the Radio 35
4.13 Using the Scan Modes
The RAY101E is equipped with three types of scan options: All Scan, Saved
(Memory) Scan and Priority Scan. If there are no channels in memory, the default
is All Scan.
This function automatically searches for transmissions on the channel set being
scanned. If a TX signal is received, the scan stops on the receiving channel as long
as it is present and the SCAN indicator flashes. If the signal is lost for five seconds,
the radio resumes scanning.
During the Scan Modes:
• Press the Channel UP/DOWN key to change the scan direction.
UP increments the channel while DOWN decrements it.
• Press and release
•
DW/TRI and
Scan modes are disabled when the ATIS operation is active.
Note:
All Scan
Press and release the SCAN/SAVE key when no channels are stored in memory to
activate the All Scan function.
SCAN/SAVE to terminate the SCAN mode.
keys do not function and sound an error beep if pressed.
*
The SCAN indicator appears on the LCD during All Scan.
Page 36

36 Ray101E Handheld VHF Radio
In All Scan mode, all channels in the channel
set are scanned in sequence, assuming no
channels have been stored in memory. After
the last channel number has been scanned,
the cycle repeats.
All Scan is demonstrated in the figure to the
left (including Private Channel M1).
Saved (Memory) Scan
Press and release the SCAN/SAVE key when there is at least one channel in
memory to activate the Saved Scan function.
In Saved Scan Mode, the SAVED and SCAN indicators appear on the LCD.
In Saved Scan mode, only the channels that
have been saved in memory are scanned in
sequence. After the last saved channel number
has been scanned, the cycle repeats.
Saved Scan is demonstrated in the figure to the
left.
Page 37

Chapter 4: Operating the Radio 37
Priority All Scan
Press and hold the SCAN/SAVE key while All Scan is active to initiate Priority
Scan.
.During Priority Scan, the PSCAN indicator appears on the LCD.
Priority Scan searches for activity on all
channels but alternates scanning the Priority
Channel 16 after each channel.
Priority Scan is demonstrated in the figure to
the left. This example includes Channel M1,
which is only used in the UK.
Priority Saved Scan
Press and hold the SCAN/SAVE key while Saved Scan is active to initiate Priority
Saved Scan.
The PSCAN and SAVED indicators appear on the LCD.
Priority Saved Scan is much like Priority Scan
except that the radio alternates searching for
activity on the Priority Channel 16 and the
channels stored in memory.
Priority Saved Scan is demonstrated in the
figure to the left.
Press and hold
SCAN/SAVE for 3 seconds to exit Priority/Priority Saved Scan and
return to All/Memory Scan.
Page 38

38 Ray101E Handheld VHF Radio
4.14 Adding Channels to Memory
The Ray101E can store any channel (including Private Channels). The stored
channels are the ones scanned in the Saved (Memory) Scan mode.
➤ To add channels to memory:
1. During normal operation mode, use the UP/DOWN key to select the desired
channel for programming.
2. Press and hold the
The SAVED icon appears to indicate the current channel has been saved in
memory. Any number of channels can be saved as memory channels.
SCAN/SAVE key for 3 seconds.
D6713-1
➤ To delete channels from memory:
1. During the normal mode, use the UP/DOWN key to select the channel to be
deleted.
2. Press and hold the SCAN/SAVE key for 3 seconds.
The selected channel is deleted from memory.
To view the channels set in memory, switch to USER mode, as described in
4.16, USER Channel Mode
.
Section
Page 39

Chapter 4: Operating the Radio 39
4.15 Using the Monitor Modes
The Watch Modes monitor the programmed Priority Channel and other userselected channel(s). The watch is halted when activity is detected on a monitored
channel. The Ray101E is equipped with 2 types of monitor operations: Dual
Watch and Tri Watch.
Note:
Monitor modes are disabled when the ATIS operation is active.
Dual Watch
Press and release the DW/TRI key to activate the Dual Watch mode.
The DUAL indicator appears on the LCD.
Dual Watch monitors the current working channel and
Channel 16 in cycle.
Dual Watch is demonstrated in the figure to the left; the
sample working channel is CH 72.
Press and release the
DW/TRI key to terminate Dual
Watch and return to the previous working channel.
Press and hold the
DW/TRI key to terminate Dual Watch mode and go into Tri
Watch mode.
Press and release the
16/PLUS key to terminate Dual Watch mode and switch to
the Priority Channel.
During Dual Watch mode, the SCAN/SAVE, USER, *, and Channel UP/DOWN keys
Note:
are inactive and sounds an error beep if pressed.
Page 40

40 Ray101E Handheld VHF Radio
Tri Watch
Press and hold the DW/TRI key for 3 seconds to activate Tri Watch mode.
The TRI indicator appears on the LCD.
Tri Watch monitors in cycle Channel 16, the current
working channel and the channel you have set as the
Favourite (PLUS) Channel.
Tri Watch is demonstrated in the figure to the left; the
sample working channel is CH 72.
Press and release the
DW/TRI key to terminate Tri Watch and return to the
previous working channel.
Press and release the
16/PLUS key to terminate Tri Watch mode and switch to the
Priority Channel.
Note:
During Tri Watch Mode, the SCAN/SAVE, USER, *, and Channel UP/DOWN keys
are inactive and sounds an error beep if pressed.
Page 41

Chapter 4: Operating the Radio 41
4.16 USER Channel Mode
Press and hold the HI/LO / USER key while in normal operation mode to enter
User Mode. The USER and SAVED indicators appear.
USER Channel Mode displays only the channels that you have saved to memory,
which enables you to easily use your favourite channels while bypassing
unwanted or seldom-used channels during a scan.
The procedure for saving a channel to memory is outlined in Section 4.14, Adding
Note:
Channels to Memory.
While in User Mode:
• Press and release the
SCAN/SAVE key to start Memory Scan mode.
• Press and release the Channel UP or Channel DOWN key to scroll through the
saved channels.
• Press and hold the
SCAN/SAVE key to delete the current channel from mem-
ory list.
• Press
Note:
and sounds an error beep if pressed.
16/PLUS to terminate User mode and switch to the Priority Channel.
You cannot switch Channel sets while in User Mode. The * key does not function
Press and hold the HI/LO / USER key for 3 seconds to quit User mode and return
to the last-used working channel.
Page 42

42 Ray101E Handheld VHF Radio
4.17 ATIS ID Number
If you purchased your Ray101E to include use on the inland waterways of the
contracting governments of the Basel Agreement, your radio has been
programmed by your dealer to include Automatic Transmitter Identification
System (ATIS) functionality. The Basel Agreement includes Germany, Austria,
Belgium, Bulgaria, Croatia, France, Hungary, Luxembourg, Moldova, the
Netherlands, Poland, Romania, Russian Federation, the Slovak Republic,
Switzerland, the Czech Republic, Ukraine and the Federal Republic of Yugoslavia.
ATIS includes data at the end of radio transmission that identifies your station.
Your ATIS ID number is derived from your vessel’s call sign. Your authorized
Raymarine dealer can assist you in decoding the number. You can then program
the ATIS number into your Ray101E using the operation described in this section.
Regulations in some regions may not allow end users to program their own ATIS
number. If this unit was purchased to be used in such a region, this function will be
disabled and the programming must be done by your authorized Raymarine
dealer/distributor.
Note:
The ATIS ID is a ten digit number that always begins with a “9”. You will only enter
the last nine digits; the first 9 is automatically entered for you.
Programming the ATIS ID Number
1. With the radio powered OFF, simultaneously press and hold the key a nd
the
key.
*
2. While still depressing the two keys, turn ON the radio.
Page 43

Chapter 4: Operating the Radio 43
The ATIS ID programming screen is displayed.
The left digit indicates the digit position of the ATIS ID; the right digit, which
blinks continuously, indicates the value of that digit.
3. Use the CH UP/DOWN key to change the first digit to the correct value for your
particular ATIS ID.
The ATIS ID is a ten digit number that always begins with a “9”. You will only
be entering the last nine digits; the first “9” is automatically entered for you.
So, although it is technically the second number in the sequence, it is the first
digit you will be entering.
For example, if your ATIS ID = 9 244 03 8 0 7 5 and remembering that the initial “9” has already been entered for you, press CH UP/DOWN until the “2”
appears, as follows.
4. When the correct value is flashing, press SCAN/SAVE key for 3 seconds to
confirm the selection.
The next digit position and its value appear.
Page 44

44 Ray101E Handheld VHF Radio
5. Press CH UP/DOWN to change the second digit to the correct value.
Using our example of ATIS ID = 9 244 03 8 0 7 5, press CH UP/DOWN until the
4 appears.
6. Continue this process until all nine ATIS numbers have been entered.
7. You must now re-enter the ATIS ID a second time to confirm.
After entering a valid ATID ID for the second time, the radio flashes its com-
plete ATIS ID. The nine ATIS ID number pairs are flashed in sequence, one set
at a time on the screen.
Page 45

Chapter 4: Operating the Radio 45
In our example, the sequence would be:
1 2
2 4
3 4
4 0
5 3
6 8
7 0
8 7
9 5
When complete, the radio returns to the last-used mode. If no channel is
found in the memory, the radio reverts to CH 16 at High Power setting.
If a different ATIS ID is entered the second time, the operation is cancelled
and a long alarm tone is sounded.
8. Store the ATIS ID permanently into the radio by turning the radio OFF.
To exit ATIS programming mode without saving, press the
16/PLUS key at any
time to jump to priority Channel 16.
After this programming, only your distributor can modify or erase the ATIS ID.
Note:
Page 46

46 Ray101E Handheld VHF Radio
4.18 Resetting Factory Defaults
You can reset many radio settings back to their factory defaults:
• Erase any channels stored in memory
• Return to International channels, if another mode is selected
• Turn OFF the Weather Alert setting, if active
• Return power settings to their original state
➤ To perform the reset:
1. Turn the radio OFF.
2. Simultaneously press and hold the
3. While continuing to hold these keys, power the radio ON.
The LCD remains blank for 2 seconds, and then the unit switches to channel 16.
HI/LO / USER and * keys.
D6712-1
Page 47

Chapter 5: Customer Service 47
Chapter 5: Customer Service
This chapter provides information on service for your Ray101E.
5.1 How to Contact Raymarine
On the Internet
Visit the Raymarine World Wide Web site for the latest information on Raymarine
electronic equipment and systems at:
www.raymarine.com
Customer Support
Navigate to the Customer Support page for links for:
• Finding Factory Service locations and Authorized Dealers near you
• Registering your Raymarine products
• Accessing handbooks in Adobe Acrobat format
• Downloading RayTech software updates
• Accessing the Raymarine solution database
Clicking the Find Answers link routes you to our solution database. Search
questions and answers by product, category, keywords, or phrases. If the answer
you are seeking is not available, click the Ask Raymarine tab to submit your own
question to our technical support staff, who will reply to you by e-mail.
In Europe
In Europe, Raymarine support, service and accessories may be obtained from your
authorized dealer, or contact:
Raymarine Ltd
Anchorage Park
Portsmouth, Hampshire
England PO3 5TD
Tel: +44 (0) 23 9269 3611
Fax: +44 (0) 23 9269 4642
Page 48

48 Ray101E Handheld VHF Radio
Technical Support
The Technical Services Department handles inquiries concerning installation,
operation, fault diagnosis and repair. For technical helpdesk contact:
Tel: +44 (0) 23 9271 4713
Fax: +44 (0) 23 9266 1228
Accessories and Parts
Raymarine accessory items and parts are available through your authorized
Raymarine distributor. Please refer to the lists of component part numbers and
optional accessories in the Installation chapter of this manual and have the
Raymarine part number ready when speaking with your dealer.
If you are uncertain about what item to choose for your unit, please contact our
Customer Services Department prior to placing your order.
Worldwide Support
Please contact the authorized distributor in the country.
Page 49

Appendix A: Specifications 49
Appendix A: Specifications
General
Approvals:
CE - conform to EN301 178-2, EN300 968-2, -3
Size (H x W x D) 5.55”(141mm) x 2.4” (61mm) x 1.69” (43mm) without
Weight 0.36 kg (12.8 oz)
Power Source 7.2V DC (6 x AA Alkaline or AA Ni-MH Batteries)
Environmental:
Operating Range:
Storage Range:
Humidity:
Frequency Range:
Transmit
Receive
Channels 55 International VHF Marine Band. 50 US and 60 Cana-
Modulation FM 16K0G3E
Channel Spacing 25 kHz Increments
Antenna Socket SMA
Display 38.4mm x 48.3mm LCD
Built in Speaker Ø40mm / Impedance 8 Ohm
Receiver
Sensitivity (12dB SINAD) 0.30µV
antenna
Waterproof to IPX7
-15°C to +55°C (+5°F to 131°F)
-20°C to +70°C (-4°F to +158°F)
up to 95% at 35°C non-condensing
156.025 To 157.425 MHz
156.050 To 163.275 MHz
dian channels also available if so programmed. Also, 10
Weather Channels (with weather alert), if so programmed (North America only).
Squelch Sensitivity (threshold) 10 (± 2) dB SINAD
Audio Output Power At THD 5% >/= 250 mW
Max S/N ratio @ 1 mV 40 dB
Audio Response @300Hz
@2500Hz
+ 6 dB ± 3
–11dB ± 3
Page 50

50 Ray101E Handheld VHF Radio
Spurious Response Rejection Ratio 70 dB
Adjacent Channel Selectivity 70 dB
Intermodulation Rejection Ratio 68 dB
Scan Time per Channel 200 ms
Speaker Jack output 1.8 V (8ohm load @ max vol)
Current Drain at:
Transmitter
Max Audio Power
Standby
200 mA
40 mA
RF Power:
Hi Mode
Lo Mode
5 W ± 0.5
1 W ± 0.2
Carrier Frequency Tolerance ±10 PPM
Maximum Limiting ±5 KHz
Carrier Attack Time 80 ms
Audio Response @300Hz
@2500Hz
–12dB ± 3
+6 dB ± 3
Audio Distortion @ 2.5KHz dew. 3%
Hum and Noise Ratio 35 dB
Spurious/Harmonic Emissions < 60 dB
Mic Sensitivity for 3kHz 10 mV ± 3
Conducted Spurious Emission <0.25 µW
Transient Frequency Behavior
TX on
TX off
30 ms
5 ms
Current Drain
Hi Power
Lo Power
1800 mA
700 mA
Charging Current 750 mA± 50
Page 51

Appendix B: Channel List 51
Appendix B: Channel List
International VHF Marine Radio Channels & Frequencies
CH
XMIT
No.
Freq
01 156.050 160.650 Public Correspondence, Port Operations and Ship Movement
02 156.100 160.700 Public Correspondence, Port Operations and Ship Movement
03 156.150 160.750 Public Correspondence, Port Operations and Ship Movement
04 156.200 160.800 Public Correspondence, Port Operations and Ship Movement
05 156.250 160.850 Public Correspondence, Port Operations and Ship Movement
06 156.300 156.300 x
07 156.350 160.950 Public Correspondence, Port Operations and Ship Movement
08 156.400 156.400 x Intership
09 156.450 156.450 x Intership, Port Operations and Ship Movement
10 156.500 156.500 x
RCV
Freq
Single
Freq Use
Intership
Intership, Port Operations and Ship Movement
1
2
11 156.550 156.550 x Port Operations and Ship Movement
12 156.600 156.600 x Port Operations and Ship Movement
13 156.650 156.650 x
Intership Safety, Port Operations and Ship Movement
3
14 156.700 156.700 x Port Operations and Ship Movement
15 156.750 156.750 x
Intership and On-board Communications at 1W only
4
16 156.800 156.800 x Distress, Safety and Calling
17 156.850 156.850 x
Intership and On-board Communications at 1W only
4
18 156.900 161.500 Public Correspondence
19 156.950 161.550 Public Correspondence, Port Operations and Ship Movement
20 157.000 161.600 Public Correspondence, Port Operations and Ship Movement
21 157.050 161.650 Public Correspondence, Port Operations and Ship Movement
22 157.100 161.700 Public Correspondence, Port Operations and Ship Movement
23 157.150 161.750 Public Correspondence, Port Operations and Ship Movement
Page 52

52 Ray101E Handheld VHF Radio
CH
No.
XMIT
Freq
RCV
Freq
Single
Freq Use
24 157.200 161.800 Public Correspondence, Port Operations and Ship Movement
25 157.250 161.850 Public Correspondence, Port Operations and Ship Movement
26 157.300 161.900 Public Correspondence, Port Operations and Ship Movement
27 157.350 161.950 Public Correspondence, Port Operations and Ship Movement
28 157.400 162.000 Public Correspondence, Port Operations and Ship Movement
60 156.025 160.625 Public Correspondence, Port Operations and Ship Movement
61 156.075 160.675 Public Correspondence, Port Operations and Ship Movement
62 156.125 160.725 Public Correspondence, Port Operations and Ship Movement
63 156.175 160.775 Public Correspondence, Port Operations and Ship Movement
64 156.225 160.825 Public Correspondence, Port Operations and Ship Movement
65 156.275 160.875 Public Correspondence, Port Operations and Ship Movement
66 156.325 160.925 Public Correspondence, Port Operations and Ship Movement
67 156.375 156.375 x Intership, Port Operations and Ship Movement
68 156.425 156.425 x Port Operations and Ship Movement
69 156.475 156.475 x Port Operations and Ship Movement
71 156.575 156.575 x Port Operations and Ship Movement
72 156.625 156.625 x Intership
73 156.675 156.675 x
Intership
2
74 156.725 156.725 x Port operations and Ship movement
75 156.775 156.775 x See Note 5
76 156.825 156.825 x See Note 5
77 156.875 156.875 x Intership
78 156.925 161.525 Public correspondence, Port Operations and Ship Movement
79 156.975 161.575 Public correspondence, Port Operations and Ship Movement
80 157.025 161.625 Public correspondence, Port Operations and Ship Movement
81 157.075 161.675 Public correspondence, Port Operations and Ship Movement
Page 53

Appendix B: Channel List 53
CH
XMIT
No.
Freq
82 157.125 161.725 x Public correspondence, Port Operations and Ship Movement
83 157.175 161.775 x Public correspondence, Port Operations and Ship Movement
84 157.225 161.825 x Public correspondence, Port Operations and Ship Movement
85 157.275 161.875 x Public correspondence, Port Operations and Ship Movement
86 157.325 161.925 x Public correspondence, Port Operations and Ship Movement
87 157.375 157.375 x Port Operations and Ship Movement
88 157.425 157.425 x Port Operations and Ship Movement
RCV
Freq
Single
Freq Use
• Intership channels are for communications between ship stations. Intership communications
should be restricted to Channels 6, 8, 72 and 77. If these are not available, the other channels
marked for Intership may be used.
• Channels 10, 67 and 73 should be avoided within VHF range of coastal areas in Europe and Canada.
• Channel 70 is used exclusively for Digital Selective Calling (DSC) and is not available for regular
voice communications.
Notes:
1. Channel 06 may also be used for communications between ship stations and aircraft engaged in
coordinated search and rescue operations. Ship stations should avoid harmful interference to such
communications on channel 06 as well as to communications between aircraft stations, ice breakers and assisted ships during ice seasons.
2. Channels 10 or 73 (depending on location) are also used for the broadcast of Marine Safety Information by the Maritime and Coast Guard Agency in the UK only.
3. Channel 13 is designated for use on a worldwide basis as a navigation safety communication channel, primarily for intership navigation safety communications.
4. Channels 15 and 17 may also be used for on-board communications provided the effective radiated
power does not exceed 1 Watt.
5. The use of Channels 75 and 76 should be restricted to navigation related communication only and
all precautions should be taken to avoid harmful interference to channel 16. Transmit power is limited to 1 Watt.
Page 54

54 Ray101E Handheld VHF Radio
European Private Channels and Frequencies
Country
Belgium 31A
Denmark L1
Denmark,
Finland,
Norway &
Sweden
Finland,
Norway &
Sweden
Netherlands 31A
UK M1
Channel
Number
96D
L2
F1
F2
F3
L1
L2
L3
37C
M2
TX
Freq
157.550
162.425
155.500
155.525
155.625
155.775
155.825
155.500
155.525
155.650
157.550
157.850
157.850
161.425
RX
Freq Channel Use
162.150
162.425
155.500
155.525
155.625
155.775
155.825
155.500
155.525
155.650
162.150
157.850
157.850
161.425
n/a
n/a
Pleasure Boat
Pleasure Boat
Fishing Boat
Fishing Boat
Fishing Boat
Pleasure Boat
Pleasure Boat
Pleasure Boat
n/a
n/a
Pleasure Boat
Pleasure Boat
Note: A license may be required to operate the radio on the private channels. It is your
responsibility to obtain the proper license to operate the radio on these frequencies.
Page 55

Appendix B: Channel List 55
U.S. VHF Marine Radio Channels and Frequencies
CH. NoXMIT
Freq
RCV
Freq
Single
Freq Use
01A 156.050 156.050 x Port Operations and Commercial, VTS.
Available only in New Orleans / Lower Mississippi area.
1
03A 156.150 156.150 x Port Operations
05A 156.250 156.250 x Port Operations or VTS in the Houston, New Orleans and Seattle
areas.
06 156.300 156.300 x Intership Safety
07A 156.350 156.350 x Commercial
08 156.400 156.400 x Commercial (Intership only)
09 156.450 156.450 x Boater Calling. Commercial and Non-Commercial.
10 156.500 156.500 x Commercial
11 156.550 156.550 x Commercial. VTS in selected areas.
12 156.600 156.600 x Port Operations. VTS in selected a reas.
13 156.650 156.650 x Intership Navigatio n Safety (Bridge-to-bridge). Ships >20meters in
length maintain a listening watch on this channel in US waters.
2
14 156.700 156.700 x Port Operations. VTS in selected a reas.
15 - 156.750 x Environmental (Receive only). Used by Class ‘C’ EPIRBs.
16 156.800 156.800 x International Distress, Safety and Calling. Ships required to carry
radio, USCG, and most coast stations maintain a listening watch on
this channel.
3
17 156.850 156.850 x State Control
18A 156.900 156.900 x Commercial
19A 156.950 156.950 x Commercial
20 157.000 161.600 Port Operations (duplex)
20A 157.000 157.000 x Port Operations
21A 157.050 157.050 x U.S. Coast Guard only
22A 157.100 157.100 x Coast Guard Liaison and Maritime Safety Information Broadcasts.
Broadcasts announced on channel 16.
Page 56

56 Ray101E Handheld VHF Radio
CH. NoXMIT
Freq
23A 157 .150 157.150 x U.S. Coast Guard only
24 157.200 161.800 Public Correspondence (Marine Operator)
25 157.250 161.850 Public Correspondence (Marine Operator)
26 157.300 161.900 Public Correspondence (Marine Operator)
27 157.350 161.950 Public Correspondence (Marine Operator)
28 157.400 162.000 Public Correspondence (Marine Operator)
61A 156 .075 156.075 x U.S. Coast Guard only
63A 156.175 156.175 x Port Operations and Commercial, VTS. Available only in New
64A 156 .225 156.225 x U.S. Coast Guard only
65A 156 .275 156.275 x Port Operations
66A 156 .325 156.325 x Port Operations
67 156.375 156.375 x Commercial. Used for Bridge-to-bridge communications in lower
68 156.425 156.425 x Non-Commercial
69 156.475 156.475 x Non-Commercial
RCV
Freq
Single
Freq Use
Orleans / Lower Mississippi area.
Mississippi River. Intership only.
71 156.575 156.575 x Non-Commercial
72 156.625 156.625 x Non-Commercial (Intership only)
73 156.675 156.675 x Port Operations
74 156.725 156.725 x Port Operations
77 156.875 156.875 x Port Operations (Intership only)
78A 156.925 156.925 x Non-Commercial
79A 156.975 156.975 x Commercial. Non-Commercial in Great Lakes only.
80A 157.025 157.025 x Commercial. Non-Commercial in Great Lakes only
81A 157 .075 157.075 x U.S. Government only – Environmental protection operations.
82A 157 .125 157.125 x U.S. Government only
83A 157 .175 157.175 x U.S. Coast Guard only
Page 57

Appendix B: Channel List 57
CH. NoXMIT
Freq
84 157.225 161.825 Public Correspondence (Marine Operator)
85 157.275 161.875 Public Correspondence (Marine Operator)
86 157.325 161.925 Public Correspondence (Marine Operator)
87 157.375 161.975 Public Correspondence Marine Operator)
88 157.425 162.025 Public Correspondence only near Canadian border
88A 157.425 157.425 x Commercial, Intership only
RCV
Freq
Single
Freq Use
• Boaters should normally use channels listed as Non-Commercial.
• Channels 13 and 67 are initially set to 1 watt output power only. You can temporarily override this
restriction to transmit at high power if necessary.
• Channel 70 is used exclusively for Digital Selective Calling (DSC) and is not available for regular
voice communications.
• Channels 75 and 76 are reserved as guard bands for Channel 16 and are not available for regular
voice communications.
Notes:
1. The letter “A” following a channel number indicates simplex use of the ship station transmit side of
an international duplex channel. Operations are different from that of international operations on
that channel.
2. Channel 13 should be used to contact a ship when there is danger of collision. All ships of length 20
meters or greater are required to guard VHF channel 13, in addition to VHF channel 16, when operating within U.S. territorial waters.
3. Channel 16 is used for calling other stations or for distress alerting.
Page 58

58 Ray101E Handheld VHF Radio
Canadian VHF Marine Radio Channels and Frequencies
CH
XMIT
No.
Freq
01 156.050 160.650 PC Public Correspondence
02 156.100 160.700 PC Public Correspondence
03 156.150 160.750 PC Public Correspondence
RCV
Freq
Area of
Operation Use
04A 156.200 156.200 PC Intership, Ship/Shore and Safety:
Canadian Coast Guard search and rescue
1
04A 156.200 156.200 EC Intership, Ship/Shore and Commercial:
Commercial fishing only
05A 156.250 156.250 Ship Movement
06 156.300 156.300 All areas Intership, Commercial, Non-commercial and Safety:
May be used for search and rescue communications between
ships and aircraft.
07A 156.350 156.350 All areas Intership, Ship/Shore, Commercial
08 156.400 156.400 WC, EC Intership, Commercial and Safety:
Also assigned for operations in the Lake Winnipeg area.
09 156.450 156.450 AC Intership, Ship/Shore, Commercial, Non-commercial and Ship
Movement: May be used to communicate with aircraft and
helicopters in predominantly maritime support operations.
10 156.500 156.500 AC, GL Intership, Ship/Shore, Commercial, Non-commercial, Safety
and Ship Movement: May also be used for communications
with aircraft engaged in coordinated search and rescue and
antipollution operations.
11 156.550 156.550 PC, AC, GL Intership, Ship/Shore, Commercial, Non-commercial and Ship
Movement: Also used for pilotage purposes.
12 156.600 156.600 WC, AC, GL Intership, Ship/Shore, Commercial, Non-commercial and Ship
Movement: Port operations and pilot information and messages.
13 156.650 156.650 All areas Intership, Commercial, Non-commercial and Ship Movement:
Exclusively for bridge-to-bridge navigational traffic.
14 156.700 156.700 AC, GL Intership, Ship/Shore, Commercial, Non-commercial and Ship
Movement: Port operations and pilot information and messages.
Page 59

Appendix B: Channel List 59
CH
No.
XMIT
Freq
RCV
Freq
Area of
Operation Use
15 156.750 156.750 All areas Intership, Ship/Shore, Commercial, Non-commercial and Ship
Movement: All operations limited to 1-watt maximum power.
May also be used for on-board communications.
16 156.800 1 56.800 All areas
International Distress, Safety and Calling
2
17 156.850 156.850 All areas Intership, Ship/Shore, Commercial, Non-commercial and Ship
Movement: All operations limited to 1-watt maximum power.
May also be used for on-board communications.
18A 156.900 156.900 All areas Intership, Ship/Shore and Commercial:
Towing on the Pacific Coast.
19A 156.950 156.950 All areas
except PC
Intership and Ship/Shore:
Canadian Coast Guard only.
19A 156.950 156.950 PC Intership and Ship/Shore:
Various Government departments.
20 157.000 161.600 All areas Ship/Shore, Safety and Ship Movement:
Port operations only with 1-watt m aximum power.
21A 157.050 157.050 All areas Intership and Ship/Shore:
Canadian Coast Guard only.
21B - 161.650 All areas
Safety: Continuous Marine Broadcast (CMB) service.
3
22A 157.100 157.100 All areas Intership, Ship/Shore, Commercial and Non-commercial:
For communications between Ca nadian Coast Guard and nonCanadian Coast Guard stations only.
23 157.150 161.750 PC Ship/Shore and Public Correspondence:
Also in the inland waters of British Columbia and the Yukon.
24 157.200 161.800 All areas Ship/Shore and Public Correspondence
25 157.250 161.850 PC Ship/Shore and Public Correspondence: Also assigned for
operations in the Lake Winnipeg area.
25B - 161.850 AC Safety: Continuous Marine Broadcast (CMB) service.
26 157.300 161.900 All areas Ship/Shore, Safety and Public Correspondence
27 157.350 161.950 AC, GL, PC Ship/Shore and Public Correspondence
28 157.400 162.000 PC Ship/Shore, Safety and Public Correspondence
28B - 162.000 AC Safety: Continuous Marine Broadcast (CMB) service.
Page 60

60 Ray101E Handheld VHF Radio
CH
XMIT
No.
Freq
60 156.025 160.625 PC Ship/Shore and Public Correspondence
61A 156 .075 156.075 PC Intership and Ship/Shore:
RCV
Freq
Area of
Operation Use
Canadian Coast Guard only.
61A 156.075 156.075 EC Intership, Ship/Shore and Commercial:
62A 15 6.125 156.125 PC Intership and Ship/Shore:
62A 156.125 156.125 EC Intership, Ship/Shore and Commercial:
64 156.225 160.825 PC Ship/Shore and Public Correspondence
64A 156.225 156.225 EC Intership, Ship/Shore and Commercial:
65A 156 .275 156.275 Intership, Ship/Shore, Commercial, Non-commercial, Safety :
66A 156 .325 156.325 Intership, Ship/Shore, Commercial, Non-commercial, Safety
67 156.375 156.375 EC Intership, Ship/Shore and Commercial:
67 156.375 156.375 All areas
except EC
Commercial fishing only.
Canadian Coast Guard only.
Commercial fishing only.
Commercial fishing only.
Search & rescue and antipollution operations on the Great
Lakes. Towing on the Pacific Coast. Port operations only in the
St. Lawrence River areas with 1W maximum power. Pleasure
craft in the inland waters of Alberta, Saskatchewan and Manitoba (excluding Lake Winnipeg and the Red River).
and Ship Movement: Port operations only in the St.Lawrence
River/Great Lakes Areas with 1-watt maximum power.
Commercial fishing only.
Intership, Ship/Shore, Commercial, Non-commercial, Safety:
May also be used for c ommunications with aircraft engaged in
coordinated search and rescue and antipollution operations.
68 156.425 156.425 All areas Intership, Ship/Shore and Non-commercial:
69 156.475 156.475 All areas
except EC
69 156.475 156.475 EC Intership, Ship/Shore and Commercial:
71 156.575 156.575 PC Intership, Ship/Shore, Commercial, Non-commercial, Safety
For marinas and yacht clubs.
Intership, Ship/Shore, Commercial and Non-commercial
Commercial fishing only
and Ship Movement
Page 61

Appendix B: Channel List 61
CH
No.
XMIT
Freq
RCV
Freq
Area of
Operation Use
71 156.575 156.575 Intership, Ship/Shore and Non-commercial: For marinas and
72 156.625 156.625 EC, PC Intership, Commercial and Non-commercial:
73 156.675 156.675 EC Intership, Ship/Shore and Commercial:
73 156.675 156.675 All areas
except EC
74 156.725 156.725 EC, PC Intership, Ship/Shore, Commercial, Non-commercial and Ship
77 156.875 156.875 Intership, Ship/Shore, Safety and Ship Movement:
78A 156.925 156.925 EC, PC Intership, Ship/Shore and Commercial
79A 156.975 156.975 EC, PC Intership, Ship/Shore and Commercial
80A 157.025 157.025 EC, PC Intership, Ship/Shore and Commercial
81A 157.075 157.075 Intership and Ship/Shore: Canadian Coast Guard use only in
81A 157.075 157.075 PC Intership, Ship/Shore and Safety:
yacht clubs on the East Coast and on Lake Winnipeg.
May be used to communicate with aircraft and helicopters in
predominantly maritime support operations.
Commercial fishing only
Intership, Ship/Shore, Commercial, Non-commercial, Safety:
May also be used for comm unications with aircraft engaged in
coordinated search and rescue and antipollution operations.
Movement
Pilotage on Pacific Coast. Port operations only in the St.
Lawrence River/Great Lakes areas with 1W maximum power.
the St. Lawrence River/Great Lakes areas.
Canadian Coast Guard antipollution.
82A 157.125 157.125 PC Intership, Ship/Shore and Safety:
82A 157.125 157.125 Intership and Ship/Shore: Canadian Coast Guard use only in
83 157.175 161.775 PC Ship/Shore and Safety:
83A 157.175 157.175 EC Intership and Ship/Shore:
83B - 161.775 AC, GL Safety: Continuous Marine Broadcast (CMB) Service.
84 157.225 161.825 PC Ship/Shore and Public Correspondence
Canadian Coast Guard use only.
the St. Lawrence River/Great Lakes areas.
Canadian Coast Guard use only.
Canadian Coast Guard and other Government agencies.
Page 62

62 Ray101E Handheld VHF Radio
CH
XMIT
No.
Freq
85 157.275 161.875 AC, GL, NL Ship/Shore and Public Correspondence
86 157.325 161.925 PC Ship/Shore and Public Correspondence
87 157.375 161.975 AC, GL, NL Ship/Shore and Public Correspondence
88 157.425 162.025 AC, GL, NL Ship/Shore and Public Correspondence
RCV
Freq
Area of
Operation Use
Area of Operation
AC: Atlantic Coast, Gulf and St. Lawrence River up to and including Montreal
EC (East Coast): includes NL, AC, GL and Eastern Arctic areas
GL: Great Lakes (including St. Lawrence above Montreal)
NL: Newfoundland and Labrador
PC: Pacific Coast
WC (West Coast): Pacific Coast, Western Arctic and Athabasca-Mackenzie Watershed areas
All areas: includes East and West Coast areas
Notes:
1. The letter “A” following a channe l number indicates simplex use of the ship station transmit side of
an international duplex channel. Operations are different from that of international operations on
that channel.
2. Channel 16 is used for calling other stations or for distress alerting.
3. The letter “B” following a channel number indicates simplex use of the coast station transmit side
of an international duplex channel. That is, the channel is Receive Only.
4. Channel 70 is used exclusively for Digital Selective Calling (DSC) and is not available for regular
voice communications.
5. Channels 75 and 76 are reserved as guard bands for Channel 16 and are not available for regular
voice communications.
Page 63

Appendix B: Channel List 63
WX Channels (North America only)
Weather
Channel
WX 1 162.550
WX 2 162.400
WX 3 162.475
WX 4 162.425
WX 5 162.450
WX 6 162.500
WX 7 162.525
WX 8 161.650
WX 9 161.775
WX 10 163.275
Frequency
in MHz
Page 64

64 Ray101E Handheld VHF Radio
Page 65

Appendix C: Glossary 65
Appendix C: Glossary
Term Meaning
All Scan A feature that scans all channels.
ATIS Automatic Transmission Identification System. Used for inland
waterways in some European countries.
Canadian Channels Channel designator as defined by Industry Canada.
CH Channel selection key
Dual Watch A feature that monitors the Priority Channel 16 while working on
another channel.
Duplex Transmit and receive on different frequencies
FCC Federal Communications Commission (US)
International Channels Channel designator as defined by the ITU
ITU International Telecommunications Union
LCD Liquid Crystal Display
NOAA National Oceanographic and Atmospheric Administration (USA)
Priority Channel Channel 16
Priority Mode Initiated by pressing the 16/PLUS key, this mode instantly places
the radio at Channel 16 at high power.
Priority Scan (PSCAN) A feature that alternates monitoring the Priority Channel 16 with
PTT switch Microphone Push-To-Talk switch
RF Radio Frequency
RX Receive
Saved Scan Scans only user-selected memory channels
Simplex Transmit and receive on the same frequency
Squelch A circui t that sets the threshold for cu tting off the receiver when the
TX Transmit
Tri Watch A function that monitors the Priority Channel and (previously pro-
each of the regular channels
signal is too weak for reception of anything but noise.
grammed) Favourite Channel while working on another channel.
Page 66

66 Ray101E Handheld VHF Radio
Term Meaning
US Channels Channel designations as defined by the FCC.
VOL Volume key
VHF Very High Frequency (30MHz to 300MHz)
Weather (WX) Channels Channels for routine and emergency weather information
broadcast by NOAA (USA).
Working Channel The currently-selected (non-priority, non-WX) channel.
Page 67

67
Index
Symbols
"*" key 23
"A" indicator 25
"B" indicator 25
"C" indicator 25
"I" indicator 25
"P" indicator 25
"U" indicator 25
Numerics
16/PLUS key 23
A
Adding channels to memory 38
ALERT indicator 26
All Scan function 35
Antenna 13
ATIS 12
Indicator 26
Programming 42
B
Backlight 23, 34
BAND function 30
Battery 14
Charging 17
Level indicator 25
Tray 15
Type switch 15
Belt Clip 14
C
Canadian channels 58
CH indicator 25
Channel List
Canadian frequencies 58
International frequencies 51
US frequencies 55
WX frequencies 63
Channel Set selection 23
Channel Sets 30
Channel setting 29
Channel UP/DOWN 23
Charging batteries 17
Conventions 7
Customer Support 47
D
Delete channels from memory 38
DUAL indicator 26
Dual Watch 23, 39
E
Equipment supplied 13
F
Factory reset 4 6
Features 11
Frequency Band 30
Frequen cy settings
Canadian channels 58
International channels 51
US channels 55
WX channels 63
G
Glossary 65
H
Help from Raymarine 47
HI/LO / USER key 23
HI/LO indicator 26
HI/LOW power selection 23, 28
I
Installation 13
International channels 51
K
Keylock 23, 34
Keylock indicator 26
L
LCD display 24
Licensing requirements 12
Page 68

68
M
Memory 38
Monitor modes 39, 40
P
Power 22
Power ON/OFF 27
Power selection 28
Priority Channel 31
Priority Mode 25, 31
Priority Scan function 37
PSCAN indicator 25
PTT 22, 33
Push-To-Talk key 33
R
Raymarine
Website 47
Recharging batteries 17
Reset 46
RX indicator 24
S
Save channels to memory 38
SAVED indicator 25
Saved Scan function 36
Scan function 35
SCAN indicator 25
SCAN/SAVE key 23
Signal strength 26
Squelch 22, 28
V
Volume 27
W
Warning 8
Warranty 7
Weather Alert 30
Weather Channels 29
Website 47
Wrist Strap 14
WX 29
channels 63
indicator 26
T
Transmitting 33
TRI indicator 26
Tri Watch 23, 40
TX 33
TX indicator 24
U
US channels 55
USER Channel Mode 23, 41
USER indicator 24
 Loading...