

Page 1

Type 150/400
Autopilot
System
Installation Guide
Document number: 81173-3
Date: June 2001
Page 2

ii Type 150/400 Autopilot System: Installation Guide
Autohelm, HSB (High Speed Bus), SailPilot, SeaTalk and SportPilot
are registered trademarks of Raymarine Ltd.
Raymarine, AST (Advanced Steering T echnology), AutoAdapt,
AutoLearn, AutoRelease, AutoSeastate, AutoTack, AutoTrim,
FastTrim, GyroPl us, RayGyro, RayPilot and W indTrim are
trademarks of Raymarine Ltd.
Handbook contents © Raymarine Ltd 2001.
Page 3

Preface iii
Contents
About this handbook ............................................................v
Important Information ........................................................vi
Warranty .....................................................................................vi
Safety notices .............................................................................vi
EMC conformance ....................................................................vii
Handbook information ..............................................................vii
Step 1: Check the Installation Kit ............................................1
1.1 Read this handbook ...................................................................1
The autopilot system – core pack contents ................................1
The autopilot system – other key compone nts .......................... 3
The autopilot system – extended systems ................................. 3
1.2 Obtain installation tools ............................................................4
1.3 Check parts supplied ................................................................. 4
Step 2: Check Locations ............................................................6
2.1 Identify suitable locations .........................................................6
2.2 EMC installation guidelines ..................................................... 7
Step 3: Install the Course Computer .......................................9
3.1 Select the location ...................................................................10
Suitable locations ....................................................................10
Unsuitable locations ................................................................11
Orientation ..............................................................................11
3.2 Secure the course computer ....................................................12
3.3 Remove the connector cover ...................................................12
Connecting cables to the terminals .........................................14
Using the fuses ........................................................................14
3.4 Attach the power cables .......................................................... 15
Step 4: Install the Compass ....................................................17
4.1 Select the location ...................................................................18
4.2 Mount the compass ................................................................. 20
4.3 Connect to the course computer ..............................................20
4.4 Connecting SeaT alk or NMEA compasses ............................. 21
Step 5: Install the Rudder Position Sensor ...........................22
5.1 Rotary rudder position sensor - installation ............................ 22
Introduction ............................................................................ 22
Ensuring correct alignment .....................................................23
Securing the sensor to the boat ................................................24
Page 4

iv Type 150/400 Autopilot System: Installation Guide
Attaching the sensor to the tiller arm ...................................... 24
Checking alignment ................................................................25
Connecting to the course computer .........................................25
5.2 Linear rudder position sensor - installation ............................. 26
Introduction ............................................................................ 26
Mounting ................................................................................ 26
Step 6: Install the Drive Unit .................................................. 28
Step 7: Install the Control Unit ..............................................29
Step 8: Clamp the Cables ........................................................ 30
Step 9: Integrate the System ................................................. 31
9.1 Connecting SeaT alk equipment .............................................. 32
Possible systems .....................................................................32
9.2 Connecting NMEA equipment ............................................... 36
Course computer NMEA inputs/outputs ................................36
Control unit NMEA inputs ..................................................... 38
SeaTa lk/NMEA interface .......................................................38
Connecting several items of NMEA equipment .....................38
9.3 Connecting optional components ........................................... 40
GyroPlus yaw sensor .............................................................. 40
Handheld remotes ................................................................... 40
External alarm ......................................................................... 40
Wind vane (sail b oats) .............................................................40
Off switch ............................................................................... 41
Other manufacturers’ drive units ............................................ 41
9.4 Setting-up the autopilot ...........................................................42
Maintenance ........................................................................ 43
Regular checks ...........................................................................43
Fault-finding ..............................................................................43
Servicing ....................................................................................43
EMC, servicing and safety guidelines .................................... 44
Product support ..........................................................................44
Specifications ...................................................................... 45
Control unit functionality ..........................................................46
Glossary ................................................................................ 47
Index ..................................................................................... 49
Page 5

Preface v
About this handbook
W elcome to the installation guide for the Raymarin e Typ e 150/400
autopilot system. This autopilot system will steer your boat to a
heading automatically, accurately and reliably .
This handbook explains how to install the parts pro vided with
T ype 150, T ype 150G, Type 400 and T ype 400G autopilot system
core packs. The installation process involves the following steps:
Check the Installation Kit page 1
1
Check Locations page 6
2
Install the Course Computer page 9
3
Install the Compass page 17
4
Install the Rudder Position Sensor page 22
5
Install the Drive Unit page 28
6
Install the Control Unit page 29
7
Clamp the Cables page 30
8
Integrate the System page 31
9
At the end of this handbook we have also included:
• maintenance information
• product specifications
• glossary and index
• installation template
• the warranty statement
Note: T his handbook contains important information about the
installation and maintenance of your new Raymarine product. To get
the best from the product, please read this handb ook thoroughly.
Page 6

vi Type 150/400 Autopilot System: Installation Guide
Important Information
Warranty
T o register your new product, please take a few minutes to fill out the
warranty card. It is important that you return the card to the factory to
receive full warranty benefits.
Safety notices
WARNING: Product installation
This equipment must be installed and operated in accordance
with the instructions contained in this handbook. Failure to do so
could result in poor pr oduct performance, personal injury
and/or damage to your boat.
Because correct performance of the boat’s steering is critical for
safety , we STRONGLY RECO MMEND tha t an Autho rized
Raymarine Service Representative fits this product. Y ou will
only receive full warranty benefits if you can show that an
Authorized Raymarine Service Representative has installed or
commissioned this product.
WARNING: Electrical safety
Make sure the power supply is switched off befor e you make any
electrical connections.
WARNING: Calibration
We supply this pr oduct calibrated to default settings. To ensure
optimum performance on your boat, this product MUST be
calibrated before use. Do NOT use the product until it has been
calibrated using the instructions supplied.
WARNING: Navigation aid
Although we have designed this pr oduct to be accurate and
reliable, many factors can affect its performance. As a result, it
should only be used as an aid to n avigation and should never
replace common s ense and navigational judgement. A lways
maintain a permanent watch so you can respond t o situations as
they develop.
Page 7

Preface vii
Y our Raymarine autopilot will add a new dimension to your boating
enjoymen t. Howeve r, i t is the sk ipper’s responsibility to ensure the
safety of the vessel at all times by following these basic rules:
• Ensure that someone is present at the helm A T ALL TIMES, to
take manual control in an emergency .
• Make sure that all members of crew know how to disengage the
autopilot.
• Regularly check for other boats and any obstacles to navigation –
no matter how clear the sea may appear, a dangerous situation can
develop rapidly.
• Maintain an accurate record of the boat’s posit ion by using either
a navigation aid or visual bearings.
• Maintain a continuous plot of your boat’s position on a current
chart. Ensure that the locked autopilot heading will steer the boat
clear of all obstacles. Make proper allowance for tidal set – the
autopilot cannot.
• Even when your autopilot is locked onto the desired track using a
navigation aid, always maintain a log and make regular positional
plots. Navigation signals can produce signifi cant errors under
some circumstances and the autopilot will not be able to detect
these errors.
EMC conformance
All Raymarine equipment and accessories are designed to the best
industry standards for use in the recreational marine environment.
The design and manufacture of Raymarine equipment and
accessories conform to the appropriate Electromagnetic
Compatibility (EMC) standards, but correct installation is required to
ensure that performance is not compromised.
Handbook information
T o the best of our knowledge, the information in this handbook was
correct when it went to press. However, Raymarine cannot accept
liability for any inaccuracies or omissions it may contain. In addition,
our policy of continuous product improv ement may change
specifications without notice. As a result, Raymarine cannot accept
liability for any differences between the product and th e handbook.
Page 8
viii Type 150/400 Autopilot System: Installation Guide
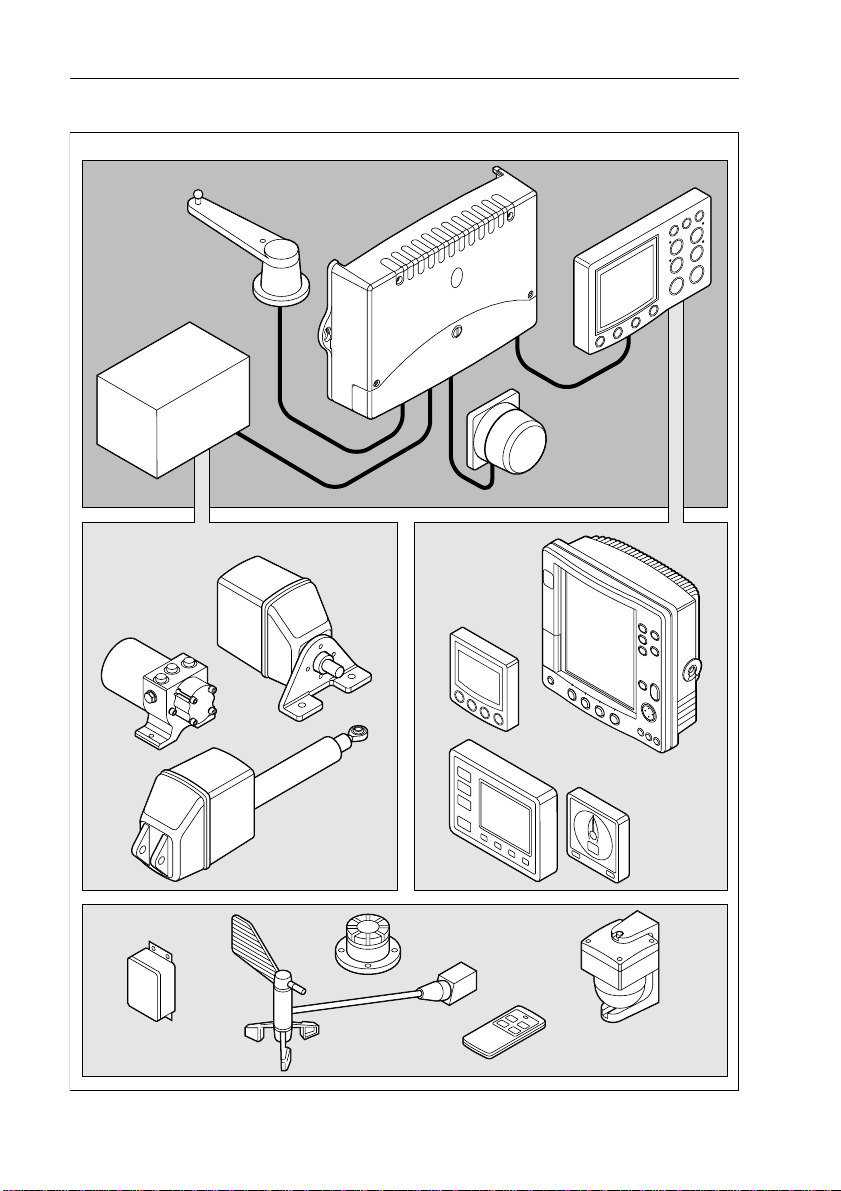
Type 150/400 autopilot system
Key components
Rudder
position sensor
Drive
unit
Course
computer
Standard
fluxgate
compass
Control
unit
Typical
drive units
Hydraulic
pump
Options
External GyroPlus
yaw sensor
Wind
vane
Linear drive
Rotary
drive
Other
equipment
External
alarm
SeaTalk
equipment
SeaTalk
handheld remote
NMEA
equipment
Active
compass
D5191-2
Page 9

Step 1: Check the Installation Kit 1
Step 1: Check the Installation Kit
The first step is to get ready for installation by:
• reading through all installation steps
• obtaining the necessary installation tools
• checking the parts supplied
WARNING: Product installation
This equipme nt must be inst alled and opera ted in accord ance
with the ins tructions containe d in this handboo k. Failure to do so
could result in poor p roduct performance, personal in jury
and/or damage to your boat.
Because correct performance of the boat’s steering is critical for
safety, we STRONGL Y RECOMMEND that an Authorized
Raymarine Service Representative fits this product. You will
only receive full warranty benefits if you can show that an
Authorized Raymarine Service Representative has installed or
commissioned this product.
1.1 Read this handbook
T o prepare for the system installation, read through the following
information and the rest of this handbook to familiarize yourself with
the autopilot system and how to install it.
Step 1
The autopilot system – core pack contents
Course computer
The course computer lies at the heart of the autopilot system. It
processes information from the sensors in the syst em (e.g. rudder
position and compass) so it can steer the boat using the drive unit:
• it contains a microprocessor, electronic circuitry to control the
drive unit and a powe r amplif ier for th e drive mo tor .
• it is the central distribution point for the autopilot system, with
terminals to take power from the boat’s distribution p anel and
inputs/outputs for all other autopilot componen ts
• it has inputs/outputs for SeaT alk and NMEA so you can connect it
to Raymarine and other manufacturer’s equipmen t.
Page 10

2 Type 150/400 Autopilot System: Installation Guide
Course computer versions
Version Supply voltage Drive unit compatibility
Step 1
Type 150
Type 150G
Type 400
Type 400G
*Note: The Raymarine GyroPlus yaw sensor measures the boat’s yaw (its rate of turn). The autopilot
system uses this informa tion to enhance course keeping in adverse weather and sai lin g conditions (such
as sailing downwind in following seas). The Type 150G and Type 400G course computers contain a
built-in GyroPlus yaw sensor as standard. The Type 150 and Type 400 course computers do not contain
a built-in GyroPlus, but have the option of an external GyroPlus or dealer-fitted internal GyroPlus.
12 V
12 V
12 V or 24 V
12 V or 24 V
All Raymarine Type 1 12 V drives and pumps
(including 12 V Constant Running pump).
All Raymarine Type 1 12 V drives and pumps
(including 12 V Constant Running pump).
All Raymarine 12 V and 24 V Type 1, Type 2 and
Type 3 drives and pumps. Drive voltage must be
matched to boat’s supply voltage.
All Raymarine 12 V and 24 V Type 1, Type 2 and
Type 3 drives and pumps. Drive voltage must be
matched to boat’s supply voltage.
Built-in
GyroPlus*?
No
Yes
No
Yes
CAUTION:
Before installing the course computer and drive unit, check that
they are the correct voltage for your boat’s supply.
For course computer installation information, see page 9
Í
For course computer specifications, see page 45
Compass
The compass is the direction sensor for the autopilot system. It
provides the course computer with precise information about the
boat’s heading.
Raymarine supplies a standard fluxgate compass for the autopilot
system.
For more information, see page 17
Í
Rudder position sensor
The rudder position sensor (or rudder reference transducer) provides
the course computer with the exact position of the boat’s rudder.
Page 11

Step 1: Check the Installation Kit 3
Raymarine produces two alternative types of rudder sensor:
• the rotary rudder position sensor is suitable for all steering
systems (apart from ‘bullhorn’ style hydraulic outboards)
• the linear rudder position sensor is specifically designed for
‘bullhorn’ style hydraulic outboard steering systems
For more information, see page 22
Í
The autopilot system – other key components
Drive unit
The drive unit translates instructions from the course computer into
rudder movement, so the course computer can steer the boat.
Raymarine produces a wide range of drive units to suit different types
of steering systems.
For more information, see page 28
Í
Control unit
The control unit is the your interface with the autopilot system. Y ou
can use it to:
• engage and disengage the autopilot
• adjust the boat’s course when the autopilot is engaged
• view information about the autopilot system’s status and perform
a range of other functions
Step 1
Raymarine produces a range of control units to suit di fferent boats
and user requirements.
For more information, see page 29
Í
The autopilot system – extended systems
Around these key components of the autopilot system, you can
extend the system by adding options su ch as:
• connections to additional control units, SeaT alk equipment or
other manufacturers’ equipment (via NMEA)
• a GyroPlus yaw sensor (if you have a T ype 150 or T ype 400
course computer without a built-in GyroPlus )
Page 12

4 Type 150/400 Autopilot System: Installation Guide
• handheld remotes (the ST600R full-function remo te control or
the SeaT alk handheld remote control)
Step 1
• pushpit or masthead wind vanes (for sail boats without a suitable
wind instrument)
• an external alarm (through an E85001 interface)
For more information about extended systems, see page 31.
Í
1.2 Obtain installation tools
T o install the core pack you will need the following items:
• tape measure (metric/imperial)
• screwdrivers:
• cross-head/pozi-drive
• flat-bladed (large and small)
• drill and 3 mm drill bit
• center punch, pencil and masking tape
• for the rudder position sensor:
• hacksaw
• small adjustable spanner
• bolts, nuts and lockwashers (if required for tiller pin)
• for the course computer power supply:
• suitabl e power ca ble (see page 16)
• suitable fuse/circuit breaker (see page 16)
Note: Y ou will also need the tools and equipment required to install
the control unit and drive unit. For full detai ls, refer the information
supplied with control unit and drive unit .
1.3 Check parts supplied
Use the diagram on the following page to check the parts supplied.
CAUTION:
Before you start installing the course computer, check that it is
the correct voltage for your boat’s power and your drive unit.
Page 13
Step 1: Check the Installation Kit 5
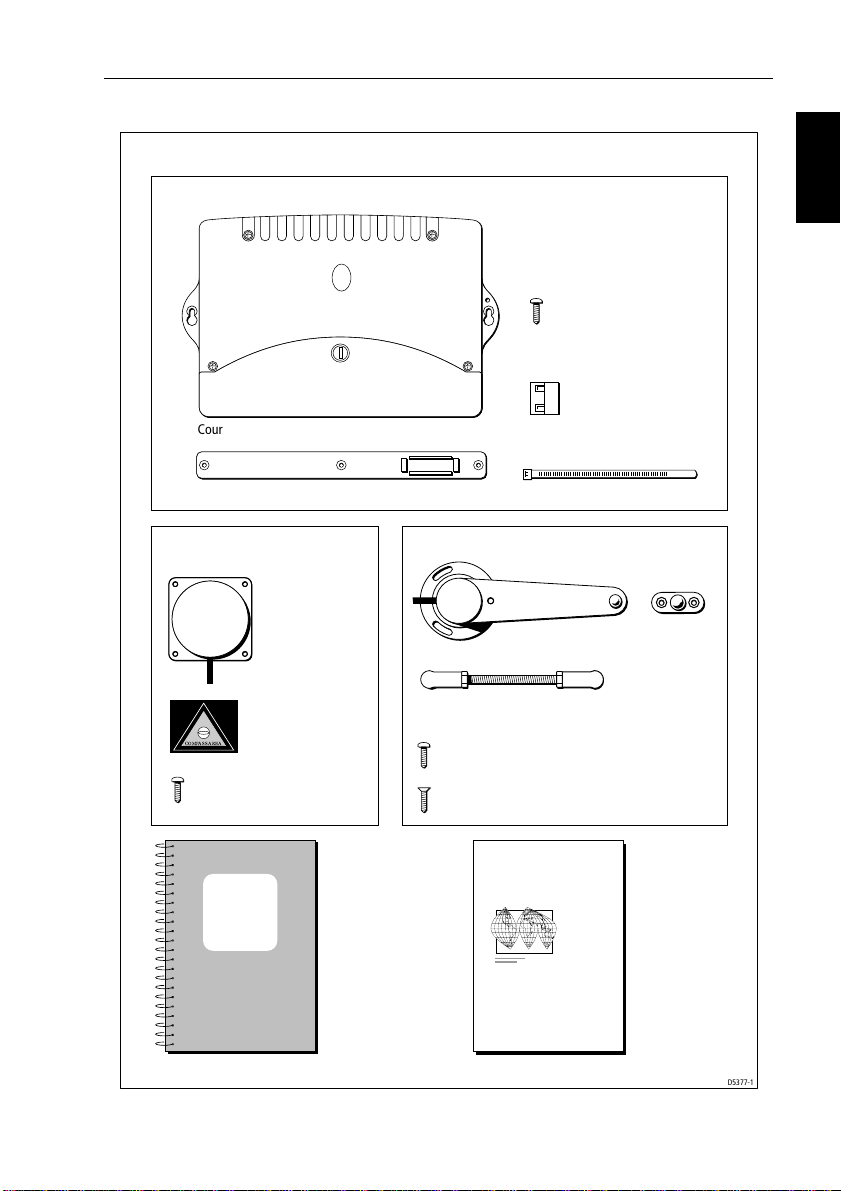
Core pack – parts supplied
Course computer components
No8 x 3/4 inch pan-head
self-tapping screws (x5):
• 2 for course computer
• 3 for cable clamp
Ferrite
(for power cable)
Course computer
Cable clamp Tie-wrap (for cable clamp)
Compass components Rudder position sensor components
Fluxgate compass
with 8 m (26 ft) cable
Step 1
Tiller pin
Worldwide
Distributor List
Compass
!
warning label
COMPASSAREA
No8 x 3/4 inch pan-head
self-tapping screws (x4)
Type 150/400
Autopilot
System
Installation
Guide
Installation Guide
(includes warranty
documents and
fitting templates)
Rudder position sensor
with 10 m (32 ft) cable
Connecting rod (M6), nuts (M6 x2)
and ball-pin sockets (x2)
No8 x 3/4 inch pan-head self-tapping screws (x3)
for rudder position sensor
No8 x 3/4 inch countersunk self-tapping screws (x2)
for tiller pin
Worldwide
Distributors
Note: This illustration shows the parts supplied with Type 150, 150G, 400 and 400G autopilot core packs.
D5377-1
Page 14
6 Type 150/400 Autopilot System: Installation Guide
Step 2: Check Locations
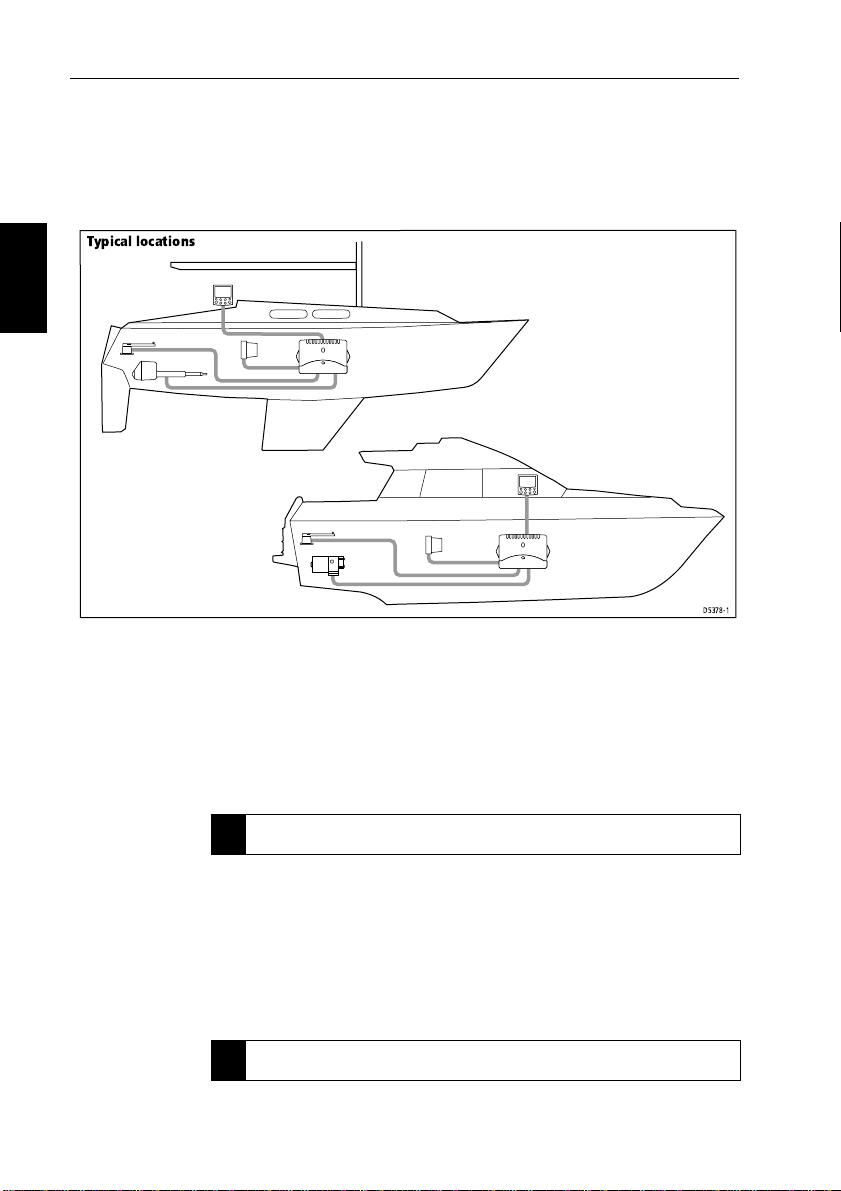
2.1 Identify suitable locations
Typical locations
Step 2
After reading the following EMC installation guidelines (see page 7),
identify suitable locations for each part of the system.
D5378-1
Course computer location:
• mount vertically on a flat bulkhead below decks
• dry , protected and well-ventilated
• free from high operating temperatures and excessive vibration
For more information, see page 10
Í
Compass location:
• mount vertically, with cable exiting at the base
• as near as possible to the boat’s pi tch and roll center
• at least 0.8 m (2 ft 6 in) away from the boat’s steering compass
• in the back two-thirds of the boat
• away from potential sources of magnetic interference
For more information, see page 18
Í
Page 15

Step 2: Check Locations 7
Rotary rudder position sensor location:
• suitable base alongside the rudder stock and tiller arm.
• so the ball-joints at each end of the connecting rod are level
• so the sensor arm is between 75 mm (3 in) and 310 mm (12 in)
from the tiller arm
For more information, see page 23
Í
Drive unit and control unit locations
Refer to the information supplied with these units to identify suitable
locations.
Cabling:
• consider how you will run cables to and from each component
• avoid running cables through bilges where p ossible
• avoid running cables close to fluorescent lights, engi nes, radio
transmitting equipment etc.
Note: When cutting cables to length, we recommend that you include
a loop of extra cable so you can cut and strip the cables a few ti mes in
the future (if necessary).
Step 2
2.2 EMC installation guidelines
All Raymarine equipment and accessories are designed to the best
industry standards for use in the recreational marine environment.
Their design and manufacture conforms to the appropriate
Electromagnetic Compatibility (EMC) standards, but correct
installation is required to ensure that performance is not
compromised. Although every effort has b een taken to ensure that
they will perform under all conditions, it is important to understand
what factors could affect the operation of the product.
The guidelines given here describe the conditions for op timum EMC
performance, but it is recognized that it may not be possible to meet
all of these conditions in all situations. To ensure the best possible
conditions for EMC performance within the constraints imposed by
any location, always ensure the maximum separation possibl e
between different items of electrical equipment.
Page 16

8 Type 150/400 Autopilot System: Installation Guide
For optimum EMC perform ance, we recommend that wherever
possible:
• Raymarine equipment and cables connected to it are:
• At least 3 ft (1 m) from any equipment transmitting or cable s
carrying radio signals e.g. VHF radios, cables and antennas.
In the case of SSB radios, increases the distance to 7 ft (2 m).
• More than 7 ft (2 m) from the path of a radar beam. A radar
Step 2
beam can normally be assumed to spread 20 degrees above
and below the radiating element.
• The equipment is supplied from a separate battery from that used
for engine start. Voltage drops below 10 V , and starter motor
transients, can cause the equipment to reset. This will not damage
the equipment, but may cause the loss of some information and
may change the operating mode.
• Raymarine specified cables are used. Cutting and rejoining these
cables can compromise EMC performance and must be avoided
unless doing so is detailed in the installation manu al.
• If a suppression ferrite is attached to a cable, this ferrite should no t
be removed. If the ferrite needs to be removed d uring installation
it must be reassembled in the same position.
Suppression ferrites
This following illustration shows t ypical cable suppression ferrites
used on Raymarine equipment. Always use the ferrites supplied by
Raymarine.
D3548-2
Connections to other equipment
If your Raymarine equipment is to be connected to other equipment
using a cable not supplied by Raymarine, a suppression ferrite MUST
always be attached to the cable near to the Raymarine unit.
Page 17
Step 3: Install the Course Computer 9
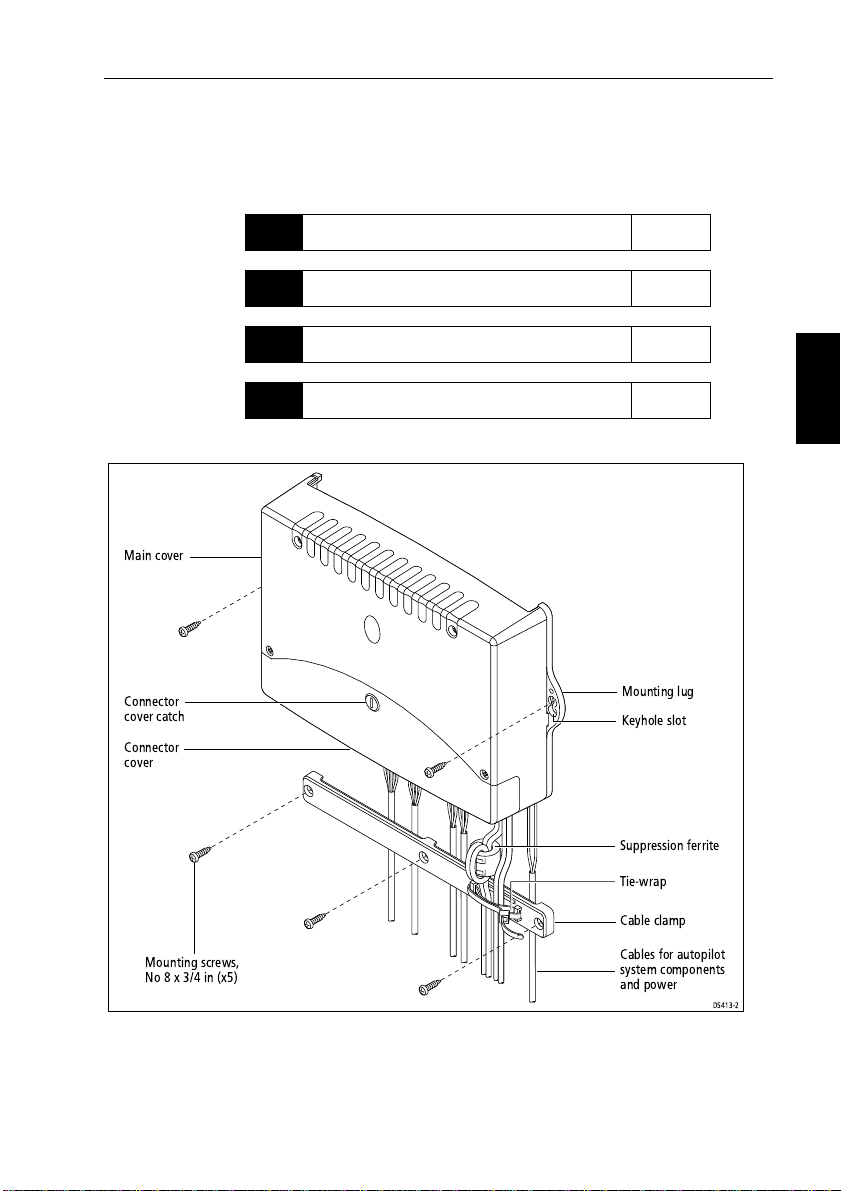
Step 3: Install the Course Computer
Installing the course computer involves these tasks:
Select the location page 10
3.1
Secure the course computer page 12
3.2
Remove the connector cover page 12
3.3
Attach the power cables page 15
3.4
Main cover
Step 3
Connector
cover catch
Connector
cover
Mounting screws,
No 8 x 3/4 in (x5)
Course computer - main parts
Mounting lug
Keyhole slot
Suppression ferrite
Tie-wrap
Cable clamp
Cables for autopilot
system components
and power
D5413-2
Page 18
10 Type 150/400 Autopilot System: Installation Guide
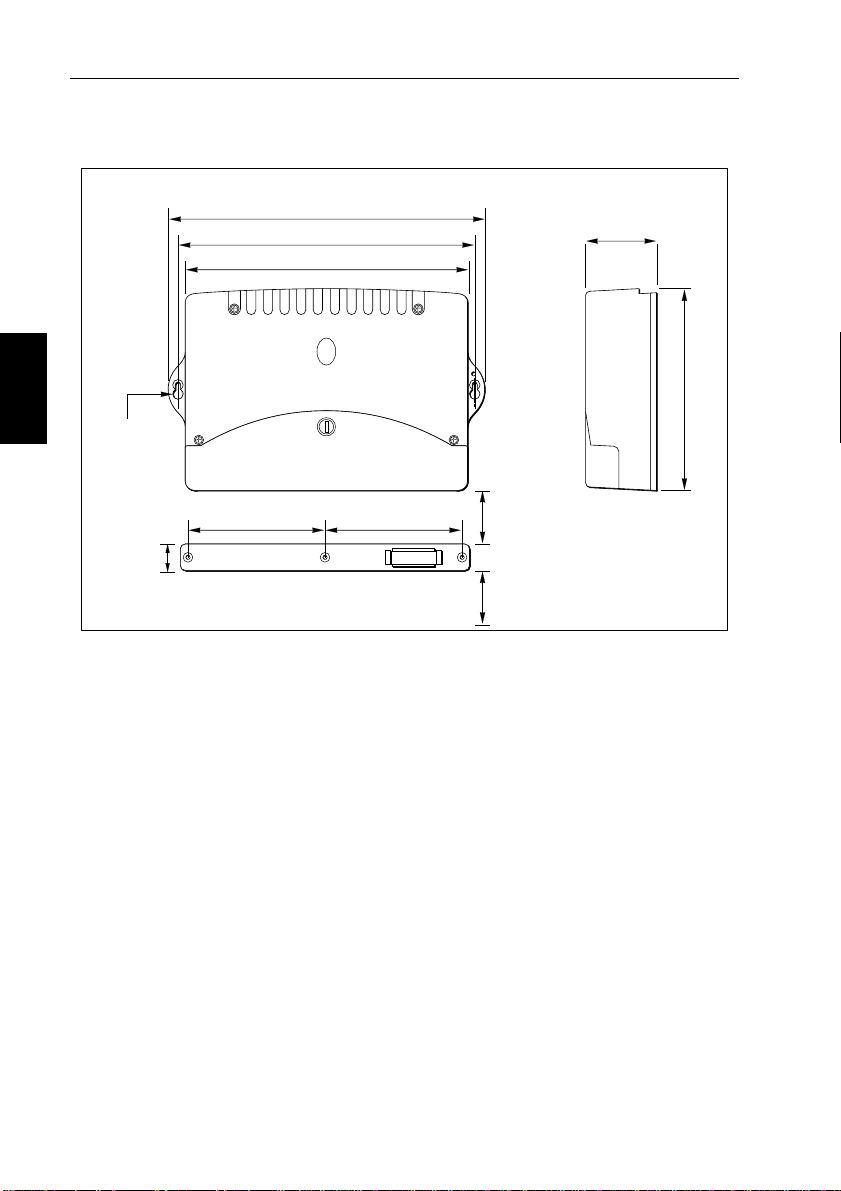
3.1 Select the location
Course computer – installation dimensions
307 mm (12.1 in)
288 mm (11.3 in)
277 mm (10.9 in)
70 mm
(2.8 in)
Step 3
Keyhole slots
for No 8 screws
(pan-head)
133 mm (5.2 in) 133 mm (5.2 in)
26 mm
(1.0 in)
Suitable locations
The course computer is designed to be mounted on a vertical and flat
bulkhead below decks. Select a location that is:
• dry , protected and well-ventilated
• free from high operating temperatures
• free from excessive vibration
• non-metallic
• accessible for cable routing and sufficiently large to secure the
cable clamp under the computer
On sailboats, we also recommend mounting the course computer
across the boat on a transverse bulkhead.
Notes:
min 50 mm (1.9 in)
(recommended)
cable clearance:
min 50 mm (1.9 in)
(recommended)
195 mm (7.7 in)
D5260-1
1. If the only possible location has a meta llic surface, you must
insulate the base of course computer so it is not earthed.
2. When selecting the mounting location, also refer to the EMC
installation guidelines (on page 7).
Page 19
Step 3: Install the Course Computer 11
Unsuitable locations
WARNING:
The course computer is NOT designed to be mounted in engine
compartments.
Do NOT install the course computer:
• where there might be flammable vapors (such as in an engine
room or compartment, or in a fuel tank bay)
• where there is water splash or spray from bilges or hatches
• where it is at risk from physical damage from heavy items (such
as hatch covers, tool boxes, etc.)
• where it might be covered by other equipment
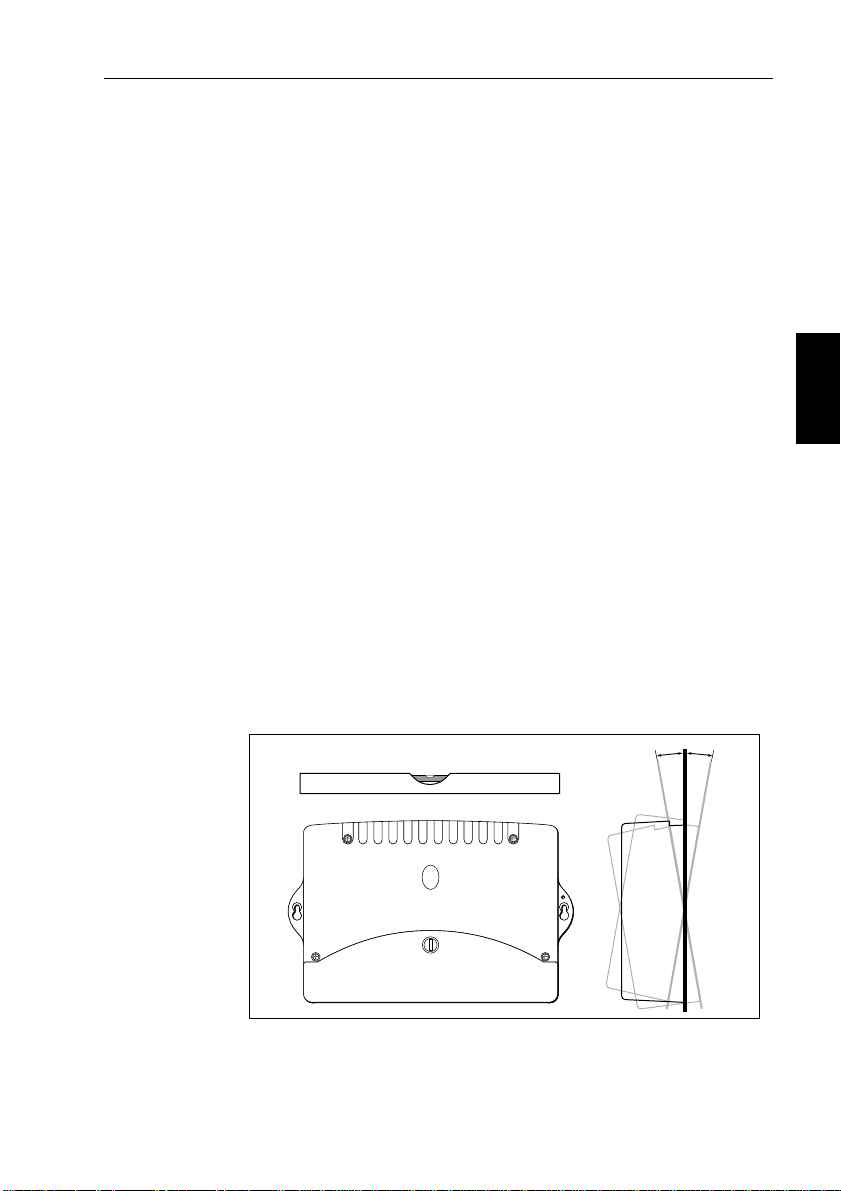
Orientation
CAUTION:
Y ou MUST mount the course computer so it is level and within
+/- 10° of the vertical.
The T ype 150G and T ype 400G course computers contain a buil t-in
GyroPlus yaw sensor that will NOT work correctly if you mount the
computer in any other orientation. This orientation also maximizes
the air flow to cool the course computer and provides optimum
resistance to dripping water .
±10˚
Step 3
level
D5379-1
Note: Type 150G and Type 400G course computers are supplied with
a temporary ‘Mount vertically’ label stuck to the case. Remove this
label after installation.
Page 20

12 Type 150/400 Autopilot System: Installation Guide
3.2 Secure the course computer
1 2 3 4
6mm
minimum
Step 3
Follow these steps to secure the course computer:
1. Hold the course computer in place against the mounting location
so you can mark the centre of the keyhole slots:
• these marks should be level and 288 mm (1 1.3 in) apart
• remove the course computer then drill the two pilot holes
using a 3 mm (
1
/8 in) drill bit
2. Screw the supplied self-tapping screws (No 8 x
into the holes, so the head of each screw is at least 6 mm (
from the surface.
3. Place the keyhole slots over the screw heads, then move the
course computer down, so the screw heads are at the top of the
keyhole slots.
4. Tighten the screws to hold t he course computer securely against
the mounting surface.
3.3 Remove the connector cover
To remove the connector cover:
• unlock the cover:
• use a flat-bladed screwdriver or small coin to rotate the catch
1
/
turn (90°) in either d irection – until you hear a click and the
4
slot is horizontal
• lift off the cover
D5196-1
3
/4 in, pan-head)
1
/4 in)
Page 21

Step 3: Install the Course Computer 13
Unlock
Lock
D5194-1
Spare connectors
for future upgrades
(Type 400 only)
Replacing the connector cover
To replace the connector cover:
• fit the cover
• lock the cover:
• turn the catch so the slot is vertical
• push in the catch until you hear it click
Course computer inputs, outputs and fuses
When you have removed the connector cover, you will see the course
computer inputs, outputs and fuses.
Spare fuses
Fluxgate
compass
inputs
External
GyroPlus
yaw sensor
inputs
sensor inputs
Fuse puller
Rudder
position
SeaTalk fuse
NMEA 0183
inputs/outputs
(5 A)
Clutch fuse
(4 A)
SeaTalk
inputs/
outputs
Type 150: 30 A
Type 400: 40 A
Off switch
inputs
Power inputs
Type 150: 12 V
Type 400:
12 V or 24 V
Power fuse
outputs
Drive
motor
Drive solenoid
return inputs
(for drives/pumps
with solenoids)
Drive clutch
outputs
Type 400:
selectable for
12 V or 24 V
D5193-2
Step 3
Page 22

14 Type 150/400 Autopilot System: Installation Guide
Connecting cables to the terminals
Power and Motor terminals
• The POWER and MOTOR terminals on T ype 150/150G course
computers accept stranded cable up to 4mm
• The
POWER and MOTOR terminals on Type 400/400G course
computers accept stranded cable up to 10 mm
T o secure cables in these terminals:
• strip 8–10 mm (
1
/2 in) of insulation from the end of each cable
• use a small screwdriver to loosen the screw on the terminal block
Step 3
• insert the stripped cable into the terminal
• tighten the screw
Other terminals
Note: All other terminals on the course computer will accept
stranded cable up to 2.5 mm
T o secure cables to the other terminals:
• strip at least 5 mm (
• use a small screwdriver to push the small plastic lever on top of
the terminal and release the cable clamp
• insert the stripped cable
• release the lever to grip the cable
2
(14 AWG).
1
/4 in) of insulation from the end of each cable
2
(12 A WG).
2
(8 AWG).
Using the fuses
The POWER, MOTOR and SeaTalk terminals are fuse protected
against short-circuits and misconnections. T o change the fuses:
• use the fuse puller (supplied in the case) to remove the fuse
• replace the fuse with an appropriate spare fuse
Note: The course computer is supplied with three spare fuses fitted in
the case. The fuses used in the course computer are standard
automotive blade fuses, so you can easily obtai n replacement fuses.
Your Raymarine dealer can also provide a replacement fuse pack
(part number: A18065).
Page 23

Step 3: Install the Course Computer 15
3.4 Attach the power cables
WARNING: Electrical safety
Make sure the power su pply is swi tched off befo re you make any
electrical connections.
Follow these steps to provide power to the course computer:
1. Measure the total length of cable run from the boat’s distribution
panel to the course computer, then use Table 3-1 to identify the
appropriate cable size.
Note: When s electing power cable you must use the gauge specified
in Table 3-1. If in doubt, use a heavier gauge cable than specified.
A lighter gauge cable might cause a voltage dr op between the supply
and the course computer. This could cause the course com puter to
malfunction and will reduce the power supplied to t he drive unit.
2. Route the cables back to the course computer, taking into account
the EMC installation guidelines (page 7).
3. Install a circuit breaker or fuse on the power supply to suit the
drive unit connected to your autopilot system (see Table 3-2).
4. Connect the cables to the
5. Attach the suppression ferrite (suppli ed) around both the positive
and negative power cables, between the cable clamp and course
computer. Wh en you attach the ferrite, you must loop both p ower
cables so that the ferrite encloses two passes of each cable.
Secure the ferrite with the small tie-wrap (supplied).
POWER inputs on the course computer.
Step 3
Course
computer
terminals
Power
supply
Fuse or
circuit breaker
Course computer – connecting power supply
Ferrite
D5380-2
Page 24

16 Type 150/400 Autopilot System: Installation Guide
Table 3-1: Recommended power supply cable sizes (stranded cables)
Cable length
(distribution panel to course computer)
Cable gauge
(AWG)
Copper area
(mm2)
Type 1 drive 12/24 V;
I/O drive; CR pump solenoids*
up to 3m (10ft)
up to 5m (16ft)
up to 7m (23ft)
up to 10m (32ft)
up to 16m (52ft)
14 AWG
12 AWG
10 AWG
8 AWG
6 AWG
Type 2 drive 12 V
Step 3
up to 7m (23ft)
up to 16m (52ft)
up to 5m (16ft)
10 AWG
8 AWG
6 AWG
Type 2 drive 24 V
up to 3m (10ft)
up to 5m (16ft)
up to 10m (32ft)
up to 16m (52ft)
12 AWG
10 AWG
8 AWG
6 AWG
Type 3 drive 12 V
up to 5m (16ft)
up to 7m (23ft)
up to 16m (52ft)
8 AWG
6 AWG
4 AWG
Type 3 drive 24 V
up to 5m (16ft)
up to 7m (23ft)
up to 16m (52ft)
Table 3-2: Recommended power cable fuse and circuit breaker sizes
10 AWG
8 AWG
6 AWG
2.5 mm
4 mm
6 mm
10 mm
16 mm
6 mm
10 mm
16 mm
4 mm
6 mm
10 mm
16 mm
10 mm
16 mm
25 mm
6 mm
10 mm
16 mm
2
2
2
2
2
2
2
2
2
2
2
2
2
2
2
2
2
2
Drive unit Fuse (Amps)
Thermal over-current
circuit breaker (Amps)
Rotary, linear, hydraulic pump,
hydraulic linear
Type 1: 12 V and 24 V
Type 2: 12 V
Type 2: 24 V
Type 3: 12 V and 24 V
25 A
40 A
30 A
40 A
20 A
30 A
30 A
30 A
I/O drive 15 A 10 A
CR pump solenoids* 10 A 10 A
* These specifications apply to the cabling for CR pump solenoids. Power the
CR pump motor separately, as specified in the CR pump installation guide.
Page 25

Step 4: Install the Compass 17
Step 4: Install the Compass
This section provides installation instruct ions for the standard
Raymarine f luxgate comp ass (supplied in the core pack). This
involves the following tasks:
Select the location page 18
4.1
Mount the compass page 20
4.2
Connect to the course computer page 20
4.3
Note: This section also provides information about connecting other
SeaTalk or NMEA compasses to the course comput er (see page 21).
Compass description and dimensions
The compass contains a self-levelling mechanism. This enables the
compass to provide accurate readings with pitch and roll movements
up to +/- 35°.
76 mm (3 in)
Step 4
76 mm (3 in)
D5381-1
Fluxgate compass dimensions
Note: The rattle that the fluxgate compass makes when shaken is
normal. It is caused by the pendulum weight hitting the inside of
the case.
Page 26

18 Type 150/400 Autopilot System: Installation Guide
4.1 Select the location
The compass is primarily designed for mounting below deck on a
bulkhead. On steel-hulled boats you must moun t it above deck.
Standard location
T o achieve the best performance from the compass, mount it:
• as near as possible to the boat’s pitch and roll center to minimize
compass disturbance
• at least 0.8 m (2 ft 6 in) away from the boat’s steering compass to
prevent deviation of either compass
• away from the front third of the boat (otherwise shock motion will
affect compass performance)
• away from potential sources of magnetic interference, such as:
motors, drive units, loudspeakers, alternators/starters, electric
Step 4
cables, large ferrous objects (such as engines, ballast, keel, gas
bottles and tool boxes)
Note: Becaus e you align the compass after installation (see the
control unit handbook), you can mount it so it faces in any d irection.
0.3L to 0.5L
L
0.3L to 0.5L
L
Compass - recommended location for non-steel hulls
D5382-1
Page 27

Step 4: Install the Compass 19
Finding the most suitable location
T o identify the best compass location on your boat, start at the pi tch
and roll center then move the compass up and/or aft until you find a
location with minimal magnetic disturbance.
Note: To check if the intended mounting location is free from
magnetic influence, tape a handheld compass to the chosen location,
then turn the boat through 360°. The readi ngs on the handheld
compass and your boat’s main steering compass (if accurately
aligned) should not differ by m ore than10° at any heading.
Steel-hulled boats
On steel-hulled boats you must mount the compass at least 1 m (3 ft)
above the main deck or wheelhouse. Otherwise the compass will not
work correctly because the hull will prevent it from sensing the
Earth’s magn etic field. The following diagram shows recommended
mounting positions for steel-hulle d boats.
Note: The higher above the waterline you mount the compass, the
more the boat’s pitch and r oll will affect compass performance.
Step 4
6 ft (1.8 m)
4 ft (1.2 m)
4 ft (1.2 m)
Compass - recommended location for steel-hulled boats
D5383-1
Page 28

20 Type 150/400 Autopilot System: Installation Guide
4.2 Mount the compass
Vertical
Fluxgate compass - orientation
CAUTION:
Y ou must mount the fluxgate compass vert ically, with the cables
Step 4
exiting at the base.
1. Hold the compass against the mounting location.
2. Mark the four mounting holes, then remove the compass.
3. Drill four pilot holes using a 3 mm (
1
/8 in) drill bit.
4. Making sure the cable exits at the bottom of the compass, secure
the fluxgate compass using the self-tapping screws p rovided
(No 8 x
3
/4 in, pan-head).
538
4-1
D
Note: St ick the supplied warning label near to the co mpass, where it
is clearly visible.
4.3 Connect to the course computer
1. The compass is supplied with 8 m (26 ft) of cable. Route the cable
to the course computer, taking int o account the EMC installation
guidelines (page 7).
Note: Make sure you leave some spare cable so, if necessary, you can
re-position the compass to reduce deviation. If the standard cabl e is
not long enough, your Raymarine dealer can supply a 10 m (30 ft)
extension cable (part number: D174)
2. Connect the five cores of the cable to the
the course computer (as shown).
FLUXGATE terminals on
Page 29

Step 4: Install the Compass 21
Course
computer
terminals
Red Yellow
Screen Blue
Green
Compass cable
4.4 Connecting SeaTalk or NMEA compasses
Y ou can connect SeaT alk or NMEA compasses to the course
computer, either to replace the fluxgate compass or provide
supplementary compass signals.
When you connect more than one compass to the autopilot system,
the course computer processes their signals in this ord er of priority:
1. Fluxgate compass
2. NMEA compass
3. SeaTalk compass
This means that if you want to use a NMEA compass as the primary
compass, you need to disconnect the fluxgate compass .
T o connect a SeaTalk or NMEA compass to the autopilot system:
• NMEA compass: connect it to one set of NMEA inputs on the
course computer
• SeaT alk compass: connect it to the SeaT alk bus or the course
computer SeaTalk terminals
D5385-1
Step 4
Page 30

22 Type 150/400 Autopilot System: Installation Guide
Step 5: Install the Rudder Position Sensor
Note: Y our autopilot system must in clude either a rotary or linear
rudder position sensor, otherwise it will not function.
Refer to the following installation instructions to fit either a rotary or
linear rudder position sensor:
Rotary rudder position sensor - installation page 22
5.1
Linear rudder position sensor - installation
5.2
(on ‘bullhorn’ style hydraulic outboards only)
5.1 Rotary rudder position sensor - installation
Introduction
The rotary rudder position sensor is suitable for all steering s ystems
apart from ‘bullhorn’ style hydraulic out boards (which require a
linear rudder position sensor - see page26). The rotary rudder
Step 5
position sensor connects directly to the boat’s tiller arm or quadrant.
Installing the sensor involves five main tas ks:
• ensuring correct alignment
• securing the sensor to the boat
• attaching the sensor to the tiller arm
• checking alignment
• connecting to the course computer
187 mm (7.35 in)
140 mm (5.5 in)
page 26
Rudder position sensor - dimensions
60 mm (2.4 in)
70 mm (2.75 in)
D5386-1
Page 31

Step 5: Install the Rudder Position Sensor 23
Ensuring correct alignment
CAUTION:
T ake care to ensure correct rudder sensor alignment. If the
sensor is not correctly aligned, the autopilot system will not
perform accurately.
Vertical alignment
When viewed from the front of the boat, the connecting rod should:
• be as level as possible, so the ball-joints at each end are level
• remain parallel to the tiller arm’s plane of ro tation at all times
Note: If misalignment exceeds +/-5° the ball-joints will bind or fail.
Front view - rudder amidships
Ball joints (level)
Parallel
Tiller arm
or quadrant
Connecting rod
Sensor arm
Rudder position
sensor
Mounting base
Step 5
Top view - rudder amidships
Aft
Min: 101 mm (4 in)
Optimum: 140 mm (5.5 in)
Max: 190 mm (7.5 in)
Parallel
60˚ 60˚
90˚
Minimum: 75 mm (3 in)
Maximum: 310 mm (12 in)
Cable entry
Maximum
permitted
travel: +/- 60˚
D5387-1
Page 32

24 Type 150/400 Autopilot System: Installation Guide
Horizontal alignment
When viewed from above (as shown in the previous i llustration):
• the sensor arm must be between 75 mm (3 in) and 310 mm (12 in)
from the tiller arm
• with the rudder amidships, the sensor arm should be at 90° to th e
connecting rod and directly opposite the cable entry point o n the
sensor body
• when the rudder moves from hardover to hardover:
• the sensor arm and the tiller arm must remain parallel to each
other at all times
• sensor arm movement must not exceed +/- 60°: the rudder
position sensor may be damaged if th e steering system drives
the sensor arm beyond these limits onto its end stops
Securing the sensor to the boat
Mount the rudder position sensor on a suitable base alongs ide the
rudder stock and tiller arm:
1. Hold the sensor in place, mark the mounting holes, then remove
the sensor . (If required, use the template at the back of the book.)
Step 5
2. Drill the pilot holes using a 3 mm (
3. Attach the sensor to the mounting base using the self-tapping
screws supplied (No 8 x
3
/4 inch, pan-head).
1
/8 in) drill bit.
Note: To make minor adjustments to the sensor alignment, loosen th e
screws, rotate the sensor body, then re-tighten the screw s.
Attaching the sensor to the tiller arm
Attaching the tiller pin to the tiller arm
1. For optimum performance, mount the tiller pin on the tiller arm
140 mm (5.5 in) from the rudder stock.
Note: If necessary, you can fit the tiller pin anywhere between
101 mm (4 in) and 190 mm (7.5 in) from the rudder stock. This will
not affect autopilot performance, but will slightly alter the scaling of
the rudder angle display shown on the control unit.
2. Hold the tiller pin in place on the tiller arm, mark the mounting
holes then remove the tiller pin. Y ou can mo unt the tiller pin so it
is aligned either along or across the tiller arm.
Page 33

Step 5: Install the Rudder Position Sensor 25
3. Drill pilot holes using a 3 mm (1/8 in) drill bit.
4. Attach the tiller pin to the tiller arm using the two self-tapping
screws supplied (No 8 x
3
/4 inch, countersunk) or suitable bolts,
nuts and lock washers.
Attaching the connector rod
1. Use a hacksaw to cut the threaded connector rod to length.
2. Screw the lock nuts onto the rod and then the ball-pin sockets.
3. Press the sockets onto the pins on the sensor arm and t iller pin.
Note: T o give the precise rudder position, the rudder se nsor has a
built-in spring to remove any free play in the linkage to the tiller.
Checking alignment
Move the rudder from hardover to hardover and check that at all
rudder angles:
• all moving parts of the sensor remain free from any obs tructions
• the sensor and connecting rod remain accurately aligned
• the ball joints do not bind
Connecting to the course computer
Step 5
1. The rudder sensor is supplied with 10 m (32 ft) of cable. Route the
cable to the course computer, taking into account the EMC
installation guidelines (see page 7).
2. Connect to the
RUDDER terminals on the course computer.
Note: If you have mounted the rudder sensor upside down, you will
need to swap the red and green connections at the course computer.
Course
computer
terminals
Screen
BlueRed
Green
Rudder position sensor cable
D5388-1
Rudder position sensor - connecting to course computer
Page 34

26 Type 150/400 Autopilot System: Installation Guide
5.2 Linear rudder position sensor - installation
Introduction
The linear rudder position sensor (part number: M81 188) is designed
for ‘bullhorn’ style hydraulic outboard steering systems. It is totally
weatherproof and designed to be mounted on the bullhorn ram.
Note: You must use the linear rudder position sensor on all hydraulic
outboard installations.
425 mm (16.75 in)
Linear rudder position sensor - dimensions
Mounting
1. Use the steering system to position the bullhorn ram amidships.
Step 5
2. If necessary , release the hydraulic pressure from the boat’s
hydraulic steering system
Note: Contact your steering gear manufacture for advic e on this step,
and follow their instructions for r eleasing the hydraulic pressure .
32 mm
(1.3 in)
D5389-1
3. Loosen the starboard bolt that secures the bullhorn ram’s shaft to
the end bracket.
4. Fit the U-bracket (supplied) over the end bracket and th e bullhorn
ram’s s haft.
5. Hand tighten the starboard bolt to hold the U-bracket in place.
6. Fully open the hose clamps (supplied) using a flat bl aded
screwdriver, then hang them over the bullh orn ram.
7. Place the spacers (supplied) on the bullhorn ram and use adhesive
tape to sec ure them te mporaril y .
8. Pull out the rudder sensor’s shaft until its alignment mark is level
with the end of the barrel.
9. Position the rudder sensor against the spacers so the threaded rod
end of its shaft passes through the U-bracket.
Page 35

Step 5: Install the Rudder Position Sensor 27
10. Tighten the hose clamps around the bullhorn ram and the rudder
sensor’s barrel.
11. Tighten the starboard bullhorn bolt to secure the U-bracket.
12. Fit and tighten the supplied nut and washer to secure the threaded
rod end of the sensor’s shaft to the U-bracket.
Note: W e recommend installing the sensor with i ts shaft pointing to
starboard. If you cannot install the unit in this orientat ion, you can fit
it with the shaft pointing to port. If you do this, swap the red and green
connections at the course computer.
End
Starboard
bolt
bracket
Bullhorn
ram shaft
Nut and
washer
Threaded
rod
U-bracket
Sensor
shaft
Alignment mark
Sensor
shaft
Sensor
barrel
Hose clamp
Sensor
barrel
Spacer
Cable
Bullhorn
ram
D5390-1
Linear rudder position sensor - installation
Connecting to the course computer
1. Route the cable to the course computer, taking into account the
EMC installation guidelines (page 7).
2. Connect to the
to the illustration on page 25).
Note: To allow for the bullhorn’s movement, leave a loop of cable at
the end of the linear rudder position senso r. If the standard cable is
not long enough, your Raymarine dealer can supply a 1 0 m (30 ft)
extension cable (part number: D173).
RUDDER terminals on the course computer (refer
Step 5
Page 36

28 Type 150/400 Autopilot System: Installation Guide
rotary drive
linear drive
Step 6: Install the Drive Unit
Raymarine produces a wide range of drive units to suit different types
of steering systems:
• The rotary drive is designed for steering systems that can be
driven from the helm position through a chain and sp rockets.
• The linear and hydraulic linear drives are designed for boats
with existing mechanical steering systems, and drive the rudder
directly. The hyd raulic linear drive is suitable for larger boats and
heavier duty steering applications.
• The hydraulic pump and constant runn ing hydraulic p ump
(CR pump) are primarily designed for boats with existing
hydraulic steering systems. Alternatively , you can us e them in
combination with a secondary steering ram on boats with
mechanical steering. The CR pump is suitable for larger boats and
heavier duty steering applications.
pump
Step 6
• The I/O drive (the Inboard/Outboard or stern drive) is de signed
to drive cable operated, power assisted outbo ard steering systems.
T o control a Raymarine drive or pump, connect it to the motor
terminals on the course computer (and clutch terminals where
necessary). For Raymarine CR pumps, connect the solenoids to the
motor and solenoid terminals on the course computer .
For full information, see the installation guide packed with the drive.
Í
If you are connecting a non-Raymarine drive unit, see page 41.
Í
Page 37

Step 7: Install the Control Unit 29
ST7001+
ST6001+
Step 7: Install the Control Unit
Raymarine produce a range of control units to suit different boats and
user requirements.
The ST6001+ and ST7001+ control units have been design ed
specifically to provide access to all advanced functions on the
T ype 150, 150G , 4 00 and 400G course computes.
Y ou can also use the following control uni ts to operate the course
computer autopilot system, but they do not enable access to some of
its more advanced functions:
• ST6000+ control unit
• ST7000+ control unit
• ST600R remote control unit
• ST80 autopilot keypad (as part of an ST80 ins trument system)
• RayPilot 650 control unit
• ST6000 and ST7000 control units
For full information about control unit functionality, see page 46.
Í
Connecting to the course computer
If your system only includes a s ingle control unit, connect it to one set
of SeaT alk terminals on the course computer.
For full information, refer to the control unit owner’s handbook.
Í
If you are connecting mor e than one control unit or a combination of co ntrol
Í
units and SeaTalk instruments/equipment, see page 32 of this handbook.
Step 7
Page 38

30 Type 150/400 Autopilot System: Installation Guide
Step 8: Clamp the Cables
When you have connected all autopilot system components t o the
course computer, we recommend that you use the supplied cable
clamp to relieve any strain on the cable connections.
Secure the cables with the cable clamp as follows:
1. Hold the cable clamp in place below the course computer, making
sure:
• its center hole is below the center of the course computer (i.e.
in line with the connector cover catch)
• it is between at least 50 mm (2 in) from the bottom of the
course computer
• the hole locations are clear of any cables
2. Mark the position of the three holes, then remove the cable clamp.
3. Drill the three pilot holes using a 3 mm (
4. Secure the cable clamp using the self-tapping screws supplied
3
(No 8 x
/4 in, pan-head), making sure:
• the tie-wrap securing loops are on the right (below the
POWER and MOTOR terminals on the course computer)
• the clamp securely holds all cables
• the legs on cable clamp do not pinch any of the cables
Note: If the power and/or motor cables are larger than 5 mm (
diameter, secure them on top of the cable clamp with the tie-wrap
supplied. Make sure the tie-wrap sits ab ove the cables (as shown
below), so it pulls the cables against the clamp when tightened.
1 2
1
/8 in) drill bit.
1
/4 in)
Step 8
D5224-1
Page 39

Step 9: Integrate the System 31
Step 9: Integrate the System
This section explains how to connect the autopilot to other eq uipment
and integrate the system:
Connecting SeaTalk equipment page 32
9.1
Connecting NMEA equipment page 36
9.2
Connecting optional components page 40
9.3
Setting-up the autopilot page 42
9.4
Note: Before connecting other equipment, read the EMC installation
guidelines (see page 7).
Step 9
Page 40

32 Type 150/400 Autopilot System: Installation Guide
9.1 Connecting SeaTalk equipment
Y ou can use SeaT alk to connect the autopilot system to:
• additional SeaTalk control u nits: you can use any control units
to operate the autopilot and view autopilot information
• SeaT alk equipment (such as wind, navigation, radar and GPS):
• the autopilot system can use information from this equipment
to enhance course keeping and provide additional features
(such as waypoint navigation)
• you can also display information fr om the SeaT alk equipment
on the autopilot control unit
Possible systems
When connecting SeaT alk equipment, you have a range of options
depending on whether you want to:
• provide an ‘isolated’ control unit (for systems with more than one
control unit – see next page)
• provide power separately to the course computer and main
SeaT alk bus
The following illustrations show some typical ways to connect
simple SeaTalk systems.
CAUTION:
If your autopilot system includes more than one control unit,
we strong ly recomm end connect ing the mai n control unit to one
course computer SeaTalk port and the additional control unit(s)
to the other SeaT alk port. Th is will mean that if either SeaTalk
system fails, you will still have one operational control unit.
Single control unit, single power supply
The simplest type of system has the course computer prov iding
power to a single SeaT alk system that includes a single control unit
and several instruments.
Step 9
Page 41

Step 9: Integrate the System 33
Single control unit, single power supply
Course computer
power supply
SeaTalk A
(via breaker/fuse)
ST60
instruments
Control unit
Extra connection on larger SeaTalk systems*
SeaTalk bus
D5391-2
Isolated control unit, single power supply
If you have two control units, we recommend that you connect one to
each SeaTalk terminal. In the following illustration:
• the course computer provides power to the SeaT alk system
• one control unit is connected on its own to SeaTalk A so it is
isolated against any possible failure of SeaTalk B
If the SeaTalk B line fails, the isolated control unit will switch to
Standby mode as a safety measure. By pressi ng
control u nit you can regain f ull autopi lot contro l.
Isolated control unit, single power supply
SeaTalk B
SeaTalk A
auto on the isolated
Course computer
power supply
(via breaker/fuse)
ST60
instruments
Isolated
control unit
Second
control unit
Extra connection on larger SeaTalk systems*
SeaTalk bus
D5392-2
* Note: Depending on the n umber of SeaTalk units and the total length of SeaTalk
cabling, you may need to provide power supply to each end of the SeaTalk bus
(‘ring-main’ style). Refer to the instrument handbook for more information.
Step 9
Page 42

34 Type 150/400 Autopilot System: Installation Guide
Separate course computer and instrument power
Another option is to provide separate power supplies t o the course
computer and SeaT alk system so you can have independent, switched
instrument and pilot systems.
On the illustrated example, the behavior of the control unit on
SeaT alk A depends on whether you connect the red SeaT alk wire to
the SeaTalk B terminal:
• if the red wire is not connected, the control unit does not power up
when the course computer power is off
• if the red wire is connected, the control unit shows a
NO LINK message when the course computer power is off (as it will
still receive power from the SeaTalk B line)
Separate course computer and instrument power supplies
SeaTalk B
SeaTalk A
PILOT OFF or
Course computer
power supply
(via breaker/fuse)
ST60
instruments
Control unit
Red*
Screen
*Red wire not connected:
When course computer power supply is off,
control unit does not power up.
*Red wire connected:
When course computer power supply is off,
Yellow
control unit shows 'PILOT OFF' or 'NO LINK'
message.
Instrument SeaTalk bus
12 V power supply
for Instrument
SeaTalk bus
(via breaker/fuse)
D5393-2
Typical larger boat system
The following illustration shows a typical system layout for a
T ype 150G or T ype 400G course computer on a larger bo at. It has:
• separate course computer and SeaT alk power supplies
• an isolated control unit on SeaT alk A
• a NMEA 1 output so the radar/chartplotters can use the fast
heading output from the course computer to enable MARP A
Step 9
(see page 37)
Page 43

Step 9: Integrate the System 35
Typical larger boat system
Radar scanner
GPS receiver
Radar/
Chartplotter
Connect
NMEA
+ to Orange
NMEA
- to Yellow
SeaTalk A
Radar/Chartplotter
Control unit Instrument Instrument
SeaTalk B
HSB
(High Speed Bus)
Isolated control unit Instrument Instrument
Fast compass
output from
NMEA 1 out
SeaTalk B
Flybridge
Lower Helm
Separate power
feed for SeaTalk B
SeaTalk B
SeaTalk A (isolated control unit)
NMEA 1 out (fast compass heading)
Distribution
Panel
SeaTalk B
Step 9
D5394-3
Page 44

36 Type 150/400 Autopilot System: Installation Guide
9.2 Connecting NMEA equipment
If you have equipment on your boat that transmits NMEA 0183 dat a
(e.g. GPS), you can connect this equipment to the autopilot system.
Y ou can connect the NMEA equipment in any combination of these
ways:
• using the course computer NMEA inputs/outputs
• using the NMEA inputs on the back of either the ST6001+ or
ST7001+ control units (if your installation includes one of these
control units)
• using the SeaT alk/NMEA interface (part number: E85001) to
convert the NMEA data to SeaTalk dat a
WARNING: Connections to other equipment
If you are connecting Raymarine equipment to other equipment
using a non-Raymarine cable, you MUST a ttach an appropriate
suppression ferrite to the cable near to the Raymarine unit.
Course computer NMEA inputs/outputs
Note: Do NOT connect more than one piece of equipment to each of
the course computer NMEA inputs.
The course computer has two sets of NMEA in puts/outputs to receive
and transmit information from NMEA equipment. The course
computer decodes and transmits the following NMEA data:
Course computer NMEA 1 and 2 inputs
NMEA 0183 received Information extracted
APB
BWC
BWR
GGA
GLL
HDG
HDM
HDT
MWV apparent wind angle, apparent wind speed
Step 9
RMA
cross track error, bearing to waypoint, waypoint
number
bearing to waypoint, distance to waypoint,
waypoint number, time
latitude/longitude, time
heading
course over ground (COG), speed over ground
(SOG), latitude/longitude, variation
Page 45

Step 9: Integrate the System 37
Course computer NMEA 1 and 2 inputs
NMEA 0183 received Information extracted
RMB
RMC
VHW speed through water, heading
VTG
VWR
XTE cross track error
ZDA time, date
Note: When connected to a NMEA navigator, the course computer looks at
NMEA 1 first. If NMEA 1 has no data, the course computer looks at NMEA 2.
If both channels have the same type of navigation data, the course computer
uses NMEA 1.
Course computer NMEA 1 output*
NMEA 0183 transmitted Information sent
HDM heading
* Note: Type 150G and Type 400G course computers provide fast heading
(HDM) output from NMEA 1 at 10 Hz 0.1° resolution. This fast heading data is
suitable for use with the MARPA function on radar equipment.
cross track error, bearing to waypoint, distance to
waypoint, waypoint number
course over ground (COG), speed over ground
(SOG), latitude/longitude, time, variation
course over ground (COG), speed over ground
(SOG)
relative apparent wind angle, relative apparent
wind speed
Course computer NMEA 2 output
NMEA 0183 transmitted Information sent (* if available)
BWC
bearing to waypoint*, distance to waypoint*,
waypoint number*, time*
GLL latitude/longitude*, time*
HDG
HDM
heading
HDT
VTG
course over ground* (COG), speed over ground*
(SOG)
* Note: The course computer will only transmit these items if it has received the
appropriate data.
Step 9
Page 46

38 Type 150/400 Autopilot System: Installation Guide
Connect:
• the NMEA outputs from the equipment (such as navigators, wind
or speed instruments to the NMEA inputs on the course computer
• the NMEA outputs on the course computer to the NMEA inputs
on the equipment (such as radar)
Control unit NMEA inputs
Y ou can connect the outputs from a single item of NMEA equipment
to the NMEA inputs on the ST6001+ or ST7001+ cont rol units.
For more information, refer to the control unit owner’s handbook.
Í
SeaTalk/NMEA interface
The SeaTalk/NMEA interface (part number: E85001) enables you to
connect NMEA equipment to the SeaTalk system. It allows the
non-SeaT alk equipment to transmit and receive information to/from
the SeaTalk system.
The interface converts:
• NMEA data from the equipment into SeaT alk data
• SeaTalk data from the SeaT alk system into NMEA data
For more information about NMEA and SeaTalk received and transmitted,
Í
refer to the handbook supplied with the interface.
Connect:
• the NMEA equipment to the SeaTalk/NMEA interface
• the SeaTalk/NMEA interface to:
• one of the course computer SeaT alk terminals
• or, any other SeaT alk product (us ing one of the available
interface cables)
Connecting several items of NMEA equipment
If you need to connect several NMEA items to the course computer,
you will need to use an appropriate combination of:
• course computer NMEA inputs and outputs
Step 9
• control unit NMEA inputs
• SeaTalk/NMEA interface (part number: E85001)
Page 47

Step 9: Integrate the System 39
Typical NMEA connections
Option 1 – without SeaTalk/NMEA interface
Type 150/400 course computer terminals
Control unit (rear)
SeaTalk
Red
Screen
Yellow
SeaTalk
NMEA
GPS
Loran
Decca
NMEA
NMEA
radar
NMEA
NMEA
wind
instrument
Option 2 – with SeaTalk/NMEA interface
Type 150/400 course computer terminals
Red
Screen
Yellow
SeaTalk
NMEA
GPS
Loran
Decca
NMEA
radar
NMEANMEA
SeaTalk/
NMEA
interface
NMEA
wind
instrument
NMEA
NMEA
speed
instrument
Control unit (rear)
NMEA
SeaTalkSeaTalk
NMEA
speed
instrument
D5395-1
Step 9
Page 48

40 Type 150/400 Autopilot System: Installation Guide
9.3 Connecting optional components
To install any of these options, refer to the information supplied with the
Í
component.
GyroPlus yaw sensor
The T ype 150 and T ype 400 course computers do not contain a
built-in GyroPlus, but you have the opti on of adding:
• an external GyroPlus (part number: M81 162)
• or a dealer-fitted internal GyroPlus (part number: A1806 9)
Handheld remotes
Y ou can connect handheld remotes to the autopi lot system:
• the ST60 0R remote control unit (part number: A12016) can act
as the sole pilot control unit in your system or as a full-function
remote for systems with other fixed pilot cont rol units
• the compact SeaT alk handheld remote (part number: A15002)
gives you full course control away from the main steering
position
External alarm
The autopilot system sounds an off-cours e alarm from all control
units. On large and/or noisy boats you can fi t a Raymarine external
alarm (part number: Z035, connected though E85001 interface box)
as a high volume repeater.
Wind vane (sail boats)
The course computer can use wind angle information from a wind
vane or instrument to maintain a course relative to the wind. Y o u can
provide wind angle information to the autopilot sy stem by connecting
it to:
• a suitable SeaT alk or NMEA instrument (providing wind angle
and speed information)
or
• a Raymarine pushpit wind vane (part number: Z159) connected
Step 9
through an interface box (part number: M81189)
Page 49

Step 9: Integrate the System 41
Off switch
The course computer has inputs so you can fit an off s witch if
required. By closing a circuit, this switch will turn of f the course
computer power supply .
Connect a suitable off switch to the
computer.
OFF SWITCH inputs on the course
Course computer terminals
Connecting an off switch
Other manufacturers’ drive units
If you are connecting another manufacturer’s drive uni t, refer to the
specifications (on page 45) for information on the course computer’s
drive motor, drive clutch and drive solenoid terminals. Connect the
drive unit to these terminals as necessary.
For more information, contact the drive unit manufacturer.
Í
Connecting spool valves
If the drive has spool valves, connect them to the motor and solenoid
terminals on the course computer as shown below . The course
computer provides a negative ground for the spool valves even when
it is switched off.
Off switch (closes circuit to
turn off course computer power)
D5396-1
CAUTION:
Do NOT connect the solenoid return cables to boat’s negative
ground, as this will bypass the current protection devices inside
the course computer .
Step 9
Page 50

42 Type 150/400 Autopilot System: Installation Guide
Course computer connections
If electronic steering or jog lever
is used on the same solenoids, fit
diodes (suggested type: 1N4004)
as indicated to prevent
backfeeding the course computer.
Electronic steering
or jog lever
Diodes
Return cables
12 V
24 V
Selecting clutch voltage (Type 400/400G)
Note: Al l Raymarine 12 V and 24 V drive units with a clutch have a
12 V clutch so you do NOT need to re-position the clutch fuse.
Y ou can use the T ype 400/400 G course computers with other
manufacturers’ drives that have either 12 V or 24 V clutches.
Select the appropriate clutch voltage by positioning the clutch fuse to
the left (12 V clutch) or right (24 V clutch).
Fuse position: 12 V clutch Fuse position: 24 V clutch
4
9.4 Setting-up the autopilot
When you have installed and connected all components, you need to
check the system and then set-up the autopilot.
Spool valves
(diodes across
spool valves)
D5397-1
4
D5398-1
For more information about autopilot set-up, refer to the control unit
Step 9
Í
owner’s handbook.
Page 51

Maintenance 43
Maintenance
All Raymarine products are designed to provide many years of
trouble-free operation. W e also put them through comprehens ive
testing and quality assurance procedures before shipping.
Regular checks
On a regular basis:
• check that all connections and mountings are secure and
undamaged
• check the course computer for any signs of physical damage or
water damage
Note: Do not use chemical or abr asive materials to clean the course
computer. If the case is dirty, wipe it with a clean, damp cloth.
Fault-finding
Course computer fuses
Symptoms of a blown course computer fuse are:
Servicing
• if either the power fuse or SeaTalk fuse blows, the control unit
display will go blank
• if the clutch fuse blows and your drive has a clutch, the control
unit will show a
If your control unit shows either of these symptoms, check the
relevant fuse(s). If the fuse has blown, replace it with a fuse of the
same current rating (see page 14).
For more information about diagnosing faults on your autopilot system,
Í
refer to the Fault Finding section of the control unit owner’s handbook.
DRIVE STOPPED alarm message
CAUTION:
The course computer does NOT contain user-serviceable parts.
If you remove the main cover you will invalidate the warranty .
Page 52

44 Type 150/400 Autopilot System: Installation Guide
EMC, servicing and safety guidelines
• Raymarine equipment should be serviced only by authorized
Raymarine service technicians. They will ensure that service
procedures and replacement parts used will not affect
performance. There are no user serviceable parts in any
Raymarine product.
• Some products generate high voltages: never handle the
cables/connectors when power is being supplied to the
equipment.
• When powered up, all electrical equipment produces
electromagnetic fields. These can cause adjacent pieces of
electrical equipment to interact with one another, with a
consequent adverse effect on operation. In order to minimize
these effects and enable you to get the best possible performance
from your Raymarine equipment, guidelines are given in the
installation instructions, to enable you to ens ure minimum
interaction between different items of equipment, i.e. ensure
optimum Electromagnetic Compatibility (EMC).
• Always report EMC-related problems to your nearest Raymarine
dealer. W e use such information to improve our quality standards.
• In some installations, it may not be possible to preven t the
equipment from being affected by ext ernal influences. In general
this will not damage the equipment but it can lead to spurious
resetting action, or momentarily may result in faulty operation.
Product support
Raymarine products are supported by a worldwide network of
distributors and Authorized Service Representa tives. If you
encounter any difficulties with thi s product, please contact either
your national distributor , or your service representative, or the
Raymarine T echnical Services Call Center. Refer to the back cover
or the W orldwide Distributor List for contact detail s.
Page 53

Specifications 45
Specifications
Course computer specifications
Nominal supply voltage:
Type 150/150G
Type 400/400G
Operating voltage range:
Type 150/150G
Type 400/400G
Power consumption (standby) 300 mA
GyroPlus yaw sensor: • Type 150G/Type 400G: internal GyroPlus fitted onto circuit board
Operating conditions:
temperature range
relative humidity limit
water protection
Storage conditions:
temperature range
relative humidity limit
Dimensions:
width
height
depth
Weight 2.1 kg (4 lb 7.5 oz)
Inputs fluxgate compass, external GyroPlus yaw sensor, rudder position
Outputs NMEA 0183 v2.3 (x2), SeaTalk (x2), drive motor, drive clutch
Raymarine drive compatibility:
Type 150/150G
Type 400/400G
Drive motor output:
Type 150/150G
Type 400/400G
[specifications continue on next page]
12 V DC (fuse protected at 30 A)
12 V or 24 V DC (fuse protected at 40 A)
10 V to 16 V DC
10 V to 32 V DC
• Type 150/Type 400: option of external GyroPlus or dealer-fit
internal GyroPlus
-10°C to 55°C (14°F to 131°F)
80%
drip resistant when mounted vertically
-5°C to 50°C (23°F to 122°F)
75%
307 mm (12.1 in)
195 mm (7.7 in)
70 mm (2.8 in)
sensor, NMEA 0183 v2.3 (x2), SeaTalk (x2), off switch, power,
drive solenoid return
all Type 1 12 V and Type CR1 12V drives/pumps
all Type 1, Type 2 and Type 3 drives/pumps (drive voltage must match
boat’s supply voltage)
continuous 18 A at 12 V
continuous 30 A at supply voltage
Page 54

46 Type 150/400 Autopilot System: Installation Guide
Course computer specifications (contd)
Drive clutch output:
Type 150/150G
Type 400/400G
Drive solenoid return input 5 A at supply voltage
SeaTalk output 5 A at 12 V (fuse protected at 5 A)
NMEA 0183 v2.3
inputs/outputs
NMEA fast heading output Type 150G and Type 400G transmit fast heading (HDM) from NMEA
Fuses Standard automotive blade fuses to protect:
CE approvals - conforms to: 89/336/EC (EMC), EN60945:1997
WARNING:
4 A at 12 V (fuse protected at 4 A)
4 A at 12/24 V selectable (fuse protected at 4 A)
See page 36 for information on NMEA 0183 received/transmitted
1 at 10 Hz 0.1° resolution
• power terminals (30 A Type 150/150G; 40 A Type 400/400G)
• drive clutch terminals (4 A)
• SeaTalk terminals (5 A)
Contains a possible source of ignition - NOT protected for use in
engine compartments.
Control unit functionality
Control
unit
ST7001+
ST6001+
ST7000+
ST6000+
ST600R
ST80
RP650
ST7000
ST6000
Course computer
Type 150G/400G Type 150/400 Type 100/300
• Internal GyroPlus yaw
sensor enables enhanced
course keeping using AST
• Full access to AutoLearn,
providing automatic
steering calibration
• Improved track-keeping
• Steers to true and apparent
wind in Wind Vane mode
• Improved calibration access
• Enhanced course keeping
using AST
• Improved track-keeping
• No access to AutoLearn
• Enhanced course keeping
using AST
• Improved track-keeping
• No access to AutoLearn
• Full basic functionality
• Improved track-keeping
• Steers to true and apparent
wind in Wind Vane mode
• Improved calibration
access, but without
AutoLearn
• Uses Raymarine steering
algorithm without AST
• Full basic functionality
• Uses Raymarine steering
algorithm without AST
• Improved track-keeping
• Full basic functionality
• Uses Raymarine steering
algorithm without AST
• Improved track-keeping
• Standard functionality
using Raymarine steering
algorithm without AST
• Steers only to apparent
wind in Wind Vane mode
• Improved calibration
access, but without
AutoLearn
• Standard functionality
using Raymarine steering
algorithm without AST
• Standard functionality
using Raymarine steering
algorithm without AST
• No access to vessel type
set up
Page 55

Glossary 47
Glossary
Term Meaning
° degrees
AAmps
AST
(Advanced Steering
Tec hn ol og y)
AutoLearn Self-learning calibration feature available on Type 150G and Type 400G
AWG American Wire Gauge
CE Marked on products that comply with defined European Community
CR pump Constant Running hydraulic pump
EMC
(Electromagnetic
Compatibility)
Fluxgate Standard Raymarine compass supplied with course computer core pack
ft foot (1 ft = 305 mm)
GPS Global Positioning System
GyroPlus Raymarine’s GyroPlus yaw sensor that measures the boat’s rate of turn. It is
Hz Hertz (cycles per second)
I/O drive Inboard/Outboard or stern drive
in inch (1 in = 25.4 mm)
kg kilograms (1 kg = 2.2 lb)
lb pound (1 lb = 0.45 kg)
m metre (1 m = 39.4 inches)
MARPA Mini Automatic Radar Plotting Aid
mm millimeter (1 mm = 0.04 inches)
NMEA The NMEA (National Maritime Electronics Association) protocol is an
AST (Advanced Steering Technology) is Raymarine’s unique advanced
steering algorithm. It uses inputs from a wide variety of sensors to tune the
autopilot’s operation to provide superior co ntrol of the boat in any condition.
course computers.
standards
When powered up, all electrical equipment produces electromagnetic fields.
These can cause adjacent pieces of electr ical equipment to interact with one
another, and this can degrade their performance. By following the EMC
guidelines in this handbook, you can minimize these effects by ensuring
optimum Electromagnetic Compatibility (EMC) between equipment.
built into the Type 150G and Type 400G course computers.
internationally accepted serial communication interface standard for
sharing data between electronic equipment. Raymarine products can share
information with non-SeaTalk equipment using the NMEA 0183 protocol.
Page 56

48 Type 150/400 Autopilot System: Installation Guide
Term Meaning
oz ounce (1 oz = 0.028 kg)
SeaTalk SeaTalk is Raymarine’s proprietary communication system. It links products
SeaTalk bus This refers to the continuous SeaTalk system connecting together a series of
SSB Single Side Band (radio)
Type 150 12 V course computer without internal GyroPlus
Type 150G 12 V course computer with internal GyroPlus
Type 400 12/24 V course computer without internal GyroPlus
Type 400G 12/24 V course computer with internal GyroPlus
VVolts
VHF Very High Frequency (radio)
Ya w B oa t’s rate of turn (°/sec)
to provide a single, integrated system sharing power and data.
Raymarine units.
Page 57

Index 49
Index
A
Autopilot system
Core pack parts
Key components
Optional components
4
1–3
C
Cable clam p in stallation 30
Cabling
Compass
Course computer po w er supply
General guidelines
Linear rudder position sensor
Rotary rudder position sensor
Clutch voltage, Selecting
Compass
Cabling
Description
Dimensions
Installation
Location, non steel hulls
Location, steel hulls
Mounting
Multiple compass systems
NMEA compass
SeaTalk compass
Connecting
NMEA compass
NMEA equipment
Non-Raymarine drives
Optional components
Raymarine equipment
SeaTalk compass
Control unit
Description 3, 29
Installation
20
7
42
20
2, 17
17
17–21
19
20
21
21
21
36–39
External alarm
GyroPlus
Handheld remotes
Off switch
Wind vane
Additional control units
SeaTalk equipment
40
40
41
40
21
29
3
18
21
41
40–42
40
32–35
32
27
25
32
15
Core pack, Parts supplied
Course computer
12V and 12/24V versions
Cable clam p
Cabling
Connector cover
Description
Dimensions
Fuses
GyroPlus options
Input/output terminals
Installation
Location
Main parts
Mounting
NMEA data
Orientation
Power cable
Specifications
30
14
12
1
10
14, 43
2, 40
9–16
6, 10
9
12
36–37
11
Circuit breaker 16
Connecting
Fuse
Sizes
15
16
16
45
D
Dimensions
Compass
Course computer
Rudder position sensor
Drive unit
Description
Installation
17
Linear 26
22
Rotary
3, 28
28
10
E
EMC
Conformance statement
Installation guidelines
Servicing and safety guidelines
External alarm
40
4
2
13
vii
7
44
Page 58

50 Type 150/400 Autopilot System: Installation Guide
F
Fast heading (HDM) output 37
Fault-finding
Fluxgate compass, See Compass
Fuses
43
Course computer
Course computer power
14, 43
16
G
Glossary 47
GyroPlus yaw sensor
General description
Options
2, 40
2
H
Handheld remotes 40
I
Important information
EMC conformanc e
Handbook accuracy
Safety notices
Warranty
Installation
Cable clamp
Check locations
Checking kit
Compass
Control unit
Course computer
Drive unit
Rudder position sensor
Tools
vi
17–21
28
Linear
Rotary
4
vii
vii
vi
30
6–8
1–4
29
9–16
22–27
26–27
22–25
L
Linear rudder sensor 26–27
Locations
Compass 6, 18
Course computer
Rotary rudder position sensor
6, 10
M
Maintenance and servicing 43–44
7, 24
Mounting
Compass
Course computer
Rudder position sensor
Multiple compass systems
20
Linear
Rotary
12
26
24
N
NMEA compass 21
NMEA data inputs/outputs
Fast heading (HDM) ou tput
Navigator data inputs
NMEA equipment
Connecting 36–39
Non-Raymarin e driv e s
Connecting
Selecting clutch voltage
41
O
Off switch 41
Optional components
External alarm
GyroPlus
Handheld remotes
Off switch
Wind vane
40
40
40
41
40
P
Parts supplied 4
Product support
44
R
Raymarine equipment
Connecting
Regular checks
Remote control
Rotary rudder sensor
Rudder position sensor
Description 2
Linear installation
32–35
Additional control units
SeaTalk equipment
43
40
22–25
26–27
Cabling
27
Description
26
21
36–37
37
37
42
32
32
Page 59

Index 51
Dimensions 26
Mounting
Rotary installation
Alignment
Cabling
Description
Dimensions
Location
Mounting
Rudder reference,
See Rudder position sensor
26
22–25
23
25
22
22
7, 24
24
S
Safety notices vi
SeaTalk compass
SeaTalk equipment
Servicing
Specifications
Step 1, Check kit
Step 2, Check loca tions
Step 3, Install course compu ter
Step 4, Install compass
Step 5, Install rudder sensor
Step 6, Install drive unit
Step 7, Install control unit
Step 8, Clamp cables
Step 9, Integrate system
21
32
43–44
45
1–4
6–8
9–16
17–21
22–27
28
29
30
31–42
T
Technical support 44
Tools required
4
W
Warranty vi
Wind vane
40
Y
Yaw sensor (GyroPlus) 2, 40
Page 60

52 Type 150/400 Autopilot System: Installation Guide
Page 61

Rudder position sensor template
Rudder
positioned
amidships
Drill 3 mm (1/8 in)
diameter hole
(3 positions)
Cable position
Maximum
permitted
travel: +/- 60˚
Aft
D3440-2
Page 62

Page 63

Limited Warranty Certificate
Raymarine warrants each new Light Mar ine/Dealer Distributor Product to be of good materials and
workmanship, and will repair or exchange any parts proven to be defective in material and
workmanship under no rmal use for a period of 2 years/24 mon ths from date of sale to end user , except
as provided below.
Defects will be corrected by Raymarine or an authorized Raymarine dealer. Raymarine will, except
as provided below , accept labor cost for a period of 2 years /24 months from the date of sale to end user .
During this period, except for cer tain products, travel costs (auto milea ge and tolls) up to 100 round
trip highway miles (160 kilometres) and travel time of 2 hours, will be assumed by Raymarine only
on products where proof of installation or commission by authorized serv ice agents, can be shown.
Warranty Limitations
Raymarine W arranty policy does not apply to equ ipment which has been subjected to ac cident, abuse
or misuse, shipping damage, alteration s, corrosion, incorr ect and/or non-auth orized service, or
equipment on which the serial number has been altered, m utilated or removed.
Except where Raymarine or its authorized dealer has performed the installation, it assumes no
responsibility for damage incurred during installation.
This W arranty does not cover routin e system checkouts or alignment/calibration, unless required by
replacement of part(s) in the area being aligned.
A suitable proof of pu rchase, showing d ate, place, and serial number must be made available to
Raymarine or authorized service agent at the time of request for W arranty service.
Consumable items, (such as: Char t paper, lamps, fus es, batteries, styli, stylus/drive belts, radar mixer
crystals/diodes, snap-in impeller carriers, impellers, impeller bearings, and impeller shaft) are
specifically excluded from this Warranty .
Magnetrons, Cathode Ray Tubes (CR T), TFT Liquid Crystal Displays (LCD) and cold cathode
fluorescent lamps (CCFL), hailer horns and transducers are warranted for 1 year/12 months from date
of sale. These items must be returned to a Raymarine facility.
All costs associated with transducer replacement, other than the cost of the transducer itself, are
specifically excluded from this Warranty .
Overtime premium labor portion of services outside of normal working h ours is not covered by this
W arranty.
Travel cost allowance on certa in products with a suggested retail p rice below $2500 .00 is not
authorized. When/or if repairs are ne cessary , these products must be f orwarded to a Raymarine
facility or an authorized dealer at owner’s expense will be returned via surface carrier at no cost to the
owner.
Travel costs other than auto mileage, tolls and two (2) hours travel time, are specifically excluded on
all products. T ravel costs which are exc luded from the coverage of this W arranty in clude but are no t
limited to: taxi, launch fees, aircraft rental, subsistence, customs, shipp ing and communication
charges etc. T ravel cost s, mileage and time, in excess to that allo wed must have prior appr oval in
writing.
TO THE EXTENT CONSISTENT WITH ST ATE AND FEDERAL LA W:
(1) THIS W ARRANTY IS STRICTLY LIMITED TO THE TERMS INDICA TED HEREIN, AND
NO OTHER WARRANT IES OR REME DIES SHALL BE BINDING ON RA YMARI NE
INCLUDING W ITHOUT LIMI T A TI ON ANY WARRANTI ES OF MERCHA NT ABLE OR
FITNESS FOR A P ARTICULAR PURPOSE.
(2) Raymarine shall not be liable for any incidental, consequential or special (including punitive or
multiple) damages.
All Raymarine products sold or provided her eunder are merely aids to navigation. It is the
responsibility of the user to exercise discretion and proper navigational skill independent of any
Raymarine equipment.
Document number: 84064-8
April 2001
Page 64

Factory Service Centers
United States of America UK, Europe, Middle East, Far East
Raymarine Inc
22 Cotton Road, Unit D
Nashua, NH 03063-4 219, USA
Telephone: +1 603 881 5200
Fax: +1 603 864 4756
www.raymarine.com
Sales & Order Services
Telephone: +1 800 539 5539 Ext. 2333 or
Technical Support
Telephone: +1 800 539 5539 Ext. 2444 or
Email: techsupport@raymarine.com
Product Repair Center
Telephone: +1 800 539 5539 Ext. 2118
+1 603 881 5200 Ext. 2333
+1 603 881 5200 Ext. 2444
Raymarin e Ltd
Anchorage Park, Portsmouth
PO3 5TD, England
Telephone: +44 (0)23 9269 3611
Fax: +44 (0)23 9269 4642
www.raymarine.com
Customer Support
Telephone: +44 (0)23 9271 4713
Fax: +44 (0)23 9266 1228
Email: techsupport@ ra ym arine.com
Stick barcode label here
Purchased f rom Purchase date
Dealer address
Installed by Installation date
Commissioned by
Commissioning date
Owner’s name
Mailing address
This portion should be comple ted and retained by the owner.
 Loading...