

Ransburg
SERVICE MANUAL
LN-9407-00.3
(Replaces LN-9407-00.2)
March - 2013
RCS-2 USER MANUAL
MODELS: A10549 CONTROL CONSOLE
A10776 MOTOR AMPLIFIER PANEL
A10948 FLUID PANEL
IMPORTANT: Before using this equipment,
carefully read SAFETY PRECAUTIONS, starting
on page 1, and all instructions in this manual.
Keep this Service Manual for future reference.
Service Manual Price: $50.00 (U.S.)

RCS-2 User Manual - Contents
CONTENTS
SAFETY:
Ransburg
PAGE
1-5
SAFETY PRECAUTIONS..........................................................................................................
HAZARDS / SAFEGUARDS......................................................................................................
INTRODUCTION:
FEATURES..................................................................................................................................
SPECIFICATIONS......................................................................................................................
GENERAL DESCRIPTION.........................................................................................................
CHANNELS AND GUNS ...........................................................................................................
CONTROL RACK INTEGRATION.............................................................................................
CONFIGURABLE OPERATING PARAMETERS......................................................................
BLOCK DIAGRAMS....................................................................................................................
FLUID PANEL SCHEMATIC.......................................................................................................
INSTALLATION:
SYSTEM GUIDELINES..............................................................................................................
DIMENSIONAL INFORMATION................................................................................................
INPUT POWER...........................................................................................................................
DISCRETE CHANNEL AND GUN INPUTS..............................................................................
DISCRETE CHANNEL AND GUN OUTPUTS..........................................................................
ANALOG INPUTS.......................................................................................................................
ANALOG OUTPUTS...................................................................................................................
FREQUENCY INPUTS...............................................................................................................
SYSTEM INPUTS AND OUTPUTS............................................................................................
ODD NUMBER CHANNEL CONNECTIONS TABLE...............................................................
EVEM NUMBER CHANNEL CONNECTIONS TABLE.............................................................
SYSTEM I/O CONNECTIONS TABLE.......................................................................................
1
2-5
6-13
6
7
7-10
10
10
10-11
12
13
14-27
14
15-17
17
18-20
20-21
21-22
22
22
23-24
25
26
27
OPERATION:
SETUP AND OPERATION.........................................................................................................
BUTTON FUNCTIONS...............................................................................................................
PASSWORD OPERATION........................................................................................................
CONFIGURABLE OPERATING PARAMETERS......................................................................
USER INTERFACE SOFTWARE...............................................................................................
LIMITED WARRANTY:
LIMITED WARRANTY.................................................................................................................
(Continued On Next Page.)
28-49
28
28-29
29
29-30
31-49
50
50
LN-9407-00.2

Ransburg
CONTENTS (Cont.)
RCS-2 User Manual - Contents
PAGE
APPENDIX:
A - STANDARD KEYBOARD FUNCTIONS..............................................................................
B - CALIBRATION DATA AND FLOW RANGES OF
STANDARD RCS-2 PUMP...................................................................................................
C - CHANNEL BOARD JUMPER SETTINGS...........................................................................
D - INTERFACE BOARD JUMPER SETTINGS........................................................................
E - CHANNEL AND GUN I/O TERMINALS...............................................................................
F - SYSTEM I/O TERMINALS.....................................................................................................
G - CATALYST FLOW SENSOR...............................................................................................
H - FEATHERING.......................................................................................................................
I - REMOTE OPERATORS PANEL..........................................................................................
J - MOTOR AMPLIFIER LED DISPLAY FAULT CODES
(PART 1 AND 2)....................................................................................................................
K - ERROR CODES..................................................................................................................
L - PUSHOUT.............................................................................................................................
M - TRIGGER LOG.....................................................................................................................
N - IMPROVING THE ACCURACY OF THE RCS-2................................................................
51-77
51
52
53
54
55
56
57-59
60-61
62-63
64-67
68-71
72
73-74
75-77
LN-9407-00.2

RCS-2 User Manual - Safety
SAFETY
Ransburg
SAFETY PRECAUTIONS
Before operating, maintaining or servicing any
Ransburg electrostatic coating system, read and
understand all of the technical and safety literature for your Ransburg products. This manual
contains information that is important for you to
know and understand. This information relates to
USER SAFETY and PREVENTING EQUIPMENT
PROBLEMS. To help you recognize this information, we use the following symbols. Please pay
particular attention to these sections.
A WARNING! states information to alert you
to a situation that might cause serious injury
if instructions are not followed.
A CAUTION! states information that tells how
to prevent damage to equipment or how to
avoid a situation that might cause minor injury.
A NOTE is information relevant to the procedure in progress.
W A R N I N G
!
The user MUST read and be familiar with the
Safety Secon in this manual and the Ransburg
safety literature therein idened.
This manual MUST be read and thoroughly
understood by ALL personnel who operate, clean
or maintain this equipment! Special care should
be taken to ensure that the WARNINGS and
safety requirements for operang and servicing
the equipment are followed. The user should be
aware of and adhere to ALL local building and re
codes and ordinances as well as NFPA-33 SAFETY
STANDARD, LATEST EDITION, prior to installing,
operang, and/or servicing this equipment.
W A R N I N G
!
While this manual lists standard specications
and service procedures, some minor deviations
may be found between this literature and your
equipment. Differences in local codes and plant
requirements, material delivery requirements,
etc., make such variations inevitable. Compare
this manual with your system installation drawings and appropriate Ransburg equipment manuals to reconcile such differences.
Careful study and continued use of this manual will
provide a better understanding of the equipment
and process, resulting in more efcient operation,
longer trouble-free service and faster, easier
troubleshooting. If you do not have the manuals
and safety literature for your Ransburg system,
contact your local Ransburg representative or
Ransburg.
The hazards shown on the following pages
may occur during the normal use of this equipment. Please read the hazard chart beginning on
page 2.
1
LN-9407-00.2
Ransburg
RCS-2 User Manual - Safety
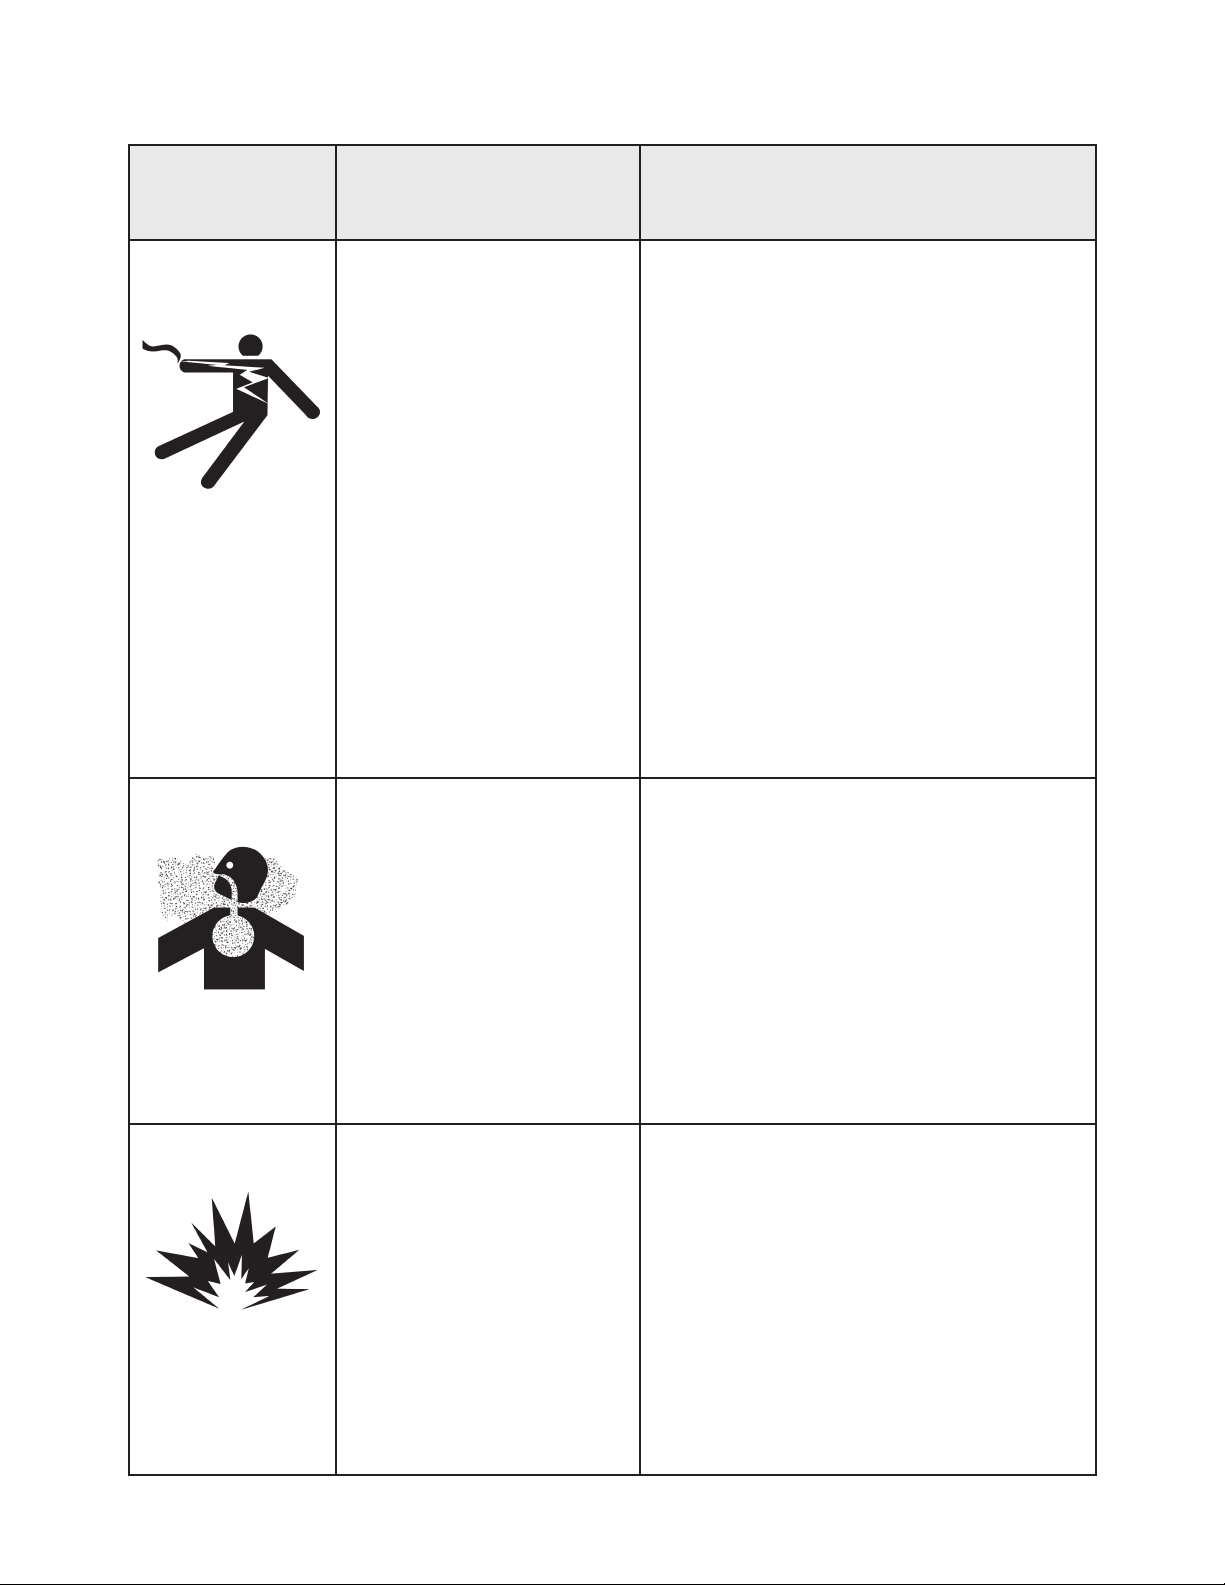
AREA
Tells where hazards
may occur.
Spray Area
HAZARD
Tells what the hazard is.
Fire Hazard
Improper or inadequate
operation and maintenance
procedures will cause a re
hazard.
Protection against inadvertent arcing that is capable of
causing re or explosion is
lost if any safety interlocks
are disabled during operation. Frequent Power Supply
or Controller shutdown indicates a problem in the system
requiring correction.
SAFEGUARDS
Tells how to avoid the hazard.
Fire extinguishing equipment must be present in
the spray area and tested periodically.
Spray areas must be kept clean to prevent the
accumulation of combustible residues.
Smoking must never be allowed in the spray
area.
The high voltage supplied to the atomizer must
be turned off prior to cleaning, ushing or maintenance.
When using solvents for cleaning:
• Those used for equipment ushing should
have ash points equal to or higher than
those of the coating material.
• Those used for general cleaning must have
ash points above 100°F (37.8°C).
Spray booth ventilation must be kept at the rates
required by NFPA-33, OSHA, country, and local
codes. In addition, ventilation must be maintained during cleaning operations using ammable or combustible solvents.
Electrostatic arcing must be prevented. Safe
sparking distance must be maintained between
the parts being coated and the applicator. A distance of 1 inch for every 10KV of output voltage
is required at all times.
Test only in areas free of combustible material.
Testing may require high voltage to be on, but
only as instructed.
Non-factory replacement parts or unautho-
rized equipment modications may cause re or
injury.
If used, the key switch bypass is intended for
use only during setup operations. Production
should never be done with safety interlocks disabled.
Never use equipment intended for use in waterborne installations to spray solvent based materials.
The paint process and equipment should be
set up and operated in accordance with NFPA33, NEC, OSHA, local, country, and European
Health and Safety Norms.
LN-9407-00.2
2
RCS-2 User Manual - Safety
Ransburg
AREA
Tells where hazards
may occur.
Spray Area
HAZARD
Tells what the hazard is.
Explosion Hazard
Improper or inadequate operation and maintenance proce-
dures will cause a re hazard.
Protection against inadvertent
arcing that is capable of caus-
ing re or explosion is lost if
any safety interlocks are disabled during operation.
Frequent Power Supply or
Controller shutdown indicates
a problem in the system requiring correction.
SAFEGUARDS
Tells how to avoid the hazard.
Electrostatic arcing must be prevented. Safe
sparking distance must be maintained between
the parts being coated and the applicator. A distance of 1 inch for every 10KV of output voltage
is required at all times.
Unless specically approved for use in hazardous locations, all electrical equipment must be
located outside Class I or II, Division 1 or 2
hazardous areas, in accordance with NFPA-33.
Test only in areas free of ammable or combustible materials.
The current overload sensitivity (if equipped)
MUST be set as described in the corresponding section of the equipment manual. Protection against inadvertent arcing that is capable
of causing re or explosion is lost if the current
overload sensitivity is not properly set. Frequent power supply shutdown indicates a problem in the system which requires correction.
General Use and
Maintenance
Improper operation or maintenance may create a hazard.
Personnel must be properly
trained in the use of this equipment.
Always turn the control panel power off prior to
ushing, cleaning, or working on spray system
equipment.
Before turning high voltage on, make sure no
objects are within the safe sparking distance.
Ensure that the control panel is interlocked with
the ventilation system and conveyor in accordance with NFPA-33, EN 50176.
Have re extinguishing equipment readily available and tested periodically.
Personnel must be given training in accordance
with the requirements of NFPA-33, EN 60079-0.
Instructions and safety precautions must be
read and understood prior to using this equipment.
Comply with appropriate local, state, and national codes governing ventilation, re protection, operation maintenance, and housekeeping. Reference OSHA, NFPA-33, EN Norms
and your insurance company requirements.
3
LN-9407-00.2
Ransburg
RCS-2 User Manual - Safety
AREA
Tells where hazards
may occur.
Spray Area /
High Voltage
Equipment
HAZARD
Tells what the hazard is.
Electrical Discharge
There is a high voltage device
that can induce an electrical
charge on ungrounded objects
which is capable of igniting
coating materials.
Inadequate grounding will
cause a spark hazard. A
spark can ignite many coating
materials and cause a re or
explosion.
SAFEGUARDS
Tells how to avoid the hazard.
Parts being sprayed and operators in the spray
area must be properly grounded.
Parts being sprayed must be supported on conveyors or hangers that are properly grounded. The resistance between the part and earth
ground must not exceed 1 meg ohm. (Refer to
NFPA-33.)
Operators must be grounded. Rubber soled insulating shoes should not be worn. Grounding
straps on wrists or legs may be used to assure
adequate ground contact.
Operators must not be wearing or carrying any
ungrounded metal objects.
When using an electrostatic handgun, operators
must assure contact with the handle of the applicator via conductive gloves or gloves with the
palm section cut out.
NOTE: REFER TO NFPA-33 OR SPECIFIC
COUNTRY SAFETY CODES REGARDING
PROPER OPERATOR GROUNDING.
All electrically conductive objects in the spray
area, with the exception of those objects required by the process to be at high voltage, must
be grounded. Grounded conductive ooring
must be provided in the spray area.
Always turn off the power supply prior to ushing, cleaning, or working on spray system equipment.
Unless specically approved for use in hazardous locations, all electrical equipment must be
located outside Class I or II, Division 1 or 2 hazardous areas, in accordance with NFPA-33.
LN-9407-00.2
4
RCS-2 User Manual - Safety
Ransburg
AREA
Tells where hazards
may occur.
Electrical
Equipment
HAZARD
Tells what the hazard is.
Electrical Discharge
High voltage equipment is utilized in the process. Arcing
in the vicinity of ammable or
combustible materials may oc-
cur. Personnel are exposed to
high voltage during operation
and maintenance.
Protection against inadvertent
arcing that may cause a re or
explosion is lost if safety circuits
are disabled during operation.
Frequent power supply shutdown indicates a problem in the
system which requires correction.
An electrical arc can ignite coat-
ing materials and cause a re or
explosion.
SAFEGUARDS
Tells how to avoid the hazard.
Unless specically approved for use in hazardous locations, the power supply, control cabinet,
and all other electrical equipment must be located outside Class I or II, Division 1 and 2 hazardous areas in accordance with NFPA-33 and EN
50176.
Turn the power supply OFF before working on
the equipment.
Test only in areas free of ammable or combustible material.
Testing may require high voltage to be on, but
only as instructed.
Production should never be done with the safety
circuits disabled.
Before turning the high voltage on, make sure no
objects are within the sparking distance.
Toxic Substances
Spray Area
Certain material may be harmful
if inhaled, or if there is contact
with the skin.
Explosion Hazard –
Incompatible Materials
Halogenated hydrocarbon sol-
vents for example: methylene
chloride and 1,1,1,-Trichloroethane are not chemically
compatible with the aluminum
that might be used in many system components. The chemical
reaction caused by these solvents reacting with aluminum
can become violent and lead to
an equipment explosion.
Follow the requirements of the Material Safety
Data Sheet supplied by coating material manufacturer.
Adequate exhaust must be provided to keep the
air free of accumulations of toxic materials.
Use a mask or respirator whenever there is a
chance of inhaling sprayed materials. The mask
must be compatible with the material being
sprayed and its concentration. Equipment must
be as prescribed by an industrial hygienist or
safety expert, and be NIOSH approved.
Aluminum is widely used in other spray application equipment - such as material pumps,
regulators, triggering valves, etc. Halogenated
hydrocarbon solvents must never be used with
aluminum equipment during spraying, ushing,
or cleaning. Read the label or data sheet for the
material you intend to spray. If in doubt as to
whether or not a coating or cleaning material is
compatible, contact your coating supplier. Any
other type of solvent may be used with aluminum
equipment.
5
LN-9407-00.2

Ransburg
INTRODUCTION
FEATURES
RCS-2 User Manual - Introduction
• Control of up to 8 gear pumps from one 24"
W X 24" H X 17" D control console
• Guns congurable as single or dual channel
guns. (Congurable as 8 single channel
guns, 4 dual channel guns, or almost any
combination of the two.)
• Dual channel guns congurable as automatic
(ow and ratio control) or as manual (ow,
ratio, and pressure control) modes
• Congurable operating parameters for all
channels and guns. (Up to 199 "Jobs" per
gun can be programmed.)
• Full color graphical screens for setup, opera tion, and diagnostics.
• Comprehensive help information available
from all screens.
• USB ports allow backup of all operating
parameters, retrieval of ow response
graphs, and updating of user interface soft
ware.
• Firmware on control cards is stored in ash
memory and can be updated using a laptop
with a serial port. (Firmware and software
updates can be emailed to site.)
• User interface computer can be located any where and a simple Ethernet cable run from
interface PC to RCS-2 interface card.
• Retrot option allows RCS customers to
upgrade their electronics and use their
existing uid components.
• All discrete digital and analog inputs and out puts can be monitored and forced for diag nostic purposes.
• Pot life timer monitoring and alarming.
• Pressure pot volume monitoring and alarm ing.
• Congurable alarms, faulting conditions, and
alarm tolerance times.
• With proper pump sizes selected, has virtu-
ally unlimited ratio and ow capabilities.
(Currently available pumps provide ow
ranges from 0.9 cc/min to 1500 cc/min per
channel.)
• Discrete I/O capabilities allow interfacing to
any manufacturer's PLC.
• Bradley Remote I/O capabilities (op tional)
• All parameter screens can be password pro tected.
• Most analog inputs and outputs congurable
for 0-10 VDC or 4-20 mA.
• Data acquisition style trending screens avail-
able for setup, diagnostics, and ne tuning of
the system.
LN-9407-00.2
6

RCS-2 User Manual - Introduction
Ransburg
SPECIFICATIONS
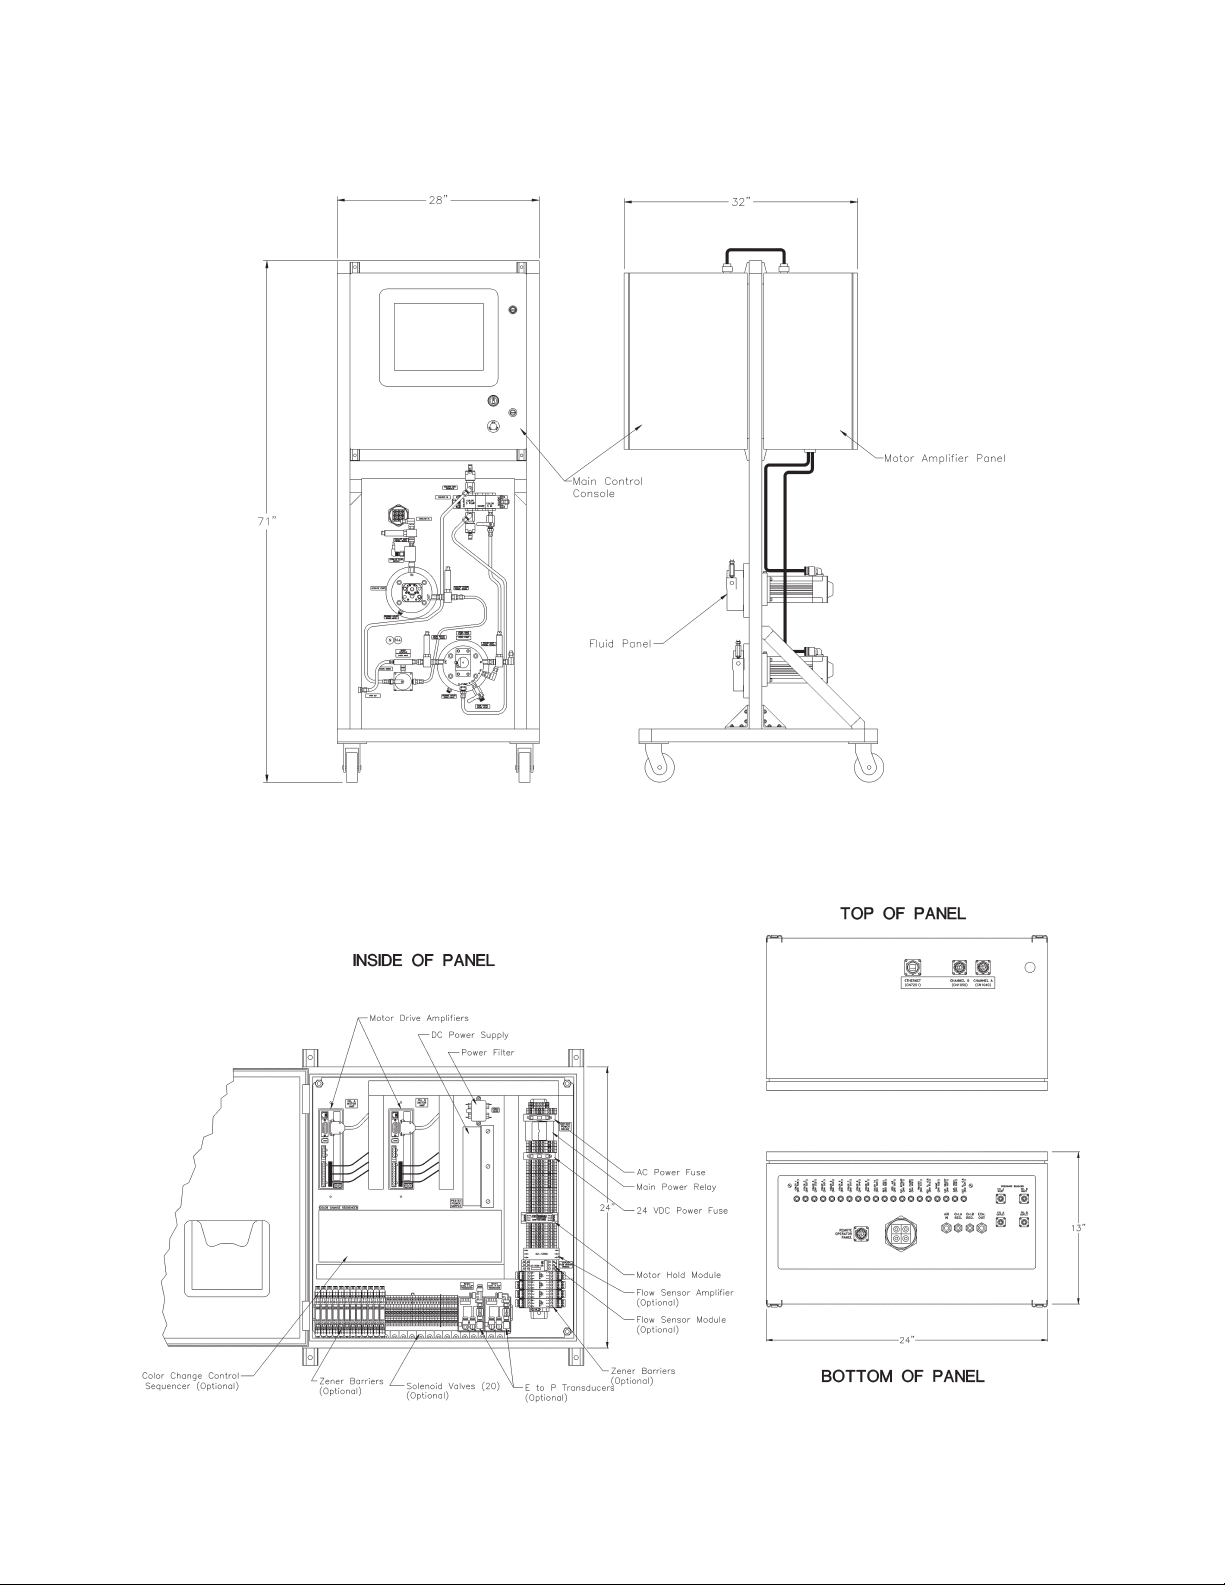
Size:
Stand Alone Cart Mount Version:
71" High x 28" Wide x 32" Deep
(180.34 cm X 71.12 cm X 81.28 cm)
Main Control Console:
24" High x 24" Wide x 17" Deep
(61 cm X 61 cm X 43.18 cm)
Motor Amplier Panel:
24" High x 24" Wide x 13" Deep
(61 cm X 61 cm X 33 cm)
Fluid Panel:
34" High x 21" Wide x 24" Deep
(86.36 cm X 53.34 cm X 61 cm)
Weight: 400 lbs. (181.5 Kg)
Operating Temperature: 32°F to 120°F
(0°C to 49°C)
Operating Humidity: 0% to 95%
Power Requirements: 120 VAC at 10
Amps
(240 VAC at 5 Amps)
Pneumatic Air Consumption: Less
than 5 cfm
Pneumatic Air Inlet Size: 3/8" ODT
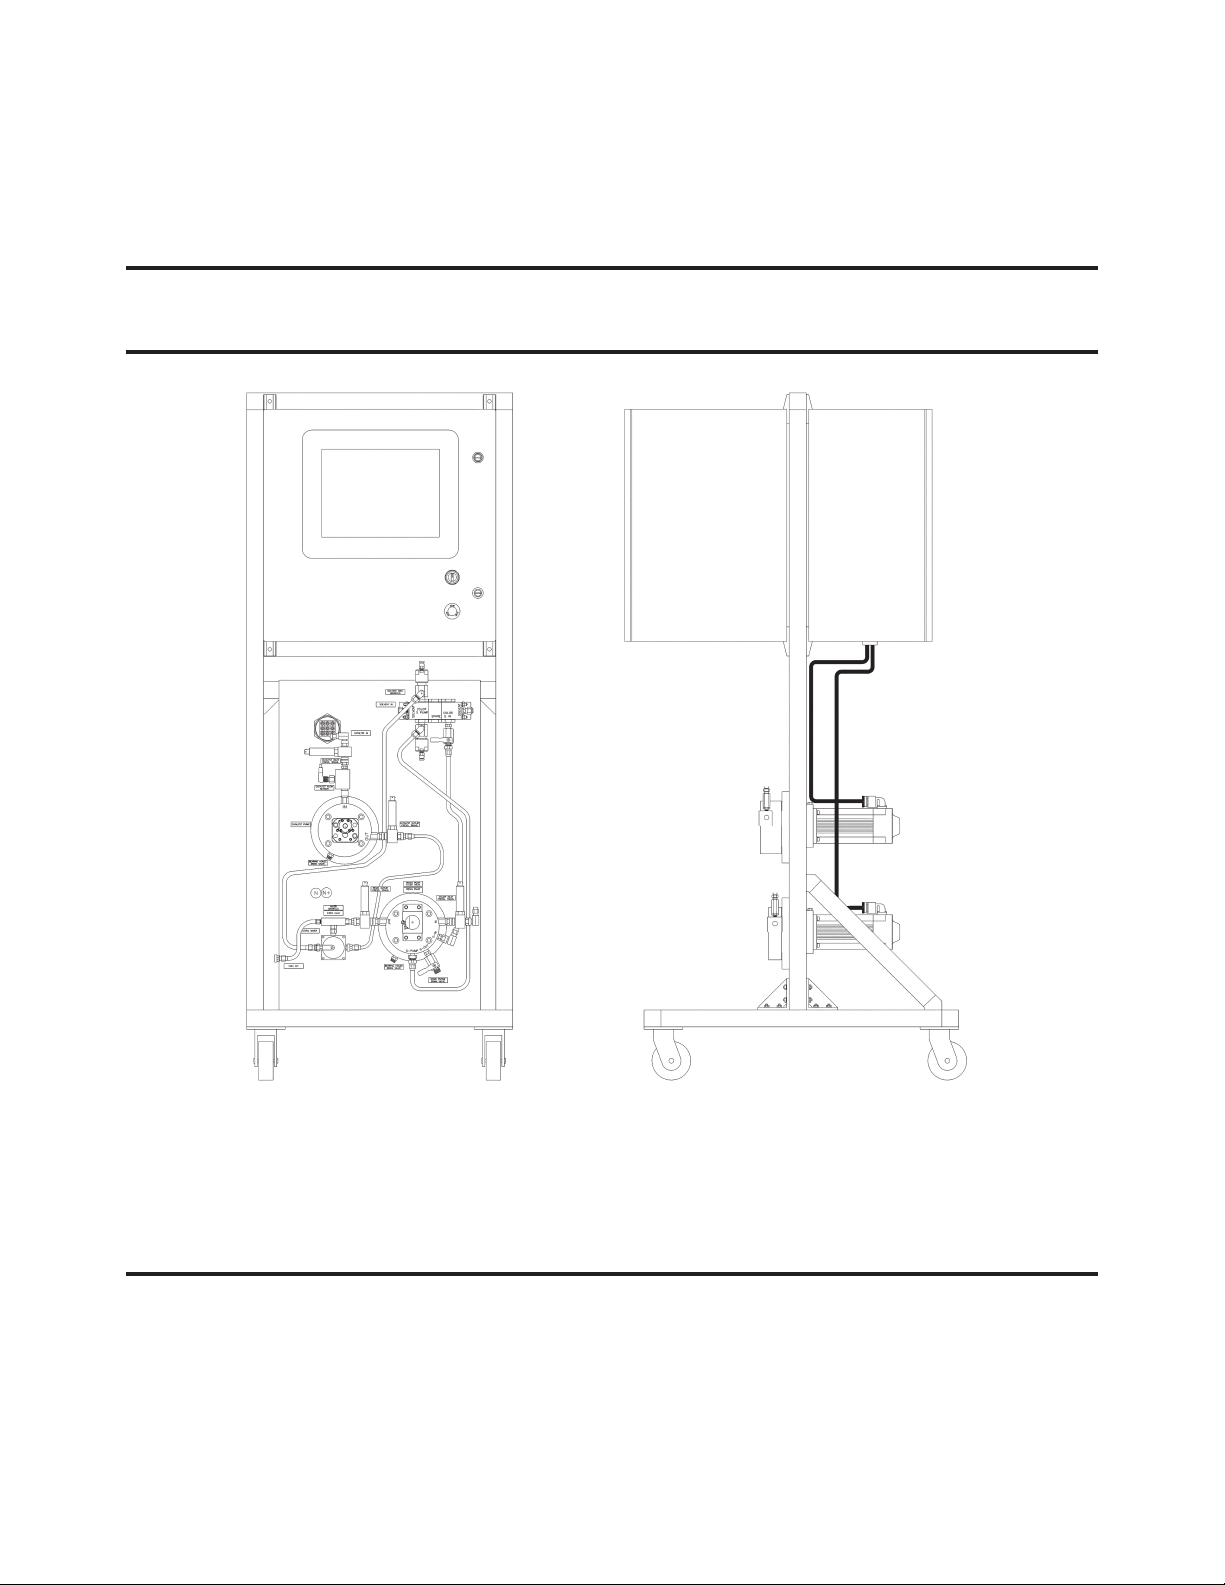
GENERAL DESCRIPTION
The RCS-2 System is composed of four basic
elements:
• Main Control Console
• Motor Amplier Panel
• Fluid Panel
• Remote Operator's Panel
The Main Control Console can control up to 8
pumps, the Motor Amplier Panels will interface
with either one or two pumps, and the Fluid
Panels are available with either one or two
pumps.
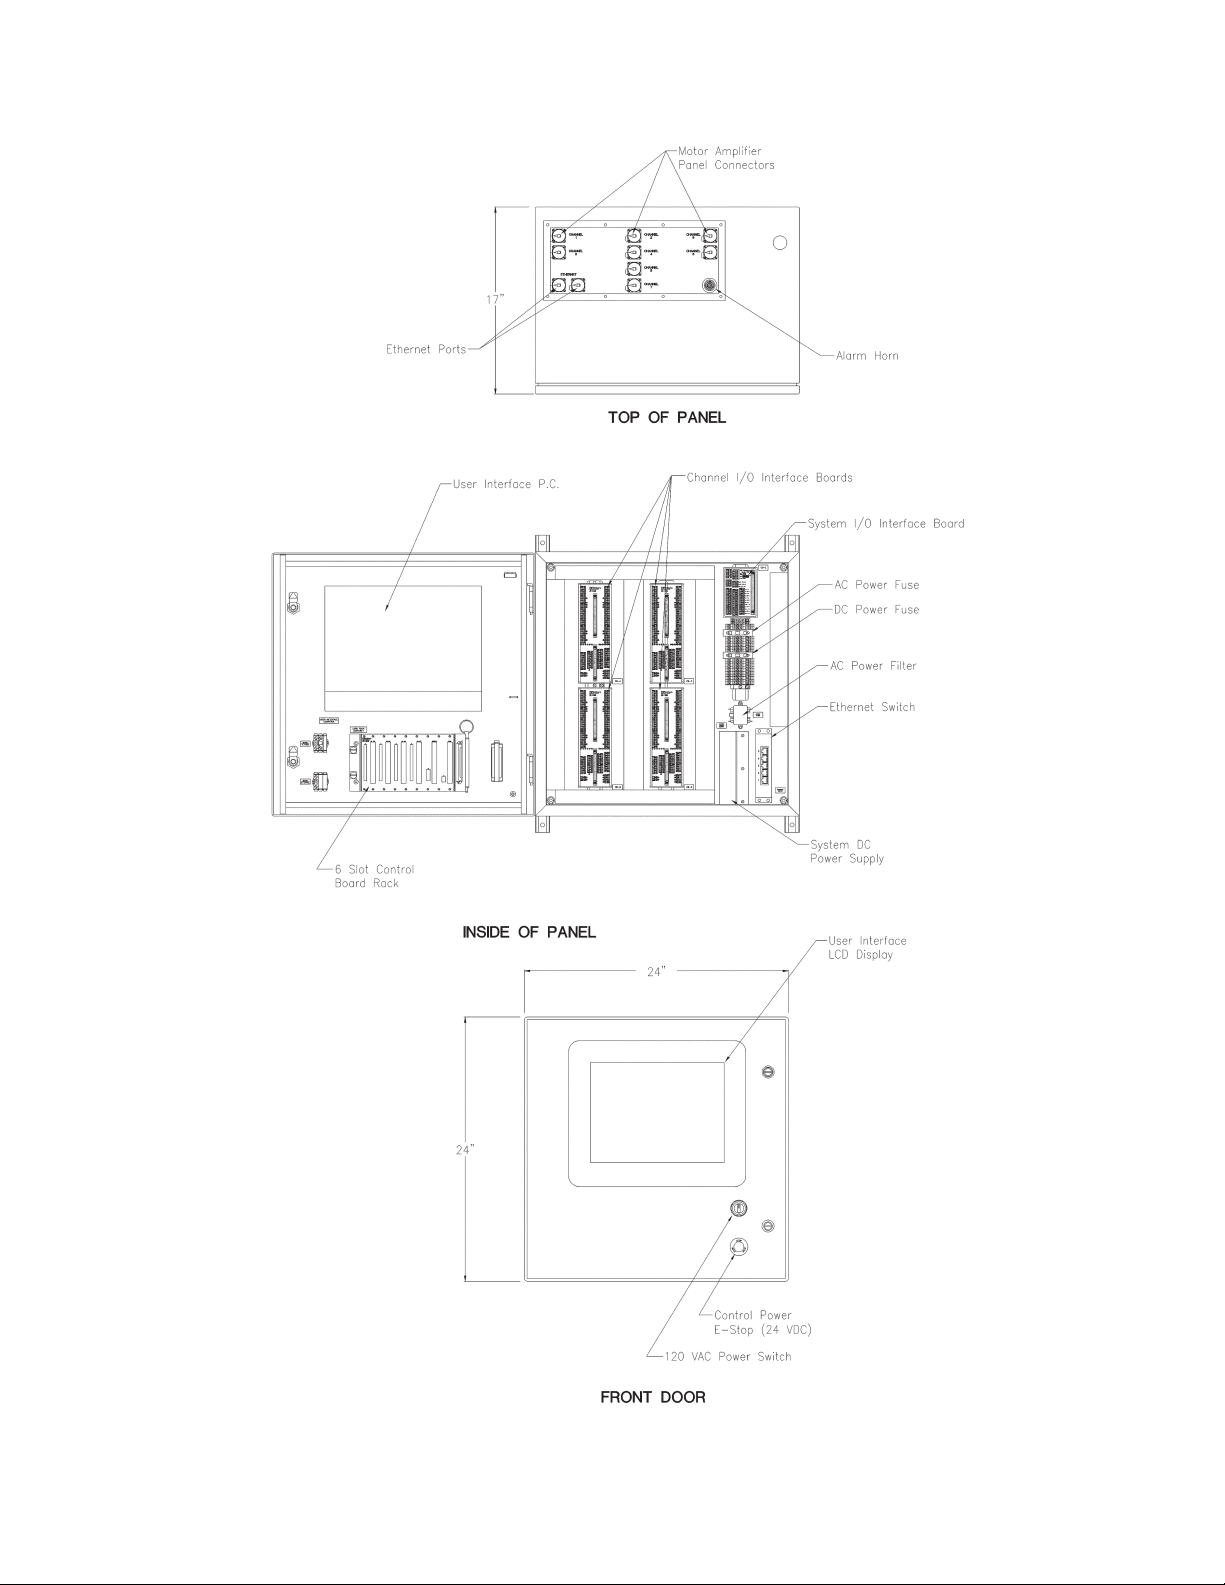
Main Control Console
The Main Control Console is the heart of the
system. It houses the following items:
• User-interface computer
• Control card rack
• Ethernet switch
• Interface card
• Channel card(s)
• 15" color LCD touch screen display
• DC power supply
• Ribbon cable interface boards
• Power and I/O terminal strip
• Noise lter and fuses
• I/O connectors for motor amplier panels
Pneumatic Air Outlet Size: ¼” ODT
User Interface
Processor: 1 GHz Intel® PIII
Running Windows
Embedded XP
Interface Board Processor: Rabbit 2000™
Channel Board Processor:
Motorola MC68HC16
Fluid Capacity: 0.9 cc/min to 1500 cc/min
per pump
Fluid Inlet Size: 3/8" ODT
Fluid Viscosity Range: 20–1000 centipoise
Fluid Inlet Pressure: 0 psi to 200 psi
Fluid Outlet Pressure: 200 psi maximum
7
The User Interface Computer is a Pentium®
based PC with a non-volatile ash-disk that
contains a Windows XP® Embedded operating
system and the RCS-2 user-interface software.
It has an on-board Ethernet port to allow interface
with the interface card. The computer has USB
ports for updating its software and for backing-up
parameter data. Keyboard and mouse ports are
also available on the unit for setup, diagnostics,
and troubleshooting, if necessary.
The control card rack is a half-width 19" rack
with space for one RIO card, one interface card,
and up to four channel cards. It is powered from
24 VDC and utilizes up to 9 ribbon cable connections (if all 8 channels are used). High speed
communications between cards is accomplished
using a Motorola® SPI bus.
LN-9407-00.2

Ransburg
RCS-2 User Manual - Introduction
The interface card houses a Rabbit 2000®
embedded processor. This board performs the
following functions:
• It handles all communications between
the user-interface computer and the chan nel cards.
• It stores all parameter data in battery backed RAM.
• Has an Ethernet port used to communi cate with the user-interface PC and the
color change sequencer.
• Handles all discrete system I/O (job num ber inputs, strobe inputs, system fault out puts, etc.).
Each channel card houses a Motorola®
MC68HC16 embedded processor. These boards
perform the following funtions:
• Controls all gun and channel specic dis-
crete inputs and outputs.
• Controls all gun and channel specic ana-
log inputs and outputs.
• Holds rmware for PID loops that control
motor ampliers.
• Holds rmware for PID loops that control
inlet pressure transducers.
The LCD touch-screen display is a 15" diag-onal, full color LCD display with 1024 by 768
pixel resolution.
There is one DC power supply housed in the
main control console. It supplies 24 VDC for
all discrete I/O signals and for the boards in the
control rack.
The ribbon cable interface boards provide easy
screw-terminal access to all analog and digital input
and output signals. They also provide specic test
points to allow easy connection of test devices
and data acquisition equipment.
On the top of the main control console there are
up to eight 26-pin military-style connectors, one
for each channel. These I/O connectors allow
the main control console to be interfaced with
the motor amplifer panel(s) via the 26-conductor
"umbilical cables". Also, on the top of the main
control panel are two Ethernet connectors used
to connect to the interface card and user interface
computer.
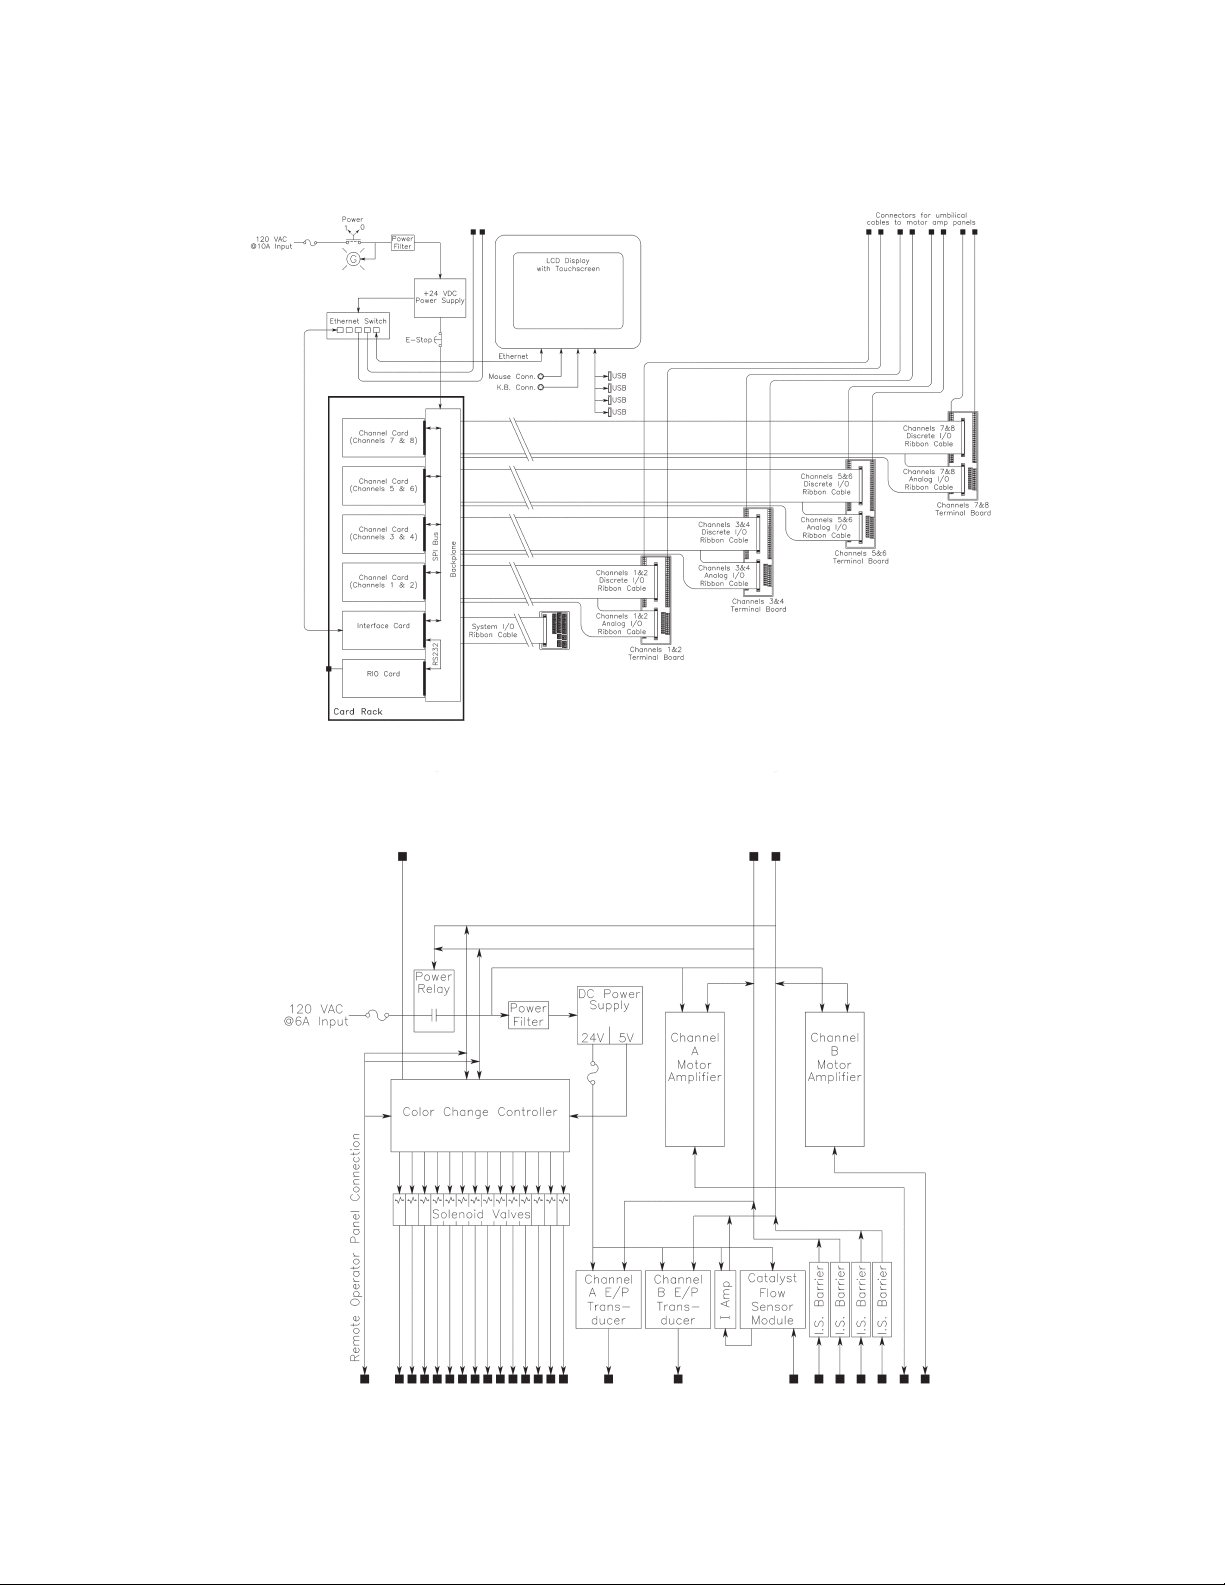
Motor Amplier Panels
The Motor Amplifer Panels act as the interface
between the CPU on the channel cards and the
"real world" devices such as motors, pressure
transducers, and ow switches. They house the
following items:
• Motor Drive Ampliers
• E to P Pressure Transducers
• Zener Barriers
• Interface Modules for Flow Sensor
• 24 VDC Power Supply
• Corr-Com Power Filter
• Control Relay
• Terminal Strip
• Optional Color Change Sequencer
The motor drive ampliers convert a 0 to 10
VDC signal from the channel cards to a proportional RPM (0 to 150) at the motors. They also
receive the feedback from the resolvers attached
to the motors. In this way, they can generate a
fault if the actual motor RPM does not match the
target RPM.
The E to P pressure transducers convert a 0 to
10 VDC signal or optionally a 4 to 20 mA signal
from the channel cards to a proportional 0 to 100
psi air signal. This signal is used to pilot uid
regulators on the inlet of the pumps, allowing the
channel card to control the inlet pressure of the
pumps.
The terminal strip is used for connecting AC
power to the unit and for access to the 24 VDC
power supply for external I/O devices. The terminal strip has two fuses, one for the incoming
AC power and one for the 24 VDC control power.
On the buttom of the terminal strip is a Corr-Com®
power lter for the incoming AC.
LN-9407-00.2
The optional Zener barriers make the pressure
sensors and the optional Remote Operator's Panel
intrinsically safe for use inside the spray area.
The optional catalyst ow sensor interface
module powers and monitors the ow sensor
8

RCS-2 User Manual - Introduction
Ransburg
typically used in the catalyst line of the uid panel.
An additional module converts the ow signal to
a 4 to 20 mA signal that is proportional to the ow
rate of the catalyst. That signal is then fed back
to the channel card so it can be used to generate
faults when catalyst ow falls below a preset point
or if air is detected in the supply line.
The 24 VDC power supply powers the E to P
transducers, the pressure sensors, catalyst ow
sensor modules, and the optional Remote Operators's Panel.
If the optional color change sequencer is installed,
this power supply will also have a +5 VDC output
to power the color change sequencer.
The optional Color Change Sequencer is a small
P.L.C. like processor that controls the ush, load,
and color change sequences for each gun and
job number. Each time a job number is loaded
into a gun, the ush and load sequences are
downloaded to this controller. (A color change
sequence is simply a ush sequence followed by
a load sequence.)
The pump manifolds house the magnetic couplings which tie the servo motors to the gear pumps.
The servo motors actually house both an AC drive
servo motor and a feedback resolver in the same
physical housing. They get their drive signals
from the motor drive ampliers and the resolvers
feed their rotational information back to the motor
drive ampliers. (Explosion proof servo motors
are available as an option.)
The pressure sensors convert the uid pressure
from the uid inlet and outlet of the pumps to a
4 to 20 mA signal which is then fed through the
zener barriers and back to the channel boards (in
the control rack). Standard units have a pressure
range of 0 psi to 200 psi.
The catalyst ow sensor is a thermal shedding
type ow sensor that is immersed in the catalyst
ow stream. It detects ow by heating the sensor
and then sensing how much of the heat is being
removed from the sensor by the ow of catalyst.
(More ow = more heat removed from the sensor
head.) An optional explosion-proof version of this
sensor is available for use in hazardous areas.
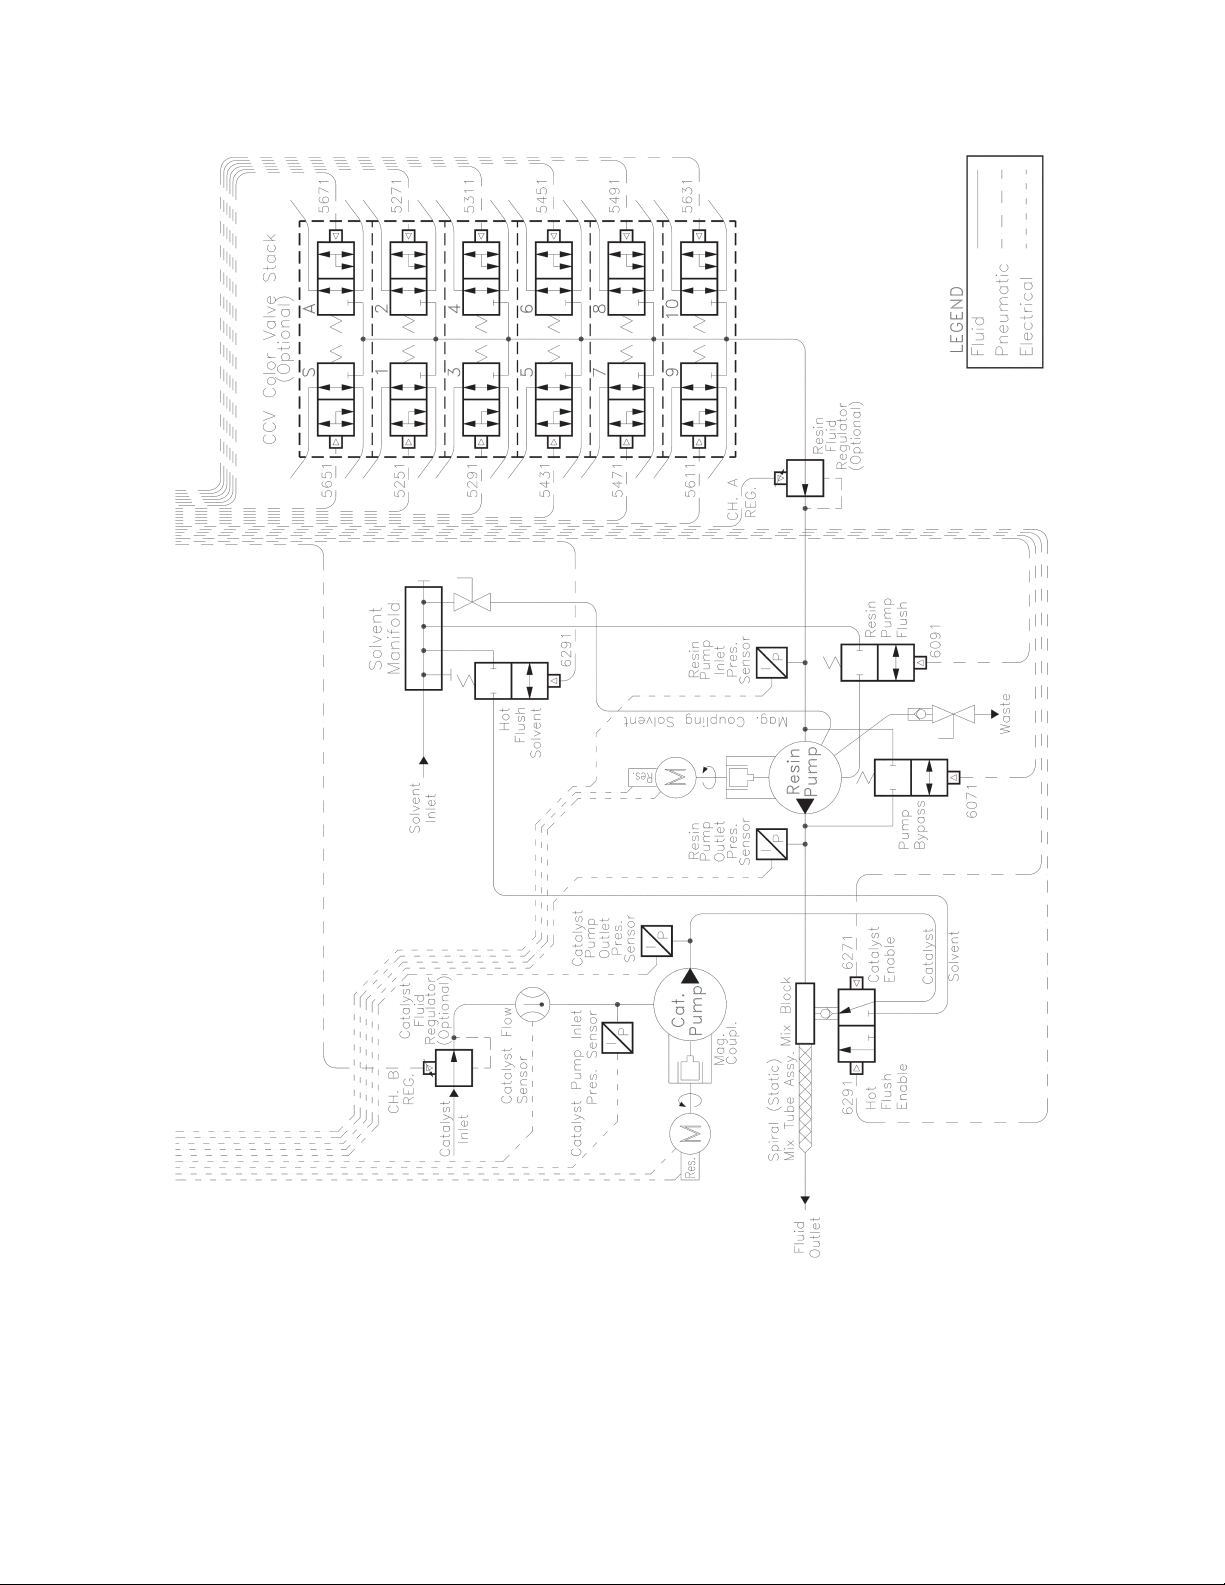
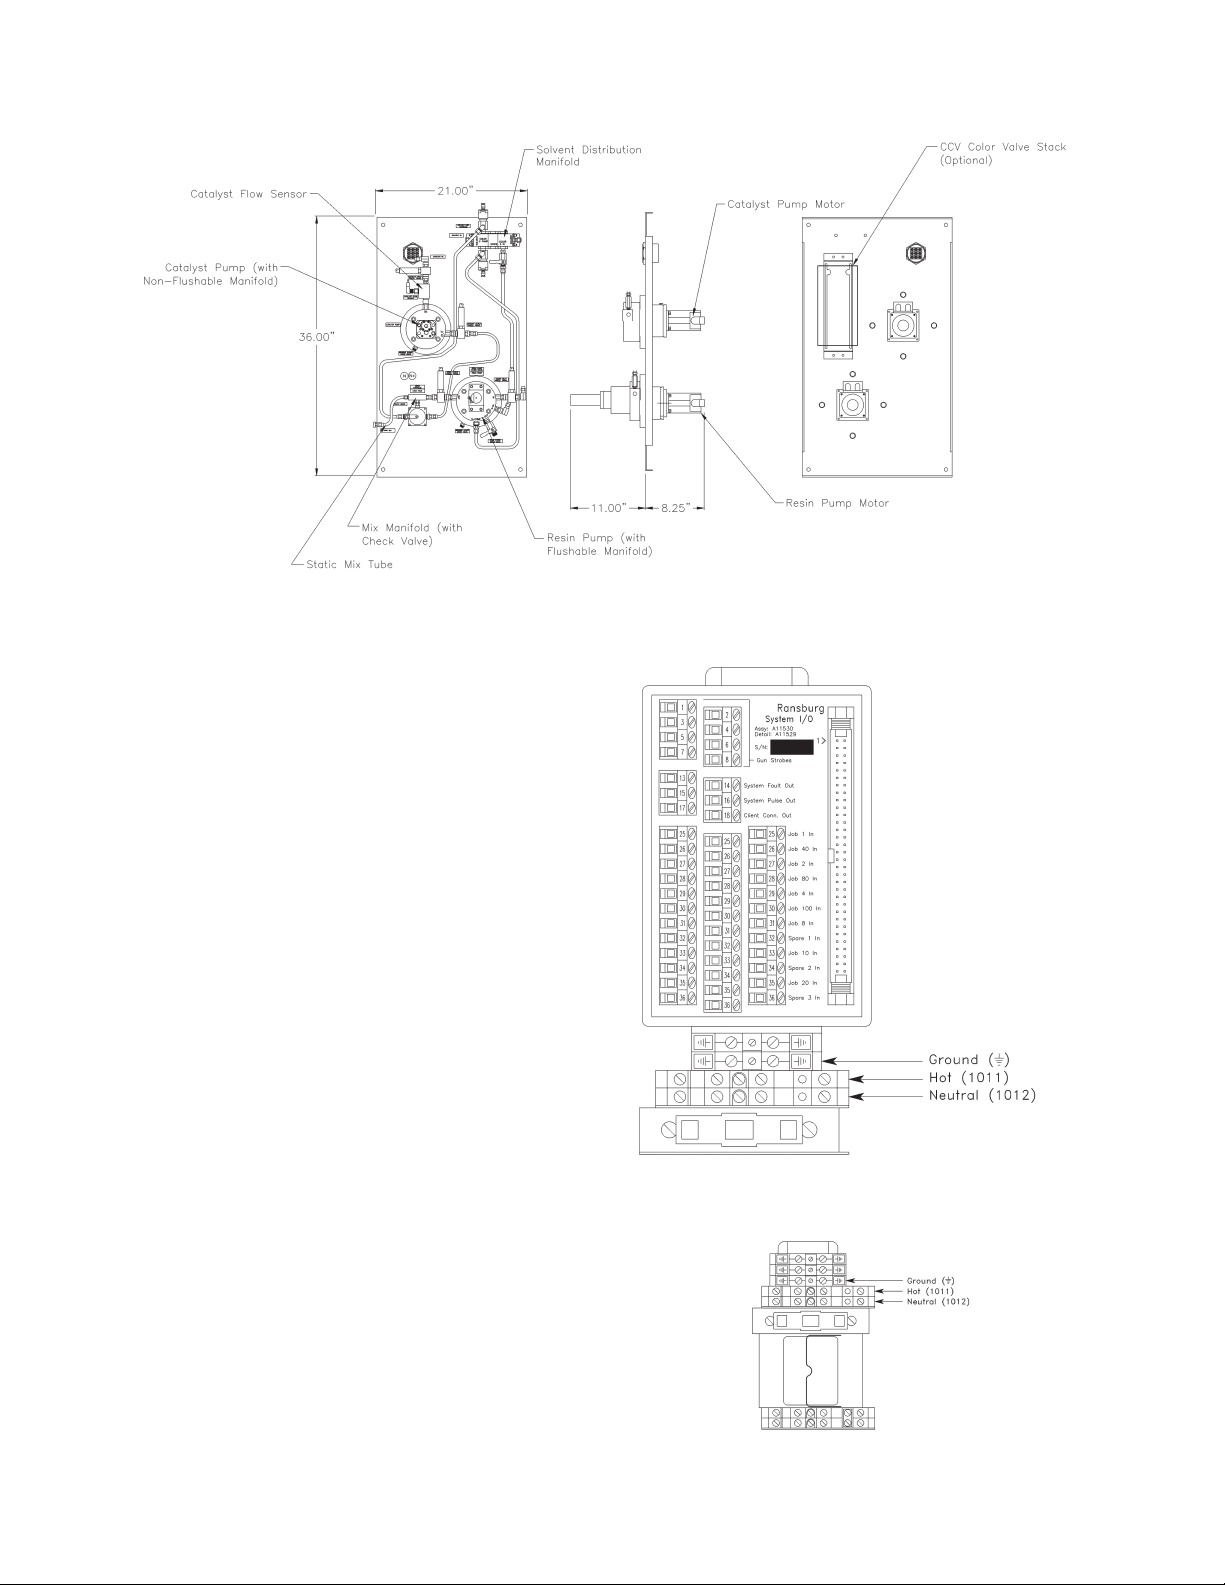
Fluid Panels
The Fluid Panels contain all of the "wetted" components for the RCS-2 as well as the drive motors.
These include:
• Gear Pumps
• Pump Manifolds
• Servo Motors
• Pressure Sensors
• Catalyst Flow Sensor (optional)
• Mix-Block
• Spiral Mix Tube
• Color Valve Stack (optional)
• Solvent Manifold
• Pump Bypass Valve
The gear pumps are available in various sizes for
various materials and ow rates. Users should
consult Ransburg technical support group to
determine which pumps are required for their
specic application. (Refer to "Appendix B" for a
list of currently available pump sizes.)
The Mix-Block is a three-port manifold that brings
the uid from the outlet of the resin pump together
with the outlet of the catalyst pump. The block
houses a check valve in the catalyst stream to
prevent resin from backing up into the catalyst
ow stream. Attached to the bottom of the MixBlock is a solvent ush valve for quick ushing of
only the mixed material from the Mix-Block out to
the applicator.
Attached to the outlet of the Mix-Block is the spiral
mix tube. This is simply a piece of tubing with a
helical-shaped element inside the tube. This element causes the two materials (resin and catalyst)
to be "folded" together numerous times as the
materials pass through it, thus causing it to mix.
The optional CCV style color valve stack allows
users to do color changes on the resin side of up
to 10 colors.
9
LN-9407-00.2

Ransburg
RCS-2 User Manual - Introduction
The solvent manifold supplies solvent for ushing
as well as lling of the magnetic coupling chamber.
The pump bypass valve is mounted on the resin
pump and allows the uid passing into the inlet
of the resin pump to bypass the gears and go
directly to the outlet port. This can decrease ush
and load times.
NOTE
> This valve should not be used while
loading 2k materials as improper ratios
will result.
CHANNELS AND GUNS
The RCS-2 control system achieves closed-loop
control of its uids via its congured channels and
guns. A channel consists of one pump, one motor,
one motor amplier, two pressure transducers,
and one half of a channel card.
A gun, in most cases, represents one applicator
and may be congured with one channel (for ow
control only) or congured with two channels (for
ratio and ow control).
Each channel operates independently of and
simultaneously with all of the other channels in
the system. The controller, therefore, provides
accurate dynamic ow control for all channels.
CONTROL RACK
INTEGRATION
The control rack has been designed to be consistent with other Ransburg products to allow
integration of the RCS-2 control rack in larger
control consoles. These consoles may house
rotary atomizer speed control, shaping and fan
air control, high voltage setpoints, etc.
CONFIGURABLE
OPERATING
PARAMETERS
The design of the system allows it to be congured
to meet the requirements of the application. The
large number of parameters allows the system to
be used in almost any application involving ow
and/or ratio control of uids.
System Parameters are parameters that affect
the overall system, which includes all channels
and guns or the user interface. They include:
• Over Pressure Limit
• Foldback Pressure
• Pressure Sensor Limit
• Horn Enable/Disable
• Password
• Password Timeout
• Controller I/P Address
• Interface Card Name
• Software and Firmware Version Information
• User Program IP Port
• System Time
• System Date
Gun Parameters are parameters that affect the
gun. These parameters apply to all channels
congured to that gun. They include:
• Mode (manual or automatic)
• Number of channels congured to gun
• Master Channel Number
• Slave Channel Number
• Number of Applicators
• Default Job Number
• Mixed Volume
• Flow/Ratio Tolerance
• Tolerance Volume
• Alarm Tolerance Time
• Solvent Flow Meter Calibration Factor
• Horn Code
• Auto Reset Enable/Disable
LN-9407-00.2
10

RCS-2 User Manual - Introduction
Ransburg
Channel Parameters are parameters that affect
only that specic channel. For two channel guns,
there are independent parameters for each of the
two channels. They include:
• Fill Enable/Disable
• Trigger On-Delay Time
• Trigger Off-Delay Time
• Pump Size
• Pump Pulses Per Liter
• Maximum Pump Speed
• Miniumum Pump Speed
• Maximum Inlet Pressure
• Minimum Inlet Pressure
• Maximum Outlet Pressure
• Minimum Outlet Pressure
• Inlet Pressure Sensor Enable/Disable
• Foldback Kp
• Foldback Ki
• Foldback Kd
• Foldback Deadband
• Feather Kp
• Feather Ki
• Feather Kd
• Feather Deadband
Job Parameters are parameters that are stored
with the specic job number. Typically, a job
number is assigned to a specic material. In this
way, totalization data and PID parameters relate
directly to the material. These parameters include:
• Ratio
• Flow Setpoint
• Maximum Flow (for analog control)
• Minimum Flow (for analog control)
• Bar-Graph Limit
• Pot-Life Time
• Feather Pressure
• Fill Volume
• Pressure Pot Capacity
• Pressure Differential (across the pump)
• Minimum Pressure
• Inlet Presure Control PID Parameters
• Hardener Sample Time
• Hardener No Flow Setpoint
• Hardener Flow On Point
Alarm Conguration Parameters allow the
user to specify what conditions cause a "spray
shutdown" to occur. They include:
• Input Under Pressure
• Input Over Pressure
• Output Under Pressure
• Output Over Pressure
• Flow Rate Out of Tolerance
• Hardener Flow Loss
• Pressure Pot Empty
• Inlet Pressure Loss
• Analog Remote Loss
• Ratio Out of Tolerance
• Motor Amp Fault *
• Analog Feather Loss
• Analog Spare Loss
• Foldback Pressure Reached
• Pot Life Expired
• System Over Pressure *
• Channel Card Parameter Fault *
• Channel Card SPI Fault *
NOTE
> Items marked with an asterisk (*) can-
not be disabled
11
LN-9407-00.2
Ransburg
BLOCK DIAGRAMS
RCS-2 User Manual - Introduction
Figure 1: Control Console Block Diagram
LN-9407-00.2
Figure 2: Motor Amplier Panel Block Diagram
12
RCS-2 User Manual - Introduction
Ransburg
13
Figure 3: Fluid Panel Schematic
LN-9407-00.2

Ransburg
INSTALLATION
RCS-2 User Manual - Installation
SYSTEM GUIDELINES
Customized Prints
Drawings and information contained in this section
of the manual is applicable to most installations.
However, in many cases, will supply custom
installation drawings for your specic site. It is
highly recommended that if your installation differs
signicantly from the installation drawings supplied
by, you notify your representative to ensure that
standard installation practices are not violated and
to have your prints updated to reect the installation
accurately for future reference.
Cable Assemblies
Interconnections between all control panels and
the uid panels are made using custom manufactured cable assemblies with military style connec-
tors. This simplies installation and eliminates the
possibility of items being wired incorrectly. The
one exception to this is the discrete interface I/O
wiring. These connections will vary greatly from
installation to installation. This can involve well
over 100 connections per control console and,
therefore, require that conduit be run to the control
console and multiple cables or wires pulled from
the control console to the controlling medium
(PLC, robot, etc.).
There are four basic panels used in the RCS-2
system:
• Main Control Console
• Motor Amplier Panel
• Fluid Panel
• Remote Operator’s Panel
The motor amplier panels must be placed within
100-feet of the control console, the uid panels
must be placed within 10-feet of their respective
motor amplier panel, and the remote operator’s
panel must be placed within 25-feet of its respective
motor amplier panel. If longer distances than
this are necessary, contact your representative.
Fluid Regulators
It is highly recommended that a pilot operated
uid regulator (similar to the DR-1 regulator) be
used on the inlet of all of the gear pumps. The
accuracy of the pumps depends to a high degree
on controlling the differential pressure across the
pump. The system includes pressure transducers
in the motor amplier panels to pilot these uid
regulators. In this way, the software has full con-
trol of uid inlet pressure of the pumps and can,
therefore, control the differential pressure across
each pump. By using this feature, the extremely
accurate ow rates and ratios can be maintained,
without the need to calibrate the pumps.
Equipment Grounding
All panels should be grounded in accordance with
either the National Electrical Code or local electrical codes (whichever is more stringent). Refer to
the electrical installation drawings provided by to
locate the grounding terminal for all control panels.
Equipment Locations
All of the panels must be located outside of the
hazardous area with the exception of the intrinsically safe version of the Remote Operator’s Panel
(and in some cases the uid panel). If in doubt,
refer to local codes and ordinances, or contact
your representative for clarication.
LN-9407-00.2
Intrinsic Safety
The motor amplier panels can be ordered with
optional zener barriers that make the uid panels
and the remote operator panels intrinsically safe
for operation inside hazardous areas. An optional
explosion-proof catalyst ow sensor and motors
are also available. They must be hard-piped if
used in hazardous areas.
14
RCS-2 User Manual - Installation
DIMENSIONAL INFORMATION
Ransburg
Figure 4: Stand-Alone Unit
15
Figure 5: Motor Amplier Panel
LN-9407-00.2
Ransburg
RCS-2 User Manual - Installation
LN-9407-00.2
Figure 6: Control Panel Assembly
16
RCS-2 User Manual - Installation
Ransburg
Figure 7: Fluid Panel Assembly
INPUT POWER
Input power supply connections should be made
from a fused disconnect. With the exception of
the stand alone, cart mounted RCS-2; conduit
should be used for bringing the input power into
the control panel and motor amplier panels. In
the case of the stand alone unit, SO cord will be
provided with standard AC grounded plugs.
Both the control panel and the motor amplier
panels operate from 120 VAC at 60 Hz with a
maximum current draw of 10 amps (for each
panel). The uid panels get their power from the
motor amplier panel and, therefore, require no
power connections.
If there is the possibility of AC line voltage uctuations of greater than ±10% of the line voltage, a
constant voltage transformer (CVT) should be used
between the fused disconnect and the control panel
and motor amplier panels. (These uctuations
are commonly seen when heavy electric machinery or welding equipment is being used nearby.)
Figure 8: Control Panel Input Power
Refer to Figures 8 and 9 to determine proper AC
power and ground connections to the control panel
and the motor amplier panels.
17
Figure 9: Motor Amplier Panel Input Power
LN-9407-00.2
Ransburg
RCS-2 User Manual - Installation
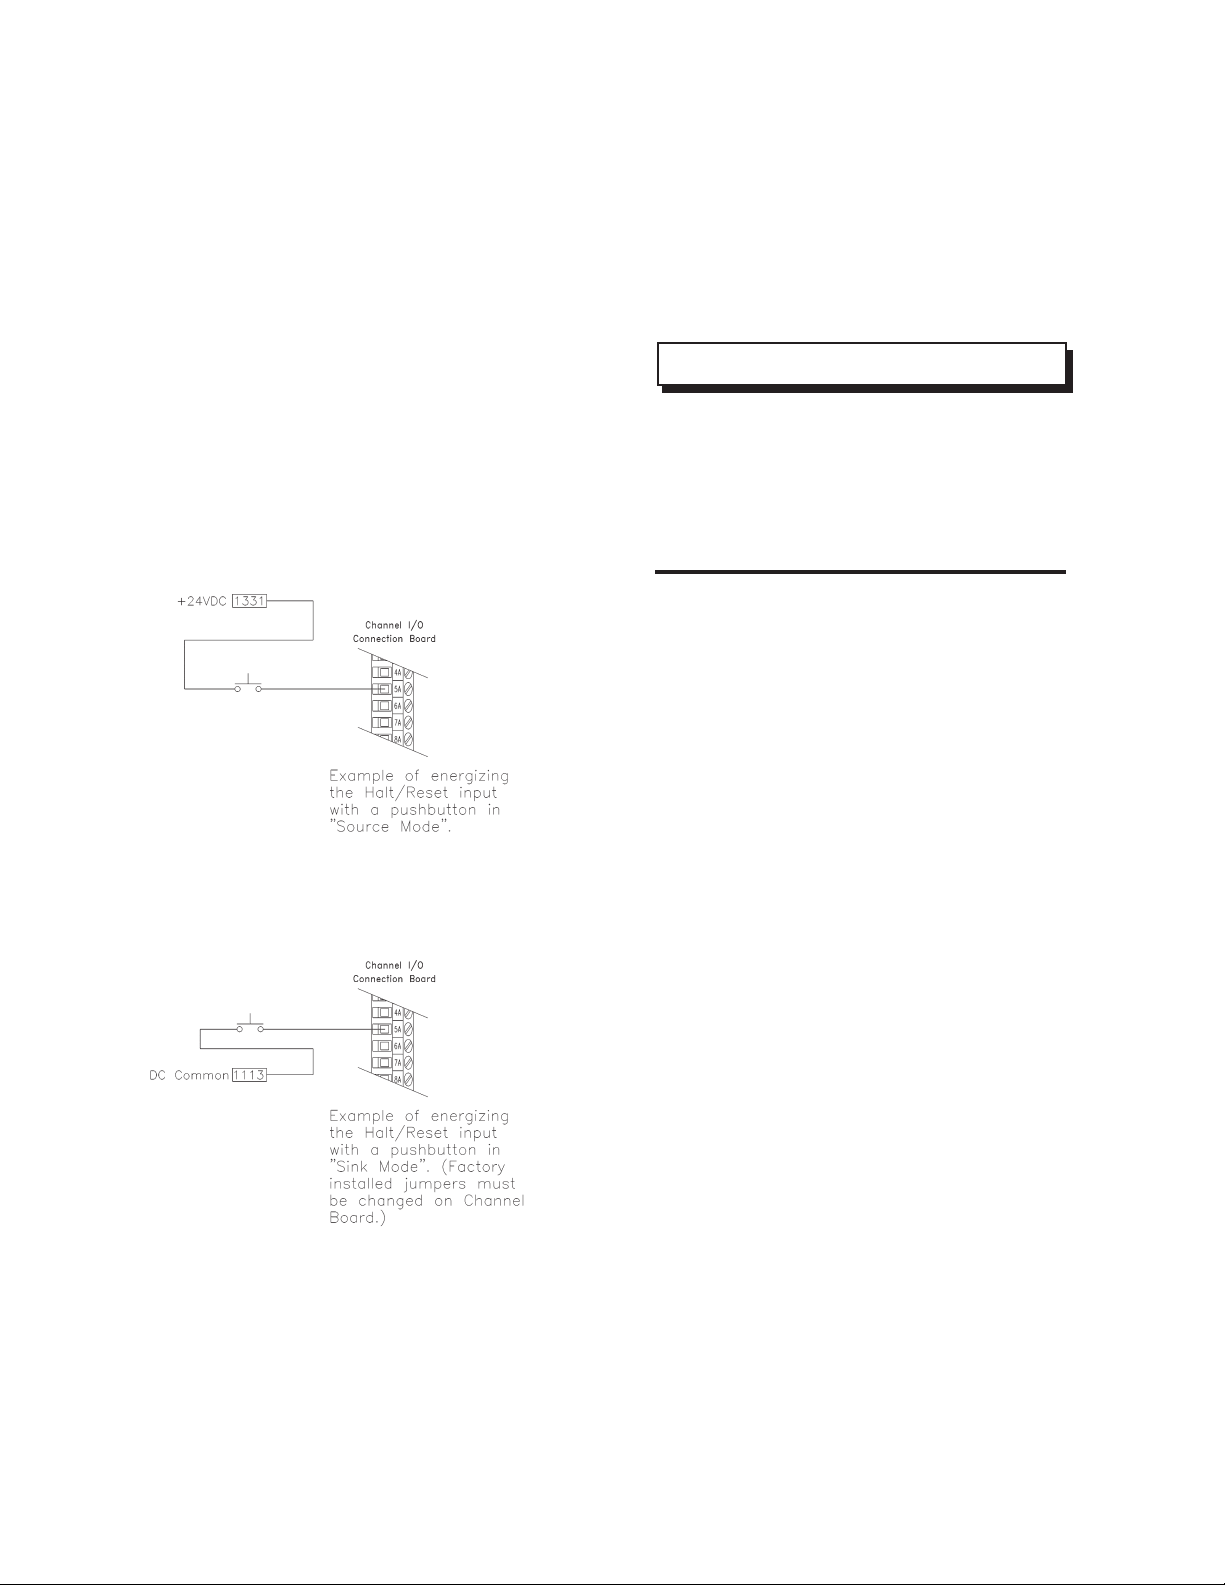
DISCRETE CHANNEL AND
GUN INPUTS
All discrete digital inputs are optically isolated and
will function with an input voltage in the range of
10 VDC to 45 VDC. Factory jumper settings on
the interface and channel boards require that
voltage be sourced to the discrete input. If, however, a sinking input is required, inputs can be
recongured by changing those jumpers. (See
Appendix C for Channel Board Jumper Settings.)
It is recommended that the 24 VDC power supply
in the controller be used to source these inputs
(terminal #1331). Optionally, if an external supply
If the gun is congured as a single channel gun
and this signal is pulsed, the gun will be put in
fast ll mode. This will cause the pump to run at
its maximum rate (150 RPM) until the halt signal
is pulsed. (It is not necessary to have the trigger
signal energized.)
NOTE
> Times stated above are for discrete
digital inputs only. When interfacing using Bradley's Remot I/O (aka RIO), these
times may vary signicantly. (Refer to the
RCS-2 RIO Interface Programmer's Manual for more details.)
pulsed signals to a gun should also be separated
by 250 milliseconds. For example, don't turn the
halt/reset signal off at the same time that the run
signal is being turned on as results will be unpredictable. Maintained signals operate as long as
the input remains energized.
Figure 10: Gun I-O Sourcing-Sinking
is used as the source for these inputs, it must be
referenced to the ground terminal (terminal #1113).
There are two types of discrete digital inputs,
pulsed inputs and maintained inputs. The pulsed
inputs must be turned on and held on for 250 milliseconds minimum, to insure operation. Multiple
Some discrete digital inputs are specic to a gun
and others are specic for a channel. If it is a gun
input and the gun is congured as a two channel
gun, eld wiring must always be connected to the
master channel terminals (channel A).
Fast Fill
Type of Input: Gun
Type of Signal: Pulsed
The gun must be in run mode prior to initiating
this mode or the RCS-2 controller will ignore it.
If the gun is congured at a two-channel gun, and
this input is pulsed, the gun will be placed in fast
ll mode. The pumps will run at the maximum
speed possible while maintaining the target ratio.
That is, the software will determine which of the
two pumps can be run at its maximum speed (150
RPM) and run the opposite channel at whatever
speed is necessary to ensure the proper ratio
of component A to component B. The software
LN-9407-00.2
18

RCS-2 User Manual - Installation
Ransburg
determines this based on the programmed pump
sizes and the programmed ratio. Pulsing the halt/
reset input takes the gun out of the fast ll mode.
Channel Fill
Type of Input: Channel
Type of Signal: Pulsed
A gun must be in the ready state to use this mode.
This mode functions the same for single channel
guns as it does for dual channel guns.
When this input is pulsed, the pump for that channel
is run at its maximum rate (150 RPM) until the halt
signal is pulsed. It is not necessary for the trigger
input to be energized. If it is desired to have both
channels of a two channel gun run at full speed
(for ushing, etc.) this input must be pulsed on
both channels. The halt signal for the specic
channel that is channel lling must be pulsed. For
example: if both channels are channel lling, both
halt signals must be pulsed to stop them.
Feather Set
Type of Input: Gun
Type of Signal: Pulsed
If the gun is congured as a manual mode gun and
the value zero (0) is programmed in for feather
pressure (under the CONFIG JOB parameters)
this input can be used to program the feather
pressure "on the y". That is, if a handsprayer is
painting and this input is momentarily energized,
the RCS-2 controller takes a snapshot of the outbound pressure of the pumps (or the pressure at
the optional feather pressure sensor, if it is being
used) and then starts controlling the speed of the
pumps to maintain that pressure. The optional
Remote Operator’s Panel has a pushbutton on
it that allows the handsprayer to utilize this fea-
ture. (Refer to "Appendix H" for more details on
feathering.)
Run
Type of Input: Gun
Type of Signal: Pulsed
This signal takes a congured gun from the ready
state to the "run" mode. In order for a gun to spray,
it must rst be put into run mode. It is essentially
a way of enabling a gun. Energizing the trigger
input of a gun will not cause uid to ow unless
the gun has rst been placed in run mode.
Halt/Fault Reset
Type of Input: Gun
Type of Signal: Pulsed
This input takes a congured gun that is in run
mode to the ready state, essentially disabling the
gun from spraying. It also resets a fault for the
gun if it is in the faulted state.
Trigger 1
Type of Input: Gun
Type of Signal: Maintained
This input tells the controller to run the pumps if and
only if the gun has rst been placed in run mode.
Motor Amp Enable
Type of Input: Channel
Type of Signal: Maintained
This is an input to the controller from the motor
amplier indicating that the motor amplier has
been enabled by the channel card and that there
are no problems.
Triggers 2, 3, and 4
Type of Input: Gun
Type of Signal: Maintained
These signals are additional trigger input signals.
They would be used in cases where the output of
a uid panel was split between multiple applicators. They work in conjunction with the trigger 1
input to allow up to 4 independent triggers, one
for each of 4 applicators. The software can be
congured in such a way that if one of these inputs
is on, the uid panel delivers the target ow rate
of material. If a second input is turned on, then
the uid panel will deliver twice the target ow
rate. If a third input is energized, three times the
target ow is delivered and if all four inputs are
energized, the uid panel will deliver four times the
target ow rate. It is assumed that each of these
inputs are also connected to the trigger inputs on
four independent applicators.
19
LN-9407-00.2

Ransburg
RCS-2 User Manual - Installation
Volume Fill
Type of input: Gun
Type of signal: Pulsed
By pulsing the volume ll discrete input, the unit
will be put into the V. FILL mode. (The gun must
be in the ready state prior to this.) When the
gun trigger input goes high, the pumps will run
at the programmed ow rate and ratio until the
volume programmed in for Fill Volume (on the
Job parameters screen) is dispensed. If more
than one gun trigger inputs goes high (triggers 2,
3, or 4) the unit will multiply the ow rate by the
number of high inputs but still only run until the
programmed volume is dispensed. When that
volume is reached, the gun will be halted and
returned to the ready state.
Volume Fill with Fast Fill Mode
It is possible to volume ll and fast ll simultaneously. If the gun is put into volume ll mode, and
then the fast ll input is pulsed, the unit will run in
fast ll mode until the volume programmed in for
ll volume is dispensed. At that time, the gun will
be halted and returned to the ready state. This
happens regardless of the condition of the gun
trigger inputs.
to a dry contact relay with allowable current limited
to 1 amp 45 volts, AC or DC (exceeding this limit
may damage the output on the channel card).
Although a myriad of voltages could be used, it
is recommended that the Hi signal be connected
to the +24 VDC terminal (terminal #1331) and the
output be taken from the Lo output terminal. This
terminal will supply 24 VDC when the output is
energized by the software. (Referenced ground
terminal is #1113.)
An alternate way of connecting these outputs
would be to connect the positive supply voltage to
the load, the common of the load to the Hi output
terminal of the RCS-2 output, and connect the Lo
output terminal to both the ground of the supply
connected to the load and the ground terminal
(terminal #1113). Once again, current must be
limited to 1 amp and should never exceed 40 volts.
Push Out
Type of Input: Gun
Type of signal: Pulsed
This feature allows a customer that uses dual purge
applicators to use two resin pumps that share a
common catalyst pump and pushout the resin with
solvent on one side of the dual purge applicator
while loading the other side of the applicator with
the next material to be sprayed. For additional
details on how to implement this feature, refer to"
Appendix L".
DISCRETE CHANNEL AND
GUN OUTPUTS
All discrete outputs have two terminals, one labeled
Hi and one labeled Lo. They operate very similar
Figure 11: Sourcing-Sinking Outputs
LN-9407-00.2
20

RCS-2 User Manual - Installation
Ransburg
Fault
This output is energized anytime a fault condition
is recognized by the software. Even if the fault
is disabled (turned off) on the Congured Alarms
screen, this output will be energized as long as
the condition persists. Fluid ow will not be halted
when this output is energized unless it is con-gured to do so on the Congured Alarms screen.
Ready
This output is energized if the gun is congured
properly, a good job number has been loaded,
and the gun has been placed in run mode. This
output goes off if a fault occurs.
Spray Shutdown
This output is energized if a fault condition exists
and the specic fault that exists is enabled on
the Congured Alarms screen (turned on). This
indicates that the ow of uid from the uid panel
has been stopped as the result of a detected fault
condition.
Flush Request
This output is energized when the pot-life timer
has expired from the mixed material. (For more
information, see "Mixed Volume and Pot-Life
Timer" in the "Operation" section.)
Motor On
This output is energized by the software when it
wants to control the motor. It is connected to the
input of the motor amplier that causes the motor
to be controlled. Do not connect external devices
to this terminal.
Motor Amp Reset
This output is energized by the software when it
is necessary to reset a faulted motor amplier.
Typically, by pushing the Clear Faults button on
the front panel or by pulsing the Halt/Reset digital
input, this output will be energized momentarily
to reset the amplier. Do not connect external
devices to this terminal.
ANALOG INPUTS
Analog inputs are jumper selectable to be 0 to 10
VDC or 4-20 mA with the exception of the hardener
ow sensor which is xed at 4-20 mA.
Hardener Flow
Type of Input: Channel
Type of Signal: Fixed at 4-20 mA
Factory Setting: Not applicable
This is a 4-20 mA input that is normally connect-
ed to the output of a thermal shedding type ow
sensor placed in the catalyst uid stream. Since
the feedback from the motor tachometer can only
indicate that the motor is turning and not that uid
is actually owing, this optional sensor is added to
prevent spraying uid without any catalyst.
Flow Rate
Type of input: Gun
Type of signal: Jumper Selectable
Factory Setting: 0-10 VDC
This input is used if it is desired to have the ability to
vary the ow rate as the unit is spraying. Minimum
and maximum ow rates are programmed and an
external device (robot, PLC, potentiometer, etc.)
controls the actual ow rate by varying the input
between 0 and 10 volts or 4 and 20 milliamps.
(See "Minimum Flow and Maximum Flow in the
"Operation" section.)
Feather Pressure
Type of Input: Gun
Type of Signal: Jumper Selectable
Factory Setting: 4-20 mA
This input allows an optional pressure sensor to
be placed near the spraygun. Handgun operators
can use this to program a set feather pressure
at the inlet of the spraygun and the RCS-2 will
maintain that pressure while spraying.
21
LN-9407-00.2

Ransburg
RCS-2 User Manual - Installation
Pump Inlet Pressure
Type of Input: Channel
Type of Signal: Jumper Selectable
Factory Setting: 4-20 mA
This input is typically connected to a pressure
sensor located near the input of the pump. When
used in conjunction with a pilot operated uid
regulator on the inlet of the pump, it minimizes
the differential pressure across the pump, thereby
increasing the accuracy of the pump.
Pump Outlet Pressure
Type of Input: Channel
Type of Signal: Jumper Selectable
Factory Setting: 4-20 mA
This input is typically connected to a pressure
sensor located near the output of the pump. This
is used to monitor and control the differential
pressure across the pump, thereby increasing
the accuracy of the pump.
This outlet pressure is also used as the feather
pressure for manual spray guns if an optional
feather pressure sensor is not used.
ANALOG OUTPUTS
Most of the analog outputs are jumper selectable
to be 0 to 10 VDC or 4-20 mA. Actual Flow, how-
ever, is xed at 0-10 VDC.
Motor Speed
Type of Output: Channel
Type of Signal: Jumper Selectable
Factory Setting: 0-10 VDC
This output is connected to the analog input on
the servo motor controller located in the motor
amplier panel. A 0 VDC signal tells the servo
controller to run at 0 RPM, a 10 VDC signal tells
it to run at the programmed maximum RPM for
that pump.
Pressure Control
Type of Output: Channel
Type of Signal: Jumper Selectable
Factory Setting: 0-10 VDC
This output is normally connected a voltage to
pressure transducer which converts a 0 to 10
VDC signal to a 0 to100 psi air pressure. The
pressure is then used to control the pilot port on
a uid regulator. This uid regulator is then used
to control the uid inlet pressure of the pump.
Actual Flow
Type of Output: Gun
Type of Signal: 0-10 VDC
This output is 0 to 10 VDC output that is propor-
tional to the actual ow of material coming out
of the applicator. 0 VDC means no ow and 10
VDC indicates 2000 cc/min. (Therefore, 3.40 VDC
would indicate 680 cc/min.)
FREQUENCY INPUTS
All frequency inputs are optically isolated and
expect a maximum amplitude square wave of
24 VDC and a maximum frequency of 1.5 KHz.
Both sides of the optical isolators are accessible,
allowing the RCS-2 to sink or source any of the
frequency signals.
Motor Feedback
Type of Output: Channel
Type of Signal: Frequency
This signal is a square wave output from the servo
motor controller, indicating the actual speed of the
motor that is driving the pump. It is used by the
rmware to determine the current ow rate of the
material out of the pump. (It can alternately be
connected to the output of a ow meter placed in
the uid stream.)
Solvent Flowmeter
Type of Output: Gun
Type of Signal: Frequency
This input allows users to connect a owmeter
in the solvent supply line and collect totalization
data on solvent usage.
LN-9407-00.2
22

RCS-2 User Manual - Installation
Ransburg
SYSTEM INPUTS &
OUTPUTS
All discrete system inputs and outputs can be
congured to either sink or source current. All
system inputs connect to the system via the inter-
face board. Refer to " Appendix D" to congure
the jumpers on the interface board for the discrete
system inputs.
To source (current or voltage) from the system
outputs, simply connect the positive terminal of the
desired output to the positive terminal of a power
supply (10 VDC to 40 VDC) and the negative
terminal of the desired output to the positive input
of the device. The negative input to the device
must be grounded to the aforementioned power
supply. To sink current on the interface board,
simply connect the negative output terminal of
the desired output to ground, the positive output
terminal to the negative input to the device, and
the positive input to the device to the positive
terminal of the appropriate power supply.
System Inputs
Gun Strobe
Type of Input: Gun
Type of Signal: Pulsed
This input signal is used in coordination with the
Job Number inputs (see below). When this input
is taken from the non-energized state to the energized state for any gun, the Job Number that
is appearing at the Job Number inputs is loaded
into the job queue. If the gun is in the halted,
ready, or faulted state, the new job becomes
active immediately. If the gun is in a run state,
the new job number is held in the queue until the
next time the gun is halted (or faults). Note that
the job queue is only one in length. If another job
is loaded on top of one already in the queue, the
new one overwrites the older one in the queue.
Job Number (1, 2, 4, 8, 10, 20, 40, 80, 100)
Type of Input: System
Type of Signal: Maintained
These inputs are simple BCD (binary coded decimal) inputs that represent the job number that
an external controller energizes to load new job
numbers into the RCS-2 guns. Note that these
inputs are common to all guns and they are ignored until one or more of the Gun Strobe inputs
is energized. Allowable job number range from
1 to 199.
23
System Outputs
System Fault
Type of Output: System
Type of Signal: Maintained
This output is normally connected to the horn in
the top of the control console. It can be energized
anytime there is a system fault. (It can be enabled
and disabled on the CONFIG SYSTEM screen.)
Some examples of system faults are problems
with the disk drive, hard drive, or CDROM of the
user-interface PC. Also, certain problems with
the interface board or RIO board (if used) may
cause a system fault.
This output can also be programmed to energize
when any of the guns fault. This is done on the
CONFIG GUN screens. Each gun can be con-
gured to cause the horn to sound when it faults
Figure 12: System I-O Sourcing-Sinking
LN-9407-00.2

Ransburg
RCS-2 User Manual - Installation
independent of each other. Note that the horn must
be enabled on the CONFIG SYSTEM screen or
the horn will not sound for gun faults regardless
of whether or not they are congured to do so on
the CONFIG GUN screens.
System Pulse
Type of Output: System
Type of Signal: Pulsing
This output pulses at approximately a 0.5 hertz rate
as long as the processor on the interface board
does not detect any on-board rmware problems.
Users may wish to use this signal to detect when
the RCS-2 controller is powered up and running.
System User Link
Type of Output: System
Type of Signal: Maintained
This output is energized as long as the Ethernet
link between the user interface PC and the interface card is functioning.
NOTES
LN-9407-00.2
24

RCS-2 User Manual - Installation
TABLE 1 - ODD NUMBER CHANNEL CONNECTIONS
Terminal
Signal Name
Fast Fill
Channel Fill
Feather Set
Run
Halt/Fault Reset
Trigger
Motor Amp Enable
Trigger 2
Trigger 3
Trigger 4
Volume Fill
Push Out
Fault Output (hi)
Fault Output (low)
Ready Output (hi)
Ready Output (low)
Spray Shutdown (hi)
Spray Shutdown (low)
Flush Request (hi)
Flush Request (low)
Motor On (hi)
Motor On (low)
Motor Amp Reset (hi)
Motor Amp Reset (low)
Digital Ground
+24 VDC
Flow Rate Command
Feather Pressure
Pump Inlet Pressure
Pump Outlet Pressure
Spare Analog Input
Motor Speed
Pressure Control
Actual Flow
Analog Ground
Motor Feedback (A+)
Motor Feedback (A-)
Label
1A
2A
3A
4A
5A
6A
7A
8A
9A
10A
11A
12A
13A
14A
15A
16A
17A
18A
19A
20A
21A
22A
23A
24A
D.G.
+24
31A
32A
33A
34A
35A
36A
37A
38A
A.G.
41A
42A
Channel
A
A
A
A
A
A
A
A
A
A
A
A
A
A
A
A
A
A
A
A
A
A
A
A
A or B
A or B
A
A
A
A
A
A
A
A
A
A
A
Input or
Output
Input
Input
Input
Input
Input
Input
Input
Input
Input
Input
Input
Input
Output
Output
Output
Output
Output
Output
Output
Output
Output
Output
Output
Output
N/A
N/A
Input
Input
Input
Input
Input
Output
Output
Output
---Input
Input
Channel #1
Wire No. *
2021
2023
2031
2033
2041
2043
2051
2053
2061
2063
2071
2073
2081
2083
2091
2093
2101
2103
2111
2113
2121
2123
2131
2133
1113
1331
2203
2211
2213
2221
2223
2231
2233
2241
---2801
2803
Channel #3
Wire No. *
2521
2523
2531
2533
2541
2543
2551
2553
2561
2563
2571
2573
2581
2583
2591
2593
2601
2603
2611
2613
2621
2623
2631
2633
1113
1331
2703
2711
2713
2721
2723
2731
2733
2741
---2801
2803
Channel #5
Wire No. *
3021
3023
3031
3033
3041
3043
3051
3053
3061
3063
3071
3073
3081
3083
3091
3093
3101
3103
3111
3113
3121
3123
3131
3133
1113
1331
3203
3211
3213
3221
3223
3231
3233
3241
---3301
3303
Ransburg
Channel #7
Wire No. *
3521
3523
3531
3533
3541
3543
3551
3553
3561
3563
3571
3573
3581
3583
3591
3593
3601
3603
3611
3613
3621
3623
3631
3633
1113
1331
3703
3711
3713
3721
3723
3731
3733
3741
---3801
3803
* Reference Drawing Number A10479
** Refer to "Appendix E" for Termination Board Drawing.
25
LN-9407-00.2

Ransburg
Signal Name
Fast Fill
Channel Fill
Feather Set
Halt/Fault Reset
Trigger 1
Motor Amp Enable
Trigger 2
Trigger 3
Trigger 4
Volume Fill
Push Out
Fault Output (hi)
Fault Output (low)
Ready Output (hi)
Ready Output (low)
Spray Shutdown (hi)
Spray Shutdown (low)
Flush Request (hi)
Flush Request (low)
Motor On (hi)
Motor On (low)
Motor Amp Reset (hi)
Motor Amp Reset (low)
Digital Ground
+24 VDC
Hardner Flow
Flow Rate Command
Feather Pressure
Pump Inlet Pressure
Pump Outlet Pressure
Spare Analog Input
Motor Speed
Pressure Control
Actual Flow
Analog Ground
Motor Feedback (B+)
Motor Feedback (B-)
Solvent (B+)
Solvent (B-)
Run
RCS-2 User Manual - Installation
TABLE 2 - EVEN NUMBER CANNEL CONNECTIONS
Terminal
Label
1B
2B
3B
4B
5B
6B
7B
8B
9B
10B
11B
12B
13B
14B
15B
16B
17B
18B
19B
20B
21B
22B
23B
24B
D.G.
+24
30B
31B
32B
33B
34B
35B
36B
37B
38B
A.G.
41B
42B
43B
44B
Channel
B
B
B
B
B
B
B
B
B
B
B
B
B
B
B
B
B
B
B
B
B
B
B
B
A or B
A or B
B
B
B
B
B
B
B
B
B
B
B
B
N/A
N/A
Input or
Output
Input
Input
Input
Input
Input
Input
Input
Input
Input
Input
Input
Input
Output
Output
Output
Output
Output
Output
Output
Output
Output
Output
Output
Output
N/A
N/A
Input
Input
Input
Input
Input
Input
Output
Output
Output
---Input
Input
Input
Input
Channel #2
Wire No. *
2022
2024
2032
2034
2042
2044
2052
2054
2062
2064
2072
2074
2082
2084
2092
2094
2102
2104
2112
2114
2122
2124
2132
2134
1113
1331
2202
2204
2212
2214
2222
2224
2232
2234
2242
---2302
2304
2911
2312
Channel #4
Wire No. *
2522
2524
2532
2534
2542
2544
2552
2554
2562
2564
2572
2574
2582
2584
2592
2594
2602
2604
2612
2614
2622
2624
2632
2634
1113
1331
2702
2704
2712
2714
2722
2724
2732
2734
2742
---2802
2804
2811
2812
Channel #6
Wire No. *
3022
3024
3032
3034
3142
3044
3052
3054
3062
3064
3072
3074
3082
3084
3092
3094
3102
3104
3112
3114
3122
3124
3132
3134
1113
1331
3202
3204
3212
3214
3222
3224
3232
3234
3242
---3302
3304
3311
3312
Channel #8
Wire No. *
3522
3524
3532
3534
3542
3544
3552
3554
3562
3564
3572
3574
3582
3584
3592
3594
3602
3604
3612
3614
3622
3624
3632
3634
1113
1331
3702
3704
3712
3714
3722
3724
3732
3734
3742
---3802
3804
3811
3812
* Reference Drawing Number A10479
** Refer to "Appendix E" for Termination Board Drawing.
LN-9407-00.2
26

RCS-2 User Manual - Installation
TABLE 3 - SYSTEM I/O CONNECTIONS
Terminal
System Signals
Strobe, Gun 1
Strobe, Gun 2
Strobe, Gun 3
Strobe, Gun 4
Strobe, Gun 5
Strobe, Gun 6
Strobe, Gun 7
Strobe, Gun 8
Label
CN4012-1
CN4012-3
CN4012-5
CN4012-7
CN4012-2
CN4012-4
CN4012-6
CN4012-8
Channel
S
S
S
S
S
S
S
S
Input or
Output
Input
Input
Input
Input
Input
Input
Input
Input
Ransburg
System
Wire No. *
4021
4031
4041
4051
4023
4033
4043
4053
System Fault (Hi)
System Fault (Low)
System Pulse (Hi)
System Pulse (Low)
System User Link (Hi)
System User Link (Low)
Job Number 1
Job Number 2
Job Number 4
Job Number 8
Job Number 10
Job Number 20
Job Number 40
Job Number 80
Job Number 100
Spare System Input
Spare System Input
Spare System Input
CN4012-13
CN4012-14
CN4012-15
CN4012-16
CN4012-17
CN4012-18
CN4012-25
CN4012-27
CN4012-29
CN4012-31
CN4012-33
CN4012-35
CN4012-26
CN4012-28
CN4012-30
CN4012-32
CN4012-34
CN4012-36
S
S
S
S
S
S
S
S
S
S
S
S
S
S
S
S
S
S
Output
Output
Output
Output
Output
Output
Input
Input
Input
Input
Input
Input
Input
Input
Input
Input
Input
Input
* Reference Drawing Number A10479
** Refer to "Appendix F" for Termination Board Drawing.
4081
4083
4091
4093
4101
4103
4141
4151
4161
4171
4181
4191
4143
4153
4163
4173
4183
4193
27
LN-9407-00.2

Ransburg
OPERATION
RCS-2 User Manual - Operation
SETUP AND OPERATION
The operator interface was designed to be user
friendly and to supply all of the necessary information for the operation of the RCS-2 control
directly to the operator. Most information located
in the manual regarding the operation of the
RCS-2 system is available directly through the
operator interface screens. All of the screens offer
"‘on-line" descriptive information and help text.
Graphic information is also displayed for a quick
determination of system performance.
Power ON
When power is rst applied to the RCS-2 system,
the interface card and any installed channel cards
located in the card rack immediately perform initialization and place all GUNs in the ready state
assuming valid congurations and successful
self tests. The interface card will determine which
channel cards are installed and that the installed
cards are communicating properly. The PC, upon
application of power, will load the Windows Embedded XP operating system and then display a
RCS-2 icon. Double tapping the icon will start the
user-interface software.
Power OFF
It is very important that the power to the main control
console not be shut off until a Windows shutdown
is performed (using the F12 function key). The
LCD display will indicate to the user when it is
okay to turn the power off to the controller.
E-Stop Button
The E-Stop button on the RCS-2 controller does not
completely remove power from the RCS-2 control
console. When this button is pushed, the 24 volt
supply to the control card rack is disconnected.
Therefore, all control power is removed from the
system and all uid ow will be stopped. (The motor
amplier panels will loose all power as there is a
24 VDC control relay in them powered from the
E-Stop button in the control console.) This is the
button that should be used to remove power from
the card rack when adding, removing, or changing
interface and channel cards. This avoids the long
wait times involved when Windows goes through
its shutdown and startup sequences.
BUTTON FUNCTIONS
F1–F12 Soft Buttons
F1 through F12 are known as soft buttons. The
function of these keys will change depending on
which user-interface screen is active on the LCD
display. The function for each button is shown
inside the button.
ESC
This button is used to exit any active screen or
pop-up box.
GUN 1 - GUN 8 ON/OFF
These buttons allow manual activation and deactivation of each GUN. Pressing a GUN ON/OFF
button is the same as supplying an external GUN
RUN or GUN HALT input signal. These buttons
also display the status of each gun. (READY,
RUN, HALTED, FAULT, A FILL, B FILL, AB FILL,
CHAN FILL, FLUSH REQ, FAST FILL, VOLUME
FILL, OR HALTED.)
FAST FILL
The FAST FILL button causes a pop-up box to
appear on the current screen. Any GUN can be
manually placed in FAST FILL MODE by simply
pressing the number for the desired GUN. The
FAST FILL MODE is deactivated by pressing the
GUN number again or pushing the ESC button.
This is the same as supplying an external FAST
FILL input signals. (See "Discrete Inputs - Fast
Fill" in the "Installation" section for details on the
fast ll mode.)
Note that the pumps will start running the instant
the gun number is pushed.
LN-9407-00.2
28

RCS-2 User Manual - Operation
Ransburg
CHANNEL FILL
The CHANNEL FILL button causes a pop-up box
to appear on the current screen. Any CHANNEL
can be manually placed in CHANNEL FILL MODE
by simply pressing the number for the desired
CHANNEL. The mode is deactivated by pressing
the CHANNEL number again or by pushing the
ESC button. This is the same as supplying an external CHANNEL FILL input signal. (See "Discrete
Inputs - Channel Fill" in the "Installation" section
for details on the channel ll mode.) Note that
the motor will start running the instant the channel
number is pushed.
HELP
The HELP button can be pressed at any time.
It will provide more detailed help for the current
active screen.
CLEAR GUN FAULTS
Pressing this button will immediately clear any
faults reported by the controller regardless of the
current screen. If the fault resulted in the stoppage
of uid, then a GUN RUN signal is required to
start ow again. Enter the ERROR LOG screen
to view the error that occurred. Pot-life faults can
only be ‘cleared’ by evacuating the volume of uid
as determined by the Mixed Volume parameter
located in the GUN CONFIGURATION screen .
Pressing the Clear Faults button will silence the
horn, if it is enabled.
ERROR LOG
Pressing this button opens up the error log window, which displays the last 100 faults that have
occurred. These faults are time and date stamped
and can be saved to a diskette or memory stick,
if desired.
PASSWORD OPERATION
When enabled, the password is required for ed-
iting any system or GUN congurations, loading
information from les, editing Job tables or forcing
inputs and outputs. A pop-up screen will appear
requesting the password when attempting to
perform a password protected operation. Once a
password is entered correctly, it will not be required
again until the password timer has elapsed. The
password and password timer can be set in the
SYSTEM CONFIGURATION screen. The pass-
NOTE
> Note that the interface card stores
the previous fault information in battery-backed memory but it does not contain a real-time clock. Therefore, the date
and time of the faults are provided by the
user-interface PC. If the unit is powered
up with faults still stored in the Error Log,
the date and time of those faults on the
Error Log Screen will either be left blank
or may be random values.
word timer starts after the last button is pushed.
Every additional keystroke before the password
timer elapses resets the timer. This makes it
convenient for an operator to change multiple
parameters without having to continually reenter
the password. In the event that the password is
lost or is not recognized by the controller, contact
Ransburg Service. Entering a "O" (zero) for the
password will disable password protection.
CONFIGURABLE
OPERATING
PARAMETERS
The design of the RCS-2 system allows it to be
congured to meet the requirements of the application. The large number of parameters allows
the RCS-2 to be used in almost any application
involving ow and/or ratio control of uids.
System Parameters are parameters that affect
the overall system, which includes all channels
and guns or the user interface. They include:
• Over Pressure Limit
• Foldback Pressure
• Pressure Sensor Limit
• Horn Enable
• Password Timeout
• Interface Card Name
• Interface Card I/P Address
• User Program IP Port
• Password
• Software and Firmware Version Information
• System Date and Time
29
LN-9407-00.2

Ransburg
RCS-2 User Manual - Operation
Gun Parameters are parameters that affect the
gun. These parameters apply to all channels
congured to that gun. They include:
• Mode (manual or automatic)
• Number of channels congured to gun
• Master Channel Number
• Slave Channel Number
• Default Job Number
• Number of Applicators
• Default Job Number
• Mixed Volume
• Tolerance Percentage
• Tolerance Volume
• Tolerance Time
• Solvent Pulses Per Liter
• Horn Code
• Auto Reset
Channel Parameters are parameters that affect
only that specic channel. For two channel guns,
there are independent parameters for each of the
two channels. They include:
• Fill Enable/Disable
• Trigger On-Delay Time
• Trigger Off-Delay Time
• Pump Size
• Pump Pulses Per Liter
• Maximum Pump Speed
• Miniumum Pump Speed
• Maximum Inlet Fluid Pressure
• Minimum Inlet Fluid Pressure
• Maximum Outlet Fluid Pressure
• Minimum Outlet Fluid Pressure
• Inlet Pressure Sensor Enable/Disable
• Foldback Kp
• Foldback Ki
• Foldback Kd
• Foldback Deadband
• Feather Kp
• Feather Ki
• Feather Kd
• Feather Deadband
Job Parameters are parameters that are stored
with the specic job number. Typically, a job
number is assigned to a specic material. In this
way, totalization data and PID parameters relate
directly to the material. These parameters include:
• Ratio
• Flow Rate Setpoint
• Max. Flow Rate
• Min. Flow Rate
• Bar Graph Limit
• Pot Life Timer
• Feather Pressure
• Fill Volume
• Pressure Pot Capacity
• Delta Pressure
• Min. Inlet Fluid Pressure
• Min. Inlet Control Pressure
• Inlet Cont. Pressure Kp
• Inlet Cont. Pressure Ki
• Inlet Cont. Pressure Kd
• Inlet Cont. Pressure Db
• Hardener Sample Time
• Hardener No Flow Limit
• Hardener Flow On Limit
Alarm Conguration Parameters allow the
user to specify what conditions cause a "spray
shutdown" to occur. They include:
• Input Under Pressure
• Input Over Pressure
• Output Under Pressure
• Output Over Pressure
• Flow Out of Tolerance
• Hardener Flow Loss
• Pressure Pot Empty
• Inlet Pressure Loss
• Outlet Pressure Loss
• Analog Remote Loss
• Ratio Out of Tolerance
• Motor Amp Fault *
• Analog Feather Loss
• Foldback Pressure Reached
• Pot Life Expired
• System Over Pressure *
• Channel Card Parameter Fault *
• Channel Card SPI Fault *
• Channel Card Internal Fault *
NOTE
LN-9407-00.2
> Items above marked with an asterisk (*)
cannot be disabled.
30

RCS-2 User Manual - Operation
Ransburg
USER INTERFACE
SOFTWARE
When the RCS-2 is started up, users are presented
with the main user interface screen. An example
is shown below:
Setting Up A New System
Notice the function buttons at the bottom of the
screen. Users setting up a new system should,
typically, start conguring the system with the F1
function button and work progressively to the right,
one function button at a time.
F1: Cong System
Anywhere from 0 to 8 guns may be displayed
when the system rst starts up, depending on how
the system was last used.
The following information is available on the Main
Screen:
• Which channels are congured to which
guns
• Currently running job number for the gun
• The next (queued) job for the gun
• The mode that the gun is congured for
• The current status for the gun (Running,
halted, faulted, etc.)
• Status of the trigger input
• Target ow rate for the gun
• Actual ow rate for the gun
• Actual ow rate of the master channel
• Actual ow rate of the slave channel
• Requested ratio for the gun (if 2 channel
gun)
• Actual ratio for the gun (if 2 channel gun)
• Volume remaining in pressure pot (or pots,
if 2 channel)
• Which, if any, forces are active
Overpressure Limit
This is the pressure limit of the entire system. If
any pressure sensor in the system reaches or
exceeds this pressure, a system overpressure
fault is issued by the software and the pumps
congured for that gun are halted. This fault
cannot be disabled.
Foldback Pressure
When the outbound pressure of the pump exceeds this setting, the software starts a gradual
slowdown of the pumps (while keeping the ratio
at its proper setpoint). This prevents nuisance
overpressure faults when uid pressures spike
during load sequences, etc. It is expressed in
pounds per square inch (psi).
Sensor Limit
This is the maximum pressure that the pressure
sensors in the system can detect. It is expressed
in pounds per square inch (psi).
31
LN-9407-00.2

Ransburg
RCS-2 User Manual - Operation
Horn Enable
This enables or disables the horn to sound when
system or gun faults occur.
Password Timeout
This is the amount of time (in minutes) that the
system allows a user to examine and modify password restricted parameters after the pass-word
has been entered. This eliminates con-stantly
having to re-enter the password when setting up
numerous parameters at the same time.
Interface Card Name
In some cases one user-interface PC is used to
monitor more than one RCS-2 rack. When this
is done, it is more convenient to give each rack
a name (such as Prime, or Line 1, etc.) to easily
identify which rack is being controlled by the PC.
When this is done it is possible for each rack (effectively each interface card) to be given a unique
name. This is done in the fms.ini le on the hard
drive of the user-interface PC. Contact Ransburg’s
technical support department for details on how
to implement this feature.
Interface Card IP Address
This is the Ethernet IP address of the interface
card that this PC is currently communicating with
(or trying to communicate with). It can only be
modied in the fms.ini le on the hard drive of the
user-interface PC.
User Program IP Port
This determines if this user-interface PC is in readwrite mode or read-only mode. If the user-interface
PC is using Port 3000, it is in read-write mode. If
it is using Port 3001 it is in read-only mode. PC’s
congured in read only mode can monitor the
functioning of the RCS-2 but cannot make any
changes or save any data. Contact Ransburg’s
technical support department for details on how
to implement this feature.
System Time and Date
These two elds allow the user to examine and
change the system time and date for the user-in-
terface PC without exiting to the Windows XP
operating system.
There are eight function buttons dened for use
from the System Parameter Screen:
F1: Modify - This button allows the user to step
through the possible options for this parameter or
presents a numeric keypad if a numerical value
is required.
F2: Version Info - This button allows the user to
determine what version of user interface software
is installed on the user interface computer and
what rmware revision is currently installed on all
installed cards in the rack.
F3: Change Password - This button allows user
to change the password that limits access to
varous user interface screens. If a password was
previously stored, user has to know the password
to make a change to it. Entering a password of 0
disables the password option.
F5: Send to RCS-2 - This button takes the data
displayed on the current screen and sends it to the
interface card where it is then stored in non-volatile
memory. Any changes made to the parameters on
this screen will be lost if the screen is exited prior
to sending it to the interface card using this button.
F7: Read in all les – This function reads in
the data from all parameter les (System, Gun,
Channel, Job, Alarms, Totals, and Color Change)
from any media and sends them to the interface
card to be stored in non-volatile memory. This
differs from the F9 key in that the F9 key only
reads system parameter data and sends it to the
interface card.
F8: Save to all les – This function reads all
parameter data currently stored in non-volatile
memory on the interface card and stores it on the
media selected by the user (internal ash, oppy
drive, USB memory, or CDROM). This includes
System, Gun, Channel, Job, Alarms, Totals, and
Color Change parameters. This differs from the
F10 save function in that F10 saves only the
data displayed on the current System Parameter
Screen.
LN-9407-00.2
32

RCS-2 User Manual - Operation
Ransburg
F9: Read in File - This button allows operators
to load the system parameters from any media.
They are stored in a le named system.par.
F10: Save to File - This button allows operators
to save the parameters on this screen to any
writeable media. They are stored in a le named
system.par.
F2: Cong Gun
When F2 is selected from the main screen, the
operator will be prompted to select the gun number they wish to create or modify the parameters
for. Once a gun number is selected, the following
screen will appear.
MANUAL - This setting is used when the user
wishes only to control the ratio of the material.
Users can "demand" as much material as they wish
and the controller will deliver as much as possible
while keeping the ratio on target. (A maximum
ow rate can be programmed.)
No. of Channels
This parameter has 3 possible settings: 0, 1, or 2.
0 - This effectively disables the gun
1 - This indicates that the gun is to be a single
channel, ow control only gun.
2 - This indicates that the gun is to be a dual
channel, ratio controlled gun.
Master Channel
This parameter has 8 possible settings: 1-8. For
single channel guns, it simply indicates which
channel will be controlling the pump for this gun.
For dual channel guns it indicates (normally) which
channel will be controlling resin pump.
Mode
This parameter has three possible settings: OFF,
AUTO, and MANUAL.
OFF - This setting completely disables the gun,
removes its data from the main screen, and places
the channels tied to this gun available for use by
another gun.
AUTO - This setting is used when the user wishes
to control the ow rate of the applicator. If this is
to be a 2 channel gun, it also controls the ratio of
the two materials.
Slave Channel
This parameter has 4 possible settings: 2, 4, 6, or
8. It indicates which channel will be slave to the
master channel (selected above) for ratio control.
Number of Applicators
The range of allowable values for this parameter
is any integer from 1 to 4.
This parameter indicates how many applicators
will be connected to the uid panel controlled by
this gun. It is used by the multiple trigger input
capabilities of the RCS-2 to multiply the target
ow rate by the number of triggers being input.
For example: if the target ow rate is 100 cc/min
and 1 gun is triggered, the RCS-2 will deliver 100
cc/min to the outlet of the uid panel, if 3 trigger
inputs are energized, the RCS-2 will deliver 300
cc/min to the outlet of the uid panel.
33
LN-9407-00.2

Ransburg
RCS-2 User Manual - Operation
Default Job Number
This parameter can be any integer from 1 to 199.
It indicates which job number an operator wants
to automatically load into the gun upon power up
of the system.
Mixed Volume
The range of allowable volumes for this parameter is from 1 cc to 5000 cc. This volume is the
amount of material in the uid lines between the
mix-block and the applicator or applicators. It
is used by the pot-life timer to keep track of the
age of the mixed material. If the material in the
applicator (the ma-terial that has been mixed the
longest) exceeds the programmed pot-life of the
material, a ush request is issued by the RCS-2
for that gun.
Tolerance Percentage
Allowable value for this parameter is any integer
form 1% to 100%.
This parameter indicates how far off from the
target ow rate any channel is allowed to be or
how far off from the target ratio the actual ratio
is allowed to be before a fault is issued by the
RCS-2 controller.
Tolerance Volume
Allowable volumes for this parameter are from
0 cc to 255 cc's.
This parameter indicates how often the software
veries that the actual ratio being expelled from
the uid panel is within the programmed tolerance
limit of the target ratio. Every time this volume of
material passes out of the mix tube, the controller
calculates the actual ratio based on the actual
volume of resin and the actual volume of catalyst
that was contained in that sample. It then compares
that ratio to the target ratio and checks to see if
the actual ratio is within the tolerance limit of the
target ratio. If not, a Ratio Out of Tolerance Fault
is issued by the controller.
Alarm Tolerance Time
This parameter is in seconds and can be any value
from 0.000 to 20.000 seconds. This parameter allows users to program how long an error condition
can persist before the unit issues a fault for that
gun. Users are warned against programming this
value too small as nuisance faults may become
a problem. A value of 3.000 seconds has been
found to be a good value for most applications.
Solvent Pulses Per Liter
This parameter can be any integer value for 1 to
100,000 pulses per liter.
This value is used by totalization software to track
the amount of ush solvent used by the gun
.
Horn Code
This allows the user to enable or disable the horn
(on top of the control console) for various errors
and faults. There are 6 possible settings for this
parameter:
a. Disabled - the horn will not sound for any
gun faults or errors.
b. SSD - the horn sounds only if a Spray
ShutDown for that gun occurs.
c. AE - the horn sounds if Any Error occurs on
that gun, even if they are not programmed to
cause a spray shutdown.
d. PLT - the horn sounds if the Pot-Life Timer
expires.
e. SSD+PLT - the horn sounds if either a spray
shutdown occurs or a pot-life timer expires for
that gun
f. AE+PLT - the horn sounds if any gun errors
occur or if the pot-life timer expires.
If a 0 (zero) is entered for the tolerance volume
prarameter, ratio is automatically checked every
10 milliseconds. This check,however, is based
on ow rate data, not volume data.
LN-9407-00.2
34

RCS-2 User Manual - Operation
Ransburg
Auto Reset
This allows the user to enable or disable the auto
fault reset feature. While enabled, anytime a gun
fault occurs, it can be automatically reset by simply
turning off the gun trigger signal and turning it back
on. (This allows a handgun operator the ability to
reset a fault without returning to a control panel.)
Note: All trigger signals for that gun must remain
off for at least 0.5 second to cause a reset.
There are six function buttons dened for use from
the Gun Parameters Screen:
F1: Modify - This button allows the user to step
through the possible options for this parameter or
presents a numeric keypad if a numerical value
is required.
F2: Previous Gun – This button opens the
Gun Conguration screen for the previous gun.
Note that any data changed on this screen prior
to pushing this button will be lost if F5 (Send to
RCS-2) is not used.
F10: Save to File -This button allows oeprators to
save the parameters on this screen to a oppy disk,
internal ash memory, USB memory, or CDROM.
They are stored in a le named gun-cong.par.
F3: Cong Channel
When F3 is selected from the Main Screen, the
operator will be prompted to select the gun num-
ber they wish to examine or edit parameters for
(and if it is a two channel gun whether they wish
to access the master or the slave channel for that
gun). At that time, the following screen will appear:
F3: Next Gun – This button opens the Gun Con-
guration screen for the next gun. Note that any
data changed on this screen prior to pushing this
button will be lost if F5 (Send to RCS-2) is not used.
F5: Send to RCS-2 - This button takes the data
displayed on the current screen and sends it to the
interface card where it is then stored in non-volatile
memory. Any changes made to the parameters on
this screen will be lost if the screen is exited prior
to sending it to the interface card using this button.
F9: Read in File - This button allows operators
to load the parameters contained on this screen
from a oppy disk, internal ash memory, USB
memory, or CDRom. They are stored in a le
named guncong.par.
Fill Enable
Allowable settings for this parameter are: Yes
or No.
This parameter allows the operator to enable or
disable the channel ll button on the top of the
Main Screen. This allows a supervisor to prevent
a gun from being put into channel ll mode without
the operator knowing the password. (This prevents
an applicator that is being used in production from
applying the wrong ow rate or ratio of material.)
NOTE
> This setting has no effect on Fast Fill.
35
LN-9407-00.2

Ransburg
RCS-2 User Manual - Operation
Trigger On Delay
The allowable range of values for this parameter
is from 0.000 seconds to 5.000 seconds.
This indicates how long after receiving a trigger
signal the controller will wait before it actually starts
running the pump(s) for that gun. This allows the
operator to compensate for pneumatic delays
inherent with some applicators.
Trigger Off Delay
The allowable range of values for this parameter
is from 0.000 seconds to 5.000 seconds.
This indicates how long to run the pump(s) after
the trigger signal has been removed. This allows
the operator to compensate for pneumatic delays
inherent with some applicators.
Pump Size
The allowable range of values for this parameter
is from 0.000 to 10.000 cc/rev.
This is the volume of material that the pump being
used on this channel allows to pass with each
complete revolution of its gears.
Pump Pulses Per Liter
The allowable range of values for this parameter
is any integer from 1,000 to 1,000,000 pulses/liter.
This is the number of pulses received by the
channel card from the sensing device (motor
amplier, owmeter, etc.) for each liter of material
that passes through the channel.
Maximum Pump Speed
The allowable range of values for this parameter
is any integer from 1 RPM to 65,535 RPM.
This is the maximum allowable speed at which
that the pump can be run. It is assumed by the
con-troller that this will be the speed that the pump
will run at when a 10 volt DC signal is sent to the
motor amplier. The recommended setting for
this parameter is 150 RPM.
Minimum Pump Speed
The allowable range of values for this parameter
is any integer from 0 RPM to 65,535 RPM.
This is the minimum speed at which that the system
will allow the pump to run. If the commanded ow
rate or ratio would result in a pump running below
this setpoint, the pump (or pumps) assigned to
that gun will not run. Gear pumps do not typically
function accurately at speeds less than 3 RPM and
this is the recommend-ed setting for this parameter.
NOTE
> If the RCS-2 controller determines that
either pump must run below this limit to
obtain the desired ow rate or ratio, the
controller will stop both motors and a MotorTach Loss fault may be generated.
Maximum Inlet Fluid Pressure
The allowable range of values for this parameter
is any integer from 0 psi to 200 psi.
This parameter allows the operator to limit the
maximum pressure at the inlet to the pump for this
channel. If too much pressure is allowed at the inlet
of the pump, uid may "blow by" the pump without
being metered, thus causing inaccurate ow rates
or ratios. Exceeding this setpoint will cause the
controller to generate an Inlet Overpressure Fault.
This check is only active in Run Mode.
Minimum Inlet Fluid Pressure
The allowable range of values for this parameter
is any integer from 0 psi to 200 psi.
This parameter allows the operator to limit the
minimum pressure at the inlet to the pump for this
channel. If too little pressure is allowed at the
inlet of the pump, the pump will "cavitate" or have
to pull uid into it, which could seriously effect its
accuracy, thus causing inaccurate ow rates or
ratios. Falling below this setpoint will cause the
controller to generate an Inlet Underpressure Fault.
This check is only active in Run Mode.
LN-9407-00.2
36

RCS-2 User Manual - Operation
Ransburg
Maximum Outlet Fluid Pressure
The allowable range of values for this parameter
is any integer from 0 psi to 200 psi.
This is the maximum allowable outbound pressure
for the pump. Exceeding this setpoint will cause
the controller to generate an Outlet Overpressure
Fault. This check is only active in Run Mode.
Minimum Outlet Fluid Pressure
The allowable range of values for this parameter
is any integer from 0 psi to 200 psi.
This is the minimum allowable outbound pressure
for the pump. If the outbound pressure from the
pump falls below this setpoint while the gun is
triggered, an Outlet Underpressure Fault will be
generated by the controller. This check is only
active in Run Mode.
Inlet Pressure Sensor
This allows the user to enable or disable the inlet
pressure sensor. If the system is being operated
without an inlet pressure sensor, this must be
disabled or a fault will occur.
NOTE
> When this is disabled, closed loop con-
trol of the inlet pressure of the pump is
also disabled.
Foldback PID Loop
The PID parameters for foldback control how fast
the motors respond when they enter foldback mode
but they also control how fast the motors respond
(acceleration and deceleration) when the trigger
signal changes state and when there are “on the
y” changes in the requested ow rate.
Foldback Pressure Ki
The allowable range of values for this parameter
is any integer from 0 to 65,535. It has no units.
This allows the operator to control the integral
gain for the foldback PID loop.
Foldback Pressure Kd
The allowable range of values for this parameter
is any integer from 0 to 65,535. It is expressed
in PSI. This allows the operator to control the
derivative gain for the foldback PID loop.
Foldback Pressure Deadband
The allowable range of values for this parameter
is any integer from 0 to 65,535. It is expressed
in psi. This allows the operator to control the
deadband for the foldback PID loop.
Feather Pressure Kp
The allowable range of values for this parameter
is any integer from 0 to 65,535. It has no units.
This allows the operator to control the proportional
gain for the feather PID loop.
Feather Pressure Ki
The allowable range of values for this parameter
is any integer from 0 to 65,535. It has no units.
This allows the operator to control the integral
gain for the feather PID loop.
Feather Pressure Kd
The allowable range of values for this parameter
is any integer from 0 to 65,535. It has no units.
This allows the operator to control the derivative
gain for the feather PID loop.
Feather Pressure Deadband
The allowable range of values for this parameter
is any integer from 0 to 65,535. It is expressed
in PSI. This allows the operator to control the
deadband for the feather PID loop.
Foldback Pressure Kp
The allowable range of values for this parameter
is any integer from 0 to 65,535. It has no units.
This allows the operator to control the proportional
gain for the foldback PID loop.
37
LN-9407-00.2

Ransburg
RCS-2 User Manual - Operation
There are 6 function buttons dened for use from
the Channel Parameter Screen:
F1: Modify - This button allows the user to step
through the possible options for this parameter
or a numeric keypad is presented if a numerical
value is required.
F2: Edit Master - This button allows the user to
switch to viewing and editing the master channel
parameters.
F3: Edit Slave - This button allows the user to
switch to viewing and editing the slave channel
parameters (if it is a 2 channel gun).
F5: Send to RCS-2 - This button takes the
data displayed on the current screen and sends
it to the interface card where it is then stored in
non-volatile memory. Any changes made to the
parameters on this screen will be lost if the screen
is exited prior to sending it to the interface card,
using this button.
F4: Cong Job
When F4 is selected from the Main Screen, the
operator will be prompted to select the gun num-
ber they wish to examine and/or edit parameters
for and what Job Number they wish to examine/
edit. At that time, the following screen will appear:
Ratio
The allowable range of values for this parameter
is any number from 0.001 to 99.999.
F9: Read in File - This button allows operators
to load the parameters contained on this screen
from any media. They are stored in a le named
chancong.par.
F10: Save to File - This button allows opera-
tors to save the parameters on this screen to any
writeable media. They are stored in a le named
chancong.par.
This is the taget ratio of resin to catalyst that the
controller is going to try to maintain while triggered.
The ratio of 1 for the slave channel is assumed.
For example: if 12.345 was programmed here,
a ratio of 12.345 parts of resin would be metered
into 1 part of catalyst. If a value less than 1.000
is programmed here, the ow of the catalyst will
be greater than the ow of the resin. For exam-
ple: if 0.250 was programmed here, a ratio of 4
parts of catalyst (slave channel material) would
be metered into 1 part of resin (master channel
material).
A value of 65 or higher will cause only resin (single
component) to ow. (The ratio tolerance bar-
graph, the B Channel bar-graph, the ratio and all
B Channel text are not shown on the main screen
for single component ratios.)
Flow Setpoint
The allowable range of values for this parameter
is any integer from 0 cc/min to 10,000 cc/min.
LN-9407-00.2
This is the target ow rate for the output of the
uid panel associated with this gun.
38

RCS-2 User Manual - Operation
Ransburg
Maximum Flow
The allowable range of values for this parameter
is any integer from 0 cc/min to 10,000 cc/min.
When using an analog input to control the target
ow rate, this is the ow rate that the controller will
try to maintain if the maximum voltage (10 VDC)
or current (20 mA) is applied to the analog input.
Minimum Flow
The allowable range of values for this parameter
is any integer from 0 cc/min to 10,000 cc/min.
When using an analog input to control the target
ow rate, this is the ow rate that the controller
will try to maintain if the minimum voltage (0 VDC)
or current (4 mA) is applied to the analog input.
Bar Graph Limit
The allowable range of values for this parameter
is any integer from 0 cc/min to 10,000 cc/min.
This is the ow rate indicated by top of the ow rate
bar-graphs on the Main Screen and determines
the maximum value displayed on the plot-graphs.
Pot-Life Timer
The allowable range of values for this parameter
is any integer from 0 min. to 1000 min. This is
the amount of time that mixed plural component
material is allowed to remain in the uid stream
after being mixed before a ush-request output
and error is issued by the controller.
Feather Pressure
The allowable range of values for this parameter
is any integer value from 0 psi to 255 psi.
This value is the pressure that will be maintained
at the outlet of the pump (or pumps) when a gun
is congured as a manual mode gun and the oper-ator is feathering the spray gun. (See Appendix
H for more details on Feather Modes.)
Fill Volume
This is the amount of material that the user wish-
es to ow through the pump(s) when the gun is
placed in the volume ll mode.
The following 8 parameters have a master
channel component and a slave channel component. (Note the master and slave columns on
the screen.) Both values must be programmed
for plural component materials.
Pressure Pot Capacity
The allowable range of values for this parameter
is any value from 0.000 liters to 255.000 liters.
This value is simply the volume of material that
the pressure pot will be lled with each time it is
relled. There is a pot reset button on the Job
Totals screen (F9) that must be actuated every
time a pot is lled.
Delta Pressure
The allowable range of values for this parameter
is any integer value from 0 psi to 20 psi.
This is the target differential pressure that the
controller tries to maintain across the pump.
Keeping the differential pressure across the
pump to a minimum is essential, especially with
low-viscosity materials. If the outbound pressure
of the pump is signicantly higher than the inbound
pressure and the pump has any signicant wear,
it is possible for the gear teeth to “slip by” a small
volume of material and less material will be delivered per revolution of the pump. If the inbound
pressure is signicantly higher than the outbound
pressure, then material can “blow by” the pump
and more material than desired will be delivered.
The pump should essentially act as a metering
device as opposed to a pumping device.
Minimum Inlet Fluid Pressure
The allowable range of values for this parameter
is any integer value from 0 psi to 200 psi.
This is the target pressure that the controller tries
to maintain on the inlet of the pump as long as
the minimum inlet control pressure setting is not
greater than this setting.
39
LN-9407-00.2

Ransburg
RCS-2 User Manual - Safety Operation
Minimum Inlet Control Pressure
The allowable range of values for this parameter
is any integer value from 0 psi to 100 psi.
This is the minimum pressure that the E to P
transducer in the motor amplier panel will be
allowed to go down to. Even if the uid pressure
at the inlet of the pump is above the minimum inlet
uid pressure setpoint, the control (pilot) pressure
from the E to P transducer will not go below this
setpoint. This can be used as an offset to keep
the uid regulator at its cracking point to allow for
rapid response by the uid regulator at the trigger
on points.
Inlet Kp
The allowable range of values for this parameter
is any integer from 0 to 65,535. The value has
no units.
This value is the proportional gain factor for the
PID loop that controls the inlet pressure to the
pump.
Inlet Ki
The allowable range of values for this parameter
is any integer from 0 to 65,535. The value has
no units.
This value is the integral gain factor for the PID
loop that controls the inlet pressure to the pump.
NOTE
> See "Appendix G" for details on adjust-
ing the following three parameters.
Hardener Sample Time
The allowable range of values for this parameter
is any integer from 0 seconds to 10 seconds.
This parameter allows the operator to program
how often (in accumulated seconds) the ow of
the slave channel is veried.
Hardener No Flow
The allowable range of values for this parameter
is 4 mA to 20 mA.
This parameter allows the user to program in the
current (in milliamps) below which the controller
assumes that no catalyst is owing.
Hardener Flow On
The allowable range of values for the parameter
is 4 mA to 20 mA.
This is the value above which the controller will
assume that catalyst is owing. It must always
be greater than the Hardener No Flow Parameter.
Inlet Kd
The allowable range of values for this parameter
is any integer from 0 to 65,535. The value has
no units.
This value is the derivative gain factor for the PID
loop that controls the inlet pressure to the pump.
Inlet Deadband
The allowable range of values for this parameter
is any integer from 0 to 65,535. It is expressed
in PSI.
This value is the deadband for the PID loop that
controls the inlet pressure to the pump.
LN-9407-00.2
If the controller sees a value between hardener no
ow and hardener ow on, it examines the slope
of the current. As long as the current is increasing
while the gun is triggered, the controller assumes
catalyst is owing. If the current is decreasing or
remains stable while the gun is triggered, the con-
troller will assume no catalyst ow and increment
the hardener sample time timer.
Edit Job Function Keys
There are 9 function keys dened for use from
the Job Parameters screen:
F1: Modify – This button allows the user to modify
the currently selected parameter (highlighted).
40

RCS-2 User Manual - Operation
Ransburg
F2: Previous Job – This button allows the user to
view and edit the previous job to the one currently
displayed (for that gun).
F3: Next Job – This button allows the user to view
and edit the next job for that gun.
F4: Previous Gun – This button allows the user
to view and edit the job parameters for the previous gun.
F5: Send to RCS-2 – This button takes the data
displayed on the current screen and sends it to the
interface card where it is then stored in non-volatile
memory. Any changes made to the parameters on
this screen will be lost if the screen is exited prior
to sending it to interface card, using this button.
F6: Next Gun - This button allows the user to
view and edit the job parameters for the next gun.
F7: Copy Parameter – This button allows the user
to copy the data from the highlighted parameter
on the screen to any other job, range of jobs, gun,
or range of guns.
F5: Load Job
This function allows operators to load a different
job number to a gun. Note that if the gun is in run
mode when the new job is seleted, the new job
will not become active until the gun is halted and
put back in run mode.
NOTE
> The new job will also become active if
the gun faults, as this generates a halt for
that gun.
F6: Congure Alarms
This screen allows the operator to program which
errors and faults actually cause a spray shutdown
condition. That is, what errors and faults (when
they occur) will actually halt the pumps and cause
spray to cease.
F8: Copy Job – This button allows the user to
copy the data from any job to any other job. Users
are also prompted for which gun or guns they wish
the job data copied to.
F9: Read le – This button reads in the totalization
data from the internal ash drive, the oppy disk
drive, a USB memory drive, or the CDROM and
sends them to the interface card to be stored in
non-volatile memory.
F10: Save to le – This button reads all totalization data currently stored in non-volatile memory
on the interface card and stores it on the media
selected by the user (internal ash, oppy drive,
USB memory, or CDROM). The data is stored in
a le named jobs.par .
If the alarm is turned off, the main screen will
indicate that the gun is faulted but running. The
Status line on the main screen will show:
STATUS: RUN
(The word RUN will be printed in red.)
41
LN-9407-00.2

Ransburg
RCS-2 User Manual - Operation
There are four function buttons dened while
editing alarm conguration data:
F1: Modify - This button toggels an off state
(disabled) to an on state (enabled).
F5: Send to RCS-2 - This button takes the data
displayed on the current screen and sends it to the
interface card where it is then stored in non-volatile
memory. Any changes made to the pa-rameters
on this screen will be lost if the screen is exited
prior to sending it to the interface card using this
button.
F9: Read In File - This button allows the operator
to load alarm congurations from any media.
F10: Save To File - This button allows the oper-
ator to save alarm congurations to any writeable
media. All congurations are saved in a le named
alarmcfg.par.
INPUTS:
Fast Fill
Channel Fill
Feather Set
Run
Halt/Reset
Trigger 1
Motor Amp Enable
Trigger 2
Trigger 3
Trigger 4
Volume Fill
Push Out
OUTPUTS:
Gun Fault
Gun Run
Spray Shutdown
Flush Request
Motor On
Gun Ready
F7: Digital and Analog I/O
The following 3 screens allow the operator to
examine all digital and analog inputs and outputs
as well as force most of them for debug and troubleshooting purposes.
Note that there are more signals than there is
room for on one screen so operator must scroll
down to see additional outputs.
Option 1 - Gun (Digital) Inputs and Outputs
(For detailed explanations for each of these inputs
and outputs, see the "I/O Descriptions" in the
"Installation" section.)
Option 2 - System Inputs and Outputs
LN-9407-00.2
42

RCS-2 User Manual - Operation
Ransburg
INPUTS:
Strobe Gun 1
Strobe Gun 2
Strobe Gun 3
Strobe Gun 4
Strobe Gun 5
Strobe Gun 6
Strobe Gun 7
Strobe Gun 8
Job #[1]
Job #[2]
Job #[4]
Job #[8]
Job #[10]
Job #[20]
Job #[40]
Job #[80]
Job #[100]
System Spare 1
System Spare 2
System Spare 3
OUTPUTS:
System Fault
System Pulse
System User Link
Option 3 - Analog Inputs and Outputs
INPUTS:
Flow Rate Setpoint
Actual Flow Rate
Motor RPM
Solvent Flow Rate
Hardener Flow Sensor
Feather Pressure
Inlet Pressure
Outlet Pressure
OUTPUTS:
Actual Flow Rate
Motor RPM
Pressure Control
On all of the Force I/O screens, there are 3 function
buttons dened:
F1: Toggle On/Off or Modify Force - This button allows the user to toggle forces on and off. If
the parameter requires a numeric input, a popup
keypad is displayed. (User must rst use the F2
button to enable the force prior to using this key.)
F2: Toggle Force - This button allows the user
to enable or disable the particular force under
the cursor. A letter F in parenthesis will appear if
the force is enabled next to the value in that cell.
43
F3: Reset All - This button allows the user to
remove all forces for the displayed screen. To
reset all forces (gun, system, and analog) user
must go to each of the three screens and push
the F3 button.
F8: Plot Data
This feature allows operators to generate a graph
of many of the process variables to monitor the
response of the system as it relates to time. Up
to 4 var-iables from any of the congured guns
can be graphed at any one time. All 4 variables
to be graphed do not need to be from the same
gun. (e.g. The triggers of 4 guns can be graphed
at the same time.)
LN-9407-00.2

Ransburg
RCS-2 User Manual - Operation
The following variables can be graphed:
Trigger
Requested Ratio (2 channel guns only)
Actual Ratio (2 channel guns only)
Total Flow (for both channels together)
Requested Flow (for either or both channels)
Actual Flow (for either or both channels)
Inlet Pressure (for the pump on either or both
channels)
Outlet Pressure (for the pump on either or both
channels)
Hardener Flow
Setup:
Graphing:
Each of the 4 variables is graphed in a different
color: red, green, blue, or black. The order in which
the operator selects the variables determines in
which order they appear on the screen.
F1: Time Base – This button allows the user to
switch the time base (resolution) of the graph. In
fast mode, the full-screen width is graphed in 40
seconds. In slow mode, the full-screen width is
graphed in 80 seconds.
Operator simply highlights the variables they wish
graphed and then pushes the F1 key to select
them. The selected variables will then show up in
the box in the lower left of the screen. Variables
can be removed by simply pushing the F3 button.
Selecting F2 will cause the graphed data to run
continuously. After a full screen of data has been
graphed, the screen is cleared and the graphing
restarts on the left end of the screen.
F2: Single Plot – This button allows the user to
record one full screen of data (40 or 80 seconds)
at which point the graphing stops to allow the user
to examine the data. In continuous data mode,
when the cursor reaches the right end of the graph,
it automatically jumps back to the left end of the
graph and writes over old data.
F3: Stop Plot – This button allows the user to
stop the data acquisition process temporarily and
freeze the display for analysis or to save the plot.
F4: Start Stop (<--) – This button allows the user
to move both the start-time cursor and the stoptime cursor at the same time to the left.
F5: Start Time (<--) – This button allows the user
to move the start-time cursor to the left.
F6: Start Time (-->) – This button allows the user
to move the start-time cursor to the right.
LN-9407-00.2
44

RCS-2 User Manual - Operation
Ransburg
F7: Stop Time (-->) – This button allows the user
to move the stop-time cursor to the left.
F8: Stop Time (-->) – This button allows the user
to move the start-time cursor to the right.
F9: Start Stop (-->) – This button allows the user
to move both the start-time cursor and the stoptime cursor at the same time to the right.
F10: Save Plot – This button allows the operator
to save the graph in a bitmap (.bmp) format for
later examination and printing. The operator is
given the option of saving the data to any writable
media. Users are cautioned against storing them
on the internal ash drive (drive C:\) as this drive
has limited space. The le name that is used for
the graph is based on the date and time that it is
saved…
It is in the form of: AABBCCDD.bmp, where…
AA = Month
BB = Day of month
CC = Number of hours since midnight
DD = Minutes since last hour
Data Displays: At the top of the graphing screen
there may be as many as 6 white boxes with data
in them. The center two boxes indicate the time
of the start and stop cursors (start on top, stop on
bottom). The other 4 boxes indicate the value of
the graphed variable at the point where the cursors
are currently positioned.
F9: Job Totals
When F9 is selected from the main screen, the
operator is prompted to enter a Job number. Once
this has been done, the following screen appears.
Total volume usage is recorded for each Job
number independent of each other. (The lower
half of the screen shows total volumes for all jobs
summed together.) Job totals are stored in two
independent registers, Daily Volume, and Year
to Date Volume. These volumes are in no way
tied to the clock or calendar, they simply are two
separately resetable volumes.
(Operators may wish to use the Daily Volume as
a Shift Volume and the Year to Date as a Weekly
Volume, etc.) Both volumes are incremented
when material ows.
45
Job Totals Function Keys
There are 11 function keys dened for use from
the Job Totals screen:
F1: Reset Total – This button allows the user to
reset the currently selected (highlighted) value.
F2: Reset Channel – This button allows the user to
reset the totals for the currently selected channel.
F3: Reset Gun - This button allows the user to
reset the totals for the currently selected gun. (If it
is a two channel gun, both channels will be reset.)
LN-9407-00.2

Ransburg
RCS-2 User Manual - Operation
F4: Reset All – This button allows the user to
reset the totals for all jobs, guns, and channels.
F5: Previous Job – This button allows the user
to examine the totals for the next job.
F6: Select Job – This button allows the user to
choose another job to examine/reset data for.
F7: Next Job – This button allows the user to
examine the totals for the next job.
F8: Toggle Units – This button allows the user
to toggle the units that the data is displayed in
between liters and gallons.
F9: Read le – This button reads in the totalization
data from the internal ash drive, the oppy disk
drive, a USB memory drive, or the CDROM and
sends them to the interface card to be stored in
non-volatile memory.
digital inputs. Note that volumes are rounded to
the nearest cc. The latest events are displayed
at the top of the screen and the older events are
pushed off of the bottom of the screen (but can be
accessed by using the Windows scroll bar). Values
can also be saved to writeable media by using
the F10 key but recording must rst be stopped
to allow saving of this data. (Refer to "Appendix
M" for more details on how to use this feature.)
F10: Save To le – This button reads all totalization data currently stored in non-volatile memory
on the interface card and stores it on the media
selected by the user (internal ash, oppy drive,
USB memory, or CDROM). The data is stored in
a le named totals.par .
F11: Pot Reset – This button allows the user to
reset the volume counters for pressure pot track-
ing. This is typically done when the pots are lled.
F10: Trigger Log
With this feature, users can monitor and record
the trigger on and off times as well as the uid
that owed during those trigger on times for up
to 200 successive triggers. When this feature is
selected, the user will be prompted to select which
gun they wish to monitor. Recording of data will
not start until the Start Logging (F1) button is
pushed. Keep in mind that data will not appear in
the screen until the second on-trigger (on dwell)
event has occurred to allow the software the ability
to record the time of the rst off-trigger (off dwell)
event. The job number that was running during
the trigger is also recorded. The status of three
ags are also recorded with each event. These
ags reect the status of the three spare system
F11: Color Changer
An optional color change sequencer may have
been included with the controller. If it was includ-ed, the F11 button will indicate as such on the
main screen. If the F11 key is blank, your system
does not have this option.
When this function is selected, the operator is rst
prompted for the gun number they wish to view
or edit the sequence for, they are then prompted
for which Job Number they wish to view and/or
edit the sequences of, and last, they are asked if
they want to view/edit the sequence for ushing
or lling. (There is a separate ush sequence
and ll sequence stored for every Job Number
and for every gun.)
LN-9407-00.2
46

RCS-2 User Manual - Operation
Ransburg
Once the operator responds to the above prompts,
a screen similar to the following appears:
This chart displays a simple 6 step sequencer
where the user denes how long they wish each
step to take and which valves or signals should
be energized at each one of those steps. There
are 6 steps for the ush cycle and 6 steps for the
ll cycle. When a color change is desired, the
sequencer automatically runs the ush sequence
followed by the load sequence.
The following RCS-2 inputs can be controlled by
the sequencer:
RCS-2 Run
RCS-2 Halt
RCS-2 Fast Fill
RCS-2 A Fill
RCS-2 B Fill
RCS-2 Trigger
Note that there are too many valves and signals
to be displayed on one screen. Therefore, the
operator must scroll down to see the bottom ve
items.
There are 8 function buttons dened while editing
ush, load, and color change sequences:
F1: Modify - This button brings up a numeric
keypad if cursor is on one of the step duration
cells. If cursor is on one of the valve condition
cells, that cell is toggled from off to on or on to off.
F2: Air Chop Time - This button allows the user
to program how long the air valve remains on for
each step of the solvent/air chop timer.
The following solenoid valves can be controlled
by the sequencer:
Resin/Solvent Air Chop
Resin Solvent
Resin Air
Paint
Resin Pump Bypass
Resin Pump Flush
Trigger Solenoid
Resin Override
Dump Valve
Catalyst Select Valve
Catalyst Solvent
Catalyst Override
F3: Solvent Chop Time - This button allows the
user to program how long the solvent valve remains on for each step of the solvent/air chop timer.
F4: Edit Flush or Fill - This button opens the
screen that allows viewing and editing of the
sequences. (If the ush screen is displayed, it
switches to ll, or vice-versa.)
F5: Send to Opto22 - This button allows the operator to immediately send the edited sequence
to the sequencer (located in the motor amplier
panel). Note that the sequences are automatically sent to the sequencer every time a new Job
Number is loaded.
F9: Read In File - This button allows the operator
to load ush and load sequences from a diskette.
Note that all sequences for all guns and all jobs
are overwitten on the ash drive, using the data
on the diskette.
47
LN-9407-00.2

Ransburg
RCS-2 User Manual - Operation
F10: Save To File - This button allows the operator
to save ush and load sequences to any writeable
media. All ush and load sequences for all guns
are saved in a le named ColorChg.par.
Note that there are nine solenoid valves whose text
descriptors are in red. (Paint, Resin Bypass, Resin
Pump Flush, Trigger Solenoid, Resin Override,
Dump Valve, Catalyst Select, Catalyst Solvent,
and Catalyst Override) These functions may not
always be required in all systems and therefore
can be renamed and used for other functions.
Inside of the RCS-2 folder on the hard drive of the
user-interface computer there is a text le named:
Solenoid_Valves.txt. In it the above 9 valves are
named. Users are free to rename any or all of those
valves and use them for other functions during
the color change sequences that they program.
Simply exit the user-interface software, open the
le with any text editor (Wordpad, etc.), change
the names as required, and resave the le. The
next time the user-interface software is opened,
it will use the new names when the color change
sequencer screens are opened.
F12: Shutdown
This function key allows the RCS-2 to perform an
orderly shutdown of the Windows XP Embedded
operating system. The operating system (stored
on the ash drive, drive C:\) can be damaged if
the unit is powered off with the power switch on
the front door of the controller without performing
this shutdown procedure rst.
User-Interface Software Buttons:
(top of screen)
On the top-right of the user interface screen, there
are 5 buttons. The function of these buttons are
as follows…
Channel Fill - This function allows the operator
to run any of the 8 pumps at their maximum ow
rate (typically 150 RPM). This is typically used
for ushing purposes and for rapidly getting material from a color valve stack down to the pump,
prior to using Fast Fill. The gun that the channel
is assigned to must be in the Ready state before
it will be allowed to channel ll. Also, Fill Enable
must be set to Yes for the channel in the Cong.
Channel parameter screen. When the Channel
Fill button is pushed, the operator will be prompted
with a display showing 8 buttons (one for each
channel). The instant any of those buttons are
pushed, the pump for that channel will run at its
maximum RPM (typically 150 RPM). Make sure
the applicator is triggered prior to pushing these
buttons or an overpressure fault may occur. Any
combinations of these buttons can be turned on
simultaneously. Pushing the button a second time
will take that channel out of Channel Fill Mode
and stop the pump (if it was put in Channel Fill
Mode from this screen). If either the enter or the
escape button (below the channel number buttons)
is pushed, the Channel Fill Screen will be exited
and all pumps that had been put in Channel Fill
Mode from this screen will stop.
Fast Fill – This function allows the operator to ll
the uid lines as fast as possible at the ratio cur-
rently programmed for the loaded job number. That
is, one of the two pumps will run at its maximum
RPM (typically 150 RPM), and the other pump
will be slaved to it to deliver material at the proper
ratio. The software will determine which of the two
pumps will run at the maximum RPM based on
the ratio setting and the two pump sizes. In order
to run a gun in Fast Fill Mode, the gun must rst
be in Run Mode prior to selecting Fast Fill. When
the user pushes this button, they are presented
with a screen showing gun numbers 1 through 8.
The user simply pushes the gun number that they
wish to put in Fast Fill Mode. Note that the pumps
will start running immediately, so make sure the
applicator is triggered or either an overpressure
LN-9407-00.2
48

RCS-2 User Manual - Operation
Ransburg
fault will occur or the system will fold-back. Any
combinations of guns can be placed in Fast Fill
Mode simultaneously. To take a gun out of Fast
Fill Mode, simply push the gun number button a
second time. Pushing either the enter or escape
button (below the gun number buttons) will take
any and all guns that were put in Fast Fill Mode
via this screen out of Fast Fill Mode, as the screen
exits. Exiting this screen while a gun is Fast Filling
that has been initiated elsewhere (discretely, via
RIO, or via Ethernet) will not be taken out of Fast
Fill Mode.
Help – This function allows the operator to get
context-sensitive help for the current screen being
displayed. That is, the portion of the help text le
that refers to the screen currently displayed will
automatically be displayed when this button is
pushed. Users can scroll up and down through
the entire help le once it is displayed. Pushing
the Cancel button exits the help screen.
Error Log - This button allows the operator to
view the last 100 errors or faults generated by the
system. Errors and faults are channel, date, and
time stamped for easy identication as to when
they occurred and for which channels. Faults can
also be reset from within this screen.
If the error log is displayed, users can save the log
to a diskette or to the ash drive by pushing the F8
key. The data is stored in a le named ErrorLog.
Txt and is a simple text le, viewable with any word
processor or text editor. Once again, users are
cautioned against saving data on the ash drive
(Drive C:\) because of its limited space.
Clear Gun Faults – This button will ash with a
red outline if any guns are faulted. By pushing this
button, any and all guns that are faulted will be
reset. The gun or guns that were faulted have to
be put back in run mode (if so desired) by pushing
the appropriate Gun On/Off button in the upper
left of the user interface section.
If the outline of this button is ashing yellow, this
indicates that the Ethernet communication link
between the user-interface computer and the
interface card has been broken. This can be the
result of the rack not having power (check the
E-Stop pushbutton), a disconnected Ethernet
cable, a non-functioning Ethernet switch, etc.
If the outline of this button is ashing blue, this
indicates that the user-interface computer is running in simulate mode. This is normally done if
you are running the software on a computer that
is not connected to an RCS-2 rack. This mode is
controlled by an entry in the fms.ini le on the hard
drive of the user-interface computer. Adding a line
of text with the word: simulate puts the software in
this mode. This is required when running without a
rack connected as every time the software enters
a new screen, it asks for data from the interface
card an you will receive a Network Error if it is
not in simulate mode. This line of text must be
removed or commented out in order to talk to an
interface card.
Gun On/Off Buttons – The buttons in the top left
of the screen can be used to turn guns on or off
(switches them between Run mode and Ready
mode). Note that guns must be in Run mode to
spray. Faulted guns are noted by a ashing red
boarder around the button of the gun that is faulted. Pushing this button once when it is faulted
will reset the fault and pushing it a second time
puts the gun back in Run mode to put it back into
operation.
49
LN-9407-00.2

Ransburg
WARRANTY POLICIES
LIMITED WARRANTY
RCS-2 User Manual - Warranty Policies
Ransburg will replace or repair without charge any
part and/or equipment that falls within the specied
time (see below) because of faulty workmanship
or material, provided that the equipment has been
used and maintained in accordance with Ransburg's written safety and operating instructions,
and has been used under normal operating con-
ditions. Normal wear items are excluded.
THE USE OF OTHER THAN RANSBURG APPROVED PARTS, VOID ALL WARRANTIES.
SPARE PARTS: One hundred and eighty (180)
days from date of purchase, except for rebuilt
parts (any part number ending in "R") for which
the warranty period is ninety (90) days.
EQUIPMENT: When purchased as a complete unit,
(i.e., guns, power supplies, control units, etc.), is
one (1) year from date of purchase. WRAPPING
THE APPLICATOR IN PLASTIC, SHRINK-WRAP,
ETC., WILL VOID THIS WARRANTY.
RANSBURG'S ONLY OBLIGATION UNDER THIS
WARRANTY IS TO REPLACE PARTS THAT
HAVE FAILED BECAUSE OF FAULTY WORKMANSHIP OR MATERIALS. THERE ARE NO
IMPLIED WARRANTIES NOR WARRANTIES OF
EITHER MERCHANTABILITY OR FITNESS FOR
A PARTICULAR PURPOSE. RANSBURG ASSUMES NO LIABILITY FOR INJURY, DAMAGE
TO PROPERTY OR FOR CONSEQUENTIAL
DAMAGES FOR LOSS OF GOODWILL OR
PRODUCTION OR INCOME, WHICH RESULT
FROM USE OR MISUSE OF THE EQUIPMENT
BY PURCHASER OR OTHERS.
EXCLUSIONS: If, in Ransburg's opinion the
warranty item in question, or other items damaged
by this part was improperly installed, operated or
maintained, Ransburg will assume no responsibility for repair or replacement of the item or
items. The purchaser, therefore will assume all
responsibility for any cost of repair or replacement
and service related costs if applicable.
LN-9407-00.2
50

RCS-2 User Manual - Appendix
APPENDIX
APPENDIX A: STANDARD KEYBOARD FUNCTIONS
When operating the user-interface software from a PC or laptop, the touchscreen buttons are not
available. Below is a handy cross-reference table that associates available functions to a standard
qwerty keyboard.
Function Key
0-9............................................................................. 0-9
Asterisk (*)................................................................ *
Channel Fill............................................................... Space Bar
Clear Faults............................................................... C
Dot (.)........................................................................ (.)
Enter......................................................................... Enter Key
Escape...................................................................... Esc. Key
(undo, previous menu, etc.)
F1 - F12.....................................................................F1 - F12 Key
Fast Fill......................................................................Backspace Key
Gun 1 On/Off............................................................ A or a
Gun 2 On/Off............................................................ S or s
Gun 3 On/Off............................................................ D or d
Gun 4 On/Off............................................................ F or f
Gun 5 On/Off............................................................ G or g
Gun 6 On/Off............................................................ H or h
Gun 7 On/Off............................................................ J or j
Gun 8 On/Off............................................................ K or k
Help........................................................................... L or l
Home.........................................................................Home Key
Scroll Down............................................................... Down Arrow Key
Scroll Left.................................................................. Left Arrow Key
Scroll Right................................................................ Right Arrow Key
Scroll Up................................................................... Up Arrow Key
Ransburg
51
LN-9407-00.2

Ransburg
RCS-2 User Manual - Appendix
APPENDIX B: CALIBRATION DATA AND FLOW RANGES
OF STANDARD RCS-2 PUMPS
LN-9407-00.2
52

RCS-2 User Manual - Appendix
APPENDIX C: CHANNEL BOARD JUMPER SETTINGS
Ransburg
53
* Indicates default (factory) settings.
** 78814-01 Channel Cards do not support 4-20 mA outputs.
LN-9407-00.2

Ransburg
RCS-2 User Manual - Appendix
APPENDIX D: INTERFACE BOARD JUMPER SETTINGS
LN-9407-00.2
* Indicates default factory settings.
54

RCS-2 User Manual - Appendix
APPENDIX E: CHANNEL AND GUN I/O TERMINALS
Ransburg
Notes:
1. Do not use more than 2 wires in each terminal or an unreliable connection will exist. If more than 2
connections are required, use an external terminal block or a butt splice.
2. Do not supply 24 volts to the +24 terminals on this board! The +24 terminals on this board should only
be used to supply voltage to other terminals on this board that are to be pulled high.
55
LN-9407-00.2

Ransburg
APPENDIX F: SYSTEM I/O TERMINALS
OLD SYSTEM I-O BOARD
RCS-2 User Manual - Appendix
NEW SYSTEM I-O BOARD
LN-9407-00.2
56

RCS-2 User Manual - Appendix
APPENDIX G: CATALYST FLOW SENSOR
Ransburg
CATALYST FLOW SENSOR
DESCRIPTION &
OPERATION
The FLOW MONITOR control system used to de-
tect no-ow in the hardener uid system consists of
three components, a sensor, the control amplier,
and the analog output amplier. The sensor is a
thermal shedding type that uses the principle of
thermal conductivity. The temperature compensat-
ed sensing head is inserted into the uid stream
via a manifold and is heated up a few degrees
higher than the medium. The control amplier
provides all of the necessary electronics to provide
heater current, temperature comp-ensation, level
adjustment for the sensor and a low level analog
output signal which is a function of ow. The third
component is the analog output amplier which
provides a 4-20ma control signal to the microprocessor on the channel board. The operation of the
ow monitor system is as follows… The sensor
is heated up a few degrees above the ambient
temperature of the uid. If the uid is moving, the
heat generated in the sensor is conducted away
from the sensor head and the sensor is cooled.
If the uid is at rest or at a no-ow condition, the
temperature of the sensor head rises. Thermistors
are used in the sensor to convert the temperature
into an electrical signal which is processed by
the control amplier. The control amplier also
compensates for changes in uid temperature at
a rate of up to 15° C/min. When there is ow, the
analog output voltage increases, and when there
is no ow, the analog output voltage decreases.
The analog output voltage is then fed into the
analog output amplier which outputs a 4-20ma
signal that is used by the channel board to de-
termine ow status. The program in the channel
board determines whether there is ow or no-ow
by checking the slope of the analog signal and by
checking the programmable ow/no-ow levels.
The program also allows for the adjustment of the
ow-on and the no-ow levels via parameters in
the user interface software. Also, to allow for the
delay in the thermal sensor signal, a programmable
time delay is available to prevent nuisance faults.
SPECIFICATIONS
Input Power Requirements:
Voltage- +24vdc +/-10%
Current - 80ma (maximum)
Ambient Temperature Range: 0 - 55° C
Compensated Fluid
Temperature Range: -25 to 80° C
Minimum Flow Rate: 20cc’s/min
Operating Flow Rate Range: 20 - 600cc/min
Analog Output Signal: 4 - 20ma
Response Time: Flow Rate Dependent
Maximum Fluid Pressure: 200psi
Controls: (1) Zero Flow Adjust
57
LN-9407-00.2

Ransburg
RCS-2 User Manual - Appendix
Since all catalysts are not the same and have
differing abilities to remove heat from this se sor,
the sensor must be calibrated prior to use.
Setup and Adjustments
Refer to the System Interconnect Diagrams in
the Maintenance/Troubleshooting manual before
proceeding with any of the following setup and
adjustment procedures.
Access the Digital/Analog I/O screen on the User
Interface Screen of the RCS-2. Select the Analog
I/O option. On this screen, the current coming
from the analog output amplier can be monitored.
1. Fill the system to be monitored with the uid
to be monitored (NOTE: YOU CANNOT USE AIR
AS THE FLUID!)
2. Monitor the output current from analog output
amplier (P/N: 22-1050) on the User Interface
Analog I/O Screen.
3. Let the uid stand in the line (NO Fluid Flow)
for a minimum of 60 seconds. (The longer you
can let the uid stand, the better the accuracy
and response time of the Flow Monitor System.)
4. Make sure the switch on the control amplier
(P/N: 22-1046) is set to position 1 (LIQUID).
NOTE
>If the current continues to vary after
you adjust the pot, you have not waited
long enough.
5. Adjust the trim potentiometer on the control
amplier until the output current displayed on
the User Interface Screen is equal to 4.80mA
+/- 0.10mA.
6. This completes the zero ow adjustment of the
hardener no-ow detect system.
User Interface Parameter Setup
There are three parameters that must be programmed for this feature to work correctly.
Hardener Flow On – This is the level (in milliamps) above which the hardener is considered
to be owing.
Hardener No Flow - This is the level (in milliamps)
below which the hardener is considered as not
owing.
(The Hardener Flow On parameter must always
be greater than the Hardener No Flow parameter.)
Note that if the current being sensed is between
the Hardener No Flow nad the Hardener Flow
On setpoint, as long as the ow is increasing, the
processor will assume that hardener is owing.
If the ow being sensed is between these two
values and is not changing or is decreasing, the
processor will assume that there is no hardener
ow.
Hardener Sample Time – This is the time period
of no hardener ow that the hardener no ow timer
should accumulate to before generating a fault.
This time continues to accumulate as long as the
processor sees no hardener ow regardless of the
number of applicator triggers. The timer is reset
every time the ow meets or exceeds the value
programmed in for Hardener Flow On.
The initial setup for these parameters should be
set to the following values: delay time = 4 seconds, no-ow = 6 mA, ow-on = 10 mA. After the
zero ow calibration has been done correctly, the
system can now be programmed to t the applica-
tion. The delay time is used to prevent nuisance
hardener ow errors. To properly set this time to
minimize delays and prevent nuisance errors, the
delay time should be set to a value which is less
than the minimum spray-on time of the system
being measured. The delay time is cumulative
to allow for short spray-on times used in some
applications. The smallest difference between the
delay time and the minimum spray-on time should
be 100 mSec. Smaller values can be used, but
LN-9407-00.2
58

RCS-2 User Manual - Appendix
Ransburg
more nuisance errors can occur. If values larger
than the minimum spray-on time are programmed,
hardener ow errors will be detected because the
delay time accumulates every time the spray-on is
turned on and off without detecting a valid current
input level (i.e. positive slope at a level above the
value programmed for no-ow or a value above
the programmed ow-on level).
The no-ow and ow-on levels can now be
programmed to t the application. Current mea-
sured at the output of the analog output amplier
provides information to the RCS-2 channel card.
Program-ming specic values can speed up or
slow down system response to given ow conditions. Programming the no-ow value as low as
possible, will help minimize response time from
a no-ow to ow-on condition, but if it is too low,
uid noise could periodically cause indications of
ow when, in reality, there is no ow.
Programming the ow-on value to the lowest
possible value will minimize response time to a
ow-on to no-ow condition, but in this case uid
noise could cause nuisance errors when there is
actually ow. The best way to set up the no-ow/
ow-on values is to begin with the default values
indicated above. Monitor the output current from
the Analog I/O Screen with the system operating
normally. Set the ow-on value to about 1-2 mA
below the minimum measured current during
normal operation. (Note: Fluid must be owing
to properly set this value.) To set the no-ow
value, turn the hardener supply off. Monitor the
output current from the analog output amplier.
The current should begin to decrease and steadily
fall until it begins to approach a level of approximately 4.8 mA, (the no-ow zero reference value).
Note: In order to prevent system shutdown, go
to the Congure Alarm setup screen on the User
Interface Screen of the RCS-2 and temporarily
program the system for no shutdown on hardener
ow loss). This will allow the motor to continue to
run and provide a good indication of uid noise at
the no-ow condition. Observe the output current
level under these conditions and program the
no-ow level to approximately 0.5 mA above the
peak current level measured. Best system performance will vary depending upon the system
and setup accuracy.
NOTE
>The above should only be used as a
guide. the nal parameters for the Hardener ow Monitoring system will vary with
the requirements for each individual sys-
tem, and they will be the nal determining
factors of these parameters.
C A U T I O N
!
> Remember to reprogram the system
to shut down on Hardener Flow Loss
after completing this setup, if required.
59
LN-9407-00.2

Ransburg
APPENDIX H: FEATHERING
RCS-2 User Manual - Appendix
When a gun is congured as a manual mode gun,
the operator has two possible ways of operating
the system. When in manual mode, it is assumed
that handguns are being used.
Pressure Pot Mode: If a value greater than zero
(0) is programmed in for the feather pressure
parameter (on the Cong. Job screen), the unit
simulates a pressure pot set to the programmed
feather pressure. That is, it controls the outbound
pressure of the pumps such that the greater pressure of the two (resin or catalyst) always equals
the programmed feather pressure. Therefore,
within the ow limits of the pumps being used and
the ratio selected, the controller will continuously
regulate the outbound pressure of the pumps,
targeting the programmed feather pressure. In
this mode, air ow switches are not required on
the handguns as the system maintains the outlet pressure to the applicators regardless as to
whether or not it sees trigger signauts. (Note that
air ow switches are still required if the auto-reset
feature is used.) The feather PID parameters
may have to be adjusted to control how fast the
pumps respond to changes in ow. This directly
effects how close to the target feather pressure
the actual outlet pressure is maintained.
Feather Set Mode: If a value of zero (0) is programmed as the feather pressure parameter (on
the Cong. Job screen), the unit operates in feather
set mode. In this mode, a feather set pushbutton
is required to program the feather pressure. This
can be a normally open momentary pushbutton
connected to the feather set discrete input for
the gun (see Appendix E) or, use the feather set
pushbutton on the optional Remote Operator’s
Panel (see Appendix I). Also required in this
mode are air ow switches for each handgun. (It
is not recommended that more than 2 handguns
be fed from each uid panel as it becomes very
difcult to control ow and pressure while more
than 2 handguns are being triggered and feathered
simultaneously.)
Operating the unit in feather set mode involves
the following steps:
1. Zero (0) psi must be programmed for the feather
pressure parameter under the Cong. Job screen.
2. A desired ow rate for each handgun must be
programmed for the parameter Target Flow, under
the Cong. Job screen.
3. All handguns should be triggered simulta-
neously and the triggers held wide open. (Air ow
switches must be connected to all handguns, in
this mode.)
4. Press and hold the feather set button to achieve
the desired ow rate for the number of guns triggered. Releasing the button records the feather
pressure.
5. From then on, the operators can spray (and
feather) normally. If the controller can achieve the
target ow rate with both guns triggered without
exceeding the pressure recorded in step 4 above,
it will do so. If, however, the recorded pressure is
reached before it reaches the target ow rate (as
if one or both painters are feathering), then the
RCS-2 controller regulates the ow by targeting
the prerecorded outbound pressure. If only one
gun is triggered, the controller tries to ow at the
target ow rate for one gun, unless it reaches the
prerecorded outbound pressure rst, at which time
it again controls ow by targeting the prerecorded
outbound pressure.
LN-9407-00.2
60

RCS-2 User Manual - Appendix
Ransburg
6. If the spraygun tips start to become plugged or
some other restriction occurs, causing the actual
ow to fall signicantly below the targeted ow rate,
the operators can again trigger both handguns,
push and hold the feather set pushbutton (until
the target ow rate is achieved) then release the
feather set pushbutton, and a new (higher) feather
set pressure will be recorded.
Once again, the master channel feather pressure
PID parameters may have to be adjusted to control
how fast the pumps respond to a change in ow.
This directly effects how close to the target feather
pressure the actual outlet pressure is maintained.
NOTES
61
LN-9407-00.2

Ransburg
RCS-2 User Manual - Appendix
APPENDIX I: REMOTE OPERATOR'S PANEL
The Remote Operator’s Panel (shown above)
operates in the following manner:
Color Select – This is an eleven position selector
switch that allows the operator to select the next
color to be loaded. If the most counterclockwise
position is selected (Solv.) and the Paint (Solvent)
Fill button is pushed, the normal load sequence
occurs and solvent is loaded into the uid system
as if it is was a color.
Paint (Solvent) Fill/Filled – This is a green illuminated pushbutton. When pushed, the paint load
sequence runs (as programmed from the “Load”
user interface screen). The green indicator lamp
ashes as the sequence is occurring and stays lit
solid when the sequence has completed, indicating
to the operator that the system is ready.
If there is already a color loaded (ie. one of the color
valve outputs is already on) when this button is
pushed, the system will execute a ush sequence,
followed by a load sequence.
Purge/Purged – This is an amber illuminated
pushbutton. When pushed, a purge sequence is
initiated (as programmed from the “Purge” user
interface screen). While the purge sequence is
occurring, this indicator lamp ashes. It remains
on solid when the purge sequence is complete,
indicating to the operator that the purge is complete. This indicator will be turned off if a “Paint
(Solvent) Fill sequence has been initiated or a
color is loaded.
NOTE
>If both the green Paint (Solvent) Fill/
Filled lamp and the amber Purge/Purged
lamps are ashing simultaneously, this
indicates that no sequence has been
downloaded to the color change sequencer
since the last time power was applied to the
system. This can be corrected by loading
a job from the user interface screen.
LN-9407-00.2
62

RCS-2 User Manual - Appendix
Ransburg
Horn – In the top center of the panel is a horn that
indicates when the RCS-2 controller has turned
on the “Spray Shutdown” output for the gun.
Total Flow – This is an LCD display that indicates
the current ow rate out of the applicator (or applicators, if multiple applicators are fed from one uid
panel). It operates from an analog output signal
from the RCS-2 controller with 0 VDC being 0
cc’s/min and 10 VDC scaled to be 2000 cc’s/min.
Flow Control – This is a potentiometer that varies
the analog ow control voltage into the RCS-2
channel card from 0 volts DC to 10 volts DC.
Users can program what ow rate they want for
both extremes by using the Min. Flow and Max.
Flow parameters under the edit gun screen.
Faulted/Fault Reset – This is a red illuminated
pushbutton. The lamp will be illuminated any time a
fault occurs in the RCS-2, whether that fault causes
a spray shutdown condition or not. Pushing this
button resets any fault that has caused a spray
shutdown condition. It does not reset a non-fatal
fault (one that is disabled in the “Cong. Alarms”
setup screen of the RCS-2). After resetting a fatal fault, the user must then push the Ready/Run
pushbutton to put the gun back into run mode to
resume spraying. Note that this lamp will icker
when the controller is folding back the outbound
pressure of the pumps.
Ready/Run – This is a green illuminated pushbutton. Pushing this button puts a gun into run mode.
When in run mode, the green lamp is illuminated.
It is extinguished in ready, halted, or faulted state.
respective ush boxes. A ush or load sequence
will not be allow to start until both of these indicators are illuminated. These LED’s are connected
to four pressure switches, which are actuated by
the two ush boxes. (One indicates that the gun
is in the box and the other indicates that the ush
box is closed.) The signal from these pressure
switches also feeds the Paint Fill and Purge
pushbuttons to prevent color changes and purges
from occurring unless the guns are in their ush
boxes and the boxes are closed. These pressure
switches should be jumpered if gun ush boxes
are not to be used. There are jumpers on the PC
board inside the panel to bypass these pressure
switches.
Feather Reset – This is a simple pushbutton that
sends a Feather Reset signal back to the RCS-2
control console.
Spray Test – This is a simple pushbutton that
sends a trigger signal back to the RCS-2 channel
card and also turns on the trigger solenoid to allow
operators to verify and test ow, etc. (A valid color
must be loaded for this button to work.)
Jumpers – In the lower right corner of the PC board
inside the panel there are four jumpers labeled:
JMP1, JMP2, JMP3, and JMP4. If a single gun
ush box is being used, remove the jumper at
position JMP1. If two gun ush boxes are being
used, remove jumpers JMP1 and JMP2. JMP3
and JMP4 should always remain installed.
Guns in Flush Box – These are two LED’s that
indicate when up to two sprayguns are in their
63
LN-9407-00.2

Ransburg
RCS-2 User Manual - Appendix
APPENDIX J: MOTOR AMPLIFIER LED DISPLAY
FAULT CODES (PART 1)
GE FANUC AMPLIFIER
LED
Display
PF
LE
FE
EI
FL
Denition Explanation and/or Possible Causes
Power Failure
Loss Enable
Following Error
Excessive Command
Increment
Feedback Lost
This display indicates that the 120 VAC power supply to the motor
amplier has been cycled (turned off and back on).
This display indicates that the enable signal to the motor amplier
from the RCS-2 channel card is low or disabled. (This is normal
when the unit is in the Ready or Halted state.)
This display indicates that the motor amplier has commanded the
motor to turn at a certain speed but was unable to maintain that
speed. This usually indicates a motor, pump, or magnetic coupling
that is bound up and not able to turn freely.
This indicates that the motor amplifer was commanded by the RCS2 channel card to turn faster than the motor is capable of turning.
This typically indicates that improper parameters have been programmed into the RCS-2. Verify parameters such as pump size,
calibration factor, maximum pump speed, and maximum ow.
This indicates that the motor amplier is no longer receiving feed-
back from the resolver mounted inside of the motor enclosure.
Check the two cables running from the back of the motor to the bot-
tom of the motor amplier panel and the cables inside of the motor
amplier panel running from the motor amplier to the bottom of the
panel.
LN-9407-00.2
OV
EC
OC
MT
DT
Motor Power Over Voltage
Motor Power Clamp
Excessive Duty Cycle
Motor Over-Current Fault
Motor Over-Temperature
Fault
Drive Over-Temperature
This indicates that the voltage being supplied to the motor amplier
is excessive. Check the AC power supply voltage to the motor am-
plifer panel.
This indicates that the motor amplier has exceeded the allowable
current limit for the motor. This usually indicates a motor, pump, or
magnetic coupling that is bound up and not able to turn freely.
This indicates that the motor is running excessively hot. Look for
binding of the motor magnetic coupling, or pump.
This indicates that the driver circuitry in the motor amplier has exceeded the allowable temperature for that circuitry. This could indi-
cate a failure in the motor amplier itself, a failure in the motor, or a
bound motor, pump, or magnetic coupling.
64

RCS-2 User Manual - Appendix
APPENDIX J: MOTOR AMPLIFIER LED DISPLAY
FAULT CODES (PART 2)
AMPLIFIER
Ransburg
Status LED
Blink Code
ON
OFF
Fast Blink
1
2
3
4
Fault Description Explanation and/or Possible Causes
No faults, power stage Enabled
Control power not applied or
insufcient control power applied
No faults, power stage Disabled
Not Assigned
Motor Over Temp
Motor temperature exceeds allowed
limit
Drive Over/Under Temp
Temperature of drive heatsink/
chassis is outside of allowed limits
Drive I*t Too High
The product of the drives output
current multiplied by time has
exceeded allowed limits.
If current foldback is enabled, the
drive peak output current automatically reduces to 0.67% of DIpeak.
If foldback is not enabled, the drive
will fault.
Normal opertion.
Loose or open circuit wiring of control power input.
Low input voltage to control power supply.
Hardware or Software Enable inactive. To enable drive,
apply hardware enable and set software enable.
High ambient temperature at motor.
Insufcient motor heat sinking from motor mounting.
Operating above the motor's continuous current rating.
Motor temperature sensor failure or not connected.
High or low drive ambient temperature.
Restriction of cooling air due to insufcient space
around unit.
Operating above the drive's continuous current rating.
Mechanically-jammed motor.
Motion prole acceleration requires peak current for too
long of a time duration.
Machine load on the motor increased by friction.
Wiring problem between drive and motor yielding
improper motion.
Motor commutation error.
Drive under-sized for application, friction, or load.
65
5
6
Motor I*I*t Too High
Motor current amplitude squared
multiplied by time has exceed allowed limits
Optional Battery low
Optional fault used to indicate SFD
battery supply voltage is low
Mechanically-jammed motor.
Motion prole acceleration requires peak current for too
long of a time duration.
Machine load on the motor increased by friction.
Motor commutation error.
Motor under-sized for application, friction, or load.
Battery low fault enabled and battery is not installed.
SFD Battery back-up voltage is low.
LN-9407-00.2

Ransburg
RCS-2 User Manual - Appendix
APPENDIX J: MOTOR AMPLIFIER LED DISPLAY FAULT CODES
(PART 2) (Continued)
AMPLIFIER
Status LED
Blink Code
7
8
9
Fault Description Explanation and/or Possible Causes
Bus Over Voltage - Self Resetting
The BUS voltage has exceeded
the upper threshold limit
Bus Under Voltage - Self Resetting
S200 DC drive fault only
BUS voltage is below specied
20 VDC minimum
Motor I-I or I-n Short
Line-to-Line, Line-to-Neutral, or
Line-to-PE short on the motor
ouput causing an instataneous
over current
AC Line voltage (AC unit) or DC bus power supply
voltage (DC unit) is too high.
Regenative energy during deceleration is cusing the
BUS to rise:
On AC Drives add regen resistor.
On S200 DC input drives external BUS capacitor is too
small; add capacitance.
On S200 DC input drives:
BUS voltage is too low.
BUS voltage is pulled down during high acceleration or
loading.
External BUS capacitor is too small.
Motor power wiring short circuit - line-to-ground/neutral.
Motor cable short line-to-line.
Motor power cable length exceeds the data sheet
specication causing excessive motor line-to-earth
ground/neutral capacitance.
Internal motor winding short circuit.
Motor L too small.
KIP set too large.
10
11
12
13
14
Output Over Current
Hall Fault
Valid only when drive is set to 6
Step (Hall feedback) operation
SFD Conguration Error
J3 FB +5V Short
Excessive current drain on SFD
+5 supply output
SFD Motor Data Error
Motor data in SFD is outside
drive limits or is inconsistent
Insufcient motor inductance
KIP or KII improperly set causing excessive output
current overshoots.
Invalid conguration.
Motor overspeed.
Invalid hall state.
Invalid hall transition.
SFD UART error during SFD initialization.
Bad motor data check sum.
The drive will attempt to initialize the SFD up to 4 times.
If it fails, this error is reported.
Excessive loading on SFD +5 supply.
Short in the feedback cable on SFD +5 (J3-1) to ground.
Motor and Drive are not compatible. Auto setup calcu
tion yielded a desired parameter value outside valid range.
Incorrect/inconsistent motor data loaded into the SFD.
la-
LN-9407-00.2
66

RCS-2 User Manual - Appendix
APPENDIX J: MOTOR AMPLIFIER LED DISPLAY FAULT CODES
(PART 2) (Continued)
AMPLIFIER
Ransburg
Status LED
Blink Code
15
16
17
18
19
Fault Description Explanation and/or Possible Causes
SFD Sensor Failure
SFD UART Error
SFD Communication Error
Option Card Watch Dog
Time Out
Position Error Too Large
Internal SFD failure.
Excessive electrical noise in the drive environment
causing communications interference.
Internal SFD failure.
Feedback cable not connected at the drive or at the
motor.
Feedback cable shield not connected.
Defective feedback cable.
Internal SFD failure.
Excessive electrical noise in the drive environment
causing communications interference.
Communication error between option card and main board.
Check ExtFaults:
ExtFaults = Step size over ow means
GearOut/GearIn is too large.
ExtFaults = Position error over ow means that the
following error, = PosErr, has exceeded ±128 revs.
Check if the motor is stalling or if the commanded speed is
higher than the motor can achieve at the present bus voltage.
67
20
Option Card Fault
Check ExtFaults:
If ExtFaults is AuxFBFault, then the AusFB device is in error.
Check the AuxFB faults: AuxFBEnDatFlt, AuxFBPTCFit, or
AuxFBSCDFlt.
Check to make sure the the drive is set up for the correct
feedback device and that the device is functioning
correctly. If ExtFaults is "No Extended Fault", then this was a
fault induced by the controller, such as SynqLost.
LN-9407-00.2

Ransburg
APPENDIX K: ERROR CODES
Error
Name
Source
Description Explanation and/or Possible Causes
RCS-2 User Manual - Appendix
Input
Under
Pressure
Input
Over
Pressure
Output
Under
Pressure
Channel
Card
Channel
Card
Channel
Card
Pump inlet pressure is below the
Minimum Pressure value specied
in the Channel Conguration
Pump inlet pressure is above the
Maximum Pressure value specied
in the Channel conguration.
Pump outlet pressure is below the
Minimum Pressure value specied
in the Channel Conguration
1. No material available to pump inlet.
2. Material supply pressure is too low.
3. Loss of supply air to the E/P transducer
that controls the pump inlet pressure.
4. Loss of electrical supply or control signal to
the E/P transducer that controls the pump
inlet pressure.
5. Failure of the E/P transducer that controls
the pump inlet pressure.
6. Failure of the pressure regulator that
controls the pump inlet pressure.
7. Failure of the pump inlet pressure sensor.
8. Minimum Inlet Pressure value specied in
the Channel Conguration is too high.
1. Failure of the E/P transducer that controls
the pump inlet pressure.
2. Failure of the pressure regulator that
controls the pump inlet pressure.
3. Maximum Inlet Pressure value specied in
the Channel Conguration is too low.
1. Pump is not turning.
2. Material is not available at pump inlet.
3. Failure of pump outlet pressure sensor.
4. Minimum Outlet Pressure value specied in
the Channel Conguation is too high.
Output
Over
Pressure
Flow Rate
Out of
Tolerance
Hardener
Flow Loss
LN-9407-00.2
Channel
Card
Channel
Card
Channel
Card
Pump outlet pressure is above the
Maximum Pressure value specied
in the Channel Conguration
The difference between the
commanded ow rate (RPM) of the
pump and the actual ow rate
measured from the feedback signal
exceeds +/- 2 times the Flow Rate/
Ratio Tolerance Percentage value
specied in the Gun Conguration
The electrical current from the
Hardener Flow sensor is less than
1 milliamp
1. Restriction in the uid line.
2. For Autmatic guns, failure of applicator
trigger valve.
3. Maximum Outlet pressure value specied
in the Channel Conguration is too low.
1. Loss of feedback signal from motor
amplier or ow meter.
2. Incorrect Calibration Factor in Channel
Conguration.
1. There is no hardener ow due to the pump
not operating or an obstruction in the
harener uid line.
2. Electrical connection problems.
3. Failure of Hardener Flow sensor.
68

RCS-2 User Manual - Appendix
APPENDIX K: ERROR CODES (Continued)
Error
Name
Source
Description
Ransburg
Explanation and/or Possible Causes
Pressure
Pot Empty
Inlet
Pressure
Loss
Outlet
Pressure
Loss
Analog
Remote
Loss
Ratio
Out of
Tolerance
Channel
Card
Channel
Card
Channel
Card
Channel
Card
Channel
Card
The system has determined the
pressure pot is empty for the
respective channel
The electrical current from the
Pump Inlet
Pressure Sensor is less than 1
milliamp
The electrical current from the
Pump Outlet Pressure sensor is
less than 1 milliamp
The electrical current from the
Remote Analog Setpoint source
is less than 1 milliamp
The difference between the desired ratio and the actual ratio,
expressed as a percentage error,
exceeds the Flow Rate/Ratio Tol-
erance Percentage value speci-
ed in the Gun Conguration.
1. The value entered for the pressure pot
Capacity in the Job Conguration is
Incorrect.
2. The operator neglected to reset the
Pressure Pot.
Capacity when it was last lled.
3. Pressure Pot is empty.
1. Electrical connection problems.
2. Failure of Pump Inlet Pressure sensor.
1. Electrical connection problems.
2. Failure of Pump Outlet Pressure sensor.
1. Electrical connection problems.
2. The Remote Analog Setpoint source is
congured for voltage instead of current
loop.
1. Loss of feedback signal from motor
amplier or ow meter.
2. Incorrect Calibration Factor in Channel
Conguration.
3. One or both channel is unable to deliver the
correct ow rate due to restriction in the
uid line, lack of material.
69
Motor
Amplier
Fault
Analog
Feather
Loss
Analog
Spare
Loss
Foldback
Pressure
Reached
Channel
Card
Channel
Card
Channel
Card
Channel
Card
The motor amplier has detected
a fault condition.
The electrical current from the
Feather pressure sensor is less
than 1 milliamp
The electrical current from the
Spare Analog Input sensor is
less than 1 milliamp
The Pump Outlet pressure has
exceeded the Foldback Pressure
value specied in the System
Conguration
1. Reference the motor amplier diagnostics
to determine the cause of the fault.
1. Electrical connection problems.
2. Failure of Feather Pressure sensor.
1. Electrical connection problems.
2. Failure of Spare Analog input sensor.
1. This error is normal when operating in Fast
Fill or Channel Fill mode.
2. For Automatic guns, restriction in the uid
line.
3. For Automatic guns, failure of applicator
trigger valve.
LN-9407-00.2

Ransburg
APPENDIX K: ERROR CODES (Continued)
Error
Name
Source
Description
RCS-2 User Manual - Appendix
Explanation and/or Possible Causes
Pot Life
Expired
System
Over
Pressure
Channel
Card
Parameter
Fault
Channel
Card
Channel
Card
Channel
Card
Mixed material in the applicator uid line has remained be-
yond the Pot Life Time speci-
ed in the Job Conguration.
Either the Pump Outlet or
Inlet pressure exceeded the
Over-Pressure Limit specied
in the System
Conguration.
Invalid parameter entered in
either the Channel or Job
Conguration.
1.Mixed material has remained in the applicator uid
line beyond the Pot Life Time specied in the Job
Conguration.
2. The Flow Rate Setpoint specied in the Job Conguration, or via the Remote Analog Setpoint, or
via Remote I/O, is not high enough to move the
Mixed Volume specied in the Gun Conguration
during the Pot Life Time specied in the Job Conguration.
1. Failure of the E/P transducer that controls the pump
inlet pressure.
2. Failure of the pressure regulator that
controls the pump inlet pressure.
3. Restriction in the uid line.
4. For Automatic guns, failure of applicator trigger
valve.
5. Over-Pressure Limit value specied in the System
Conguration is too low.
1. Hardener No Flow value specied in the Slave
Channel Conguration is less than 4.0 milliamps.
2. Hardener Flow On value specied in the Slave
Channel Conguration is greater than 20.0 milli-
amps.
3. Hardener No Flow value specied in the Slave
Channel Conguration is greater than Hardener
Flow On value specied in the Slave Channel
Conguration.
4. Any Minimum Pressure or Maximum Pressure
value specied in the Channel Conguration or
Feather Pressure specied in the Job Conguration
exceeds the Over Pressure Limit value specied
in the System Conguration.
Channel
Card SPI
Fault
Channel
Card
Internal
Fault
LN-9407-00.2
Channel
Card
Channel
Card
No communication via the Serial Peripheral Interface (SPI)
bus has occurred between the
Interface Card and Channel
Card for more than one seond.
The timer interrupt service rou-
tine is unable to execute the
required rmware logic in the
time between time interrupts.
1. Interface Card is no longer functioning.
2. Failure of the mother board (backplane).
3. A rmware bug is preventing service of the SPI
bus communications.
1. A rmware bug is preventing completion of required
logic in the time between timer interrupts.
70

RCS-2 User Manual - Appendix
APPENDIX K: ERROR CODES (Continued)
Error
Name
Source
Description Explanation and/or Possible Causes
Ransburg
Batttery
Low
No slaves
Present
Interface
SPI Fault
Network
Error
XXXXX
Opto-22
Failure
Interface
Card
Interface
Card
Interface
Card
User Interface
Computer
User Interface
Computer
The battery that maintains the data
parameters is below the minimum operating voltage.
On power up, the Interface Card could
not communicate with any of the four
(4) possible Channel Cards, referred
to as slaves on the Serial Peripheral
Interface (SPI) bus.
The Interface Card detected an error
while attempting to communicate with
a Channel Card via the Serial Peripheral Interface (SPI) bus.
The User - Interface Computer is not
able to communicate with the
interface card.
The User - Interface Computer is not
able to communicate with the color
change sequencer brain.
1. The power to the Interface Card may have
been off for too long resulting in premature
failure of the battery.
1. There are no Channel Cards inserted into
the card rack and mother board (backplane).
2. The SPI bus device on the Interface Card
may not be functioning.
3. One of the SPI bus devices on a Channel
Card may not be functioning in such a way
as to prevent communications by any other
Channel Card.
1. This error may occur when the system is
rst powered up and may be ignored.
1. Check for power on the rack (E-Stop button
out)?
2. Check all Ethernet cables, switches, etc.
1. Check for power on the motor amp panel.
2. Check all Ethernet cables, switches, etc.
71
LN-9407-00.2

Ransburg
APPENDIX L: PUSHOUT
A new feature has been added to the RCS-2
software called “Pushout”. This feature allows a
customer that uses dual purge applicators to use
two resin pumps that share a common catalyst
pump and pushout the resin with solvent on one
side of the dual purge applicator while loading the
other side of the applicator with the next material
to be sprayed.
The system employs a small relay panel that
switches the command signals for the catalyst
motor drive between two slave channels in the
RCS-2 control console. (Contact Ransburg for
design details for this relay panel.)
RCS-2 User Manual - Appendix
4. The RCS-2 will continue to deliver uid out of the
rst dual purge side until the volume programmed
in for mixed volume has been sprayed and then
that gun (in this case Gun #1) will automatically
be halted (taken out of run mode). This state will
be recognized by the PLC or robot when the Run
output from the RCS-2 turns off.
5. The PLC or robot must then energize a series of
relays in the relay panel which switches the signals
connected between the catalyst motor drive and
the channel card from channel 2 to channel 4.
The process steps to implement this feature are
outlined below:
1. Assume the applicator is running 2 component
material through one side of a dual purge applicator
and that material is being controlled by channels
1 and 2 of the RCS-2 where channel 1 is the resin
and channel 2 is the catalyst.
2. As the last part, buck, rack, etc. approaches
the robot for the presently running color, either
the PLC or the robot sends a “Pushout” signal to
the RCS-2. At that instant, the RCS-2 will immediately turn off the catalyst pump and speed up
the resin pump to maintain the target ow rate
that was being sprayed prior to the initiation of the
pushout signal. (Note that this pushout signal is
a maintained signal.)
3. Simultaneous with the pushout signal being
turned on, the PLC or robot will turn off the color
valve and turn on the solvent valve on the resin
color valve stack connected to the rst resin pump.
Depending on how the catalyst is controlled, it
may be necessary to also switch off the catalyst
valve or at least change its direction. Note that
not all pumps are capable of accurately dispensing
solvent (because of its low viscosity). It is up to
the user to ascertain if the pump they are using
is accurate enough when metering solvent to
maintain a proper lm builds on their parts.
6. While the rst dual purge side is being pushed
out, gun #2 (congured as channels 3 and 4) can
begin to load dual component material, using the
resin pump connected to channel 3 and the catalyst pump that is now controlled by channel 4.
(Single component material can also be loaded
by using the proper 1k ratio programmed in the
job parameters.)
7. As the applicator continues to spray dual com-
ponent material out of the second side, the rst
side can be ushed using A Fill, solvent/air chops,
pump bypass signals, etc. Note: The pushout
signal must be asserted with the A Fill signal or
the software will attempt to enable the channel B
motor drive. (This is done to prevent backow of
resin in the catalyst line on 2k congured guns.)
8. When the last part approaches the robot for the
presently running color occurs again, the procedure repeats for the second side of the dual purge
applicator (see step 2, above) with the exception of
in step 5, the relays are de-energized to reconnect
the catalyst motor drive to channel 2.
LN-9407-00.2
72

RCS-2 User Manual - Appendix
APPENDIX M: TRIGGER LOG
Ransburg
A new feature has been added to the RCS-2
software package that allows the user to monitor
trigger on and off times, the volume sprayed in
during each trigger on time, and the status of four
discrete (digital) inputs to the RCS-2.
The option is accessed by selecting Function F10
(Trigger Log) from the main screen of the User-Interface Software. When you open the Trigger Log
display, a screen similar to this will be displayed
(although there will be no data present).
the logging is stopped with the STOP LOGGING
function button, the user may easily scroll down
to look at the older events. There is also a SAVE
to FILE function button to create a CSV le of the
logged events using Excel, or any other spreadsheet program capable of displaying CSV les.
The rst column of data is the date that the trigger
occurred (obtained from the real time clock in the
PC running the User-Interface Software.)
The second column of data is the time that the
trigger occurred (obtained from the real time clock
in the PC running the User-Interface Software.)
The third column shows the amount of time (in
seconds) that the trigger signal(s) remained in
the off state. (Trigger Off Condition (Off Dwell) =
Channel A Triggers 1 through 4 must all be off.)
The fourth column shows the amount of time (in
seconds) that the trigger(s) were energized (on).
There will be a START LOGGING function button
displayed that will start logging trigger data as it
occurs. (This button changes to a Stop Logging
button when logging begins.) New data will be
entered on the top line and the older data pushed
down as new data arrives. This data is live, as it
occurs. Note that the very rst trigger time (On
Dwell) that occurs after the Start Logging button
is pushed will not be displayed. This is because
the software does not start timing until the rst
on to off transition occurs as the Off Dwell time is
always captured rst.
Scrolling down to examine data that has scrolled
off of the bottom of the screen is a problem while
data is being captured because every time a new
trigger event occurs, the scroll bar will return to
the top, newest, entry. (This is controlled externally by the Windows operating system.) Once
(Trigger On Condition (On Dwell) = Any time
Channel A receives an trigger input signal. This
can be any of the 4 trigger inputs for channel A.)
The Off Dwell Time is the time from previous
event’s trigger off to the new event’s trigger on,
the On Dwell Time is the time from this event’s
trigger on to this event’s trigger off.
The fth column indicates what job number was
running in the RCS-2 during this trigger event.
The sixth column shows the status of four binary
ags (digital inputs) at the start of this trigger
event. The four trigger inputs for channel B are
not required for dual component guns and so are
monitored and displayed on the Trigger Log screen
to allow users to use them as ags. (Flags are
73
LN-9407-00.2

Ransburg
APPENDIX M: TRIGGER LOG (Continued)
RCS-2 User Manual - Appendix
markers in time to indicate when certain events
occur.)
Flags “wxyz” are displayed as four binary bits 0
= off, or 1 = on:
w = Channel B Trigger Input 4
x = Channel B Trigger Input 3
y = Channel B Trigger Input 2
z = Channel B Trigger Input 1
Columns 7, 8, and 9 indicate the volume of resin,
catalyst, and the total, respectively during that
trigger on event.
NOTES
LN-9407-00.2
74

RCS-2 User Manual - Appendix
APPENDIX N: IMPROVING THE ACCURACY OF
THE RCS-2
Ransburg
There are many ways that the accuracy of the
RCS-2 system can be improved. This article
presents three things that can and should be examined if it is necessary to improve the accuracy
of the machine.
Differential Pressure Control:
One of the rst things that should be examined
is the differential pressure across the pumps. It
has been found that by keeping this differential
pressure to a minimum (5 psi or less), the pumps
act more as metering devices than pumps and
this allows them to be extremely accurate. If the
inlet pressure is too high, the material will tend to
“blow by” the pump gears (slippage) and more
material than desired will pass through the pump
If the inlet pressure is too low, the pump may be
starved and “cavitate” thus delivering too low of a
volume of material. (Cavitation is rarely a problem
as long as the supply tubing is of adequate size.)
The software in the RCS-2 is designed to automatically control this differential pressure as long
as pressure transducers are installed at both the
inlet and outlet of the pumps and pilot-operated
uid regulators (such as the Ransburg DR-1) are
provided on the inlets of the pumps. (The air pilots must be controlled by the voltage to pressure
transducers in the RCS-2 motor amplier panel.)
Since the outbound pressure of the pumps var-
ies based on uid ow rate, uid viscosity, hose
lengths, hose diameters, applicator orices, etc.
the inlet pressure must be dynamic, as well. Note
that slippage is rarely a problem if the viscosity
of the material is 25 cps or greater and cavitation
issues can be minimized by insuring that the uid delivery tubing is of adequate size. Inlet uid
regulators are seldom required when supplying
uid from pressure pots.
Pump Volume per Revolution and Flow Rate:
Note that the channel cards in the RCS-2 do not
perform closed loop control of the motor RPM
based on a comparison of the desired RPM and
the speed feedback from the motor amplier. The
channel card commands the motor amplier to
spin the motor at the desired RPM and the motor
amplier has its own closed loop control with the
motor. If the motor is not able to run at the desired
RPM, the motor amplier generates a fault, which
is then fed back to the RCS-2 channel card. The
RCS-2 channel card does conrm that the motor
is running at the desired RPM (within the tolerance
programmed on the Congure Gun screen) but
it does not try to compensate for over or under
speed conditions by modifying the analog signal
to the motor amplier.
On the Congure Channel screen of the RCS-2
user-interface software there is a value named
Pump Size. It is expressed in cc’s/revolution of
the pump. This value is normally obtained from
the pump manufacturer and is accurate enough in
almost all applications. There are cases, however,
(especially after a pump has been used for quite
some time) when accuracy can be improved by
modifying this value slightly. The way that the
RCS-2 channel card determines how fast to spin
the pump is based simply on two values, the target
ow rate of the material and the value entered
for Pump Size on the Congure Channel screen.
For example, if the pump is programmed as a
10 cc/rev. pump and the desired ow rate is 300
cc’s/min, the software can easily determine that it
has to run the pump at 30 RPM. Since the motor
amplier has been programmed to spin at 0 RPM
with a 0 volt input and at 150 RPM with a 10 volt
input, the software can then determine it must
send exactly 2.000 volts to the motor amplier to
obtain the desired 30 RPM. However, because of
very minor inaccuracies in the pump, the analog
output of the channel card, the analog input of the
motor amplier, cable and connector resistances,
etc. the desired 300 cc’s/min could be off slightly.
By making very minor adjustments to the Pump
Size value on the Congure Channel screen,
these minor variations can be accounted for and
the channel’s accuracy improved signicantly.
Calibration of the pumps can be performed in the
following manner: Program the RCS-2 controller to
75
LN-9407-00.2

Ransburg
APPENDIX N: IMPROVING THE ACCURACY OF
THE RCS-2 (Continued)
RCS-2 User Manual - Appendix
ow at some xed value in the middle of the range
of ows expected. That is, if the range of ow rates
of the pump during normal operation is expected
to be from 100 cc’s/min to 500 cc’s/min, set the
target ow rate to 300 cc’s/min. Flow material for a
signicant amount of time (we suggest a minimum
of 2 minutes) into a beaker and measure the volume. It is highly recommended that the material
be weighed as opposed to measured for increased
accuracy.1 If the ow rate multiplied by the time
results in more material than was actually obtained
in the ow test, than the Pump Size programmed
in the Congure Channel screen is too large. Try
reducing the value by the same percentage that
the volume exceeded the expected volume and
try the test again. If the actual volume of material
obtained was greater than the calculated value, try
increasing the Pump Size value by that percentage
and try the test again. Repeat this several times
until acceptable volumes result.
Example:
Pump Size = 5.5 cc’s/rev
Programmed ow rate = 300 cc’s/min
Flow time = 3 minutes
Calculated volume = 3 minutes x 300 cc’s/min =
900 cc’s
Actual volume collected = 887 cc’s
887 cc’s 900 cc’s
5.5 cc/rev x New PS
Therefore, New PS = 900 x 5.5 = 5.58 cc/rev
887
Put 5.58 cc’s/rev in for the Pump Size on the
Congure Channel screen, push Send to RCS-2
and retest.
terface software there is a value named Pump
Pulses per Liter. All of the RCS-2 ow rate and
volume displays are based on this value. The motor
amplier sends 500 pulses per revolution back to
the RCS-2 channel card no matter what RPM it
is running at. Therefore, it is easy to calculate a
volume of material per pulse or a number of pulses
per volume (in this case, per liter). However, by
adjusting the Pump Size value (as shown above)
the pulses per liter value will also be affected and
should be adjusted. There are two ways this can be
accomplished: Mathematically or experimentally.
Mathematically: Simply divide 500,000 (1000 cc’s/
liter x 500 pulses/rev) by the new pump size. In
the case above, 500000/5.58 = 89605 pulses/liter.
Experimentally: Zero the volume on one of the
totalizer values on the Flow Totals screen of the
RCS-2 then ow a random volume of material into
a beaker and measure the actual volume. (Once
again, it is highly recommended that the volume
be determined by weight as opposed to trying to
measure it based on the uid level in the beaker.1)
Compare the actual volume with the volume recorded on the RCS-2 Totalization screen. If the
actual volume obtained was greater than what was
displayed on the totalization screen, then the Pump
Pulses per Liter value is too small. If the actual
volume obtained was less than that displayed
on the totalization screen, the Pump Pulses per
Liter is too large. Modify the value up or down as
required by the percentage they differ and retest.
Pump Pulses per Liter and Totalization:
On the Congure Channel screen of the user-in-
LN-9407-00.2
76

RCS-2 User Manual - Appendix
Example:
300 cc’s (totalization screen value) X 305 cc’s (actual volume collected)
90909 (current pulse per liter value) New Pulse/Liter value
Therefore, New Pulse/Liter Value = 305 X 90909 = 92424 pulses/liter
300
Enter the new value for the Pump Pulses per Liter
value on the Congure Channel screen, send it
to the RCS-2 and retest. Repeat the test several
times until the accuracy required is obtained and
the values (actual volume vs. displayed volume)
are repeatedly very close to one another.
1
Note: In order to convert the weighed material
to a volume, the specic weight of the material
must be known. (Specic weight is dened as
the weight of the material per unit volume.) This
is normally available from the manufacturer of the
material. If this information is unavailable or the
material has been reduced, the specic weight will
need to be experimentally determined. Obtain a
very accurate measuring device such as a syringe,
pipette, 10 cc graduated cylinder, etc. and weigh
the container prior to lling it with material. Then
put exactly 10 cc’s of material in the container and
reweigh the container. Subtract the weight of the
empty container from the weight of the full one and
divide that difference by 10. The resulting value is
the material’s weight per cc. This value can then
be used to very accurately determine the volume
of material collected in the above tests.
Ransburg
77
LN-9407-00.2

Ransburg
RCS-2 User Manual - Manual Change
MANUAL CHANGE SUMMARY
This manual was published to supercede Service Manual LN-9407-00.2, RCS-2
User Manual to make the following changes:
1. Change logo.
LN-9407-00.2
78

Service Manual Price: $50.00 (U.S.)
Manufacturing
1910 North Wayne Street
Angola, Indiana 46703-9100
Telephone: 260/665-8800
Fax: 260/665-8516
Technical/Service Assistance
Telephone: 800/ 233-3366
Fax: 419/ 470-2071
www.ransburg.com
Technical Support Representative will direct you to the appropriate
telephone number for ordering Spare Parts.
© 2013 Ransburg. All Rights reserved.
Models and specications subject to change without notice.
Form No. LN-9407-00.3
Litho in U.S.A.
03/13
 Loading...