

Page 1

A
x
User Guide
Guía del usuario
Guide d’utilisation
Guida per l’uso
Benutzerhandbuch
ppendi
English (3–11)
Español (12–20)
Français (21–29)
Italiano (30–38)
Deutsch (39–47)
English (48–49)
Page 2

2
Page 3

User Guide (English)
Introduction
Thank you for purchasing the Black & Blue. At Rane, performance and reliability mean as
much to us as they do to you. That’s why we design our equipment with only one thing in
mind—to make your performance the best it can be.
Box Contents
Black & Blue
Power Cable
Euroblock
(3) Bluetooth antennas
User Guide
Rack Ears (attached to unit)
Safety & Warranty Manual
Support
For the latest information about this product (documentation, technical specifications, system
requirements, compatibility information, etc.) and product registration, visit rane.com.
For additional product support, visit rane.com/support.
3
Page 4
r
r
A
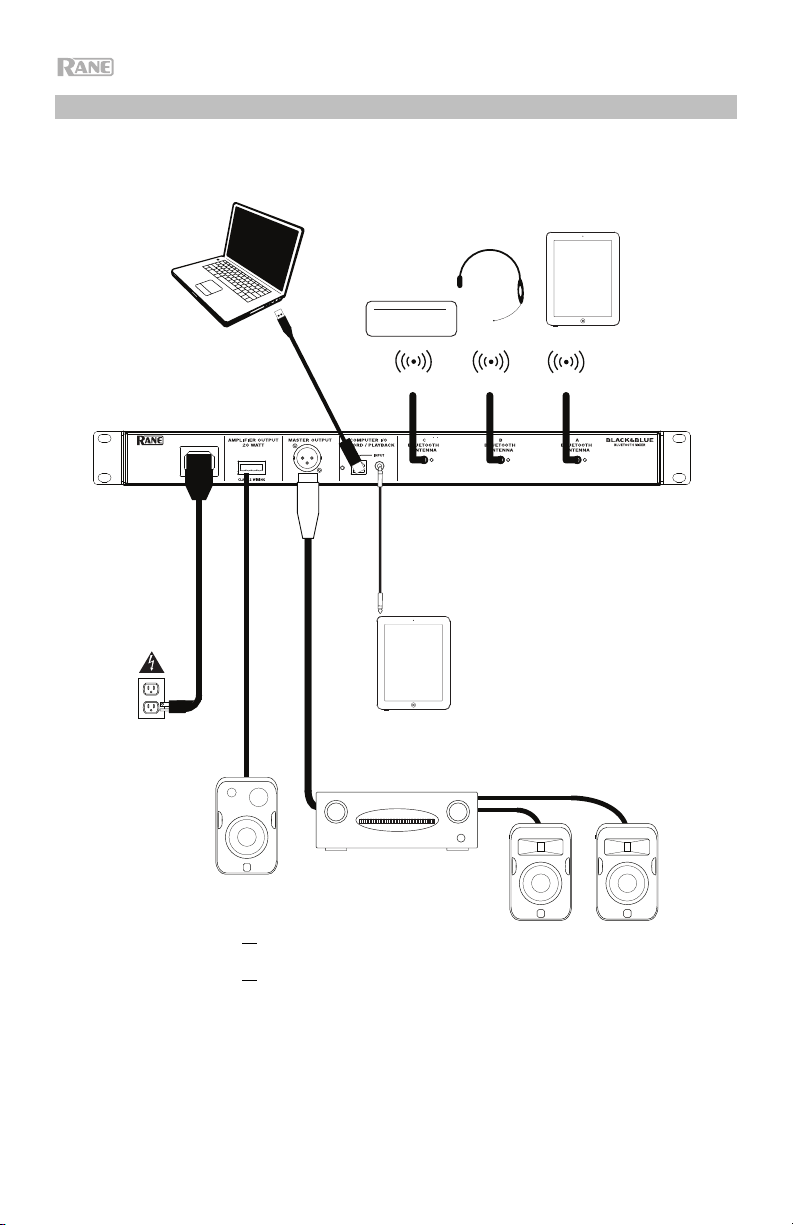
Setup Diagram
Items not listed under Introduction > Box Contents are sold separately.
Bluetooth
Sources
Computer
Bluetooth
ntennas
Tablet
Powe
Amplifier
Loudspeake
4 - 8
or
70 V
or
100 V
4
Loudspeakers
Page 5
Application Examples
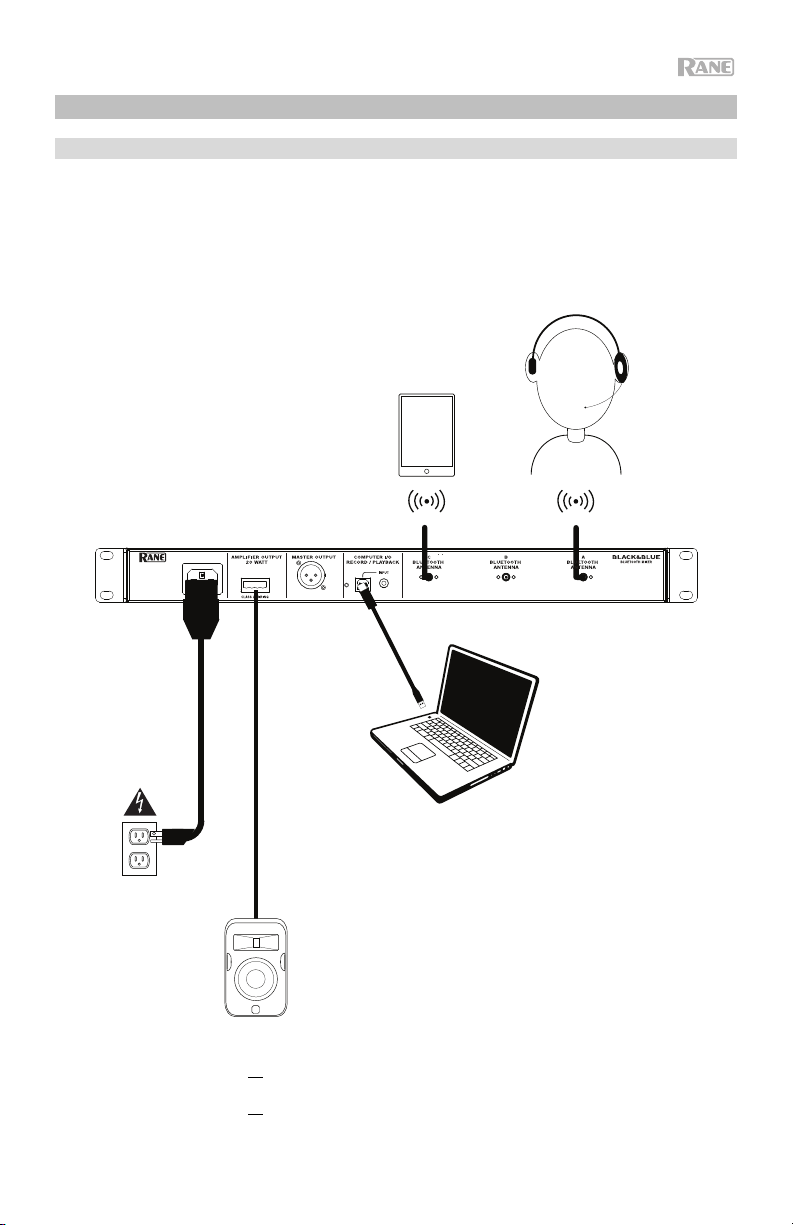
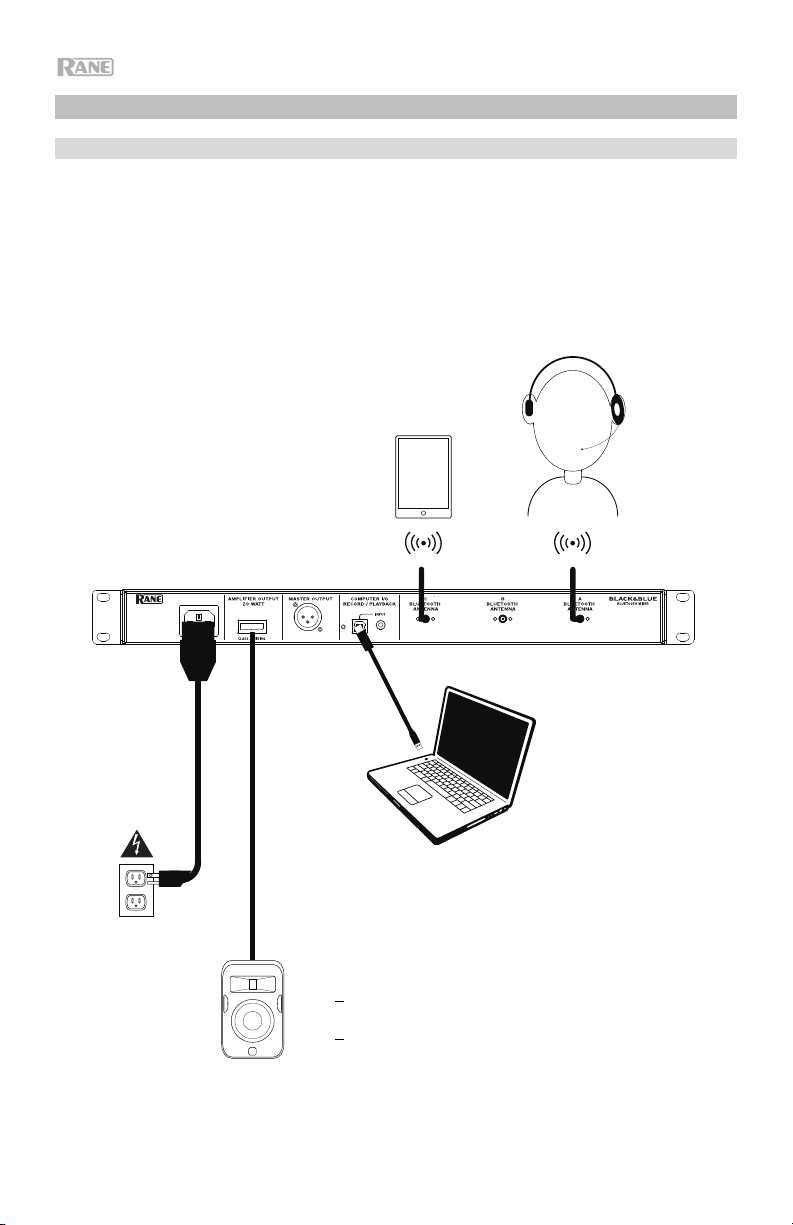
Meeting Room
This example shows:
- a head-worn Bluetooth microphone paired to Bluetooth input A
- the Amplifier output connected to full-range speakers
- the Mix button is depressed to monitor a mix of the Bluetooth A and Computer sources
Power
Loudspeaker
4 - 8
or
70 V
or
100 V
Tablet
Bluetooth
microphone
Computer
5
Page 6
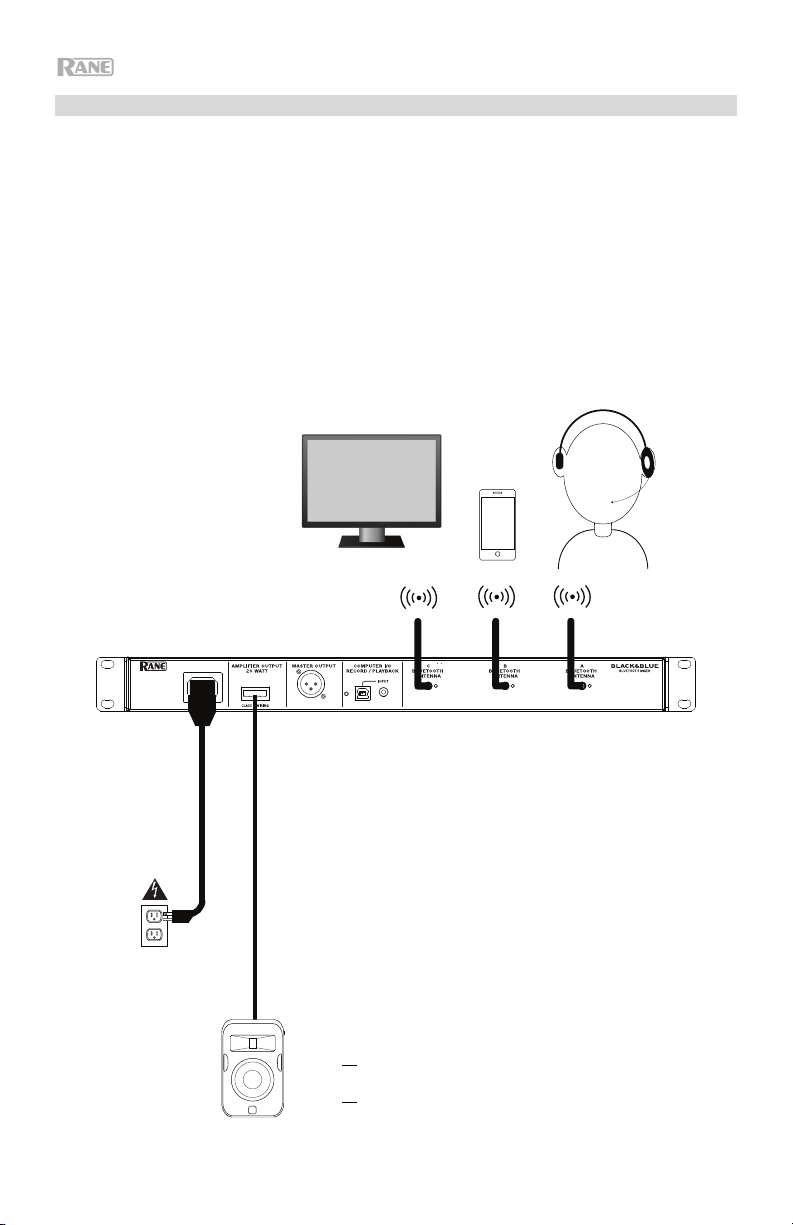
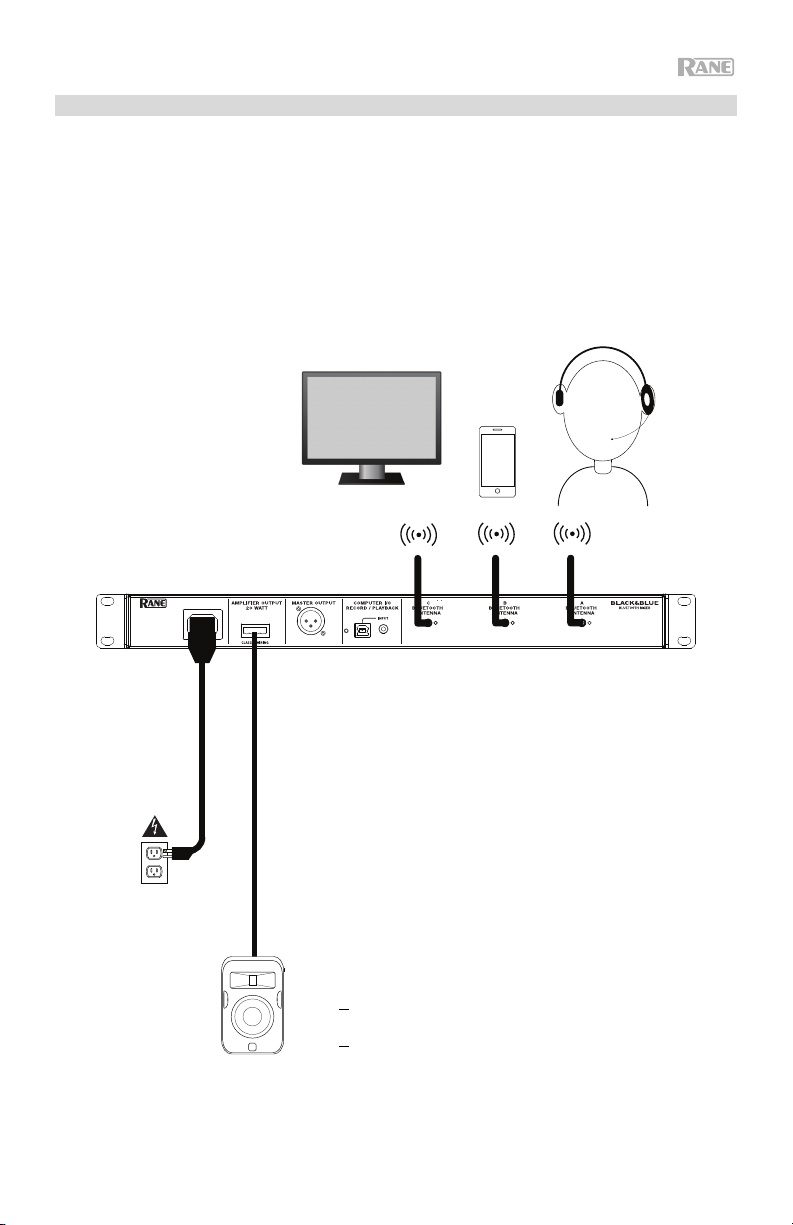
Coffee Bar
This example shows:
- a head-worn Bluetooth microphone paired to Bluetooth input A
- a smartphone paired to Bluetooth input B
- a TV with a Bluetooth transmitter paired to Bluetooth input C
- the Amplifier output connected to full-range speakers
Power
6
TV with Bluetooth
transmitter
Smartphone
Loudspeaker
4 - 8
or
70 V
or
100 V
Bluetooth
microphone
Page 7

9
1
234
1
234
1
234
5
6
7
8
10
11
12
13
14
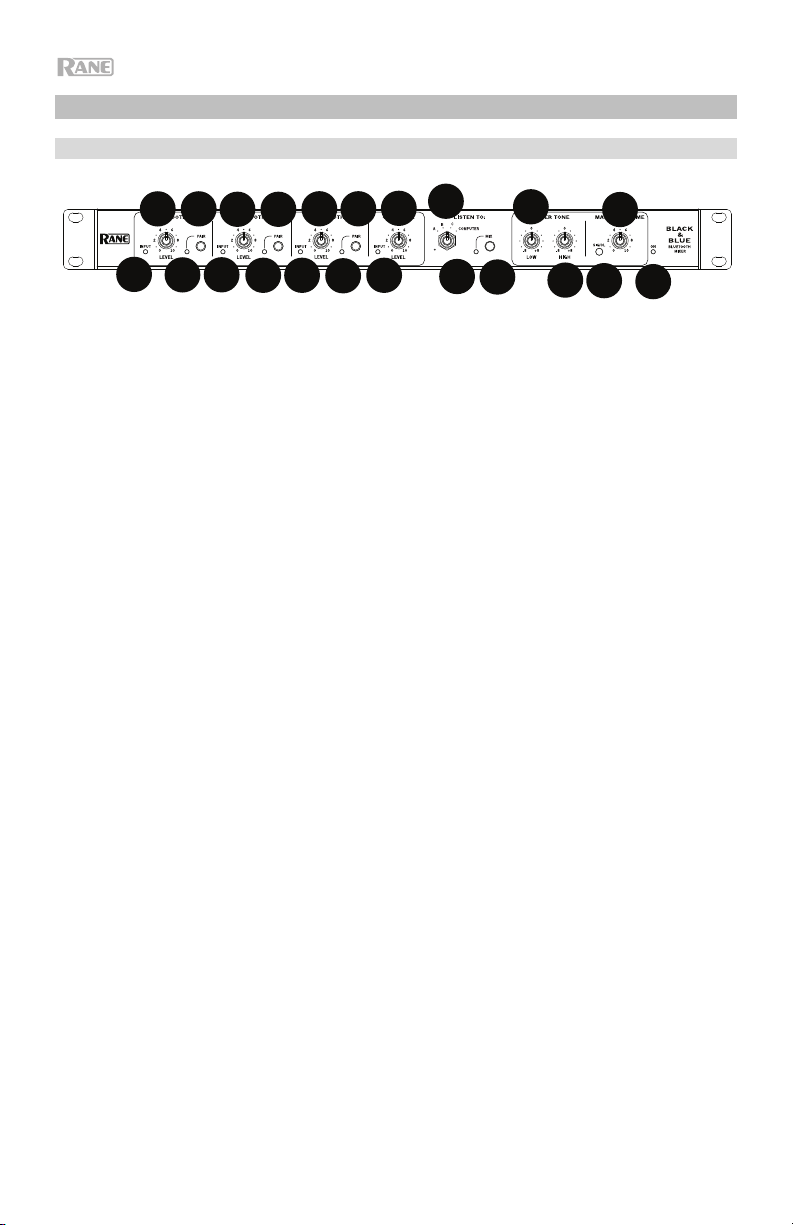
Features
Front Panel
10
1. Bluetooth Signal LED: This LED will illuminate green when the Bluetooth signal
exceeds -40 dBFS.
2. Input Level Knob: Turn this knob to adjust the input signal level for the
individual Bluetooth channels.
3. Pairing LED: This LED flashes when the Pair button is pressed and held for 3
seconds and is lit solid when paired to a Bluetooth source.
4. Pair Button: Press and hold this button for 3 seconds to pair to a Bluetooth
source. Press and hold this button for 3 seconds to disconnect from a
Bluetooth source.
5. Computer Signal LED: This LED will illuminate green when the computer USB
signal exceeds -40 dBFS.
6. Computer Level Knob: Turn this knob to adjust the level for the computer USB
playback or the 1/8” (3.5 mm) TRS input.
7. Listen To Knob: Turn this knob to select which input signal (Bluetooth A, B, C,
or Computer) is sent to the Master output and Amplifier output.
8. Mix LED: This LED illuminates yellow when Mix mode is selected.
9. Mix Button: Depress this button to monitor a blend of the Bluetooth A, B, C,
and Computer sources.
10. Low EQ: Adjust this knob to increase or decrease the low (bass) frequencies
for all signals.
11. High EQ: Adjust this knob to increase or decrease the high (treble) frequencies
for all signals.
12. Signal LED: This LED illuminates green when the master volume exceeds -40
dBFS, illuminates yellow when the signal exceeds -10 dBFS, and illuminates
red when the signal exceeds 0 dBFS. When the LED illuminates red, reduce the
Input Level knob settings to prevent “clipping” and distortion.
13. Master Volume Knob: Turn this knob to increase or decrease the signal level
sent to the Master output, Amplifier output, and USB port.
14. Power LED: This LED illuminates yellow when the unit is powered on.
11
13
12
14
7
Page 8
9
1
234
1
234
1
234
5
6
7
8
10
11
12
13
14
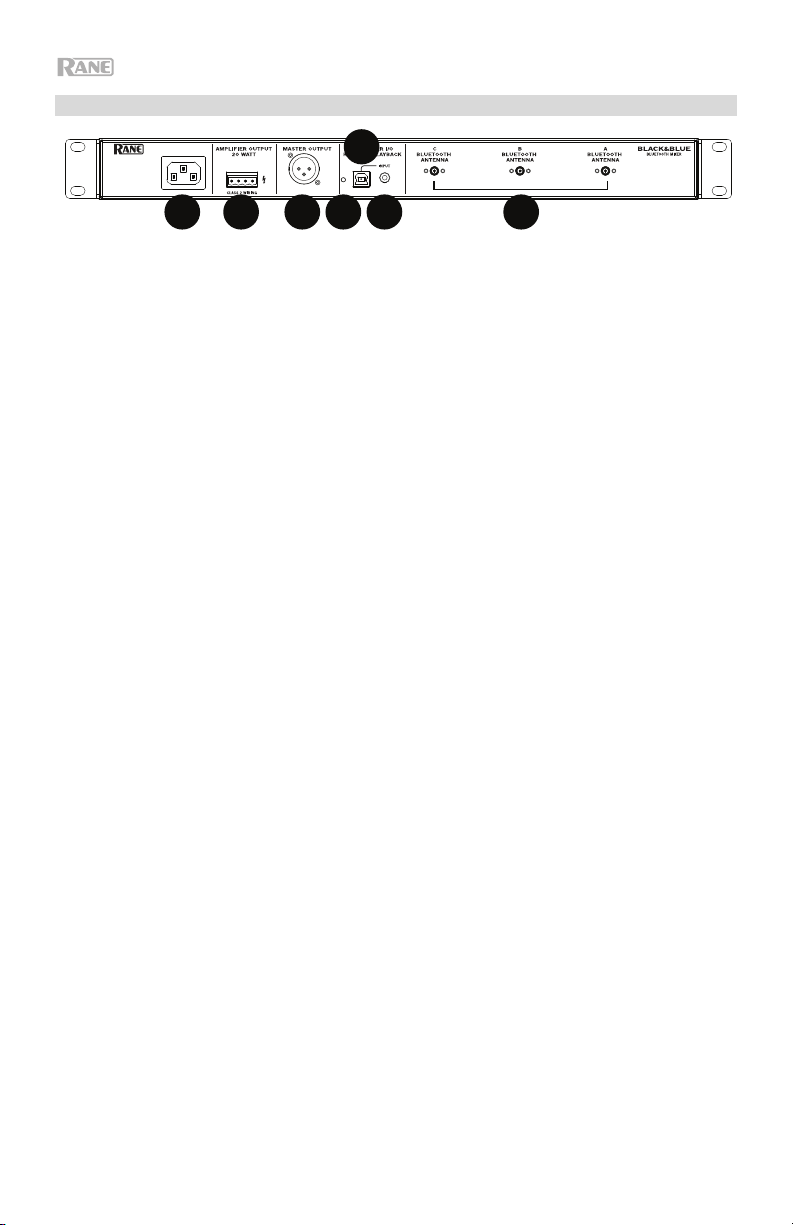
1 2 3 456 7
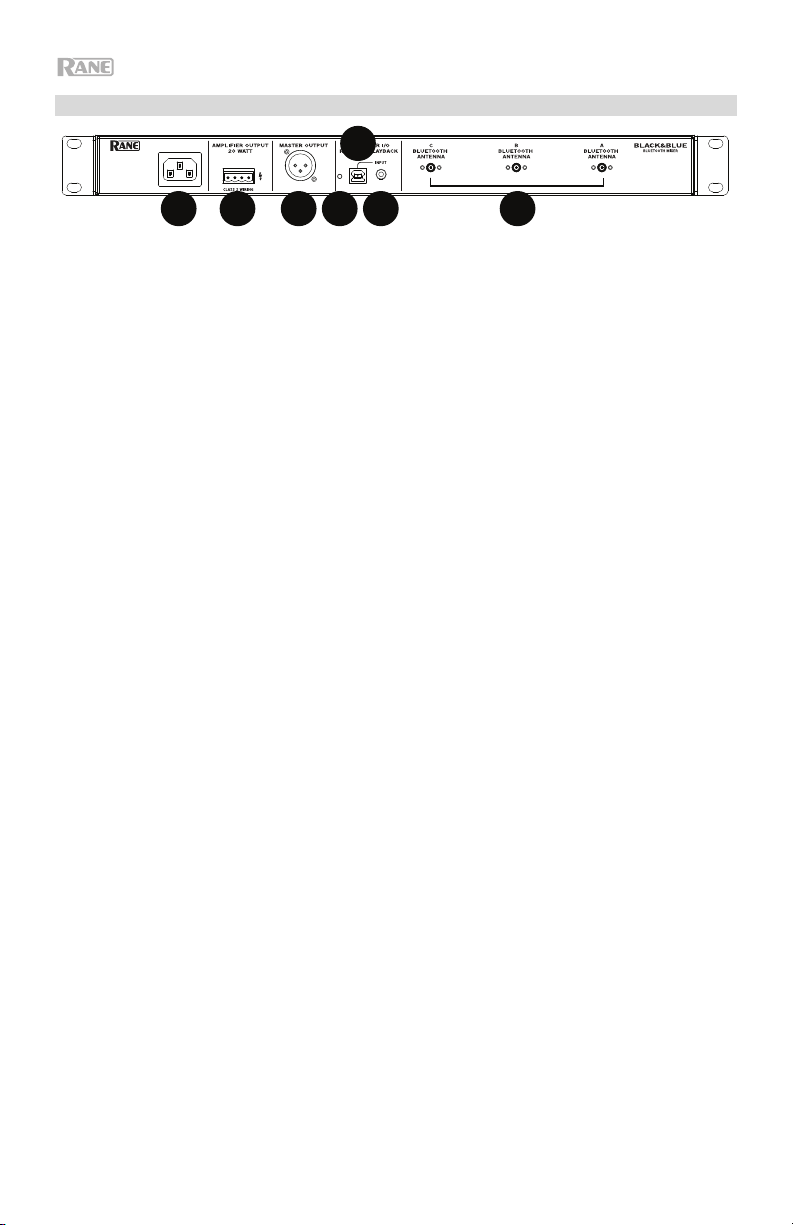
Rear Panel
1. Power Input: Connect the included power cable here.
2. Power Amplifier Output: This sends the master signal to your loudspeaker. 4 –
32 ohms, 70 V, and 100 V connections are provided. Connect this to your
loudspeaker using a properly terminated 4-pin Euroblock connector and
appropriately sized wire. See the section Operation > Euroblock Setup for
more information.
Note: This output always provides a mono signal.
3. Master Output: Connect this balanced mono XLR output to a powered
speaker.
Note: This output is always summed to a mono signal.
4. USB LED: This LED will illuminate when the USB port is connected to a
computer’s USB port.
5. USB Port: Connect a USB cable from here to a computer’s USB port for audio
playback and recording.
Note: This output always provides a mono signal.
6. 1/8” (3.5 mm) TRS Input: Connect a line-level device such as a smartphone,
tablet, CD player, etc. here.
Note: Connecting to this jack disconnects USB input (playback). USB output
(recording) is unaffected. This allows for recording of three Bluetooth signals
and the 1/8" (3.5 mm) TRS input to the computer using the USB port.
7. Bluetooth Antenna: Connect the 3 included Bluetooth antennas here for
pairing to Bluetooth sources.
8
Page 9

Operation
Pairing Bluetooth Sources
1. Connect the 3 included Bluetooth antennas to the connectors on Black & Blue’s
rear panel.
2. Power on Black & Blue. The power LED will illuminate solid.
3. Press and hold the Pair button for 3 seconds for the particular Bluetooth input
you desire to connect to for your Bluetooth source. The Pair LED will flash.
4. Pair your Bluetooth source to Black & Blue.
a. Smartphone: open Bluetooth settings in your smartphone, find Black &
Blue-A, and connect. The pair LED on Black & Blue will be lit solid when
connected.
b. Bluetooth headset mic: turn on the headset mic. The mic LED will flash
quickly when searching for Black & Blue. When paired successfully, the
mic LED will flash slowly and Black & Blue’s pair LED will be lit solid.
Note: Bluetooth audio cannot be sent to a headset’s headphones.
Bluetooth audio will only be sent from a Bluetooth headset’s microphone to
Black & Blue.
To disconnect from a Bluetooth source, press and hold the Bluetooth input’s Pairing
button for 3 seconds.
Note: If the mic connects with a different Bluetooth source which is not desired (for
example, Black & Blue-A), press the search button on the Bluetooth headset mic
and connect to the next Bluetooth source (Black & Blue-B or Black & Blue-C).
Note: Repeat the above steps to connect additional Bluetooth sources.
Selecting Sources
1. Connect the included Bluetooth antennas to the connectors on Black & Blue’s
rear panel.
2. Press and hold the Pair button(s) for 3 seconds to connect to your Bluetooth
source(s).
3. Connect a USB cable from Black & Blue's USB port to an available USB port on
your computer.
4. Adjust the Listen To knob to select Bluetooth A, B, C, or Computer as source.
Press the Mix button to hear a blend of all sources from the Master output and
Power Amplifier output.
5. Turn the Master Volume knob to adjust the signal level sent to the Master
output and Power Amplifier output.
9
Page 10
Recording
1. Connect a USB cable from Black & Blue's USB port to an available USB port on
your computer.
2. See the section Computer Setup > Setting Black & Blue as the Default
Recording Device
to set Black & Blue as the default recording device.
3. On your computer, open your preferred recording software.
Note: To hear music while it’s playing or to monitor recording content, listen
through your computer's speakers, or connect Black & Blue's Master output to
an amplifier or powered speakers.
Playback
You can listen to the music on your computer through Black & Blue. See the section
Computer Setup > Setting Black & Blue as the Default Playback Device before
playing back your computer music.
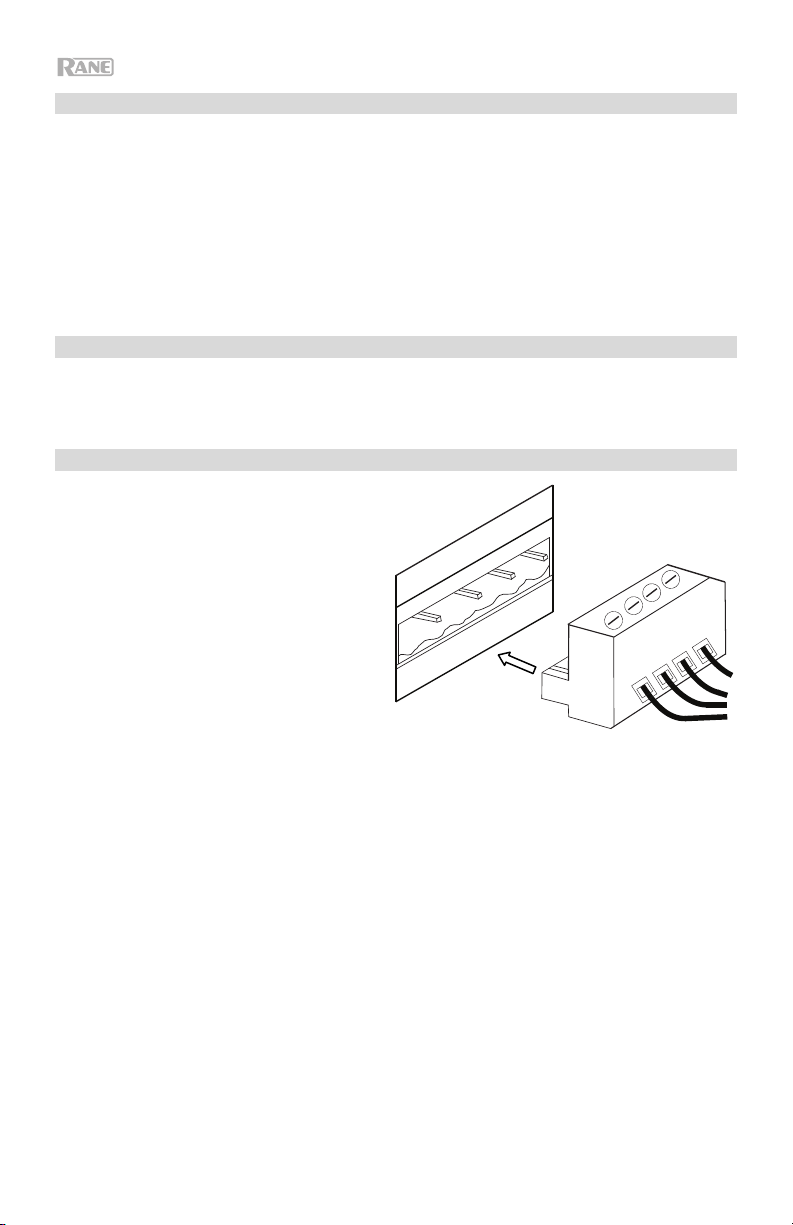
Euroblock Setup
1. Connect a device to the 1/8” (3.5
mm) TRS Input or pair your
Bluetooth source to Black & Blue.
2. Strip approximately 1/4 inch (6
mm) insulation off the wire ends.
When using stranded wires, twist
the cable ends to form a taut lead.
This will help avoid short circuits
due to loose strands. Insert the
wire end into the appropriate port.
Push the wire until it reaches the
lowest point in connector. Use a
small (-) screwdriver to secure each wire. Ensure the connections fit securely,
but not too tight. Check the connection by attempting to pull the wire out of the
connector. If it comes out, loosen the screw and repeat the process to secure
more firmly.
3. Attach the Euroblock connector to the Amplifier Output on Black & Blue.
4. Make sure all Level knobs are set to “0”.
5. Connect the included power cable from the power input to a power outlet;
power on Black & Blue.
6. Adjust the individual channel input Level knobs and the Master Volume knob
to get a strong signal without distortion or “clipping”. Reduce the Master
Volume setting when Signal LED continuously illuminates red.
7. Adjust the Low and High tone knobs to contour the sound for your liking.
Note: The Low tone knob affects rumbles, thumps, and other bass sounds.
Reduce this setting when only speech signals are being mixed. The High tone
knob affects brightness and clarity. Reduce this setting when the content
sounds shrill or harsh.
10
Page 11

Computer Setup
Setting Black & Blue as the Default Recording Device
• Windows XP: Click Start Menu Control Panel (or Settings Control Panel in Classic View)
Sound and Audio Devices. Click the Audio tab and under Sound recording, select USB Audio
Codec as the default device. Select Properties and click the Advanced tab to select the Default
Format, 44100 Hz or 48000 Hz.
• Windows Vista: Click Start Menu Control Panel (or Settings Control Panel in Classic View)
Hardware and Sound Sound. Click the Recording tab and select USB Audio Codec as the default
device. Select Properties and click the Advanced tab to select the Default Format, 44100 Hz or 48000
Hz.
• Windows 7: Click Start Menu Control Panel Sound. Click the Recording tab and select USB
Audio Codec as the default device. Select Properties and click the Advanced tab to select the Default
Format, 44100 Hz or 48000 Hz.
• Windows 8: From the Start Menu, click the lower-left corner of the screen to bring yourself to the
Desktop. In the bottom-right corner of the Taskbar, locate the Volume Control "Speaker" icon. Rightclick the speaker and select Playback Devices. In the Windows Sound control panel select the
Recording tab. If USB Audio Codec does not have a green "check mark" symbol next to it, right-click
it and select "Set as Default Device". Select Properties and click the Advanced tab to select the
Default Format, 44100 Hz or 48000 Hz.
• Windows 10: Click Start Menu Control Panel (or Settings Control Panel in Classic View)
Hardware and Sound Sound. In the Windows Sound control panel select the Recording tab. If
USB Audio Codec does not have a green "check mark" symbol next to it, right-click it and select "Set
as Default Device". Select Properties and click the Advanced tab to select the Default Format,
44100 Hz or 48000 Hz.
• Mac OS X 10.4-10.11: Click the upper-left "apple" icon then click System Preferences Sound.
Click the Input tab. From the menu, select USB Audio Codec as the device. Under Format, select
44100 Hz or 48000 Hz.
Setting Black & Blue as the Default Playback Device
• Windows XP: Click Start Menu Control Panel (or Settings Control Panel in Classic View)
Sound and Audio Devices. Click the Audio tab and under Sound playback, select USB Audio
Codec.
• Windows Vista: Click Start Menu Control Panel (or Settings Control Panel in Classic View)
Hardware and Sound Sound. Click the Playback tab and select USB Audio Codec.
• Windows 7: Click Start Menu Control Panel Sound. Click the Playback tab and select USB
Audio Codec as the default device.
• Windows 8: From the Start menu, click the lower-left corner of the screen to bring yourself to the
Desktop. In the bottom-right corner of the Taskbar, locate the Volume Control "Speaker" icon. Rightclick the speaker and select Playback Devices. The Windows Sound control panel should appear set
on the Playback tab. If USB Audio Codec does not have a green "check mark" symbol next to it, rightclick it and select "Set as Default Device".
• Windows 10: Click Start Menu Control Panel Sound. Click the Playback tab and select USB
Audio Codec as the default device.
• Mac OS X 10.4-10.11: Click the upper-left "apple" icon then click System Preferences Sound.
Click the Output tab. From the menu, select USB Audio Codec as the device.
11
Page 12

Guía del usuario (Español)
Introducción
Gracias por comprar el Black & Blue. En Rane, el rendimiento y la confiabilidad significan
tanto para nosotros como para usted. Por eso es que diseñamos nuestros equipos con una
sola cosa en mente—hacer que pueda tocar su mejor interpretación.
Contenido de la caja
Black & Blue
Cable del suministro eléctrico
Euroblock
(3) antenas Bluetooth
Guía del usuario
Orejetas para rack (sujetas a la unidad)
Manual sobre la seguridad y garantía
Soporte
Para obtener la información más reciente acerca de este producto (documentación,
especificaciones técnicas, requisitos de sistema, información de compatibilidad, etc.) y
registrarlo, visite rane.com.
Para obtener soporte adicional del producto, visite rane.com/support.
12
Page 13
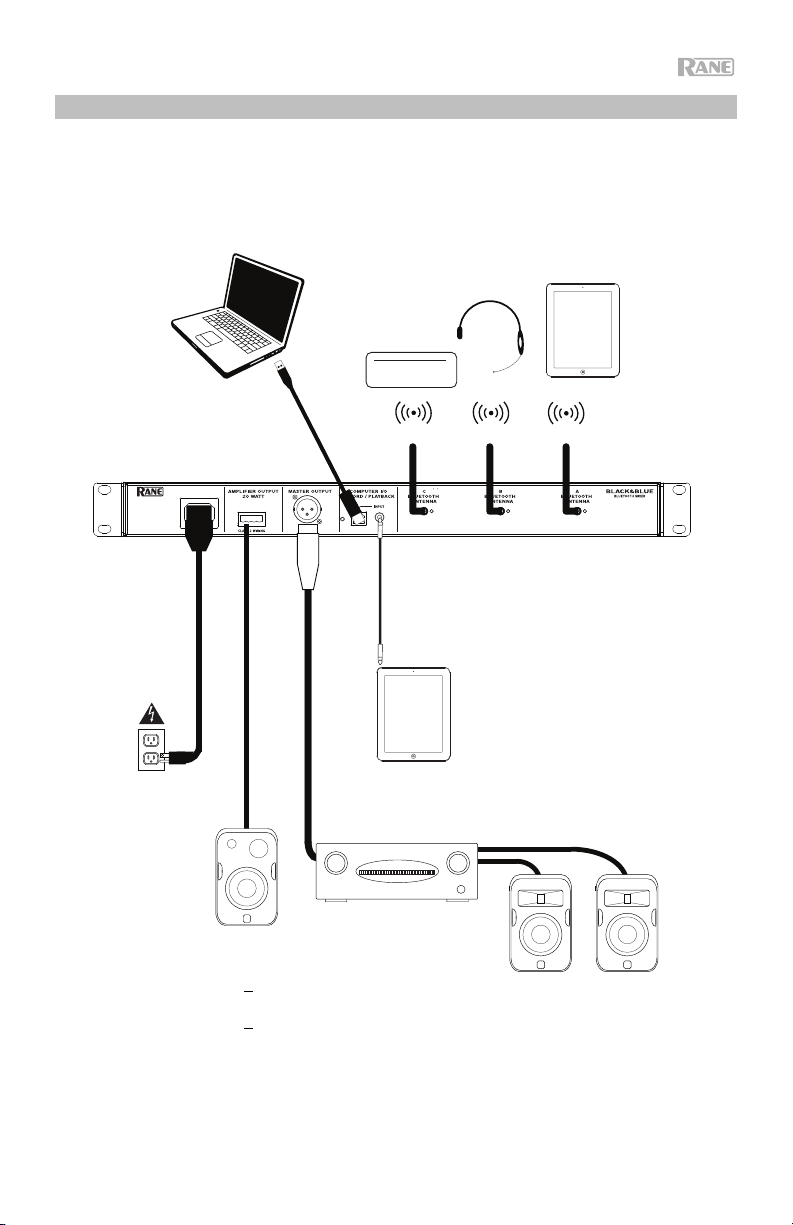
Diagrama de instalación
Los elementos que no se enumeran en Introducción > Contenido de la caja se venden por
separado.
Ordenador
Fuentes
Bluetooth
Bluetooth
Antenas
Suministro
eléctrico
Black Series
4 - 8
o
70 V
o
100 V
Amplificador
Tableta
Altavoces
13
Page 14
Ejemplos de aplicación
Salas de reunión
Este ejemplo muestra:
- Un micrófono Bluetooth de diadema apareado a la entrada Bluetooth
- La salida Amplifier conectada a los altavoces de rango completo
- El botón
Computer
14
Mix se pulsa para monitorizar una mezcla de las fuentes de Bluetooth A y
Tableta
Ordenador
Suministro
eléctrico
Black Series
4 - 8
o
70 V
o
100 V
A
Micrófono
Bluetooth
Page 15
Cafetería
Este ejemplo muestra:
- Un micrófono Bluetooth de diadema apareado a la entrada Bluetooth
- Un teléfono inteligente (smartphone) apareado con la
- Una TV con un transmisor Bluetooth apareado a la entrada Bluetooth
- La salida Amplifier conectada a los altavoces de rango completo
Suministro eléctrico
Una TV con un
transmisor Bluetooth
Black Series
4 - 8
o
70 V
o
100 V
entrada Bluetooth B
Teléfono
inteligente
(smartphone)
A
C
Micrófono
Bluetooth
15
Page 16
9
1
234
1
234
1
234
5
6
7
8
10
11
12
13
14
Características
Panel frontal
10
1. LED de señal Bluetooth: Este LED se iluminará de color verde cuando la señal
Bluetooth supere los -40 dBFS.
2. Perilla de nivel de entrada: Gire esta perilla para ajustar el nivel de la señal de
entrada de los
3. LED de apareamiento: Este LED parpadea cuando el botón Pair se mantiene
pulsado durante 3 segundos y se enciende de forma permanente cuando está
apareado con una fuente Bluetooth.
4. Botón Pair: Mantenga pulsado este botón durante 3 segundos para aparear la
unidad con una fuente Bluetooth. Mantenga pulsado este botón durante 3
segundos para desconectar la unidad de una fuente Bluetooth.
5. LED de señal del ordenador: Este LED se iluminará de color verde cuando la
señal USB del ordenador supere los -40 dBFS.
6. Perilla de nivel Computer: Gire esta perilla para ajustar el nivel de la
reproducción USB del ordenador o la entrada TRS de 3,5 mm (1/8 pulg.).
7. Perilla Listen To: Gire esta perilla para seleccionar la señal de entrada
(Bluetooth A, B, C o Computer) que se envía a la salida Master y a la salida
Amplifier.
8. LED
9. Botón
10. Ecualización de graves: Ajuste esta perilla para aumentar o disminuir las
11. Ecualización de agudos: Ajuste esta perilla para aumentar o disminuir las
12. LED de señal: Este LED se enciende de color verde cuando el volumen
13. Perilla
14. LED de encendido: Este LED se enciende de color amarillo cuando la unidad
16
Mix: Este LED se enciende de color amarillo cuando se selecciona el
modo mezcla.
Mix: Pulse este botón para monitorizar una mezcla de las fuentes
Bluetooth A, B, C y Computer.
frecuencias bajas (graves) de todas las señales.
frecuencias altas (agudos) de todas las señales.
maestro excede los -40 dBFS, se entiende color amarillo cuando excede los 10 dBFS y se ilumina de color rojo cuando excede los 0 dBFS. Cuando el LED
se encienda de color rojo, disminuye el ajuste de la perilla de nivel de entrada
para evitar el "recorte" y la distorsión.
Master Volume: Gire esta perilla para aumentar o disminuir el nivel de
la señal enviada a la salida maestra, la salida del amplificador y el puerto USB.
está encendida.
canales Bluetooth individuales.
11
13
12
14
Page 17

9
1
234
1
234
1
234
5
6
7
8
10
11
12
13
14
1 2 3 456 7
Panel trasero
1. Entrada de corriente: Conecte aquí el cable de alimentación incluido.
2. Salida del amplificador de potencia: Esta salida envía la señal maestra a su
altavoz. Se proveen conexiones de 4 – 32 ohmios, y 70 y 100 V. Conecte esta
salida su altavoz utilizando un conector Euroblock de 4 patillas correctamente
terminado y un cable del tamaño apropiado. Consulte la sección
Funcionamiento > Configuración de Euroblock para obtener más
información.
Nota: Esta salida siempre emite una señal mono.
3. Salida
4. LED USB: Este LED se enciende cuando el puerto USB se conecta al puerto
5. Puerto USB: Conecte un cable USB desde aquí hasta el puerto USB de un
6. Entrada TRS de 3,5 mm (1/8 pulg.): Conecte aquí un dispositivo de nivel de
7. Bluetooth Antenna: Conecte aquí las 3 antenas Bluetooth incluidas a fin de
Master: Conecte esta salida XLR mono balanceada a un altavoz
alimentado.
Nota: Esta salida siempre se suma a una señal mono.
USB de un ordenador.
ordenador para reproducir y grabar audio.
Nota: Esta salida siempre emite una señal mono.
línea tal como un teléfono inteligente (smartphone), tableta, reproductor de CD,
etc.
Nota: Al conectar un dispositivo a este conector, se desconecta la entrada
USB (reproducción). La salida de USB (grabación) no se ve afectada. Esto
permite la grabación de tres señales Bluetooth y de la entrada TRS de 3,5 mm
(1/8 pulg.) en el ordenador a través del puerto USB.
aparearse con fuentes Bluetooth.
17
Page 18

Funcionamiento
Apareamiento de fuentes Bluetooth
1. Conecte las 3 antenas Bluetooth incluidas en los conectores del panel trasero
del Black & Blue.
2. Encienda el Black & Blue. El LED de encendido se enciende de forma
permanente.
3. Mantenga pulsado durante 3 segundos el botón Pair de la entrada Bluetooth en
particular a la cual desea conectarse para utilizar como fuente Bluetooth. Su
LED de apareamiento parpadeará.
4. Aparee su fuente Bluetooth con el Black & Blue.
a. Teléfono inteligente (smartphone): abra los ajustes de Bluetooth en su
teléfono inteligente, busque Black & Blue-A, y establezca la conexión. El
LED de apareamiento del Black & Blue se encenderá de forma permanente
una vez conectado.
b. Micrófono con auriculares Bluetooth: encienda el micrófono con
auriculares. El LED del micrófono parpadeará rápidamente mientras busca al
Black & Blue. Una vez apareado exitosamente, el LED del micrófono
parpadeará lentamente y el LED de apareamiento del Black & Bluese
encenderá de forma permanente.
Nota: No se puede enviar audio Bluetooth a los auriculares. El audio Bluetooth sólo
se puede enviar desde un micrófono con auriculares Bluetooth al Black & Blue.
Para desconectarse de una fuente Bluetooth, mantenga pulsado el botón de
apareamiento de la entrada Bluetoothdurante 3 segundos.
Nota: Si el micrófono se conecta a una fuente Bluetooth distinta no deseada (por
ejemplo, el Black & Blue-A), pulse el botón de búsqueda del micrófono con
auriculares Bluetooth y conéctese a la siguiente fuente Bluetooth (Black & Blue-B o
Black & Blue-C).
Nota: Repita los pasos anteriores para conectarse a fuentes Bluetooth adicionales.
Selección de fuentes
1. Conecte las antenas Bluetooth incluidas en los conectores del panel trasero del
Black & Blue.
2. Mantenga pulsado el/los botón(es) Pair durante 3 segundos para conectar su(s)
fuente(s) Bluetooth.
3. Conecte un cable USB desde el puerto USB del Black & Blue a un puerto USB
disponible en el ordenador.
4. Ajuste la perilla Listen To para seleccionar Bluetooth A, B, C o Computer como
fuente. Pulse el botón Mix para escuchar una mezcla de todas las fuentes
desde la
salida Master y la salida del amplificador de potencia.
5. Gire la perilla Master Volume para ajustar el nivel de la señal enviada a la salida
Master y la salida del amplificador de potencia.
18
Page 19

Grabación
1. Conecte un cable USB desde el puerto USB del Black & Blue a un puerto USB disponible
en el ordenador.
2. Consulte la sección Configuración del ordenador > Configuración del Black & Blue
como dispositivo de grabación predeterminado
para configurar al Black & Blue como
dispositivo de grabación predeterminado.
3. En su ordenador, abra su software de grabación preferido.
Nota: Para escuchar la música mientras se reproduce o para monitorizar el contenido que
se está grabando, escuche a través de los altavoces de su ordenador o conecte la salida
Master del Black & Blue a un amplificador o a altavoces alimentados.
Reproducción
Puede escuchar la música en su ordenador a través del Black & Blue. Consulte la sección
Configuración del ordenador > Configuración del Black & Blue como dispositivo de
reproducción predeterminado
antes de reproducir la música de su ordenador.
Configuración de Euroblock
1. Conecte un dispositivo a la entrada
TRS de 3,5 mm (1/8 pulg.) o aparee
su fuente Bluetooth con el Black &
Blue.
2. Pele aproximadamente 6 mm (1/4
pulgadas) de aislamiento de los
extremos del cable. Si utiliza cables
trenzados, retuerza los extremos de los
cables para formar un cable tenso.
Esto ayudará a evitar cortocircuitos
debido a cables sueltos. Inserte el
extremo del cable en el puerto
apropiado. Empuje el cable hasta que
llegue al punto más bajo del conector. Utilice un destornillador (-) pequeño para sujetar
cada cable. Asegúrese de que las conexiones queden firmes pero no demasiado
apretadas. Verifique la conexión intentando tirar del cable para arrancarlo del conector.
Si el cable se sale, afloje el tornillo y repita el proceso para sujetarlo con mayor firmeza.
3. Conecte el conector Euroblock a la salida
4. Asegúrese de que todas las perillas Level estén ajustadas en “0”.
5. Conecte el cable de corriente incluido desde la entrada de corriente a la toma de
corriente; encienda el Black & Blue.
6. Ajuste las perillas Level de cada canal individual y la perilla Master Volume para obtener
una señal fuerte sin distorsiones ni "recortes". Disminuya el ajuste de Master Volume
cuando el LED de señal se encienda continuamente de color rojo.
7. Ajuste las perillas de tono Low y High para darle al sonido el contorno que desee.
Nota: La perilla de tono Low afecta los retumbos los golpes y otros sonidos graves.
Disminuya este ajuste únicamente cuando se estén mezclando señales de voz. La perilla
de tono High afecta el brillo y la claridad. Disminuya este ajuste cuando el contenido
suene estridente o chillón.
Amplifier en el Black & Blue.
19
Page 20

Configuración del ordenador
Cómo ajustar el Black & Blue como dispositivo de grabación predeterminado
• Windows XP: Haga clic en el menú Start (Inicio) Control Panel (Panel de control) (o Settings [Ajustes] Control Panel
[Panel de control] en la vista clásica) Sound and Audio Devices (Dispositivos de sonido y audio). Haga clic en la
pestaña Audio y bajo Sound recording (Grabación de sonido), seleccione USB Audio Codec como dispositivo
predeterminado. Seleccione Properties (Propiedades) y haga clic en la pestaña Advanced (Avanzado) para seleccionar
el formato predeterminado, 44100 o 48000 Hz.
• Windows Vista: Haga clic en el menú Start (Inicio) Control Panel (Panel de control) (o Settings Control Panel
[Configuración > Panel de control] en la vista clásica) Hardware and Sound (Hardware y sonido) Sound (Sonido).
Haga clic en la pestaña Recording (Grabación) y seleccione USB Audio Codec (Códec de audio USB) como dispositivo
predeterminado. Seleccione Properties (Propiedades) y haga clic en la pestaña Advanced (Avanzado) para seleccionar
el formato predeterminado, 44100 o 48000 Hz.
• Windows 7: Haga clic en el menú Start (Inicio) Control Panel (Panel de control) Sound (Sonido). Haga clic en la
pestaña Recording (Grabación) y seleccione USB Audio Codec (Códec de audio USB) como dispositivo
predeterminado. Seleccione Properties (Propiedades) y haga clic en la pestaña Advanced (Avanzado) para seleccionar
el formato predeterminado, 44100 o 48000 Hz.
• Windows 8: Desde el menú Start (Inicio), haga clic en la esquina inferior izquierda de la pantalla para entrar al escritorio.
En la esquina inferior derecha de la barra de tareas, localice el icono del "Altavoz" de control de volumen. Haga clic
derecho en el altavoz y seleccione Playback Devices (Dispositivos de reproducción). En el panel de control Windows
Sound (Sonido de Windows), seleccione la pestaña Recording. Si el Códec de audio USB no tiene el símbolo de la
"marca de verificación" verde junto a ella, haga clic derecho en la misma y seleccione "Set as Default Device"
(Configurar como dispositivo predeterminado). Seleccione Properties (Propiedades) y haga clic en la pestaña Advanced
(Avanzado) para seleccionar el formato predeterminado, 44100 o 48000 Hz.
• Windows 10: Haga clic en el menú Start (Inicio) Control Panel (Panel de control) (o Settings Control Panel
[Configuración > Panel de control] en la vista clásica) Hardware and Sound (Hardware y sonido) Sound (Sonido).
En el panel de control Windows Sound (Sonido de Windows), seleccione la pestaña Recording. Si el Códec de audio
USB no tiene el símbolo de la "marca de verificación" verde junto a ella, haga clic derecho en la misma y seleccione "Set
as Default Device" (Configurar como dispositivo predeterminado). Seleccione Properties (Propiedades) y haga clic en la
pestaña Advanced (Avanzado) para seleccionar el formato predeterminado, 44100 o 48000 Hz.
• Mac OS X 10.4-10.11: Haga clic en el icono superior izquierdo de la manzana y luego en System Preferences Sound
(Preferencias del sistema > Sonido). Haga clic en la pestaña Input. En el menú seleccione USB Audio Codec (Códec de
audio USB) como dispositivo. En Format (Formato), seleccione 441000 o 48000 Hz.
Cómo ajustar el Black & Blue como dispositivo de reproducción predeterminado
• Windows XP: Haga clic en el menú Start (Inicio) Control Panel (Panel de control) (o Settings [Ajustes] Control
Panel [Panel de control] en la vista clásica) Sound and Audio Devices (Dispositivos de sonido y audio). Haga clic en
la pestaña Audio y bajo Sound playback (Reproducción de sonido), seleccione USB Audio Codec (Códec de audio
USB).
• Windows Vista: Haga clic en el menú Start (Inicio) Control Panel (Panel de control) (o Settings Control Panel
[Configuración > Panel de control] en la vista clásica) Hardware and Sound (Hardware y sonido) Sound (Sonido).
Haga clic en la pestaña Playback (Reproducción) y seleccione USB Audio Codec (Códec de audio USB).
• Windows 7: Haga clic en el menú Start (Inicio) Control Panel (Panel de control) Sound (Sonido). Haga clic en la
pestaña Playback (Reproducción) y seleccione USB Audio Codec (Códec de audio USB) como dispositivo
predeterminado.
• Windows 8: Desde el menú Start (Inicio), haga clic en la esquina inferior izquierda de la pantalla para entrar al escritorio.
En la esquina inferior derecha de la barra de tareas, localice el icono del "Altavoz" de control de volumen. Haga clic
derecho en el altavoz y seleccione Playback Devices (Dispositivos de reproducción). El panel de control Windows
Sound (Sonido de Windows) debe aparecer en la pestaña Playback (Reproducción). Si el Códec de audio USB no tiene
el símbolo de la "marca de verificación" verde junto a ella, haga clic derecho en la misma y seleccione "Set as Default
Device" (Configurar como dispositivo predeterminado).
• Windows 10: Haga clic en el menú Start (Inicio) Control Panel (Panel de control) Sound (Sonido). Haga clic en la
pestaña Playback (Reproducción) y seleccione USB Audio Codec (Códec de audio USB) como dispositivo
predeterminado.
• Mac OS X 10.4-10.11: Haga clic en el icono superior izquierdo de la manzana y luego en System Preferences
Sound (Preferencias del sistema > Sonido). Haga clic en la pestaña Output (Salida). En el menú seleccione USB Audio
Codec (Códec de audio USB) como dispositivo.
20
Page 21

Guide d’utilisation (Français)
Présentation
Merci d’avoir fait l’acquisition du Black & Blue. Chez Rane, la performance et la fiabilité sont
aussi importantes pour nous qu’ils le sont pour vous. C’est pourquoi nous concevons nos
produits avec une seule chose en tête — faire de votre performance la meilleure qui soit.
Contenu de la boîte
Black & Blue
Câble d'alimentation
Euroblock
3 antennes Bluetooth
Guide d'utilisation
Équerres de montage fixes
Consignes de sécurité et informations concernant la garantie
Assistance technique
Pour les toutes dernières informations concernant la documentation, les spécifications
techniques, la configuration requise, la compatibilité et l’enregistrement du produit, veuillez
visiter le site rane.com.
Pour de l’assistance supplémentaire, veuillez visiter le site rane.com/support.
21
Page 22

Schéma d'installation
Les articles qui ne figurent pas dans la section Présentation > Contenu de la boîte sont
vendus séparément.
Ordinateur
Sources
Bluetooth
Antennes
Bluetooth
22
Alimentation
Enceinte
4 - 8
ou
70 V
ou
100 V
Tablette
Amplificateur
Enceintes
Page 23

Exemples d’applications
Salle de réunion
Cet exemple montre :
- un casque d’écoute Bluetooth avec microphone est jumelé à l’entrée Bluetooth A
- la sortie Amplifier est reliée à des enceintes à gamme étendue
- la touche Mix est enfoncée afin de contrôler le mix des sources Bluetooth A et Computer
Alimentation
Enceinte
4 - 8
ou
70 V
ou
100 V
Tablette
Microphone
Bluetooth
Ordinateur
23
Page 24

Bar à café
Cet exemple montre :
- un casque d’écoute Bluetooth avec microphone est jumelé à l’entrée Bluetooth A
- un smartphone est jumelé à l’entrée Bluetooth B
- un téléviseur avec émetteur Bluetooth est jumelé à l’entrée Bluetooth C
- la sortie Amplifier est reliée à des enceintes à gamme étendue
24
Téléviseur avec
émetteur Bluetooth
Smartphone
Alimentation
Enceinte
4 - 8
ou
70 V
ou
100 V
Microphone
Bluetooth
Page 25

9
1
234
1
234
1
234
5
6
7
8
10
11
12
13
14
Caractéristiques
Panneau avant
10
1. DEL du signal Bluetooth : Cette DEL devient verte lorsque le signal Bluetooth
dépasse -40 dBfs.
2. Bouton du niveau d’entrée Bluetooth : Ce bouton permet d'ajuster le niveau
du signal d’entrée pour chaque canal Bluetooth.
3. DEL de jumelage : Cette DEL clignote lorsque la touche Pair est maintenue
enfoncée pendant 3 secondes et demeure allumée lorsque l'appareil est
connecté à une source Bluetooth.
4. Touche Pair : Maintenir cette touche enfoncée pendant 3 secondes permet de
jumeler une source Bluetooth. Pour déjumeler un appareil Bluetooth, maintenir
cette touche enfoncée pendant 3 secondes.
5. DEL du signal Computer : Cette DEL devient verte lorsque le signal USB
provenant de l’ordinateur dépasse -40 dBfs.
6. Bouton du niveau d’entrée Computer : Ce bouton permet d’ajuster le volume
de l’entrée USB ou de l’entrée TRS 3,5 mm.
7. Bouton Listen To : Ce bouton permet de sélectionner le signal d’entrée
(Bluetooth A, B, C ou Computer) qui est transmis aux sorties Master et
Amplifier.
8. DEL Mix : Cette DEL s’allume afin d’indiquer que le mode Mix est sélectionné.
9. Touche Mix : Enfoncer cette touche permet de contrôler le mix des sources
Bluetooth A, B, C et Computer.
10. Égalisation basses fréquences : Ce bouton permet d'augmenter et de
diminuer les basses fréquences de tous les signaux.
11. Égalisation hautes fréquences : Ce bouton permet d'augmenter et de
diminuer les hautes fréquences de tous les signaux.
12. DEL du signal : Cette DEL devient verte lorsque le niveau du volume principal
dépasse -40 dBfs, devient jaune lorsque le signal dépasse -10 dBfs et devient
rouge lorsque le signal dépasse 0 dBfs. Lorsqu’elle devient rouge, réduisez le
réglage du bouton du niveau d’entrée afin d’éviter l’écrêtage et la distorsion
du signal.
Bouton Master Volume : Ce bouton permet d’augmenter et de diminuer le
13.
niveau du signal qui est transmis aux sorties Master, Amplifier et USB.
14. DEL d’alimentation : Cette DEL devient jaune lorsque l’appareil est sous
tension.
11
13
12
14
25
Page 26

9
1
234
1
234
1
234
5
6
7
8
10
11
12
13
14
1 2 3 456 7
Panneau arrière
1. Entrée d'alimentation : Cette entrée permet de brancher le câble
d’alimentation fourni.
2. Sortie d'amplificateur : Cette sortie transmet le signal principal à une
enceinte. Les options de connexions sont 4 – 32 ohms, 70 V et 100 V. Utilisez
un connecteur Euroblock à 4 broches correctement câblé et du câble pour
enceinte de bonne dimension pour raccorder cette sortie à l’enceinte. Veuillez
consulter la section
plus.
Remarque : Cette sortie fournit uniquement un signal mono.
3. Sortie Master : Cette sortie XLR mono symétrique permet de relier une
enceinte amplifiée.
Remarque : Cette sortie fournit uniquement un signal mono combiné.
4. DEL USB : Cette DEL s’allume lorsque le port USB de l’appareil est relié au
port USB d’un ordinateur.
5. Port USB : Ce port permet de relier le port USB d’un ordinateur afin de l’utiliser
pour la lecture et l’enregistrement.
Remarque : Cette sortie fournit uniquement un signal mono.
6. Entrée TRS 3,5 mm : Cette entrée permet de brancher un appareil à niveau
ligne comme un smartphone, une tablette, un lecteur de disques compacts,
etc.
Remarque : Lorsque cette entrée est utilisée, l’entrée USB est désactivée et ne
peut être utilisée pour la lecture. La sortie USB demeure activée et peut être
utilisée pour l’enregistrement. Ceci permet d’enregistrer les signaux provenant
des trois entrées Bluetooth et de l’entrée TRS 3,5 mm sur l’ordinateur relier au
port USB.
7. Bluetooth Antenna : Ces entrées permettent de brancher les trois antennes
Bluetooth fournies afin de jumeler les sources Bluetooth.
Fonctionnement > Connexion Euroblock afin d’en savoir
26
Page 27

Fonctionnement
Jumelage des sources Bluetooth
1. Branchez les trois antennes Bluetooth fournies aux connecteurs arrière du Black
& Blue.
2. Mettez le Black & Blue sous tension. La DEL d’alimentation devrait s’allumer.
3. Maintenez la touche Pair de l’entrée Bluetooth à laquelle vous souhaitez
connecter votre appareil Bluetooth enfoncée pendant 3 secondes. La DEL de
jumelage devrait clignoter.
4. Jumelez votre source Bluetooth au Black & Blue.
a. Smartphone : Accédez aux paramètres Bluetooth de votre smartphone,
recherchez Black & Blue-A, puis lancez le jumelage. La DEL de jumelage
du Black & Blue s'allume lorsque le jumelage a réussi.
b. Casque d’écoute Bluetooth avec microphone : Mettez le casque sous
tension. La DEL microphone clignotera rapidement lors du jumelage avec le
Black & Blue. Lorsque le jumelage est réussi, la DEL microphone clignote
lentement et la DEL de jumelage du Black & Blue demeure allumée.
Remarque : Le signal audio Bluetooth ne peut pas être transmis au casque.
Seul le signal Bluetooth provenant du casque est transmis au Black & Blue.
Pour déjumeler un appareil Bluetooth, maintenez la touche Pair de l’entrée
Bluetooth enfoncée pendant 3 secondes.
Remarque : Si le casque d’écoute avec microphone se connecte avec une autre
source Bluetooth que celle souhaitée (par exemple, Black & Blue-A), appuyez sur la
touche de rechercher sur le casque d’écoute afin de le connecter à la source
Bluetooth (Black & Blue-B ou Black & Blue-C) suivante.
Remarque : Répétez les étapes ci-dessus afin de connecter des sources Bluetooth
supplémentaires.
Sélection des sources
1. Branchez les antennes Bluetooth fournies aux connecteurs arrière du Black &
Blue.
2. Maintenez la ou les touches Pair enfoncées pendant 3 secondes afin de
connecter la ou les sources Bluetooth.
3. Branchez un câble USB du port USB du Black & Blue à un port USB sur votre
ordinateur.
4. Utilisez le bouton Listen To afin de sélectionner l'entrée Bluetooth A, B, C ou
Computer comme source. Appuyez sur la touche Mix afin d’écouter le mix de
toutes les sources transmis aux sorties Master et Amplifier.
5. Utilisez le bouton Master Volume de régler le niveau du signal qui est transmis
aux sorties Master et Amplifier.
27
Page 28

Enregistrement
1. Branchez un câble USB du port USB du Black & Blue à un port USB sur votre
ordinateur.
2. Veuillez consulter la section Configuration de l’ordinateur > Configuration du
Black & Blue comme périphérique d’enregistrement par défaut avant de
commencer à enregistrer.
3. Sur votre ordinateur, lancez le logiciel d’enregistrement que vous souhaitez utiliser.
Remarque : Pour écouter la musique durant la lecture ou pour contrôler
l'enregistrement, vous pouvez utiliser les haut-parleurs de votre ordinateur, ou
encore, brancher la sortie Master du Black & Blue à un amplificateur ou à des
enceintes amplifiées.
Lecture
Vous pouvez écouter de la musique sur votre ordinateur par l'intermédiaire du Black &
Blue. Veuillez consulter la section Configuration de l’ordinateur > Configuration du
Black & Blue comme périphérique de lecture audio par défaut avant de faire la
lecture de la musique sur votre ordinateur.
Connexion Euroblock
1. Reliez un appareil à l’entrée TRS
3,5 mm ou jumelez une source
Bluetooth au Black & Blue.
2. Dénudez les extrémités des fils
d’environ 6 mm. Si vous utilisez du fil
multibrin, toronnez les portions
dénudées de façon à ce qu’ils
forment un fil unique afin qu’aucun
toron de câble ne soit pas raccordé
et ne cause un court circuit. Insérez
l’extrémité du fil dans le port
approprié. Insérez le fil jusqu'à ce
qu'il atteigne le fond du connecteur.
Utilisez un petit tournevis plat pour fixer chaque fil. Veillez à ce que les connexions
soient bien visées, mais pas trop serrées. Vérifiez le raccordement en tirant
doucement sur les fils. Si un fil se dégage, desserrez la vis et répétez l'opération afin
de fixer le fil plus fermement.
3. Fixez le connecteur Euroblock à la sortie Amplifier du Black & Blue.
4. Veillez à ce que tous les boutons Level soient réglés sur « 0 ».
5. Utilisez le câble d'alimentation fourni pour brancher l’entrée d’alimentation à une
prise secteur, puis mettez le Black & Blue sous tension.
6. Réglez les boutons Level de chaque entrée et le bouton Master Volume afin
d’obtenir un signal puissant, sans distorsion ni écrêtage. Diminuez le réglage du
bouton Master Volume lorsque la DEL du signal devient rouge.
7. Utilisez les boutons Low et High afin de régler le son selon votre goût.
Remarque : Le bouton Low affecte les grondements, les bruits sourds et autres
sons graves. Réduisez ce réglage uniquement lorsque des signaux vocaux sont
mixés. Le bouton High affecte l'intensité et la précision sonore. Réduisez ce réglage
uniquement lorsque les sons produits sont stridents ou abrasifs.
28
Page 29

Configuration de l’ordinateur
Configuration du Black & Blue comme appareil d’enregistrement par défaut
• Windows XP : Cliquez sur Démarrer Panneau de configuration (ou Paramètres Panneau de
configuration en Affichage classique) Sons et périphériques audio. Cliquez sur l’onglet Audio sous
Enregistrement audio et sélectionnez « USB audio codec » comme périphérique par défaut.
Sélectionnez Propriétés et cliquez sur l’onglet Advancé afin de sélectionner le format par défaut,
44 100 Hz ou 48 000 Hz.
• Windows Vista : Cliquez sur Démarrer Panneau de configuration (ou Paramètres Panneau de
configuration en Affichage classique) Matériel et audio Son. Cliquez sur l’onglet Enregistrement
et sélectionnez USB audio codec comme appareil par défaut. Sélectionnez Propriétés et cliquez sur
l’onglet Advancé afin de sélectionner le format par défaut, 44 100 Hz ou 48 000 Hz.
• Windows 7 : Cliquez sur Démarrer Panneau de configuration Son. Cliquez sur l’onglet
Enregistrement et sélectionnez USB audio codec comme appareil par défaut. Sélectionnez
Propriétés et cliquez sur l’onglet Advancé afin de sélectionner le format par défaut, 44 100 Hz ou
48 000 Hz.
• Windows 8 : Dans le menu Démarrer, cliquez sur le coin inférieur gauche de l'écran pour afficher le
bureau. Dans le coin inférieur droit de la barre des tâches, recherchez l’icône de la commande de
volume « haut-parleur ». Faites un clic droit sur l’icône du haut-parleur et sélectionnez Périphériques
de lecture. Dans le panneau de configuration Son Windows, sélectionnez l'onglet Enregistrement. Si
le champs USB Audio Codec ne dispose pas d’un crochet, faites un clic droit et sélectionnez « Définir
comme périphérique par défaut ». Sélectionnez Propriétés et cliquez sur l’onglet Advancé afin de
sélectionner le format par défaut, 44 100 Hz ou 48 000 Hz.
• Windows 10 : Cliquez sur Démarrer Panneau de configuration (ou Paramètres Panneau de
configuration en Affichage classique) Matériel et audio Son. Dans le panneau de configuration
Son Windows, sélectionnez l'onglet Enregistrement. Si le champ USB Audio Codec ne dispose pas
d’un crochet, faites un clic droit et sélectionnez « Définir comme périphérique par défaut ». Sélectionnez
Propriétés et cliquez sur l’onglet Advancé afin de sélectionner le format par défaut, 44 100 Hz ou
48 000 Hz.
• Mac OS X 10.4-10.11 : Cliquez sur la pomme Apple située dans le coin supérieur gauche de l’écran et
sélectionnez Préférences Système Sons. Cliquez sur l’onglet Entrée. À partir du menu,
sélectionnez USB Audio Codec comme périphérique par défaut. Sous le Format, sélectionnez
44 100 Hz ou 48 000 Hz.
Configuration du Black & Blue comme appareil de lecture par défaut
• Windows XP : Cliquez sur Démarrer Panneau de configuration (ou Paramètres Panneau de
configuration en Affichage classique) Sons et périphériques audio. Cliquez sur l’onglet Audio sous
Enregistrement audio et sélectionnez « USB audio codec » comme périphérique par défaut.
• Windows Vista : Cliquez sur Démarrer Panneau de configuration (ou Paramètres Panneau de
configuration en Affichage classique) Matériel et audio Son. Cliquez sur l’onglet Lecture et
sélectionnez USB Audio Codec comme périphérique par défaut.
• Windows 7 : Cliquez sur Démarrer Panneau de configuration Son. Cliquez sur l’onglet Lecture
et sélectionnez USB Audio Codec comme périphérique par défaut.
• Windows 8 : Dans le menu Démarrer, cliquez sur le coin inférieur gauche de l'écran pour afficher le
bureau. Dans le coin inférieur droit de la barre des tâches, recherchez l’icône de la commande de
volume « haut-parleur ». Faites un clic droit sur l’icône du haut-parleur et sélectionnez Périphériques
de lecture. Le panneau de configuration Sons Windows devrait s’afficher sur l'onglet Lecture. Si le
champ USB Audio Codec ne dispose pas d’un crochet, faites un clic droit et sélectionnez « Définir
comme périphérique par défaut ».
• Windows 10 : Cliquez sur Démarrer Panneau de configuration Son. Cliquez sur l’onglet
Lecture et sélectionnez USB Audio Codec comme périphérique par défaut.
• Mac OS X 10.4-10.11 : Cliquez sur la pomme Apple située dans le coin supérieur gauche de l’écran et
sélectionnez Préférences Système Sons. Cliquez sur l’onglet Sortie. À partir du menu, sélectionnez
USB Audio Codec comme périphérique par défaut.
29
Page 30

Guida per l'uso (Italiano)
Introduzione
Grazie per aver acquistato il Black & Blue. Per noi di Rane, prestazioni e affidabilità contano
moltissimo, proprio come per te. Ecco perché progettiamo i nostri dispositivi con un unico
obiettivo in mente: rendere le tue prestazioni le migliori possibili.
Contenuti della confezione
Black & Blue
Cavo di alimentazione
Euroblock
3 antenne Bluetooth
Guida per l'uso
Attacchi per il rack (fissati all’apparecchio)
Istruzioni di sicurezza e garanzia
Assistenza
Per le ultime informazioni in merito a questo prodotto (documentazione, specifiche tecniche,
requisiti di sistema, informazioni sulla compatibilità, ecc.) e per effettuarne la registrazione,
recarsi alla pagina rane.com.
Per ulteriore assistenza sul prodotto, recarsi alla pagina rane.com/support.
30
Page 31

Schema di configurazione
Elementi non elencati sotto Introduzione > Contenuti della confezione sono venduti
separatamente.
Computer
Fonti Bluetooth
Antenne
Bluetooth
Alimentazione
Altoparlante
4 - 8
oppure
70 V
oppure
100 V
Amplificatore
Tablet
Altoparlanti
31
Page 32

Esempi di applicazione
Sala conferenze
Questo esempio mostra:
- un microfono Bluetooth con archetto collegato all’ingresso A Bluetooth
- l’uscita Amplifier collegata ad altoparlanti a gamma completa
- il tasto Mix è premuto per monitorare un mix delle fonti Bluetooth A e Computer
Alimentazione
32
Altoparlante
4 - 8
oppure
70 V
oppure
100 V
Tablet
Microfono
Bluetooth
Computer
Page 33

Bar
Questo esempio mostra:
- un microfono Bluetooth con archetto collegato all’ingresso A Bluetooth
- uno smartphone collegato all’ingresso B Bluetooth
- una TV con un trasmettitore Bluetooth collegato all’ingresso C Bluetooth
- l’uscita Amplifier collegata ad altoparlanti a gamma completa
TV con trasmettitore
Bluetooth
Smartphone
Alimentazione
Altoparlante
4 - 8
oppure
70 V
oppure
100 V
Microfono Bluetooth
33
Page 34

9
1
234
1
234
1
234
5
6
7
8
10
11
12
13
14
Caratteristiche
Pannello anteriore
10
1. LED segnale Bluetooth: questo LED si illumina di verde quando il segnale
Bluetooth supera -40 dBFS.
2. Manopola Input Level: girare questa manopola per regolare il livello del
segnale di ingresso per i singoli canali Bluetooth.
3. LED di collegamento: questo LED lampeggia quando il tasto Pair viene
mantenuto premuto per 3 secondi ed è fisso quando è collegato a una fonte
Bluetooth.
4. Tasto Pair: tenere premuto questo tasto per 3 secondi per effettuare il
collegamento a una fonte Bluetooth. Tenere premuto questo tasto per 3
secondi per annullare il collegamento a una fonte Bluetooth.
5. LED segnale computer: questo LED si illumina di verde quando il segnale
USB del computer supera -40 dBFS.
6. Manopola livello Computer: girare questa manopola per regolare il livello della
riproduzione USB del computer o dell’ingresso TRS da 1/8” (3,5 mm).
7. Manopola Listen To: girare questa manopola per selezionare quale segnale di
ingresso (Bluetooth A, B, C o Computer) inviare all’uscita Master e all’uscita
Amplifier.
8. LED Mix: questo LED si illumina di giallo quando viene selezionata la modalità
Mix.
9. Tasto Mix: premere questo tasto per monitorare una miscela di fonti Bluetooth
A, B, C e Computer.
10. Low EQ: regolare questa manopola per alzare o abbassare le frequenze basse
(bass) di tutti i segnali.
11. High EQ: regolare questa manopola per alzare o abbassare le frequenze alte
(treble) di tutti i segnali.
12. LED segnale: questo LED si illumina di verde quando il volume master supera -
40 dBFS, si illumina di giallo quando il segnale supera -10 dBFS, e si illumina di
rosso quando il segnale supera 0 dBFS. Quando il LED si illumina di rosso,
ridurre i valori della manopola di livello di ingresso per evitare “tagli” e
distorsioni
13. Manopola Master Volume: girare questa manopola per alzare o abbassare il
livello del segnale inviato all’uscita Master, all’uscita Amplificatore e alla porta
USB.
14. LED di alimentazione: questo LED si illumina di giallo quando l'apparecchio
viene acceso.
34
11
13
12
14
Page 35

9
1
234
1
234
1
234
5
6
7
8
10
11
12
13
14
1 2 3 456 7
Pannello posteriore
1. Ingresso di alimentazione: collegare a questo livello il cavo di alimentazione in
dotazione.
2. Uscita amplificatore: invia il segnale master all’altoparlante. Sono presenti
collegamenti a 4 – 32 ohm, 70 V, e 100 V. Collegarla all’altoparlante servendosi
di un connettore Euroblock a 4 perni adeguato e un cavo delle dimensioni
adeguate. Per maggiori informazioni, si veda il paragrafo Operazione >
Configurazione Euroblock.
Nota bene: questa uscita fornisce sempre un segnale mono.
3. Uscita Master: collegare questa uscita mono XLR bilanciata a un altoparlante.
Nota bene: questa uscita è sempre sommata a un segnale mono.
4. LED USB: questo LED si illumina quando la porta USB è collegata alla porta
USB di un computer.
5. Porta USB: collegare un cavo USB da qui alla porta USB di un computer per la
riproduzione e la registrazione di audio
Nota bene: questa uscita fornisce sempre un segnale mono.
6. Ingresso TRS da 1/8” (3,5 mm): collegare un dispositivo a livello di linea quali
uno smartphone, un tablet, un lettore CD, ecc. a questo livello.
Nota bene: collegando questo jack si scollega l’ingresso USB (riproduzione).
L’uscita USB (registrazione) non è coinvolta. Ciò consente la registrazione di tre
segnali Bluetooth e dell’ingresso TRS da 1/8" (3,5 mm) sul computer
servendosi della porta USB.
7. Bluetooth Antenna: collegare a questo livello le 3 antenne Bluetooth in
dotazione per il collegamento a fonti Bluetooth.
35
Page 36

Uso
Collegamento di fonti Bluetooth
1. Collegare le 3 antenne Bluetooth in dotazione ai connettori presenti sul pannello
posteriore del Black & Blue.
2. Accendere il Black & Blue. Il LED di alimentazione si illumina in maniera fissa.
3. Tenere premuto il tasto Pair per 3 secondi per l’ingresso Bluetooth specifico cui
si desidera collegare la fonte Bluetooth. II LED di collegamento Pair lampeggerà.
4. Collegare la fonte Bluetooth al Black & Blue.
a. Smartphone: aprire le configurazioni Bluetooth nello smartphone, trovare
l’Black & Blue-A, e collegarlo. Una volta collegato, il LED sul Black & Blue
sarà illuminato in maniera fissa.
b. Bluetooth cuffie con mic: accendere le cuffie con microfono. Il LED mic
lampeggia rapidamente mentre cerca il Black & Blue. Una volta effettuato il
collegamento, il LED lampeggia lentamente e il LED di collegamento del
Black & Blue sarà illuminato in maniera fissa.
Nota bene: l’audio Bluetooth non può essere inviato alle cuffie. L’audio
Bluetooth sarà inviato unicamente dal microfono di un paio di cuffie
Bluetooth al Black & Blue.
Per interrompere il collegamento da un dispositivo Bluetooth, tenere premuto il
tasto di collegamento dell’ingresso Bluetooth per 3 secondi.
Nota bene: se il microfono si collega con una fonte Bluetooth diversa e non
desiderata (ad esempio Black & Blue-A), premere il tasto di ricerca sul microfono
Bluetooth e collegarlo alla fonte Bluetooth successiva (Black & Blue-B o Black &
Blue-C).
Nota bene: ripetere i passaggi di cui sopra per collegare ulteriori fonti Bluetooth.
Scelta delle fonti
1. Collegare le antenne Bluetooth in dotazione ai connettori presenti sul pannello
posteriore del Black & Blue.
2. Tenere premuto il tasto
3. Collegare un cavo USB dalla porta USB del
disponibile del computer.
Pair per 3 secondi per collegare le fonti Bluetooth.
Black & Blue a una porta USB
4. Regolare la manopola Listen To per selezionare Bluetooth A, B, C o Computer
come fonte. Premere il tasto Mix per sentire un mix di tutte le fonti provenienti
dall’uscita Master e dall’uscita Power Amplifier.
5. Girare la manopola Master Volume per regolare il livello di segnale inviato
all’uscita Master e all’uscita Power Amplifier.
36
Page 37

Registrazione
1. Collegare un cavo USB dalla porta USB del Black & Blue a una porta USB
disponibile del computer.
2. Si veda la sezione Setup computer > Configurazione del Black & Blue come
dispositivo di registrazione predefinito per impostare il Black & Blue come
dispositivo di registrazione predefinito.
3. Sul computer, aprire il proprio software di registrazione preferito.
Nota bene: per ascoltare la musica riprodotta o per monitorare i contenuti registrati,
ascoltare con le casse del computer o collegare l’uscita Master del Black & Blue a
un amplificatore o alle casse.
Riproduzione
È possibile ascoltare la musica presente sul proprio computer tramite il Black & Blue. Si
veda Setup computer > Configurazione del Black & Blue come dispositivo di
riproduzione predefinito prima di riprodurre la musica del computer.
Configurazione Euroblock
1. Collegare un dispositivo all’ingresso
TRS da 1/8” (3,5 mm) oppure
collegare la fonte Bluetooth al
Black & Blue.
2. Spellare l’isolamento del cavo di
circa 6 mm alle estremità. Quando si
utilizzano cavi spellati, torcere le
estremità dei cavi per formare un
cavo teso. Ciò eviterà cortocircuiti
dovuti a fili liberi. Inserire l’estremità
del filo nella porta adeguata.
Spingere il filo fino in fondo al
connettore. Servirsi di un piccolo
cacciavite (-) per fissare ciascun filo. Assicurarsi che le connessioni siano ben
fissate, ma non troppo serrate. Verificare il collegamento tentando di estrarre il filo
dal connettore. Se esce, allentare la vite e ripetere il procedimento per fissarlo in
maniera più salda.
3. Fissare il connettore Euroblock all’uscita Amplifier sul Black & Blue.
4. Assicurarsi che tutte le manopole Level siano impostate su "0”.
5. Collegare il cavo di alimentazione in dotazione dall'ingresso di alimentazione a una
presa di alimentazione. Accendere il Black & Blue.
6. Regolare le manopole di Livello (Level) di ciascun canale e la manopola Master
Volume per ottenere un segnale forte senza distorsione o “salti”. Ridurre
l’impostazione del Master Volume quando il LED di segnale si illumina
continuamente di rosso.
7. Regolare le manopole di tonalità Low e High per regolare il contour del suono a
piacimento.
Nota bene: la manopola Low influisce su rombi, ritmi e altri suoni bassi. Ridurre
questa impostazione quando vengono mixati solo segnali vocali. La manopola di
tonalità High influisce su nitidezza e chiarezza. Ridurre questa impostazione se il
contenuto suona stridulo o duro.
37
Page 38

Configurazione del computer
Configurare il Black & Blue come dispositivo di registrazione predefinito
• Windows XP: cliccare sul Menu Start Pannello di controllo (o Impostazioni Pannello di controllo
nella vista Classica) Suoni e periferiche audio. Cliccare sulla scheda Audio e selezionare USB
Audio Codec come periferica predefinita sotto Registrazione suoni. Selezionare Proprietà e cliccare
sulla scheda Avanzate per selezionare il formato predefinito, 44100 Hz o 48000 Hz.
• Windows Vista: cliccare sul menu Start Pannello di controllo (o Impostazioni Pannello di
controllo nella vista Classica) Hardware e suoni Suoni. Cliccare sulla scheda Registrazione e
selezionare USB Audio Codec come periferica predefinita. Selezionare Proprietà e cliccare sulla
scheda Avanzate per selezionare il formato predefinito, 44100 Hz o 48000 Hz.
• Windows 7: cliccare sul menu Start Pannello di controllo Audio. Cliccare sulla scheda
Registrazione e selezionare USB Audio Codec come periferica predefinita. Selezionare Proprietà e
cliccare sulla scheda Avanzate per selezionare il formato predefinito, 44100 Hz o 48000 Hz.
• Windows 8: nel menu Start, cliccare sull'angolo inferiore sinistro dello schermo per passare al
Desktop. Nell'angolo inferiore destro della Barra delle applicazioni, individuare l'icona "Speaker" di
controllo del Volume. Fare clic col tasto destro del mouse e selezionare Dispositivi di riproduzione.
Nel pannello di controllo Audio di Windows selezionare la scheda Registrazione. Se l'USB Audio
Codec non presenta un segno di spunta verde, fare click col destro e selezionare "Imposta come
dispositivo predefinito". Selezionare Proprietà e cliccare sulla scheda Avanzate per selezionare il
formato predefinito, 44100 Hz o 48000 Hz.
• Windows 10: cliccare sul menu Start Pannello di controllo (o Impostazioni Pannello di controllo
nella vista Classica) Hardware e suoni Suoni. Nel pannello di controllo Audio di Windows
selezionare la scheda Registrazione. Se l'USB Audio Codec non presenta un segno di spunta verde,
fare click col destro e selezionare "Imposta come dispositivo predefinito". Selezionare Proprietà e
cliccare sulla scheda Avanzate per selezionare il formato predefinito,
44100 Hz o 48000 Hz.
• Mac OS X 10.4-10.11: Cliccare sull'icona della mela nell'angolo superiore sinistro, quindi cliccare su
System Preferences Sound. Fare clic sulla scheda “Ingresso”. Dal menu, selezionare “USB Audio
Codec” come periferica. Sotto Format, selezionare 44100 Hz o 48000 Hz.
Configurare il Black & Blue come dispositivo di riproduzione predefinito
• Windows XP: cliccare sul Menu Start Pannello di controllo (o Impostazioni Pannello di controllo
nella vista Classica) Suoni e periferiche audio. Cliccare sulla scheda Audio e selezionare USB
Audio Codec sotto Registrazione suoni.
• Windows Vista: cliccare sul menu Start Pannello di controllo (o Impostazioni Pannello di controllo
nella vista Classica) Hardware e suoni Suoni. Cliccare sulla scheda Riproduzione e selezionare
USB Audio Codec.
• Windows 7: cliccare sul menu Start Pannello di controllo Audio. Cliccare sulla scheda
Riproduzione e selezionare USB Audio Codec come periferica predefinita.
• Windows 8: nel menu Start, cliccare sull'angolo inferiore sinistro dello schermo per passare al
Desktop. Nell'angolo inferiore destro della Barra delle applicazioni, individuare l'icona "Speaker" di
controllo del Volume. Fare clic col tasto destro del mouse e selezionare Dispositivi di riproduzione. Il
pannello di controllo Audio di Windows dovrebbe comparire sulla scheda Riproduzione. Se l'USB
Audio Codec non presenta un segno di spunta verde, fare click col destro e selezionare "Imposta
come dispositivo predefinito".
• Windows 10: cliccare sul menu Start Pannello di controllo Audio. Cliccare sulla scheda
Riproduzione e selezionare USB Audio Codec come periferica predefinita.
• Mac OS X 10.4-10.11: cliccare sull'icona della mela nell'angolo superiore sinistro, quindi cliccare su
System Preferences Sound. Fare clic sulla scheda “Output” (uscita). Dal menu, selezionare “USB
Audio Codec” come periferica.
38
Page 39

Benutzerhandbuch (Deutsch)
Einführung
Vielen Dank für den Kauf des Black & Blue. Bei Rane schätzen wir Leistung und
Zuverlässigkeit - genau wie Sie. Darum entwerfen wir unsere Geräte stets nur mit einem
einzigen Ziel vor Augen: Ihre Anwendung so gut wie möglich zu unterstützen.
Lieferumfang
Black & Blue
Stromkabel
Euroblock
(3) Bluetooth-Antennen
Benutzerhandbuch
Rack-Montagewinkel (am Gerät angebracht)
Sicherheitshinweise und Garantieinformationen
Kundendienst
Für die neuesten Informationen zu diesem Produkt (Dokumentation, technische Daten,
Systemanforderungen, Informationen zur Kompatibilität etc.) und zur Produktregistrierung
besuchen Sie bitte rane.com.
Für zusätzlichen Produkt-Support besuchen Sie rane.com/support.
39
Page 40

Aufbaudiagramm
Teile, die nicht unter Einführung > Lieferumfang angegeben sind, sind separat erhältlich.
Computer
Bluetooth-
Quellen
Bluetooth
Antennen
Stromversorgung
40
Lautsprecher
4 - 8
oder
70 V
oder
100 V
Tablet
Verstärker
Lautsprecher
Page 41

Anwendungsbeispiele
Konferenzraum
Dieses Beispiel zeigt:
- ein am Kopf getragenes Bluetooth-Mikrofon, das mit dem Bluetooth-Eingang A
verbunden ist
- den Amplifier-Ausgang, der mit Full-Range-Lautsprechern verbunden ist
- die Mix-Taste ist heruntergedrückt, um das Monitoring der Bluetooth A und Computer-
Quellen zu ermöglichen
Stromversorgung
Lautsprecher
4 - 8
oder
70 V
oder
100 V
Tablet
Bluetooth-
Mikrofon
Computer
41
Page 42

V
Kaffeebar
Dieses Beispiel zeigt:
- ein am Kopf getragenes Bluetooth-Mikrofon, das mit dem Bluetooth-Eingang A
verbunden ist
- ein Smartphone, das mit dem Bluetooth-Eingang B verbunden ist
- ein TV-Gerät mit einem Bluetooth-Sender, das mit dem Bluetooth-Eingang C verbunden
ist
- den Amplifier-Ausgang, der mit Full-Range-Lautsprechern verbunden ist
Stromversorgung
42
ein TV-Gerät mit
einem Bluetooth-
Sender
Lautsprecher
4 - 8
oder
70 V
oder
100
Bluetooth-Mikrofon
Smartphone
Page 43

9
1
234
1
234
1
234
5
6
7
8
10
11
12
13
14
Funktionen
Vorderseite
10
1. Bluetooth-Signal-LED: Diese LED leuchtet grün, wenn das Bluetooth-Signal -
40 dBFS überschreitet.
2. Eingangspegelregler: Drehen Sie diesen Regler, um den Eingangssignalpegel
für die einzelnen Bluetooth-Kanäle einzustellen.
3. Koppel-LED: Diese LED blinkt, wenn die Pair-Taste gedrückt und 3 Sekunden
lang gedrückt gehalten wird und leuchtet konstant, wenn sie mit einer
Bluetooth-Quelle gekoppelt ist.
4. Koppel-Taste: Halten Sie diese Taste 3 Sekunden lang gedrückt, um eine
Verbindung zu einer Bluetooth-Quelle herzustellen. Halten Sie diese Taste 3
Sekunden lang gedrückt, um die Bluetooth-Verbindung zu trennen.
5. Computer-Signal-LED: Diese LED leuchtet grün, wenn das Computer-USB-
Signal -40 dBFS überschreitet.
6. Computer-Pegelregler: Drehen Sie diesen Knopf, um den Pegel für die USB-
Wiedergabe des Computers oder den 3,5-mm-TRS-Eingang einzustellen.
7. Listen To-Regler: Drehen Sie diesen Regler, um auszuwählen, welches
Eingangssignal (Bluetooth A, B, C oder Computer) an den Master-Ausgang und
den Amplifier-Ausgang gesendet wird.
8. Mix-LED: Diese LED leuchtet gelb, wenn der Mix-Modus ausgewählt ist.
9. Mix-Taste: Drücken Sie diese Taste, um eine Mischung der Bluetooth A-, B-,
C- und Computer-Quellen zu überwachen.
10. Low-EQ: Stellen Sie diesen Regler ein, um die tiefen Frequenzen (Bass) für alle
Signale zu erhöhen oder zu verringern.
11. High-EQ: Stellen Sie diesen Regler ein, um die hohen Frequenzen (Treble) für
alle Signale zu erhöhen oder zu verringern.
12. Signal-LED: Diese LED leuchtet grün, wenn die Master-Lautstärke -40 dBFS
überschreitet, gelb, wenn das Signal -10 dBFS überschreitet und rot, wenn das
Signal 0 dBFS überschreitet. Wenn die LED rot leuchtet, verringern Sie die
Einstellungen des Eingangspegelreglers, um „Clipping“ und Verzerrungen zu
vermeiden.
13. Master Volume-Regler: Drehen Sie diesen Regler, um den Signalpegel zu
erhöhen oder zu verringern, der an den Master-Ausgang, den
Verstärkerausgang und den USB-Anschluss gesendet wird.
14. Power-LED: Diese LED leuchtet gelb, wenn das Gerät eingeschaltet ist.
11
12
13
14
43
Page 44
9
1
234
1
234
1
234
5
6
7
8
10
11
12
13
14
1 2 3 456 7
Rückseite
1. Netzeingang: Schließen Sie das mitgelieferte Netzkabel hier an.
2. Endstufenausgang: Sendet das Master-Signal an Ihren Lautsprecher. Es
stehen 4 - 32 Ohm, 70 V und 100 V Anschlüsse zur Verfügung. Schließen Sie
dies an Ihren Lautsprecher an, indem Sie einen 4-poligen Euroblock-Stecker
und einen entsprechend dimensionierten Draht verwenden. Weitere
Informationen finden Sie im Abschnitt Betrieb > Euroblock-Setup.
Hinweis: Dieser Ausgang liefert immer ein Monosignal.
3. Master-Ausgang: Verbinden Sie diesen symmetrischen Mono-XLR-Ausgang
mit einem aktiven Lautsprecher.
Hinweis: Dieser Ausgang wird immer zu einem Monosignal summiert.
4. USB-LED: Diese LED leuchtet auf, wenn der USB-Anschluss mit dem USB-
Anschluss eines Computers verbunden ist.
5. USB-Anschluss: Schließen Sie hier ein USB-Kabel an den USB-Anschluss
eines Computers an, um Audiowiedergabe und -aufnahme zu ermöglichen.
Hinweis: Dieser Ausgang liefert immer ein Monosignal.
6. 3,5 mm TRS-Eingang: Schließen Sie hier ein Line-Level-Gerät wie ein
Smartphone, ein Tablet, einen CD-Player usw. an.
Hinweis: Das Anschließen an diese Buchse trennt den USB-Eingang
(Wiedergabe). Der USB-Ausgang (Aufzeichnung) ist nicht betroffen. Damit
können drei Bluetooth-Signale und der 3,5-mm-TRS-Eingang über den USBAnschluss am Computer aufgezeichnet werden.
7. Bluetooth-Antenne: Schließen Sie hier die 3 mitgelieferten Bluetooth-
Antennen an, um eine Verbindung zu den Bluetooth-Quellen herzustellen.
44
Page 45

Betrieb
Koppeln von Bluetooth-Quellen
1. Schließen Sie die 3 mitgelieferten Bluetooth-Antennen an die Anschlüsse an der
Rückseite von Black & Blue an.
2. Schalten Sie Black & Blue ein. Die Betriebsanzeige leuchtet dauerhaft.
3. Halten Sie die Pair-Taste 3 Sekunden lang gedrückt, um den Bluetooth-Eingang
auszuwählen, den Sie für Ihre Bluetooth-Quelle verwenden möchten. Die
Koppel-LED blinkt.
4. Koppeln Sie Ihre Bluetooth-Quelle mit dem Black & Blue.
a. Smartphone: Öffnen Sie die Bluetooth-Einstellungen in Ihrem Smartphone,
suchen Black & Blue-A und stellen eine Verbindung her. Die Koppel-LED
am Black & Blue leuchtet durchgehend, wenn eine Verbindung hergestellt
wurde.
b. Bluetooth-Headset-Mikrofon: Schalten Sie das Headset-Mikrofon ein. Die
Mikrofon-LED blinkt schnell, wenn Sie nach Black & Blue suchen. Nach dem
erfolgreichen Koppeln blinkt die Mikrofon-LED langsam und die Koppel-LED
am Black & Blue leuchtet durchgehend.
Hinweis: Bluetooth-Audio kann nicht an die Kopfhörer eines Headsets
gesendet werden. Bluetooth-Audio wird nur vom Mikrofon eines BluetoothHeadsets an das Black & Blue gesendet.
Um die Verbindung zu einer Bluetooth-Quelle zu trennen, halten Sie die KoppelTaste des Bluetooth-Eingangs 3 Sekunden lang gedrückt.
Hinweis: Wenn das Mikrofon mit einer anderen, unerwünschten Bluetooth-Quelle
verbunden ist (z. B. Black & Blue-A), drücken Sie die Such-Taste am BluetoothHeadset-Mikrofon und stellen eine Verbindung zur nächsten Bluetooth-Quelle her
(Black & Blue-B oder Black & Blue-C).
Hinweis: Wiederholen Sie die obigen Schritte, um weitere Bluetooth-Quellen
anzuschließen.
Quellen auswählen
1. Schließen Sie die mitgelieferten Bluetooth-Antennen an die Anschlüsse an der
Rückseite von Black & Blue an.
2. Halten Sie die Pair-Taste(n) 3 Sekunden lang gedrückt, um eine Verbindung zu
Ihrer/Ihren Bluetooth-Quelle(n) herzustellen.
3. Verbinden Sie den USB-Anschluss des Black & Blue mit einem freien USB-
Anschluss Ihres Computers mit einem USB-Kabel.
4. Stellen Sie den Listen To-Regler ein, um Bluetooth Bluetooth A, B, C oder
Computer als Quelle auszuwählen. Drücken Sie die Mix-Taste, um einen Mix
aller Quellen vom Master-Ausgang und vom Endstufenausgang zu hören.
5. Drehen Sie den Master Volume-Regler, um den Signalpegel einzustellen, der
an den Master-Ausgang und den Endstufenausgang gesendet wird.
45
Page 46

Aufnahme
1. Verbinden Sie den USB-Anschluss des Black & Blue mit einem freien USB-
Anschluss Ihres Computers mit einem USB-Kabel.
2. Lesen Sie den Abschnitt Computer-Setup > Einstellungen, um Black & Blue als
Standard-Aufnahmegerät festzulegen.
3. Öffnen Sie auf Ihrem Computer Ihre bevorzugte Aufnahmesoftware.
Hinweis: Um die Musik während der Wiedergabe zu hören oder um Aufnahmeinhalte
zu überwachen, verwenden Sie die Lautsprecher Ihres Computers oder verbinden
den Master-Ausgang des Black & Blue mit einem Verstärker oder Aktivlautsprechern.
Wiedergabe
Sie können die Musik auf Ihrem Computer über Black & Blue hören. Lesen Sie den
Abschnitt Computer-Setup > Einstellungen, um Black & Blue als Standard-
Wiedergabegerät einzustellen, bevor Sie die Musik vom Computer wiedergeben.
Euroblock-Setup
1. Schließen Sie ein Gerät an den 3,5 mm
TRS-Eingang an oder koppeln Sie Ihre
Bluetooth-Quelle mit Schwarz & Blau.
2. Ziehen Sie etwa 6 mm Isolierung von den
Drahtenden ab. Verdrillen Sie bei der
Verwendung von Litzen die Kabelenden,
um eine straffe Leitung zu erzielen. Dies
hilft bei der Vermeidung von
Kurzschlüssen durch lose Enden. Stecken
Sie das Kabelende in den entsprechenden
Anschluss. Schieben Sie den Draht soweit
wie möglich in den Stecker. Verwenden Sie einen kleinen (-) Schraubendreher, um
jeden Draht zu sichern. Sorgen Sie dafür, dass die Anschlüsse sicher, aber nicht zu
fest sitzen. Überprüfen Sie die Verbindung, indem Sie versuchen, den Draht aus
dem Stecker herauszuziehen. Wenn sich der Draht herausziehen lässt, lösen Sie die
Schraube und wiederholen Sie den Vorgang, um ihn besser zu sichern.
3. Bringen Sie den Euroblock-Anschluss an den Amplifier-Ausgang am Black & Blue
an.
4. Sorgen Sie dafür, dass alle Pegelregler auf „0“ eingestellt sind.
5. Verbinden Sie das mitgelieferte Netzkabel mit dem Netzeingang und einer
Steckdose; Schalten Sie Black & Blue ein.
6. Passen Sie die einzelnen Level-Kanaleingangsregler und den Master Volume-
Regler an, um ein starkes Signal ohne Verzerrung oder „Clipping“ zu erhalten.
Verringern Sie die Master Volume -Einstellung, wenn die Signal-LED kontinuierlich
rot leuchtet.
7. Stellen Sie die Low- und High-Regler ein, um den Sound nach Ihren Wünschen zu
konturieren.
Hinweis: Der Low-Regler beeinflusst Dröhnen, dumpfe Schläge und andere
Bassgeräusche. Reduzieren Sie diese Einstellung, wenn nur Sprachsignale gemischt
werden. Der High-Tone-Regler beeinflusst Helligkeit und Klarheit. Reduzieren Sie
diese Einstellung, wenn der Inhalt zu schrill oder scharf klingt.
46
Page 47

Computer-Setup
Einstellen von Black & Blue als Standardaufnahmegerät
• Windows XP: Klicken Sie auf Startmenü Systemsteuerung (oder Einstellungen Systemsteuerung
in der klassischen Ansicht) Sound und Audiogeräte. Klicken Sie auf die Registerkarte Audio unter
Aufnahme und wählen USB Audio Codec als Standard-Gerät aus. Wählen Sie Eigenschaften aus und
klicken Sie auf die Registerkarte Erweitert, um das Standardformat 44100 Hz oder 48000 Hz
auszuwählen.
• Windows Vista: Klicken Sie auf Startmenü Systemsteuerung (oder Einstellungen
Systemsteuerung in der klassischen Ansicht) Hardware und Sound Ton. Klicken Sie auf die
Registerkarte Aufnahme und wählen Sie USB Audio Codec als Standard-Gerät aus. Wählen Sie
Eigenschaften aus und klicken Sie auf die Registerkarte Erweitert, um das Standardformat 44100 Hz
oder 48000 Hz auszuwählen.
• Windows 7: Wählen Sie Startmenü Systemsteuerung Ton. Klicken Sie auf die Registerkarte
Aufnahme und wählen Sie USB Audio Codec als Standard-Gerät aus. Wählen Sie Eigenschaften aus
und klicken Sie auf die Registerkarte Erweitert, um das Standardformat 44100 Hz oder 48000 Hz
auszuwählen.
• Windows 8: Klicken Sie im Startmenü auf die linke untere Ecke des Bildschirms, um zum Desktop zu
gelangen. Klicken Sie in der rechten unteren Ecke der Taskleiste auf das „Lautsprechersymbol“. Klicken
Sie mit der rechten Maustaste auf den Lautsprecher und wählen Wiedergabegeräte. In der Windows-
Systemsteuerung für Sound wählen Sie die Registerkarte Aufnahme. Wenn neben USB Audio Codec
kein grünes „Häkchen“-Symbol angezeigt wird, klicken Sie mit der rechten Maustaste auf das Gerät
und wählen „Als Standardgerät festlegen“. Wählen Sie Eigenschaften aus und klicken Sie auf die
Registerkarte Erweitert, um das Standardformat 44100 Hz oder 48000 Hz auszuwählen.
• Windows 10: Klicken Sie auf Startmenü Systemsteuerung (oder Einstellungen Systemsteuerung
in der klassischen Ansicht) Hardware und Sound Ton. In der Windows-Systemsteuerung für
Sound wählen Sie die Registerkarte Aufnahme. Wenn neben USB Audio Codec kein grünes
„Häkchen“-Symbol angezeigt wird, klicken Sie mit der rechten Maustaste auf das Gerät und wählen
„Als Standardgerät festlegen“. Wählen Sie Eigenschaften aus und klicken Sie auf die Registerkarte
Erweitert, um das Standardformat 44100 Hz oder 48000 Hz auszuwählen.
• Mac OS X 10.4-10.11: Klicken Sie auf das obere linke „Apfel“-Symbol und klicken dann auf
Systemeinstellungen Ton. Klicken Sie auf die Registerkarte Input. Aus dem Menü wählen Sie USB
Audio Codec als Gerät. Unter Format wählen Sie 44100,0 Hz oder 48000,0 Hz.
Einstellen von Black & Blue als Standardwiedergabegerät
• Windows XP: Klicken Sie auf Startmenü Systemsteuerung (oder Einstellungen Systemsteuerung
in der klassischen Ansicht) Sound und Audiogeräte. Klicken Sie auf die Registerkarte Audio und
wählen unter Audiowiedergabe die Option USB-Audiocodec aus.
• Windows Vista: Klicken Sie auf Startmenü Systemsteuerung (oder Einstellungen
Systemsteuerung in der klassischen Ansicht) Hardware und Sound Ton. Klicken Sie auf die
Registerkarte Wiedergabe und wählen unter Audiowiedergabe die Option USB Audio Codec aus.
• Windows 7: Wählen Sie Startmenü Systemsteuerung Ton. Klicken Sie auf die Registerkarte
Wiedergabe und wählen Sie USB Audio Codec als Standard-Gerät aus.
• Windows 8: Klicken Sie im Startmenü auf die linke untere Ecke des Bildschirms, um zum Desktop zu
gelangen. Klicken Sie in der rechten unteren Ecke der Taskleiste auf das „Lautsprechersymbol“. Klicken
Sie mit der rechten Maustaste auf den Lautsprecher und wählen Wiedergabegeräte. Die Windows-
Systemsteuerung für Sound sollte nun unter der Registerkarte Wiedergabe aufscheinen. Wenn neben
USB Audio Codec kein grünes „Häkchen“-Symbol angezeigt wird, klicken Sie mit der rechten
Maustaste auf das Gerät und wählen „Als Standardgerät festlegen“.
• Windows 10: Wählen Sie Startmenü Systemsteuerung Ton. Klicken Sie auf die Registerkarte
Wiedergabe und wählen Sie USB Audio Codec als Standard-Gerät aus.
• Mac OS X 10.4-10.11: Klicken Sie auf das obere linke „Apfel“-Symbol und klicken dann auf
Systemeinstellungen Ton. Klicken Sie auf die Registerkarte Ausgabe. Aus dem Menü wählen Sie
USB Audio Codec als Gerät.
47
Page 48

Appendix (English)
Block Diagram
UNIVERSAL AC MAINS
POWER SUPPLY
&
POINT OF LOAD REGULATORS
PAIR
BLUETOOTH 4.0
A
PAIR
BLUETOOTH 4.0
B
PAIR
BLUETOOTH 4.0
C
D/A
D/A
D/A
INPUT BUFFER
LEVEL CONTR OL
SIG
INPUT BUFFER
LEVEL CONTR OL
SIG
INPUT BUFFER
LEVEL CONTR OL
SIG
48
INPUT
MINI TRS
(sum T/R)
CLK MST
USB 2.0
CLASS COMPLIANT
MASTER OUTPUT
XLR
100V
70V
XFMR
4
BUFFER
USB 2.0
CONTROLLER
CLASS-D
AMP MODULE
INPUT BUFFER
LEVEL CONTROL
SIG
D/A
A/D SUM
MASTER LEVEL
SIG/OL
20W
MASTER TONE
LOW/HIGH
Page 49

Technical Specifications
Bluetooth
Specifications
Connectors
Inputs/Outputs
Version: 4.2
Profile: A2DP, AVRCP, HFP, HSP
Range: Up to 88’; 27 m *
Maximum Transmission Power: 8 dBm
Frequency: 2402-2480 MHz
(1) 1/8” (3.5 mm) TRS input
(1) USB Type-B port
(1) IEC power cable input
(1) XLR output
(1) 4-position Euroblock output (5.08 mm)
(3) Bluetooth antenna connectors
Amplifier Output: Mono, 20W. @ 4 , 70 V and 100 V
XLR Balanced Output: Frequency Response: 20 Hz – 20 kHz
THD+N: < 0.05%
3.5 mm TRS Unbalanced Input: THD+N < 0.05%
Frequency Response: 20 Hz – 20 kHz
USB: 44.1 kHz, 24 bit
Power
power cable
Connection: IEC
Voltage: 100–240VAC, 50/60 Hz
Consumption: 30 W
Dimensions
(width x depth x height)
Weight
19” x 11” x 1.7”
483 x 286 x 44 mm
9.15 lbs.
4.15 kg
* Bluetooth range is affected by walls, obstructions, and movement. For optimal performance, place the
product in a location that is unobstructed by walls, furniture, etc.
Specifications are subject to change without notice.
Trademarks & Licenses
Rane is a trademark of inMusic Brands, Inc., registered in the U.S. and other countries.
The Bluetooth word mark and logos are registered trademarks owned by Bluetooth SIG, Inc. and any use of
such marks by Rane is under license.
All other product names, company names, trademarks, or trade names are those of their respective owners.
49
Page 50

50
Page 51

51
Page 52

rane.com
Manual Version 1.4
 Loading...