

Rane AM 2 User Manual
OPERATORS MANUAL
AM2
AUTOMIXER
POWER
LOCATE
OUTIN
CASCADE
RAD
1
MIC INPUTS
SIG OL2SIG OLLEVEL3SIG OLLEVEL4SIG OLLEVEL5SIG OLLEVEL6SIG OLLEVEL7SIG OLLEVEL8SIG OLLEVEL
OUTPUT
SIG OLLEVELLEVEL
POWER
COMM
AUDIO RX
AUDIO TX
QUICK START
If you’re setting up the AM2 automixer, then this Quick Start is
for you. It’s intended to get your audio working quickly in just
422 words.
Plug microphones into the Mic Inputs using standard XLR
mic cables. Condenser mics need the MIC +48V switch position.
Use the MIC +0V middle position for dynamic mics. e LINE
position is used when a wireless microphone’s receiver output is
connected.
Connect the Main Output XLR to your amplier or powered
loudspeaker and select the LINE switch position. If the Main
Output feeds a microphone input, select the MIC position.
Start with the gray OUTPUT LEVEL knob turned all the
way down – fully counterclockwise. One at a time for each mic,
talk very loudly and very closely to the mic and adjust the corresponding black LEVEL control so only the loudest speech just
barely ickers the red overload (OL) indicators. Once the input
gains are set, the AM2 automatically controls the mic mix to
avoid feedback. (You won’t need to ride these controls.)
Turn on the amplier/loudspeaker and turn it up about half
way. Also turn the OUTPUT LEVEL knob up until the volume
is appropriate for your application.
AM2
AUTOMATIC MIXER
If the system feeds back (that horrible squeal), your mics
are hearing too much from your loudspeakers. First try moving
the mics farther from the loudspeaker and/or pointing the mics
and loudspeakers away from each other. Next, try turning down
the gain on the amplier or loudspeaker. If this does not reduce
feedback, don’t reach for the black Mic Input knobs, instead turn
down the OUTPUT LEVEL.
Daisy-chain up to eight AM2s together by connecting
CASCADE IN to CASCADE OUT. e Main Output on each
AM2 delivers a gain-sharing automix of it’s Mic Inputs and all
upstream Inputs. is means the mix of all Mic Inputs is on the
Main Output of the last AM2 in the daisy-chain. ough each
AM2’s OUTPUT LEVEL control always adjusts the volume of
it’s respective XLR OUTPUT, the last OUTPUT LEVEL aects
all Mic Inputs to it’s Main Output including the RAD PORT.
If your AM2(s) connect to a Rane Mongoose, the last AM2
in the cascade needs its RAD PORT connected with a shielded
CAT5 cable to one of the Rane Mongoose’s rear panel Remote
Audio Device ports. Some systems may provide a wall plate location to connect the R AD Port cable.
If you have line sources such as iPods® or CD/DVD players
you would like to mix with these mics, or would like USB audio
playback or recording, look at the Rane AM1.
WEAR PARTS: is product contains no wear parts.
Manual-1
FRONT PANEL DESCRIPTION
AM2
AUTOMIXER
POWER
LOCATE
OUTIN
CASCADE
RAD
1
MIC INPUTS
SIG OL2SIG OLLEVEL3SIG OLLEVEL4SIG OLLEVEL5SIG OLLEVEL6SIG OLLEVEL7SIG OLLEVEL8SIG OLLEVEL
OUTPUT
SIG OLLEVELLEVEL
POWER
COMM
AUDIO RX
AUDIO TX
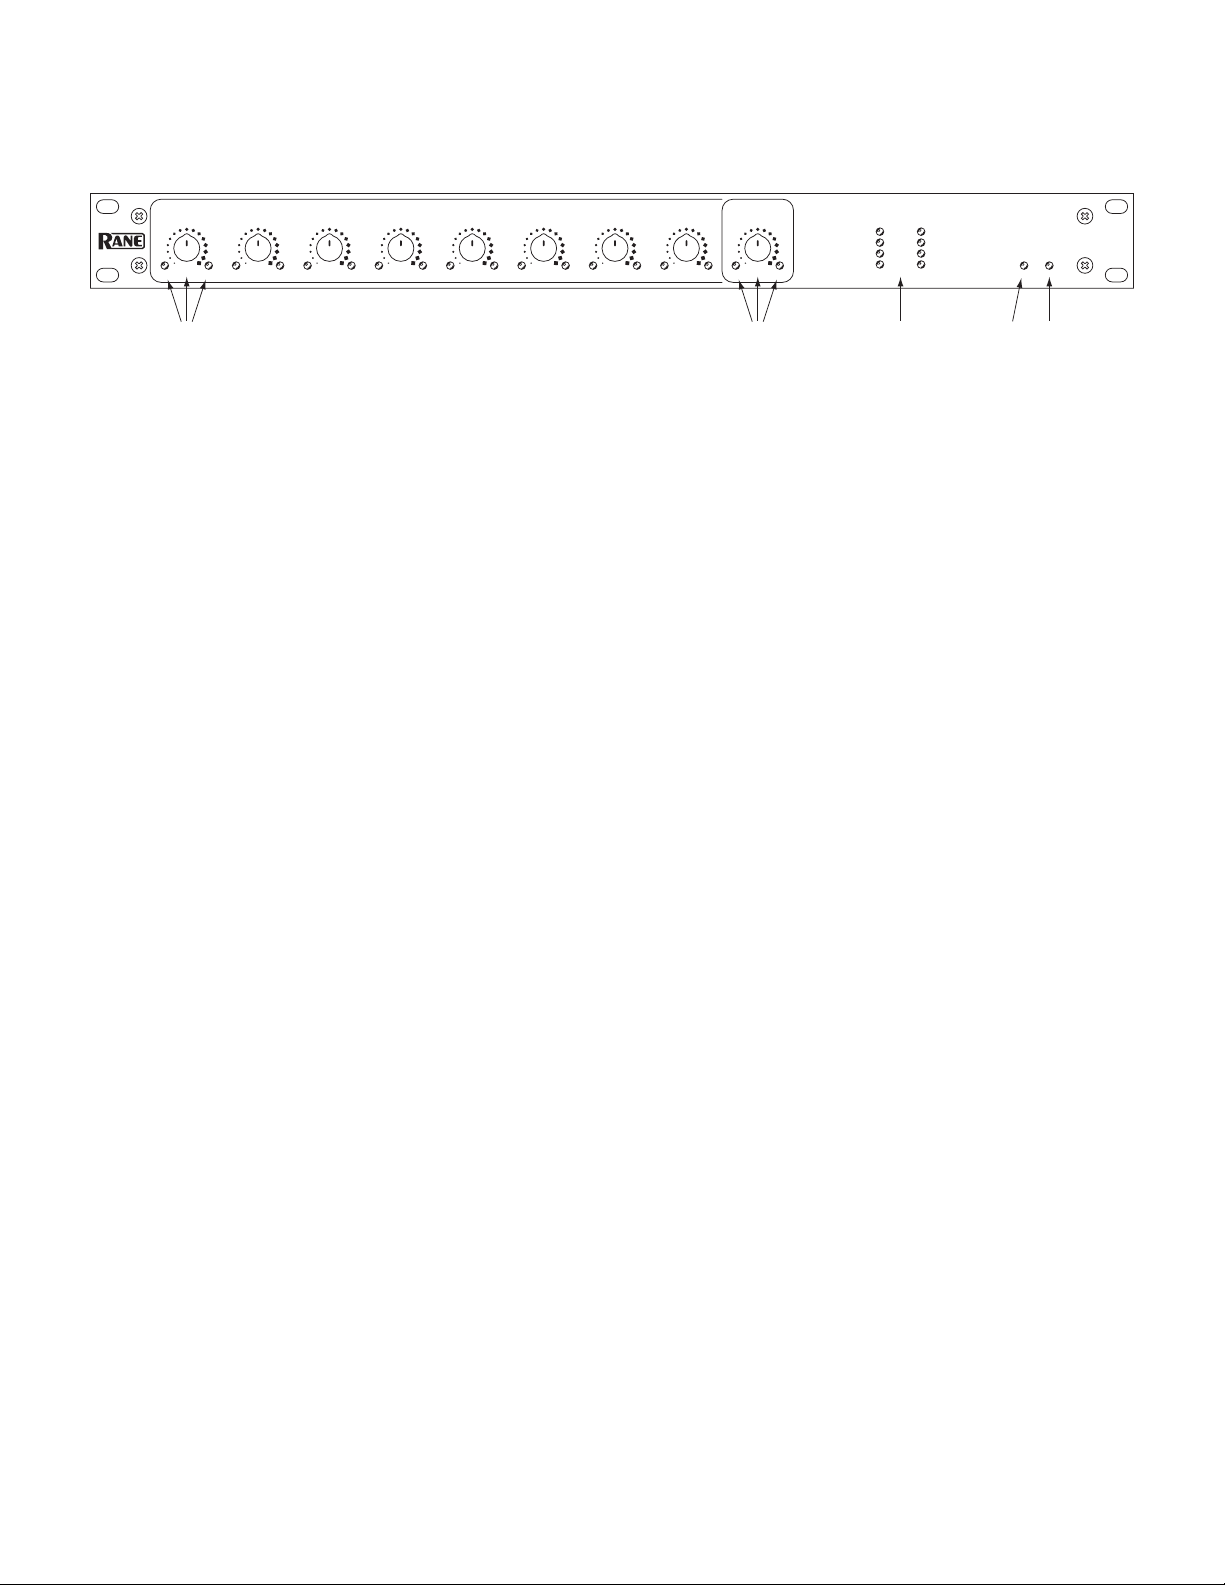
1 2 3 45
1 MIC INPUT LEVEL controls adjust the mic input gain. e green Signal indicators inform of audio presence. Overload
indicators warn of excessive signal levels.
2 Main OUTPUT LEVEL control adjusts the level of the mix exiting the XLR output and the RAD Port output. When connected
to an AM1 or AM2 CASCADE IN port, the AM2 OUTPUT LEVEL only aects the XLR Output.
3 CASCADE IN, CASCADE OUT and RAD status indicators prove that proper cable termination and device conguring has
occurred when all four indicators illuminate, when the AM2 is connected to an AM1 or other AM2s. If any of these are o or
ashing, a conguration or wiring error is the culprit.
4 LOCATE indicator helps system installers identify a specic AM2 Automixer when using Rane’s Mongoose Tracker software.
5 POWER indicator lights whenever adequate power is applied to the unit.
Manual-2
 Loading...