

Radio Shack Mini Tiger I Tank User Manual
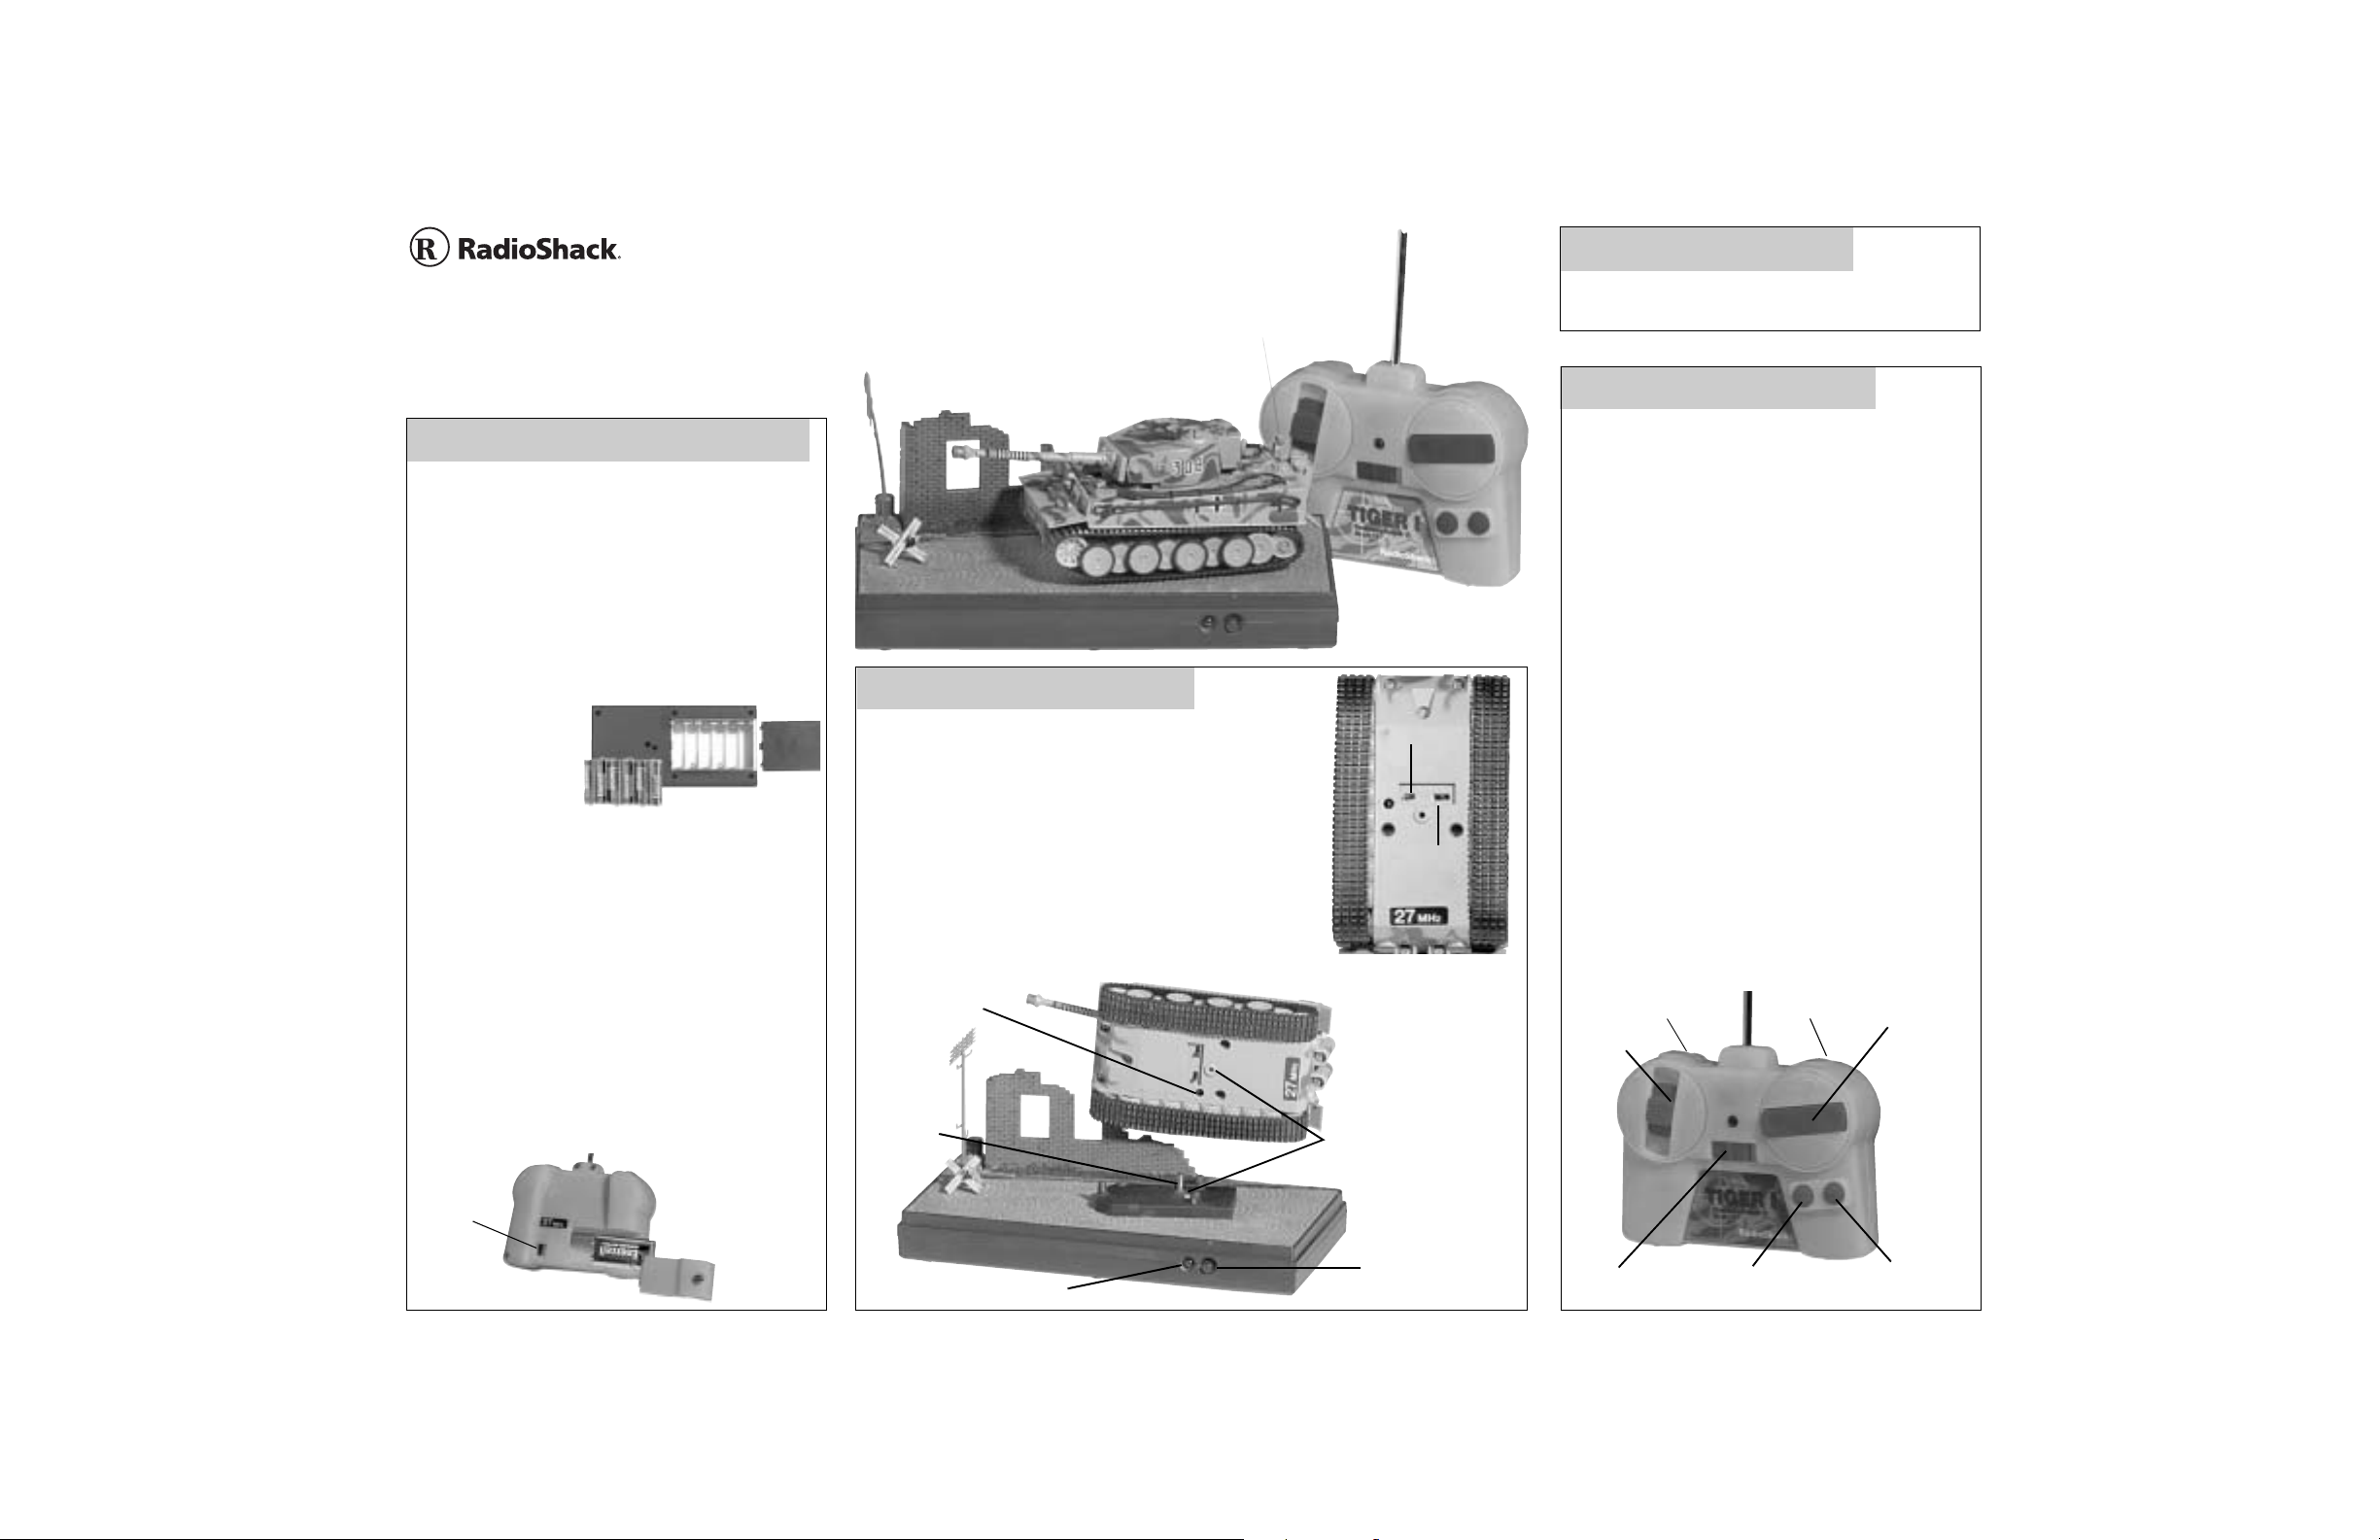
What’s Included
Turns turret
R
Mini Tiger I Tank
60-4366
Installing the Batteries
You will need...
One 9V battery for the transmitter
Six AA batteries for the charging stand
Phillips screwdriver
Put Batteries in the Charging Stand
The tank is fastened to the charging stand with a
shipping screw.
• Loosen the screw with a Phillips screwdriver to
free the tank from
the charge stand.
• Slide the battery
compartment
cover off.
• Insert six AA
batteries in the
charging stand,
matching the polarity symbols (+ and -) as
marked inside.
• Replace the cover.
Put Battery in the Transmitter
• Turn the transmitter off.
• Loosen the screw on the
battery compartment cover with a Phillips
screwdriver and remove the cover.
• Insert one 9V battery in the battery compartment,
and match the polarity symbols (+ and -) as
marked inside.
• Replace the cover and tighten the screw.
Band Switch
A-B-C
Charging the Tank
• Turn the tan k off and p lace the tank on th e charge
stand so the plug fits into the jack on the tank.
• Press the button on the charging stand to start
charging the tank. The red LED illuminates.
• Remove the tank from the stand only after the red
LED turns off. The charging cycle is complete
when this happens.
Note: It takes about three minutes to charge the
tank.
Charging
Jack
Charging
Plug
LED
On/Off Switch
A-B-C
Loosen the shipping
screw to free the tank
from the charging
stand
Press to start
charging the
tank
Mini Tiger I Tan k
Charging Stand & Clear Case
♦ Antenna ♦ Transmitter
♦ Owner’s Manual
Driving the Tank
• Thread the supplied antenna into the transmitte r’s
antenna connector tightly.
• Turn the tank and transmitter on.
• Use the steering and speed controls on the
transmitter to drive the tank.
• Use the buttons on the shoulder of the transmitter
to rotate the turret.
• Use the buttons on the bottom right side of the
transmitter to fire the machine gun and cannon.
• When you finish drivi ng the tank , turn the tan k and
transmitter off.
Steering Control
• While the tank is in motion, press and hold th e left
side of the control to go left and press the right
side to go right.
• Release to let the tank go straight.
• Press the left side or right side with the tank in
neutral to spin the tank in a circle.
Speed Control
• Slide the control up and hold to drive forward.
• Slide the control down and hold to drive in
reverse.
• Release to stop.
Note: After you fire the cannon, wait for the LED
light on the tank to go off before you fire it again.
Turns turret left
Speed
Control
F
e
Neutral
d
R
On/Off Switch
right
Fires the
machine gun
Steering
Control
(Straight)
Lf g
Fires the
cannon

Helpful Hints
Care & Use
• Be sure to set the tank and transmitter to the same band switch position when driving your tank.
• You can race up to six tanks at one time. Be sure you and your friends have different frequencies (27 or 49 MHz) and do not use
the same band switch (A-B-C) position.
• Be sure the tank is not out of the transmitter’s range. The range is determined by your surrounding and battery strength.
Obstructions, such as build ings and fences, between the transmitter a nd the tank reduce the ra nge.
• If someone uses a CB nearby, it might interfere with control of the tank. If this happens, move the tank away from the CB.
• You cannot operate your tank near devices with transmitters that use the same frequency as your tank (27 or 49 MHz).
• The tank has a special circuit to prolong battery life. If you keep the left control trigger in one position for more than 45
seconds, the transmitter automatically turns off. If this happens, move the control trigger to another position to continue driving.
• If the tank moves slowly after you charge the battery, check the wheel mechanisms for lint, thread, hair and dust.
• When you fin ish with the ta nk, place it o n the cha r ging sta nd an d r epl ace its clea r case . Alwa ys ho ld th e stand’s base when you
move the stand. Never hold the clear case.
• Do not remove the tank from the charge stand while the indicator is on.
The FCC Wants You to Know
This equipment has been tested and found to comply with
the limits for a Class B digital device, pursuant to Part 15 of
the FCC Rules. These limits are designed to provide reasonable protection against harmful interference in a residential installation. This equipment generates, uses and can
radiate radio frequency energy and, if not installed and used
in accordance with the instructions, may cause harmful interference to radio communications. However, there is no guarantee that interference will not occur in a particular
installation. If this equipment does cause harmful interference to radio or television reception, which can be determined by turning the equipment off and on, the user is
encouraged to try to correct the interference by one or more
of the following measures:
• Reorient or relocate the receiving antenna.
• Increase the separation between the equipment and
receiver.
• Connect the equipment into an outlet on a circuit different
from that to which the receiver is connected.
• Consult your local RadioShack store or an experienced
radio/TV technician for help.
If you cannot eliminate the interference, the FCC requires
that you stop using your radio-controlled vehicle.
Changes or modifications not expressly approved by
RadioShack may cause interference and void the user’s
authority to operate the equipment.
Battery Notes
• Use only fresh batteri es of the required s ize and recommended type.
Do not mix old and new batt eries, di ffe rent typ es of ba tteries ( standar d,
alkaline, or rechargeable), or rechargeable batteries of different
capacities.
• Never leave dead or weak batteries in the transmitter or charging
stand.
• If you do not plan to use the tank for several days, remove all the
batteries from the transmitter and charging stand. Batteries can leak
chemicals that may destroy electronic parts.
• Do not charge or recharge the tank while it is still on.
• Do not charge the tank’s battery too often. Run the tank until the
battery fully dis charges and the tank stops. Then charge the battery;
this extends the battery’s ability to fully recharge.
• If the tank runs slowly or does not move at all, recharge the tank.
• Dispose of old batteries pr omptly and prope rly. Do not burn or bury
them.
• Do not drive the tank into people or objects.
• Keep the tank dry; if it gets wet, wipe it dry
immediately.
• Use and store the tank only in room
temperature environments.
• Handle the tank carefully. Do not drop it.
• Keep the tank away from dust and dirt.
• Wipe the tank with a damp cloth occasion ally
to keep it looking new.
• If your tank is not performing as it should, take
it to your local RadioShack store for
assistance. Modifying or tampering with the
tank’s internal components can cause a
malfunction, invalidate its warranty and void
your FCC authorization to us e it .
Limited 90-Day Warranty
This product is warranted by RadioShack against manufacturing defects in material and workmanship under normal use for 90 days from the date of purchase from RadioShack company-owned
stores and authorized RadioShack franchisees and dealers. EXCEPT AS PROVIDED HEREIN,
RadioShack MAKES NO EXPRESS WARRANTIES AND ANY IMPLIED WARRANTIES, INCLUDING THOSE OF MERCHANTABILITY AND FITNESS FOR A PARTICULAR PURPOSE, ARE LIMITED IN DURATION TO THE DURATION OF THE WRITTEN LIMITED WARRANTIES CONTAINED
HEREIN. EXCEPT AS PROVIDED HEREIN, RadioShack SHALL HAVE NO LIABILITY OR
RESPONSIBILITY TO CUSTOMER OR ANY OTHER PERSON OR ENTITY W ITH RESPECT TO
ANY LIABILITY, LOSS OR DAMAGE CAUSED DIRECTLY OR INDIRECTLY BY USE OR PERFORMANCE OF THE PRODUCT OR ARISING OUT OF ANY BREACH OF THIS WARRANTY, INCLUDING, BUT NOT LIMITED TO, ANY DAMAGES RESULTING FROM INCONVENIENCE, LOSS OF
TIME, DATA, PROPERTY, REVENUE, OR PROFIT OR ANY INDIRECT, SPECIAL, INCIDENTAL,
OR CONSEQUENTIAL DAMAGES, EVEN IF RadioShack HAS BEEN ADVISED OF THE POSSIBILITY OF SUCH DAMAGES.
Some states do not allow limitations on how long an implied w arranty lasts or the exclusion or limitation of incidental or consequential damages, so the above limitations or exclusions may not apply to
you.
In the event of a product defect during the warranty period, take the product and the RadioShack
sales receipt as proof of purchase date to any RadioShack store. RadioShack will, at its option,
unless otherwise provided by law: (a) correct the defect by product repair without charge for parts
and labor; (b) replace the product with one of the same or similar design; or (c) refund the purchase
price. All replaced par ts an d pr od uct s , and products on which a refund is made, become the pr ope rt y
of RadioShack. New or reconditioned parts and products may be used in the performance of warranty service. Repaired or replac ed parts and produ cts are warr anted for the remainde r of t he original
warranty period. You will be charged for repair or replacement of the product made after the expiration of the warranty period.
This warranty does not cover: (a) damage or failure caused by or attributable to acts of God, abuse,
accident, misuse, improper or abnormal usage, failure to follow instructions, improper installation or
maintenance, alteration, lightning or other incidence of excess voltage or current; (b) any repairs
other than those provided by a RadioShack Authorized Service Facility; (c) consumables such as
fuses or batteries; (d) cosmetic damage; (e) transportation, shipping or insurance costs; or (f) costs
of product removal, installation, set-up service adjustment or reinstallation.
This warranty gives you specific legal rights, and you may also have other rights which vary from
state to state
RadioShack Customer Relations, 200 Taylor Street, 6th Floor, Fort Worth, TX 76102
©2003 RadioShack Corpora tion . 60-4366
All Rights Reserved. Printed in China
RadioShack and RadioShack.com are trademarks Date 07A03
used by RadioShack Corporation.
12/99
 Loading...