

Page 1

MD500 MIDI Keyboard
with Mini-Size Keys
Owner’s Manual
Please read before using this equipment.
Page 2

CONTENTS
Features .................................................................................................................................. 2
The FCC Wants You to Know ........................................................................................... 2
Preparation ............................................................................................................................. 3
Connecting Power ............................................................................................................ 3
Using Batteries .......................................................................................................... 3
Using AC/DC Power .................................................................................................. 3
Connecting Headphones .................................................................................................. 4
Listening Safely ......................................................................................................... 4
Connecting an External Amplifier ..................................................................................... 4
A Quick Look at Your Keyboard ........................................................................................... 5
Operation ................................................................................................................................ 5
Basic Operation ................................................................................................................ 5
Playing the Prerecorded Tunes ........................................................................................ 6
Playing Back a Prerecorded Tune ............................................................................. 6
Using DEMO ............................................................................................................. 6
Using the Preset Tones .................................................................................................... 7
Selecting/Playing a Preset Tone ................................................................................ 7
Using the Preset Auto-Rhythms ....................................................................................... 7
Selecting/Playing an Auto-Rhythm ............................................................................ 7
Using SYNC .............................................................................................................. 8
Using FILL-IN ............................................................................................................ 8
Using Auto Accompaniment ............................................................................................. 8
Single Fingering ........................................................................................................ 8
Standard Fingering .................................................................................................... 9
Learning to Play ............................................................................................................... 9
Using the Metronome ............................................................................ ......................... 10
Using BEA T..................................................................................................................... 10
Special Features .................................................................................................................. 10
Recording ....................................................................................................................... 10
Using One-Touch Setting ................................................................................................ 10
Using Sustain ............................................................ ... ... .................................... ............ 11
Percussion Pads .................................. .................................... ... .................................... . 11
Using a Percussion Pad ........................................................................................... 11
Recording/Playing a Percussion Pad Sound ............................................................ 11
Transposing ..................................................................................................................... 11
Using MIDI ............................................................................................................................ 12
About MIDI ..................................................................................................................... 12
Making the MIDI Connections ........................................................................................ 12
Troubleshooting ................................................................................................................... 13
Care ................................................................................................................................ 13
Chord Charts ........................................................................................................................ 14
Specifications ...................................................................................................................... 16
1
Page 3

Features
Your RadioShack MIDI Keyboard is a stateof-the-art keyboard with many exciting features. You can set the keyboard to sound like
50 different musical instruments. To accompany your music, the keyboard has 30
rhythms, as well as auto accompaniments
and percussion sounds.
Your keyboard also includes a MIDI (Musical
Instrument Digital Interface) OUT feature,
which lets you connect it to other MIDIequipped musical instruments or devices —
even your personal computer.
Music Information Display
the notes and chords as you play them,
along with the current tone, rhythm, and tempo.
Sustain Function
length of a played note, providing added flexibility as you make music.
Recording/Playback
own tunes and play them back at any time.
Metronome
beat, making it easy to keep time with the
music.
— lets you extend the
— lets you record your
— the keyboard sounds the
— shows you
THE FCC WANTS YOU TO
KNOW
This equipment complies with the limits for a
Class B digital device as specified in Part 15
FCC Rules
of
able protection against radio and TV interference in a residential area. However, your
equipment might cause TV or radio interference even when it is operating properly. To
eliminate interference, you can try one or
more of the following corrective measures:
• reorient or relocate the receiving
antenna
• increase the distance between the
equipment and the radio or TV
• use outlets on different electrical circuits
for the keyboard and the radio or TV.
Consult your local RadioShack store if the
problem still exists.
You must use shielded interface cables with
this equipment.
. These limits provide reason-
Tempo Controls
slow down the tempo of any selected music
pattern.
This Owner’s Manual explains how to
Note:
use this electronic keyboard. It does not
teach music.
2
— let you speed up or
2001 RadioShack Corporation.
©
RadioShack, Adaptaplug, and RadioShack.com are trademarks used by RadioShack Corporation.
All Rights Reserved.
Features
Page 4

!
Preparation
To connect a MIDI device to your keyboard,
see “Making the MIDI Connections” on
Page 12.
CONNECTING POWER
You can power your keyboard in any of these
ways:
• internal batteries
• standard AC power using an optional
AC adapter
• a vehicle’s cigarette-lighter socket using
an optional DC adapter
:
Notes
• Connecting an AC or DC adapter automatically disconnects internal batteries.
• Always disconnect the AC or DC
adapter when you finish using the keyboard.
Using Batteries
Your keyboard can use six C batteries (not
supplied) for power. For the best performance and longest life, we recommend
RadioShack alkaline batteries.
Cautions:
• Use only fresh batteries of the required
size and recommended type.
• Do not mix old and new batteries, different types of batteries (standard, alkaline, or rechargeable), or rechargeable
batteries of different capacities.
to
1. Slide
POWER
OFF
.
2. Press the tabs on the battery compartment cover on the bottom of the keyboard and pull up the cover to remove it.
3. Place the batteries in the compartment
as indicated by the polarity symbols (+
and –) marked inside the compartment.
4. Replace the cover.
When the keyboard stops operating properly,
replace the batteries.
Warning:
and properly. Do not burn or bury them.
Caution:
board with batteries for a week or more, remove the batteries. Batteries can leak
chemicals that can destroy electronic parts.
Dispose of old batteries promptly
If you do not plan to use the key-
Using AC/DC Power
You can power the keyboard using an optional 9V, 300-mA AC or DC adapter and a
size M Adaptaplug™ adapter (none supplied). All are available at your local
RadioShack store.
Cautions:
You must use a Class 2 power
source that supplies 9V DC
and delivers at least 300 mA.
Its center tip must be set to positive and
its plug must fit the keyboard's
jack. Using an adapter that does not
meet these specifications could damage
the keyboard or the adapter.
• Always connect the AC or DC adapter to
the keyboard before you connect it to
AC power or vehicle battery power.
When you finish, disconnect the adapter
from AC power or vehicle battery power
DC 9V
Preparation
3
Page 5

before you disconnect it from the keyboard.
to
1. Slide
POWER
OFF
.
Listening Safely
To protect your hearing, follow these guidelines when you use headphones.
2. Set the AC or DC adapter’s voltage
switch to 9V.
3. Insert the Adaptaplug adapter into the
adapter’s cord so it reads + TIP.
4. Connect the AC or
DC adapter’s barrel plug to the
jack on the
9V
back of the keyboard.
5. Plug the AC or DC adapter’s other end
into a standard AC outlet or your vehicle’s cigarette-lighter socket.
DC
DC 9V
CONNECTING
HEADPHONES
To listen to your keyboard with out disturbing
others, you can connect an optional pair of
stereo headphones with a 1/8-inch (3.5-mm)
plug. Your local RadioShack store sells a
wide selection of headphones.
Insert the headphones’ plug into the
jack on the back of the keyboard.
Note
: Connecting headphones disconnects
the keyboard’s built-in speakers.
PHONE
• Set the volume to the lowest setting
before you begin listening. After you
begin listening, adjust the volume to a
comfortable level.
• Do not listen at extremely high volume
levels. Extended high-volume listening
can lead to permanent hearing loss.
• Once you set the volume, do not
increase it. Over time, your ears adapt
to the volume level, so a volume level
that does not cause discomfort might
still damage your hearing.
CONNECTING AN
EXTERNAL AMPLIFIER
To amplify your keyboard’s sound, you can
connect it to an optional external amplifier
using an audio cable with a
plug (not supplied).
To connect an external amplifier to your keyboard, insert the cable’s plug into the
jack on the back of the keyboard, and connect the cable’s other end to the amplifier’s
input jack(s) (such as AUX IN or TAPE IN).
Your local RadioShack store sells a full line
of amplifiers, speakers, and connection cables.
1
/8-inch (3.5-mm)
PHONE
4
Preparation
Page 6
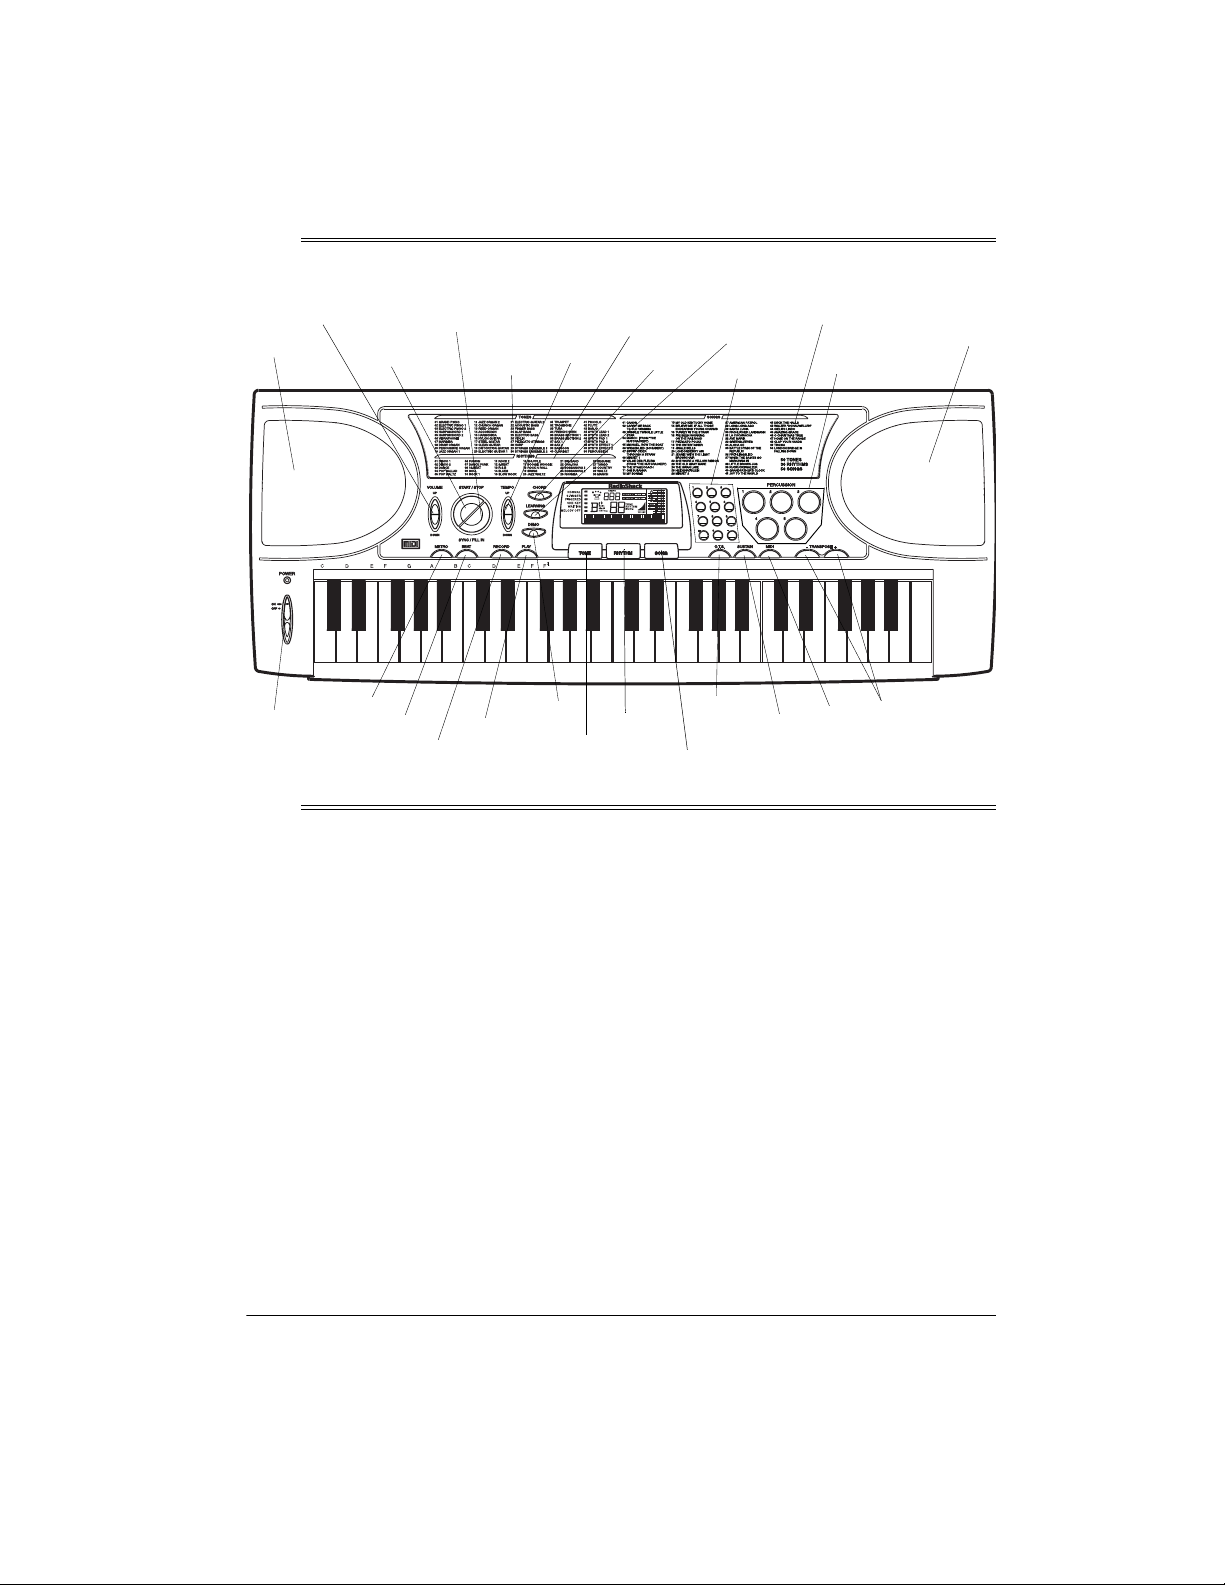
A Quick Look at Y our Keyboard
VOLUME
Speaker
START/
STOP
SYNC/
FILL-IN
TONES
List
TEMPO
RHYTHMS
List
CHORD
LEARNING
Number
Keys
SONGS
List
PERCUSSION
Keys
Speaker
POWER
METRO
Operation
BEAT
PLAY
RECORD
DEMO
TONE
BASIC OPERATION
1. To turn on the keyboard, set
The POWER indicator lights.
ON.
Important:
always set the keyboard’s volume to its
lowest level before you begin playing it
after changing any settings.
Note:
ing operation, the keyboard automatically sounds a tone about every 5
minutes if you do not press a key.
2. To hear a sample of the keyboard’s
many sounds, play a prerecorded tune
(see “Playing the Prerecorded Tunes”
To prevent hearin g damage,
To remind yo u to save p ower dur-
POWER
RHYTHM
to
O.T.S.
SUSTAIN
SONG
on Page 6). To make your own music,
simply begin playing the keyboard.
Notes:
• The keyboard automatically selects
the tone Grand PIANO (No. 01) when
you turn the power on. To select a different tone, see “Selecting/Playing a
Preset Tone” on Page 7.
• To select an au to-rhythm, see “Using
the Preset Auto-Rhythms” on Page 7.
• To play auto accompaniment, see
“Using Auto Accompaniment” on
Page 8.
MIDI
TRANSPOSE
A Quick Look at Your Keyboard
5
Page 7

3. Repeatedly press
UME DOWN
to increase or decrease the
volume.
VOLUME UP
or
VOL-
• If you enter an incorrect first digit,
repeatedly press
or – to move to the
+
next higher or lower numbered tune.
Notes:
• The keyboard’s volume ranges from 0
(no sound) to 10 (maximum), and the
current volume level appears on the
display. Each time you turn on the
keyboard, the volume is set to 6.
• To quickly return to the default volume setting of 6, turn the keyboard off
then back on.
4. To turn off the keyboard, set
. The POWER indicator turns off.
OFF
POWER
to
PLAYING THE
PRERECORDED TUNES
You can listen to any of the 50 tunes that
come prerecorded in the keyboard, or you
can turn off a tune’s melody or accompaniment and play along on the keyboard.
Playing Back a Prerecorded Tune
1. Press
SONG
the current tune appears.
The keyboard always selects the
Note:
tune “Canon” (No. 01) each time you
turn it on.
2. Choose a tune from the SONGS list and
enter its two-digit number on the keypad.
621*
.
and the number of
3. Press
START/STOP
to start playing the
tune.
You can change the tune by repeating
Step 2 even while a tune is playing. The
new tune immediately begins to play. As
it plays, the display shows:
• a “score” to show you the notes that
are playing (right side of the display)
• a “keyboard” to show you the fingering and which keys are pressed (bottom of the display)
• the black dots above the metronome
show the beat count in the measure
• the chord name (center left of the display)
Each tune plays a different preset
Note:
tone for the melody.
4. Use
VOLUME
to adjust the volume as
desired.
5. To change the tempo, repeatedly press
TEMPO UP
or
TEMPO DOWN
. The current
tempo setting appears.
6. To select a different tune, repeat Step 2.
To stop the tune completely, press
START/STOP
.
Using DEMO
Or, you can press
to move to the
– or +
next higher or lower numbered tune.
Notes:
• Precede a single-digit number with a
0. For example, to select 06
(“Wiegenlied (Schubert)”), press
6
.
0 6
Operation
To play the prerecorded tunes one by one (in
order from the selected starting point), press
. To stop the demo, press
DEMO
DEMO
again.
Page 8

USING THE PRESET TONES
Your keyboard can sound like 50 different
musical instruments. The name and two-digit
number for each preset tone is listed on the
TONES list on the keyboard’s top panel.
The keyboard has 8-note (maximum)
Note:
polyphonic sound. This means that you can
play up to 8 different notes at the same time
with most of the keyboard’s preset tones.
You can play a preset auto-rhythm on the
keyboard in any of the following ways:
• select and play a rhythm (see “Select-
ing/Playing an Auto-Rhythm” )
• synchronize the start of a rhythm with
your music (see “Using SYNC” on
Page 8)
• briefly vary the pattern of a rhythm (see
“Using FILL-IN” on Page 8)
Selecting/Playing a Preset Tone
1. Press
number appears.
Note:
on, it automatically selects the tone
Grand PIANO (No. 01).
2. To play a different tone, choo se a preset
tone from the TONES list and enter its
two-digit number on the keypad. As you
press the keys, the selected digits
appear.
Or, you can use
next higher or lower numbered tone.
Note:
with a 0. For example, to select VIBRAPHONE (No. 06), press
3. Play the keyboard to hear the selected
tone and adjust
DOWN
4. To select a different tone, repeat Steps 1
and 2.
721(
.
TONE
Each time you turn the keyboard
Precede a single-digit number
to the desired level.
and the current tone’s
or – to move to the
+
.
0 6
VOLUME UP
or
VOLUME
USING THE PRESET AUTORHYTHMS
Your keyboard has 30 preset auto-rhythms
that provide a steady beat for your music.
The name and two-digit number of each preset auto-rhythm is listed on the RHYTHMS
list on the keyboard’s top panel.
Selecting/Playing
an Auto-Rhythm
1. Press
2. To select a different rhythm, choose an
3. Press
4. Adjust
5. To chang e the tempo, repeatedly press
RHYTHM
Each time you turn on the key-
Note:
board, it automatically selects the
rhythm Disco 1 (No. 01).
auto-rhythm from the RHYTHMS list and
enter its two-digit number on the keypad. Or, repeatedly press
to the next higher or lower numbered
rhythm.
: Precede a single-digit number
Note
with a 0. For example, press
POP WAL TZ (No. 05).
START/STOP
auto-rhythm.
VOLUME
TEMPO UP
tempo setting appears.
:
Notes
• You can adjust the tempo
auto-rhythm from 40 to 240 beats per
minute.
.
to start the selected
to the desired level.
or
TEMPO DOWN
or – to move
+
to se lect
0 5
. The current
to play an
Operation
7
Page 9

• To reset the tempo to its d efault (o riginal) speed, press
TEMPO DOWN
6. Play the keyboard along with the autorhythm.
7. To select a different rhythm, repeat
Steps 1 and 2.
8. To stop the auto-rhythm, press
again.
STOP
TEMPO UP
at the same time.
and
START/
Using SYNC
This feature lets you synchronize the start of
an auto-rhythm with the beginning of your
music.
After you select and enter an auto-rhythm,
press
SYNC/FILL-IN
the metronome flash to show the keyboard is
in a standby mode.
Begin playing the keyboard. The keyboard
automatically begins to play the rhythm when
you press any key.
. The black dots above
Using FILL-IN
This feature lets you insert a short (1- to 2measure) variation in the beat pattern of a
selected auto-rhythm.
Simply press
rhythm is playing. The keyboard inserts a
variation, then the original rhythm automatically resumes at the end of the current measure. Or, to insert a longer variation, hold
down
SYNC/FILL-IN
variation until you release
SYNC/FILL-IN
. The keyboard plays the
while the auto-
SYNC/FILL-IN
.
USING AUTO
ACCOMPANIMENT
keys you press determine the type of chord
that plays.
You can set the keyboard to play with no accompaniment or two different types of auto
accompaniment using the accompaniment
keys.
Normal
•
turned off in this mode (but you can
select tone and rhythm).
S.Finger
•
mode lets you play chords on the
accompaniment keys using standard
chord formations (see “Single Fingering”).
Fingered
•
This mode lets you play chords on the
accompaniment keys using chord formations of from three or more notes.
The chord name appears on the display.
The number of keys you press determines the type of chord that plays (see
“Standard Fingering” on Page 9).
Note:
list of all the chords you can play on your
keyboard.
Your keyboard defaults to the normal mode.
Follow the steps under “Single Fingering” or
“Standard Fingering” on Page 9 to set it to an
accompaniment mode.
— normal mode. Chords are
— single fingering mode. This
— standard fingering mode.
See “Chord Charts” on Page 14 for a
Single Fingering
1. Set
POWER
2. Repeatedly press
dot appears next to S.FINGER on the
left side of the display.
3. Press
to ON.
RHYTHM
.
CHORD
until a black
The 19 keys on the left side of the keyboard
with note labels above them are called
companiment keys
8
. The accompaniment
ac-
Operation
4. Enter a two-digit auto-rhythm number.
5. To start the auto-rhythm before the auto
accompaniment, press
START/ST O P
.
Page 10

Or, to synchronize the start of the
selected auto-rhythm with your accompaniment, press
SYNC/FILL-IN
.
4. To start the auto-rhythm before your
auto accompaniment, press
.
STOP
START/
6. Begin the accompaniment at the desired
interval by pressing the desired accompaniment key(s).
To play a melody along with the accompaniment, press any key(s) to the right
of the accompaniment keys.
7. Adjust
TEMPO
and
VOLUME
to the
desired levels.
8. To change chords without interrupting
the rhythm, simply press the auto
accompaniment key(s) re-quired to form
the new chord. The name of the chord
appears.
9. To stop auto accompa niment bu t not th e
auto-rhythm, repeatedly press
until the black dot appears next to
0$/
on the display. Or, to stop auto
CHORD
125
accompaniment and the auto-rhythm,
press
START/STOP
.
Standard Fingering
The standard fingering method uses standard formations of three or more notes, and
lets the experienced musician play a wider
variety of accompaniment chords.
Note
: See “Chord Charts” on Page 14 for a
list of all the chords you can play on your
keyboard using standard fingering accompaniment.
Follow these steps to start standard fingering
auto accompaniment.
1. Set
POWER
to ON.
Or, to synchronize the start of the
selected auto-rhythm with your accompaniment, press
SYNC/FILL-IN
.
5. Begin the accompaniment at the desired
interval by pressing at least three
accompaniment keys to play the desired
chord.
To play a melody along with the accompaniment, press any key(s) to the right
of the accompaniment keys.
6. Adjust
TEMPO
and
VOLUME
to the
desired levels.
7. To change chords without interrupting
the rhythm, simply press the auto
accompaniment key(s) re-quired to form
the new chord. The name of the chord
appears.
8. To stop auto accompaniment and the
auto-rhythm, press
START/ST O P
.
LEARNING TO PLAY
Your keyboard’s learning feature lets beginning keyboard players easily learn and play a
prerecorded tune. You can select any of the
following modes:
• ONE KEY — in this mode, press
and any key to play accompani-
STOP
ment and a melody note. The note
appears.
• WAITING — In this mode, the melody
does not play until you play a correct
note. The next note of the tune appears.
START/
2. Repeatedly press
dot appears next to
CHORD
until a black
),1*(5('
on the left
side of the display.
3. Select and enter an auto-rhythm.
Operation
• MELODY OFF — in this mode, you can
play melody with accompaniment.
9
Page 11

1. Press
LEARNING
21( .(<
to
2. Select a tone from the SONGS list and
enter its two-digit number on the keypad.
Or, you can press
next higher or lower numbered tune.
3. Press
the first note of the tune you selected
and the note appears. Press the corresponding key on the keyboard to continue learning. The next note you need
to press appears. The tune will continue
to play even if you press the wrong key.
, then repeatedly press
SONG
until black dots appear next
on the left side of the display.
to move to the
– or +
START/STOP
. The keyboard plays
If you want to play the tune with accompaniment in the learning mode, repeatedly press
LEARNING
0(/2'<2))
If you want to quit the learning mode, repeatedly press
pears next to
until a black dot appears next to
.
LEARNING
1250$/
until the black dot ap-
.
USING THE METRONOME
To turn on the keyboard’s metronome, press
or
TONE
metronome’s bar swings along with the tempo you selected, and the corresponding beat
appears. Press
ronome off.
RHYTHM
, then press
again to turn the met-
METRO
METRO
. The
4. To stop learning, press
again or press
pressed
next to
Press the correct key to continue learning. The tune doesn’t play until you
press the correct key.
LEARNING
:$,7,1*
Special Features
LEARNING
, a black dot appears
anda note appears.
START/STOP
. If you
RECORDING
You can record a sequence of notes up to 37
notes in length.
1. Press
5(&25'
2. Play the notes you want to record.
3. Press
recorded.
4. To turn off recording, press
TONE
RECORD
appears.
PLAY
, or
to start recording.
to play the notes you
3/$<
appears.
RHYTHM
.
SONG
USING BEAT
When the metronome is on, repeatedly press
until you hear the desired beat to ad-
BEAT
just it. 9 beats (00, 02–09) are available and
can be selected cyclically. The beat number
you selected appears.
Note:
If the keyboard loses power,
recording is turned off and any recording
you made is erased.
USING ONE-TOUCH
SETTING
Your keyboard’s one-touch setting feature
lets you automatically play a preset tone to
match a selected auto-rhythm you changed.
276
.
.
appears.
1. Press
,
2. Enter a two-digit auto-rhythm number.
3. Press
RHYTHM
O.T.S
10
Special Features
Page 12

4. Press
matches the selected auto-rhythm
appears.
To quit one-touch setting, press
disappears.
. The preset tone that
TONE
O.T.S.
USING SUSTAIN
276
Recording/Playing a
Percussion Pad Sound
You can record any of the available percussion sounds onto any of the percussion
pads. This lets you quickly select and play
any percussion sound that the keyboard can
make.
For added flexibility and control as you make
music, you can set the keyboard so it sustains sound.
To sustain notes you play, press
6867$,1
the played note until you release
Press
appears and the keyboard sustains
SUSTAIN
again to turn off sustain.
SUSTAIN
SUSTAIN
PERCUSSION PADS
Using a Percussion Pad
Your keyboard’s percussion pads put the
sound of 5 different percussion instruments
(bass drum, snare drum, hi-hat open, high
tom-tom, and hi-hat close) at your fingertips.
To play a percussion pad sound, simply
press the desired pad at any time. The keyboard plays the selected percussion sound
once each time you press the pad.
Note:
The keyboard clears any sound you
assign to a percussion pad each time you
turn it off.
.
1. Press
board.
.
2. Select the tone you want by pressing
any of the 16 white keys in the middle of
the keyboard until you hear the sound
you want.
3. When you hear the tone you want to
record, hold down the percussion pad
you want to assign the sound to and
press the white key.
then enter 5 0 on the key-
TONE
TRANSPOSING
The keyboard automatically selects the key
of middle C each time you turn it on. For added flexibility, you can transpose (change) the
keyboard’s key using as many as 12 steps
-6). You can adjust the transposition
(+6
–
freely by pressing the
To transpose the keyboard’s key, press
TRANSPOSE +
TRANSPOSE –
to raise a chromatic scale or
to decrease a chromatic.
TRANSPOSE
buttons.
To reset the keyboard’s key to its default,
press
the same time.
Special Features
TRANSPOSE +
and
TRANSPOSE –
at
11
Page 13

Using MIDI
Your keyboard includes a feature called MIDI
(Musical Instrument Digital Interface). MIDI is
the universal standard for sending and receiving performance data between all types
of electronic musical instruments, regardless of the manufacturer.
Using MIDI, you can play music on your keyboard and another instrument at the same
time while pressing the keys on only one,
record your music to a sequencer, acquire a
wider selection of preset tones from a soun d
module, and much more.
ABOUT MIDI
Every MIDI-equipped instrument has a MIDI
OUT terminal, and some also have a MIDI IN
and MIDI THRU terminal. Each of these terminals serves a different purpose.
MIDI OUT sends MIDI data to (“talks to”) the
other MIDI instrument(s).
MIDI IN receives (“listens to”) MIDI data sent
by the other MIDI instrument(s).
Connecting your keyboard to another
Note:
MIDI device requires a MIDI cable (not supplied). See “Making the MIDI Connections.”
MAKING THE MIDI
CONNECTIONS
To connect your keyboard to another MIDIequipped device, you must use a MIDI cable
(available at your local RadioShack store).
The keyboard’s MIDI data is sent automatically as you play.
Cautions:
• Always turn off power to your keyboard
and the other MIDI device before you
connect or disconnect MIDI cables.
• As you make the cable connections, be
sure to align the MIDI cable pins with the
matching holes on your keyboard’s
terminal. If you have trouble plug-
OUT
ging in the cable, do not force it! You
might damage the plug or the instrument.
MIDI
MIDI THRU lets you conne ct (“network”) additional MIDI instruments, and sends along to
other MIDI devices a copy of all data it receives through its MIDI IN terminal.
Your keyboard has a
The cable that connects MIDI devices does
not actually carry sound between them, like a
speaker wire carries sound from a receiver to
a speaker. Instead, MIDI-equipped devices
communicate with each other using digital
codes (instructions). One MIDI device sends
digital instructions representing exactly what
is being played on it. The other MIDI device
receives and translates those instructions,
then produces (or records) the sound exactly
as it was played on the first device.
12
MIDI OUT
terminal.
Using MIDI
Notes:
• The keyboard’s auto-rhythms, prerecorded tunes, sustain information, and
transpose information cannot be sent as
MIDI data.
• If you send MIDI data to a device such
as a personal computer, the computer
will need a sound card, software to interpret the data, and a pair of speakers
(none supplied). Your local RadioShack
store carries sound cards, MIDI cable,
and software.
• MIDI Channel 10 is preset to percussion
data in some MIDI receiving devices,
depending on the specific device you
select.
Page 14

1. Use a MIDI cable to connect
g
MIDI OUT
on the back of the keyboard to the other
exchange data. As in a TV broadcast,
different channels send different data.
device’s MIDI IN terminal.
3. To transmit to the MIDI device, play the
2. Repeatedly press
to select a MIDI
MIDI
channel. MIDI uses up to 16 channels to
Troubleshootin
melody using the keyboard’s black and
white keys.
If your keyboard is not performing as it should, these suggestions might help. If you still cannot
solve the problem, take the keyboard to your local RadioShack store for assistance.
Trouble Possible Cause Remedy
No sound, even when
the keys are pressed.
No rhythm. Volume is turned down. Repeatedly press
No accompaniment
when accompaniment
keys are pressed.
No sound when connected to an external
amplifier.
No sound when playing MIDI data.
POWER
Volume is turned down. Repeatedly press
Headphones are connected. Disconnect headphones.
Power supply problem. Check the power supply.
Rhythm is not started. Press
Volume is turned down. Repeatedly press
Accompaniment keys are not
pressed.
Volume is turned down. Repeatedly press
Defective connection cord. Replace the connection cord.
Problem with external amplifier. Check the amplifier.
MIDI cables are not connected
properly.
is set to
OFF
.Set
POWER
the volume.
Are battery symbols (+/–) facing correctly?
Are the batteries fresh?
Is the AC or DC adapter connected properly?
the volume.
the volume.
Press the accompaniment keys (on the left
side of the keyboard).
the volume.
Check the connection.
to ON.
VOLUME UP
VOLUME UP
START/STOP
VOLUME UP
VOLUME UP
to increase
to increase
.
to increase
to increase
CARE
Keep the keyboard dry. Use and store the
keyboard only in normal temperature environments. Handle the keyboard carefully.
Keep the keyboard away from dust and dirt.
Troubleshooting
Modifying or tampering with the keyboard’s
internal components can cause a malfunction and invalidate its warranty. If your keyboard is not performing as it should, take it to
your local RadioShack store for assistance.
13
Page 15

Chord Charts
These tables show the fingering for the chords you play most often.
Diminished
Suspended
14
Chord Charts
Page 16

Chord Charts
Diminished
15
Page 17

Specifications
Number of Keys ................................................................................................................................................................ 49
Polyphonic Sound ........................................................................................................................................... 8-note (Max.)
Preset Tones .................... ................................ ............................... ... ............................................................................... 50
Auto-Rhythms ................................................................................................................................................................... 30
Prerecorded Tunes .............................................................. ................................................................................... 50 Tunes
Effect ........................... .................................................. ....................................................................................... Transpose
Rhythm Controls ................................................................................................................ TEMPO, FILL-IN, START/STOP
Built-In Speakers ............................................................................................................................... 4 Inches (102 mm) × 2
...........................................................................................................................................................(Output 3W Max Each)
Terminals:
Power Supply .....................................................................................................................................................
Jack .........................................................................................................................................................
PHONE
MIDI OUT
Power Sources .......................................................................................................................................... DC: 6 C batteries
Dimensions (HWD) ............................................... ... .. ................................ .. ........................ 2
Weight (Without Batteries) ................................. ... ............................... ... ... ............................................................. 5 lb 8 oz
Included Accessory ..................................................................................................
Specifications are typical; individual units might vary. Specifications are subject to change and improvement without notice.
Jack ....................... ............. ............. .......... ............. ............. .............. ............. .............................................. OUT
AC: 120V, 60Hz, with AC adapter
Vehicle Battery: 9V with DC adapter
15
/16 × 2615/16 × 109/16 Inches
(75 × 684 × 269 mm)
Play Guide for the Prerecorded Tunes
DC 9V
1
/8 Inches
(3.5 mm)
Jack
(2.5 kg)
Limited One-Year Warranty
This product is warranted by RadioShack against manufacturing defects in material and workmanship under normal use for one (1)
year from the date of purchase from RadioShack company-owned stores and authorized RadioShack franchisees and dealers. EXCEPT AS PROVIDED HEREIN, RadioShack MAKES NO EXPRESS WARRANTIES AND ANY IMPLIED WARRANTIES, INCLUDING
THOSE OF MERCHANTABILITY AND FITNESS FOR A P A R TI CULAR PURPOSE, ARE LIMITED IN DURATION TO THE DURATION
OF THE WRITTEN LIMITED WARRANTIES CONTAINED HEREIN. EXCEPT AS PROVIDED HEREIN, RadioShack SHALL HAVE NO
LIABILITY OR RESPONSIBILITY TO CUSTOMER OR ANY OTHER PERSON OR ENTITY WITH RESPECT TO ANY LIABILITY,
LOSS OR DAMAGE CAUSED DIRECTLY OR INDIRECTLY BY USE OR PERFORMANCE OF THE PRODUCT OR ARISING OUT OF
ANY BREACH OF THIS WARRANTY, INCLUDING, BUT NOT LIMITED TO, ANY DAMAGES RESULTING FROM INCONVENIENCE,
LOSS OF TIME, DATA, PROPERTY, REVENUE, OR PROFIT OR ANY INDIRECT, SPECIAL, INCIDENTAL, OR CONSEQUENTIAL
DAMAGES, EVEN IF RadioShack HAS BEEN ADVISED OF THE POSSIBILITY OF SUCH DAMAGES.
Some states do not allow limitatio ns on how lo ng an im plied warra nty last s or the ex clusion o r limita tion of i ncident al or con sequential
damages, so the above limitations or exclusions may not apply to you.
In the event of a product defect during the warranty period, take the product and the RadioShack sales receipt as proof of purchase
date to any RadioShack store. RadioShack will, at its option, unless otherwise provided by law: (a ) corre ct the de fect by produ ct repa ir
without charge for parts and labor; (b) replace the product with one of the same or similar design; or (c) refund the purchase price. All
replaced parts and products, and p r odu cts on w hic h a r efu nd i s m ad e, be com e th e property of RadioShack. New or re cond i ti on ed parts
and products may be used in the performance of warranty service. Repaired or replaced parts and products are warranted for the remainder of the original warranty period. You will be charged for repair or replacement of the p roduct made after the expiration of the
warranty period.
This warranty does not cover: (a) damage or failure caused by or attributable to acts of God, abuse, accident, misuse, improper or abnormal usage, failure to follow instructions, improper installation or maintenance, alteration, lightning or other incidence of excess voltage or current; (b) any repairs other than those provided by a Radio Shack Authorized Service Fa cility; (c) consuma bles such as fuses
or batteries; (d) cosmetic damage; (e) transportation, shipping or insurance costs; or (f) costs of product removal, installation, set-up
service adjustment or reinstallation.
This warranty gives you specific legal rights, and you may also have other rights which vary from state to state.
RadioShack Customer Relations, 200 Taylor Street, 6th Floor, Fort Worth, TX 76102
We Service What We Sell
12/99
RadioShack Corporation
Fort Worth, Texas 76102
42-4034
A
01A01
Printed in China
 Loading...