

Radio Shack Metal Detector with Depth Read-Out Owner's Manual
Metal Detector with Depth Read-Out
Plug Connector
OWNER’S MANUAL — Please read before using this equipment.
With your R adioShack Me tal Detect or, you can hunt for coi ns, relics,
jewelry, gold, and silver just about anywhere. This electronically advanced metal detector is versatile, easy to use, and offers superior
performance when hunting for smaller objects (such as gold nuggets
or small pieces of je welr y). The m etal d etecto r’s other fea tures i nclud e:
Dual Liquid Crystal Display
— displays the probable type of metal
being detected and the probable depth of the target item.
Slow Sweep Discrimination
— distinguishes between different met-
als efficiently, even when the detector is swung at slow speeds.
Three-Tone Audio Discrimination
— sounds distinctive tones for dif-
ferent categories of metal objects to make target identification easier.
Eight Inch Waterproof Search Coil
— lets you use your metal dete c-
tor in almost any weather conditions.
TREASURE HUNTER’S CODE OF ETHICS
All treasure hunters might be judged by the example you set. Here are
a few basic rules you should follow while using your metal detector:
• Always get permission before searchin g any site.
• Respect the rights and property of others.
• Observe all national, state, and local laws while treasure hunting.
• Never destroy his tori ca l o r ar cha eo log ic al treasures. If you a r e n ot
sure about an object you ha ve found, contact a museum or h ist orical society in your area.
• Leave the land and vegetation as it was. Fill in any holes you dig.
• Use your detector only in safe areas.
• Dispose of any junk you find only in approved areas. Do not leave
it for the next treasure hunter to find.
CHOOSING A SEARCH COIL
The best search coil to use depends on
and the
desired target
. Your local RadioSha ck s tore ca rries a varie ty of
search coils.
• If you are looking for deeply-buried objects, a medium-sized
search coil (such as the supplied standard 8 inch search coil) is
more efficient.
where
you use the detector
PREPARATION
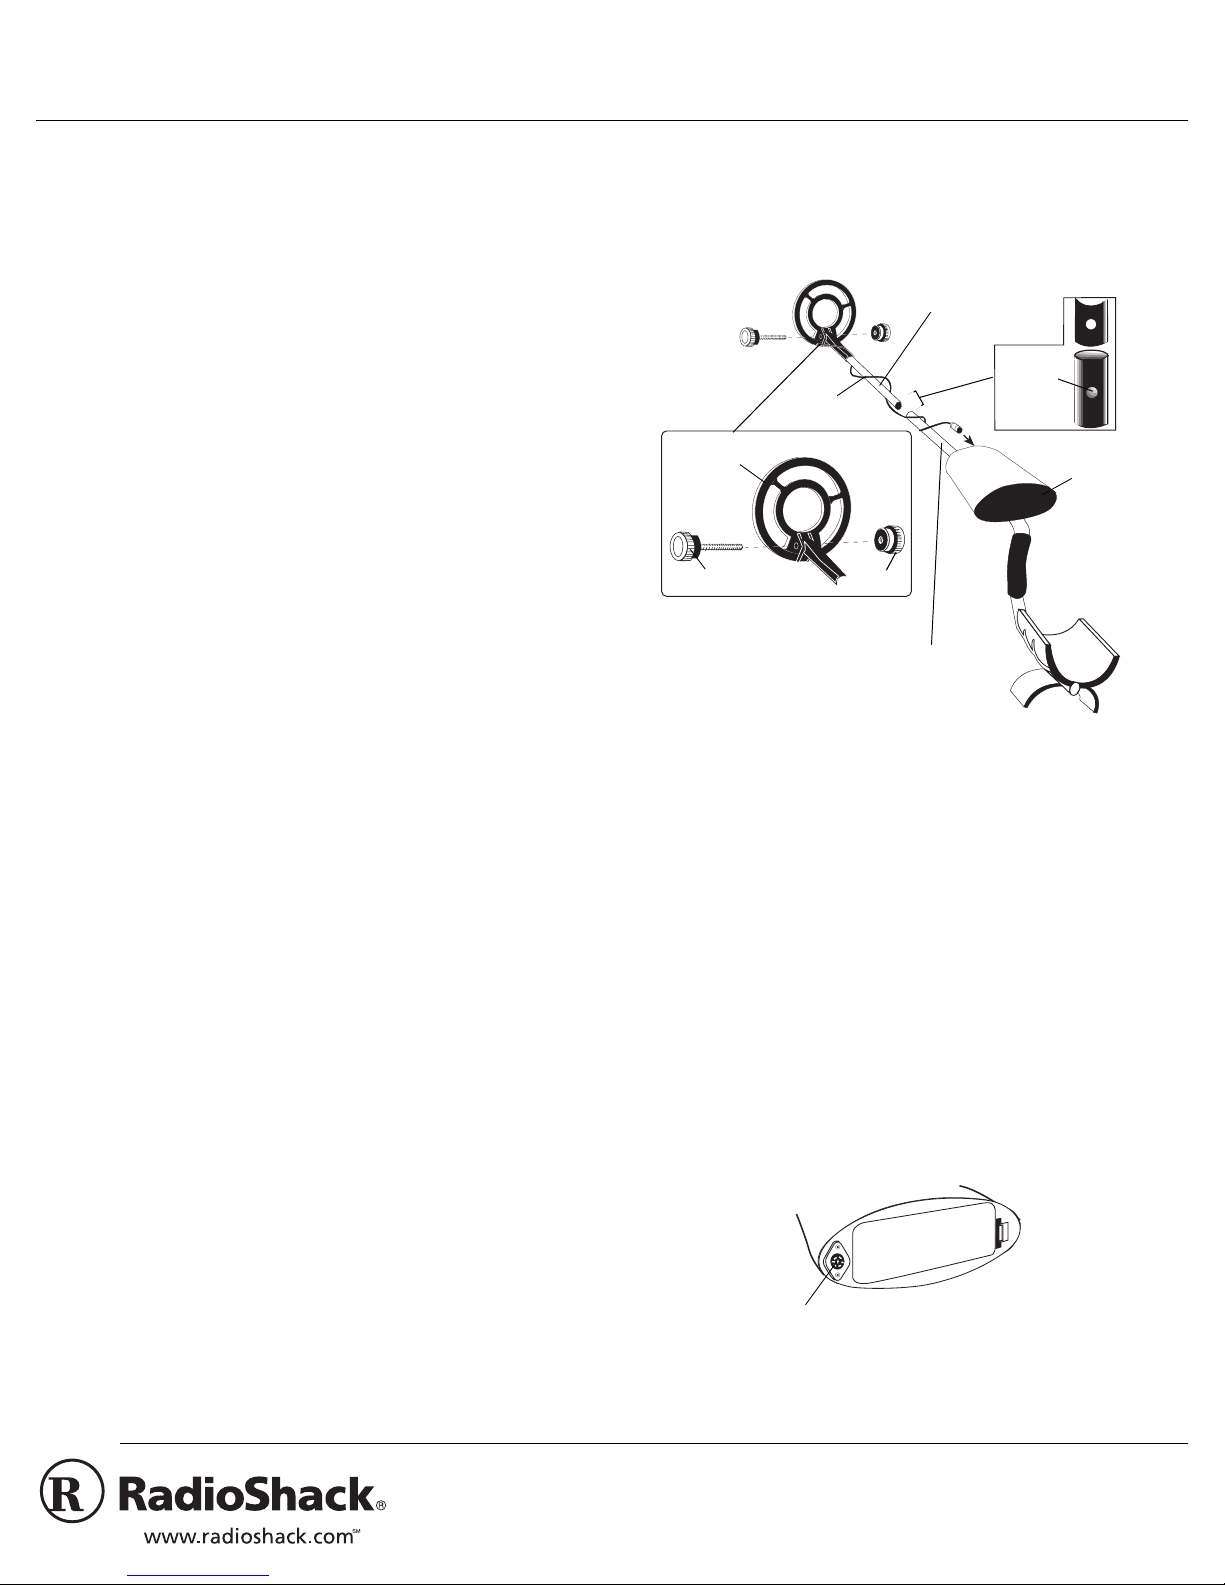
Assembling the Metal Detector
Assembling your metal detector is easy and requires no special too ls.
Lower Stem
Button
Cable
Search Coil
Knob
Bolt
Upper Stem
1. Using the supplie d bolt and knurled kno b, a ttac h th e s earch coil to
the lower stem. Do not fasten the bolt all the way.
2. Press the button on the upper end of the lower stem, then slide
the lower stem into the upper stem, allowing the button to stop at
the desired length.
Adjust the stem to a length that lets you maintain a comfortable
upright posture, wit h yo ur arm rela xe d at your side and the search
coil parallel to the ground.
3. Wind the search coil’s cable around the stem. Leave enough
slack in the cable to let you adjust the search coil when you are
hunting on uneven ground.
4. Tighten the knob at the end of the search coil.
5. Insert the search coil’s plug into the matching connector on the
control housing. Be sure the holes and pins line up correctly.
Do not force it! The plug fits only one way.
Control
Panel
• If you are looking for tiny , coi n-s iz ed o bje cts no t buri ed to o de eply ,
or if you are gold prospec ting , a 4 inc h search coil might work better.
2000 RadioShack Corporation.
©
RadioShack and RadioShack.com are trademarks used by RadioShack Corporation.
All Rights Reserved.
Caution:
pull on the cable.
When disconnecting the cable, pull it out by the plug. Do not
Installing Batteries
Your metal detector requires two 9V batt eries (not supplied) for power.
For the best performan ce and long est li fe, we rec omm end Rad ioShac k
alkaline batteries.
Cautions:
• Use only fresh batteries of the required size and recommended
type.
• Do not mix old and new batteries, different types of batteries
(standard, alkaline, or rechargeable), or rechargeable batteries of
different capacities.
1. Press down on the battery compartment cover’s tab and lift the
cover out.
2. Snap the batteries into the terminals. 9V batteries fit only one way
— do not try to force them.
Listening Safely
To protect your hearing, follow these guidelines when you use headphones.
• Set the volume to the lowest setting before you begin listening.
After you begin listen ing , adj us t the vol um e to a com fort abl e le vel.
• Do not listen at extremely high volume levels. Extended high-volume listening can lead to permanent hearing loss.
• Once you set the volume, do not increase it. Over time, your ears
adapt to the volume level, so a volume level that does not cause
discomfort might still damage your hearing.
Traffic Safety
Do not wear headphones while operating your metal detector near
high-traffic areas.
Even though some headphones let you hear some outside sounds
when list ening at norma l volu me leve ls, th ey stil l can p resent a traf fic
hazard.
3. Place the batteries inside the compartment.
4. Replace the cover.
When the low battery indicator stays on continuously, the metal detector does not power on, the sound becom es weak or distorte d or wi ll not
tune properly, or the metal detector stops operating properly, replace
the batteries.
You can extend battery life by using headphones (see “Using Headphones”).
Warning:
or bury them.
Caution:
longer, remove the batterie s. Batterie s can le ak chem icals tha t can destroy electronic parts.
Dispose of old batteries promptly and properly. Do not burn
If you do not plan to use the metal detector for a week or
RESETTING THE METAL DETECTOR
The metal detector might lock up and sound a continuous tone if you
have low battery vo lta ge or a r e tes tin g t he detector with the se arc h c oi l
near a large metal object.
If the metal detector locks up, try the following:
• Reset the detector by turning it off, then back on.
• Check and replace the batteries, as necessary.
• Move to a different testing location.
USING HEADPHONES
You can connect a pair of stereo headphones (not supplied) to the
metal detector so you can listen to it privately. Using headphones also
saves battery power and makes it easier to identify subtle changes in
the sounds you hea r for better detection result s. W e re co mm en d u sin g
a set of headphones with an independent volume control. Your local
RadioShack store carries a wide variety of headphones.
To connect headphones to the metal detector, insert the headphones’
1
/4-inch (6.35-mm) plug into the
HEADPHONE
jack on the front panel.
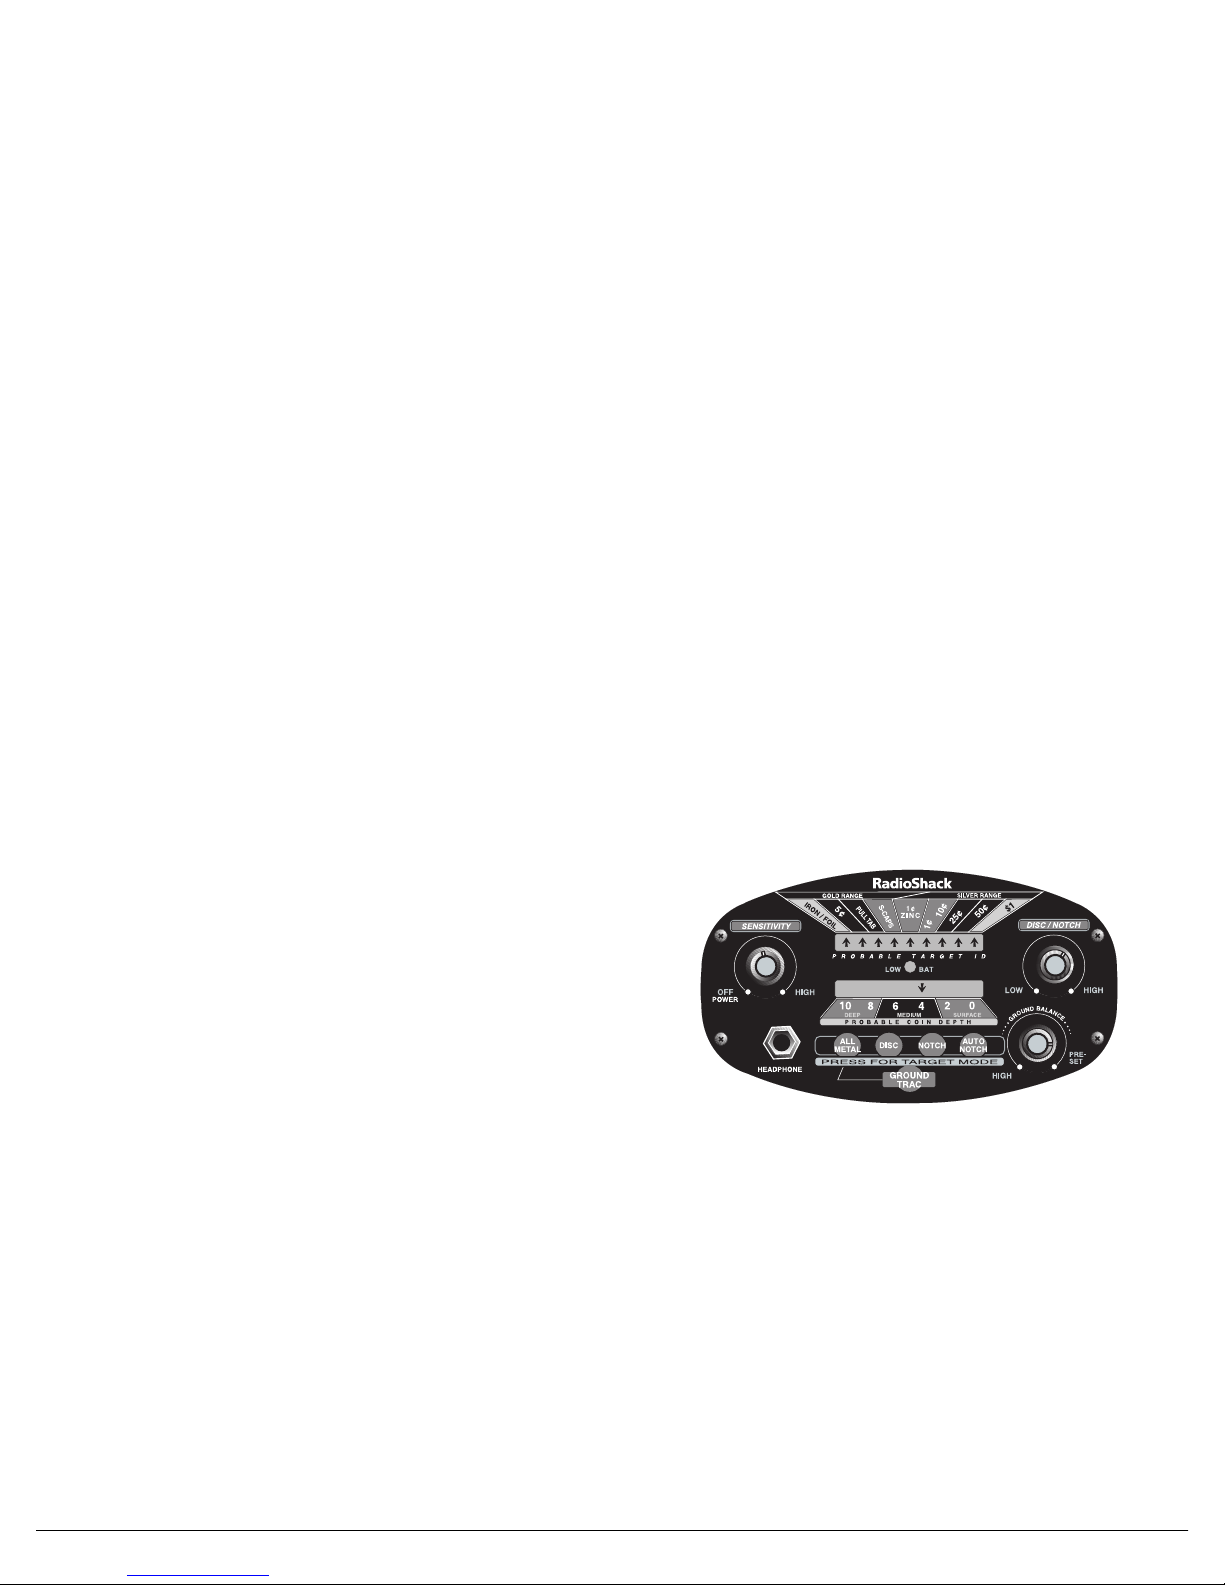
TURNING THE DETECTOR ON/OFF
To turn on the metal detector, rotate
The detector sounds three beeps, display arrows appear, and the low
battery indicator lights briefly.
The metal detector is preset to the
detector to the desired mode, follow the Steps in the desired mode’s
section under “Setting the Mode” on Page 4.
To turn off the metal detector, rotate
OFF
clockwise toward
.
POWER/SENSIT IVITY
ALL METAL
mode. To set the metal
POWER/SENSITIVITY
clockwise.
counter-
UNDERSTANDING THE DISPLAY
Notes:
• The target i nd i ca tor s ar e us ed as ap p r ox im ati on s of wha t is be i ng
targeted. Many other types of metal can fall under any one of
these indicators. There is always a “trash-to-treasure” ratio when
detecting. The display provides a visual reference to minimize the
trash only. It cannot completely eliminate all trash items.
• When the arrow points to a coin, the detector could be sensing
either a coin or another type of metal (such as jewelry, tokens,
medals, or even junk metal).
PROBABLE TARGET ID
ject, including various coins and metal objects, with a range from
GOLD
When the detector senses a target, an arrow appears to indicate the
probable target being detect ed.
to
SILVER
— Shows the probable iden tity of th e tar get o b-
(other types of metal fall under both spectrums).
2
 Loading...