

Page 1
42-4056.fm Page 1 Friday, April 26, 2002 9:14 AM
/&/;:4"/+&+"-G[DQCTF
42-4056
Two Power Options
internal batteries (not supplied) or standard AC power
(with an optional adapter), so you can make music
almost anywhere (see “Conne cti ng Pow er” on Page2).
100 Auto-Rhythms
steady beat for many styles of music,
from rhumba to rock (see “Using the
Preset Auto-Rhythms” on Page 7).
— let you power the keyboard from
100 Tones
— provide a
keyboard to sound like a nythi ng
from a harpsichord to a honkytonk piano (see “Using the
Preset Tones” on Page 6).
— let you set your
OWNER’S MANUAL — Please read before using this equipment.
12-Note Polyphonic Sound
— lets you play and
hear up to 12 notes at the same time, so you can
play or create almost any type of music.
100 Prerecorded Tunes
— let you he ar a sam pl e o f
what you and your keyboard can do. You can play
the tunes either one at a time or consecutively, and
you can turn off the melody or accompaniment
portion so you can play along with the tunes (see
“Playing the Prerecorded Tunes” on Page 5).
Middle “C”
Large Music Information Display
— shows you a staff with
the notes and chords as you play them, along with the
61 Full-Sized Keys
— provide the feel of a fine musical instrument.
fingering, current tone, rhythm, volume, melody, and tempo.
The display also shows a metronome icon to indicate the beat.
This Owner’s Manual explains how to use this electronic keyboard. It does not teach music.
Your keyboard includes a MIDI (Musical Instrument Digital Interface) feature, which lets you connect it to other MIDI-equipped musical
instruments or devices — even your personal computer. The keyboard conforms to most, but not all, General MIDI specifications.
Because of this, you might experience some incompatibility when using the keyboard with another General MIDI device. See “Using
MIDI” on Page 10.
%106'065
The FCC Wants You to Know ...................... 2
Connecting Power ..................... .... .... .... ...... 2
Installing Batteries .................................... 2
Using AC Power ....................................... 2
Connecting Headphones ............................. 2
Listening Safely ........................................ 2
Connecting an External Amplifier ................ 3
Using the Sheet Music Stand ...................... 3
A Quick Look at Your Keyboard .................. 4
Basic Operation ........................................... 5
Playing the Prerecorded Tunes ................... 5
Playing Back a Prerecorded Tune ............ 5
Playing Along with a
Prerecorded Tune .................................... 6
Turning Applause Off/On .......................... 6
Consecutively Playing Back
the Tunes ................................................. 6
Using the Preset Tones ............................... 6
Selecting/Playing a Preset Tone .............. 6
Layered Tones ......................................... 6
Keyboard Split Tones ............................... 7
Percussion Sounds .................................. 7
Using the Pre se t Au to-Rhythm s .................. 7
Selecting/Playing an Auto-Rhythm .......... 7
Using SYNCHRO ..................................... 7
Using FILL-IN ........................................... 7
Using Auto Accompaniment ........................ 8
Adjusting the
Accompaniment Volume .......................... 8
Concert Chord .......................................... 8
Standard Fingering .................................. 9
Using the Chord Book ................................. 9
Special Fe a tu res .............. ......................... 10
Changing Keys ....................................... 10
Tuning the Keyboard .............................. 10
Using a Sustain Pedal ............................ 10
Using MIDI ................................................ 10
About MIDI ............................................. 10
Making the MIDI Connections ................ 10
MIDI Data ............................................... 10
Changing MIDI Settings ......................... 11
Notes About the
MIDI Implementation Chart .................... 11
Troubleshooting ........................................ 12
Care ........ .. .................................... ............ 12
Service and Repair .................................... 12
Standard Fingering Chord Charts ............. 13
Note Table ................................................. 15
MIDI Implementation Chart ....................... 17
Specificat i o n s .............................. .............. 18
2002 RadioShack Corporation.
©
Adaptaplug, RadioShack, and RadioShack.com are trademarks used by RadioShack Corporation.
All Rights Reserved.
Page 2
42-4056.fm Page 2 Friday, April 26, 2002 9:14 AM
The FCC Wants You to Know
The FCC Wants You to Know
If an icon appears at the end of a paragraph,
go to the box on that page with the
corresponding icon for pertinent information.
— Warning # — Important
Rý
.... — Caution
±
— Note
Dispose of old batteries promptly and properly.
Do not burn or bury them.
Installing Batteries
• Use only fresh batteries of the required size
and recommended type.
• Do not mix old and new batteries, different
types of batteries (standard, alkaline, or
rechargeable), or rechargeable batteries of
different capacities.
• If you do not plan to use the keyboard with
batteries for a week or more, remove the
batteries. Batteries can leak chemicals that
can destroy electronic parts.
Using AC Power
!
center tip must be set to negative and its
plug must fit the keyboard's DC 9V jack.
Using an adapter that does not meet these
specifications could damage the keyboard
or the adapter.
• Always connect the AC adapter to the
keyboard before you connect it to AC
power. When you finish, disconnect the
adapter from AC power before you
disconnect it from the keyboard.
"+/2146#06"
#
"9#40+0)
R
.
"%#76+10"
You must use a Class 2 power
source that supplies 9V DC and
delivers at least 800 mA. Its
°°°°
ý
R
.
#
— Hint
"
6*'"(%%"9#065";17"61"-019
This equipment has been tested and found
to comply with the li mi ts f or a C l as s B di gi tal
device, pursuant to Part 15 of the
. These limits are designed to provide
Rules
reasonable protection against harmful
interference in a re si dential installation . T his
equipment generates, uses and can radiate
radio frequency energy and, if not installed
and used in accordance with the
instructions, ma y cause harmful inte rference
to radio communications.
However, there is no guarantee that
interference will not occur in a particular
installation. If this equipment does cause
harmful interference to radio or television
reception, which can be determined by
turning the equipment o ff and o n, the us er is
FCC
encouraged to try to c orrec t the in terfe renc e
by one or more of the following measures:
• Reorient or relocate the receiving
antenna.
• Increase the separation between the
equipment and receiver.
• Connect the equi pment int o an outlet on
a circuit different from that to which the
receiver is connected.
• Consult your local RadioShack store or
an experienced radio/TV technician for
help.
If you cannot eliminate the interference, the
FCC requires that you stop using your
keyboard.
You must use shielded interfac e cable s with
this equipment.
%100'%6+0)"219'4
You can power your keyboa rd usin g intern al
batteries or standard AC power with an
optional AC adapter.
+056#..+0)"$#66'4+'5
Your keyboard can use 6 AA batteries (not
supplied) for power. For the best performance and longest life, we recommend
RadioShack alkaline batteries.
1. Make sure
2. While pressing the tab on the battery
compartment cover on the bottom o f the
keyboard, pull up the c over to re move it.
3. Place the batteries in the compartment
as indicated by the polarity symbols (+
and –) marked inside.
4. Replace the cover.
When the keyboard stops operating
properly, replace the batteries.
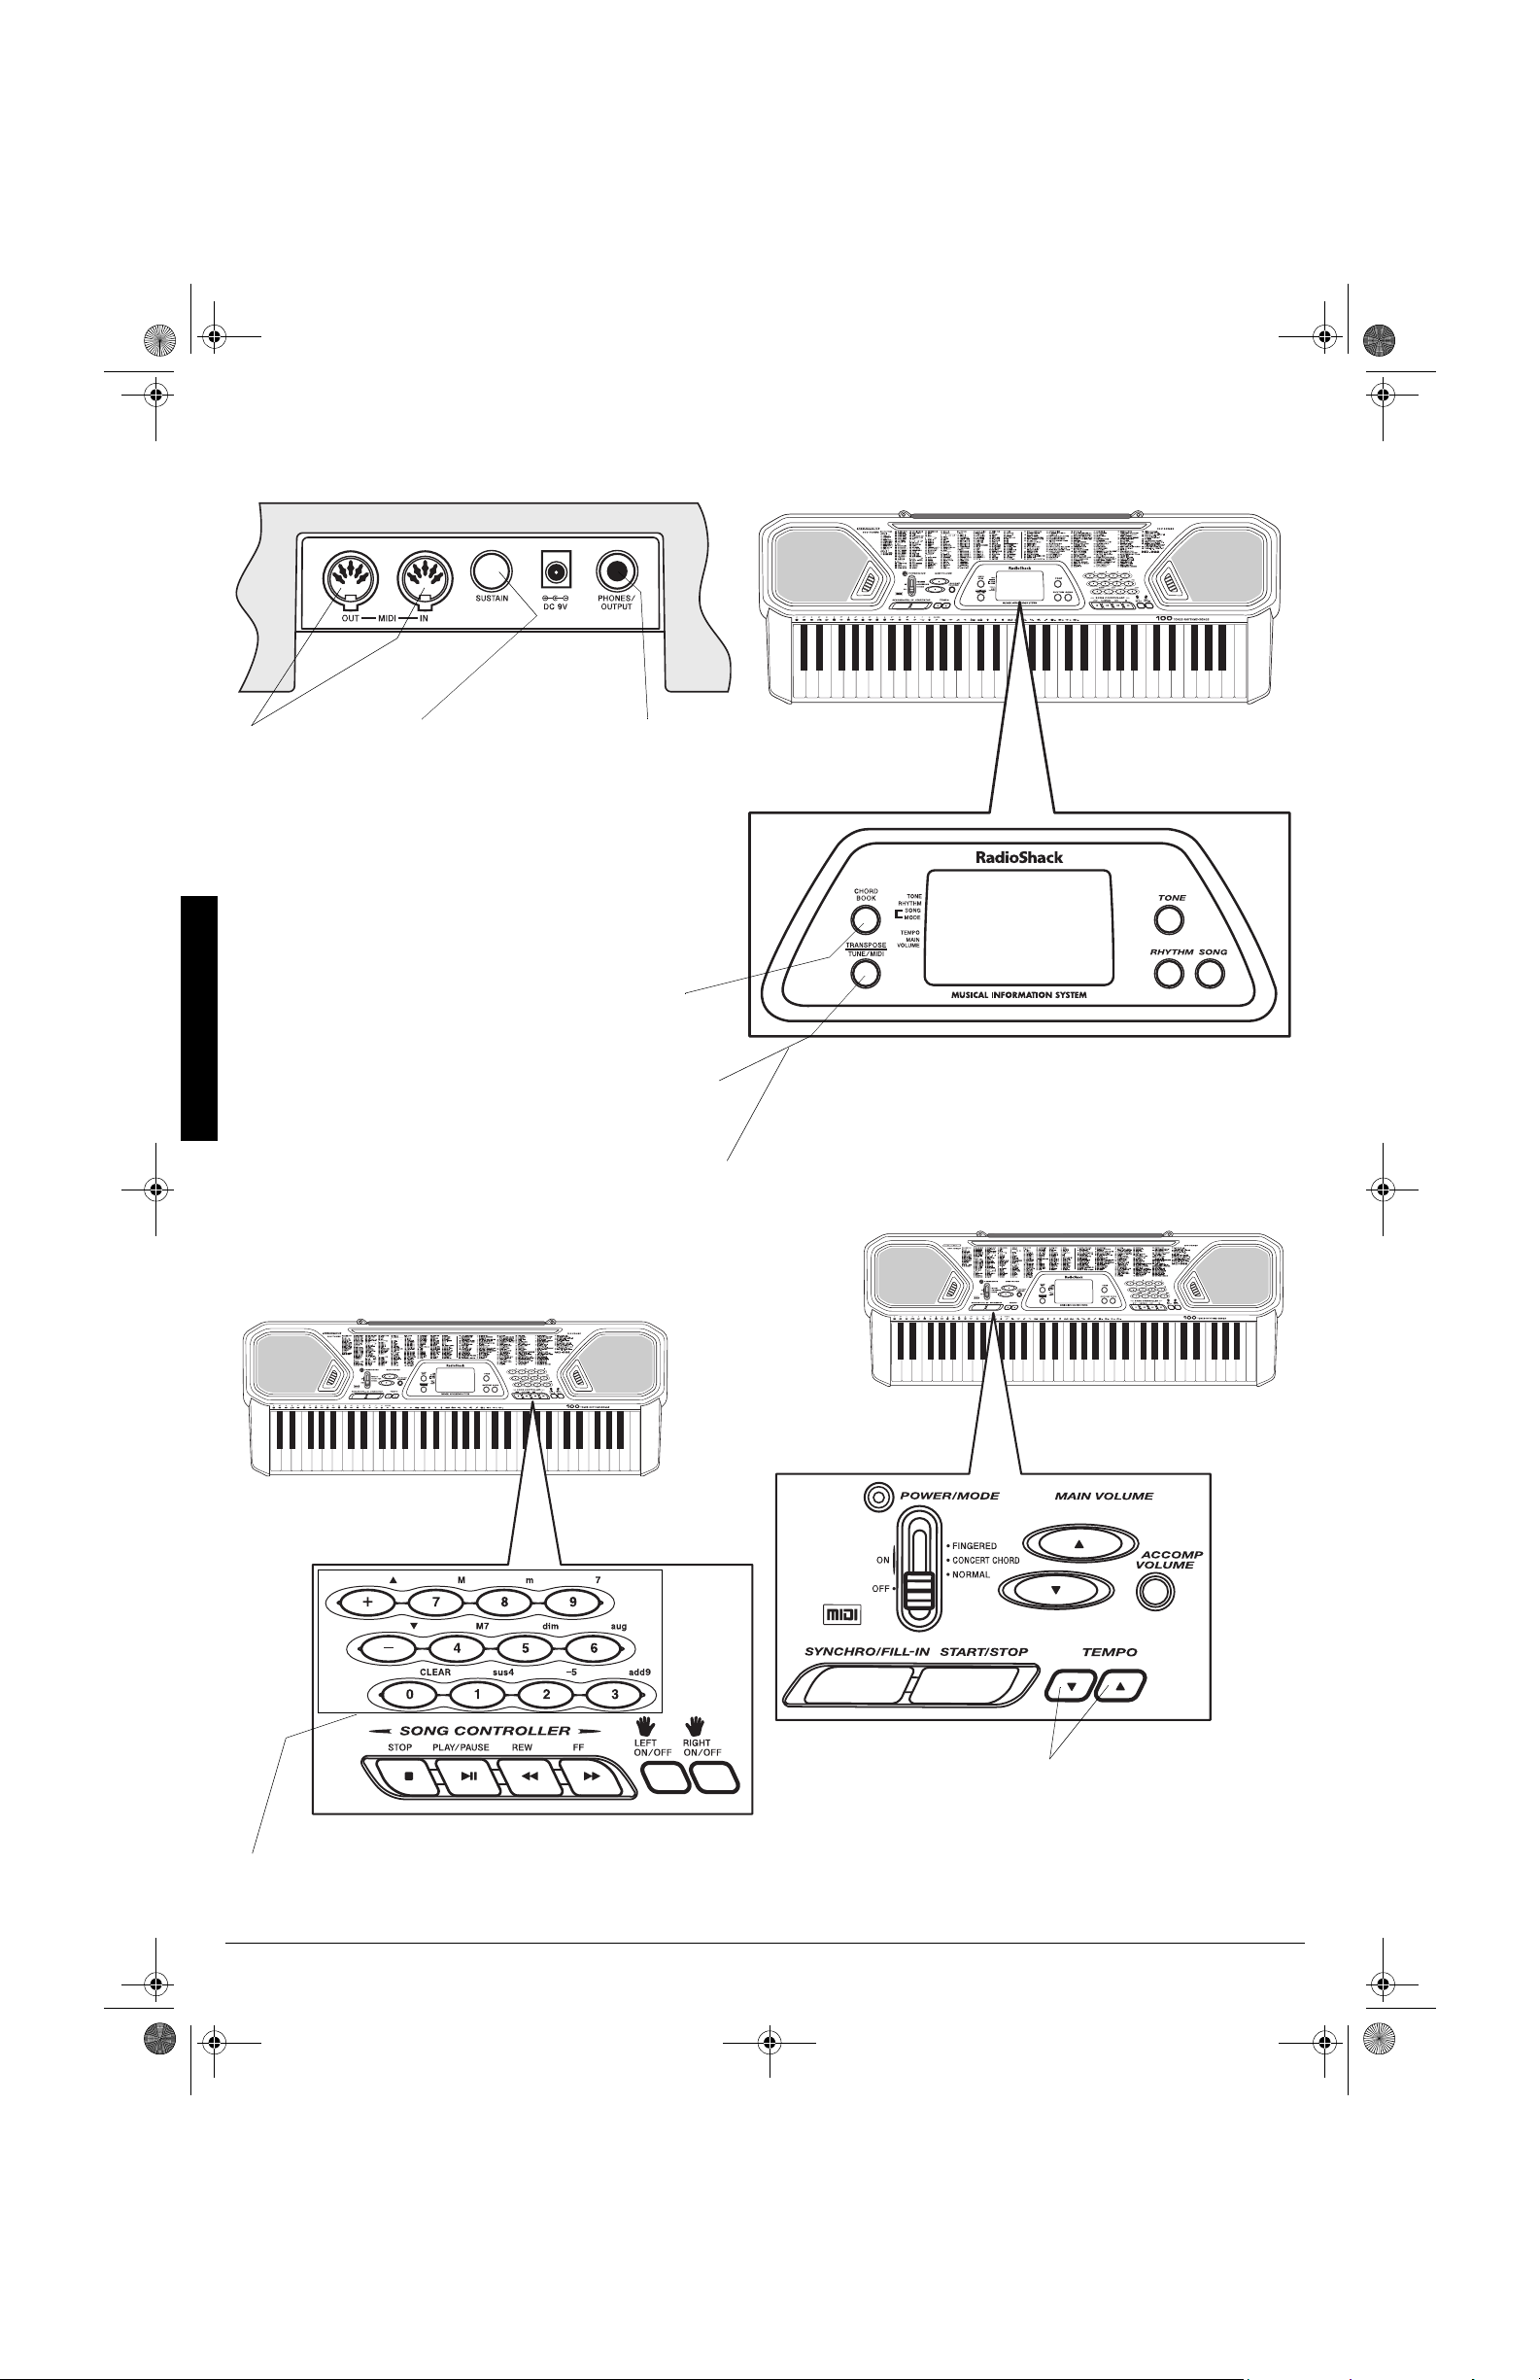
POWER/MODE
....
is set to
.#
.#
.#.#
Rý
OFF
75+0)"#%"219'4
You can power the keyboard using a 9V,
800 mA AC adapter and a size M
Adaptaplug™ adapter (neither supplied).
Both are available at your local RadioShack
store or online at
Connecting an AC adapter automatically
disconnects any internal batteries.
1. Make sure
.
2. Set the AC adapter’s voltage switch to
9V
.
3. Insert the Adaptaplug adapter into the
adapter’s cord so it reads – TIP.
4. Connect the AC ada pter’s barrel plug to
DC 9V
on the back of the keyboard.
5. Plug the AC adapter’s other end into a
standard AC outlet.
Always disconnect th e AC adapter when you
finish using the keyboard.
%100'%6+0)"*'#&2*10'5
To listen to your keyboard without disturb ing
others, you can connect an optional pair of
stereo headphone s with a
plug. RadioShack sells a wide selection of
headphones. Insert the headphones’ plug
PHONES/OUTPUT
into
keyboard. Connecting headphones
disconnects the keyboard’s built-in
speakers.
1
/4-inch (6.35 mm)
on the back of the
.+56'0+0)"5#('.;
To protect your hearing, follow these
guidelines when you use headphones.
• Do not listen at extremely high volume
levels. Extended high-volume listening
can lead to permanent hearing loss.
• Once you set the volume, do not
increase it. Over time, your ears adapt
to the volume level, so a volume level
that does not cause discomfort might
still damag e your hearing.
www.radioshack .co m
POWER/MODE
is set to
....
.
OFF
.
• Set the volume to the lowest setting
before you begin listening. After you
begin listening, adjust the volume to a
comfortable level.
2
Page 3
42-4056.fm Page 3 Friday, April 26, 2002 9:14 AM
%100'%6+0)"#0"':6'40#."#/2.+(+'4
To amplify your keyboard’s sound, you can
connect it to an optional external amplifier
using an audio cable with a 1/4-inch (6.35
mm) plug (not supplied). To connect an
external amplifier to your keyboard, insert
the cable’s plug into
PHONES/OUTPUT
on
the back of the keyboard, then connect the
other end of the cabl e to the ampl ifier’s in put
jack(s) (such as AUX IN or TAPE IN).
RadioShack sells a full line of amplifiers,
speakers, and cables.
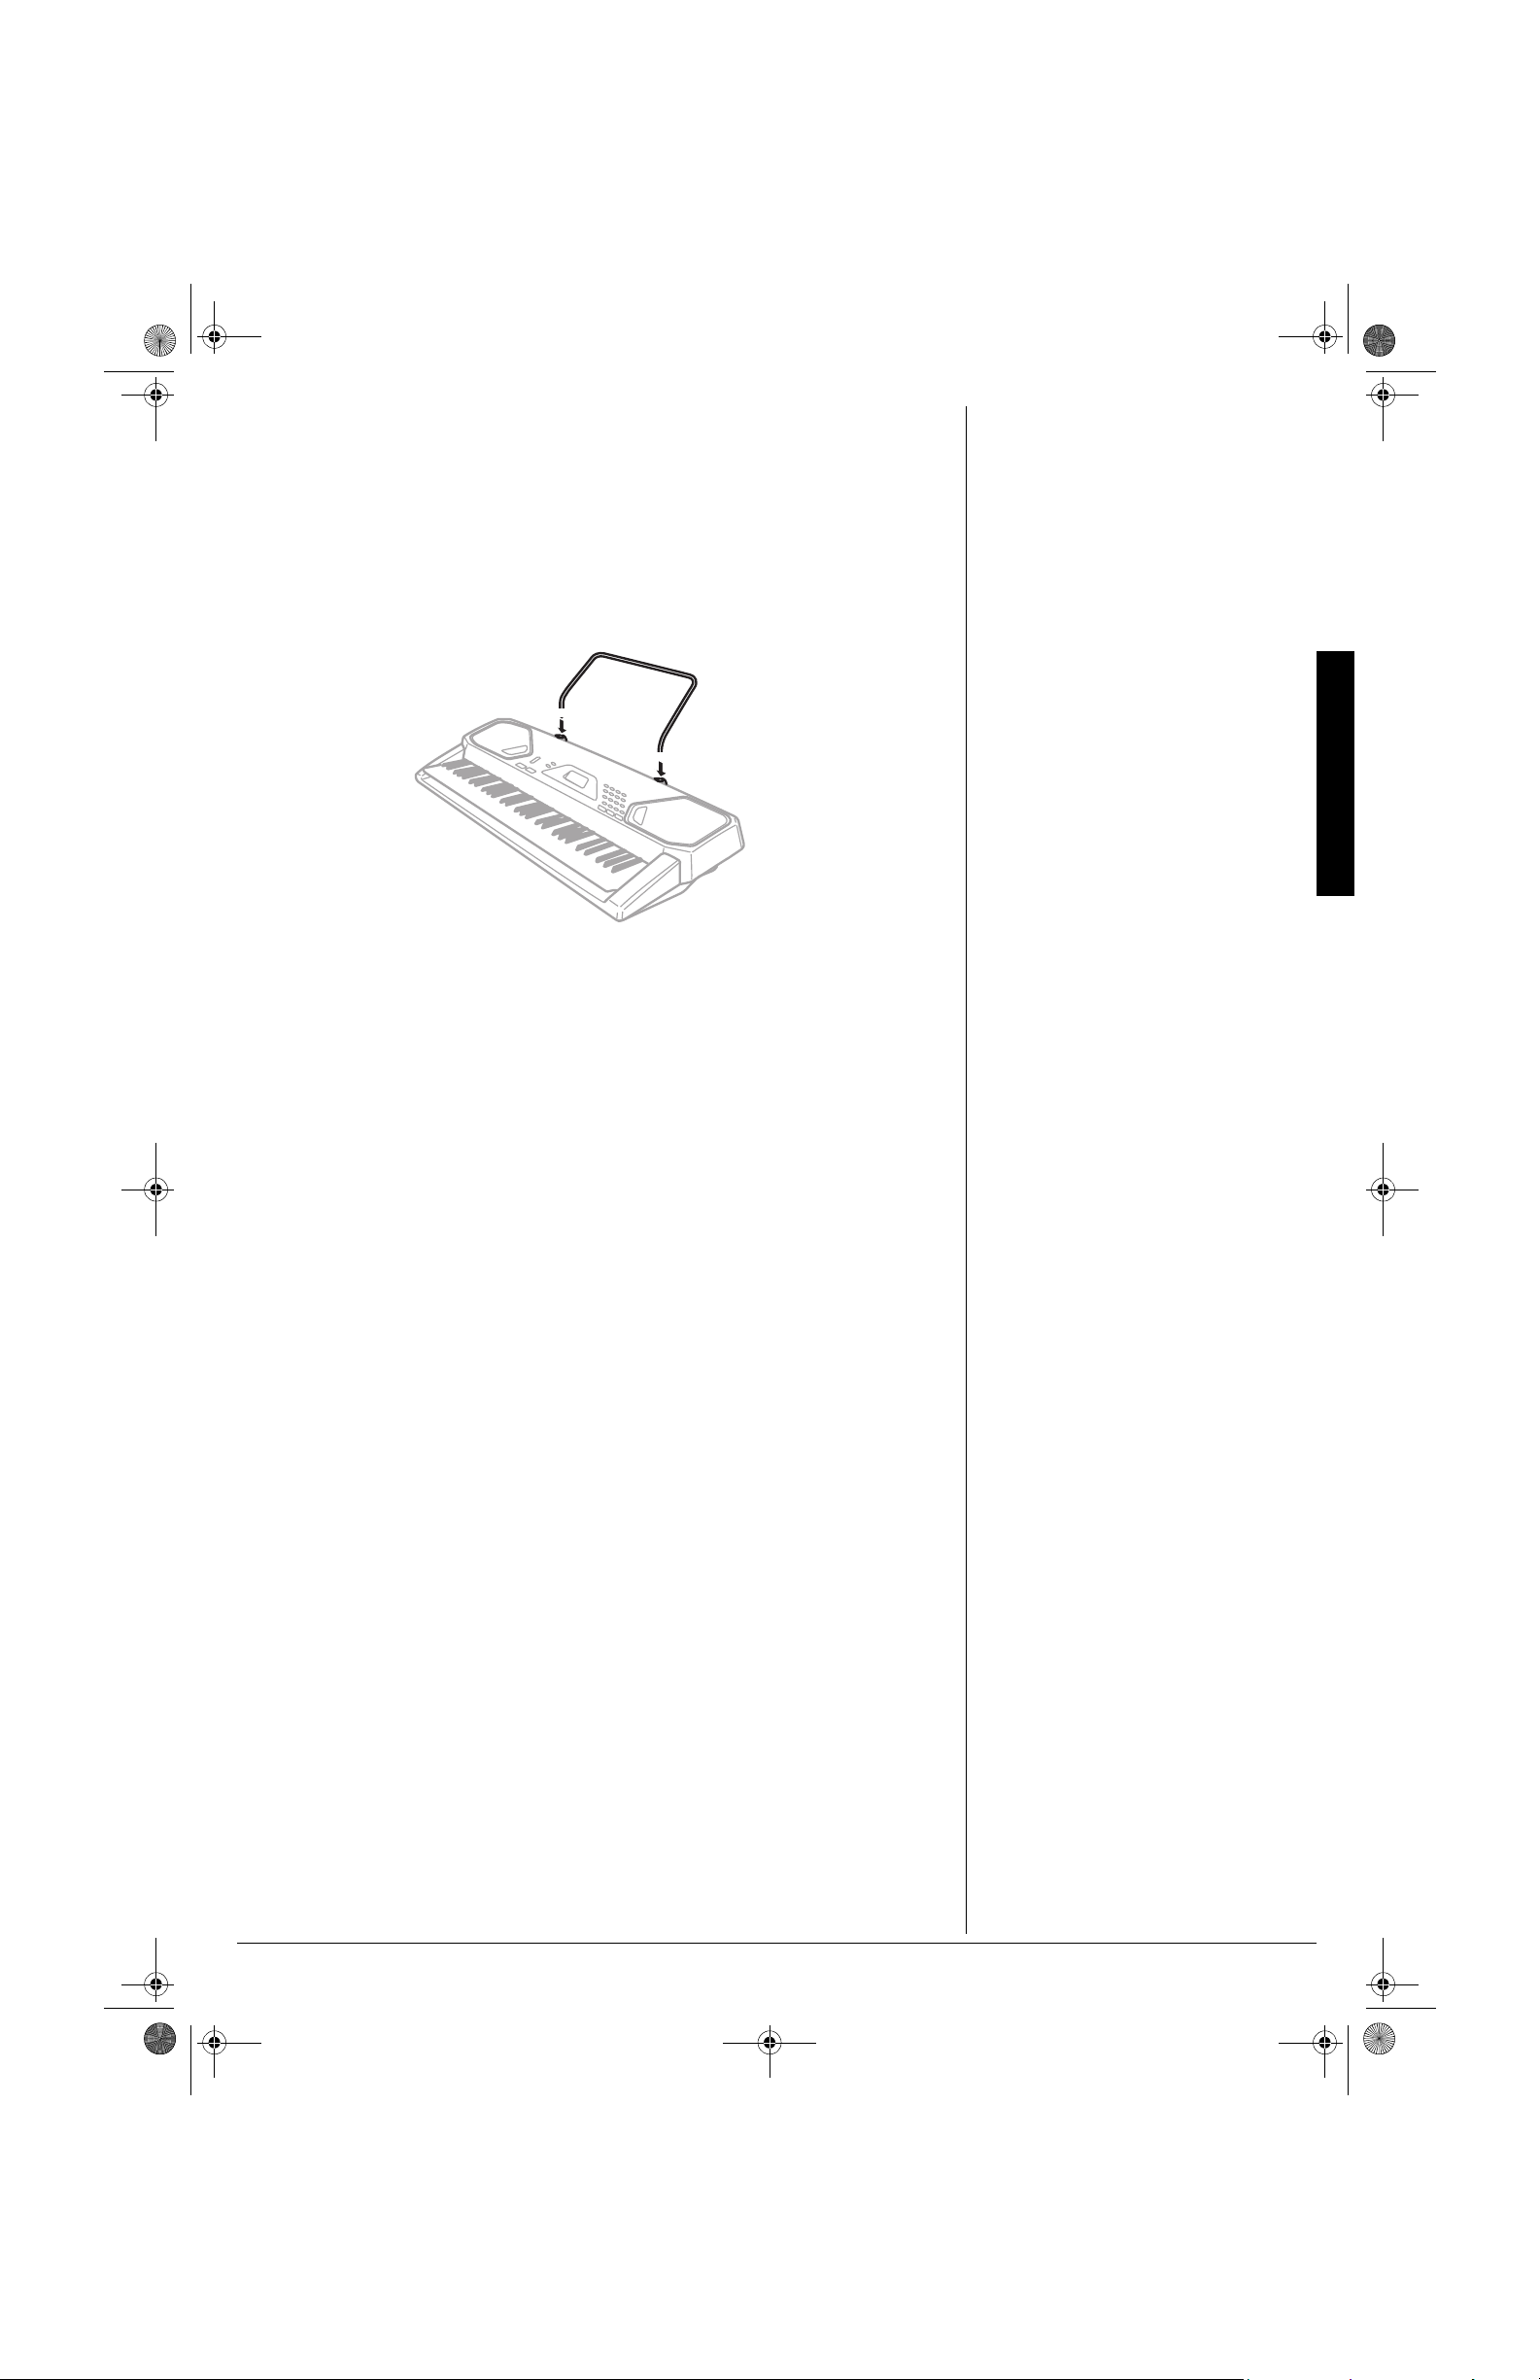
75+0)"6*'"5*''6"/75+%"56#0&
Connecting an External AmplifierConnecting an External Amplifier
To easily view sheet music while playing
your keyboard, insert the supplied sheet
music stand into the holes on the top back
panel.
3
Page 4
42-4056.fm Page 4 Friday, April 26, 2002 9:14 AM
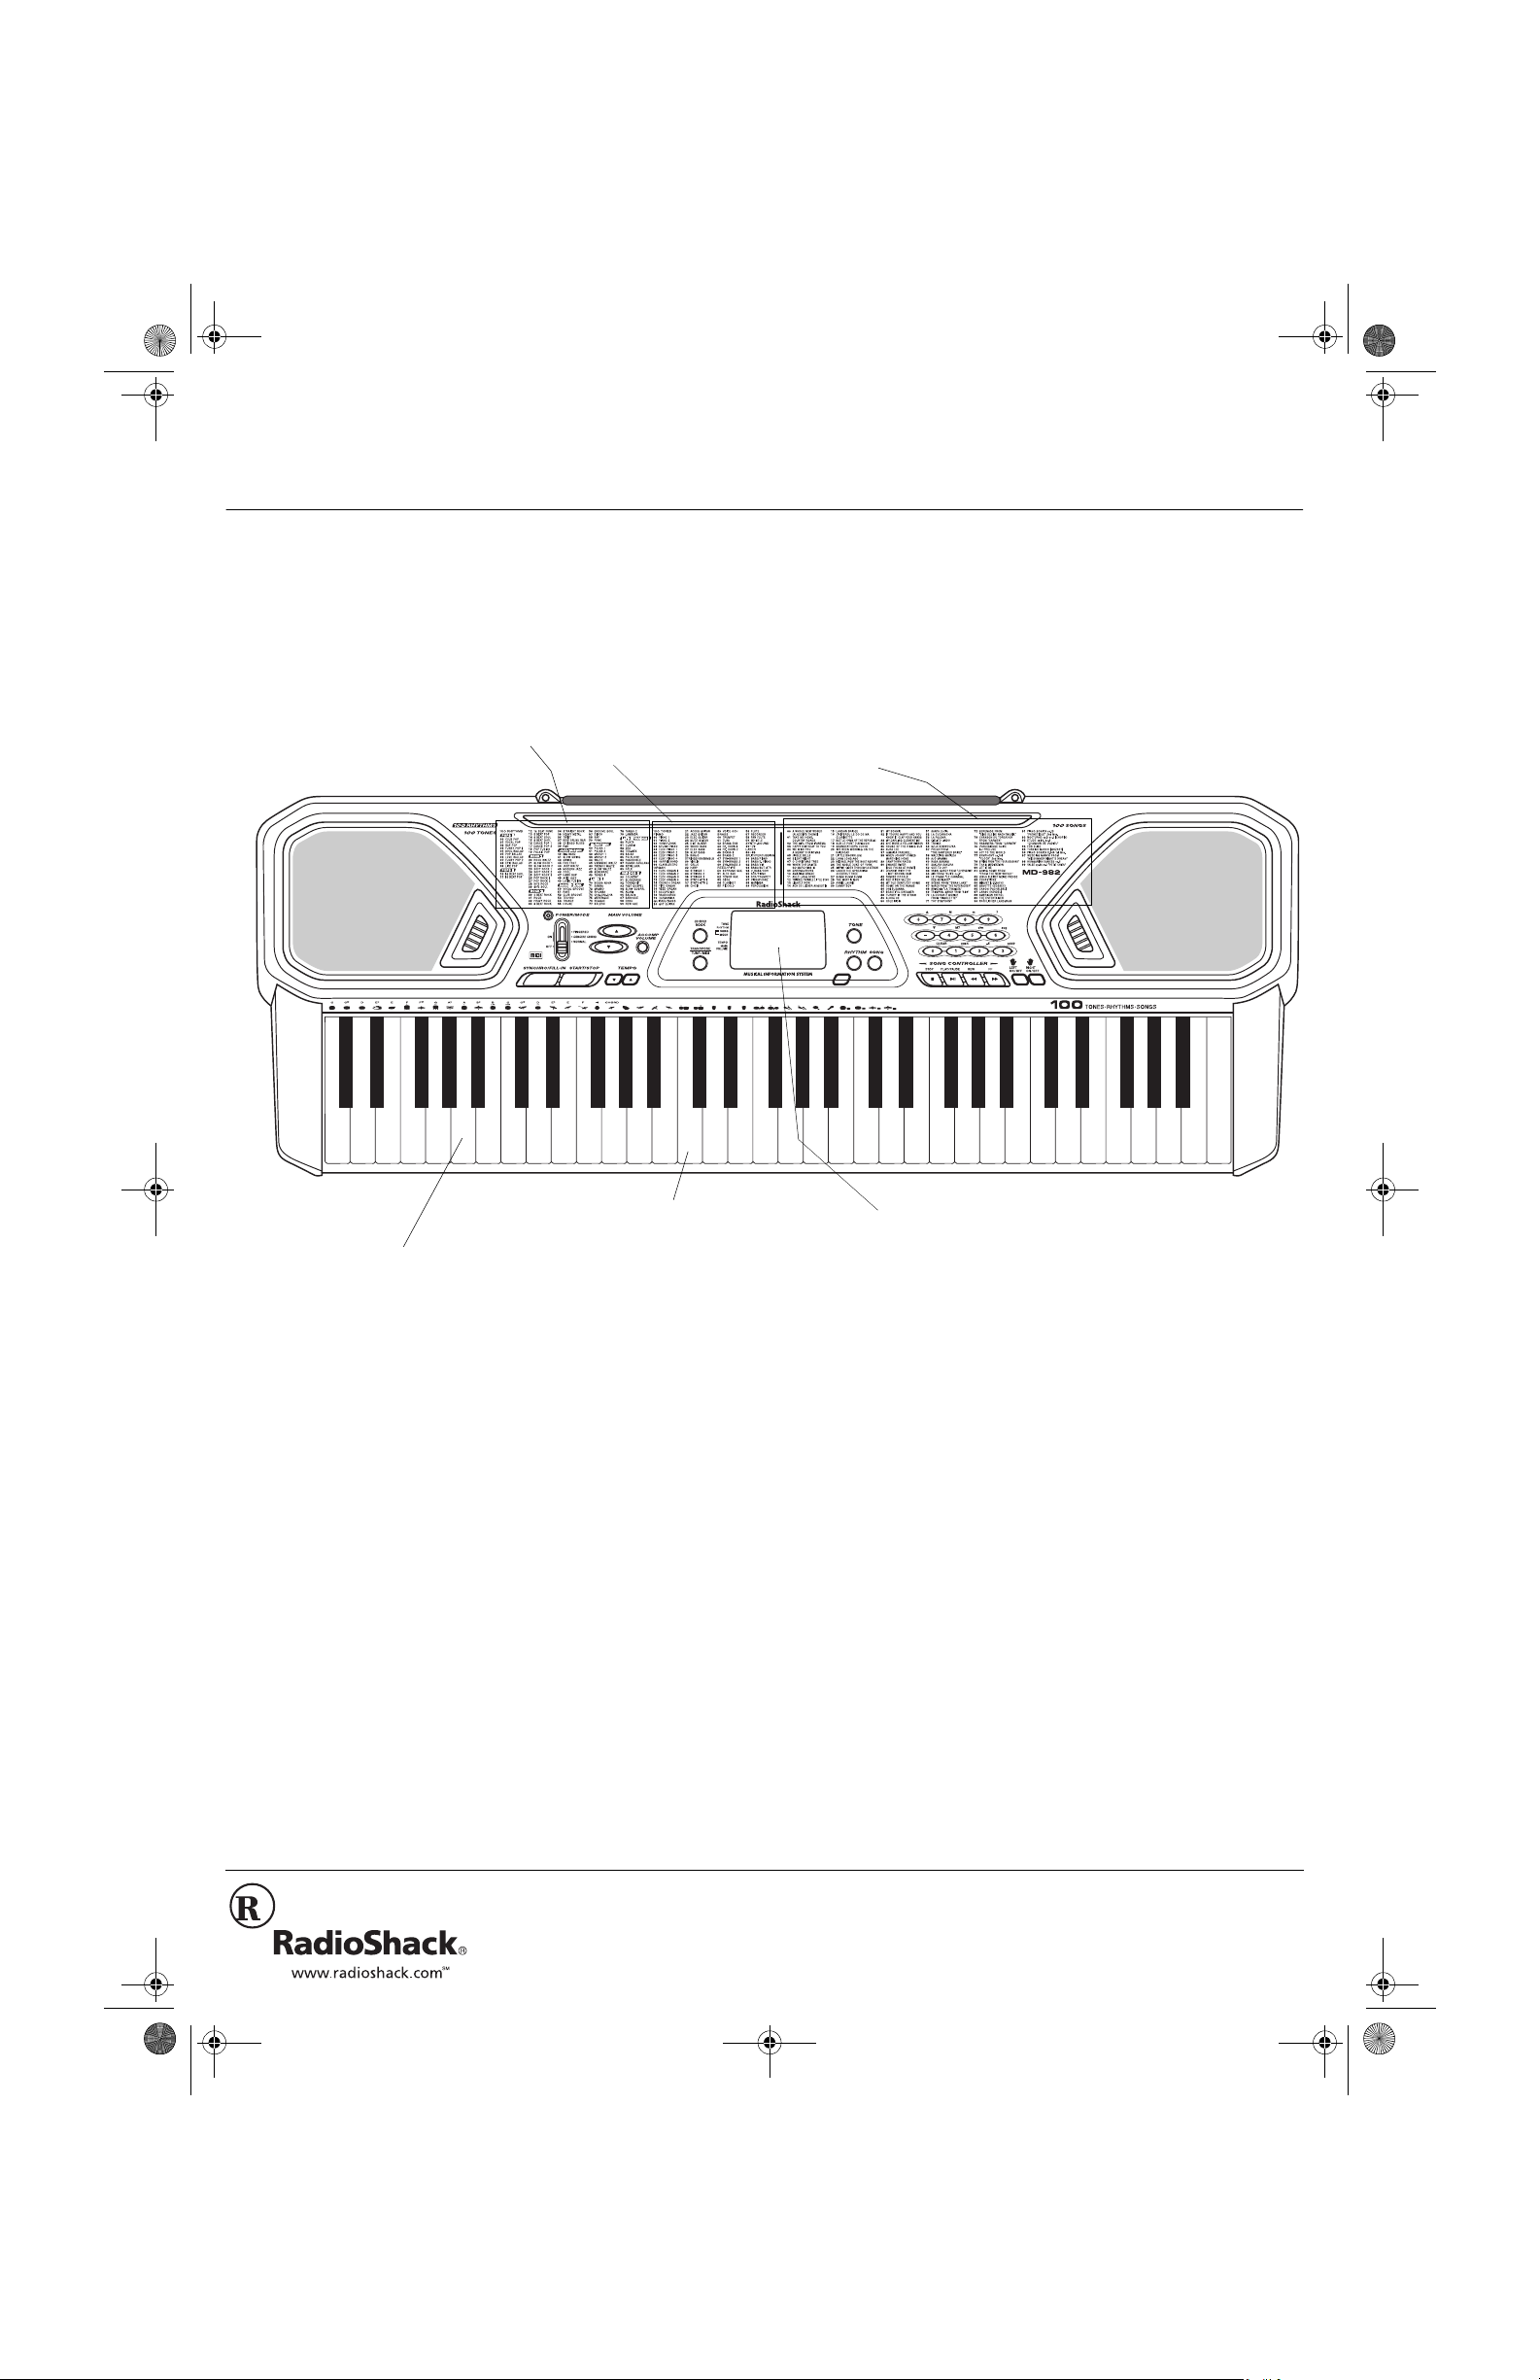
#"37+%-".11-"#6";174"-';$1#4&
(Back of Keyboard)
MIDI In/Out Jacks
let you connect the
keyboard to another
MIDI-equipped
device. To connect a
MIDI device to your
keyboard, see
“Making the MIDI
A Quick Look at Your Keyboard
Connections” on
Page 10.
Chord Book
and which fingers to use to form a chord, as well as a
chord’s name (see “Using the Chord Book” on Page 9).
Transpose Function
the music, even whi le you are pla ying (see “Chan ging Ke ys” on
Page 10).
Tune Control
you can play in tune with other instruments (see “Tuning the
Keyboard” on Page 10).
— lets you easily see which keys to press
— lets you adjust the pitch of your keyboard so
Sustain Jack
—
lets you connect a
sustain pedal (not
supplied) to the
keyboard so you
can sustain your
keyboard’s sound
(see “Using a
Sustain Pedal” on
Page 10).
— lets you instantly change the key of
—
Headphones/
Output Jack
lets you connect
headphones so
you can play
without disturbing
others, or an
external amplifier
so you can play
for a crowd
(neither supplied).
—
Numeric Keypad
rhythm, to adjust the accompaniment volume, and to change the key and pitch.
—makes it easy to enter the name of a chord, so ng, tone, and
4
Tempo Control
or slow down the tempo of any
selected music pattern.
— lets you speed up
Page 5
±
"016'"±"
Basic Operation
• The keyboard automatically selects the
tone PIANO 1 (No. 00) when you turn the
power on. To select a different tone, see
“Selecting/Playing a Preset Tone” on
Page 6.
• To select an auto-rhythm, see “Using the
Preset Auto-Rhythms” on Page 7.
• To play auto accompaniment, see “Using
Auto Accompaniment” on Page 8.
• The keyboard’s volume ranges from 0 (no
sound) to 9 (maximum). Each time you turn
on the keyboard, the volume is set to 7.
• To quickly change the volume setting, hold
down MAIN VOLUME
▲ or ▼.
• To quickly return to the default volume
setting of 7, press both MAIN VOLUME
buttons at the same time.
• The volume level differs depending on the
tone, accompaniment, or song you
selected.
Playing Back a Prerecorded Tune
• The keyboard always selects the tune “A
Whole New World” (No. 00) the first time
you press SONG after turning the power on.
• Precede a single-digit number with a 0. For
example, to select 07 (“O Christmas Tree”),
press 0 7.
• If you enter an incorrect first digit, press
SONG to clear your entry, then enter the
correct digit.
• Each tune plays a different preset tone for
the melody, but you can change to another
tone even while the tune is playing. Follow
the steps under “Selecting/Playing a Preset
Tone” on Page 6 to select a different tone.
• To quickly slow down or speed up the
tempo, hold down TEMPO
▼ or ▲.
• To reset the tempo to its default (original)
speed, press TEMPO ▲ and ▼ at the same
time.
• Tunes 80 to 99 are arranged so the tempo
changes during play. However, if you select
a tempo other than the default tempo, those
tunes play in the newest tempo.
42-4056.fm Page 5 Friday, April 26, 2002 9:14 AM
$#5+%"12'4#6+10
1. To turn on the keyboard, set
MODE
indicator lights.
NORMAL.
to
The POWER/MODE
±
POWER/
4. To turn off the keyboard, set
MODE
OFF
to
. The POWER/MODE
indicator turns off.
POWER/
2. To hear a sample of the keyboard’s
many sounds, play a prerecorded tune
(see “Playing the Prerecorded Tunes”).
To make your own music, simply begin
playing the keyboard.
3. Repeatedly pres s
▼
to increase or decrease the volume.
MAIN VOLUME
▲ or
The current setting appears.
If you use batteries to power the keyboard, it
automatically turns itself off after about 6
minutes if you do not press a key. To turn on
the keyboard again, set
NORMAL
. To cancel auto power off, turn on
the keyboard while holding down
next time you turn the keyboard off, then
back on again, it automa tically tu rns off after
about 6 minutes.
2.#;+0)"6*'"24'4'%14&'&"670'5
You can sit back and listen to the 100 tunes
that come prerecorded in the keyboard, or
you can turn off a tune’s melody or
The demo tu ne number appears here.
accompan iment and play along on the
keyboard.
The treble and ba ss c lefs s how th e notes
as they play.
POWER/MODE
TONE
to
. The
2.#;+0)"$#%-"#"
4'4'%14&'&"670'
2
1. Press
2. Choose a tune from the 100 SONGS
3. Press
SONG
to SONG and the num ber o f the c urrent
tune appears.
list and enter i ts two-digit number on t he
keypad.
Or, you can press
next higher or lower numbered tune.
PLAY/PAUSE
tune.
You can change the tune by repeating
Step 2 even while a tune is playi ng. The
new tune immediately begins to play.
As a tune plays, the display shows:
• a “score” revealing the
notes that are playing (righ t
side of the display)
• a “keyboard” to show you
the fingering and which
keys are pressed (bottom of the
display)
The keyboard at the bottom of the display
shows the location of the keys being pressed.
. An indicator appears next
±
±
– or +
to move to the
to start playing the
• a “metronome” to show you the
selected tempo — the metronome’s bar swings along with
the tempo you selected, and the
black dots above the metronome
show the beat count in the measure
• the chord name (except for tunes 80
to 99, center right of the display)
• “hands” that show the
fingering to play the tune
and chords
4. Use
MAIN VOLUME
to adjust the overall
volume as desired.
To adjust only the accompaniment
volume (except tunes 80 to 99), press
ACCOMP VOLUME
then enter the
desired volume level using the number
&&&&
keys (between
////
and
) or press + or –
within 5 seconds.
5. To move to a particular section of a
REW
tune, hold down
or FF during play.
When you think you have reached the
section you want, release
REW
or FF to
resume normal play.
6. To change the tempo, press
▲
. The current tempo setting
or
appears.
±
TEMPO ▼
Basic Operation
5
Page 6
42-4056.fm Page 6 Friday, April 26, 2002 9:14 AM
"016'"±"
±
Playing Along with a
Prerecorded Tune
• You can find the scores for most of the
prerecorded tunes in the
Prerecorded Tunes
keyboard.
• Tunes 80 to 99 are solo tunes. You can turn
off either the right-hand or left-hand portion,
but not both.
• If you select tunes 00 through 79 and turn
off both the melody and accompaniment,
the keyboard plays an obligato
accompaniment (a simple background
accompaniment).
• You can turn the melody on or off by
repeating Step 2 even while the current
tune is playing.
Play Guide for the
, supplied with your
Using the Preset Tones
• The keyboard has 12-note (maximum)
polyphonic sound. This means that you can
play up to 12 different notes at the same
time with most of the keyboard’s preset
tones. Some tones are only capable of 6note polyphony.
• Most tones on this keyboard have been
recorded and processed using a technique
digital sampling
called
level of tonal quality, samples are taken in
the low, mid, and high ranges and are then
combined to sound amazingly close to the
originals. You might notice very slight
differences in volume or sound quality for
some tones when you play them at different
positions on the keyboard. This is an
unavoidable result of multiple sampling and
is not a malfunction.
• Some sound effect tones, such as
PERCUSSION (No. 99), do not follow the
musical scale when played, but change
effect as you play them in different octaves
on the keyboard.
. To ensure a high
Selecting/Playing a Preset Tone
• Precede a single-digit number with a 0. For
example, to select ELEC PIANO 1 (No. 04),
press 0 4.
• If you enter an incorrect first digit, press
Using the Preset Tones
TONE to clear your entry, then enter the
correct digit.
7. To temporarily stop playing the tune,
PLAY/PAUSE
press
tune completely, press
again. To stop the
STOP
.
2.#;+0)"#.10)"9+6*"#"
4'4'%14&'&"670'
2
Follow these steps to ha ve the keyboa rd n ot
play the melody or accompaniment of a
prerecorded tune, so you can play it ins tead!
±
1. Select and enter the tune you want to
play.
2. Press
ody.
ON/OFF RIGHT
HHHH
disappears from the “hands,”
to turn off the mel-
6740+0)"#22.#75'"1((110
When you turn off either the melody or
accompaniment and then play a tune,
applause automa ticall y sou nds at t he end o f
the tune. To turn off the applause, hold
down
ON/OFF RIGHT
applause on again, press the same buttons.
7fbi3Ed
7fbi3Ed
7fbi3Ed7fbi3Ed
indicating that the keyboard is not playing the right-hand portion of the music.
Or, press
accompaniment.
ON/OFF LEFT
BBBB
disappears from the
to turn off the
“hands.”
3. Press
PLAY/PAUSE
to start play.
4. Adjust the tempo and volume as
desired.
%105'%76+8'.;"2.#;+0)"
$
Normally, the tune you selected plays
continuously until you press
all 100 prerecorded tunes consecutively,
press either
PLAY/PAUSE
in sequence starting with Tune 00.
To stop consecutive playback, press
75+0)"6*'"24'5'6"610'5
Your keyboard can simulate 100 different
musical instr uments or sound effects. The
TONES list on the keyboard’s top panel
shows the name and two-digit number for
each 100 preset tone.
±
5'.'%6+0)12.#;+0)"#"24'5'6"
10'
6
1. Press
2. To play a different tone, c hoose a pr eset
3. Play the keyboard to hear the selected
4. To select a different tone, repeat Steps
6QPG".KUV
SYNTH-SOUND
60 SYN-LEAD 1
61 SYN-LEAD 2
62 SYN-LEAD 3
63 SYN-CALLIOPE
64 SYN-PAD 1
65 SYN-PAD 2
66 SYN-PAD 3
67 GLASS HMCA
68 COUNTRY FARM
TONE
. An indicator appears next
to TONE and the current tone’ s num ber
appears.
±
tone from the 100 T ONES l ist and en ter
its two-digit number on the keypad. As
you press the keys, the selected digits
appear.
+
Or, you can use
or – to move to the
next higher or lower numbered tone.
tone and adjust
MAIN VOLUME
to the
desired level.
1 and 2.
69 SYN-BASS
70 PEARL DROP
71 COSMIC SOUND
72 SOUNDTRACK
73 SPACE PAD
74 VOICE BASS
75 APPLAUSE
76 SYNTH-SFX (sound effects)
77 VEHICLE
78 PHONE
79 FUNNY
.#;'4'&"610'5
The preset tones numbered 80 throu gh 89
on your keybo ard let you automatically play
two different layered tones at the same time
when you press on e key . Fo r ex am pl e, ST R
PNO (No. 80) plays string and piano tones
when you press a key.
6QPG".KUV
80 STR PIANO
81 STR E.PIANO
82 CHOIR E.P
83 CHOIR ORGAN
84 STR GUITAR
85 STR HARP
86 BRASS STR
87 VIB PAD
88 12 STR GTR
89 CHOIR STR
5. Play along with the tune on the
keyboard.
6. To temporarily stop playing the tune,
PLAY/PAUSE
press
tune completely, press
STOP
and press either
7fbi3E\\
7fbi3E\\
.
7fbi3E\\7fbi3E\\
again. To stop the
STOP
.
ON/OFF LEF T
appears. To turn the
appears.
#%-"6*'"670'5
STOP
. To play
TONE
. The keyboard plays the tunes
RHYTHM
or
, then press
STOP
or
.
6
Page 7

±
"016'"±"
Percussion Sounds
When you select the Fingered or Concert
Chord mode, the keys in the lower 1
1
/2 octaves
become the accompaniment keys and do not
produce percussion sounds. See “Using Auto
Accompaniment” on Page 8.
Selecting/Playing an Auto-Rhythm
• The keyboard automatically selects the
rhythm Club Pop (No. 00) when you turn
the power on.
• Precede a single-digit number with an 0.
For example, to select POP BALLAD (No.
05), press 0 5.
• If you incorrectly enter the first digit of the
rhythm, press RHYTHM to clear the entry
and return to the last selected auto-rhythm.
• You can adjust the tempo to play an auto-
rhythm from 20 to 255 beats per minute.
• To quickly slow down or speed up the
tempo, hold down TEMPO
▲
or▼.
• To reset the tempo to its default (original)
speed, press TEMPO
▲
and ▼ at the
same time.
42-4056.fm Page 7 Friday, April 26, 2002 9:14 AM
-';$1#4&"52.+6"610'5
The preset tones numbered 90 through 96
on your keyboard let you automatically play
two different musical instruments or sound
effects independently on opposite sides of
the keyboard.
The instrument l isted fir st in the tone’s name
plays on the left half of the keyboard (below
middle C). The instrument listed next plays
on the right half of the keyboard (above
middle C). For example, BS/PNO (No. 90)
plays a bass tone on the left half of the
keyboard and a piano tone on the right.
2'4%755+10"5170&5
PERCUSSION (No. 99) lets you pl ay the 3 9
different percussion sounds shown here.
The symbol for each sound appears above
the corresponding key on the keyboard.
±
75+0)"6*'"24'5'6"#761/4*;6*/5
Your keyboard has 100 preset aut o-rhythms
that provide a steady beat for your music.
The name and two-digit number of each
preset auto-rhythm is listed on the
keyboard’s top panel.
You can play a preset auto-rhythm on the
keyboard in any of the following ways:
• Select and play a rhythm (see
“Selecting/Playing an Auto-Rhythm”)
• Synchronize the start of a rhythm with
your music (see “Using SYNCHRO”)
• Briefly vary the pattern of a rhythm (see
“Using FILL-IN”)
5'.'%6+0)12.#;+0)"#0"
761/4*;6*/
#
1. Press
2. To select a different rhythm, choose an
RHYTHM
. An indicator appe ars t o
the right of RHYTHM and t he number of
the current auto-rhythm appears.
±
auto-rhythm from the 100 RHYTHMS
list and enter i ts two-digit number on t he
+
keypad. Or, repeatedly press
or – to
move to the next higher or lower
numbered rhythm.
5. To change the auto-rhythm speed,
TEMPO
press
▼ or ▲. The current
tempo setting appears.
6. Play the keyboard along with the autorhythm.
7. To select a different rhythm, repeat
Steps 1 and 2.
8. To stop the auto-rhythm, press
STOP
again.
75+0)"5;0%*41
This feature lets you synchronize the start of
an auto-rhythm with the beginning of your
music.
After you select and enter an auto-rhythm,
SYNCHRO/FILL-IN
press
metronome flash to show the keyboard is in
standby mode.
Begin playing the keyboard. The keyboard
automatically begins to play the rhythm
when you press any key within the first 11/2
octaves of the lower end of the keyboard
(the first 18 keys from the left side of the
keyboard).
START/
. The bars of the
3. Press
auto-rhythm.
4. Adjust
VOLUME
“Adjusting the Accompani ment V olume”
on Page 8).
START/STOP
MAIN VOLUME
to start the s ele cte d
and
to the desired level (see
ACCOMP
75+0)"(+../+0
This feature lets you insert a short (1- to 2measure) variation in the beat pattern of a
selected auto-rhythm.
Press and release
SYNCHRO/FILL-IN
the auto-rhythm is playing. The keyboard
inserts a 1- to 2-measure vari ati on, then the
while
Using the Preset Auto-Rhythms
7
Page 8

C DE F GAB C DE F
C DE F GAB C DE F
C DEFG ABC DE F
C DE F GAB C DE F
42-4056.fm Page 8 Friday, April 26, 2002 9:14 AM
Using Auto Accompaniment
"016'"±"
±
Using Auto Accompaniment
• You can use the keyboard’s rhythm controls
(FILL-IN and SYNCHRO) with both types of
auto accompaniment.
• After you press the auto accompaniment
keys, the keyboard plays the same chord
until you press other keys to play a different
chord or press START/STOP.
Adjusting the Accompaniment Volume
You can adjust the accompaniment volume
separately for your keyboard play and
prerecorded tune playback.
Concert Chord
You can press any labeled note(s) to the right
of the lowest note in the chord to produce a
minor, a dominant seventh, or minor seventh
chord.
original rhythm auto matically resumes a t the
end of the current measure.
75+0)"#761"#%%1/2#0+/'06
The 18 keys on the left side of the keyboard
with note labels above them are called
accompaniment ke ys .
Accompaniment
Keyboard
Melody
Keyboard
You can set the keyboard to play two
different types of auto ac companime nt using
the accompaniment keys.
Concert Chord
•
±
— lets you play chords
on the accompaniment keys using
chord formations of one to four notes.
The number of keys you press
determines the type of chord that plays
(see “Concert Chord”).
Standard Fingering
•
— lets you play
chords on the accompaniment keys
using standard chord formations of
three or four notes (see “Standard
Fingering” on Page 9).
#&,756+0)"6*'"
#
%%1/2#0+/'06"81.7/'
The keyboard lets you adjust the volume of
your accompaniment separately from the
overall volume of the keyboard.
%10%'46"%*14&
The concert chord method lets beginning
keyboard players eas ily sele ct and play a
chord.
The number of accompaniment keys you
press determines the type of chord that
plays. This chart shows the chord type that
plays when you press one, two, three, or
four accompaniment keys at the same time.
0WODGT"QH"-G[U"2TGUUGF %JQTF"6[RG
Major
Minor (m)
Dominant
Seventh (7)
Minor
Seventh (m7)
1. Press
ACCOMP VOLUME
. The current
accompaniment vo lume setting appears
7YecfýLeb
next to
7YecfýLeb
7YecfýLeb7YecfýLeb
.
2. Within 5 seconds, enter a number from
0
(no sound) to
9
(loudest) on the
keypad. The number appears as you
press the key.
–
Or, press
or + to select the ne xt lowes t
or highest accompaniment volume
setting.
To reset the accompaniment volume to its
–
default value of 7, press
±
time.
and + at the same
The lowest note you play determ ines the key
of the chord. For exam ple , if the lowest note
is C, the keyboard plays a C chord.
1. Set
POWER/MODE
CONCERT CHORD
to
±
2. Enter a two-digit auto-rhythm number.
3. To start the auto-rhythm before the auto
accompaniment, press
START/STOP.
Or, to synchronize the start of the
selected auto-rhythm with your
accompaniment, press
IN
.
SYNCHRO/FILL-
4. Begin the accompaniment at the
desired interval by pressing the desired
accompanime nt key(s).
To play a melody along with the
accompaniment, press any key(s) to the
right of the accompaniment keys.
5. Adjust the tempo,
ACCOMP VOLUME
MAIN VOLUME,
to the desired levels.
and
6. To change chords without interrupting
the rhythm, simply press the auto
accompaniment key(s) required to form
the new chord.
.
7. To stop auto accompaniment and the
auto-rhythm, press
START/STOP
.
8
Page 9

±
"016'"±"
Standard Fingering
• You do not have to press the key marked
with parentheses on the keyboard in the
chart to produce a 7, m7, M7, mM7, add9,
or madd9 chord.
• Although the chart shows only one possible
fingering position for each chord, it is
possible to play a chord using several
different positions. For example, the
following three positions produce the same
C chord.
• When you play an aug, 7
–
5
, or dim7 chord,
the lowest note you play determines the
root of the chord. Be sure that your
fingering correctly defines the root you
want.
• See “Standard Fingering Chord Charts” on
Page 13 for all the chords you can play on
your keyboard using standard fingering
accompaniment.
Using the Chord Book
• If the chord is not recognized by the
keyboard, only a dash appears.
• Since the keyboard automatically changes
some chords so you can play them on the
accompaniment keyboard, the keyboard
might display some chords in inverted form.
• The keyboard does not display some
chords because the chords cannot be
played within the accompaniment
keyboard’s range. See “Standard Fingering
Chord Charts” on Page 13 for more
information.
42-4056.fm Page 9 Friday, April 26, 2002 9:14 AM
56#0&"(+0)'4+0)
The standard fingering method uses
standard formations of three or four notes,
and lets the experienced musician play a
wider variety of accompaniment chords.
This chart shows the 15 chord types you
can play on your keyboard by using
standard fingering.
±
1. Set
POWER/MODE
FINGERED
to
.
2. Select and enter an auto-rhythm.
3. To start the auto-rhythm before your
auto accompaniment, press
STOP
.
START/
Or, to synchronize the start of the
selected auto-rhythm with your
accompaniment, press
IN
.
SYNCHRO/FILL-
4. Begin the accompaniment at the
desired interval by pressing at least
three accompaniment keys to play the
desired chord.
To play a melody along with the
accompaniment, press any key(s) to
the right of the accompaniment keys.
5. Adjust the tempo,
ACCOMP VOLUME
MAIN VOLUME,
to the desired levels.
and
6. To change chords without interrupting
the rhythm, simply press the auto
accompaniment keys required to form
the new chord.
7. To stop auto accompaniment and the
auto-rhythm, press
START/STOP
.
Using the Chord BookUsing the Chord Book
75+0)"6*'"%*14&"$11-
You can use your keyboard’s chord boo k
display feature to see which keys to press
and which fingers to use to form a chord.
You can also display the name of a chord
you play.
POWER/MODE
1. Set
CONCERT CHORD
BOOK
.
2. Press
3. If you want to see information about a
4. Press the ro ot key on the
CLEAR (0
chord entry.
major chord while you play it, skip to
Step 4. Otherwise, enter the chord’s
name using that chord’s keys on the
numeric keypa d.
For example, to enter a minor 7
chord, press
enter 7sus4, press
accompaniment keyboard to play the
chord.
As the chord plays, the display shows
the chord you entered, the keys to
press to form the chord (on the bottom
“keyboard”), the fingers you need to
use to play the chord (on the center
“hands”), and the notes that make up
the chord (on the staff display).
NORMAL
to
, then press
or
CHORD
) to clear any previous
–
m (8) 7 (9) –5 (2
7 (9
) and
). Or, to
sus4 (1
–
5. Use
or + to scroll through the chords
associated with the root chord you
entered in Step 3. Or, press a different
root key to see the chords based on
that key.
±
6. Using the center “hands” as a guide,
play the displayed chord on the
keyboard.
7. You can also display the name of the
chord you play on the accompaniment
keyboard. Press
CLEAR
to erase any previous entry.
CHORD BOOK
then
Then play the chord on the
accompaniment keyboard. The name of
the chord appears.
CHORD
5
8. When you have finished, press
BOOK
to turn off chord book.
).
9
Page 10

42-4056.fm Page 10 Friday, April 26, 2002 9:14 AM
"016'"±"
±
Changing Keys
• You cannot change the key while a
prerecorded tune is selected or playing.
• The number on the display is the number of
semitones
compared to its default key. A semitone is a
measurement that represents the
acoustical interval between the tones of any
two keys on the keyboard. For example, the
difference between C and C or B and B
is one semitone. You can transpose the key
down 6 semitones (to an F ) and up 5
semitones (to an F) — a range of one full
octave.
• You can also use the number keypad to
quickly raise the key. Simply press the
semitone change value (1 to 5).
• The keyboard automatically resets the key
to the default value of 0 (middle C) each
time you play a prerecorded tune.
• Each preset tone plays within a specified
range. If a key change causes a note to
exceed its range, the same note sounds in
the nearest octave.
Special Features
• When you select preset tones 90 through
96 after changing the key, the keyboard
split point changes accordingly (see
“Keyboard Split Tones” on Page 7).
• Changing the key does not affect the
PERCUSSION (No. 99) preset tone.
to which the keyboard is set,
Tuning the Keyboard
• You cannot tune the keyboard while a
prerecorded tune is displayed or playing.
• The number on the display is the number of
cents
to which the keyboard is currently
tuned, compared to its default pitch. A cent
is the measurement representing the
acoustical interval between two tones. 1200
cents equal 1 octave. You can tune the
keyboard to within 50 cents (101 levels) of
its default pitch.
• You can use the number keypad to raise
the pitch by entering the cent change value.
• The keyboard automatically resets the
tuning pitch to the default value of 00
(cents) each time you turn off the keyboard
or play the prerecorded tunes.
Making the MIDI Connections
You do not need to make both connections if
you are only either sending or receiving.
MIDI Data
• The keyboard’s prerecorded tunes cannot
be sent as MIDI data.
• For detailed specifications of the MIDI
function, see the “MIDI Implementation
.
"%#76+10"
• Always turn off power to your keyboard and
the other MIDI device before you connect or
disconnect MIDI cables.
• As you make the cable connections, be
sure to align the MIDI cable pins with the
matching holes on your keyboard’s MIDI
OUT and MIDI IN terminals. If you have
trouble plugging in the cable, do not force it!
You might damage the plug or the
instrument.
.
52'%+#."('#674'5
%*#0)+0)"-';5
The keyboard automatically selects the key
of middle C each time you turn it on.
For added flexibility as you play, the
keyboard lets you change (transpose) the
musical key in which it plays.
1. Repeatedly press
MIDI
setting appear
until
JhWdi
JhWdi
and the current key
JhWdiJhWdi
.
2. Within 5 seconds, press – or + to lower
or raise the key. Each time you press –
or +, the number decreases or
increases by 1 semitone.
As you raise the key,
and so on. As you lower the key, –
2
is B , –3 is A, and so on.
B, –
±
TRANSPOSE/TUNE/
1
is C , 2 is D,
1
is
670+0)"6*'"-';$1#4&
Although your keyboard never goes out of
tune, you can adjust its pitch to match other
instruments or musical recordings.
1. Repeatedly press
MIDI
until the display shows
TRANSPOSE/TUNE/
±
Jkd[
Jkd[
Jkd[Jkd[
and
the current pitch setting.
2. Within 5 seco nds, repeate dly press – or
+
to lower or raise the keyboard’s pitch.
Each time you press the key, the
number decreases or increases by 1
cent.
75+0)"#"5756#+0"2'&#.
For added flexib ility and c ontrol as yo u make
music, you can connect an optional sustain
pedal, available through RadioShack.
A sustain pedal lets you sustain the
keyboard’s sound.
To connect a sustain pedal to your
keyboard, insert the pedal’s plug into
SUSTAIN
on the back of the keyboard.
75+0)"/+&+
Your keyboard includes a feature called
MIDI (Musical Instrument Digital Interface).
MIDI is the universal standard for sending
and receiving perfor man ce dat a bet w een all
types of electronic musical instruments,
regardless of manufactur er. Using MIDI, you
can play music on your keyboard and
another instrument at the same time while
pressing the keys on only one, record your
music to a sequencer, acquire a wider
selection of preset tones from a sound
module, and much more.
Connecting your keyboard to another MIDI
device requires a MIDI cable (not supplied).
For detailed specifications of the MIDI
function, see the “MIDI Implementation
Chart” on P age 17.
#$176"/+&+
Every MIDI-equipped instrument has MIDI
OUT and IN terminals, and some also have
a MIDI THRU terminal. Each of these
terminals serves a different purpose.
MIDI OUT sends M IDI data t o (“talk s to” ) the
other MIDI instrument(s).
MIDI IN receives (“listens to”) MIDI d ata sent
by the other MIDI instrument(s).
MIDI THRU lets you connect (“network”)
additional MIDI instruments, and sends
other MIDI devices a copy of all data it
receives through its MIDI IN terminal.
Your keyboard has
terminals.
MIDI OUT
and
MIDI IN
The cable that connects MIDI devices does
not actually carry sound between them, like
a speaker wire carri es sound from a re ceiver
to a speaker. Instead, MIDI-equipped
devices communicate with each other using
digital codes (instru ctions). One MIDI dev ice
sends digital instructions representing
exactly what is bein g played on it. The othe r
MIDI device receives and translates those
instructions, then produces (or records) the
sound exactly as it was played on the first
device.
/#-+0)"6*'"/+&+"
100'%6+105
%
To connect your keyboard to another MIDIequipped devic e, you mu st use a M IDI cab le
(available at RadioShack).
....
To send MIDI data from your keyboard, use
a MIDI cable to connect the keyboard’s
OUT
terminal to the other device’s MIDI IN
MIDI
terminal.
To receive MIDI data on your keyboard, use
a MIDI cable to connect the keyboard’s
IN
terminal to the other device’s MIDI OUT
terminal.
±
MIDI
/+&+"#
Your keyboard can send and receive several
different types of MIDI data. The keyboard’s
tones, rhythms, and oth er types of MIDI dat a
are sent automatically as you play.
±
10
Page 11

±
"016'"±"
• The pitch of a note depends on the tone
that is being used, as shown in the “Note
Table” on Page 15.
• If the keyboard receives a “request” to play
notes outside of its range (higher or lower),
it automatically selects the same note in the
nearest octave.
42-4056.fm Page 11 Friday, April 26, 2002 9:14 AM
Note On/Off —
pressed (Note On) or released (Note Off).
Also includes how lou d a note is pl ayed as a
value from 0 to 127.
Program Change —
keyboard sends pro gram change data in the
range of 0 to 99, corresponding to tone
numbers. It receives data within the same
range if GM tone mapping is set to N, or in
the range of 0 to 127 if GM tone mapping is
set to G. In the latter case, tones in the
range of 100 to 127 are translated to the
closest tone that the keyboard has.
Pitch Bend —
information. The keyboard’s pitch changes
as it receives a Pitch Bend message
through the
Control Change —
vibrato and volume changes during
keyboard play. The message includes a
control number (the effect type) and a
control value (the on/off and depth of the
effect).
Here is the data that can be received with
this keyboard and the c orresp onding cont rol
number.
Modulation 1
Volume 7
Hold1 (Sustain) 64
The keyboard can send Hold1 Control
Change data only when you connect a
sustain pedal and press it.
specifies which keys are
±
specifies the tone . The
supplies Pitch Bend
MIDI IN
terminal.
adds effects such as
'HHGEV
%QPVTQN"
0WODGT
%*#0)+0)"/+&+"5'66+0)5
The keyboard lets you chan ge two MIDI
parameters, Tone Map and Keyboard
Channel.
Tone Map
change values received/recognized by this
keyboard.
1. Repeatedly pres s
2. Within 5 sec onds, press – or + to select
—sets the range of program
TRANSPOSE/TUNE/
MIDI
the setting you want.
DDDD
: Normal T one M ap. This setting allow s
receipt of 0 to 99 program changes.
Each program change corresponds to
one of the prerecorded tones.
====
: General MIDI Tone Map. This setting
allows receipt of all 0 to 127 program
changes. Any data over 100 are
translated to the closest tone the
keyboard has. See “Note Table” on
Page 15 for details.
until
JedCWf3D
JedCWf3D
JedCWf3DJedCWf3D
appears.
Keyboard Channel
sending MIDI data to an external device
(Default: 01). The keyboard receives MIDI
data on channels 1 through 4 and 10 only. The
data received on other channels are ignored.
For transmission of MIDI data, you can use
any of 16 channels.
1. Repeatedly press
MIDI
until
2. Within 5 se conds , press – or + to select
the channel you want.
— sets the channel for
TRANSPOSE/TUNE/
A[oXZý9^
A[oXZý9^
A[oXZý9^A[oXZý9^
appears.
016'5"#$176"6*'"/+&+"
/2.'/'06#6+10"%*#46
+
The “MIDI Implement ation Chart ” on
Page 17 shows specific details about how
your keyboard is compatible with the MIDI
standard. The following notes explain how
the keyboard works within the MIDI
standard.
Basic Channel
allows for the use of up to 16 channels to
exchange data. Like a TV broadcast , each
of these channels can c ontain diff erent data.
The keyboard can send data on all 16 of
these channels and can receive data on
channels 1 through 4 and channel 10.
Mode
— The MIDI standard allows for four
separate modes of opera tion. The keybo ard
sends and receives data in Mode 3. This
means that the data sent and received by
the keyboard can be polyphonic and can be
sent or received on only one channel at a
time.
Note Number
for note numbers from 0 through 127. This
number represents each possible note that
a device can play. The lowest note number
(0) is five octaves below middle C and the
highest note number (127) is three octaves
above middle C. The keyboard can receive
all 128 note numbers and can send note
numbers between 36 and 96.
If the keyboard receives a note number
outside its range, it automatically assigns
the note to a key within its key range.
The keyboard’s lowest note is two octaves
below middle C, and the highest note is
three octaves above middle C.
Velocity
velocity numbers from 0 through 127.
Velocity is how fast a key is pressed (or if
the key is pressed at all) or how loud a note
sounds. A velocity of 0 me ans that the key is
not pressed. The lowest velocity (1) is
pianissimo and the highest velocity (127) is
fortissimo. The keyb oard can receive a ll 128
velocity numbers and can send velocity
numbers 75 or 100.
— The MIDI standard allows for
— The MIDI standard
— The MIDI standard allow s
Using MIDI
Select
MIDI data from an external device.
====
when you listen to General
9
n
— This means that the Note ON
message is 9 hexadecimal for the channel
number n.
11
Page 12

42-4056.fm Page 12 Friday, April 26, 2002 9:14 AM
Pitch Bender
— The keyboar d receives
(but cannot send) pitch bending signals.
Control Change
— This feature sends data
on various controllers, each having its own
number. For the details of each parameter,
see “MIDI Data” on Page10.
6417$.'5*116+0)
6TQWDNG 2QUUKDNG"%CWUG 4GOGF[
The keyboard has turned off
automatically.
The volume is turned down.
No sound, even if keys
are pressed.
No sound when
connected to an external
amplifier.
The key or tuning does
not match when playing
along with another MIDI
instrument.
No sound when
receiving and playing
MIDI data.
Bass notes in General
MIDI data are sent out
one octave lower.
Sounds sent to another
MIDI device by the
keyboard do not sound
correct.
The headphones are connected. Disconnect the headphones.
Power supply problem.
You are pressing too few
accompaniment keys while
POWER/MODE is set to
FINGERED.
The volume is turned down.
Defective connection cord. Replace the connection cord.
The tuning or transpose
parameter is set to a value other
than 0 or 00.
MIDI cables are not connected
properly.
Tone map parameter is set to D
The other device’s MIDI THRU
function is turned on.
Program Change
— This feature changes
the preset sounds. Each sound number
corresponds to a program number between
0 and 127. See “MIDI Data” on Page 10.
Set POWER/MODE to OFF then
NORMAL.
Repeatedly press MAIN VOLUME ▲ to
increase the volume.
Make sure the batteries are fresh and
inserted correctly, or the AC adapter is
connected securely.
Set POWER MODE to NORMAL or
CONCERT CHORD. Or press 3 or 4
keys to form a chord while MODE is set
to FINGERED.
Repeatedly press MAIN VOLUME ▲ to
increase the volume.
Set the tuning or transpose parameter to
0 or 00.
Check the connection.
Set the tone map parameter to =
D.
DD
“Changing MIDI Settings” on Page 11).
Turn off the MIDI THRU function on the
other device.
= (see
==
Troubleshooting
%#4'
Keep the keyboard dry; if it gets wet, wipe it
dry immediately. Use and store the
keyboard only in normal temperature
environments. Handle the keyboard
carefully; do not drop it. Keep the keyboard
away from dust and dirt, and wipe it with a
damp cloth occasionally to keep it looking
new.
5'48+%'"#0&"4'2#+4
If your keyboard is not performing as it
should, take it to your local RadioShack
store for assistance. Modifying or tampering
with the keyboard ’s internal compon ents can
cause a malfunction and might invalidate its
warranty and void your FCC authori zation to
operate it.
12
Page 13

42-4056.fm Page 13 Friday, April 26, 2002 9:14 AM
56#0&"(+0)'4+0)"%*14&"%*#465
These tables show the left-hand fingering for the chords you play most often.
This illustration sho w s which fingers on your lef t ha nd m atch the numbers on th e
charts. The illustration also appears on your keyboard’s display.
You cannot play chords marked with an asterisk (*) in the fingered mode on this
keyboard.
13
Standard Fingering Chord Charts
Page 14

42-4056.fm Page 14 Friday, April 26, 2002 9:14 AM
Standard Fingering Chord Charts
14
Page 15

42-4056.fm Page 15 Friday, April 26, 2002 9:14 AM
016'"6#$.'
Legend:
(1) Tone number
(2) Maximum polyphony
(3) Range type (see Page 17)
(4) Corresponding general MIDI number (see “MIDI Data” on Page 10)
Note Table
15
Page 16

42-4056.fm Page 16 Friday, April 26, 2002 9:14 AM
Legend:
Note Table
Playable range (when receiving MIDI data)
Range transposed to nearest octave (when receiving MIDI data or using the keyboard’s transpose function)
(1) The received MIDI data is played one octave lower
(2) The received MIDI data is played one octave higher
Range of keyboard play
16
Page 17

42-4056.fm Page 17 Friday, April 26, 2002 9:14 AM
/+&+"+/2.'/'06#6+10"%*#46
MIDI Implementation ChartMIDI Implementation Chart
MAIN VOLUME
*2: If
2
or higher, V is set to 100.
to
*4: Depends on GM tone ma p s ettin g. Se e “ Cha nging M IDI Se ttings ” on Page 11.
is set to 0 or 1, V (velocity) is set to 75. If
MAIN VOLUME
is set
17
Page 18

42-4056.fm Page 18 Friday, April 26, 2002 9:14 AM
Specifications
52'%+(+%#6+105
Number of Keys ......................................................... ............................ ...................................... .......... 61
Polyphonic Sound ............................................................................................................... 12-note (Max.)
Preset Tones ........................................................................................................................................ 100
Auto-Rhythms ...................................................................................................................................... 100
Tempo ...................................................................................... Adjustable (20 to 255 Beats Per Minute)
Other ..... ............................ ........................... ........................... ......................... Fill-In and Synchro Start
Accompaniments ................................................................................................ Concert Chord, Fingered
Prerecorded Tunes ............................................................................................................. ...... 100 Tunes
Transpose ................................................................................................................ (F ~C~F: half-notes)
Tuning .................................................................................................. Adjus table A4 = 440 Hz ±50 cents
Built-In Speakers ............................................................................. 4 Inch (10 cm) × 2 (Output 2W + 2W)
Terminals:
Power Supply ..................................................................................................................... DC 9V Jack
PHONES/OUTPUT Jack . ........................................................................ Output Impedance: 78 Ohms
MIDI IN, MIDI OUT Jack ........................................................................................ Standard DIN Jacks
SUSTAIN Jack ..................................................................................................
Power Sources ................................ ........................................ ...................................... DC: 6 AA batterie s
Power Consumption .......................................................................................................................... 7.7 W
Dimensions (HWD) ................................. ............................ ...... 5 × 37
Weight (Without Batteries) ................................................................................................ 8 lb 14 oz (4 kg)
Included Accessories ................................................................................................... Sheet Music Stand
Output Voltage: 4V (RMS) MAX
1
/4-Inch Standard Jack
AC: 120V, 60Hz, with AC adapter
3
/4 × 14 In. (12.5 × 95.6 × 35.3 cm)
Play Guide for the Prerecorded Tunes
Specifications are typical; individual units might vary. Specifications are subject to change and
improvement without notice.
18
Page 19

42-4056.fm Page 19 Friday, April 26, 2002 9:14 AM
016'5
Notes
19
Page 20
42-4056.fm Page 20 Friday, April 26, 2002 9:14 AM
Limited One-Year Warranty
This product is warranted by RadioShack against manufacturing defects in material and workmanship under normal use for one (1) year from the date of purchase from RadioShack comp any- ow n ed sto res and aut hor i zed RadioShack franchisees and dealers. EXCEPT AS PROVIDED HEREIN, RadioShack MAKES NO EXPRESS
WARRANTIES AND ANY IMPLIED WARRANTIES, INCLUDING THOSE OF MERCHANTABILITY AND FITNESS FOR A PARTICULAR PURPOSE, ARE LIMITED IN DURAT ION TO THE DURATION OF THE WRITTEN
LIMITED WARRANTIES CONTAINED HEREIN. EXCEPT AS PROVIDED HEREIN, RadioShack SHALL HAVE
NO LIABILITY OR RESPONSIBILITY TO CUSTOMER OR ANY OTHER PERSON OR ENTITY WITH RESPECT TO ANY LIABILITY, LOSS OR DAMAGE CAUSED DIRECTLY OR INDIRECTLY BY USE OR PERFORMANCE OF THE PRODUCT OR ARISING OUT OF ANY BREACH OF THIS WARRANTY, INCLUDING, BUT
NOT LIMITED TO, ANY DAMAGES RESULTING FROM INCONVENIENCE, LOSS OF TIME, DATA, PROPERTY, REVENUE, OR PROFIT OR ANY INDIRECT, SPECIAL, INCIDENTAL, OR CONSEQUENTIAL DAMAGES, EVEN IF RadioShack HAS BEEN ADVISED OF THE POSSIBILITY OF SUCH DAMAGES.
Some states do not allow limitations on how long an implied warranty lasts o r the exclusion or limitation of incidental or consequential damages, so the above limitations or exclusions may not apply to you.
In the event of a product defect during the warranty period, take the product and the RadioShack sales receipt as
proof of purchase date to any RadioShack store. RadioShack will, at its option, unless otherwise provided by law:
(a) correct the defect by produ ct rep ai r witho ut charge for parts and labor; (b) re place the product with one of the
same or similar d esig n; o r ( c) r efu nd the purchase price . Al l re placed parts and product s , a nd pro duc ts on w hich
a refund is made, become the property of RadioShack. New or reconditioned parts and products may be used in
the performance of warranty service. Repaired or replaced parts and products are warranted for the remainder of
the original warranty period. You will be charged for repair or replacement of the product made after the expiration
of the warranty period.
This warranty does no t cover: (a) damage or failure caused by or att ributable to acts o f God, abuse, accident ,
misuse, improper or abnorm al usage, failure to follow instructions, i mproper installation or maintenance , alteration, lightning or other incidence of excess voltage or current; (b) any repairs other than those provided by a RadioShack Authorized Service Facility; (c) consumables such as fuses or batteries; (d) cosmetic d amage; (e)
transportation, shipping or insurance costs; or (f) costs of product removal, installation, set-up service adjustment
or reinstallation.
This warranty gives you specific legal rights, and you may also have other rights which vary from state to state.
RadioShack Customer Relations, 200 Taylor Street, 6th Floor, Fort Worth, TX 76102
12/99
RadioShack Corporation
Fort Worth, Texas 76102
MD982E-1/MA0206-A
42-4056
04A02
Printed in China
 Loading...