

Radio Shack MD-1700 Owner's Manual
MD-1700 76 Key MIDI Keyboard
Owner’s Manual
Please read before using this equipment.

ˆ
Contents
Features ................................................................................................................................................. ... 4
The FCC Wants You to Know ............................................................................................................. 5
Preparation ............................................................................................................................................... 6
Connecting Power .............................................................................................................................. 6
Using Batteries ........................................................................................................................... 6
Cancelling Auto Power Off ......................................................................................................... 6
Using AC Power ......................................................................................................................... 6
Replacing the Memory Battery ........................................................................................................... 7
Resetting the Keyboard ...................................................................................................................... 7
Connecting Headphones ................................................. .... .. .. ....... .... .. .... .. .. ....... .... .. .. .... .. ................. 7
Listening Safely .......................................................................................................................... 7
Connecting an External Amplifier ....................................................................................................... 7
Using the Sheet Music Stand ............................................................................................................. 8
A Quick Look at Your Keyboard ............................................................................................................. 8
A Look at the Display ......................................................................................................................... 9
Operation .................................................................................................................................................. 9
Adjusting the Display Cont rast .................................................................... ............................... 9
Basic Operation ............. ............ ............. ......................... ...................................... ............................. 9
Playing the Demonstration Tunes .................................................................................................... 10
Using the Preset Tones .................................................................................................................... 10
Using DSP Effects ............................................................................................................................ 12
Using Sound Range Shift ................................................................................................................. 13
Using Split ........................................................................................................................................ 13
Using Layer ................................................................................................................................... .. . 1 4
Using Split and Layer Together ........................................................................................................ 14
Using the Preset Auto-Rhythms ....................................................................................................... 15
Selecting/Playing an Auto-Rhythm ........................................................................................... 15
Using SYNCHRO ..................................................................................................................... 16
Using INTRO ............................................................................................................................ 16
Using NORMAL/FILL-IN ........................................................................................................... 16
Using VAR/FILL-IN ................................................................................................................... 16
Using ENDING ......................................................................................................................... 16
Using Auto Accompaniment ............................................................................................................. 16
Adjusting the Accompaniment Volume ..................................................................................... 17
Concert Chord .......................................................................................................................... 1 7
Standard Fingering ................................................................................................................... 18
Full-Range Chords ................................... .......................... ......................... ............................. 19
Using Auto Harmonize ............................................................................................................. 19
Using One-Touch Preset .......................................................................................................... 20
Using Free Session .................................................................................................................. 20
Using the Mixer ............................................................................................................................... . 20
Mixer Modes ............................................................................................................................. 21
Editing the Status of a Channel ................................................................................................ 21
Editing the Parameter .............................................................................................................. 22
Using the Custom Tone Synthesizer ................................................................................................ 22
Understanding 1DCO and 2DCO Tones . ................................................................................. 23
RadioShack, Adaptaplug, and RadioShack.com are trademarks used by RadioShack Corporation.
2
©
2000 RadioShack Corporation.
All Rights Reserved.
Contents

Creating and Storing a User Tone ............................................................................................ 23
Special Features ............................................................................................................................ .. ....... 25
Recording ................................................................................................................................................ 28
Using MIDI ....................................................... ......................... .......................... ..................................... 39
Troubleshooting ..................................................................................................................................... 44
Hints on Creating a User Tone ................................................................................................. 25
Changing Keys ....................................................................................... ......... .. .... .... .. ..................... 25
Tuning the Keyboard ....................................................................................................................... . 26
Using Touch Response .................................................................................................................... 26
Setting the Touc h Response Sens itivity ................................................................................... 26
Using Pitch Bend .............................................................................................................................. 27
Adjusting the Pitch Bend Range ..................................................................... .. .... ....... .. .... .. .. .. 27
Using the Modulation Wheel ............................................................................................................ 27
Using a Sustain Pedal ...................................................................................................................... 27
Using the Registration Memory ........................................................................................................ 28
Storing a Setup ........................................................................................................................ 28
Recalling a Setup ..................................................................................................................... 28
Using the Song Sequencer .............................................................................................................. 28
Memory Capacity ............................................................................................................................. 29
Real-Time Record in g ................................................ ...................................... ................................. 30
On Track 1 ............................................................................................................................... 30
On Tracks 2–6 ....................................................................................................................... .. . 31
Punch-In Recording ......................................................................................................................... 31
On Track 1 ............................................................................................................................... 31
On Tracks 2–6 ....................................................................................................................... .. . 32
Playing Back from Memory .............................................................................................................. 32
Deleting a Track from Memory ......................................................................................................... 33
Defining Global Settings and Operations ......................................................................................... 33
Using the Pattern Sequencer ........................................................................................................... 34
Memory Capacity ..................................................................................................................... 35
Pattern Sequencer Settings ..................................................................................................... 35
Creating a Pattern .................................................................................................................... 35
Editing the Stored Pattern ........................................................................................................ 36
Deleting Specific Notes ............................................................................................................ 37
Deleting a Part ......................................................................................................................... 37
Global Menu Items ................................................................................................................... 37
Element Menu Items ................................................................................................................ 37
Part Menu Items ....................................................................................................................... 37
Saving the Settings .................................................................................................................. 38
About MIDI ....................................................................................................................................... 39
Making the MIDI Connections .............................................................. .. .. ....... .... .. .... .. .. ....... .... ........ 3 9
MIDI Data ......................................................................................................................................... 39
Changing MIDI Settings ........................................................................................ .. .... .. ....... ............ 41
Dumping/Importing Data ........................................................ .......................................................... 42
Dumping Data .......................................................................................................................... 42
Importing Data .......................................................................................................................... 42
Using the Mixer and MIDI ................................................................................................................. 42
Internal Mode . .......................................................................................................................... 42
External Mode .......................................................................................................................... 4 3
External Solo Mode .................................................................................................................. 43
External Play Mode .................................................................................................................. 43
Notes About the MIDI Implementation Chart .......................................................... .. .. .. ..... .. .. .. .. .. .. .. 43
Care ........................................................................................................................................ ......... 45
Contents
3

Appendix ................................................................................................................................... ............. . 45
Note Table ........................................................................................................................................ 45
Drum Assignment List ...................................................................................................................... 48
Fingered Chord Chart ...................................................... .. .. .... ..... .. .. .. .. .. .. .. ....... .. .. .. .. .. .. .. .. ............... 50
Free Session Chord Progression Chart ........................................................................................... 52
Chord Conversion Table ................................................................................................................... 53
MIDI Implementation Chart .................................................................................................................... 54
Specifications ......................................................................................................................................... 55
ˆ
Features
Your RadioShack MD-1700 76 Key MIDI
Keyboard is a state-of-the-art musical instrument that offers you a vast array of sounds.
You can choose from 232 different musical
instruments or sound effects and 130
rhythms, as well as automatic accompaniments and percussion sounds.
Your keyboar d al so inc l ud es a MID I (M usi ca l
Instrument Digital Interface) feature, which
lets you connect it to other MIDI-equipped
musical instr uments o r device s — even yo ur
personal computer.
This versatile keyboard can provide hours of
fun and is ideal for anyone who wants to
make music, from the beginner to the experienced musician.
Note:
The keyboard conforms to most, but
not all, General MIDI specifications. Because
of this, you might experience some incompatibility when using the keyboard with another General MIDI device. For more
information, see “Using MIDI” on Page 39.
Your keyboard’s features include:
76 Full-Sized Keys
fine musical instrument.
Touch Response
varies in response to the force of your touch,
just like an acoustic piano or organ, so you
can add emotion to your music.
— provide the feel of a
— the keyboard’s volume
32-Note Polyphonic Sound
and hear up to 32 notes at the same time, so
you can play or create almost any type of
music.
232 Tones
sound like anything from a harpsichord to a
honky-tonk piano. You can even create your
own tones with the custom tone synthesizer
feature.
130 Auto-Rhythms
for many styles of music, from rhumba to
rock.
Large LCD Mus ic Information Displ ay
shows you the notes and chords as you play
them, along with the current tone, rhythm,
and tempo. The display’s built-in backlight
makes it easy to read it, even in dim light.
Pitch Be nd e r W h ee l
by altering their pitch, creating realistic effects for tones such as reed instruments or
guitar.
Modulation Wheel
notes, creating real istic effec ts for to nes s uch
as saxophones.
Two Buil t-In Stereo Bass-Reflex Speakers
— let you feel the bass your keyboard can
produce and hear the sound you create.
120 Free Sessions
number of accompaniments (consisting of a
— you ca n set your ke yboard to
— provide a stead y be at
— lets you add vi brat o to
— let you choose a wide
— lets you play
—
— lets you bend no tes
4
Features

prerecorded chord pro gres s ion with a ma tching rhythm).
Synthesizer Function
to 32 of your own original tones.
Registration Memory
20 different setups of the keyboard’s controls, letting you instantly recall them when
you need them.
Headphones/Output Jack
nect headphones so you can play without
disturbing others, or an external amplifier so
you can play for a crowd (neither supplied).
— lets you create up
— lets you store up to
— lets you co n-
One-Touch Preset
the tone, tempo, and other characteristics
that are best suited for a rhythm you select.
DSP (Digital Signal Processing) Effects
let you add a variety of nuances to your music.
Automatic Intro/Ending Rhythm
can set the keyboard so it automatically adds
a 3- to 8-measure introduction or 3- to 8measure ending to the selected auto-rhythm.
MIDI In/Out Jacks
keyboard to another MIDI-equipped device.
— lets you quickly recall
—
— you
— let you connect the
Assignable Jack
tain pedal (not supplied) to the keyboard so
you can sustain or soften your keyboard’s
sound, or start/stop an auto-rhythm.
Tune Control
your keyboard so you can play in tune with
other instruments.
Transpose Function
change the ke y of t he m usic , even wh ile yo u
are playing.
Tempo Control
down the tempo of any selected music pattern.
Auto Accompaniment
cally play a preset harmo ni c pa ttern to ma tch
the selected auto-rhythm.
Layer Function
to play two different tones at the same time,
giving your music a “layered” effect.
Mixer Function
ment of the auto accompaniment, memory
playback, or MIDI data re ceive d from ano ther
MIDI device.
— lets you connect a sus-
— lets you adjust the pitch of
— lets you instantly
— lets you speed up or s lo w
— lets you automati-
— lets you set the keyboard
— lets you control any ele-
Two Power Options
keyboard from internal batteries (not supplied) or standard AC pow er (with an optiona l
adapter), so you can make music almost
anywhere.
Note:
This Owner’s Manual explains how to
use this electronic keyboard. It does not
teach music.
— let you power the
THE FCC WANTS YOU TO
KNOW
This equipment complies with the limits for a
Class B digital device as specified in Part 15
of
FCC Rules
able protection against radio and TV interference in a residential area. However, your
equipment might cause TV or radio interference even when it is operating properly. To
eliminate interference, you can try one or
more of the following corrective measures:
• reorient or relocate the receiving
antenna
• increase the distance between the
equipment and the radio or TV
. These limits provide reason-
Auto Harmonize
mony to a melody you play.
— automatically adds har-
Features
• use outlets on different electrical circuits
for the keyboard and the radio or TV.
5

Consult your local RadioShack store if the
problem still exists.
ˆ
Preparation
Note:
To connect a MIDI device to your keyboard, see “Making the MIDI Connections” on
Page 39. To connect a sustain pedal, see “U sing a Sustain Pedal” on Page 27.
You must use shielded interface cables with
this equipment.
2. Place the batteries in the compartment
as indicated by the polarity symbols (+
and –) marked beside the compartment.
3. Replace the cover.
CONNECTING POWER
You can power your keyboard using internal
batteries or with stan dard AC p ower us ing an
optional AC adapter.
Notes
:
• Connecting an AC adapter autom atical ly
disconnects any internal batteries.
• Always disconnec t the AC ada pte r w hen
you finish using the keyboard.
Using Batteries
Your keyboard can use six D batteries (not
supplied) for main keyboard power. For the
best performance and longe st lif e, we recom mend RadioShack alkaline batteries.
Cautions:
• Use only fresh batteries of the required
size and recommended type.
• Do not mix old and new batteries, different types of batteries (standard, alkaline, or rechargeable), or rechargeable
batteries of different capacities.
1. While pressing the tabs on the battery
compartment cover on the bottom of the
keyboard, pull up the cover to remove it.
When the keyboard stops op erat ing prop erly,
replace the batteries.
Warning:
and properly. Do not burn or bury them.
Caution:
board with batteries for a week or more, remove the batteries. Batteries can leak
chemicals that can destroy electronic parts.
Dispose of ol d batteries prompt ly
If you do not plan to use the key-
Cancelling Auto Power Off
When you use batteries to power the keyboard, it automatically shuts off after about 6
minutes if you do not press any key. Press
POWER
To have the keyboard not automatically turn
off during a session, turn the keyboard on
while holding down
The keyboard resets auto power off every
time you turn it off, then back on.
again to turn the keyboard back on.
TONE
.
Using AC Power
You can power the keyboard using a 12V,
1500-mA AC adapter and a size M Adaptaplug™ adapter (neither supplied). Both are
available at your local RadioShack store.
Cautions:
6
Preparation
You must use a Class 2 power
source that supplies 12V DC
!
and delivers at least 1500 mA.

Its center tip must be se t to ne gativ e and
its plug must fit the keyboard's
jack. Using an adapter that does not
meet these specifications could damage
the keyboard or the adapter.
• Always connect the AC adapter to the
keyboard before you connect it to AC
power. When you finish, disconnect the
adapter from AC power before you disconnect it from the keyboard.
1. Insert the Adaptaplug adapter into the
adapter’s cord so it reads
2. Connect the AC adapter’s barrel plug to
DC 12V
the
board.
3. Plug the AC adapter’s other end into a
standard AC outlet.
jack on the back of the key-
– TIP
DC 12V
.
To reset the keyboard’s parameter settings,
turn on the keyboard, then hold down
ENTER
and
at the same time.
+, –
CONNECTING
HEADPHONES
To listen to your keyboard without disturbing
others, you can connect an optional pair of
stereo headphones with a 1/4-inch (6.35-mm)
plug. Your local RadioShack store sells a
wide selection of headphones. Insert the
headphones’ plug into the
jack on the left side of the keyboard.
Note
: Connecting headphones disconnects
the keyboard’s built-in speakers.
Listening Safely
PHONES/OUT PUT
,
REPLACING THE MEMORY
BATTERY
Your keyboard uses one lithium battery to
protect some types of data when it is turned
off. This battery is installed at the factory,
and lasts up to 5 years. If the keyboard’s
memory is erased when you turn the keyboard off, take the keyb oard to yo ur local RadioShack store to replace the lithium battery.
RESETTING THE
KEYBOARD
Note:
Resetting the keyboard clears all information you stored in the ke yboard ’s memory ,
including the parameter settings, song sequencer, pattern sequencer, and registration
memory. Resetting the keyboard’s parameter settings clears only those settings from
the keyboard’s memory.
To reset the keyboard, turn the power off.
Then hold down
Reset?
appears. Press
ENTER
and press
YES
POWER
.
To protect your hearing, follow these guidelines when you use headphones.
• Set the volume to the lowest setting
before you begin listening. After you
begin listening, adjust the volume to a
comfortable level.
• Do not listen at extremely high volume
levels. Extended high-volume listening
can lead to permanent hearing loss.
• Once you set the volume, do not
increase it. Over time, your ears adapt
to the volume level, so a volume level
that does not cause discomfort might
still damage your hearing.
CONNECTING AN
EXTERNAL AMPLIFIER
To amplify your keyboard’s sound, you can
connect it to an optional external amplifier
using an audio cable with a 1/4-inch (6.35-
.
mm) plug (not supplied). To connect an external amplifier to your keyboard, insert the
cable’s plug into the
on the left side of the keyboard, and connect
PHONES/OUTPUT
jack
Preparation
7
the cable’s other end to the amplifier’s input
jack(s) (such as AUX IN or TAPE IN).
Your local RadioShack store sells a full line
of amplifiers, speakers, and cables.
USING THE SHEET MUSIC
STAND
To easily view sheet music while playing
your keyboard, insert the supplied sheet music stand into the slot on the top back panel.
ˆ
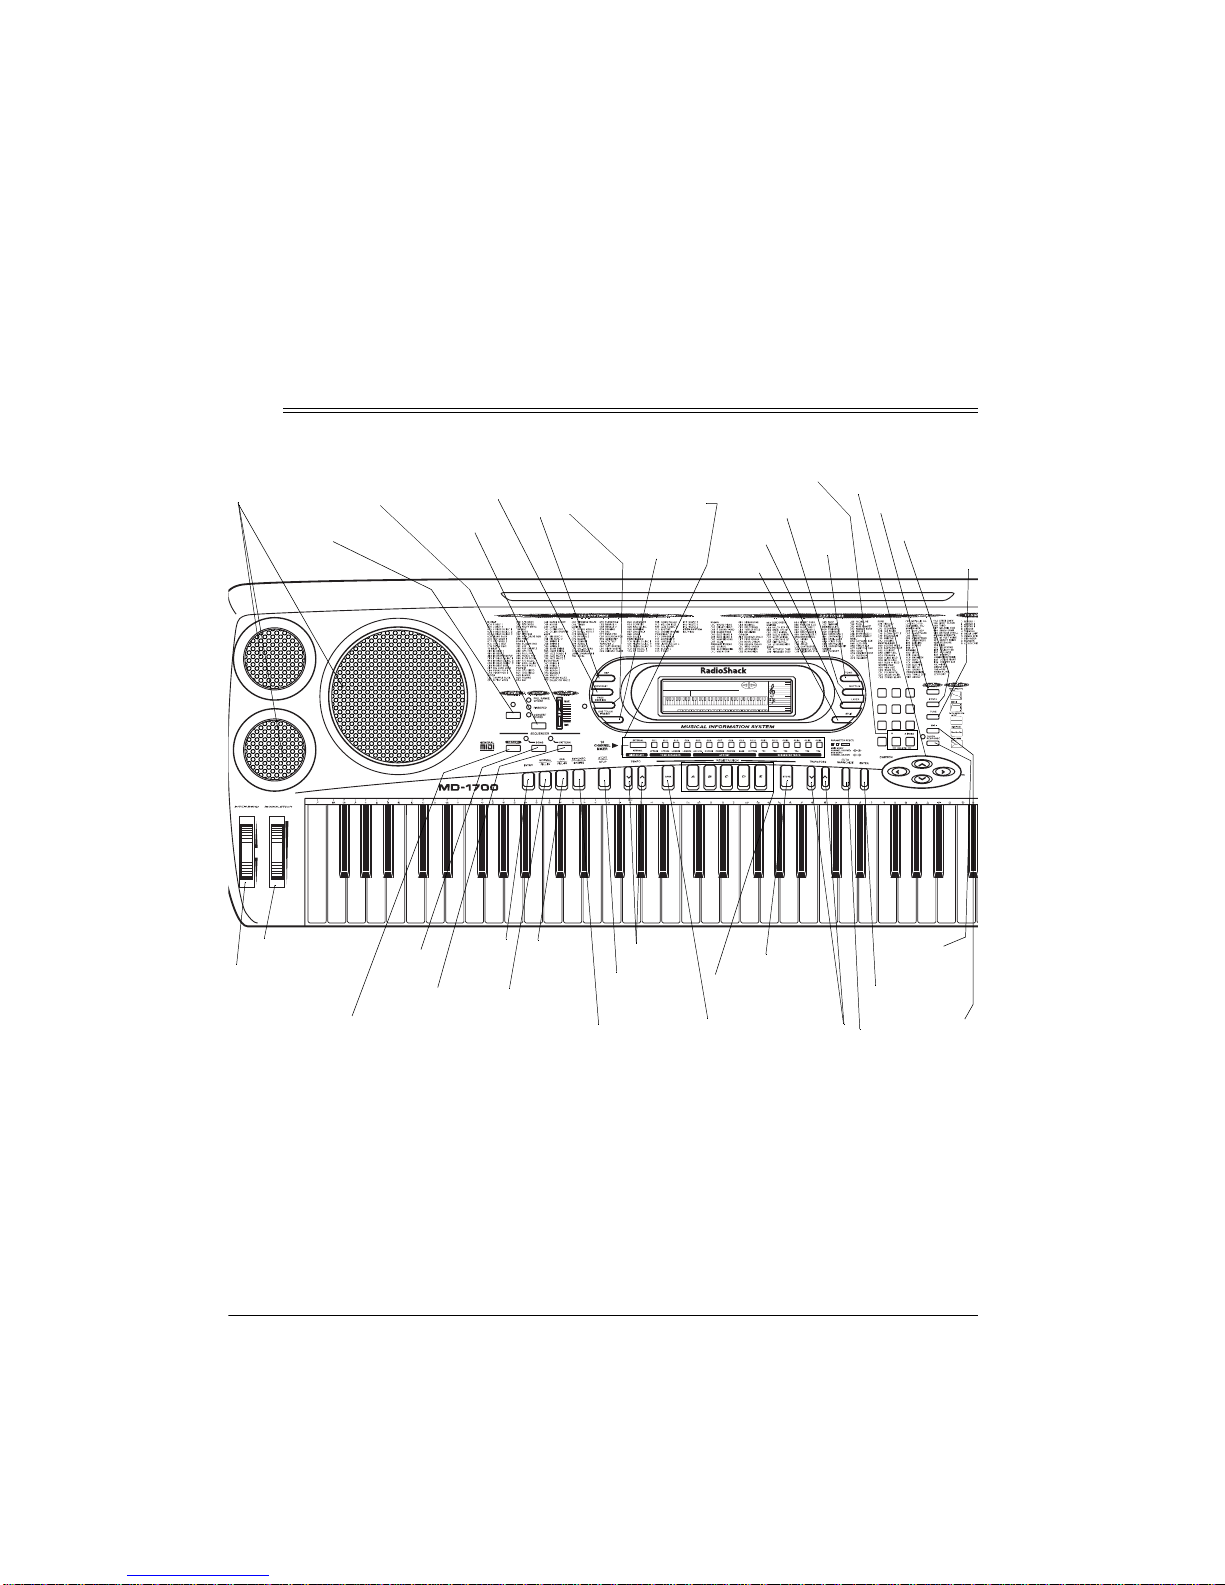
A Quick Look at Your Keyboard
Speakers
POWER
MODE
CONTRAST
VOLUME
DSP
FREE
SESSION
16 CHANNEL
MIXER
ONE TOUCH
PRESET
DELETE
RHYTHM
LAYER
SPLIT
Cursor Direction
Keys
DEMO
TONE
789
456
1023
SYNTH
TUNE
/NO
MODULATION
PITCH
BEND
RECORD
8
SONG
PATTERN
INTRO
VAR/
FILL-IN
NORMAL/
FILL-IN
A Quick Look at Your Keyboard
TEMPO
START/
STOP
SYNCHRO/
ENDING
REGISTRATION
Keys
BANK
STORE
TRANSPOSE
TOUCH
RESPONSE
ENTER
AUTO
HARMONIZE
MIDI
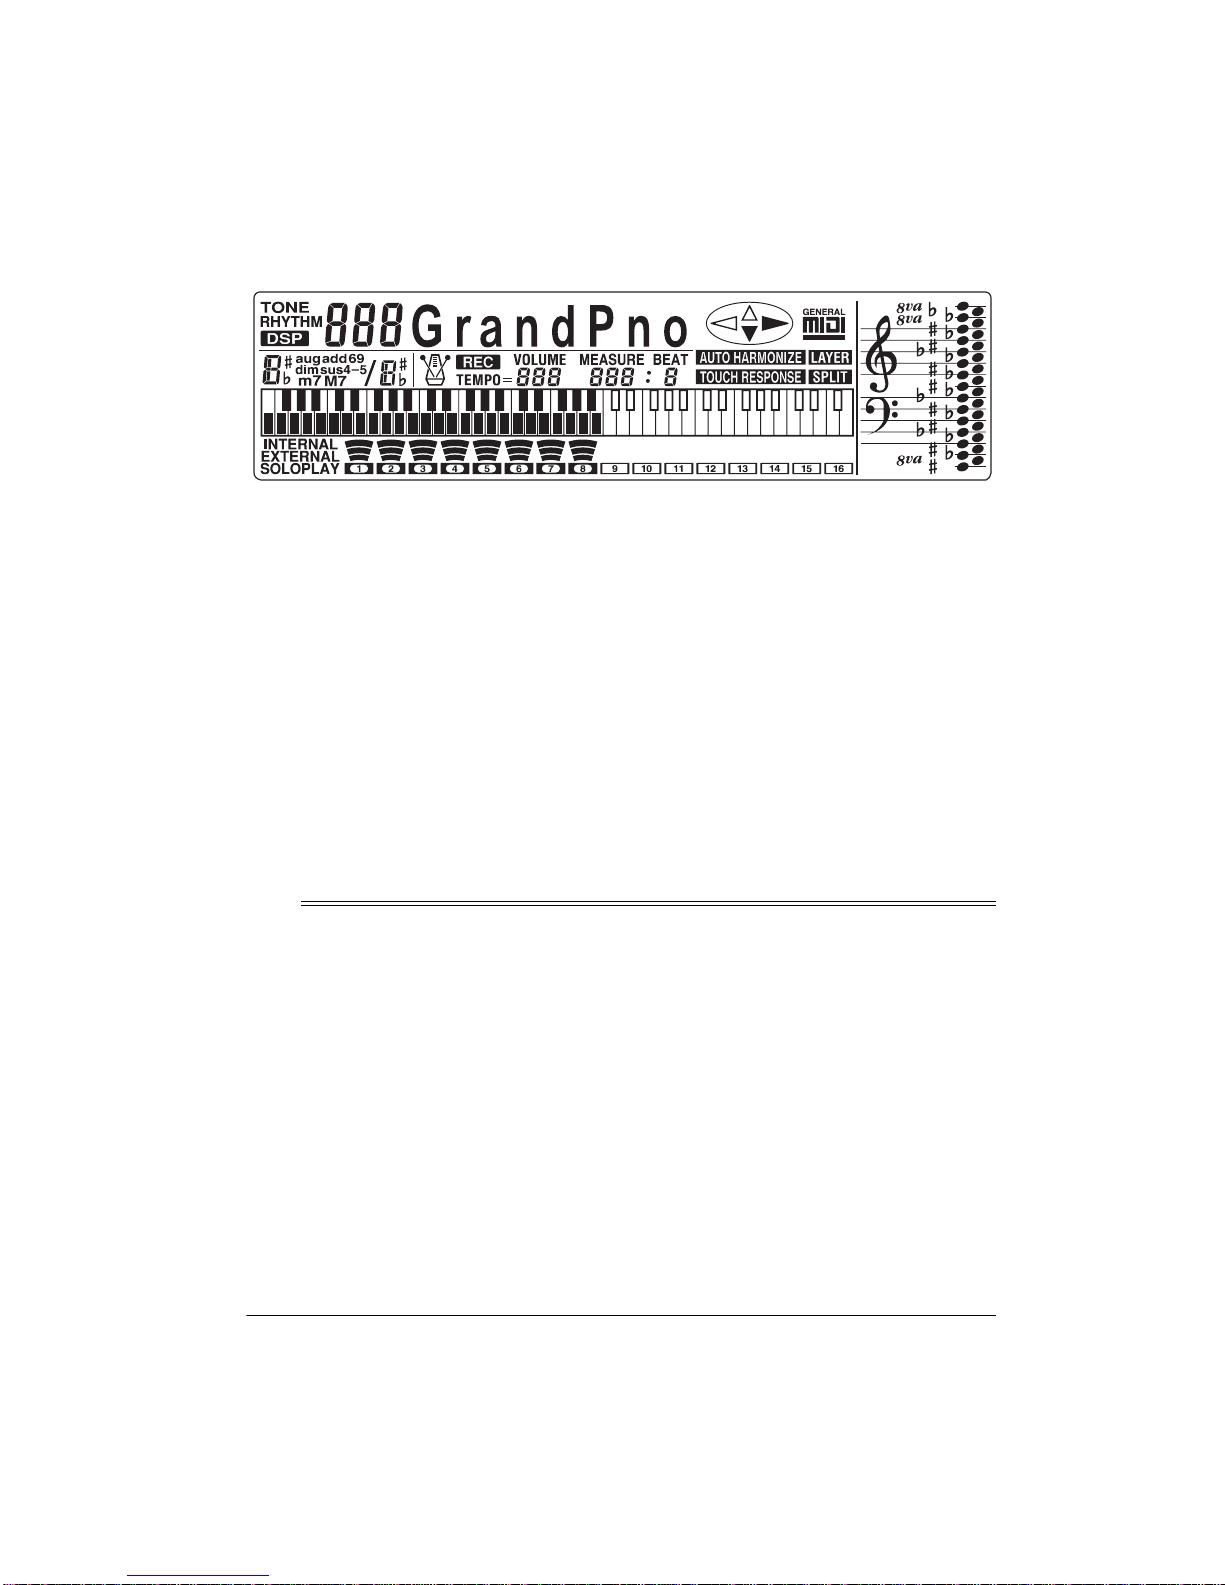
A LOOK AT THE DISPLAY
The display’s top line shows the number and
name of the tone or rhythm you se lec t, or the
names and settings of various parameters.
The directio nal arrows (curs or key symbols)
at the right show which cursor keys are active. Press the desired key to advance
through various settings.
The middle row shows the tempo in beats
per minute, the number of the measure playing, and the beat count in each measure.
The treble and bass clefs on the right of the
display show the notes as they play. The
keyboard shows the location of the keys being pressed.
ˆ
Operation
BASIC OPERATION
1. Slide
2. To turn on the keyboard, press
VOLUME
Important:
always set the keyb oard’s volume to
before you turn it on.
The POWER indicator lights and the dis play turns on.
MIN
to
(minimum).
To prevent hearing damage,
MIN
POWER
The bar graph at the bottom of the display
shows the sound level on each of the 16
channels (see “Using the Mixer” on Page
20).
Adjusting the Display Contrast
You can adjust the display contrast to any of
100 levels. To adjust the display contrast,
CONTRAST
press
–
or enter a number from 00 to 99 while
CONTRAST
To reset the display contrast to its default
setting (50), hold down + and – at the same
time.
utes. To turn on the keyboard again,
press
see “Cancelling Auto Power Off” on
Page 6.
3. If necessary, repeatedly press
until all indicato rs o n the front of the ke y-
.
board turn off.
4. Slide
begin playing the keyboard .
, then repeatedly press + or
appears.
POWER
VOLUME
. To cancel auto power off,
toward
MAX
slightly and
MODE
Note:
To save power when using batteries, the keyboard automatically turns off
if it has not been used for about 6 min-
Operation
9

Notes:
Notes:
• The keyboard automatically selects
the tone GRAND PIANO (No. 000)
when you turn the power on. Each
time you turn it on after that, it selects
the last selected tone. To select a different tone, see “Using the Preset
Tones” on Page 10.
• To select an auto-rhythm, see “Using
the Preset Auto-Rhythms” on Page
15.
• To play auto accompaniment, see
“Using Auto Accompaniment” on
Page 16.
5. Slide
VOLUME
toward
the sound level or toward
MAX
to increase
MIN
to
decrease it.
6. To turn off the keyboard, press
POWER
The Power indicator and the keyboard’s
display turn off.
PLAYING THE
DEMONSTRATION TUNES
To showcase its sounds, your keyboard can
play two preprogrammed demonstration
tunes. To start the demonstration, press
DEMO
. The keyboard plays the first demon-
stration tune (No. 0). To select the other
– or +
tune, press
ed tune’s number appears and the tune
plays. To stop the demo tune, press
START/STOP
on the keypad. The select-
.
DEMO
or
• The keyboard has 32-note (maximum)
polyphonic sound. This means that you
can play up to 32 different notes at the
same time with most of the keyboard’s
preset tones. Some of the keyboard’s
preset tones, however, are capable of
only 16-note polyphony.
• Most tones on this keyboard have been
recorded and processed using a technique called digital sampling. To ensure
a high level of tonal quality, samples
are taken in the low, mid, and high
ranges and are then combined to sound
amazingly close to the originals. You
might notice very slight differences in
volume or sound quality for some tones
when you play them at different positions on the keyboard. This is an
.
unavoidable result of multiple sampling
and is not a malfunction.
To select and play a preset tone:
1. Press
TONE
TONE
.
and the current
tone’s name and number appear.
Note:
The first time you turn the keyboard on, it automatically selects the
tone GRAND PIANO (No. 000).
2. To play a different tone, choose a preset
tone from the 232 TONES list and enter
its three-digit number on the keypad. As
you press the keys, the selected digits
appear.
USING THE PRESET TONES
Your keyboard can sound like 232 different
musical instruments or sound effects. The
name and three-digit number for each preset
tone is listed on the 232 TONES list on the
keyboard’s top panel.
10
Operation
Notes:
• You can select the next highest or lowest numbered tone by simply pressing
or – on the keypad.
• The names of tone numbers 000–129
are marked above and to the right of the
keyboard’s display. The names for tone
numbers 130–199 appear in the following table. Memory locations 200–231
+
are reserved for custom tones that you
create (see “Using the Custom Tone
Synthesizer” on Page 22).
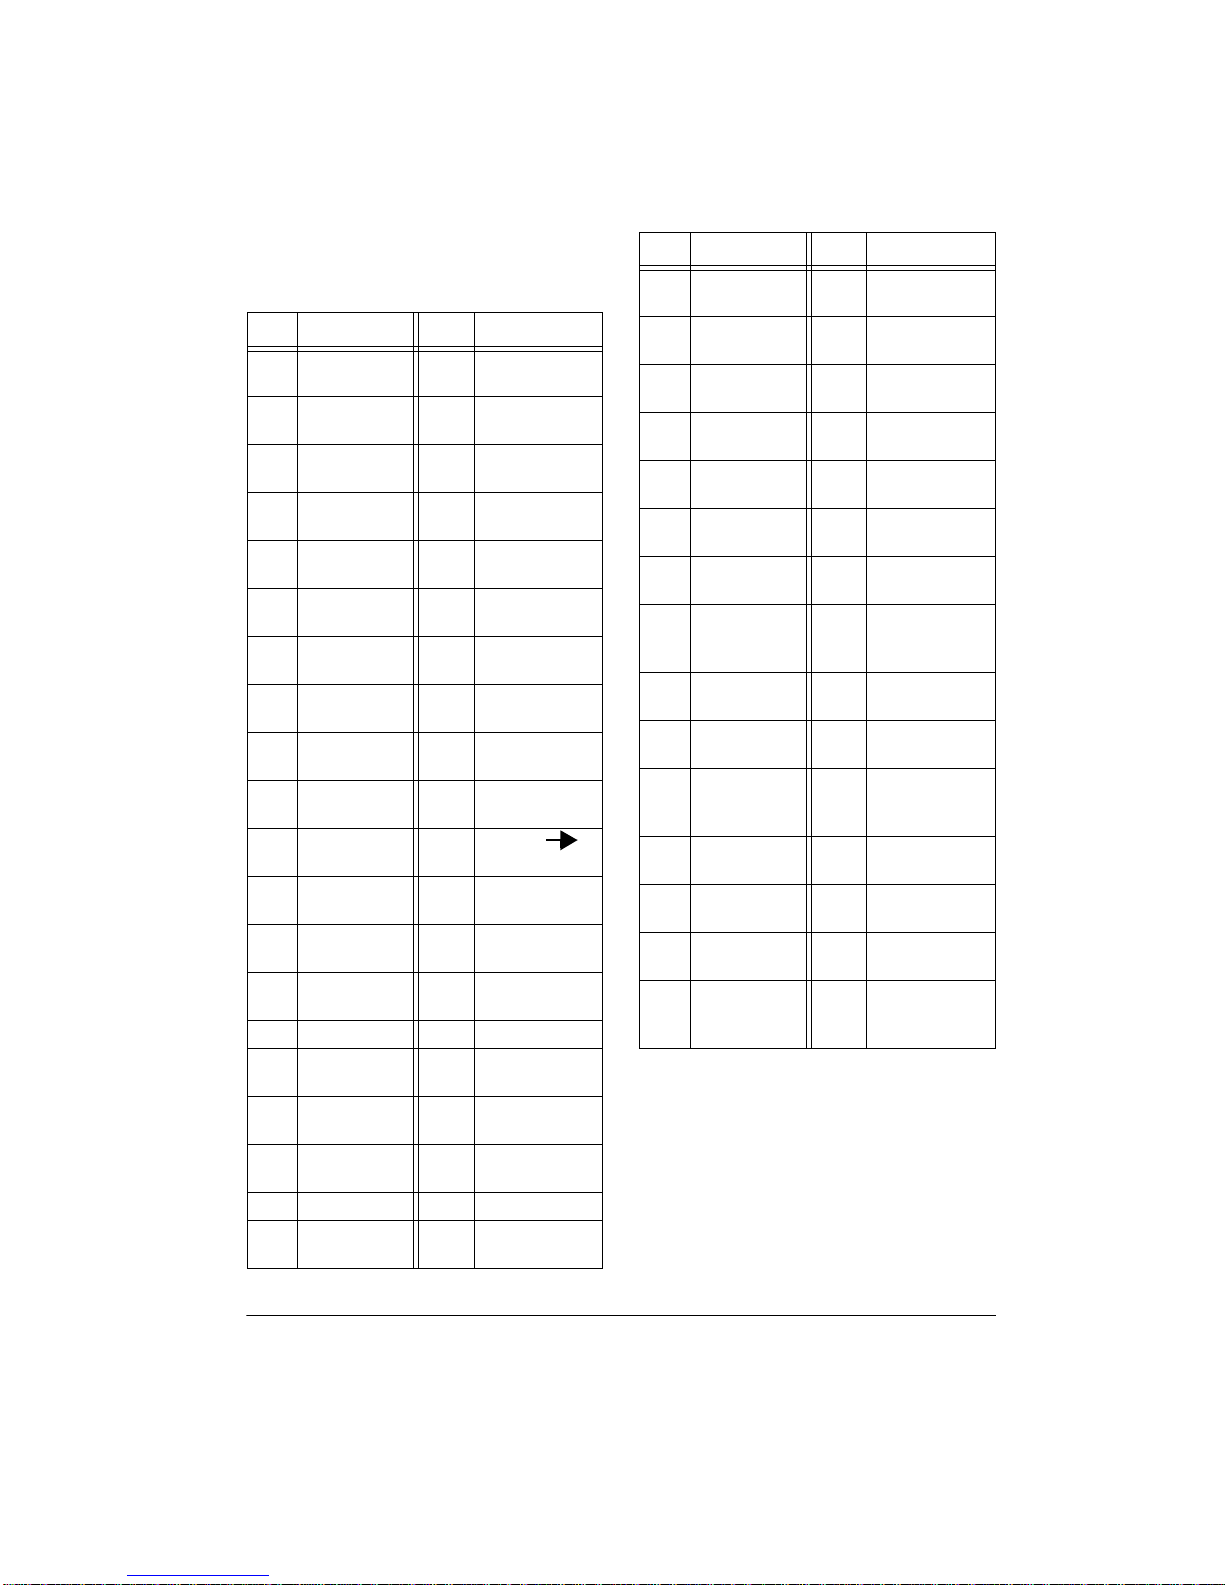
No. Tone No. Tone
130
131
132
133
134
135
136
137
138
139
140
141
142
143
144 SLAP BASS 179 SYNTH-PAD 4
145
146
147
148 STRINGS 3 183 SYNTH-PAD 8
149 TRUMPET 2 184
STEREO
PIANO
ELEC
PIANO 3
DETUNED
EP 1
DETUNED
EP 2
DETUNED
EP 3
DETUNED
CLAVI
ELEC
ORGAN 1
ELEC
ORGAN 2
ELEC
ORGAN 3
ELEC
ORGAN 4
ELEC
ORGAN 5
PIPE
ORGAN
STEREO
GUITAR
12 STR
GUITAR
SYNTH-
BASS 3
SYNTH-
BASS 4
SYNTH-
BASS 5
165 PERC ENS
166 VIBES ENS
167
168
169
170
171 TOUCH BASS
172 BRASS FALL
173 BASS SLIDE
174 FEEDBACK
175
176 SYNTH-PAD 1
177 SYNTH-PAD 2
178 SYNTH-PAD 3
180 SYNTH-PAD 5
181 SYNTH-PAD 6
182 SYNTH-PAD 7
REVERSE
ORCH
TOUCH STR
PNO
TOUCH
STRINGS
TOUCH VIB
PNO
PIANO
STR
SYNTH-LEAD
1
No. Tone No. Tone
150
151
152
153
154
155
156
157
158
159 SITAR AAH 194
160 HARP ENS 195
161 VOICE ENS 196
162 BRAS S ENS 197
163
164 PIPE ENS 199
BRASS
SECTION
SYNTH-
BRASS 3
STRINGS
PIANO
STRINGS
EP
STR
HARPSI
STR
CELESTA
STR
KALIMBA
STRINGS
HORN
STEREO
STR GTR
OCTAVE
SAX
SYNTH-LEAD
185
186 SYNTH- SFX 1
187 SYNTH- SFX 2
188 SYNTH- SFX 3
189 SYNTH- SFX 4
190 SEQUENCE 1
191 SEQUENCE 2
192
193
198
2
DRUM SET 1
STANDARD
SET
DRUM SET 2
ROOM SET
DRUM SET 3
POWER SET
DRUM SET 4
ELEC-
TRONIC SET
DRUM SET 5
SYNTH SET
DRUM SET 6
JAZZ SET
DRUM SET 7
BRUSH SET
DRUM SET 8
ORCHESTRA
SET
• Always enter three digits for the tone
number. For example, to select ELEC
PIANO 1 (No. 004), press
0 0 4
• If you enter an incorrect first digit,
TONE
press
to clear your entry, then
enter the correct digit.
• When you select one of the dr um set s
(tone numbers 192–199), each key
.
Operation
11
plays a different percussion sound.
See “Drum Assignment List” on Page
48.
• When you select tone numbers 168–
170 and set
ON
, the sound you hear changes
TOUCH RESPONSE
to
based on how hard you strike the
key(s). See “Using Touch Response”
on Page 26 for more information.
• The drum set sounds change when
you change the rhythm number, play
back data stored in memory, or
receive MIDI program change data.
5
6
7
8
9
Phaser
Organ
Speaker
Enhancer
Flanger
Loudness
Rotary speaker effect
Electronic organ
rotary speaker effect
Attack effect by
enhancing high harmonics
Jet plane effect that
causes the sound to
build then decay
Enhances the lower
tones
• Tone numbers 200–231 are preset to
duplicate tones 128–159. You can
change them to the desired setting(s). See “Using the Custom Tone
Synthesizer” on Page 22.
3. Play the keyboard to hear the selected
tone and adjust
VOLUME
to the desired
level.
4. To select a different tone, repeat Step 2
TONE
while
appears.
USING DSP EFFECTS
Your keyboard’s DSP (Digital Signal Processing) feature lets you add a variety of nuances to your music. The following table
shows the available effects.
No.
0
1
2
3
4
Display
Shows
Reverb1
Reverb2
Reverb3
Chorus
Tremolo
Tone
Deep reverb
Medium reverb
Shallow reverb
More depth and
breadth
Slight modulation of
volume
Follow these steps to select and turn DSP effects on or off.
DSP
DSP
.
1. Press
and the name of the
currently selected effect appear when
any effect is turned on, or
DSP Off
appears if no effect has been selected.
2. To turn off the effect, while
DSP
appears, repeatedly press + or – until
the desired effect appears, or until
Off
appears.
DSP
Once selected, you can turn the effect on
DSP
and off by pressing
DSP
.
appears when
the effect is turned on.
Notes:
• Only one DSP effect can be applied at a
time.
• Each demo tune has its own DSP effect.
You cannot change or cancel it.
• Changing the DSP effect during play
might cause a slight break in the tone.
• DSP effects are also applied to rhythm
and auto accompaniment. DSP effects 3
through 6 and 8 might produce a nonsuitable effect to rhythm or auto accompaniment. You can turn off the application of the effect to the rhythm or
12
Operation
accompaniment by usin g the mixer func tion. See “Using the Mixer” on Page 20.
• If you adjust
imum) while
VOLUME
LOUDNESS
toward
MAX
(max-
is set, you
might notic e a distortion in some tones
or rhythms. If this occurs, adjust
UME
toward
MIN
.
VOL-
USING SOUND RANGE
SHIFT
Each tone built into the keyboard has its own
range (see “Note Table” on Page 45). Some
tones, can be adjusted one octave higher or
lower.
The following table shows the available tone
adjustments .
Tone
No.
032
033
034
035
036
037
Name
Acoustic Bass
Fingered Bass
Picked Bass
Fretless Bass
Slap Bass 1
Slap Bass 2
038 Synth Bass 1 Lower
039 Synth Bass 2 Lower
043 Contrabass Lower
Can Shift One
Octave...
Lower
Lower
Lower
Lower
Lower
Lower
USING SPLIT
The split feature lets you play two different
tones on opposite ends of the keyboard, so
the low keys play one tone, and the high
keys play another.
TONE
1. Press
2. Enter the three-digit number for the tone
you want the high keys to play.
3. Press
appears.
4. Enter the three-digit number for the tone
you want the low keys to play.
Note:
appear on the display, alternating every
5 seconds.
5. Hold down
where you want the high tones to begin.
The selected key’s name appears.
For example, if you set the split point to
be F below middle C,
Note:
any time.
6. Play both the low and high keys to hear
the selected split tones.
To select a different low tone, enter the
three-digit number for the new low tone while
the name and number of the low tone appear. To select a different high tone, enter
the three-digit number for the new high tone
while the name and number of the high tone
appear.
.
SPLIT
. The
SPLIT
indicator
The low and high key tones
SPLIT
and press the key
F3
appears.
You can chan ge the spli t point at
072 Piccolo Higher
To shift the tone range, press
peatedly pr ess ▼ until
rent setting appear. Then, within 5 seconds,
repeatedly press + or – to change the setting.
On
Off
or
appears.
Shift
MIDI
then re-
and the cur-
Operation
To cancel split play, repeatedly press
SPLIT
until
Notes:
disappears.
• If the SPLIT indicator is on when you
turn off the keyboard, split will still be on
the next time you turn on the keyboard.
SPLIT
13

• When you use split, the last selected
settings appear.
• The keyboard uses mixer channel 1 as
the high tone and channel 3 as the low
tone. You can use the keyboard’s mixer
function to change the volume balance
or stereo pan pos iti on for ea ch ton e (s ee
“Using the Mixer” on Page 20).
USING LAYER
The keyboard lets you play two different preset tones at the same time, creating a layered effect when yo u pr ess o ne k ey . Th e first
tone you select when usin g laye r is c alled the
base tone
layer tone
1. Press
2. Enter the three-digit numbe r for the base
3. Enter the three-digit number for the
4. Play the keyboard to hear the selected
To select a different Layer tone, enter the
three-digit number for the new layer tone
while the layer tone appears. To select a different base tone, enter the three-digit number for the new base tone while the base
tone appears.
To cancel Layer, repea tedly press
LAYER
til
Notes:
and the second tone is called the
.
TONE
.
tone, then press
appears.
Layer tone.
layered tones.
disappears.
LAYER
LAYER
.
LA YE R
un-
• The keyboard uses the mixer channel 1
as the base tone and channel 2 as the
layer tone. You can use the keyboard’s
mixer function to change the v olume balance or stereo pan position for each
tone (see “Using the Mixer” on Page
20).
USING SPLIT AND LAYER
TOGETHER
You can combine the Split and Layer features, so you can play one layered combination of tones on the low keys and another on
the high keys.
1. If the SPLIT or LAYER indicator is on,
SPLIT
press
2. Enter the number for the high base tone
on the keypad.
3. Repeatedly press
appears.
4. Enter the number for the low base tone.
5. Repeatedly press
disappears.
6. Repeatedly press
indicator appears.
7. Enter the number of the layered tone for
the high keys.
8. Press
9. Enter the number of the layered tone for
10. If desi red, hold down
SPLIT
the low keys.
the key where you want the high tones
to begin.
LAYER
or
SPLIT
.
to turn it off.
SPLIT
SPLIT
until the
LAYER
appears.
SPLIT
SPLIT
until
SPLIT
until the layer
then pre ss
• If the layer indicator is on when you turn
off the keyboa rd, Layer w ill s till b e on the
next time you turn on the keyboard.
• When you turn on Layer, the previous
tone settings appear.
14
11. Play the keyboard to hear the selected
tones.
To cancel the Split/Layer combination, press
each button so both
appear.
Operation
SPLIT
and
LAYER
dis-

Hint:
You can use the mixer function to control the individual tone. For example, you can
turn off channel 4 so the keyboard generates
a single tone at the low end and a layered
tone at the high end. Se e “Using th e Mixer”
on Page 20.
USING THE PRESET
AUTO-RHYTHMS
Your keyboard has 120 preset auto-rhythms
that provide a steady beat for your music.
The name and two-digit number of each preset auto-rhythm is listed on the left side of
the keyboard.
You can play a preset auto-rhythm on the
keyboard in any of the following ways:
• select and play a rhythm (see “Selecting/Playing an Auto-Rhythm”)
• synchronize the start of a rhythm with
your music (see “Using SYNCHRO” on
Page 16)
you turn it on after tha t, it se lec ts the las t
selected rhyt hm.
2. To select a differe nt rhythm, choose an
auto-rhythm from the 120 RHYTH MS lis t
and enter its three-digit number on the
+
keypad. Or, repeatedly press
or – to
move to the next higher or lower numbered rhy thm.
Notes
:
• Enter three digits for the rhythm num-
ber. For example, press
0 0 5
to select
PIANO ROCK (No. 005).
• Rhythms 110–119 are chord accom-
paniment only without percussion
effects. Therefore, these rhythms do
not sound without activating autoaccompaniment (see “Using Auto
Accompaniment” on Page 16).
• If you incorrectly enter the first digit of
the rhythm, press
RHYTHM
to clear
the entry and return to the last
selected auto-rhythm.
• start a rhythm with a special introduction
(see “Using INTRO” on Page 16)
• briefly vary the pattern of a rhythm (see
“Using NORMAL/FILL-IN” on Page 16)
• stop a rhythm with a special ending (see
“Using ENDING” on Page 16)
• play an alternate version (variation) of a
rhythm (see “Using VAR/FILL-IN” on
Page 16)
Selecting/Playing an
Auto-Rhythm
1. Press
RHYTHM
.
RHYTHM
and the name
and number of the current auto-rhythm
appears.
Note:
The keyboard automatically
selects th e rhythm 8 BEAT 1 (No. 00 0)
when you turn the power on. Each time
Operation
3. If necessary, repeatedly press
MODE
until all indicators turn off, then press
START/STOP
to start the selected auto-
rhythm.
4. Adjus t
VOLUME
to the desired level.
5. To change the auto-rhythm speed, press
TEMPO
(or hold down)
▼ or ▲. The cur-
rent tempo setting appears.
Notes
:
• You can adjust the tempo
to play an
auto-rhythm from 30 to 255 beats per
minute.
• To reset the tempo to its default (original) spee d, press
TEMPO
▼
or ▲. at
the same time.
6. Play the keyboard along with the autorhythm.
15

7. To select a different rhythm, repeat
Steps 1–2.
8. To stop the auto-rhythm, press
STOP
.
START/
Using SYNCHRO
its normal beat pattern. The variation differs
slightly from the normal rhythm, so it is almost like having two rhythms in one!
To play the alternate rhythm, pre ss
IN
. The variation plays continuously at the
selected tempo.
V AR/FI LL-
This feature lets you synchronize the start of
an auto-rhythm with the beginning of your
music.
After you select and enter an auto-rhythm,
SYNCHRO/ENDING
press
the keyboard. The keyboard automatically
begins to play the rhythm when you press
any key within the first 2 octaves and a tone
of the lower end of the keyboard (the first 26
keys from the left side of the keyboard).
, then begin playing
Using INTRO
This feature lets you start the selected autorhythm with a light, 3- to 8-measure introduction that blends easily into the selected
rhythm.
To start a rhythm with an introduction, select
INTRO
and enter the rhythm, then press
introduction plays, then the selected autorhythm automatically starts.
. The
Using NORMAL/FILL-IN
This featur e lets you inser t a short (1- to 2measure) variation in the beat pattern of a
selected auto-rhythm.
To insert the fill-in segment in the alternate
rhythm, press
adds a 1- to 2-measure variation in the
rhythm.
To return to the normal rhythm, press
MAL/FILL-IN
To stop the auto-rhythm, pr ess
VAR/FILL-IN
.
. The keyboard
NOR-
START/ STOP
Using ENDING
To end the selected rhythm with a special 3to 8-measure flourish, press
ING
while the auto-rhythm is playing, about 3
– 8 measures before you want the rhythm to
end. The keyboard plays a special ending,
then automatically stops the rhythm.
SYNCHRO/END-
USING AUTO
ACCOMPANIMENT
The 26 keys on the left side of the keyboard
with note labels above them are called
companiment Keys
You can set the keybo ard to p lay th ree different types of auto accompaniment using the
accompaniment keys.
.
Ac-
.
Simply press and release
while the auto-rhythm is playing. The keyboard inserts a 1- to 2-measure variation,
then the original rhythm automatically resumes at the end of the current measure.
Using VAR/FILL-IN
Each of the keyboard’s 120 preset autorhythms has a built-in variation (alternate) to
16
NORMAL/FILL-IN
Operation
•
Concert Chord
on the accompaniment keys using chord
formations of one to four notes. The
number of keys you press determines
the type of chord that plays (see “Concert Chord” on Page 17).
•
Standard Fingering
chords on the accompaniment keys
using standard ch ord formations of thre e
— lets you play chords
— lets you play
or four notes (see “Standard Fingering”
on Page 18).
•
Full-Range Chord
— lets you play the
melody using the entire keyboard while
the keyboard plays accompaniment
based on your auto-rhythm selection
(see “Full-Range Chords” on Page 19).
Notes
:
• You can use the keyboard’s rhythm con-
INTRO, NORMAL/FILL-IN, VAR/FILL-
trols (
IN,
SYNCHRO/ENDING
and
) with all three
types of auto accompaniment.
• After you press the auto accompan imen t
keys while using concert chord or standard fingering, the keyboard plays the
same chord until you press other
accompaniment keys to play a different
chord or press
START/STOP
.
Adjusting the Accompaniment
Volume
The keyboard lets you adjust the volume of
your accompaniment separately from the
overall volume of the keyboard.
1. Press
CH5/ACC VOL
accompaniment volume setting
appears.
. The current
through the
MIDI IN
terminal. See “Using
the Mixer” on Page 20 for more information.
Concert Chord
The concert chord method lets beginning
keyboard players easily select and play a
chord.
The number of accompaniment keys you
press determines the type of chord that
plays. This chart shows the chord type that
plays when you press one , two , thr ee, or fo ur
accompaniment keys at the same time.
Number of Keys
Pressed
C DEFGABCDE F
C DEFGABCDE F
C D E F G A B C D E F
Chord Type
Major
Minor (m)
Dominant
Seven th (7)
2. Within 5 seconds, press or hold down
or ▲. The numbers appear as yo u press
the keys.
Notes:
• The auto-accompaniment patterns consist of five parts: chord 1, chord 2, chord
3, bass, and rhythm. You can delete any
of the parts by using the mixer function.
See “Using the Mixer” on Page 20.
• The auto-accompaniment volume setting is effective only in the keyboard’s
internal mode. You cannot change the
volume setting for the songs received
▼
C DEFGABCDE F
The lowest note you play determines the key
of the chord. For example, if the lowest note
is C, the keyboard plays a C chord.
Note:
You can press
labeled note(s) to
any
the right of the lowest note in the chord to
produce a minor, a dominant seventh, or minor seventh chord.
Operation
Minor
Seven th
(m7)
17
 Loading...