

Page 1

MD-1210 MIDI Keyboard
Owner’s Manual
Please read before using this equipment.
Page 2

Contents
Features ................................................................................................................... 4
The FCC Wants You to Know ............................................................................. 5
Preparation .............................................................................................................. 6
Connecting Power .............................................................................................. 6
Connecting Headphones .................................................................................... 7
Connecting an External Amplifier ....................................................................... 7
Using the Sheet Music Stand ............................................................................. 7
A Quick Look at Your Keyboard ............................................................................ 8
Operation ................................................................................................................. 8
Basic Operation .................................... ....... ...... ....... ...... ....... ............................. 8
Playing the Demonstration Tunes ...................................................................... 9
Using the Preset Tones ...................................................................................... 9
Using the Drum Pads ....................................................................................... 11
Using Reverb .................................................................................................... 11
Using Split ........................................................................................................ 11
Using Layer ...................................................................................................... 12
Using Split and Layer Together ........................................................................ 12
Using the Preset Auto-Rhythms ....................................................................... 13
Using Auto Accompaniment ............................................................................. 15
Using the Mixer ................................................................................................. 18
Using the Custom T one Synthesizer ................................................................ 20
Using the Registration Memory ........................................................................ 23
Special Features ....... ....... ...... ...... .............................................. ...... ....... ...... ...... .. 24
Changing Keys ................................................................................................. 24
Tuning the Keyboard ........................................................................................ 25
Using Touch Response ..................................................................................... 25
Changing Auto Power Off ................................................................................. 25
Using Pitch Bend .............................................................................................. 26
Using a Sustain Pedal ...................................................................................... 26
©
2000 Tandy Corporation.
RadioShack, Adaptaplug, and RadioShack.com are trademarks used by Tandy Corporation.
2
All Rights Reserved.
Contents
Page 3

Using the Memory ................................................................................................. 27
Real-Time Recording ....................................................................................... 27
Playing Back from Memory .............................................................................. 29
Step Recording ................................................................................................. 29
Recording Multiple Tracks ................................................................................ 31
Editing Memory Contents ................................................................................. 33
Using MIDI ............................................................................................................. 34
About MIDI ......................................................................... ...... ....... ...... ........... 35
Making the MIDI Connections .......................................................................... 35
MIDI Data ......................................................................................................... 35
Changing MIDI Settings ................................................................................... 37
Dumping/Importing Data .................................................................................. 38
Notes About the MIDI Implementation Chart .................................................... 39
Troubleshooting ...................................................................... ................... ........... 40
Care ...................................... ....... ............................................. ....... ...... ...... ..... 41
Appendix ............................................................................................................... 42
Note Table ........................................................................................................ 42
Drum Assignment List ...................................................................................... 44
Fingered Chord Chart ........................ ....... ...... ....... ...... ..................................... 45
MIDI Implementation Chart .................................................................................. 46
Specifications ....................................................................................................... 47
3Contents
Page 4

Features
Your RadioShack MIDI Keyboard is a
state-of-the-art musical instrument that
offers you a vast array of sounds. You
can choose from 200 different musical
instruments or sound effects and 100
rhythms, as well as a utom ati c ac co mpa niments and percussion sounds.
Your keyboard also includes a MIDI
(Musical Instrument Digital Interface)
feature, which lets you connect it to other MIDI-equipped musical instruments
or devices — eve n your personal computer.
This versatile keyboard can provide
hours of fun and is i dea l for anyone who
wants to make music, from the begi nner
to the experienced musician.
Note:
The keyboard conforms to most,
but not all, General MIDI spe cifications.
Because of this, you might experience
some incompatibility when using the
keyboard with ano the r Ge ner al MIDI device. For more information, see “Using
MIDI” on Page 34.
Your keyboard’s features include:
24-Note Polyphonic Sound
play and hear up to 24 notes at the
same time, so y ou ca n p lay o r c rea te almost any type of music.
Synthesizer Function
ate up to 32 of your own original tones.
Memory
record up to 2 songs, 6 tracks, and
4,900 notes. The recording remains
stored even while the keyboard is off.
Large LCD Music Information Dis play
— shows you the notes and chords as
— lets you set the keyboard to
— lets you
— lets you cre-
you play them, along with the current
tone, rhythm, and tempo. The displ ay’s
built-in backl igh t m ak es i t e as y to r ead i t
even in dim light.
Two Built-In Stereo Bass-Reflex
Speakers
keyboard can produce and hear the
sound you create.
Registration Memory
up to 32 different setups of the keyboard’s controls , letting you ins tantly recall them when you need them.
Drum Pads
gardless of the keyboard’s tone setting.
61 Full-Sized Keys
of a fine musical instrument.
Touch Response
volume varies in re spon se to th e force of
your touch, just like an acoustic piano or
organ, so you can add emotion to your
music.
Pitch Bender Wheel
notes by altering t heir pitch, cr eating realistic effects for tones s uch as reed instruments or guitar tones.
200 Tones
board to sound like anything from a
harpsichord to a honky-tonk piano. You
can even create your own tones with the
custom tone synthesizer feature.
100 Auto-Rhythms
beat for many styles of music, from
rhumba to rock.
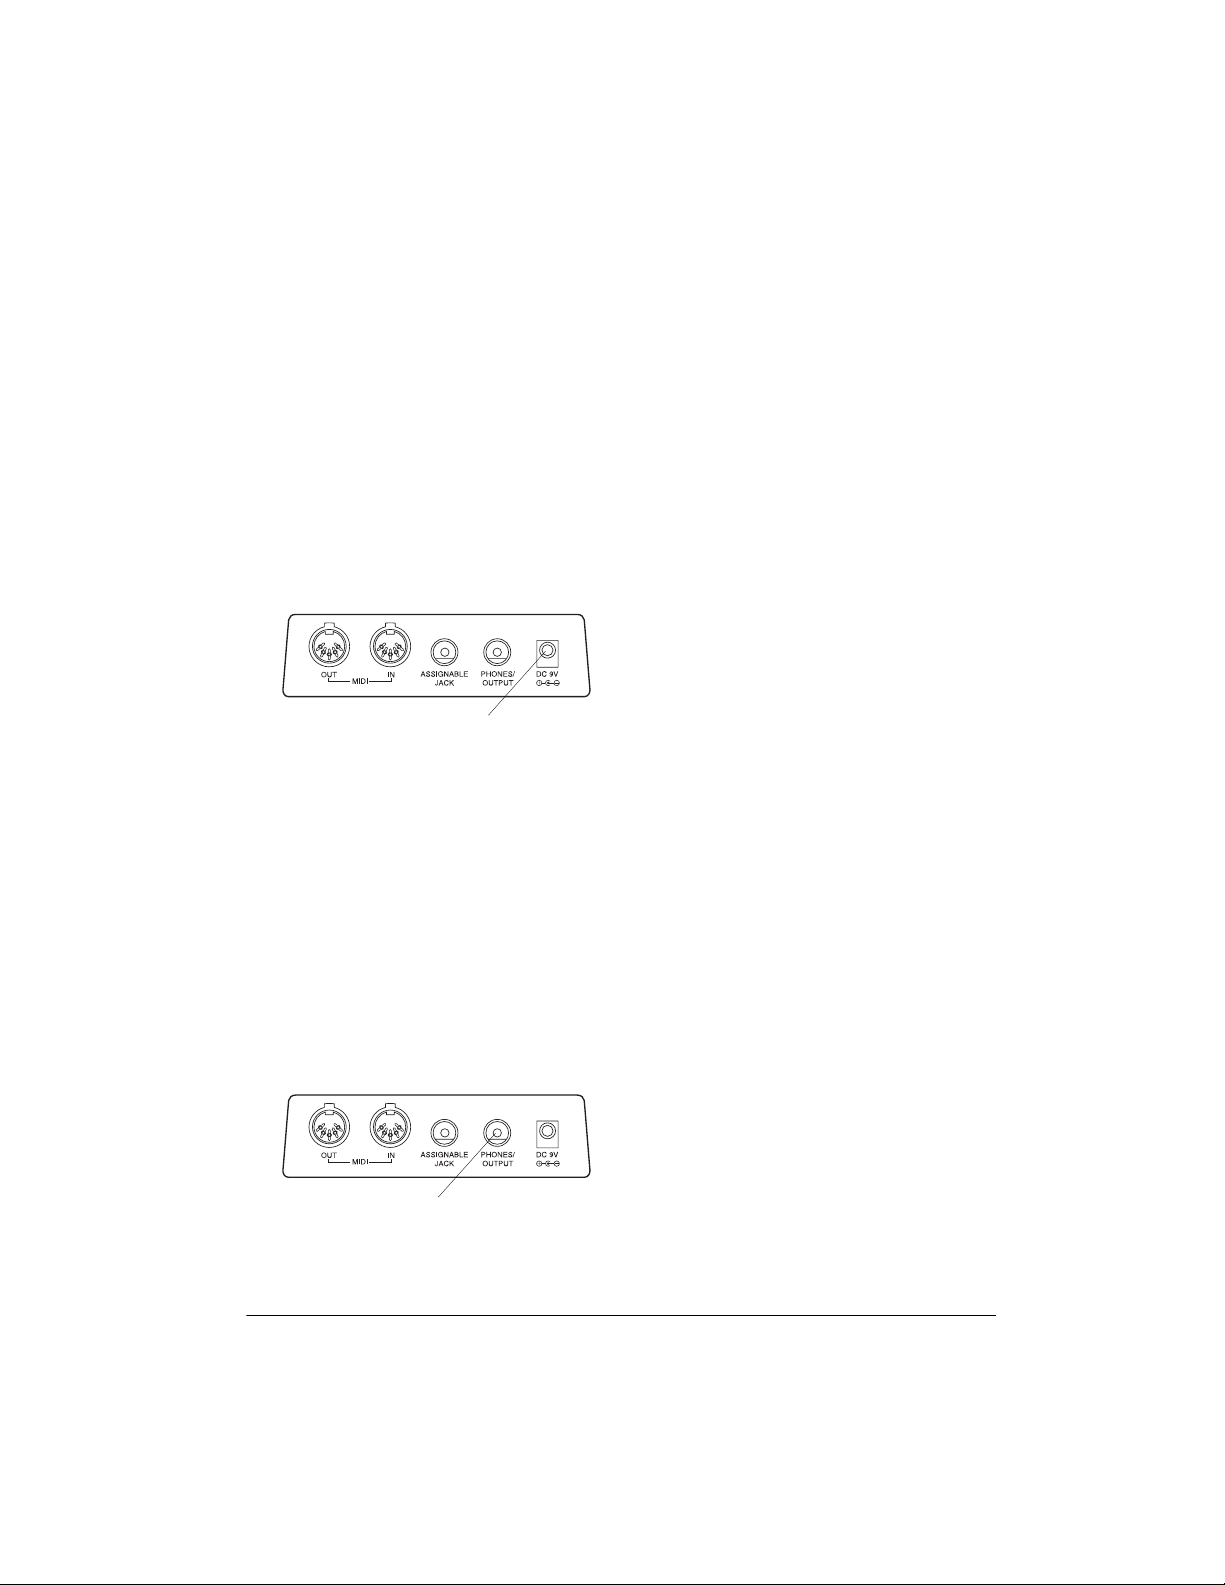
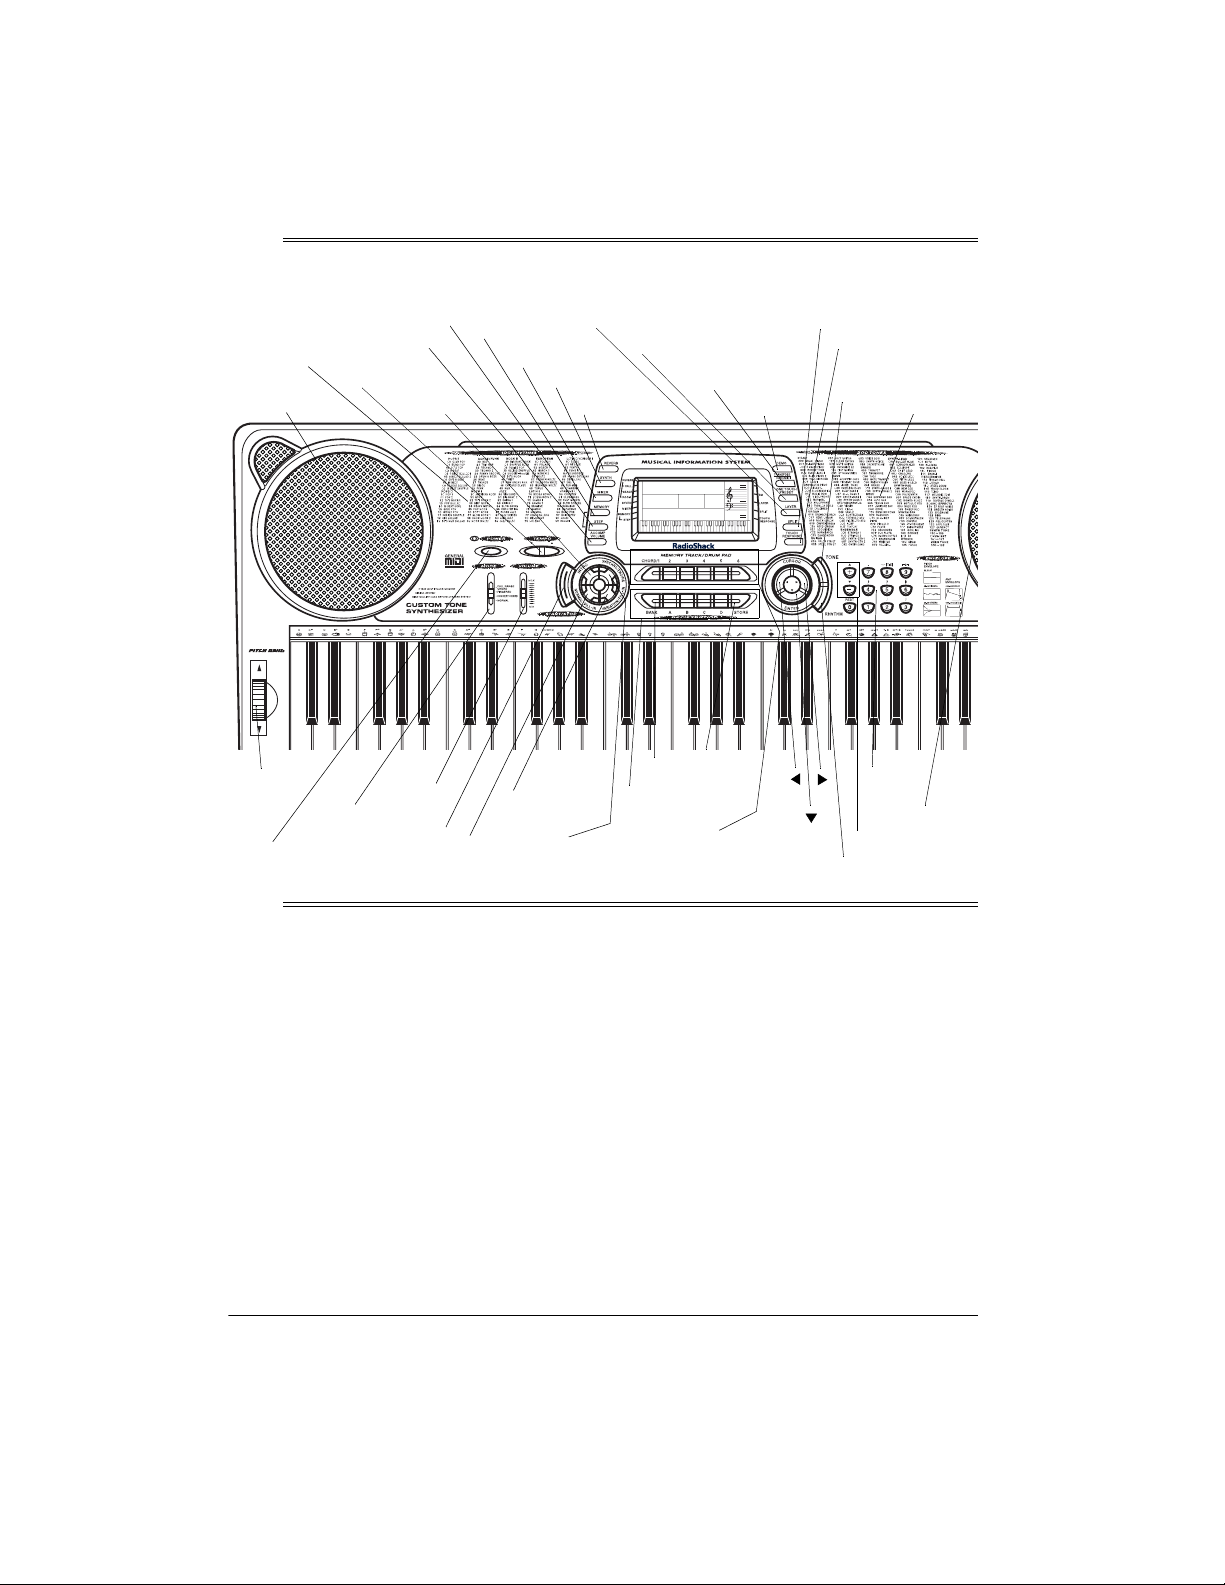
Headphones/Output Jack
connect headphones so you can play
without disturbing oth ers, or an external
— let you feel the bass your
— lets you st ore
— play drum sounds re-
— provide the feel
— the keyboard’s
— lets you bend
— you can set your key-
— provide a ste ady
— lets you
4
Features
Page 5

amplifier so you can play for a crowd
(neither supplied).
tion or 3- to 8-measure ending to the
selected auto-rhythm.
Assignable Jack
sustain pedal (not supplied) to the keyboard so you can sus tain or soften y our
keyboard’s sound, o r start/sto p an autorhythm.
Tune Control
pitch of your keyboard so you can play
in tune with other instruments.
Transpose Function
stantly change the key of the music,
even while you are playing.
Tempo Control
slow down the tempo of any selected
music pattern.
Fill-In Rhythm
variation into any auto-rhythm.
Auto Accompaniment
matically play a pr eset harmo nic patter n
to match the selected auto-rhythm.
Reverb
to the sound.
Layer Function
board to play two differe nt tones at the
same time, giving your music a “layered”
effect.
Split Function
sounds for the low-end and high-end
keys.
— lets you add depth and space
— lets you connect a
— lets you adjust the
— lets you in-
— lets you spe ed up o r
— lets you insert a short
— lets you auto-
— lets you set the key-
— lets you use different
MIDI In/Out Jacks
the keyboard to another MIDI- equipped
device.
Two Power Options
the keyboard from internal batter ies (n ot
supplied) or standard AC power (with an
optional adapter) , so you c an make m usic almost anywhere.
Note:
This Owner’s Manual explains
how to use this electronic keyboard. It
does not teach music.
— let you connect
— let you power
THE FCC WANTS YOU TO
KNOW
This equipment compl ies with the limits
for a Class B dig ital device as speci fied
in Part 15 of
provide reasonable protection against
radio and TV interference in a residential
area. However, your equipment might
cause TV or radio interference even
when it is operating properly. To eliminate interference, you can try one or
more of the following corrective measures:
• reorient or relocate the receiving
antenna
• increase the distance between the
equipment and the radio or TV
FCC Rules
. These limits
Mixer Function
keyboard sound multiple tones for auto
accompaniment, memory playback, or
to play MIDI data received fr om another
MIDI device.
Automatic Intro/Ending Rhythm
you can set the keyboard so it automatically adds a 3- to 8-measure introduc-
— lets you make the
—
• use outlets on di fferent ele ctr i ca l c ircuits for the keyboar d and the radio
or TV.
Consult your local RadioShack store if
the problem still exists.
You must use shielded interface cables
with this equipment.
5Features
Page 6

Preparation
Note:
To connect a MIDI device to your
keyboard, see “Making the MIDI Connections” on Page 35. To connect a sustain
pedal, see “Using a Sustain Pedal” on
Page 26.
CONNECTING POWER
You can power yo ur keyboard using internal batteries or with standard AC
power using an optional AC adapter
tom of the keyboard, pull up the
cover to remove it.
2. Place the batteries in the compartment as indicated by the polarity
symbols (+ and –) marked below the
compartment.
3. Replace the cover.
When the keyboard stops operating
properly, replace the batteries.
Notes
:
• Connecting an AC or DC adapter
automatically disc onnects any internal batteries.
• Always disconnect the AC or DC
adapter when you finish using the
keyboard.
Using Batteries
Your keyboard can use six D batteries
(not supplied) for power. For the best
performance and longest life, we rec om mend RadioShack alkaline batteries.
Cautions:
• Use only fresh batteries of the
required size and recommended
type.
• Do not mix old and new batteries,
different types of batteries (standard, alkaline, or rechargeable), or
rechargeable batteries of different
capacities.
Follow these steps to install batteries.
1. While pressing the tabs on the bat tery compartment cov er on the bot-
6
Preparation
Warning:
promptly and properly. Do not burn or
bury them.
Caution:
keyboard with batteries for a week or
more, remove the batteries. Batteries
can leak chemicals that can destroy
electronic parts.
Dispose of old batteries
If you do not plan to use the
Using AC Power
You can power the keyboard using a 9V,
1200-mA AC adapter and a size M
Adaptaplug™ adapter (neither supplied). Both are available at your local
RadioShack store.
Cautions:
You must use a Class 2
power source that s upplies
!
9V DC and delivers at least
1200 mA. Its center tip m ust be set
to negative and its plug must fit the
keyboard's
adapter that does not meet these
specifications could damage the
keyboard or the adapter.
• Always connect the AC adapter to
the keyboard before you connect it
DC 9V
jack. Using an
Page 7
to AC power. When you finish, disconnect the adapt er from AC power
before you disconnect it from the
keyboard.
Listening Safely
To protect your hearing, follow these
guidelines when you use headphones.
Follow these steps to connect an AC
adapter to the keyboard.
1. Set the DC adapter ’s voltage switch
to 9V.
2. Insert the Adaptaplug adapter into
the adapter’s cord so it reads – TIP.
3. Connect the AC adapter’s barrel
plug to the
the keyboard.
4. Plug the AC adapter’s other end into
a standard AC outlet.
DC 9V
jack on the back of
DC 9V
CONNECTING
HEADPHONES
To listen to your keyboard without disturbing others, you can connect an optional pair of stereo headpho nes with a
1
/4-inch (6.35-mm) plug. Your local RadioShack store s ells a wide se lection of
headphones. Insert the headphones’
plug into the
the back of the keyboard.
PHONES/OUTPUT
jack on
• Set the volume to the low est setting
before you begin liste ning. A fter you
begin listening, adjus t the volume to
a comfortable level.
• Do not listen at extr emely high volume levels. Extended high-volume
listening can lead to permanent
hearing loss.
• Once you set the volume, do not
increase it. Over time, your ears
adapt to the volum e level, so a volume level that does not cause discomfort might still damage your
hearing.
CONNECTING AN
EXTERNAL AMPLIFIER
To amplify your keyboard’s sound, you
can connect it to an optional external
amplifier using an a udio c able with a
inch (6.35-mm) plug (not supplied). To
connect an external amplifier to your
keyboard, insert the cable’s plug into the
PHONES/OUTPUT
the keyboard, and connect the cable’s
other end to the amplifi er’s input jack(s)
(such as AUX IN or TAPE IN).
Your local Radi oShack store sells a f ull
line of amplifiers, speakers, and cables.
jack on the back of
1
/4-
PHONES/
OUTPUT
Note
: Connecting headphones discon-
nects the keyboard’s built-in speakers.
USING THE SHEET MUSIC
STAND
To easily view sheet music while playing
your keyboard, inser t the s upplied s heet
music stand into the slot on the top back
panel.
7Preparation
Page 8
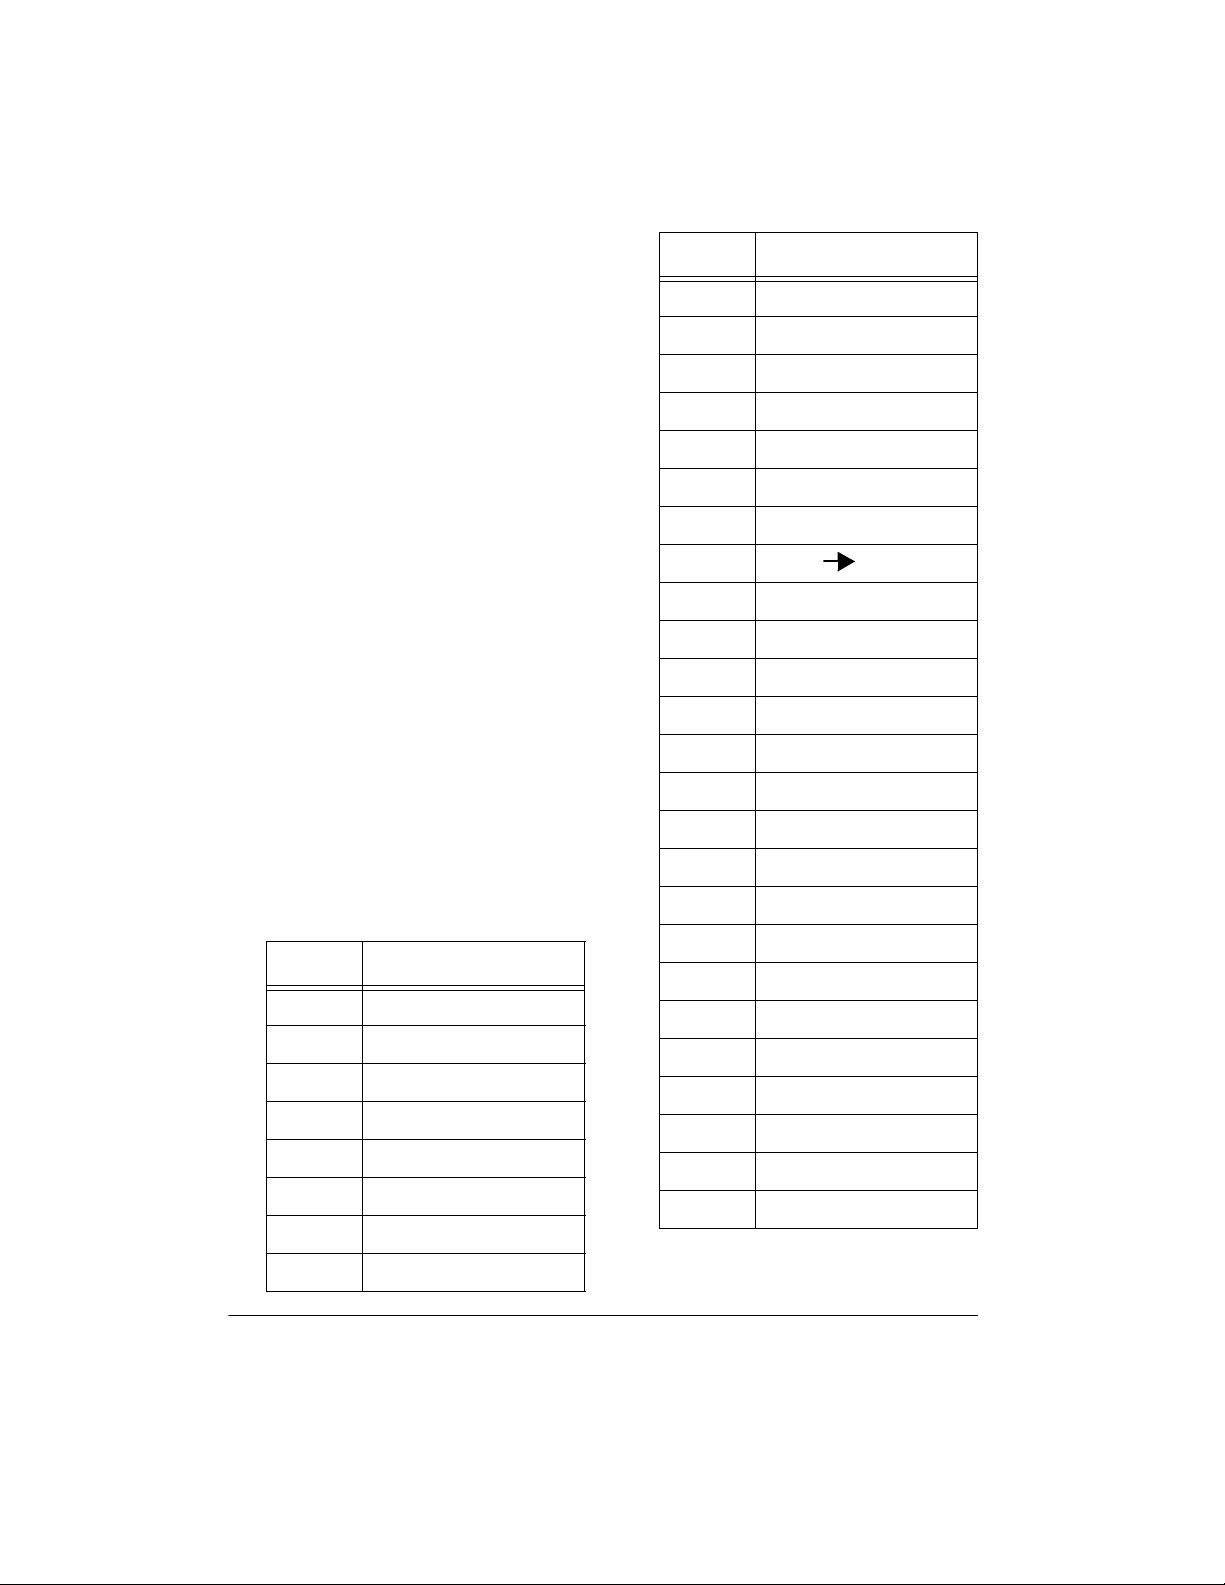
A Quick Look at Your Keyboard
100
RHYTHMS
List
Speaker
PITCH
BEND
POWER
MODE
ACCOMP
VOLUME
TEMPO
VOLUME
START/
STOP
STEP
INTRO
MEMORY
MIXER
VARIATION/
FILL-IN
NORMAL/
FILL-IN
LAYER
SYNTH
REVERB
SYNCHRO/
ENDING
ONE TOUCH
PRESET
REGISTRATION
Buttons
BANK
CHORD
Buttons
TRANSPOSE/
TUNE/MIDI
STORE
SPLIT
DEMO
RHYTHM
TOUCH
RESPONSE
TONE
Number
Keys
+/–
200
TONES
List
Speaker
Operation
BASIC OPERATION
1. Slide
VOLUME
Important:
age, always set the keyboard’s volume to
MIN
2. To turn on the keyboard, press
POWER
. The POWER indicator
lights and the display turns on.
Note:
To s ave power, the keyboard
automatically turns off after about 6
8
MIN
to
(minimum).
To prevent hearing dam before you turn it on.
A Quick Look at Your Keyboard
minutes if you do not press a key. To
turn on the keyboard again, press
POWER
. To cancel auto power off,
see “Cancell ing Auto Pow er Off” on
Page 9.
3. Slide
4. Slide
MODE
VOLUME
NORMAL
to
toward
.
MAX
slightly
and begin playing the keyboard.
Notes:
• The keyboard automatically se-
lects the tone GRAND PIANO
Page 9

(No. 000) when you turn the
power on. Each time you turn it
on after that, it selects the last
selected tone. To select a different tone, see “Using the Preset
Tones”.
• To select an auto-rhythm, see
“Using the Preset Auto-Rhythms”
on Page 13 .
dle row shows the
minute, the
ing
and the
treble and bass clef s
The
the display show th e notes a s they play.
The bar graph shows the
each of the 16 ch annels (see “Using th e
Mixer” on Pa ge 18). The
bottom of the display sho ws the lo catio n
of the keys being pressed.
number of t he mea sur e pl aybeat count
tempo
in beats per
in each me asure.
to the right of
sound level
keyboard
at the
on
• To p lay auto a cc om pan im ent, s ee
“Using Auto Accompaniment” on
Page 15.
5. Slide
increase the sound level or toward
MIN
6. To turn off the keyboard, press
POWER
the keyboard’s display turn off.
VOLUME
to decrease it.
. The POWER indicator and
toward
MAX
to
Cancelling Auto Power Off
To have the keyboard not automatically
turn off during a session, turn on the
keyboard while holding down
The next time you turn the keyb oard off
then back on again, it wil l automatically
turn off after about 6 minutes.
TONE
.
PLAYING THE
DEMONSTRATION TUNES
To showcase its sou nds, your keyboar d
can play two preprogrammed demonstration tunes. To start the demonstration, press
the first demonstration tune (No. 0). To
select the other tune, press
keypad. The selected tune’s number appears and the tune plays.
demo tune number and
The
pear at the top of the display. T he mid-
DEMO
. The keyboard plays
–or +
Demo
on the
ap-
USING THE PRESET
TONES
Your keyboard can sound like 200 different musical instruments or sound effects. The name and three-digit number
for each preset tone is listed on the 200
TONES list on the keyboard’s top panel.
Notes:
• The keyboard has 24-note (maximum) polyphonic sound. This
means that you can play up to 24
different notes at the same time with
most of the key bo a rd ’s preset to ne s.
Some of the keyboard’s preset
tones, however, are capable of on ly
12-note polyphony.
• Most tones on this keyboard have
been record ed and p roce ssed usin g
a technique called dig ital sampling.
To ensure a hi gh level of tonal quality, samples are taken in the low,
mid, and high ranges and are then
combined to sound amaz ingly close
to the originals. You might notice
very slight differences in volume or
sound quality for some tones when
you play them at d ifferent positions
on the keyboard. This is an unavoidable result of multiple sampling and
is not a malfunction.
9Operation
Page 10
Follow these steps to select and play a
preset tone.
1. Press
TONE
TONE
.
and the current
tone’s number appear.
No. Tone
136 STRINGS PIANO
137 E. PIANO STRINGS
Note:
The first time you turn the
keyboard on, it automatically selects
the tone GRAND PIANO (No. 000).
2. To play a different tone, choose a
preset tone from the 200 TONES list
and enter its three-digit number on
the keypad. As you press the keys,
the selected digits appear.
Notes:
• You can select the next highest or
lowest numbered tone by simply
pressing
+
or – on the keypad.
• The names of tone numbers 000–
127 are marked to the right of the
keyboard’s display. The names for
tone numbers 128–167 appear in
the table below. Memory locations
168 199 are reserved for custom
tones that you create (see “Using
the Custom Tone Synthesizer” on
Page 20).
No. Tone
128 SYNTH PAD 1
129 SYNTH PAD 2
130 OCT PIANO
131 OCT HARP
132 12 STR GUITAR 1
133 JAZZ OCT GUITAR
134 OCT SAXOPHONE
135 TOUCH BASS
138 STEREO PIANO
139 12 STR GUITAR 2
140 BRASS FALL
141 BASS SLIDE
142 FEEDBACK GT
143 PIANO STRINGS
144 ECHO ORGAN
145 ROTARY ORGAN
146 CHORUSED EP
147 STRINGS GT
148 P AD ENS 1
149 P AD ENS 2
150 SEQUENCE 1
151 SEQUENCE 2
152 SYNTH PAD 3
153 SYNTH PAD 4
154 SYNTH PAD 5
155 SYNTH PAD 6
156 SYNTH PAD 7
157 SYNTH PAD 8
158 REVERSE ECHO
159 FAST TREMOLO
167 DRUM SET 1-8
160
–
• Precede a single-digit number
0 0
with
. For example, to select
10
Operation
Page 11

ELEC PIANO 1 (No. 004), press
0 4
.
• If you enter an incorrect firs t digit,
TONE
press
then enter the correct digit.
to clear your entry,
0
and reverberate. To turn on th e reverb,
repeatedly press
cator appears next to the type of reverb
you want.
HALL
— creates a concert hall effect.
REVERB
until an indi-
• When you select one of the dr um
sets (tone numbers 160–167),
each key plays a different percussion sound. See “Drum Assignment List” on Page 44.
• The drum set sounds change
when you change the rhythm
number, play back data stored in
memory, or receive MIDI program
change data.
• Tone numbers 168–199 are the
user tone area. See “Using the
Custom Tone Synthesizer” on
Page 20.
3. Play the keyboard to hear the
selected tone and adjust
the desired level.
4. To select a different tone, repeat
Step 2 whil e
TONE
VOLUME
appears.
to
USING THE DRUM PADS
The keyboard has six drum pads that
you can use to play percu ssion sounds
independent of the key board keys . Simply tap on a drum pad to play the percussion sound currently assigned to it.
To change the drum pad sounds, use
the mixer function to change the tone
assigned to Channel 10. See “Us ing the
Mixer” on Page 18.
STAGE
small club.
ROOM
To turn off the reverb, r epeatedly press
REVERB
— creates the acoustics of a
— adds the acoustics of a studio.
until the indicator disappears.
USING SPLIT
The SPLIT feature lets y ou play two different tones on opposite ends of the
keyboard, so the l ow-end keys pl ay one
tone, and the high- end keys play another. Follow these steps to use SPLIT.
1. Press
2. Enter the three-digit number for the
3. Press
4. Enter the three-digit number for the
5. Hold down
TONE
.
tone you want the high-end ke ys to
play.
SPLIT
. The SPLIT indicator
appears.
tone you want the low-end keys to
play.
SPLIT
, and press the key
where you want the hi gh-end tones
to begin. The selected key’s name
appears.
For example, if you set the split
point to be F below middle C,
appears.
F3
USING REVERB
The REVERB feature creates ambiance
effects by causing the sound to linger
Note:
You can change the split point
at any time.
6. Play both the low and high-end keys
to hear the selected split tones.
11Operation
Page 12

To select a different low- end tone, e nter
the three-digit numb er for the new lowend tone while the SPLIT indicator appears. To select a different high-end
tone, press
SPLIT
to turn off its indicator,
then enter the three-digit numbe r for the
new high-end tone. Then press
SPLIT
again so the SPLIT indicator appears.
three-digit number for the new base
tone. Then press
LAYER
again so the
LAYER indicator appear s.
To cancel LAYER, repeatedly press
LAYER
until its indicator disappears.
Notes:
To cancel SPLIT play, r epeatedly press
SPLIT
until its indicator disappears.
Notes:
• If SPLIT is on when you turn off the
keyboard, SPLIT will still be on the
next time you turn on the keyboard.
• When you turn on SPLIT, the last
selected settings appear.
USING LAYER
The keyboard lets you play two different
preset tones at the same tim e, creating
a “layered effect” when you press one
key. The firs t tone you select when using LAYER is called the
the second tone is called the
1. Press
TONE
.
2. Enter the three-digit number for the
base tone then press
LAYER
indicator appears.
3. Enter the three-digit number for the
layer tone.
4. Play the keyboard to hear the
selected layered tones.
base tone
layer tone
LAYER
and
. The
• If LAYER is on when you turn off the
keyboard, LAYER will still be on the
next time you turn on the keyboard.
• When you turn on LAYER, the previous tone settings appear.
USING SPLIT AND LAYER
TOGETHER
You can combine the SPLIT and LAYER
features, so you can play one layered
combination of tones on the low-end
keys and another on the high-end keys.
1. If the SPLIT or LAYER indicator is
on, press
SPLIT
off.
2. Enter the number for the high-end
.
base tone on the keypad.
3. Repeatedly press
SPLIT indicator appears.
4. Enter the number for the low-end
base tone.
5. Repeatedly press
SPLIT indicator disappears.
6. Repeatedly press
LAYER indicator appears.
or
LAYER
SPLIT
SPLIT
LAYER
to turn it
until the
until the
until the
To select a different layer tone, enter the
three-digit number for the new layer tone
while the LAYER indicator appears. To
select a different base to ne, press
ER
to turn off its indicator, then enter the
12
LAY-
Operation
7. Enter the number of the layered
tone for the high-end keys.
8. Press
SPLIT
. The SPLIT indicator
appears.
Page 13

9. Enter the number of the layered
tone for the low-end keys.
10. If desired, hold down
press the key where you want the
high-end tones to begin.
11. Play the keyboard to hear the
selected tones.
To cancel the SPLIT/LAYER combination, press each button so both the
SPLIT and LAYER indicators disappear.
SPLIT
then
Selecting/Playing
an Auto-Rhythm
1. Press
name and number of the current
auto-rhythm appears.
Note:
selects the rhythm CLUB POP (No.
00) when you turn the power on.
Each time you turn it on afte r that, it
selects the last selected rhythm.
RHYTHM
The keyboard automatically
.
RHYTHM
and the
USING THE PRESET
AUTO-RHYTHMS
Your keyboard has 100 preset autorhythms that provide a steady beat for
your music. The name and two-digit
number of each preset auto-rhythm is
listed on the keyboard’s top panel.
You can play a preset auto-rhythm on
the keyboard in any of the following
ways:
• select and play a rhythm (see
“Selecting/Playing an AutoRhythm”)
• synchronize the start of a rhythm
with your music (see “Using SYNCHRO” on Page 14)
• start a rhythm with a special introduction (see “Using INTRO” on
Page 14)
• briefly vary the pattern of a rhythm
(see “Using FILL-IN” on Page 14)
• stop a rhythm with a s pecial ending
(see “Using ENDING” on Page 14)
• play an alternate vers ion (variation)
of a rhythm (see “Using VARIATION” on Page 14 )
2. To select a different rhythm, choose
an auto-rhythm from the 100
RHYTHMS list and enter its twodigit number on the keypad. Or,
repeatedly press
the next higher or lower numbered
rhythm.
Notes
:
• Precede a single-digit number
with a 0. For example, p ress
to select 8-BEAT BALLAD 2 (No.
05).
• If you incorrectly enter the first
digit of the rhythm, press
to clear the entry and return to the
last selected auto-rhythm.
3. Set
4. Adjust
5. To change the auto-rhythm speed,
MODE
to
START/STOP
auto-rhythm.
VOLUME
TEMPO
press
tempo setting appears.
Notes
:
• You can adjust the tempo to play
an auto-rhythm from 40 to 255
beats per minute.
+
or – to move to
05
RHYTHM
NORMAL
to start the selected
to the desired level.
▼
or ▲. The current
, then press
13Operation
Page 14

• To qui ckl y sl ow d own o r sp eed up
the tempo, hold down
TEMPO
▼
or ▲.
INTRO
. The introduction pl ays, then the
selected auto-rhythm automatically
starts.
• You can also adjust the tempo b y
first pressing
TEMPO
▼
or ▲, then
entering the desired number of
beats per minute in three digits
(040 to 255), or by holding down
or – on the keypad.
• To reset the tempo to its default
(original) speed, pr ess
TEMPO
▼
or ▲. at the same time.
6. Play the keyboard along with the
auto-rhythm.
7. To s elect a different rhythm, repeat
Steps 1
–
2.
8. To stop the auto-rhythm, press
START/STOP
.
Using SYNCHRO
This feature lets you synchronize the
start of an auto-rhythm with the beginning of your music.
After you select and enter an autorhythm, press
begin playing the keyboard. The keyboard automatically begins to play the
rhythm when you press any key within
the first 1
the keyboard (the fi rst 18 keys from the
left side of the keyboard).
SYNCHRO/ENDING
1
/2 octaves of the lower end of
, then
Using FILL-IN
This feature lets y ou insert a shor t (1- t o
2-measure) variation in the beat pattern
+
of a selected auto-rhythm.
Simply press and release
IN
while the auto-rhythm is playing . The
NORMAL/FILL-
keyboard inserts a 1- to 2-meas ure var iation, then the orig inal rhythm automatically resumes at th e end of the current
measure.
Using VARIATION
Each of the keyboard’ s 100 pr eset au torhythms has a built-in variation (alternate) to its normal beat pattern. The
variation differs sligh tly from the normal
rhythm, so it is almost like having two
rhythms in one!
To play the alternate rhythm, press
VARIATION/FILL-IN
continuously at the selected tempo.
To insert the fill- in segment in the alter-
nate rhythm, press
The keyboard adds a 1- to 2-measure
variation in the rhythm.
To return to the normal rhythm, press
NORMAL/FILL-IN
. The variation plays
VARIATION/FILL-IN
.
.
Using INTRO
This feature lets you start the selected
auto-rhythm with a light, 3- to 8-measure
introduction that blends easily into the
selected rhythm.
To start a rhythm with an introduction,
select and enter the rhythm, then pres s
14
Operation
To stop the auto-rhythm, press
STOP
.
START/
Using ENDING
To end the se lected rhythm with a special 3- to 8-measure flourish, press
CHRO/ENDING
while the auto-rhythm is
SYN-
Page 15
playing, about 3–8 measures before you
want the rhythm to end. The keyboard
plays a special ending, then automatically stops the rhythm.
USING AUTO
ACCOMPANIMENT
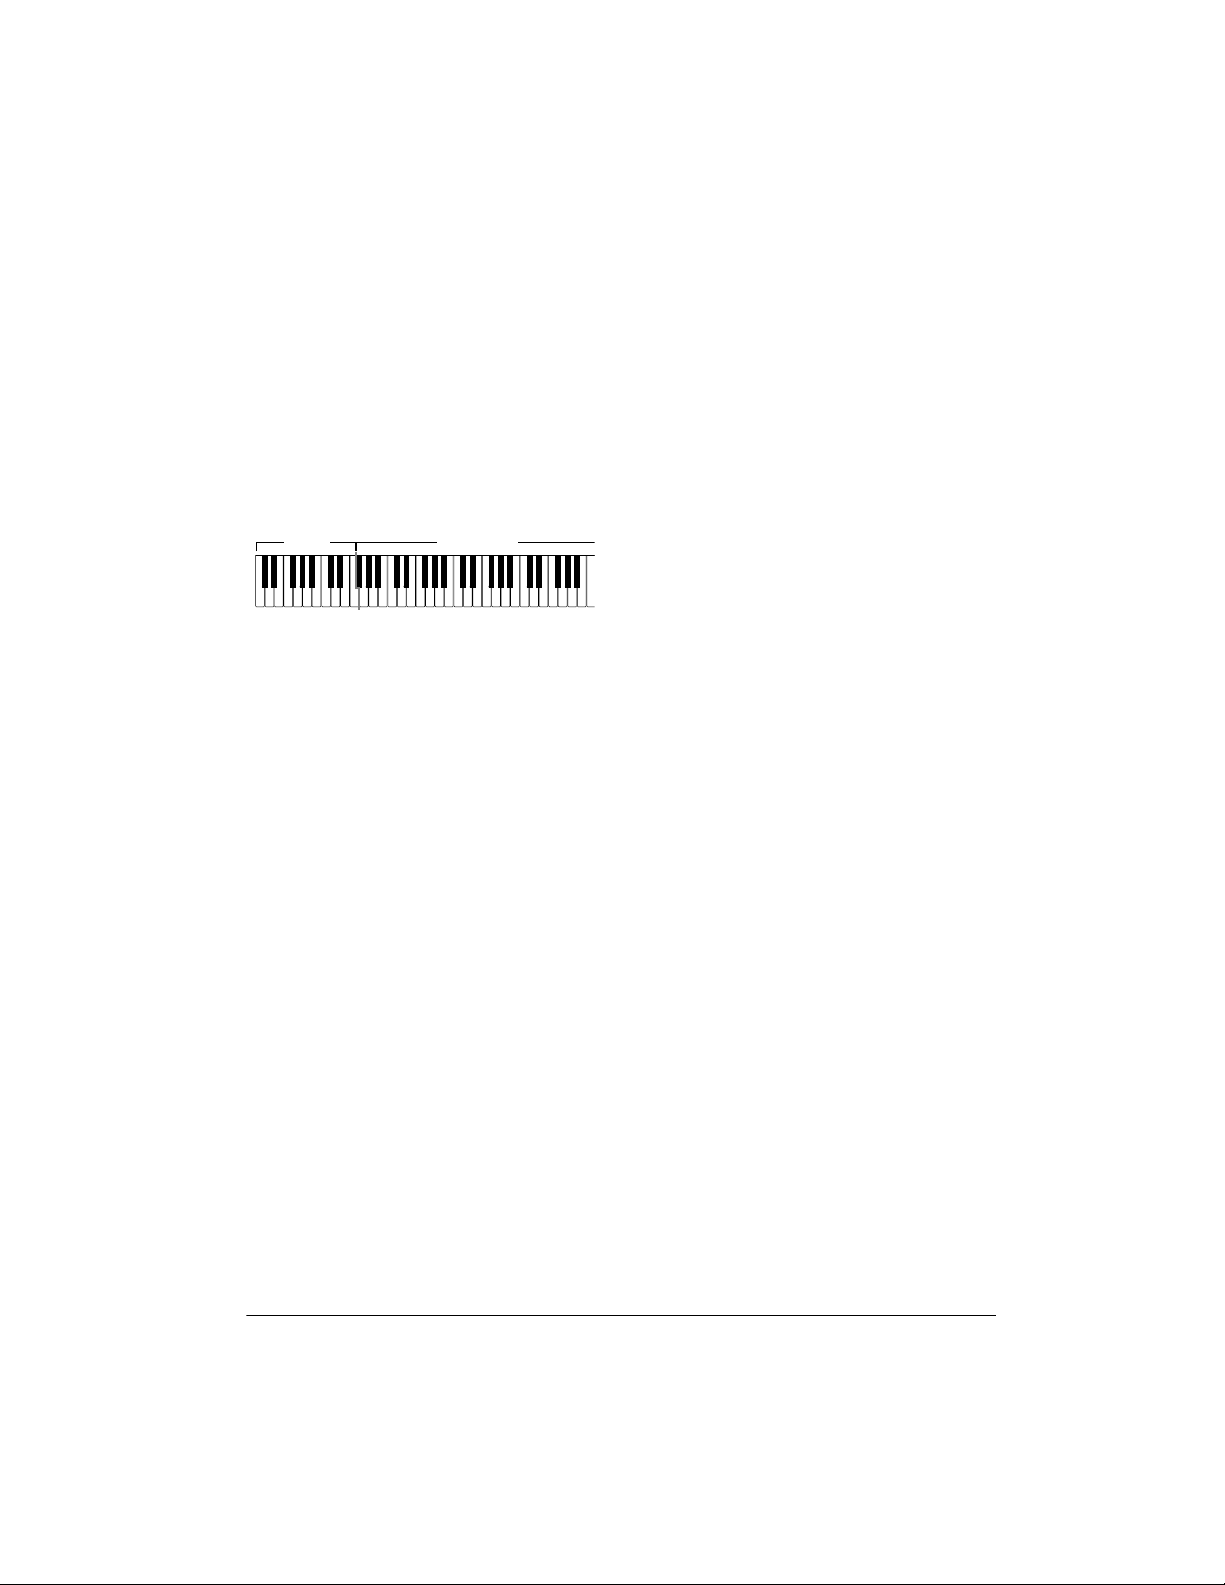
The 18 keys on th e left side of the keyboard with note labels above them are
accompaniment keys
called
Accompaniment
Keyboard
You can set the keybo ard to play three
different types of auto accompaniment
using the accompaniment keys.
Concert Chord
•
chords on the accompaniment k eys
using chord formations of from one
to four notes. The number of keys
you press determines the type of
chord that plays (see “Concert
Chord” on Page 16).
Standard Fingering
•
chords on the accompaniment k eys
using standard chord formations of
three or four notes (see “Standard
Fingering” on Page 16).
Full-Range Chord
•
the melody using the entire keyboard while the keyboard plays
accompaniment based on your
auto-rhythm selection.
Notes
:
• You can use the keyboar d’s rhythm
controls (
VARIATION/FILL-IN,
INTRO,NORMAL/FILL-IN,
.
Melody
Keyboard
— lets you play
— lets you play
— lets you play
SYNCHRO/
and
ENDING
) with all three types of auto
accompaniment.
• After you press the auto accompa niment keys while using concert chord
or standard finge ring, the keyboard
plays the same chord until you
press other accomp animent keys to
play a different chord or press
START/STOP
.
Adjusting the Accompaniment
Volume
The keyboard lets you adjust the volume
of your accompanimen t separately from
the overall volume of the keyboard.
1. Press
rent accompaniment volume setting
appears.
2. Within 5 seconds, enter a number
from
on the keypad. The numbers appear
as you press the keys.
Or, press
repeatedly press
next lowest or highest accompaniment volume setting.
To reset the accomp animent volume to
its default value of 87, press
VOLUME
time.
Note:
terns consist of four parts: chord 1,
chord 2, bass, and rhythm. You c an delete any of the parts by using the mixer
function. See “Using the Mixer” on
Page 18.
ACCOMP VOLUME
0 0 0
(softest) to
ACCOMP VOLUME
–
or + to select the
. The cur-
1 2 7
(loudest)
then
ACCOMP
then pres s – and + at the same
The auto-accompaniment pat-
15Operation
Page 16
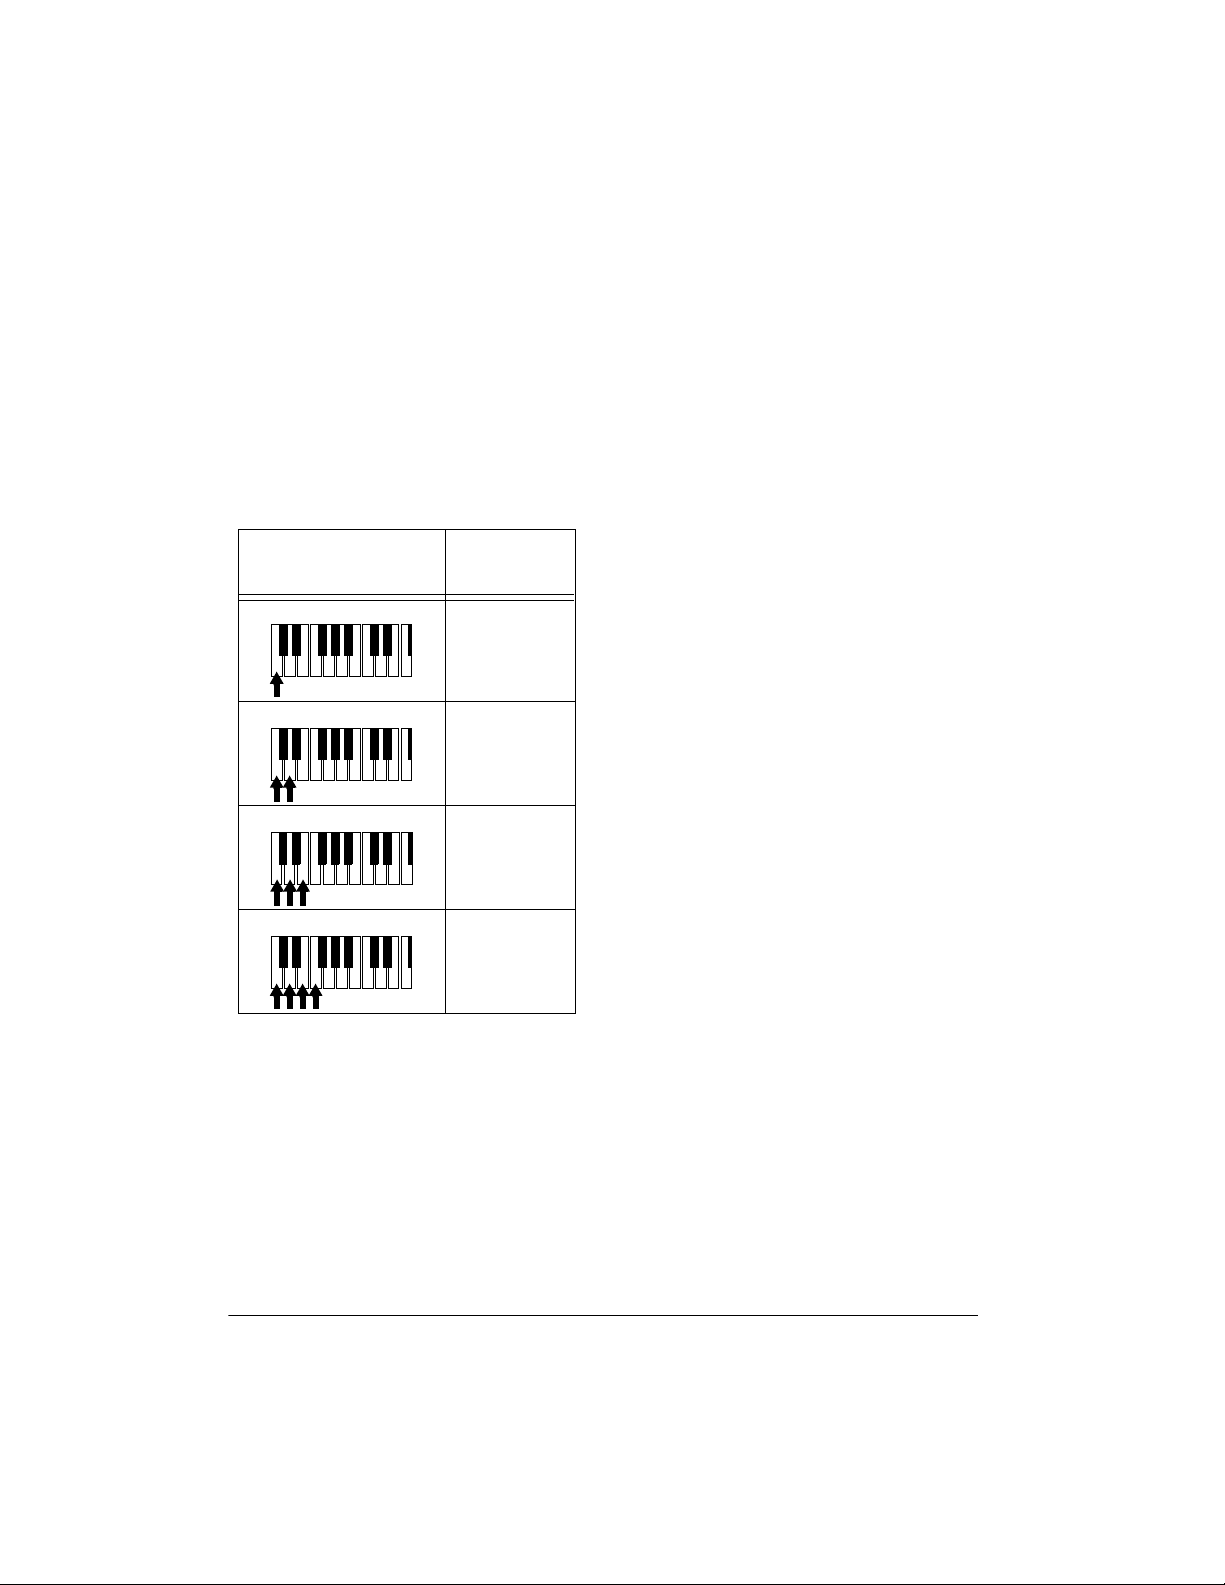
Concert Chord
1. Set
MODE
CONCERT CHORD
to
.
The concert chord method lets beginning keyboard players ea sily select and
play a chord.
The number of accompaniment keys
you press determin es the type of chord
that plays. This chart shows the chord
type that plays when you press one,
two, three, or four accompan iment keys
at the same time.
Number of Keys
Pressed
C DEF GAB C DE F
C DEF GAB C DE F
C D E F G A B C D E F
Chord Type
Major
Minor (m)
Dominant
Seventh (7)
2. Enter a two-digit auto-rhythm number.
3. To start the auto-rhythm before the
auto accompaniment, pr ess
STOP
or
INTRO
.
START/
Or, to synchronize the start of the
selected auto-rhythm with your
accompaniment, press
ENDING
.
SYNCHRO/
4. Begin the accompaniment at the
desired interval by pressing the
desired accompa nim ent ke y( s ).
To play a melody along with the
accompanim ent, press any key(s) to
the right of the accompaniment
keys.
5. Adjust the tempo and
VOLUME
to
the desired levels.
6. To change chords without interrupting the rhythm, simply press the
auto accompaniment key(s)
required to form the new chord.
C DEF GAB C DE F
Minor
Seventh
(m7)
The lowest note you play determines the
key of the chor d. F or e xam ple , if th e lo west note is C, the keyboard plays a C
chord.
Note:
You can press
any
labeled note(s)
to the right of the lowest note in the
chord to produce a minor, a dominant
seventh, or minor seventh chord.
Follow these steps to start concert chord
auto accompaniment.
16
Operation
7. To stop auto accompaniment and
the auto-rhythm, press
START/STOP
Standard Fingering
The standard fingering method uses
standard formations of three or four
notes, and lets the experienced musician play a wider variety of accompaniment chords.
This chart shows the 15 chord types you
can play on your keyboard by using
standard fingering.
.
Page 17

Major (M)
Suspended
4th (SUS4)
()
Major 7th
(M7)
Minor (m)
Augmented
() ()
Dominant
7th (7)
Minor Half-
Diminished
-5
)
(m7
(aug)
Minor 7th
(m7)
Major HalfDiminished
-5
(7
)
–
• When you play an aug, 7
5
, or dim7
chord, the lowest note you play
determines the ro ot of the c ho rd. B e
sure that your fingering correctly
defines the root you want.
Note
: See “Fingered Chord Chart” on
Page 45 for a list of all the c hords you
can play on your keyboard using standard fingering accompaniment.
Follow these steps to star t standard fingering auto accompaniment.
1. Set
MODE
FINGERED
to
.
2. Select and enter an auto-rhythm.
Dominant
Suspended
4th (7sus4)
()
Major 9th
(add9) (madd9)
()
Minor 9th
()
Minor/Major
7th (mM7)
Diminished Diminished
7th (dim7)
Notes:
• You do not have to press the key
marked with parentheses on the
keyboard in the preceding chart to
produce a 7, m7, M7, mM7, add9, or
madd9 chord.
• This chart shows onl y one possible
fingering position for each chord. It
is possible to play a chord using
several different positions. For
example, the followin g three fingering positions produce the same C
chord.
3. To start the auto-rhythm before your
auto accompaniment, pr ess
STOP
or
INTRO
.
START/
Or, to synchronize the start of the
selected auto-rhythm with your
accompaniment, press
ENDING
.
SYNCHRO/
4. Begin the accompaniment at the
desired interva l by pressing at least
three accompaniment keys to play
the desired chord.
To play a melody along with the
accompanim ent, press any key(s) to
the right of the accompaniment
keys.
5. Adjust
TEMPO
and
VOLUME
to the
desired levels.
6. To c hange chords without interrupting the rhythm, simply press the
auto accompaniment keys required
to form the new chord.
7. To stop auto accompaniment and
the auto-rhythm, press
START/STOP
17Operation
.
Page 18

Full-Range Chords
While the easy random and standard fingering methods limit c ho rd for ma tio ns to
the accompaniment k eys, the full-range
chord method lets you play chords of
any type using any of the keyboard’s
keys.
Set
MODE
FULL RANGE CHORD
to
and
follow the steps under “Standard Fingering” on Page 16. If you press three or
more keys anywhere on the keyboard
that form a chord, the keyboard plays
that chord. The keybo ard responds with
melody sounds if you press fewer than
three keys.
Notes:
• In the full-range chord mode, the
keyboard recognizes these 23
chords in addition to the 15 chords
in the standard fingering mode
(examples show C as the base
note):
C6 Cm6 C69 C#/C D/C E/C
F/C G/C A /C B /C B/C C#m/
C
Dm/CFm/CGm/CBm/C Dm7
F7/CFm7/CGm7/CA add9/
C
-5/C
A7/
C
• When the composite notes of a
chord are more than five notes
apart, the lowest sound becomes
the base note.
Using One-Touch Preset
The keyboard’s one-touch preset feature recalls the tone and tempo best
suited for the rhythm you sel ected. Afte r
selecting a rhythm, press
PRESET
, then start the acco mpaniment.
ONE TOUCH
The rhythm starts playing at a suitable
tempo, and the keyboard sounds the
suitable tone for the rhythm you selected
as you play the keyboard.
USING THE MIXER
The keyboard play s mult iple pa rts at th e
same time during auto accompaniment,
or memory playb ack, or when receiving
MIDI data, in up to 16 separate channels. You can contr ol the on/off setting,
volume, and parame ters of each of the
keyboard’s channels just as you would
with a sound mixer.
This chart shows the parts assigned to
each channel.
Channel Part
1 Main tone
2 Layered tone
3 Split tone
4 Layered/split tone
5 These channels only produ ce
6
7 Auto accompaniment chord
8 Auto accompaniment chord
9 Auto accompaniment bass
10 Auto accompaniment rhythm
11 Memory Track 1
sound when they receive
MIDI signals
part 1
part 2
part
part, drum pad
18
Operation
Page 19

Channel Part
12 Memory Track 2
13 Memory Track 3
14 Memory Track 4
15 Memory Track 5
16 Memory Track 6
3. Repeatedly press or (
CURSOR
to display the current status of the
channel —
on,oFF
4. Repeatedly press
SoL
, or
+
or – to select the
(solo).
status you want.
on
(default): Turns on the current
channel. A bar appears at the bottom of the level meter for the
selected channel.
)
Notes:
• Normally, keyboard play is assigned
to Channel 1 and the drum pads are
assigned to Channe l 10. When you
use auto accompa niment, ea ch part
is assigned to Channels 7–10.
• When you use th e keyboard as the
sound source for another MIDI
device, all 16 channels are assigned
musical instrument parts (Channel
10 is reserved for drum parts only,
per MIDI standard).
• The mixer settings also affect the
corresponding MIDI output.
Editing the Status of a Channel
You can edit the status (o n, off, solo) of
a channel to delete a s pecific part or to
play a specific part by itself.
Follow these steps to edit the status of a
channel.
1. Press
2. Use
MIXER
. The MIXER indicator
and the last selected channel
appear.
+
or – on the keypad to se lect
the channel you want to edit.
oFF
: Turns off the current channel.
The bar at the bottom of the level
meter disappears.
SoL
: Turns the current channel on
and all the other channels off. A bar
appears over only the c urrent channel.
5. To edit other channels, press or
to return to the channel selection
screen and repeat Steps 2–4.
To exit the edit mode, press
MIXER
. The
display shows the performance status of
the channels as edited.
Editing the Parameter
You can change the settings of six parameters such as tone, volume, and pan
(relative position of the tone between the
left and right speaker channels) for the
selected channel.
Follow these steps to edit the parameters.
1. Select the channel y ou want to edit
as described in Steps 1 and 2 of
“Editing the Status of a Channel”.
2. Press ▼ (
parameter edit mode.
ENTER)
to enter the
19Operation
Page 20

3. Repeatedly press or to select
the parameter you want to change.
Program Change Number (000 to
199)
— sets the tone assigned to
the channel.
Note:
Channel 10 is reserved for
percussion, so only tone numbers
160 (DRUM SET1) through 167
(DRUM SET 8) can be set for Channel 10.
Volume (000 to 127)
volume of the selected channel.
Pan (000 to 127)
pan. 000 is fully left, 64 is the center
position, and 127 is fully right.
Fine Tune (–50 to +50)
tunes the pitch of the selected channel in cent units. A cent is one hundredth of a semitone. Th ere are 12
semitones per octave.
C (Coarse) Tune (–12 to +12)
coarsely tunes the pitch of the
selected channel in semitone units.
Express (Expression ) (00 0 t o 127 )
— controls the volume of the
selected channel. Similar to the volume setting, this is often used to
control crescendo/decrescendo.
4. Use the number buttons or
change the parameter setting.
5. To edit other channels, press ▼ to
return to the channel selection display, select the chan nel , the n rep eat
Steps 2–4.
6. To exit the parameter edit mode,
MIXER
press
.
— controls the
— controls the
— fine
—
+
or – to
USING THE CUSTOM
TONE SYNTHESIZER
The keyboard’s custom tone synthesizer
lets you create up to 32 of your own
original tones. To create a “user” tone,
you simply sele ct one of the keyboard’s
200 preset tones, change its parameters, then store the new tone in any
memory location fro m 1 68– 199. Yo u s elect and use a user tone the s ame as a
preset tone.
Notes:
• You cannot use tones 160–167
(drum set tones) as base tones.
• The preset tone you use as the
basis for a user tone is not changed.
• The tone locat ions 168–199 a re not
empty (before you store user tones
there). They initially contain duplicate versions of tone nu mbers 128–
159. The user tone yo u store in any
of those locations replaces the existing tone. If you delet e a user tone,
the keyboard automat ically restores
the initial, duplicate tone there.
The parameters you c an change are divided into four groups. For the det ails of
each parameter, see “Creating and Storing a User Tone” on Page 21.
Tone Characteristic Waveform
•
PCM Set
Volume Characteristic
•
Envelope Set
Tone Pitch
•
Envelope Set
Tone Characteristic
•
Rate, Release Rate, Level, Touch
Sensitivity, and Pan
— Pitch and Pitch
— Amp
— Attack
—
20
Operation
Page 21

Understanding 1DCO and
2DCO Tones
A Digital Controlled Oscillator (DCO)
controls the sound output of a digital signal. Some of the keyboard’s built-in
tones are simple tones (1DCO), and
some are layered tones ( 2DCO). When
you select a 2DCO to ne as the bas is fo r
creating a user tone, you need to
change the parameters of both tones.
When you select a layered tone,
appears, indicating that this is the first
tone of a layered tone.
dCo1
Creating and Storing a User
Tone
Follow these steps to create and store
your own tone. (Re fer to “Hints on C reating a User Tone” on Page 23.)
Notes:
For example , if yo u s el e ct ed t o ne 19
(Church Organ),
appears. Then, when you press
SYNTH
Note:
at any time, press
twice.
3. Repeatedly pre ss or to display
the parameter you want to change.
PCM Set (0 to 173 )
the characteristic of a tone by
changing its digital ly sa mpled waveform.
Amp Envelope Set (
to 137)
lopes. 000 to 048 set vol ume envelopes for a decaying note (h ow fast
or slow the sound dim inishes). 049
to 137 set volume envelopes that
sustain the note. Samples of the
amp envelopes appear in a graph
near your keyboard’s right speaker.
026 ChrchOrgA
,
To cance l the save operation
— Selects the volum e env e-
019 ChrchOrg
appears.
SYNTH
— Determines
Amp.Set
or
TONE
) (0
• A new or revised use r tone re place s
the existing user tone.
• Layer, split, auto accompaniment,
demo tune play, and MIDI functions
are all disabled while the keyboard
is in the Custom Tone Synthesizer
mode.
1. Select the preset tone (except 160–
167) you want to use as a basis fo r
your user tone.
2. Press
SYNTH
the Custom Tone Synthesizer mode
and the first parameter (PCM Set)
appears. The display also shows
whether the tone you selected is a
DCO1
or
tone), and shows the current PCM
setting.
. The keyboard enters
DCO2
tone (if it is a layered
Attack Rate (
— Sets the sp eed of the attack (th e
period from when you press a key to
when the tone reaches it s ma xi mu m
volume). The greater the value , the
quicker the attack. Use this par am eter to make fine adjus tments to the
tone characteristics of the amp
envelope.
Release Rate (
127)
— Controls the speed of a
tone’s release (the period from
when you release a key to whe n th e
tone stops sounding). The greater
the value, the quicker the release.
Use this parameter to make fine
adjustments to t he tone character istics of the amp envelope.
Pitch Envelope Set (
(0 to 49)
Atk Rate
Rel.Rate
— Selects the pitch enve-
) (1 to 127)
) (1 to
PitchSet
21Operation
)
Page 22
lopes. 00 specifies no change, a
value from 01 to 19 changes the
vibrato, and a value from 20 to 49
changes a parame ter o ther than the
vibrato. Samples of th e pitch envelopes appear in a graph near your
keyboard’s right speaker.
Pitch (
Controls the overall pitch of the
tone. A positive v alue increa ses the
pitch, a negative value lowers it. A
setting of zero sets the pitch to the
standard setting for the selected
tone.
Level (
trols the overall volu me of the tone.
The greater the value, the greater
the volume. Setting a level of zero
means that the tone does not sound
at all.
Pitch
Level
) (–64 to +63)
) (0 to 127)
— Con-
—
Notes:
• If you want to change another
parameter, repeat Steps 3 and 4.
• If you selected a layered preset
tone, press to recall the DCO2
parameters (
repeat Steps 3 and 4 to set the
parameters. Press
return to the DCO1 parameters.
5. Press
SYNTH
To store the settings, press to
display the tone nu mber where you
want to save the user tone.
To exit the Custom Tone Synthesizer mode without storing a new
tone, press .
Press to cancel.
d Co2
Save?
.
Cancel?
appears), and
TONE
again to
appears.
appears.
Touch Sensitivity (
(–64 to +63)
the volume of the tone depending
on how hard you strike the keys.
You can specify more volume for
stronger striking and less volume for
lighter striking, or you can specify 00
to set the same volume regardless
of how hard you strike the keys.
Pan (
Pan
the relative position of the tone
between the left and right speaker
channels. A greater positive value
moves the center point further to the
right, a negative value moves it to
the left.
4. Use
22
+
ter’s setting. You can also use the
number buttons to directly enter a
value for the parameter.
— Controls changes in
) (–64 to +63)
or – to change the parame-
TchSense
— Controls
)
Operation
6. Press
7. To give a name to your tone, press
8. Repeatedly press
9. Press to move to the next charac-
10. Press to save the user tone.
+
or – until the tone number
you want appears. If you do not
want to assign a nam e, skip to Step
10.
. The first character of the tone
name flashes.
+
or – until the first
character of the new name appears.
ter position. Repeat Steps 8 and 9 to
enter the rest of the characters in
the new name.
Note:
Press to change the tone
number (the name of the tone
returns to its preset name).
Save OK
keyboard exits the Custom Tone
Synthesizer mod e.
appears briefly and the
Page 23

Hints on Creating a User Tone
• Use a preset tone that is similar to
the one you are trying to create.
When you already have a general
idea of the tone you are trying to
create, it is a good idea to start with
a similar preset tone. If you want to
use a layered tone, start out with a
2DCO tone.
sists of eight banks (0-7), and each bank
has four memory locations (A – D), totaling up to 32 settings. You can save each
of the following settings in each registration memory:
•tone
•rhythm
•tempo
• Determine the most important
parameter. The PCM Set and Amp
Envelope Set parameters are the
major factors that determine the
overall tone characteri stic. Start out
by setting these two parameters to
get the general sound you want, and
then set the other parameters to add
the finishing touches.
• Experiment with different settings.
There are no real rules about what a
tone should sound like. Let your
imagination run free a nd e xp er iment
with different combinations. You
might be surprised at what you c an
achieve!
Deleting a User Tone
To delete an existing user tone, follow
Steps 1–5 of “Creating and Storing a
User Tone” on Page 21. When
appears in Step 5, press twice.
lete?
The parameters of the default tone for
that number are restored.
appears. Press to delete.
SAVE ?
De-
• split on/off
• split point
• layer on/off
• mixer settings (Channels 1 – 4)
• keyboard channel on/off (Channels
1 – 10)
• reverb settings
• touch response settings
• assignable jack setting (see “Using
a Sustain Pedal” on Page 26)
• transpose (see “Ch anging Keys” on
Page 24)
• tuning (see “Tuning the Keyboard”
on Page 25)
• pitch bend range (see “Using Pitch
Bend” on Page 26)
• accompaniment volume
Notes:
USING THE
REGISTRATION MEMORY
Your keyboard can save different setups
of controls in its registration memory.
This lets you instantly recall your favorite
settings. The registration memory con-
• You cannot use the registration
memory while you are using the
synthesizer, memory, or demo tune
functions.
• You cannot delete a registration
setup from memory, but you can
store a different setup in its place.
23Operation
Page 24

• You can use the keyboard’s MIDI
function to save your setup da ta to
your PC or other storage device.
Storing a Setup
4. Release
TION
5. Repeat Steps 1–4 to store more setups.
STORE
.
and
REGISTRA-
1. Set the desired c ontrols to the setting you want to store.
2. Within 5 seconds, repeatedly press
BANK
until the desired bank number
appears.
3. While holding down
the desired
A,B, C
(
the selected bank/location number/
letter.
Special Features
REGISTRATION
, or D).
Store
STORE
, press
button
appears after
CHANGING KEYS
The keyboard automatically selects the
key of middle C each time you turn it on.
For added flexibility as you play, the
keyboard lets you change (transpose)
the musical key in which it plays.
Note:
You cannot cha nge the key while
a prerecorded tune is selected or playing.
Recalling a Setup
1. Repeatedly press
desired bank number appears.
2. Within 5 s econds, press t he desi red
REGISTRATION
D
Recall
).
selected bank/location number/letter.
Note:
You can skip Step 1 if the setting
you want to recall is in the same bank as
the current one.
example, the difference between C
and C or B and B is one semitone. You can transpose the key
down 6 semitones (to an F ) and up
5 semitones (to an F) — a full
octave.
2. Within 5 seconds, press
lower or raise the key. Each time
you press
decreases or increases by 1 (semitone).
–
BANK
until the
button (A,B, C, or
appears after the
–
or + to
or +, the number
1. Repeatedly press
TUNE/MIDI
Note:
the number of “semiton es” to which
the keyboard is set, compared to its
default key. A semitone is a measurement that represents the acoustical interval between the tones of
any two keys on the keyboard. For
24
until
00 Trans
The number on the display is
TRANSPOSE/
appear
.
Special Features
As you raise the key,
and so on. As you lower th e key, –
is B, –2 is B , –3 is A, and so on.
Notes
:
• The transpose setting also affects
memory playback (see “Playing
Back from Memory” on Page 29)
and auto accompaniment.
is C , 2 is D,
1
1
Page 25

• The keyboard automatically resets
the key to the default value of 0
(middle C) ea ch t im e yo u pl ay a pr erecorded tune.
TU NING THE KEYBOARD
Although your k eyboard never g oes out
of tune, it lets you adjust its pitch to
match other instruments or musical recordings.
Note:
You cannot tune the keyboard
while a prerecorded tune is disp layed or
playing.
• Auto accompaniment uses the currently set pitch.
• The keyboard automatically resets
the tuning pitch to the default va lue
of 00 (cents) eac h time you turn off
the keyboard.
USING TOUCH RESPONSE
Your keyboard has a touch response
feature th at l ets you adj ust t he v ol ume of
your music’s tone based on how hard
you strike the key(s), so you can add
emotion to your music.
Follow these steps to tune the keyboard.
1. Repeatedly press
TUNE/MIDI
appears.
2. Repeatedly press or until
TUNE
Note:
the number of “cents” to which the
keyboard is currently tuned, compared to its default pitch. A cent is
the measurement that represents
the acoustical interval between two
tones. 1,200 cents equal 1 octave.
You can tune the keybo ard to w ithin
50 cents (101 levels) of its default
pitch.
3. Within 5 seconds, repeatedly press
–
or + to lower or raise the keyboard’s pitch. Each time you press
the key, the number decreases or
increases by 1 (cent).
Notes:
• Memory playback uses the pitch
with which the m emorized tune was
recorded.
until
appears.
The number on the display is
TRANSPOSE/
00 Trans
00
Repeatedly press
until its indicator appears (to turn touch
response on) or disappears (to turn it
off).
Notes:
• The touch response setting does not
affect auto accompaniment or
received MIDI data.
• The MIDI data sent out from the
keyboard is affected by the touch
response setting.
TOUCH RESPONSE
CHANGING AUTO POWER
OFF
When you operate the keyboard with
battery power, the keyboard automatically shuts off after about 6 minutes if
you do not press a key. Press
again to turn power back on.
To have the keyboard not au tomatically
turn off during a session, turn the keyboard on while holding down
The next time you turn the keyboard off
then back on again, it automatically
turns off after about 6 minutes.
POWER
TONE
.
25Special Features
Page 26

USING PITCH BEND
Your keyboard has a p itch bend feature
that lets you bend a note by altering its
pitch. Pitch bend lets you create realistic
effects for sounds such as a saxophone,
other reed instruments, and guitar
tones.
To use pitch bend, rotate and hold
PITCH BEND
The pitch of the key you p ressed slides
smoothly up and down. R elease
BEND
to stop the effect.
while holding down a key.
PITCH
pedal (not supplied), available through
your local RadioShack store. A sustain
pedal lets you sustain or soften the keyboard’s sound, and even start or stop an
auto-rhythm.
To connect a sustain ped al to your keyboard, insert the pedal’s plug into
SIGNABLE JACK
on the back of the
AS-
keyboard.
You can adjust the keyboard to these
settings when you use a sustain pedal.
Adjusting the Pitch Bend
Range
You can adjust the bend ran ge of pitch
controls from 1 to 12 semitones.
Note:
The keyboard automatically selects a bend range of 2 semitones the
first time you turn it on after connecti ng
power. Each time you turn it on after
that, it recalls the last selected bend
range.
Follow these steps to adjust the pitch
bend range.
1. Repeatedly press
TUNE/MIDI
until a number and
appear.
2. Within 5 seconds, repeatedly press
+
or – until the pitch ben d range y ou
want appears, or enter a number
01–12
from
.
TRANSPOSE/
Bend
Setting Description
SUS
(Sustain) Causes one or more
notes to linger after
they are played
SoS
(Sostenuto) Similar to SUS, but
only sustains one
note just played
SFt
(Soft) Softens the sou nd
rHy
(Rhythm) Starts or stops the
selected auto-rhythm
Follow these steps to change the
SIGNABLE JACK
1. Repeatedly press
TUNE/MIDI
jack’s setting.
until
Bend
TRANSPOSE/
appears.
Then repeatedly press until the
current setting for
JACK
and
Jack
ASSIGNABLE
appear.
2. Within 5 secon ds, repeatedly press
+
or – until the desired setting (
SoS,SFt
, or
rHy
) appears.
SUS
AS-
,
USING A SUSTAIN PEDAL
For added flexibility and control as you
make music, you can connect a sustain
26
Special Features
Press the sustain p edal as you play to
hear the desired sound or to start/stop
the selected auto-rhythm.
Page 27

Using the Memory
The keyboard lets you rec ord up to two
separate songs in memory for later playback. You can use either of two methods to record a song —
recording
step recording
chords one-by-one).
You can record on each of the key-
board’s six tracks separately. Besides
notes, each trac k can ha ve it s own to ne
number. Then, when you play ba ck the
tracks together, it s ounds like an entire
six-piece band. Also, you can use different mixer settings for each track.
Track 1 is the main trac k, and you can
use it to record auto accompaniment
and drum pad sounds, as well as keyboard play. Tracks 2 through 6 are m elody tracks, and you can use these for
recording a secondary melody that includes keyboard play and the drum pad.
Because each track is independent of
the others, you only need to re-r ecord a
single track if you make a mistake while
recording on it.
(you record as you play) or
(you enter notes and
real-time
you play a note or a chord on the
accompaniment keys.
• To reco rd using an intro, ending, or
fill-in, use
ING
,
TION/FILL-IN
• To synchro start auto accompani-
ment with an intro pattern, press
SYNCHRO/ENDING
instead of
“Real-Time Recording.” Recording
starts with the intro pattern when
you play a note or a chord on the
accompaniment keys.
• To start aut o accompani ment durin g
a recording, press
ING
instead of
5. Play the melody keys to start
recording. When you reach the point
where you want accompaniment to
start, play a cho rd on the accompaniment keys.
Follow these steps to record as you
play.
INTRO,SYNCHRO/END-
NORMAL/FILL-IN
as you normally would.
START/STOP
ST ART/STOP
, or
and then
SYNCHRO/END-
VARIA-
INTRO
in Step 5 of
in Step
REAL-TIME RECORDING
With real-time recording, the notes are
recorded as you pl ay them on the keyboard. Before you start, read these tips.
• To record without an auto-rhythm,
skip Step 5 of “Real-Time Recording.” Recording starts when you
press a key.
• To start recording with synchro start,
SYNCHRO/ENDING
press
START/STOP
Recording.” Recording starts when
in Step 5 of “Real- T im e
instead of
1. Repeatedly press
Rec. No.
Note:
switch. When you pre ss it once, the
keyboard enters the memory playback mode. When you press it
again, it enters the memory record
mode. When you pres s the button a
third time, it turns off the memory
function.
2. Within 5 se conds, pr ess
or 1) to select a song number.
appears.
MEMORY
MEMORY
is a three-way
+
or – (or
until
0
27Using the Memory
Page 28

3. Press
CHORD/1
to select Track 1.
While the keyboard is in memory
record mode, the level meters for
channels 11 through 16 correspond
to memory tracks 1 through 6. When
all four bars are lit, that chann el has
something in memory: if only one
bar is lit, that track is empty.
4. If desired, you can change these
settings:
This data is stored on Track 1 along with
the notes you played:
• tone number
• rhythm number
• rhythm controller (
FILL-IN
, etc.) operations
INTRO,NORMAL/
• pitch bender operations
• pedal operations
• tone number
• rhythm number
• tempo
MODE
•
Note:
Do not change the tempo
unless you already know the desired
tempo. Pressing
START/STOP
to
hear the tempo caus es recording to
begin.
5. Press
START/STOP
to start record-
ing.
6. Play the keyboard.
You can also record auto ac compa-
niment chords, the drum p ad, pitch
bender, and pedal operations.
7. Press
START/STOP
to end record-
ing.
If you make a mistake, press
STOP
to stop recording a nd begin again
START/
from Step 1, or you can edit the contents. See “Editing Memory Contents”
on Page 33 .
Press after you select Track 1 in Step
3 to use the drum pads. Th at way, you
can also start recording by playing a
drum pad.
28
Using the Memory
• drum pad operations
See “Recording Multiple Tracks” on
Page 31 to record on the other five
tracks.
Notes:
• When you record on a track that
contains data, the new recording
replaces the previous recording.
• The touch response setting (on/off)
is not recorded. However, the
strength of the strike is recorded.
• Channel 1 mixer parameters are
automatically recorded to Track 1.
• The memory can store a total of
about 4,900 notes. If t he remaining
memory is less than 100 note s, the
measure and beat numbers flash.
When memory bec ome s f ull , re cord ing automatically stops (and autoaccompaniment or rhythm stops
playing, if used).
• Memory contents are sav ed as long
as power is supplied to the keyboard. Unplugging th e adapter without batteries or with wea k batteries
erases the memory. To preven t data
loss, connect an adapter before
replacing the batteries.
Page 29

• Turning off the keyboard while
recording erases the co nte nts of the
track you were recording.
• You can transfer memory contents
to another MIDI device.
PLAYING BACK FROM
MEMORY
1. Repeatedly press
Play No.
appears.
2. Within 5 seconds, use
1
) to select a song number.
3. Within 5 seconds, press
STOP
to play back the song you
selected. You can use
adjust the playback tempo.
4. Press
START/STOP
playback.
Notes:
• You can use layer and/or split during
memory playback.
• You can change the rhythm during
playback.
• Pressing
START/STOP
song restarts the song from the
beginning.
• You can set the volume and pan
position of the playback tracks using
the mixer. This setting data is output
through
MIDI OUT
MEMORY
+
or – (or 0 or
TEMPO
again to stop
during the
.
until
START/
to
STEP RECORDING
With step recording, you can record a
chord progressio n one chord at a time.
Before you start, re ad these tips. (If you
want to record one note at a time, refer
to “Recording Multiple Tracks” on
Page 31.)
• To start accompaniment with an
intro pattern, press
CHRO/ENDING
INTRO
in Step 6 of “Step
Recording.”
• To switch to a rhythm variation,
press
VARIATION/FILL-IN
ately before entering the chord in
Step 6 of “Step Recording.”
• To insert an ending or fill in, press
SYNCHRO/ENDING
VARIATION/FILL-IN
IN
(
NORMAL/FILL-
or
for variation
rhythm) immediately before entering
the chord in Step 6 of “Step Recor ding.”
• To step-record chords without a
rhythm, skip Step 5 of “Step Recording.” The chord of the specified
length is recorded. A rest can be
specified there, so you can create
an original chord pattern.
• To add chord accompaniment during rhythm play, enter rests from the
beginning of the recording up to
where you want accompaniment to
start. Then enter only the chords (no
rests).
SYN-
after
immedi-
• The entire keyboard fun ctions as a
melody keyboard during playback,
regardless of the
MODE
setting.
Follow these steps to record chords with
step recording.
1. Repeatedly press
REC.No.
appears.
MEMORY
until
2. Within 5 secon ds, repeatedly press
+
or – to select a song number.
29Using the Memory
Page 30

3. Press
CHORD/1
to select Track 1.
4. If desired, you can change these
settings:
• rhythm number
• tempo
MODE
•
5. Press
6. Press
STEP
to start recording.
SYNCHRO/ENDING
, then play
a chord.
• Use the chord play method deter-
mined by the current
MODE
setting (Fingered, Concert Chord,
Full Range Chord, or Normal).
• When
MODE
is set to
NORMAL
specify the chord using the root
keys and chord-type keys. See
“Specifying Chords in the Normal
Mode”.
7. Use the number buttons to specify
the length of the chord. See “S pecifying the Length of a Note”.
8. For each additiona l chord you want
to enter, play the chord and use the
number buttons to specify its length.
9. When you finish recording, press
MEMORY,STEP
To play back the song, press
STOP
.
START/ STOP
, or
.
START/
Notes:
• To correct entry mistakes, see “Editing Memory Contents” on Page 33.
1
beat, or clock (
/48 of a beat) — and
adds your new entry to it.
• You can enter a 0 (a rest) in S tep 6,
but the rest is ignored when the
accompanim ent plays.
• The rhythm number and
SYNCHRO/ENDING,NORMAL/FILLIN
, and
VARIATION/FILL-IN
tions are stored on Track 1, along
with the notes you played.
See “Recording M ultiple Tracks” on
Page 31 to record on the other five
tracks.
Specifying Chords in the
Normal Mode
,
To enter chords when
NORMAL
during step recording, you
MODE
must specify them usi ng a meth od ot her
than Concert Chord or Fingered. That
way, you can enter 18 chord types using
only two keys.
While holding down the desired chord
root key, press the chord key to specify
the chord.
The root and chord types are labeled
above each key. The chord root letter
and type of chord also appear as you
play a chord.
Specifying the Length of a Note
During step recording, use the number
buttons (or
of each note.
+
or –) to specify the length
INTRO
opera-
is set to
,
• When you record on a track that
already contains data, the ke yboard
automatically locates the end of the
previous recording — measure,
30
Using the Memory
Use numbers
whole notes (
notes (
(
3
), eighth notes (4), 16th notes
5
), and 32nd notes (6).
1
through 6 to specify
1
), half notes (2), quarter
Page 31
Hold down 7 (dot) or 9 (triplicate), then
1
press
the notes.
To enter a tie, press
then the second notes.
To enter a rest, press
bers
the rest.
through 6 to enter the lengths of
8
and enter the first
0
then use num-
1
through 9 to specify the length of
RECORDING MULTIPLE
TRACKS
In addition to Track 1, whe re you rec ord
auto accompaniment as well as keyboard play, there are five other melody
tracks that you can use to record melody
parts only. You can record different
tones on these tracks and build a full ensemble of instruments.
Correcting Mistakes
Before finishing your s tep recording entry, you can move the entry point back to
correct the data you entered. Howev er,
this operation deletes all data after the
point where you make corrections.
1. Before you press
START/STOP
. This moves the entr y point back
one “space.”
The data recorded at the current
entry point appears.
2. While monitoring the data on the
display, repeatedly press or to
move the entry point to the data you
want to change.
3. Press
+
and – at the same time.
Rewrite?
4. Press to clear all data after the
current entry point.
5. Press , ,
rewrite operation. After that, you can
press or to move the entry point
to another location if you want.
Note:
press at the end of the recording.
TrackEnd
MEMORY,STEP
to end recording, press
appears.
+
, or – to cancel the
appears if you
, or
You can play back what you al ready recorded on Track 1 (or any other track)
while you record on Tracks 2–6.
Real-Time Recording
1. Repeatedly press
Rec. No.
2. Within 5 secon ds, repeatedly press
+
or – to select a song number.
3. Press the desired
6
) to select the track you want to
record on.
Note:
nels 11–16 to see which memory
tracks contain data and which are
empty.
4. If desired, you can change these
settings:
• tone number
• tempo (to a tempo that is eas y for
you to follow)
5. Press
ing. The contents of any tracks
already recorded sta rt to play.
6. Play on the keyboard wh at you want
to record on the selected track.
appears.
Check the display for Chan-
START/STOP
MEMORY
CHORD
to start record-
until
button (2–
31Using the Memory
Page 32

7. Press
ing.
START/STOP
to end record-
7. Use
note or rest.
1–9
to enter the length of the
This data is stored on the selected
track in addition to the notes you
played:
• tone number
• optional pedal operation s
• pitch bender operations
• drum pad operations
Step Recording
1. Repeatedly press
Rec. No.
appears.
2. Within 5 seconds, repeatedly press
+
or – to select a song number.
3. Press the desired
6
) to select the track you want to
record on.
4. Change the tone, if desired.
5. Press
STEP
to start recording.
6. Use the keyboard or
notes, or
0
to enter rests.
• When you enter the note using
the keyboard with touch response
turned on, the key pressure is
also recorded.
• You can also enter the chords
using the keyboard.
• When you use
note, a staff on the display sho ws
the note you enter.
• To delete a rest entry, press
again.
MEMORY
CHORD
+
or – to enter
+
or – to enter a
until
button (2–
8. Repeat entering chords by playing
them and specifying their length.
9. Press
STOP
MEMORY,STEP
to end recording.
, or
Notes:
• If you make a mistake, see “Correcting Mistakes” on Page 31.
• When you record on a track that
already contains data, the key board
automatically locat es the end of the
previous recording — measure,
1
beat, or clock (
/48 of a beat) — and
appends your new entry from there.
• To record a drum pad part, play a
drum pad in Step 5.
• During recording on Tracks 2
through 6, the entire keybo ard functions as a melody key board, regardless of the current
MODE
• This data is stored on the selected
track in addition to the notes you
played:
• tone number
• drum pad operations
• You can turn off a specific track during playback by using the mixer
function (see “Using the Mixer” on
Page 18).
Changing the Navigation Track
After you record, the display shows the
contents of the last recorded or edited
track. To display a different track, re-
0
peatedly press
until
Bend
TRANSPOSE/TUNE/MIDI
appears, then repeatedly
START/
setting.
32
Using the Memory
Page 33

press until
Then repeatedly press
track you want appears.
Navi. Tr.
+
or – until the
appears.
EDITING MEMORY
CONTENTS
You can recall and change individual
notes and parameter settings (such as
tone number) in memory contents.
• When you change note, key pressure, chord, or drum pad data, the
keyboard sounds the new setting
so you can hear what it sounds
like.
6. Repeat Steps 5 and 6 to ed it other
parameters.
7. Press
STOP
MEMORY,STEP
when you are finished.
, or
START/
1. Repeatedly press
Play No.
2. Within 5 seconds, use
select a song number.
3. Press
4. Use the
the track you want to edit.
5. Repeatedly press or to move to
the entry point you want to change.
You can change the parameter that
is flashing on the di s pla y. To chan ge
a different parameter, press so
the parameter you want to edit
starts flashing.
Make the desired changes to the
selected parameter.
The actual procedures you use to
change a parameter depend on the
type of data it contains. See “ Ed iting
Techniques and Display Contents”.
Notes:
STEP
CHORD
appears.
.
MEMORY
buttons to select
until
+
or – to
Notes:
• When you interrupt playback of a
song and immediatel y start an editing operation, the entry point (or
point of inter ruption) a ppears on the
editing screen.
• The only parameters that can be
edited for Tracks 2–6 are notes,
chords, tone, rhyth m, key pressure,
and drum pad.
• You cannot add data to a recording.
• You cannot move portions of a
recording to a different location
within the recording.
• You cannot change note lengths.
Editing Techniques and
Display Contents
Note:
You can edit Chord, Tone Number/Rhythm Number , and Rhythm Controller controls only when you first record
these items.
• Do not change a note identic al to
the preceding or succeeding note.
Doing so might alter the length of
the note and you will have to rerecord the entire track.
Key Pressure (Velocity)
keyboard, number buttons, or
adjust the key pr essure. To change the
key pressure using the keyboard, be
sure to turn on touch response.
— Use the
+
and – to
33Using the Memory
Page 34

Pitch
— Enter a new note on the keyboard or use
higher or lower note. The keyboard and
the staff on the display sh ow your new
entry.
+
or – to change to the next
2. Within 5 secon ds, repeatedly press
+
or – to select a song number.
3. Hold down
Tr.Del.?
MEMORY
appears.
until
Chord
— Use the appropriate chord fin-
gering method as determined by the
MODE
setting.
Tone Number/Rhythm Number
the number buttons or
Rhythm Controller (
FILL-IN,VARIATION/FILL-IN,SYNCHRO/
ENDING
the function you want to change to.
CHORD
)
,
+
or –.
INTRO,NORMAL/
— Press the button for
— Use
Deleting Individual Data
1. Follow Steps 1–5 under “Editing
Memory Contents” on Page 33.
2. Press
DataDel?
3. Press to delete the selected
data.
Or press or (or
the procedure without deleting anything.
+
and – at the same time.
appears.
+
or –) to cancel
Deleting All Data in a Specific
Track
4. Within 5 se conds, p ress the
number (2–6) for the track(s) you
want to delete.
• You can specify more than one
track by pressi ng more than one
button.
• To de select a track, simply press
its button again.
The track contents indicator(s) for
the selected track flash(es).
5. To delete the data in the selected
track(s), press . The keyboard
goes into playback standby mode.
To e xit the track deletion proc edure
without changing any data, press
MEMORY
Notes:
• You cannot change the song number after
• You cannot select a tr ack that does
not contain any recorded data.
.
Tr.Del.?
appears.
CHORD
1. Repeatedly press
Rec. No.
Using MIDI
Your keyboard in cludes a feat ure called
MIDI (Musical Instrument Digital Interface). MIDI is the u niversal standard for
sending and receiving performance data
between all types of electronic musical
34
appears.
MEMORY
until
Using MIDI
instruments, regard less of the manufacturer. Using MIDI, you can play music on
your keyboard and another instrument
at the same time while pressing the keys
on only one, reco rd your music to a s e-
Page 35

quencer, acquire a wider selection of
preset tones from a sound module, and
much more.
ABOUT MIDI
Every MIDI-equipped instrument has
MIDI OUT and IN terminals, and some
also have a MIDI THRU terminal. Each
of these terminals serves a different purpose.
MIDI OUT sends MIDI data to (“talks
to”) the other MIDI instrument(s).
MIDI IN receives (“listens to”) MIDI data
sent by the other MIDI instrument(s).
MIDI THRU lets you connect (“network”)
additional MIDI instruments, and sends
along to other MIDI devices a copy of al l
data it receives through its MIDI IN terminal.
Your keyboard has
terminals.
The cable that connects MIDI devices
does not actually carry sound between
them, like a speaker wire carries sound
from a receiver to a speaker. Instead,
MIDI-equipped devices communicate
with each other using dig ital codes (instructions). One MIDI dev ice se nds di gital instructions representing exactly
what is being played on it. The other
MIDI device receives and translates
those instructions, then produces (or
records) the sound exactly as it was
played on the first device.
Note:
Connecting your keyboar d to another MIDI device requires a MIDI cable
(not supplied). See “Making the MIDI
Connections”.
MIDI OUT
and
MIDI IN
MAKING THE MIDI
CONNECTIONS
To connect your keyboard to another
MIDI-equipped device, you must use a
MIDI cable (available at your local RadioShack store).
Cautions:
• Always turn off power to your keyboard and the other MIDI device
before you connect or disconnect
MIDI cables.
• As you make the cable connection s,
be sure to align the M IDI cable pins
with the matching holes on your keyboard’s
nals. If you have trouble plugging in
the cable, do not force it! You might
damage the plug or the instrument.
To send MIDI data from your keyboard,
use a MIDI cable to connect the keyboard’s
device’s MIDI IN terminal.
To receive MIDI da ta on your keyboa rd,
use a MIDI cable to connect the keyboard’s
vice’s MIDI OUT terminal.
Note:
connections if you are only either sending or receiving.
MIDI OUT
MIDI OUT
MIDI IN
You do not need to make both
terminal to the other
terminal to the o ther de-
and
MIDI IN
termi-
MIDI DATA
Your keyboard can send and receive
several different types of M IDI da ta. Th e
keyboard’s tones, rhythms, and other
types of MIDI data are sent a utomati cally as you play.
35Using MIDI
Page 36
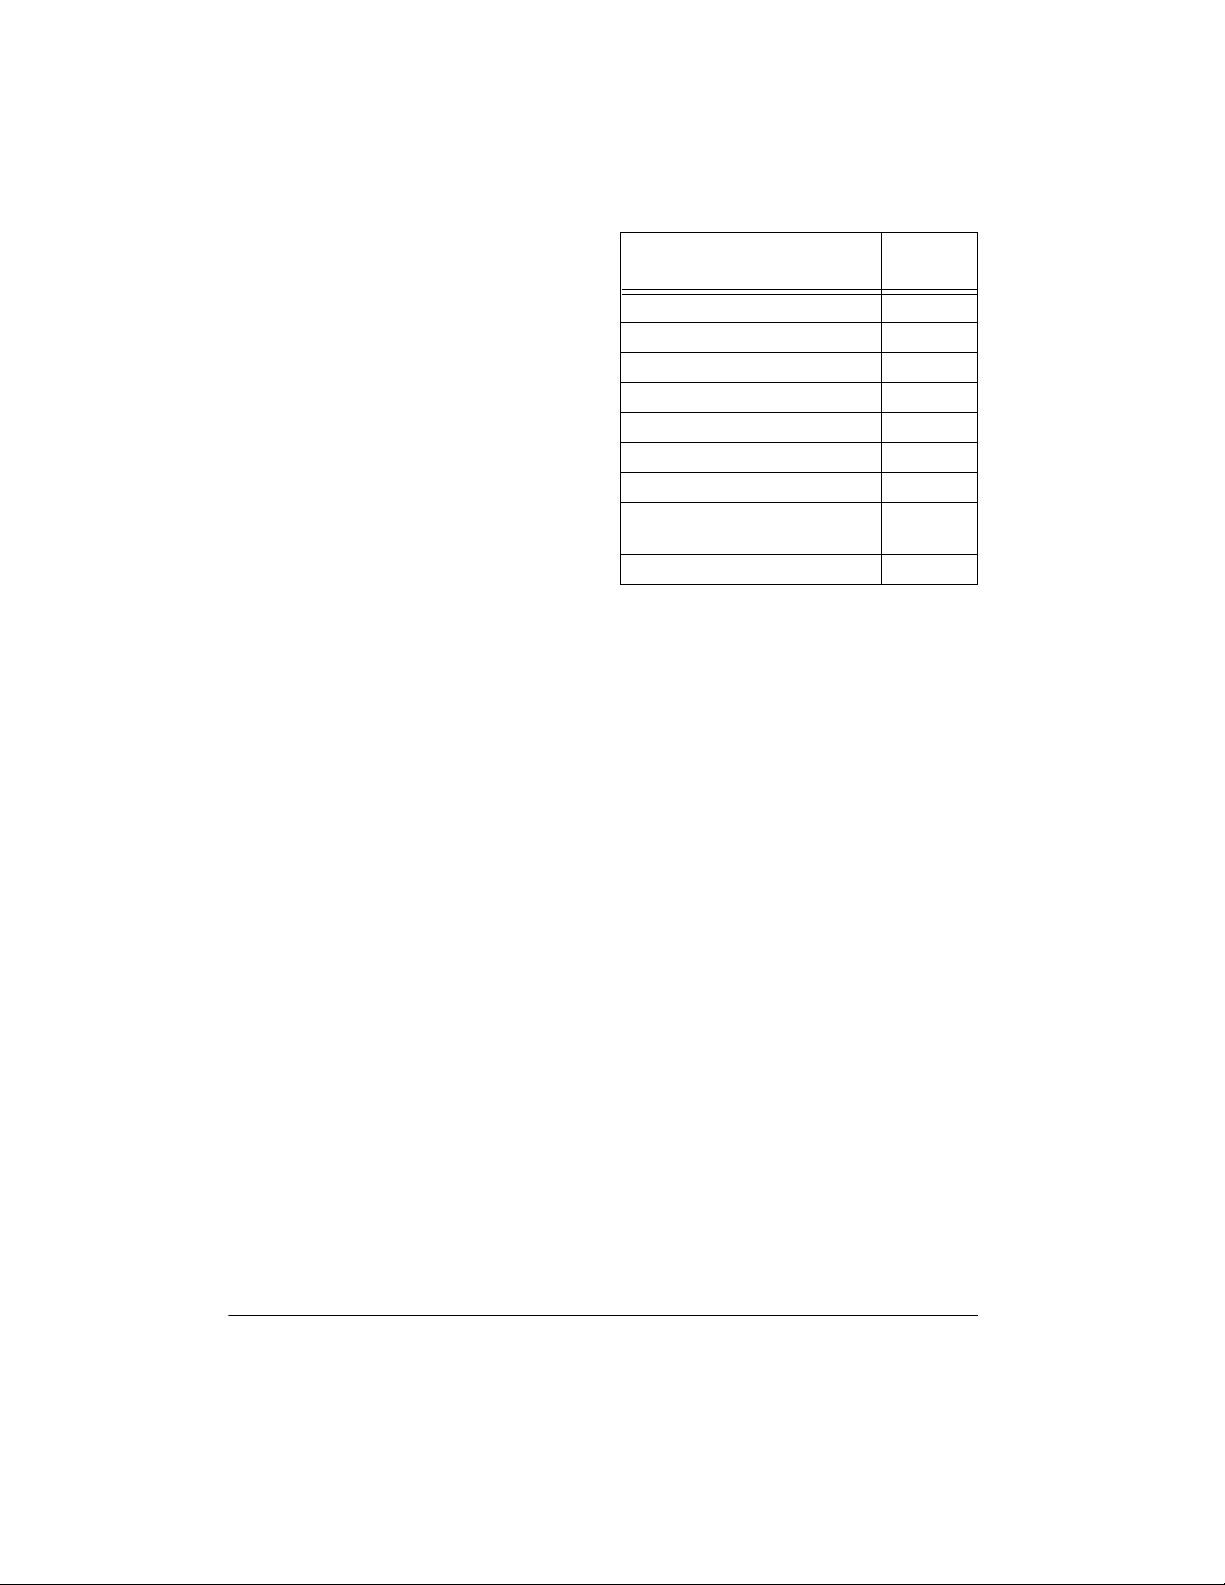
Notes:
• The keyboard’s prerecorded tunes
cannot be sent as MIDI data.
• For detailed specifications of the
MIDI function, see th e “MIDI Implementation Chart” on Page 46.
Note On/Off
— specifies which keys a re
pressed (Note On) or released (Note
Off). Also includes how loud a note is
played as a value from 0 to 127.
Notes:
• The pitch of a note de pends on the
tone that is being used, as shown in
the “MIDI Implementation Ch art” on
Page 46.
• If the keyboard receives a “request”
to play notes outside of its range
(higher or lower), it automatically
selects the same note in the nearest
octave.
Effect
Bank Select 0, 32
Volume 7
Pan 10
Expression 11
Hold1 (Sustain) 64
Sostenuto 66
Soft Pedal 67
RPN (Registered Parameter
Number)
Data Entry 6/38
Control
Number
100/101
Use the Bank Select setting to select the
keyboard’s tone groups to be changed
by the Program Number message.
• Bank 0 — 0 to 127 (General MIDI
tones)
• Bank 1 — 128 to 159 (synthes ized
tones)
Program Change
Pitch Bend
— specifies the tone.
— supplies pitch bend information. The keyboard’s pitch changes
as it receives a Pitch Bend message
through the
MIDI IN
terminal, and the
keyboard sends pitch bend information
through the
PITCH BEND
tate
Control Change
MIDI OUT
terminal as you ro-
.
— adds effects such
as vibrato and v olume changes applied
during keyboard play . The message includes a control number (the effect type)
and a control value (the on/off and depth
of the effect).
Here is the data that can be received
with this keyboard and the corresponding control number.
36
Using MIDI
• Bank 2 — 160 to 167 (drum sets)
• Bank 3 — 168 to 199 (user tones)
Just before sending a Pro gram Change
message, send two Control Change
messages with this data to the keyboard:
• Control Number = 0, Control Value =
<bank number>
• Control Number = 32, Control Value
= 0
For example, to selec t tone numbe r 19 0
(user tone number 22), enter:
• Control Number = 0, Control Value =
3 (bank number for user tone)
• Control Number = 32, Control Value
= 0
Page 37
• Program Change = 22 (22 nd t one in
bank 3)
Note:
Channel 10 is rese rved for drum
sounds only, so it is not necessary to
send bank select data when changing
tones.
RPN is used when combining multiple
control changes. RPN (100 and 101) selects the parameter to control, and D ata
Entry (6 and 38) sets th e co nten ts of the
parameter. On the keyboard, RPN is
used to set pitch bend range, transpose,
and tune control from an ex ternal MIDI
device.
All Sound Off
current channel to turn off, reg ardle ss of
how the sound is being produced.
All Notes Off
from an external device on the channel.
The notes being sustaine d by the pedal
continue to sound until the next pedal off
signal is received.
Reset All Controllers
bend and all other control changes.
System Exclusive
adjustments unique t o a particular system. The system exclusives are unique
to a particular system; however, there
are “universal” system exclusives that
are common among devices produced
by individual manufacturers.
These are the system exclusive messages supported by this keyboard.
forces all sound on the
turns off all note data sent
initializes pitch
controls fine tone
Notes:
• GM is a standar d lis t of speci fications that allows music crea te d on
one MIDI device to sound the
same when played on another
MIDI device. This keyboar d’s GM
mode incorporat es most of these
specifications.
• This message takes more time to
process than other messages;
when you program GM Mod e On
in the sequencer, leave at least a
100 msec pause before the next
message.
GM Mode Off ([F0][7E][7F][09]
•
[02][F7])
board’s GM mode.
Reverb Change ([F0][44][0E][09]
•
[yy][F7])
reverb function. yy determines the
type of reverberation effect.
Note:
The contents of the System Exclusive message affect the entire keyboard. Other messages affect only the
current MIDI channel.
— used to turn off the key-
— switches the keyboard’s
yy Value Reverb
00 Room
01 Stage
02 Hall
0F Off
GM Mode On ([F0][7E][7F][09]
•
[01][F7])
board’s GM (General MIDI) mode
from an external MIDI device.
— used to turn on the key-
CHANGING MIDI
SETTINGS
The keyboard lets you change a number
of MIDI parameters, including turning
37Using MIDI
Page 38

General MIDI mode on/off and selec ting
a MIDI channel.
Follow these steps to change MIDI parameters.
1. Repeatedly press
TUNE/MIDI
appears.
2. Within 5 seconds, repeatedly press
or to select the parameter you
want to change.
until
TRANSPOSE/
oFFGMMode
and as MIDI data. Set to
send data only as MIDI data (the
speakers on the keyboard remain
silent).
AcompOut
(Default: Off): set to on to s end aut o
accompaniment as MIDI data. Set to
oFF
to turn it off.
3. Within 5 seconds, use
change the setting of the parameter.
(Accompaniment Out)
+
or – to
oFF
to
GM Mode
on
board receive GM data from another
MIDI device. Turning GM mode on
automatically turns
since GM mode an d MIDI In Chord
Judge cannot be used at the same
time.
Set to
The tone, volume an d other parameter settings of each channel are initialized. When playing received
MIDI data, bass tones are lowered
one octave and the piccolo tone is
raised one octave.
Keybd Ch
nel) (Default: 01): sets the channel
for sending MIDI data t o an ex tern al
device.
Chord
(Default: Off): when set to on, the
keyboard determ ines basic channel
note data as auto accompaniment
chords per the c urrent chord finger ing method. Turning GM mode on
automatically turns
since GM mode an d MIDI In Chord
Judge cannot be used at the same
time.
Local
On): set to on to se nd data simu ltaneously to the keyb oard’s speakers
on/off (Default: Off): set to
when you want to have the key-
CHORD
oFF
to turn GM mode off.
(Keyboard Basic Chan-
(MIDI In Chord Judge)
Chord
(Local Control) (Default:
off,
off,
DUMPING/IMPORTING
DATA
The keyboard’s internal data, including
data recorded to memory and synthesizer data, can be sent and received in bulk
as MIDI exclusive data thr ou gh th e MI DI
terminals. Thus, you can use a computer or other MIDI device as an external
storage device.
First make connections from the
MIDI OUT
and
device using MIDI cables.
Note:
Some software does not supp ort
MIDI exclusive data.
terminals to an external
Dumping Data
1. Put the other device in its receive
standby mode.
See the owner’s manual that co mes
with the receiving device for details.
2. Repeatedly press
TUNE/MIDI
pears.
3. Within 5 seconds , press to start
data send.
until
Sending
BulkSnd?
appears. The
MIDI IN
TRANSPOSE/
ap-
38
Using MIDI
Page 39

keyboard automatically exits the
data transfer mode after al l the data
is sent.
Importing Data
1. Repeatedly press
TUNE/MIDI
pears.
2. Within 5 seconds, repeatedly press
or until
until
BulkRcv?
TRANSPOSE/
BulkSnd?
appears.
ap-
Note Number
sents each key of the keyboard. The
lowest number (0) is fiv e octaves below
middle C. Since the keyboard’s lowest
note is two octaves below middle C and
the highest is thr ee octaves abo ve middle C, your keyboard can send a note
number between 36 and 96. But, it can
receive all 0 thr ough 127 n ote number s,
so those keys outside the keyboard’s
key range are interpreted as notes inside the key range.
— This number repre-
3. Within 5 seconds, press to pre-
pare the keyboard to receive data.
4. Start the send operation on the
sending device. See the owner’s
manual that comes with the connected device for details. The keyboard automatically exits the data
transfer mode after all the data is
received.
NOTES ABOUT THE MIDI
IMPLEMENTATION
CHART
The “MIDI Implementation Chart” on
Page 46 illustrates the details of the keyboard’s MIDI function . An O in the chart
means that the keyboard has this feature; X means it does not have this feature. This section explains what the
keyboard can do.
Basic Channel
channels to exchange da ta. As in a TV
broadcast, different channels send different data.
Mode
— The chart shows that Mode 3 is
OMNI OFF, POLY. This means the keyboard sends and receives polyphonic
data on only one channel at a time.
— MIDI uses up to 16
Velocity
fast the key was pressed, or how loud
the note should sound. 1 is the lowest
velocity, pianissim o; 127 is the loudest,
fortissimo. 0 means the key is released.
9n
sage is 9 hexadecimal, and n is the
channel number.
For example, if you select Channel 16
and press Key D in m ezzo-piano, 9E (E
is 15 in hexadecimal ; note that Channel
1 is 0 in MIDI data) is first sent from MIDI
OUT, then 3D (decimal 61) is sent as
the key number, final ly 21 (decimal 33)
is sent as velocity.
Pitch Bender
and receives pitch bending signals.
Control Change
data on various co ntrollers , each hav ing
its own number. Fo r the details of each
parameter, see “MIDI Data” on Page 35.
Program Change
changes the preset sounds. Each sound
number corresponds to a prog ram number between 0 and 127.
System Exclusive
sends special sign als unique to th e ke y-
— This number shows how
— This means that the Note On mes-
— The keyboard sends
— This feature sends
— This feature
— This feature
39Using MIDI
Page 40
board. For details, see “MIDI Data” on
Page 35.
music to begin at wh atever point it was
last stopped.
System Real Time
— “Clock” is like a
metronome to send the synchronizing
signal.
All Notes Off
— This feature is a kind of
panic button: it stops the sounds currently playing. The keyboard only receives this message.
System real time co mmands send thr ee
kinds of signals —
start
tells the key-
board to start playing from the begin-
stop
ning,
instruments to stop play ing, and
ue
is similar to start, but it signals the
tells all the synchronized
contin-
Troubleshooting
Active Sensing
— This means the keyboard’s sound turns off in the event the
connection cable to
MIDI IN
terminal is
accidentally disc onn ec ted.
If your keyboard is not perfo rming as it should, thes e suggestions migh t help. If you
still cannot so lve the problem , take the key board to yo ur local RadioS hack store for
assistance.
Trouble Possible Cause Remedy
No sound, even if keys
are pressed.
The keyboard has turned
off automatically.
Volum e is turn ed dow n. R ep eate dl y pres s
Set
UME
MODE
▲
OFF
to
to increase the volume.
then ON.
MAIN VOL-
No sound when connected to an external
amplifier.
40
Headphones connected. Disconnect headphones.
Power supply problem. Check the power supply.
Are battery symbols
(+/–) facing correctly?
Are the batteries fresh?
Is the AC or DC adapter connected properly?
You are pressing too few
accompaniment keys
MODE
while
GERED
Volume is turned down. Repeatedly press
Defective connection cord. Replace the connection cord.
is set to
.
Troubleshooting
FIN-
MODE
Set
CONCERT CHORD
Press 3 or 4 keys to form a
chord while
GERED
to increase the volume.
.
NORMAL
to
MODE
or
.
is set to
VOLUME
FIN-
▲
Page 41

Trouble Possible Cause Remedy
No sound when receiving
and playing MIDI data.
The key or tuning does
not match when playing
along with another MIDI
instrument.
Bass notes in General
MIDI data are sent out
one octave lower.
Sounds sent to another
MIDI device by the keyboard do not sound correct.
MIDI cables are not connected properly.
The tuning or transpose
parameter is set to a va lue
other than
T one map parameter is set
.
to
N
The other device’s MIDI
THRU function is turned
on.
or 00.
0
Check the connection.
Set the tuning or transpose to
.
or
00
Set the tone map parameter to
(see “Changing MIDI Setti ngs”
G
on Page 37).
Turn off th e MIDI THRU func tion
on the other device.
CARE
To enjoy your MIDI Keyboard for a long time:
• Keep the keyboard dry. If it gets wet, wipe it dry immediately.
• Use and store the keyboard only in normal temperature environments.
• Handle the keyboard gently and carefully. Do not drop it.
• Keep the keyboard away from dust and dirt.
0
• Wipe the keyboard with a damp cloth occasionally to keep it looking new.
Modifying or tamper ing with the keyboard’s internal comp onents
can cause a malfunction and might invalidate its warranty and void your FCC authorization to operate
it
. If your keyb oard is not performing as it should, take it to your loca l RadioShack
store for assistance.
41Troubleshooting
Page 42

Appendix
NOTE TABLE
42
Appendix
Page 43
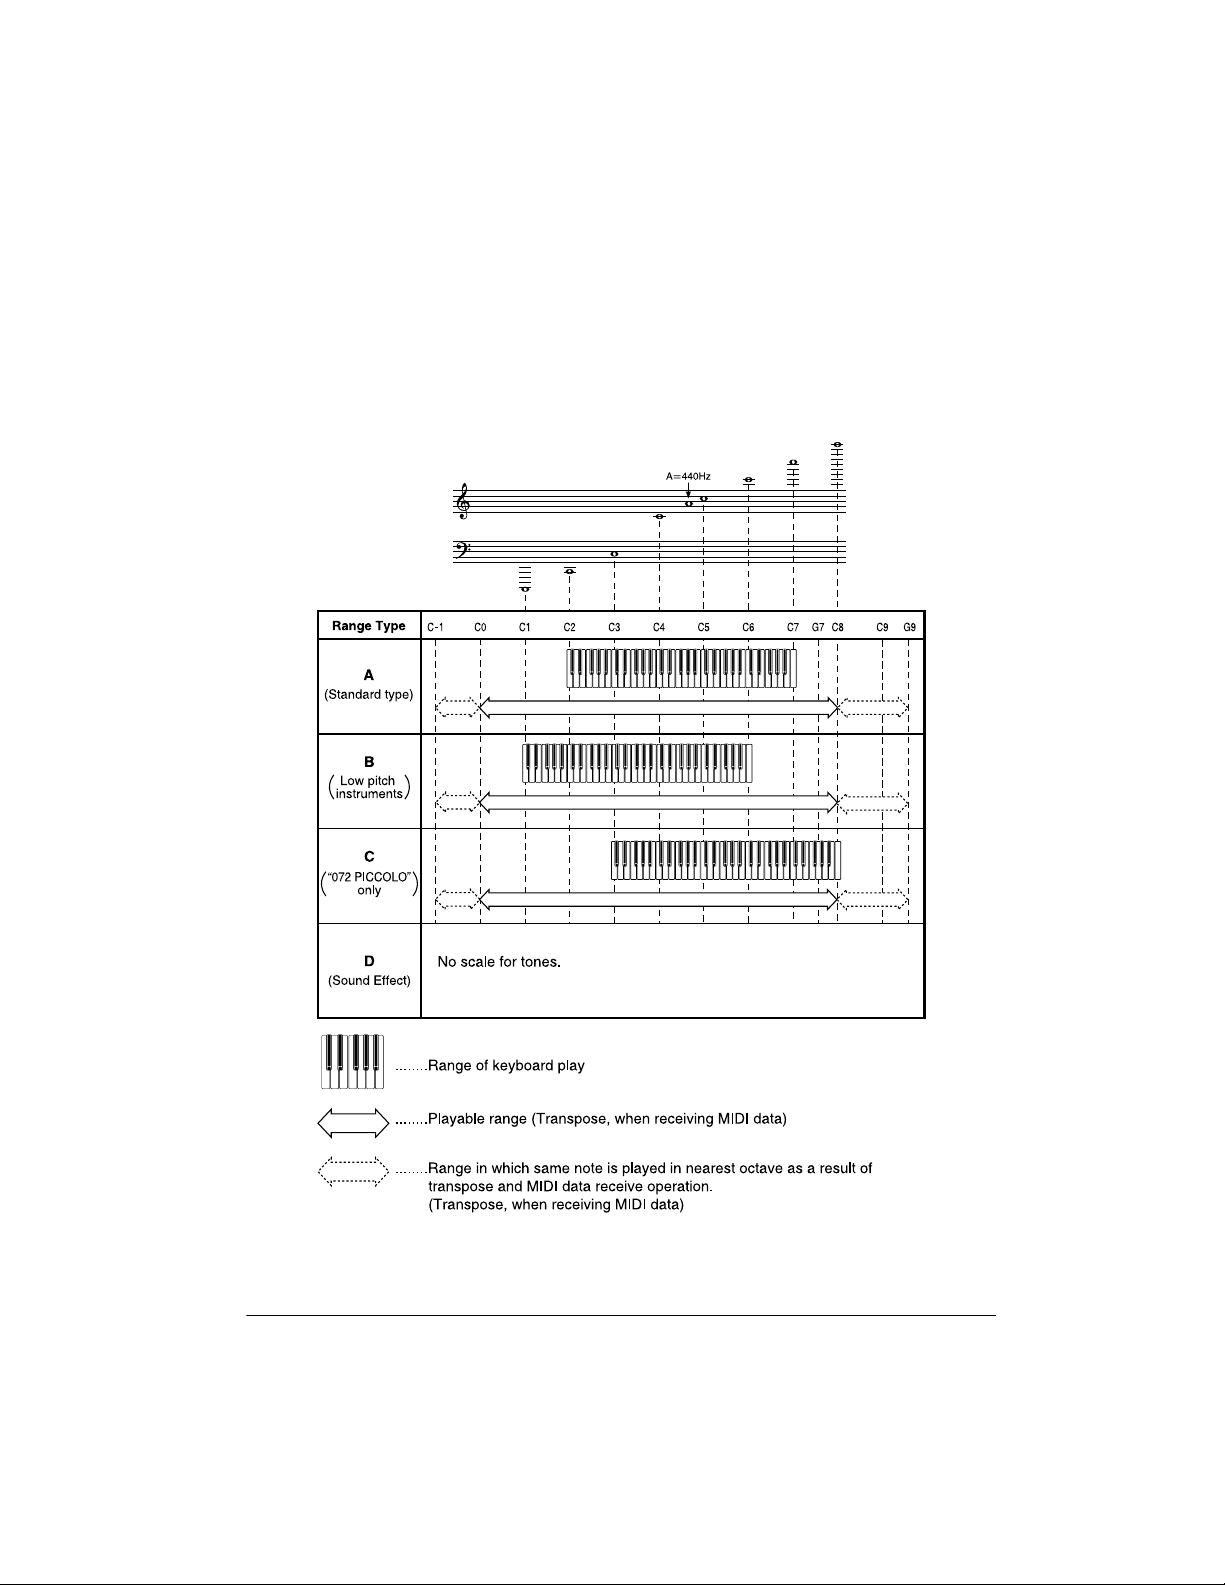
Legend:
1. Tone number
2. Maximum polyphony
3. Digital Controlled Oscillator
4. Range type
5. Recommended sound range for General MIDI
* Tones without scale
* The following shows maximum polyphone for synthesized tones 128 through 159:
141 BASS SLIDE: 24 notes 1 DCO
Other tones: 12 notes 2 DCO
43Appendix
Page 44

DRUM ASSIGNMENT LIST
44
Appendix
Page 45

FINGERED CHORD CHART
Note:
Chords marked with a cannot be played in the FINGERED mode due to the
limitation of the accompaniment keyboar d ra nge. Us e F UL L RA NGE CHO RD t o pl ay
pieces that contain these chords.
45Appendix
Page 46

MIDI Implementation Chart
FUNCTION TRANSMITTED RECOGNIZED REMARKS
1
Basic
Channel
Default
Changed
Mode Default
Messages
Altered
Note
Number: True voice
Velocity Note ON
Note OFF
After
Touch
Keys
Channels
*
1–16
1–16
Mode 3
X
❊❊❊❊❊❊❊❊❊❊❊❊❊❊❊❊
36–96
❊❊❊❊❊❊❊❊❊❊❊❊❊❊❊❊
O 9nH v=1–127
X 9nH v=0
X
X
Pitch Bender O O
Control
Change
Program
Change: True #
System Exclusive O
System
Common
System
Real Time
Aux
Messages
0, 32
1
6, 38
7
10
11
64
66
67
100, 101
120
121
: Song Pos
: Song Sel
: Tune
: Clock
: Commands
: Local ON/OFF
: All notes OFF
: Active Sense
: Reset
O
X
*4
O
O
O
O
*5
O
*5
O
*5
O
*4
O
X
X
O 0–127
❊❊❊❊❊❊❊❊❊❊❊❊❊❊❊❊
*6
X
X
X
O
O
X
X
X
X
1–16
1–16
Mode 3
X
❊❊❊❊❊❊❊❊❊❊❊❊❊❊❊
0–127
12–108
2
*
O 9nH v=1–127
X 9nH v=0, 8nH
v=XX
X
*3
O
O
*3
O
*4
O
O
O
O
O
O
O
*4
O
O
O
O 0–127
❊❊❊❊❊❊❊❊❊❊❊❊❊❊❊
*6
O
X
X
X
X
X
O
O
X
X
1
*
Held in memory
with power supplied
2
*
See “Note Table”
on Page 42
XX=no relation
Bank Select
Modulation
Data entry
Volume
Pan
Expression
Hold 1
Sostenuto
Soft pedal
RPN LSB, MSB
All sound off
Reset all controller
46
MIDI Implementation Chart
Page 47

Remarks
*3
Modulation and after to uch for each channel are the same effect.
*4
Pitch bend sense, fine tune, c oarse tune send/receive, and RPN Null receive
*5
In accordance with assigna ble jack setting
*6
GM on/off GM ON:[F0][7E][7F][09][01][F7]
GM OFF: [F0][7E][7 F ] [0 9][02][F7]
Reverb change [F0][ 44][0E][09][XX][F7] XX=00: ROOM, 01: STAGE, 02: HALL, 0F: OFF
Bulk dump [F0] [44][0E][0
Mode 1: OMNI ON, POLY Mode 3: OMNI OFF, POLY O: Yes
Mode 2: OMNI ON, MONO Mode 4: OMNI OFF, MONO X: No
ID Number Data (128
Specifications
7] [0L0][0H0]...[0L
2 = 256 Bytes) Checksum (1 × 2 = 2 bytes)
×
][0H
] [0LCS][0HCS] [F7] × 255 Block
127
127
Number of Keys ..................................................................................................................... 61
Drum Pads ............................................................................................................................... 6
Polyphonic Sound ............................................................................................... 24-note (Max.)
Preset Tones ............................ 200 (128 General MIDI, 32 synthesized, 32 user, 8 drum sets)
with Layer and Split
Rhythm Instrument Tones ...................................................................................................... 61
Digital Effects ............................................................... 3 reverb types (HALL, STAGE, ROOM)
Demo Tunes ........................................................... ..... ...... .................................. ..... ...... ......... 2
Auto Accompaniment
Rhythm Patterns .................................................................................................................. 100
Tempo ....................................................................................... Variable (216 steps, 40 to 255)
Chords ......................................... 3 fingering methods (Concert Chord, Fingered, Full Range)
Rhythm Controller ................. Start/Stop, Intro, Normal/Fill-In, Variation/Fill-In, Synchro/Ending
Accompaniment Volume ............................................................................ 0 to 127 (128 steps)
One-Touch Preset ........... Recalls tone and tempo settings best suited for the selected rhythm
Registration Memory
Number of Setups ............................................................................. 32 (4 locations × 8 banks)
Memory Contents ................ Tone, rhythm, tempo, split setting, split point, layer setting, mixer
settings, keyboard channel on/off, reverb setting, touch response
setting,
ASSIGNABLE JACK
setting, transpose setting, tuning setting,
pitch bend range, accompaniment volume setting
Memory Function
Songs ...................................................................................................................................... 2
Recording Tracks .................................................................. 6 (2 through 6 are melody tracks)
47Specifications
Page 48

Recording Methods ........................................................................................... Real-time, Step
Memory Capacity ............................................ Approximately 4,900 notes (total for two songs)
Edit Function ............................................................................................................... Equipped
Custom Tone Parameter Function
Parameters ............................................ PCM set, amp envelope set, attack rate, release rate,
pitch envelope set, pitch, level, touch sense, pan
Mixer Function
Channels ................................................................................................................................ 16
Parameters ....................................................... Program change number, volume, expression,
pan, coarse tuning, fine tuning, on/off/solo
MIDI .................................................................... 16 multi-timbre receive, GM Level 1 standard
Transpose .............................................................................. –12 semitones to +12 semitones
Tuning ................................................................................. Adjustable A4 = 440 Hz ±50 cents
Pitch Bend Range ............................................................................12 semitones up and down
Built-In Speakers .........................................................................................................12 cm× 2
Terminals
MIDI Terminals .............................................................................................................. IN, OUT
1
Assignable Terminal ....................................................................................
/4-Inch Phone Jack
(sustain, sostenuto, soft, rhythm start/stop)
Power Supply .......................................................................................................... 9V DC Jack
Headphones Stereo Standard Jack .............................................Output Impedance:150 Ohms
Output Voltage: 5 V (RMS) MAX at 47K ohm load
Power Sources ............................................................................................... DC: 6 D batteries
AC: 9V with AC adapter
Power Consumption ......................................................................................................... 7.7 W
Dimensions (HWD) ........................................................................ 5
15
7
16
×
37
/
13
8
×
14
/
/16 Inches
(15.2 × 96× 37.6 cm)
Weight (Without Batteries) ..................................................................................... 12 lbs 12 oz
(5.8 kg)
Included Accessories .................................................................................. Sheet Music Stand
Play Guide for the Prerecorded Tunes
Specifications are typical; individual units might vary. Specifications are subject to change and
improvement without notice .
48
Specifications
Page 49

Notes
49Notes
Page 50

50
Notes
Page 51

51Notes
Page 52

Limited One-Year Warranty
This product is warrante d by RadioShack ag ainst manufactur ing defects in materia l and workmanship under normal use for one (1) year from the date of purchase from RadioShack company-owned
stores and authorized RadioShack franchisees and dealers. EXCEPT AS PROVIDED HEREIN, RadioShack MAKES NO EXPRESS WARRANTIES AND ANY IMPLIED WARRANTIES, INCLUDING
THOSE OF MERCHANTABILITY AND FITNESS FOR A PA RTICULAR PURPOSE, ARE LIMITED
IN DURATION TO THE DURATION OF THE WRITTEN LIMITED WARRANTIES CONTAINED
HEREIN. EXCEPT AS PROVIDED HEREIN, RadioShack SHALL HAVE NO L IABILITY OR RESPONSIBILITY TO CUSTOMER OR ANY OTHER PERSON OR ENTI TY WITH RES PECT TO ANY
LIABILITY, LOSS OR DAMAGE CAUSED DIRECTLY OR INDIRECTLY BY USE OR PERFORMANCE OF THE PRODUCT OR ARISING OUT OF ANY BREACH OF THIS WARRANTY, INCLUDING, BUT NOT LIMITED TO, ANY DAMAGES RESULTING FROM INCONVENIENCE, LOSS
OF TIME, DATA, PROPERTY, REVENUE, OR PROFIT OR ANY INDIRECT, SPECIAL, INCIDENTAL, OR CONSEQUENTIAL DAMAGES, EVEN IF RadioShack HAS BEEN ADVISED OF THE
POSSIBILITY OF SUCH DAMAGES.
Some states do not allow limitations on how long an implied warranty lasts or the exclusion or limitation of incidental or consequ en tial dam ages, so the above limitations or exclu si ons may no t apply to
you.
In the event of a pr oduct defect durin g the warranty pe riod, take the pr oduct and the Rad ioShack
sales receipt as pr oof o f p ur c has e dat e t o any RadioShack stor e. R ad ioS ha ck will, a t i ts o ption , unless otherwise provid ed by l a w: (a ) correct the defect by p rod uct re pai r wi tho ut c har ge for pa rts and
labor; (b) replace the product with on e of the same or simil ar design; or (c) r efund the purchase
price. All replaced parts and products, and produc ts on which a refund is mad e, become the property of RadioShack. New or recondi tioned parts and products may b e used in the pe rformance of
warranty service. Re paired or replac ed parts and pr oducts are warran ted for the rem ainder of the
original warranty period. You will be charged for repair or replacem ent o f the p rod uct m ade afte r the
expiration of the warranty period .
This warranty does not cover: (a ) dam ag e or fai lu re ca used by or att ri bu tab le to acts of Go d, ab use ,
accident, misuse, improper or abn ormal usage, fa ilure to follow instr uctions, imp roper installa tion or
maintenance, altera tion, lightning or other incidence of excess voltage or current; (b) any repairs
other than those provided by a RadioS hack Authorized Service Facility; (c) con sumables such as
fuses or batteries; (d) cosmet ic dam age; (e ) transport ation, ship ping or ins ura nce costs; or (f) cost s
of product removal, installation, set-up service adjustment or reinstallation.
This warranty gives you specific lega l rights, and you may also have other righ ts which vary from
state to state.
RadioShack Customer Relations, 200 Taylor Street, 6th Floor, Fort Worth, TX 76102
We Service What We Sell
12/99
MD1210E-1
RadioShack
A Division of Tandy Corporation
Fort Worth, Texas 76102
42-4045
MA0005-A
05A00
Printed in Malaysia
 Loading...