

Radio Shack Kameleon Owner's Manual
OWNER’S MANUAL
RS 6in1 Kam Owners Manual.fm Page 1 Monday, June 7, 2004 12:16 PM
TABLE OF CONTENTS
INTRODUCTION
T
he Radioshack 6-in-1 Remote Powered by Kameleon
is a revolutionary universal remote control that uses
Universal Electronics’ Kameleon Technology.
Moreover, it allows you to consolidate the clutter of all
of your original remote controls into one easy-to-use
product.Advanced features include
• Kameleon Technology – dynamic menu
screens that respond to device selection and
illuminate only active keys
• My System Mode – a custom mode that
groups the most-often-used keys together for
operating convenience in one mode
• Macros – for instant activation of favorite
key sequences
• Learning – to capture unique functions from
your devices’ original remote controls
• Direct Code Setup – for easy device
programming with setup codes
• Innovative Code Search – allows setup of
your devices without looking up codes
• Favorite Channel Scan – for easy channel
surfing of favorite channels
• Vol um e Lo ck – to assign volume controls to
individual devices or to one global device
• Extensive Code Library – largest and most
efficient group of IR remote control codes for
virtually every current brand and make
• Upg radeab ili ty – our unique telephone
upgrade system ensures your remote control
always has the latest setup codes when adding
new devices in the future
After installing four (4) new AA alkaline batteries
(not included, see next page), you can immediately
use the unit to control a RCA DVD Player, a Pioneer
CD Player and Audio Receiver, and a RCA TV,VCR,
and Satellite Receiver. To control other brands than
the default ones, see Programming Device Control
on page 7.
:
functionality, to match the home entertainment
environment.Moreover, this technology provides
unparalleled ease-of-use and superior control by
delivering a uniquely intuitive, graphical interface
that intelligently illuminates only the active keys.
The Radioshack 6-in-1 Remote uses Kameleon
technology to provide the versatility of an LCD
remote control with the feel of a traditional push
button unit. The result is a stunning, bright display
with engaging animation and touch-sensitive
graphics for the user.
The remote control includes convenient Menu
Driven programming.The displays are divided
into two types of interactive screens: Device
Menus for normal remote control use, and
Programming Menus for feature setup.Acting
like its namesake, Kameleon changes the Device
Menu for the device being selected. For example,
selecting TV displays a main menu that contains
channel selection, volume control, and a
keypad.However, selecting a DVD player still
displays a menu w ith those same keys as the TV, but
now navigation keys and transport controls are
added for the DVD device.
Several devices have additional menus that can be
accessed using SCREEN (see Device Menu
Screens, starting on page “Device Menu Screens”
on page 24. For example, TV has two menus: a
main menu with keys for a general purpose TV, a
second menu screen that adds navigation keys and
removes INPUT, +100, PIP and TRANSPORT
keys,.Depending on desired features, a user has the
flexibility to use any menu screen that works best
for the selected device.
Animated key graphics also provided enhanced
operational feedback, so the user can easily see
what mode is active and when the commands are
communicating with a device. The end result of
Kameleon technology is a simple, elegant, and
intelligent way of organizing a large number of
remote control keys for six different devices in a
relatively small case.
INSTALLING BATTERIES
HOW KAMELEON™ WORKS
Kameleon™ allows wireless controllers to
dynamically change their appearance and
BATTERY USE AND SAFETY
• Dispose of old batteries promptly and
properly.
• Do not burn or bury batteries.
• Use only new batteries of the required size.
Table of Contents/Installing Batteries 1
6-IN-ONE REMOTE POWERED BY KAMELEON
RS 6in1 Kam Owners Manual.fm Page 2 Monday, June 7, 2004 12:16 PM
• Do not mix old and new batteries, different
types of batteries (e.g., standard, alkaline, or
rechargeable), or rechargeable batteries of
different capacities.
• If you do not plan to use the remote control for
an extended period, remove the batteries.
They can leak chemicals that can destroy
electronic parts.
ABOUT BATTERY LIFE
As with all battery-operated devices, battery life
will vary depending on use, including frequency
and duration of key presses on the Kameleon
screen. Battery life may be extended by:
• reducing the brightness level of the display
screen (see “Adjusting Brightness” on page6).
• disabling the vibration switch (see “Setting the
Vibration Switch” on page 7)
The two bottom IR indicator segments will flash
when the betteries in your Kameleon are running
low.
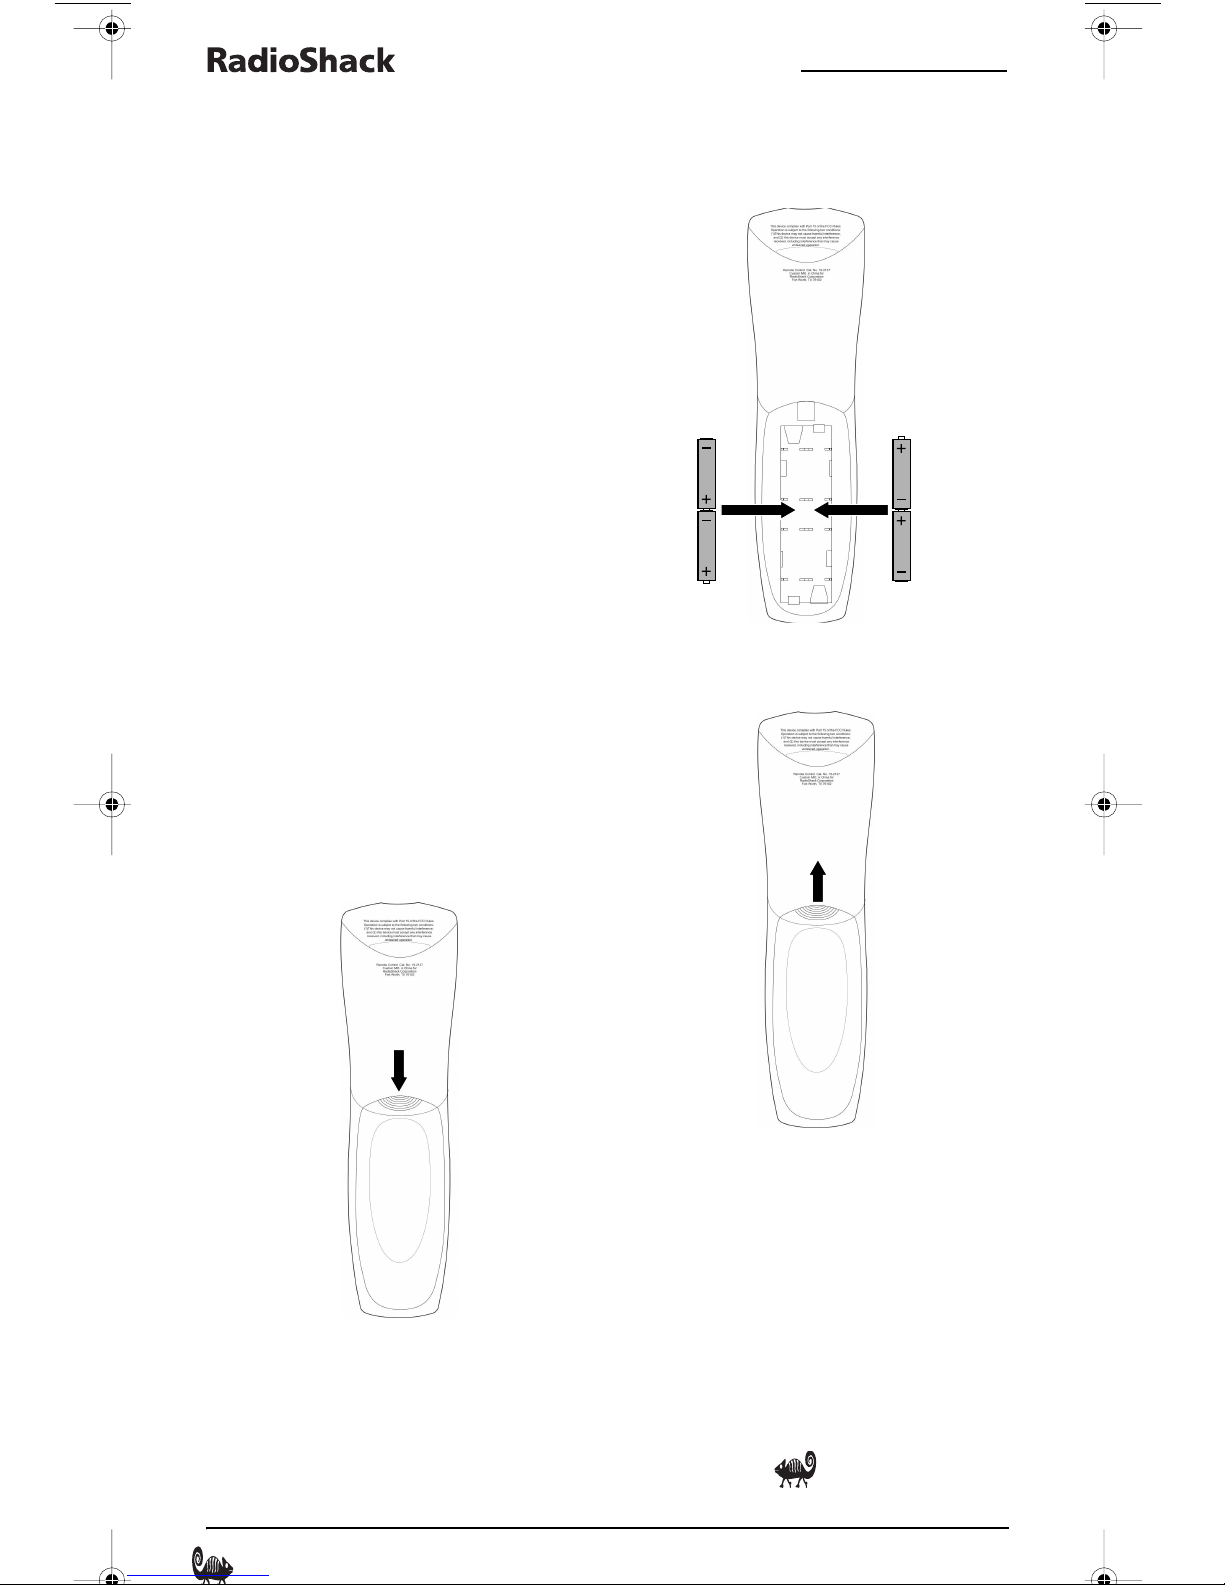
2. Place the AA batteries in the compartment as
indicated by the polarity symbols (+ and -)
marked inside.
❷❷
3. Align the cover with the compartment opening
and replace it.
INSTALLING BATTERIES
Your remote requires four AA batteries (not
supplied) for power.
1. Push down on the indent marks on the battery
door (located on the back of the remote) and
lift off the cover.
❶
❸
4. If batteries are inserted correctly, the display will
turn on and show all keys after any key is
pressed.
NOTE: The two bottom segments of the IR indicator
flash when the batteries are running low.
NOTE: The batteries will need replacement if one of
the following conditions occurs:
2 Installing Batteries/Installing Batteries
1. Pressing any key turns on all keys and icons.
2. The remote control no longer operates and the
display flashes on and off continuously.
OWNER’S MANUAL
RS 6in1 Kam Owners Manual.fm Page 3 Monday, June 7, 2004 12:16 PM
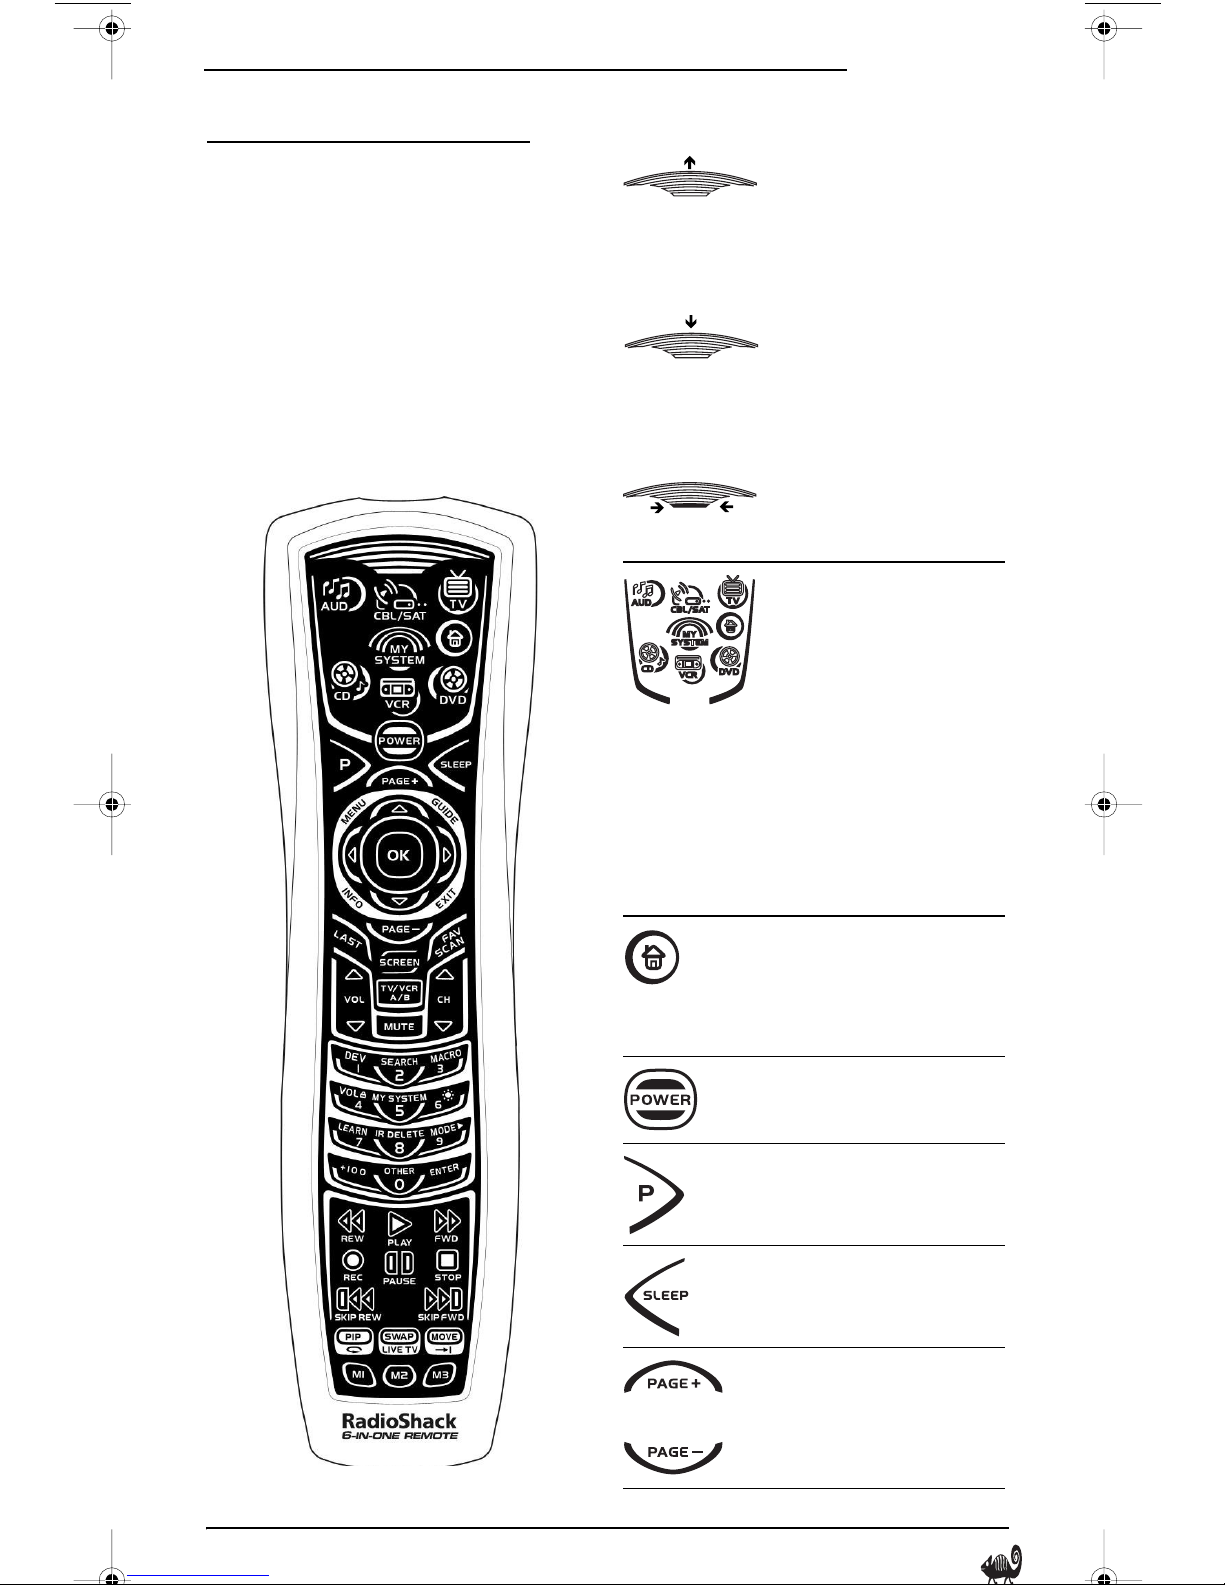
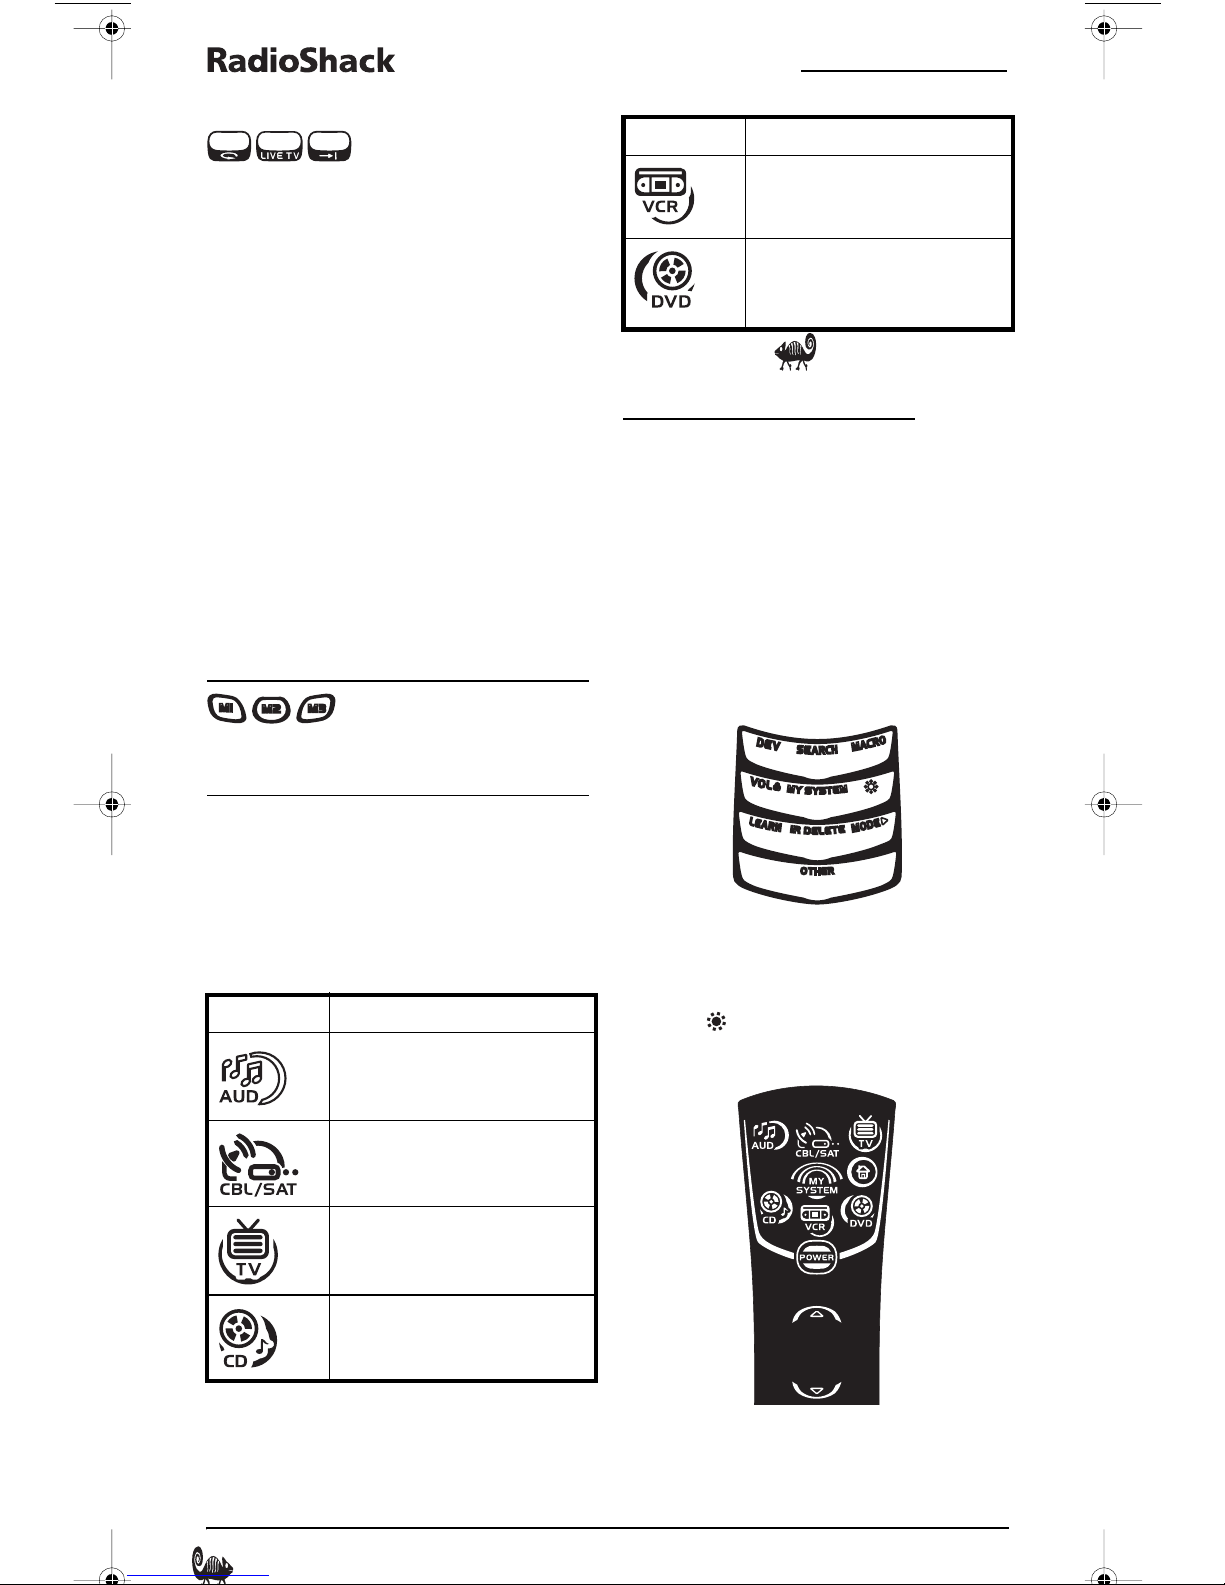
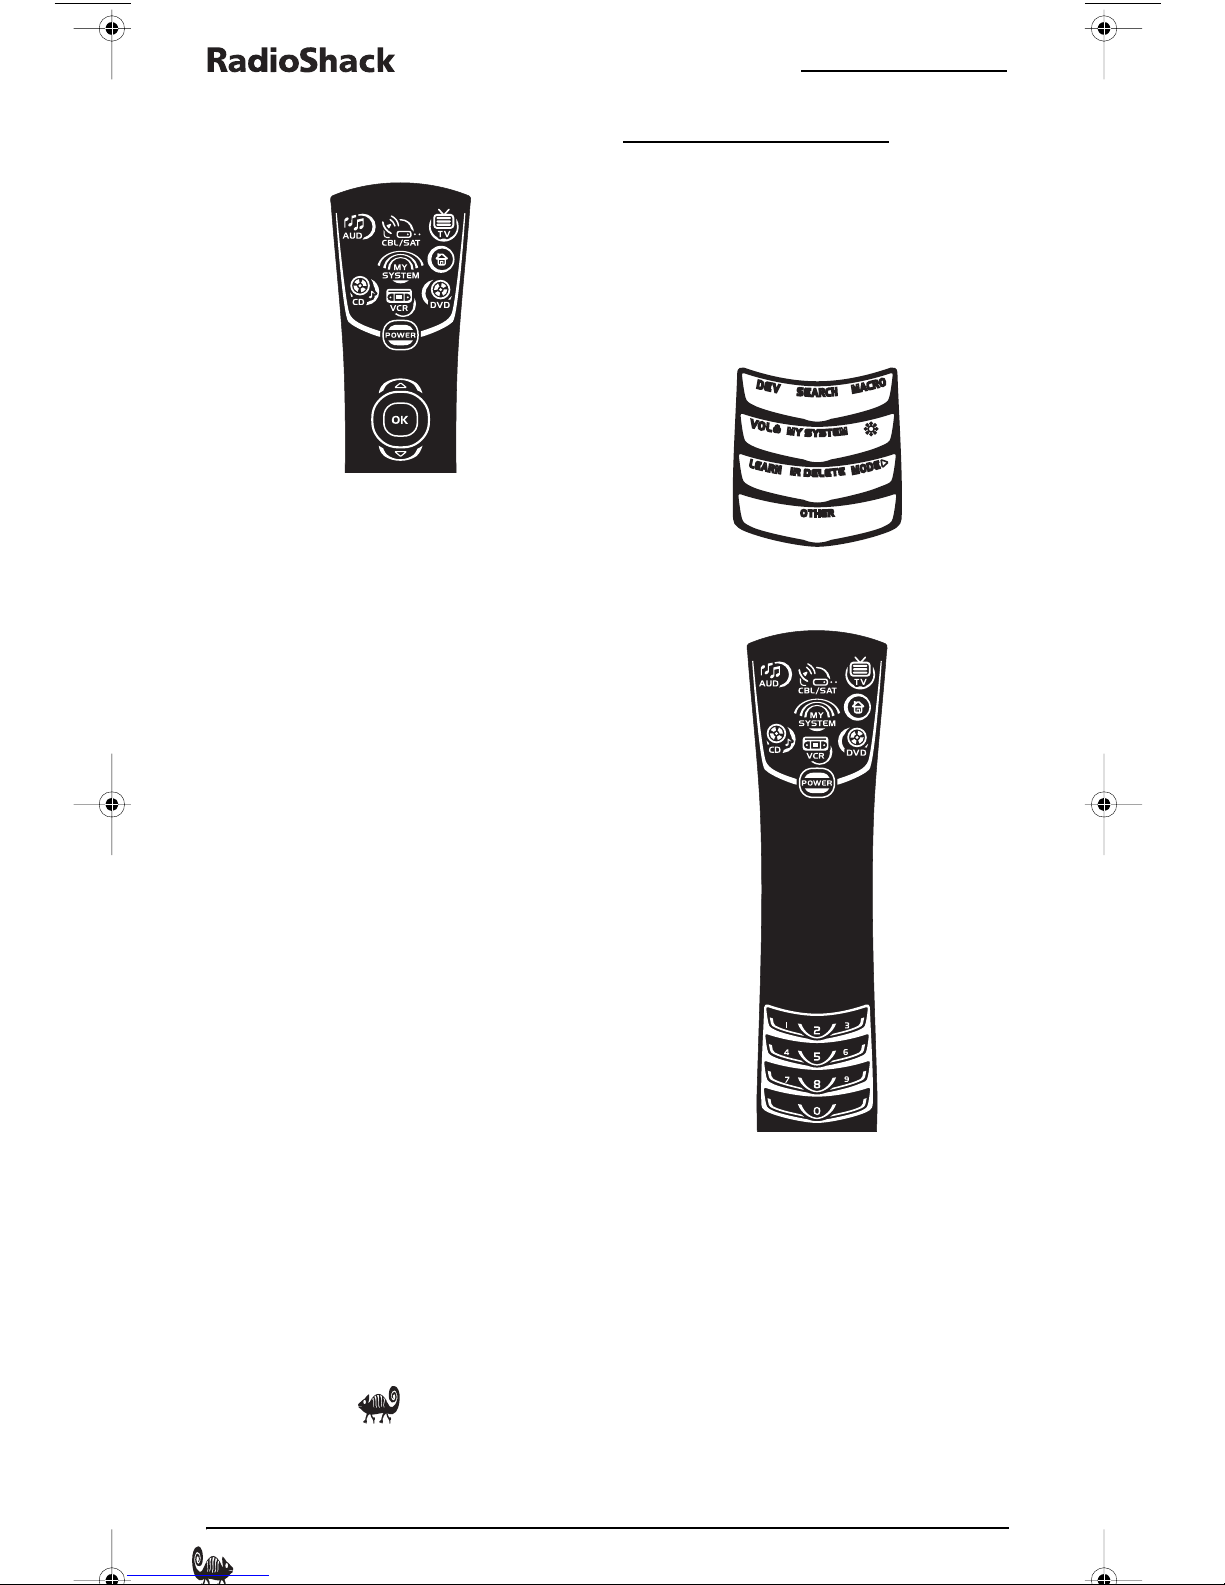
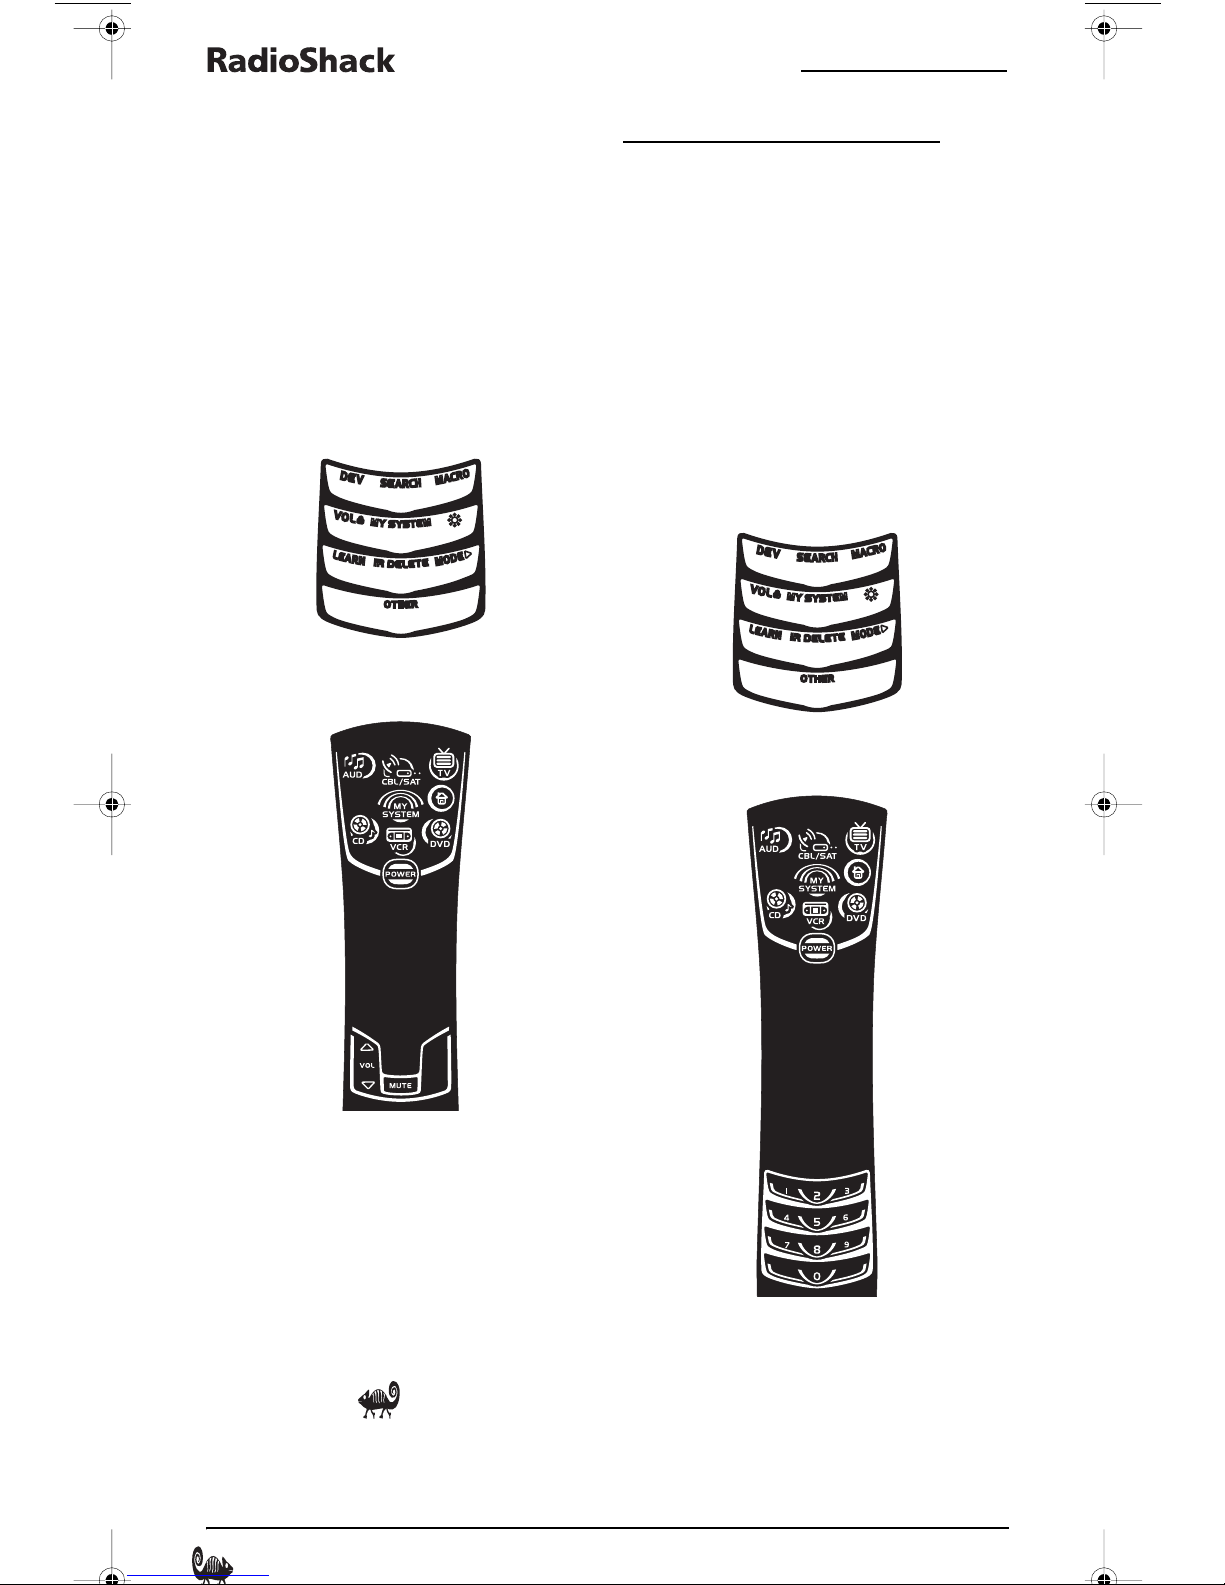
FEATURES AND FUNCTIONS
Use the illustration below to locate features on the
Radioshack 6-in-1 Remote Powered by Kameleon
and then refer to the Key Charts (starting on the
right) to learn how they function.
NOTE: The illustration shows all remote
control keys. In actual operation, only active keys
used by the selected device are displayed and nonactive keys are hidden.
To find out what type of devices can be controlled
by each device key after programming, see the
“Device Table” on page 6.
KEY CHARTS.
When a key is pressed, the IR
Segment will animate.
Outgoing animation (see
arrows) indicates the remote
control is sending IR signals
to a selected device.
Incoming animation (see
arrow) indicates the remote
control is receiving IR
signals from a device being
learned (see Using Learning
on page 17)
During programming, the
bottom IR segment flashes
to confirm setup actions.
Press a Device Key once to
select a desired home
entertainment device to
control (e.g., DVD).When
selected, the Device Key will
animate to indicate it is
currently active.Also see the
“Device Table” on page 6.
After programming, press
the My System key once to
select the home theater
mode (se e “Using My System
Mode” on page 11).
During programming, the
HOME key will appear. Use it
to exit the program screen or
to return to the last-selected
device key screen.
Press POWER once to turn a
selected device on or off.
Use P to enable the
programming screen.
Press SLEEP to turn on the
sleep function. See “Setting
the Sleep Timer” on page 14.
In the My System and CBL/
SAT modes, use PAGE+ or
PAGE– to page up or down
through channels in the
program guide.
Features And Functions/Features And Functions 3
6-IN-ONE REMOTE POWERED BY KAMELEON
RS 6in1 Kam Owners Manual.fm Page 4 Monday, June 7, 2004 12:16 PM
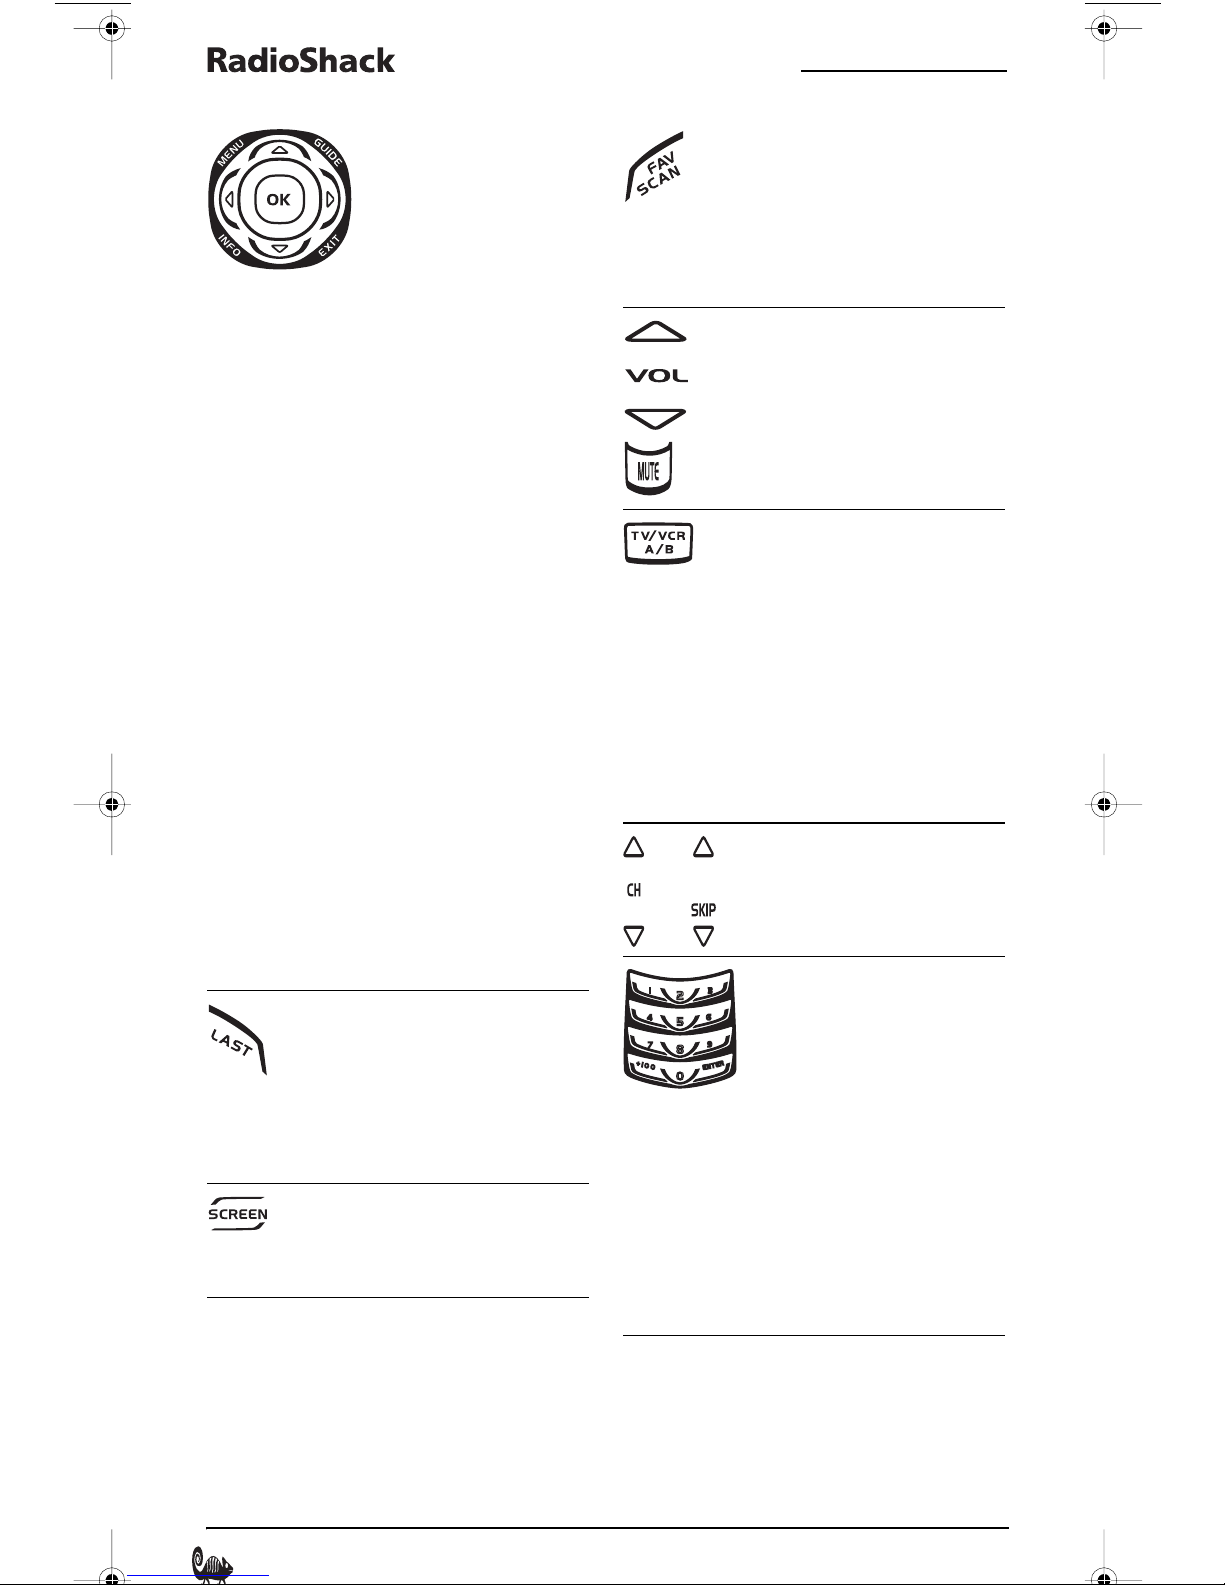
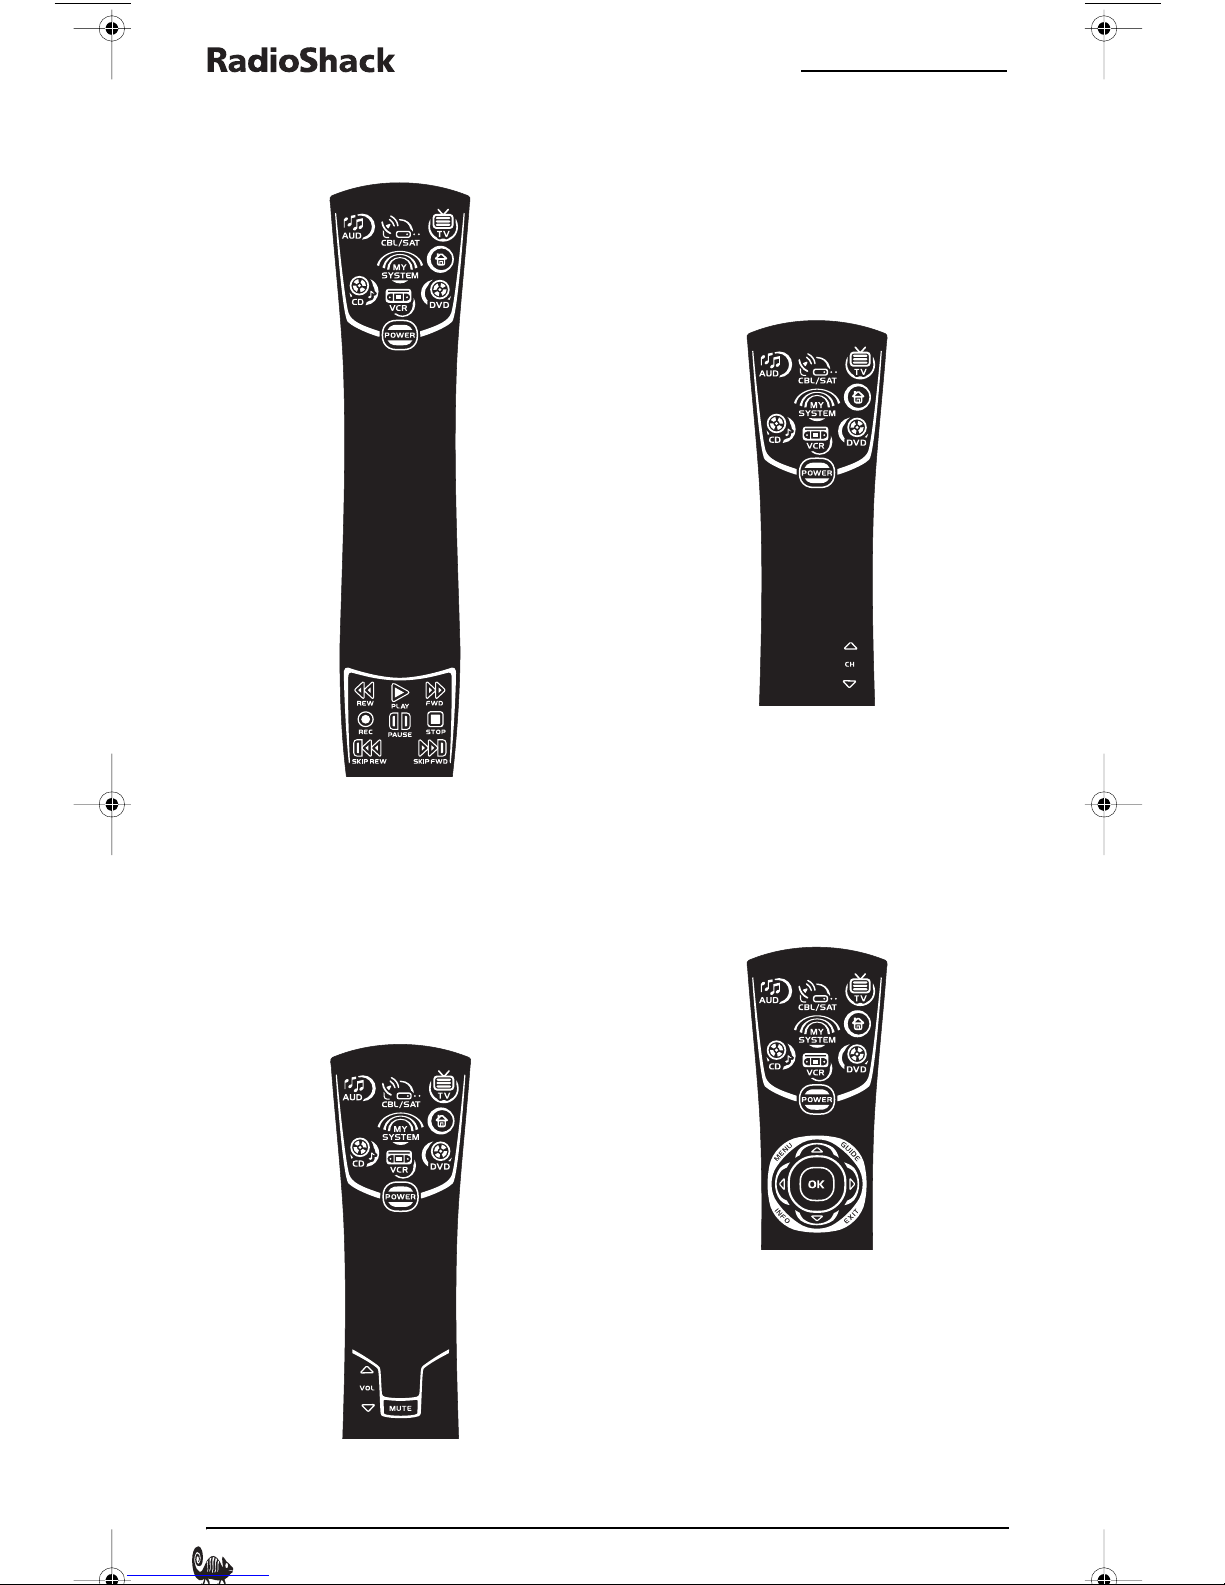
Use the navigation keys as
follows:
Use MENU to display the your
device's main menu.
Use GUIDE to display your
device's program guide, or
setup or program menu.
Use INFO to display the
current channel and
program information.
Use EXIT to exit from your
device's guide or menu.
Use the cursor keys (
!,",
#,or $) to navigate
through the program guide
and menu screens.
In the CD mode, use
!(or
#) to select the next (or
previous) disc or navigate
through menus.
In the AUD mode, use
!(or #) to raise (or
lower) rear channel volume
or navigate through menus
and use
audio left (or right).
Use OK to choose options
from your device's menu or
guide.
In all modes except CD and
DVD, press LAST once to
recall the last channel.
$or " to balance
or
In the CBL/SAT, VCR, My
System, and TV modes, use
FAV SCAN to scan through all
channels, or after
programming, to scan
through 10 favorite
channels.
Use VOL !(or VOL #) to
raise (or lower) the sound
volume for the selected
device (also see Changing
Volu me Lo ck on page 13).
Press MUTE once to turn the
sound off or on.
In the TV, VCR, or DVD mode,
use TV/VCR to switch the
TV's input to view TV or
video programs.
In the AUD mode, use TV/VCR
to switch between audio
inputs.
In the CBL/SAT mode use A/B
to change your cable boxes
A/B or Bypass function, or
input on your SAT.
Use CH !(or CH #) to
select the next higher (or
lower) channel.
In all modes except AUDIO,
use the Number Keys (1 – 9
and 0) to directly select
channels (e.g., 009 or 031)
or enter numbers. In the
AUDIO mode, use the
Number Keys to directly
select inputs 1 – 9 and 10.
In the CD, TV, AUD, and VCR
modes, use SCREEN to view
additional key screens for
the selected device.
4 Features And Functions/Features And Functions
For certain brands in all
modes except CD and AUDIO,
press ENTER once after
entering numbers (if
required on your original
remote control).
OWNER’S MANUAL
RS 6in1 Kam Owners Manual.fm Page 5 Monday, June 7, 2004 12:16 PM
Note: Press below
the title to activate
a desired program.
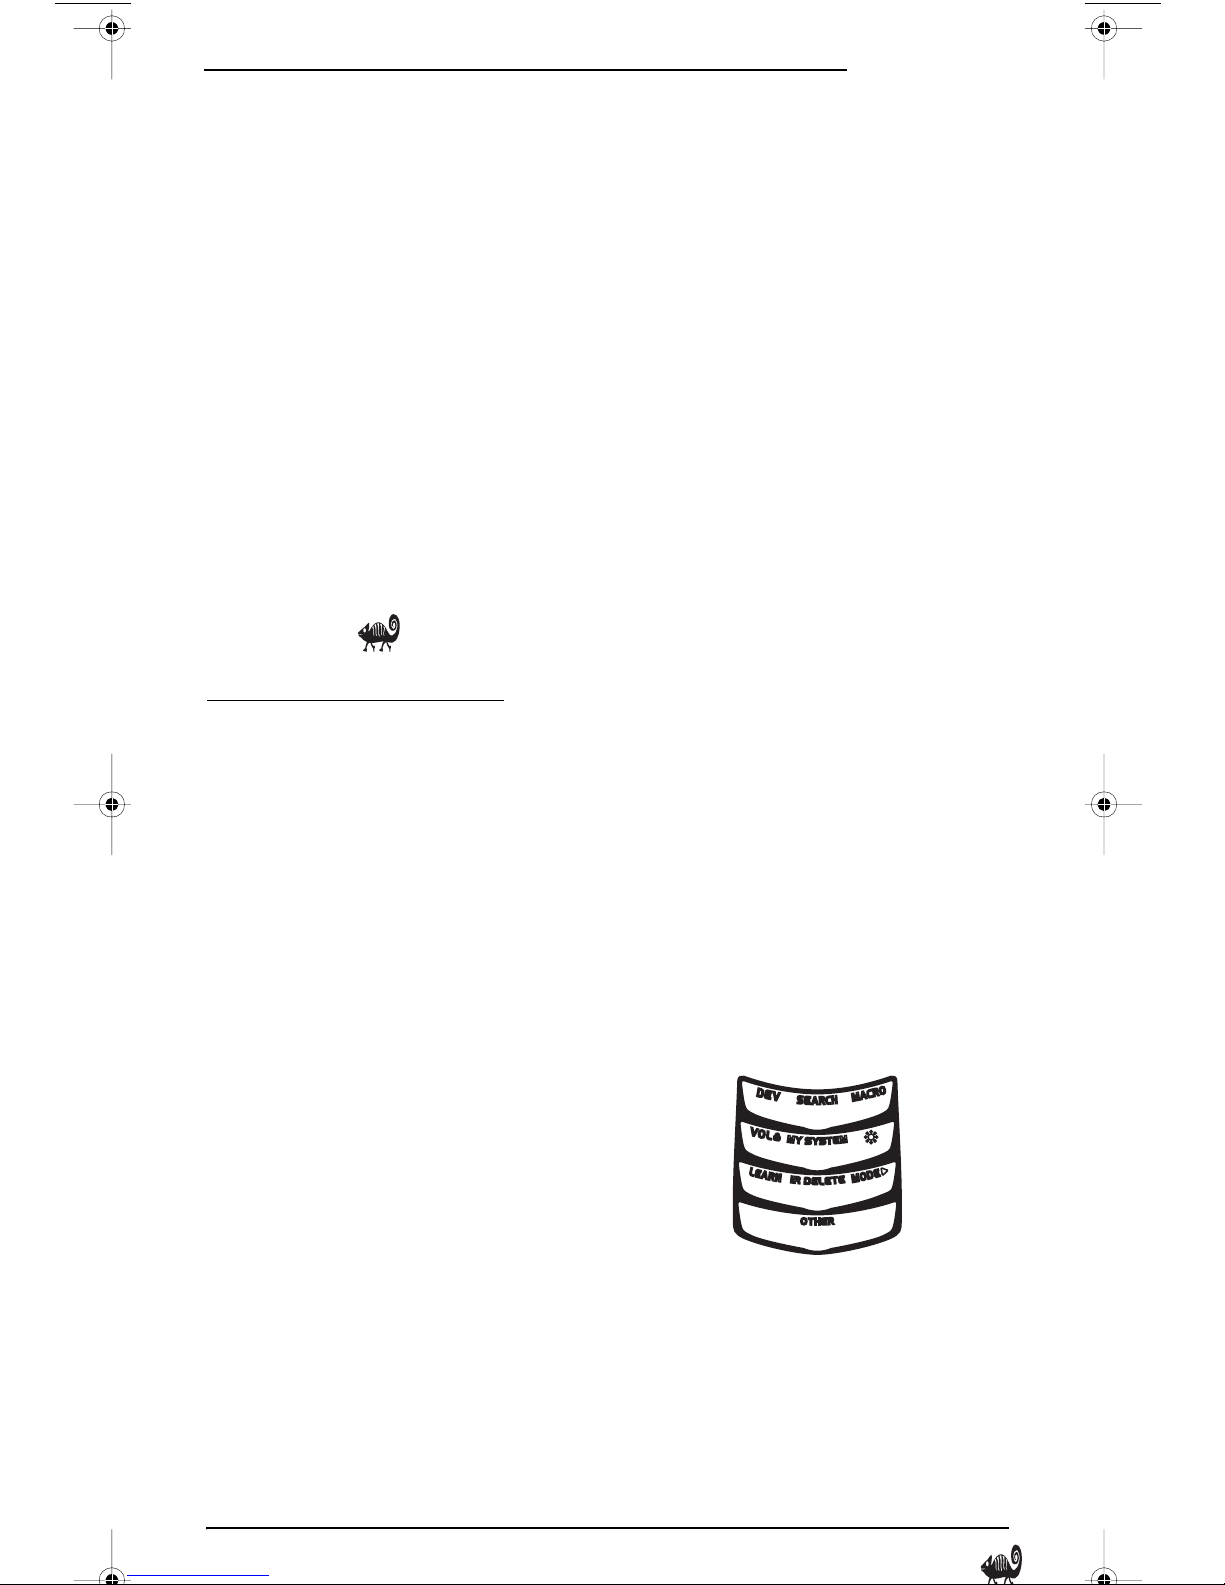
In the program mode, use
the Program Keys to
personalize the remote
control as follows:
Use DEV to program your
device codes.See
“Programming Device
Control” on page 7.
Use SEARCH as an alternate
way to set up a device by
searching available codes.
See “Searching For Your
Code” on page 9.
Use MY SYSTEM to create a
custom mode with favorite
remote control keys from
different devices in your
home theater system.See
“Using My System Mode” on
page 11.
Use VOL (Volume Lock) to
set volume controls for
individual or global device
use.See “Changing Volume
Lock” on page 13.
Use MACRO to program a
series of commands on five
available macro keys. See
“Using Macros” on page 15.
Use (Brightness) to
adjust the brightness level of
the EL display. See
“Ad ju s ti n g T h e D is pl ay ” o n
page6.
Use IR Learrn and IR Delete
to add and delete key
functions learned from your
original device remote
controls.See “Using
Learning” on page 17.
Use MODE " to reassign an
unused device key to control
a second device.See
“Reassigning Device Keys”
on page 19.
Use OTHER to program other
functions. See the Table of
Contents on page 1 for
sections on Checking The
Codes, Programming
Favorite Channel Scan, or
Upgrading.
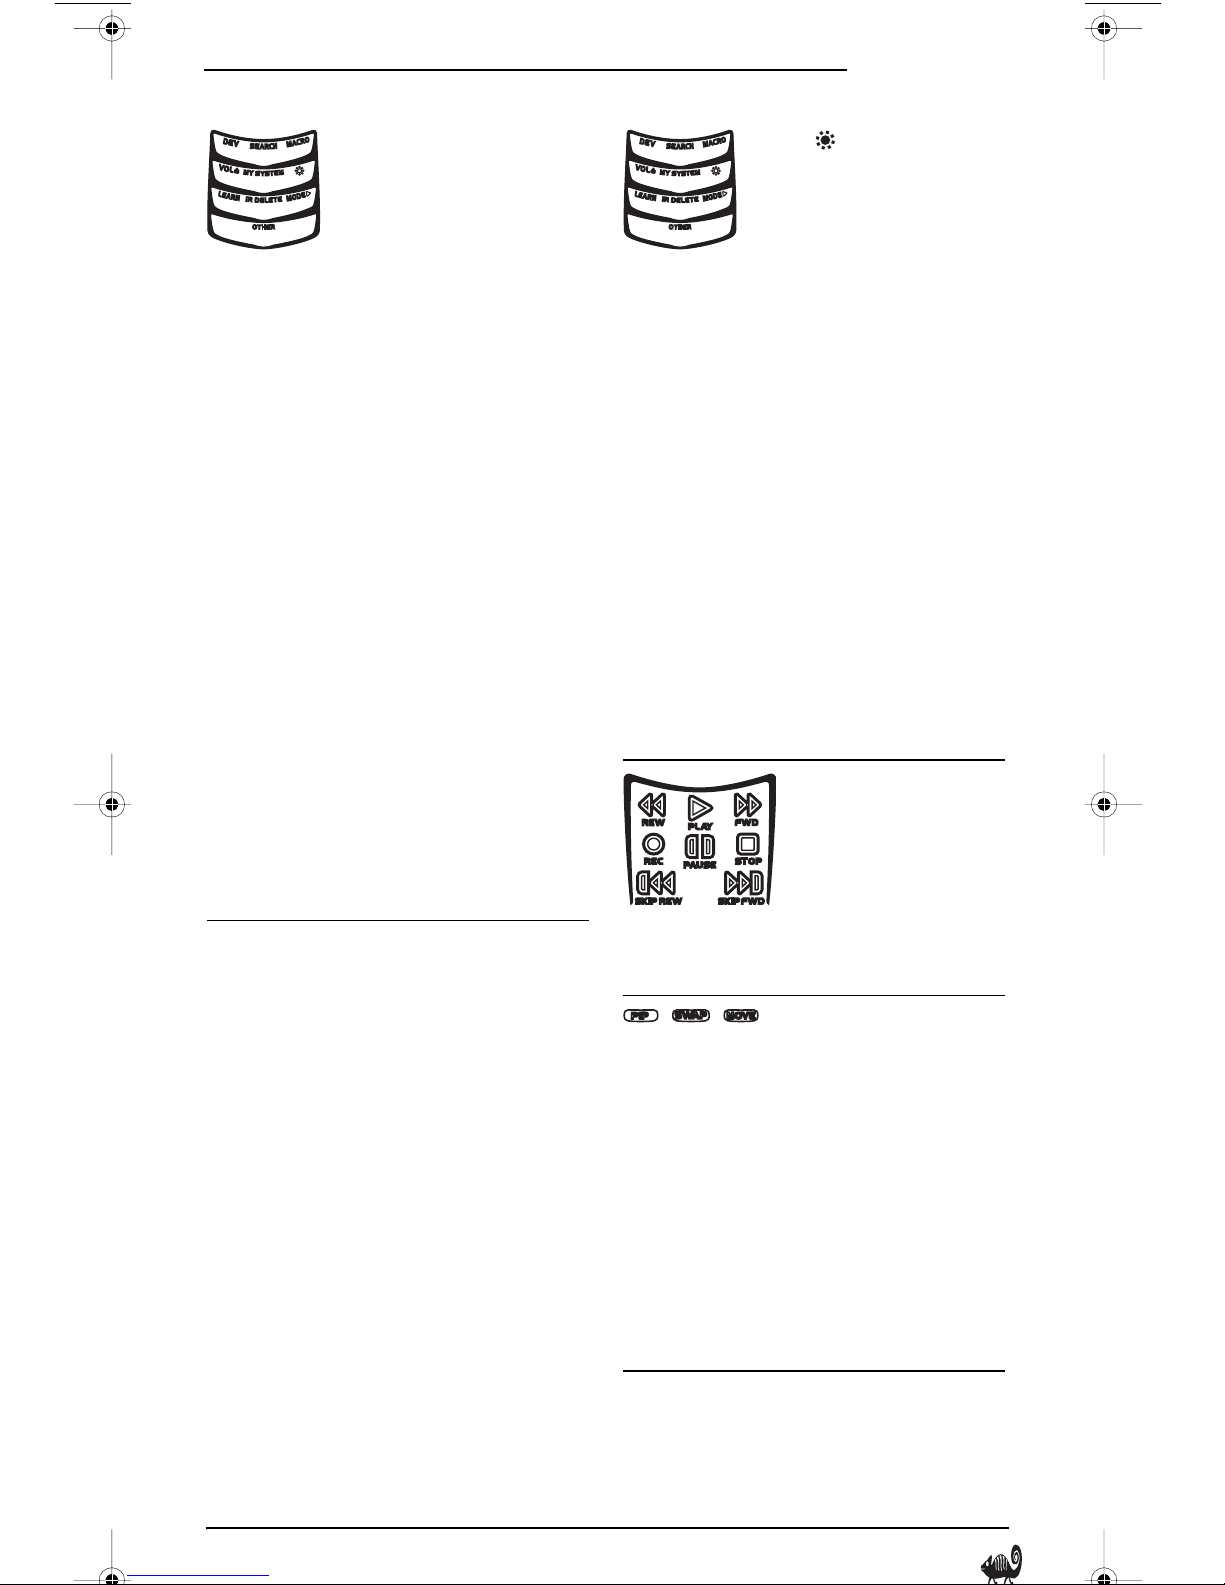
In the all modes, use the
Transport Keys to control the
device’s transport if that
function is available.
In all modes, press REC
twice to record a program on
your device (if function is
available).
In the TV mode, use the PIP
keys to control the following
Picture-In-Picture features
(if available) on your TV:
Use PIP to switch the
Picture-In-Picture feature on
or off.
Use SWAP to switch images
and sound between the main
and window pictures.
Use MOVE to move the
window picture to different
places in the main picture.
Features And Functions/Features And Functions 5
6-IN-ONE REMOTE POWERED BY KAMELEON
RS 6in1 Kam Owners Manual.fm Page 6 Monday, June 7, 2004 12:16 PM
In the CBL/SAT, VCR, or DVD
modes, use the PVR/DVR
Keys as follows:
Use the replay key (on the
left-hand side)to instantly
replay the last 7 seconds of a
program you are watching (if
the feature is available).
Use the advance key (in the
center) to skip past
commercials or other
uninteresting scenes (if the
feature is available).
In the DVD or CD mode, use
the advance key to change
discs.
Use LIVE TV to switch
between live TV and video
programming (if the feature
is available).
After programming, press
Macro Key 1 – 3 once to run
a macro (see “Using Macros”
on page 15).
DEVICE KEY CONTROLS THESE DEVICES
VCR or PVR (DVR )
DVD Player or Home-Theater-ina-Box Device
ADJUSTING THE DISPLAY
Your new remote has several ways to adjust the
display for your comfort and best use.
ADJUSTING BRIGHTNESS
The Radioshack 6-in-1 Remote has five levels of
brightness adjustment and is set to the middle one
at the factory. To increase or decrease the
brightness, perform the following steps:
1. Press and hold P until the bottom IR segment
flashes twice. The Program Keys will appear.
DEVICE TABLE
NOTE: Please refer to the table below when
performing the instructions in “Programming Device
Control” on page 7.
After programming, the Radioshack 6-in-1 Remote
will be able to control the following types of devices:
DEVICE KEY CONTROLS THESE DEVICES
Audio Amplifier or Audio
Receiver
Cable Box (Converter), Satellite
Receiver, or Satellite/PVR Combo
Television, TV/VCR Combo,
TV.VCR.DVD Combo, or TV/DVD
Combo
CD Player or CD Recorder
NOTE:
If the display turns off because of
inactivity, you will need to start the programming
sequence again by repeating this step.
2. Press (Brightness) once.The Brightness
programming screen will appear:
6 Adjusting The Display/Adjusting The Display
• To increase brightness, press ! one or
more times.

OWNER’S MANUAL
RS 6in1 Kam Owners Manual.fm Page 7 Monday, June 7, 2004 12:16 PM
• To decrease brightness, press # one or
more times.
3. When the desired brightness is achieved, press
HOME twice to exit programming and return to
the last-selected device menu screen.
NOTE: Otherwise, to program other features,
press HOME only once to return to the Program
Keys.
SETTING THE VIBRATION SWITCH
The Radioshack 6-in-1 Remote can be set to turn
the display on when you pick it up, before you even
press a button. Your new remote comes preset with
vibration turned on. To turn vibration sensitivity
off, perform the following steps:
1. Press and hold P until the bottom IR segment
flashes twice. The Program Keys will appear.
3. Using the Number Keys, enter 9 8 5. The
bottom IR segment flashes four times if you
are turning it OFF and twice if you are turning
it ON.
4. Press HOME twice to exit programming and
return to the last-selected device menu screen.
To turn vibration sensitivity off, repeat these steps.
PROGRAMMING DEVICE
CONTROL
The Radioshack 6-in-1 Remote is preset at the
factory to operate an RCA TV,VCR, DVD Player, or
Satellite Receiver, Pioneer CD Player, and Audio
Receiver
To control devices other than the default brands,
perform the following steps; otherwise skip this
section:
NOTE: To c ont ro l a DV D P lay er /VC R Co mb o,
perform the instructions in “Programming DVD
Player/ VCR Combo Control” on page 8.
NOTE: If the display turns off because of
inactivity, you will need to start the
programming sequence again by repeating this
step.
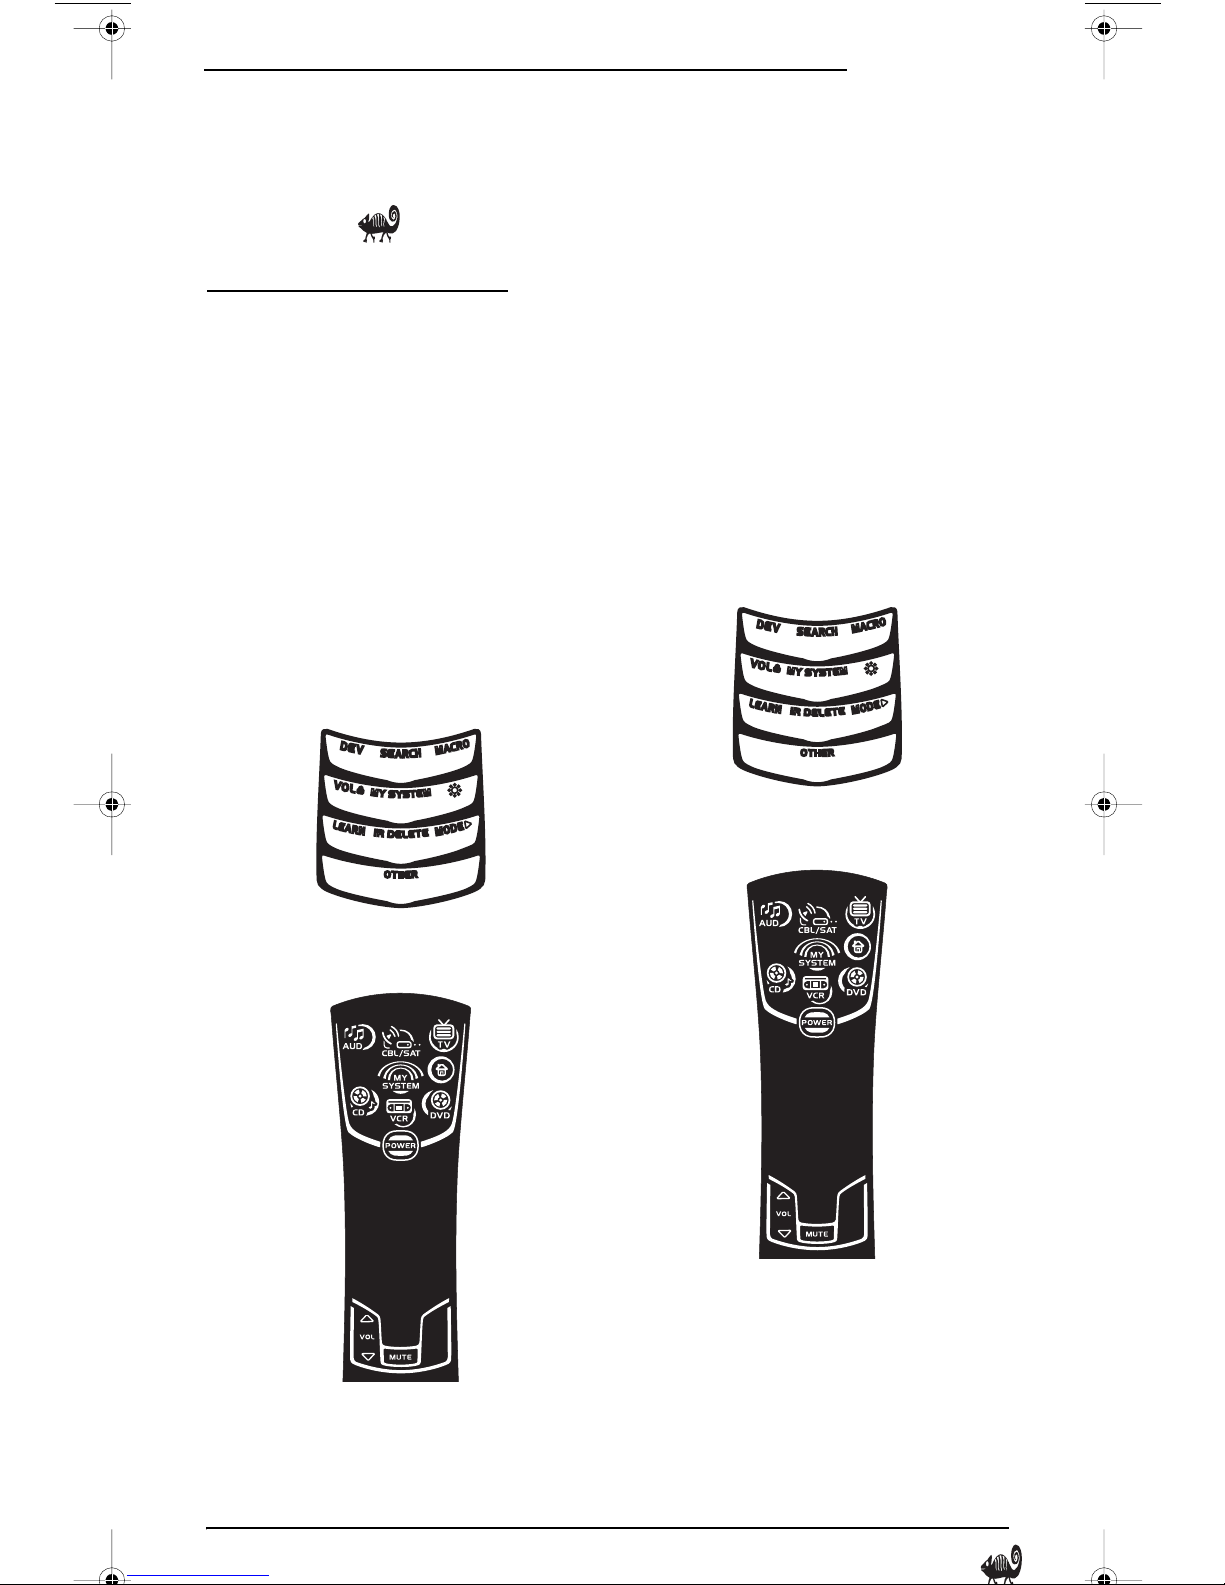
2. Press OTHER once.The Other programming
screen will appear:
1. Turn on a desired device (e.g.,VCR or DVD
player) and, if applicable, insert media (e.g.,
cassette or disc).
NOTE: Please read steps 2 through 9 completely
before proceeding. Before starting step 2, review
the “Manufacturer’s Codes” (starting on page
33). Brands are listed alphabetically in order of
most popular ones first. Highlight or write down
the devices and the codes you wish to program.
2. Press and hold P until the bottom IR segment
flashes twice. The Program Keys will appear.
NOTE: If the display turns off due to inactivity,
the remote control will exit programming and
return to the last-selected device menu screen.
To start programming again, repeat this step.
NOTE: To stop programming at any time, press
HOME once to return to the Program Keys
screen. Press HOME once more to exit completely.
3. Press DEV once. The Device Setup
programming screen will appear:
Programming Device Control/Programming Device Control 7
6-IN-ONE REMOTE POWERED BY KAMELEON
RS 6in1 Kam Owners Manual.fm Page 8 Monday, June 7, 2004 12:16 PM
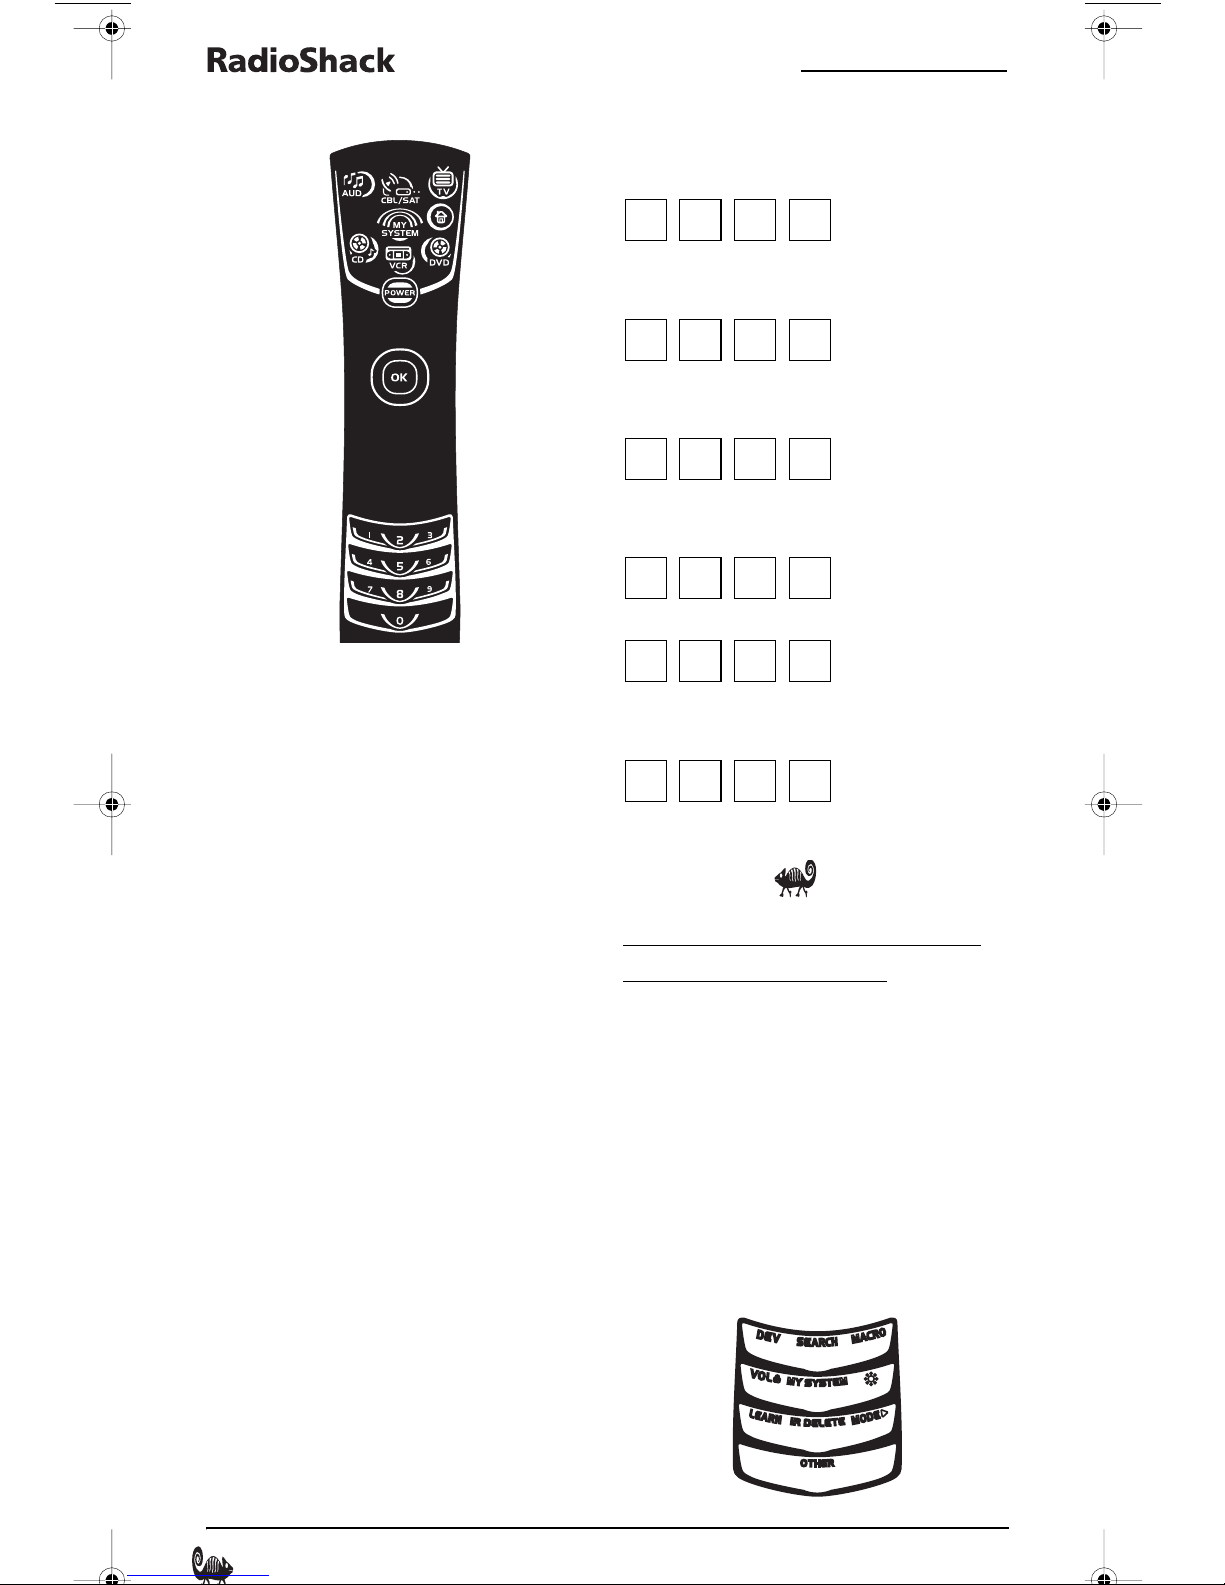
9. For future reference, write down each working
device code in the following boxes:
CBL/SAT Code:
Brand Name:_______________________
CD Code:
Brand Name:_______________________
DVD Code:
Braind Name:_______________________
TV Code:
AUDIO Code:
4. Press a device key once (i.e., CBL/SAT, CD, TV,
DVD, AUDIO, or VCR). The selected device key
will animate.
NOTE: Please refer to the “Device Table” on
page 6 when choosing a device key for
programming.
5. Use the Manufacturer’s Codes (starting on page
33) to locate the type of device and brand
name and then use the Number Keys to enter
the first four-digit code for your device. If
performed correctly, the bottom IR segment
flashes twice.
NOTE: If the bottom two IR segments displayed
one long flash instead, a mistake has occurred.
Try entering the same code again.
6. Aim the remote control at the device and press
POWER once.The device should turn off. If it
does not, repeat steps 5 and 6, trying each
code for your brand until you find one that
works. If it still doesn’t work, try “Searching
For Your Code” on page 9.
7. If the code works, press OK once.The bottom
IR segment will flash twice.
8. If desired, repeat steps 4 through 7 for each
device you want to control. If finished, press
HOME twice to exit programming and return to
the last-selected device menu screen.
Brand Name:_______________________
VCR Code:
Brand Name:_______________________
PROGRAMMING DVD PLAYER/
VCR COMBO CONTROL
1. Turn on the DVD Player/VCR Combo and
insert a DVD.
NOTE: Please read steps 2 through 10
completely before proceeding. Before starting
step 2, review the “Setup Codes For DVD Player/
VCR Combos” (on page 38). Brands are listed
alphabetically in order of most popular ones
first.Highlight or write down the devices and the
codes you wish to program.
2. Press and hold P until the bottom IR segment
flashes twice. The Program Keys will appear.
8 Programming DVD Player/ VCR Combo Control/Programming DVD Player/ VCR Combo Control
OWNER’S MANUAL
RS 6in1 Kam Owners Manual.fm Page 9 Monday, June 7, 2004 12:16 PM
3. Press DEV once.The Device Setup
programming screen will appear:
separate VCR device or another device (see
“Reassigning Device Keys” on page 19).
9. To exit programming, press HOME twice. The
display will return to the last-selected device
menu screen.
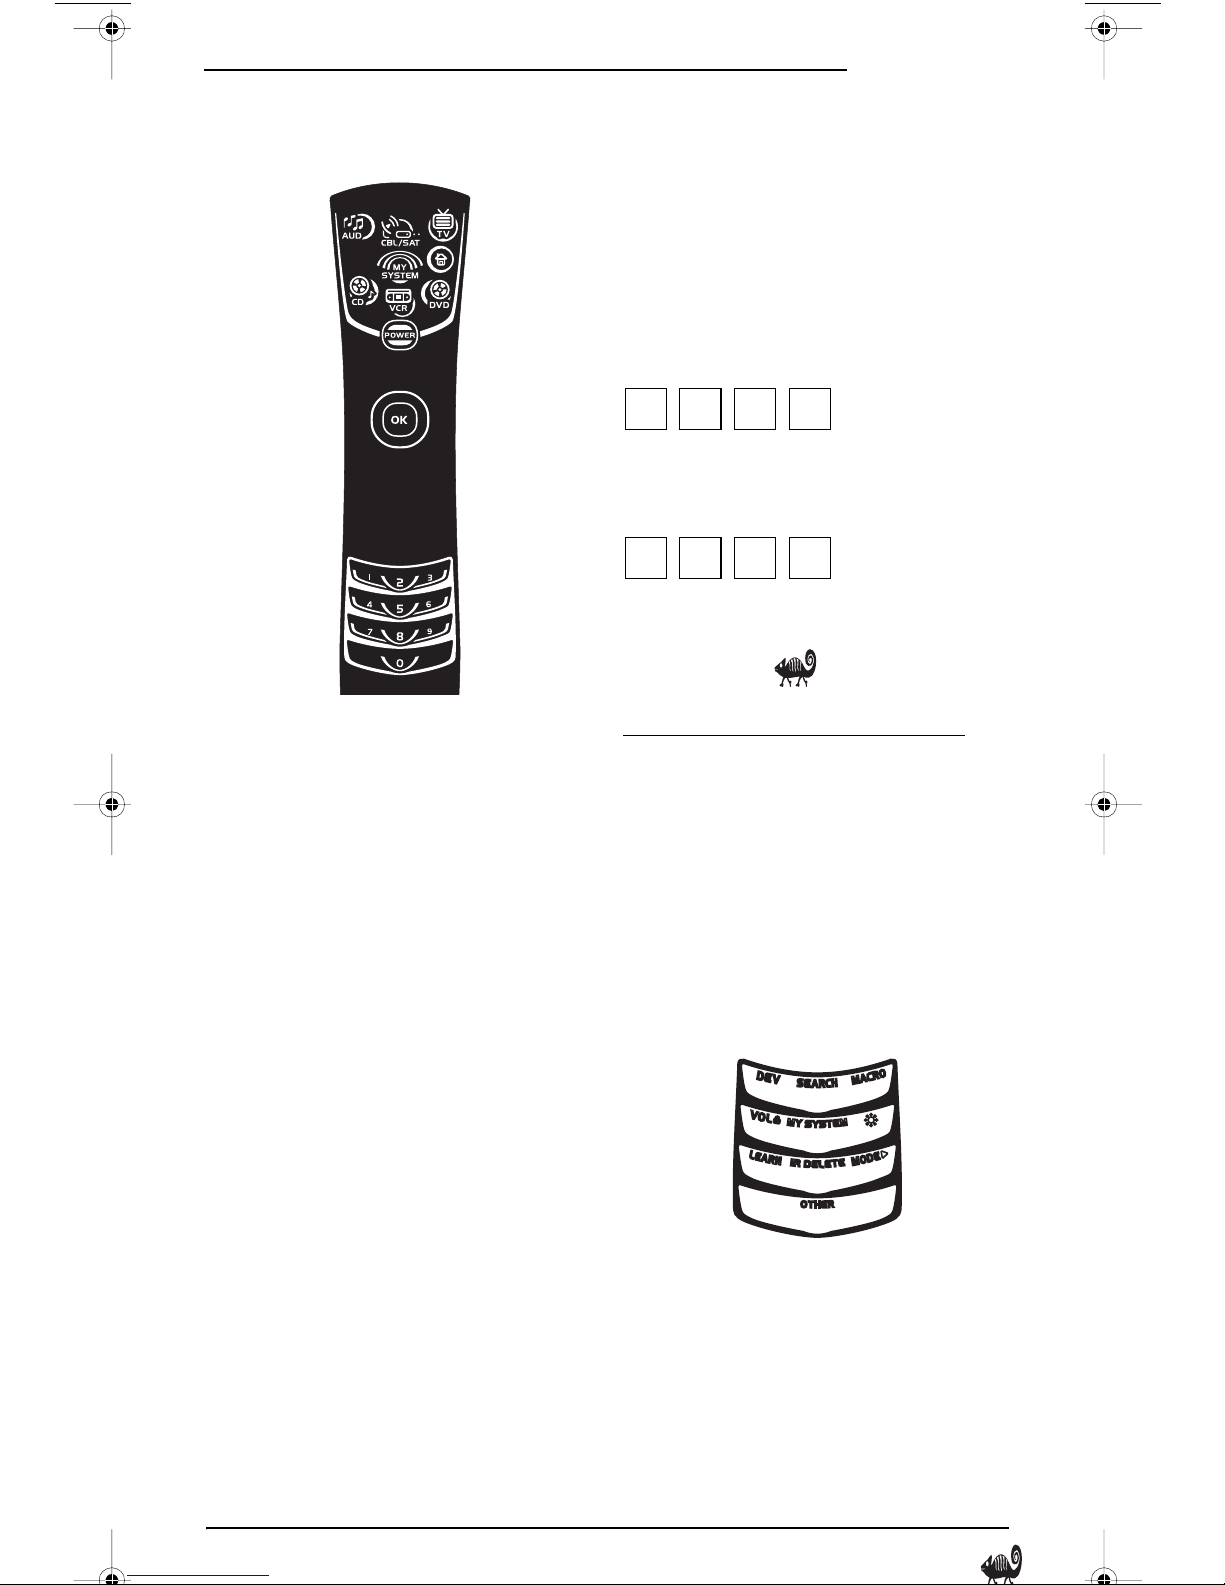
10. For future reference, write down the working
DVD Player/VCR Combo code in the following
boxes:
DVD Player/VCR Code:
Brand Name:______________________
VCR Code (if used):
Brand Name:______________________
4. Press DVD once.The key will animate.
5. Use the Setup Codes For DVD Player/VCR
Combos (on page 38) to locate the brand name
and then use the Number Keys to enter the first
four-digit code for your device. If performed
correctly, the bottom IR segment will flash
twice.
NOTE: If the bottom IR segment displayed one
long flash instead, an error has occurred. Try
entering the same code again.
6. Aim the remote control at the device and press
POWER once.The device should turn off.
7. If the code works, press OK once.The bottom
IR segmentwill flash twice.
8. (Optional) If you’ve located a setup code that
works, but it also has a separate VCR code as
listed on p age 38 , you’ll also n eed to program it
into the remote control to access VCR controls
as follows:
aPress VCR once.
bUsing the Number Keys, enter the four
digit VCR code for your DVD Player/VCR
Combo. If performed correctly, the
bottom IR segmentwill flash twice.
cPress OK once.The bottom IR segment
will flash twice.
NOTE: If a separate VCR setup code is not
listed, you can use the VCR key to program a
SEARCHING FOR YOUR CODE
If your device does not respond to the remote
control after trying all codes listed for your brand,
or if your brand is not listed at all, try searching for
your code.
NOTE: Before performing a code search for a CD or
DVD player or a VCR, turn on the device and insert
the required media.
For example, to search for a code for your TV:
1. Press and hold P until the bottom IR segment
flashes twice. The Program Keys will appear.
Searching For Your Code/Searching For Your Code 9
6-IN-ONE REMOTE POWERED BY KAMELEON
RS 6in1 Kam Owners Manual.fm Page 10 Monday, June 7, 2004 12:16 PM
2. Press SEARCH once.The Search Codes
programming screen will appear:
3. Press a device key once (e.g., TV). The selected
device key will animate.The device’s Main
Menu screen will appear with the HOME key
still displayed.
4. Press POWER once to select it as the search test
function.The Search Programming screen will
appear again.
NOTE: With POWER as the search test
function, a “Power On” IR command will be
sent to the device each time a test code is sent.As
a confirmation, the IR segments will display an
outgoing animation.
CHECKING THE CODES
If you have set up the remote control using the
Searching For Your Code procedure (on the left), you
may need to find out which four-digit code is
operating your equipment. For example, to find out
which code is operating your TV:
1. Press and hold P until the bottom IR segment
flashes twice. The Program Keys will appear.
2. Press OTHER once.The Other programming
screen will appear:
NOTE: If your device or its original remote control
does not have a Power key, select a different test
function in this step (e.g., CH+, VOL+, Play, etc.).
5. Aim the remote control at the device (e.g., TV)
and press ! one or more times. Stop when a
working code performs the test function
selected in step 4. If desired, use # to try a
previous code.
NOTE: In the search mode, the remote control
will send IR codes from its library to the selected
device, starting with the most popular code first.
6. To lock in the code, press OK once.The bottom
IR segment flashes twice.
7. To search for codes of your other devices,
repeat steps 3 to 6, but use the appropriate
device key and test function key for the device
you are searching for.
8. To exit programming, press HOME twice. The
display will return to the last-selected device
menu screen.
3. Using the Number Keys, enter 9 9 0.The
bottom IR segment flashes twice.
4. Press a desired device key once (i.e., CBL/SAT,
CD, TV, DVD, AUDIO, or VCR). The selected
device key will animate.
5. To view the code for the first digit, press 1
once.Count the number of times t he bottom IR
segment flashes (e.g., three flashes = 3) and
write down the number in leftmost box in the
TV code boxes on page 8.
NOTE: If a code digit is “0”, the bottom IR
segmentwill not flash.
10 Checking The Codes/Checking The Codes
OWNER’S MANUAL
RS 6in1 Kam Owners Manual.fm Page 11 Monday, June 7, 2004 12:16 PM
6. Repeat step 5 three more times for remaining
digits.Use 2 for the second digit, 3 for the third
digit, and 4 for the fourth digit.Write down the
code digits in the remaining TV code boxes on
page 8.
NOTE: If you enter an invalid number (e.g., 7)
or key (e.g., Play), the bottom IR
segmentwill display one long flash and return
to the “Other” programming screen. Start again
with step 2 above.
7. To check for codes of other devices, repeat
steps 4 to 6, but substitute the appropriate
device key for each device you are checking.
Write down the device’s code digits in the
appropriate code boxes on page 8.
8. To exit programming, press HOME twice. The
display will return to the last-selected device
menu screen.
USING MY SYSTEM MODE
Channel Controls Group:
Menu Controls Group: Cursor Controls (Up,
!, CH#, TV/
CH
VCR, Keypad (0 – 9),
FAV Scan, ENTER,
and LAST
Down, Left, and
Right), OK, PAGE+,
PAGE-, MENU, INFO,
GUIDE, and EXIT
ABOUT DEVICE MODES
Moreover, the above Control Groups can be used in
all modes.
FACTORY DEFAULT SETTINGS
At the factor y, the Control Groups are assigned the
following modes as default settings:
Transport Group DVD
Volu me Co nt ro ls G ro up : AUDIO
Channel Controls Group: CBL/SAT
The Radioshack 6-in-1 Remote includes a custom
Home Theater mode.After the My System key is
programmed, it will allow you to access four groups
of remote control keys without having to change
device modes.
CONTROL ORGANIZATION
ABOUT CONTROL GROUPS
For Home Theater programming, the remote
control’s keys are grouped by type of control into the
following four control groups:
Video Playback Group: Transp or t Cont rols
(Rewind, Play, Fast
Forward, Stop,
Pause, Record, Skip
Forward, and Skip
Back)
Volu me Cont rol s Grou p:
!, VOL#,
VOL
and MUTE
Menu Controls Group: CBL/SAT
If the default settings fit your needs, you can skip
programming this mode.Otherwise, perform the
steps in the following section to assign device
modes to the Control Groups.
PROGRAMMING MY SYSTEM MODE
1. Press any device key once (i.e., CBL/SAT, CD,
TV, DVD, AUDIO, or VCR). The selected device
key will animate.
2. Press and hold P until the bottom IR segment
flashes twice. The Program Keys will appear.
Using My System Mode/Using My System Mode 11
6-IN-ONE REMOTE POWERED BY KAMELEON
RS 6in1 Kam Owners Manual.fm Page 12 Monday, June 7, 2004 12:16 PM
3. Press MY SYSTEM once.The Tr a n s p o r t
programming screen will appear:
programming the Home Theater mode, you
must select a device key, even if it is the same
one that is currently animated.
5. To assign a mode to the Volume Controls
group, press a device key once.Then the
Channel Controls programming screen will
appear:
NOTE: If a device key is animated, it is assigned
to this function group. To continue
programming the Home Theater mode, you
must select a device key, even if it is the same
one that is currently animated.
4. To assign a mode to the Tr an s po r t group, press
a device key once (i.e., CBL/SAT, CD, TV, DVD,
AUDIO, VCR).Then the Volu me Cont rol s
programming screen will appear:
NOTE: If a device key is animated, it is assigned
to this function group. To continue
programming the Home Theater mode, you
must select a device key, even if it is the same
one that is currently animated.
6. To assign a mode to the Channel Controls
group, press a device key once.Then the Menu
Controls programming screen will appear:
NOTE: If a device key is animated, it is assigned
to this function group. To continue
programming the Home Theater mode, you
must select a device key, even if it is the same
one that is currently animated.
NOTE: If a device key is animated, it is assigned
to this function group. To continue
12 Using My System Mode/Using My System Mode
7. To assign a mode to the Menu Controls group,
press a device key once. Since My System
programming is now complete, the Program
Keys will appear again.
OWNER’S MANUAL
RS 6in1 Kam Owners Manual.fm Page 13 Monday, June 7, 2004 12:16 PM
8. To exit programming, press HOME once.The
display will return to the last-selected device
menu screen
.
CHANGING VOLUME LOCK
The Radioshack 6-in-1 Remote is set at the factory
for independent volume control of each selected
device.
However, you may change the Volume Lock setting
to Global Volume Lock so that a device’s volume
will be locked to one mode (e.g., to control TV
volume in all other modes).After that, if desired,
you can perform Individual Volume Unlock on a
selected device to set its volume control for
independent operation.
LOCKING VOLUME CONTROL TO ONE MODE
(G
LOBAL VOLUME LOCK)
1. Press and hold P until the bottom IR segment
flashes twice. The Program Keys will appear.
3. Press a device key once (i.e., CBL/SAT, CD, TV,
DVD, AUDIO, VCR) where you want the volume
controls locked to.The bottom IR segmentwill
flash twice and the Program Keys will appear
again.
4. To exit programming, press HOME once.The
display will return to the last-selected device
menu screen
5. Now, when you press VOL!, VOL#, or MUTE,
the selected device’s volume will be controlled,
regardless of the mode selected.
.
UNLOCKING VOLUME CONTROL FOR A
S
INGLE DEVICE (INDIVIDUAL VOLUME
UNLOCK)
1. Press and hold P until the bottom IR segment
flashes twice. The Program Keys will appear.
2. Press VOL once.The Vo lu me Lo ck
programming screen will appear:
2. Press VOL once.The Vo lu me L ock
programming screen will appear:
3. 3. Press VO L# once.Then press a device key
once (i.e., AUX, CBL/SAT, CD, TV, DVD, AUDIO,
VCR, or PVR) where you want the volume
controls unlocked.The bottom IR segmentwill
flash four times and the Program Keys will
appear again.
4. If desired, repeat steps 2 through 3 (of this
section) for each device that you want volume
to be unlocked.
Changing Volume Lock/Changing Volume Lock 13
6-IN-ONE REMOTE POWERED BY KAMELEON
RS 6in1 Kam Owners Manual.fm Page 14 Monday, June 7, 2004 12:16 PM
5. To exit programming, press HOME once.The
display will return to the last-selected device
menu screen
6. Now, after you select a device that has volume
unlocked, pressing VO L!, VOL #, or MUTE
will control the device’s volume only in its own
mode.
.
UNLOCKING ALL VOLUME CONTROL (RESTORING
D
EFAULT SETTING)
1. Press and hold P until the bottom IR segment
flashes twice. The Program Keys will appear.
2. Press VOL once.The Vol um e L ock
programming screen will appear:
SETTING THE SLEEP TIMER
The Radioshack 6-in-1 Remote includes a sleep
timer that lets you set your devices up to be turned
off after a specified time, even if the device does not
have a sleep function.
ENABLING THE SLEEP TIMER
If the SLEEP key does not operate your device’s
built-in sleep timer or activate on the remote, you
must enable the sleep timer for that mode:
1. Press a mode key (i.e., TV, VCR, CBL/SAT, DVD,
CD, AUD).
2. Press and hold P until the bottom IR segment
flashes twice. The Program Keys will appear.
3. Press VO L ! once.The bottom IR
segmentwill flash four times and the Program
Keys will appear again.
4. To exit programming, press HOME once.The
display will return to the last-selected device
menu screen
5. Volume will again be independently controlled
according to its default states for all
programmed devices.
.
3. Press OTHER once.The Other programming
screen will appear:
4. Using the number keys, enter 9 7 0. The IR
segment will flash twice, confirming Sleep is
enabled.
The sleep timer is now enabled for that device.
Repeat these steps for each device where you want
to use the sleep timer.
14 Setting the Sleep Timer/Setting the Sleep Timer
 Loading...