


©
2000 RadioShack Corporation.
All Rights Reserved.
RadioShack and RadioShack.com are trademarks used by RadioShack Corporation.
OWNER’S MANUAL — Please read before using this equipment.
Jumbo EL Travel Alarm Clock
Your RadioShack Jumbo EL (Electro-Luminescent) Travel Alarm
Clock combines a simple design with advanced technology in this
easy-to-use alarm clock. Its light weight lets you carry it almost anywhere — pack it in your suitcase or with your camping gear!
The alarm clock’s other features include:
Backlight
— lets you light the display for about 5 seconds so you
can see the time in the dark.
Crescendo Alarm
— gradually increases in volume to gently wake
you.
Clock Cover
— prevents you from accidentally changing the time-
setting controls while you carry the clock.
Snooze Control
— temporarily silences the alarm for about 8 min-
utes so you can sleep a little longer.
Built-In Stand
— lets you place the clock on a flat surface for easy
viewing.
Lock Control
— keeps the time and alarm settings from accidental-
ly being changed.
Night Finder
— helps you locate the clock in the dark as the display
flashes every few seconds.
REMOVING THE BATTERY
INSULATION SLIP
Before you can use the alarm clock, you must remove the protective
insulation slip from the battery compartment. To remove the slip,
grasp its end and gently pull it out.
INSTALLING BATTERIES
Your clock requires two AAA batteries (not supplied) to power the
backlight and the alarm. For the best performanc e and longest life,
we recommend RadioShack alkaline batteries.
Cautions:
• Use only fresh batteries of the required size and recommended
type.
• Do not mix old and new batteries, different types of batteries
(standard, alkaline, or rechargeable), or rechargeable batte ries
of different capacities.
1. Slide the battery compartment cover in the direction of the
arrow to remove it.
2. Place the batteries in the compartment as indicated by the
polarity symbols (+ and –) marked inside.
3. Replace the cover.
When the alarm sound becomes weak or distorted or the backlight
lights dimly or not at all, replace the AAA batteries. When the battery
low indicator appears, replace the button-cell battery. See “Replacing the Button-Cell Battery” on Page 2.
Warning:
Dispose of old batteries promptly and properly. Do not
burn or bury them.
Caution:
If you do not plan to use the alarm clock for a month or
longer, remove the batteries. Batteries can leak chemicals that can
destroy electronic parts.
USING THE STAND
To use the control panel cover as a stand, flip the cover under the
clock and set in on a level surface (such as a table).
SETTING THE TIME
1. Grasp the cover on either side and lift it up to open it.
2. Set
TIME SET/LOCK/ALARM SET
to
TIME SET
. The time display
flashes.
3. Repeatedly press (or hold down)
orto set the time. The
clock scrolls through the time, either forward or backward.
Note:
When scrolling through the time,
AM
appears for AM
hours, and PM appears for PM hours.
4. Release orwhen the clock reaches the desired time.
5. Set
TIME SET/LOCK/ALARM SET
to
LOCK
. The time stops flash-
ing.
USING THE ALARM
Setting the Alarm Time
1. Grasp the cover on either side and lift it up to open it.
2. Set
TIME SET/LOCK/ALARM SET
to
ALARM SET
. The alarm time,
located at the top left of the display, flashes.
3. Repeatedly press (or hold down)
orto set the alarm time.
The clock scrolls through the time, either forward or backward.
Note:
When scrolling through the time, AM appears for AM
hours, and
PM
appears for PM hours.
4. Release orwhen the clock reaches the desired time.
5. Set
TIME SET/LOCK/ALARM SET
to
LOCK
. The alarm time stops
flashing.
Turning the Alarm On/Off
Set
ALARM/OFF/ON
to ON to turn on the alarm. Set
ALARM/OFF/ON
to
OFF
to turn off the alarm. appears when the alarm is on.
The alarm sounds for about 1 minute at the set alarm time. After
about 1 minute, the alarm automatically turns off, and sounds at the
same time the next day. To silence the alarm sooner, set
ALARM/
OFF/ON
to
OFF
.
USING SNOOZE
Note:
You can only use snooze when the clock is set on its stand.
To silence the alarm for about 8 minutes, gently press down on
((SNOOZE))
so the clock rocks back on its stand and beeps.
63-965
09A00
Printed in China
RadioShack Corporation
Fort Worth, Texas 76102
Limited One-Year Warranty
This product is warranted by RadioShack agai nst m anufactur ing d efects in m ateri al and work manship under normal use for one (1) year from the date of purchase from RadioShack companyowned stores and authorized RadioShack franchisees and dealers. EXCEPT AS PROVIDED
HEREIN, RadioShack MAKES NO EXPRESS WARRANTIES AND ANY IMPLIED WARRANTIES, INCLUDING THOSE OF MERCHANTABILITY AND FITNESS FOR A PARTICULAR PURPOSE, ARE LIMITED IN DURATION TO THE DURATION OF THE WRITTEN LIMITED
WARRANTIES CONTAINED HEREIN. EXCEPT AS PROVIDED HEREIN, RadioShack SHALL
HAVE NO LIABILITY OR RE SPONS IBILITY T O CUST OMER OR ANY OTHER PERSON OR ENTITY WITH RESPECT TO ANY LIABILITY, LOSS OR DAMAGE CAUSED DIRECTLY OR INDIRECTLY BY USE OR PERFORMANCE OF THE PRODUCT OR ARISING OUT OF ANY
BREACH OF THIS WARRANTY, INCLUDING, BUT NOT LIMITED TO, ANY DAMAGES RESULTING FROM INCONVENIENCE, LOSS OF TIME, DATA, PROPERTY, REVENUE, OR
PROFIT OR ANY INDIRECT, SPECIAL, INCIDENTAL, OR CONSEQUENTIAL DAMAGES, EVEN
IF RadioShack HAS BEEN ADVISED OF THE POSSIBILITY OF SUCH DAMAGES.
Some states do not allow limitations on ho w lo ng a n i mpl i ed w a rr an ty lasts or the exclusion or limitation of incidental or consequential damages, so the above limitations or exclusions may not apply to you.
In the event of a product defect during the warranty period, take the product and the RadioShack
sales receipt as proof of purchase date to any RadioShack store. RadioShack will, at its option,
unless otherwise provided by law: (a) corr ect th e def ec t by pr odu ct re pair wit h out ch arg e for par ts
and labor; (b) replace the product with one of the same or similar design; or (c) refund the purchase price. All replaced parts and products, and products on which a refund is made, become
the property of RadioShack. New or reconditioned parts and products may be used in the performance of warranty service. Repaire d or re pla ced parts and pro duc ts are warra nted f or th e rema inder of the original warranty period. You will be charged for repair or replacement of the product
made after the expiration of the warranty period.
This warranty does not cover: (a) damage or failure caused by or attributable to acts of God,
abuse, accident, misuse, improper or abnormal usage, failure to follow instructions, improper installation or maintenance, alteration, lightning or other incidence of excess voltage or current; (b)
any repairs other than those provided by a RadioShack Authorized Service Facility; (c) consumables such as fuses or batteries; (d) cosmetic damage; (e) transportation, shipping or insurance
costs; or (f) costs of product removal, installation, set-up service adjustment or reinstallation.
This warranty gives you specific legal rights, and you may also have other rights which vary from
state to state.
RadioShack Customer Relations,
200 Taylor Street, 6th Floor, Fort Worth, TX 76102
We Service What We Sell
12/99
You can press
((SNOOZE))
repeatedly, but after about one hour,
the alarm automatically turns off and sounds again at the preset time
the next day.
USING THE BACKLIGHT
Note:
You can only use the backlight when the clock is set on its
stand.
To light the display for about 5 seconds, gently press down on
((SNOOZE))
so the clock rocks back on its stand and beeps and
the display lights.
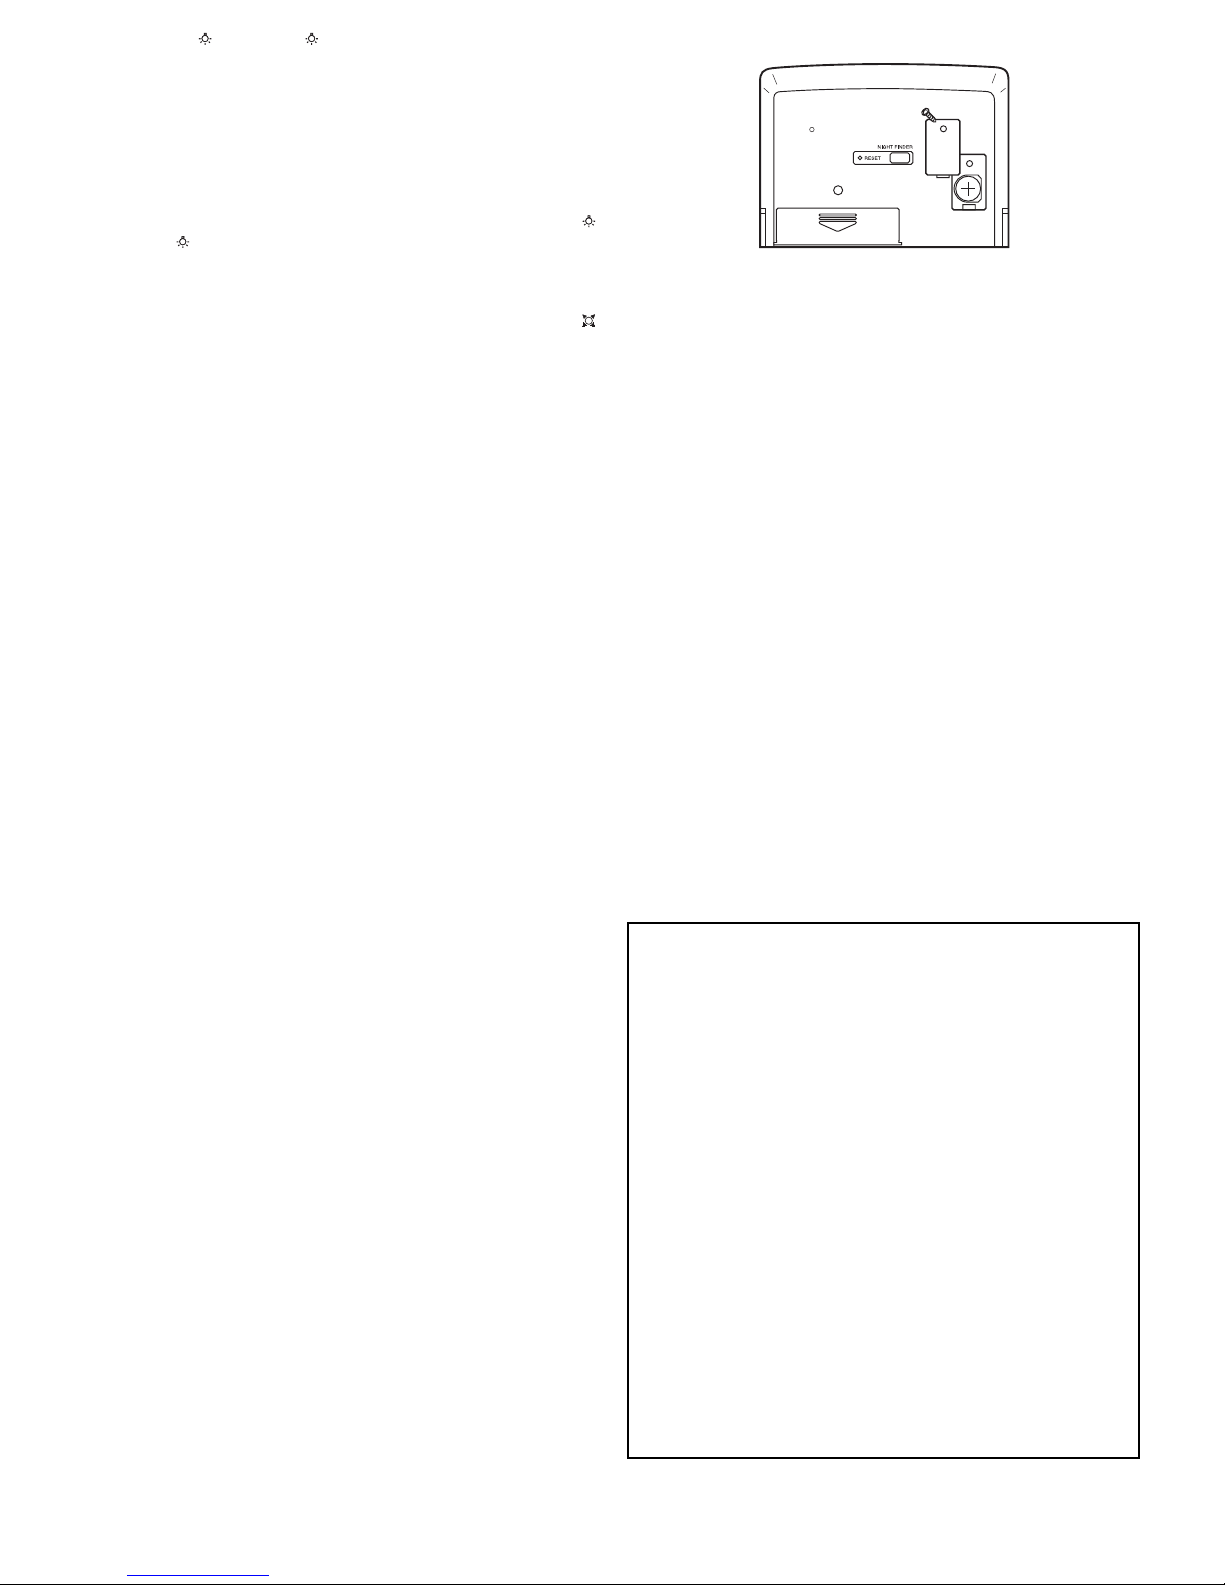
You can also press
NIGHT FINDER
(on the back of the clock) so the
display flashes every few seconds to help you find it in the dark.
appears when
NIGHT FINDER
is on.
NIGHT FINDER
automatically
shuts off after about 9 hours.
If
NIGHT FINDER
is turned on and the alarm sounds,
NIGHT FINDER
shuts off
after
the alarm cycle stops. The alarm cycle must complete-
ly finish. If you silence the alarm
before
it completes its cycle,
NIGHT
FINDER
remains on.
Note:
You can only use
NIGHT FINDER
in a very dark environment.
You may not be able to see the flashing display under normal light
conditions.
CARE
To enjoy your RadioShack Jumbo EL Travel Alarm Clock for a long
time:
• Keep the clock dry. If it gets wet, wipe it dry immediately.
• Use and store the clock only in normal temperature environments.
• Handle the clock gently and carefully. Do not drop it.
• Keep the clock away from dust and dirt.
• Wipe the clock with a damp cloth occasionally to keep it looking
new.
Modifying or tampering with the clock’s internal components can
cause a malfunction and might invalidate its warranty. If your clock is
not performing as it should, take it to your local RadioShack store for
assistance.
REPLACING THE BUTTON-CELL BATTERY
Your clock comes with one 357A button-cell battery to power the
clock. When the low battery indicator appears, replace the buttoncell battery. For the best performance and longest life, we recommend RadioShack alkaline batteries.
Warnings:
• Keep button-cell batteries away from children. Swallowing a
button-cell battery can be fatal.
• Dispose of old batteries promptly and properly. Do not burn or
bury them.
Caution:
Use only a fresh battery of the required size and recom-
mended type.
Follow these steps to replace the button-cell battery.
1. Use a Phillips screwdriver to loosen the screw on the button-cell
battery compartment.
2. Lift off the cover.
3. Remove the old battery and replace it with a new one, positive
(+) side up.
4. Replace the cover and secure it with its screw.
RESETTING THE CLOCK
To reset the clock, use a pointed object (such as a straightened paper clip) to press
RESET
on the back of the clock. The default time is
set to
12:00 PM
and the alarm is set to
6:00 AM
. Reset the time
and alarm, as necessary.
SPECIFICATIONS
Power Requirements ........................................ One 357A button-cell battery
2 AAA batteries
Accuracy ............................................................................ ±0.67 second/day
Battery Life .................................................................. A76 battery, 6 months
2 AAA batteries, 10 months
Dimensions (HWD) ......................... 3
1
/16 × 43/16 × 5/8 in (78 × 107 × 16 mm)
Weight ....................................................................................... 3.2 oz (90 g)
Specifications are typical; individual units might vary. Specifications are subject to change and improvement without notice.
 Loading...