

Page 1
32-3043
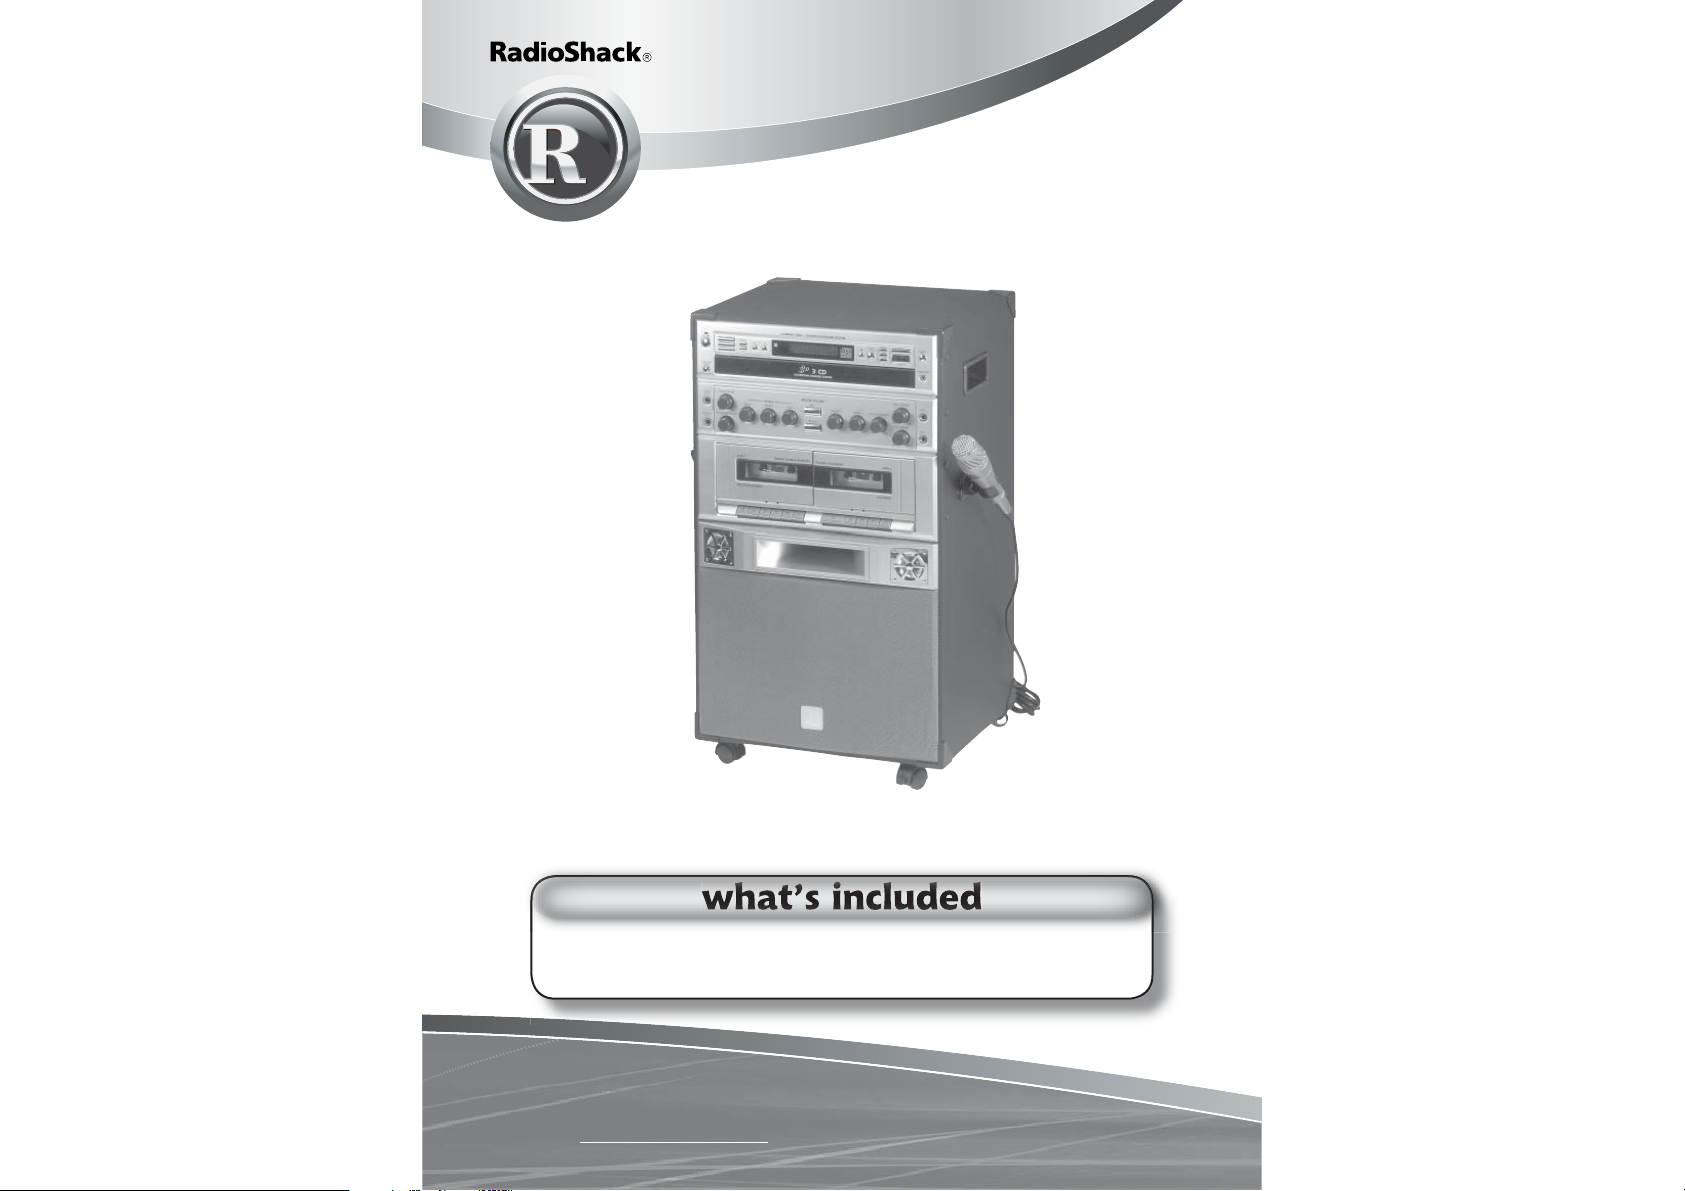
semi-pro 3 CD/CDG carousel
karaoke system with dual cassette
Thank you for purchasing your Semi-Pro 3 CDG Carousel Karaoke
System with Dual Cassette from RadioShack.
microphone remote control
user’s guide
Please read this user’s guide before installing,
setting up and using your new product
www.radioshack.com
Page 2
The Basics
The Basics
contents
a look at your karaoke system 3
The Basics
connecting to a TV 4
connecting an external audio
component 4
connecting your karaoke system 4
connecting your microphone 4
operating your karaoke system 5-6
operating your cassette deck 5
recording from a cassette to a cassette 6
recording from a CD/CDG to a cassette 6
operating your karaoke machine 6
Beyond the Basics
operating your CD/CD+G carousel 5
using advanced features 7-8
search play (for CDs only) 7
repeat play 7
random play 7
time display selection 8
program play 8
important information 9-10
warnings and cautions 9
the FCC wants you to know 10
skipping tracks on CDs/CDGs 7
care and maintenance 9
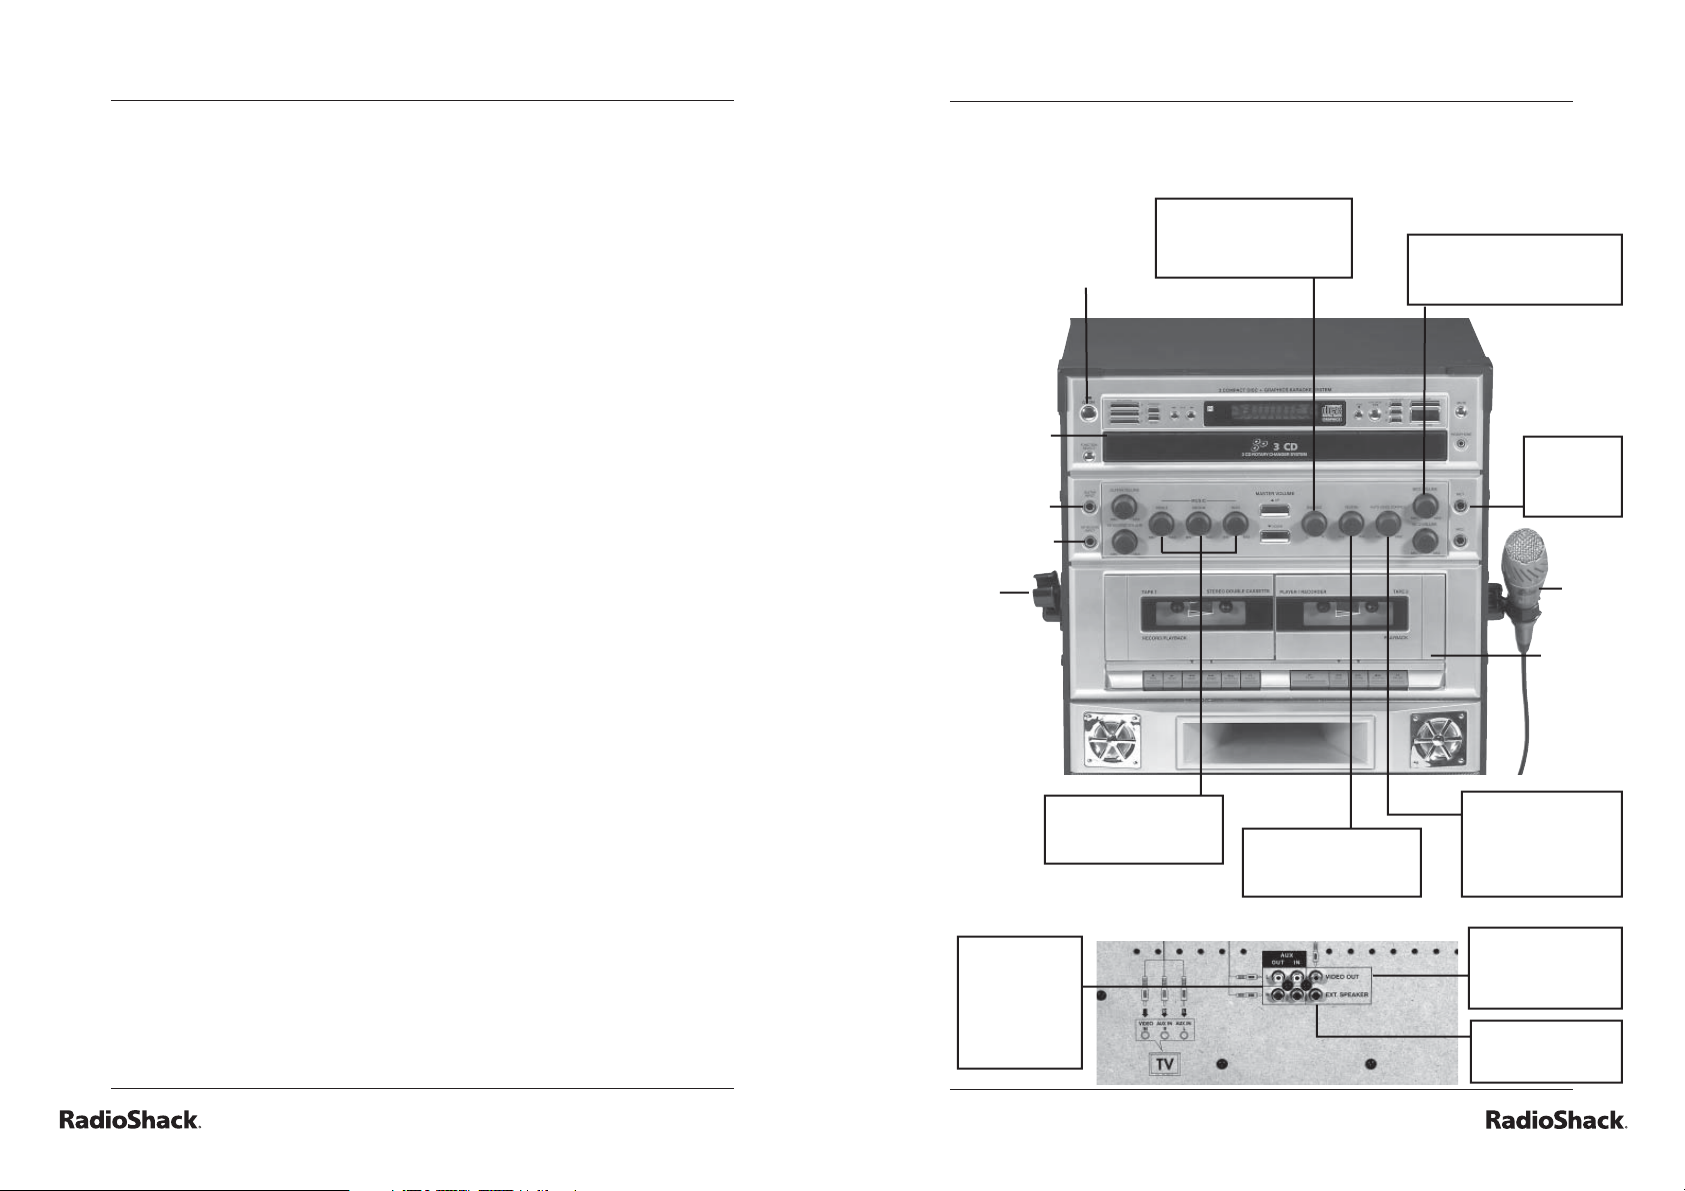
a look at your karaoke system
Balance Control - Lets
you balance between
3 CD/CDG
Changer
Guitar jack
Keyboard
jack
Mic
holder
your voice and the
Power On
To ne - Lets you defi ne
Treble, Medium and
Bass settings.
original singer’s voice.
Reverb Control - Lets
you enrich your voice
for a concert effect.
Microphone Volume
Control - Adjust your voice
for perfect balance.
Auto Voice Control
- Lets you replace
your voice with the
singer’s voice while
CD plays.
Mic jacks 1
and 2 - Plug
into both for
duets.
Mic and
holder
Dual
cassette
deck
Troubleshooting 11
Warranty
12
Accessories 12
2
AUX OUT
L/R - Plug your
external audio
componeent’s
AUDIO INPUT
jacks here.
Rear of Karaoke System
3
Video Out - Plug
supplied cable for
connection to a TV
or monitor.
Ext. Speaker - lets
you connect an
extra speaker.
Page 3
The Basics
The Basics
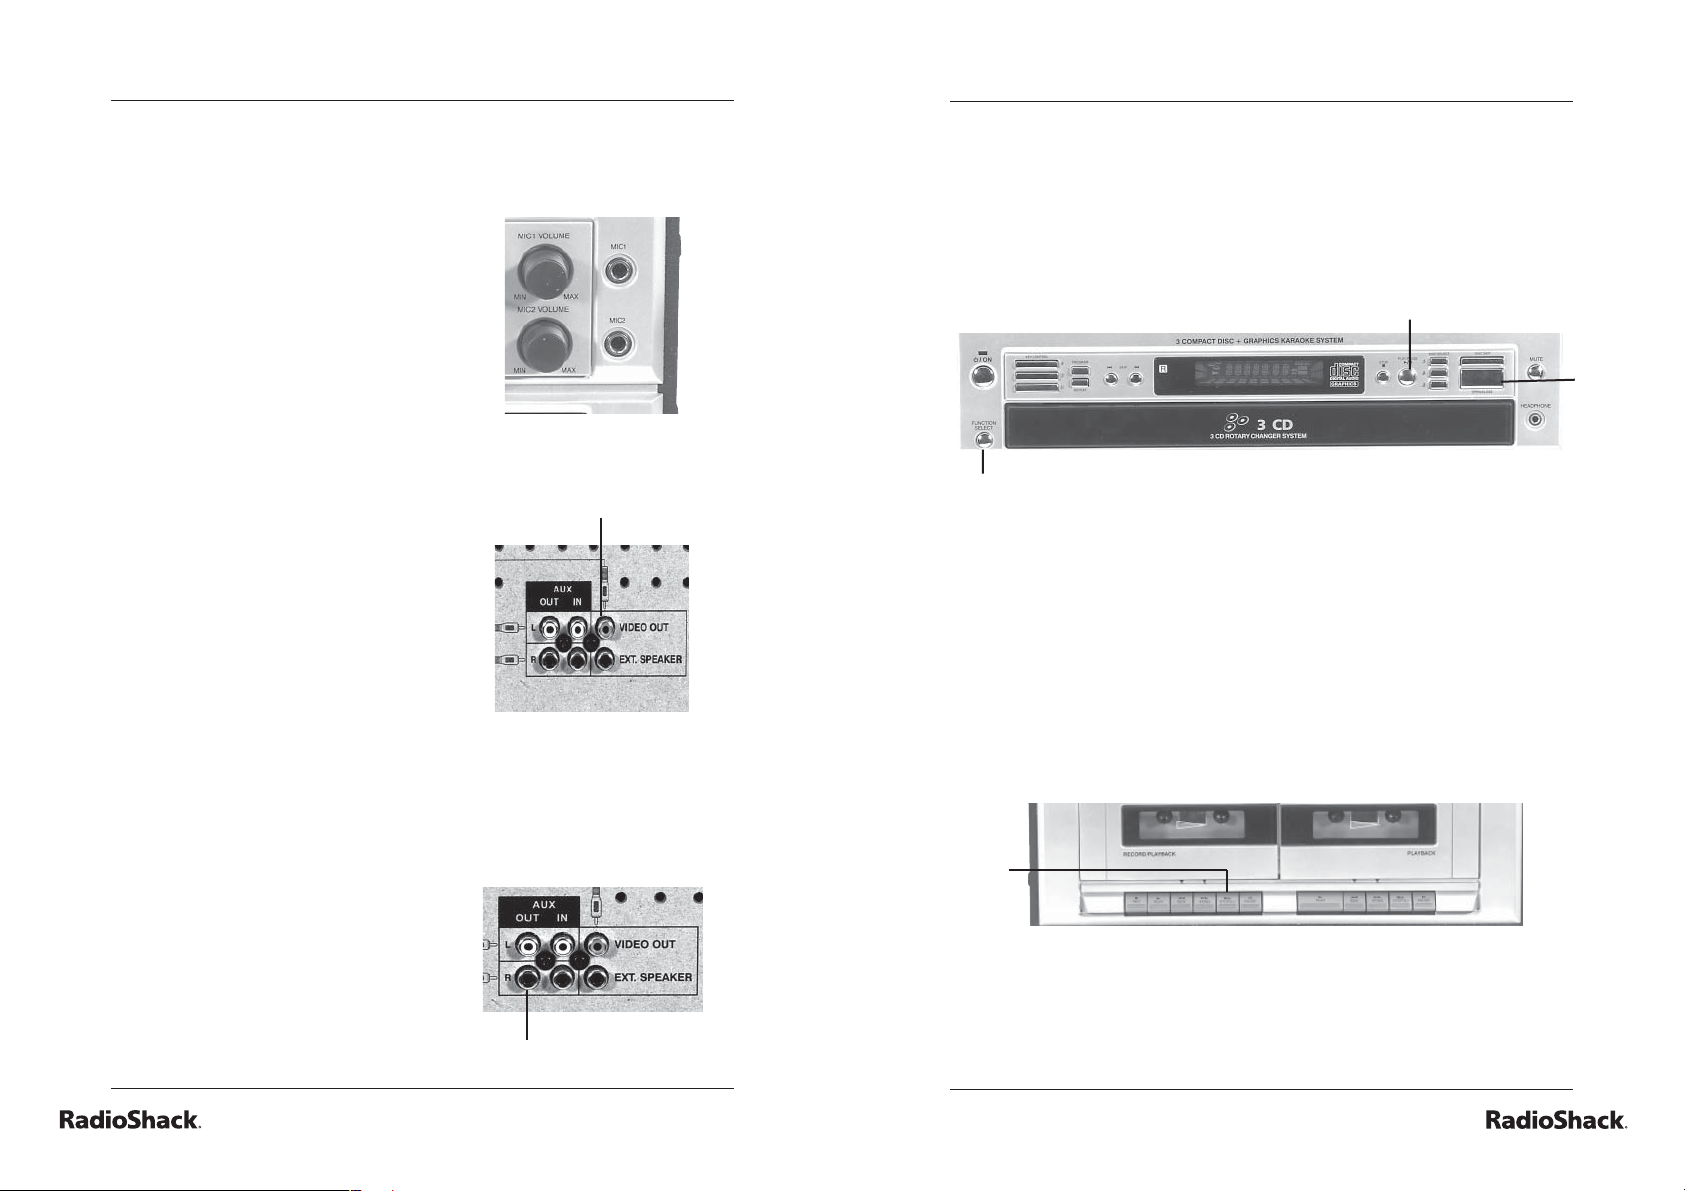
connecting your karaoke system
connecting your microphone
The system has two
microphone jacks. You can
use the supplied microphone
to sing along to your favorite
songs, and connect an
additional microphone (not
supplied) for duets, or lead
and background vocals.
connecting to a tv
You can connect your karaoke
system to a TV or monitor
and see the words and/or
images produced by the CDG.
Plug one end of the supplied
cable into the VIDEO OUT jack
and other end into your TV’s
VIDEO IN jack.
connecting an external audio
component
You can connect your
karaoke system to an
external source, such as
an equalizer/booster or PA
system. Connect the
external audio component’s
AUDIO INPUT jacks to the
karaoke system’s AUX OUT
R and L jacks.
AUX OUT L/R jacks
VIDEO OUT
operating your karaoke system
operating your CD/CD+G carousel
Plug in your karaoke system’s power cord into a standard
AC outlet.
Turn on your karaoke system and press FUNCTION
SELECT to select the CD function.
FUNCTION SELECT
Press OPEN/CLOSE and insert one disc into the tray, with
the label facing up. If desired, insert two additional discs in
the other two trays, by pressing DISC SKIP.
Press OPEN/CLOSE to close the disc tray and press
PLAY/PAUSE on your karaoke system or press the number
matching the desired track on your remote control.
operating your cassette deck
Press STOP/EJECT to open the cassette door.
Insert a cassette, with the exposed tape down and close the
door.
STOP/
EJECT
Press FUNCTION SELECT to select the tape function and
press PLAY.
For consecutive play, press PLAY on the TAPE 2 cassette deck you
want to begin with. Then, press PAU SE and PLAY on the TAPE 1
next cassette deck. when the fi rst deck stops, the second deck will
begin.
PLAY/PAUSE
OPEN/
CLOSE
4
5
Page 4

The Basics
Beyond the Basics
recording from a cassette to a cassette
Insert a blank cassette in Tape 1.
Insert a cassette in Tape 2 and press PLAY.
Press RECORD and PLAY at the same time on
Ta p e 1 .
RECORD/PLAY
PLAY
PLAY
MIC
VOLUME
MIC
Jack
MASTER
VOLUME
recording from a CD/CDG to a cassette
Insert a blank cassette in Tape 1.
Open the CD changer and insert a CD/CD+G in the CD
compartment and press FUNCTION SELECT to select CD
function.
Press PLAY to start the CD. Then, press RECORD
and PLAY at the same time on Tape 1.
operating your karaoke machine
Connect the supplied microphone to one of the MIC jacks
and turn on your microphone.
Insert a CD/CD+G.
Rotate the MIC VOLUME or MASTER VOLUME to the
desired level.
Sing along with your CD.
using advanced features
skipping tracks on CDs and CDGs
You can skip backward or forward to the desired track by
repeatedly pressing SKIP/SEARCH BACKWARD or FORWARD.
search play (For CDs only)
When playing any audio CD, press and hold down SKIP or .
The system will search at high speed in the forward or backward
direction. The CD plays rapidly and you can hear the sound at a
high speed. To return to normal play, release SKIP.
SKIP
/
repeat play
You can set the CD player to continuously play a single track, all
tracks, or all of the programmed tracks on a loaded CD.
Repeatedly press REPEAT on the remote control to select the one
of the three repeat play modes.
REPEAT 1 – to repeat the current track
REPEAT 1 DISC – to repeat all tracks on
one CD
REPEAT DISC - to repeat all tracks for all
loaded CDs
random play
PLAY/PAUSE
REPEAT
Press RANDOM on the remote control.
Press PLAY/PAUSE to start random play.
RANDOM
6
7
Page 5

Beyond the Basics
Beyond the Basics
time display selection
Repeatedly press DISPLAY on your remote during normal play. You
will see REMAIN, TOTAL, REMAIN TOTAL on the top left side of the
display.
REMAIN - Remaining playing time for the current track
TOTAL - Elapsed playing time for the disc
REMAIN TOTAL - Total remaining playing time for the disc
The displayed playing times may differ slightly
Note
from the times listed on the notes accompanying
the disc.
program play
You can program up to 32 selections on up to three discs for play in
any order.
The same disc or track can be programmed more
Notes
To begin the programming procedure, select the “CD” mode.
Press PROGRAM and select DISC SELECT or DISC SKIP to
select the desired disc, in CD player stop mode.
Press SKIP or the number button on the remote control to
select the desired track. P-01 will appear.
Press PROGRAM to store the selected track.
Repeat steps 2-4 to program up to 32 tracks.
Press PLAY/PAUSE to play the programmed tracks.
To review the programmed tracks, press PROGRAM
repeatedly, in CD player stop mode.
To replace the number of the tracks you want, press
PROGRAM repeatedly until the desired track appears, and
repeat steps 3-4 to select and store the new track.
To erase a programmed sequence at any time, press
OPEN/CLOSE, or press STOP after you stop the playing.
than once.
Load the disc that you want to program before
starting programmed play.
important information
care and maintenance
To clean the surface of the unit, simply wipe with a
soft, clean cloth moistened with plain lukewarm water.
To clean the cassette deck, use a soft, clean moistened
Handle your CD/CDGs with care.
If fi ngerprints, dust or dirt appear on your CD/CDGs, wipe
warnings and cautions
The normal ventilation of this product shall not be impeded
This CD player is made and tested to meet exact safety
This CD player uses a laser light beam. Only qualifi ed
The use of controls, adjustments, or procedures other
The CD player is classifi ed as a Class 1 Laser product. The
Invisible laser radiation when open. Avoid exposure to
To clean the tape heads, pinch the rollers and capstans,
and wipe using a cotton swab moistened with alcohol or
head-cleaning fl uid.
cloth. Never use chemical cleaners or let liquid inside the
unit.
with a damp cloth in straight lines from the center to the
edge. Do not use detergents or abrasive cleaning agents.
for intended use.
standards. It meets FCC requirements and complies with
the safety performance standards of the U.S. Department of
Health and Human Services.
service personnel should remove the cover or attempt to
service this device, due to possible eye injury.
than those specifi ed herein might result in hazardous
radiation exposure.
label is located on the rear panel.
beam.
The CD player shall be used only in an open area.
8
9
Page 6

Beyond the Basics
Beyond the Basics
the FCC wants you to know
This equipment has been tested and found to comply with the limits for a Class
B digital device, pursuant to Part 15 of the FCC Rules. These limits are designed
to provide reasonable protection against harmful interference in a residential
installation. This equipment generates, uses, and can radiate radio frequency energy
and, if not installed and used in accordance with the instructions, may cause harmful
interference to radio
communications.
However, there is no guarantee that interference will not occur in a particular
installation. If this equipment does cause harmful interference to radio or
television reception, which can be determined by turning the equipment off and
on, the user is encouraged to try to correct the interference by one or more of the
following measures:
• Reorient or relocate the receiving antenna.
• Increase the separation between the equipment and receiver.
• Connect the equipment into an outlet on a circuit different from that to
which the receiver is connected.
Consult your local RadioShack store or an experienced radio/TV technician
for help.
If you cannot eliminate the interference, the FCC requires that you stop
using your phone.
Changes or modifi cations not expressly approved by RadioShack may cause
interference and void the user’s authority to operate the equipment.
WARNING: To reduce the risk of fi re or shock hazard, do not expose this product to rain or moisture.
RISK OF ELECTRIC SHOCK.
D O N O T O P E N .
troubleshooting
troubleshooting your CD carousel
No power when the unit is on - Insert the power plug into the AC outlet.
No power when plugged into the AC outlet - Check the outlet with a working
lamp or appliance.
No sound
Turn up the volume; turn up the volume on the TV or PA system; or,
turn on the TV or PA system.
Follow the directions for “Connecting your Karaoke system.”
Select the correct function.
CD player not working properly
Insert the disc properly; wipe the CD clean; use a new disc.
Let moisture on disc dry.
Disconnect the karaoke machine from the power source for 30 seconds.
No sound if using home stereo - Select AUX IN as the source for your home
stereo; or, follow the directions for “Connecting your Karaoke system.”
No sound if using a TV or VCR - Follow directions for “Connecting your
Karaoke system.”
Song lyrics leave double image during play - Restart the song selection to
reset or clear the video screen.
No song lyrics appear on the screen -
Connect the karaoke machine’s video cable from the VIDEO OUT to your
TV’s VIDEO IN. Using your TV remote, select the VIDEO input.
Check your connections. Refer to “Connecting your Karaoke system.”
Check the disc to make sure it is a CD+G.
If it is a CD+G, make sure it is clean.
CAUTION: TO REDUCE THE RISK OF ELECTRIC SHOCK, DO NOT REMOVE COVER OR BACK. NO USERSERVICEABLE PARTS INSIDE. REFER SERVICING TO QUALIFIED PERSONNEL.
This symbol is intended to alert you to the presence of uninsulated
dangerous voltage within the product’s enclosure that might be of
suffi cient magnitude to constitute a risk of electric shock. Do not
open the product’s case.
This symbol is intended to inform you that important operating and
maintenance instructions are included in the literature accompanying
this product.
10
troubleshooting your tape deck
Cannot copy from Deck 2 to Deck 1 - Check for correct tape in
Deck 2.
Distorted sound - Clean the capstan or replace the tape.
Cannot record - Replace the tape or cover tab openings with adhesive tape;
or, make sure the Record and Play buttons are pressed down at the same
time.
Cannot copy from Deck 2 to Deck 1 - Set the FUNCTION button to TAP E
mode.
11
Page 7

accessories
Stop by your local RadioShack store to pick up
additional accessories for your karaoke system.
Full-Sized
Headphones
Dynamic
Omnidirectional
Microphone
3-Way Bookshelf
Speaker
This product is warranted by RadioShack against manufacturing defects in material and workmanship
under normal use for one (1) year from the date of purchase from RadioShack company-owned stores
and authorized RadioShack franchisees and dealers. For complete warranty details and exclusions, check
with your local RadioShack store.
RadioShack Customer Relations
200 Taylor Street, 6th Floor, Fort Worth, TX 76102 04/04
©2004. RadioShack Corporation.
All rights reserved. RadioShack and RadioShack.com are
trademarks used by RadioShack Corporation.
Printed in China
32-3043
05A04
 Loading...