

Page 1

TABLE OF CONTENTS
Introduction. . . . . . . . . . . . . . . . . . . . . . . . . . . . . . . . . . . . . . . . . . . . . . . . . . . . . . . . . . . . . . . . . . . . . . . . . . . . . . . 3
Installing Batteries. . . . . . . . . . . . . . . . . . . . . . . . . . . . . . . . . . . . . . . . . . . . . . . . . . . . . . . . . . . . . . . . . . . . . . . . . 4
Setting The Clock . . . . . . . . . . . . . . . . . . . . . . . . . . . . . . . . . . . . . . . . . . . . . . . . . . . . . . . . . . . . . . . . . . . . . . . . . . 5
A Quick Look At The Controls. . . . . . . . . . . . . . . . . . . . . . . . . . . . . . . . . . . . . . . . . . . . . . . . . . . . . . . . . . . . . . . . . 6
Key Functions. . . . . . . . . . . . . . . . . . . . . . . . . . . . . . . . . . . . . . . . . . . . . . . . . . . . . . . . . . . . . . . . . . . . . . . . . . . . 7
Key Table . . . . . . . . . . . . . . . . . . . . . . . . . . . . . . . . . . . . . . . . . . . . . . . . . . . . . . . . . . . . . . . . . . . . . . . . . . . . . . 10
Programming A Device. . . . . . . . . . . . . . . . . . . . . . . . . . . . . . . . . . . . . . . . . . . . . . . . . . . . . . . . . . . . . . . . . . . . . 16
Programming A TV/VCR Combo . . . . . . . . . . . . . . . . . . . . . . . . . . . . . . . . . . . . . . . . . . . . . . . . . . . . . . . . . . . . . 18
Searching For Your Code . . . . . . . . . . . . . . . . . . . . . . . . . . . . . . . . . . . . . . . . . . . . . . . . . . . . . . . . . . . . . . . . . . . 19
Using Learning . . . . . . . . . . . . . . . . . . . . . . . . . . . . . . . . . . . . . . . . . . . . . . . . . . . . . . . . . . . . . . . . . . . . . . . . . . . 20
Programming A Learning Key . . . . . . . . . . . . . . . . . . . . . . . . . . . . . . . . . . . . . . . . . . . . . . . . . . . . . . . . . . . . . . . 20
Deleting A Function From A Learning Key . . . . . . . . . . . . . . . . . . . . . . . . . . . . . . . . . . . . . . . . . . . . . . . . . . . . . . 22
Changing Volume Lock. . . . . . . . . . . . . . . . . . . . . . . . . . . . . . . . . . . . . . . . . . . . . . . . . . . . . . . . . . . . . . . . . . . . . 22
Programming Volume Lock. . . . . . . . . . . . . . . . . . . . . . . . . . . . . . . . . . . . . . . . . . . . . . . . . . . . . . . . . . . . . . . . . 22
Programming Volume Unlock . . . . . . . . . . . . . . . . . . . . . . . . . . . . . . . . . . . . . . . . . . . . . . . . . . . . . . . . . . . . . . . 23
Using Macros . . . . . . . . . . . . . . . . . . . . . . . . . . . . . . . . . . . . . . . . . . . . . . . . . . . . . . . . . . . . . . . . . . . . . . . . . . . . 24
Programming A Favorite Channel . . . . . . . . . . . . . . . . . . . . . . . . . . . . . . . . . . . . . . . . . . . . . . . . . . . . . . . . . . . . 24
Programming A Master Power Key With Instant Channel Selection . . . . . . . . . . . . . . . . . . . . . . . . . . . . . . . . . . . 25
Clearing A Macro . . . . . . . . . . . . . . . . . . . . . . . . . . . . . . . . . . . . . . . . . . . . . . . . . . . . . . . . . . . . . . . . . . . . . . . . 26
Using Keymover. . . . . . . . . . . . . . . . . . . . . . . . . . . . . . . . . . . . . . . . . . . . . . . . . . . . . . . . . . . . . . . . . . . . . . . . . . . 26
Programming Keymover . . . . . . . . . . . . . . . . . . . . . . . . . . . . . . . . . . . . . . . . . . . . . . . . . . . . . . . . . . . . . . . . . . . 26
Restoring A Single Keymoved Key . . . . . . . . . . . . . . . . . . . . . . . . . . . . . . . . . . . . . . . . . . . . . . . . . . . . . . . . . . . . 27
Restoring All Keymoved Keys In A Single Mode . . . . . . . . . . . . . . . . . . . . . . . . . . . . . . . . . . . . . . . . . . . . . . . . . . 28
Programming Favorite Channel Scan. . . . . . . . . . . . . . . . . . . . . . . . . . . . . . . . . . . . . . . . . . . . . . . . . . . . . . . . . 28
Using Channel Scan. . . . . . . . . . . . . . . . . . . . . . . . . . . . . . . . . . . . . . . . . . . . . . . . . . . . . . . . . . . . . . . . . . . . . . . 29
Using My System. . . . . . . . . . . . . . . . . . . . . . . . . . . . . . . . . . . . . . . . . . . . . . . . . . . . . . . . . . . . . . . . . . . . . . . . . . 30
Control Organization . . . . . . . . . . . . . . . . . . . . . . . . . . . . . . . . . . . . . . . . . . . . . . . . . . . . . . . . . . . . . . . . . . . . . 30
Programming My System . . . . . . . . . . . . . . . . . . . . . . . . . . . . . . . . . . . . . . . . . . . . . . . . . . . . . . . . . . . . . . . . . . 31
Operating My System . . . . . . . . . . . . . . . . . . . . . . . . . . . . . . . . . . . . . . . . . . . . . . . . . . . . . . . . . . . . . . . . . . . . 33
Reassigning Device Keys . . . . . . . . . . . . . . . . . . . . . . . . . . . . . . . . . . . . . . . . . . . . . . . . . . . . . . . . . . . . . . . . . . . 34
Restoring Factory Default Settings. . . . . . . . . . . . . . . . . . . . . . . . . . . . . . . . . . . . . . . . . . . . . . . . . . . . . . . . . . . 36
Troubleshooting . . . . . . . . . . . . . . . . . . . . . . . . . . . . . . . . . . . . . . . . . . . . . . . . . . . . . . . . . . . . . . . . . . . . . . . . . . 37
Error Messages . . . . . . . . . . . . . . . . . . . . . . . . . . . . . . . . . . . . . . . . . . . . . . . . . . . . . . . . . . . . . . . . . . . . . . . . . . . 38
Specifications . . . . . . . . . . . . . . . . . . . . . . . . . . . . . . . . . . . . . . . . . . . . . . . . . . . . . . . . . . . . . . . . . . . . . . . . . . . . 38
Instruction To The User. . . . . . . . . . . . . . . . . . . . . . . . . . . . . . . . . . . . . . . . . . . . . . . . . . . . . . . . . . . . . . . . . . . . . 39
Care . . . . . . . . . . . . . . . . . . . . . . . . . . . . . . . . . . . . . . . . . . . . . . . . . . . . . . . . . . . . . . . . . . . . . . . . . . . . . . . . . . . . 39
Limited Warranty. . . . . . . . . . . . . . . . . . . . . . . . . . . . . . . . . . . . . . . . . . . . . . . . . . . . . . . . . . . . . . . . . . . . . . . . . . 40
Guía Del Usuario . . . . . . . . . . . . . . . . . . . . . . . . . . . . . . . . . . . . . . . . . . . . . . . . . . . . . . . . . . . . . . . . . . . . . . . . . 42
Manufacturer’s Codes (Códigos De Fabricantes) . . . . . . . . . . . . . . . . . . . . . . . . . . . . . . . . . . . . . . . . . . . . . . . 84
Setup Codes For Audio Amplifiers (Códigos De Configuración Para Amplificadores De Audio) . . . . . . . . . . . . . . . 84
Setup Codes For Audio Cassette Decks (Códigos De Configuración Para Reproductores De Audiocasetes) . . . . . 84
Setup Codes For Audio Receivers (Códigos De Configuración Para Receptores De Audio) . . . . . . . . . . . . . . . . . . 84
Setup Codes For Audio Services (Códigos De Configuración Para Servicios De Audio) . . . . . . . . . . . . . . . . . . . . . 85
Setup Codes For Audio Turntables (Códigos De Configuración Para Tornamesas De Audio). . . . . . . . . . . . . . . . . 85
Setup Codes For Cable Converters (Códigos De Configuración Para Convertidores De Cable) . . . . . . . . . . . . . . . 85
Setup Codes For CD Players (Códigos De Configuración Para Reproductores De CDs) . . . . . . . . . . . . . . . . . . . . . 85
Setup Codes For DAT Decks (Códigos De Configuración Para Reproductores DAT). . . . . . . . . . . . . . . . . . . . . . . . 86
Setup Codes For DVD Players (Códigos De Configuración Para Reproductores DVD) . . . . . . . . . . . . . . . . . . . . . . 86
Setup Codes For Home Automation (Códigos De Configuración Para La Automatización Del Hogar) . . . . . . . . . . 87
Setup Codes For Home-Theater-In-A-Box Devices (Códigos De Configuración Para Dispositivos
Home-Theater-In-A-Box). . . . . . . . . . . . . . . . . . . . . . . . . . . . . . . . . . . . . . . . . . . . . . . . . . . . . . . . . . . . . . . . . . . 87
Setup Codes For LD Players (Códigos De Configuración Para Reproductores LD). . . . . . . . . . . . . . . . . . . . . . . . . 87
Setup Codes For Satellite Receivers (Códigos De Configuración Para Receptores De Satélite). . . . . . . . . . . . . . . 87
Setup Codes For TVs (Códigos De Configuración Para Televisores) . . . . . . . . . . . . . . . . . . . . . . . . . . . . . . . . . . . 87
Setup Codes For TV/VCR Combos (Códigos De Configuración Para Aparatos Combinados
Televisor/Videograbadora) . . . . . . . . . . . . . . . . . . . . . . . . . . . . . . . . . . . . . . . . . . . . . . . . . . . . . . . . . . . . . . . . . 89
Setup Codes For VCRs (Códigos De Configuración Para Videograbadoras. . . . . . . . . . . . . . . . . . . . . . . . . . . . . . 89
Setup Codes For Video Accessories (Códigos De Configuración Para Accesorios De Vídeo) . . . . . . . . . . . . . . . . . 91
2 Table Of Contents
8-IN-ONE REMOTE
Page 2

INTRODUCTION
The RadioShack 8-in-One Remote is our latest high-performance universal remote control.
It is designed to operate up to eight home entertainment devices, including TV,video, and
audio components.Moreover,this remote control contains sophisticated technology that
will allow you to consolidate the clutter of all of the original remote controls into one easyto-use product.It’s packed with advanced features such as:
•
Liquid Crystal Display (LCD) – with 15 alphanumeric characters,real-time clock, and
icons for constant visual feedback of operations and programming sequences
•
My System – a unique mode that combines different device controls under one mode
for operating convenience
• Macros – for instant activation of favorite key sequences
•
Learning – to capture unique functions from your devices’ original remote controls
•
Key Mover – for copying keys from one device to another, or to a different position in
the same mode
•
Code Search and Verification – help you quickly set up the remote control to operate
your devices
•
Channel Scan and Favorite Channel Scan – let you “channel surf”all available and
favorite channels
• Vol ume L oc k – to assign volume controls to individual devices or to one global device
•
Dedicated Menu/Guide Keys – for instant access to cable and satellite program guides
and menus
•
Searchable Code Library – contains world’s largest and most efficient group of infrared
remote control codes for virtually every current brand and make.
•
Low Battery Icon – to notify you when batteries are getting low
•
Backlighting – to aid operation in low ambient light
After installing four (4) new AAA alkaline batteries (not included,see next page), you
can immediately use the remote to control an RCA TV,VCR, and satellite receiver, a
Motorola (General Instruments) cable converter, and Pioneer CD and DVD players, and
audio devices.
To control other brands, please perform the instructions in
Programming A Device on
page 16 and
Programming A TV/VCR Combo on page 18.
Introduction 3
USER’S GUIDE
Page 3

INSTALLING BATTERIES
Your remote requires four AAA batteries (not supplied) for power. For the best performance
and longest life,we recommend using RadioShack alkaline batteries.
CAUTIONS:
• Use only fresh batteries of the required size and recommended type.
• Do not mix old and new batteries,different types of batteries (e.g., standard,alkaline,
or rechargeable), or rechargeable batteries of different capacities.
• If you do not plan to use the remote for an extended period, remove the batteries.
Batteries can leak chemicals that can destroy electronic parts.
WARNING: Dispose of old batteries promptly and properly. Do not burn or bury them.
TO INSTALL BATTERIES:
1. Press the tab on the battery compartment cover (located on the back of the remote)
and lift off the cover.
2. Place the AAA batteries in the compartment as indicated by the polarity symbols
(+ and –) marked inside.
3. Align the cover key with the compartment opening and replace the cover.
4. If batteries are inserted correctly, the entire LCD will turn on. After 5 seconds of
inactivity,the remote control will turn itself off to conserve battery life.
5. Perform the steps in
Setting The Clock (on the next page) to set the correct time.
NOTE: When a battery icon appears in the display (see page 7,“Key Functions”),the batteries are low.
Simply replace them as soon as possible and the remote will be restored to full functionality, complete
with your favorite settings.
4 Installing Batteries
8-IN-ONE REMOTE
❶
❸❷
Page 4

SETTING THE CLOCK
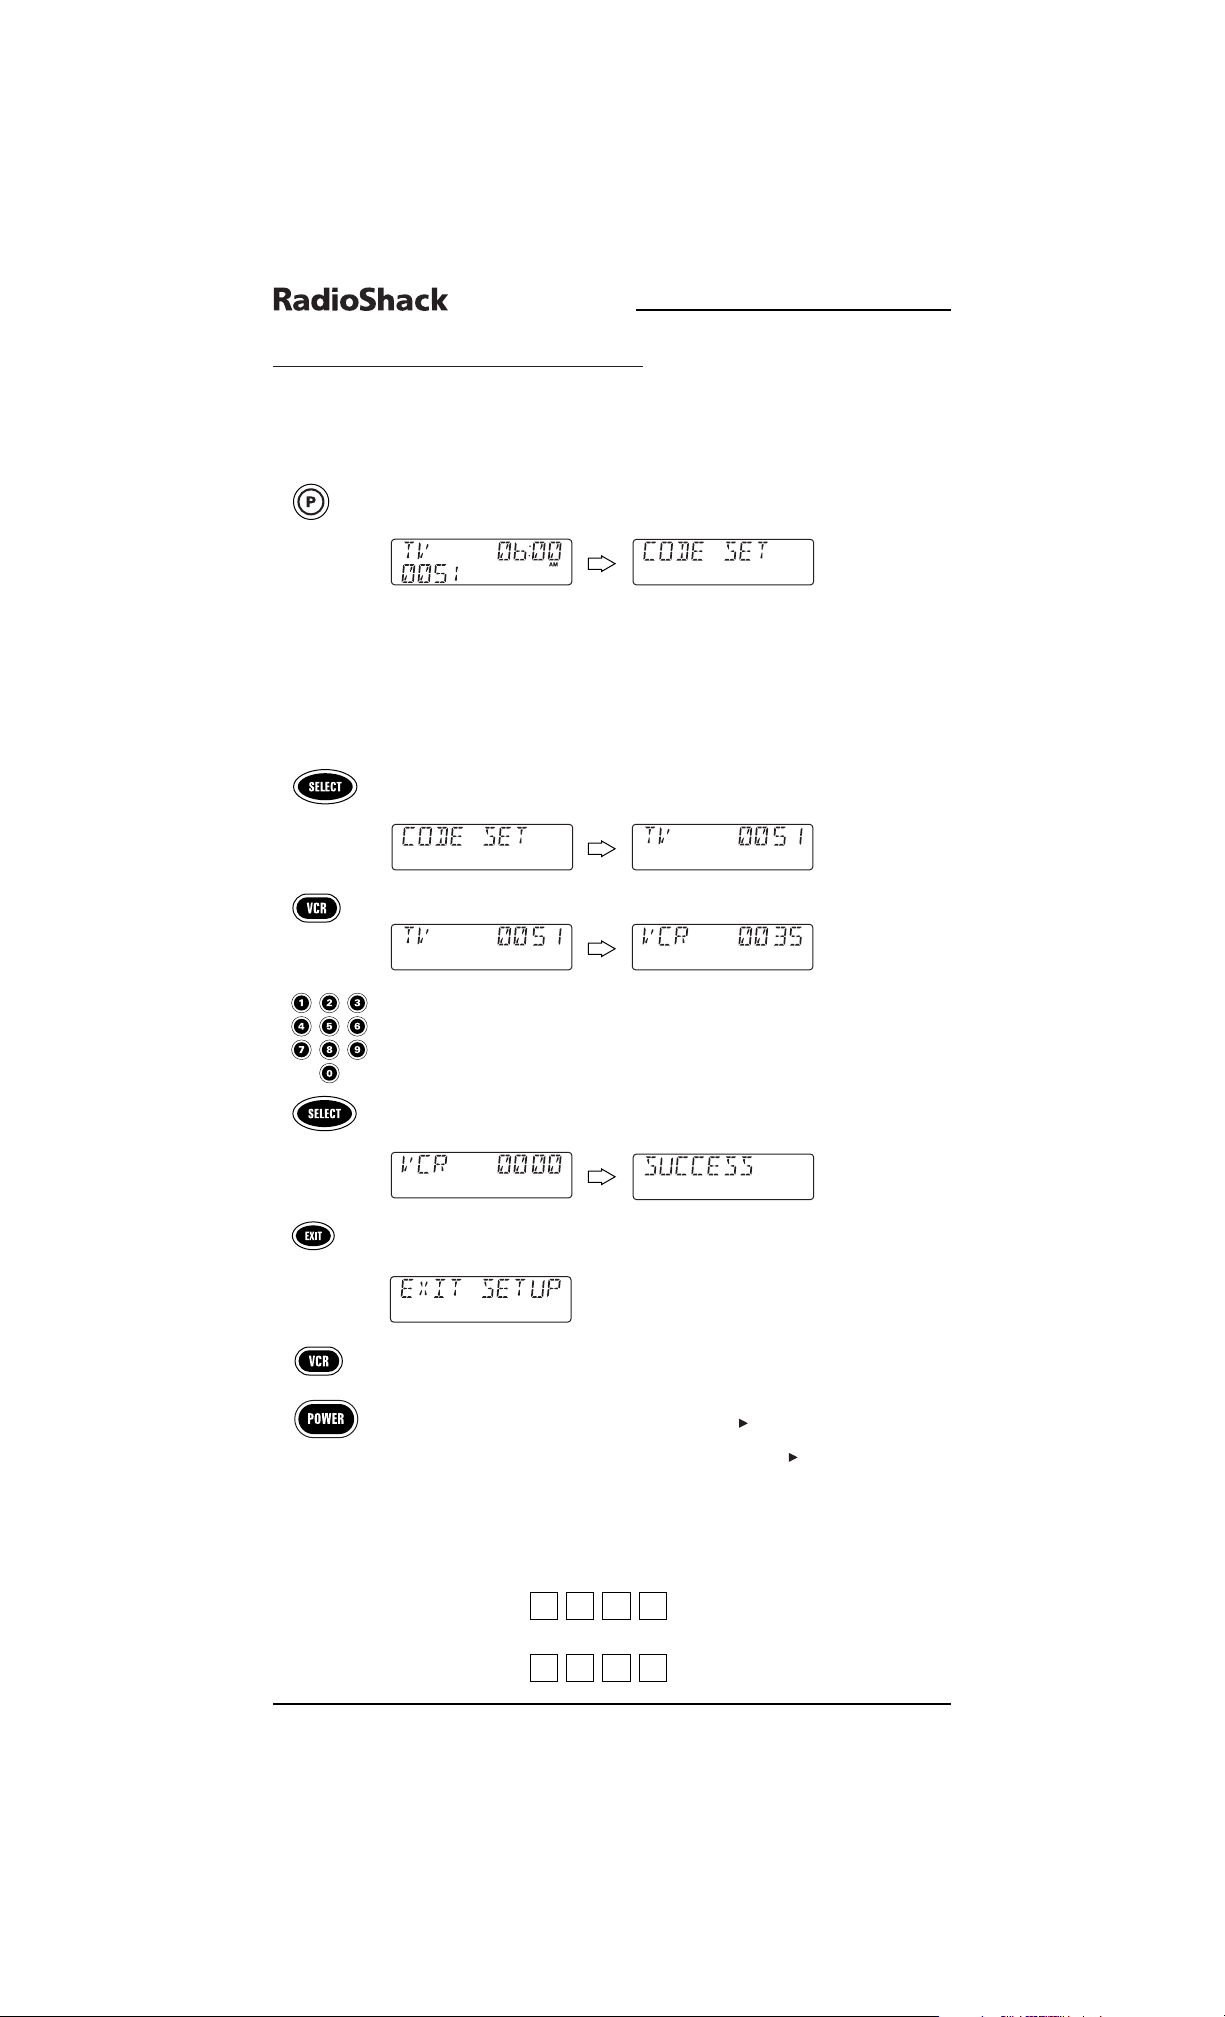
1. On the remote,press and hold Puntil the display changes from the default
device and time to
[CODE SET].
NOTE: Default values for device, its code, and time are shown above.Your remote control
settings may be different.
NOTE: If you wish to exit the programming mode at any time, press EXIT once. An
[EXIT] message appears as the remote control returns to normal operation.
NOTE:Ifan [INVALID] message appears,you have inadvertently pressed an incorrect
key. Simply note your error and continue programming.
2. Press ▲ four times until [CLOCK SET] appears.
NOTE:Ifyou go past [CLOCK SET],press ▼ one or more times to return to it.
3. Press SELECT once to begin programming.The default setting (12:00 a.m.) or
the current time (if previously set) appears.
4. Press
▲one or more times until the desired hour for morning or evening
(a.m. or p.m.) appears.
5. Press
▼ one or more times until the desired minute appears.
6. Once the time is correctly set,press
SELECT once to accept the values.
The display will confirm your entry with
[SUCCESS] and then [EXIT SETUP].
The remote will return to normal operation.
Setting The Clock 5
USER’S GUIDE
(x 4)
Page 5

A QUICK LOOK AT THE CONTROLS
Use the illustration below to locate controls on the remote and then study the Key Functions
(on the next three pages) to learn how they function.
NOTE: Also refer to the “Key Table” (starting on page 10) to learn key functions for specific devices.
6 A Quick Look At The Controls
8-IN-ONE REMOTE
Page 6
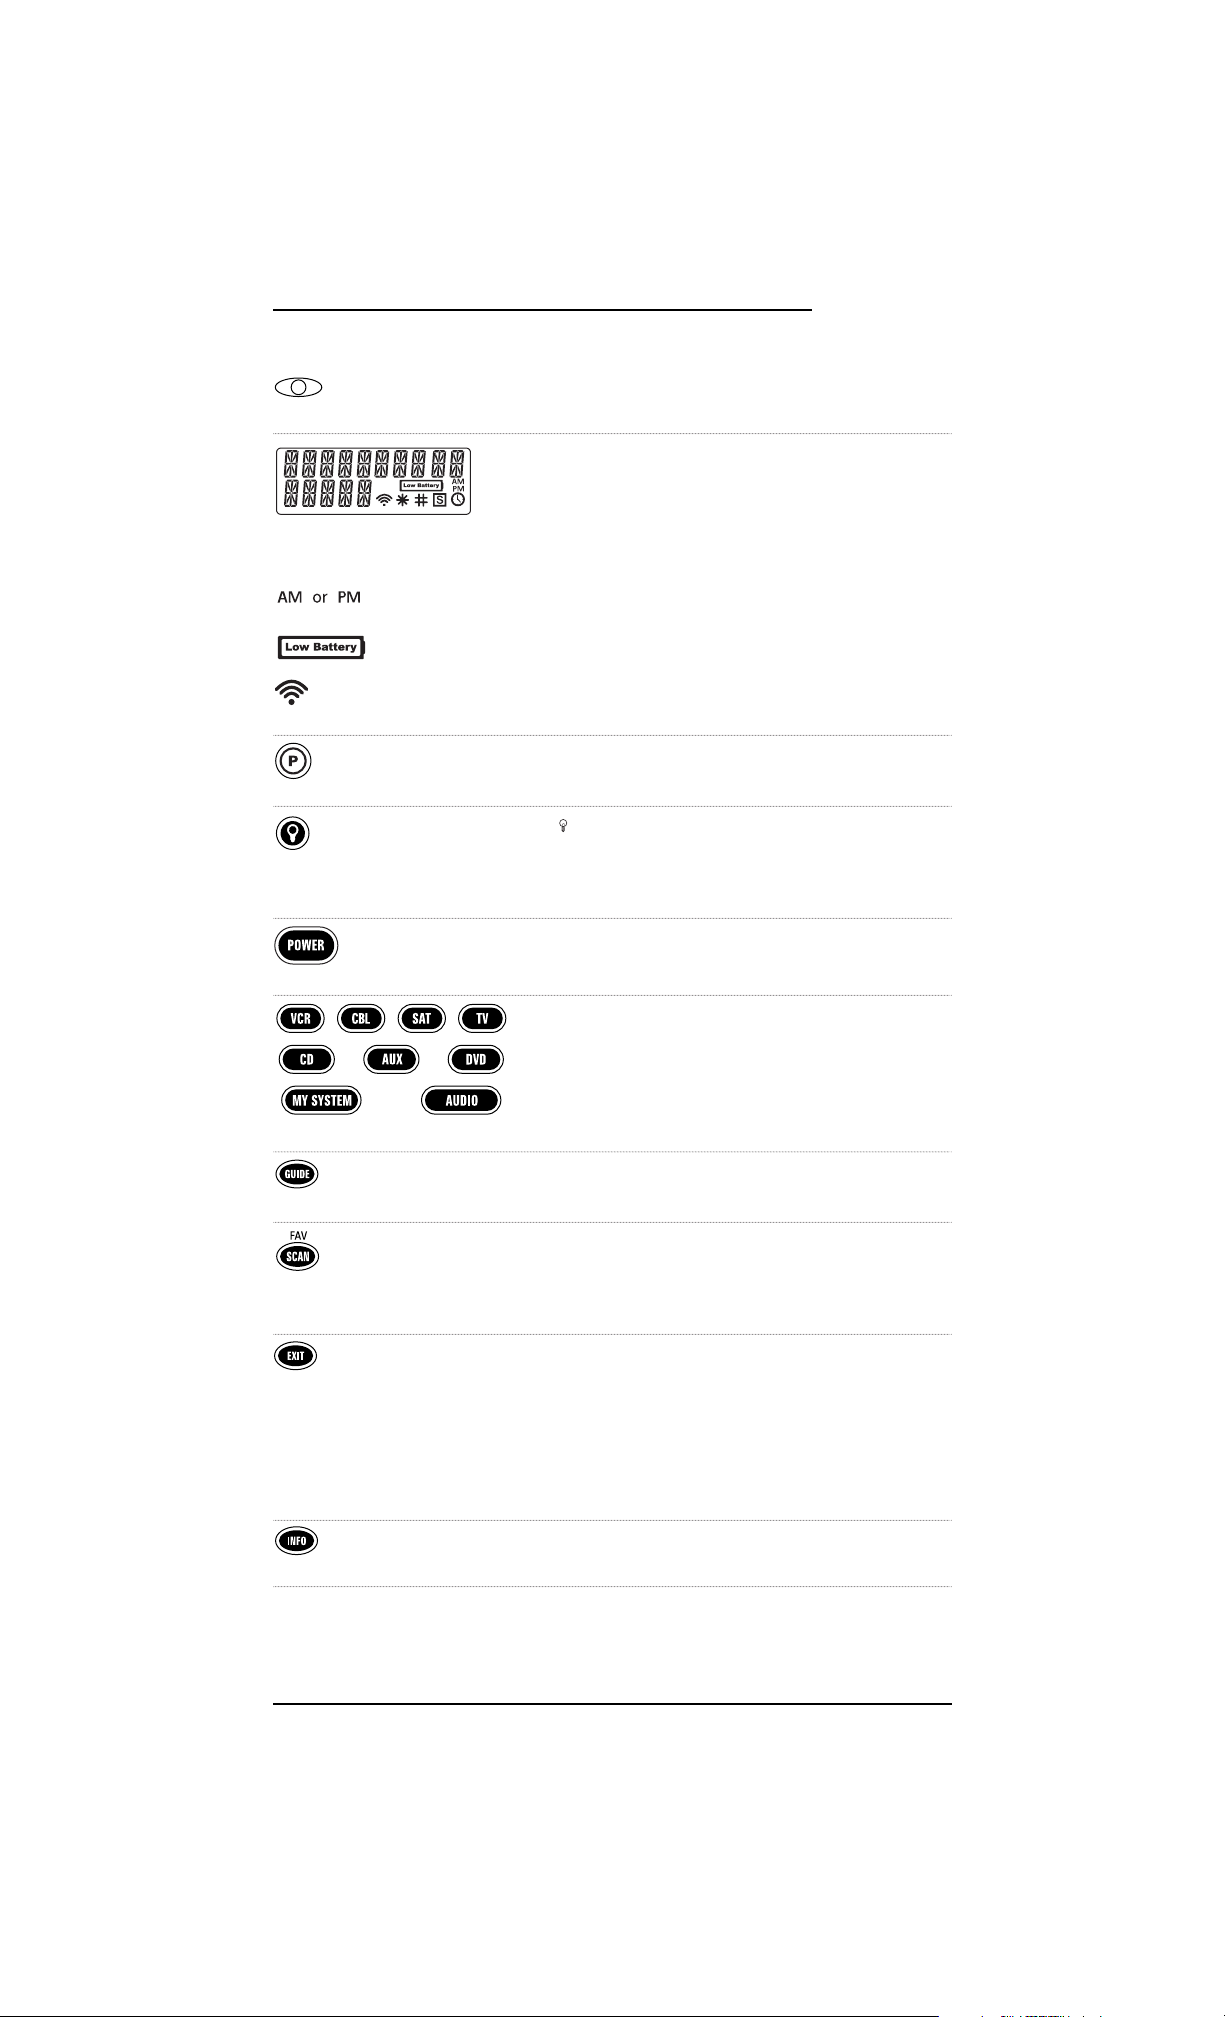
KEY FUNCTIONS
The red LED (Light Emitting Diode) blinks to show that
the remote control is sending signals.
The LCD (Liquid Crystal Display) has 15 alphanumeric
characters that display status messages during remote
control operation and programming.Also,one or more
icons will appear in the LCD to indicate the following
conditions:
Morning or Afternoon Time
Low Battery
IR Signal Transmission
Use P for all programming sequences.
Use to turn on or off the key backlight. When this feature
is activated,keys will remain backlit for 5 seconds after the
last key press.In the setup mode, backlighting will remain
on for 30 seconds.
Press
POWER once to turn on or off the selected device.
Press VCR,CBL,SAT,TV,CD, AUX,DVD,or AUDIO once to
select a device to control.
After programming, press
MY SYSTEM once to select your
custom system controls. See
Using My System on page 30.
Use GUIDE to display the program, guide,or setup menu
for the selected device.
In the VCR, CBL,SAT,and TVmodes, use SCAN (FAV) to scan
favorite channels and/or all channels.See
Programming
Favorite Channel Scan
on page 28 and Using Channel Scan
on page 29.
Press
EXIT once to exit the selected device’s program, guide,
or menu.
During programming, press
EXIT once to exit the
program mode.
Also see the
Key Table on pages 10 and 11 to learn how
EXIT functions when using other devices.
Use
INFO to display the current channel and program
information.
continued on next page...
A Quick Look At The Controls 7
USER’S GUIDE
Page 7

A QUICK LOOK AT THE CONTROLS
KEY FUNCTIONS (CONTINUED)
Press MENU once to display the menu for the selected device.
Use the cursor keys (▲,▼, ,or ) to move the cursor in
the program guide and menu screens.Use
SELECT to
choose options from your selected device’s menu or guide.
During programming,use
SELECT to set program options.
Also see the
Key Table on pages 10 and 11 to learn how the
cursor keys and SELECT function when using other devices.
Use
VOL+ (or VOL-) to raise (or lower) the audio volume.
Also see the
Key Table on pages 10 and 11 to learn how
VOL+ (or VOL-) functions when using other devices.
Press MUTE once to turn the audio off or on.
Also see the
Key Table on pages 10 and 11 to learn how
MUTE functions when using other devices.
Use
CH+ (or CH-) to select the next higher (or lower)
channel or tracks.
Also see the
Key Table on pages 12 and 13 to learn how
CH+ (or CH-) functions when using other devices.
Press LAST once to recall the last-viewed channel or to
page back one screen on the main menu.
Also see the
Key Table on pages 12 and 13 to learn how
LAST functions when using other devices.
Use
PIP to switch the Picture-In-Picture feature on or off
(if available on your TV).
Press
FREEZE once to capture a frame of video in the
main picture (if available).Press it again to resume
normal viewing.
Use
SWAP to switch images and sound (if available)
between the main and window pictures.
Use
MOVE to move the window picture (if available) to
different positions in the main picture.
▲
▲
8 A Quick Look At The Controls
8-IN-ONE REMOTE
Page 8

Use the keypad (1 ~ 9 and 0) to directly enter channels.
If you have access to over 100 channels,add a
0 before
the channel numbers (e.g.,for channel 71,press
0,then 7,
and then
1).If the original remote control required
pressing an Enter key to change the channel,also press the
ENTER key after the channel number (e.g.,press 0,then 7,
then
1,and then ENTER).
Also see the
Key Table on pages 12 and 13 to learn how the
keypad functions when using other devices.
Use +100 to enter channels over 100 (e.g.,for channel 131,
press
+100,then 3,and then 1).
Press ENTER once after entering the channel numbers on
some TVs.
Also see the
Key Table on pages 12 and 13 to learn how
ENTER functions when using other devices.
Use
TV/VIDEO (A/B) to switch the TV’s input to view TV or
VCR programs,or act as your cable box’s A/B switch.
Use SLEEP to activate your device’s sleep timer (if one is
available for the device).
Use the transport keys, (REW), (PLAY), (FFWD),
(
STOP), and (PAUSE), to control your VCR.To record
a VCR program, press (
REC) twice.
Also see the
Key Table on pages 14 and 15 to learn how the
transport keys function when using other devices.
A Quick Look At The Controls 9
USER’S GUIDE
Page 9

A QUICK LOOK AT THE CONTROLS (continued)
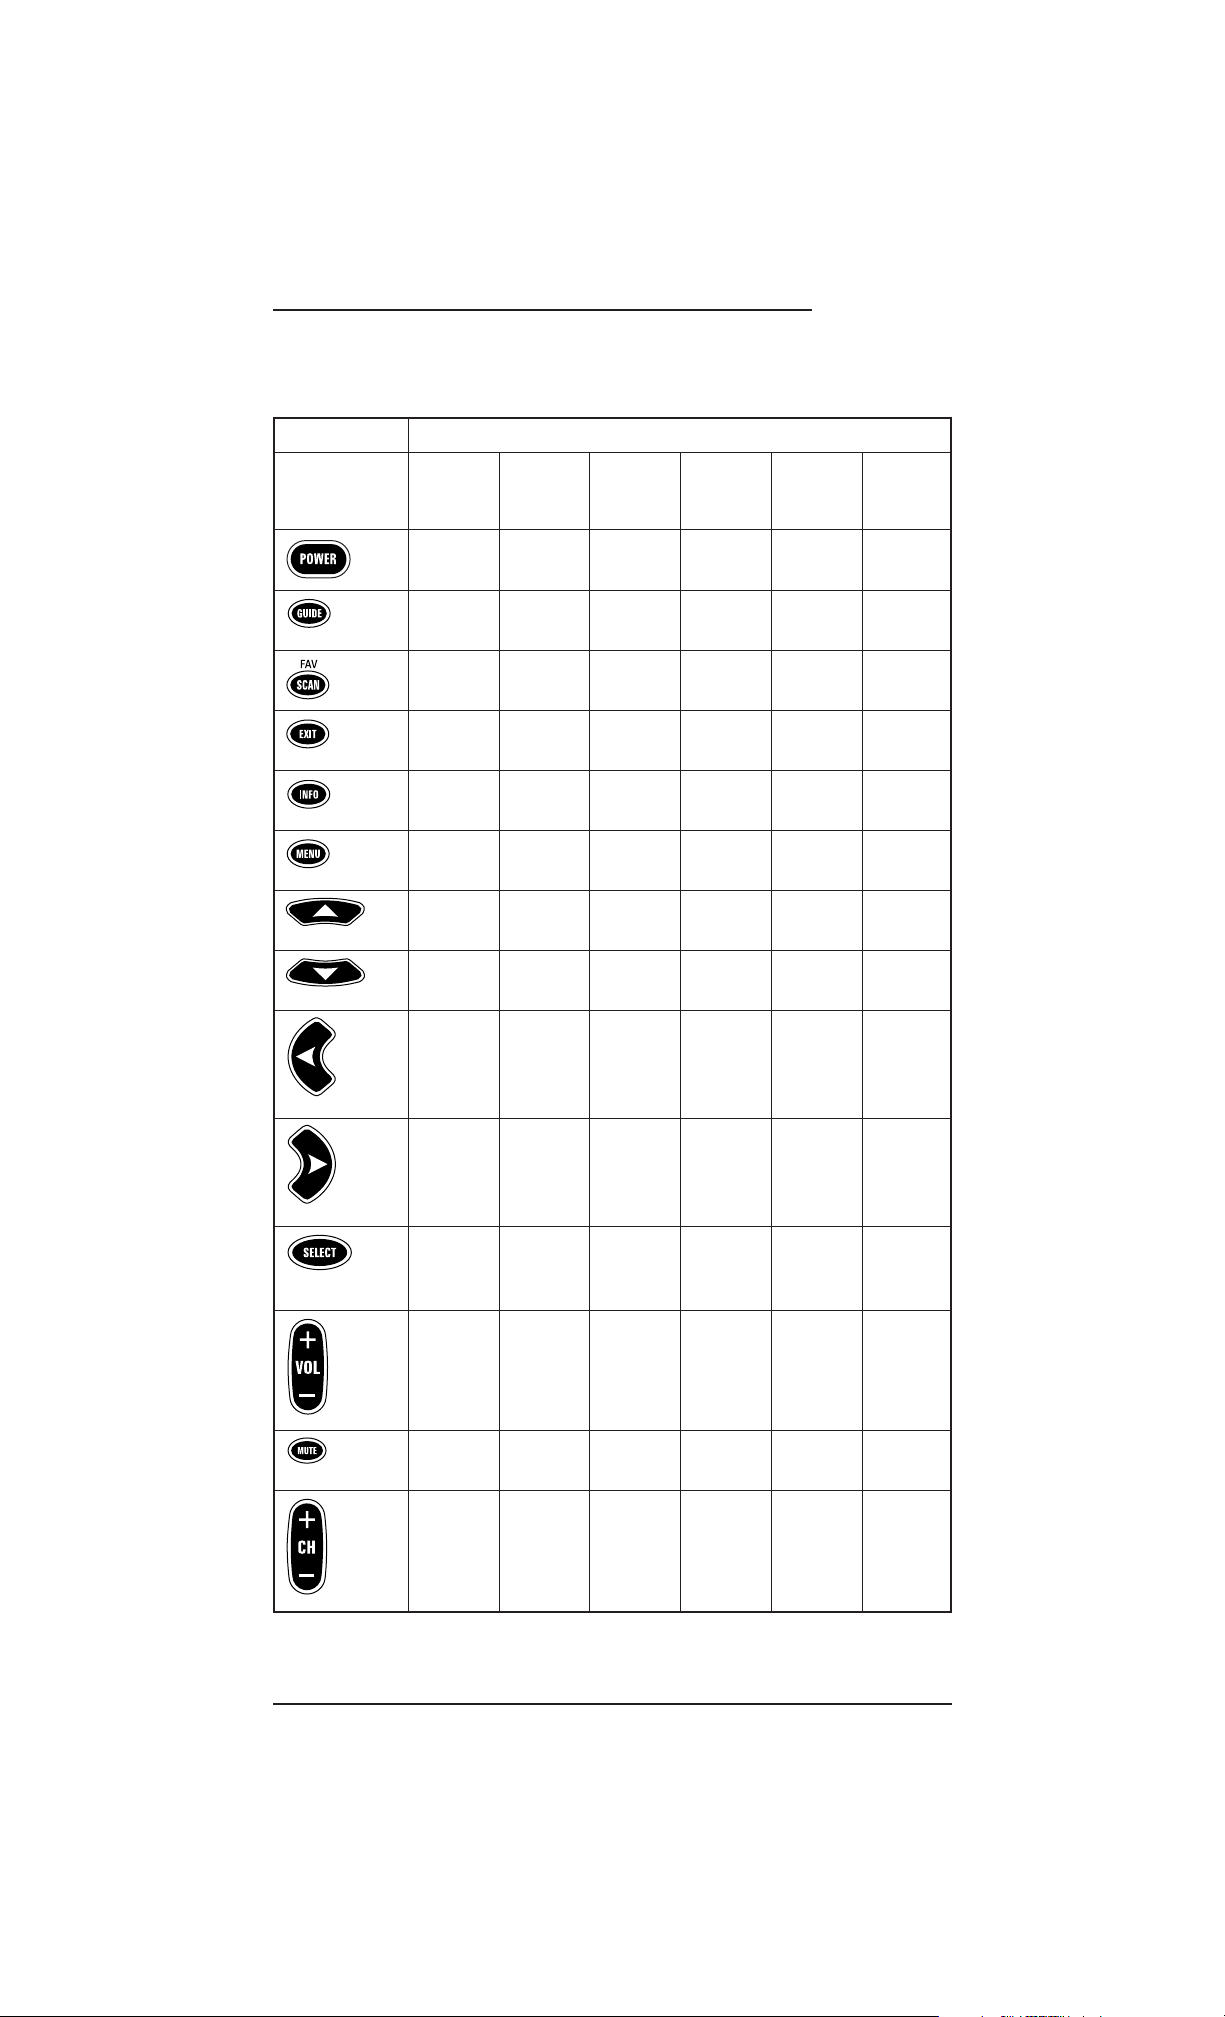
KEY TABLE
continued on page 12...
10 A Quick Look At The Controls
8-IN-ONE REMOTE
KEY FUNCTIONS FOR SELECTED DEVICE
KEY A
UDIO
A
UDIO
A
UDIO
A
UDIO
C
ABLE
CD
AMP./R
CVR
./ C
ASSETTE
/R
CVR
./DVD T
URNTABLECONVERTER
/P
LAYER
T
UNER
/HTIB1DAT D
ECK
C
OMBO
V
IDEOACC
.
Power Power Power Power Power Power
On/Off On/Off On/Off On/Off On/Off On/Off
Program – GUI – Guide Menu/
Program
––––Favorite/ –
Ch. Scan
2
Exit – Return – Exit Clear
––––Info./Info.
Display
Menu/ Menu Menu – Menu –
Front
Up/Rear – Up – Up Up/
Vol.Up Disc Up
Down/Rear – Down – Down Down/
Vol.Down Disc Down
Left/ – Left – Left Left/
Balance Previous
Left Track
Right/–Right–RightRight/
Balance Next
Right Track
Select/ – Enter – Select/ Select/
Surr. Sound (DVD) Enter Disc
On/Off Select
Vo l um e Vo l um e Vo l um e Vo l um e Vo l um e Vo l um e
Up Up Up Up Up Up
Vo l um e Vo l um e Vo l um e Vo l um e Vo l um e Vo l um e
Down Down Down Down Down Down
Mute Mute Mu te Mute Mute Mu te
Aud io Au di o Au di o Au dio Aud io Au di o
Channel Channel Preset – Channel Preset
Up Up Up Up Up
Channel Channel Preset – Channel Preset
Down Down Down Down Down
Page 10
KEY TABLE
continued on page 13...
A Quick Look At The Controls 11
USER’S GUIDE
KEY FUNCTIONS FOR SELECTED DEVICE
KEY DVD/LD H
OME
S
ATELLITE
TV TV/VCR VCR/
P
LAYER
A
UTOMATIONRECEIVER
C
OMBO
PVR
Power All Power Power Power Power
On/Off On On/Off On/Off On/Off On/Off
Setup – Guide Guide Guide Program/
Menu Gu ide
3
Favorite/ – Favorite/ – Favorite/ Favorite/
Ch. Scan Ch. Scan Ch.Scan Ch. Scan
Exit Clear Exit Exit Exit Exit
Display – Info./ Display Display –
Display (TV)
Front Menu Menu Menu Menu Menu
Channels
Up – UpUpUpUp
Down – Down Dow n Down Down
Left – Left – Left Left
Right – Right – Right Right
Select/ – Select/ Select Select Select
Enter Enter
Vo l um e Li g ht s Vol u me Vo l um e Vo lu m e Vol u me
Up Up Up Up Up Up
Vo l um e Li g ht s Vol u me Vo l um e Vo lu m e Vol u me
Down Down Down Down Down Down
Mute All Mute Mute Mute Mute
Aud io O ff Au di o Au di o Au di o Au dio
Skip Curtains Channel Channel Channel Channel
Forward Open (On) Up Up Up Up
Skip Curtains Channel Channel Channel Channel
Reverse Close (Off ) Down Down Down Down
Page 11

A QUICK LOOK AT THE CONTROLS
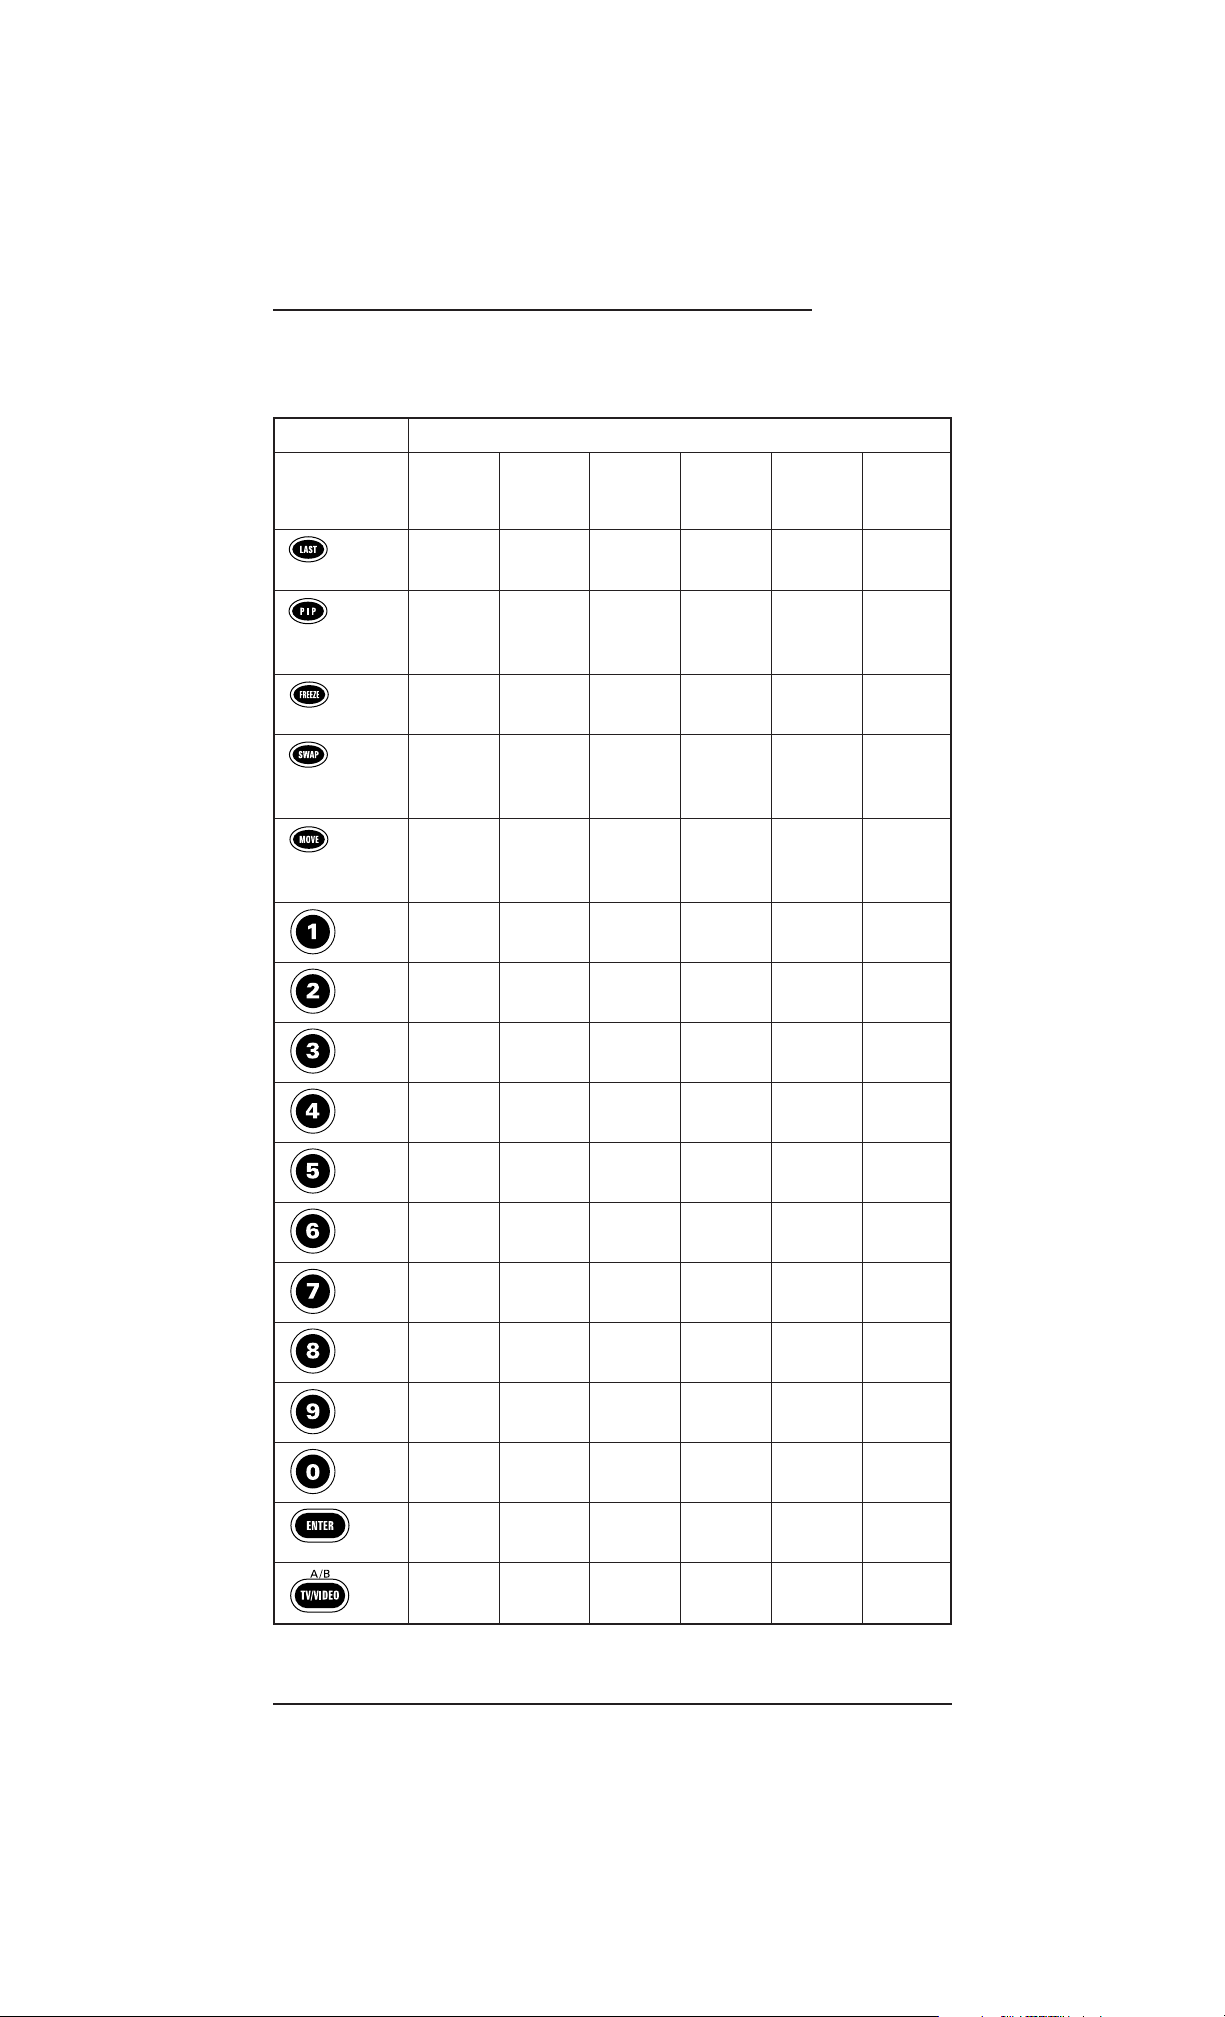
KEY TABLE (CONTINUED FROM PAGE 10)
continued on page 14...
12 A Quick Look At The Controls
8-IN-ONE REMOTE
KEY FUNCTIONS FOR SELECTED DEVICE
KEY A
UDIO
A
UDIO
A
UDIO
A
UDIO
C
ABLE
CD
A
MP
./R
CVR
./ C
ASSETTE
/R
CVR
./DVD T
URNTABLECONVERTER
/P
LAYER
T
UNER
/HTIB1DAT D
ECK
C
OMBO
V
IDEOACC
.
Band – Repeat – Last Random
FM/AM
Play On/Off
Channel
Play On/Off
––––PIP On–
––––PIP Off/ –
Freeze
––––PIP–
Swap
––––PIP–
Move
Source 1/ Digit FM – Digit Track 1/
Digit 1 1 Mode 1 Digit 1
Source 2/ Digit Tuner – Digit Track 2/
Digit 2 2 2 Digit 2
Source 3/ Digit Band – Digit Track 3/
Digit 3 3
FM/AM
3Digit 3
Source 4/ Digit DVD – Digit Track 4/
Digit 4 4 4 Digit 4
Source 5/ Digit Tape – Digit Track 5/
Digit 5 5 5 Digit 5
Source 6/ Digit VCR – Digit Track 6/
Digit 6 6 6 Digit 6
Source 7/ Digit Aux. – Digit Track 7/
Digit 7 7 7 Digit 7
Source 8/ Digit TV – Digit Track 8/
Digit 8 8 8 Digit 8
Source 9/ Digit Satellite – Digit Track 9/
Digit 9 9 9 Digit 9
Source 10/ Digit Tuning – Digit Track 10/
Digit 0 0 Mode 0 Digit 0
Enter/ – Enter – Enter/ +10
Select Select
Input A/B Disc – A/B/ –
Skip Bypass
Page 12
KEY TABLE (CONTINUED FROM PAGE 11)
continued on page 15...
A Quick Look At The Controls 13
USER’S GUIDE
KEY FUNCTIONS FOR SELECTED DEVICE
KEY DVD/LD H
OME
S
ATELLITE
TV TV/VCR VCR/
P
LAYER
A
UTOMATIONRECEIVER
C
OMBO
PVR
– – Last Last Last Last
Channel Channel Channel Channel
– – PIP On/ PIP On PIP On PIP On/
Instant Instant
Replay Replay
– – PIP Off/ PIP Off/ PIP Off/ PIP Off/
Freeze Freeze Freeze Freeze
– – PIP Swap/ PIP PIP PIP Swap/
Return To Swap Swap Return To
Live Live
– – PIP Move/ PIP PIP PIP Move/
Quick Move Move Quick
Skip Skip
Digit Scene 1/ Digit Digit Digit Digit
1Digit 1
1
111
Digit Scene 2/ Tuner Digit Digit Digit
2Digit 2 222
Digit Scene 3/ Band Digit Digit Digit
3Digit 3
FM/AM
333
Digit Scene 4/ DVD Digit Digit Digit
4Digit 4 444
Digit Scene 5/ Tape Digit Digit Digit
5Digit 5 555
Digit Scene 6/ VCR Digit Digit Digit
6Digit 6
6
66
Digit Scene 7/ Aux. Digit Digit Digit
7Digit 7
7
77
Digit Scene 8/ TV Digit Digit Digit
8Digit 8
8
88
Digit Scene 9/ Satellite Digit Digit Digit
9Digit 9 999
Digit Scene 10/ Tuning Digit Digit Digit
0Digit 0Mode000
Enter/ – Enter – Enter/ +10
Select Select
TV/ – TV/ TV/ TV/ TV/
DVD (LD) Satellite VCR VCR VCR
Page 13
A QUICK LOOK AT THE CONTROLS
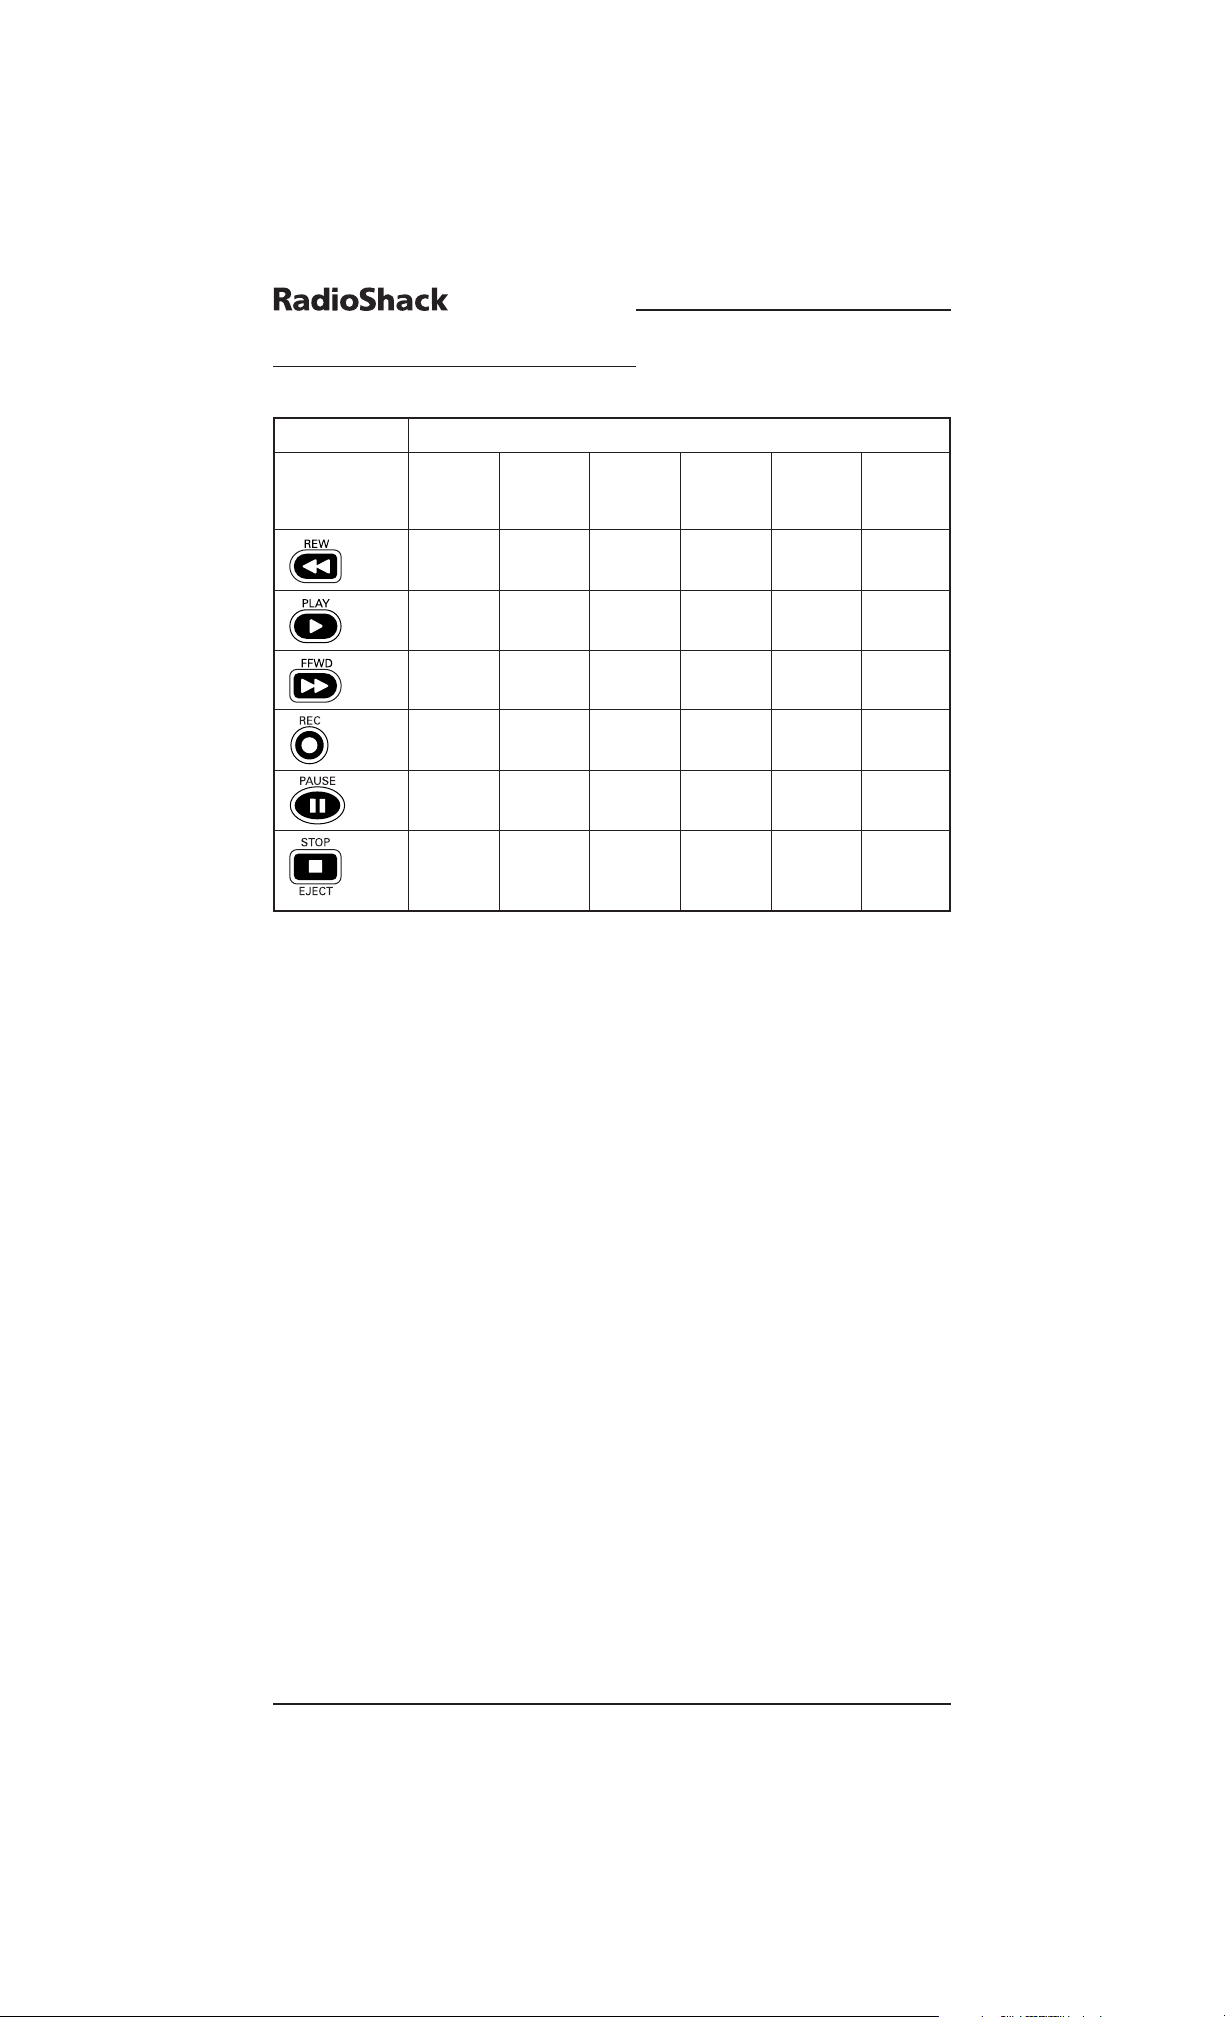
KEY TABLE (CONTINUED FROM PAGE 12)
NOTES:
1. Home-Theater-In-A-Box (HTIB) device.
2.
FAV/SCAN is only available for Cable Converters.
3. Select
GUIDE for PVR codes.
4. Applicable only if Audio Receiver/Tuner/Amplifier or HTIB has a tape transport.
5. If VOD (Video On Demand) is not available, pressing this key will control the VCR (only if the VCR code
is programmed under VCR mode).
6. Applicable only if device is a CD recorder.
14 A Quick Look At The Controls
8-IN-ONE REMOTE
KEY FUNCTIONS FOR SELECTED DEVICE
KEY A
UDIO
A
UDIO
A
UDIO
A
UDIO
C
ABLE
CD
A
MP
./R
CVR
./ C
ASSETTE
/R
CVR
./DVD T
URNTABLECONVERTER
/P
LAYER
T
UNER
/HTIB1DAT D
ECK
C
OMBO
V
IDEOACC
.
Rewind Rewind Skip Rev. Rewind Rewind Rewind
Ta p e
4
DVD VOD
5
Play Play Play Play Play Play
Ta p e
4
DVD VOD
5
F. Fwd Fast Skip Fwd. Fast F. Fwd. Fast
Ta p e
4
Forward DVD Forward VOD
5
Forward
Record Record – – Record Record
6
Ta p e
4
VOD
5
Pause Pause Pause Paus e Paus e Pause
Ta p e
4
DVD VOD
5
Stop/Eject Stop/ Stop/Eject Stop Stop Stop/
Ta p e
4
Eject DVD VOD
5
Eject
Page 14

KEY TABLE (CONTINUED FROM PAGE 13)
A Quick Look At The Controls 15
USER’S GUIDE
KEY FUNCTIONS FOR SELECTED DEVICE
KEY DVD/LD H
OME
S
ATELLITE
TV TV/VCR VCR/
P
LAYER
A
UTOMATIONRECEIVER
C
OMBO
PVR
Rewind – Rewind Rewind Rewind Rewind
VOD
5
VCR VCR VCR/PVR
Play – Play Play Play Play
VOD
5
VCR VCR VCR/PVR
Fast – FFWD FFWD FFWD FFWD
Forward VOD
5
VCR VCR VCR/PVR
– – Record Record Record Record
VOD
5
VCR VCR VCR/PVR
Pause – Pause Paus e Pause Pause
VOD
5
VCR VCR VCR/PVR
Stop/ – Stop Stop Stop Stop
Eject VOD
5
VCR VCR VCR/PVR
or Eject
Ta p e
Page 15

PROGRAMMING A DEVICE
The remote is preprogrammed at the factory to operate an RCA TV,VCR,and satellite
receiver,a Motorola (General Instruments) cable converter, and Pioneer CD and DVD
players, and audio devices. To control devices other than the default brands, perform the
following steps and repeat them as needed for each device to be programmed; otherwise
skip this section:
NOTE: To control a TV/VCR Combo, see “Programming A TV/VCR Combo” on page 18.
1. Find the codes for the devices you want to program in Manufacturer’s Codes
(starting on page 84) and write them down or highlight them.
2. Turn on a device (e.g.,VCR or DVD player) and, if necessary, load media (e.g.,
cassette or disc).
NOTE: Please read steps 3 through 9 completely before proceeding. Highlight or write
down the codes and device you wish to program before starting step 2.
3. On the remote,press and hold P until the display changes from the default
device and time to
[CODE SET].
NOTE: Default values for device, its code, and time are shown above.Your remote control
settings may be different.
NOTE: If you wish to exit the programming mode at any time, press EXIT once. An
[EXIT] message appears as the remote control returns to normal operation.
NOTE:Ifan [INVALID] message appears,you have inadvertently pressed an incorrect
key. Simply note your error and continue programming.
4. Press SELECT once to begin programming.The last-selected device and its
current code (e.g.,
TV and 0051) appear.
5. Press a desired device key once (e.g.,
VCR). The desired device and its current
code (e.g.,
VCR and 0035) appear.
NOTE: Use the AUX key to program home automation devices, video accessories,audio
services, and other audio/video devices.See “Reassigning Device Keys”on page 34.
6. Use the keypad to enter the first four-digit code for your device and press
SELECT once.
For example, to enter the first GE VCR code (on page 90), press
0 twice,6 once,
0 once,and then SELECT once.
If the code is entered correctly, the
[SUCCESS] message appears.
16 Programming A Device
8-IN-ONE REMOTE
Page 16

7. Press EXIT to exit the programming mode.An [EXIT SETUP] message appears
as the remote returns to normal operation.
8. To verify the code works,aim the remote at the desired device,press its device
key once and then press
POWER once.The device should turn off. If it does not
respond,repeat steps 3 through 7,trying each code for your brand until you
find one that works. If you cannot find a code that works,try
Searching For
You r Code
on page 19.
NOTE: If the device does not have a POWER key, press (Play).
9. Repeat steps 1 through 8 for each device you want to control.For future
reference,write down each working device code in the boxes below:
VCR Code:
CBL Code:
SAT Code:
TV Code:
CD Code:
DVD Code:
AUDIO Code:
Audio Device Type:________________________________
AUX Code:
Aux.Device Type:________________________________
Programming A Device 17
USER’S GUIDE
Page 17
PROGRAMMING A TV/VCR COMBO
1. Find the codes for the devices you want to program in Setup Codes for TV/VCR
Combos
on page 89 and write them down or highlight them.
2. Turn on the TV/VCR Combo and insert a videocassette.
3. On the remote,press and hold
P until the display changes from the default
device and time to
[CODE SET].
NOTE: Default values for device, its code, and time are shown above.Your remote control
settings may be different.
NOTE: If you wish to exit the programming mode at any time, press EXIT once. An
[EXIT] message appears as the remote control returns to normal operation.
NOTE:Ifan [INVALID] message appears,you have inadvertently pressed an incorrect
key. Simply note your error and continue programming.
4. Press SELECT once to begin programming.The last-selected device and its
current code (e.g.,
TV and 0051) appear.
5. Press
VCR once. [VCR] and its current code appear.
6. Use the keypad to enter the first four-digit code for your device and press
SELECT once.
For example, to enter the first Sony TV/VCR Combo on page 89,press
0 four
times and then
SELECT once.If the code is entered correctly,the [SUCCESS]
message appears.
7. Press
EXIT to exit the programming mode.An [EXIT SETUP] message appears
as the remote returns to normal operation.
8. To verify the code works,aim the remote at the TV/VCR Combo, press
VCR
once and then press POWER once.
NOTE: If the device does not have a POWER key, press (Play).
The unit should turn off or start playing if you pressed (Play). If it does not
respond,repeat steps 3 through 9,trying each code for your brand until you
find one that works. If you cannot find a code that works,try
Searching For
You r Code
on page 19.
9. For future reference,write down the working TV/VCR combo code below:
TV/VCR Code:
TV Code (if used):
18 Programming A TV/VCR Combo
8-IN-ONE REMOTE
Page 18

Searching For Your Code 19
USER’S GUIDE
SEARCHING FOR YOUR CODE
If your device does not respond to the remote after trying all codes listed for your brand,or if
your brand is not listed at all,try manually searching for your code.For example, to manually
search for a code for your TV:
1. Turn on the TV.
2. On the remote,press and hold
P until the display changes from the default
device and time to
[CODE SET] .
NOTE: Default values for device, its code, and time are shown above.Your remote control
settings may be different.
NOTE: If you wish to exit the programming mode at any time, press EXIT once. An
[EXIT] message appears as the remote control returns to normal operation.
NOTE:Ifan [INVALID] message appears,you have inadvertently pressed an incorrect
key. Simply note your error and continue programming.
3. Press ▼ once. [MAN SRCH] appears.
NOTE:Ifyou go past [MAN SRCH],press ▲ one or more times to return to it.
4. Press SELECT once to begin programming.The last-selected device and its
code (e.g.,
VCR and 0035) appear.
5. Press
TV once.The desired device and the first code in the manual search list
(e.g.,
TV and 0047) appear.
6. Aim the remote at the TV and press
SELECT once.The red LED blinks and the
(
IR) icon flashes,indicating IR codes are being transmitted.
NOTE: In the manual search mode,the remote will send IR codes from its library to the
selected device, starting with the most popular code first.
7. If the TV turned off, skip to the next step. If it did not turn off, aim the remote
at the TV and press
▲ once to advance the manual search to the next code
(e.g.,
TV and 0054).Again the red LED blinks and the (IR) icon flashes.
Repeat this step as often as needed until you find a code that turns off
the device.
continued on next page...
Page 19

20 Searching For Your Code/Using Learning
8-IN-ONE REMOTE
SEARCHING FOR YOUR CODE (continued)
8. Once you have found a working code,press SELECT once to save it.The display
confirms your entry with
[SUCCESS] and then [EXIT SETUP].
The remote returns to normal operation.
NOTE: For future reference, write down the working device code in the appropriate boxes
on page 17.
9. To perform a manual code search for another device,repeat steps 1 through 8,
but this time (in step 5) substitute the appropriate device key for the device
you are searching for.
USING LEARNING
The remote includes a Learning feature so you can add functions that are unique to your
home entertainment devices (e.g.,VCR Tracking Up or Down).However, there are some
considerations:
• Your original remote controls must be in working order for the learning feature to
work properly.
• Learned keys are mode specific,so each one can store a unique function for each mode.
• Learned keys can be used in macros (see
Using Macros on page 24).
• You can also use any key for learning, except device keys,
P,,and POWER.However,
using them as learned keys will overwrite their original functions.
• For optimum learning, avoid high levels of ambient light such as natural sunlight or
energy-efficient fluorescent lights.
NOTE: Please have your original remote controls handy before programming learning. Be sure to
press each key within 5 seconds of the previous entry.If not, the remote will exit
the programming mode.
PROGRAMMING A LEARNING KEY
1. On the remote,press and hold P until the display changes from the default
device and time to
[CODE SET].
NOTE: Default values for device, its code, and time are shown above.Your remote control
settings may be different.
NOTE: If you wish to exit the programming mode at any time, press EXIT once. An
[EXIT] message appears as the remote control returns to normal operation.
NOTE:Ifan [INVALID] message appears,you have inadvertently pressed an incorrect
key. Simply note your error and continue programming.
2. Press ▼ twice until [IR LEARN] appears.
NOTE:Ifyou go past [IR LEARN] ,press ▲ one or more times to return to it.
(x 2)
Page 20

Using Learning 21
USER’S GUIDE
3. Press SELECT once to begin programming.The last-selected device appears.
4. Press a device key once (e.g.,
TV) to assign a desired mode for learning.
5. Select a key for learning and press it once.As the remote enters the learning
mode,
[LEARNING] appears and the red LED turns on for 5 seconds.
6. Place your original remote control (e.g.,TV remote control) head-to-head
(about 2" apart) from the remote.
7. On the original remote control,press and hold the key (i.e.,feature) to be
learned until
[SUCCESS] appears on the remote.The display will return to the
device mode you selected for learning (e.g.,
TV).
If the key was not learned,you will see an [ERROR] message instead.
Repeat steps 5 through 7 as needed to achieve [SUCCESS].
8. To learn functions onto other keys, repeat steps 4 through 7 for each key.
9. Press
EXIT to exit the programming mode.An [EXIT SETUP] message appears
as the remote returns to normal operation.
10. To test a learned feature,aim the remote at the desired device and press its
device key once (e.g.,TV, where the learning mode was assigned). Then press
the key where the learned feature is stored.The feature should activate.If not,
try programming the key again,starting with step 1 (on page 20).
2"
Page 21

22 Using Learning/Changing Volume Lock
8-IN-ONE REMOTE
USING LEARNING (continued)
DELETING A FUNCTION FROM A LEARNING KEY
1. On the remote,press and hold P until the display changes from the default
device and time to
[CODE SET].
NOTE: Default values for device, its code, and time are shown above.Your remote control
settings may be different.
NOTE: If you wish to exit the programming mode at any time, press EXIT once. An
[EXIT] message appears as the remote control returns to normal operation.
NOTE:Ifan [INVALID] message appears,you have inadvertently pressed an incorrect
key. Simply note your error and continue programming.
2. Press ▼ three times until [IR DELETE] appears.
NOTE:Ifyou go past [IR DELETE],press ▲ one or more times to return to it.
3. Press SELECT once to begin programming.The last-selected device appears.
4. Press a device key once (e.g.,
TV) for the mode that contains the learned function.
5. Press the key once where the learned function (to be deleted) is stored. The
display changes to
[DELETED] and then returns to last-selected mode (e.g.,TV).
6. If desired,repeat steps 4 and 5 to delete other learned functions.
7. Press
EXIT to exit the programming mode.An [EXIT SETUP] message appears
as the remote returns to normal operation.
CHANGING VOLUME LOCK
In its default (unlocked) state, the remote allows each device to control its own volume
only in its own mode (e.g.,
TV volume in the TV mode, VCR volume in VCR mode, etc.).
However, using our
Volu m e Lock feature,you can lock the volume controls for each device
to all modes (e.g.,
AUDIO volume in all modes).
Moreover, using the
Volume Unlock feature (see the next page), you can further customize
the settings so that a device’s volume controls are unlocked in one mode, but remain locked
in all other modes (e.g.,
TV volume in the TV mode and AUDIO volume in other modes).
PROGRAMMING VOLUME LOCK
1. On the remote,press and hold P until the display changes from the default
device and time to
[CODE SET].
(x 3)
Page 22

NOTE: Default values for device, its code, and time are shown above.Your remote control
settings may be different.
NOTE: If you wish to exit the programming mode at any time, press EXIT once. An
[EXIT] message appears as the remote control returns to normal operation.
NOTE:Ifan [INVALID] message appears,you have inadvertently pressed an incorrect
key. Simply note your error and continue programming.
2. Press ▼ four times until [VOL LOCK] appears.
NOTE:Ifyou go past [VOL LOCK],press ▲ one or more times to return to it.
3. Press SELECT once to begin programming. [TO MODE] appears.
4. Press a mode key (e.g.,
AUDIO) to lock a device’s volume controls to all modes.
[SUCCESS] and then [EXIT SETUP] appear as the remote control automatically
exits the programming mode and returns to normal operation.
5. If desired,repeat steps 1 through 4 as needed to lock volume controls for other
devices to all modes.
PROGRAMMING VOLUME UNLOCK
1. On the remote,press and hold Puntil the display changes from the default
device and time to
[CODE SET].
2. Press ▼ five times until [VOL UNLOCK] appears.
NOTE:Ifyou go past [VOL UNLOCK],press ▲ one or more times to return to it.
3. Press SELECT once to begin programming. [ALL MODE] appears.
To unlock one mode, skip to step 4. Otherwise press SELECT once to unlock
all modes.
[UNLOCKED] and then [EXIT SETUP] appear as the remote
automatically exits the programming mode and returns to normal operation.
continued on next page...
Changing Volume Lock 23
USER’S GUIDE
(x 5)
(x 4)
Page 23

CHANGING VOLUME LOCK
PROGRAMMING VOLUME UNLOCK (CONTINUED)
4. (Optional) Press ▲ (or ▼) once.[ONE MODE] appears.
a. Press
SELECT once. [SEL MODE] appears.
b. Press a mode key once (e.g.,
TV) to unlock it. [UNLOCKED] and then
[SEL MODE] appear.
c. If desired, repeat step 4b as needed to unlock volume controls for
other devices.Otherwise, press
EXIT to exit the programming mode.
[EXIT SETUP] appears as the remote returns to normal operation.
USING MACROS
With Macro programming, your remote can be setup to perform repetitive,time-consuming
operations for easy, convenient access through the press of a single key. Macros are ideal for
home theater operations,setting a favorite channel,guide steps, or other multiple functions
you would like to control with one key press. Moreover, each macro can hold up to 15 key
presses total.
NOTE: Programming a new macro over an existing one will erase the original macro.
PROGRAMMING A FAVORITE CHANNEL
With so many channels available through your cable or satellite system provider, you can
program a macro that directly selects a favorite channel with one key press.For example,
let’s assume your favorite cable programs are on channel 71. Perform the following steps to
program a macro for direct access of this channel:
NOTE: This example assumes the TV connects directly to the cable and not through a cable converter.
1. On the remote,press and hold P until the display changes from the default
device and time to
[CODE SET].
NOTE: Default values for device, its code, and time are shown above.Your remote control
settings may be different.
NOTE: If you wish to exit the programming mode at any time, press EXIT once. An
[EXIT] message appears as the remote control returns to normal operation.
NOTE:Ifan [INVALID] message appears,you have inadvertently pressed an incorrect
key. Simply note your error and continue programming.
24 Using Macros
8-IN-ONE REMOTE
or
Page 24
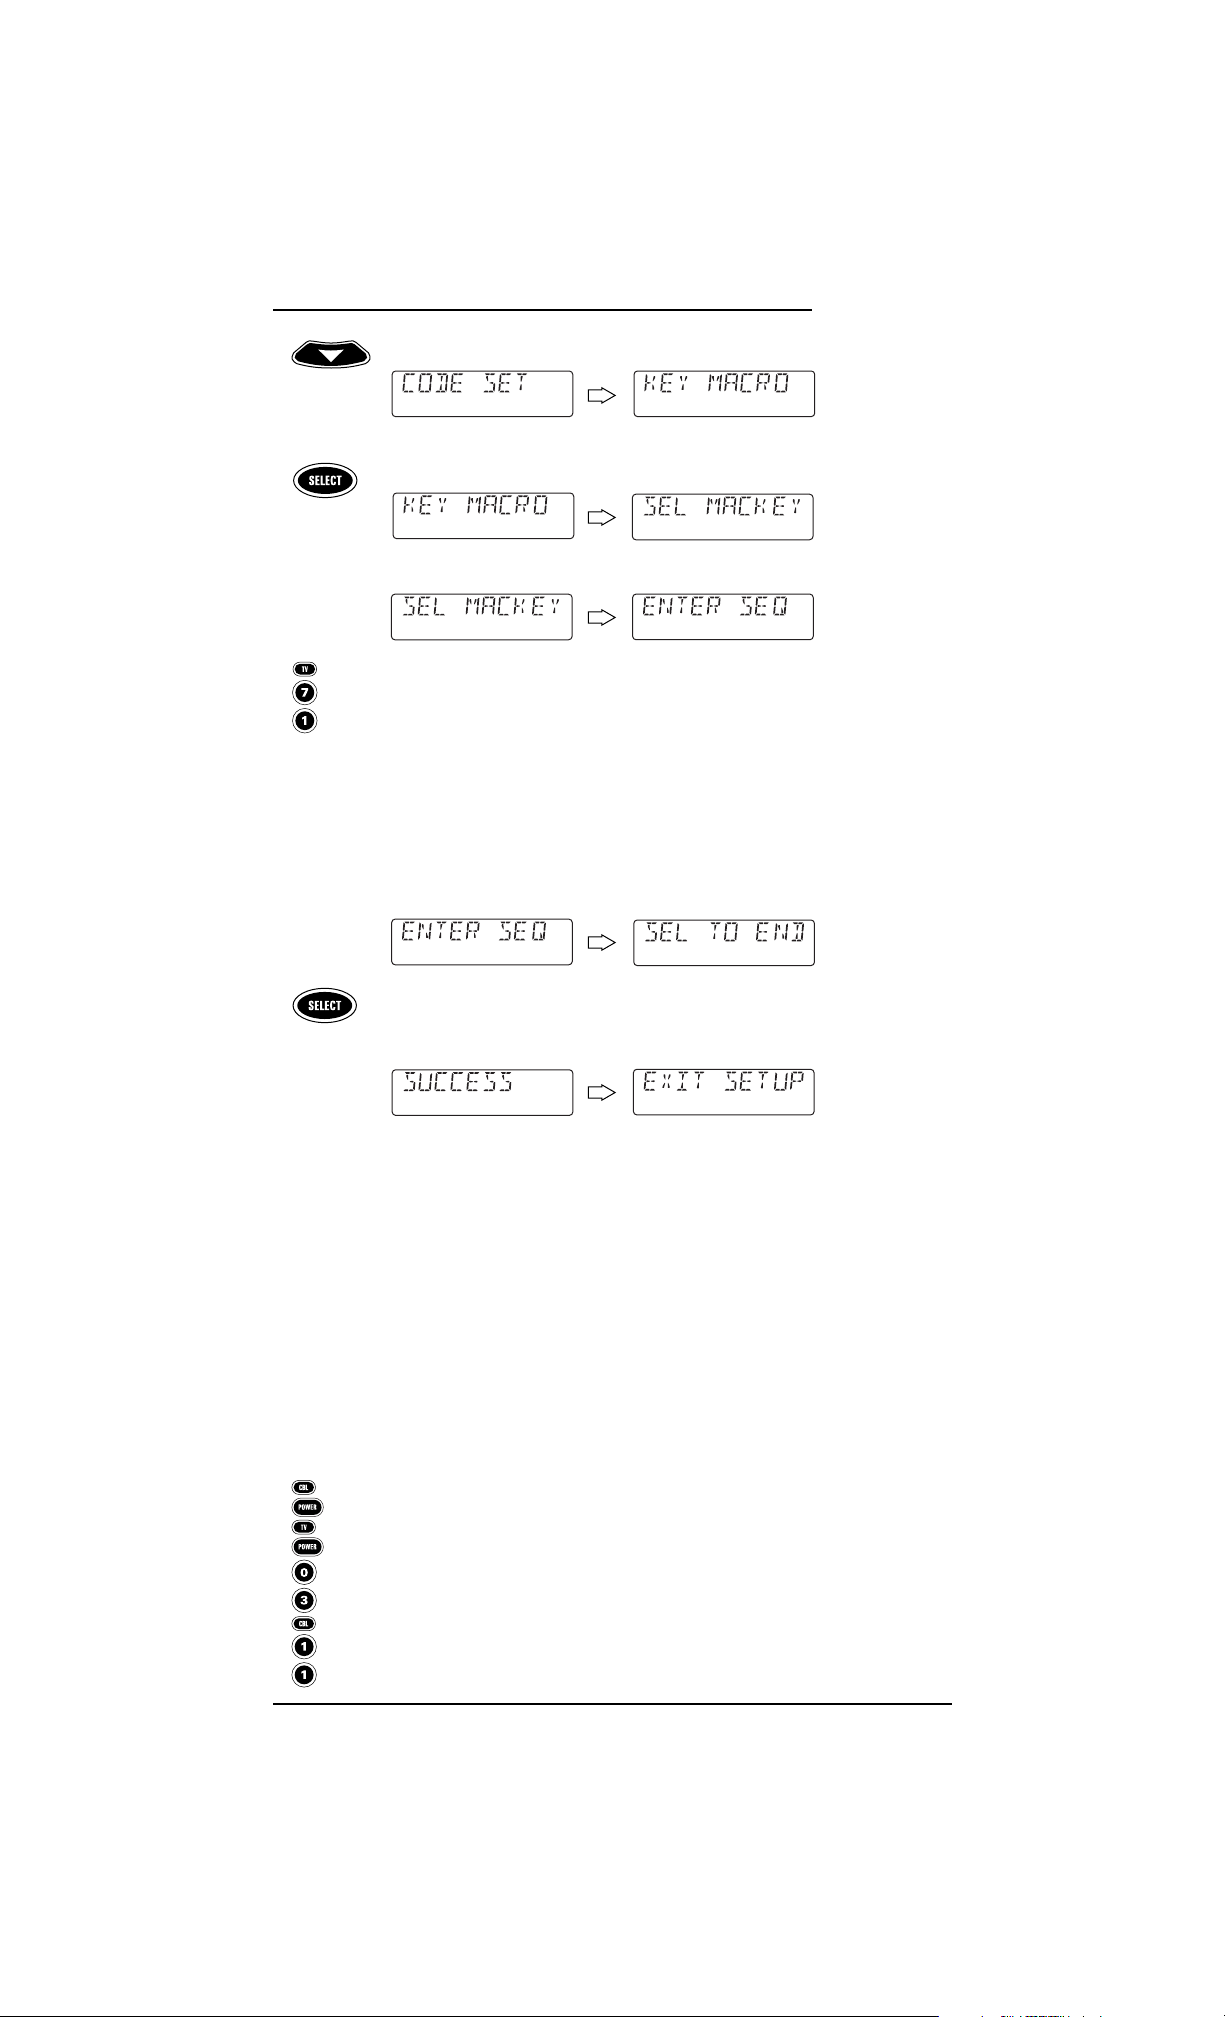
2. Press ▼ six times until [KEY MACRO] appears.
NOTE:Ifyou go past [KEY MACRO],press ▲ one or more times to return to it.
3. Press SELECT once to begin programming. [SEL MACKEY] appears.
4. Select a key you want to use as a macro and press it once.
[ENTER SEQ] appears.
5. Enter a macro sequence of up to 15 keys. For our example, press the following
keys once in this order:
TV - 7 - 1.
NOTE: If you have access to over 100 channels, add a 0 before the channel numbers (e.g.,
0 -7 - 1). If the original remote control required pressing an Enter key to change the
channel, also press
ENTER after the channel number (e.g.,0 - 7 - 1 - ENTER).
NOTE:An [ERROR] message,followed by [MAX = 15] alerts you that the macro
sequence must be 15 keys or less.
After pressing the first key (in the macro sequence),[SEL TO END] appears as a
reminder to use
SELECT to end the sequence (see next step).
6. To end the macro sequence, press and hold
SELECT until [SUCCESS] appears,
followed by [
EXIT SETUP]. The remote will automatically exit the programming
mode and return to normal operation.
Now when you press the key with this assigned macro,you will instantly see cable channel 71
on your TV set.
PROGRAMMING A MASTER POWER KEY WITH INSTANT CHANNEL SELECTION
A macro key can be programmed to turn on and off your devices as well.For example, let’s
set up a sequence that will turn on the TV and tune it to channel 3,and then turn on the
cable converter and tune it to a premium channel (e.g., 11).
NOTE: This example assumes all equipment is turned off and that the TV is connected through the
cable converter with TV tuning set to channel 3.
1. Perform steps 1 through 4 of the previous section, Programming A Favorite
Channel
on the previous page. However,this time in step 4, substitute another
key for use as a macro key.
2. Enter a macro sequence of up to 15 keys. For our example, press the following
keys once in this order: CBL - POWER - TV - POWER - 0 - 3- CBL- 1 - 1
NOTE: If you have access to over 100 channels, add an 0 before each set of channel
numbers (e.g.,
0 - 0 -3 and 0 - 1 - 1).If the original remote control required pressing
an Enter key to change the channel,also press
ENTER after each channel number
(e.g.,
0 - 0 -3 - ENTER and 0 - 1 - 1 - ENTER).
NOTE:An [ERROR] message,followed by [MAX = 15] alerts you that the macro
sequence must be 15 keys or less.
continued on next page...
Using Macros 25
USER’S GUIDE
(x 6)
Page 25

USING MACROS
PROGRAMMING A MASTER POWER KEY WITH INSTANT CHANNEL SELECTION (CONT’D)
3. After pressing the first key (in the macro sequence), [SEL TO END] appears as
a reminder to use
SELECT to end the sequence (see next step).
4. To end the macro sequence, press and hold
SELECT until you see [SUCCESS]
appear in the display, followed by [EXIT SETUP].The remote will automatically
exit the programming mode and return to normal operation.
Now when you press the key with this assigned macro, the cable converter and TV will turn
on, the TV will tune to channel 03, and then the cable converter will tune to channel 11.
CLEARING A MACRO
1. Perform steps 1 through 4 of the earlier section,Programming A Favorite
Channel
on page 24.However, this time in step 2, select a macro key you want
to be cleared.
2. Press and hold
SELECT to clear the macro key. [SEL TO END] appears as a
reminder to use
SELECT to end the sequence (see next step).
3. Press
SELECT until [SUCCESS] appears, followed by [EXIT SETUP].The remote
will automatically exit the programming mode and return to normal operation.
USING KEYMOVER
The remote includes a Key mover feature that allows you to map (or copy) keys from one
mode (i.e., source mode) to another mode (i.e., destination mode).
NOTE: The following keys cannot be used as a source or destination: VCR,CBL, SAT,TV, CD, AUX, DVD,
MY SYSTEM, AUDIO,and P.
PROGRAMMING KEYMOVER
For example, if your VCR does not have volume control, try mapping the volume and mute
keys from
TV mode to VCR mode as follows:
1. On the remote,press and hold
P until the display changes from the default
device and time to
[CODE SET].
NOTE: Default values for device, its code, and time are shown above.Your remote control
settings may be different.
NOTE: If you wish to exit the programming mode at any time, press EXIT once. An
[EXIT] message appears as the remote control returns to normal operation.
26 Using Macros/Using Keymover
8-IN-ONE REMOTE
Page 26

NOTE:Ifan [INVALID] message appears,you have inadvertently pressed an incorrect
key. Simply note your error and continue programming.
2. Press ▲ five times until [KEYMOVER] appears.
NOTE:Ifyou go past [KEYMOVER],press ▼ one or more times to return to it.
3. Press SELECT once to begin programming. [FROM MODE] appears.
4. Select a source mode (e.g.,
TV) and press it once. [FROM KEY]appears.
5. Select a source key (e.g.,
VOL+) and press it once. [TO MODE]appears.
6. Select a destination mode (e.g.,
VCR) and press it once. [TO KEY]appears.
7. Select a destination key (e.g.,
VOL+) and press it once. [SUCCESS]appears,
followed by
[EXIT SETUP]. The remote will automatically exit the programming
mode and return to normal operation.
8. Repeat steps 1 through 7 twice more, substituting
VOL– and MUTE as source
and destination keys in steps 5 and 7.
Upon completion of the above procedure,you can now use your remote to control the TV’s
volume and mute in the
VCR mode, as well as in the TV mode.
RESTORING A SINGLE KEYMOVED KEY
1. Perform steps 1 through 7 of the previous section, Programming Keymover,on
the previous page.However, this time in step 6,make the destination mode the
same as the source mode (e.g.,
TV). [CLR KMVR] appears.
2. Press
SELECT once to clear the keymoved key. [DELETED] appears, followed by
[EXIT SETUP]. The remote will automatically exit the
programming mode and return to normal operation.
continued on next page...
Using Keymover 27
USER’S GUIDE
(x 5)
Page 27

28 Using Keymover/Programming Favorite Channel Scan
8-IN-ONE REMOTE
USING KEYMOVER (continued)
RESTORING ALL KEYMOVED KEYS IN A SINGLE MODE
1. Perform steps 1 through 4 of the earlier section,Programming Keymover,
on page 26.However, this time in steps 3 and 4,make the source mode and
source key the same mode (e.g.,
TV). [CLR KMVR] appears.
2. Press
SELECT once to clear all keymoved keys from this mode. [DELETED]
appears, followed by [EXIT SETUP]. The remote will automatically exit the
programming mode and return to normal operation.
PROGRAMMING FAVORITE CHANNEL SCAN
In the TV, VCR, DVD,SAT,or CBL mode, the remote can store a list of up to 10 favorite
channels, in any order, that will be immediately scanned when you press
SCAN (FAV)once
(see
Using Channel Scan on the next page).
NOTE: Only channels of one mode can be stored and any previously-stored channels will be cleared.
1. On the remote,press and hold P until the display changes from the default
device and time to
[CODE SET].
NOTE: Default values for device, its code, and time are shown above.Your remote control
settings may be different.
NOTE: If you wish to exit the programming mode at any time, press EXIT once. An
[EXIT] message appears as the remote control returns to normal operation.
NOTE:Ifan [INVALID] message appears,you have inadvertently pressed an incorrect
key. Simply note your error and continue programming.
2. Press ▲ three times until [FAV CHAN] appears.
NOTE:Ifyou go past [FAV CHAN],press ▼ one or more times to return to it.
3. Press SELECT once to begin programming.The last-selected device (e.g.,
[VCR]) appears.
4. Select a mode (e.g.,
TV) for favorite channel scanning and press it once.Then
press
SELECT once. [FAV] appears.
(x 3)
Page 28
Programming Favorite Channel Scan/Using Channel Scan 29
USER’S GUIDE
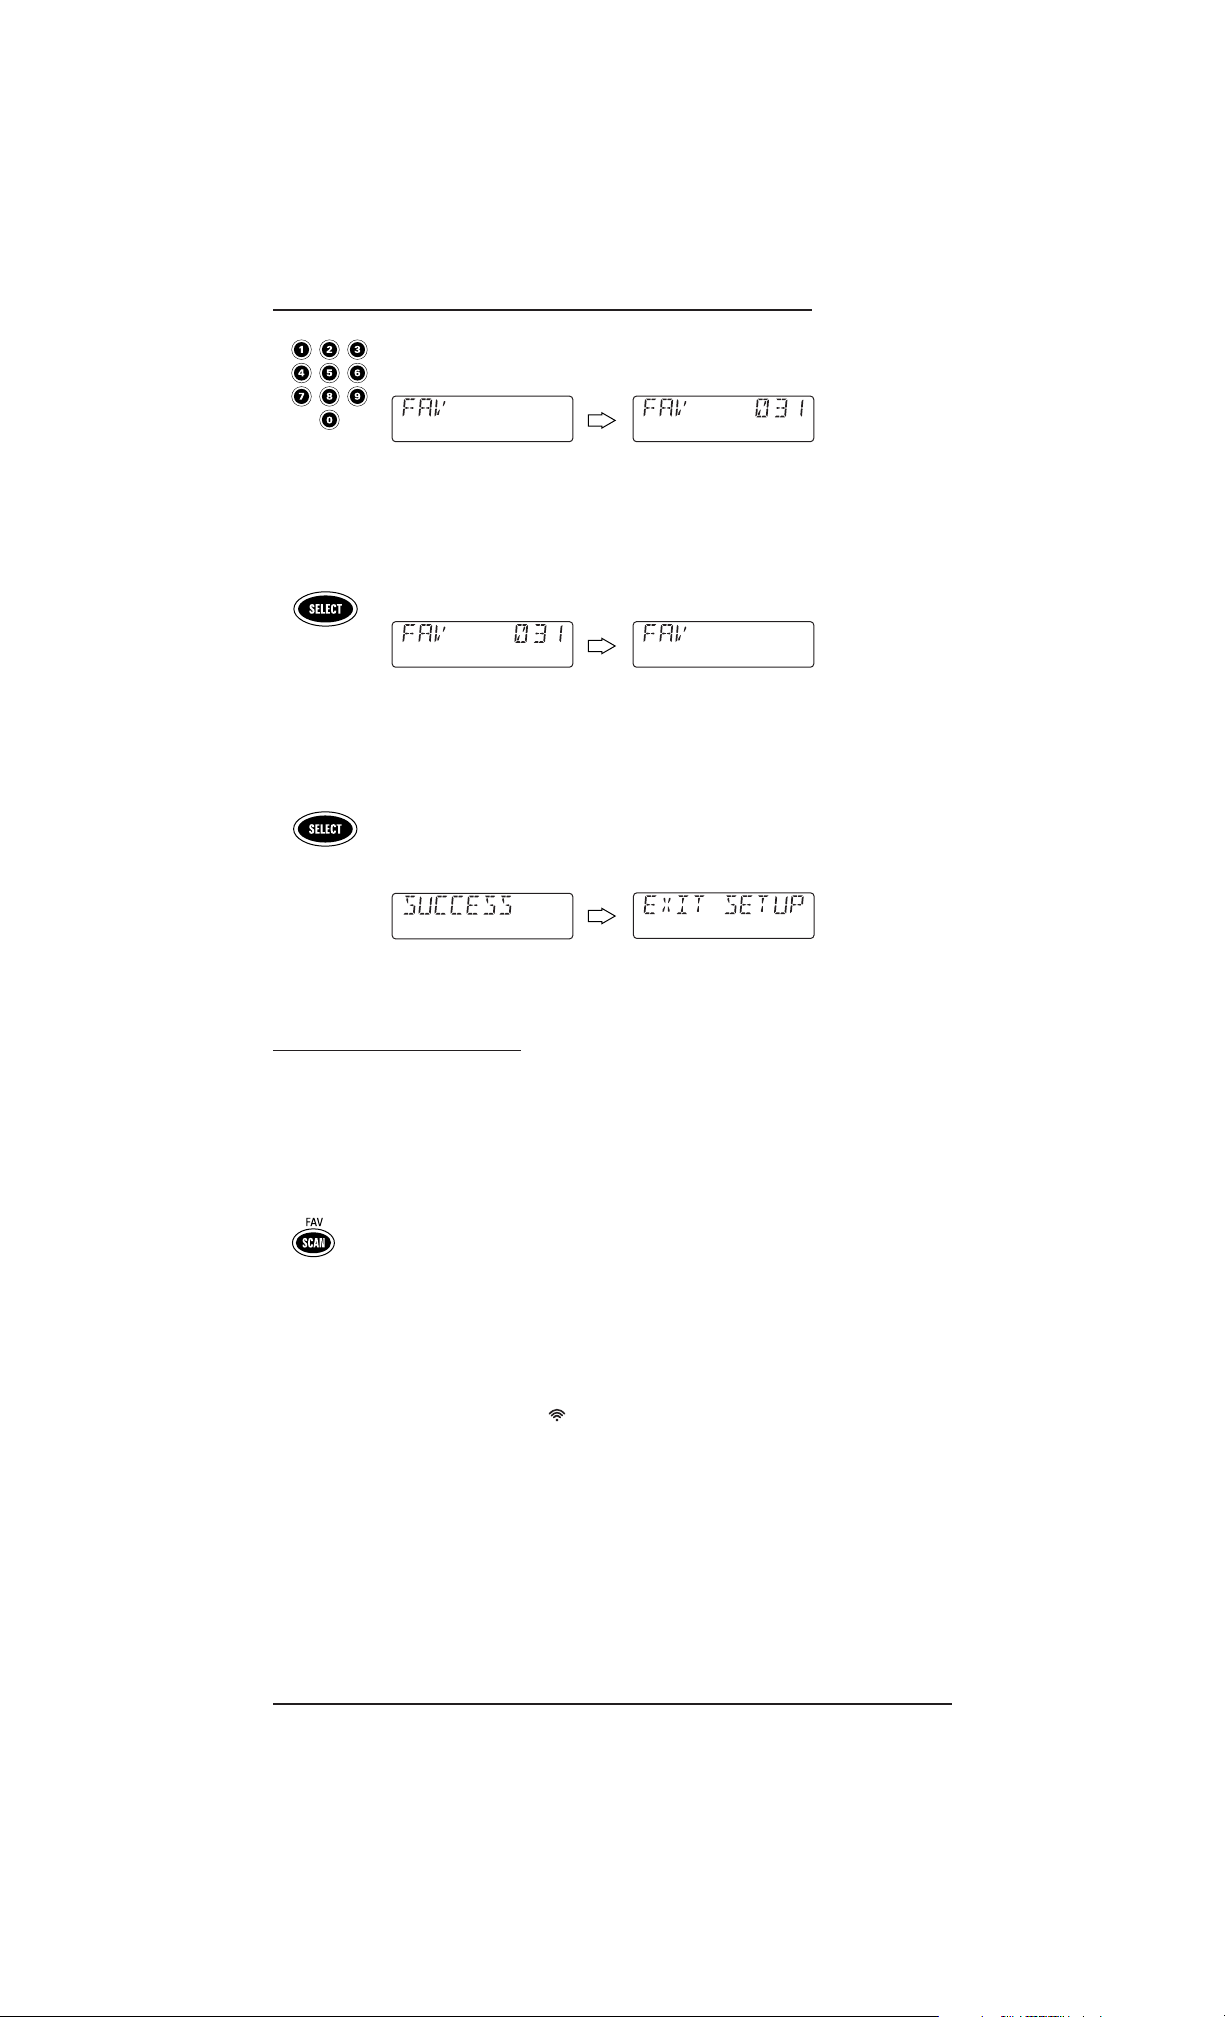
5. Use the keypad to enter a favorite channel number (e.g.,031). The display
shows your entry.
NOTE: If the original remote control required pressing an Enter key to change the
channel, also press
ENTER after the channel number (e.g.,0 - 3 - 1 - ENTER). However,
the display will not show
ENTER.
NOTE: If you made a mistake during entry, press any number key one or more times
until you see the display clear out.Then try entering the correct numbers again.
Press SELECT once. The display clears out, ready for your next entry.
6. If desired,repeat step 5 for each favorite channel to be stored,up to a total of
10 channels.
NOTE: Once the tenth channel is entered, the remote will automatically exit the
programming mode.
7. (Optional) To exit programming, press and hold SELECT until [SUCCESS]
appears, followed by [EXIT SETUP]. The remote will automatically exit the
programming mode and return to normal operation.
USING CHANNEL SCAN
In the VCR, CBL, SAT, TV,and DVD modes, use the SCAN (FAV) key to start a 3-second scan of
all favorite channels (if programmed – see
Programming Favorite Channel Scan on the pre-
vious page) and/or all channels for the selected mode.
1. If
Favorite Channel Scan has been set up, skip to step 2.Otherwise, on the
remote, press
VCR, CBL,SAT, TV,or DVD once.
2. Press
SCAN (FAV) once.
•If
Favorite Channel Scan has been set up, scanning of favorite channels will
start and, upon completion,continue to scan all channels upward for the
same device.
•IfFavorite Channel Scan has not been set up, scanning will start with the
current channel,then proceed to the next channel up,and continue until
all channels of the selected device are scanned.The red LED and IR
transmission icon ( ) blink each time a channel is scanned.
3. To stop scanning channels at any time, press any key once.
Page 29

30 Using My System
8-IN-ONE REMOTE
USING MY SYSTEM
The remote includes a custom My System mode for your devices.After the MY SYSTEM key is
programmed,it will allow you to access five groups of remote control keys without having to
change device modes. However,there are some considerations.
•
Key moved ,Learned,and Macro functions are affected by the My System mode.
If keys are moved (using
Key mover) or learned onto (using Learning) and they are
placed on keys not within the Control Groups,the keys will be ignored when pressed.
•A
Macro on the POWER key (if applicable) will carry over to the My System mode.
CONTROL ORGANIZATION
ABOUT CONTROL GROUPS
For My System programming, the remote’s keys are grouped by type of control into the
following five control groups:
(1) Playback Controls: REW, PLAY,FFWD, REC,STOP,and PAUSE
(2) Audio Controls: VOL+, VOL-,and MUTE
(3) Channel Controls: CH+, CH-, Keypad (0~ 9),ENTER, LAST, SLEEP,INFO,and TV/VIDEO
(4) Menu Controls: MENU, GUIDE, Cursor Controls (▲,▼,,),SELECT,and EXIT
(5) PIP Controls: PIP, FREEZE, SWAP, MOVE,and +100
ABOUT DEVICE GROUPS
Moreover, the remote’s devices are grouped into the following five
device groups:
(1) Playback Group: VCR, CBL,SAT, CD,AUDIO,and DVD
(2) Audio Group: VCR, CBL, SAT, TV,CD, AUDIO, DVD and AUX
(3) Channel Group: VCR, CBL, SAT, TV,CD, AUDIO, DVD and AUX
(4) Menu Group: VCR, CBL, SAT, TV,and DVD
(5) PIP Group: VCR, CBL,SAT,and TV
The default Device Group settings from the factory is:
(1) Playback Group: VCR
(2) Audio Group: TV
(3) Channel Group: CBL
(4) Menu Group: CBL
(5) PIP Group: TV
▲
▲
Page 30

Using My System 31
USER’S GUIDE
PROGRAMMING MY SYSTEM
For example, let’s assume you have a TV, a cable converter, and a VCR in your home theater
system.You can program the
My System mode so that selected controls are assigned to
these devices as follows:
1. On the remote,press and hold
P until the display changes from the default
device and time to
[CODE SET].
NOTE: Default values for device, its code, and time are shown above.Your remote control
settings may be different.
NOTE: If you wish to exit the programming mode at any time, press EXIT once. An
[EXIT] message appears as the remote control returns to normal operation.
NOTE:Ifan [INVALID] message appears,you have inadvertently pressed an incorrect
key. Simply note your error and continue programming.
2. Press ▲ two times until [MY SYSTEM] appears.
NOTE:Ifyou go past [MY SYSTEM],press ▼ one or more times to return to it.
3. Press SELECT once to begin programming. [PLAYBACK] appears.
NOTE: The program will automatically step through each Control Group (from Playback
to PIP) as you perform steps 3 through 7.However, you can use the
▲ or ▼ keys to
navigate to a specific group to make further changes.
a. Press SELECT once to enter Playback Control Group assignment.The last-
selected device (e.g.,
[TV]) appears.
b. Select a device for
Playback Control Group assignment.For this example,
press
VCR once.This will assign the entire group of Playback Controls (i.e.,
REW, PLAY, FFWD, REC, STOP,and PAUSE) to the VCR.Your device choice
(e.g.,
[VCR]) appears.
c. Press
SELECT once to accept the assignment in step 3b. The next Control
Group
assignment, [AUDIO]) appears.
continued on next page...
(x 2)
Page 31

32 Using My System
8-IN-ONE REMOTE
USING MY SYSTEM
PROGRAMMING MY SYSTEM (CONTINUED)
4. Press SELECT once to enter Audio Control Group assignment. The last-selected
device (e.g.,
[VCR]) appears.
a. Select a device for
Audio Control Group assignment. For this example,press
TV once.This will assign the entire group of Audio Controls (i.e., VOL+,VOL-,
and
MUTE) to the TV. Your device choice (e.g.,[TV]) appears.
b. Press
SELECT once to accept the assignment in step 4a. The next Control
Group
assignment, [CHANNEL]) appears.
5. Press
SELECT once to enter Channel Control Group assignment.
The last-selected device (e.g.,
[TV]) appears.
a. Select a device for
Channel Control Group assignment.For this example,
press
CBL once.This will assign the entire group of Channel Controls (i.e.,
CH+, CH-,Keypad (0 ~ 9),ENTER, LAST,SLEEP,INFO,and TV/VIDEO) to
the cable converter.Your device choice (e.g.,
[CBL]) appears.
b. Press
SELECT once to accept the assignment in step 5b. The next Control
Group
assignment, [MENU]) appears.
6. Press
SELECT once to enter Menu Control Group assignment. The last-selected
device (e.g.,
[CBL]) appears.
a. Select a device for
Menu Control Group assignment.For this example,press
CBL once.This will assign the entire group of Menu Controls (i.e., MENU,
GUIDE, Cursor Controls (▲,▼,,),SELECT,and EXIT) to the cable
converter. Your device choice (e.g.,
[CBL]) appears.
b. Press
SELECT once to accept the assignment in step 6a. The next Control
Group
assignment, [PIP]) appears.
▲
▲
Page 32

Using My System 33
USER’S GUIDE
7. Press SELECT once to enter the PIP Control Group assignment.
The last-selected device (e.g.,
[CBL]) appears.
a. Select a device for
PIP Control Group assignment.For this example,press TV
once.This will assign the entire group of PIP Controls (i.e., PIP, FREEZE,
SWAP,MOVE,and +100) to the TV. Your device choice (e.g.,[TV]) appears.
b. Press
SELECT once to accept the assignment in step 7a.The first Control
Group
assignment, [PLAYBACK]) appears.
8. At this point,all
Control Groups have been assigned. To change an assignment,
use
▲ or ▼ to navigate to a specific group and make changes by repeating the
appropriate step (3, 4,5,6, or 7).
Otherwise,to exit programming,press and hold
SELECT until [SUCCESS]
appears, followed by [EXIT SETUP]. The remote will automatically exit the
programming mode and return to normal operation.
OPERATING MY SYSTEM
After programming the My System mode (see the previous section), simply activate it by
pressing
MY SYSTEM once.Instantly,groups of remote keys will be assigned to their pro-
grammed devices.In the above example, pressing
MY SYSTEM once would assign the following
keys to the VCR,TV, and cable converter:
VCR:
REW, PLAY, FFWD, REC, STOP,and PAUSE
TV: VOL+,VOL-, MUTE,PIP, FREEZE, SWAP, MOVE,and +100
Cable Converter: CH+,CH-,Keypad (0 ~ 9), ENTER,LAST, SLEEP,INFO,TV/VIDEO, MENU,
GUIDE, Cursor Controls (▲,▼,,),SELECT,and EXIT
▲
▲
or
Page 33

34 Reassigning Device Keys
8-IN-ONE REMOTE
REASSIGNING DEVICE KEYS
The remote can be set up to control a second TV, VCR, DVD player, or other device not listed on the device keys.
For example, to control a TV, a cable converter, and two VCRs,you can reassign the unused
AUX key to operate the second VCR as follows:
1. Find the codes for the device you want to program in
Manufacturer’s Codes
(starting on page 84) and write them down or highlight them.For this
example,locate the VCR codes on page 89.
2. Turn on a device (e.g.,VCR) and,if necessary, load media (e.g., videocassette).
NOTE: Please read steps 3 through 9 completely before proceeding. Highlight or write
down the codes and device you wish to program before starting step 2.
3. On the remote,press AUX once.Then press and hold Puntil the display changes
from the current
AUX device and code (e.g., RCVR and 1023) to [CODE SET].
NOTE: Default values for device, its code, and time are shown above.Your remote control
settings may be different.
NOTE: If you wish to exit the programming mode at any time, press EXIT once. An
[EXIT] message appears as the remote control returns to normal operation.
NOTE:Ifan [INVALID] message appears,you have inadvertently pressed an incorrect
key. Simply note your error and continue programming.
4. Press SELECT once to begin programming.The last-selected device and its
current code (e.g.,
RCVR and 1023) appear.
5. Use
▲ or ▼ to navigate to the device type you want to assign to the AUX key.
For this example, locate VCR and its default code (e.g.,
VCR and 0060).
6. Use the keypad to enter the first four-digit code for your device and press
SELECT once.
For example,to enter the first Sony VCR code (
0035 on page 91),press 0twice,
then
3,then 5,and then SELECT once.
If the code is entered correctly,
[SUCCESS] appears.
7. Press
EXIT to exit the programming mode.An [EXIT SETUP] message appears
as the remote returns to normal operation.
or
Page 34

Reassigning Device Keys 35
USER’S GUIDE
8. To verify the code works,aim the remote at the desired device (e.g.,VCR),
press the reassigned device key (e.g.,
AUX) once and then press POWER once.
The device should turn off.If it does not respond,repeat steps 3 through 8,
trying each code for your brand until you find one that works. If you cannot
find a code that works, try
Searching For Your Code on page 19.
NOTE: If the device does not have a POWER key, press (Play).
9. To reassign other device keys,repeat steps 1 through 8,but this time in step 3
substitute another device key you want to reassign. Then in step 4,locate and
select the device you own.
For example, let’s say you own a LD player instead of DVD player.In step 3,
press
DVD once (instead of AUX). In step 4,use ▲ or ▼ to navigate to LDP
instead of VCR.Then complete the remaining instructions.
10. For future reference,write down each reassigned device key and its working
code in the boxes below:
VCR = Device: _____________________ Code =
CBL = Device: _____________________ Code =
SAT = Device:______________________ Code =
TV = Device: ______________________ Code =
CD = Device: ______________________ Code =
AUX = Device: _____________________ Code =
DVD = Device: _____________________ Code =
AUDIO = Device:____________________ Code =
Page 35

36 Restoring Factory Default Settings
8-IN-ONE REMOTE
RESTORING FACTORY DEFAULT SETTINGS
The remote includes an Operation Reset program that you can use to restore the unit to
factory default settings.
IMPORTANT: Executing this program will erase all custom settings, including Home Theater
assignments, Macros,Learned Keys, Keymoved Keys, and all device assignments.
1. On the remote,press and hold P until you see the display change from the
default device and time to
[CODE SET].
NOTE: Default values for device, its code, and time are shown above.Your remote control
settings may be different.
NOTE: If you wish to exit the programming mode at any time, press EXIT once. An
[EXIT] message appears as the remote control returns to normal operation.
NOTE:Ifan [INVALID] message appears,you have inadvertently pressed an incorrect
key. Simply note your error and continue programming.
2. Press ▲ once. [OPS RESET] appears.
NOTE:Ifyou go past [OPS RESET],press ▼ one or more times to return to it.
3. Press SELECT once to begin programming. [CLR SETUP] appears.
4. Press
SELECT once to start the process.[RESET RAM] appears as the active
memory is cleared, followed by
[RESET E2] as the preprogrammed memory
is restored.
An
[EXIT SETUP] message appears as the remote automatically exits the
programming mode and returns to normal operation.
Page 36

Troubleshooting 37
USER’S GUIDE
TROUBLESHOOTING
PROBLEM: LCD (Liquid Crystal Display) begins to fade, does not appear, or the Low
Battery ( )icon appears.
SOLUTION: Replace the batteries with four (4) new AAA alkaline batteries (see page 4).
PROBLEM: Red LED and IR ( ) icon blinks when you press a key, but device does
not respond.
SOLUTION: Be sure to select the correct device key for the device you want to control.Also,
aim the remote at the device not farther than 15 feet away.
PROBLEM: The remote does not control devices or commands are not working properly.
SOLUTION: Try all listed codes for the device.Make sure the device operates with an
infrared remote control.
PROBLEM: TV/VCR combo does not respond properly.
SOLUTION: Use the VCR codes for your brand.Some combo units may require both a TV
code and a VCR code for full operation.
PROBLEM: The remote does not turn on a Sony or Sharp TV/VCR combo.
SOLUTION: These models require TV codes to turn on power. For Sony, use TV code 0000
and VCR code 0032.For Sharp, use TV code 0093 and VCR code 0048.
PROBLEM: Changing channels does not work properly.
SOLUTION: If the original remote control required Enter to be pressed to change channels,
press ENTER on the remote after entering the channel number.
PROBLEM: During learning, the remote’s display shows an
[ERROR] message after pressing
and holding a key to be learned.
SOLUTION: A bad capture has occurred.Avoid high-ambient light sources, such as direct
daylight and fluorescent bulbs. Also,try readjusting positions of remote
controls before performing the procedure again.Make sure the key(s) on the
original remote control is (are) operating correctly.
PROBLEM:
CH+, CH-,and LAST do not work for your RCA TV.
SOLUTION: Due to RCA design from 1983 to 1987,only the original remote control will
operate these functions.
PROBLEM: No volume on a second TV.
SOLUTION: Follow instructions in Changing Volume Lock on page 22.
PROBLEM: Cannot find a working code using the instructions in
Searching For Your Code.
SOLUTION: See our website
www.radioshack.com for help or take the remote to your
local RadioShack store.
PROBLEM: The remote turns on audio devices and controls volume,but does not change
preset channels.
SOLUTION: Some products may need both a Tuner (or Receiver) code and an Audio
Amplifier code for remote control of all features on your audio device.
PROBLEM: Your satellite (DSS) receiver does not respond to the codes listed on page 87.
SOLUTION: Make sure the satellite (DSS) receiver can be operated with an infrared (IR)
remote control and is not set up to receive only radio frequency (RF) signals.
NOTE: If you have any other problems, call customer service at 1-800-763-9232.
Page 37

38 Error Messages/Specifications
8-IN-ONE REMOTE
ERROR MESSAGES
A wrong key sequence or incorrect data has been entered.
Try entry again.
Requested manufacturer’s code has not been found in the
remote’s database.Try another code.
Macro sequence being entered has reached the maximum limit
of 15 keystrokes.Try entry again with fewer keystrokes.
A complete cycle of code search in the remote’s database has
been completed.Try another code search or see our website
www.radioshack.com for help. Or take the remote to your local
RadioShack store.
An error has occurred during a learning or programming
sequence.Try entry again.
Indicates a check result of E2 status is either bad or is not present.
See our website
www.radioshack.com for help or take the
remote to your local RadioShack store.
Indicates data captured during learning has filled the remote’s
memory.Try deleting older learned keys to free up memory
space (see page 22).
Indicates data captured during learning has caused a error in
the remote’s memory. Try learning again.
SPECIFICATIONS
Remote Control Power . . . . . . . . . . . . . . . . . . . . . . . . . . . . . . . . . . . . . . . . . . . . . . . 4 AAA Batteries
Remote Control Dimensions
(H x W x D). . . . . . . . . . . . . . . . . . . . . . . . . . . . . . . . . . . . . . . . . . . . . . . . . . . 9.21 x 2.52 x 1.34 in.
(H x W x D). . . . . . . . . . . . . . . . . . . . . . . . . . . . . . . . . . . . . . . . . . . . . . . . . . . . . 234 x 64 x 34 mm
Remote Control Weight (without Batteries) . . . . . . . . . . . . . . . . . . . . . . . . . . . . . . . 0.45 lb (204 g)
NOTE: Specifications are typical. Individual units might vary. Specifications are subject to change and
improvement without notice.
Page 38

Instruction To The User/Care 39
USER’S GUIDE
INSTRUCTION TO THE USER
This equipment has been tested and found to comply with the limits for a class B digital
device, pursuant to part 15 of the FCC Rules.These limits are designed to provide reasonable
protection against harmful interference in a residential installation.This equipment generates,
uses and can radiate radio frequency energy and if not installed and used in accordance with
the instructions, may cause harmful interference to radio communications.However, there is
no guarantee that interference will not occur in a particular installation.If this equipment
does cause harmful interference to radio or television reception,which can be determined by
turning the equipment off and on, the user is encouraged to try to correct the interference by
one or more of the following measures:
• Reorient or relocate the receiving antenna.
• Increase the separation between the equipment and receiver.
• Connect the equipment into an outlet on a circuit different from that to which the receiver
is connected.
• Consult the dealer or an experienced radio/TV technician for help.
This equipment has been verified to comply with the limits for a class B computing device,
pursuant to FCC Rules.In order to maintain compliance with FCC regulations,shielded cables
must be used with this equipment. Operation with non-approved equipment or unshielded
cables is likely to result in interference to radio and TV reception. The user is cautioned that
changes and modifications made to the equipment without the approval of manufacturer
could void the user's authority to operate this equipment.
CARE
• Keep the remote dry. If the remote gets wet, wipe it dry immediately.
• Handle the remote gently and carefully. Don’t drop it.
• Use and store the remote only in normal temperature environments.
• Keep the remote away from dust and dirt.
• Wipe the remote with a damp cloth to keep it looking new.
Modifying or tampering with internal parts can cause damage and invalidate the warranty.
If your remote is not performing as it should, please contact us at:
www.radioshack.com
or visit your local RadioShack store for help.
Page 39

LIMITED 90-DAY WARRANTY
This product is warranted by RadioShack against manufacturing defects in material and workmanship under
normal use for ninety (90) days from the date of purchase from RadioShack company-owned stores and
authorized RadioShack franchisees and dealers.
EXCEPT AS PROVIDED HEREIN, RadioShack MAKES NO EXPRESS WARRANTIES AND ANY IMPLIED
WARRANTIES, INCLUDING THOSE OF MERCHANTABILITY AND FITNESS FOR A PARTICULAR PURPOSE,
ARE LIMITED IN DURATION TO THE DURATION OF THE WRITTEN LIMITED WARRANTIES CONTAINED
HEREIN. EXCEPT AS PROVIDED HEREIN,RadioShack SHALL HAVE NO LIABILITY OR RESPONSIBILITY TO
CUSTOMER OR ANY OTHER PERSON OR ENTITY WITH RESPECT TO ANY LIABILITY, LOSS OR DAMAGE
CAUSED DIRECTLY OR INDIRECTLY BY USE OR PERFORMANCE OF THE PRODUCT OR ARISING OUT OF
ANY BREACH OF THIS WARRANTY, INCLUDING, BUT NOT LIMITED TO,ANY DAMAGES RESULTING
FROM INCONVENIENCE,LOSS OF TIME, DATA,PROPERTY, REVENUE,OR PROFIT OR ANY INDIRECT,
SPECIAL, INCIDENTAL, OR CONSEQUENTIAL DAMAGES, EVEN IF RadioShack HAS BEEN ADVISED OF
THE POSSIBILITY OF SUCH DAMAGES.
Some states do not allow limitations on how long an implied warranty lasts or the exclusion or limitation of
incidental or consequential damages,so the above limitations or exclusions may not apply to you.
In the event of a product defect during the warranty period, take the product and the RadioShack sales receipt
as proof of purchase date to any RadioShack store. RadioShack will,at its option,unless otherwise provided by
law: (a) correct the defect by product repair without charge for parts and labor; (b) replace the product with
one of the same or similar design; or (c) refund the purchase price.All replaced parts and products, and
products on which a refund is made, become the property of RadioShack. New or reconditioned parts and
products may be used in the performance of warranty service. Repaired or replaced parts and products are
warranted for the remainder of the original warranty period.You will be charged for repair or replacement of
the product made after the expiration of the warranty period.
This warranty does not cover: (a) damage or failure caused by or attributable to acts of God, abuse,accident,
misuse, improper or abnormal usage,failure to follow instructions, improper installation or maintenance,
alteration,lightning or other incidence of excess voltage or current;(b) any repairs other than those provided
by a RadioShack Authorized Service Facility; (c) consumables such as fuses or batteries; (d) cosmetic damage;
(e) transportation,shipping or insurance costs; or (f) costs of product removal,installation,set-up service
adjustment or reinstallation.
This warranty gives you specific legal rights, and you may also have other rights which vary from state to state.
RadioShack Customer Relations,
200 Taylor Street, 6th Floor,
Fort Worth, TX 76102
Cat. No.15-2116 01/03
Fort Worth, Texas 76102
40 Limited 90-Day Warranty
8-IN-ONE REMOTE
Page 40

NOTES:
Notes 41
USER’S GUIDE
Page 41

8-IN-ONE REMOTE
ÍNDICE DE MATERIAS
Introducción. . . . . . . . . . . . . . . . . . . . . . . . . . . . . . . . . . . . . . . . . . . . . . . . . . . . . . . . . . . . . . . . . . . . . . . . . . . . . . 43
Instalación De Las Baterías . . . . . . . . . . . . . . . . . . . . . . . . . . . . . . . . . . . . . . . . . . . . . . . . . . . . . . . . . . . . . . . . 44
Fijación De La Hora . . . . . . . . . . . . . . . . . . . . . . . . . . . . . . . . . . . . . . . . . . . . . . . . . . . . . . . . . . . . . . . . . . . . . . . 45
Un Vistazo Rápido A Los Controles. . . . . . . . . . . . . . . . . . . . . . . . . . . . . . . . . . . . . . . . . . . . . . . . . . . . . . . . . . . 46
Funciones De Las Teclas. . . . . . . . . . . . . . . . . . . . . . . . . . . . . . . . . . . . . . . . . . . . . . . . . . . . . . . . . . . . . . . . . . . 47
Tabla De Las Teclas . . . . . . . . . . . . . . . . . . . . . . . . . . . . . . . . . . . . . . . . . . . . . . . . . . . . . . . . . . . . . . . . . . . . . . 50
Programación De Un Dispositivo. . . . . . . . . . . . . . . . . . . . . . . . . . . . . . . . . . . . . . . . . . . . . . . . . . . . . . . . . . . . . 56
Programación De Un Aparato Combinado Televisor/Videograbadora . . . . . . . . . . . . . . . . . . . . . . . . . . . . . . . 58
Búsqueda De Su Código . . . . . . . . . . . . . . . . . . . . . . . . . . . . . . . . . . . . . . . . . . . . . . . . . . . . . . . . . . . . . . . . . . . 59
Uso De La Función Aprendizaje. . . . . . . . . . . . . . . . . . . . . . . . . . . . . . . . . . . . . . . . . . . . . . . . . . . . . . . . . . . . . . 60
Programación De Una Tecla De Aprendizaje . . . . . . . . . . . . . . . . . . . . . . . . . . . . . . . . . . . . . . . . . . . . . . . . . . . . 60
Supresión De Una Función De Una Tecla De Aprendizaje. . . . . . . . . . . . . . . . . . . . . . . . . . . . . . . . . . . . . . . . . . . 62
Cambio Del Bloqueo Del Volumen. . . . . . . . . . . . . . . . . . . . . . . . . . . . . . . . . . . . . . . . . . . . . . . . . . . . . . . . . . . . 63
Programación Del Bloqueo Del Volumen . . . . . . . . . . . . . . . . . . . . . . . . . . . . . . . . . . . . . . . . . . . . . . . . . . . . . . . 63
Programación Del Desbloqueo Del Volumen . . . . . . . . . . . . . . . . . . . . . . . . . . . . . . . . . . . . . . . . . . . . . . . . . . . . 64
Uso De Los Macros . . . . . . . . . . . . . . . . . . . . . . . . . . . . . . . . . . . . . . . . . . . . . . . . . . . . . . . . . . . . . . . . . . . . . . . . 64
Programación De Un Canal Favorito . . . . . . . . . . . . . . . . . . . . . . . . . . . . . . . . . . . . . . . . . . . . . . . . . . . . . . . . . . 64
Programación De Una Tecla Maestra De Encendido Con Selección Instantánea De Canal. . . . . . . . . . . . . . . . . . 66
Remoción De Un Macro . . . . . . . . . . . . . . . . . . . . . . . . . . . . . . . . . . . . . . . . . . . . . . . . . . . . . . . . . . . . . . . . . . . 66
Uso De La Función Keymover. . . . . . . . . . . . . . . . . . . . . . . . . . . . . . . . . . . . . . . . . . . . . . . . . . . . . . . . . . . . . . . . 67
Programación De La Función Keymover . . . . . . . . . . . . . . . . . . . . . . . . . . . . . . . . . . . . . . . . . . . . . . . . . . . . . . . 67
Restauración De Una Sola Tecla Movida. . . . . . . . . . . . . . . . . . . . . . . . . . . . . . . . . . . . . . . . . . . . . . . . . . . . . . . 68
Restauración De Todas Las Teclas Movidas En Un Solo Modo . . . . . . . . . . . . . . . . . . . . . . . . . . . . . . . . . . . . . . . 68
Programación De Una Exploración De Canales Favoritos . . . . . . . . . . . . . . . . . . . . . . . . . . . . . . . . . . . . . . . . 69
Uso De La Exploración De Canales. . . . . . . . . . . . . . . . . . . . . . . . . . . . . . . . . . . . . . . . . . . . . . . . . . . . . . . . . . . 70
Uso De My System (Mi Sistema) . . . . . . . . . . . . . . . . . . . . . . . . . . . . . . . . . . . . . . . . . . . . . . . . . . . . . . . . . . . . . 71
Organización De Los Controles . . . . . . . . . . . . . . . . . . . . . . . . . . . . . . . . . . . . . . . . . . . . . . . . . . . . . . . . . . . . . . 71
Programación De My System . . . . . . . . . . . . . . . . . . . . . . . . . . . . . . . . . . . . . . . . . . . . . . . . . . . . . . . . . . . . . . . 72
Operación De My System . . . . . . . . . . . . . . . . . . . . . . . . . . . . . . . . . . . . . . . . . . . . . . . . . . . . . . . . . . . . . . . . . . 74
Reasignación De Las Teclas De Dispositivos. . . . . . . . . . . . . . . . . . . . . . . . . . . . . . . . . . . . . . . . . . . . . . . . . . . 75
Restauración De Los Valores Fijados En La Fábrica. . . . . . . . . . . . . . . . . . . . . . . . . . . . . . . . . . . . . . . . . . . . . 77
Localización De Fallas . . . . . . . . . . . . . . . . . . . . . . . . . . . . . . . . . . . . . . . . . . . . . . . . . . . . . . . . . . . . . . . . . . . . . 78
Mensajes De Error. . . . . . . . . . . . . . . . . . . . . . . . . . . . . . . . . . . . . . . . . . . . . . . . . . . . . . . . . . . . . . . . . . . . . . . . . 79
Especificaciones. . . . . . . . . . . . . . . . . . . . . . . . . . . . . . . . . . . . . . . . . . . . . . . . . . . . . . . . . . . . . . . . . . . . . . . . . . 80
Instrucciones Para El Usuario. . . . . . . . . . . . . . . . . . . . . . . . . . . . . . . . . . . . . . . . . . . . . . . . . . . . . . . . . . . . . . . 80
Cuidado . . . . . . . . . . . . . . . . . . . . . . . . . . . . . . . . . . . . . . . . . . . . . . . . . . . . . . . . . . . . . . . . . . . . . . . . . . . . . . . . . 81
Garantía Limitada . . . . . . . . . . . . . . . . . . . . . . . . . . . . . . . . . . . . . . . . . . . . . . . . . . . . . . . . . . . . . . . . . . . . . . . . 82
Códigos Del Fabricante . . . . . . . . . . . . . . . . . . . . . . . . . . . . . . . . . . . . . . . . . . . . . . . . . . . . . . . . . . . . . . . . . . . . 84
Códigos De Configuración Para Amplificadores De Audio . . . . . . . . . . . . . . . . . . . . . . . . . . . . . . . . . . . . . . . . . . 84
Códigos De Configuración Para Reproductores De Audiocasetes. . . . . . . . . . . . . . . . . . . . . . . . . . . . . . . . . . . . . 84
Códigos De Configuración Para Receptores De Audio . . . . . . . . . . . . . . . . . . . . . . . . . . . . . . . . . . . . . . . . . . . . . 84
Códigos De Configuración Para Servicios De Audio. . . . . . . . . . . . . . . . . . . . . . . . . . . . . . . . . . . . . . . . . . . . . . . 85
Códigos De Configuración Para Tornamesas De Audio . . . . . . . . . . . . . . . . . . . . . . . . . . . . . . . . . . . . . . . . . . . . 85
Códigos De Configuración Para Convertidores De Cable . . . . . . . . . . . . . . . . . . . . . . . . . . . . . . . . . . . . . . . . . . . 85
Códigos De Configuración Para Reproductores De CDs. . . . . . . . . . . . . . . . . . . . . . . . . . . . . . . . . . . . . . . . . . . . 85
Códigos De Configuración Para Reproductores DAT . . . . . . . . . . . . . . . . . . . . . . . . . . . . . . . . . . . . . . . . . . . . . . 86
Códigos De Configuración Para Reproductores DVD . . . . . . . . . . . . . . . . . . . . . . . . . . . . . . . . . . . . . . . . . . . . . . 86
Códigos De Configuración Para La Automatización Del Hogar. . . . . . . . . . . . . . . . . . . . . . . . . . . . . . . . . . . . . . . 87
Códigos De Configuración Para Dispositivos Home-Theater-In-A-Box. . . . . . . . . . . . . . . . . . . . . . . . . . . . . . . . . . 87
Códigos De Configuración Para Reproductores LD . . . . . . . . . . . . . . . . . . . . . . . . . . . . . . . . . . . . . . . . . . . . . . . 87
Códigos De Configuración Para Receptores De Satélite. . . . . . . . . . . . . . . . . . . . . . . . . . . . . . . . . . . . . . . . . . . . 87
Códigos De Configuración Para Televisores. . . . . . . . . . . . . . . . . . . . . . . . . . . . . . . . . . . . . . . . . . . . . . . . . . . . . 87
Códigos De Configuración Para Aparatos Combinados Televisor/Videograbadora (TV/VCR). . . . . . . . . . . . . . . . . 89
Códigos De Configuración Para Videograbadoras (VCR) . . . . . . . . . . . . . . . . . . . . . . . . . . . . . . . . . . . . . . . . . . . 89
Códigos De Configuración Para Accesorios De Vídeo. . . . . . . . . . . . . . . . . . . . . . . . . . . . . . . . . . . . . . . . . . . . . . 91
42 Índice De Materias
Page 42

Introducción 43
GUÍA DEL USUARIO
INTRODUCCIÓN
El Remoto 8-en-Uno de RadioShack es nuestro más reciente control remoto universal de
alto rendimiento.Está diseñado para operar hasta ocho dispositivos de entretenimiento en
el hogar,incluyendo componentes de televisión,vídeo y audio. Más aún, este control remoto contiene tecnología sofisticada que le permitirá consolidar toda una pila de controles
remotos originales dentro de un solo producto fácil de usar. Está repleto de funciones
avanzadas,tales como:
•
Pantalla De Cristal Líquido (LCD) – con 15 caracteres alfanuméricos,reloj de tiempo
real,e iconos para una retroalimentación visual constante de las operaciones y secuencias de programación
•
My System – un modo extraordinario que combina controles de dispositivos diferentes
dentro de un modo para conveniencia en la operación
•
Macros – para una activación instantánea de las secuencias de teclas favoritas
•
Aprendizaje – para capturar funciones únicas de los controles remotos originales de
sus dispositivos
• Función KeyMover – para copiar teclas de un dispositivo a otro,o a una posición
diferente en el mismo modo
•
Búsqueda y Verificación De Códigos – le ayudan a configurar rápidamente al control
remoto para que opere sus dispositivos
•
Exploración De Canales y Exploración De Canales Favoritos – le permiten “navegar
canales”a través de todos los canales disponibles y favoritos
•
Bloqueo Del Volumen – para asignar los controles del volumen a dispositivos individuales o a un dispositivo global
•
Teclas Dedicadas De Menú/Guía – para un acceso instantáneo a las guías y menúes de
los programas por cable y por satélite
•
Base De Datos De Códigos Que Se Pueden Buscar – contiene el grupo de códigos de
controles remotos infrarrojos más grande y eficiente del mundo para prácticamente
todas las marcas de la actualidad
•
Icono Indicador De Batería Baja – le avisa cuando las baterías comienzan a bajarse
•
Retroiluminación – para ayudar a operarlo cuando hay poca luz ambiental
Después de instalar cuatro (4) baterías alcalinas nuevas de tamaño AAA (no vienen incluidas,
vea la página siguiente),puede usar el control remoto de inmediato para controlar un televisor,
una videograbadora (VCR) y un receptor de satélite RCA,un convertidor de cable Motorola
(General Instruments),y reproductores de CD y de DVD y dispositivos de audio Pioneer.
Para controlar otras marcas,sírvase llevar a cabo las instrucciones de la
Programación De
Un Dispositivo
en la página 56 y de la Programación De Un Aparato Combinado
Televisor/Videograbadora (TV/VCR)
en la página 58.
Page 43

INSTALACIÓN DE LAS BATERÍAS
Su control remoto necesita cuatro baterías AAA (no vienen incluidas) para funcionar. Para
obtener el mejor funcionamiento y mayor duración, le recomendamos que use las baterías
alcalinas RadioShack.
PRECAUCIONES:
• Utilice únicamente baterías frescas del tamaño requerido y del tipo recomendado.
• No mezcle baterías viejas y nuevas, diferentes tipos de baterías (v.g., estándar,alcalinas,
o recargables),ni baterías recargables de diferentes capacidades.
• Si no va a usar el control remoto durante un largo tiempo,quítele las baterías.Éstas pueden
derramar substancias químicas que pueden destruir los componentes electrónicos.
ADVERTENCIA: Deseche las baterías viejas rápida y adecuadamente. No las queme ni las entierre.
PARA INSTALAR LAS BATERÍAS:
1. Presione la lengüeta en la tapa del compartimento de baterías (ubicado en el respaldo
del control remoto) y levante la tapa.
2. Coloque las baterías AAA en el compartimento como se indica por los símbolos de
polaridad (+ y –) marcados en el interior.
3. Alinee la saliente de la tapa con la abertura del compartimento y vuelva a colocar la tapa.
4. Si las baterías se insertan como es debido,toda la pantalla LCD se encenderá.Después
de 5 segundos de inactividad, el control remoto se apagará por sí mismo para conservar la vida de las baterías.
5. Lleve a cabo los pasos de la sección Fijación de la hora (en la página siguiente) para
poner la hora correcta.
NOTA: Cuando aparece un icono de batería en la pantalla (vea la página 47,“Funciones De Las
Teclas”), significa que las baterías están bajas.Cámbielas tan pronto le sea posible y el control remoto se
restaurará a su funcionamiento completo, con todo y sus fijaciones favoritas.
44 Instalación De Las Baterías
8-IN-ONE REMOTE
❶
❸❷
Page 44

FIJACIÓN DE LA HORA
1. En el control remoto, presione y mantenga oprimida la tecla Phasta que la
pantalla cambie del dispositivo y de la hora de fábrica a la
[CODE SET]
(Fijación De Códigos).
NOTA:Arriba se muestran los valores de fábrica de un dispositivo,su código, y la hora.
Los valores fijados en su control remoto pueden ser diferentes.
NOTA: Si en algún momento dado desea salirse del modo de programación, presione
EXIT (Salida) una vez. Aparece un mensaje [EXIT] al tiempo que el control remoto vuelve
a la operación normal.
NOTA:Si aparece el mensaje [INVALID] (No Válido), significa que accidentalmente
presionó una tecla incorrecta.Simplemente tome nota del error y continúe programando.
2. Presione ▲ cuatro veces hasta que aparezca [CLOCK SET] (Fijación De La Hora).
NOTA: Si se pasa de [CLOCK SET], presione t una vez o más hasta volver a ella.
3. Presione SELECT (Seleccionar) una vez para comenzar a programar.Aparece el
valor fijado en la fábrica (12:00 a.m.) o la hora actual (si ésta se fijó antes).
4. Presione
▲ una vez o más hasta que aparezca la hora que desea del día o de la
tarde (a.m.o p.m.).
5. Presione
▼ una vez o más hasta que aparezca el minuto que desea.
6. Una vez que haya fijado la hora correcta,presione
SELECT una vez para
aceptar los valores indicados. La pantalla confirmará los datos asentados
con
[SUCCESS] (Éxito) y después con [EXIT SETUP] (Salir De Configuración).
El control remoto volverá a la operación normal.
Fijación De La Hora 45
GUÍA DEL USUARIO
(x 4)
Page 45
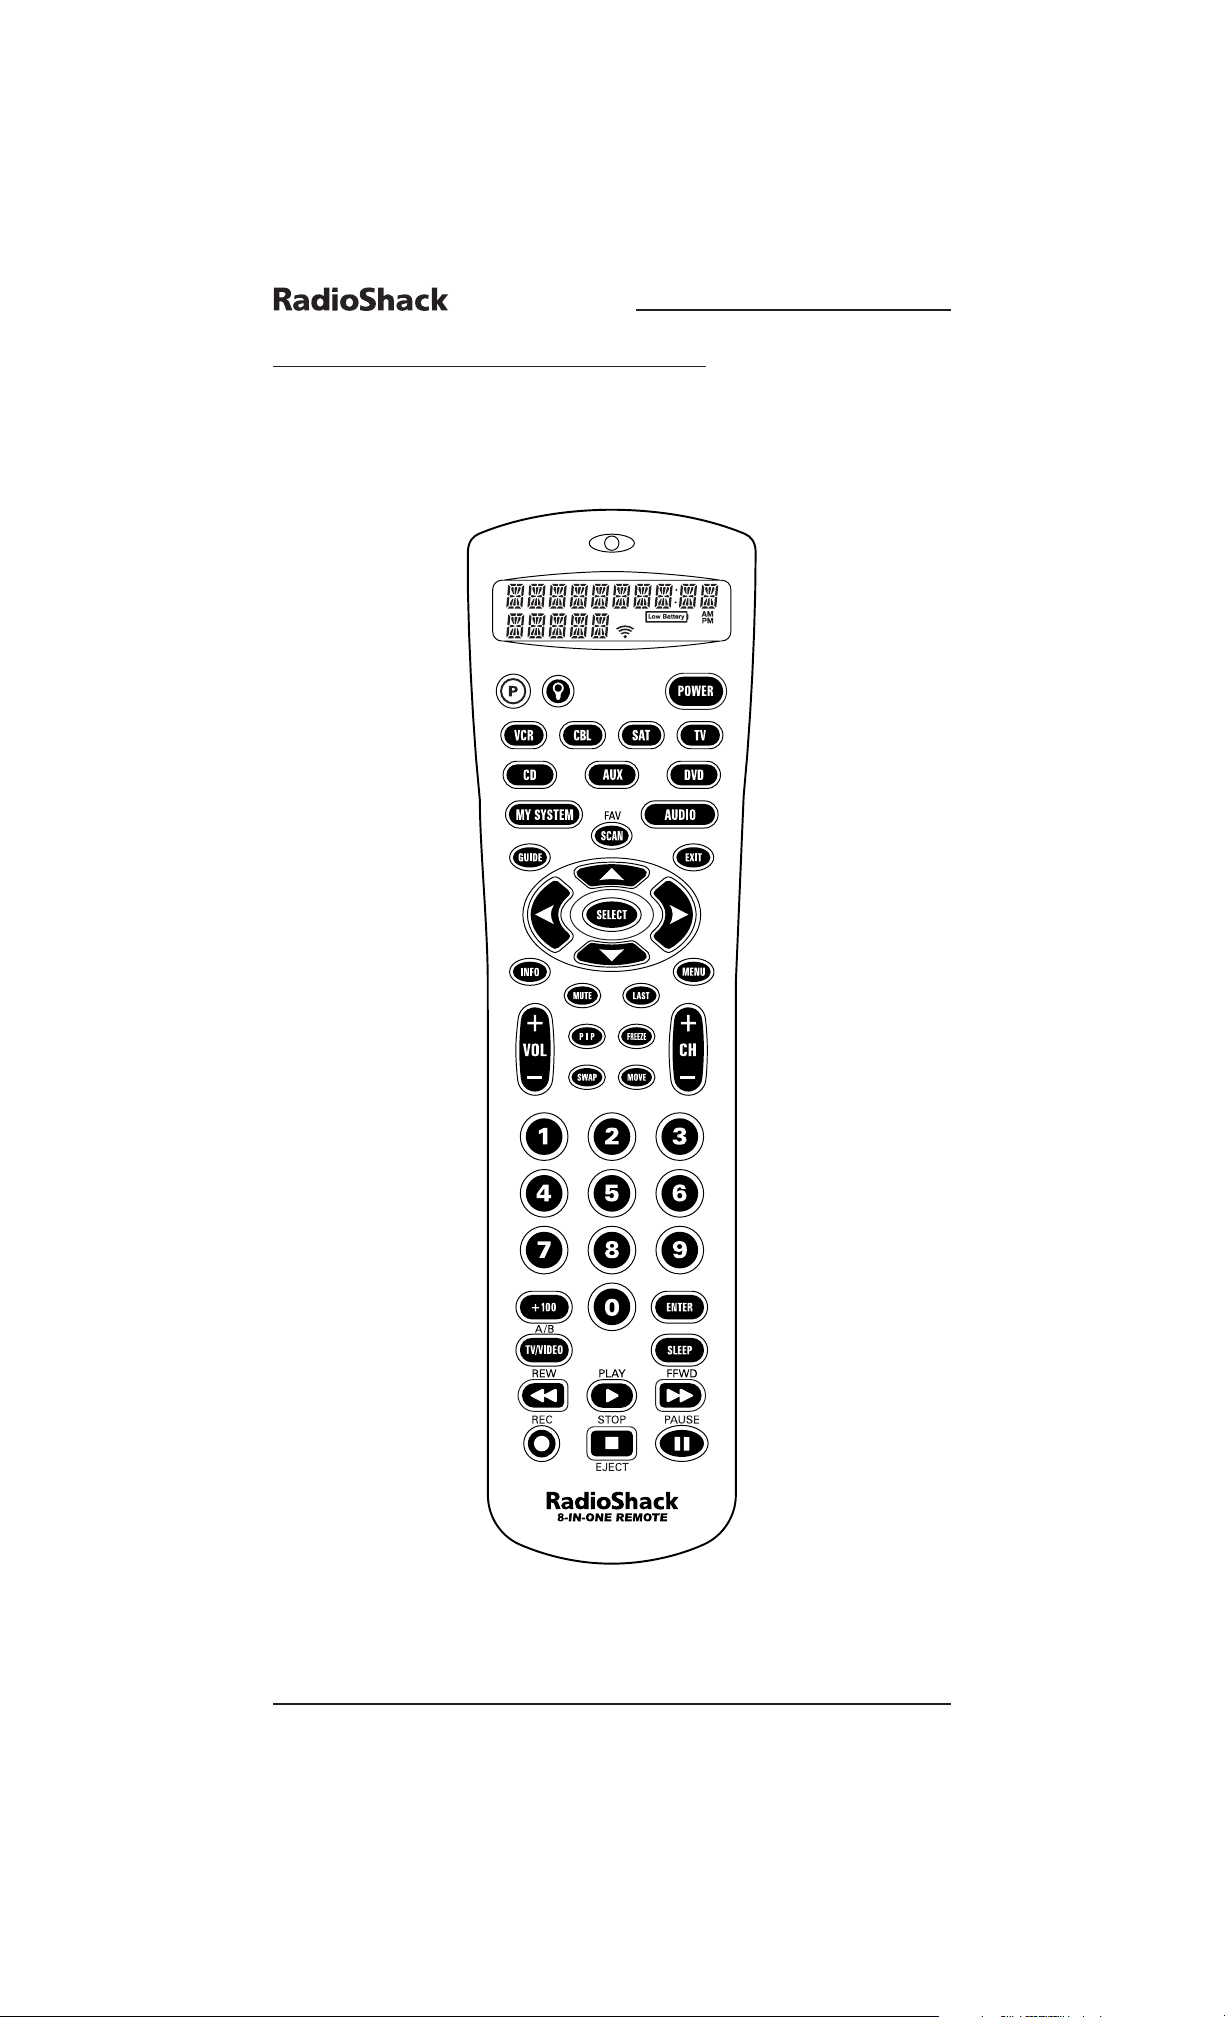
UN VISTAZO RÁPIDO A LOS CONTROLES
Use la ilustración de abajo para ubicar los controles en el control remoto y después estudie
las
Funciones De Las Teclas (en las siguientes tres páginas) para aprender cómo funcionan.
NOTA: También consulte la “Tabla De Las Teclas”(comienza en la página 50) para aprender las
funciones de las teclas en dispositivos específicos.
46 Un Vistazo Rápido A Los Controles
8-IN-ONE REMOTE
Page 46
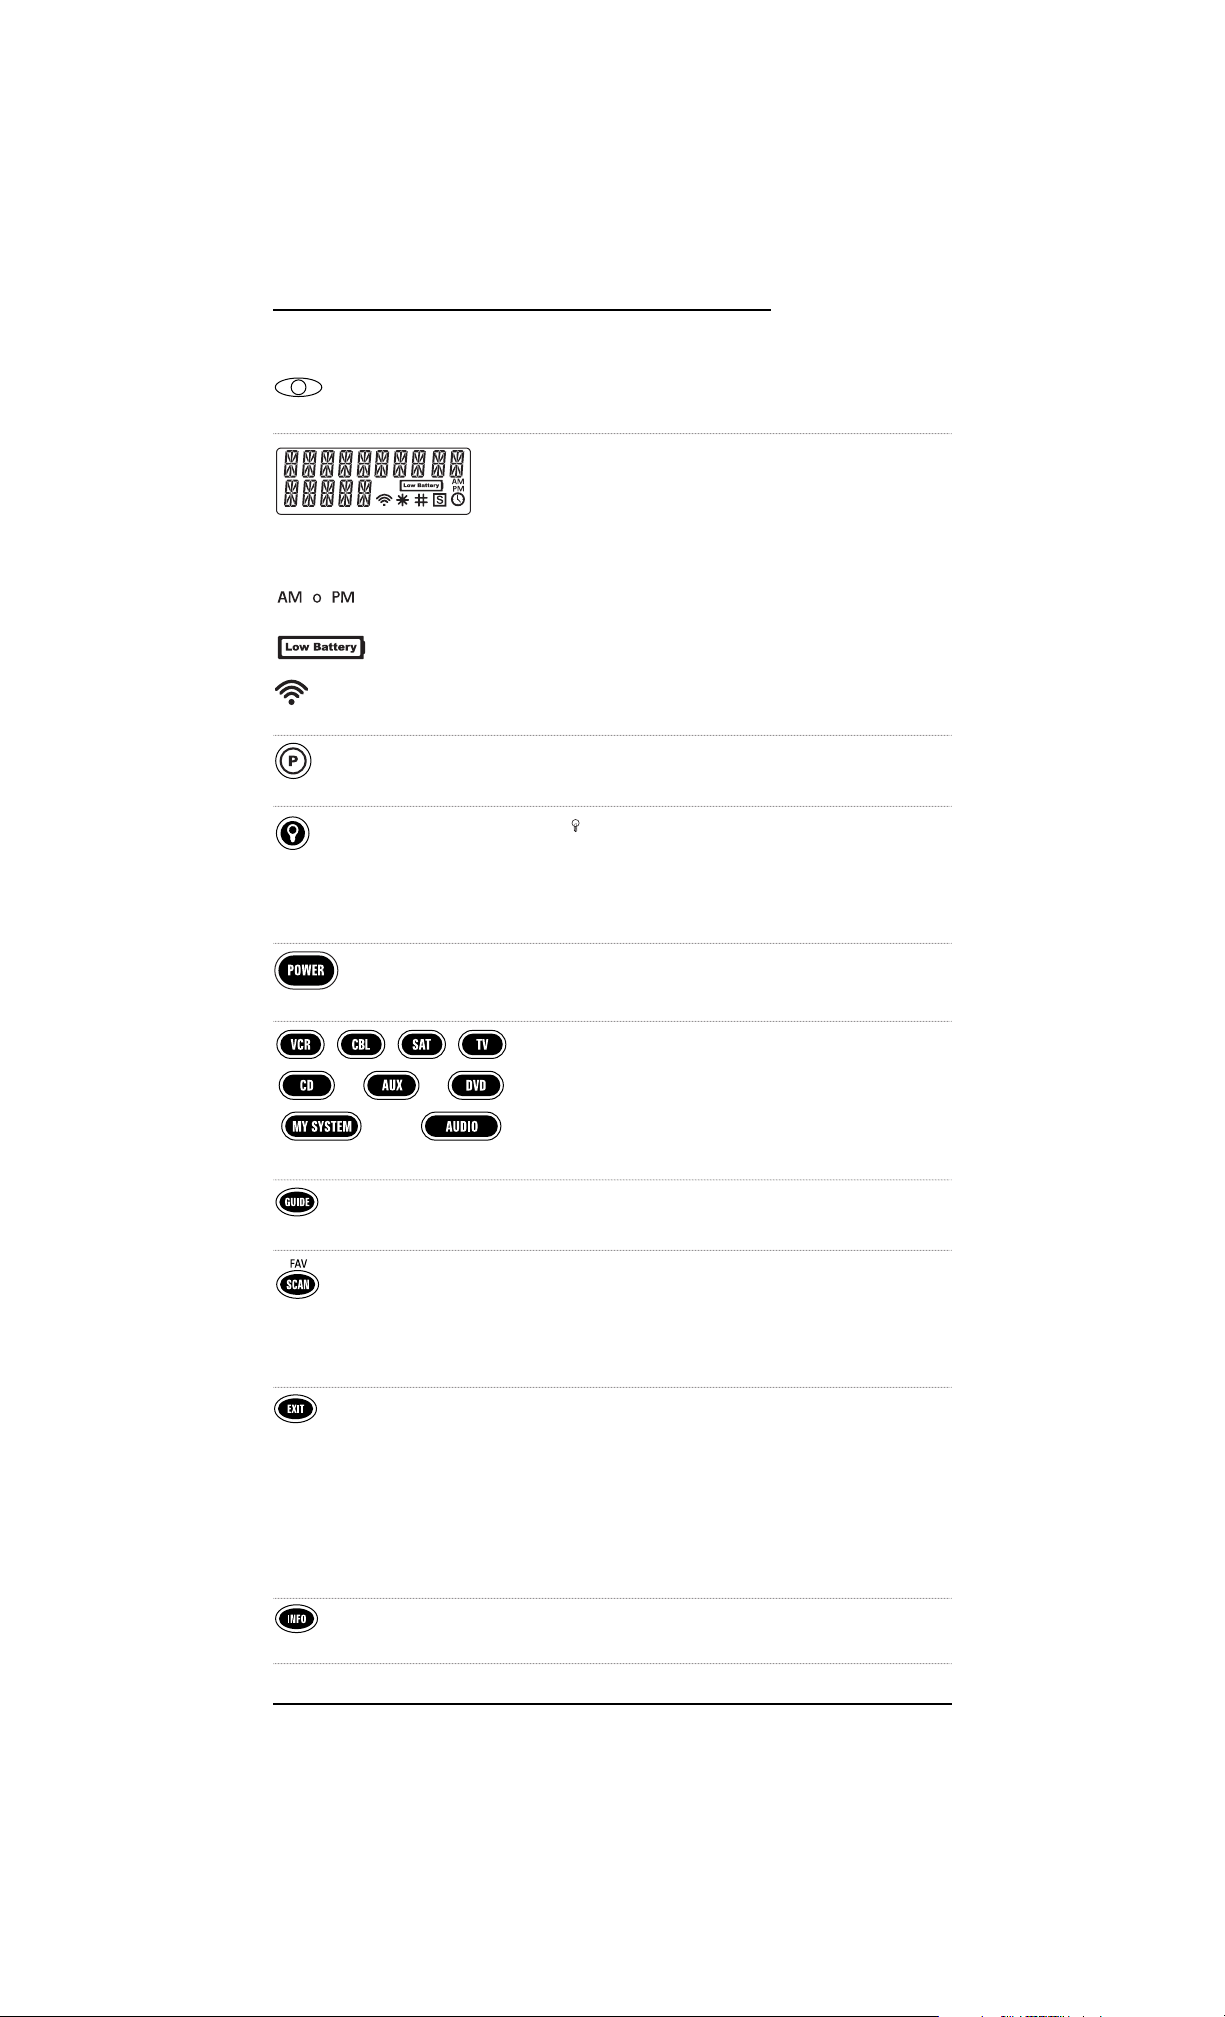
FUNCIONES DE LAS TECLAS
El LED (diodo emisor de luz) rojo parpadea para mostrar
que el control remoto está enviando señales.
La LCD (pantalla de cristal líquido) tiene 15 caracteres
alfanuméricos que muestran mensajes de situación
durante la operación y programación del control remoto.
Además,aparecerán un icono o más en la LCD para indicar
las siguientes condiciones:
Hora De La Mañana o De La Tarde
Batería Baja
Transmisión de la señal IR (Infrarroja)
Use P para todas las secuencias de programación.
Úsela para encender o apagar la retroiluminación de las
teclas. Cuando este atributo está activado, las teclas permanecen retroiluminadas durante 5 segundos después de presionar la última tecla.En el modo de configuración, la retroluminación permanecerá encendida durante 30 segundos.
Presione
POWER (Alimentación Eléctrica) una vez para
encender o apagar el dispositivo seleccionado.
Presione VCR, CBL,SAT,TV, CD,AUX,DVD,o AUDIO una vez
para seleccionar el dispositivo que quiere controlar.
Después de la programación,presione
MY SYSTEM una vez
para seleccionar los controles de su sistema a la medida.
Consulte Uso de My System (Mi Sistema) en la página 71.
Use GUIDE (Guía) para mostrar el programa,la guía, o el
menú de configuración del dispositivo seleccionado.
En los modos VCR, CBL,SAT,y TV, use SCAN (FAV) para
repasar los canales favoritos y/o todos los canales.Vea
Pro gramación De Una Exploración De Canales Favoritos
en la página 69 y Uso De La Exploración De Canales en la
página 70.
Presione
EXIT una vez para salir del programa,guía o
menú del dispositivo seleccionado.
Durante la programación, presione
EXIT una vez para
salirse del modo de programación.
También vea la
Tabla De Las Teclas en las páginas 50 y 51
para aprender cómo funciona
EXIT cuando se usan
otros dispositivos.
Use
INFO para mostrar la información actual del canal y del
programa.
continúa en la siguiente página…
Un Vistazo Rápido A Los Controles 47
GUÍA DEL USUARIO
Page 47

UN VISTAZO RÁPIDO A LOS CONTROLES
FUNCIONES DE LAS TECLAS (CONTINUACIÓN)
Presion e MENU una vez para mostrar el menú correspondiente al dispositivo seleccionado.
Use las teclas del cursor (▲,▼, ,or ) para mover el
cursor en las pantallas de la guía de la programación y del
menú. Use
SELECT para escoger las opciones en el menú o
guía del dispositivo seleccionado.
Durante la programación, use
SELECT para fijar las opciones
del programa.
Vea también la
Tabla De Las Teclas en las páginas 50 y 51
para aprender cómo funcionan las teclas de cursor y
SELECT al usar otros dispositivos.
Use
VOL+ (or VOL-) para subir (o bajar) el volumen del audio.
Vea también la
Tabla De Las Teclas en las páginas 50 y 51
para aprender cómo funcionan
VOL+ (o VOL-) al usar
otros dispositivos.
Presione MUTE (Enmudecer) una vez para apagar o encender el audio.
Vea también la
Tabla De Las Teclas en las páginas 50 y 51
para aprender cómo funciona MUTE al usar otros dispositivos.
Use
CH+ (o CH-) para seleccionar el siguiente canal o pista
con número más alto (o más bajo).
Vea también la
Tabla De Las Teclas en las páginas 50 y 51
para aprender cómo funcionan
CH+ (o CH-) al usar
otros dispositivos.
Presione
LAST (Último) una vez para recobrar el último
canal visto o para regresar una página en la pantalla del
menú principal.
Vea también la Tabla de las teclas en las páginas 52 y 53 para
aprender cómo funciona LAST al usar otros dispositivos.
Use
PIP para encender o apagar la función Picture-In-Picture
(Imagen En Imagen),si su televisor tiene esta posibilidad.
Presione
FREEZE (Congelar) una vez para capturar un
cuadro de vídeo en la imagen principal (si la hay).
Presiónelo de nuevo para reanudar la visión normal.
Use
SWAP (Permutar) para cambiar las imágenes y el sonido
(si lo hay) entre las imágenes principal y de la ventanilla.
Use
MOVE (Mover) para mover la imagen en ventanilla (si
la hay) a diferentes posiciones en la imagen principal.
▲
▲
48 Un Vistazo Rápido A Los Controles
8-IN-ONE REMOTE
Page 48

Use el teclado (1 ~9 and 0) para introducir directamente
el número de canal.
Si tiene acceso a más de 100 canales,agregue un
0 antes de
los números de canal (v.g., para el canal 71,introduzca
0,
después
7,y después1). Si el control remoto original
requería que se presionara una tecla Enter para cambiar el
canal, también presione la tecla
ENTER después del número
del canal (v.g., presione
0,luego 7,luego 1,y luego ENTER).
Vea también la
Tabla De Las Teclas en las páginas 52 y 53 para
aprender cómo funciona el teclado al usar otros dispositivos.
Use la tecla
+100 para introducir canales superiores al 100
(v.g., para el canal 131, presione la tecla
+100,luego 3,y
luego 1).
Presione
ENTER una vez después de introducir los números
del canal en algunos televisores.
Vea también la
Tabla De Las Teclas en las páginas 52 y 53 para
aprender cómo funciona ENTER al usar otros dispositivos.
Use
TV/VIDEO (A/B) para conmutar lo que entra al televisor
y ver programas de TV o la VCR, o para que actúe como un
conmutador A/B de su caja de cable.
Use
SLEEP (Dormir) para activar el cronómetro de dormido
del dispositivo (si éste tiene uno disponible).
Use las teclas de transporte,, (REW), (PLAY),
(
FFWD), (STOP), y (PAUSE), para controlar su
videograbadora.Para grabar un programa en la VCR,
presione (
REC) dos veces.
También vea la
Tabla De Las Teclas en las páginas 54 y 55
para aprender cómo funcionan las teclas de transporte al
usar otros dispositivos.
Un Vistazo Rápido A Los Controles 49
GUÍA DEL USUARIO
Page 49
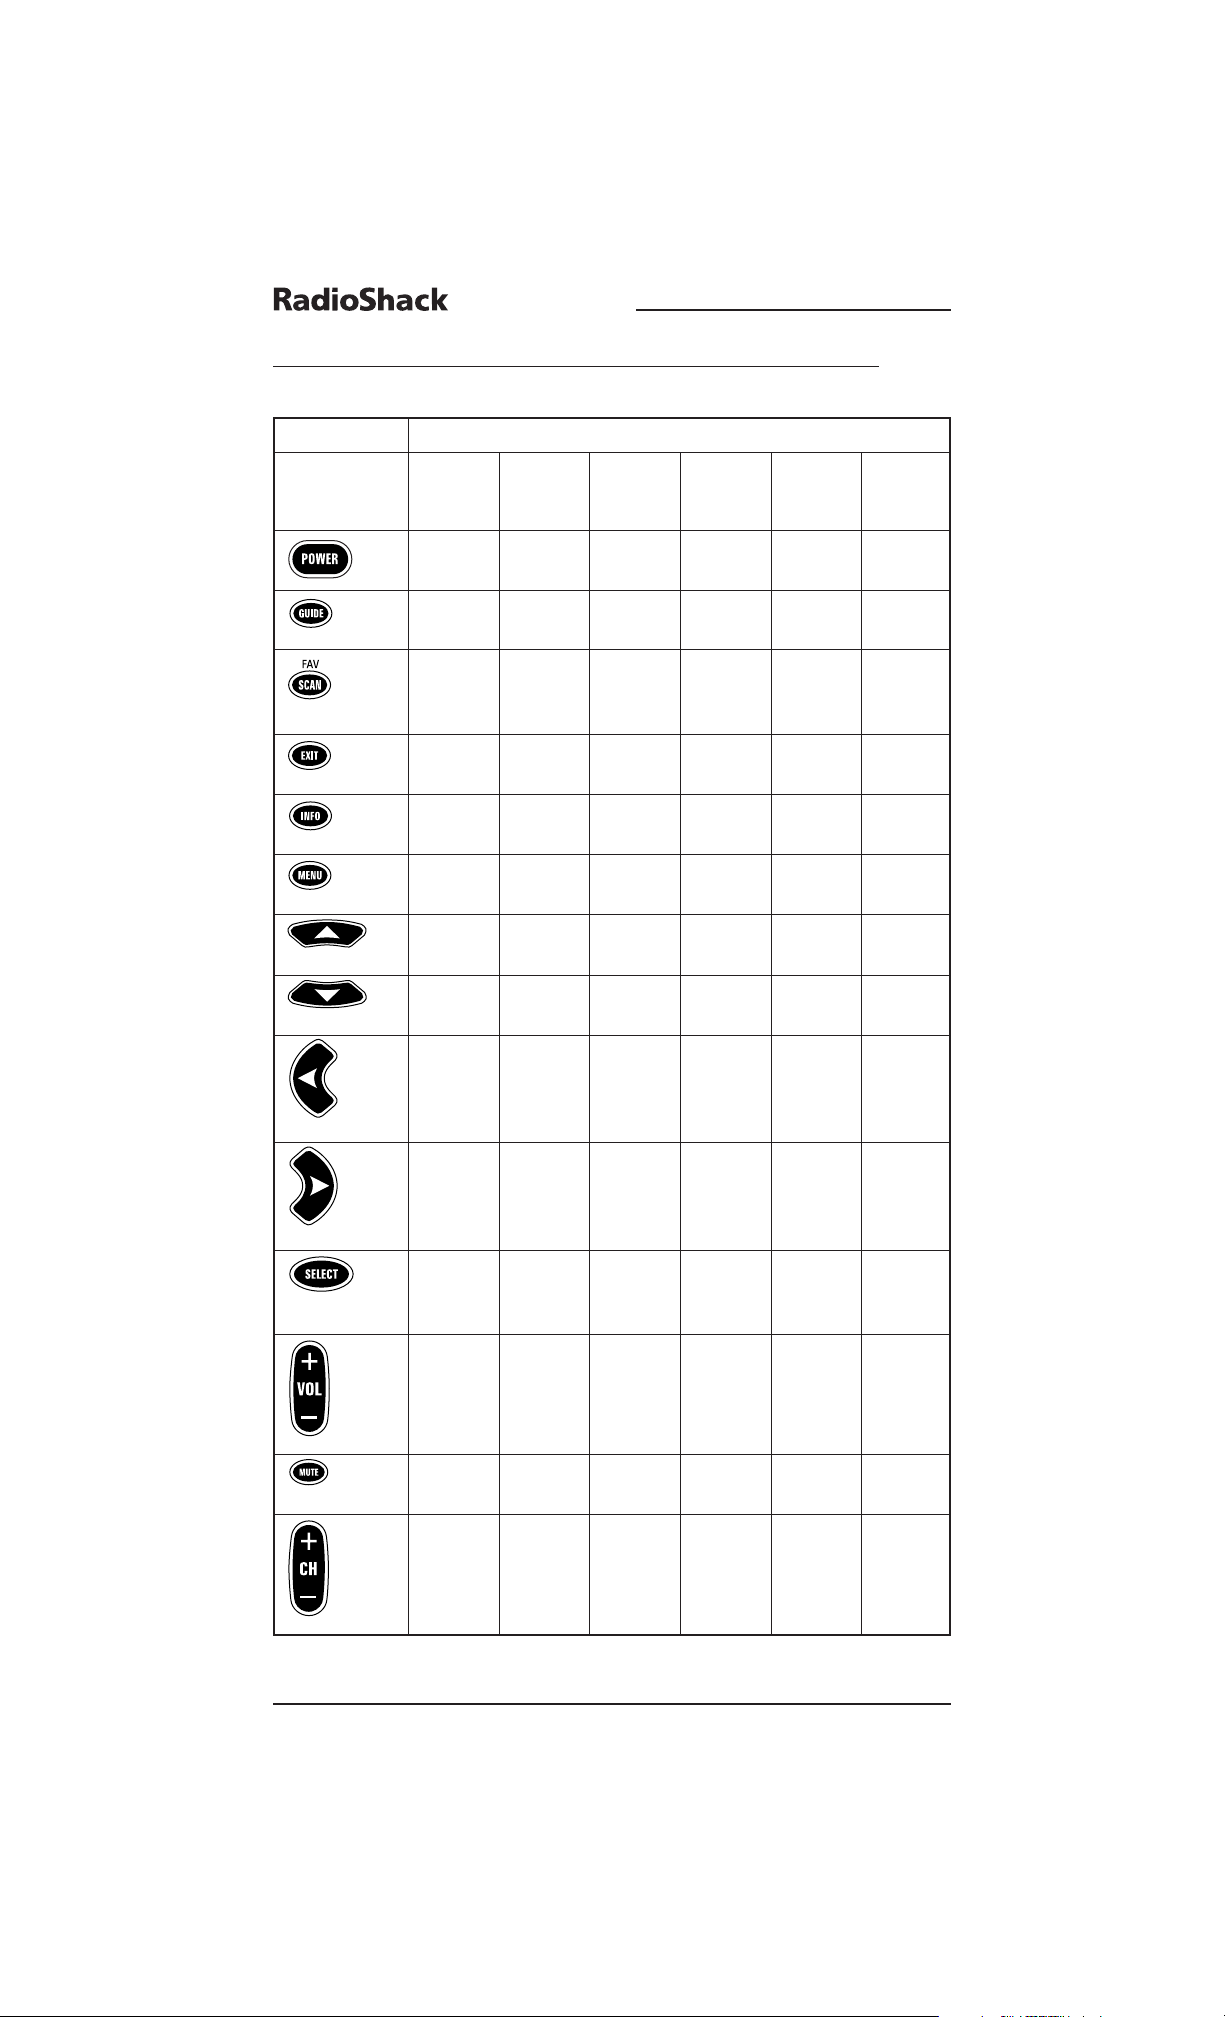
UN VISTAZO RÁPIDO A LOS CONTROLES (continuación)
TABLA DE LAS TECLAS
continúa en la página 52...
50 Un Vistazo Rápido A Los Controles
8-IN-ONE REMOTE
FUNCIONES DE LAS TECLAS DEL DISPOSITIVO SELECCIONADO
TECLA A
UDIOAMP
./ A
UDIO
A
UDIO
A
UDIO
C
ONVERTIDORREPRO
. D
E
R
ECEP
./ R
EPRO
. D
E
C
OMB
.T
ORNAMESADECABLE
/D
ISCOS
S
INT
./HTIB1C
ASETE
/DAT R
ECEP
./DVD ACC.DEV
IDEOCOMPACTOS
Encendido/ Encendido/ Encendido/ Encendido/ Encendido/ Encendido/
Apagado Apagado Apagado Apagado Apagado Apagado
Programa – GUI – Guía Menú /
Programa
––––Exploración
2
–
De Canal /
Favoritos
Salir – Regresar – Salir Remover
––––Info./Info.
Most rar
Menú/ Menú Menú – Menú –
Frente
Arriba/Atrás – Arriba – Arriba Arriba/
Más Vol. Disco ▲
Abajo/Atrás – Abajo – Abajo Abajo/
Menos Vol. Disco ▼
Izquierda/ – Izquierda – Izquierda Izquierda/
Balance Pista
Izquierda Anterior
Derecha/ – Derecha – Derecha Derecha/
Balance Pista
Derecha Siguiente
Seleccionar/ – Introducir – Seleccionar/ Seleccionar/
Sonido Env. (DVD) Introducir Seleccionar
Enc./Apag. Disco
Más Más Más Más Más Más
Vo l u me n Vo l u me n Vo l u me n Vo l u me n Vo l u me n Vo l u me n
Meno s Men os Meno s Men os Meno s Men os
Vo l u me n Vo l u me n Vo l u me n Vo l u me n Vo l u me n Vo l u me n
Aud io Au dio Au di o Aud io Au dio Au di o
Mud o Mu do Mu do Mud o Mu do Mud o
Canal Canal Canal Prefij. – Canal Canal Prefij.
Siguiente Siguiente Siguiente Siguiente Siguiente
Canal Canal Canal Prefij. – Canal Canal Prefij.
Anterior Anterior Anterior Anterior Anterior
Page 50

TABLA DE LAS TECLAS
continúa en la página 53...
Un Vistazo Rápido A Los Controles 51
GUÍA DEL USUARIO
FUNCIONES DE LAS TECLAS DEL DISPOSITIVO SELECCIONADO
TECLA R
EPRODUCTORAUTOMATIZA
.
R
ECEPTOR
TV C
OMB
. VCR/
DEDVD/LD D
EL
D
E
TV/VCR PVR
H
OGAR
S
ATÉLITE
Encendido/ Todo Encendido/ Encendido/ Encendido/ Encendido/
Apagado Encend ido Ap agado Apaga do Ap agado Ap agado
Menú De – Guía Guía Guía Programa/
Configuración
Guía
3
Exploración – Exploración – Exploración Exploración
De Canal/ De Canal/ De Canal/ De Canal/
Favoritos Favoritos Favoritos Favor itos
Salir Remover Salir Salir Salir Salir
Mostrar – Info./ Mostrar Mostrar –
Mostrar (TV)
Canales Menú Menú Menú Menú Menú
Frontales
Subir – Subir Subir Subir Subir
Bajar – Bajar Bajar Bajar Bajar
Izquierda – Izquierda – Izquierda Izquierda
Derecha – Derecha – Derecha Derecha
Seleccionar/ – Seleccionar/ Seleccionar Seleccionar Seleccionar
Introducir Introducir
Más Más Más Más Más Más
Vo l u me n L u z Vo l u m e n Volu m e n Vo l u m en Vo l u m en
Meno s Men os Meno s Men os Meno s Men os
Vo l u me n L u z Vo l u m e n Volu m e n Vo l u m en Vo l u m en
Aud io Tod o Au dio Au di o Aud io Au dio
Mudo Apagado Mudo Mudo Mudo Mudo
Salto Hacia Cortinas Canal Canal Canal Canal
Adelante Abiertas Siguiente Siguiente Siguiente Siguiente
Salto Hacia Cortinas Canal Canal Canal Canal
Atrás Cerradas Anterior Anterior Anterior Anterior
Page 51

UN VISTAZO RÁPIDO A LOS CONTROLES
TABLA DE LAS TECLAS (CONTINÚA DE LA PÁGINA 50)
continúa en la página 54...
52 Un Vistazo Rápido A Los Controles
8-IN-ONE REMOTE
FUNCIONES DE LAS TECLAS DEL DISPOSITIVO SELECCIONADO
TECLA A
UDIOAMP
./ A
UDIO
A
UDIO
A
UDIO
C
ONVERTIDORREPRO
. D
E
R
ECEP
./ R
EPRO
. D
E
COM.T
ORNAMESADECABLE
/D
ISCOS
S
INT
./HTIB1C
ASETE
/DAT R
ECEP
./DVD ACC.DEV
IDEOCOMPACTOS
Banda – Repetir – Último
Rep.Aleatoria
FM/AM
Enc./Apag.
Canal
Enc./Apag.
––––PIP Enc.–
––––PIP Apag./–
Congelar
––––PIP–
Per muta r
––––PIP–
Mover
Origen 1/ Dígito Modo – Dígito Pista 1/
Dígito 1 1 FM 1 Dígito 1
Origen 2/ Dígito Sintonizador – Dígito Pista 2/
Dígito 2 2 2 Dígito 2
Origen 3/ Dígito Banda – Dígito Pista 3/
Dígito 3 3
FM/AM
3 Dígito 3
Origen 4/ Dígito DVD – Dígito Pista 4/
Dígito 4 4 4 Dígito 4
Origen 5/ Dígito Cinta – Dígito Pista 5/
Dígito 5 5 5 Dígito 5
Origen 6/ Dígito Videogra- – Dígito Pista 6/
Dígito 6 6 badora 6 Dígito 6
Origen 7/ Dígito Aux. – Dígito Pista 7/
Dígito 7 7 7 Dígito 7
Origen 8/ Dígito TV – Dígito Pista 8/
Dígito 8 8 8 Dígito 8
Origen 9/ Dígito Satélite – Dígito Pista 9/
Dígito 9 9 9 Dígito 9
Origen 10/ Dígito Modo – Dígito Pista 10/
Dígito 0 0 Sintonía 0 Dígito 0
Introducir/ – Introducir – Introducir/ +10
Seleccionar Seleccionar
Entrada A/B Saltar – A/B/ –
Disco Desvío
Page 52

TABLA DE LAS TECLAS (CONTINÚA DE LA PÁGINA 51)
continúa en la página 55...
Un Vistazo Rápido A Los Controles 53
GUÍA DEL USUARIO
FUNCIONES DE LAS TECLAS DEL DISPOSITIVO SELECCIONADO
TECLA R
EPRODUCTORAUTOMATIZA
.
R
ECEPTOR
TV C
OMB
. VCR/
D
E
DVD/LD D
EL
D
E
TV/VCR PVR
H
OGAR
S
ATÉLITE
– – Último Último Último Último
Canal Canal Canal Canal
– – PIP Enc./ PIP Enc. PIP Enc. PIP Enc./
Repetición Repetición
Instantánea Instantánea
– – PIP Apag./ PIP Apag./ PIP Apag./ PIP Apag./
Congelar Congelar Congelar Congelar
– – Permutación Permutación Permutación Permutación
PIP/Volver PIP PIP PIP/Volver
A En Vivo A En Vivo
– – Mover PIP/ Mover Mover Mover PIP/
Salto PIP PIP Salto
Rápido Rápido
Dígito Escena 1/ Dígito Dígito Dígito Dígito
1 Dígito 1
1
111
Dígito Escena 2/ Sintonizador Dígito Dígito Dígito
2 Dígito 2 2 2 2
Dígito Escena 3/ Banda Dígito Dígito Dígito
3 Dígito 3
FM/AM
333
Dígito Escena 4/ DVD Dígito Dígito Dígito
4 Dígito 4 4 4 4
Dígito Escena 5/ Cinta Dígito Dígito Dígito
5 Dígito 5 5 5 5
Dígito Escena 6/ Videogra- Dígito Dígito Dígito
6 Dígito 6 badora
6
66
Dígito Escena 7/ Aux. Dígito Dígito Dígito
7 Dígito 7
7
77
Dígito Escena 8/ TV Dígito Dígito Dígito
8 Dígito 8
8
88
Dígito Escena 9/ Satélite Dígito Dígito Dígito
9 Dígito 9 9 9 9
Dígito Escena 10/ Modo Dígito Dígito Dígito
0 Dígito 0 Sintonía 0 0 0
Introducir/ – Introducir – Introducir/ +10
Seleccionar Seleccionar
TV/ – TV/ TV/ TV/ TV/
DVD (LD) Satélite VCR VCR VCR
Page 53

UN VISTAZO RÁPIDO A LOS CONTROLES
TABLA DE LAS TECLAS (CONTINÚA DE LA PÁGINA 52)
NOTAS:
1. Dispositivo de Home-Theater-In-A-Box (cine en el hogar en una caja) HTIB.
2.
FAV/SCAN está disponible sólo para los convertidores de cable.
3. Seleccione
GUIDE para los códigos PVR.
4. Es aplicable sólo si el Receptor/Sintonizador/Amplificador De Audio o el HTIB tienen un transporte
de cinta.
5. Si el VOD (vídeo a petición) no está disponible, al presionar esta tecla se controlará la videograbadora
(sólo si el código VCR está programado bajo el modo VCR).
6. Es aplicable sólo si el dispositivo es una grabadora de CDs.
54 Un Vistazo Rápido A Los Controles
8-IN-ONE REMOTE
FUNCIONES DE LAS TECLAS DEL DISPOSITIVO SELECCIONADO
TECLA A
UDIOAMP
./ A
UDIO
A
UDIO
A
UDIO
C
ONVERTIDORREPRO
. D
E
R
ECEP
./ R
EPRO
. D
E
C
OMB
.T
ORNAMESADECABLE
/D
ISCOS
S
INT
./HTIB1C
ASETE
/DAT R
ECEP
./DVD ACC.DEV
IDEOCOMPACTOS
Rebobinar Rebobinar Saltar Rev. Rebobinar Rebobinar Rebobinar
Cinta
4
DVD VOD
5
Toc a r To c a r To c a r To c a r To c a r To c a r
Cinta
4
DVD VOD
5
Bobinado Bobinado Saltar Bobinado Bobinado Bobinado
Rápido Rápido Adelante Rápido Rápido Rápido
Cinta
4
DVD VOD
5
Grabar Grabar – – Grabar Grabar
6
Cinta
4
VOD
5
Pausar Paus ar Pausar Pausar Paus ar Pausar
Cinta
4
DVD VOD
5
Para r/ Par ar/ Parar/ Para r Par ar Parar/
Expulsar Expulsar Expulsar VOD
5
Expulsar
Cinta
4
DVD
Page 54

TABLA DE LAS TECLAS (CONTINÚA DE LA PÁGINA 53)
Un Vistazo Rápido A Los Controles 55
GUÍA DEL USUARIO
FUNCIONES DE LAS TECLAS DEL DISPOSITIVO SELECCIONADO
TECLA R
EPRODUCTORAUTOMATIZA
.
R
ECEPTOR
TV C
OMB
. VCR/
DEDVD/LD D
EL
D
E
TV/VCR PVR
H
OGAR
S
ATÉLITE
Rebobinar – Rebobinar Rebobinar Rebobinar Rebobinar
VOD
5
VCR VCR VCR/PVR
Toc a r – To c a r To c a r To c a r To c a r
VOD
5
VCR VCR VCR/PVR
Bobinado – Bobinado Bobinado Bobinado Bobinado
Rápido Rápido Rápido Rápido Rápido
VOD
5
VCR VCR VCR/PVR
– – Grabar Grabar Grabar Grabar
VOD
5
VCR VCR VCR/PVR
Pausar – Pausar Pausar Pausar Pausar
VOD
5
VCR VCR VCR/PVR
Para r/ – Parar Para r Par ar Parar
Expulsar VOD
5
VCR VCR VCR/PVR
o Expulsar
Cinta
Page 55

PROGRAMACIÓN DE UN DISPOSITIVO
El control remoto está pre-programado en la fábrica para operar un televisor, una
videograbadora y un receptor de satélite RCA, un convertidor de cable Motorola (General
Instruments),y reproductores de CD, DVD y dispositivos de audio Pioneer. Para controlar
dispositivos diferentes a las marcas fijadas en la fábrica, lleve a cabo los siguientes pasos y
repítalos según se necesite para cada dispositivo que vaya a programar; de otra forma
puede saltarse esta sección:
NOTA: Para controlar un aparato combinado televisor/ videograbadora (TV/VCR), vea “Programación
De Un Aparato Combinado Televisor/ Videograbadora (TV/VCR)”en la página 58.
1. Encuentre los códigos de los dispositivos que desea programar en los
Códigos Del Fabricante (comenzando en la página 84) y anótelos o reálcelos
con un marcador.
2. Encienda un dispositivo (v.g., la videograbadora o el reproductor de DVDs) y,
si fuese necesario,póngale el medio que usa (v.g., casete o disco).
NOTA: Por favor lea los pasos 3 a 9 en su totalidad antes de proceder. Realce o anote los
códigos y el dispositivo que quiere programar antes de iniciar el paso 2.
3. En el control remoto, presione y mantenga presionada Phasta que la pantalla
cambie de dispositivo y hora de fábrica a
[CODE SET] (Fijar Código).
NOTA:Arriba se muestran los valores de fábrica de un dispositivo,su código, y la hora.
Los valores fijados en su control remoto pueden ser diferentes.
NOTA: Si en algún momento dado desea salirse del modo de programación, presione
EXIT (Salida) una vez. Aparece un mensaje [EXIT] al tiempo que el control remoto vuelve
a la operación normal.
NOTA:Si aparece el mensaje [INVALID] (No Válido), significa que accidentalmente
presionó una tecla incorrecta.Simplemente tome nota del error y continúe programando.
4. Presione SELECT una vez para comenzar la programación.Aparece el último
dispositivo seleccionado y su código actual (v.g.,
TV y 0051).
5. Presione una vez la clave del dispositivo que desea programar (v.g.,
VCR).
Aparece el dispositivo deseado y su código actual (v.g.,
VCR y 0035).
NOTA: Use la tecla AUX para programar dispositivos de automatización del hogar,
accesorios de vídeo, servicios de audio,y otros dispositivos de audio/vídeo. Vea
“Reasignación De Las Teclas De Dispositivos” en la página 75.
6. Use el teclado para introducir el primer código de cuatro dígitos para el
dispositivo y presione
SELECT una vez.
Por ejemplo,para introducir el primer código de la videograbadora (VCR) de
la GE (en la página 90), presione el
0 dos veces,el 6 una vez, el 0una vez, y
después
SELECT una vez.
56 Programación De Un Dispositivo
8-IN-ONE REMOTE
Page 56
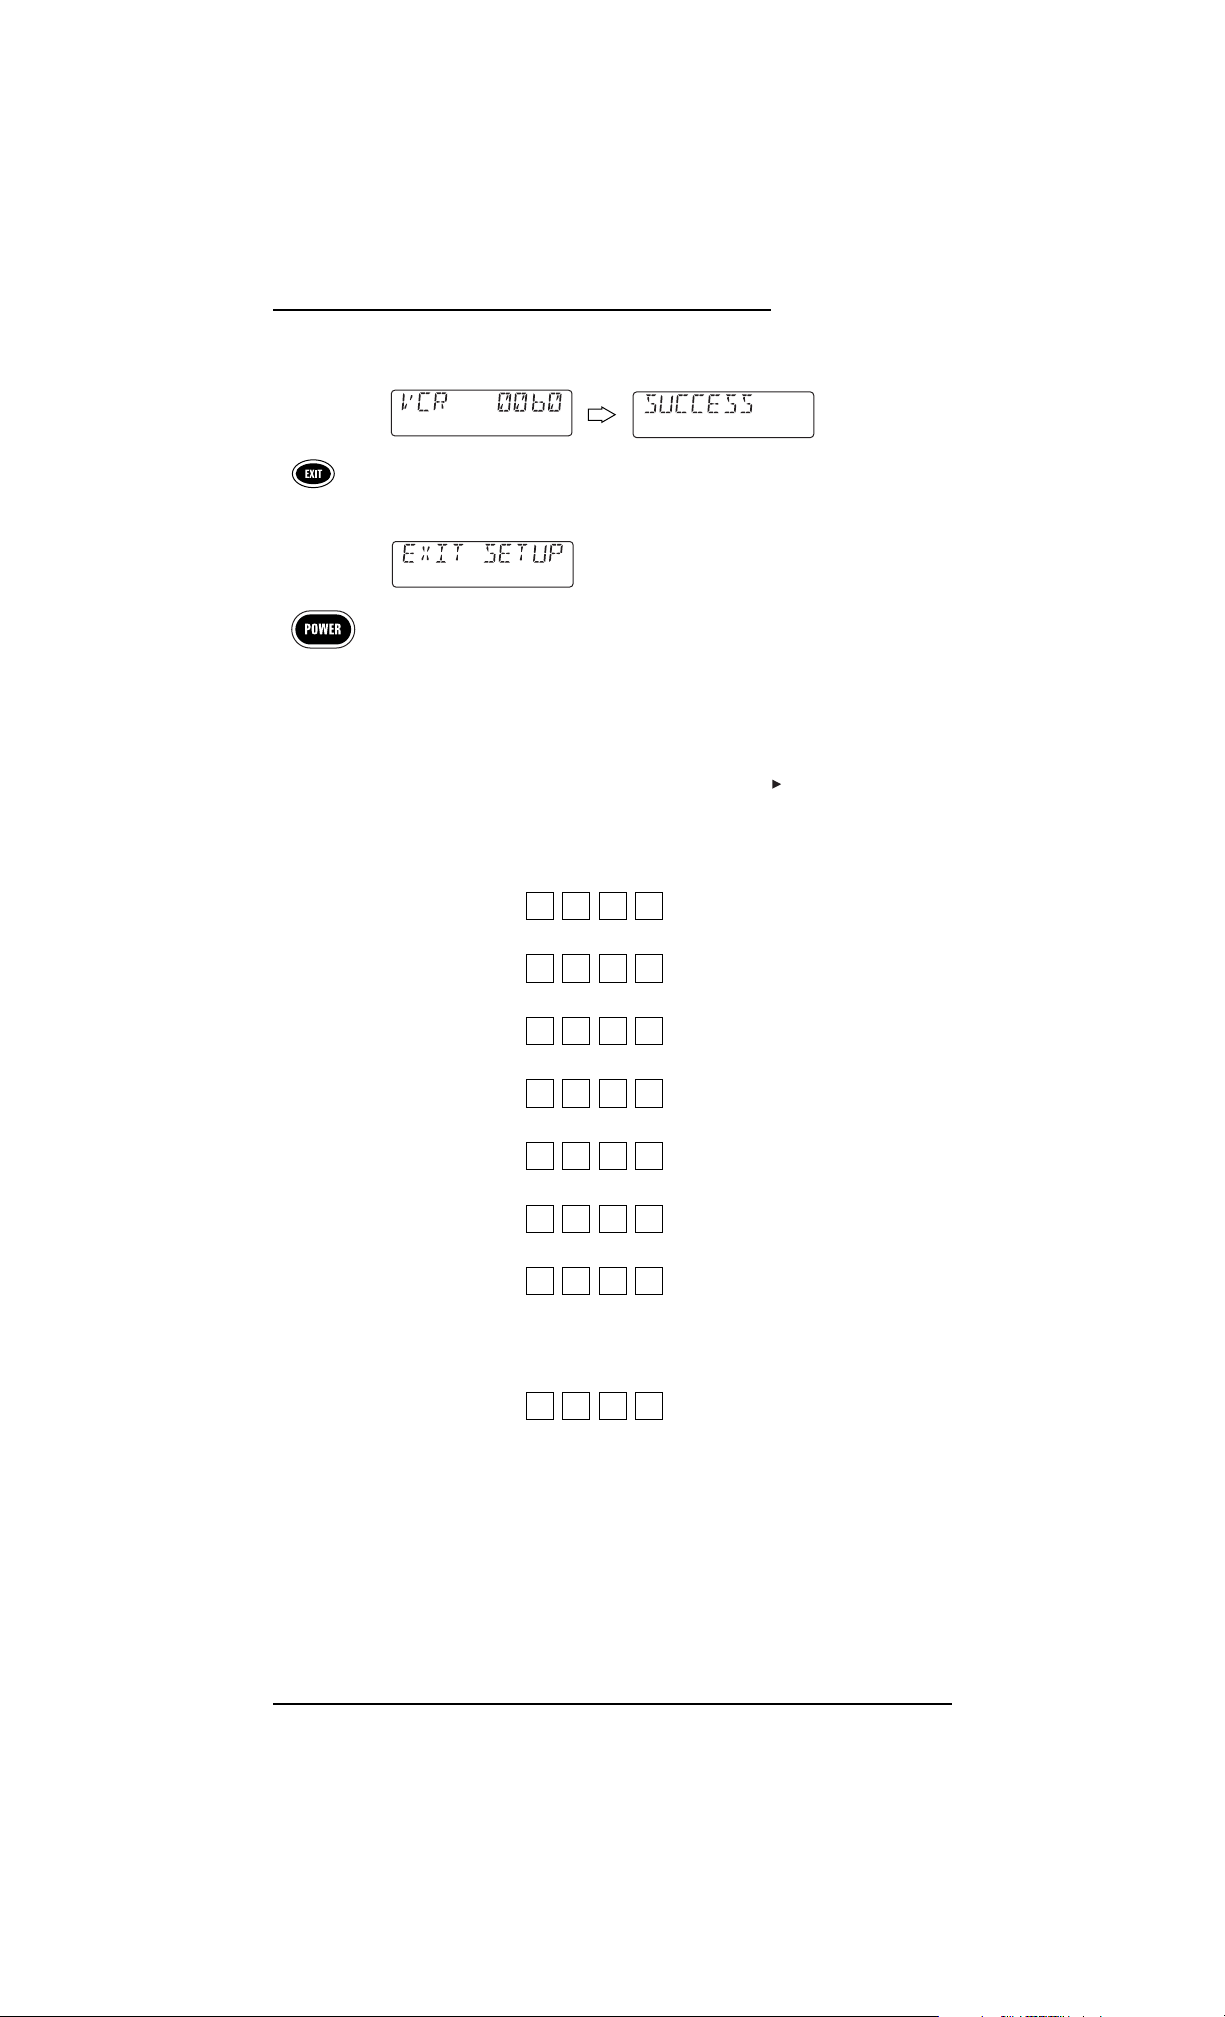
Si el código se introdujo en forma correcta, aparece el mensaje [SUCCESS]
(Éxito).
7. Presione
EXIT (Salida) para salir del modo de programación.Aparecerá un
mensaje de
[EXIT SETUP] (Salir De Configuración) al tiempo que el control
remoto vuelve a la operación normal.
8. Para verificar que el código funciona, apunte el control remoto al dispositivo
deseado,presione la tecla de ese dispositivo una vez y después presione la tecla
POWER una vez.El dispositivo debe apagarse. Si no responde,repita los pasos
3 a 7, probando con cada código para la marca del dispositivo hasta que
encuentre uno que funcione.Si no puede hallar un código que funcione,haga
la prueba con
Búsqueda De Su Código en la página 59.
NOTA: Si el dispositivo no tiene una tecla POWER,presione (Play).
9. Repita los pasos 1 a 8 para cada dispositivo que desee controlar. Para referencia
futura, anote cada uno de los códigos de los dispositivos que funcionan en los
cuadrados de abajo:
Código VCR:
Código
CBL:
Código
SAT:
Código
TV:
Código
CD:
Código
DVD:
Código
AUDIO:
Tipo de dispositivo
de audio:________________________________
Código
AUX:
Tipo de dispositivo
auxiliar:_________________________________
Programación De Un Dispositivo 57
GUÍA DEL USUARIO
Page 57

PROGRAMACIÓN DE UN APARATO COMBINADO
TELEVISOR/ VIDEOGRABADORA (TV/VCR)
1. Encuentre los códigos de los dispositivos que desea programar en los Códigos
De Configuración Para Aparatos Combinados Televisor/Videograbadoraen
la
página 89 y anótelos o reálcelos con un marcador.
2. Encienda el aparato combinado TV/VCR e insértele un videocasete.
3. En el control remoto, presione y mantenga presionada
P hasta que la pantalla
cambie de dispositivo y hora de fábrica a
[CODE SET] (Fijar Código).
NOTA:Arriba se muestran los valores de fábrica de un dispositivo,su código, y la hora.
Los valores fijados en su control remoto pueden ser diferentes.
NOTA: Si en algún momento dado desea salirse del modo de programación, presione
EXIT (Salida) una vez. Aparece un mensaje [EXIT] al tiempo que el control remoto vuelve
a la operación normal.
NOTA:Si aparece el mensaje [INVALID] (No Válido), significa que accidentalmente
presionó una tecla incorrecta.Simplemente tome nota del error y continúe programando.
4. Presione SELECT una vez para comenzar la programación.Aparece el último
dispositivo seleccionado y su código actual (v.g.,
TV y 0051).
5. Presione
VCR una vez.Aparece [VCR] y su código actual.
6. Use el teclado para introducir el primer código de cuatro dígitos para el
dispositivo y presione
SELECT una vez.
Por ejemplo,para introducir el primer código de los aparatos combinados
TV/VCR
Sony en la página 89, presione el 0cuatro veces y después SELECT una vez.
Si el código se introdujo en forma correcta,aparece el mensaje
[SUCCESS] (Éxito).
7. Presione
EXIT (Salida) para salir del modo de programación.Aparecerá un
mensaje de
[EXIT SETUP] (Salir De Configuración) al tiempo que el control
remoto vuelve a la operación normal.
8. Para verificar que el código funciona, apunte el control remoto al aparato
combinado TV/VCR, presione la tecla
VCR una vez y después presione la tecla
POWER una vez.
NOTA: Si el dispositivo no tiene una tecla POWER,presione (Play).
La unidad debe apagarse o comenzar a tocar si presionó (Play). Si no
responde, repita los pasos 3 a 9,probando cada código para la marca de su
58 Programación De Un Aparato Combinado Televisor/ Videograbadora
8-IN-ONE REMOTE
Page 58

aparato hasta que halle un que funcione. Si no puede hallar un código que
funcione, haga la prueba con
Búsqueda De Su Código en la siguiente sección.
9. Para referencia futura,anote el código que funciona del aparato combinado
TV/VCR en los cuadrados de abajo:
Código
TV/VCR:
Código
TV (si se usa):
BÚSQUEDA DE SU CÓDIGO
Si su dispositivo no le responde al control remoto después de haber probado todos los códigos
listados para su marca,o si su marca no está listada en lo absoluto, haga la prueba de buscar
manualmente a su código.Por ejemplo,para buscar manualmente un código para su TV:
1. Encienda el televisor.
2. En el control remoto, presione y mantenga presionada
P hasta que la pantalla
cambie de dispositivo y hora de fábrica a
[CODE SET] (Fijar Código).
NOTA:Arriba se muestran los valores de fábrica de un dispositivo,su código, y la hora.
Los valores fijados en su control remoto pueden ser diferentes.
NOTA: Si en algún momento dado desea salirse del modo de programación, presione
EXIT (Salida) una vez. Aparece un mensaje [EXIT] al tiempo que el control remoto vuelve
a la operación normal.
NOTA:Si aparece el mensaje [INVALID] (No Válido), significa que accidentalmente
presionó una tecla incorrecta.Simplemente tome nota del error y continúe programando.
3. Presione la tecla ▼ una vez.Aparece [MAN SRCH] (Búsqueda Manual).
NOTA: Si se pasa de [MAN SRCH],presione ▲ una vez o más hasta volver a ella.
4. Presione SELECT (Seleccionar) una vez para comenzar a programar.Aparecen
el último dispositivo seleccionado y su código (v.g.,
VCR y 0035).
5. Presione
TV una vez.Aparecen el dispositivo deseado y el primer código en la
lista de búsqueda manual (v.g.,
TV y 0047).
6. Apunte el control remoto al televisor y presione
SELECT una vez.El LED rojo
parpadea y el icono (
IR) destella, indicando que se están transmitiendo
códigos IR (infrarrojos).
NOTA: En el modo de búsqueda manual, el control remoto enviará códigos IR de su base
de datos hacia el dispositivo seleccionado, comenzando primero con el código más popular.
continúa en la siguiente página...
Programación De Un Aparato Combinado Televisor/Videograbadora/Búsqueda De Su Código 59
GUÍA DEL USUARIO
Page 59

BÚSQUEDA DE SU CÓDIGO (continuación)
7. Si el televisor se apaga,sáltese al siguiente paso.Si no se apagó,apunte el con-
trol remoto al televisor y presione
▲ una vez para avanzar la búsqueda manu-
al al siguiente código (v.g.,
TV y 0054).Nuevamente el LED rojo parpadea y el
icono (
IR) destella.
Repita este paso tanta veces como sea necesario hasta que halle un código que
apague el dispositivo.
8. Una vez que encuentre un código que funcione,presione
SELECT una vez para
guardarlo.La pantalla confirma el número introducido con
[SUCCESS] y
después con
[EXIT SETUP].
El control remoto vuelve a la operación normal.
NOTA: Para referencia futura, anote el código que funciona para el dispositivo en los
cuadrados apropiados en la página 57.
9. Para realizar una búsqueda manual del código de otro dispositivo,repita los
pasos 1 a 8, pero esta vez (en el paso 5) substituya la tecla de dispositivo
apropiada por el dispositivo que está buscando.
USO DE LA FUNCIÓN APRENDIZAJE
El control remoto incluye una función de Aprendizaje para que usted pueda añadir funciones
que son únicas a los dispositivos de su entretenimiento en el hogar (v.g., rastreo arriba o
abajo de su VCR). Sin embargo,hay algunas consideraciones:
• Sus controles remotos originales tienen que estar trabajando bien para que la función
de aprendizaje funcione adecuadamente.
• Las teclas aprendidas son específicas al modo,de manera que cada una puede guardar
una función única para cada modo.
• Las teclas aprendidas se pueden usar en macros (vea
Uso De Los Macros en la página 64).
• También puede usar cualquier tecla para el aprendizaje,excepto las teclas de disposi-
tivos,
P,,y POWER. Sin embargo, el usarlas como teclas aprendidas borra sus fun-
ciones originales.
• Para un aprendizaje óptimo, evite niveles altos de luz ambiental como la luz del sol o
las luces fluorescentes eficientes de energía.
NOTA: Tenga a la mano sus controles remotos originales antes de programar el aprendizaje.Cerciórese
de presionar cada tecla antes de que pasen 5 segundos después de la introducción previa. Si no, el control remoto se saldrá de su modo de programación.
PROGRAMACIÓN DE UNA TECLA DE APRENDIZAJE
1. En el control remoto, presione y mantenga presionada Phasta que la pantalla
cambie de dispositivo y hora de fábrica a
[CODE SET] (Fijar Código).
60 Búsqueda De Su Código/Uso De La Función Aprendizaje
8-IN-ONE REMOTE
Page 60
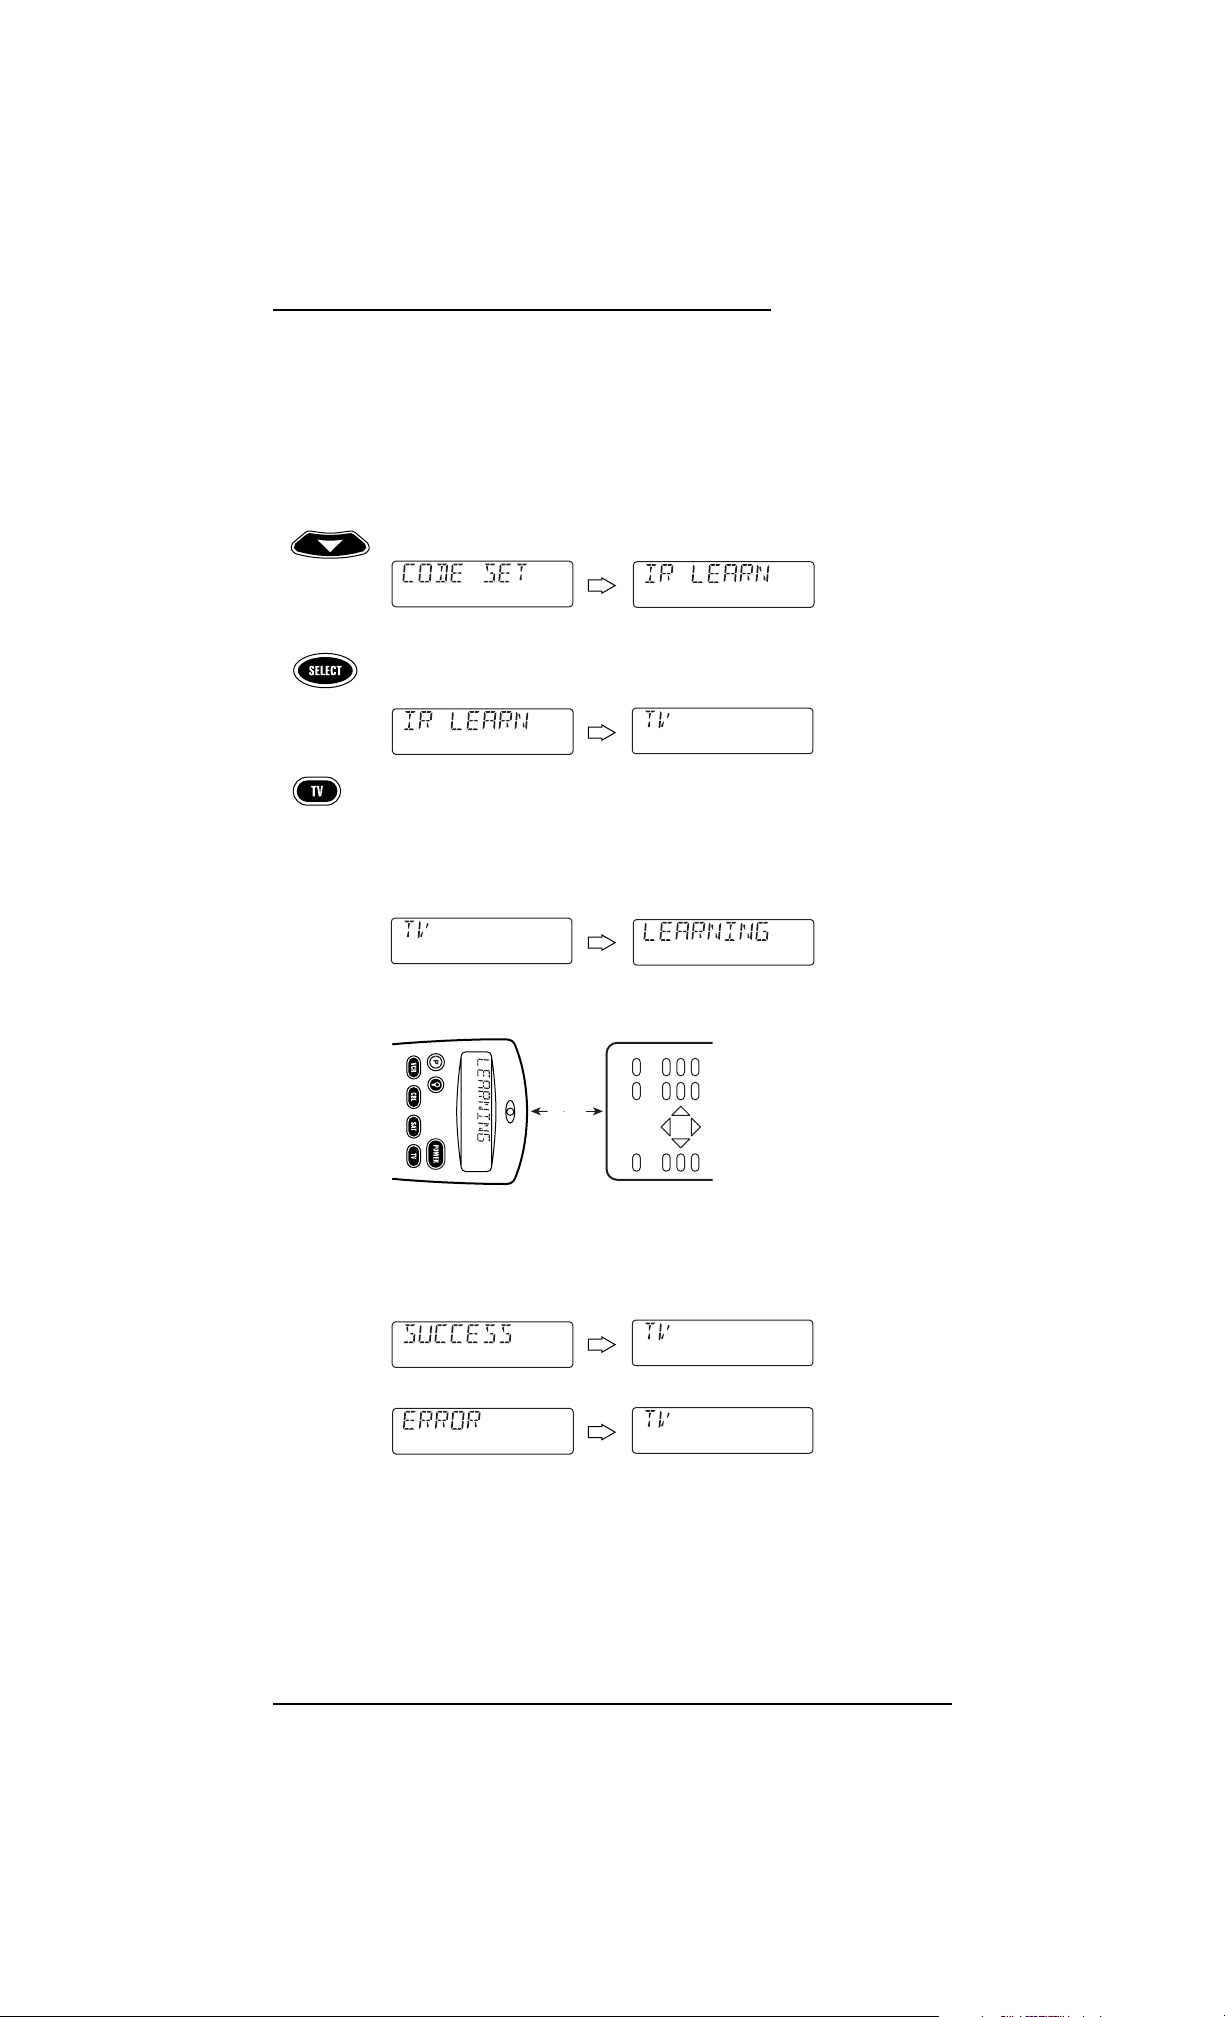
NOTA:Arriba se muestran los valores de fábrica de un dispositivo,su código, y la hora.
Los valores fijados en su control remoto pueden ser diferentes.
NOTA: Si en algún momento dado desea salirse del modo de programación, presione
EXIT (Salida) una vez. Aparece un mensaje [EXIT] al tiempo que el control remoto vuelve
a la operación normal.
NOTA:Si aparece el mensaje [INVALID] (No Válido), significa que accidentalmente
presionó una tecla incorrecta.Simplemente tome nota del error y continúe programando.
2. Presione la tecla ▼ dos veces hasta que aparezca [IR LEARN].
NOTA: Si se pasa de [IR LEARN],presione ▲ una vez o más hasta volver a ella.
3. Presione SELECT una vez para comenzar la programación.Aparece el último
dispositivo seleccionado.
4. Presione la tecla de un dispositivo una vez (v.g.,
TV) para asignar el modo
deseado para el aprendizaje.
5. Escoja una tecla para aprendizaje y presiónela una vez.Cuando el control
remoto entra en el modo de aprendizaje, aparece
[LEARNING] y el LED rojo se
enciende durante 5 segundos.
6. Coloque el control remoto original (v.g., el control remoto del televisor) junto
(a unos 5 cm de distancia) al control remoto.
7. En el control remoto original,presione y mantenga oprimida la tecla (es decir,
la función) que se va a aprender hasta que aparezca
[SUCCESS] en el control
remoto.La pantalla volverá al modo del dispositivo que usted escogió para
aprender (v.g.,
TV).
Si no se aprendió la tecla,entonces verá un mensaje de [ERROR].
Repita los pasos del 5 al 7 según se necesite para alcanzar el [SUCCESS] (Éxito).
8. Para aprender funciones sobre otras teclas, repita los pasos 4 a 7 para cada tecla.
continúa en la siguiente página...
5 cm
Uso De La Función Aprendizaje 61
GUÍA DEL USUARIO
(x 2)
Page 61

USO DE LA FUNCIÓN APRENDIZAJE
PROGRAMACIÓN DE UNA TECLA DE APRENDIZAJE (CONTINUACIÓN)
9. Presione EXIT (Salida) para salir del modo de programación.Aparecerá un
mensaje de
[EXIT SETUP] (Salir De Configuración) al tiempo que el control
remoto vuelve a la operación normal.
10. Para probar la función aprendida,apunte el remoto al dispositivo deseado y
presione la tecla del dispositivo una vez (v.g.,TV, donde fue asignado el modo
de aprendizaje).Después presione la tecla donde se guardó la función aprendida. La función debe activarse.Si no sucede,vuelva a tratar de programar la
tecla,comenzando con el paso 1 (en la página 60).
SUPRESIÓN DE UNA FUNCIÓN DE UNA TECLA DE APRENDIZAJE
1. En el control remoto, presione y mantenga presionada Phasta que la pantalla
cambie de dispositivo y hora de fábrica a
[CODE SET] (Fijar Código).
NOTA:Arriba se muestran los valores de fábrica de un dispositivo,su código, y la hora.
Los valores fijados en su control remoto pueden ser diferentes.
NOTA: Si en algún momento dado desea salirse del modo de programación, presione
EXIT (Salida) una vez. Aparece un mensaje [EXIT] al tiempo que el control remoto vuelve
a la operación normal.
NOTA:Si aparece el mensaje [INVALID] (No Válido), significa que accidentalmente
presionó una tecla incorrecta.Simplemente tome nota del error y continúe programando.
2. Presione ▼ tres veces hasta que aparezca [IR DELETE].
NOTA: Si se pasa de [IR DELETE],presione ▲ una vez o más hasta volver a ella.
3. Presione SELECT una vez para comenzar la programación.Aparece el último
dispositivo seleccionado (v.g.,
TV).
4. Presione la tecla de un dispositivo una vez (v.g.,
TV) correspondiente al modo que
contiene la función aprendida.
5. Presione la tecla una vez en donde está guardada la función aprendida (que se
va a borrar).La pantalla cambia a
[DELETED] y después vuelve al último modo
seleccionado (v.g.,
TV).
6. Si lo desea, puede repetir los pasos 4 y 5 para borrar otras funciones aprendidas.
7. Presione
EXIT (Salida) para salir del modo de programación.Aparecerá un
mensaje de
[EXIT SETUP] (Salir De Configuración) al tiempo que el control
remoto vuelve a la operación normal.
62 Uso De La Función Aprendizaje
8-IN-ONE REMOTE
(x 3)
Page 62

CAMBIO DEL BLOQUEO DEL VOLUMEN
En su estado original (desbloqueado),el remoto permite que cada dispositivo controle su
propio volumen únicamente en su propio modo (v.g., el volumen del televisor en el modo
TV, el volumen de la videograbadora en el modo VCR, etc.).Sin embargo, al usar nuestra
función
De Bloqueo De Volumen, usted puede bloquear los controles del volumen de cada
dispositivo en todos los modos (v.g., el volumen de
AUDIO en todos los modos).
Más aún, al usar la función
De Desbloqueo Del Volumen (vea la página que sigue),usted
puede ajustar más a su gusto las fijaciones de tal manera que los controles del volumen de
un dispositivo estén desbloqueados en un modo,pero permanezcan bloqueados en todos
los otros modos (v.g., el volumen del televisor en el modo
TV y el volumen AUDIO en todos
los otros modos).
PROGRAMACIÓN DEL BLOQUEO DEL VOLUMEN
1. En el control remoto, presione y mantenga presionada Phasta que la pantalla
cambie de dispositivo y hora de fábrica a
[CODE SET] (Fijar Código).
NOTA:Arriba se muestran los valores de fábrica de un dispositivo,su código, y la hora.
Los valores fijados en su control remoto pueden ser diferentes.
NOTA: Si en algún momento dado desea salirse del modo de programación, presione
EXIT (Salida) una vez. Aparece un mensaje [EXIT] al tiempo que el control remoto vuelve
a la operación normal.
NOTA:Si aparece el mensaje [INVALID] (No Válido), significa que accidentalmente
presionó una tecla incorrecta.Simplemente tome nota del error y continúe programando.
2. Presione ▼ cuatro veces hasta que aparezca [VOL LOCK].
NOTA: Si se pasa de [VOL LOCK],presione ▲ una vez o más hasta volver a ella.
3. Presione SELECT (Seleccionar) una vez para comenzar a programar. Aparece
[TO MODE] (Al Modo).
4. Presione una tecla de modo (v.g.,
AUDIO) para bloquear los controles de
volumen de un dispositivo a todos los modos.Aparecen
[SUCCESS] y después
[EXIT SETUP] al tiempo que el control remoto sale automáticamente del modo
de programación y vuelve a la operación normal.
5. Si lo desea,repita los pasos 1 al 4 según sea necesario para bloquear los
controles de volumen de otros dispositivos a todos los modos.
PROGRAMACIÓN DEL DESBLOQUEO DEL VOLUMEN
1. En el control remoto, presione y mantenga presionada Phasta que la pantalla
cambie de dispositivo y hora de fábrica a
[CODE SET] (Fijar Código).
continúa en la siguiente página...
Cambio Del Bloqueo Del Volumen 63
GUÍA DEL USUARIO
(x 4)
Page 63

CAMBIO DEL BLOQUEO DEL VOLUMEN
PROGRAMACIÓN DEL DESBLOQUEO DEL VOLUMEN (CONTINUACIÓN)
2. Presione ▼ cinco veces hasta que aparezca [VOL UNLOCK].
NOTA: Si se pasa de [VOL UNLOCK],presione ▲ una vez o más hasta volver a ella.
3. Presione SELECT una vez para comenzar la programación.Aparece [ALL MODE].
Para desbloquear un modo, sáltese al paso 4.De otra forma, presione SELECT
una vez para desbloquear todos los modos.Aparecen [UNLOCKED] y después
[EXIT SETUP] al tiempo que el remoto se sale automáticamente del modo de
programación y vuelve a la operación normal.
4. (Opcional) Presione
▲ (o ▼) una vez.Aparece [ONE MODE].
a. Presione
SELECT una vez.Aparece [SEL MODE].
b. Presione una tecla de modo una vez (v.g.,
TV) para desbloquearla.Aparecen
[UNLOCKED] y después [SEL MODE].
c. Si lo desea, repita el paso 4b según se necesite para desbloquear los controles
de volumen de otros dispositivos. De otra forma,presione
EXIT para salirse
del modo de programación.Aparecerá un mensaje de
[EXIT SETUP] al tiempo
que el control remoto vuelve a la operación normal.
USO DE LOS MACROS
Con la programación de Macros, su control remoto se puede configurar para que realice
operaciones repetitivas que desperdician tiempo, y brindarle acceso fácil, conveniente con
sólo presionar una sola tecla. Los macros son ideales para las operaciones de cine en el
hogar,fijación de un canal favorito, pasos de guía,u otras funciones múltiples que a usted
le gustaría controlar con una sola tecla.Más aún, cada macro puede guardar hasta 15 presiones de tecla en total.
NOTA: La programación de un nuevo macro por encima de uno existente borrará al macro original.
PROGRAMACIÓN DE UN CANAL FAVORITO
Con tantos canales disponibles a través del proveedor de su sistema de cable o de satélite,
usted puede programar un macro que seleccione directamente un canal favorito con sólo
64 Cambio Del Bloqueo Del Volumen/Uso De Los Macros
8-IN-ONE REMOTE
(x 5)
o
Page 64
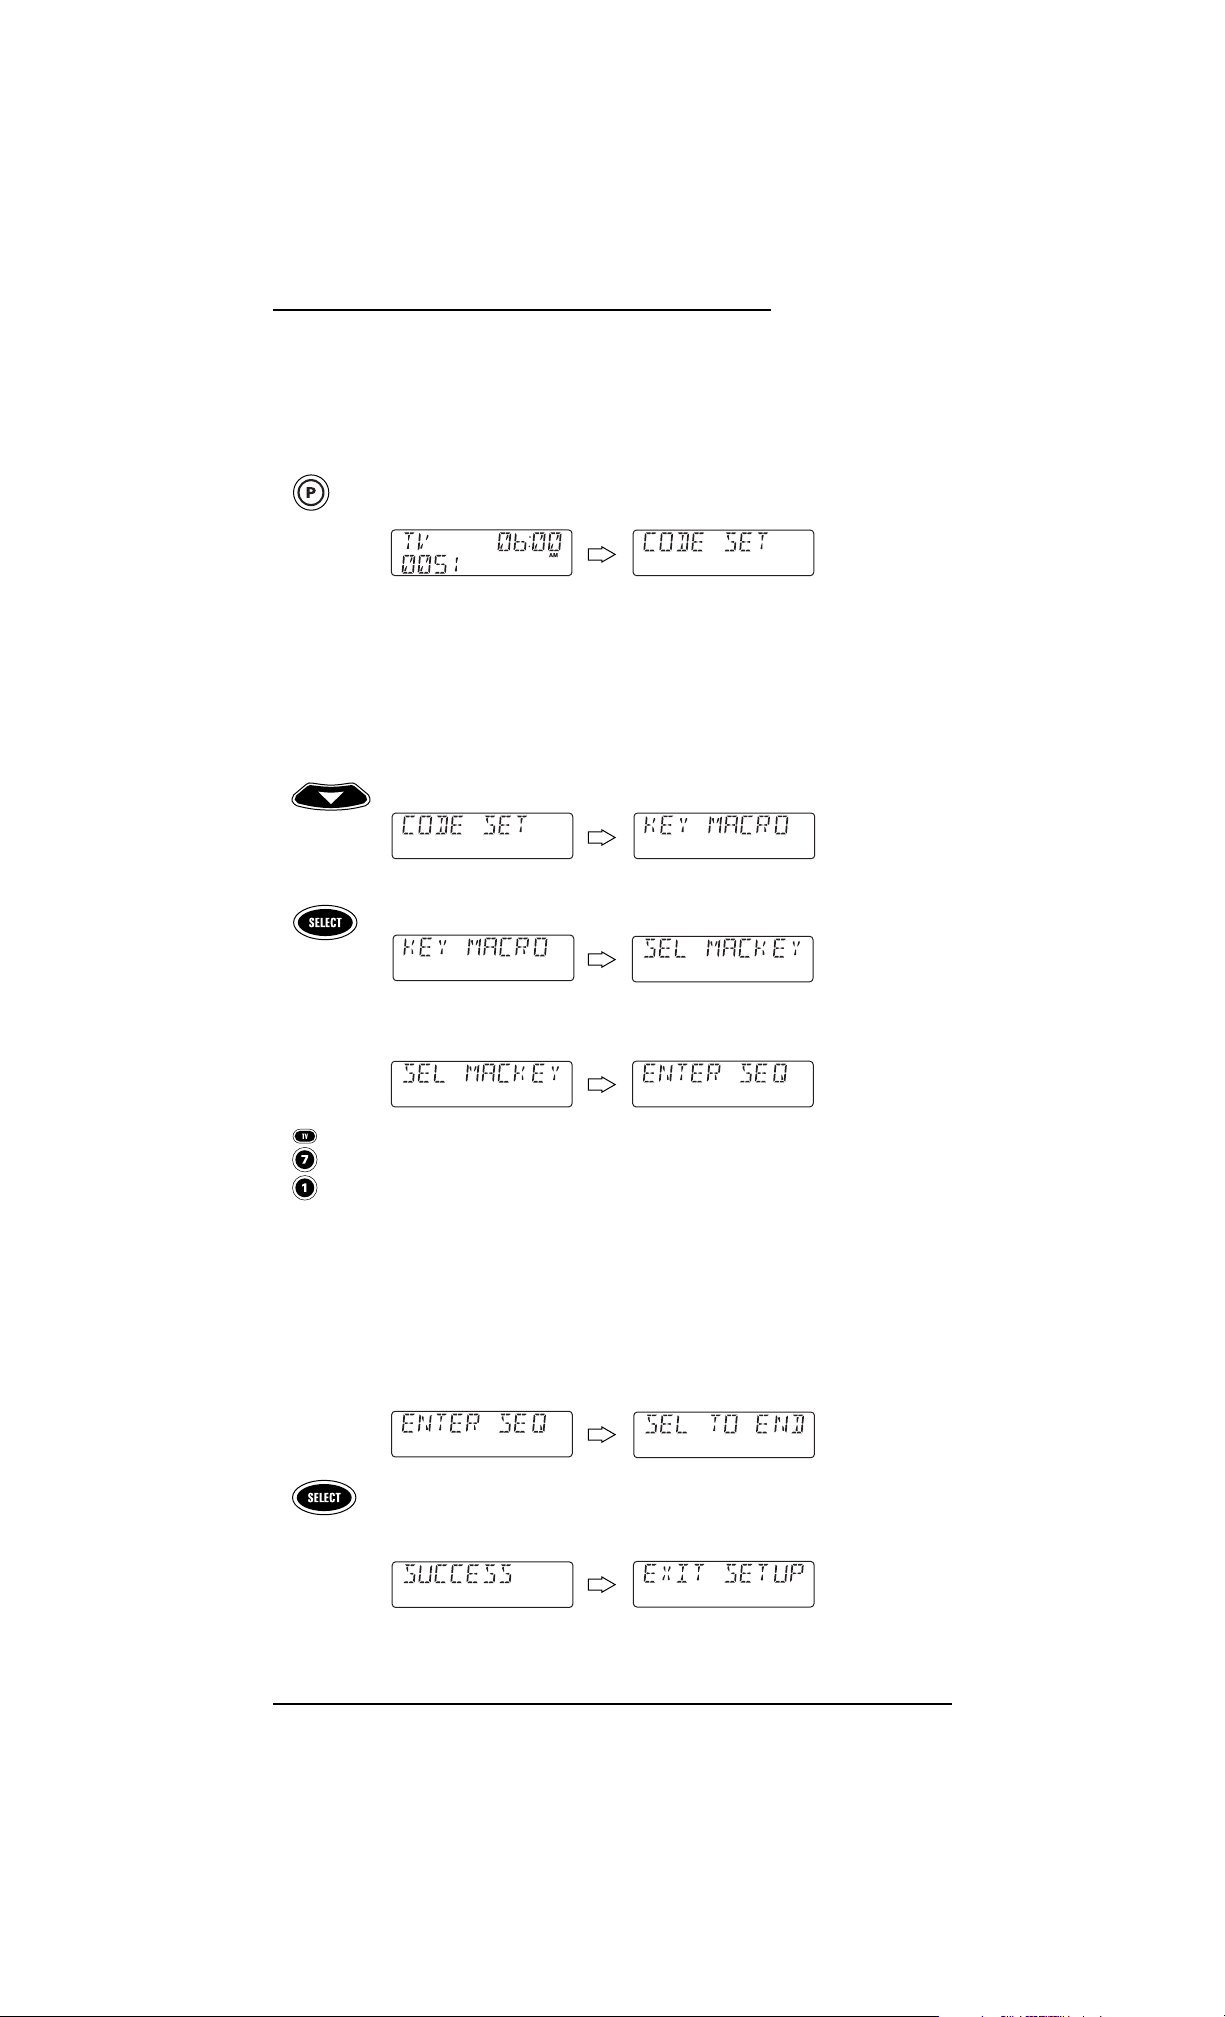
presionar una tecla. Por ejemplo,supongamos que sus programas favoritos de cable están
en el canal 71. Lleve a cabo los siguientes pasos para programar un macro con acceso
directo a este canal:
NOTA: Este ejemplo supone que el televisor está conectado directamente al cable y no a través de un
convertidor de cable.
1. En el control remoto, presione y mantenga presionada Phasta que la pantalla
cambie de dispositivo y hora de fábrica a
[CODE SET] (Fijar Código).
NOTA:Arriba se muestran los valores de fábrica de un dispositivo,su código, y la hora.
Los valores fijados en su control remoto pueden ser diferentes.
NOTA: Si en algún momento dado desea salirse del modo de programación, presione
EXIT (Salida) una vez. Aparece un mensaje [EXIT] al tiempo que el control remoto vuelve
a la operación normal.
NOTA:Si aparece el mensaje [INVALID] (No Válido), significa que accidentalmente
presionó una tecla incorrecta.Simplemente tome nota del error y continúe programando.
2. Presione ▼ seis veces hasta que aparezca [KEY MACRO].
NOTA: Si se pasa de [KEY MACRO],presione ▲ una vez o más hasta volver a ella.
3. Presione SELECT una vez para comenzar a programar. Aparece [SEL MACKEY].
4. Escoja la tecla que quiere usar como un macro y presiónela una vez. Aparece
[ENTER SEQ] (Introduzca La Secuencia).
5. Introduzca una secuencia de macro de hasta 15 teclas. En nuestro ejemplo,
presione las siguientes teclas una vez en este orden:
TV - 7 - 1.
NOTA: Si tiene acceso a más de 100 canales,agregue un 0 antes de los números de canal (v.g.,
0 -7 - 1).Si el control remoto original requería que se presionase la tecla Enter para cambiar de
canal, también debe presionar
ENTER después del número de canal (v.g.,0 - 7 -1 -ENTER).
NOTA: Un mensaje de [ERROR],seguido de [MAX = 15] le recuerda que la secuencia del
macro tiene que ser de 15 teclas o menos.
Después de presionar la primera tecla (en la secuencia del macro), aparece
[SEL TO END] como recordatorio de usar SELECT para finalizar la secuencia
(vea el siguiente paso).
6. Para terminar la secuencia del macro,presione y mantenga oprimida
SELECT
hasta que aparezca [SUCCESS],seguida de [EXIT SETUP].El control remoto se saldrá automáticamente del modo de programación y volverá a la operación normal.
Ahora cuando usted presione la tecla con este macro asignado,verá instantáneamente el
canal 71 del cable en su televisor.
continúa en la siguiente página...
Uso De Los Macros 65
GUÍA DEL USUARIO
(x 6)
Page 65

USO DE LOS MACROS (continuación)
PROGRAMACIÓN DE UNA TECLA MAESTRA DE ENCENDIDO CON SELECCIÓN
INSTANTÁNEA DE CANAL
Se puede programar un macro para encender y apagar sus dispositivos también.Por ejemplo,
vamos a configurar una secuencia que encenderá su televisor y sintonizará el canal 3,y
después encenderá el convertidor de cable y sintonizará un canal premium (v.g., el 11).
NOTA: Este ejemplo supone que todos los equipos están apagados y que el televisor está conectado a
través de un convertidor de cable con la sintonía de la TV fijada al canal 3.
1. Lleve a cabo los pasos del 1 al 4 de la sección previa,Programación De Un
Canal Favorito
en la página 64. Sin embargo,en esta ocasión en el paso 4,
substituya otra tecla para usarla como una tecla de macro.
2. Introduzca una secuencia de macro de hasta 15 teclas. Para nuestro ejemplo,
presione las siguientes teclas una vez en este orden:
CBL - POWER - TV -
POWER - 0 - 3 - CBL - 1 - 1
NOTA: Si tiene acceso a más de 100 canales,agregue un 0 antes de cada grupo de
números de canal (v.g.,
0 - 0 -3 y 0 -1 - 1). Si el control remoto original requería que se
presionara una tecla Enter para cambiar el canal,también presione la tecla
ENTER
después del número del canal (v.g., presione 0 - 0 - 3 - ENTER y 0 - 1 - 1 - ENTER).
NOTA: Un mensaje de [ERROR],seguido de [MAX = 15] le recuerda que la secuencia del
macro tiene que ser de 15 teclas o menos.
3. Después de presionar la primera tecla (en la secuencia del macro),aparece [SEL
TO END]
como un recordatorio de usar SELECT para terminar la secuencia (vea
el siguiente paso).
4. Para terminar la secuencia del macro, presione y mantenga oprimida
SELECT
hasta que vea [SUCCESS] en la pantalla,seguida de [EXIT SETUP].El control
remoto se saldrá automáticamente del modo de programación y volverá a la
operación normal.
Ahora cuando presione la tecla con este macro asignado,se encenderá el convertidor de
cable y el televisor, el televisor se sintonizará en el canal 03, y después el convertidor de
cable se sintonizará en el canal 11.
REMOCIÓN DE UN MACRO
1. Realice los pasos 1 a 4 de la sección anterior, Programación De Un Canal
Favor ito
en la página 64. Sin embargo,esta vez en el paso 2,seleccione una
tecla de macro que usted quiera borrar.
2. Presione y mantenga oprimida
SELECT para borrar la tecla del macro.
Apare cerá
[SEL TO END] como un recordatorio de usar SELECT para terminar
la secuencia (vea el siguiente paso).
66 Uso De Los Macros
8-IN-ONE REMOTE
Page 66

3. Presione SELECT hasta que aparezca [SUCCESS],seguido de [EXIT SETUP].El
control remoto se saldrá automáticamente del modo de programación y volverá
a la operación normal.
USO DE LA FUNCIÓN KEYMOVER
El control remoto incluye una función Keym over (mueve teclas) que le permite detallar (o
copiar) teclas de un modo (es decir, el modo origen) a otro modo (es decir, el modo destino).
NOTA: Las siguientes teclas no se pueden usar como un origen o como un destino:VCR, CBL, SAT, TV,
CD, AUX, DVD, MY SYSTEM,AUDIO,and P.
PROGRAMACIÓN DE LA FUNCIÓN KEYMOVER
Por ejemplo,si su videograbadora (VCR) no tiene control de volumen,haga la prueba de copiar
las teclas de volumen y de enmudecer desde el modo
TV hasta el modo VCR como sigue:
1. En el control remoto, presione y mantenga presionada
P hasta que la pantalla
cambie de dispositivo y hora de fábrica a
[CODE SET] (Fijar Código).
NOTA:Arriba se muestran los valores de fábrica de un dispositivo,su código, y la hora.
Los valores fijados en su control remoto pueden ser diferentes.
NOTA: Si en algún momento dado desea salirse del modo de programación, presione
EXIT (Salida) una vez. Aparece un mensaje [EXIT] al tiempo que el control remoto vuelve
a la operación normal.
NOTA:Si aparece el mensaje [INVALID] (No Válido), significa que accidentalmente
presionó una tecla incorrecta.Simplemente tome nota del error y continúe programando.
2. Presione ▲ cinco veces hasta que aparezca [KEYMOVER].
NOTA: Si se pasa de [KEYMOVER],presione ▼una vez o más hasta volver a ella.
3. Presione SELECT (Seleccionar) una vez para comenzar a programar. Aparece
[FROM MODE] (Desde El Modo).
4. Seleccione un modo de origen (v.g.,
TV) y presiónelo una vez.Aparece
[FROM KEY] (Desde La Tecla).
5. Seleccione una tecla origen (v.g.,
VOL+) y presiónela una vez.Aparece
[TO MODE] (Al Modo).
continúa en la siguiente página...
Uso De Los Macros/Uso De La Función Keymover 67
GUÍA DEL USUARIO
(x 5)
Page 67

USO DE LA FUNCIÓN KEYMOVER
PROGRAMACIÓN DE LA FUNCIÓN KEYMOVER (CONTINUACIÓN)
6. Seleccione un modo destino (v.g., VCR) y presiónelo una vez.Aparece [TO KEY]
(A La Tecla).
7. Seleccione una tecla destino (v.g.,
VOL+) y presionela una vez.Aparece
[SUCCESS],seguido de [EXIT SETUP]. El control remoto se saldrá automática-
mente del modo de programación y volverá a la operación normal.
8. Repita los pasos 1 al 7 dos veces más,sustituyendo
VOL- y MUTE como teclas
de origen y de destino en los pasos 5 y 7.
Al completar el procedimiento de arriba, podrá usar su control remoto para controlar el
volumen de su televisor y el enmudecimiento en el modo VCR,igual que en el modo TV.
RESTAURACIÓN DE UNA SOLA TECLA MOVIDA
1. Realice los pasos 1 al 7 de la sección previa, Programación De La Función
Key move r
, en la página anterior.Sin embargo,esta vez en el paso 6,haga que el
modo destino sea el mismo que el modo origen (v.g.,
TV).Aparece [CLR KMVR].
2. Presione
SELECT una vez para borrar la tecla movida.Aparece [DELETED]
(Borrada), seguido de [EXIT SETUP].El control remoto se saldrá automáticamente del modo de programación y volverá a la operación normal.
RESTAURACIÓN DE TODAS LAS TECLAS MOVIDAS EN UN SOLO MODO
1. Realice los pasos 1 a 4 de la sección anterior, Programación De La Función
Key mover
, en la página anterior. Sin embargo,esta vez en los pasos 3 y 4,
haga que el modo origen y la tecla origen tengan el mismo modo (v.g.,
TV).
Apare cerá
[CLR KMVR].
2. Presione
SELECT una vez para borrar todas las teclas movidas de este modo.
Apare ce
[DELETED],seguido de [EXIT SETUP]. El control remoto se saldrá
automáticamente del modo de programación y volverá a la operación normal.
68 Uso De La Función Keymover
8-IN-ONE REMOTE
Page 68

PROGRAMACIÓN DE UNA EXPLORACIÓN DE CANALES FAVORITOS
En el modo TV, VCR,DVD, SAT,o CBL, el control remoto puede guardar una lista de hasta
10 canales favoritos,en cualquier orden,que serán explorados inmediatamente cuando usted
presione
SCAN (FAV) una vez (vea Uso De La Exploración De Canales en la siguiente página).
NOTA: Sólo se pueden guardar canales en un modo y cualesquiera canales previamente guardados
se borrarán.
1. En el control remoto, presione y mantenga presionada Phasta que la pantalla
cambie de dispositivo y hora de fábrica a
[CODE SET] (Fijar Código).
NOTA:Arriba se muestran los valores de fábrica de un dispositivo,su código, y la hora.
Los valores fijados en su control remoto pueden ser diferentes.
NOTA: Si en algún momento dado desea salirse del modo de programación, presione
EXIT (Salida) una vez. Aparece un mensaje [EXIT] al tiempo que el control remoto vuelve
a la operación normal.
NOTA:Si aparece el mensaje [INVALID] (No Válido), significa que accidentalmente
presionó una tecla incorrecta.Simplemente tome nota del error y continúe programando.
2. Presione ▲ tres veces hasta que aparezca [FAV CHAN] (Canales Favoritos).
NOTA: Si se pasa de [FAV CHAN],presione ▼ una vez o más hasta volver a ella.
3. Presione SELECT una vez para comenzar la programación.Aparece el último
dispositivo seleccionado (v.g.,
[VCR]).
4. Seleccione un modo (v.g.,
TV) para explorar sus canales favoritos y presiónelo
una vez.Después presione
SELECT una vez.Aparece [FAV].
5. Use el teclado para introducir el número de un canal favorito (v.g.,
031).
La pantalla muestra lo que usted tecleó.
NOTA: Si el control remoto original requería que se presionara una tecla Enter para
cambiar el canal, también presione la tecla
ENTER después del número del canal
(v.g.,
0 - 3 -1 - ENTER).Sin embargo,la pantalla no mostrará ENTER.
NOTA: Si se equivoca al asentar los datos, presione cualquier tecla numérica una vez o
más hasta que vea que la pantalla se borra. Entonces, trate de volver a introducir los
números correctos.
Presione SELECT una vez. La pantalla se borra,lista para la próxima
introducción de datos.
continúa en la siguiente página...
Programación De Una Exploración De Canales Favoritos 69
GUÍA DEL USUARIO
(x 3)
Page 69

PROGRAMACIÓN DE UNA EXPLORACIÓN
DE CANALES FAVORITOS (continuación)
6. Si lo desea,repita el paso 5 (en la página anterior) para cada canal favorito que
va a guardar, hasta por un total de 10 canales.
NOTA: Una vez que haya introducido el décimo canal,el control remoto se saldrá
automáticamente del modo de programación.
7. (Opcional) Para salir de la programación, presione y mantenga oprimida
SELECT hasta que aparezca [SUCCESS],seguida de [EXIT SETUP].El control
remoto se saldrá automáticamente del modo de programación y volverá a la
operación normal.
USO DE LA EXPLORACIÓN DE CANALES
En los modos VCR, CBL,SAT, TV,y DVD, use la tecla SCAN (FAV) para iniciar una exploración
de 3 segundos de todos los canales favoritos (si están programados – vea
Programación De
Una Exploración De Canales Favoritos
en la página previa) y/o todos los canales para el
modo seleccionado.
1. Si se configuró
Una Exploración De Canales Favoritos,sáltese al paso 2.De
otra forma,en el control remoto,presione
VCR, CBL,SAT, TV,o DVD una vez.
2. Presione
SCAN (FAV) una vez.
• Si se configuró
Una Exploración De Canales Favoritos,ésta dará comienzo y,
al terminar, continuará la exploración de todos los canales del mismo dispositivo en forma ascendente.
• Si no se ha configurado Una Exploración De Canales Favoritos,la exploración
comenzará con el canal actual,después procederá al siguiente canal ascendente,y continuará hasta que todos los canales del dispositivo seleccionado
hayan sido explorados.El LED rojo y el icono de transmisión IR ( )
parpadean cada vez que se explora un canal.
3. Para detener la exploración de canales en cualquier momento,presione
cualquier tecla una vez.
70 Programación De Una Exploración De Canales Favoritos/Uso De La Exploración De Canales
8-IN-ONE REMOTE
Page 70

USO DE MY SYSTEM (MI SISTEMA)
El control remoto incluye un modo al gusto llamado My System (Mi Sistema) para sus
dispositivos. Después de que la tecla
MY SYSTEM se haya programado, le permitirá acceder
cinco grupos de teclas de control remoto sin tener que cambiar de modo de dispositivo.Sin
embargo,hay algunas consideraciones.
•
Las Funciones Tecla Movida, Aprendida,y De Macro son afectadas por el modo My
System
. Si las teclas se movieron (usando el Key move r) o se les enseñó algo (usando
Aprendizaje) y están ubicadas en teclas que no estén dentro de los Grupos Control, las
teclas serán ignoradas cuando se las presione.
•Un Macro en la tecla POWER (si es aplicable) se pasará al modo My System.
ORGANIZACIÓN DE LOS CONTROLES
ACERCA DE LOS GRUPOS CONTROL
Para la programación de My System,las teclas del remoto están agrupadas por tipo de
control dentro de los siguientes cinco grupos de control:
(1) Controles De Reproducción: REW, PLAY, FFWD,REC, STOP,y PAUSE
(2) Controles De Audio: VOL+,VOL-,y MUTE
(3) Controles De Canal: CH+, CH-,Teclado (0~ 9), ENTER,LAST, SLEEP,INFO,
y
TV/VIDEO
(4) Controles De Menú: MENU,GUIDE, Controles Del Cursor (▲, ▼,,),
SELECT,y EXIT
(5) Controles PIP: PIP, FREEZE,SWAP, MOVE,y +100
ACERCA DE LOS GRUPOS DE DISPOSITIVOS
Más aún, los dispositivos del remoto están agrupados dentro de los siguientes cinco grupos
de dispositivos:
(1) Grupo Reproductor: VCR, CBL,SAT,CD, AUDIO,y DVD
(2) Grupo De Audio: VCR, CBL,SAT, TV,CD, AUDIO,DVD y AUX
(3) Grupo De Canales: VCR, CBL,SAT, TV,CD, AUDIO,DVD y AUX
(4) Grupo De Menúes: VCR, CBL,SAT,TV,y DVD
(5) Grupo PIP: VCR, CBL, SAT,y TV
Los parámetros originales Del Grupo De Dispositivos son:
(1) Grupo Reproductor: VCR
(2) Grupo De Audio: TV
(3) Grupo De Canales: CBL
(4) Grupo De Menúes: CBL
(5) Grupo PIP: TV
continúa en la siguiente página...
▲
▲
Uso De My System (Mi Sistema) 71
GUÍA DEL USUARIO
Page 71

USO DE MY SYSTEM (continuación)
PROGRAMACIÓN DE MY SYSTEM
Por ejemplo,supongamos que usted tiene un televisor, un convertidor de cable,y una
videograbadora en su sistema de cine en el hogar. Usted puede programar el modo
My System
de tal manera que los controles seleccionados se asignen a estos dispositivos como sigue:
1. En el control remoto, presione y mantenga presionada
P hasta que la pantalla
cambie de dispositivo y hora de fábrica a
[CODE SET] (Fijar Código).
NOTA:Arriba se muestran los valores de fábrica de un dispositivo,su código, y la hora.
Los valores fijados en su control remoto pueden ser diferentes.
NOTA: Si en algún momento dado desea salirse del modo de programación, presione
EXIT (Salida) una vez. Aparece un mensaje [EXIT] al tiempo que el control remoto vuelve
a la operación normal.
NOTA:Si aparece el mensaje [INVALID] (No Válido), significa que accidentalmente
presionó una tecla incorrecta.Simplemente tome nota del error y continúe programando.
2. Presione ▲ dos veces hasta que aparezca [MY SYSTEM].
NOTA: Si se pasa de [MY SYSTEM],presione ▼ una vez o más hasta volver a ella.
3. Presione SELECT una vez para comenzar la programación.Aparece
[PLAYBACK] (Reproducción).
NOTA: El programa automáticamente pasará a través de cada Grupo de Control (desde
Playback hasta PIP) mientras usted realiza los pasos del 3 al 7. Sin embargo,usted puede
usar las teclas
▲ o ▼ para navegar a un grupo específico con el fin de hacer más cambios.
a. Presione SELECT una vez para ingresar a la asignación del Grupo De Control
De Reproducción
.Aparece el último dispositivo seleccionado (v.g., [TV]).
b. Seleccione un dispositivo para asignarle el
Grupo De Control De
Reproducción
. Para este ejemplo, presione VCR una vez.Esto asignará todo
el
Grupo De Controles De Reproducción (es decir, PLAY, FFWD,REC, STOP,y
PAUSE) a la videograbadora (VCR).Aparece su selección de dispositivo
(v.g.,
[VCR]).
c. Presione
SELECT una vez para aceptar la asignación del paso 3b.Aparece la
siguiente asignación de
Grupo De Control, [AUDIO]).
72 Uso De My System (Mi Sistema)
8-IN-ONE REMOTE
(x 2)
Page 72

4. Presione SELECT una vez para ingresar a la asignación Del Grupo De Control
De Audio
.Aparece el último dispositivo seleccionado (v.g., [VCR]).
a. Seleccione un dispositivo para asignarle el
Grupo De Control De Audio.Para
este ejemplo,presione
TV una vez.Esto asignará todo el grupo de Controles
De Audio
(es decir, VOL+,VOL-,y MUTE) al televisor.Aparece su selección de
dispositivo (v.g.,
[TV]).
b. Presion e
SELECT una vez para aceptar la asignación del paso 4a.Aparece la
siguiente asignación de
Grupo De Control, [CHANNEL]).
5. Presione
SELECT una vez para ingresar a la asignación del Grupo De Control
De Canales
.Aparece el último dispositivo seleccionado (v.g., [TV]).
a. Seleccione un dispositivo para asignarle el
Grupo De Control De Canales.
Para este ejemplo,presione
CBL una vez.Esto asignará todo el grupo de
Controles De Canales (es decir, CH+,CH-, Teclado (0 ~ 9), ENTER,LAST,
SLEEP, INFO,y TV/VIDEO) al convertidor de cable.Aparece su selección de
dispositivo (v.g.,
[CBL]).
b. Presion e
SELECT una vez para aceptar la asignación del paso 5b.Aparece la
siguiente asignación de
Grupo De Control, [MENU]).
6. Presione
SELECT una vez para ingresar a la asignación del Grupo De Control
De Menúes
.Aparece el último dispositivo seleccionado (v.g., [CBL]).
a. Seleccione un dispositivo para asignarle el
Grupo De Control De Menúes.
Para este ejemplo,presione
CBL una vez.Esto asignará todo el grupo de
Controles De Menúes (es decir,MENU, GUIDE,Los Controles Del Cursor
(▲,▼,,),SELECT,y EXIT) al convertidor de cable.Aparece su selección
de dispositivo (v.g.,
[CBL]).
b. Presion e
SELECT una vez para aceptar la asignación del paso 6a.Aparece la
siguiente asignación de
Grupo De Control, [PIP]).
continúa en la siguiente página...
▲
▲
Uso De My System (Mi Sistema) 73
GUÍA DEL USUARIO
Page 73

USO DE MY SYSTEM (MI SISTEMA)
PROGRAMACIÓN DE MY SYSTEM (CONTINUACIÓN)
7. Presione SELECT una vez para ingresar la asignación del Grupo De Control PIP.
Aparece el último dispositivo seleccionado (v.g.,
[CBL]).
a. Seleccione un dispositivo para asignarle el
Grupo De Control PIP.Para este
ejemplo,presione
TV una vez.Esto asignará todo el grupo de Controles PIP
(es decir, PIP,FREEZE,SWAP,MOVE,y +100) a TV. Aparece su selección de
dispositivo (v.g.,
[TV]).
b. Presion e
SELECT una vez para aceptar la asignación en el paso 7a.Aparece
la primera asignación de
Grupo De Control,([PLAYBACK]).
8. En este punto,todos los
Grupos De Control han sido asignados. Para cambiar
la asignación, use
▲ o ▼ para navegar a un grupo específico y realice los
cambios repitiendo el paso adecuado (3,4, 5,6, o 7).
De otra forma,para salir de la programación, presione y mantenga oprimida
SELECT hasta que aparezca [SUCCESS],seguida de [EXIT SETUP].El control
remoto se saldrá automáticamente del modo de programación y volverá a la
operación normal.
OPERACIÓN DE MY SYSTEM
Después de programar el modo My System (vea la sección previa),simplemente actívelo
presionando
MY SYSTEM una vez. Instantáneamente, los grupos de teclas del control remoto se
asignarán a sus dispositivos programados.En el ejemplo de arriba, al presionar
MY SYSTEM
una vez se asignarían las siguientes teclas a la VCR, TV, y convertidor de cable:
VCR:
REW, PLAY, FFWD, REC, STOP,y PAUSE
TV: VOL+, VOL-,MUTE, PIP, FREEZE,SWAP,MOVE,y +100
Convertidor De Cable: CH+, CH-,Teclado (0 ~ 9), ENTER,LAST, SLEEP,INFO,TV/VIDEO,
MENU, GUIDE, Controles Del Cursor (▲,▼,,),SELECT,y EXIT
▲
▲
74 Uso De My System (Mi Sistema)
8-IN-ONE REMOTE
o
Page 74

REASIGNACIÓN DE LAS TECLAS DE DISPOSITIVOS
El remoto se puede configurar para que controle un segundo televisor,videograbadora o
reproductor de DVDs,u otro dispositivo que no esté listado en las teclas de dispositivo.
Por ejemplo,para controlar un televisor, un convertidor de cable y dos videograbadoras,
usted puede reasignar la tecla
AUX no utilizada para que opere la segunda videograbadora
como sigue:
1. Encuentre los códigos para el dispositivo que usted quiere programar en los
Códigos Del Fabricante (comenzando en la página 84) y anótelos o reálcelos
con un marcador. Para este ejemplo, ubique los códigos VCR en la página 89.
2. Encienda el dispositivo (v.g., la VCR) y,si fuese necesario, insértele el medio
que utiliza (v.g., videocasete).
NOTA: Por favor lea los pasos 3 a 9 en su totalidad antes de proceder. Realce o anote los
códigos y el dispositivo que quiere programar antes de iniciar el paso 2.
3. En el remoto,presione AUXuna vez. Después presione y mantenga oprimida P
hasta que la pantalla cambie del dispositivo y código
AUX actual (v.g., RCVR y
1023) a [CODE SET].
NOTA:Arriba se muestran los valores de fábrica de un dispositivo,su código, y la hora.
Los valores fijados en su control remoto pueden ser diferentes.
NOTA: Si en algún momento dado desea salirse del modo de programación, presione
EXIT (Salida) una vez. Aparece un mensaje [EXIT] al tiempo que el control remoto vuelve
a la operación normal.
NOTA:Si aparece el mensaje [INVALID] (No Válido), significa que accidentalmente
presionó una tecla incorrecta.Simplemente tome nota del error y continúe programando.
4. Presione SELECT una vez para comenzar la programación.Aparece el último
dispositivo seleccionado y su código actual (v.g.,
RCVR y 1023).
5. Use
▲ o ▼ para navegar hasta el tipo de dispositivo que usted quiere asignar
a la tecla
AUX. En este ejemplo,encuentre VCR y su código de fábrica (v.g., VCR
y 0060).
6. Use el teclado para introducir el primer código de cuatro dígitos para el
dispositivo y presione
SELECT una vez.
Por ejemplo,para introducir el primer código VCR de Sony (
0035 en la
página 91), presione el
0 dos veces, luego el 3,luego el 5,y despuésSELECT
una vez.
Si el código se introdujo en forma correcta,aparece el mensaje
[SUCCESS] (Éxito).
continúa en la siguiente página...
Reasignación De Las Teclas De Dispositivos 75
GUÍA DEL USUARIO
o
Page 75

REASIGNACIÓN DE LAS TECLAS DE DISPOSITIVOS (continuación)
7. Presione EXIT (Salida) para salir del modo de programación.Aparecerá un
mensaje de
[EXIT SETUP] (Salir De Configuración) al tiempo que el control
remoto vuelve a la operación normal.
8. Para verificar que el código funciona, apunte el control remoto al dispositivo
deseado (v.g.,VCR),presione la tecla reasignada del dispositivo (v.g.,
AUX)
una vez y después presione la tecla
POWER una vez.El dispositivo debe apa-
garse.Si no responde,repita los pasos 3 a 8,probando con cada código para
la marca del dispositivo hasta que encuentre una que funcione.Si no puede
hallar un código que funcione,haga la prueba con
Búsqueda De Su Código en
la página 59.
NOTA: Si el dispositivo no tiene una tecla POWER,presione (Play).
9. Para reasignar otras teclas de dispositivos,repita los pasos 1 a 8,pero esta vez
en el paso 3 substituya otra tecla de dispositivo que quiera reasignar. Después,
en el paso 4, ubique y seleccione el dispositivo que usted tiene.
Por ejemplo,digamos que usted tiene un reproductor de discos láser (LD) en
lugar de un reproductor de DVDs. En el paso 3, presione
DVD una vez (en lugar
de
AUX). En el paso 4,use ▲ o ▼ para navegar a LDP en lugar de VCR. Luego,
termine el resto de las instrucciones.
10. Para referencia futura,anote cada una de las teclas reasignadas de dispositivo
y su código de funcionamiento en los cuadrados de abajo:
VCR = Dispositivo:________________ Código =
CBL = Dispositivo: ________________ Código =
SAT = Dispositivo: ________________ Código =
TV = Dispositivo: _________________ Código =
CD = Dispositivo:_________________ Código =
AUX = Dispositivo: ________________ Código =
DVD = Dispositivo: _______________ Código =
AUDIO = Dispositivo: ______________ Código =
76 Reasignación De Las Teclas De Dispositivos
8-IN-ONE REMOTE
Page 76
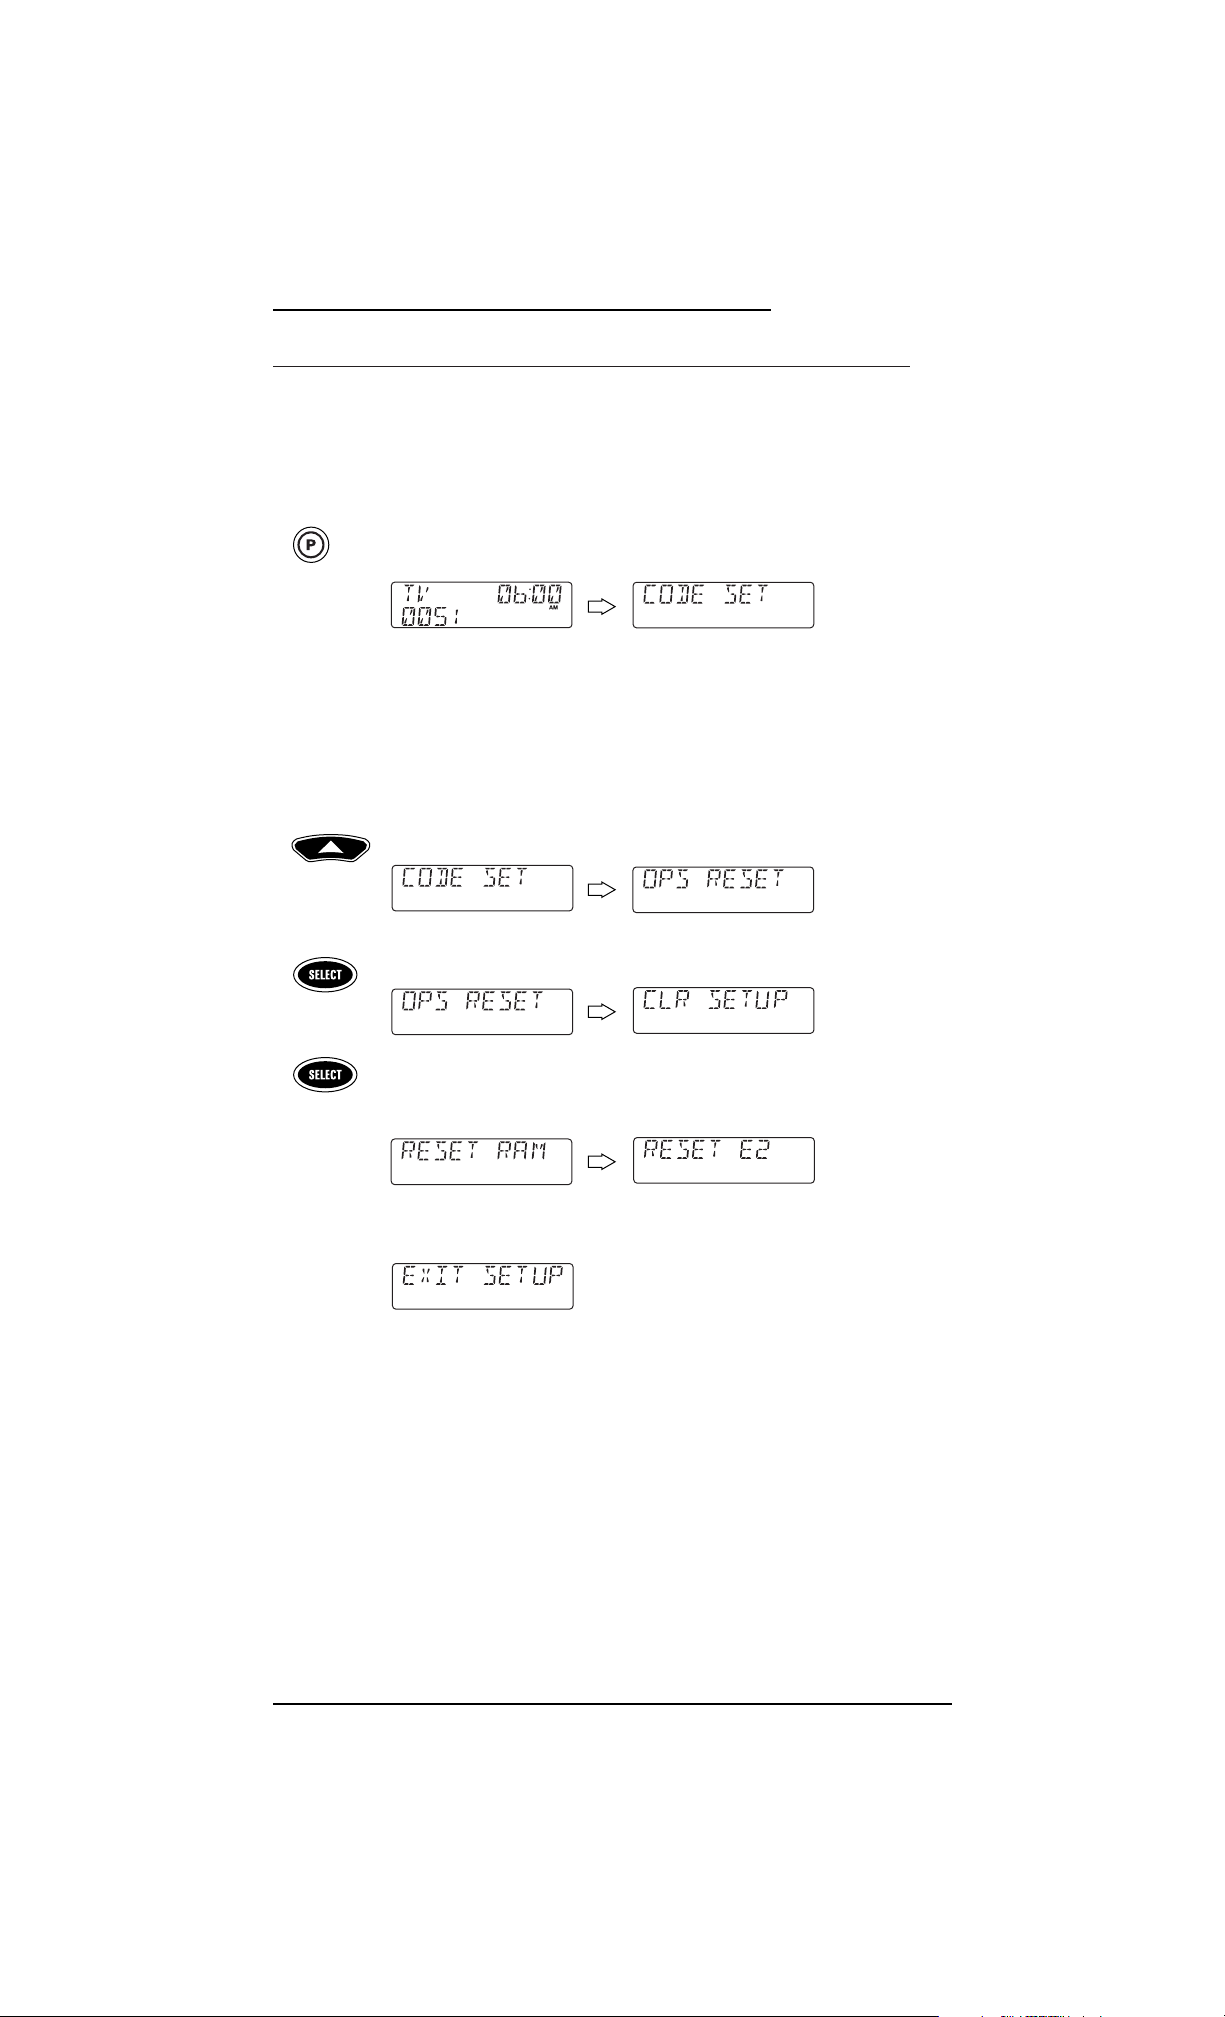
RESTAURACIÓN DE LOS VALORES FIJADOS EN LA FÁBRICA
El remoto incluye un programa de Reposición De Las Operaciones que usted puede usar para
restaurar los valores fijados en la fábrica.
IMPORTANTE: Al ejecutar este programa se borran todos los parámetros modificados a la
medida, incluyendo las asignaciones de Cine En El Hogar, Macros, Teclas Con Aprendizaje,
Teclas Reasignadas (Keymoved), y todas las asignaciones de dispositivos.
1. En el control remoto, presione y mantenga presionada Phasta que la pantalla
cambie de dispositivo y hora de fábrica a
[CODE SET] (Fijar Código).
NOTA:Arriba se muestran los valores de fábrica de un dispositivo,su código, y la hora.
Los valores fijados en su control remoto pueden ser diferentes.
NOTA: Si en algún momento dado desea salirse del modo de programación, presione
EXIT (Salida) una vez. Aparece un mensaje [EXIT] al tiempo que el control remoto vuelve
a la operación normal.
NOTA:Si aparece el mensaje [INVALID] (No Válido), significa que accidentalmente
presionó una tecla incorrecta.Simplemente tome nota del error y continúe programando.
2. Presione ▲ una vez.Aparece [OPS RESET].
NOTA: Si se pasa de [OPS RESET],presione ▼ una vez o más hasta volver a ella.
3. Presione SELECT una vez para comenzar a programar. Aparece [CLR SETUP].
4. Presione
SELECT una vez para comenzar el proceso. Aparece [RESET RAM] al
borrarse la memoria activa, seguido de
[RESET E2] al restaurarse la memoria
pre-programada.
Aparece un mensaje de
[EXIT SETUP] al tiempo que el remoto se sale
automáticamente del modo de programación y vuelve a la operación normal.
Restauración De Los Valores Fijados En La Fábrica 77
GUÍA DEL USUARIO
Page 77

LOCALIZACIÓN DE FALLAS
PROBLEMA: La LCD (pantalla de cristal líquido) comienza a desvanecerse,no enciende, o
aparece el icono de Batería Baja ( ).
SOLUCIÓN: Cambie las baterías por cuatro (4) nuevas baterías alcalinas tamaño AAA (vea
la página 44).
PROBLEMA: El LED rojo y el icono de infrarrojos IR ( ) parpadean cuando usted presiona
una tecla,pero el dispositivo no responde.
SOLUCIÓN: Cerciórese de seleccionar la tecla de dispositivo correcta para el dispositivo que
desea controlar.Además,apunte el remoto hacia el dispositivo a menos de 4.58 m
de distancia.
PROBLEMA: El remoto no controla dispositivos o los mandos no están funcionando bien.
SOLUCIÓN: Pruebe todos los códigos listados para el dispositivo. Cerciórese de que el
dispositivo funcione con un control remoto de rayos infrarrojos.
PROBLEMA: La combinación TV/VCR no responde adecuadamente.
SOLUCIÓN: Use los códigos VCR para su marca.Algunas unidades de combinación pueden
requerir un código TV y un código VCR para una operación completa.
PROBLEMA: El remoto no enciende a una unidad de combinación TV/VCR marca Sony o
Sharp.
SOLUCIÓN: Estos modelos requieren códigos de TV para encenderse.Para la Sony, use el
código 0000 para TV y el código 0032 para VCR.Para la marca Sharp,use el
código 0093 para TV y el código 0048 para VCR.
PROBLEMA: El cambio de canales no funciona bien.
SOLUCIÓN: Si el control remoto original requería que se presionara la tecla Enter para cam
biar de canales, presione
ENTER en el remoto después de introducir el número
de canal.
PROBLEMA: Durante el aprendizaje,la pantalla del remoto muestra un mensaje de
[ERROR]
después de presionar y mantener oprimida una tecla que se va a aprender.
SOLUCIÓN: Ocurrió una captura equivocada.Evite las fuentes de luz ambiental intensa,
como lo son la luz directa del sol y las bombillas (focos) fluorescentes.Además,
vuelva a ajustar las posiciones de los controles remotos antes de volver a
realizar el procedimiento.Cerciórese de que la(s) tecla(s) en el control remoto
original esté(n) funcionando correctamente.
PROBLEMA: Las teclas
CH+, CH-,y LAST no funcionan con su televisor marca RCA.
SOLUCIÓN: Debido al diseño RCA de 1983 a 1987, sólo el control remoto original puede
realizar estas funciones.
PROBLEMA: No hay volumen en un segundo televisor.
SOLUCIÓN: Siga las instrucciones en la sección
Cambio Del Bloqueo Del Volumen en la
página 63.
PROBLEMA: No se puede hallar un código que funcione usando las instrucciones en
Búsqueda De Su Código.
SOLUCIÓN: Vea nuestro sitio en la Internet,
www.radioshack.com,para obtener ayuda,o
lleve el control remoto a la tienda RadioShack de su localidad.
78 Localización De Fallas
8-IN-ONE REMOTE
Page 78

PROBLEMA: El control remoto enciende dispositivos de audio y controla el volumen,pero
no cambia los canales prefijados.
SOLUCIÓN: Algunos productos podrían requerir un código de sintonizador (o receptor) y
un código de amplificador de audio para controlar a remoto todas las funciones
en su dispositivo de audio.
PROBLEMA: Su receptor de satélite (DSS) no responde a los códigos listados en la página 87.
SOLUCIÓN: Cerciórese de que el receptor de satélite (DSS) pueda operarse con un control
remoto de rayos infrarrojos (IR) y que no esté configurado para recibir únicamente señales de radiofrecuencia (RF).
NOTA: Si tiene algún otro problema, llame a servicios al cliente al 1-800-763-9232.
MENSAJES DE ERROR
Se introdujo una secuencia equivocada para la tecla o datos
incorrectos.Vuélvalo a intentar.
El código de fabricante solicitado no se halló en la base de datos
del control remoto. Haga la prueba con otro código.
La secuencia de macro que se está introduciendo alcanzó el
límite máximo de 15 golpes de tecla.Vuélvalo a intentar con
menos golpes de tecla.
Se ha completado todo un ciclo de búsqueda de códigos en la
base de datos del control remoto. Pruebe otra búsqueda de códi
gos o visite nuestro sitio en la Internet en
www.radioshack.com
para encontrar ayuda. O lleve el control remoto a la tienda
RadioShack de su localidad.
Ocurrió un error durante una secuencia de aprendizaje o de
programación.Vuélvalo a intentar.
Indica que un resultado de la revisión de situación E2 ya sea que
está equivocado o no está presente.Visite nuestro sitio en la
Internet en
www.radioshack.com para obtener ayuda o lleve el
control remoto a la tienda RadioShack de su localidad.
Indica que los datos capturados durante el aprendizaje llenaron
la memoria del control remoto. Pruebe borrando teclas con
aprendizaje más viejo con el fin de liberar espacio en la memoria
(vea la página 62).
Indica que los datos capturados durante el aprendizaje han
causado un error en la memoria del control remoto.Vuélvalo
a intentar.
Localización De Fallas/Mensajes De Error 79
GUÍA DEL USUARIO
Page 79

ESPECIFICACIONES
Alimentación Del Control Remoto . . . . . . . . . . . . . . . . . . . . . . . . . . . . . . . . . . . . . . 4 Baterías AAA
Dimensiones Del Control Remoto
(H x W x D). . . . . . . . . . . . . . . . . . . . . . . . . . . . . . . . . . . . . . . . . . . . . . . . . . . 9.21 x 2.52 x 1.34 in.
(H x W x D). . . . . . . . . . . . . . . . . . . . . . . . . . . . . . . . . . . . . . . . . . . . . . . . . . . . . 234 x 64 x 34 mm
Peso Del Control Remoto (Sin Las Baterías). . . . . . . . . . . . . . . . . . . . . . . . . . . . . . . 0.45 lb (204 g)
NOTA: Las especificaciones son típicas. Las unidades individuales podrían variar. Las especificaciones
quedan sujetas a cambios y mejoras sin previo aviso.
INSTRUCCIONES PARA EL USUARIO
Este equipo fue probado y demostró que cumple con los límites para los dispositivos digitales
de clase B,de acuerdo con la parte 15 de las Reglas de la FCC.Estos límites están diseñados
para proporcionar una protección razonable contra interferencias dañinas en una instalación
residencial.Este equipo genera,usa e irradia energía de radiofrecuencia y si no se le instala y
usa de acuerdo con las instrucciones,podría causar interferencias dañinas a las comunicaciones por radio.Sin embargo,no hay garantía de que no ocurrirá una interferencia en una
instalación en particular. Si este equipo causa interferencias dañinas a la recepción de radio o
televisión, lo cual se puede determinar apagando y encendiendo el equipo,se anima al usuario
a que trate de corregir la interferencia mediante una o más de las siguientes medidas:
• Reoriente o reubique la antena receptora.
• Aumente la separación que hay entre el equipo y el receptor.
• Conecte el equipo a un tomacorriente en un circuito diferente a donde está conectado
el receptor.
• Consulte al distribuidor o a un técnico con experiencia en radio y televisión para que
le asista.
Se verificó que este equipo cumple con los límites de un dispositivo de computación de
clase B,de acuerdo con las Reglas de la FCC. Para poder mantener el cumplimiento con los
reglamentos de la FCC,tienen que usarse cables blindados con este equipo. La operación con
equipos no aprobados o con cables no blindados puede resultar en una interferencia en la
recepción de radio y televisión.Se cauciona al usuario que los cambios y las modificaciones
que se hagan al equipo sin la aprobación del fabricante podrían nulificar la autoridad del
usuario para operar este equipo.
80 Especificaciones/Instrucciones Para El Usuario
8-IN-ONE REMOTE
Page 80

CUIDADO
• Mantenga seco el control remoto. Si éste se moja,séquelo con un paño de inmediato.
• Maneje el control remoto delicada y cuidadosamente. No lo deje caer.
• Use y guarde el control remoto sólo en ambientes con temperatura normal.
• Mantenga el control remoto alejado del polvo y de la mugre.
• Limpie el control remoto con un paño húmedo para conservarlo luciendo como nuevo.
La modificación o alteración de piezas internas puede causar daños y anular la garantía.
Si su remoto no está funcionando como debe, por favor contáctenos en:
www.radioshack.com
o visite la tienda RadioShack de su localidad para obtener ayuda.
Cuidado 81
GUÍA DEL USUARIO
Page 81
GARANTÍA LIMITADA DE 90 DÍAS
Este producto está garantizado por RadioShack contra defectos de fabricación en su material y mano de obra
bajo un uso normal durante noventa (90) días a partir de la fecha de compra en una tienda propiedad de la
compañía RadioShack o de concesionarios y distribuidores autorizados RadioShack.
EXCEPTO A LO PROVISTO AQUÍ, RadioShack NO BRINDA NINGUNA GARANTÍA EXPRESA Y
CUALESQUIERA GARANTÍAS IMPLÍCITAS, INCLUYENDO LAS DE COMERCIABILIDAD Y ADECUACIÓN
PARA UN PROPÓSITO PARTICULAR,ESTÁN LIMITADAS EN SU DURACIÓN A LA DURACIÓN DE LA
GARANTÍAS LIMITADAS ESCRITAS CONTENIDAS AQUÍ.EXCEPTO A LO PROVISTO AQUÍ, RadioShack
NO SERÁ RESPONSABLE ANTE EL CLIENTE NI ANTE ALGUNA OTRA PERSONA O ENTIDAD EN LO
TOCANTE A CUALQUIER RESPONSABILIDAD, PÉRDIDA O DAÑO CAUSADO DIRECTA O INDIRECTAMENTE
POR EL USO O FUNCIONAMIENTO DEL PRODUCTO O QUE SURJA DE CUALQUIER INCUMPLIMIENTO
DE ESTA GARANTÍA, INCLUYENDO, PERO SIN LIMITARSE A,PÉRDIDA DE TIEMPO,DE DATOS, DE
PROPIEDAD, DE INGRESOS,O DE GANANCIAS O CUALESQUIERA DAÑOS INDIRECTOS,ESPECIALES,
INCIDENTALES, O EMERGENTES,AUN CUANDO RadioShack HAYA SIDO NOTIFICADA DE LA POSIBILIDAD
DE TALES DAÑOS.
Algunos estados no permiten limitaciones respecto a cuánto dura una garantía implícita o a la exclusión o
limitación de daños incidentales o emergentes, de manera que las limitaciones o exclusiones de arriba
podrían no aplicársele a usted.
En caso de que se presente un defecto en el producto durante el plazo de garantía, lleve el producto y el recibo
de venta de RadioShack como prueba de la fecha de compra a cualquier tienda RadioShack. RadioShack,a su
opción, a no ser que la ley prevea otra cosa: (a) corregirá el defecto mediante la reparación del producto sin
cargo por las piezas ni por la mano de obra; (b) reemplazará el producto por otro igual o de diseño similar;
o (c) reembolsará el precio de compra.Todas las piezas y productos reemplazados, y los productos sobre los
cuales se otorgó un reembolso, se convierten en la propiedad de RadioShack.Las piezas o productos nuevos
o reacondicionados podrían usarse en el desempeño del servicio de garantía.Las piezas y productos
reparados o reemplazados están garantizados por el resto del plazo de la garantía original.Usted tendrá que
pagar por las reparaciones o reemplazos del producto que se realicen después de la fecha de vencimiento del
período de garantía.
Esta garantía no cubre: (a) daño o falla causados por o atribuibles a fuerza mayor,abuso, accidente,mal uso,
uso inadecuado o anormal,no seguir las instrucciones,instalación o mantenimiento inadecuados,alteración,
rayos u otros incidentes de exceso de voltaje o corriente; (b) cualesquiera reparaciones que no sean las
proporcionadas por una Instalación de Servicios Autorizada RadioShack; (c) fungibles como los fusibles o
baterías; (d) daño cosmético; (e) costos de transporte, flete o seguro;o (f) costos de remoción, instalación,
ajuste por servicio de ubicación o reinstalación del producto.
Esta garantía le brinda derechos legales específicos,y usted podría tener otros derechos que varían de acuerdo
con el estado donde vive.
Departamento RadioShack De Relaciones Con El Cliente,
200 Taylor Street, 6th Floor,
Fort Worth, TX 76102
Cat. No.15-2116 09/02
Fort Worth, Texas 76102
82 Garantía Limitada De 90 Días
8-IN-ONE REMOTE
Page 82

NOTAS:
Notas 83
GUÍA DEL USUARIO
Page 83
MANUFACTURER’S CODES
(CÓDIGOS DEL FABRICANTE)
S
ETUPCODESFORAUDIOAMPLIFIERS
(C
ÓDIGOSDECONFIGURACIÓNPARA
A
MPLIFICADORESDEAUDIO
)
[AMP]
Aiwa 0406
Carver 0269
Curtis Mathes 0300
Denon 0160
Harman/Kardon 0892
JVC 0331
Left Coast 0892
Linn 0269
Magnavox 0269
Marantz 0892, 0269
Optimus 0395, 0300, 0823
Panasonic 0308
Philips 0892,0269
Pioneer 0013, 0300, 0823
Polk Audio 0892,0269
RCA 0300, 0823
Realistic 0395
Technics 0308
Victor 0331
Wards 0013
Yamaha 0354
S
ETUPCODESFORAUDIOCASSETTEDECKS
(C
ÓDIGOSDECONFIGURACIÓNPARA
R
EPRODUCTORESDEAUDIOCASETES
)
[TAPE]
Akai 0188, 0189
Carver 0261
Fisher 0261
Garrard 0300, 0439
Optimus 0027, 0220, 0300,0318, 0439
Pioneer 0027, 0220
RCA 0027, 0220, 0261
Rotel 0174
Sanyo 0261
Sony 0243, 0170
Wards 0027
S
ETUPCODESFORAUDIORECEIVERS
(C
ÓDIGOSDECONFIGURACIÓNPARA
R
ECEPTORESDEAUDIO
)
[RCVR]
Alco 1390
ADC 0531
Admiral 0182
Aiwa 1089, 1405, 0121
Akai 0115
Audiotronic 1189
Audiovox 1390
Capetronic 0531, 0690
Carver 1089, 1189, 0042, 0360
Casio 0195
Clarinette 0195
Curtis Mathes 0080
Denon 1104, 1160
Fisher 0042, 0219, 0360
Glory Horse 1263
Garrard 0440, 0744
Hanwah 0741
Jensen 0754
Kansai 0440
Kenwood 1313, 1027, 1570, 1569,0042, 0186
KLH 1390
Koss 0744
LXI 0181, 0744
Lloyd’s 0195
Magnavox 1089, 1189, 0195,0364, 0531
Marantz 1089, 1189
Memorex 0335
Modulaire 0195
Musicmagic 1089
NTDE Geniesom 0744
Optimus 1023, 0042, 0080,0177, 0181, 0186,
0219, 0754, 0440,0531, 0622, 0670,
0690, 0738, 0744,0797, 0801, 0849,
1074
Orient Power 0744
Panasonic 1518
Penney 0195
Philips 1089, 1189,1269
Pioneer 1023, 0080, 0531
Proscan 1254
RCA 1023, 1254, 0080,0360, 0531,1074,
1122, 1123, 1609,1390
RadioShack 0744, 1263
Realistic 0001, 0025, 0163, 0178,0181, 0182,
0195, 0534
Sansui 1089
Sanyo 0219, 0801
Schneider 0364
Scott 0163, 0418
Sharp 0186
Sony 1058, 1258,1158, 0415
84 Manufacturer’s Codes (Códigos Del Fabricante)
8-IN-ONE REMOTE
Page 84

S
ETUPCODESFORAUDIORECEIVERS
,
C
ONTINUED
(C
ÓDIGOSDECONFIGURACIÓNPARA
R
ECEPTORESDEAUDIO
, C
ONTINUACIÓN
)
[RCVR]
Soundesign 0670
Stereophonics 1023
Sunfire 1313
Symphonic 0182
Teac 0163
Technics 1308, 1309, 1518
Techwood 0364
Thorens 1189
Venturer 1390
Wards 0080
Yamaha 0176, 0186, 1176,1276
Yorx 0195
Zenith 0622, 0744
S
ETUPCODESFORAUDIOSERVICES
(
CÓDIGOS DE CONFIGURACIÓN PARA
SERVICIOS DE AUDIO
)
[MISC]
Aiwa 0159
Sony 0159
S
ETUPCODESFORAUDIOTURNTABLES
(
CÓDIGOS DE CONFIGURACIÓN PARA
TORNAMESAS DE AUDIO
)
[PHONO]
Aiwa 0188
Carver 0188
Magnavox 0188
Marantz 0188
Philips 0188
S
ETUPCODESFORCABLECONVERTERS
(
CÓDIGOS DE CONFIGURACIÓN PARA
CONVERTIDORES DE CABLE)
[CBL]
ABC 0003, 0008, 0014
Americast 0899
Archer 0797
Bell & Howell 0014
Bell South 0899
Director 0476
Emerson 0797
Gemini 0797
General Instrument 0476, 0810
GoldStar 0144
Goodmind 0797
Jerrold 0476, 0003,0276, 0014, 0810
Memorex 0000
Motorola 0476, 1106, 0276,0810
Pace 0237
Panasonic 0000, 0107
Paragon 0000
Philips 0305,0317
Pioneer 0877, 0144, 0533,1877
Pulsar 0000
Quasar 0000
RadioShack 0303, 0797, 0883
Runco 0000
Samsung 0144
Scientific Atlanta 0877, 0008, 0477, 1877
Sony 1006
Starcom 0003
Stargate 0797
Supercable 0276
Torx 0003
Toshiba 0000
Viewmaster 0883
Zenith 0000, 0525, 0899
S
ETUPCODESFOR
CD P
LAYERS
(
CÓDIGOS DE CONFIGURACIÓN PARA
REPRODUCTORES DE CDS)
[CD]
Adcom 0155
Aiwa 0157
Audio Alchemy 0194
BSR 0194
Burmester 0420
California Audio Labs 0029
Carrera 0194
Carver 0157, 0179, 0437
DKK 0000
DMX Electronics 0157
Denon 0873
Emerson 0155, 0164, 0305
Fisher 0179, 0342
Garrard 0280, 0420
Genexxa 0032, 0164, 0305
Harman/Kardon 0157, 0173, 0426
Hitachi 0032, 0155
JVC 0072
Kenwood 0681, 0826, 0626, 0028,0037, 0190
Krell 0157
LXI 0305
Linn 0157
continued on next page...
(continúa en la siguiente página...)
(Códigos Del Fabricante) Manufacturer’s Codes 85
USER’S GUIDE (GUÍA DEL USUARIO)
Page 85

MANUFACTURER’S CODES
(CÓDIGOS DEL FABRICANTE)
S
ETUPCODESFOR
CD P
LAYERS
,
C
ONTINUED
(
CÓDIGOS DE CONFIGURACIÓN PARA
REPRODUCTORES DE CDS, CONTINUACIÓN)
[CD]
MCS 0029
MTC 0420
Magnavox 0157, 0305
Marantz 0626, 0029, 0157,0180
Miro 0000
Mission 0157
NSM 0157
Nikko 0164
Onkyo 0868
Optimus 1063, 0000, 0032,0037, 0145, 0175,
0179, 0194, 0196,0280, 0305, 0342,
0420, 0426, 0437,0468, 0536, 0671,
0775, 0850, 1075
Panasonic 0029
Parasound 0194, 0420
Philips 0626,0157
Pioneer 1063, 1062, 0032,0305, 0468
Polk Audio 0157
Proton 0157
QED 0157
Quasar 0029
RCA 1062, 0032, 0053,0155, 0179,0305,
0468
RadioShack 1083
Realistic 0155, 0164, 0175, 0179,0180, 0420
Rotel 0157, 0420
SAE 0157
Sansui 0157, 0305
Sanyo 0179
Scott 0155, 0164, 0305
Sears 0305
Sharp 0861, 0037, 0180
Sherwood 1067, 0180, 0196,0426
Sonic Frontiers 0157
Sony 0490, 0000
Soundesign 0145
Staron 0398
Tascam 0420
Teac 0180, 0420
Technics 0029
Vector Research 0194
Victor 0072
Wards 0157, 0053, 0559
Yamaha 0888, 0036
S
ETUPCODESFOR
DAT D
ECKS
(C
ÓDIGOSDECONFIGURACIÓNPARA
R
EPRODUCTORES
DAT)
[DAT]
Carver 0158
Harman/Kardon 0158
Magnavox 0158
Marantz 0158
Philips 0158
S
ETUPCODESFOR
DVD P
LAYERS
(C
ÓDIGOSDECONFIGURACIÓNPARA
R
EPRODUCTORES
DVD)
[DVD]
Apex 0672, 0755
Apex Digital 0717
Blue Parade 0571
Denon 0490
Emerson 0591
Enterprise 0591
Fisher 0670
GE 0522, 0717, 0815
Go Video 0715,0783
Gradiente 0651
Greenhill 0717
Hitachi 0573, 0664
Hiteker 0672
InterAct 0697
JVC 0558,0623
Kenwood 0534, 0682, 0737
KLH 0717
Konka 0711, 0719, 0720,0721
Magnavox 0503, 0675
Marantz 0539
Microsoft 0522
Mitsubishi 0521
Onkyo 0503
Oritron 0651
Panasonic 0490, 0632,0677
Pelican Accessories 0731
Philips 0503,0539
Pioneer 0525, 0571, 0632
Proscan 0522
RCA 0522, 0571, 0717,0822, 1022
Saitek 0731
Samsung 0573
Sanyo 0670
Sharp 0630
Sony 0533, 0772
Technics 0490
Theta Digital 0571
Thrustmaster 0498
86 Manufacturer’s Codes (Códigos Del Fabricante)
8-IN-ONE REMOTE
Page 86

S
ETUPCODESFOR
DVD P
LAYERS
,
C
ONTINUED
(C
ÓDIGOSDECONFIGURACIÓNPARA
R
EPRODUCTORES
DVD, C
ONTINUACIÓN
)
[DVD]
Toshiba 0503
Urban Concepts 0503
Yamaha 0490, 0545
Zenith 0503, 0591
S
ETUPCODESFORHOMEAUTOMATION
(
CÓDIGOS DE CONFIGURACIÓN PARA LA
AUTOMATIZACIÓN DEL HOGAR
)
[HOME]
GE 0240
One For All 0167
RadioShack 0240
Security System 0167
Universal X10 0167
X10 0167
SETUP CODES FOR HOME-THEATER-IN-A-BOX
D
EVICES
(C
ÓDIGOSDECONFIGURACIÓNPARA
D
ISPOSITIVOSHOME-THEATER-IN
-A-BOX)
[RCVR]
Alco 1390
Audiovox 1390
Kenwood 1313
KLH 1390
Marantz 1089, 1189
Philips 1269
Pioneer 1023
RCA 1609, 1390
Sony 1258
Venturer 1390
S
ETUPCODESFOR
LD P
LAYERS
(
CÓDIGOS DE CONFIGURACIÓN PARA
REPRODUCTORES LD
)
[LDP]
Aiwa 0203
Denon 0059
Funai 0203
Mitsubishi 0059
NAD 0059
Optimus 0059
Pioneer 0059
Realistic 0203
S
ETUPCODESFORSATELLITERECEIVERS
(
CÓDIGOS DE CONFIGURACIÓN PARA
RECEPTORES DE SATÉLITE
)
[SAT]
AlphaStar 0772
Chaparral 0216
Echostar 1005, 0775
Expressvu 0775
GE 0566
GOI 0775
General Instrument 0869
HTS 0775
Hitachi 0819
Hughes Network Systems 1142, 0749, 1749
JVC 0775
Magnavox 0724, 0722
Memorex 0724
Mitsubishi 0749
Motorola 0869
Next Level 0869
Panasonic 0247, 0701
Paysat 0724
Philips 1142, 0749,0724, 1076, 0722
Proscan 0392
RCA 0392, 0566, 0855,0143
RadioShack 0869
Realistic 0052
Samsung 1109
Sony 0639
Star Choice 0869
Toshiba 0749, 0790
Uniden 0724, 0722,0052
Zenith 0856
S
ETUPCODESFORTVS
(C
ÓDIGOSDECONFIGURACIÓNPARA
T
ELEVISORES
)
[TV]
A-Mark 0003
AOC 0030, 0019, 0003
Abex 0032
Admiral 0093, 0463
Aiko 0092
Aiwa 0701
Akai 0030
Alaron 0179
America Action 0180
Ampro 0751
Anam 0180
Archer 0003
continued on next page...
(continúa en la siguiente página...)
Manufacturer’s Codes (Códigos Del Fabricante) 87
USER’S GUIDE (GUÍA DEL USUARIO)
Page 87

MANUFACTURER’S CODES
(CÓDIGOS DEL FABRICANTE)
S
ETUPCODESFORTVS
, C
ONTINUED
(C
ÓDIGOSDECONFIGURACIÓNPARA
T
ELEVISORES
, C
ONTINUACIÓN
)
[TV]
Audiovox 0451, 0180, 0003,0092, 0623
Baysonic 0180
Belcor 0019
Bell & Howell 0154, 0016
Bradford 0180
Brockwood 0019
Broksonic 0236, 0463, 0003
CXC 0180
Candle 0030, 0056
Carnivale 0030
Carver 0054
Celebrity 0000
Cineral 0451, 0092
Citizen 0060, 0030,0056, 0039, 0092
Concerto 0056
Contec 0180
Craig 0180
Crosley 0054
Crown 0180, 0039
Curtis Mathes 0047, 0054, 0154,0051, 0451,0093,
0060, 0030, 0145,0056, 0016, 0039,
0166, 0466, 0747,1147, 1347
Daewoo 0451, 0019, 0039, 0092,0623, 0624
Daytron 0019
Denon 0145
Dumont 0017, 0019
Dwin 0720,0774
Electroband 0000
Electrohome 0409
Emerson 0154, 0236, 0463,0180, 0178, 0019,
0179, 0039, 0623,0624
Envision 0030
Fisher 0154
Fujitsu 0179,0683
Funai 0180, 0179, 0171
Futuretech 0180
GE 0047, 0051, 0451, 0093,0178, 0021,
0747, 1147, 1347
Gibralter 0017, 0030, 0019
GoldStar 0030, 0178, 0019, 0056, 0032,0409
Gradiente 0053, 0056
Grunpy 0180, 0179
Hallmark 0178
Harley Davidson 0179
Harman/Kardon 0054
Harvard 0180
Havermy 0093
Hitachi 0145, 0056, 0016,0032, 0409
Infinity 0054
Inteq 0017
JBL 0054
JCB 0000
JVC 0053
KEC 0180
KTV 0180, 0030, 0039
Kenwood 0030, 0019
Konka 0628, 0632, 0638,0703, 0707
LG 0056
LXI 0047, 0054,0154, 0156,0178, 0747
Logik 0016
Luxman 0056
MGA 0150, 0030, 0178,0019
MTC 0060, 0030,0019, 0056
Magnavox 0054, 0030, 0179,1254
Majestic 0016
Marantz 0054, 0030
Matsushita 0250
Megatron 0178, 0145,0003
Memorex 0154, 0250, 0463,0150, 0178,0179,
0056, 0016
Midland 0047, 0017, 0051,0039, 0032, 0747
Minutz 0021
Mitsubishi 0093, 0150, 0178, 0019
Motorola 0093
Multitech 0180
NAD 0156, 0178,0166
NEC 0030, 0019, 0056
NTC 0092
Nikko 0030, 0178, 0092
Onwa 0180
Optimus 0154, 0250, 0166
Optonica 0093, 0165
Orion 0236, 0463, 0179
Panasonic 0250, 0051
Penney 0047, 0156, 0051,0060, 0030, 0178,
0021, 0019, 0056,0039, 0003, 0032,
0747, 1347
Philco 0054, 0463, 0030,0145, 0019
Philips 0054
Pilot 0030, 0019, 0039
Pioneer 0166, 0679
Portland 0019, 0039, 0092
Princeton 0717
Prism 0051
Proscan 0047, 0747
Proton 0178, 0003, 0466
Pulsar 0017, 0019
Quasar 0250, 0051, 0165
RCA 0047, 0051, 0093,0019, 0090,0679,
0747, 1047, 1147,1247, 1347, 1447
RadioShack 0047, 0154, 0165,0180, 0030,0178,
0019, 0056, 0039,0032, 0409, 0747
88 Manufacturer’s Codes (Códigos Del Fabricante)
8-IN-ONE REMOTE
Page 88

S
ETUPCODESFORTVS
, C
ONTINUED
(C
ÓDIGOSDECONFIGURACIÓNPARA
T
ELEVISORES
, C
ONTINUACIÓN
)
[TV]
Realistic 0154, 0165, 0180, 0030,0178, 0019,
0056, 0039, 0032
Runco 0017, 0030, 0603
SSS 0180, 0019
Sampo 0030, 0039, 0032
Samsung 0060,0030, 0178, 0019, 0056, 0032
Samsux 0039
Sansei 0451
Sansui 0463
Sanyo 0154
Scimitsu 0019
Scotch 0178
Scott 0236, 0180, 0178, 0019, 0179
Sears 0047, 0054, 0154, 0156, 0178, 0179,
0056, 0171, 0747
Semivox 0180
Semp 0156
Sharp 0093, 0165, 0039,0688, 0689
Shogun 0019
Signature 0016
Sony 0000
Soundesign 0180, 0178, 0179
Spectricon 0003
Squareview 0171
Starlite 0180
Supreme 0000
Sylvania 0054, 0030
Symphonic 0180, 0171
TMK 0178, 0056
TNCi 0017
Tandy 0093
Tatung 0003
Technics 0250, 0051
Technol Ace 0179
Techwood 0051, 0056, 0003
Teknika 0054, 0180, 0150, 0060,0019, 0179,
0056, 0016, 0039,0092
Telefunken 0056
Toshiba 0154, 0156, 0060, 1256
Totevision 0039
Vector Research 0030
Victor 0053
Vidikron 0054
Vidtech 0178,0019
Wards 0054, 0165, 0030, 0178, 0021,0019,
0179, 0056, 0016
Waycon 0156
White Westinghouse 0463, 0623, 0624
Yamaha 0030, 0019
Zenith 0017, 0463, 0016,0092, 0624
Zonda 0003
S
ETUPCODESFOR
TV/VCR C
OMBOS
(C
ÓDIGOSDECONFIGURACIÓNPARA
A
PARATOSCOMBINADOS
T
ELEVISOR/VIDEOGRABADORA
)
[VCR]
Broksonic 0002, 1479
Citizen 1278
Colt 0072
Curthis Mathes 1035
Daewoo 1278
Emerson 0002, 1278, 1479
Funai 0000
GE 0807, 1035, 1060, 0240
Goldstar 1237
Harley Davidson 0000
Hitachi 0000
Lloyd’s 0000
MGA 0240
Magnasonic 0593, 1278
Magnavox 1781, 0000
Magnin 0240
Memorex 1162, 1237, 1262, 1037
Mitsubishi 0807
Optimus 0593, 1162, 1262
Orion 0002, 1479
Panasonic 1035, 1162,1262, 1362
Penney 1035, 1237, 0240
Proscan 1060
Quasar 1035, 1162
RCA 0807, 1035, 1060,0240
RadioShack 1037
Sansui 0000, 1479
Sanyo 0240
Sears 1237, 0000
Sharp 0807
Sony 0000, 1232
Sylvania 1781
Symphonic 0000, 0593
Thomas 0000
White Westinghouse 1278
Zenith 0000, 1479
S
ETUPCODESFOR
VCR
S
(C
ÓDIGOSDECONFIGURACIÓNPARA
V
IDEOGRABADORAS
)
[VCR]
Admiral 0048, 0209
Adventura 0000
Aiko 0278
Aiwa 0037, 0000, 0307
continued on next page...
(continúa en la siguiente página...)
Manufacturer’s Codes (Códigos Del Fabricante) 89
USER’S GUIDE (GUÍA DEL USUARIO)
Page 89
MANUFACTURER’S CODES
(CÓDIGOS DEL FABRICANTE)
S
ETUPCODESFOR
VCRS, C
ONTINUED
(C
ÓDIGOSDECONFIGURACIÓNPARA
V
IDEOGRABADORAS
, C
ONTINUACIÓN
)
[VCR]
Akai 0041
America Action 0278
American High 0035
Asha 0240
Audiovox 0037
Beaumark 0240
Bell & Howell 0104
Broksonic 0184, 0121, 0209, 0002,0479
CCE 0072, 0278
Calix 0037
Canon 0035
Carver 0081
Cineral 0278
Citizen 0037, 0278
Colt 0072
Craig 0037, 0047,0240, 0072
Curtis Mathes 0060, 0035, 0162,0041, 0760
Cybernex 0240
Daewoo 0045, 0278
Denon 0042
Dynatech 0000
Electrohome 0037
Electrophonic 0037
Emerex 0032
Emerson 0037, 0184, 0000,0121, 0043, 0209,
0002, 0278, 0479
Fisher 0047, 0104, 0066
Fuji 0035,0033
Funai 0000
GE 0060, 0035, 0048, 0240,0202, 0760
Garrard 0000
Go Video 0432
GoldStar 0037, 0038, 0480
Gradiente 0000
HI-Q 0047
Harley Davidson 0000
Harman/Kardon 0081, 0038
Harwood 0072
Headquarter 0046
Hitachi 0000, 0042, 0041
Hughes Network Sys. 0042
JVC 0067,0041
Jensen 0041
KEC 0037, 0278
KLH 0072
Kenwood 0067, 0041, 0038
Kodak 0035, 0037
LXI 0037
Lloyd’s 0000
Logik 0072
MEI 0035
MGA 0240, 0043
MGN Technology 0240
MTC 0240, 0000
Magnasonic 0278, 0593
Magnavox 0035, 0039, 0081,0000, 0149, 0563
Magnin 0240
Marantz 0035, 0081
Marta 0037
Matsushita 0035, 0162, 0454
Memorex 0035, 0162, 0037,0048, 0039,0047,
0240, 0000, 0104,0209, 0046, 0268,
0299, 0307, 0454,0479, 1037, 1162,
1262
Minolta 0042
Mitsubishi 0048, 0067, 0043
Motorola 0035, 0048
Multitech 0000, 0072
NAD 0058
NEC 0104, 0067, 0041, 0038
Nikko 0037
Noblex 0240
Olympus 0035
Optimus 1062, 0162, 0037,0048, 0104, 0058,
0454, 0432, 0568,0593, 0619, 1048,
1162, 1262
Optonica 0062
Orion 0184, 0209, 0002,0479
Panasonic 1062, 0035,0162, 0225,0454, 0616,
1162, 1262, 1362
Penney 0035, 0037, 0240,0042, 0038
Pentax 0042
Philco 0035, 0209, 0479
Philips 0035, 0081, 0062, 0618,1081, 1181
Pilot 0037
Pioneer 0067, 0058
Polk Audio 0081
Profitronic 0240
Proscan 0060, 0202, 0760
Protec 0072
Pulsar 0039
Quarter 0046
Quartz 0046
Quasar 0035, 0162, 0454,1162
RCA 0060, 0035, 0048,0240, 0042,0149,
0058, 0202, 0619,0760
RadioShack 0000, 1037
Radix 0037
Randex 0037
Realistic 0035, 0037, 0048, 0047,0000, 0104,
0062, 0046, 0066
ReplayTV 0614, 0616
Runco 0039
90 Manufacturer’s Codes (Códigos Del Fabricante)
8-IN-ONE REMOTE
Page 90

S
ETUPCODESFOR
VCRS, C
ONTINUED
(C
ÓDIGOSDECONFIGURACIÓNPARA
V
IDEOGRABADORAS
, C
ONTINUACIÓN
)
[VCR]
STS 0042
Samsung 0240,0045
Sanky 0048, 0039
Sansui 0000, 0067, 0209, 0041, 0479
Sanyo 0047, 0240, 0104, 0046, 0268
Scott 0184, 0045, 0121, 0043
Sears 0035, 0037,0047, 0000,0042, 0104,
0046, 0066
Semp 0045
Sharp 0048, 0062
Shintom 0072
Shogun 0240
Singer 0072
Sony 0035, 0032,0000, 0033,0636, 1032
Sylvania 0035, 0081, 0000,0043
Symphonic 0000, 0593
TMK 0240
Tatung 0041
Teac 0000, 0041
Technics 0035, 0162
Teknika 0035, 0037, 0000
Thomas 0000
Tivo 0618, 0636
Toshiba 0045, 0043, 0066
Totevision 0037, 0240
Unitech 0240
Vector 0045
Vector Research 0038
Video Concepts 0045
Videomagic 0037
Videosonic 0240
Villain 0000
Wards 0060, 0035, 0048, 0047, 0081,0240,
0000, 0042, 0072,0149, 0062, 0760
White Westinghouse 0209, 0072, 0278
XR-1000 0035, 0000,0072
Yamaha 0038
Zenith 0039, 0000, 0209,0033, 0479
S
ETUPCODESFORVIDEOACCESSORIES
(
CÓDIGOS DE CONFIGURACIÓN PARA
ACCESORIOS DE VÍDEO)
[VIDEO]
Archer 0160
Bantor 0160
GC Electronics 0160
Jebsee 0160
Panasonic 1120
Princeton 0113, 0295
RadioShack 0160
Samsung 1190
Sensory Science 1126
Manufacturer’s Codes (Códigos Del Fabricante) 91
USER’S GUIDE (GUÍA DEL USUARIO)
 Loading...