

Page 1
www.radioshack.com
OWNER’S MANUAL —
Please read before using this equipment.
SM
Thank you for purchasing a RadioShack Adjustable
View Caller ID Box. Your Caller I D Box stores and
displays up to 64 multiple (name and number) or 99
single (number-only) Caller ID records. It displays the
caller’s telephone number (and name, if available in
your area) and the current date and time, as provided
by your local phone company to CallerID service
subscribers.
Where Caller ID is offered, one or more of the following
options are generally available:
• caller’s number only
• caller’s name only
• caller’s name and number
The actual number of Caller ID records your Caller ID box
stores depends on the Caller ID information sent by thephone
company. If your phone company sends name-and-number
records, your Caller ID box stores up to 64 records. If your
phone company sends number-only records, your Caller ID
boxstoresupto99records.
!
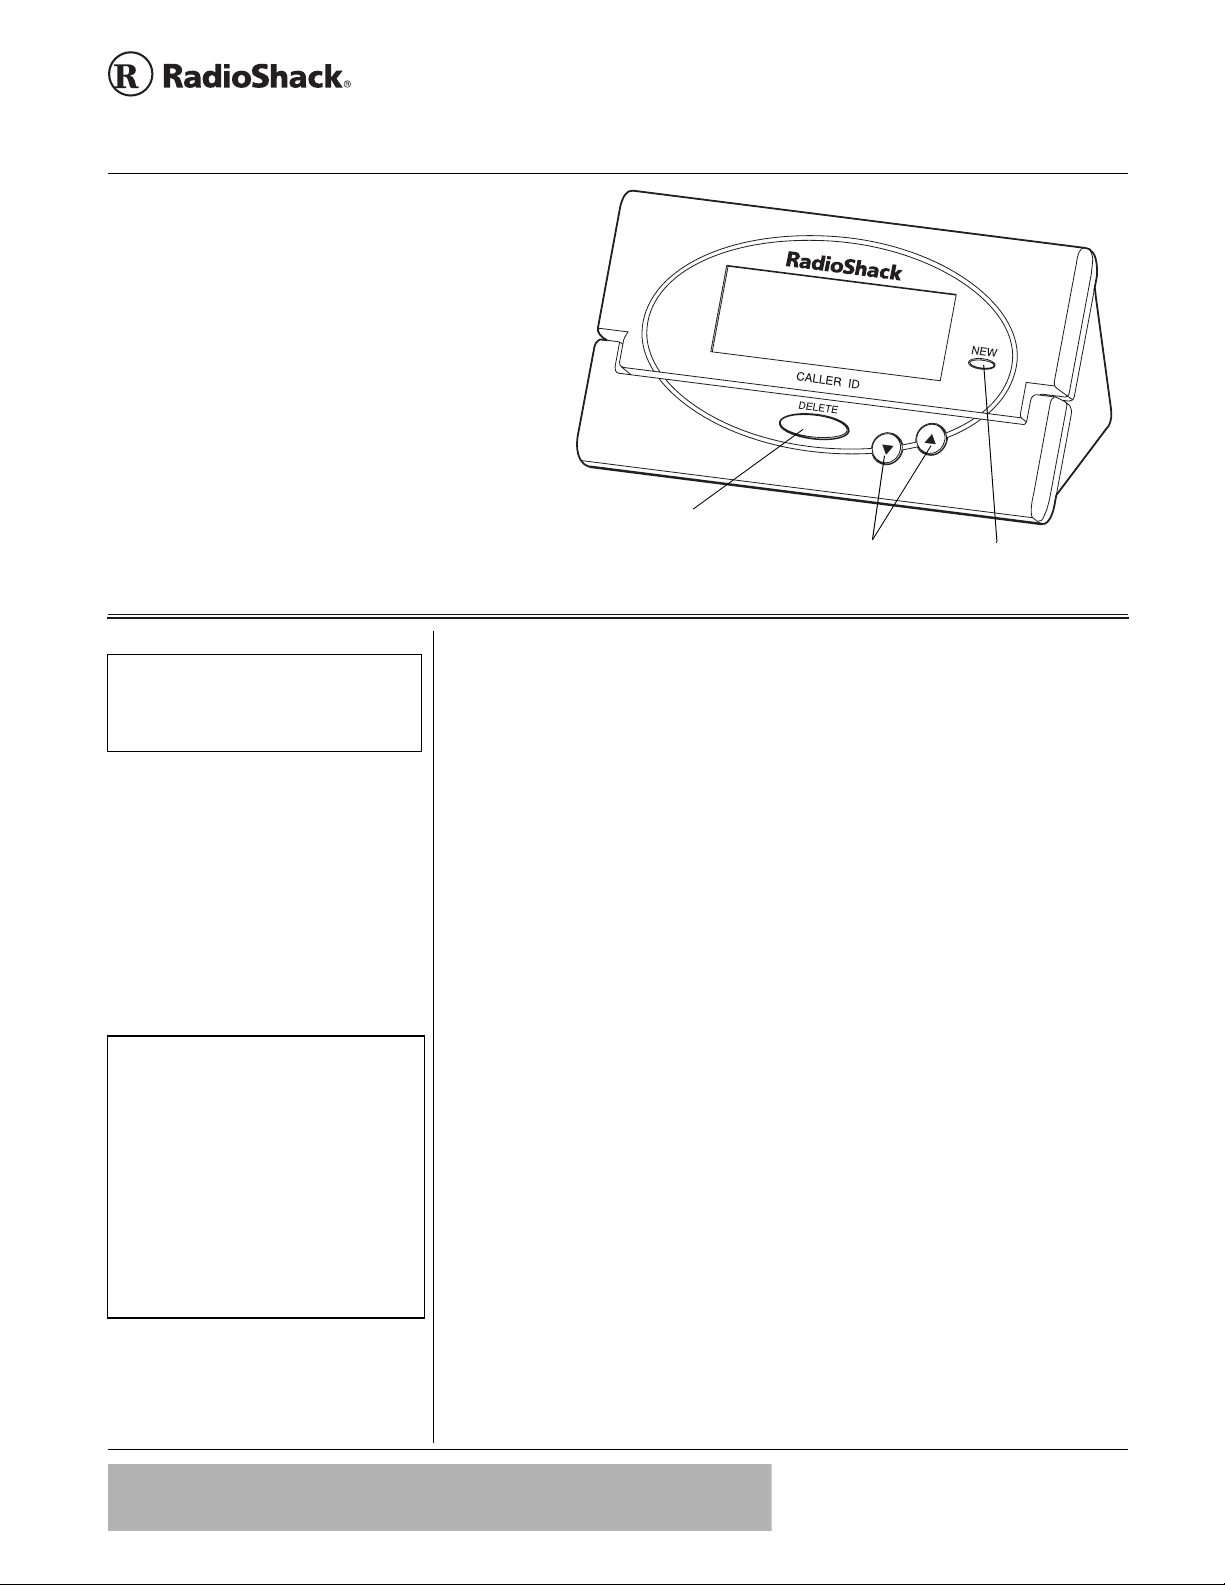
Adjustable View Caller ID Box
Press to delete Caller ID
records, or confirm
programmed information.
Press to scroll through
Caller ID records and
program the Caller ID box.
43-3902
NEW
Call Light
IMPORTANT
!
To use this Caller ID box , you must be in an
area where Caller ID service is available, and
you must subscribe to the service.
!
Ô BATTERY NOTES Ô
• Dispose of dead batteries promptly and
properly.
• Do not burn or bury batteries.
• Use only fresh batteries of the required size
and recommended type.
• Do not mix old and new batteries, different
types of batteries (standard, alkaline, or
rechargeable), o r rechargeable batteries of
different capacities.
• When you replace the batteries, donot press
any buttons on th e Caller ID box after you
remove the old batteries. Doing so could
erase all stored inform ation.
CALLER ID BOX SETUP
Caller ID is a service provided by your
telephone company. When you subscribe to
this service, between the first and second
rings, the telephone company sends the
caller’s telephone number (and name, if
available) and the call’s date and time. The
Caller ID box receives and displays this
information for each call and updates the
display with the current date and time. Your
Caller ID box saves up to 99 call records,
then replaces the oldest call record with
each new one.
INSTALLING BATTERIES
You need three AAAbatteries (not supplied)
to power and protect the Caller ID box’s
memory during a power failure. Batteries are
available at your local RadioShack store or
online at www.radioshack.com.Ô
1. Use a flat-bladescrewdriver to lift the
compartment door on the bottom of the
Caller ID box.
2. Place three fresh AAA batteries (not
supplied) into the compartment as
indicated by the polarity symbols
(+ and –) marked inside.
3. Replace the battery cover and snap it
closed.
When $appears or the display dims,
replace the batteries.
CALLER ID BOX CONNECTION
Your Caller ID box is ETL listed to UL
standards and meets all applicable FCC
requirements.
Your Caller ID box connects directly to a
modular telephone line jack. If your
telephone wiring does not have a modular
jack,youcanupdatethewiringyourself
using jacks and adapters (available at your
local RadioShack store), or have the
telephone company update the wiring for
you. You must use compatible modular
jacks that are compliant with Part 68 of FCC
Rules and the requirements adopted by the
ACTA. The telephone cord and modular
plug provided is Part 68 compliant for
connecting to the telephone company
network.
The USOC number for both the single-line
and two-line jacks to be installed is RJ11C
(or RJ11W for a wall plate jack).
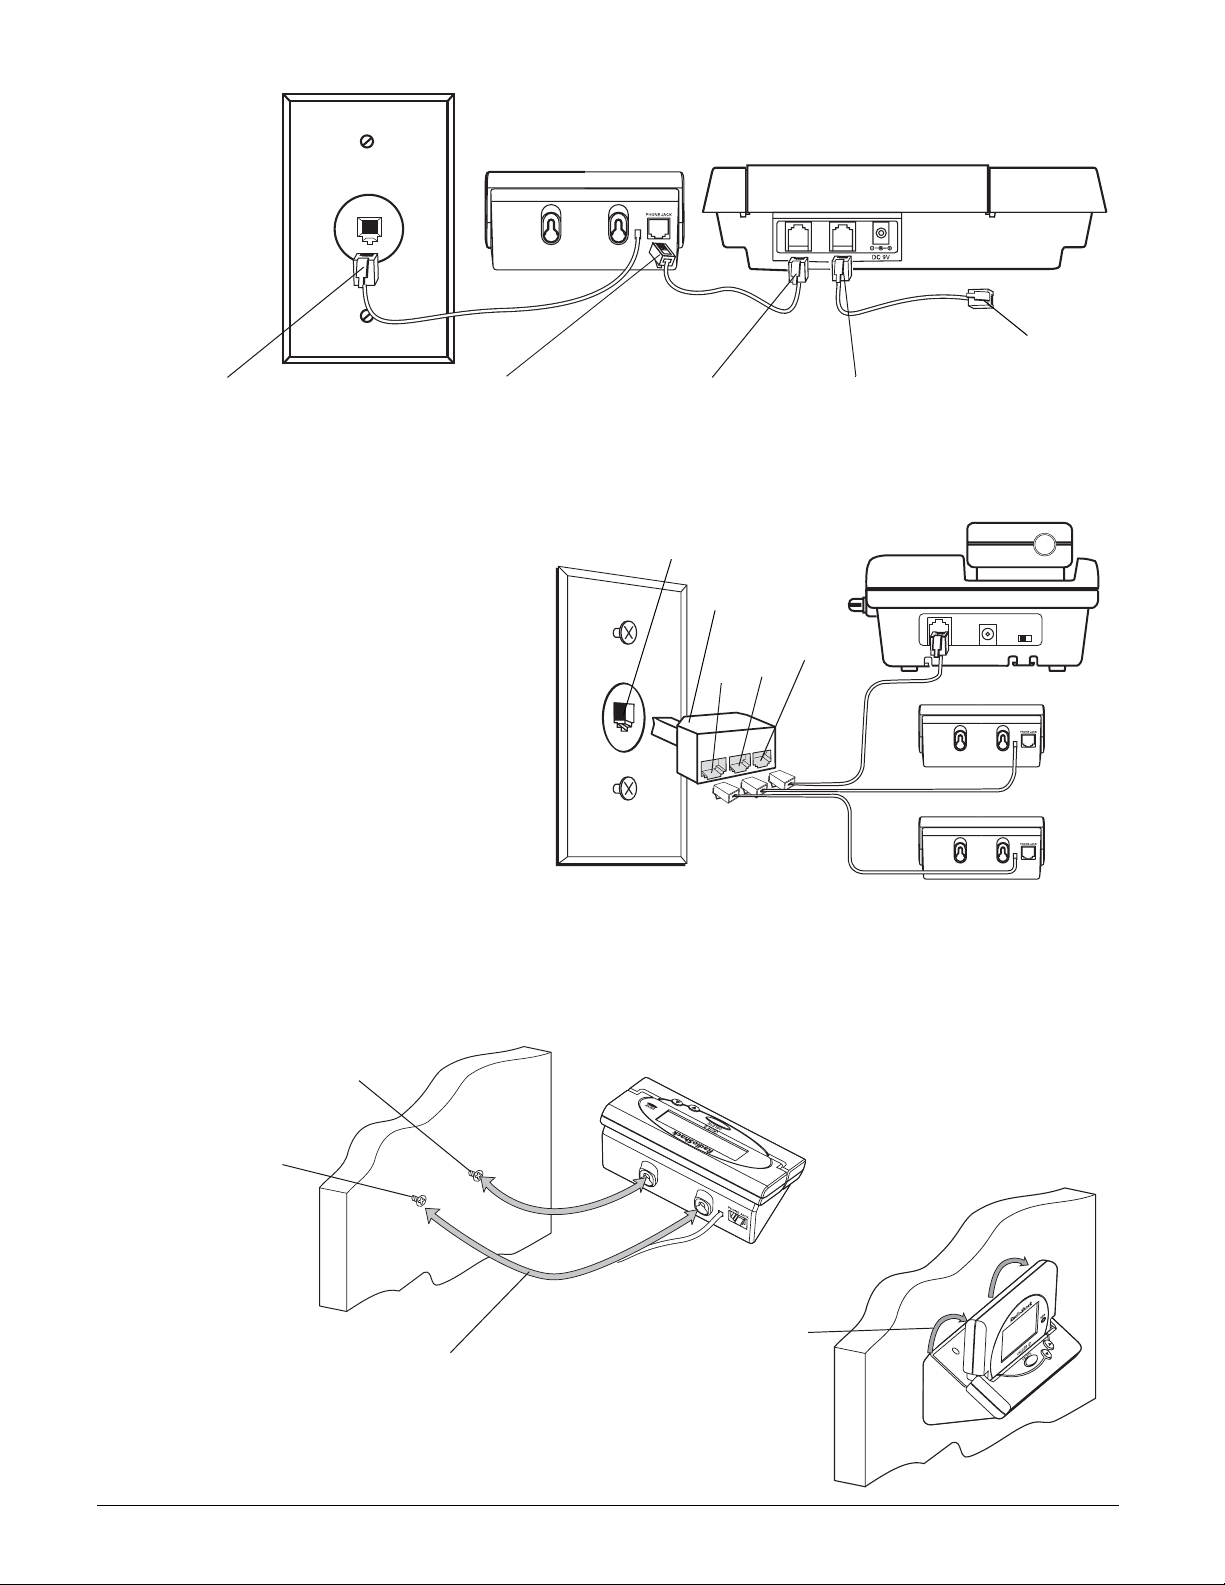
Connecting to a Single-Line
Phone
1. Disconnect the telephone line cord from
the modular phone jack on the wall and
plug it into the PHONE JACK on the
back of the Caller ID box.
2. Plug the Caller ID box’s pre-wired
telephone line cord into the modular
phone jack on the wall.
IMPORTANT
If an icon appears at the end of a paragraph, go to the box on that page with
!
the corresponding icon for pertinent information.
!
— Important
!
Ô —Note
© 2002 RadioShack Corporation.
RadioShackandRadioShack.comare trademarksused by
All Rights Reserved.
RadioShack Corporation.
Page 2
Connecting to an Answering Machine
Be sure to set your
answering machine
to answer after two
or more rings, so the
Caller ID box has
time to record the
call information.
To Telephone
1. Plug the Caller ID box’s prewired telephone line cord
into the modular wall jack.
2. Plug one end of
another modular
cord (not supplied)
into the Caller ID
3. Plug the line cord’s
other end into the
answeringmachine’s
line jack.
box’s PHONE JACK.
Connecting to a Two-Line Phone
To record information about calls received on a two-line
phone, you can connect two Caller ID boxes using a triplex
adapter (not supplied, available at RadioShack). Each Caller
ID box only records information about calls received on the
line to which it is connected.
Your modular phone jack must be an RJ14 jack wired for
two phone lines.
1. Disconnect the telephone line cord from the modular
phone jack on the wall, and plug it into the
L1 + L2 jack
on the triplex adapter.
2. Plug the triplex adapter into the modular phone jack.
3. Plug the pre-wired telephone line cord from your Caller
ID box into either
L1 or L2 on the triplex adapter.
4. Repeat Step 3 to connect another Caller ID box to the
other available jack (
L1 or L2) on the triplex adapter.
Modular Phone Jack
Triplex
Adapter
L2
L1
MOUNTING THE CALLER ID BOX
You can set the Caller ID box flat on a desk, shelf or table, or mount the Caller ID box on a wall.
4. Plug one end of a third
telephone line cord into the
answering machine’s phone
jack and the other end into the
phone’s modular jack.
L1 + L2
On a Wall
1. Drill two holes 1
(38mm) apart at the
mounting location.
2. Threadthe screws
(not supplied) into the
holes, letting the heads
extend about
(3mm) from the
mounting surface.
3. Connect the Caller ID
boxasdescribedin
“Caller ID Box
Connection” on Page 1.
2
1
/8 inch
1
/2 inches
4. Align the keyholeslots
on the mounting
bracket with the
screws and slide the
Caller ID box down
until it is secure.
5. Lift the Caller ID
box’s screen to
the desired angle.
Page 3

SETTING UP THE CALLER ID
Be sure to peel the film off the screen before
using your Caller ID box.
1. When the time appears, hold down
and at the same time until ENTER
LANGUAGE
ENG flashes.
2. Press
language. Press
CONTRAST
flashes.
3. Press
level (from 1 – 5). Press
confirm.
appears, and the first _ flashes.
4. Press
Press
5. Repeat Step 4 to set the second and
third digit.
6.
ENTER TIME DATE appears and the hour
digit flashes.
and then ENG ESP FRA appear.
or to select the desired
DELETE to confirm. LCD
and 1 2 3 4 5 appear, and 3
or to select the contrast
DELETE to
ENTER AREA CODE,and_ _ _
or toselecttheareacode.
DELETE to confirm the selection.
DELETING CALL RECORDS
Deleting a Single Record
1. Press or until you
see the record you want
to delete.
2. Press
Deleting All Records
1. After reviewing all new
2. While
To cancel deletion, do not press any
buttons. After about 20 seconds,
CALLS?
DELETE twice to
delete the record. The
remaining call records are
renumbered
automatically.
messages, press and
DELETE for about 3
hold
seconds.
appears.
ERASE ALL CALLS?
ERASE ALL CALLS? appears, press
DELETE again. – NO CALLS – appears.
ERASE ALL
disappears.
DELETE
7. Press
or to select the desired
hour. Press
DELETE to confirm.
AM appears for an AM hour and PM
appears for a PM hour.
8. Repeat Step 7 to set the minutes,
month and date. Ô
RECEIVING CALLS
During an incoming call, NEW appears and
the red New Call light flashes while the
phone is ringing. The number of new and
total calls appear. The red light flashes
slowly, until all calls are reviewed. Ô
• If only the caller’s phone number is
received, the caller’s phone number with
the call time and date appear.
• If an incorrect, invalid or incomplete signal
is received,
• If the name and number are unlisted,
–PRIVATE CALL–appears with the call time
and date.
• If the name and number are not available,
– UNAVAILABLE – appears with the call time
and date.
• For long distance calls,
appears.
– LINE ERROR – appears.
LONG DISTANCE
CARE
Keep the Caller ID box dry; if it gets wet,
wipe it dry immediately. Use and store the
Caller ID box only in normal temperature
environments. Handle the Caller ID box
carefully; do not drop it. Keep the Caller ID
box away from dust and dirt, and wipe it with
a damp cloth occasionally to keep it looking
new.
If your Caller ID box is not performing as it
should, take it to your local RadioShack
store for assistance. To locate your nearest
RadioShack, use the store locator feature on
RadioShack's website
(www.radioshack.com), or call 1-800-The
Shack (843-7422) and follow the menu
options.Modifyingor tampering with the
Caller ID box's internal components can
cause a malfunction and might invalidate its
warranty and void your FCC authorization to
operate it.
Ô NOTE Ô
Setting Up the Caller ID box
If no keys are pressed for 20 seconds, the
Caller ID box exits setup.
Receiving Calls
The red New Call indicator flashes until all the
new calls have been reviewed.
Reviewing Call Records
•IfRPT appears, you have multiple new calls
from the same number.
• If you receive a call from a number
previously stored in memory, the old record’s
data is replaced with the new call’s time and
date, and
NEW appears.
REVIEWING CALL RECORDS
Each call record includes the time and date
of the call, the call number (determined by
the order in which the calls are received),
the caller’s telephone number, and the
caller’s name (if available).
1. Press
2. Press
or to review the calls. Ô
Onceyouhaveviewedallthenewcalls,
END OF NEW CALL appears.
After you view all the saved calls,
OF LIST
appears.
END
or to view them again.
3
Page 4

Limited Ninety-Day Warranty
This product is warranted by RadioShack against
manufacturing defects in material and w orkmanship
under normal use for ninety (90) days from the date
of purchase from RadioShack company-owned
stores and authorized RadioShack franchisees and
dealers. EXCEPT AS PROVIDED HEREIN, RadioShack MAKES NO EXPRESS WARRANTIES
AND ANY IMPLIED WARRANTIES, INCLUDING
THOSE OF MERCHANTABILITY AND FITNESS
FOR A PARTICULAR PURPOSE,ARE LIMITED IN
DURATION TO THE DURATION OF THE WRITTEN LIMITED WARRANTIES CONTAINED
HEREIN. EXCEPT AS PROVIDED HEREIN, RadioShack SHALL HAVE NO LIABILITY OR RESPONSIBILITY TO CUSTOMER OR ANY OTHER
PERSON OR ENTITY WITH RESPECT TO ANY
LIABILITY, LOSS OR DAMAGE CAUSED DIRECTLY OR INDIRECTLY BY USE OR PERFORMANCE OF THE PRODUCT OR ARISING OUT
OF ANY BREACH OF THIS WARRANTY, INCLUDING, BUT NOT LIMITED TO, ANY DAMAGES RESULTING FROM INCONVENIENCE, LOSS OF
TIME, DATA, PROPERTY,REVENUE, OR PROFIT
OR ANY INDIRECT, SPECIAL, INCIDENTAL, OR
CONSEQUENTIAL DAMAGES, EVEN IF RadioShack HAS BEEN ADVISED OF THE POSSIBILITY OF SUCH DAMAGES.
Some states do not allow limitations on how long an
implied warranty lasts or the exclusion or limitation
of incidental or consequential damages, so the
above limitations or exclusions may not apply to
you.
In the event of a product defect during the warranty
period, take the product and the RadioShack sales
receipt as proof of purchase date to any RadioShack store. RadioShack will, at its option, unless otherwise provided by law: (a) correct the
defect by product repair without charge for parts
and labor; (b) replace the product w ith one of the
same or similar design; or (c) refund the purchase
price. All replaced parts and products,and products
on which a refund is made, become the property of
RadioShack. New or reconditioned parts and products may be used in the performance of warranty
service. Repaired or replaced parts and products
are warranted for the remainder of the original warranty period. You will be charged for repair or replacement of the product made after the expiration
of the warranty period.
This warranty does not cover: (a) damage or failure
caused by or attributable to acts of God, abuse, accident, misuse, improper or abnormal usage, failure
to follow instructions, improper installation or maintenance, alteration, lightning or other incidence of
excess voltageor current; (b) any repairs other than
those provided by a RadioShack Authorized Service Facility; (c) consumables such as fuses or batteries; (d) cosmetic damage; (e) transportation,
shipping or insurance costs; or (f) costs of product
removal, installation, set-up service adjustment or
reinstallation.
This warranty gives you specific legal rights, and
you may also have other rights which vary from
statetostate.
RadioShackCustomer Relations,200 TaylorStreet,
6th Floor, Fort Worth, TX 76102
12/99
THE FCC WANTS YOU
TO KNOW
This equipment has been tested and found
to comply with the limits for a Class B digital
device, pursuant to Part 15 of the FCC
Rules. These limits are designed to provide
reasonable protection against harmful
interference in a residential installation. This
equipment generates, uses, and can radiate
radio frequency energy and, if not installed
and used in accordance with the
instructions, maycause harmful interference
to radio communications.
However, there is no guarantee that
interference will not occur in a particular
installation. If this equipment does cause
harmful interference to radio or television
reception, which can be determined by
turning the equipment off and on, the user is
encouraged to try to correct the interference
by one or more of the following measures:
• Reorient or relocate the receiving
antenna.
• Increase the separation between the
equipment and receiver.
• Connect the equipment into an outlet on
a circuit different from that to which the
receiveris connected.
• Consult your local RadioShack store or
an experienced radio/TV technician for
help.
• If you cannot eliminate the interference,
the FCC requires that you stop using
your Caller ID box.
Changes or modifications not expressly
approved by RadioShack may cause
interference and void the user’s authority to
operate the equipment.
FCC STATEMENT
Your Caller ID box complies with Part 68 of
FCC Rules and the requirements adopted
by the ACTA. On the bottom of this product
is a label with this product’s FCC Product
Identification number in the format
US: AAOND01B433902. If requested, you
must provide this information to the
telephone company.
You must not connect your Caller ID box to:
• coin-operated systems
• most electronic key telephone systems
Your Caller ID box is not intended to be
used with party-line systems. Connection to
party line service is subject to state tariffs.
Contact the state public utility commission,
public service commission, or corporation
commission for information.
as a telephone or answering machine) that
you connect to the telephone line draws
power from the telephone line. We refer to
this power draw as the device's ringer
equivalence number, or REN on the bottom
of your Caller ID box.
If you use more than one phone or other
device on the line, add up all of the RENs. If
the total is more than five (three in rural
areas), your telephones might not ring. If
ringer operation is impaired, remove a
device from the line.
In the unlikely event that your phone causes
problems on the phone line, the phone
company can temporarily discontinue your
service. If this happens, the phone company
attempts to notify you inadvance. Ifadvance
notice is not practical, the phone company
notifies you as soon as possible and advises
you of your right to file a complaint with the
FCC.
Also, the phone company can make
changes to its lines, equipment, operations,
or procedures that could affect the operation
of this Caller ID box. The telephone
companynotifies you of these changes in
advance, so you can take the necessary
steps to prevent interruption of your
telephone service.
If your home has specially wired alarm
equipment connected to the telephone line,
be sure that installing the Caller ID box does
not disable your alarm equipment. If you
have questions about what will disable your
alarm equipment, contact your telephone
company or a qualified installer.
SURGE PROTECTION
Your Caller ID box has built-in protection
circuits to reduce the risk of damage from
surges in telephone line and power line
current. These protection circuits meet or
exceed the FCC requirements. However,
lightning striking the Caller ID box or power
lines can damage your Caller ID box.
Lightning damage is not common.
Nevertheless,ifyouliveinanareathathas
severe electrical storms, we suggest that
you unplug your phone when storms
approach to reduce the possibility of
damage.
RadioShack Corporation
Fort Worth, Texas 76102
We have designed your Caller ID box to
conformto federal regulations, and you can
connect it to most telephone lines. However,
each Caller ID box (and each device, such
43-3902
LIB964YY
12A02
Printed in China
 Loading...