

Page 1
$KI"$WVVQP"2JQPG
YKVJ"%CNNGT"+&
43-3901
%106'065
FCC Statement .......................... 2
Lightning ...................... ........... 3
Preparation ................................. 3
Installing Batteries ................... 3
Selecting a Location ................ 4
Mounting the Phone ................ 4
On a Desktop........................ 4
On a Wall Plate or Wall......... 4
Connecting the Handset ......... 5
Setting Up the Phone .............. 5
Setting the Ringer ................... 6
Setting the Dialing Mode ......... 6
Using Tone Services ............... 7
Operation ......... .......................... 7
Dialing a Call ........................... 7
Receiving a Call ...................... 7
Timer ............................ ........... 7
Adjusting the Handset
Volume .................................... 7
Using Mute .............................. 8
Using Flash ............................. 8
Using Redial ............................ 8
Using Pause ............................ 8
Storing a Number
in Memory ............................... 8
Copying a Number from the
Caller ID into Memory ............. 9
Dialing a Stored Number ......... 9
Caller Id Operation ..................... 9
Reviewing Call Records .......... 9
Call Back from Caller ID
Memory ................................. 10
Deleting Call Records ............ 11
Care ............................ ............. 12
Service and Repair ................... 12
OWNER’S MANUAL — Please read before using this equipment.
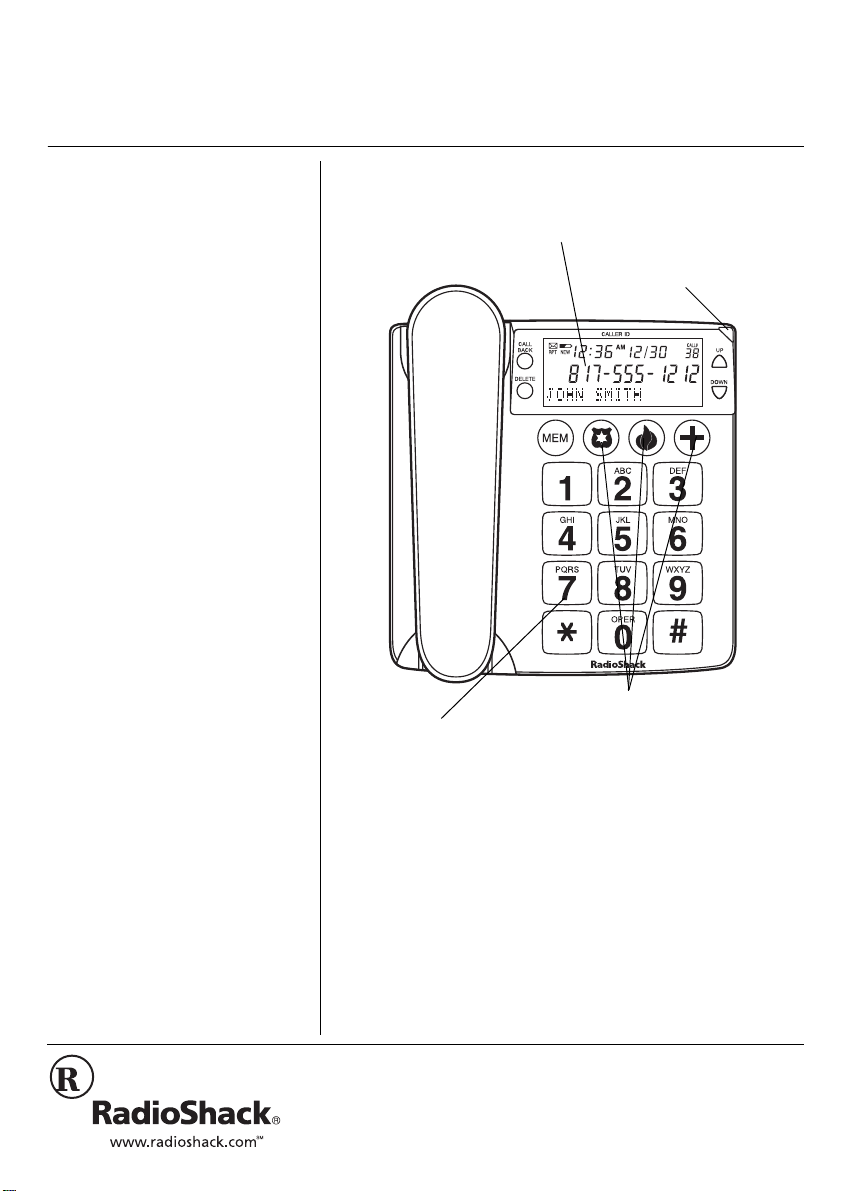
Large Liquid Crystal Display – Displays three lines of
information, including the time, the number you dialed, and
Caller ID information (see “Caller Id Operation” on Page 9).
New Call Indicator
Three Emergency Icons — Lets you
Big Button Keypad —
Provides easy button
recognition.
dial emergency service numbers with
the touch of a button (see “Storing a
Number in Memory” on Page 8 and
“Dialing a Stored Number” on Page 9).
Thank you for purchasing the RadioShack Big Button
Phone with Caller ID. Your phone offers the latest in
telephone technology, letting you store telephone numbers
in memory to make dialing frequently called numbers quick
and easy. It displays a caller’s phone number (and name, if
available in your area), the current date and time, and call
information as provided by your local phone company to
Caller ID and message waiting service subscribers. In
addition, the Caller ID memory stores and displays up to 64
incoming phone records.
2002 RadioShack Corporation.
©
RadioShack and RadioShack.com are trademarks
All Rights Reserved.
used by RadioShack Corporation.
Page 2

"+/2146#06"
#
If an icon appears at the end of a
paragraph, go to the box on that
page with the corresponding icon
for pertinent information.
— Warning # — Important
Rý
.... — Caution
±
— Note
#
(%%"56#6'/'06
This phone is Hearing Aid compatible.
Your phone compli es wi th Pa rt 68 of
upon request, provide the FCC registration number and the
REN to your telephone company. Both numbers are on the
bottom of the phone.
You must not connect your phone to:
• coin-operated systems
• party-line systems
• most electronic key telephone systems
We have designed your phone to conform to federal
regulations, and you can connect it to mo st tele phone lines.
However, each phone and each device, such as a
telephone or answering machine that you connect to the
telephone line draws power from the telephone line. We
refer to this power draw as the device's ringer equivalence
number, or REN on the bottom of your phone.
If you use more than one phone or other device on the line,
add up all of the RENs . If the tot al is more than fiv e (three i n
rural areas), your telephones might not ring. If ringer
operation is impaired, remove a device from the line.
FCC Rules
. You must,
In the unlikely event that your phone causes problems on
the phone line, the phone company can temporarily
discontinue your service. If this happens, the phone
company attempts to notify you in advance. If advance
notice is not practical, the phone company notifies you as
soon as possible and advises you of your right to file a
complaint with the FCC.
Also, the phone company can make changes to its lines,
equipment, operations, or procedures that could affect the
operation of this telepho ne. The telephone compan y notifi es
you of these changes in advance, so you can take the
necessary steps to prevent interruption of your telephone
service.
This equipment has been tested and found to comply with
the limits for a Class B digital device, pursuant to Part 15 of
FCC Rules
the
reasonable protection against harmful interference in a
residential inst al lat ion . T his equipment generates, us es a nd
can radiate radio frequency energy and, if not installed and
2
. These limits are designed to provide
Page 3

used in accordance with the instructions, may cause
harmful interference to radio communications.
However, there is no guarantee that interference will not
occur in a particular installation. If this equipment does
cause harmful interference to radio or television reception,
which can be determined by turning the equipment off and
on, the user is encouraged to try to correct the interference
by one or more of the following measures:
• Reorient or relocate the receiving antenna.
• Increase the separation between the equipment and
receiver.
Connect the equipment into an outlet on a circui t different
from that to which the receiver is connected.
.+)*60+0)
Your telephone has built-in protection circuits to reduce the
risk of damage fr om su rges i n telep hone l ine an d power line
current. These protection circuits meet or exceed the FCC
requirements. However, lightning striking the telephone or
power lines can damage your telephone.
Lightning damage is not common. Nevertheless, if you live
in an area that has severe electrical storms, we suggest that
you unplug your p hone when storm s approach to red uce the
possibility of damage.
24'2#4#6+10
+056#..+0)"$#66'4+'5
Your phone requires four AA batteries (not supplied) for
power. For the best performance and longest life, we
recommend RadioShack alkaline batteries.
1. Use a flat-blade screwdriver to lift the battery
compartment door.
2. Insert four AA batteries into the compartment as
indicated by the polarity symbols.
3. Snap the battery compartment door back into place.
When ùappears on the display or the display dims,
replace the batteries. During replacement of the batteries,
keep the phone line between the phone and wall outlet
....
.
"%#76+10"
• Use only fresh batteries of the
required size and
recommended type.
• If you do not plan to use the
phone for two weeks or longer,
remove the batteries. Batteries
can leak chemicals that can
destroy electronic parts.
.
3
Page 4

"9#40+0)
R
Dispose of old batteries promptly
and properly. Do not burn or bury
them.
"016'"±"
±
The USOC number of the jack to
be installed is RJ11C (or RJ 11W
for a wall plate jack).
ý
R
"
plugged in to maintain the Caller ID and speed dialing
memories.
If you do not replace the batteries promptly, your Caller ID
and telephone memory information may be lost.
Rý
5'.'%6+0)"#".1%#6+10
Select a location for your telephone that is:
• Near a telephone jack
• Not in the way of normal activities in the area
Your telephone connects directly to a modular telephone
line jack. If your telephone wiring does not have a modular
jack, you can update the wiring yourself using jacks and
adapters (available a t your loc al RadioSha ck store ), or have
the telephone compan y upda te the w iring for you. You mus t
use compatible modular jacks that are compliant with Part
68 of FCC Rules.
±
/1706+0)"6*'"2*10'
You can mount your telep hon e on a wal l pl ate, directly on a
wall, or place it on a shelf, desk or table.
1P"C"&GUMVQR
1. Plug one end of the supplie d long modul ar cord into the
LINE
jack at the back of the base.
2. Plug the cord’s other end into a modular phone line
jack.
3. Place the phone on a s hel f, desk, or table near en oug h
to the modular phon e li ne j ac k so that there is no strain
on the cord.
1P"C"9CNN"2NCVG"QT"9CNN
1. Press and lift out the handset holder. Rotate it 180°,
and snap it into plac e so it will h old the hand set in plac e
when the phone is mounted on the wall.
2. Insert the mounting bracket’s two tabs into the
matching slots opposite the keyhole slot on the
underside phone’s base. Then press down and slide
the bracket upward until the tabs snap into place.
3. Plug one end of the supplied short modular cord into
LINE
the
4
jack at the back of the base.
Page 5

4. Plug the cord’s other end into the wall plate jack, then
align the base’s keyhole slots with the wall plate studs
and slide the phone downward to secure it.
Wall Plate Studs
Mounting Bracket
To mount the phone directly on a wall, in addition to the
preceding steps, you need two screws (not supplied) with
heads that fit into the keyho le slo t on the bot tom of t he base.
1. Drill two holes 83mm apart (vertically). Then thread a
screw into each hole, letting the heads extend about
5mm from the wall.
2. Substitute the long modular cord for the short cord.
Keyhole Slots
%100'%6+0)"6*'"*#0&5'6
Plug one end of the supplied coiled cord into the handset’s
modular jack. Then connect it to the jack on the left side of
the telephone base.
±
5'66+0)"72"6*'"2*10'
1. Press and hold both UP and
;DJ;HýB7D=K7=;
seconds until
appear.
2. Press
press
are displayed.
3. Press UP or
++++
), press
UýUýU
UýUýU
and
UýUýUUýUýU
;DJ;HýB7D=K7=;
;DJ;HýB7D=K7=;;DJ;HýB7D=K7=;
;D=
;D=
flashes.
;D=;D=
UP
DOWN
or
DELETE
DELETE
appears. The first
to select the desired language,
to confirm.
))))
flashes.
DOWN
to select the contrast level (from
to confirm.
DOWN
for about four
;D=ý;IFý<H7
displays, then
B9:ý9EDJH7IJ
B9:ý9EDJH7IJ, '''', ((((, )))), ****
B9:ý9EDJH7IJB9:ý9EDJH7IJ
;DJ;Hý7H;7ý9E:;
;DJ;Hý7H;7ý9E:;
;DJ;Hý7H;7ý9E:;;DJ;Hý7H;7ý9E:;
UUUU
flashes.
;D=ý;IFý<H7
;D=ý;IFý<H7;D=ý;IFý<H7
,
and
''''
"016'"±"
±
Your local RadioShack store sells a
variety of longer coiled handset
cords, which are especially useful
when you mount the phone on a
wall.
++++
–
5
Page 6

4. Press UP or
code. Press
second
DOWN
DELETE
UUUU
flashes.
to select the first digit of the area
to confirm the selection. The
5. Repeat steps 1 through 4 to set the second and the
third digit. Once you have confirmed the third digit of
;DJ;HýJ?C;ý:7J;
the area code,
;DJ;HýJ?C;ý:7J;
;DJ;HýJ?C;ý:7J;;DJ;HýJ?C;ý:7J;
appears, and the hour
digit flashes.
6. Press
or
DOWN
to select the desired hour.
FC
FC
FCFC
UP
appears for a PM hour.
7. Press
DELETE
to confirm.
8. Repeat steps 6 and 7 to set the minutes, month and
date.
5'66+0)"6*'"4+0)'4
TONE/PULSE
HANDSET VOL — Receiver Volume
If you do not want to hear the phone ring, set
OFF
. You can still ma ke calls w ith the ri nger off, an d you ca n
RINGER VOLUME
RINGER
to
answer calls if you hear another phone on the same phone
line ring. The NEW CALL indicator flashes when the phone
rings, even when the ringer is off. If you want to hear the
phone ring, set
RINGER
to HI or LO.
5'66+0)"6*'"&+#.+0)"/1&'
Set the
type of service you ha ve. If you are not sure whi ch typ e yo u
have, do this simple test.
TONE/PULSE
switch on the side o f the ph one for th e
1. Set
TONE/PULSE
to
TONE
. Lift the handset and listen
for a dial tone.
0
2. Press any number except
. If your phone r equires that
you dial an access code (9, for example) before you
dial an outside number, do not press the access code
number either.
• If the dial tone stops, you have touch-tone service.
Leave the setting to
TONE
.
6
Page 7

• If the dial tone continues, you have pulse service. Set
TONE/PULSE
PULSE
to
.
75+0)"610'"5'48+%'5
Some computer services, such as alternate long distance
and bank-by-phone, require tone signals for
communication s. If you h ave p ulse ser vice, you can s till use
tone service.
1. Connect to the special service using pulse dialing.
2. When the special service answers, press
temporarily switch to tone dialing.
3. When you complete the call and hang up the handset,
the unit automatically returns to pulse service.
*
to
12'4#6+10
&+#.+0)"#"%#..
1. Pick up the handset and wait for a dial tone.
2. Press the keypad for the number you wish to dial. The
number dialed appears on the display.
When you complete your call, hang up the handset. After a
few seconds the number disappears, and the display
returns to normal.
4'%'+8+0)"#"%#..
When you receive a call, the phone rings and the NEW
97BBç
CALL indicator flashes.
number appears on the display (if you subscribe to a Caller
ID service from your phone company).±
To answer the call, pick up the handset.
97BBç
and the caller’s phone
97BBç97BBç
6+/'4
This unit is des igned wi th a clock -time r to c ount the o ff-hook
time in seconds, up to one hour. The timer appears in the
display and starts to count up when you dial any numbe r or
answer incoming calls.
±
±
"016'"±"
±
Dialing a Call
If you dial a number over 16 digits,
only the last 14 digits appear on the
display.
Receiving a Call
The NEW CALL indicator
continues to flash until you have
reviewed all calls.
Timer
• If you lift the handset and don’t
dial any number, the timer will
appear and start to count after
10 seconds.
• When the off-hook time extends
beyond an hour the timer counts
+/0+/
+/0+/
+/0+/+/0+/
, returns to
up to
continues counting.
&&0&&
&&0&&
&&0&&&&0&&
, and
#&,756+0)"6*'"*#0&5'6"81.7/'
To adjust the handset volume before or during a call, set
HANDSET VOL
to
NOR
or HI for a comfortable listening level.
7
Page 8

75+0)"/76'
To talk to someone on your end of the phone without the
MUTE
caller hearing your con versa tion, hol d down
MUTE
to resume your conversation.
. Release
75+0)"(.#5*
FLASH
performs the electronic equivalent of a switchhook
operation for special services, such as Call Waiting.
"016'"±"
±
Using Flash
If you do not have any special
phone services, pressing FLASH
might disconnect the current call.
Using Redial
The redial memory holds up to 32
digits, so you can redial long
distance as well as local phone
numbers.
For example, if you have Call Waiting, press
answer an incoming call without disconnecting the current
call. Press
FLASH
again to return to the first call.
FLASH
±
to
75+0)"4'&+#.
Pick up the handset, press
dial tone. The number scrolls across the display, and the
phone dials it.
±
REDIAL/PAUSE
when you hear a
75+0)"2#75'
In some telephone systems, you must dial an access code
(9, for example) and wait for a second dial tone before
dialing an outside number. When you manually dial a
number, or when you store a number in memory, you can
have your telephone pause anywhere during the dialing
sequence. Simply press
location.
When you redial or memory dial a number, the telephone
pauses for about 4 seconds at the pause entry. For longer
pauses, press
REDIAL/PAUSE
REDIAL/PAUSE
again.
at the desired
5614+0)"#"07/$'4"+0"/'/14;
The telephone can store up to 13 phone numbers in
memory (3 emergency numbers, and 10 standard memory
numbers).
1. Lift the handset.
2. Press
3. Enter the number to be stor ed. The number a ppears on
4. Press
5. Enter the desired memory location for the number. To
STORE
the display.
STORE
display
store the number in an emergency memory location,
IJEH;
IJEH;
,
appears on the display.
IJEH;IJEH;
IJEH;
again.
IJEH;
IJEH;IJEH;
and
C;Cý
C;Cý
appear on the
C;CýC;Cý
8
Page 9

press an emergency memory icon (see the illustration
on page 1). To store the number in a standard memory
location, press a number key (0-9).
%12;+0)"#"07/$'4"(41/"6*'"%#..'4"
+061"/'/14;
+&"
1. Lift the handset.
Up
DOWN
2. Press
or
until the desired number appears.
3. Press
4. Press a memory location (
STORE
display.
the number in standard memory, or press any one of
the three direct memory keys (emergency memory
icons) to store the number in that priority memory
location.
twice.
IJEH;
IJEH;
IJEH;IJEH;
C;C
C;C
and
0
to 9 on the keypad) to store
appear on the
C;CC;C
&+#.+0)"#"5614'&"07/$'4
1. Lift the handset.
2. To dial a number stored in an emergency memory
location, press that emergency icon. If you are dialing a
number stored in a standard memory location, press
MEM
, then press the desired memory key (0 – 9).
%#..'4"+&"12'4#6+10
If you subscribe to a Caller ID service, the phone
automatically displays information about calls you receive
and stores the information in Call ID memory. The system
can store up to 64 incoming phone numbers and incoming
names into call records.
During an incoming call, the phone company automatically
sends the correc t time betw een the first and se cond rings t o
update your system’s display (if you subscribe to Caller ID
service).
4'8+'9+0)"%#.."4'%14&5
Repeatedly press UP or
the new calls ha ve be en rev iew e d,
To review all the records from oldest to newest, repeatedly
UP
press
button.
DOWN
to review the new calls, once
;D:ýE<ýD;Mý97BB
;D:ýE<ýD;Mý97BB
;D:ýE<ýD;Mý97BB;D:ýE<ýD;Mý97BB
appears.
9
Page 10

To review the records from newest to oldest, repeatedly
DOWN
press
memory,
If an incorrect, invalid or incomplete Caller ID signal is
received, the displ ay sh ows
If the name and num be r are n ot available due to the ca ller’s
restriction, the display shows
If the name a nd numb er are not av ailable, the di splay shows
¶KD7L7?B78B;
¶KD7L7?B78B;
¶KD7L7?B78B;¶¶KD7L7?B78B;
HFJ
HFJ
appears with a number if you have received a call from
HFJHFJ
the same phone number more than once.
If you do not press a button within 20 seconds, the system
automatically returns to the normal display.
button. After you review all the records in
;D:ýE<ýB?IJ
;D:ýE<ýB?IJ
;D:ýE<ýB?IJ;D:ýE<ýB?IJ
.
appears.
B?D;ý;HHEH
B?D;ý;HHEH
B?D;ý;HHEHB?D;ý;HHEH
FH?L7J;ý97BB
FH?L7J;ý97BB
FH?L7J;ý97BBFH?L7J;ý97BB
.
.
%#.."$#%-"(41/"%#..'4"+&"/'/14;
Option 1
1. With the handset hung up on the base, press UP or
DOWN button to find the number to be dialed.
2. Press
3. Lift the handset. The number is dialed automatically.
Option 2
1. Lift the handset.
2. Press
3. Press
When the Caller’s Phone number has a different area code
from the preset area code, the initial digit 1 and the three
digit area code will be inserted automatically during Caller
ID memory call back.
1. Press
2. Press
When the Caller’s phone number has the same area code
as the preset, the initial digit 1 and the three digit area code
will be deleted during the Caller ID memory call back.
1. Press
CALL BACK
UP
or
CALL BACK
automatically.
CALL BACK
CALL BACK
number .
CALL BACK
DOWN
FFFF?9AýKFý97BB
twice.
twice. The number is dialed
. The 11-digit number will flash.
again to confirm and dial the 11-digit
. The seven-digit number flashes.
?9AýKFý97BB
?9AýKFý97BB?9AýKFý97BB
to find the number to be dialed.
appears.
10
Page 11

2. Press
CALL BACK
again to confirm and dial the seven-
digit number.
Your telephone company may require a different format for
making out-of area (toll) calls within your area code.
When your telephone company requires you to dial more
than a seven-digit number (same area code) to make toll
calls within your area code, or an 11-digit number (different
area code) use one of the 4 options below for Caller ID call
back.
Option 1
1 + Area Code + 7-digit number (11 digits)
Option 2
1+7-digit number (8 digits)
Option 3
Area Code + 7-digit number (10 digits)
Option 4
7-digit number
1. Press
or
to find the Caller ID memory to be
UP
DOWN
dialed.
2. Press
CALL BACK
. The 7-digit numbe r (if sa me as area
code) or 1 1 -digit nu mber (if di ffe rent area code ) flashes .
UP
3. Press
4. Press
DOWN
or
CALL BACK
to select one of the four options.
again to confirm.
5. Pick up the handset. The selected number is dialed.
&'.'6+0)"%#.."4'%14&5
You can select and del ete an individual call record, or del ete
all call records stored in the system.
To delete a single call record, press
call record you want to delete appears.
When the phone displays the call record, press
twice quickly. The phone deletes the call record, and
automatically renumbers the remaining call records.
±
UP
or
DOWN
until the
DELETE
"016'"±"
±
• When the phone’s memory is
full, it automatically replaces the
oldest call record with the
newest incoming call.
• If you do not press a button
within 15 seconds of when
ERASE ALL CALLS appears,
the phone returns to the normal
display.
11
Page 12

Limited One-Year Warranty
This product is warranted by RadioShack against
manufacturing defects in material and workmanship under n ormal use for one (1) y ear from th e
date of purchase from RadioShack companyowned stores and authorized RadioShack franchisees and dealers. EXCEPT AS PROVIDED
HEREIN, RadioShack MAKES NO EXPRESS
WARRANTIES AND ANY IMPLIED WARRANTIES, INCLUDING THOSE OF MERCHANTABILITY AND FITNESS FOR A PARTICULAR
PURPOSE, ARE LIMITED IN DURATION TO
THE DURATION OF THE WRITTEN LIMITED
WARRANTIES CONTAINED HEREIN. EXCEPT
AS PROVIDED HEREIN, RadioShack SHALL
HAVE NO LIABILITY OR RESPONSIBILITY TO
CUSTOMER OR ANY OTHER PERSON OR ENTITY WITH RESPECT TO ANY LIABILITY, LOSS
OR DAMAGE CAUSED DIRECTLY OR INDIRECTLY BY USE OR PERFORMANCE OF THE
PRODUCT OR ARISING OUT OF ANY BREACH
OF THIS WARRANTY, INCLUDING, BUT NO T
LIMITED TO, ANY DAMAGES RESULTING
FROM INCONVENIENCE, LOSS OF TIME,
DATA, PROPERTY, REVENUE, OR PROFIT OR
ANY INDIRECT, SPECIAL, INCIDENTAL, OR
CONSEQUENTIAL DAMAGES, EVEN IF RadioShack HAS BEEN ADVISED OF THE POSSIBILITY OF SUCH DAMAGES.
Some states do not allow limitations on how long
an implied wa rran ty las ts or the excl usio n or limi tation of incidental or consequential damages, so
the above limitations or exclusions may not apply
to you.
In the event of a product defect during the warranty period, take the product and the RadioShack sales receipt as proof of purchase date
to any RadioS hack store. R adioShack will, at its
option, unless otherwise provided by law: (a) correct the defect by product repair without charge
for parts and labor; (b) replace the product with
one of the s ame or simil ar design; o r (c) refund
the purchase price. All replaced parts and products, and pro duc ts o n w hic h a r e fund i s m ade , become the property of RadioShack. New or
reconditioned parts and products may be used in
the performance of warranty service. Repaired or
replaced parts and products are warranted for the
remainder of the original warranty period. You will
be charged for r epai r or re place men t of th e pro duct made after the expiration of the warranty period.
This warrant y do es no t co ver: ( a) d ama ge or fai lure caused by or attributable to acts of God,
abuse, accident, misuse, improper or abnormal
usage, failure to follow instructions, improper installation or maintenance, alteration, lightning or
other incidence of excess voltage or current; (b)
any repairs other than those provided by a RadioShack Authorized Service Facility; (c) consumables such as fuses or batteries; (d) cosmetic
damage; (e) transportation, shipping or insurance
costs; or (f) costs of product removal, installation,
set-up service adjustment or reinstallation.
This warranty gives you specific legal rights, and
you may also have other rights which vary from
state to state.
RadioShack Customer Relations, 200 Taylor
Street, 6th Floor, Fort Worth , TX 76 10 2
12/99
To delete all of the call records at once, at the normal
display, hold down
7BBý97BBI
7BBý97BBI
7BBý97BBI7BBý97BBI
Press
appears, then
appears.
DELETE
. The system deletes all call records.
JEJ7B0ý&&
JEJ7B0ý&&, D;Mý0ý&&ý
JEJ7B0ý&&JEJ7B0ý&&
DELETE
D;Mý0ý&&ý
D;Mý0ý&&ýD;Mý0ý&&ý
for about three seconds.
appears.
±
;H7I;ý
;H7I;ý
;H7I;ý;H7I;ý
DEý97BBI
DEý97BBI
DEý97BBIDEý97BBI
%#4'
Keep the phone dry; if it gets wet, wipe it dry immediately.
Use and store the phone only in normal temperature
environments. Handle the phone carefully; do not drop it.
Keep the phone away from dust and dirt, and wipe it with a
damp cloth occasionally to keep it looking new.
5'48+%'"#0&"4'2#+4
If your phone is not performing as it should, take it to your
local RadioShack store for assistance. Modifying or
tampering with the phone’s internal components can cause
a malfunction and might invalidate its warranty, and void
your FCC authorization to operate it.
RadioShack Corporati on
Fort Worth, Texas 76102
43-3901
LIB949YY
05A02
Printed in China
 Loading...