

43-3105
User’s Guide
Intercom System
Thank you for purchasing your Intercom System from
RadioShack. Please read this user’s guide before
installing, setting up, and using your new intercom
system.
Package contents
• Intercom System (3) • User’s Guide
• Quick Start
Features
• Three selectable channels allow you to communicate
with a specific intercom
• Lock button turns an intercom into a baby monitorLock button turns an intercom into a baby monitor
• Adjustable volume controlAdjustable volume control
• Call button sends a tone to alert other stations of anCall button sends a tone to alert other stations of an
incoming transmission
• can be mounted to a wallcan be mounted to a wall
• For indoor use onlyFor indoor use only
1 Setting up
Connect to Power
Plug each station into an outlet and place it directly on a
desk, shelf, table or on a wall.
wImportant: Stations can transmit up to 300 feet and
between buildings as long as they are connected to the
same power line transformer.
n Note: Make sure you install the stations at least 10Make sure you install the stations at least 10
feet away from each other. Placing the stations too close
together produces feedback and creates a squealing sound.
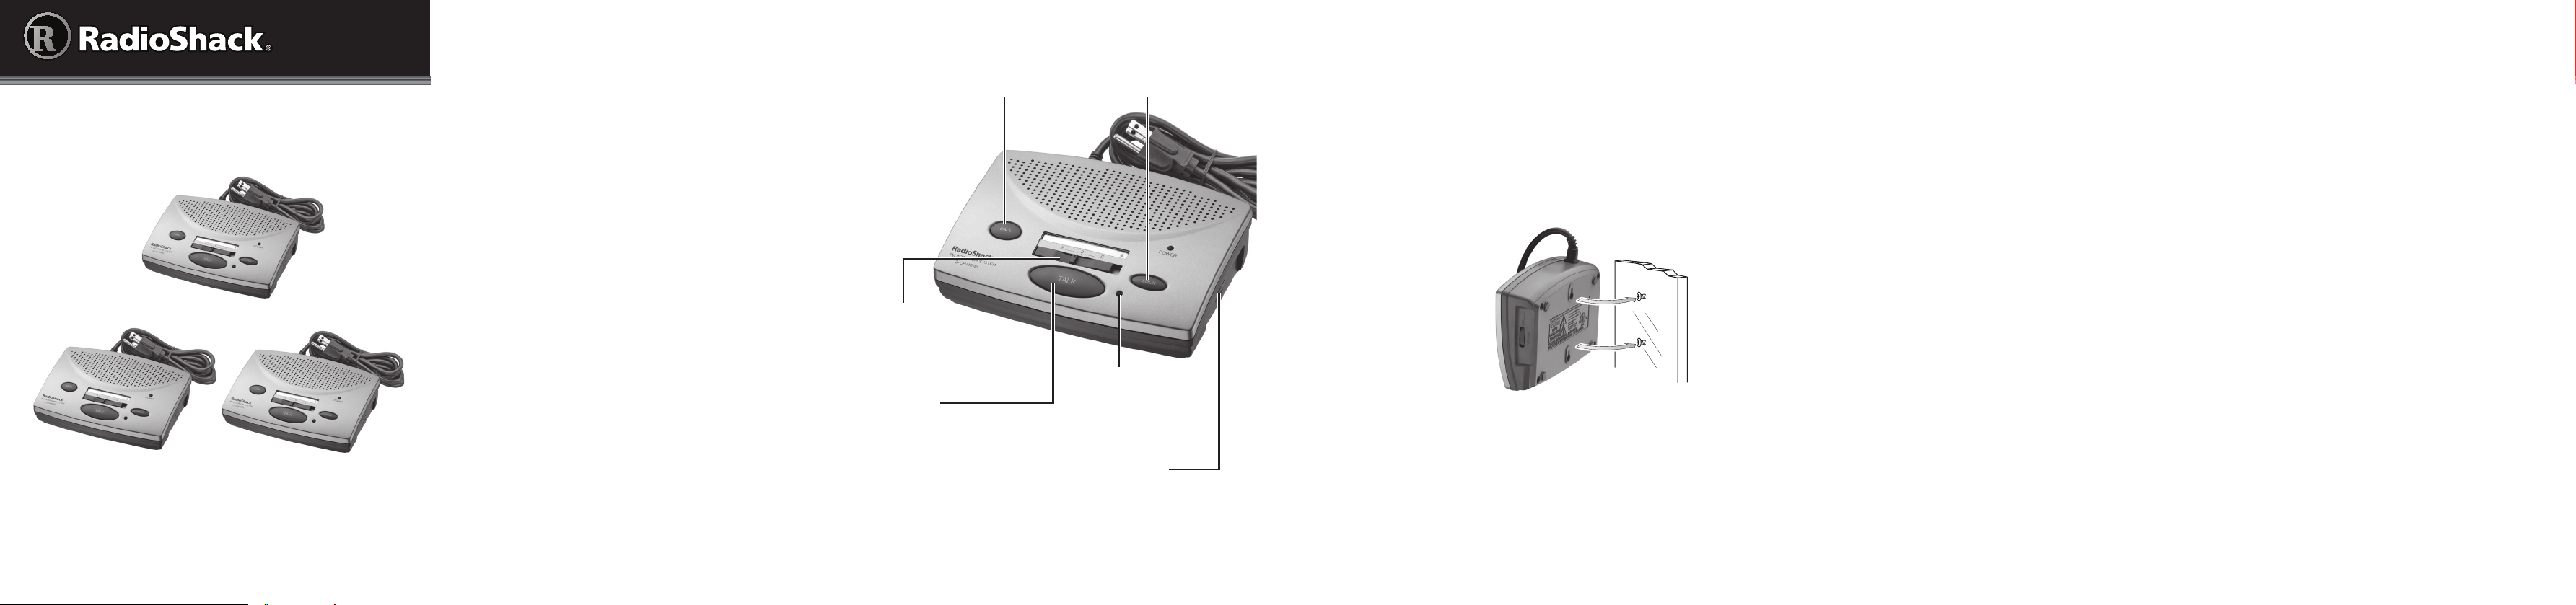
CALL
Send a tone to stations
with the same channel.
A B C
Switch channels.
TALK
Hold down to speak
with other stations.
LOCK
Constantly monitor
surroundings.
Indicator
Lights red when
you press TALK,
CALL, or LOCK.
VOLUME/OFF
To turn on the station, rotate
the dial until it clicks. POWER
indicator lights red. Rotate to
adjust the volume.
Mounting
To mount a station on the wall, you need two screws (not
supplied) with heads that fit into the keyhole slots on the
bottom of the stations.
1. Select a location for the station. Mark the mounting
screw locations on the wall 2 9/16 in. (64.8 mm) apart,
one above the other.
2. Drill holes at the marked locations.
3. Thread a screw into each hole allowing the screw
heads to extend
about 1/8 in. (3 mm)
from the wall.
4. Align the keyhole slots
on the bottom of the
station with the screw
heads in the wall.
Slide the station down
onto the screws to
secure the station.
2 Communicating
Setting the Channel
Each station has three channels, so you can select which
station or stations will communicate. You can also use a
station to monitor sounds near another station.
For example, you could set a station installed in the
kitchen to Channel A, a station installed in the family
room to Channel B, and a station installed in a bedroom
to Channel C. Using the station in the kitchen, you can
communicate with the station in the family room by
setting the channel selector to B, or with the station in
the bedroom by setting the channel selector to C.
Set the channel switch on each station as follows:
• If you want all the stations to communicate with each
other, set all stations to the same channel.
• If you want to use a station to communicate with only
one other station, set only two stations to the same
channel.
Turning a Station On
Rotate VOLUME counterclockwise until it clicks. Then
adjust VOLUME to a comfortable listening level. To turn
off, rotate VOLUME clockwise until it clicks.
Calling Another Station
Be sure the stations you plan to use are turned on and
adjusted to the desired volume level.
1. Set the channel selector to the channel (A, B, or C) of
the station(s) you are calling.
2. Press CALL. Each station that is on and set to the
selected channel sounds a tone.
3. Hold down TALK and speak. When you finish
speaking, release TALK and listen for a response.
nNotes:
• Only one party can talk on a channel at a time.
• The TALK indicator on the station you are using
remains lit as long as you hold down TALK or CALL,
or when you press LOCK.
• If your voice sounds distorted, you might be speaking
too loudly or too close to the microphone.
• Set the channel selector back to your designated
channel after you finish talking, so others can easily
reach you.
3Monitoring
You can set any station so it continuously transmits
sounds to another station.
nNote: You can monitor only one station at a time.
1. Press LOCK on the station in the area you want to
monitor. The TALK indicator lights.
nNote: TheThe TALK indicator stays lit until you press
CALL or TALK. This lets you know that the station is
transmitting.
2. Set the channel selectors on both stations to the
same channel.
2 3 4 5 6

7
8
3. When you finish monitoring, release the lock by
pressing TALK or CALL on the station in the area you
are monitoring. The TALK indicator turns off.
nNote: After pressing LOCK on a station, you
cannot call or talk to that station until you press TALK
or CALL to release the lock.
Using Additional Stations
You can add additional stations to your intercom system
as long as they transmit on the same frequency —A (200—A (200
kHz), B (270 kHz), or C (230 kHz). Be sure the frequency. Be sure the frequency
on the stations you plan to add matches the frequency
on your current stations. If you want to set up a separate
intercom system, however, be sure it operates on a
different frequency.
IMPORTANT SAFETY INSTRUCTIONS
1. Read these instructions.
2. Keep these instructions.
3. Heed all warnings.
4. Follow all instructions.
5. Unplug this product from the wall outlet before cleaning. Do
not liquid cleaners or aerosol cleaners. Clean only with dry
cloth.
6. Only use attachments/accessories specified by the
manufacturer.
7. Do not use this product near water.
8. Use only with the cart, stand, tripod, bracket, or table specified
by the manufacturer or sold with the apparatus. When a
cart is used, use caution when moving the cart/apparatus
combination to avoid injury from tip-over.
9. Exercise caution when moving any product and cart
combination. Quick stops, excessive force, and uneven
surfaces may cause the appliance and cart combination to
overturn.
10. Slots and openings in the cabinet are provided for ventilation
and to ensure reliable operation of the product and to protect
if from overheating. Do not block any ventilation openings.
Install in accordance with the manufacturer’s instructions.
11. Use only the type of power source indicated on the label. If you
are not sure of the type of power supply to your home, consult
your product dealer or local power company. For products
intended to operate on battery power, or other sources, refer
to the operating instructions.
12. Do not defeat the safety purpose of the polarized or
grounding-type plug. A polarized plug has two blades with one
wider than the other. A grounding type plug has two blades
and a third grounding prong. The wide blade or the third
prong are provided for your safety. If the provided plug does
not fit into your outlet, consult an electrician for replacement
of the obsolete outlet. Alternate Warnings: This product is
equipped with a three-wire grounding-type plug, a plug having
a third (grounding) pin. This plug will only fit into a groundingtype power outlet. This is a safety feature. If your are unable
to insert the plug into the outlet, contact your electrician to
replace your obsolete outlet. Do not defeat the safety purpose
of the grounding-type plug.
13. Protect the power cord from being walked on or pinched
particularly at plugs, convenience receptacles, and the point
where they exit from the apparatus.
14. Protective Attachment Plug: The product is equipped with an
attachment plug having overload protection. This is a safety
feature. See Instruction Manual for replacement or resetting
of protective device. If replacement of the plug is required,
be sure the service technician has used a replacement plug
specified by the manufacturer that has the same overload
protection as the original plug.
16. Unplug this apparatus during lightning storms or when unused
for long periods of time.
18. Do not overload wall outlets, extension cords, or integral
convenience receptacles as this can result in a risk of fire or
electric shock.
19. Never push objects of any kind into this product through
openings as they may touch dangerous voltage points or shortout parts that could result in a fire or electric shock. Never spill
liquid of any kind on the product.
20. Do not attempt to service this product yourself as opening
or removing covers may expose you to dangerous voltage or
other hazards. Refer all servicing to qualified service personnel.
21. Unplug this product from the wall outlet and refer servicing to
qualified service personnel under the following conditions:
a) When the power-supply cord or plug is damaged.
b) If liquid has been spilled, or objects have fallen into the
product.
c) If the product has been exposed to rain or water.
d) If the product does not operate normally by following
the operating instructions. Adjust only those controls that
are covered by the operating instructions as an improper
adjustment of other controls may result in damage and will
often require extensive work by a qualified technician to
restore the product to its normal operation.
e) If the product has been dropped or damaged in any way.
f) When the product exhibits a distinct change in
performance – this indicates a need for service.
22. Replacement Parts: When replacement parts are required,
be sure the service technician has used replacement parts
specified by the manufacturer or have the same characteristics
as the original part. Unauthorized substitutions may result in
fire, electric shock, or other hazards.
23. Upon completion of any service or repairs to this product, ask
the service technician to perform safety checks to determine
that the product is in proper operating condition.
24. Do not install near any heat sources such as radiators, heat
registers, stoves, or other apparatus (including amplifiers) that
produce heat.
CAUTION
RISK OF ELECTRIC SHOCK
DO NOT OPEN
CAUTION: TO REDUCE THE RISK OF ELECTRIC SHOCK, DO NOT REMOVE THE
COVER OR BACK. NO USER-SERVICEABLE PARTS INSIDE. REFER SERVICING
TO QUALIFIED PERSONNEL.
The lightning symbol is intended to alert you to the presence of
uninsulated, dangerous voltage within this product’s enclosure
that might be of sufcient magnitude to constitute a risk of
electric shock. Do not open the product’s case.
The exclamation symbol is intended to inform you that important
operating and maintenance instructions are included in the literature
!
accompanying this product.
WARNING: To reduce the
risk of re or shock hazard,
do not expose this product
!
to rain or moisture.
FCC Information
This equipment has been tested and found to comply with the limits for a Class B digital device,
pursuant to Part 15 of the FCC Rules. These limits are designed to provide reasonable protection
against harmful interference in a residential installation. This equipment generates, uses, and can
radiate radio frequency energy and, if not installed and used in accordance with the instructions,
may cause harmful interference to radio communications. However, there is no guarantee that
interference will not occur in a particular installation. If this equipment does cause harmful interference to radio or television reception, which can be determined by turning the equipment off
and on, the user is encouraged to try to correct the interference by one or more of the following
measures:
• Reorient or relocate the receiving antenna.
• Increase the separation between the equipment and receiver.
• Connect the equipment into an outlet on a circuit different from that to which the receiver is
connected.
• Consult your local RadioShack store or an experienced radio/TV technician for help.
If you cannot eliminate the interference, the FCC requires that you stop using your equipment.
Changes or modifications not expressly approved by RadioShack may cause interference and
void the user’s authority to operate the equipment.
This device complies with Part 15 of the FCC rules. Operation is subject to the following two
conditions: (1) This device may not cause harmful interference, and (2) This device must accept any
interference received, including interference that may cause undesired operation.
Limited Warranty
RadioShack warrants this product against defects in materials and workmanship under normal
use by the original purchaser for ninety (90) days after the date of purchase from a RadioShack-
owned store or an authorized RadioShack franchisee or dealer. RADIOSHACK MAKES NO
OTHER EXPRESS WARRANTIES.
This warranty does not cover: (a) damage or failure caused by or attributable to abuse, misuse,
failure to follow instructions, improper installation or maintenance, alteration, accident, Acts of
God (such as floods or lightning), or excess voltage or current; (b) improper or incorrectly performed repairs by persons who are not a RadioShack Authorized Service Facility; (c) consumables
such as fuses or batteries; (d) ordinary wear and tear or cosmetic damage; (e) transportation,
shipping or insurance costs; (f) costs of product removal, installation, set-up service, adjustment or
reinstallation; and (g) claims by persons other than the original purchaser.
Should a problem occur that is covered by this warranty, take the product and the RadioShack
sales receipt as proof of purchase date to any RadioShack store in the U.S. RadioShack will, at its
option, unless otherwise provided by law: (a) repair the product without charge for parts and labor;
(b) replace the product with the same or a comparable product; or (c) refund the purchase price.
All replaced parts and products, and products on which a refund is made, become the property
of RadioShack. New or reconditioned parts and products may be used in the performance of
warranty service. Repaired or replaced parts and products are warranted for the remainder of the
original warranty period. You will be charged for repair or replacement of the product made after
the expiration of the warranty period.
RADIOSHACK EXPRESSLY DISCLAIMS ALL WARRANTIES AND CONDITIONS NOT STATED
IN THIS LIMITED WARRANTY. ANY IMPLIED WARRANTIES THAT MAY BE IMPOSED BY LAW,
INCLUDING THE IMPLIED WARRANTY OF MERCHANTABILITY AND, IF APPLICABLE, THE
IMPLIED WARRANTY OF FITNESS FOR A PARTICULAR PURPOSE, SHALL EXPIRE ON THE
EXPIRATION OF THE STATED WARRANTY PERIOD.
EXCEPT AS DESCRIBED ABOVE, RADIOSHACK SHALL HAVE NO LIABILITY OR RESPONSIBIL-
ITY TO THE PURCHASER OF THE PRODUCT OR ANY OTHER PERSON OR ENTITY WITH
RESPECT TO ANY LIABILITY, LOSS OR DAMAGE CAUSED DIRECTLY OR INDIRECTLY BY
USE OR PERFORMANCE OF THE PRODUCT OR ARISING OUT OF ANY BREACH OF THIS
WARRANTY, INCLUDING, BUT NOT LIMITED TO, ANY DAMAGES RESULTING FROM INCONVENIENCE AND ANY LOSS OF TIME, DATA, PROPERTY, REVENUE, OR PROFIT AND ANY
INDIRECT, SPECIAL, INCIDENTAL, OR CONSEQUENTIAL DAMAGES, EVEN IF RADIOSHACK
HAS BEEN ADVISED OF THE POSSIBILITY OF SUCH DAMAGES.
Some States do not allow limitations on how long an implied warranty lasts or the exclusion or
limitation of incidental or consequential damages, so the above limitations or exclusions may not
apply to you. This warranty gives you specific legal rights, and you may also have other rights
which vary from State to State. You may contact RadioShack at:
RadioShack Customer Relations
300 RadioShack Circle, Fort Worth, TX 76102 04/08
Protect the environment by recyling used electronics. Go to
E-CyclingCentral.com to find an electronic recycling center near you.
©2009. RadioShack Corporation.
All rights reserved. RadioShack and RadioShack.com are
trademarks used by RadioShack Corporation.
www.RadioShack.com
Printed
in China
43-3105 A
AO0397AAA1
07A09
9 10 11 12
 Loading...