

Page 1

Handset (1)
What’s Included
•
Charger (1)
•
Ni-MH Battery Pack (1)
•
(inside handset)
43-144
5.8GHz Digital
Accessory Handset
for 43-141
43-142
43-143
Belt Clip (1)
•
AC Adapter (1)
•
User’s Guide (1)
•
Please read this User’s Guide before installing,
setting up and using your new phone.
www.radioshack.com
Page 2

2
Contents
Features 3
Introduction 4
Selecting a Location
Installing the Charger
Connecting/Charging the Battery
Installing a Belt Clip 8
Using an Optional Headset 8
Registering the Handset
Resetting Handsets 10
Resetting the Handset Without the Base 11
Controls & Functions 12
Reading the Display 13
Using Your Accessory Handset 17
Using Hold, Conference, Transfer and Intercom 23
Care 25
Service and Repair
FCC Statement
Glossary 27
Limited One-Year Warranty
5
9
25
25
28
4
5
Page 3
3
Features
Additional Handset — lets you add up to ten additional
handsets to expand your telephone system (
43-141, 43-142 or 43-143). You can even transfer an
outside call or make an intercom conversation between
handsets.
5.8 GHz Digital Spread Spectrum System — spreads the
signal across several frequencies, providing additional
security for your phone conversation.
10 Tone and 10 Melody Ringer Control — lets you control
the way the ring sounds.
Voice Mail/Message Indicator — lets you know a
message is waiting.
Handsfree Operation — allows you to talk while your
hands are occupied for other tasks.
CAUTION
RIS K OF E LECTR IC SHO CK
DO NOT OP EN
The lightning symbol is intended to alert you to the presence of
uninsulated dangerous voltage within this product’s enclosure that
might be of sufcient magnitude to constitute a risk of electric shock. Do
not open the product’s case.
The exclamation symbol is intended to inform you that important
operating and maintenance instructions are included in the literature
accompanying this product.
RadioShack
WARNING: To reduce the risk of re
or shock hazard, do not expose this
product to rain or moisture.
CAUTION: TO REDUCE THE RISK OF ELECTRIC
SHOCK, DO NOT REMOVE COVER OR BACK.
NO USERSERVICEABLE PARTS INSIDE. REFER
SERVICING TO QUALIFIED PERSONNEL.
Page 4

4
Introduction
Thank you for purchasing this RadioShack 5.8 GHz
Accessory handset. Your handset is designed for use with
a RadioShack 5.8 GHz Expandable Cordless Telephone.
You can use this handset in any room in your home or
ofce that has an AC outlet. You can also transfer an
outside call to another handset.
This handset is designed to work only with a
5.8 GHz Expandable Cordless Telephone (Cat. No.
43-141, 43-142 and 43-143). Do not try to use it with other
cordless telephones.
RadioShack
Selecting a Location
Select a location for the base that is near an accessible AC
standard wall outlet and away from electrical machinery,
electrical appliances, metal walls, ling cabinets, wireless
intercoms, alarms, room monitors, and other cordless
phones.
Page 5
5
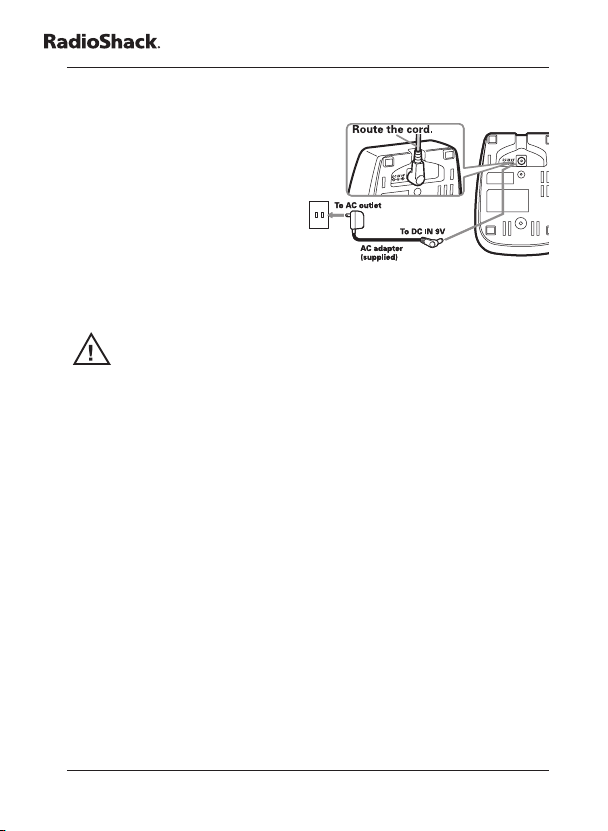
Installing the Charger
You can power the charger
using the supplied 9V,
210 mA AC adapter.
Insert the supplied AC
adapter’s barrel plug into
DC IN 9V jack on the
the
bottom of the charger. Route
the cord through the strain relief slot and plug the adapter
into a standard AC outlet.
Caution: You must use a Class 2 power source that
supplies 9V DC and delivers at least 210 mA. Its
center tip must be set to positive and its plug must
t the charger’s DC IN 9V jack. The supplied adapter
meets these specications. Using an adapter that
does not meet these specications could damage the
handset or the adapter.
Connecting/Charging the Battery
The phone comes with a rechargeable nickel metal
hydride (Ni-MH) battery pack. The supplied battery pack
should last for about a year. If the battery pack does not
hold a charge for more than 2 hours after an overnight
charge, replace it with a new 3.6 volt, 750 mAh battery
pack with a connector that ts the socket in the battery
compartment. You can order a replacement battery pack
through your local RadioShack store or online at
www.radioshack.com.
Page 6
6
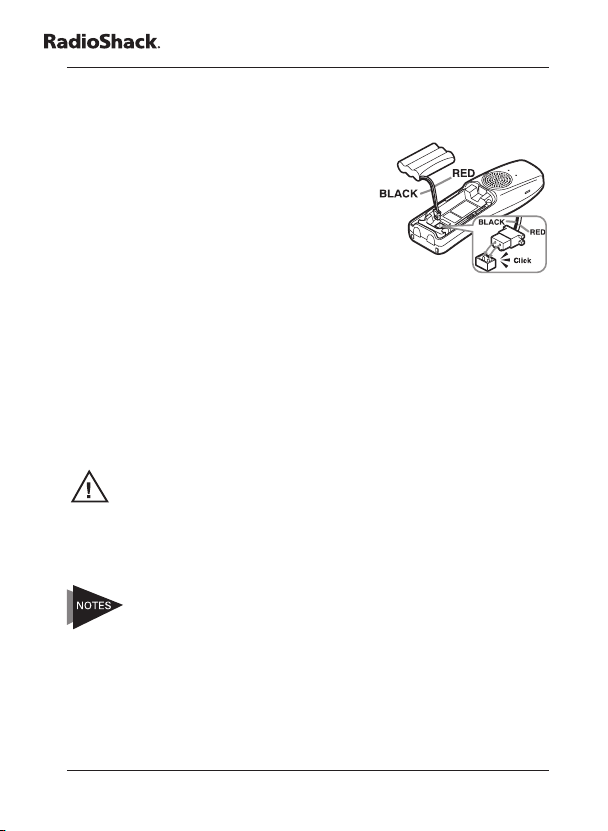
Before using your phone, you must install the battery
pack, and then charge it for about 15-20 hours.
1. Press down and slide the
battery compartment cover off.
2. Plug the battery pack’s
connector into the socket
in the compartment (the
connector ts only one way),
then place the battery pack in
the compartment. MODELS VARY! PLACE HANDSET
ON THE BASE FOR REGISTRATION OR REFER TO
OWNER’S MANUAL appears.
3. Replace the cover.
To charge the battery pack, place the handset on the
charger. The CHARGE indicator on the charging cradle
lights. Proceed to “
Important: Be sure the battery pack is properly
connected before you try to charge it. The CHARGE
indicator lights when the handset is on the charger.
Registering the Handset” on page 9.
Recharge the battery pack when LOW BATTERY appears.
About once a month, use a damp cloth to clean the
•
charging contacts on the handset.
If the battery pack becomes weak during a call, the
•
handset beeps and LOW BATTERY appears. When
this happens, you cannot make a call until you
recharge the battery pack.
If the display is blank and the phone does not work,
•
recharge the battery pack. (The battery power
might be too low to light the display.)
Page 7
7
About once a month, fully discharge the battery by
keeping the handset off the base or charger until LOW
BATTERY stays lit. Otherwise, the battery pack loses its
ability to fully recharge.
If you are not going to use your phone for an extended
period, disconnect the battery pack. This increases the
battery pack’s usable life.
If you have trouble installing the battery pack, take the
handset to your local
Warning:
Dispose of old battery packs promptly and properly.
•
Do not burn or bury them.
There is a risk of explosion if batteries are replaced
•
by the wrong type.
Dispose of used batteries according to the
•
instructions.
RadioShack store for assistance.
Page 8
8
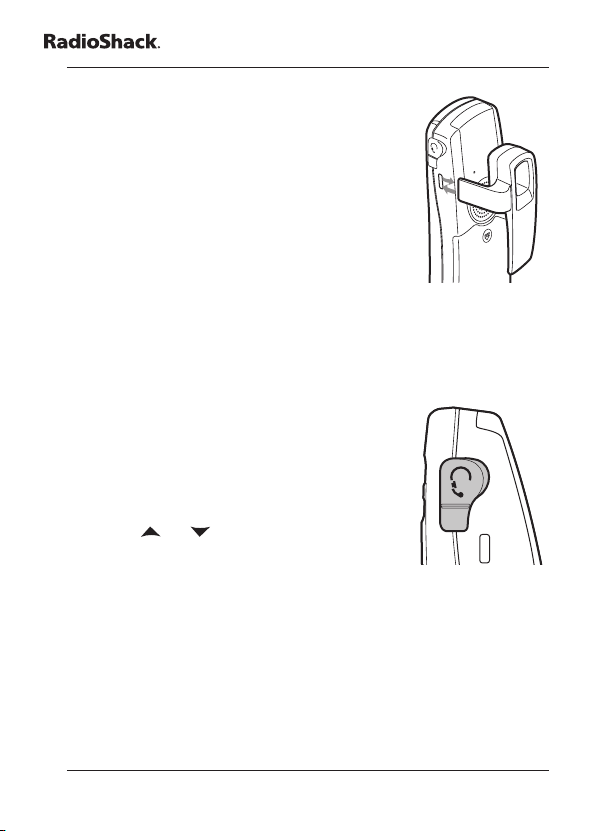
Installing a Belt Clip
To attach the belt clip, insert the belt
clip into the holes on each side of the
cordless handset. Press down until it
clicks.
To remove the belt clip, pull either side
of the belt clip to release the tabs from
the holes.
Using an Optional Headset
You can make or answer calls handsfree using an optional
headset that has a 3/32-inch (2.5-mm) plug. Your local
RadioShack store has a variety of headsets available.
To connect the headset, gently ip
1.
open the rubber headset jack cover
on the side of the cordless handset.
Then insert the headset’s plug into
the jack.
2.
3.
4.
or on the handset to
Use
adjust the headset’s volume.
With a headset connected, you can make or answer
calls as usual using the keys on the handset.
When you nish using the headset, disconnect it from the
handset and close the rubber cover to protect the jack.
Page 9

9
NOTES
Always place the handset properly on the charger
NOTE
•
whenever you are recharging the handset.
You can use a handset holder (available from your
•
local RadioShack store) to hang the handset on
your belt for added convenience.
Registering the Handset
You must register the handset to the base before you can
use it.
Base Models 43-141, 43-142:
To register to a 43-141 or 43-142 base, simply place
the accessory handset in the base. While the handset
is registering, HANDSET REGISTERING will appear
in the LCD. When REGISTRATION COMPLETE. is
displayed; the handset has been registered to the base.
If REGISTRATION FAILED. appears, remove the handset
from the base and try again.
The model number for your telephone base is located
on the bottom of main base unit.
Page 10

10
Base Model 43-143:
1. On the base, press the MENU soft key.
2. Scroll down to REGISTER HANDSET and press the
OK soft key.
3. On the handset, press and hold
reads HANDSET REGISTERING and you hear a beep.
4. When REGISTRATION COMPLETE is displayed;
the handset has been registered to the base. If
REGISTRATION FAILED. appears, please try these
steps again.
# until the display
Resetting Handsets
If you want to register a handset to a different base or
replace a handset with another one, you must rst reset
the existing registration data. To reset, please follow these
steps:
1. Press the
DEREGISTERATION submenu.
2. ARE YOU SURE? appears. Move the cursor to select
YES. Press the
To clear other handset information, please follow these
steps:
1. From the handset, press and hold
more than 5 seconds. Select the DEREGISTER HS
submenu.
2. Move the cursor to select the handset ID to be
de-registered from the list, and then press the OK soft
key.
MENU soft key. Select the
OK soft key.
and # for
Page 11

11
3. DEREGISTER HS appears. Move the cursor to select
YES. Press the
4. ARE YOU SURE? appears. Move the cursor to select
YES, and then press the
conrmation tone.
OK soft key.
OK soft key. You will hear a
Resetting the Handset Without
the Base
If the original base this handset was registered to is
not available for some reason (for example, it is lost or
somehow incapacitated), you can still reset the handset
and use it with another base.
1. Press and hold
the SYSTEM RESET menu appears.
2. Select the BASE UNAVAILABLE submenu.
BASE UNAVAILABLE appears in the display.
3. Move the cursor to select YES, and then press the
soft key. When ARE YOU SURE? appears, select YES.
You will hear a conrmation tone, and the handset
deletes its own link to the base without trying to
contact the base.
Now you are ready to register the handset to the new
base.
and # for more than 5 seconds, until
OK
Page 12

12
Controls & Functions
2
1
3
5
4
6
7
8
11
12
19
20
21
22
13
17
18
15
14
16
9
10
Handset
Handset Antenna
1.
2.
Headset Jack Cover
3.
Belt Clip Hole
4.
Speakerphone Speaker
and Ringer
5.
Handset Battery
Compartment
6.
New Message indicator
7.
Handset Earpiece
8.
Handset Display
9.
Soft keys
/FLASH key (talk/ash)
10.
key (phonebook)
11.
12.
13.
14.
15.
16.
17.
# key (pound)
18.
REDIAL/PAUSE key
19.
INT’COM/HOLD key
20.
(intercom/hold)
21.
Handset Microphone
22.
Handset Charging
Contacts
/TONE key
SPEAKER key
key (up)
key (end call)
key (caller ID)
key (down)
Page 13

13
Reading the Display
に
The handset display uses the following icons to tell you
the status of your phone.
ICON STATUS DESCRIPTION
Talk Appears while on a call.
Talk
Talk
Talk Appears when you mute the handset.
Talk
Talk
Talk
Talk
Standby Indicates that the ringer is turned off.
Standby/
Talk
Appears when Privacy mode is
turned on.
Appears while recording a
conversation (Answering System
base only).
Appears when the handset
speakerphone is in use.
Appears when T-coil mode is turned
on.
Appears when Line 1 is in use. (twoline base only.)
Appears when Line 2 is in use. (twoline base only.)
Indicates the handset battery status:
empty, low, medium, and full.
Page 14

14
The Standby Screen
NOTE
SUN 12:00A
Handset #1
New CID: 5
RE D I AL ME N U
When the phone is in standby, the handset display shows
the following items:
Ringer off icon (when the ringer is off)/
day of the week and time/battery icon
Handset ID and Banner
Number of new Caller ID calls received
(If there are no new Caller ID messages,
the Handset ID appears here.)
Illustration is of a single line system. Dual line
systems will have different soft keys and standby
screen.
Using the Four-way Function Key
Your handset has a
four-way function
key that allows you
to move the cursor
(or highlighted area)
on the display and
access the most
commonly used
features at the touch
of a button. By
moving this key to
the left, you open the
Phonebook. Move the key to the right to access Caller ID
information.
Page 15

15
Using the Handset Menus
To open the menu, press the MENU soft key. Highlight the
option you want by pressing the four-way function key.
This will move the cursor; the option currently highlighted
appears in reversed out text. Select the highlighted option
by pressing the OK soft key. To exit the menu and return
to standby, press on the handset.
If you do not press a key within 30 seconds, the phone
will time out and exit the menu. When setting Date and
Time, the time-out period to two minutes.
Entering Text from Your Handset
You can use the number keypad on your phone to enter
text by referring to the letters printed on each number
key. When you press the number key in a text entry eld,
the phone displays the rst letter printed on the number
key. Press the number key twice to display the second
letter and three times to display the third. Capital letters
are displayed rst, then lower case letters, then the
number on the key.
Page 16

16
If two letters in a row use the same number key, enter the
rst letter, then use right or left on the four-way function
key to move the cursor to the next position to enter the
second letter. For example, to enter “Movies”:
1. Press
2. Use right on the four-way function key to move the
3. Press
4. Press
5. Press
6. Press
7. Press
8. Press the
If you make a mistake while entering a name, use right
or left on the four-way function key to move the cursor
to the incorrect character. Press the
erase the wrong character, and then enter the correct
character. To delete all characters, press and hold the
DELETE soft key.
6 once to enter M.
cursor to the right.
6 six times to enter o.
8 six times to enter v.
4 six times to enter i.
3 ve times to enter e.
7 eight times to enter s.
OK soft key to end your text entry.
DELETE soft key to
Page 17

17
Using Your Accessory Handset
Making and Receiving Calls
Using the
speakerphone
1. Remove the
handset from the
charger.
2. Dial the number.
3. Press .
1. Pick up the handset.
(If AutoTalk is on,
the phone will
answer when you
remove the handset
from the charging
cradle.)
2. Press .
Making a
call
Answering
a call
Hanging
up
Using the handset
1. Remove the handset
from the charger.
2. Dial the number.
3. Press /FLASH.
1. Pick up the handset.
(If AutoTalk is on, the
phone will answer
when you remove
the handset from the
charging cradle.)
2. Press /FLASH. (If
Any Key Answer
is on, you can also
press any number
keypad.)
. Press .
Press
Page 18

18
Adjusting the Volume
NOTE
Choose from three ringer volume settings
Ringer Volume
Earpiece Volume
Speaker Volume
(off, low, and high). With the phone in
standby, use and to adjust the ringer
volume.
Choose from six volume levels for the
handset. While on a call, press to make
the handset volume louder or to make
it softer.
Choose from six volume levels for the
handset speakerphone. While on a call,
press to make the speaker volume
louder or to make it softer.
Using Caller ID and Call Waiting
You can store up to 100 Caller ID numbers in your
handset.
Your phone shares a total of 100 memory entries between
your Phonebook and Caller ID. Once you store 100
phonebook names, Caller ID information can not be
stored (but it will still display when the call comes in).
You must subscribe to Caller ID and Call Waiting
through your telephone provider.
Page 19

19
Press to open the Caller ID list. The rst thing you will
see is the summary screen. From the summary screen,
you have the following options:
To scroll through the list from A to Z,
Scroll through the list
Jump to entries
beginning with a
particular letter
Store a Caller ID entry
in the phonebook
Dial a Caller ID entry
Delete a Caller ID entry
Delete all entries
Exit the Caller ID list
press .
To scroll through the list from Z to A
press
Press the number key corresponding
to the letter you want to jump to.
Find the entry you want to store and
press
Find the entry you want to dial and
press
Find the entry you want to delete and
press the
Press the
SURE? appears, select YES and press
the OK soft key.
Press
/FLASH again if you are on a call.
.
STORE soft key.
/FLASH or .
DELETE soft key.
DELETE soft key. ARE YOU
or press the BACK soft key or
Using Call Waiting
If a second call comes in when you are on the phone, a
call waiting tone sounds, and the caller ID information of
the waiting call appears on the display. Press
on the handset to accept the waiting call. There is a short
pause, and then you will hear the new caller. To return to
the original caller, press /FLASH on the handset again.
/FLASH
Page 20

20
Using the Phonebook
Your phone allows you to store up to 2 numbers per
name and up to 100 names in your phonebook. Your
phone shares a total of 100 memory entries between
your phonebook and CID. Once you store 100 phonebook
entries, CID information will not be stored and will only
display at time of new incoming calls. When Phonebook
entries are full, you will hear a beep and MEMORY FULL
appears. You cannot store any additional names and
numbers unless you delete some of the existing ones.
Press
you have the following options:
to enter the phonebook. Once in the phonebook,
Scroll through the
entries
Jump to entries
beginning with a
particular letter
Store a new entry
Copy entries to
another handset
To scroll through the phonebook
from A to Z, press . To scroll
through the phonebook from Z to A
press .
Press the number key corresponding
to the letter you want to jump to.
Press the
the directions.
1. Find the entry you want to copy.
2. Press the
3. Select COPY SELECTION, and
4. TO WHICH UNIT? appears. Select
NEW soft key and follow
OPTIONS soft key.
then press the OK soft key.
the station you want to copy
this entry to, and then press
the OK soft key. You will hear a
conrmation tone.
Page 21

21
Copy ALL entries to
another handset
Dial an entry
Delete an entry
Delete all entries
Close the phonebook
1. Press the OPTIONS soft key.
2. Select COPY ALL and press the
OK soft key.
3. TO WHICH UNIT? appears. Select
the station you want to copy this
entry to, and then press the OK
soft key.
4. ARE YOU SURE? appears. Select
YES and press the OK soft key.
You will hear a conrmation tone.
1. Find the entry you want to dial.
2. Press
1. Find the entry you want to delete.
2. Press the
3. Select DELETE SELECTION, and
4. ARE YOU SURE? appears. Select
1. Press the
2. Select DELETE ALL and press the
3. ARE YOU SURE? appears. Select
Press
repeatedly if you are on a call.
/FLASH or .
OPTIONS soft key.
then press the OK soft key.
YES and press the OK soft key.
You will hear a conrmation tone.
OPTIONS soft key.
OK soft key.
YES and press the OK soft key.
You will hear a conrmation tone.
or the BACK soft key
Page 22

22
Redialing a Number
NOTE
You can quickly redial the last 3 numbers dialed on the
handset.
1. With the phone in standby, press
REDIAL soft key to open the redial list.
the
2. Use
3. When you nd the number you want to dial, press
and to scroll through the redial list.
/FLASH or .
You can also press /FLASH or before you open
the redial list. In this case, press [redial/pause].
REDIAL/PAUSE or
Muting the Ringer (One Call Only)
While the handset is ringing, press to mute the ringer for
this call. The phone will ring again on the next call. (The
handset must be off the cradle to mute the ringer.)
Muting the Microphone
To mute the microphone so the caller can’t hear you,
press the MUTE soft key while on a call. MUTE ON will
appear in the display for 2 seconds, but the に icon will
appear and remain in the display until the feature is
turned off. Repeat the procedure to cancel muting.
Privacy Mode
To prevent other stations from interrupting a call, press
the PRIVACY soft key while on a call. PRIVACY MODE ON
will appear in the display for 2 seconds, but the icon
will appear in the display until the feature is turned off.
Repeat the procedure to turn off privacy mode.
Page 23

23
Using Hold, Conference,
Transfer and Intercom
INT’COM/HOLD. If you leave a caller
Press
Put a call on hold
Join a call in
progress
Transfer a call
Cancel a transfer
Accept a
transferred call
on hold for more than ve minutes, the call
will be disconnected. To return to the party
on hold, press
To join a call already in progress, press
/FLASH or . You can hang up
normally; the other station remains
connected to the call.
Press INT’COM/HOLD; the call will
automatically be placed on hold. Use
or to select the station you want to
transfer the call to, and press the OK soft
key. (To page all stations at once, select
ALL.) When the other station answers,
you can talk to the station; the outside
call remains on hold. If the other station
accepts the call, you will be disconnected.
To cancel the transfer and return to the
call, press
To answer the page and speak to the
transferring station, press /FLASH or
INT’COM/HOLD. To accept the call and
speak to the caller, press
/FLASH or .
/FLASH or .
/FLASH again.
Page 24

24
Make an
intercom page
Cancel a page
Answer an
intercom page
With the phone in standby, press
INT’COM/HOLD. Use or to select
the station you want to talk with, then
press the OK soft key. (If you select ALL, all
other stations will be paged.)
To cancel the intercom page, press the
CANCEL soft key or .
/FLASH or INT’COM/HOLD. If
Press
AutoTalk is on, the handset automatically
answers the page when you remove it
from the cradle.
Page 25

25
Care
Keep the handset dry; if it gets wet, wipe it dry immediately.
Use and store the handset only in normal temperature
environments. Handle the handset carefully; do not drop it.
Keep the handset away from dust and dirt, and wipe it with a
damp cloth occasionally to keep it looking new.
Service and Repair
If your handset is not performing as it should, take it to
your local RadioShack store for assistance. Modifying or
tampering with the handset’s internal components can cause
a malfunction and might invalidate its warranty.
FCC Statement
This device complies with Part 15 of the FCC Rules. Operation
is subject to the following two conditions: (1) this device
may not cause harmful interference, and (2) this device must
accept any interference received, including interference that
may cause undesired operation.
This equipment has been tested and found to comply with
the limits for a Class B digital device, pursuant to Part 15
of the FCC Rules. These limits are designed to provide
reasonable protection against harmful interference in a
residential installation. This equipment generates, uses and
can radiate radio frequency energy and, if not installed and
used in accordance with the instructions, may cause harmful
interference to radio communications.
Page 26

26
However, there is no guarantee that interference will not
occur in a particular installation. If this equipment does cause
harmful interference to radio or television reception, which
can be determined by turning the equipment off and on, the
user is encouraged to try to correct the interference by one
or more of the following measures:
Reorient or relocate the receiving antenna.
•
Increase the separation between the equipment and
•
receiver.
Connect the equipment into an outlet on a circuit different
•
from that to which the receiver is connected.
Consult your local
•
radio/TV technician for help.
If you cannot eliminate the interference, the FCC requires
•
that you stop using your handset.
Changes or modications not expressly approved by
RadioShack may cause interference and void the user’s
authority to operate the equipment.
To ensure the safety of users, the FCC has established
criteria for the amount of radio frequency energy various
products may produce depending on their intended usage.
This product has been tested and found to comply with
the FCC’s exposure criteria. For body worn operation, the
FCC RF exposure guidelines were also met when used
with the
for this product. Use of other accessories may not ensure
compliance with FCC RF exposure guidelines and should be
avoided.
RadioShack accessories supplied or designed
RadioShack store or an experienced
Page 27

27
Glossary
Accessory Handset — This phone system is expandable:
one base supports a total of ten handsets. The accessory
handset is a handset that is compatible with this model.
Base — The main part of the phone that connects to your
phone line.
Charger — A cradle that comes with an accessory
handset and charges the handset battery. It connects to
power but does not connect to a phone line.
Standby — The handset is not in use. No line has been
activated. No dial tone is present.
Station — Any handset or the base.
Talk — A telephone line has been activated on the
handset or the base, enabling a dial tone.
Page 28

This product is warranted by RadioShack against manufacturing defects in material and
workmanship under normal use for one (1) year from the date of purchase from
RadioShack company-owned stores and authorized RadioShack franchisees and dealers.
EXCEPT AS PROVIDED HEREIN, RadioShack MAKES NO EXPRESS WARRANTIES AND
ANY IMPLIED WARRANTIES, INCLUDING THOSE OF MERCHANTABILITY AND FITNESS
FOR A PARTICULAR PURPOSE, ARE LIMITED IN DURATION TO THE DURATION OF THE
WRITTEN LIMITED WARRANTIES CONTAINED HEREIN. EXCEPT AS PROVIDED HEREIN,
RadioShack SHALL HAVE NO LIABILITY OR RESPONSIBILITY TO CUSTOMER OR ANY
OTHER PERSON OR ENTITY WITH RESPECT TO ANY LIABILITY, LOSS OR DAMAGE
CAUSED DIRECTLY OR INDIRECTLY BY USE OR PERFORMANCE OF THE PRODUCT OR
ARISING OUT OF ANY BREACH OF THIS WARRANTY, INCLUDING, BUT NOT LIMITED TO,
ANY DAMAGES RESULTING FROM INCONVENIENCE, LOSS OF TIME, DATA, PROPERTY,
REVENUE, OR PROFIT OR ANY INDIRECT, SPECIAL, INCIDENTAL, OR CONSEQUENTIAL
DAMAGES, EVEN IF RadioShack HAS BEEN ADVISED OF THE POSSIBILITY OF SUCH
DAMAGES.
Some states do not allow limitations on how long an implied warranty lasts or the
exclusion or limitation of incidental or consequential damages, so the above limitations or
exclusions may not apply to you.
In the event of a product defect during the warranty period, take the product and the
RadioShack sales receipt as proof of purchase date to any RadioShack store. RadioShack
will, at its option, unless otherwise provided by law: (a) correct the defect by product
repair without charge for parts and labor; (b) replace the product with one of the same or
similar design; or (c) refund the purchase price. All replaced parts and products, and
products on which a refund is made, become the property of RadioShack. New or
reconditioned parts and products may be used in the performance of warranty service.
Repaired or replaced parts and products are warranted for the remainder of the original
warranty period. You will be charged for repair or replacement of the product made after
the expiration of the warranty period. This warranty does not cover: (a) damage or failure
caused by or attributable to acts of God, abuse, accident, misuse, improper or abnormal
usage, failure to follow instructions, improper installation or maintenance, alteration,
lightning or other incidence of excess voltage or current; (b) any repairs other than those
provided by a RadioShack Authorized Service Facility; (c) consumables such as fuses or
batteries; (d) cosmetic damage; (e) transportation, shipping or insurance costs; or (f) costs
of product removal, installation, set-up service adjustment or reinstallation.
This warranty gives you speci c legal rights, and you may also have other rights which
vary from state to state.
RadioShack Customer Relations, 300 RadioShack Circle, Fort Worth, TX 76102-1964
12/99
©2007. RadioShack Corporation.
All rights reserved. RadioShack and RadioShack.com are
trademarks used by RadioShack Corporation.
DirectLink is a registered trademark of Uniden Corporation.
UUZZ01639BZ(0)
43-144
01A07
Printed in China
 Loading...