

Page 1
/&/+&+-G[DQCTF
42-4058
OWNER’S MANUAL — Please read before using this equipment.
Mixer Function — lets you make the
keyboard sound multiple tones for auto
accompaniment or memory playback, or to
play MIDI data received from another MIDI
device (see “Using the Mixer” on Page 12).
100 Auto-Rhythms — provide a steady beat for
many styles of music, from rhumba to rock (see
“Using the Preset Auto-Rhythms” on Page 9).
61 Full-Sized Keys with Touch Response — provide the feel of a fine musical instrument.
The keyboard’s volume varies in response to the force of your touch, just like an acoustic
piano, so you can add emotion to your music.
32-Note Polyphonic Sound — lets you play
and hear up to 32 notes at the same time, so you
can play or create almost any type of music.
Large Display — shows you the notes and
chords as you play them, along with the current
tone, rhythm, and tempo. The built-in backlight
makes it easy to read, even in dim light.
248 Tones — uses technology usually found only on
professional equipment to allow you to set your
keyboard to sound like anything from a harpsichord to a
honky-tonk piano. 100 of these tones have
corresponding advanced tones, created by
programming in digital signal processor (DSP) effects
and other settings. You can even create up to 32 of
your own tones with the custom tone synthesizer
feature (see “Using the Tone Synthesizer” on Page 13).
Auto Accompaniment — lets you automatically play a
preset harmonic pattern to match the selected autorhythm (see “Using Auto Accompaniment” on Page 10).
Data Expansion System — lets you download
additional tones, up to four sets of accompaniment
data, DSP settings, and registration from your PC
and store them in your keyboard’s memory (see
“Using the Data Download Service” on Page 21).
The FCC Wants You to Know ..................... 2
Connecting Power ....................................... 2
Installing Batteries ............. .............. ........ 2
Using AC Power ...................................... 2
Connecting Headphones ............................ 3
Listening Safely ....................................... 3
Connecting an External Amplifier ................ 3
Using the Sheet Music Stand ...................... 3
A Quick Look at Your Keyboard .................. 3
Basic Operation ............................ .............. 5
Playing the Demonstration Tunes ............ 5
Using the Preset Tones ............................ 5
Using an Advanced Tone ......................... 6
Using Reverb and Chorus ........................... 6
Selecting Reverb/Chorus ............. ............ 6
Changing the Reverb or
Chorus Parameters .................................. 6
DSP (Digital Signal Processor) ................... 7
Selecting a DSP Type .............................. 7
Setting Basic DSP Parameters ................ 7
Changing DSP Parameters ..................... 7
Saving DSP Parameter Settings .............. 7
Using the Equalizers ................................... 7
Selecting the Equalizer Type ................... 7
Adjusting the Gain ..................... .............. 8
Using SPLIT ........... ..................................... 8
Using LA YE R .............................................. 8
Using SPLIT and LAYER Together ............. 8
Using the Preset Auto-Rhythms .................. 9
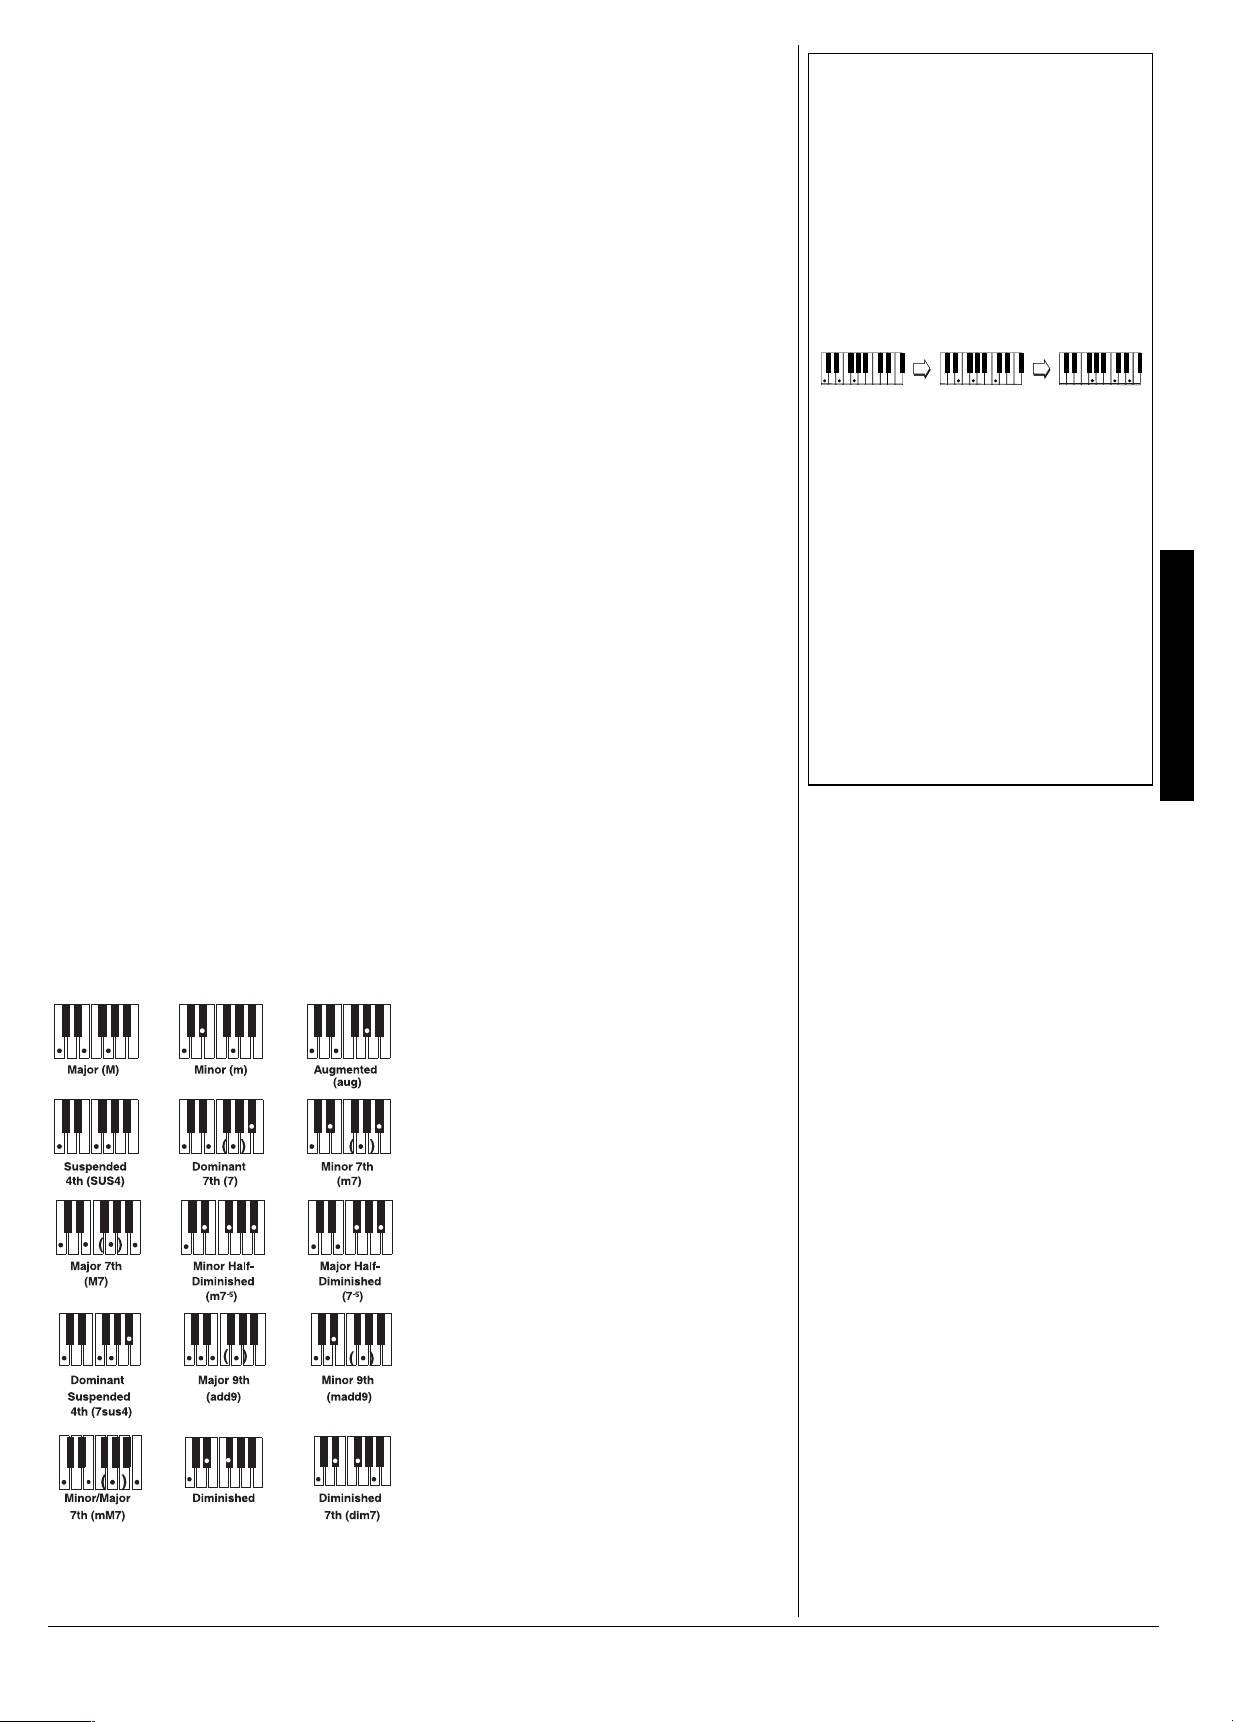
This Owner’s Manual explains how to use this electronic keyboard. It does not teach music.
The keyboard conforms to most, but not all, General MIDI specifications. Because of this, you might
experience some incompatibility when using the keyboard with another General MIDI device. For
more information, see “Using MIDI” on Page 19. Your keyboard also includes a MIDI (Musical
Instrument Digital Interface) feature, which lets you connect it to other MIDI-equipped musical
instruments or devices — even your personal computer.
%106'065
Selecting/Playing an Auto-Rhythm ........... 9
Using SYNCHRO ..................................... 9
Using INTRO .. .. .............. ............. ............. 9
Using FILL-IN ........................................... 9
Using FILL-IN NEXT . .. ........................... . 10
Using ENDING ....................................... 10
Using Auto Accompaniment ...................... 10
Adjusting the Accompaniment Volume ... 10
Concert Chord ........................................ 10
Standard Fingering . ................................ 11
Full-Range Chords ................................. 11
Using Auto Harm o n i ze ........................... 1 2
Using One-Touch Preset ........................ 12
Using the Mixer .......................................... 12
Using the Tone Synthesizer . ...................... 13
Using the Re g i stration Memo r y .......... ....... 1 4
Storing a Setup ....................................... 14
Recalling a Setup ................................... 14
Special Features .............. ............. ............. 14
Changing Keys ....................................... 14
Tuning the Keyboard .............................. 14
Using Touch Response .......................... 15
Using a Sustain Pedal ............................ 15
Adjusting the Display Contrast ............... 15
Resetting the Keyboard .......................... 15
Using the Song Memory ............................ 16
Real-Time Recording .............................. 16
Playing Back from Song Memory ........... 17
Step Recording .................. ............... ...... 17
Recording Mu l tiple Tracks . .. ................... 18
Editing Memory Contents ....................... 18
Editing a Song ........................................ 18
Using MIDI ............................................. 19
About MIDI ............................................. 19
Making the MIDI Connections ................ 20
MIDI Data ............................................... 20
Changing MIDI Settings ......................... 20
Notes About the
MIDI Implem e n tation Chart ... . .............. .. 20
Using the Data Download Service ......... 21
Troubleshooting ......................................... 22
Care .......................................................... 22
Service and Repair .................................... 22
Tone List .................................................... 23
Panel Tones ........................................... 23
Advanced Tones .................................... 25
GM Tones ............................................... 27
Drum Sounds ......................................... 29
User Tones ............................................. 29
Drum Assignment List ............................ 30
Fingered Chord Chart ............................ 31
Effect List ................................................... 32
Reverb ................................................... 32
Chorus ................................................... 32
DSP ........ .... ...... ..... .... ...... ...... ... ...... ...... .. 32
DSP Algorithm List ................................. 34
MIDI Implementation Chart ....................... 41
Specificat ions ............. ................... ............ 42
2002 RadioShack Corporation.
©
RadioShack and RadioShack.com are trademarks
All Rights Reserved.
used by RadioShack Corporation.
Page 2

The FCC Wants You to Know
The FCC Wants You to Know
If an icon appears at the end of a paragraph,
go to the box on that page with the
corresponding icon for pertinent information.
— Warning — Important
R
— Caution
±
— Note
Dispose of old batteries promptly and properly.
Do not burn or bury them.
Installing Batteries
• Use only fresh batteries of the required size
and recommended type.
• Do not mix old and new batteries, different
types of batteries (standard, alkaline, or
rechargeable), or rechargeable batteries of
different capacities.
• If you do not plan to use the keyboard with
batteries for a week or more, remove the
batteries. Batteries can leak chemicals that
can destroy electronic parts.
Using AC Power
!
center tip must be set to negative and its
plug must fit the keyboard's DC 9V jack.
Using an adapter that does not meet these
specifications could damage the keyboard
or the adapter.
+/2146#06
9#40+0)
R
%#76+10
You must use a Class 2 power
source that supplies 9V DC and
delivers at least 800 mA. Its
°°°°
R
— Hint
6*'(%%9#065;1761-019
This equipment has been tested and found
to comply with the li mi ts for a Class B digital
device, pursuant to Part 15 of the
. These limits are designed to provide
Rules
reasonable protection against harmful
interference in a re si dential installation . This
equipment generates, uses and can radiate
radio frequency energy and, if not installed
and used in accordance with the
instructions, may cau se harmful interfere nce
to radio communications.
However, there is no guarantee that
interference will not occur in a particular
installation. If this equipment does cause
harmful interference to radio or television
reception, which can be determined by
turning the equipme nt off an d on, th e user i s
encouraged to try to correct the interfere nc e
by one or more of the following measures:
FCC
• Reorient or relocate the receiving
antenna.
• Increase the separation between the
equipment and receiver.
• Connect the equi pment int o an outlet on
a circuit different from that to which the
receiver is connected.
• Consult your local RadioShack store or
an experienced radio/TV technician for
help.
• If you cannot eliminate the int erference,
the FCC requires that you stop using
your keyboard.
Changes or modifications not expressly
approved by RadioShack may cause
interference and void the user’s authority to
operate the equipment.
You must use shielded interfac e cable s with
this equipment.
%100'%6+0)219'4
You can power your keyboa rd usin g intern al
batteries or with standard AC power using
an optional AC adapter.
The keyboard retains the following settings
in its memory even when the power is turned
off as long as power is supplied to it (either
by the batteries or AC adapter):
• tone number
• layer and split
• split point
• touch resp onse
• reverb/chorus
•DSP
• equalizer
• rhythm number
• tempo
•mixer mode
• MIDI keyboard channel
• MIDI in chord judge
• MIDI accompaniment out
• assignable jack
• accompaniment vo lum e
• user area tone (synthesizer tone)
• user area accompanime nt
• user area DSP
• song memory
• registration mode
If the keyboard loses power (by
disconnecting the AC adapter when
batteries are not installed or the batteries
lose power), these settings are lost or
initialized to factory settings.
+056#..+0)$#66'4+'5
Your keyboard can use 6 D batteries (not
supplied) for power. For the best performance and longest life, we recommend
RadioShack alkaline batteries.
1. While pressing the tabs on the battery
compartment co ver on the b ottom of the
keyboard, pull up the cover to remove it.
2. Place the batteries in the compartment
as indicated by the polarity symbols (+
and –) marked next to the compa rtment .
3. Replace the cover.
When the keyboard stops operating
properly, replace the batteries.
75+0)#%219'4
You can power the keyboard using a 9V,
800 mA AC adapter and a size M
Adaptaplug™ adapter (neither supplied).
Both are available at your local RadioShack
store. Connecting an AC adapter
automatically disconnects any internal
batteries.
1. Set the AC adapter’s voltage switch to
2. Insert the Adaptaplug adapter into the
3. Connect the AC adapte r’s barrel plug to
4. Plug the AC adapter’s other end into a
9V
.
adapter’s cord so it reads – TIP.
DC 9V
on the back of the keyboard.
standard AC outlet.
R
• Always connect the AC adapter to the
keyboard before you connect it to AC
power. When you finish, disconnect the
adapter from AC power before you
disconnect it from the keyboard.
2
You can also delete or initialize some
settings independently. See “Resetting the
Keyboard” on Page 15.
Page 3
%100'%6+0)*'#&2*10'5
To listen to your keyboa rd without dis turbing
others, you can connect an optional pair of
stereo headphones with a 1/4-inch (6.35 mm)
plug. Your local RadioShack store sells a
wide selection of headphones. Insert the
headphones’ plug into
the back of the keyboard. Connecting
headphones disconnects the keyboard’s
built-in speakers.
PHONES/OUTPUT
on
.+56'0+0)5#('.;
To protect your hearing, follow these
guidelines when you use headphones.
• Set the volume to the lowest setting
before you begin listening. After you
begin listening, adjust the vo lum e to a
comfortable level.
• Do not listen at extremely high volume
levels. Extended high-volume listening
can lead to permanent hearing loss.
• Once you set the volume , do not
increase it. Over time, your ears adapt
to the volume level, so a volume level
that does not cause discomfort might
still damage your hearing.
%100'%6+0)#0':6'40#.#/2.+(+'4
To amplify your keyboard’s sound, you can
connect it to an optional external amplifier
using an audio cable with a
mm) plug (not supplied). To connect an
external amplifier to your keyboard, insert
the cable’s plug into
1
/4-inch (6.35
PHONES/OUTPUT
on
the back of the keyboard, then connect the
other end of the cabl e to the ampl ifier’s in put
jack(s) (such as AUX IN or TAPE IN). Your
local RadioShack store sells a full line of
amplifiers, speakers, and cables.
Connecting HeadphonesConnecting Headphones
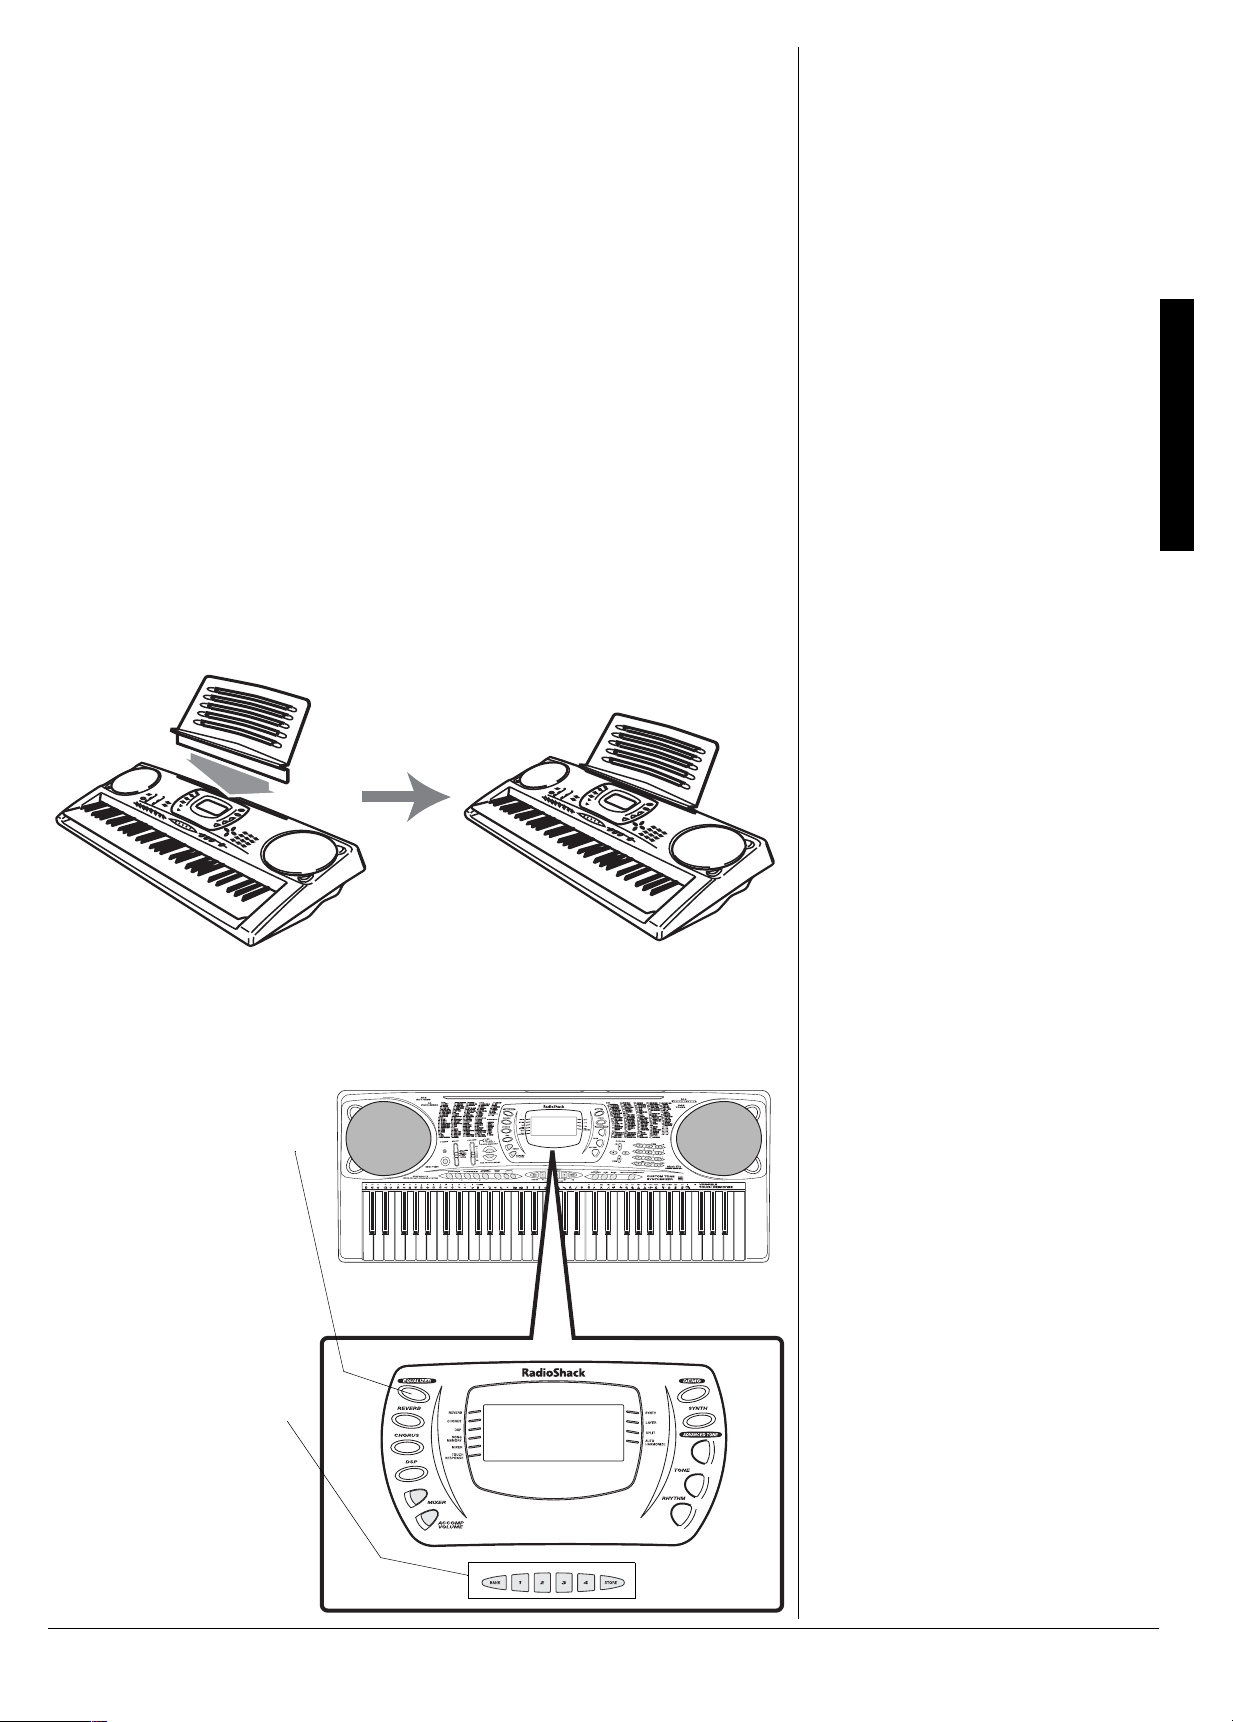
75+0)6*'5*''6/75+%56#0&
To easily view sheet music while playing
your keyboard, insert the supplied sheet
music stand into the slot on the top back
panel.
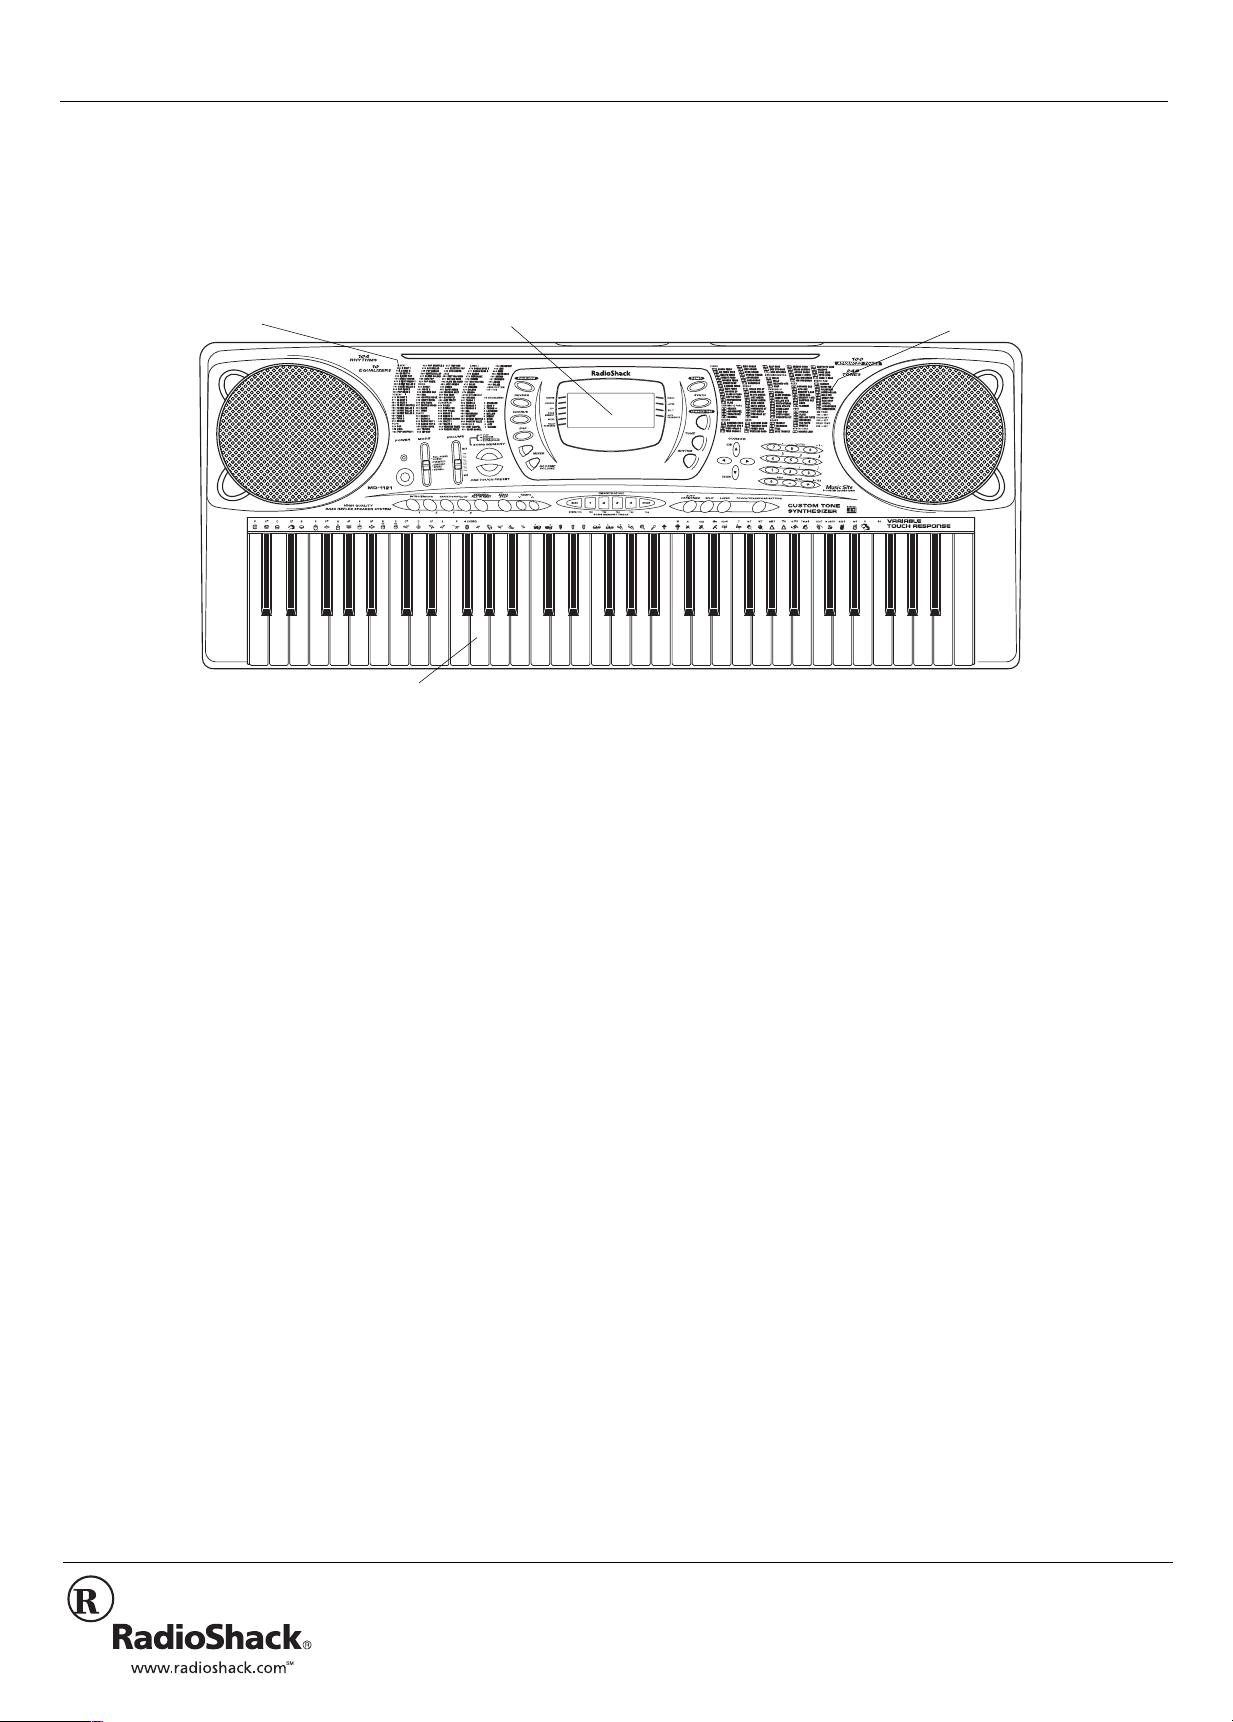
#37+%-.11-#6;174-';$1#4&
Preset 4-Band Equalizers
lets you easily set the tone to
your favorite sound mix
(Standard, Ja zz, Rock,
Dance, Classic, M ellow,
Bright, and so on). You can
even tailor the response of
each frequency band (see
“Using the Equalizers” on
Page 7).
—
Registration Memory
you store up to 32 different
setups of the keyboard’s
controls, so you can instantly
recall them when you need
them (see “Using the
Registration Memory” on
Page 14).
— lets
3
Page 4
Song Memory
— lets you set the keyboard to record up to two songs, six
tracks, and 3,500 notes. The recording remains stored even while the
keyboard is off (see “Using the Song Memory” on Page16).
Automatic Intro/Ending Rhythm
(Back of Keyboard)
— you can set the keyboard so it
automatically adds a 3- to 8measure introduction or 3- to 8measure ending to the selected
auto-rhythm (see “Using INTRO”
on Page 9).
MIDI In/Out Jacks
let you connect the
keyboard to another
MIDI-equipped
device. To connect a
MIDI device to your
keyboard, see
A Quick Look at Your Keyboard
“Making the MIDI
Connections” on
Page 20.
Tune Control
keyboard so you can play in tune with other
instruments (see “Tuning the Keyboard” on Page 14).
—
Headphones/Output Jack
lets you connect headphones
so you can play without
disturbing others, or an exte rnal
amplifier so you can play for a
crowd (neither supplied).
Sustain/Assignable Jack
connect a sustain pedal (not supplied ,
available at your local RadioShack
store or at
RadioShack.com
keyboard so you can sus tain or soften
your keyboard’s sound, or start/stop
an auto-rhythm (see “Using a Sustain
Pedal” on Page 15).
— lets you adjust the pitch of your
—
— lets you
) to the
Fill-In Rhythm
— lets you insert a
short variation into any auto-rhythm
(see “Using FILL-IN” on Page 9).
Tempo Control
— lets
you speed up or slow
down the tempo of any
selected music pattern.
Effects
— lets you add reverb, ch orus , an d m ore pow e rful
sound effects – e ven ta ilo r a pa ram eter to create your own
effect (see “Using the Preset Tones” on Page5).
Auto Harmonize
— lets you automatically add harmony to your
melodies (see “Using Auto Harmonize” on Page12).
Split Function
— lets you use different sounds for the
low- and high-end keys (see “Using SPLIT” on Page 8).
Layer Function
— lets you set the keyboard to play two
different tones at the same time, giving your music a
“layered” effect (see “Using LAYER” on Page 8).
Transpose Function
— lets you instantly
change the key of the music, even while
you are playing (see “Changing Keys” on
Page 14).
4
Page 5
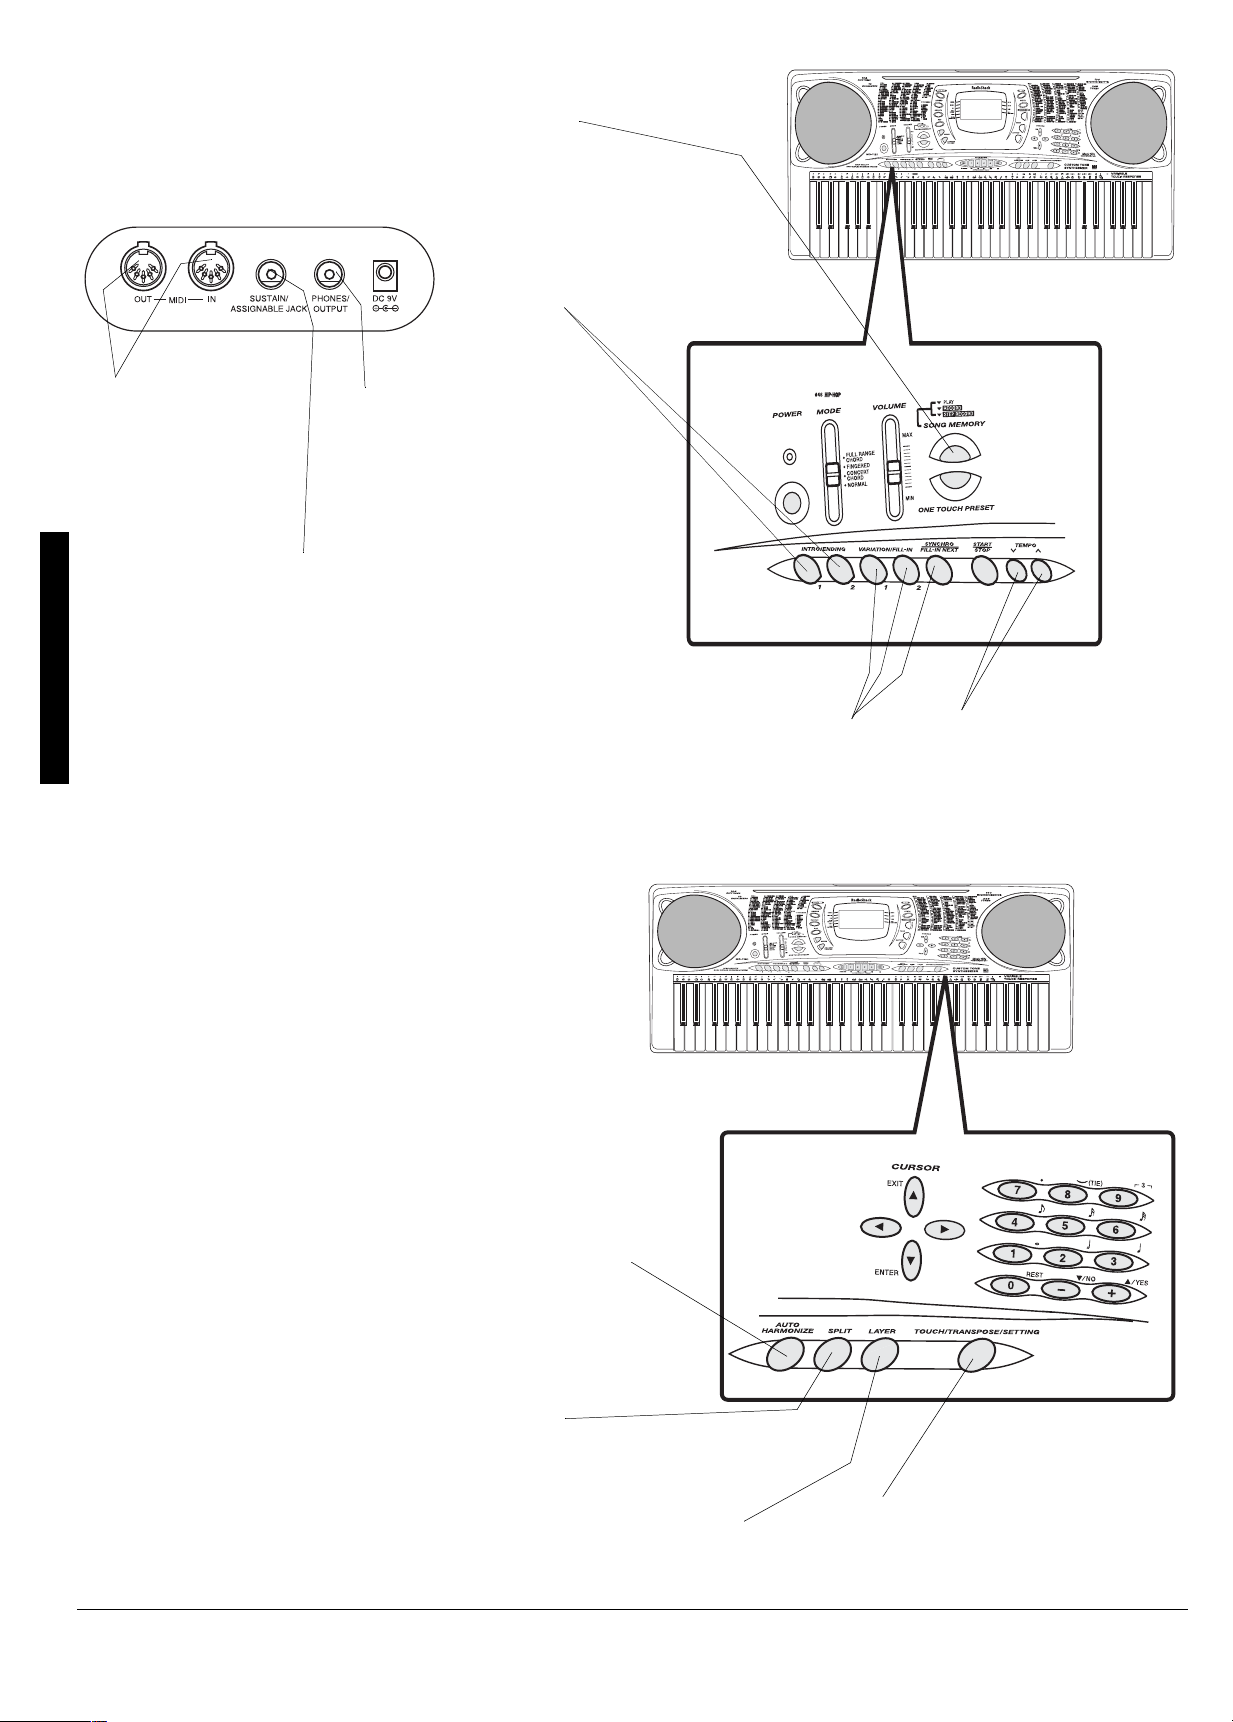
$#5+%12'4#6+10
.
1. Slide
VOLUME
2. To turn on the keyboard, press
The POWER indicator lights and the
display tur ns on.
3. Slide
4. Slide
MODE
VOLUME
begin playing the keyboard.
• To select an auto-rhythm, see “Us ing
the Preset Auto-Rhythms” on
Page 9.
• To play auto accompaniment, see
“Using Auto Accompaniment” on
Page 10.
5. Slide
VOLUME
the sound level or toward
decrease it.
6. To turn off the keyboard, pres s
The POWER indicator and the
keyboard’s display turn off.
The demo tune number appears here.
to
NORMAL
to
toward
toward
MIN
(minimum).
±
.
MAX
MAX
slightly and
to increase
MIN
to
POWER
POWER
To save power, the keyboard automatically
turns off after about 6 minutes if you do not
.
press a key. To turn on the keyboard again,
press
POWER
. To cancel auto power off,
turn on the keyboard while holding down
TONE
. The next time you turn the keyboard
off then back on again, it will automatically
turn off after about 6 minutes.
.
2.#;+0)6*'
'/10564#6+10670'5
&
Your keyboard can play two preprogrammed demonstration tunes. To start the
DEMO
demonstration, press
plays the first demonstration tune (No. 0).
To select the other tune, press
keypad. The selected tune’s number
appears and the tune plays.
The treble and bass
clefs show the notes as
they play.
. The keyboard
–
or + on the
+/2146#06
To prevent hearing damage, always set the
keyboard’s volume to MIN before you turn it on
016'±
±
Basic Operation
The keyboard automatically selects the tone
GRAND PIANO (No. 000) when you turn the
power on. Each time you turn it on after that, it
selects the last selecte d to ne. To select a
different tone, see “Using the Preset Tones”.
Using the Preset Tones
• The keyboard has 32-note (maximum)
polyphonic sound. This means that you can
play up to 32 different notes at the same
time with most of the keyboard’s preset
tones. Some tones are only capable of 16note polyphony.
• Most tones on this keyboard have been
recorded and processed using a technique
digital sampling
called
level of tonal quality, samples are taken in
the low, mid, and high ranges and are then
combined to sound amazingly close to the
originals. You might notice very slight
differences in volume or sound quality for
some tones when you play them at different
positions on the keyboard. This is an
unavoidable result of multiple sampling and
is not a malfunction.
• Repeatedly press + or – to select the next
highest or lowest numbered tone.
• If you enter an incorrect first digit, press
TONE to clear your entry, then enter the
correct digit.
• When you select one of the drum sets (tone
numbers 228–237), each key plays a
different percussion sound. See “Drum
Assignment List” on Page 30. The drum set
sounds change when you change the
rhythm number, play back data stored in
memory, or receive MIDI program change
data.
• Tone numbers 238–247 are the user tone
area. See “Using the Tone Synthesizer” on
Page 13.
. To ensure a high
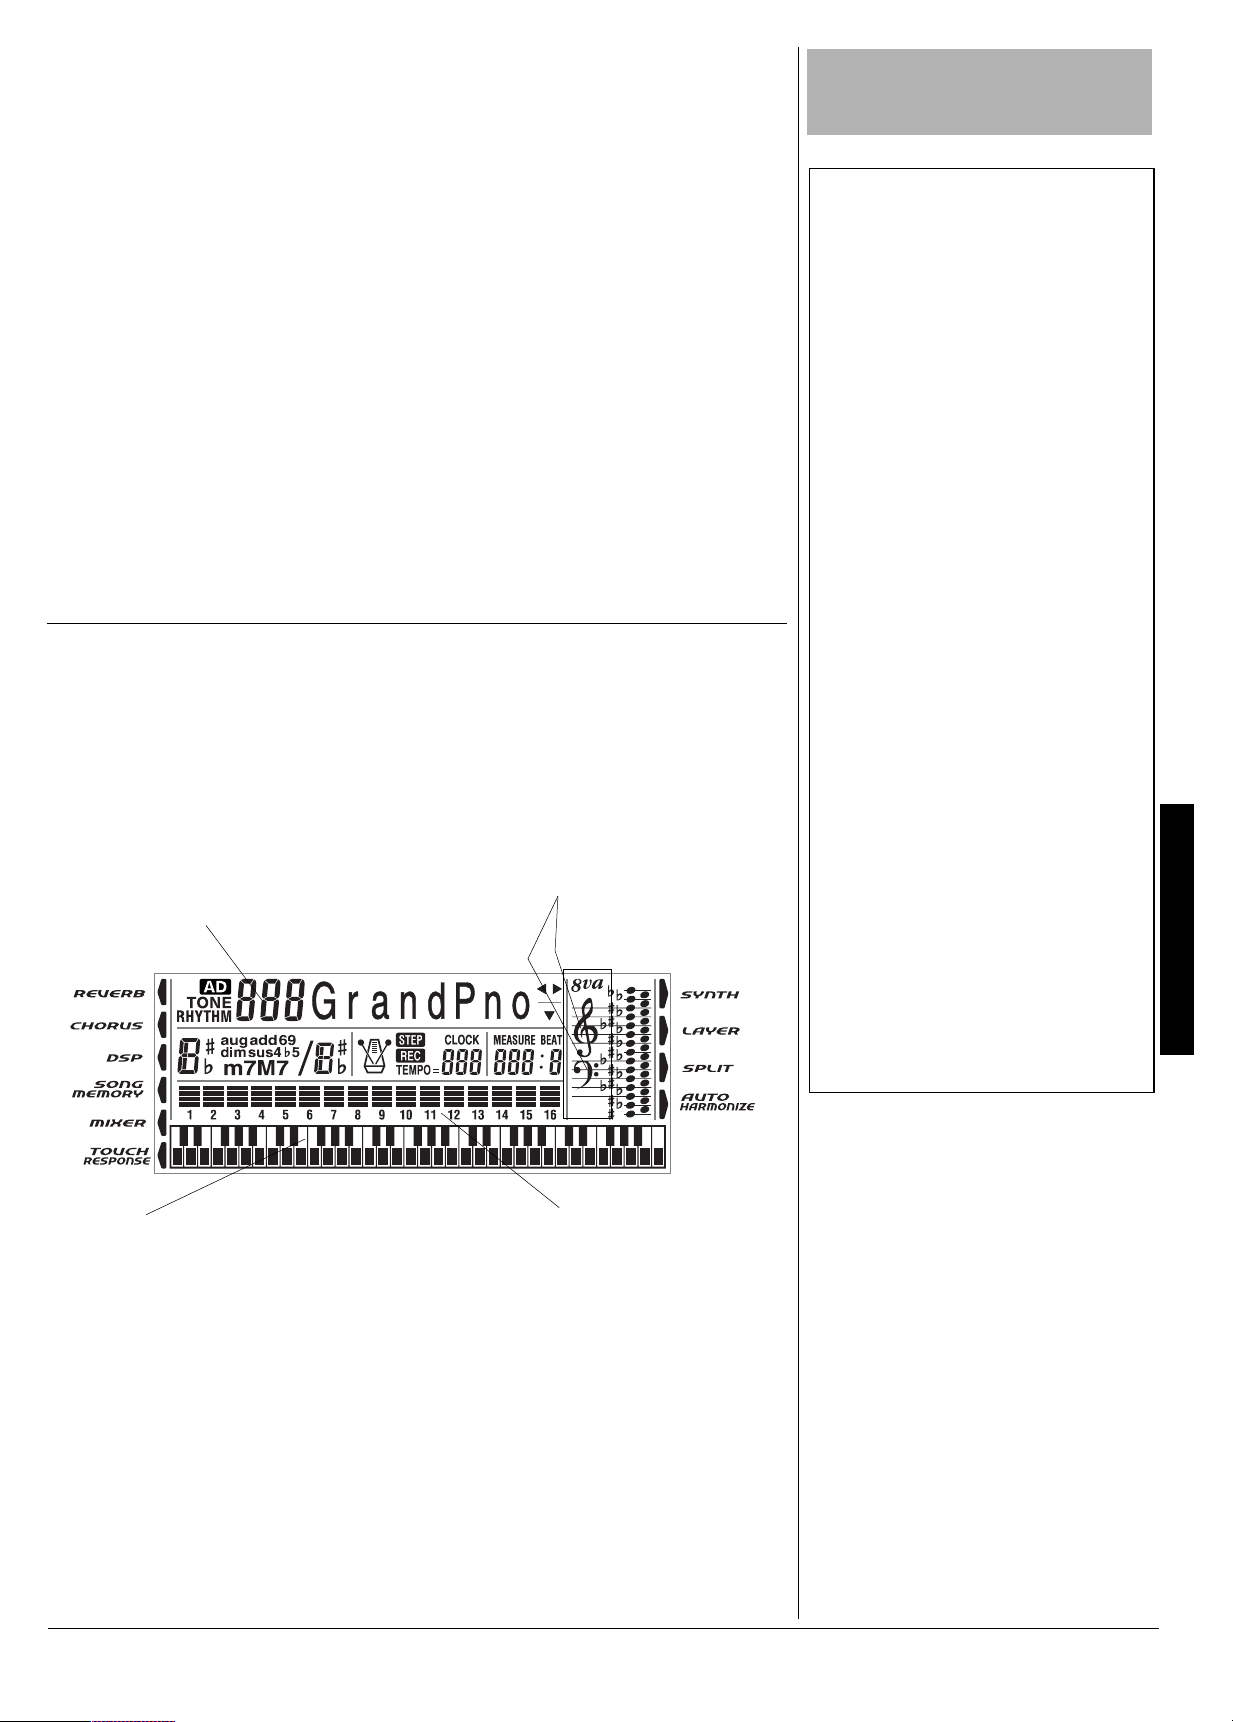
Basic Operation
The keyboard at the bottom of the display
shows the location of the keys being pressed.
75+0)6*'24'5'6610'5
Your keyboard can sound like 248 different
musical instruments or sound effects. The
TONES list on the keyboard’s top panel
shows the name and three-digit number for
the first 100 preset tones. For tones 100227, see “GM Tones” on Page 27.
Follow these steps to select and play a
preset tone.
±
The bar graph shows the
sound level on each of the
16 channels. See “Us ing the
Mixer” on Page 12.
TONE
JED;
JED;
.
1. Press
tone’s number appear.
and the current
JED;JED;
±
2. To play a different tone, choose a
preset tone from the TONES list and
enter its three-digit number on the
keypad. Precede a single- or two-digit
number with zeroes. As you press the
keys, the selected digits appear.
±
3. Play the keyboard to hear the selected
tone and adjust
VOLUME
to the desired
level.
5
Page 6

4. To select a different tone, repeat Ste p 2
JED;
JED;
JED;JED;
appears.
while
TONE
, the tone automatical ly change s to the
advanced tone version of tone number 00.
Using Reverb and Chorus
75+0)#0#&8#0%'&610'
The first 100 tones (num be rs 0 0 to 99 ) hav e
corresponding advanced tones. The
advanced tones use variations of standard
tones created by programming in effects
(DSP) and other settings. For example,
PIANO is modified into STEREO PIANO,
ORGAN becomes ROTARY SPEAKER
ORGAN, and so on. See “Advan ced Tones”
on Page 25.
If a tone number outside the range of 000 to
099 is selected when you press
ADVANCED
Only one of the channels (1 to 16) can have
an advanced tone. If you assign an
advanced tone to another channel, the tone
in the currently assigned channel becomes
the standard tone.
ADVANCED TONE
Press
advanced tone.
currently selected tone changes to its
advanced version. Repeatedly press
to scroll through the ad va nce d t ones, or use
the number buttons to enter the two-digit
tone number.
TONE
Press
7:
7:
disappears.
7:7:
75+0)4'8'4$#0&%*1475
HlX
The reverb feature creates ambience by
causing the sound to linger an d reverberate .
You can choose from 16 different reverb
effects. See “Reverb” on Page32 for details.
The chorus feature gives sound greater
depth by causing it to vibrate. You can
choose from 16 differe nt chorus effect s. See
“Chorus” on Page 32 for details.
5'.'%6+0)4'8'4$%*1475
1. Press
2. Repeatedly press
REVERB
indicator next to REVERB or CHORUS
lights.
number buttons to enter a number to
display the effect you want. See
“Reverb” or “Chorus” on Page 32 for the
type of the effects and the
corresponding numbers.
CHORUS
or
+
or – or use the
. The
%*#0)+0)6*'4'8'4$14
*14752#4#/'6'45
%
You can control the parameters of an effect
to change how it sounds. The parameters
you can control vary dep ending on the effec t
type.
1. After selecting the effect you want,
press G (
setting screen appears.
2. Repeatedly press I or J (
display the parameter you want to
change.
Reverb Parameters
Reverb effects are classified as reverb
or delay type. Parameter settings vary
depending on the type.
Reverb Type Parameters (No. 0 to 5, 8
to 13)
HlX
HlX
HlXHlX
Controls the reverb size. A larger
number produces larger reverb.
ENTER
(Reverb)
). The parameter
CURSOR
B[l[b
B[l[b (&&&
&&&
'(-
'(-
&&&&&&
to
'(-'(-
B[l[bB[l[b
) to
) —
HlX J_c[
HlXHlX
long reverb continues. A larger number
produces longer reverb.
;HB[l[b
;HB[l[b
;HB[l[b;HB[l[b
— Controls the initial reverb volum e.
The initial echo sound is the first sound
reflected from the walls and ceiling. A
larger value specifies a larger echo
sound.
>_]^:Wcf
>_]^:Wcf (&&&
>_]^:Wcf>_]^:Wcf
damping of high frequency
reverberation. A smaller val ue damps
high sounds, creating a dark reverb. A
larger value does not damp high
sounds, creating a brighter reverb.
Delay Type Parameters (No. 6, 7, 14,
15)
:[bWoB[l[b
:[bWoB[l[b (&&&
:[bWoB[l[b:[bWoB[l[b
size of the delay sound. A higher value
produces a larger delay sound.
:[bWo<8
:[bWo<8
:[bWo<8:[bWo<8
Adjusts delay repeat. A higher value
produces a greater number of repeats.
;HB[l[b
;HB[l[b
;HB[l[b;HB[l[b
— Controls the initial reverb volum e.
The initial echo sound is the first sound
reflected from the walls and ceiling. A
larger value specifies a larger echo
sound.
>_]^:Wcf
>_]^:Wcf (&&&
>_]^:Wcf>_]^:Wcf
damping of high frequency
reverberation. A smaller val ue damps
high sounds, creating a dark reverb. A
larger value does not damp high
sounds, creating a brighter reverb.
Chorus Parameters
9^e
9^e
9^e9^e
size of the ch orus sound.
9^e
9^e HWj[
9^e9^e
undulation speed of the chorus sound.
A higher value produces faster
undulation.
to select the
7:
7:
appears, and the
7:7:
to return to the standard tone.
J_c[ (&&&
&&&
'(-
'(-
to
J_c[J_c[
&&&&&&
(Initial Echo Sound) (
&&&
&&&&&&
&&&
&&&&&&
(Feedback) (
(Initial Echo Sound) (
&&&
&&&&&&
(Chorus)
HWj[ (&&&
&&&
HWj[HWj[
&&&&&&
) —Controls how
'(-'(-
'(-
'(-
to
) — – Adjusts the
'(-'(-
'(-
'(-
to
) — Specifies the
'(-'(-
&&&
&&&
&&&&&&
'(-
'(-
to
) — – Adjusts the
'(-'(-
B[l[b
B[l[b (&&&
&&&
B[l[bB[l[b
&&&&&&
'(-
'(-
to
)—Sets the
'(-'(-
to
to
'(-
'(-
'(-'(-
'(-
'(-
'(-'(-
+
–
or
&&&
&&&
'(-
'(-
to
&&&&&&
'(-'(-
) —–
&&&
&&&
'(-
'(-
to
&&&&&&
'(-'(-
)—Sets the
)
)
6
Page 7

9^e
9^e :[fj^
:[fj^ (&&&
&&&
'(-
'(-
to
9^e9^e
:[fj^:[fj^
&&&&&&
undulation depth of the ch orus sound. A
higher value produces deeper
undulation.
)—Sets the
'(-'(-
3. Repeatedly press + or – or use the
number buttons to input the parameter
setting you want.
4. Press H (
effect selection screen.
EXIT
). This returns to the
&52&+)+6#.5+)0#.241%'5514
DSP effects are applied to the path be tween
the sound source and output. You can add
the effect to any sound, even after you
added reverb or chorus effect. See “DSP”
on Page 32 for more details.
You can also create your own DSP effects
or download the data from
www.radioshack.com
keyboard. The keyboard has ten DSP effec t
memories so you can store custom DSP
effects. See “Saving DSP Parameter
Settings” on this page and “Using the Data
Download Service” on Page 21 for more
information.
and transfer it to the
5'.'%6+0)#&526;2'
1. Press
2. Repeatedly press
DSP
. The indicator next to DSP
lights.
+
or – to select the
DSP type you want. See “DSP” under
“Effect List” on Page 32 for the type of
the effects and the corresponding
&&&
&&&
'&/
'&/
numbers. The DSP number (
7Z
7Z
(advanced tone), or
7Z7Z
created using DSP) appears.
Kih
Kih
KihKih
to
&&&&&&
'&/'&/
(user tone
5'66+0)$#5+%&52
#4#/'6'45
2
You can change these basic DSP
parameters.
),
3. Repeatedly press
number using the number buttons to
change the parameter setting.
EXIT
4. Press H (
).
%*#0)+0)&522#4#/'6'45
You can control the relative strength of a
DSP and how it is applied.
1. After selecting the DSP type you want,
G
press
2. Repeatedly press I or J (
display the parameter you want to
change.
Parameters 0 to 7
the algorithm of the selected DSP. See
“DSP Algorithm List” on Page34.
:$HlXIdZ
:$HlXIdZ
:$HlXIdZ:$HlXIdZ
'(-
'(-
'(-'(-
processed sound is sent to reverb.
:$9^eIdZ
:$9^eIdZ
:$9^eIdZ:$9^eIdZ
'(-
'(-
'(-'(-
processed sound is sent to chorus.
3. Repeatedly press
number using the number buttons to
change the parameter setting.
4. Press H (
ENTER
(
(DSP Reverb Send) (
) — Sets how much of the DSP-
(DSP Chorus Send) (
) — Sets how much of the DSP-
EXIT
).
±
+
or – or enter a
).
CURSOR
— These depend on
&&&
&&&
&&&&&&
&&&
&&&
&&&&&&
+
or – or enter a
) to
to
to
±
016'±
±
Changing the Reverb or Chorus
Parameters
You can turn effects on/off or change the effect
level for each keyboard channel separately.
See “Using the Mixer” on Page 12 for more
information.
Selecting a DSP Type
You must turn on the DSP lines of the required
parts using the mixer function. See “Using the
Mixer” on Page 12.
Changing DSP Parameters
• The effects can be turned on/off or have
their levels set separately for each
keyboard channel. See “Using the Mixer”
on Page 12.
• Playing a demo tune automatically changes
the effect to the one assigned to the tune.
You cannot change or cancel a demo tune
effect.
• Changing the effect setting while the
keyboard is playing causes a slight break in
the sound when the effect changes.
• The advanced tones automatically turn on
the DSP line for more effective tones. If you
assign an advanced tone to a keyboard part
(Channels 1 through 4), the DSP line turns
on automatically and the DSP selection
changes according to the advanced tone
settings.
• In the mixer mode, the DSP line on/off
setting for a part with an advanced tone is
on, while the setting for a part that does not
have an advanced tone is off. DSP effects
previously applied to these parts are
cancelled and the tone might sound
different. Use the mixer editing sequence to
turn DSP back on (see“Using the Mixer” on
Page 12).
:IFLeb
:IFLeb
(Volume) (
:IFLeb:IFLeb
post DSP volume.
:IFFWd
:IFFWd(#,*
:IFFWd:IFFWd
stereo pan (relative position between left
and right channels).
:IF>ebZed%e<<
:IF>ebZed%e<<
:IF>ebZed%e<<:IF>ebZed%e<<
current DSP line after you change the tone.
Select
original setting of the newly selected tone.
For advanced tones, changing the tone
turns off all DSP line settings except on the
currently selected channel.
#,*
#,*#,*
e<<
e<<
to change the DSP line to the
e<<e<<
1. Press
2. Repeatedly press I or J (
display the parameter you want to
change.
&&&
&&&
'(-
'(-
to
&&&&&&
'(-'(-
!,)
!,)
to
) — Sets the post DSP
!,)!,)
ed
—Select
DSP
.
ed
eded
) — Sets the
to keep the
CURSOR
) to
75+0)6*''37#.+<'45
The keyboard has 10 preset f our-band
equalizers. You can also adjust the gain of
each of the four bands to suit your personal
preference.
5#8+0)&522#4#/'6'4
'66+0)5
5
You can save up to 10 modified DSP
settings in the user area for later recall.
1. After making the DSP parameter
settings you want, press G (
The DSP number of the user area
flashes.
2. Repeatedly press
user area DSP number (100-109) you
want to save.
3. Press G (
IWl[EA
IWl[EA
IWl[EAIWl[EA
returns to the tone or rhythm selection
screen.
ENTER
briefly appears and the display
+
or –to select the
) to store the effect.
ENTER
5'.'%6+0)6*''37#.+<'4
;2'
6
1. Press
EQUALIZER
selected equalizer type appears.
. The currently
).
DSP (Digital Signal Processor)
7
Page 8

Using SPLIT
016'±
±
Adjusting the Gain
Gain settings apply only to the current
equalizer type. When you change the
equalizer type, the default gain settings for the
newly selected equalizer type take effect.
Using Split
• If SPLIT is on when you turn off the
keyboard, it remains on the next time you
turn the keyboard back on.
• When you turn on SPLIT, the last selected
settings appear.
• When you select Concert Chord or
Fingered auto accompaniment, the
accompaniment keyboard range is shifted
to the split point you set.
Using Layer
• If LAYER is on when you turn off the
keyboard, LAYER will still be on the next
time you turn on the keyboard.
• When you turn on LAYER, the previous
tone settings appear.
2. Repeatedly press + or – or enter a
number using the number buttons to
select the equalizer type you wan t.
IjWdZWhZ
The equalizer type (
Jh[Xb[!
Jh[Xb[!,BekZd[ii
Jh[Xb[!Jh[Xb[!
:WdY[
:WdY[,@Wpp
:WdY[:WdY[
graph on the display shows the
frequency response of the type that
appears.
Press H (
equalizer setting screen.
BekZd[ii,C[bbem
BekZd[iiBekZd[ii
@Wpp
, or
@Wpp@Wpp
EXIT
IjWdZWhZ,8Wii!
IjWdZWhZIjWdZWhZ
C[bbem,8h_]^j
C[bbemC[bbem
9bWii_Y
9bWii_Y
) appears. The bar
9bWii_Y9bWii_Y
EQUALIZER
) or
8Wii!
8Wii!8Wii!
8h_]^j,HeYa
HeYa
8h_]^j8h_]^j
HeYaHeYa
to exit the
,
,
#&,756+0)6*')#+0
1. After selecting the eq ualiz er type , pres s
G
ENTER
(
).
75+0)52.+6
The SPLIT feature lets you play two d ifferent
tones on opposite ends of the keyboard, so
the low-end keys play one tone, and the
high-end keys play another. The main tone
sounds in Channel 1 and the split tone
sounds in Channel 3. You can use the m ixer
function to change the volume or other
settings in each channel. See “Using the
Mixer” on Page 12. You can change the split
point at any time.
1. Press
2. Use the number buttons to enter the
3. Press
4. Enter the three-digit number for the
TONE.
three-digit number for the tone yo u want
the high-end keys to play.
SPLIT
. The SPLIT indicator
appears.
tone you want the low-end keys to play.
2. Repeatedly press I or J (
select the band you wa nt to adjust (
C_ZBem
C_ZBem,C_Z>_]^
C_ZBemC_ZBem
graphs for the corresp ondin g frequen cy
range flash.
3. Repeatedly press
number using the number buttons to
make the adjustment for the band you
want. You can adjust within the range of
–12 to +12. The bar graphs change in
magnitude as you adjust.
4. Press H (
type selection screen, then press
EQUALIZER
±
5. Hold down
where you want the high-end tones to
begin. The selected key’s name
appears.
For example, if you set the sp lit poin t to
be F below middle C,
6. Play both the low and high-end keys to
hear the selected split tones.
C_Z>_]^
C_Z>_]^C_Z>_]^
, or
EXIT
) to return to the equalizer
to exit the equalizer mode.
SPLIT
, and press the key
T o sele ct a different low-end ton e
the three-digit number for the new lowend tone while the SPLIT indicator
appears.
To select a different high-end tone
SPLIT
press
enter the three-digit number for the new
high-end t one. Then pre s s
so the SPLIT indicator appears.
To cancel SPLIT
SPLIT
to turn off its indicato r, then
, repeatedly press
until its indicator disappears.
CURSOR
>_]^
>_]^
). The bar
>_]^>_]^
+
or – or enter a
<)
<)
appears.
<)<)
SPLIT
) to
Bem
Bem
BemBem
±
, enter
,
again
±
,
75+0).#;'4
The keyboard lets you play two different
preset tones at the same time, creating a
“layered” effect when you press one key.
The first tone you select is called the
and the second tone is called the
tone
tone
.
1. Press
2. Enter the three-digit number for the
3. Enter the three-digit number for the
TONE
.
base tone then press
LAYER indicator appears.
layer tone.
LAYER
base
layer
. The
4. Play the keyboard to hear the selected
layered tones.
To select a different layer tone
the three-digit nu mb er f or the new layer
tone while the LAYER indicator
appears.
To select a different base tone
LAYER
to turn off its ind icator , then ente r
the three-digit nu mb er for the new base
tone. Then press
LA YER ind ic ator app ears .
To cancel LAYER
LAYER
until its indicator disappears.
75+0)52.+6#0&.#;'461)'6*'4
You can combine the split and layer
features, so you can play one layered
combination of tones on the low-end keys
and another on the high-end keys.
1. If the SPLIT or LAYER indicator is on,
SPLIT
press
2. Enter the number f or t he hig h-e nd bas e
tone on the keypad.
or
LAYER
, enter
, press
LAYER
again so the
, repeatedly press
to turn it off.
±
8
Page 9

3. Repeatedly pres s
SPLIT
until the SPLIT
indicator appears.
4. Enter the number for the low-end base
tone.
SPLIT
5. Repeatedly pres s
until the SPLIT
indicator disappears.
LAYER
6. Repeatedly press
until the
LAYER indicator appears.
8. Press
9. Enter the number of the layered t one for
10. If desired, hold down
11. Play the keyboard to hear the selected
SPLIT
. The SPLIT indicator
appears.
the low-end keys.
the key where you want the high-end
tones to begin.
tones.
7. Enter the number of the layered tone for
the high-end keys.
To cancel the SPLIT/LAYER combination,
press each button so both the SPLIT and
LAYER indicators disappear.
75+0)6*'24'5'6#7614*;6*/5
Your keyboard has 100 preset aut o-rhythms
that provide a steady beat for your music.
The name and two-digit number of each
preset auto-rhythm is listed on the
keyboard’s top panel. You can also
download up to 4 sets of accompaniment
data and store them into the keyboard’s
memory. See “Using the Data Download
Service” on Page 21.
You can play a preset auto-rhythm on the
keyboard in any of the following ways:
• Select and play a rhythm (see
“Selecting/Playing an Auto-Rhythm”)
• Synchronize the start of a rhythm with
your music (see “Using SYNCHRO”)
• Start a rhythm with a special
introduction (see “Using INTRO”)
• Briefly vary the pattern of a rhythm (see
“Using FILL-IN”)
• Play an alternate v ersion (variati on) of a
rhythm (see “Using FILL-IN NEXT” on
Page 10)
• Stop a rhythm with a special ending
(see “Using ENDING” on Page10)
5'.'%6+0)2.#;+0)#0
#
7614*;6*/
1. Press
RHYTHM. H>OJ>C
and number of the current auto-rhythm
appear.
±
2. To select a different rhythm, choose an
auto-rhythm from the 100 RHYTHMS
list and enter its three-digit number on
the keypad. Precede a single- or twodigit number with zero es. Or , repeatedly
+
or – to move to the next higher
press
or lower numbered rhythm .
H>OJ>C
H>OJ>CH>OJ>C
and the name
±
slightly from the normal rhythm, so it is
almost like having two rhythms in one!
4. Adjust
VOLUME
to the desired level.
5. To change the auto-rhythm speed,
press (or hold down)
The current tempo setting appears.
6. Play the keyboard along with the autorhythm.
7. To select a different rhythm, repeat
Steps 1 and 2.
8. To stop the auto-rhythm, press
STOP
.
75+0)5;0%*41
This feature lets you synchronize the start of
an auto-rhythm with the beginning of your
music.
After you select and enter an auto-rhythm,
SYNCHRO/FILL-IN NEXT
press
playing the keyboard. The keyboard automatically begins to play the rhythm when
you press any key in the accompaniment
keyboard range (see “Using Auto
Accompanim ent” on Page 10).
75+0)+0641
This feature lets you start the selected autorhythm with a light, 3- to 8-measure introduction that blends easily into the selected
rhythm.
To start a rhythm with an in troduction, s elect
and enter the rhythm, then press
ENDING 1
selected variation (1 or 2) plays, then the
selected auto-rhythm automatically starts.
or 2. The introduction for the
SPLIT
then press
TEMPO
, then begin
¼or¹
START/
INTRO/
.
±
016'±
±
Selecting/Playing an Auto-Rhythm
• The keyboard automatically selects the
rhythm 8 BEAT 1 (No. 000) when you turn
the power on. Each time you turn it on after
that, it selects the last selected rhythm.
• If you incorrectly enter the first digit of the
rhythm, press RHYTHM to clear the entry
and return to the last selected auto-rhythm.
• You can also adjust the tempo by first
pressing TEMPO
desired number of beats per minute in three
digits (030 to 255), or by holding down + or
– on the keypad.
• To reset the tempo to its default (original)
speed, press TEMPO
time.
or ¹, then entering the
¼
and ¹at the same
¼
Using the Preset Auto-RhythmsUsing the Preset Auto-Rhythms
MODE
3. Set
START/STOP
NORMAL
to
, then press
to start the selected auto-
rhythm.
Or, you can press
VARIATION/FILL-IN 1
or 2 to start the rhythm. Each of the
keyboard’s preset aut o-rhy thm s has a
built-in variation (alter nate) to its norma l
beat pattern. The variation differs
75+0)(+..+0
This feature lets you insert a short (1- to 2measure) variation in the beat pattern of a
selected auto-rhythm. While the autorhythm is playing, press and release
VARIATION/FILL-IN 1
the variation you s tart ed w ith . T he ke yboard
inserts a 1- to 2-measure fill-in of either
variation, then the original rhythm
or 2, corresponding to
9
Page 10

016'±
±
Using Auto Accompaniment
• You can use the keyboard’s rhythm controls
(INTRO/ENDING 1 or 2, VARIATION/FILL-
IN 1 or 2, and SYNCHRO/FILL-IN NEXT)
with all three types of auto accompaniment.
• After you press the auto accompaniment
keys while using concert chord or standard
fingering, the keyboard plays the same
chord until you press other accompaniment
keys to play a different chord or press
START/STOP.
• When you select Concert Chord or
Standard Fingering mode, the range of the
accompaniment keys is set by the split
point. See “Using SPLIT” on Page 8.
Concert Chord
You can press any labeled note(s) to the right
of the lowest note in the chord to produce a
minor, a dominant seventh, or minor seventh
chord.
automatically resumes at the end of the
current measure.
When you press another variation button
V A RIATION/FILL-IN 2
(
while you are playing
variation 1, for example ), the keyboard sta rts
to play the newly-selected var iati on and
does not insert a fill-in.
75+0)(+..+00':6
To switch to the other variation of the
selected auto-rhythm during play, press
SYNCHRO/FILL-IN NEXT
while the rhythm is
playing. The fill-in pattern of the current
variation plays, then fill-in of the other
variation, and the rhythm switches to the
other vari ation.
75+0)'0&+0)
To end the selected rhythm with a special
flourish, press
the auto-rhythm is playing. The keyboard
plays a special ending of the selected type
(1 or 2), then auto matically stops the rh ythm.
The ending pattern sta rts i mm edi ate ly if yo u
press the button before the second beat of
the current measure. If you press after the
second beat, the ending pattern starts from
the next measure.
INTRO/ENDING 1
or 2 while
Using Auto Accompaniment
75+0)#761#%%1/2#0+/'06
The 18 keys on the left side of t he ke yb oard
with note labels above them are called
accompaniment ke ys .
Accompaniment
Keyboard
Melody
Keyboard
You can set t he keyboard to play three
different types of auto ac companime nt using
the accompaniment keys.
Concert Chord
•
±
— lets you play chords
on the accompaniment keys using
chord formations of from one to four
notes. The number of keys you press
determines the type of chord that plays
(see “Concert Chord”).
Standard Fingering
•
— lets you play
chords on the accompaniment keys
using standard chord formations of
three or four notes (see “Standard
Fingering” on Page 11).
Full-Range Chord
•
— lets you play the
melody using the entire keyboard while
the keyboard plays accompaniment
based on your auto-rhythm selection.
2. Within 5 seconds, enter a number from
0 0 0
(softest) to
keypad. The numbers appear as you
press the keys.
Or, press
repeatedly press – or + to select the
next lowest or highest accompaniment
volume setting.
To reset the accompaniment volume to
its default value of 87, press
VOLUME
then press – and + at the same
time.
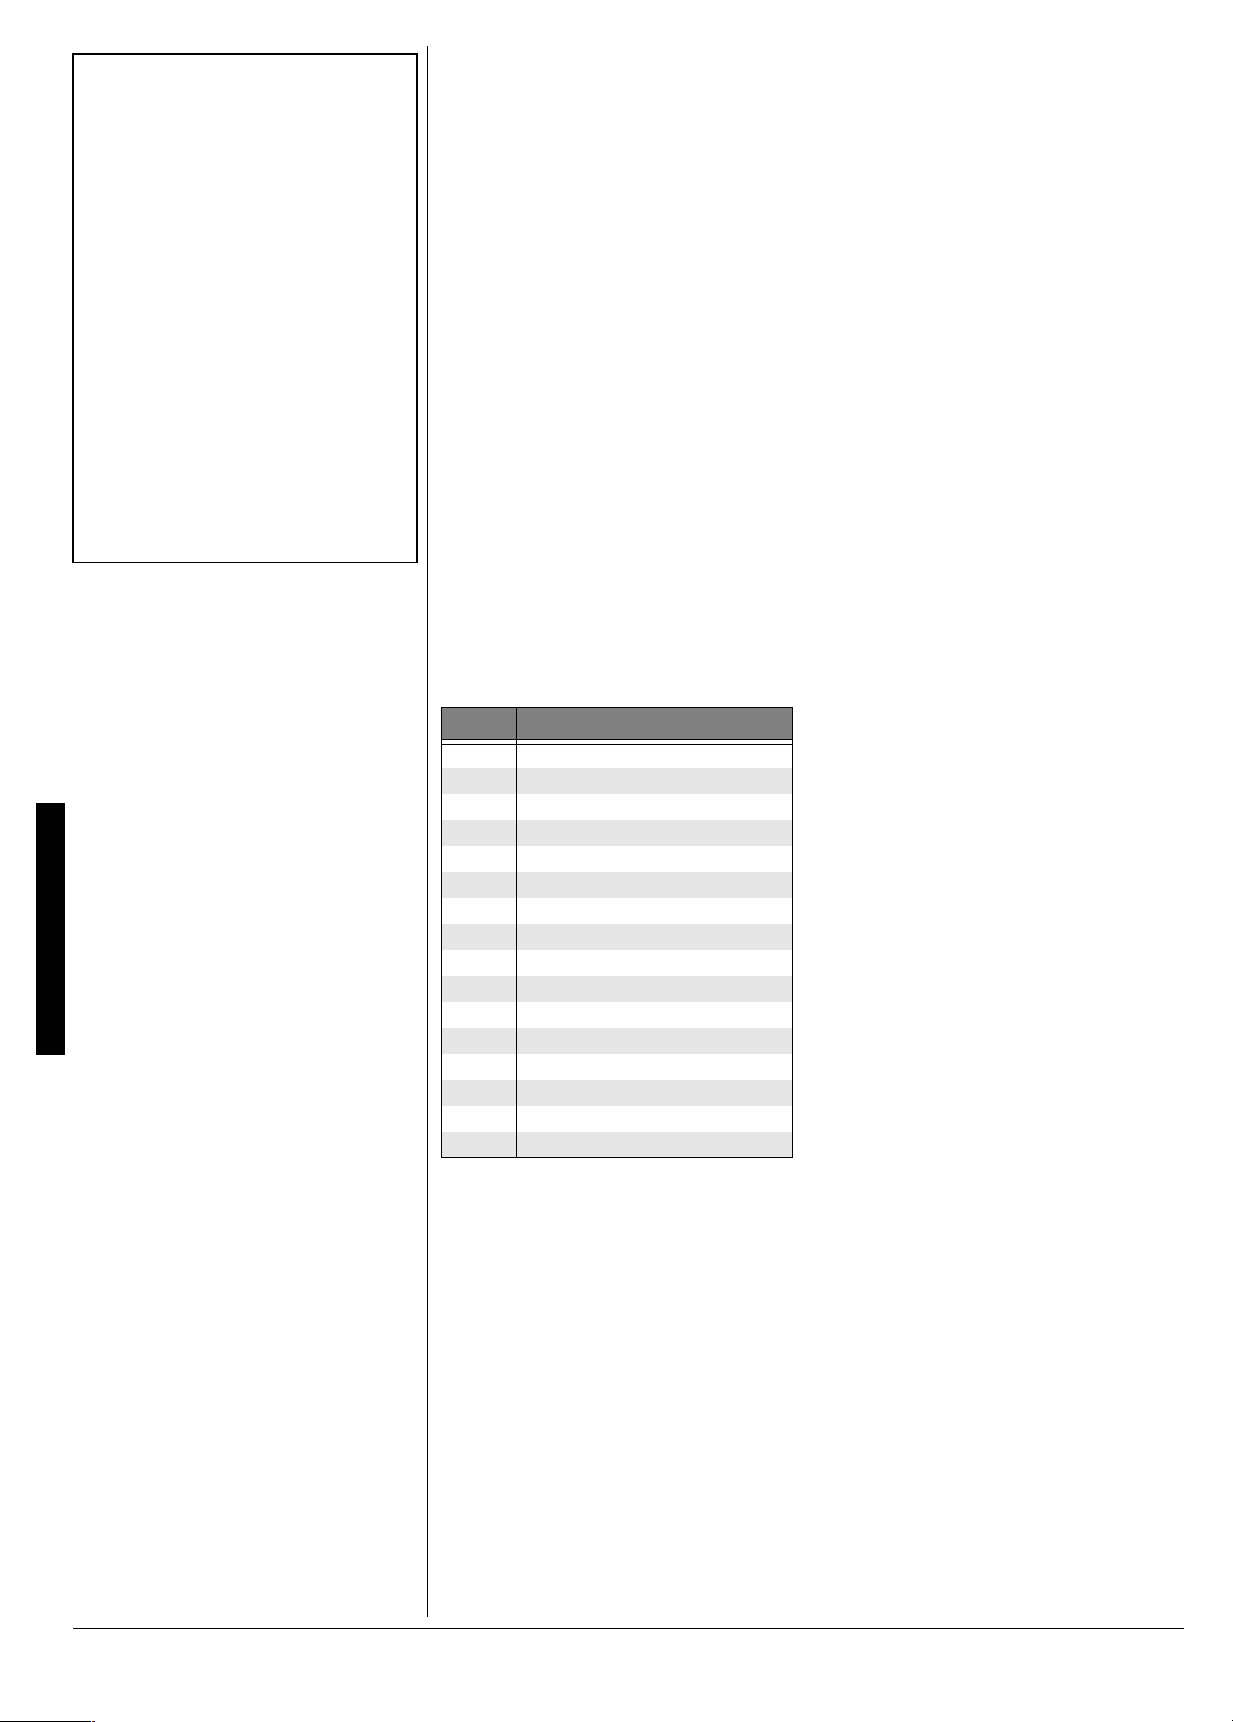
%10%'46%*14&
The concert chord method lets beginning keyboard players e asi ly s ele ct and play a chord .
The number of accompaniment keys you
press determines the type of chord that
plays. This chart shows the chord type that
plays when you press one, two, three, or
four accompaniment keys at the same time.
C D E F G A B C D E F
1 2 7
(loudest) on the
ACCOMP VOLUME
then
ACCOMP
10
The auto-accompanim ent patterns consis t of
four parts: chord 1, chord 2, bass, and
rhythm. You can delete any of the parts by
using the mixer function. See “Using the
Mixer” on Page 12.
#&,756+0)6*'
#
%%1/2#0+/'0681.7/'
The keyboard lets you adjust the volume of
your accompaniment separately from the
overall volume of the keyboard.
1. Press
ACCOMP VOLUME
. The current
accompaniment vo lume setting
appears.
C D E F G A B C D E F
C D E F G A B C D E F
C D E F G A B C D E F
Page 11
The lowest note you play determines the
key of the chord. For example, if the lowest
note is C, the keyboard plays a C chord.
1. Set
MODE
CONCERT CHORD
to
±
.
2. Enter a two-digit auto-rhythm number.
3. To start the auto-rhythm before the auto
accompaniment, press
NTRO/ENDING 1
I
or 2.
START/STOP
or
Or, to synchronize the start of the
selected auto-rhythm with your
accompaniment, press
IN NEXT
.
SYNCHRO/FILL-
4. Begin the accompaniment at the
desired interval by pres sing th e desire d
accompaniment key(s).
To play a melody along with the
accompaniment, press any key(s) to
the right of the accompaniment keys.
5. Adjust the tempo and
VOLUME
to the
desired lev els.
6. To change chords without interrupting
the rhythm, simply press the auto
accompaniment ke y(s) requ ired to form
the new chord.
7. To stop auto accompaniment and the
auto-rhythm, press
START/STOP
.
Follow these steps to start standard
fingering auto accompan im ent.
1. Set
MODE
FINGERED
to
.
2. Select and enter an auto-rhythm.
3. To start the auto-rhythm before your
auto accompaniment, press
STOP
INTRO/ENDING 1
or
START/
or 2.
Or, to synchronize the start of the
selected auto-rhythm with you r
accompaniment, press
IN NEXT
.
SYNCHRO/FILL-
4. Begin the accompaniment at the
desired interval by pressing at least
three accompaniment keys to play the
desired chord.
To play a melody along with the
accompaniment, press any key(s) to
the right of the accompaniment keys.
5. Adjust
TEMPO
and
VOLUME
to the
desired levels.
6. To change chords without interrupting
the rhythm, simply press the auto
accompaniment keys required to form
the new chord.
7. To stop auto accompaniment and the
auto-rhythm, press
START/STOP
.
016'±
±
Standard Fingering
• You do not have to press the key marked
with parentheses on the keyboard in the
chart to produce a 7, m7, M7, mM7, add9,
or madd9 chord.
• Although the chart shows only one possible
fingering position for each chord, it is
possible to play a chord using several
different positions. For example, the
following three positions produce the same
C chord.
J
5
• When you play an aug, 7
the lowest note you play determines the
root of the chord. Be sure that your
fingering correctly defines the root you
want.
• See “Fingered Chord Chart” on Page 31 for
all the chords you can play on your
keyboard using standard fingering
accompaniment.
, or dim7 chord,
Full-Range Chords
• You cannot use inverted fingerings. The
lowest note is the root.
• You can play the same chord without
pressing the 5th G.
• When the notes of a chord are more than 5
notes apart, the lowest sound becomes the
base note.
Using Auto Accompaniment
56#0&(+0)'4+0)
The standard fingering method uses
standard formations of three or four notes,
and lets the experienced musician play a
wider variety of accompaniment chords.
This chart shows the 15 chord types you
can play on your keyboard by using
standard fingering.
±
(7..4#0)'%*14&5
While the concert chord and standard
fingering methods limit ch ord formations to
the accompaniment keys, the full-range
chord method lets you play chords of any
type using any of the key board’s keys.
MODE
Set
follow the steps unde r “Stand ard Fin gering”.
If you press three or more keys that form a
chord anywhere on the keyboard, the
keyboard plays that chord. The keyboard
responds with melody sounds if you press
fewer than three keys.
In the full-range chord mode, the keyboard
recognizes 23 more chords (in additi on t o
the 15 in the fingered chord mode). The
following is an ex ampl e of th ose c hords with
C as the base note.
6
Cm
C
C
_
C
BCmDmFm Gm Am B
_
C
J
5
7
Dm
_
C
FULL RANGE CHORD
to
and
±
6
69
C
.
DEFG AJB
_
_
_
_
C
C
_
_
C
C
J
7
A
F7Fm7Gm7A
_
_
C
C
C
_
C
_
C
_
C
C
_
_
C
C
J
_
C
add9
_
C
J
_
C
J
m
_
C
11
Page 12
016'±
±
Using Auto Harmonize
• Auto harmonize does not work when you
select full range chord auto accompaniment
or no auto accompaniment.
• The harmony melody in auto harmonize
mode uses Channel 5. You can change the
tone or volume setting of the harmony by
using the keyboard’s mixer function (see
“Using the Mixer”).
Using the Mixer
• Normally, keyboard play is assigned to
Channel 1. When you use auto
accompaniment, parts are assigned to
Channels 6–10.
• When you use the keyboard as the sound
source for another MIDI device, all 16
channels are assigned musical instrument
parts, Channel 10 is reserved for drum
parts only, per MIDI standard.
• The mixer settings also affect the
corresponding MIDI output.
75+0)#761*#4/10+<'
When using auto-accompan im ent in the
fingered or concert chord modes, press
AUTO HARMONIZE
harmony to your melodies. The indicator
next to AUTO HARMONIZE lights, and the
keyboard adds harmon y based on the chord
playing on the accompaniment key section.
±
to automatically add
75+0)10'617%*24'5'6
The keyboard’s one-touch preset feature
recalls these characteristics for a selected
rhythm:
75+0)6*'/+:'4
The keyboard plays multiple parts at the
same time in up to 16 separate channels
during auto accompaniment, or memory
playback, or when receiving MIDI data. You
can control the on/off setting, volume, and
parameters of each of the keyboard’s
channels just as you would with a sound
mixer.
This table shows the parts assig ned to each
channel.
±
• tone
• tempo
• layer on/off
• effect type
• auto harmonize on/off
After selecting a rhythm, press
PRESET
standby mode. Start the accompaniment.
The rhythm plays at a suitable setting and
the keyboard sounds the selected tone for
the selected rhythm.
To exit the edit mode, press
display shows the edited status of the
channels.
. The keyboard enters synchro
e<<
e<<
: Turns off the current channel. The
e<<e<<
bar at the bottom of the level meter
disappears.
5. To edit other channels, press H (
to return to the channel selection
screen, then repeat steps 2–4.
ONE TOUCH
MIXER
. The
EXIT
)
Using the Mixer
%JCPPGN 2CTV
1 Main tone
2 Layered tone
3 Split tone
4 Layered/split tone
5 Harmonize tone
6 Auto accompaniment part 1
7 Auto accompaniment part 2
8 Auto accompaniment part 3
9 Auto accompaniment bass part
10 Auto accompaniment rhythm part
11 Memory track 1
12 Memory track 2
13 Memory track 3
14 Memory track 4
15 Memory track 5
16 Memory track 6
'FKVKPIVJG5VCVWUQHC%JCPPGN
You can turn a channel off to delete a
specific part.
MIXER
1. Press
the last selected channel appear.
2. Repeatedly press
channel you want to edit.
3. Repeatedly press G (
CURSOR
(
of the channel —
4. Press
turn it off.
ed
ed
(default): Turns on the current
eded
channel. A bar appears at th e botto m of
the level meter fo r the selected cha nne l.
. The MIXER indicator and
+
or – to select the
ENTER
) then
) to display the current status
ed
ed
e<<
e<<
or
e<<e<<
.
eded
+
to turn on the channel or – to
'FKVKPI2CTCOGVGTU
You can change the settings of six parameters for the selected channel.
1. Select the channel you want to edit as
described in Steps 1 and 2 of “Editing
the Status of a Channel”.
ENTER
2. Press G (
parameter edit mode.
3. Repeatedly press I or J to select the
parameter you want to change.
Tone Paramete rs
Jed[De$
Jed[De$ (&&&
Jed[De$Jed[De$
assigned to the channel. When the
assigned tone is an adv an ce d ton e, th e
display shows only two digits.
FWhjed%e<<
FWhjed%e<<
FWhjed%e<<FWhjed%e<<
off.
Lebkc[
Lebkc[ (&&&
Lebkc[Lebkc[
volume of the selected channel.
FWd
FWd (#,*
FWdFWd
(relative position of the tone between
left and right speaker channels).
fully left,
!,)
!,)
!,)!,)
EYj
EYj
J
EYjEYj
range of the tone up or down by octav e.
Tuning Parameters
9999
(Coarse)
tunes the pitch of the selected channel
in semitone units.
<_d[Jkd[
<_d[Jkd[ (¶'&&
<_d[Jkd[<_d[Jkd[
pitch of the selected channel in cent
&&&
&&&&&&
&&&
&&&&&&
#,*
to
#,*#,*
&&&&
is fully right.
(Octave)
) to enter the
(*-
(*-
to
) — sets the tone
(*-(*-
– turns each channel on or
'(-
'(-
to
) — controls the
'(-'(-
!,)
!,)
) — controls the pan
!,)!,)
#,*
#,*
#,*#,*
is the center position, and
I^_\j
I^_\j (#(
#(
!(
!(
to
I^_\jI^_\j
Jkd[
Jkd[ (¶(*
Jkd[Jkd[
¶'&&
to
¶'&&¶'&&
¶(*
¶(*¶(*
!'&&
!'&&
!'&&!'&&
) – shifts the
#(#(
!(!(
!(*
!(*
to
) — coarsely
!(*!(*
) — fine tunes the
is
12
Page 13
units. A cent is one hundredth of a
.
°°°°
*+06
°°°°
• To make it easier to create your own tone,
start with a preset tone that is similar to the
one you are trying to create.
• Experiment with different settings. There are
no real rules about what a tone should
sound like. Let your imagination run free
and experiment with different combinations.
You might be surprised at what you can
achieve!
semitone. There are 12 semitones per
octave.
Effect Parameters
HlX
HlX
(Reverb)
HlXHlX
how much reverb is applied.
reverb off,
9^e
9^e
(Chorus)
9^e9^e
how much chorus is applied.
chorus,
I[dZ
I[dZ (&&&
I[dZI[dZ
'(-
'(-
is maximum.
'(-'(-
I[dZ
I[dZ (&&&
I[dZI[dZ
'(-
'(-
is maximum.
'(-'(-
&&&
&&&&&&
&&&
&&&&&&
to
to
'(-
'(-
'(-'(-
'(-
'(-
'(-'(-
) – controls
&&&
&&&
is
&&&&&&
) – controls
&&&
&&&
is no
&&&&&&
4. Repeatedly press
5. To edit other channels, press H (
6. To exit the parameter edit mode, press
75+0)6*'610'5;06*'5+<'4
The keyboard’s custom tone synthesizer
lets you create up to 32 of your own original
tones. To create a “user” tone, you simply
select one of the keyboard’s 100 preset
tones or 127 GM tones, change its parameters, then store the new tone in a
memory location from 238 to 247. You
select and use a user tone as you would a
preset tone.
The parameters you can chan ge are div ided
into the following groups.
• Volume Characteristic — Attack Time,
Release Time, Resonance, Cutoff
Frequency
• Tone Pitch — Vibrato type, Vibrato
Delay, Vibrato Depth, Vibrato Rate,
Octave Shift
• Tone Characteristic — Level, Touch
Sense, Reverb Send, Chorus Send,
DSP Line, DSP Type, DSP Parameter
%TGCVKPICPF5VQTKPIC
7UGT6QPG
1. Select the preset tone (except 228–
237) you want to use as a basis for yo ur
user tone.
2. Press
Custom Tone Synthesizer mode and
7jaJ_c[
7jaJ_c[
7jaJ_c[7jaJ_c[
parameter) appears.
3. Repeatedly press I or J (
display the parameter you want to
change.
Attack Time
Sets the speed of the at tack (the pe riod
from when you p res s a k ey to w h en the
tone reaches its maximum volume). The
greater the value, the quicker the attack.
Release Time
Controls the speed of a tone’s releas e
(the period from when you release a
key to when the tone stops sounding).
The greater the value, the quicker the
release.
Vibrato Type
Igh
Igh
IghIgh
wave (
wave (
±
±
°°°°
SYNTH
. The keyboard enters the
(Attack Time, the first
CURSOR
7jaJ_c[
7jaJ_c[
(
7jaJ_c[7jaJ_c[
H[b$J_c[
H[b$J_c[
(
H[b$J_c[H[b$J_c[
— Sets the vibrato type as sine
I_d
I_d
I_dI_d
I7K
I7K
I7KI7K
L_X$Jof[
L_X$Jof[)I_d
(
L_X$Jof[L_X$Jof[
), triangle wave (
), or square wave (
#,*
#,*
!,)
to
#,*#,*
¶,*
¶,*
) (
¶,*¶,*
I_d,jh_
jh_,I7K
I_dI_d
jh_jh_
jh_
jh_
), sawtooth
jh_jh_
Igh
Igh
IghIgh
to
!,)
!,)!,)
!,)
!,)!,)
I7K
I7KI7K
).
!,)
) (
) to
) —
) —
, or
:IFB_d[ed
:IFB_d[ed/e<<
:IFB_d[ed:IFB_d[ed
line on or off for a particular channel.
number using the number buttons to
change the parameter setting.
to return to the channel selection
display, select the channel, then repeat
Steps 2–4.
MIXER
Vibrato Delay
Sets the amount of time before vibrato
starts.
Vibrato Depth
Sets the depth of vibrato effect.
Vibrato Rate
Sets the speed of the vibrato effect.
Cut Off Frequency
!,)
!,)
!,)!,)
sound. A higher cut off frequency gives
brighter timber, lower cut off frequency
produces a softer timbre.
Resonance
Sets the resonance of the tone.
Resonance enhances the harmonic
component around th e cut off fre quency
to create a dis tincti ve s ound. T he la rger
the value, the more distinctive the
sound.
Octave Shift
Shifts the range of the tone up or down
by octave.
Level
overall volume of the tone. The greater
the value, the greater the volume.
Setting a level of zero means that the
tone does not sound at all.
Touch Sensitivity
!,)
!,)
!,)!,)
of the tone depending on how ha rd y ou
strike the keys. You can specify more
volume for stronger striking and less
volume for lighter striking, or you can
specify 00 to set the same volume regardless of how hard you strike the keys.
Reverb Send
Controls the reverb effects.
Chorus Send
Controls the chorus effects.
DSP Line
line on or off.
DSP Type
applied DSP appears) — Selects the
DSP type.
DSP Parameter
parameters. See “DSP (Digital Signal
Processor)” on Page 7.
e<<
– use to turn the DSP
e<<e<<
+
or – or enter a
EXIT
)
.
L_X:[bWo
L_X:[bWo
(
L_X:[bWoL_X:[bWo
L_X:[fj^
L_X:[fj^
(
L_X:[fj^L_X:[fj^
L_X$HWj[
L_X$HWj[
(
L_X$HWj[L_X$HWj[
) — – Adjusts the timbre of the
H[iedWd
H[iedWd
(
H[iedWdH[iedWd
±
EYjI^_\j
EYjI^_\j
(
EYjI^_\jEYjI^_\j
B[l[b
B[l[b
&&&&
'(-
'(-
) (
(
B[l[bB[l[b
) — Controls cha nge s in the volum e
to
'(-'(-
HlXI[dZ
HlXI[dZ
(
HlXI[dZHlXI[dZ
9^eI[dZ
9^eI[dZ
(
9^eI[dZ9^eI[dZ
:IFB_d[
:IFB_d[)ed
(
:IFB_d[:IFB_d[
(Number and name of the
— Sets DSP
#,*
#,*
) (
to
#,*#,*
#,*
#,*
) (
to
#,*#,*
#,*
#,*
!,)
) (
9#e\\<hg
9#e\\<hg
(
9#e\\<hg9#e\\<hg
#,*
#,*
) (
#,*#,*
) (
) — Controls the
JY^I[di[
JY^I[di[
(
JY^I[di[JY^I[di[
ed/e<<
e<<
eded
e<<e<<
!,)
to
#,*#,*
!,)!,)
#,*
#,*
) (
#,*#,*
!,)
!,)
to
!,)!,)
#(
#(
!(
!(
to
#(#(
!(!(
¶,*
¶,*
) (
¶,*¶,*
&&&&
'(-
'(-
) (
to
'(-'(-
&&&&
'(-
'(-
) (
to
'(-'(-
— Sets DSP
±
!,)
!,)
!,)!,)
!,)
!,)
!,)!,)
)—
) —
) —
) —
) —
) —
to
) —
to
016'±
±
Using the Tone Synthesizer
• You cannot use tones 228–237 (drum set
tones) as base tones.
• The preset tone you use as the basis for a
user tone is not changed.
• Tone locations 238
tone number 000. The user tone you store
in any of those locations replaces it.
Creating and Storing a User Tone
• A new or revised user tone replaces the
existing user tone.
• Layer, split, auto accompaniment, demo
tune play, and MIDI functions are all
disabled while the keyboard is in the
Custom Tone Synthesizer mode.
• For some tones, setting the resonance too
high might cause distortion or noise. If you
encounter this, lower the resonance setting
• While you are setting the three DSP
parameters, an indicator appears next to
DSP.
247 initially contain the
–
Using the Tone Synthesizer
13
Page 14

016'±
±
Using the Registration Memory
• You cannot use the registration memory
while you are using the synthesizer,
memory, or demo tune functions.
• You cannot delete a registration setup from
memory, but you can store a different setup
in its place.
• You can use the keyboard’s MIDI function
to save your setup data to your PC or other
storage device.
Changing Keys
• You cannot change the key while a
prerecorded tune is selected or playing.
• A semitone is a measurement that
represents the acoustical interval between
the tones of any two keys on the keyboard.
For example, the difference between C and
C# or B and C is one semitone.
• The transpose setting also affects memory
playback (see “Playing Back from Song
Memory” on Page 17) and auto
accompaniment.
• The keyboard automatically resets the key
to the default value of 0 (middle C) each
time you play a pre-recorded tune.
Tuning the Keyboard
• You cannot tune the keyboard while a
prerecorded tune is displayed or playing.
• The tuning setting also affects memory
playback (see “Playing Back from Song
Memory” on Page 17) and auto
accompaniment.
• The keyboard automatically resets the
tuning pitch to the default value of 00
(cents) each time you turn off the keyboard.
When you store a tone with DSP line
turned on, all the DSP parameters are
recalled as you select the tone.
4. Repeatedly press
parameter’s setting, or use the number
buttons to directly enter a value for the
parameter.
If you want to change another
parameter, repeat Steps 3, 4, and 5.
5. To store the settings, press G (
to display the tone number (
where you want to save the user tone.
+
or – to change the
ENTER
().
().
().().
–
(*-
(*-
(*-(*-
)
)
±
6. Repeatedly press + or – until the tone
number you want appears.
ENTER
7. Press G (
IWl[EA
IWl[EA
appears briefly and the
IWl[EAIWl[EA
keyboard exit s the Custom Tone
Synthesizer mode.
Or, press H (
Tone Synthesizer mode without storing
a new tone.
) to save the user tone.
EXIT
75+0)6*'4')+564#6+10/'/14;
Your keyboard can save different setups of
controls in its registration memory. This lets
you instantly recall your favorite settings.
The registration memory consists of four
banks (0 – 3), each with four memory
locations (1 – 4), totaling up to 16 settings.
You can save each of the following settings
in each registration memory:
•tone
•rhythm
• tempo
• split on/off
• split point
• layer on/off
• mixer settings (Channels 1–10)
• effect settings
• equalizer settings
• touch resp onse settings
• assignable jack setting (see “Using a
Sustain Pedal” on Page 15)
• transpose (see “Changing Keys” on
Page 14)
• tuning (see “Tuning the Keyboard” on
Page 14)
±
• accompaniment volume
• auto harmonize on/off
5614+0)#5'672
1. Set the desired controls to the setting
you want to store.
2. Within 5 seconds, repeatedly press
BANK
until the desired bank number
appears.
3. While holding down
desired
or
bank/location number/letter.
4. Release
5. Repeat Steps 1–4 to sto re m ore s etu ps .
REGISTRATION
4
Ijeh[
Ijeh[
).
Ijeh[Ijeh[
STORE
appears after the selected
and
4'%#..+0)#5'672
1. Repeatedly press
desired bank number appears.
2. Within 5 seconds, press the desired
REGISTRATION
H[YWbb
H[YWbb
appears after the selected bank/
H[YWbbH[YWbb
location number/letter.
button (1,2,3, or 4).
) to exit the Custom
STORE
, press the
button (1,2,3,
REGISTRATION
BANK
until the
.
Using the Registration Memory
14
52'%+#.('#674'5
%*#0)+0)-';5
The keyboard automatically selects the key
of middle C each time you turn it on. For
added flexibility as you play, the keyboard
lets you change (tra nspose) th e musi cal k ey
in which it plays. You can trans pos e the key
up or down 24 semitones (two octaves).
1. Press
2. Within 5 seconds, repeatedly press
TOUCH/TRANSPOSE/SETTING
then repeatedly press I or J (
&&JhWdi
&&JhWdi
until
&&JhWdi&&JhWdi
number is the number of semitones to
which the keyboard is set, compared to
its default key.
–
or + to lower or raise the key. Each
time you press
by 1 semitone. As you rais e the key, 1 is
appears. The displayed
–
or +, the key changes
±
,
CURSOR
C#, 2 is D, and so on. As you lower the
key, –1 is B, –2 is B
3. Press
TOUCH/TRANSPOSE/SETTING
exit the menu setting mode.
J
, –3 is A, and so on.
670+0)6*'-';$1#4&
Although your keyboard never goes out of
tune, it lets you adjust its pitch to match
)
other instruments or musical recordings.
A cent is the measurement that represents
the acoustical interval between two tones.
1,200 cents equal 1 octave. You can tune
the keyboard to within –99 to +99 of its
default pitch.
1. Press
then repeatedly press I or J (
until
±
TOUCH/TRANSPOSE/SETTING
&&Jkd[
&&Jkd[
appears. The number on
&&Jkd[&&Jkd[
to
,
CURSOR
)
Page 15

the display is the number of “cents” to
which the keyboard is currently tuned,
compared to its default pitch.
–
2. Within 5 seconds, repe atedly pres s
+
to lower or raise the keyb oard ’s pitch.
Each time you press the key, the
number decreases or increases by 1
cent.
or
75+0)617%*4'52105'
Your keyboard’s touch re sponse feature lets
you adjust the volume of your music’s tone
based on how hard you stri ke the key(s), so
you can add emotion to your music.
1. Press
2. Within 5 seconds, repe atedly pres s
TOUCH/TRANSPOSE/SETTING
JekY^
JekY^
and the current setting (default:
JekY^JekY^
DehcWb
DehcWb
) appear.
DehcWbDehcWb
+
to select the touc h respons e level,
'B_]^j
'B_]^j,(DehcWb
JekY^
JekY^
,
JekY^JekY^
At the
results in a loud sound, and very heavy
key pressure results in a more powerful
sound. When you select
indicator next to TOUCH RESPONSE
disappears and the tone does not
change regardless of how you press
the key.
(DehcWb
'B_]^j'B_]^j
(DehcWb(DehcWb
B_]^j
B_]^j
setting, light key pressure
B_]^jB_]^j
±
, or
e<<JekY^
e<<JekY^
e<<JekY^e<<JekY^
)>[Wlo
)>[Wlo
)>[Wlo)>[Wlo
.
.
–
or
e<<
e<<
e<<e<<
, the
3. Within 5 sec onds, rep eatedly press + or
– until the desired settin g (
h>o
h>o
) appears.
or
h>oh>o
Press the sustain pedal as you play to
hear the desired sound or to start/stop
the selected auto-rhythm.
#&,756+0)6*'
+52.#;%1064#56
&
1. Press
2. Press G (
(
(
((
3. Within 5 seconds , repeat edly press
TOUCH/TRANSPOSE/SETTING
then repeatedly press I or J (
B9:%@WYa
B9:%@WYa
until
B9:%@WYaB9:%@WYa
–
until you can view the display clearly.
The number changes from 0 to 12.
appears.
ENTER
&,9edjhWij
&,9edjhWij
).
&,9edjhWij&,9edjhWij
4'5'66+0)6*'-';$1#4&
The keyboard retains various settings even
when you turn the power off, so long as you
do not disconnect power. You ca n, however,
delete or initialize some settings without
deleting others.
1. Press
2. Press G (
TOUCH/TRANSPOSE/SETTING
then repeatedly press I or J (
?d_j%:[b
?d_j%:[b
until
?d_j%:[b?d_j%:[b
appears.
ENTER
?d_jC_n5
?d_jC_n5
).
?d_jC_n5?d_jC_n5
IKI
IKI,IeI
IeI,I<j
IKIIKI
IeIIeI
CURSOR
appears.
CURSOR
appears.
I<j
I<jI<j
,
+
,
,
• The touch response setting does not affect
memory playback, auto accompaniment, or
received MIDI data.
• The MIDI data sent out from the keyboard is
affected by the touch response setting.
)
or
)
016'±
±
75+0)#5756#+02'&#.
For added flexibility and control as you
make music, you can connect an optional
sustain pedal, available through your local
RadioShack store or online at
www.radioshack.com
you sustain or soften the keyboard’s sound,
or even start and stop an auto-rhythm.
To connect a sustain pedal to your
keyboard, insert the pedal’s plu g into
SUSTAIN/AS SI GNABLE JACK
the keyboard.
You can adjust the keyboard to these
settings when you use a sustain pedal.
IKI
IKI
(Sustain)—Causes one or more
IKIIKI
notes to linger after they are played.
Iei
Iei
(Sostenuto)—Similar to sustai n, but
IeiIei
only sustains the key that was pressed
when you press the pedal.
I<j
I<j
(Soft)—Softens the sound.
I<jI<j
h^o
h^o
— Starts or stops the selected
h^oh^o
rhythm.
. A sustain pedal lets
on the back of
3. Within 5 seconds, repeatedly press
I
CURSOR
or J (
to reset appears.
?d_jC_n5
?d_jC_n5
?d_jC_n5?d_jC_n5
parameters you assigned by the mixer
function or by input from an external
sequencer.
?d_jFWh5
?d_jFWh5
?d_jFWh5?d_jFWh5
except for the display contrast setting.
h>oddd:[b5
h>oddd:[b5
h>oddd:[b5h>oddd:[b5
user rhythm number
the Data Download Service” on
Page 21.
?d_jIoi5
?d_jIoi5
?d_jIoi5?d_jIoi5
area.
4. Press
you to confirm the init ialization/d eletion.
Press
completes initializ ati on/ deletion and
exits the menu setting mode.
— Initializes the mixer
— Initializes all parameters,
— Deletes all data in the user
YES
YES
) until the item you want
— Deletes the data of the
nnn
. See “Using
Ikh[5
Ikh[5
.
appears, prompting
Ikh[5Ikh[5
again. The keyboard
Follow these steps to change the setting for
SUSTAIN/AS SI GNABLE JACK
1. Press
2. Repeatedly press G (
TOUCH/TRANSPOSE/SETTING
then repeatedly press I or J (
B9:%@WYa
B9:%@WYa
until
B9:%@WYaB9:%@WYa
repeatedly press I or J (
@WYa
@WYa
and the current setting (default:
@WYa@WYa
IKI
IKI
) appear.
IKIIKI
appears.
.
ENTER
CURSOR
,
CURSOR
) then
) until
)
Special Features
15
Page 16

016'±
Using the Song Memory
• SONG MEMORY is a four-way switch.
When you press it once, the keyboard
enters the memory playback mode. When
you press it again, it enters the real-time
memory record mode. When you press the
button a third time, it enters the step
recording mode. When you press the button
a fourth time, it turns off the memory
function.
• When you record on a track that contains
data, the new recording replaces the
previous recording.
• The touch response setting (on/off) is not
recorded. However, the strength of the
strike is recorded.
• Channel 1 mixer parameters are
automatically recorded to Track 1.
• Check the display for Channels 11–16 to
see which memory tracks contain data and
which are empty.
To record using an intro, ending, or fill-in, use
INTRO/ENDING 1 or 2, SYNCHRO/FILL-IN
NEXT, VARIATION/FILL-IN 1, or VARIATION/
FILL-IN 2 as you normally would.
±
°°°°
*+06
°°°°
75+0)6*'510)/'/14;
The keyboard lets you record up to two
separate songs (with up to about 3,500
notes) in memory for later playback. You
can use either of two methods to record a
song — real-time recording (you record as
you play) or step recording (you enter notes
and chords one-by-one).
You can record on each of th e keyboard’s
six tracks separately. Besides notes, each
track can have its own tone number. Then,
when you play back the tracks together, it
sounds like an entire six-piece band. Also,
you can use different mixer s ettings for ea ch
track.
Track 1 is the main track, and you can use it
to record auto accompaniment, as well as
keyboard play. Tracks 2 through 6 are
melody tracks, and you can use these for
recording a secondary melody that includes
keyboard play.
Because each track is independe nt of the
others, you only need to re-record a single
track if you make a mistake while recording
on it.
If the remaining memory is less than 100
notes, the measure and beat num bers flash .
When memory becomes full, recording
automatically stops (and autoaccompaniment or rhythm stops playing, if
used).
Memory contents are saved as long as
power is supplied to the keyboard.
Unplugging the adapter without batt erie s or
with weak batteries erases the memory. To
prevent data loss, connect an adapter
before replacing the batteries.
Turning off the keyboard while recording
erases the contents of the track you were
recording.
You can transfer memory contents to
another MIDI device.
4'#.6+/'4'%14&+0)
With real-time recording, the note s are
recorded as you play them on the key board.
°°°°
1. Repeatedly press
H[YehZ
H[YehZ
appears.
H[YehZH[YehZ
SONG MEMORY
±
until
5. Press
6. Play the keyboard. You can also record
7. Press
• Tone number
• Rhythm number. (To record without
an auto-rhyt hm, skip Step 5 of “RealTime Recording.” Recording starts
when you press a key.)
• Tempo. (Do not change the tempo
unless you already know the desired
tempo. Pressing
START/STOP
to hear
the tempo causes recording to
begin).
•MODE
START/STOP
to start recording.
°°°°
To start recording with synchro sta rt
SYNCHRO/FILL-IN NEXT
press
START/STOP.
Recording starts when
you play a note or a chord on the
accompaniment keys.
To synchro start auto accompaniment
with an intro pattern
FILL-IN NEXT
or 2 instead of
and then
START/STOP.
SYNCHRO/
, press
INTRO/ENDING 1
starts with the intro pattern when you
play a note or a chord on the
accompaniment keys.
To start auto accompani me nt duri ng a
INTRO/ENDING 1
recording
instead of
, press
START/STOP
. Play the melody
keys to start r ecording. When y ou reac h
the point where you want
accompaniment to start, play a chord on
the accompaniment keys.
auto accompaniment chords, tuning,
and pedal operations.
START/STOP
to end recording.
If you make a mistake, press
STOP
to stop recording and be gin aga in
from Step 1, or you can edit the
contents. See “Editing Memo ry
Contents” on Page 18.
This data is stored on Track 1 along
with the notes you played:
• tone number
• rhyt hm num be r
,
instead of
Recording
2
or
START/
16
2. Within 5 seconds, press + or – (or 0 or 1)
to select a song number.
3. Press
CHORD/TR 1
to select Track 1.
While the keyboar d is in memory record
mode, the level meters for channels 11
through 16 co rrespond to memory
tracks 1 through 6. When all four bars
are lit, that channel has something in
memory: if only one bar is lit, that track
is empty.
4. If desired, you can chang e the following
settings:
• rhythm controller (INTRO/ENDING 1
or 2, VARIA TION/FILL-IN 1 or 2, etc.)
operations
• pedal operations
• accompaniment volume
• effect type
See “Record ing Multiple Tracks” on
Page 18 to record on the other five
±
tracks.
Page 17

2.#;+0)$#%-(41/
5
10)/'/14;
1. Repeatedly press
FbWo
FbWo
appears.
FbWoFbWo
SONG MEMORY
until
2. Within 5 seconds, repeatedly press + or
–
(or 0 or 1) to select a song number.
3. Within 5 secon ds, press
START/STOP
to
play back the song you selected. You
can use
TEMPO
to adjust the playback
tempo.
4. Press
playback.
START/STOP
±
again to stop
56'24'%14&+0)
With step recordi ng, yo u c an rec ord a chord
progression one chord at a time. (If you
want to record one note at a time, refer to
“Recording Multiple Tracks” on Page 18.)
Follow these steps to record chords with
step recording.
1. Repeatedly press
Ij[fH[Y
Ij[fH[Y
Ij[fH[YIj[fH[Y
appears.
2. Within 5 seconds, repeatedly press
+ or – to select a song number.
3. If desired, you can change the rhythm
number and MODE settings.
4. Press
CHORD/TR1
The REC indicator flashes briefly, then
lights steadily.
5. Press
SYNCHRO/FILL-IN NEXT
play a chord using the chord play
method determined by the current
MODE setti ng (Fingered, Concert
Chord, Full Range Chord, or Normal).
When MODE is set to NORMAL
specify the chord using the root keys
and chord-type keys. See “Specifying
Chords in the Normal Mode”.
SONG MEMORY
until
to select Track 1.
, then
,
6. Use the n umber buttons to specify the
length of the chord. See “Specifying the
Length of a Note.”
7. For each additional chord you want to
enter, play the chord and use the
number buttons to specify its length.
8. When you finish recording, press
START/STOP
. The keyboard is now in
playback standby mode. You can try
playing back the song by pressi ng
START/STOP
±
.
5RGEKH[KPI%JQTFUKPVJG0QTOCN
/QFG
To enter chords when
NORMAL
during step recording, you must
specify them using a method other than
Concert Chord or Fingered. That way, you
can enter 18 chord types using only two
keys.
While holding down the desired chord root
key, press the chord key to specify the chord.
The root and chord types are la bel ed abov e
each key. The chord root letter and type of
chord also appear as you play a chord.
MODE
is set to
5RGEKH[KPIVJG.GPIVJQH
C0QVG
During step recording, repeatedly press
+ or – or enter a number using the number
buttons to specify the length of each note.
1
Use numbers
notes (1), half notes (2), quarter notes (3),
eighth notes (4), 16th notes (5), and 32nd
notes (6).
To enter a dot or triplicate
9
(triplicate), then press 1 through 6.
or
To enter a tie
and second notes.
To enter a rest,
through 9 to specify the length of the rest.
through 6 to specify whole
, hold down 7 (dot)
, press 8 then enter the first
press 0, then press
1
016'±
±
Playing Back from Song Memory
• You can use change the rhythm, use layer
and/or split during memory playback.
• Pressing START/STOP during the song
restarts the song from the beginning.
• You can set the volume and pan position of
the playback tracks using the mixer. This
setting data is output through MIDI OUT.
• The entire keyboard functions as a melody
keyboard during playback, regardless of the
MODE setting.
Step Recording
• If you make a mistake, see “Correcting
Mistakes”.
• When you record on a track that already
contains data, the keyboard automatically
locates the end of the previous recording —
measure, beat, or clock (1/48 of a beat) —
and adds your new entry to it.
• You can enter a 0 (a rest) in Step 5 of “Step
Recording”, but the rest is ignored when the
accompaniment plays.
• The rhythm number and INTRO/ENDING 1
or 2, SYNCHRO/FILL-IN NEXT, and
VARIATION/FILL-IN 1 or 2 operations are
stored on Track 1, along with the notes you
played. See “Recording Multiple Tracks” to
record on the other five tracks.
• During recording on Tracks 2 through 6, the
entire keyboard functions as a melody
keyboard, regardless of the current MODE
setting.
• The tone number is stored on the selected
track in addition to the notes you played.
• You can turn off a track during playback by
using the mixer function (see “Using the
Mixer” on Page 12) .
Correcting Mistakes
The REC indicator lights and the STEP
indicator stops flashing when you move to the
end of the recording.
Using the Song Memory
To start accompaniment with an intro
, press
pattern
SYNCHRO/FILL-IN NEXT
after
INTRO/ENDING 1
To switch to a rhythm variation
VARIATION/FILL-IN 1
or 2 immediately
or
.
, press
2
before playing the chord.
To insert an ending or fill in
INTRO/ENDING 1
FILL-IN 1
or 2 immediately before
or 2, or
, press
VARIATION/
entering the chord.
T o step-re cord chords wi thout a rhythm
skip this step. The chord of the
specified length is recorded. A rest can
be specified t here, so yo u can crea te an
original chord pattern.
To add chord accompaniment during
rhythm play
, enter rests from the
beginning of the recording up to where
you want accompa niment to sta rt. Then
enter only the chords (no rests).
%QTTGEVKPI/KUVCMGU
Before finishing your step recording entry,
you can move the entry po int b ack to correct
the data you entered. This deletes all data
after the point where you make corrections.
1. Before you press
recording, press I (
the entry point back one “space.” The
data recorded at the current entry point
appears, the REC indicator turns off,
and the STEP indicato r flashes.
,
2. While monitoring the data on the
display, repeatedly press I or
CURSOR
(
) to move the entry point to
the data you want to change.
3. Press G (
CURSOR
(
4. Press
ENTER
).
YES
current entry point. Press
START/STOP
CURSOR
) then press
H[mh_j[5
H[mh_j[5
H[mh_j[5H[mh_j[5
appears.
to clear all data after the
NO
to end
). This moves
J
J
H
or
17
Page 18

Using the Song Memory
016'±
±
• Do not change a note identical to the
preceding or succeeding note. Doing so
might alter the length of the note and you
will have to re-record the entire track.
• When you change note, key pressure, or
chord, the keyboard sounds the new setting
so you can hear what it sounds like.
• Some parameters are stored in the initial
portion of the memory, called “Panel
Record.” You cannot edit data in this field
using the procedure described here. See
“Rewriting Song Data (Panel Record)” on
Page 19.
• The tone and rhythm you selected before
beginning recording are stored in the panel
record. You can only change tone or rhythm
during recording.
• The only parameters that can be edited for
Tracks 2–6 are notes and tone numbers.
• You cannot add data to a recording.
• You cannot move portions of a recording to
a different location within the recording.
• You cannot change note lengths.
EXIT
(
) to cancel the rewrite operation.
±
4'%14&+0)/7.6+2.'
6
4#%-5
In addition to Trac k 1, where y ou record auto
accompaniment as well as keyboard play,
there are five other tracks you can use to
record melody parts only. You can record
different tones on these tracks and build a
full ensemble of instruments.
You can play back what you already
recorded on Track 1 (or any other track)
while you record on Tracks 2–6.
4GCN6KOG4GEQTFKPI
1. Repeatedly press
H[YehZ
H[YehZ
appears.
H[YehZH[YehZ
2. Within 5 seconds, repeatedly press
+ or – to select a song number.
3. Press the desired
TRACK
(2–6) to select the track you
want to record on.
4. If desired, you can change the tone
number and tempo settings. You can
change the tempo to one that is easy
for you to follow.
5. Press
START/STOP
The contents of any tracks already
recorded start to play.
6. Play on the keyboard what you want to
record on the selected track.
7. Press
START/STOP
If you used them, tone number and optional
pedal operation are also stored on the
selected track in addition to the notes you
played.
5VGR4GEQTFKPI
1. Repeatedly press
Ij[fH[Y
Ij[fH[Y
Ij[fH[YIj[fH[Y
2. Within 5 seconds, repeatedly press
+
3. Press the desired
TRACK
want to record on.
4. Change the tone, if desired. After
selecting a tone, press any keyboard
key to clear t he tone selection display
and return to the note input screen.
5. Use the keyboard to enter notes or
enter rests.
• When you enter a note using the
• To delete a rest entry, press
appears.
or – to select a song number.
(2–6) to select the track you
keyboard with touch response turn ed
on, the key pressure is also
recorded.
SONG MEMORY
SONG MEMORY
until
to start recording.
to end recording.
SONG MEMORY
SONG MEMORY
until
0
again.
0
to
1–9
6. Use
to enter the length of the note
or rest.
7. Continue entering notes by playing
them and specifying their length.
8. Press
START/STOP
to end recording.
'&+6+0)/'/14;%106'065
You can recall and change individual notes
and parameter settings from a song in
memory.
1. Repeatedly press
±
Ij[fH[Y
Ij[fH[Y
Ij[fH[YIj[fH[Y
appears.
SONG MEMORY
until
2. Within 5 seconds, repeatedly press
+
or – to select a song number.
3. Use
SONG MEMORY TRACK (1–6
) to
select the track you want to edit.
4. Press I (
CURSOR
5. Repeatedly press I or J (
) to enter edit mode.
CURSOR
) to
move to the entry you want to change.
You can change the parameter that is
flashing on the display. To change a
different parameter, repeatedly press
CURSOR
or J (
) so the parameter you
I
want to edit flashes.
6. Make the desired changes to the
selected parameter.
The procedures you use to change a
parameter depend on th e type of data it
contains. See “Editing Techniques and
Display Contents”.
7. Repeat Steps 5 and 6 to edit other
parameters.
8. Press
START/STOP
when you are
finished.
'FKVKPI6GEJPKSWGUCPF&KURNC[
%QPVGPVU
Key Pressure
press + and – or use the number buttons to
adjust the key pressure.
Pitch
— Enter a new note on the keyboard
or repeatedly press + or – to change to the
next higher or lower note. The keyboard an d
the staff on the di sp la y s how your new entry.
Chord
fingering method for the MODE setting.
Tone Number/Rhythm Number
Repeatedly press + or – or use the number
buttons to enter a number.
Rhythm Controller
VARIATION/FILL-IN 1
NEXT
) — Press the button for the function
you want to change to.
(Velocity) — Repeatedly
— Use the appropriate chord
—
(INTRO/ENDING 1
SYNCHRO/FILL-IN
or 2,
or 2,
'&+6+0)#510)
You can delete an entire song, a specific
track, or data associated with the song.
18
Page 19

&GNGVKPIC5QPI
1. Repeatedly press
FbWo
FbWo
appears.
FbWoFbWo
2. Repeatedly press
song number.
YES
YES
ENTER
.
again.
3. Press G (
4. Press
you to confirm the deletion.
5. Press
SONG MEMORY
+
or – to select the
Ied]:[b5
Ied]:[b5
).
Ied]:[b5Ied]:[b5
Ikh[5
Ikh[5
appears, prompting
Ikh[5Ikh[5
until
appears
&GNGVKPI#NN&CVCKPC
5RGEKHKE6TCEM
1. Repeatedly press
FbWo
FbWo
appears.
FbWoFbWo
2. Repeatedly press + or – to select the
song number.
3. Press G (
4. Repeatedly press I or J (
Jh$:[b5
Jh$:[b5
Jh$:[b5Jh$:[b5
5. Press the appropriate
TRACK
want to delete. You can specify more
than one track by pressing more than
one button.
6. Press
you to confirm the deletion.
7. Press
ENTER
appears.
(1-6) to select the track(s) you
YES
.
YES
again to delete the track(s).
SONG MEMORY
Ied]:[b5
Ied]:[b5
).
Ied]:[b5Ied]:[b5
CURSOR
SONG MEMORY
±
Ikh[5
Ikh[5
appears, prompting
Ikh[5Ikh[5
until
appears
) until
4GYTKVKPI5QPI&CVC
2CPGN4GEQTF
Each song in the keyboard’s memory has a
section in i ts h eader call ed t he
This section contains initial data for the
recording. You can rewrite this portion if
necessary.
The settings stored in panel records are:
panel record
1. Repeatedly press
FbWo
FbWo
appears.
FbWoFbWo
2. Repeatedly press + or – to select the
song number.
3. Make the changes in settings as
desired.
4. Press G (
5. Repeatedly pr ess I or J (
Fd[bH[Y5
Fd[bH[Y5
Fd[bH[Y5Fd[bH[Y5
6. Press
ENTER
appears.
YES
to rewrite the header data.
SONG MEMORY
Ied]:[b5
Ied]:[b5
).
Ied]:[b5Ied]:[b5
CURSOR
75+0)/+&+
Your keyboard includes a feature called
MIDI (Musical Instrument Digital Interface).
MIDI is the universal standard for sending
and receiving performa nce da ta betw een all
types of electronic musical instrument s,
regardless of manufacturer. Usi ng MIDI, you
can play music on your keyboard and
another instrument at the same time while
pressing the keys on only one, record your
music to a sequencer, acquire a wider
selection of preset tones from a sound
module, and much more.
Connecting your keyboard to anot her MIDI
device requires a MIDI cable (not supplied).
For detailed specifications of the MIDI
function, see the “MIDI Implementation
Chart” on Page 41. For more information
about MIDI parameters, visit
www.radioshack.com
“MD-1121 MIDI Implementation.”
.
#$176/+&+
Every MIDI-equipped instrument has MIDI
OUT and IN terminals, and some also have
a MIDI THRU terminal. Each of these
terminals serves a different purpose.
and download the
until
appears.
) until
016'±
±
• To deselect a track, simply press its button
again.
• You cannot change the song number while
in track delete standby.
• You cannot select a track that does not
contain recorded data.
• Pressing SONG MEMORY while in track
delete standby mode returns to record
standby mode.
Using the Song MemoryUsing the Song Memory
•Rhythm
• Tempo
• Accomp Volume
• Reverb On/O ff
• Reverb Type
•Chorus On/Off
•Chorus Type
• DSP Type
• Equalizer Type
The following mixer parameters are also
stored in the panel record:
•Tone
• Part On/Off
•Volume
•Pan
•Oct Shift
• Coarse Tune
• Fine Tune
• Reverb Send
• Chorus Send
MIDI OUT sends MIDI data to (“talks to”)
other MIDI instrument(s).
MIDI IN receives (“l istens to”) M IDI data s ent
by other MIDI instrument(s).
MIDI THRU lets you connect (“network”)
additional MIDI instruments, and sends
other MIDI devices a copy of all data it
receives through its MIDI IN terminal.
Your keyboard has
terminals.
The cable that connects MIDI devices does
not actually carry sound between them, like
a speaker wire carries s ound from a receiver
to a speaker. Instead, MIDI-equipped
devices communic ate w i th e ac h oth er u sin g
digital codes (instru ctions). One MID I device
sends digital instructions representing
exactly what is being playe d on it. The other
MIDI device receives and translates those
instructions, then produces (or records) the
sound exactly as it was played on the first
device.
MIDI OUT
and
MIDI IN
19
Page 20

016'±
±
You do not need to make both connections if
you are only either sending or receiving.
Using the Song Memory
• Always turn off power to your keyboard and
the other MIDI device before you connect or
disconnect MIDI cables.
• As you make the cable connections, be
sure to align the MIDI cable pins with the
matching holes on your keyboard’s MI DI
OUT and MIDI IN terminals. If you have
trouble plugging in the cable, do not force it!
You might damage the plug or the
instrument.
%#76+10
/#-+0)6*'/+&+
%
100'%6+105
To connect your keyboard to another MIDIequipped device , you mu st use a MIDI c able
(available at RadioShack).
To send MIDI data from your keyboard, use
a MIDI cable to connec t the key boa rd’ s
OUT
terminal to the other device’s MIDI IN
terminal.
To receive MIDI dat a on your keyboard, us e
a MIDI cable to connec t the key boa rd’ s
IN
terminal to the other device’s MIDI OUT
terminal.
±
MIDI
MIDI
/+&+#
Your keyboard ca n send and receiv e several
different types of MIDI da ta. Th e ke yboard’s
tones, rhythms, and other types of MIDI data
are sent automatically as you play.
The keyboard parts (Channels 1 through 4)
are sent over the corresponding channels.
When you turn auto harmonize on (see
“Using Auto Harmonize” on Page 12), the
harmonized notes are sent.
You can set accompaniment parts to be sent
over the corresponding channe ls (Chan nel s
6 – 10). See “Changing MIDI Settings.” The
keyboard’s prerecorded tunes cannot be
sent as MIDI data.
The keyboard can receive data over all 16
MIDI mixer channels at the same time.
The received message is interpreted as
chord change data when you set
CONCERT CHORD
“Changing MIDI Settings.”
FINGERED
or
MODE
. See
to
%*#0)+0)/+&+5'66+0)5
1. Press
2. Press G (
3. Within 5 seconds , repeated ly press I or
TOUCH/TRANSPOSE/SETTING
then repeatedly press I or J (
C?:?
C?:?
until
J
until the parameter you want to
change appears.
A[oXZ9^
A[oXZ9^
A[oXZ9^A[oXZ9^
(Default:
sending MIDI data to an external
device.
9^ehZ
9^ehZ
9^ehZ9^ehZ
E\\
E\\
E\\E\\
interprets the received basic channel
note data as auto accompaniment
chords using the current ch ord fingering
method.
appears.
C?:?C?:?
ENTER
(Keyboard Basic Channel)
&'
&'
&'&'
(MIDI In Chord Judge) (Default:
) — When set to on, the keyboard
&'A[oXZ9^
&'A[oXZ9^
).
&'A[oXZ9^&'A[oXZ9^
) — Sets the channel for
,
CURSOR
appears.
e<<
simultaneously. Set to
only to another MIDI device (the
keyboard’s speakers are muted).
4. Repeatedly press
number buttons to change the setting
as required. Then press H (
e<<
to send data
e<<e<<
+
or – or use the
016'5#$1766*'/+&+
/2.'/'06#6+10%*#46
+
The “MIDI Implementation Char t ” on
Page 41 shows specific details about how
your keyboard is compatible with the MIDI
standard. The following notes explain how
the keyboard works within the MIDI
standard.
Basic Channel
allows for the use of up to 16 channels to
exchange data. Like a TV broadcast, each
of these channel s can conta in diff erent data.
The keyboard can se nd and rec eive data on
all 16 of these channels.
Mode
— The MIDI standard allows for four
separate modes of o pera tio n. Th e ke yboard
sends and receives data in Mode 3. This
means that the data sent and received by
the keyboard can be polyphonic and can be
sent or received on only one channel at a
time.
Note Number
for note numbers from 0 through 127. This
number represents eac h possible note t hat a
device can play. The low est note num ber (0)
is five octaves below middle C and the
highest note number (127) is three octaves
above middle C. The keyboard ca n send
and receive all 128 note numbers.
Velocity
velocity numbers from 0 through 127.
Velocity is how fast a key is pressed (or if
the key is pressed at all) or how loud a note
)
sounds. A velocity of 0 means th at the key is
not pressed. The lowest velocity (1) is
pianissimo and the highest velocity (127) is
fortissimo. The keyboard can send and
receive all 128 velocity numbers.
Pitch Bender
(but cannot send) pitch bending signals.
Control Change
on various controllers, each having its own
number. For the details of each parameter,
see “MIDI Data”.
Program Change
the preset sounds. Each sound number
corresponds to a program number between
0 and 127. See “MIDI Data”.
— The MIDI standard
— The MIDI standard allows
— The MIDI standard allows for
— The keyboard receives
— This feature sends data
— This feature changes
EXIT
).
20
7YecfEkj
7YecfEkj
7YecfEkj7YecfEkj
(Default:
accompaniment as MIDI data.
BeYWb
BeYWb
BeYWbBeYWb
to
speakers and another MIDI device
(Accompaniment Out)
E\\
E\\
) — Set to
E\\E\\
(Local Control) (Default:
ed
ed
to send data to the keyboard’s
eded
ed
ed
to send auto
eded
Ed
Ed
EdEd
) — Set
System Exclusive
special signals unique to the keyboard.
All Notes Off
panic button: it stops the current sounds
from playing. Only the keyboard receives
this message.
— This feature sends
— This feature is a kind of
Page 21

Active Sense
keyboard’s sound turns off in the event the
connection cable to the
accidentally disconnected.
— This means the
MIDI IN
terminal is
75+0)6*'#&190.1#&
'48+%'
5
Visit
www.radioshack.com
preset accompaniments, tones, DSPs, and
registration data, as well as the software to
transfer the downloaded data from your PC
to the keyboard.
The software not only allows you to transfer
the downloaded data to the keyboard, but
also to store the various settings you made
on the keyboard onto your PC’s storage
device. See the instructions provided with
the software.
to download the
Using the Song MemoryUsing the Song Memory
21
Page 22

Troubleshooting
6417$.'5*116+0)
6TQWDNG 2QUUKDNG%CWUG 4GOGF[
The keyboard has turned off
automatically.
The volume is turned down. Adjust VOLUME.
The headphones are connected. Disconnect the headphones.
Power supply problem.
No sound, even if keys
are pressed.
No sound when
connected to an external
amplifier.
No sound when
receiving and playing
MIDI data.
The key or tuning does
not match when playing
along with another MIDI
instrument.
Some parts do not play
during song memory
playback.
Cannot record autoaccompaniment.
Sounds sent to another
MIDI device by the
keyboard do not sound
correct.
Cannot record chord
accompaniment data on
a computer.
You are pressing too few
accompaniment keys while
MODE is set to FINGERED.
Local control is off.
Mixer channel 1 is turned off or its
volume is set too low.
The volume is turned down. Adjust VOLUME.
Defective connection cord. Replace the connection cord.
MIDI cables are not connected
properly.
Mixer channel is turned off or its
volume is too low.
The tuning or transpose
parameter is set to a value other
than 0 or 00.
Channels are turned off or volume
set too low.
A track other than Track 1 is
selected. (Tracks 2 through 6 are
for melody only.)
The other device’s MIDI THRU
function is turned on.
Accomp MIDI Out is set to e<<
Press POWER.
Make sure the batteries are fresh and
inserted correctly, or the AC adapter is
connected securely.
Set MODE to NORMAL or CONCERT
CHORD. Or press 3 or 4 keys to form a
chord while MODE is set to FINGERED.
Set local control to ON (see “Changing
MIDI Settings” on Page 20).
Turn on Channel 1 or raise the volume
setting (see “Using the Mixer” on
Page 12).
Check the connection.
Turn channel 1 ON or raise the volume
setting (see “Using the Mixer” on
Page 12).
Set the tuning or transpose parameter to
0 or 00.
Use the mixer function to turn the
channel on or to raise the volume.
Select Track 1.
Turn off the MIDI THRU function on the
other device.
e<<. Set MIDI Out to ed
e<<e<<
ed.
eded
%#4'
Keep the keyboard dry; if it gets wet, wipe it
dry immediately. Use and store the
keyboard only in normal temperature
environments. Handle the keyboard
carefully; do not drop it. Keep the keyboard
away from dust and dirt, and wipe it with a
damp cloth occasionally to keep it looking
new.
5'48+%'#0&4'2#+4
If your keyboard is not performing as it
should, take it to your local RadioShack
store for assistance. M odi fyi ng o r tampering
with the keyboard ’s internal com ponents can
cause a malfunction and might invalidate its
warranty and void your FCC authori zation to
operate it.
22
Page 23

610'.+56
2#0'.610'5
Tone List
23
Page 24

2#0'.610'5%106+07'&
Tone List
24
Page 25

#&8#0%'&610'5
Tone List
25
Page 26

#&8#0%'&610'5%106+07'&
Tone List
26
Page 27

)/610'5
Tone List
27
Page 28

)/610'5%106+07'&
Tone List
28
Page 29

&47/5170&5
75'4610'5
Tone List
29
Page 30

&47/#55+)0/'06.+56
Tone List
30
Page 31

(+0)'4'&%*14&%*#46
Tone List
31
Page 32

'(('%6.+56
4'8'4$
%*1475
&52
Effect List
32
Page 33

&52%106+07'&
33
Effect List
Page 34

&52#.)14+6*/.+56
0WODGT 0COG (WPEVKQP 2CTCOGVGTU
00 Auto Pan
01 Tremolo
02 2BandEQ This is a two-band equalizer.
03 3BandEQ This is a three-band equalizer.
04 LFO Wah
05 Auto Wah
Effect List
06 Compressor
07 Limiter
08 Distortion This effect provides Distortion + AmpSimulator.
Continually performs left-right panning of the
input signal in accordance with an LFO.
– Adjusts volume of input signal in accordance
with an LFO.
This is a “wah” effect that can automatically
affect the frequency in accordance with an LFO.
This is a “wah” effect that can automatically
affect the frequency in accordance with the
level of the input signal.
Compresses the input signal, which can
suppress level variation and make it possible to
sustain dampened sounds longer.
This is an effector that you can use to set an
upper limit value on the level of the input signal.
0: Rate (0 to 127) – Adjusts the panning rate.
1: Depth (0 to 127) – Adjusts the panning depth.
0: Rate (0 to 127) – Adjusts the tremolo rate.
1: Depth (0 to 127) – Adjusts the tremolo depth.
0: Low Frequency [0 (200Hz), 1 (400Hz), 2 (800Hz)] – Adjusts the cutoff
frequency of the low-band equalizer.
1: Low Gain (-12, -11, -10 to +10, +11, +12) – Adjusts the gain of the low-band
equalizer.
2: High Frequency [0 (6.0kHz), 1 (8.0kHz), 2 (10kHz)] – Adjusts the cutoff
frequency of the high-band equalizer.
3: High Gain (-12, -11, -10 to +10, +11, +12) – Adjusts the gain of the high-band
equalizer.
0: Low Frequency [0 (200Hz), 1 (400Hz), 2 (800Hz)] – Adjusts the cutoff
frequency of the low-band equalizer.
1: Low Gain (-12, -11, -10 to +10, +11, +12) – Adjusts the gain of the low-band
equalizer.
2: Mid Frequency [0 (1.0kHz), 1 (1.3kHz), 2 (1.6kHz), 3 (2.0kHz), 4 (3.0kHz), 5
(4.0kHz), 6 (6.0kHz), 7 (8.0kHz)] – Adjusts the center frequency of the midband equalizer.
3: Mid Gain (-12, -11, -10 to +10, +11, +12) – Adjusts the gain of the mid-band
equalizer.
4: High Frequency [0 (6.0kHz), 1 (8.0kHz), 2 (10kHz)] – Adjusts the cutoff
frequency of the high-band equalizer.
5: High Gain (-12, -11, -10 to +10, +11, +12) – Adjusts the gain of the high-band
equalizer.
0: Input Level (0 to 127) – Adjusts the input level. The input signal can become
distorted when the level of the sound being input, the number of chords, or the
resonance value is large. Adjust this parameter to eliminate such distortion.
1: Resonance (0 to 127) – Adjusts the resonance of the sound.
2: Manual (0 to 127) – Adjusts the frequency used as the basis for the wah filter.
3: LFO Rate (0 to 127) – Adjusts the rate of the LFO.
4: LFO Depth (0 to 127) – Adjusts the depth of the LFO.
0: Input Level (0 to 127) – Adjusts the input level. The input signal can become
distorted when the level of the sound being input, the number of chords, or the
Resonance value is large. Adjust this parameter to eliminate such distortion.
1: Resonance (0 to 127) – Adjusts the resonance of the sound.
2: Manual (0 to 127) – Adjusts the frequency used as the basis for the wah filter.
3: Depth (-64 to 0 to +63) – Adjusts the depth of the wah in accordance with the
level of the input signal. Setting a positive value causes the wah filter to open
in direct proportion with the size of the input signal, producing a bright sound.
Setting a negative value causes the Wah filter to close in accordance with the
size of the input signal, which produces a dark tone quality. However, large
input re-opens the Wah filter, even if it is closed.
0: Depth (0 to 127) – Adjusts compression of the audio signal.
1: Attack (0 to 127) – Adjusts the attack amount of the input signal. A smaller
value causes prompt compressor operation, which suppresses the attack of
the input signal. A larger values delays compressor operation, which causes
attack to be output as-is.
2: Release (0 to 127) – Adjusts the time from the point when the input signal
drops below a certain level until the compression operation is stopped. When
an attack feeling is desired (no compression at the onset of the sound), set
this parameter to as low a value as possible. To apply compression at all
times, set a high value.
3: Level (0 to 127) – Adjusts the output level. The output volume changes in
accordance with the Depth setting and the characteristics of the input tone.
Use this parameter to correct for such changes.
0: Limit (0 to 127) – Adjusts the volume level from which the limit is applied.
1: Attack (0 to 127) – Adjusts the attack amount of the input signal.
2: Release (0 to 127) – Adjusts the time from when the input signal drops below
a certain level until the limit operation stops.
3: Level (0 to 127) – Adjusts the level being output. The output volume changes
in accordance with the Limit setting and the characteristics of the input tone.
Use this parameter to correct for such changes.
0: Gain (0 to 127) – Adjusts the input gain.
1: Low (0 to 127) – Adjusts the low-band gain. The cutoff frequency differs
according to the preset DSP.
2: High (0 to 127) – Adjusts the high-band gain. The cutoff frequency differs
according to the preset DSP.
3: Level (0 to 127) – Adjusts the output level.
34
Page 35

0WODGT 0COG (WPEVKQP 2CTCOGVGTU
0: Resonance (0 to 127) – Adjusts the resonance of the sound.
1: Manual (-64 to 0 to +63) – Adjusts the phaser shift volume, which is used for
Stereo
09
Phaser
10 Phaser
11 Rotary This is a rotary speaker simulator.
12 Drive Rotary This is an overdrive-rotary speaker simulator.
13 Enhancer
Ring
14
Modulator
15 Lo-Fi
1-Phase
16
Chorus
Sin 2-Phase
17
Chorus
3-Phase
18
Chorus
Tri 2-Phase
19
Chorus
Stereo
20
Delay 1
This is a stereo phaser that modulates the
phase in accordance with a sine wave LFO.
This is a monaural phaser that modulates the
phase in accordance with a sine wave LFO.
Enhances the outlines of the low range and
high range of the input signal.
This is a ring modulator (AM modulator) that
makes it possible to modulate the frequency of
internal oscillator (OSC) in accordance with an
internal LFO.
This is an effector that reproduces a retro-type
Lo-Fi sound using Noise Generator 1 (phonograph record player type scratch noise
generator) and Noise Generator 2 (FM radio
type white noise and pink noise continuous
noise generator), and by using noise
modulation (amplitude modulation = AM) and
distortion of frequency characteristics.
This is a monaural chorus in accordance with a
sine wave LFO.
This is a stereo chorus in accordance with a
sine wave LFO.
This is a 3-phase chorus in accordance with two
LFOs of with different sine wave rates.
This is a stereo chorus in accordance with
triangular wave LFO.
This is a delay of stereo input and output.
reference.
2: Rate (0 to 127) – Adjusts the rate of the LFO.
3: Depth (0 to 127) – Adjusts the depth of the LFO.
4: Wet Level (0 to 127) – Adjusts the volume level of the effect.
0: Resonance (0 to 127) – Adjusts the resonance of the sound.
1: Manual (-64 to 0 to +63) – Adjusts the phaser shift volume, which is used for
reference.
2: Rate (0 to 127) – Adjusts the rate of the LFO.
3: Depth (0 to 127) – Adjusts the depth of the LFO.
4: Wet Level (0 to 127) – Adjusts the level of the effect sound.
0: Speed (Slow, Fast) Switches the speed mode between fast and slow.
1: Break (Rotate, Stop) Stops speaker rotation.
2: Fall Accel (0 to 127) – Adjusts acceleration when the speed mode is switched
from fast to slow.
3: Rise Accel (0 to 127) – Adjusts acceleration when the speed mode is switched
from slow to fast.
4: Slow Rate (0 to 127) – Adjusts speaker rotation speed in the slow speed
mode.
5: Fast Rate (0 to 127) – Adjusts speaker rotation speed in the fast speed mode.
0: Overdrive Gain (0 to 127) – Adjusts overdrive gain.
1: Overdrive Level (0 to 127) – Adjusts the output level of the overdrive.
2: Speed (Slow, Fast) Switches the speed mode between fast and slow.
3: Break (Rotate, Stop) Stops speaker rotation.
4: Fall Accel (0 to 127) – Adjusts acceleration when the speed mode is switched
from fast to slow.
5: Rise Accel (0 to 127) – Adjusts acceleration when the speed mode is switched
from slow to fast.
6: Slow Rate (0 to 127) – Adjusts speaker rotation speed of the slow speed mode.
7: Fast Rate (0 to 127) – Adjusts speaker rotation speed of the fast speed mode.
0: Low Frequency (0 to 127) – Adjusts the low range enhancer frequency.
1: Low Gain (0 to 127) – Adjusts the low range enhancer gain.
2: High Frequency (0 to 127) – Adjusts the high range enhancer frequency.
3: High Gain (0 to 127) – Adjusts the high range enhancer gain.
0: OSC Frequency (0 to 127) Sets the reference frequency of the internal OSC.
1: LFO Rate (0 to 127) – Adjusts the rate of the LFO.
2: LFO Depth (0 to 127) – Adjusts the depth of the LFO.
3: Wet Level (0 to 127) – Adjusts the level of the effect sound.
4: Dry Level (0 to 127) – Adjusts the level of the original sound.
0: Noise Level 1 (0 to 127) – Adjusts the level of Noise Generator 1.
1: Noise Density 1 (0 to 127) – Adjusts the noise density of Noise Generator 1.
2: Noise Level 2 (0 to 127) – Adjusts the level of Noise Generator 2.
3: Noise Density 2 (0 to 127) – Adjusts the noise density of Noise Generator 2.
4: Tone (0 to 127) – Adjusts the tone.
5: Resonance (0 to 127) – Adjusts the resonance of the sound.
6: Bass (-64 to 0 to +63) – Adjusts the volume of low sounds.
7: Level (0 to 127) – Adjusts the output level.
0: LFO Rate (0 to 127) – Adjusts the rate of the LFO.
1: LFO Depth (0 to 127) – Adjusts the depth of the LFO.
2: Feedback (-64 to 0 to +63) – Adjusts the feedback of the sound.
3: Wet Level (0 to 127) – – Adjusts the level of the effect sound.
0: LFO Rate (0 to 127) – – Adjusts the rate of the LFO.
1: LFO Depth (0 to 127) – Adjusts the depth of the LFO.
2: Feedback (-64 to 0 to +63) – Adjusts the feedback of the sound.
3: Wet Level (0 to 127) – Adjusts the level of the effect sound.
0: Rate1 (Fast LFO Rate, 0 to 127) – Adjusts the rate of LFO1.
1: Depth1 (Fast LFO Depth, 0 to 127) – Adjusts the depth of LFO1.
2: Rate2 (Slow LFO Rate, 0 to 127) – Adjusts the rate of LFO2.
3: Depth2 (Slow LFO Depth, 0 to 127) – Adjusts the depth of LFO2.
4: Wet Level (0 to 127 – Adjusts the level of the effect sound.
0: LFO Rate (0 to 127) – Adjusts the rate of the LFO.
1: LFO Depth (0 to 127) – Adjusts the depth of the LFO.
2: Feedback (-64 to +63) – Adjusts the feedback of the sound.
3: Wet Level (0 to 127) – Adjusts the level of the effect sound.
0: Delay Time (0 to 127) – Adjusts the delay time.
1: Wet Level (0 to 127) – Adjusts the level of the effect sound.
2: Feedback (0 to 127) – Adjusts the repeat of the delay.
3: High Damp (0 to 127) – Adjusts damping of the high-range delay sound. The
smaller the value, the greater the damping of high-range delay sound.
4: Ratio L (0 to 127) – Adjusts the delay time of the left channel, proportional to
the value set for Delay Time.
5: Ratio R (0 to 127) – Adjusts the delay time of the right channel, proportional to
the value set for Delay Time.
Effect List
35
Page 36

0WODGT 0COG (WPEVKQP 2CTCOGVGTU
0: Delay Time (0 to 127) – Adjusts the delay time.
1: Wet Level (0 to 127) – Adjusts the level of the effect sound.
2: Feedback (0 to 127) – Adjusts the repeat of the delay.
Stereo
21
Delay 2
22 3-Tap Delay This is left/center/right 3-tap delay.
Gate
23
Reverb
Reverse
24
Gate
Reverb
25 Reflection
26 Reflection
Effect List
27 Reverb
28 2-Tap Delay This is left/right 2 tap delay.
This is a cross feedback delay of stereo input
and output.
This is a fader that creates artificial reverb that
sounds like it is being cut with a gate.
This is gate reverb with a reverse rotation
effect.
This is an effector that extracts the first reflected
sound from a reverb sound.
This is a flanger in accordance with a sine wave
LFO.
This is an effector that preserves the breadth of
a sound by adding a reverb sound.
3: High Damp (0 to 127) – Adjusts damping of the high-range delay sound. The
smaller the value, the greater the damping of high-range delay sound.
4: Ratio L (0 to 127) – Adjusts the delay time of the left channel, proportional to
the value set for Delay Time.
5: Ratio R (0 to 127) – Adjusts the delay time of the right channel, proportional to
the value set for Delay Time.
0: Delay Time (0 to 127) – Adjusts the delay time.
1: Wet Level (0 to 127) – Adjusts the level of the effect sound.
2: Feedback (0 to 127) – Adjusts the repeat of the delay.
3: High Damp (0 to 127) – Adjusts damping of the high-range delay sound. The
smaller the value, the greater the damping of high-range delay sound.
4: Ratio L (0 to 127) – Adjusts the delay time of the left channel. Proportional to
the value set for Delay Time.
5: Ratio C (0 to 127) – Adjusts the delay time of the center channel. Proportional
to the value set for Delay Time.
6: Ratio R (0 to 127) – Adjusts the delay time of the right channel. Proportional to
the value set for Delay Time.
0: LPF (0 to 127) – Adjusts the cutoff frequency of the low-pass filter. A smaller
value cuts the high range.
1: HPF (0 to 127) – Adjusts the cutoff frequency of the high-pass filter. A larger
value cuts the low range.
2: Feedback (0 to 127) – Adjusts the repeat of the reverb.
3: High Damp (0 to 127) – Adjusts damping of the high-range delay sound. The
smaller the value, the greater the damping of high-range delay sound.
4: Diffusion (0 to 127) Provides fine adjustment of the reverb.
5: Wet Level (0 to 127) – Adjusts the level of the effect sound.
6: Dry Level (0 to 127) – Adjusts the level of the original sound.
0: LPF (0 to 127) – Adjusts the cutoff frequency of the low-pass filter. A smaller
value cuts the high range.
1: HPF (0 to 127) – Adjusts the cutoff frequency of the high-pass filter. A larger
value cuts the low range.
2: Feedback (0 to 127) – Adjusts the repeat of the reverb.
3: High Damp (0 to 127) – Adjusts damping of the high-range reverb sound. The
smaller the value, the greater the damping of high-range reverb sound.
4: Diffusion (0 to 127) Provides fine adjustment of the reverb.
5: Wet Level (0 to 127) – Adjusts the level of the effect sound.
6: Dry Level (0 to 127) – Adjusts the level of the original sound.
0: Type (0 to 7) Selects from among the eight available reflection patterns.
1: Wet Level (0 to 127) – Adjusts the level of the effect sound.
2: Feedback (0 to 127) – Adjusts the repeat of the reflected sound.
3: Tone (0 to 127) – Adjusts the tone of the reflected sound.
0: LFO Rate (0 to 127) – Adjusts the rate of the LFO.
1: LFO Depth (0 to 127) – Adjusts the depth of the LFO.
2: Feedback (-64 to +63) – Adjusts the feedback of the sound.
3: Wet Level (0 to 127) – Adjusts the level of the effect sound.
0: Tone (0 to 127) – Adjusts the tone of the reverb sound.
1: Time (0 to 127) – Adjusts the reverb time.
2: High Damp (0 to 127) – Adjusts damping of the high-range reverb sound. The
smaller the value, the greater the damping of high-range reverb sound.
3: ER Level (0 to 127) – Adjusts the level of the initial reflection.
4: Wet Level (0 to 127) – Adjusts the level of the effect sound.
0: Delay Time (0 to 127) – Adjusts the delay time.
1: Wet Level (0 to 127) – Adjusts the level of the effect sound.
2: Feedback (0 to 127) – Adjusts the repeat of the delay.
3: High Damp (0 to 127) – Adjusts damping of the high-range delay sound. The
smaller the value, the greater the damping of high-range delay sound.
4: Ratio L (0 to 127) – Adjusts the delay time of the left channel, proportional to
the value set for Delay Time.
5: Ratio R (0 to 127) – Adjusts the delay time of the right channel, proportional to
the value set for Delay Time.
36
Page 37

The following “Multi” algorithms are used in combination with the algorithms described
previously in this section. Parameters are shared by both types of algorithms.
0WODGT 0COG (WPEVKQP 2CTCOGVGTU
0: Chorus LFO Rate
1: Chorus LFO Depth
Multi00
M00
(Sin 2-Phase Chorus
Multi01
M01
(3-Phase Chorus
Multi02
M02
(Phaser
Multi03
M03
(Flanger
Multi04
M04
(Stereo Phaser
Multi05
M05
(Enhancer
Multi06
M06
(Enhancer
Multi07
M07
(Enhancer
3-Tap Delay)
—
3-Phase Chorus)
—
2-Tap Delay)
—
Stereo Delay 1)
—
1- Phase Chorus)
—
2- Tap Delay)
—
Flanger)
—
2-Tap Delay)
—
This is a multi effector that is related to Sin 2-Phase Chorus
2-Tap Delay.
This is a multi effector that is related to 3-Phase Chorus —3-Tap Delay .
This is a multi effector that is related to Phaser
This is a multi effector that is related to Flanger — 2-Tap Delay.
This is a multi effector that is related to Stereo Phaser
This is a multi effector related to Enhancer — 1- Phase Chorus.
This is a multi effector that is related to Enhancer
This is a multi effector related to Enhancer — Flanger.
3-Phase Chorus.
—
—
—
Stereo Delay 1.
—
2-Tap Delay.
2: Chorus Feedback
3: Chorus Wet Level
4: Delay Time
5: Delay Wet Level
6: Delay Feedback
7: Delay High Damp
0: Chorus Rate 1
1: Chorus Depth 1
2: Chorus Rate 2
3: Chorus Depth 2
4: Chorus Wet Level
5: Delay Time
6: Delay Wet Level
7: Delay Feedback
0: Phaser Resonance
1: Phaser Manual
2: Phaser Rate
3: Phaser Depth
4: Chorus Rate 1
5: Chorus Depth 1
6: Chorus Rate 2
7: Chorus Depth 2
0: Flanger LFO Rate
1: Flanger LFO Depth
2: Flanger Feedback
3: Flanger Wet Level
4: Delay Time
5: Delay Wet Level
6: Delay Feedback
7: Delay High Damp
0: Phaser Resonance
1: Phaser Manual
2: Phaser Rate
3: Phaser Depth
4: Phaser Wet Level
5: Delay Time
6: Delay Wet Level
7: Delay Feedback
0: Enhancer Low
Frequency
1: Enhancer Low Gain
2: Enhancer High
Frequency
3: Enhancer High Gain
4: Chorus LFO Rate
5: Chorus LFO Depth
6: Chorus Feedback
7: Chorus Wet Level
0: Enhancer Low
Frequency
1: Enhancer Low Gain
2: Enhancer High
Frequency
3: Enhancer High Gain
4: Delay Time
5: Delay Wet Level
6: Delay Feedback
7: Delay High Damp
0: Enhancer Low
Frequency
1: Enhancer Low Gain
2: Enhancer High
Frequency
3: Enhancer High Gain
4: Flanger LFO Rate
5: Flanger LFO Depth
6: Flanger Feedback
7: Flanger Wet Level
Effect List
37
Page 38

0WODGT 0COG (WPEVKQP 2CTCOGVGTU
0: Chorus LFO Rate
1: Chorus LFO Depth
Multi08
M08
(Sin 2-Phase Chorus
Multi09
M09
(Sin 2-Phase Chorus
Multi10
M10
(Stereo Phaser
Multi11
M11
(Compressor
Multi12
M12
(Ring Modulator
Chorus
Multi13
M13
(Ring Modulator
Multi14
M14
(Lo- Fi
—
2-Tap Delay)
—
Reflection)
—
—
—
Auto Pan)
—
Lo- Fi)
Sin 2-Phase
—
Distortion)
—
Flanger)
Tremolo)
This is a multi effector that is related to Sin 2-Phase Chorus
This is a multi effector that is related to Sin 2-Phase Chorus — Tremolo.
This is a multi effector that is related to Stereo Phaser
This is a multi effector related to Compressor — Lo-Fi.
This is a multi effector that is related to Ring Modulator
Sin 2-Phase Chorus.
This is a multi effector related to Ring Modulator — Distortion.
This is a multi effector related to Lo-Fi
Reflection.
—
Auto Pan.
—
—
Flanger.
—
Effect List
Multi15
M15
M16
(Distortion
Multi16
(Drive Rotary
—
Lo- Fi)
Reflection)
—
This is a multi effector related to Distortion — Lo- Fi.
This is a multi effector related to Drive Rotary
Reflection.
—
2: Chorus Feedback
3: Chorus Wet Level
4: Flanger LFO Rate
5: Flanger LFO Depth
6: Flanger Feedback
7: Flanger Wet Level
0: Chorus LFO Rate
1: Chorus LFO Depth
2: Chorus Feedback
3: Chorus Wet Level
4: Tremolo Rate
5: Tremolo Depth
0: Phaser Resonance
1: Phaser Manual
2: Phaser Rate
3: Phaser Depth
4: Phaser Wet Level
5: Auto Pan Rate
6: Auto Pan Depth
0: Compressor Depth
1: Compressor Attack
2: Compressor Level
3: Lo-Fi Noise 1
4: Lo-Fi Noise 2
5: Lo-Fi Tone
6: Lo-Fi Resonance
7: Lo-Fi Bass
0: Ring OSC Frequency
1: Ring LFO Rate
2: Ring LFO Depth
3: Ring Wet Level
4: Ring Dry Level
5: Chorus LFO Depth
6: Delay Time
7: Delay Wet Level
0: Ring OSC Frequency
1: Ring LFO Rate
2: Ring LFO Depth
3: Ring Wet Level
4: Ring Dry Level
5: Distortion Gain
6: Distortion T one
7: Distortion Level
0: Lo-Fi Noise1
1: Lo- Fi Noise2
2: Lo- Fi Tone
3: Lo- Fi Resonance
4: Reflection Type
5: Reflection Wet Level
6: Reflection Feedback
7: Reflection Tone
0: Distortion Gain
1: Distortion Low
2: Distortion High
3: Distortion Level
4: Lo- Fi Noise1
5: Lo- Fi Noise2
6: Lo- Fi Tone
7: Lo- Fi Resonance
0: Drive Rotary Gain
1: Drive Rotary Level
2: Drive Rotary Speed
3: Drive Rotary Slow Rate
4: Drive Rotary Fast Rate
5: Reflection Wet Level
6: Reflection Feedback
7: Reflection Tone
38
Page 39

0WODGT 0COG (WPEVKQP 2CTCOGVGTU
0: Rotary Speed
1: Rotary Break
M17
M18
M19
M20
M21
M22
M23
M24
M25
Multi17
(Rotary
Multi18
(Compressor - Enhancer
2-Tap Delay)
Multi19
(Compressor
Multi20
(Phaser - 1-Phase Chorus
Auto Pan)
Multi21
(Auto Wah - Tri 2 Phase Chorus
Tap Delay)
Multi22
(LFO Wah -Tri 2-Phase Chorus
Tap Delay)
Multi23
(Compressor - Sin 2-Phase Chorus
Reflection)
Multi24
(Distortion - 1-Phase Chorus
Delay)
Multi25
(Compressor - Distortion
Delay)
Reflection)
—
—
—
Stereo Delay 1)
—
—
2-Tap
—
—
—
2-Tap
This is a multi effector related to Rotary — Reflection.
This is a multi effector that is related to Compressor - Enhancer
2-Tap Delay.
This is a multi effector related to Compressor — Stereo Delay 1.
This is a multi effector that is related to Phaser - 1-Phase Chorus
Auto Pan.
This is a multi effector that is related to Auto Wah - Tri 2-Phase Chorus
2-
2-Tap Delay.
This is a multi effector that is related to LFO Wah - Tri 2-Phase Chorus
2-
2-Tap Delay.
This is a multi effector that is related to Compressor - Sin 2-Phase Chorus
—
Reflection.
—
This is a multi effector that is related to Distortion - 1-Phase Chorus
Tap Delay.
This is a multi effector that is related to Compressor - Distortion
2-Tap Delay.
—
—
—
2: Rotary Slow Rate
3: Rotary Fast Rate
4: Reflection Wet Level
5: Reflection Feedback
6: Reflection Tone
0: Compressor Depth
1: Compressor Attack
2: Compressor Level
3: Enhancer Low Gain
4: Enhancer High Gain
5: Delay Time
6: Delay Wet Level
7: Delay Feedback
0: Compressor Depth
1: Compressor Attack
2: Compressor Release
3: Compressor Level
4: Delay Time
5: Delay Wet Level
6: Delay Feedback
7: Delay High Damp
0: Phaser Resonance
1: Phaser Manual
2: Phaser Rate
3: Phaser Depth
4: Chorus LFO Rate
5: Chorus LFO Depth
6: Auto Pan Rate
7: Auto Pan Depth
0: Wah Resonance
1: Wah Manual
2: Wah Depth
3: Chorus LFO Rate
—
4: Chorus LFO Depth
5: Delay Time
6: Delay Wet Level
7: Delay Feedback
0: Wah Resonance
1: Wah Manual
2: Wah LFO Rate
3: Wah LFO Depth
—
4: Chorus LFO Depth
5: Delay Time
6: Delay Wet Level
7: Delay Feedback
0: Compressor Depth
1: Compressor Attack
2: Compressor Level
3: Chorus LFO Rate
4: Chorus LFO Depth
5: Reflection Wet Level
6: Reflection Feedback
7: Reflection Tone
0: Distortion Gain
1: Distortion Low
2: Distortion High
2-
3: Distortion Level
—
4: Chorus LFO Depth
5: Delay Time
6: Delay Wet Level
7: Delay Feedback
0: Compressor Depth
1: Distortion Gain
2: Distortion Low
3: Distortion High
4: Distortion Level
5: Delay Time
6: Delay Wet Level
7: Delay Feedback
Effect List
39
Page 40

0WODGT 0COG (WPEVKQP 2CTCOGVGTU
0: Wah Manual
1: Wah Depth
Multi26
M26
(Auto Wah - Distortion
Multi27
M27
(LFO Wah - Distortion
Multi28
M28
(Distortion
Multi29
M29
(Distortion
Multi30
M30
(Distortion
Multi31
M31
(Distortion
2-T ap Delay)
—
2-Tap Delay)
—
3-Tap Delay)
—
Phaser)
—
Sin 2-Phase Chorus)
—
Flanger)
—
This is a multi effector that is related to Auto Wah - Distortion
2-Tap Delay.
This is a multi effector that is related to LFO Wah - Distortion
2-Tap Delay.
This is a multi effector that is related to Distortion
This is a multi effector related to Distortion — Phaser.
This is a multi effector that is related to Distortion
This is a multi effector related to Distortion — Flanger.
3-Tap Delay.
—
Sin 2-Phase Chorus.
—
—
—
2: Distortion Gain
3: Distortion T one
4: Distortion Level
5: Delay Time
6: Delay Wet Level
7: Delay Feedback
0: Wah Manual
1: Wah LFO Rate
2: Wah LFO Depth
3: Distortion Gain
4: Distortion Level
5: Delay Time
6: Delay Wet Level
7: Delay Feedback
0: Distortion Gain
1: Distortion Low
2: Distortion High
3: Distortion Level
4: Delay Time
5: Delay Wet Level
6: Delay Feedback
7: Delay High Damp
0: Distortion Gain
1: Distortion Low
2: Distortion High
3: Distortion Level
4: Phaser Resonance
5: Phaser Manual
6: Phaser Rate
7: Phaser Depth
0: Distortion Gain
1: Distortion Low
2: Distortion High
3: Distortion Level
4: Chorus LFO Rate
5: Chorus LFO Depth
6: Chorus Feedback
7: Chorus Wet Level
0: Distortion Gain
1: Distortion Low
2: Distortion High
3: Distortion Level
4: Flanger LFO Rate
5: Flanger LFO Depth
6: Flanger Feedback
7: Flanger Wet Level
Effect List
40
Page 41

/
+&++/2.'/'06#6+10%*#46
41
MIDI Implementation Chart
Page 42

Specifications
52'%+(+%#6+105
Number of Keys .............................................. 61
Polyphonic Sound ....................... 32-note (Max.)
Preset Tones ................................................. 348
Rhythm Instrument Tones ............................... 61
Effects ......................................................... DSP
Demo Tunes ....................................... .............. 2
Auto Accompaniment
Rhythm Patterns ................... 100 + 4 user areas
Tempo ................ Variable (226 steps, 30 to 255)
Chords ................................ 3 fingering methods
Rhythm Controller .............................. Start/Stop,
Accompaniment Volume ..... 0 to 127 (128 steps)
One-Touch Preset ......... Recalls tone and tempo
Registration Memory
Number of Setups ........ 16 (4 locations, 4 banks)
Memory Contents ............... Tone, rhythm, tempo
Memory Function
Songs ................................................................ 2
Recording Tracks .............................................. 6
Recording Methods .................... Real-time, Step
Memory Capacity ..... Approximately 3,500 notes
Edit Function ........................................ Equipped
Custom Tone Parameter Function
Parameters .............. .. Attack time, release time,
Mixer Function
Channels ......................................................... 16
Parameters ................ Program change number,
MIDI .............................. 16 multi-timbre receive,
Transpose ....... –24 semitones to +24 semitones
Tuning ......... Adjustable A4 = 440 Hz ±100 cents
Built-In Speakers ................................. 12 cm × 2
Terminals
MIDI Terminals ............................ ........... IN, OUT
Assignable T erminal ............
Power Supply .. ................................. 9V DC Jack
(100 panel tones, 128 General MIDI,
10 drum sounds, 10 user,
100 advanced tones)
with Layer and Split
(110 types: internal, 10 user areas)
Reverb (16 types)
Chorus (16 types)
(Concert Chord, Fingered, Full Range)
Intro/Ending 1/2
Variation/Fill-In 1/2
Synchro/Fill-In Next
settings best suited for the selected rhythm
split setting, split point, layer setting
mixer settings, mixer settings
effect setting, equalizer setting
touch response setting
SUSTAIN/ASSIGNABLE JACK setting
transpose setting, tuning setting
accompaniment volume setting
harmonize setting
(2 through 6 are melody tracks)
(total for two songs)
resonance, cutoff frequency, vibrato type,
vibrato delay, vibrato depth, vibrato rate,
octave shift, level, touch sense, reverb send,
chorus send, DSP line, DSP type,
DSP parameter
volume, expression, pan, coarse tuning,
fine tuning, on/off/solo
GM Level 1 standard
1
4
-Inch Phone Jack
/
(sustain, sostenuto, soft, rhythm start/stop)
Headphones ..................... Stereo Standard Jack
Output Impedance: ............................. 140 Ohms
Output Voltage ........................ 4.5 V (RMS) MAX
at 47K ohm load
Power Sources ........................ DC: 6 D batteries
AC: 9V with AC adapter
Power Cons u mp tion ............. .............. ....... 7.7 W
Dimensions (HWD) 5
13
7
16
× 37
/
3
8
4
× 14
/
Inches
/
(14.7 × 96 × 37.5 cm)
Weight (Without Batteries) ............... 12 lbs 12 oz
(5.8 kg)
Included Accessories ........... Sheet Music Stand
Specifications are typical; individual units might
vary. Specifications are subject to change and
improvement without notice.
42
Page 43

0
16'5
NotesNotes
43
Page 44

Limited One-Year Warranty
This product is warran ted by R a dioS h ack ag ain s t ma nuf actu ring defects in material and wor k ma nsh ip un der nor mal use for one (1) yea r fr om the da te o f p urch ase from RadioShack com pan y-o w ne d sto re s an d a uth ori ze d Ra dioShack franchisees and dealers. EXCEPT AS PROVIDED HEREIN, RadioShack MAKES NO EXPRESS
WARRANTIES AND ANY IMPLIED WARRANTIES, INCLUDING THOSE OF MERCHANTABILITY AND FITNESS FOR A PARTICULAR PURPOSE, ARE LIMITED IN DURATION TO THE DURATION OF THE WRITTEN
LIMITED WARRANTIES CONTAINED HEREIN. EXCEPT AS PROVIDED HEREIN, RadioShack SHALL HAVE
NO LIABILITY OR RESPONSIBILITY TO CUSTOMER OR ANY OTHER PERSON OR ENTITY WITH RESPECT
TO ANY LIABILITY, LOSS OR DAMAGE CAUSED DIRECTLY OR INDIRECTLY BY USE OR PERFORMANCE
OF THE PRODUCT OR ARISING OUT OF ANY BREACH OF THIS WARRANTY, INCL UDING, BUT NOT LIMITED TO, ANY DAMAGES RESULTING FROM INCONVENIENCE, LOSS OF TIME, DATA, PROPERTY, REVENUE, OR PROFIT OR ANY INDIRECT, SPECIAL, INCIDENTAL, OR CONSEQUENTIAL DAMAGES, EVEN IF
RadioShack HAS BEEN ADVISED OF THE POSSIBILITY OF SUCH DAMAGES.
Some states do not allow limitations on how long an implied warranty lasts or the exclusion or limitation of incidental or consequential damages, so the above limitations or exclusions may not apply to you.
In the event of a product defect during the warranty period, take the product and the RadioShack sales receipt as
proof of purchase date to any RadioShack store. RadioShack will, at its option, unless otherwise provided by law:
(a) correct the defe ct b y pr odu ct r ep air w it hou t ch arg e for parts and labor; ( b) rep l ace the pr od uct wi t h o ne o f th e
same or similar design; or (c) refund the purchase price. All replaced parts and products, and products on which a
refund is made, become the property of RadioShack. New or reconditioned parts and products may be used in the
performance of warranty ser vice. R ep aire d or re place d par ts and prod ucts ar e w arr ant ed for the rem ain der of the
original warranty period . You will be charged for rep air o r r epla cem en t of t he p ro duct ma de a fte r th e expiration of
the warranty period.
This warranty does not cover: (a) damage or failure caused by or attributable to acts of God, abuse, accident, misuse, improper or abnorm al usage, failure to fo llow instructions, impro per installation or m aintenance, alterati on,
lightning or other in cidence of excess voltage or curren t; (b) any repairs other than those pr ovided by a RadioShack Authorized Service Facility; (c) consumables such as fuses or batteries; (d) cosmetic damage; (e) transportation, shipping or insu rance costs; or (f) costs of prod uct removal, installation , set-up service adjustmen t or
reinstallation.
This warranty gives you specific legal rights, and you may also have other rights which vary from state to state.
RadioShack Customer Relations, 200 Taylor Street, 6th Floor, Fort Worth, TX 76102
12/99
RadioShack Corporation
Fort Worth, Texas 76102
MD1121E-1
42-4058
MA0206-A
04A02
Printed in Malaysia
 Loading...