

Page 1
T H E P E R F O R M A N C E Y O U N E E D
TM
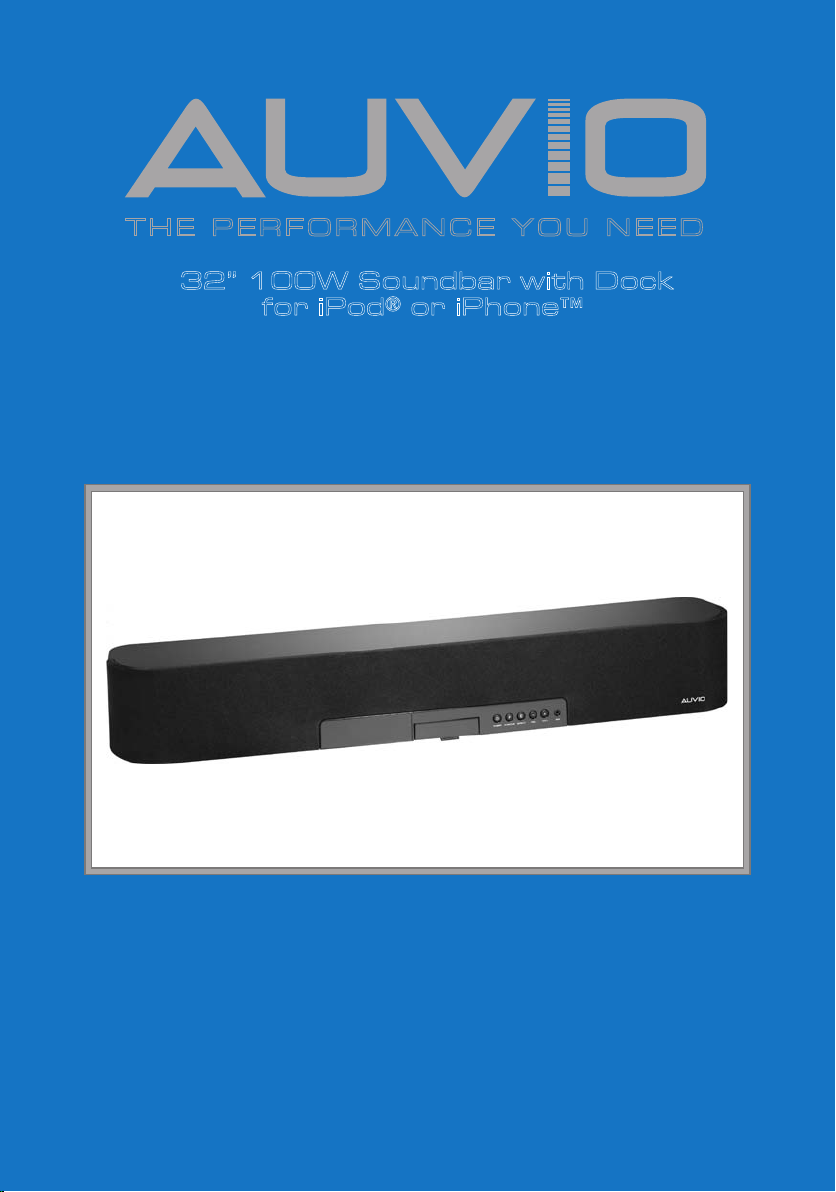
32” 100W Soundbar with Dock
for iPod® or iPhone™
User’s Guide 40-294
XX-XXX
User’s Guide
Please read this user’s guide before using your new Soundbar.
Page 2

Contents
Important Safety Instructions .............................................................................................3
Warnings and Precautions ..................................................................................................3
Overview ..............................................................................................................................4
Features ..........................................................................................................................4
Package Contents ...........................................................................................................4
Front View .......................................................................................................................5
Back View ........................................................................................................................6
Remote Control ..............................................................................................................7
Setup .....................................................................................................................................8
Connect the FM Antenna ...............................................................................................8
Connect External Devices ..............................................................................................8
Connect Power ...............................................................................................................9
Install Remote Control Batteries .................................................................................10
Setting the Clock ..........................................................................................................10
Basic Operation .................................................................................................................. 11
FM Radio ....................................................................................................................... 11
Storing Stations ...................................................................................................... 11
Recalling Station .................................................................................................... 11
Playing an iPod / iPhone .............................................................................................. 11
Dock and Charge your iPod / iPhone .................................................................... 11
Playing an iPod / iPhone ........................................................................................12
Audio Settings ..............................................................................................................12
3D Sound ................................................................................................................12
Adjusting Bass and Treble ......................................................................................12
Display Brightness .................................................................................................12
Select Source ................................................................................................................13
Additional Information ......................................................................................................13
Troubleshooting ...........................................................................................................13
Specifications ...............................................................................................................13
FCC Information ...........................................................................................................14
Limited Warranty ..........................................................................................................14
2
Page 3

Important Safety Instructions
1. Read these instructions.
2. Keep these instructions.
3. Heed all warnings.
4. Follow all instructions.
5. Do not use this apparatus near water.
6. Clean only with dry cloth.
7. Do not block any ventilation openings.Install in accordance with the manufacturer’s
instructions.
8. Do not install near any heat sources such as radiators,heat registers,stoves,or other
apparatus (including amplifiers) that produce heat.
9. Do not defeat the safety purpose of the polarized or grounding-type plug. A polarized
plug has two blades with one wider than the other. A grounding type plug has two
blades and a third grounding prong. The wide blade or the third prong are provided for
your safety. If the provided plug does not fit into your outlet, consult an electrician for
replacement of the obsolete outlet.
10. Protect the power cord from being walked on or pinched particularly at plugs,
convenience receptacles, and the point where they exit from the apparatus.
11. Only use attachments/accessories specified by the manufacturer.
12. Use only with the cart,stand, tripod, bracket,or table specified by the
manufacturer,or sold with the apparatus.When a cart is used, use
caution when moving the cart / apparatus combination to avoid injury
from tip-over.
13. Unplug this apparatus during lightning storms or when unused for
long periods of time.
14. Refer all servicing to qualified service personnel. Servicing is required when the
apparatus has been damaged in any way, such as power-supply cord or plug is
damaged, liquid has been spilled or objects have fallen into the apparatus, the apparatus
has been exposed to rain or moisture,does not operate normally, or has been dropped.
Warnings and Precautions
CAUTION: TO PREVENT ELECTRIC SHOCK, MATCH WIDE BLADE OF PLUG TO WIDE
SLOT, AND FULLY INSERT PLUG.
To reduce the risk of electric shock, do not remove cover (or back). There are no userserviceable parts inside. Please refer any servicing to qualified service personnel.
WARNING: Using this product near fluorescent lighting may cause interference with of
the remote. If the product is displaying erratic behavior, move away from any fluorescent
lighting.
The product shall not be exposed to dripping or splashing and that no objects filled with
liquids such as vases, shall be placed on apparatus.
The mains plug is used as the disconnect devide. It shall remain readily operable and should
not be obstructed druing intended use. To be completely disconnected the apparatus from
supply mains, the main plug of the product shall be disconnected from the mians socket
outlet completely.
3
Page 4
Overview
CAUTION: TO REDUCE THE RISK OF ELECTRIC
SHOCK, DO NOT REMOVE THE COVER OR
BACK. NO USER-SERVICEABLE PARTS INSIDE.
REFER SERVICING TO QUALIFIED PERSONNEL.
A
!
RISK OF ELECTRIC SHOCK
DO NOT OPEN
WARNING: To reduce the risk of fire or shock hazard,
do not expose this product to rain or moisture.
CAUTION
CAUTION: TO REDUCE THE RISK OF ELECTRIC
SHOCK, DO NOT REMOVE THE COVER OR
BACK. NO USER-SERVICEABLE PARTS INSIDE.
REFER SERVICING TO QUALIFIED PERSONNEL.
A
!
RISK OF ELECTRIC SHOCK
DO NOT OPEN
WARNING: To reduce the risk of fire or shock hazard,
do not expose this product to rain or moisture.
This lightning symbol is intended to alert
you to the presence of uninsulated,
dangerous voltage within this product’s
enclosure that might be of sufficient
magnitude to constitute a risk of electric
shock. Do not open the product’s case.
The exclamation symbol is intended to
inform you that important operating and
maintenance instructions are included in
the literature accompanying this product.
!
CAUTION
Features
Overview
Powerful 50W RMS system enhances your music listening experience
iPod Drawer conveniently opens when needed and hidden when not in use
Plays and charges most dockable iPods
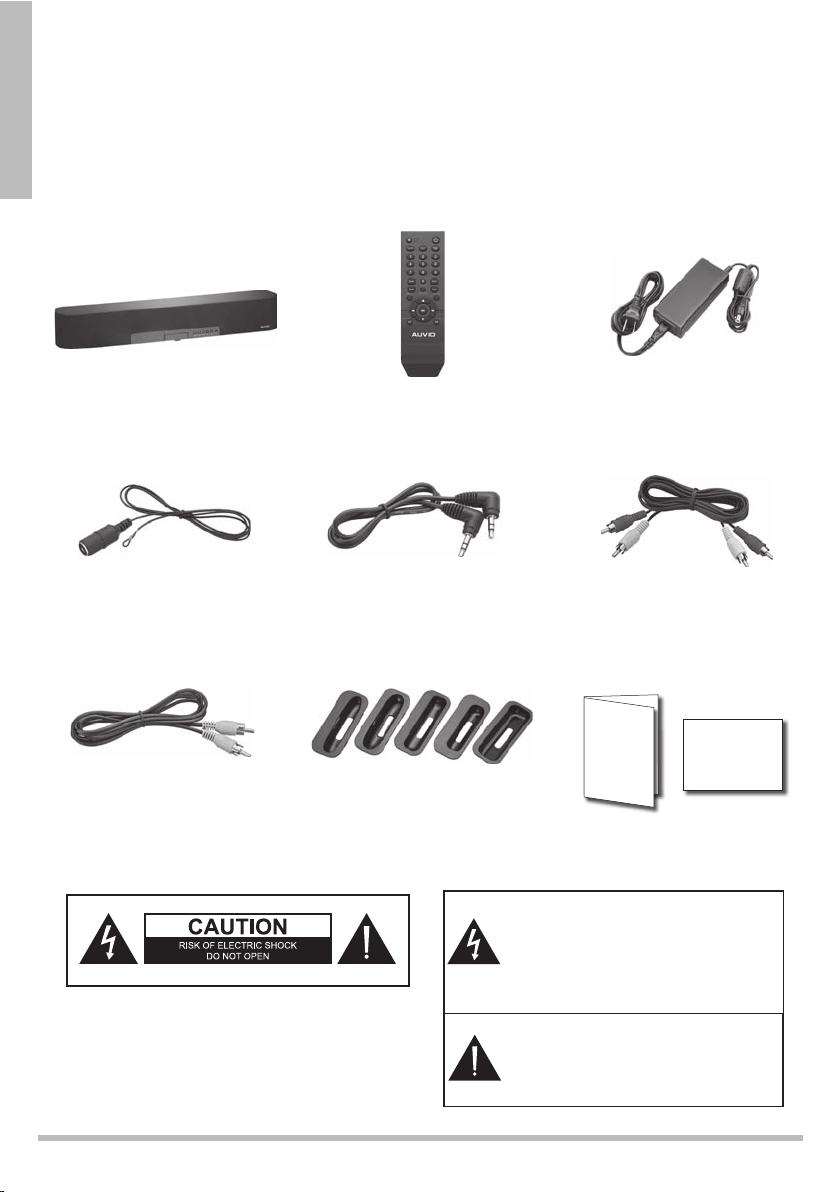
Package Contents
Soundbar
FM Antenna
Video Cable iPod™ / iPhone™
Remote Control
AC Adapter
3.5mm Cable RCA Cable
User’s
Guide
Dock Adapters (5)
Quick Start
4
Page 5

Front View
Overview
POWER
Turn your soundbar
on and off
FUNCTION
Select FM radio,
iPod, IN1, IN 2, or
AUX mode
EFFECT
Turn 3D virtural sound
effect on and off,
press and hold for
8 seconds to reset
settings to default in
standby mode
VOL– / VOL+
Decrease and
increase volume
AUX
3.5 mm line input
jack to connect
addtional sound
devices
Press to open
iPhone / iPod Dock
Select and insert the docking adapter
for your iPhone/iPod model, then insert
your iPhone or iPod
5
Page 6

Back View
Overview
FM ANT
Connect FM
antenna
SUB OUT
Connect an external
subwoofer
STEREO RCA
INPUT
Connect to the audio
output jacks on your
external device (TV, DVD,
game system, etc.)
VIDEO OUT
Connect to the
video output jacks
on your external
device
DC IN 15V
Connect supplied
DC15V power cord
Mount your Speaker (Optional)
1. Use 2 screws (not supplied) with heads no bigger
than the mount holes on your speaker.
2. Place the mount holes and slide down to secure the
speaker.
6
Page 7

Remote Control
Overview
MUTE – Turn sound on or off
FUNCTION – Select
desired input mode
Number Buttons (0-9)
Input a radio station number.
SUB + / SUB –
Increase or decrease subwoofer
volume
MENU – Return to previous
menu on a docked iPod.
//
Navigate left and right through
menus, play, pause, skip forward
or skip backward in iPod mode.
;
EFFECT
Turn 3D virtual surround
effect on or off
POWER – Turn the
soundbar on or off.
DISPLAY / TIME
Enter time setting mode,
view current mode.
VOL + / VOL –
Increase or decrease the volume
TONE / DIMMER –
Adjust bass and treble levels,
select display brightness.
ENTER – Make selections
Navigate up and down
through menus
REPEAT / ST
Select repeat options from a
docked iPod, select stereo or
mono sound in FM radio mode.
SHUFFLE – Play tracks
from your iPod / iPhone in
random order.
7
Page 8

Setup
1 Connect the FM Antenna
Plug the supplied FM antenna into the FM ANT jack.
Setup
2 Connect External Devices (Optional)
Subwoofer
Connect an external subwoofer
Audio Inputs
Use an audio cable to connect
each device’s audio output
jacks to the soundbar’s audio
jacks, IN 1 or IN 2. Red jacks
are for right audio, and white
jacks are for left audio.
Video Outputs
Use the video cable to connect
each device’s video input jack
to the soundbar’s VIDEO
OUT jack.
8
Page 9

AUX
Connect an audio device using
the 3.5mm mini-phono cable, or a
3.5 mm mini phono to RCA cable
(not included) into the AUX jack.
Connect the other end into the
audio output/headphone output
on your audio device.
3 Connect Power
Setup
9
Page 10

4 Install Remote Control Batteries
1. Press the tab to remove the battery cover.
2. Insert two AAA batteries (not supplied) as indicated by the polarity symbols (+ and –)
marked on the remote control.
3. Replace the battery cover.
Setup
A
A
A
A
A
A
b Battery Notes:
Dispose of batteries promptly and properly. Do not burn or bury them.
Use only fresh batteries of the required size and type.
Do not mix old and new batteries, different types of batteries (alkaline, or rechargeable),
or rechargeable batteries of different capacities.
If you do not plan to use the remote control for a long time, remove the batteries.
Batteries can leak chemicals that can damage electronic parts.
5 Setting the Clock
1. In standby mode, press DISPLAY/TIME on the remote control. The first hour digit
flashes.
2. Press or to adjust each hour and minutes
digits.
3. Press or
minutes digit you want to adjust.
4. Press DISPLAY/TIME to save your settings.
5. Press REPEAT/ST on the remote control to select 12 h or 24 h time format.
to move to the hour or
10
12:00
AM
Page 11

Basic Operation
FM Radio
1. Press POWER to turn on the unit.
2. Press FUNCTION to select FM mode. FM
displays.
3. Press or
station.
Press and hold or
4. Press VOL + or VOL – to adjust the volume.
5. Press REPEAT/ST on the remote control to select stereo or mono mode.
Storing Stations
1. Tune to the desired station.
2. Press ENTER. The program location flashes.
3. Press 0 through 9 on the remote control to
select a memory location (total of 10 preset
stations are available).
4. Press ENTER to store the station.
Recalling Station
1. To recall stored stations, press number 0 through 9 to access the desired memory location.
to tune down or up to find a
to auto search stations.
FM 107.3
P01 107.3
iPod/iPhone
MH z
MH z
Basic Operation
Dock and Charge
1. Select the docking adapter that fits your iPod/iPhone model.
Refer to the number marked on the adapters:
Adapter No. Compatible Models
10 Video 60G/80G & Classic 10G
13 Nano 3G
14 Touch 1G
15 iPhone 3G
16 Touch 2G
11
Page 12

2. Snap the adapter into the docking station.
3. Plug your iPod / iPhone into the adapter.
Playing Tracks
1. Dock your iPod / iPhone.
2. Press POWER to turn on the soundbar.
3. Press FUNCTION to select iPod mode. IPOD
displays.
4. Press ; to start and pause iPod / iPhone playback.
Press or
Press and hold or
Press REPEAT/ST to select repeat the current track, repeat album or playlist or repeat
off.
Press SHUFFLE to play tracks in an album randomly in your iPod/iPhone.
Press MENU to access the docked iPod menu.
Press or to navigate iPod / iPhone menus.
to skip to the previous track or to the next track.
to search backwards or forwards in the current track.
IPOD
n Note: Your iPod / iPhone must be updated with the latest firmware from Apple in order
for it to work properly with your sound bar.
Audio Settings
Basic Operation
3D Sound
Press EFFECTS to turn 3D sound on and off.
3D ON
Adjusting Bass and Treble
1. Press TONE/DIMMER on the remote control
until the display shows BAS S or T REB.
2. Press VOL + or VOL – to adjust to the desired
level.
BASS 00
Display Brightness
1. Press TONE/DIMMER on the remote control
until the display shows DIM ME R level.
2. Press VOL + or VOL – to adjust to the display brightness to the desired level.
12
DIMMER2
dB
Page 13

Select Source
To play devices connected to your soundbar, you must select the correct input source.
1. Press FUNCTION repeatedly to select:
IN1 or I N2 to play devices connected to
Audio Inputs.
AU X to play device connected to the line
input jack.
IN1
Additional Information
Troubleshooting
Problem Possible Solution
No sound Make sure the power cord is plugged in.
The batteries in the remote control may be dead. Replace the
batteries and try again.
The power outlet may be faulty. Plug in another device. If it
does not work, have an electrician inspect the outlet.
Check all wire connections. See pages 8-9.
Remote control does not
work.
Poor FM reception Make sure FM antenna is plugged in.
Replace batteries in the remote control.
Be sure batteries are installed with correct polarity.
Remove any obstacles between the remote control and TV.
Specifications
Output Power/Ch (@ 10% THD) ............................... 12.5W x 2 + 25 W (Total 50W RMS/ 100W Peak)
Freq. Response ............................................................................................................... 50Hz ~ 20KHz
Operation Power .......................................................................... 100V~240V AC 50/60Hz.DC:15V 4A
Weight .........................................................................................................................155.2 oz (4400g)
Dimensions (H × W × D) ....................................................4.9 × 31.2 × 5.3 in (12.5 × 79.4 × 13.4 cm)
Specifications are subject to change and improvement without notice. Actual product may vary from the
images found in this document.
13
Additional Info
Page 14

FCC Information
This equipment has been tested and found to comply with the limits for a Class B digital device, pursuant
to Part 15 of the FCC Rules. These limits are designed to provide reasonable protection against harmful
interference in a residential installation. This equipment generates, uses and can radiate radio frequency
energy and, if not installed and used in accordance with the instructions, may cause harmful interference
to radio communications. However, there is no guarantee that interference will not occur in a particular
installation. If this equipment does cause harmful interference to radio or television reception, which can
be determined by turning the equipment off and on, the user is encouraged to try to correct the interference by one or more of the following measures:
Reorient or relocate the receiving antenna.
Increase the separation between the equipment and receiver.
Connect the equipment into an outlet on a circuit different from that to which the receiver is connected.
Consult the dealer or an experienced radio/TV technician for help.
Changes or modifications not expressly approved by Ignition L.P. may cause interference and void the
user’s authority to operate the equipment.
This device complies with Part 15 of the FCC Rules. Operation is subject to the following two conditions:
(1) This device may not cause harmful interference, and (2) this device must accept any interference
received, including interference that may cause undesired operation.
Product 32” 100W Soundbar with Dock for
Model 40-294
Responsible
Party
Phone 866-315-0426
iPod or iPhone
Ignition L.P.,
3102 Maple Ave Suite 450
Dallas, TX 75201
Limited Warranty
Ignition L.P. warrants this product against defects in materials and workmanship under normal use by
the original purchaser for one (1) year after the date of purchase. IGNITION L.P. MAKES NO OTHER
EXPRESS WARRANTIES.
This warranty does not cover: (a) damage or failure caused by or attributable to abuse, misuse, failure to
follow instructions, improper installation or maintenance, alteration, accident, Acts of God (such as floods
or lightning), or excess voltage or current; (b) improper or incorrectly performed repairs by persons who
are not a Ignition L.P. Authorized Service Facility; (c) consumables such as fuses or batteries; (d) ordinary
wear and tear or cosmetic damage; (e) transportation, shipping or insurance costs; (f) costs of product
removal, installation, set-up service, adjustment or reinstallation; and (g) claims by persons other than the
original purchaser.
Should a problem occur that is covered by this warranty, take the product and the sales receipt as proof
of purchase date to the place of purchase in the U.S. Ignition L.P. will, at its option, unless otherwise
provided by law: (a) repair the product without charge for parts and labor; (b) replace the product with
the same or a comparable product; or (c) refund the purchase price. All replaced parts and products, and
products on which a refund is made, become the property of Ignition L.P. New or reconditioned parts and
products may be used in the performance of warranty service. Repaired or replaced parts and products
are warranted for the remainder of the original warranty period. You will be charged for repair or replace-
Additional Info
ment of the product made after the expiration of the warranty period.
IGNITION L.P. EXPRESSLY DISCLAIMS ALL WARRANTIES AND CONDITIONS NOT STATED IN THIS
LIMITED WARRANTY. ANY IMPLIED WARRANTIES THAT MAY BE IMPOSED BY LAW, INCLUDING
THE IMPLIED WARRANTY OF MERCHANTABILITY AND, IF APPLICABLE, THE IMPLIED WARRANTY
14
Page 15

OF FITNESS FOR A PARTICULAR PURPOSE, SHALL EXPIRE ON THE EXPIRATION OF THE STATED
WARRANTY PERIOD.
EXCEPT AS DESCRIBED ABOVE, IGNITION L.P. SHALL HAVE NO LIABILITY OR RESPONSIBILITY TO
THE PURCHASER OF THE PRODUCT OR ANY OTHER PERSON OR ENTITY WITH RESPECT TO ANY
LIABILITY, LOSS OR DAMAGE CAUSED DIRECTLY OR INDIRECTLY BY USE OR PERFORMANCE OF
THE PRODUCT OR ARISING OUT OF ANY BREACH OF THIS WARRANTY,
INCLUDING, BUT NOT LIMITED TO, ANY DAMAGES RESULTING FROM INCONVENIENCE AND ANY
LOSS OF TIME, DATA, PROPERTY, REVENUE, OR PROFIT AND ANY INDIRECT, SPECIAL, INCIDENTAL,
OR CONSEQUENTIAL DAMAGES, EVEN IF IGNITION L.P. HAS BEEN ADVISED OF THE POSSIBILITY OF
SUCH DAMAGES.
Some States do not allow limitations on how long an implied warranty lasts or the exclusion or limitation
of incidental or consequential damages, so the above limitations or exclusions may not apply to you.
This warranty gives you specific legal rights, and you may also have other rights which vary from State to
State. You may contact Ignition L.P. at:
Ignition L.P., 3102 Maple Ave. Suite 450, Dallas, TX 75201 02/09
For product support, call
1-866-315-0426
Additional Info
15
Page 16

T H E P E R F O R M A N C E Y O U N E E D
TM
32” 100W Soundbar with Dock
Protect the environment by recycling used electronics. Go to
E-CyclingCentral.com to find an electronic recycling center near you.
User’s Guide 40-294
Get more from your audio and video equipment. See
what you’ve been missing. With Auvio, you control the
experience.
Auvio was established by a group of technophiles to
provide high quality audio and video products without
the high sticker price. The Auvio philosophy is for you
to experience audio and video as it was intended to be:
pure and distortion free.
We know electronics can be intimidating. Auvio simpli-
fies your experience by providing the right products,
with the right specs, to work with your equipment.
Be confident about your purchase: your new Auvio product
©2009.
incorporates the latest technology, is built to the highest
quality standards, and reduces environmental impact by
complying with RoHS environmental restrictions.
for iPod® or iPhone™
XX-XXX
User’s Guide
Printed
in China
© 2009. Ignition L.P. All rights reserved. Auvio is a trademark used by Ignition L.P.
Package and user’s guide are recyclable. User’s guide contains recycled material.
iPod is a trademark of Apple Inc., registered in the U.S. and other countries.
Please read this user’s guide before using your new Soundbar.
iPhone is a trademark of Apple Inc.
Printed
in China
08A09
40-294
 Loading...