

36/%JCPPGN"2GTUQPCN"4CFKQ
YKVJ".%&"&KURNC["CPF"5:"3WKGV"%QFGU
21-1863
%106'065
Installing Batteries ....................................... 1
Operation ........................ ............................ 2
Using Quiet Codes ................................... 2
Using Key Lock ........................................ 2
Setting the Courtesy Tone ........................ 3
Using the Backlight .................................. 3
Setting the Key Tone ................................ 3
Using the Swivel Belt Clip ........................ 3
Using an Optional Wrist Strap .................. 3
Care ........................................... ................. 3
Service and Repair ...................................... 3
FCC Information ................ ............... ........... 3
Safety Information ................... .................... 3
Specifications .............................................. 4
"+/2146#06"
#
If an icon appears at the end of a paragraph,
go to the box on that page with the
corresponding icon for pertinent information.
— Warning # — Important
Rý
.... — Caution
±
— Note
"9#40+0)
• Do not attempt to charge alkaline batteries.
Non-rechargeable batteries can get hot or
explode if you try to recharge them.
• Never install non-rechargeable batteries
when CHARGE ON/OFF is set to ON. Nonrechargeable batteries can get hot or
explode if you try to recharge them.
• Dispose of old batteries promptly and
properly. Do not burn or bury them.
mA. Its center tip must be set to positive and
its plug must fit the radio's DC 6V jack. Using
an adapter that does not meet these specifications could damage the radio or the adapter.
• Always connect the AC adapter to the radio
before you connect it to AC power. When you
finish, disconnect the adapter from AC power
before you disconnect it from the radio.
• Use only fresh batteries of the required size
and recommended type.
• Do not mix old and new batteries, different
types of batteries (standard, alkaline, or
rechargeable), or rechargeable batteries of
different capacities.
• If you do not plan to use the radio for a
month or more, remove the batteries.
Batteries can leak chemicals that can
destroy electronic parts.
You can use your radio while charging the
batteries if you connect it to a DC-DC
regulated and filtered adapter (such as
RadioShack Cat. No. 273-1859), but not if you
connect it to an AC-DC regulated adapter
(such as Cat. No. 273-1762).
R
.
"%#76+10"
You must use a Class 2 power
source that supplies regulated
!
6V DC and delivers at least 600
"016'"±"
±
°°°°
ý
R
.
#
— Hint
"
OWNER’S MANUAL — Please read before using this equipment.
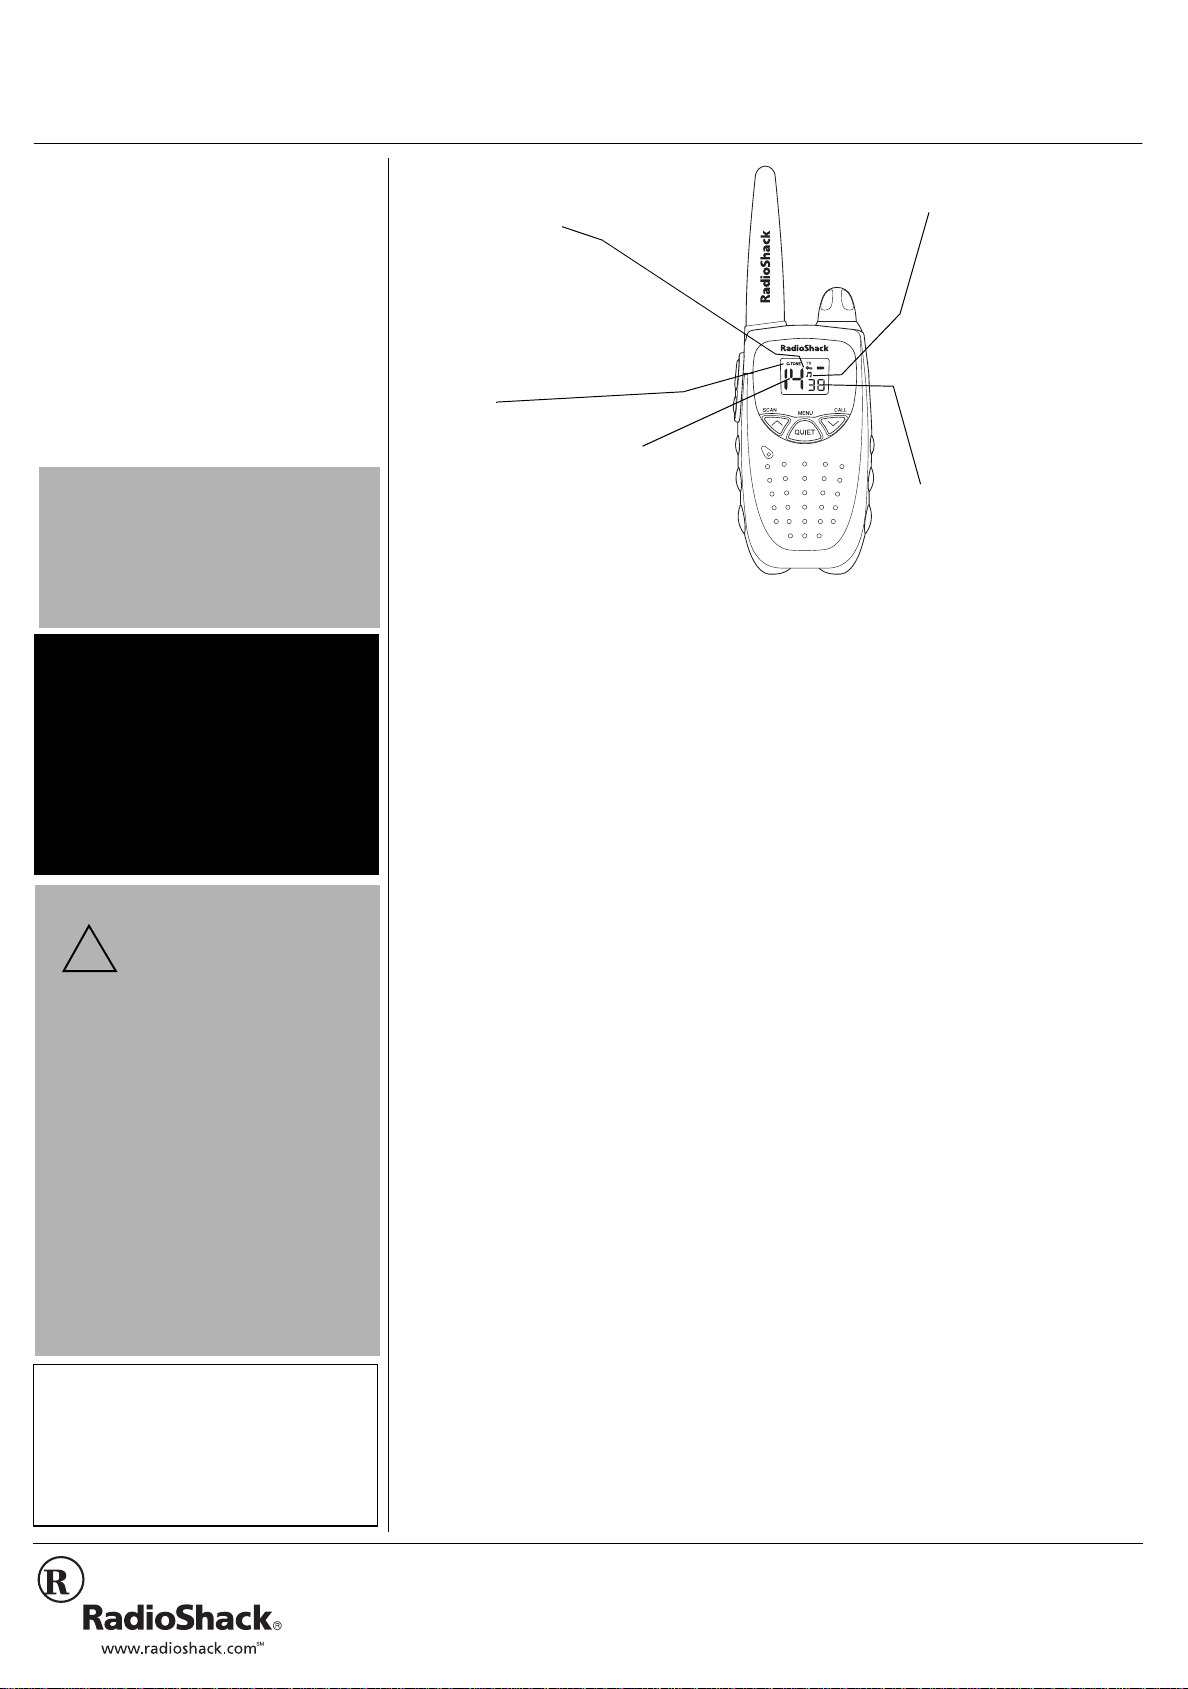
Lock
– locks the
MENU/QUIET
Lock” on Page 2).
Courtesy Tone
end of a conversation as an end-ofmessage acknowledgement (see
“Setting the Courtesy Tone” on
Page 3).
14 Channe ls
communication for up to t wo miles.
Channel Scan
other FRS users (see “Operation”
on Page 2).
The Family Radio Service (FRS) is a
license-free, two-way, short-range voice
radio service that lets families and groups
keep in touch with each other on specific
reserved channels.
Your RadioShack 14-Channel Pers ona l
Radio is a lightweight, palm-sized radio you
can use to talk with another perso n who has
a FRS radio set to the same frequency as
your radio.
SCAN/
keys (see “Using Key
– sounds at the
– provide clear
– helps you find
¼ý, ¹
/CALL
and
+056#..+0)"$#66'4+'5
Your radio requires 4 AAA alkaline or
rechargeable nickel-cadmium (Ni-Cd)/
nickel-metal hydride (Ni-MH) batteries (not
supplied) for power. For the best
performance and longest life, we
TM
(for
Rý
....
recommend R adioShack batteries.
You can also recharge Ni-Cd or Ni-MH
batteries inside the radio at home or in your
vehicle, using a 6V, 600mA AC or DC
adapter and a size F Adaptaplug
connector (neither supplied). Both adapters
and the Adaptaplug are available at your
local RadioShack store.
1. Rotate
2. Slide the battery compartment cover in
3. Slide
4. Place the batteries in the compartment
VOLUME/ON/OFF
counterclockwise until it clicks.
the direction of the arrow to remove it.
CHARGE ON/OFF
battery compartment to
alkaline batteries) or
Ni-MH rechargeable batteries).
as indicated by the polarity symbols (+
and –) marked inside.
....
Rý
inside the
OFF
ON
(for Ni-Cd or
Key Tone
show that you presse d
a key (see “S etting th e
Key Tone” on Page 3).
38 Quiet Codes
eliminate interference
from other radios that
are not tuned to the
same channel and quiet
code as your radio (see
“Using Quiet Codes” on
Page 2).
Your radio has auto-squelch, so you will not
hear anything on a channel unless someone
is transmitting nearby on the same channel.
You can use the
temporarily turn off auto-squelch to hear
weaker, distant transmissions.
You can connect an optional speak er/
microphone and earphone to the radio
(neither supplied, available at your local
RadioShack store).
5. Replace the cove r. Then rotate
ON/OFF
on the radio. If you installed alkaline
batteries , stop here.
6. If you installed rechargeable batteries,
attach the Adaptapl ug to the adapte r so
TIP reads positive (+).
7. Connect the Adaptaplug’s other end to
DC 6V
standard AC outlet or your vehicle’s
cigarette -lighter ad apter.
Complete charging takes about 10 hours.
Average charging ti me varies , dependin g on
capacity. Typically, Ni-MH batteries charge
in about 10 hours. Ni-Cd batteries charge in
about 4 hours.
When charging is complete, unplug the AC
or DC adapter from the power source, then
disconnect it from the radio’s
The battery icon’s s egments appear to s how
how much power remains. When the battery
icon’s three segments flash or the radio
stops operating, replace or recharge the
batteries.
MON
clockwise until it clicks to turn
, then plug the adapter into a
– sounds to
–
(monitor) key to
VOLUME
±
DC 6V
jack.
#
2002 RadioShack Corporation.
©
RadioShack, RadioShack.com, and Adaptaplug are trademarks used by RadioShack Corporation.
All Rights Reserved.
"+/2146#06"
#
The EPA certified RBRC
Battery Recycling Seal on the
nickel-cadmium (Ni-Cd) battery
indicates RadioShack is
voluntarily participating in an
industry program to collect and recycle these
batteries at the end of their useful life, when
taken out of service in the United States or
Canada. The RBRC program provides a
convenient alternative to placing used Ni-Cd
batteries into the trash or the municipal waste
stream, which may be illegal in your area.
Please call 1-800-THE-SHACK (1-800-843-
7422) for information on Ni-Cd battery recycling
and disposal bans/restrictions in your area.
RadioShack’s involvement in this program is
part of the company’s commitment to
preserving our
natural resources.
environment and conserving our
"016'"±"
±
#
®
Operation
If you hold down PTT for about 2 minutes, the
radio automatically stops transmitting to save
power. The radio beeps and
you release PTT.
JN
JN flashes until
JNJN
Using Quiet Codes
• To find the active channel and quiet code
used by another radio, hold down SCAN/
until the channel number appears. After
about a second, the quiet code then
appears. Then press PTT once to hold the
channel number and quiet code on the
display.
• When you set your radio to a channel, you
cannot communicate with another user who
is on the same channel but is using a
different quiet code.
¼ý
Using Key Lock
When the keys are locked, you can still send a
page to other FRS radios set to the same
channel by holding down
cannot select a channel by pressing
"75+0)"5%#00+0)"
• While the radio is scanning channels, press
PTT once to stop the scan and tune the
active channel. To continue scanning, hold
down SCAN/
the radio tunes the next active channel.
Press PTT again to stop scanning.
• The radio automatically scans through quiet
codes while scanning through the channels.
The quiet code feature automatically turns
on when the radio detects a quiet code
signal on a channel, and turns off after the
signal disappears.
• If you want to stay on the active channel
and quiet code, press PTT to stop scanning
before the signal disappears.
• To quickly find a quiet code, hold down
SCAN/
appears, then release SCAN/
CALL.
¼ý
or ¹/CALL until the quiet code
¼ý
/CALL, but you
¹
for about 2 seconds until
¼ý
/CALL.
¹
or ¹/
12'4#6+10"
SCAN/
number appears. Or, hold down for about 2 seconds to scan through the
channels. The rad io automatically scan s t hrou g h the ch ann els and pauses
on each active channel. Press
DC 6V
Ni-Cd or Ni-MH batteries
and to power the radio.
75+0)"37+'6"%1&'5
Quiet Codes lets you talk and listen to other
radios set to the same channel and quiet
code. This is like having a sub-channel
within a channel, giving you greater
communication flexibility. When you set a
quiet code (there are 38 codes to choose
from) and turn on this feature, you can
communicate with anyone who has a radio
set to the same channel and code or set to
the channel only.
1. Repeatedly press
quiet code flashes on the display.
2. Repeatedly press
until you see th e code n umber yo u want
to use. (See the “Quiet Code Chart” for
a complete list of quiet codes).
3. Press
4. To turn off the quiet code feature, press
MENU/QUIET
number disappears.
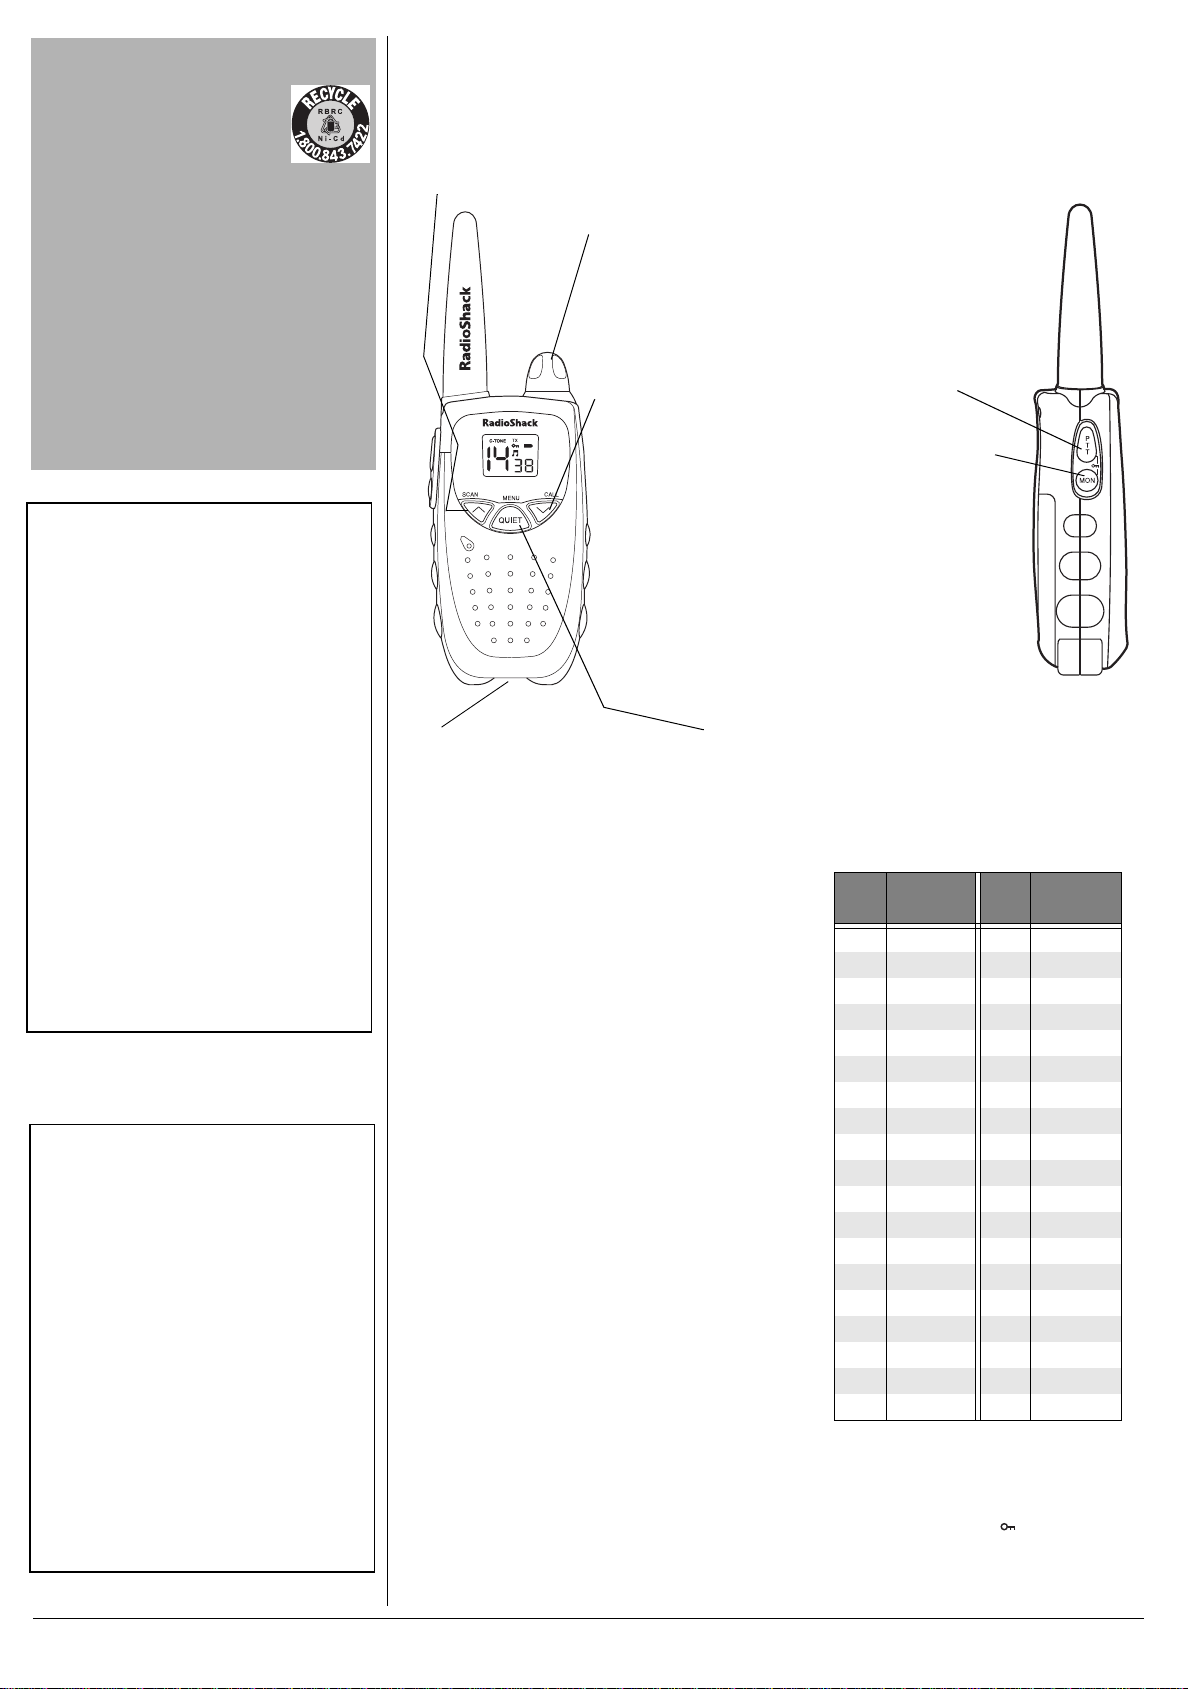
– Press to manually select a channel. The selected channel
¼ý
PTT
to stop scanning.
VOLUME ON/OFF
to turn the radio on and
off and adjust the volume.
– Rotate
PTT
– Hold down
and speak into
the microphone t o
JN
transmit.
JN
JNJN
appears. Release
PTT
to stop
transmitting.
/CALL
– Press to
¹
manually select a
channel. The selected
channel number
appears. Hold down
/CALL
¹
to send a page
to other FRS radios set
to the same channel.
appears and the call
tone sounds. After you
/CALL
hold down
for
¹
MON
– Hold down to
hear everything on a
channel, even weak
transmissions.
Release
JN
JN
JNJN
auto-squelch back
on.
MON
about 6 seconds, the
tone stops.
Jack
– Use to charge
MENU/QUIET
“Using Quiet Codes” on Page 2).
– Press to select a quiet code (see
37+'6"%1&'"%*#46
(TGSWGPE["
%QFG
1 67.0 20 131.8
2 71.9 21 136.5
3 74.4 22 141.3
4 77.0 23 146.2
5 79.7 24 151.4
6 82.5 25 156.7
MENU/QUIET
SCAN/
PTT
to store the code.
once. The quiet code
¼
or
until the
/CALL
¹
±
7 85.4 26 162.2
8 88.5 27 167.9
9 91.5 28 173.8
10 94.8 29 179.9
11 97.4 30 186.2
12 100.0 31 192.8
13 103.5 32 203.5
14 107.2 33 210.7
15 110.9 34 218.1
16 114.8 35 225.7
17 118.8 36 233.6
18 123.0 37 241.8
19 127.3 38 250.3
75+0)"-';".1%-
You can lock
QUIET
lock or unlock the keys. appears when
the keys are locked.
SCAN/
. Hold down
±
to turn
**\+
¼, ¹
MON
±
(TGSWGPE["
%QFG
/CALL
and
and press
**\+
PTT
MENU/
to
2

5'66+0)"6*'"%1746'5;"610'
±
"016'"±"
You cannot turn on the backlight while the
radio is receiving a signal.
.
"%#76+10"
.
• To maintain compliance with the FCC’s RF
exposure guidelines, hold the transmitter
and antenna at least 2 inches (5 cm) from
your face and speak in a normal voice, with
the antenna pointed up and away from your
face. If you wear the handset on your body
while using the headset accessory, use only
the supplied belt clip for this product and
when transmitting, take it out of the belt to
ensure the antenna is at least 1 inch (2.5
cm) from your body.
• Use only the supplied antenna. Unauthorized antennas, modifications, or attachments could damage the transmitter and
may violate FCC regulations.
You can set your radio so the person you
are communicating with hears a tone when
you finish transmitting. To turn on the radio’s
¼ý
or
MENU/QUIET
E<<
E<<
appears when it
E<<E<<
/CALL
to turn the
¹
PTT
until
to store
courtesy tone, hold down
9#JED;
9#JED;
flashes.
9#JED;9#JED;
courtesy tone is on and
is off. Press
courtesy tone on or off, then press
the setting. Otherwise, the radio stores the
displayed setting after about 15 seconds.
Ed
Ed
appears when the
EdEd
SCAN/
75+0)"6*'"$#%-.+)*6
Your radio’s display has a backlight that
turns on for about 10 seconds when you
MON
PTT
. To turn on the
±
.
press any key except
backlight without changing the radio’s
settings, press
5'66+0)"6*'"-';"610'
You can set the radio so it sounds a tone
PTT
when you press an y key exc ept
To turn on the key tone, hold down
QUIET
for about 2 seconds to enter menu
mode, then continue to press
Ed
Ed
until flashes..
tone is on and
SCAN/
Press
on or off. Press
the setting or it will store the displayed
setting after 15 seconds.
¼
appears when the key
EdEd
E<<
E<<
appears when it is off.
E<<E<<
/CALL
or
¹
PTT
or
MENU/QUIET
to turn the key tone
MENU/QUIET
MON
or
MENU/
to store
75+0)"6*'"59+8'."$'.6"%.+2
To attach the be lt cl ip, in se rt th e c li p into the
socket at the back of the radio until it clicks.
To remove the belt clip, press the button at
the top of the clip and pull out the clip.
(%%"+0(14/#6+10
This device complies with Part 15 of the
FCC Rules
following two condition s: (1) This device may
not cause harmful interference, and (2) this
device must accept any interference
received, including interference that may
cause undesired operation.
When the Push-to-Talk (PTT) button is
pressed, it sends out radio frequenc y
signals. The device is authorized to operate
at a duty factor not to exceed fi fty percen t. In
August 1996, the Federal Communications
Commission adopted RF exposure
guidelines with safety levels for handheld
wireless devices.
This equipment has been tested and found
to comply with the limits for a Class B digital
device, pursuant to Part 15 of the
Rules
.
reasonable protection against harmful
interference in a residential in stall ation. Thi s
equipment generates, uses and can radiate
radio frequency energy and, if not installed
and used in accordance with the
instructions, may caus e harmful in terference
to radio communications.
However, there is no guarantee that
interference will not occur in a particular
installation. If this equipment does cause
harmful interference to radio or television
reception, which can be determined by
turning the equipmen t off and on, the user is
encouraged to try to c orre ct the interference
by one or more of the following measures:
. Operation is subject to the
. These limits are designed to provide
FCC
75+0)"#0"126+10#."
94+56"564#2
You can attach an optional wrist strap (not
supplied) to the radio. Slide the wrist strap’s
small loop under the bar on the top of the
radio. You might need to use a small screwdriver or straightened paper clip to do this.
Then pull the strap’s large loop through the
small loop.
%#4'
Keep the radio dry; if it gets wet, wipe it dry
immediately. Use an d s tore the radio only in
normal temperature environments. Handle
the radio carefully; do not drop it. Keep the
radio away from dust and dirt, and wipe it
with a damp cloth occasionally to keep it
looking new.
5'48+%'"#0&"4'2#+4
If your radio is not performing as it should,
take it to your local RadioShack store for
assistance. Modifying or tampering with the
radio’s internal components can cause a
malfunction and might inva lidate its wa rranty
and void your FCC authorization to operate it.
• Reorient or relocate the receiving
antenna.
• Increase the separation between the
equipment and receiver.
• Connect the equi pment into an outlet on
a circuit different from that to which the
receiver is needed.
• Consult your local RadioShack store or
an experienced radio/TV technician for
help.
If you cannot eliminate the interference, the
FCC requires that y ou s top using you r radi o.
Changes or modifications not expressly
approved by RadioShack may cause
interference and void the user’s authority to
operate the equipment.
You must use shielded interfa ce cable s with
this equipment.
5#('6;"+0(14/#6+10
Do not open your radio t o m ak e an y i nte rnal
adjustments. Your radio is set up to transmit
a regulated signal on one of 14 assigned
frequencies. It is illegal to alter or adjust the
settings inside the radio to exceed those
limitations. Any adjustments to your radio
must be made by a qualifi ed technician
using the proper test equipment.
....
3

Limited Ninety-Day Warranty
This product is warranted by RadioShack against
manufacturing defects in mate rial and workmanship
under normal use fo r ninety (90) days from the da te
of purchase from RadioShack company-owned
stores and authori zed RadioShack franchisees and
dealers. EXCEPT AS PROVIDED HEREIN, RadioShack MAKES NO EXPRESS WARRANTIES
AND ANY IMPLIED WARRANTIES, INCLUDING
THOSE OF MERCHANTABILITY AND FITNESS
FOR A PARTICULAR PURPOSE, ARE LIMITED IN
DURATION TO THE DURATION OF THE WRITTEN
LIMITED WARRANTIES CONTAINED HEREIN. EXCEPT AS P R OVIDED HEREIN, R a d ioShack SHALL
HAVE NO LIABILITY OR RESPONSIBILITY TO
CUSTOMER OR ANY OTHER PERSON OR ENTITY WITH RESPECT TO ANY LIABILITY, LOSS
OR DAMAGE CAUSED DIRECTLY OR INDIRECTLY BY USE OR PERFORMANCE OF THE
PRODUCT OR ARISING OUT OF ANY BREACH
OF THIS WARRANTY, INC LUDING, BUT NOT LIMITED TO, ANY DAMAGES RESULTING FROM INCONVENIENCE, LOSS OF TIME, DATA,
PROPERTY, REVENUE, OR PROFIT OR ANY INDIRECT, SPECIAL, INCIDENTAL, OR CONSEQUENTIAL DAMAGES, EVEN IF RadioShack HAS BEEN
ADVISED OF THE POSSIBILITY OF SUCH DAMAGES.
Some states do not allow limitations on how long an
implied warranty lasts or the exclusion or limitation of
incidental or co nsequential damages, so th e above
limitations or exclusions may not apply to you.
In the event of a product d efect during the w arranty
period, take the prod uct and the RadioShack sales
receipt as proof of purchase d ate to any Ra di oSh ack
store. RadioShack will, at its option, unless otherwise
provided by la w: ( a) correct t he de fect by product repair without charge for parts and labor; (b) replace
the product with one of the same or similar design; or
(c) refund the purcha se price. All replaced pa rts and
products, and pro ducts on which a refund is made,
become the property of RadioShack. New or reconditioned parts an d pro ducts may be used in th e performance of warr anty service. Repair ed or replaced
parts and produ cts are warranted f or the remainder
of the original warranty period. You will be charged
for repair or replacement of the prod uct made after
the expiration of the warranty period.
This warranty does not cover: (a) dama ge or failure
caused by or attributable to acts of God, abuse, accident, misuse, improper or abno rmal usage, fa ilure to
follow instructions, improper installation or maintenance, alteration , lightning or other incid ence of excess voltage or current ; (b) any repairs other than
those provided by a Ra dioShack A uthorize d Service
Facility; (c) consumables such a s fuses or batteries;
(d) cosmetic damag e; (e) transport ation, shippin g or
insurance costs; or (f) costs of prod uct removal, installation, set-up service adjustment or reinstallation.
This warranty gives you specific legal rights, and you
may also have oth er rights which vary from state to
state.
RadioShack Customer Relations, 200 Taylor Street,
6th Floor, Fort Worth, TX 76102
12/99
To be safe:
• Never change or replace anything in
your radio except the batteries.
• Never open your radio’s case.
52'%+(+%#6+105
Channels (MHz)
1 .......................................................................................................................................... .. .. .... . 462.5625
2 .......................................................................................................................................... .. .. .... . 462.5875
3 .......................................................................................................................................... .. .. .... . 462.6125
4 .......................................................................................................................................... .. .. .... . 462.6375
5 .......................................................................................................................................... .. .. .... . 462.6625
6 .......................................................................................................................................... .. .. .... . 462.6875
7 .......................................................................................................................................... .. .. .... . 462.7125
8 .......................................................................................................................................... .. .. .... . 467.5625
9 .......................................................................................................................................... .. .. .... . 467.5875
10 .......................................................................................................................................... .. .. ... 467.6125
11 .......................................................................................................................................... .. .. ... 467.6375
12 .......................................................................................................................................... .. .. ... 467.6625
13 .......................................................................................................................................... .. .. ... 467.6875
14 .......................................................................................................................................... .. .. ... 467.7125
Frequency Range ............................................................... .. .. .... .. .. .. ....... .. .. .... 462.5625 to 467.7125 MHz
Channels ................................................................................................................................................. 14
RF Output Power .................................. .. ..... .... .. .. .. .... .. ..... .... .. .. .. .... .. ....... .. .. .. .... .. .. ..... 400 to 500mW ERP
Power Supply ................................................................................................. 6.0 VDC (4 × AAA Batteries )
Operating Temperature ........................................................................................................... –4 to 122 ºF
(–20 to 50 ºC)
3
Dimensions (HWD) ............................................................................................. 4
Weight ................................................................................................................................... 4.2 oz (120 g)
Specifications are typical; individual units might vary. Specifications are subject to change and
improvement without notice.
/16 × 25/16 × 11/3 inches
(106 × 58 × 34 mm)
RadioShack Corporation
Fort Worth, Texas 76102
21-1863
AO0105AAA1
04A02
Printed in China
 Loading...