

Page 1
5/KP/3"7PKXGTUCN"4GOQVG"%QPVTQN"L")QNHDCI"5V[NG
15-2127
"+/2146#06"
#
If an icon appears at the end of a paragraph,
go to the box on that page with the
corresponding icon for pertinent information.
— Warning
Rý
Rý
RýRý
.... — Caution
— Important
#
°°°°
±±±±
— Hint
#
— Note
OWNER’S MANUAL — Please read before using this equipment.
Thank you for purchasing the RadioShack 3-in-1 Universal Remote Control – Golfbag Style. It
is a state-of-the-art device specially designed to operate the major functions of your television
(TV), video cassette recorder (VCR), and cable converter (CBL). It is compatible with most
popular brand TV, VCR, and CBL devices. The remote is pre-programmed before you
purchase it. Input the correct code for your device and the remote is ready to use.
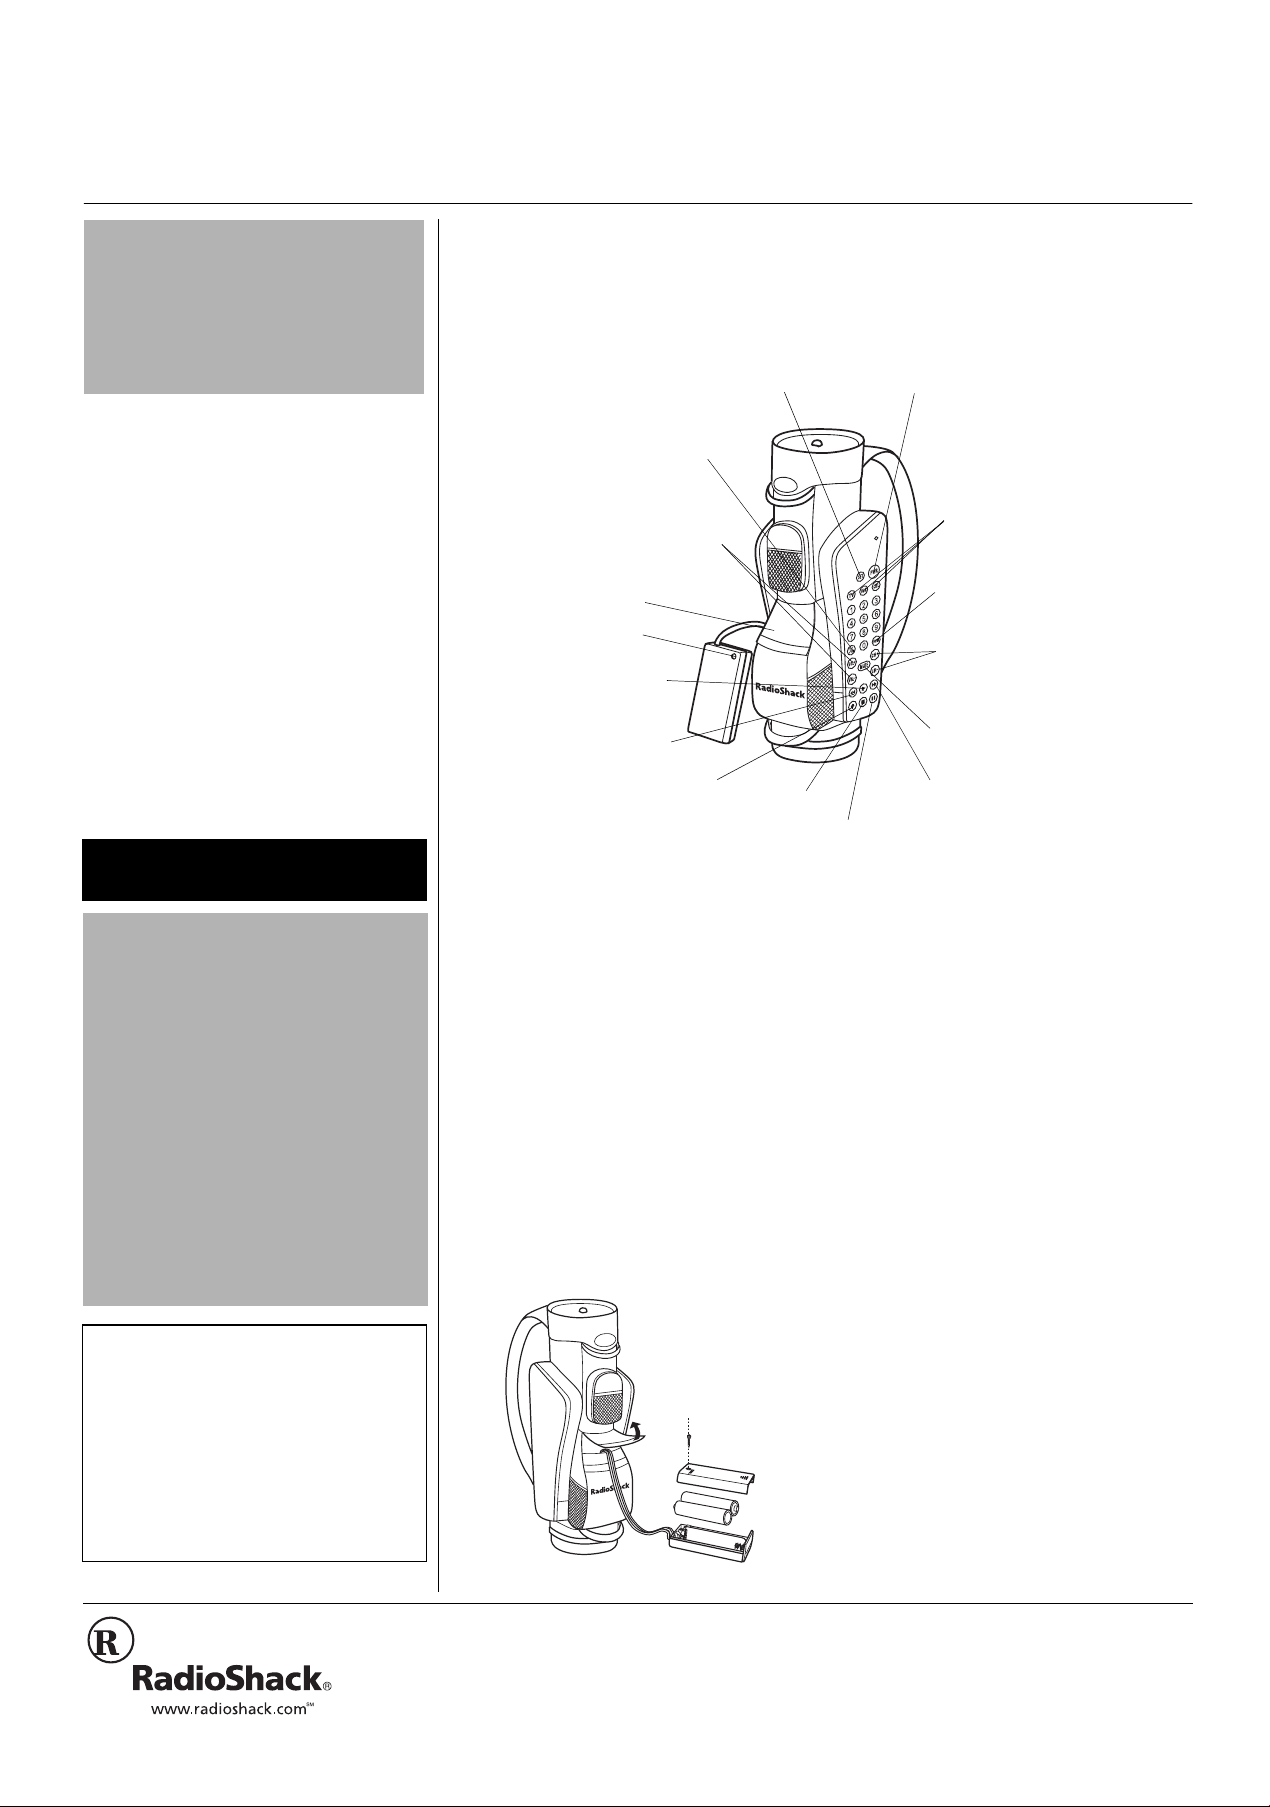
TV/VCR —
Switches the
view between
the TV and VCR.
VOL+
+
VOL– Adjusts
/
++
the volume.
Battery Compartment
RESET — Resets stored
remote settings.
— Play
JJJJ
— Rewind
####
SET — Initiates
programming mode.
PWR — Turns the selected
device on or off.
TV/VCR/CBL — Selects the
desired device type.
ENTER — Press after entering
channel numbers (on some TV
models).
++++
CH– Selects a channel.
CH
/
MUTE — Turns the sound on
or off.
"9#40+0)"R"
Dispose of batteries promptly and properly.
• Use only fresh batteries of the required size
and recommended type.
• Do not mix old and new batteries, different
types of batteries (standard, alkaline, or
rechargeable), or rechargeable batteries of
different capacities.
• If you do no plan to use the remote control
for a month or longer, remove the batteries.
• Rechargeable batteries are to be removed
from the remote before being charged.
• Rechargeable batteries are only to be
charged under adult supervision.
• Batteries are to be inserted with the correct
polarity.
• Do not short-circuit the terminals.
• Do not attempt to charge non-rechargeable
batteries.
Installing Batteries
When the remote stops operating properly,
replace the batteries within 10 minutes of
removing the old batteries. Otherwise, the
programmed settings and codes will be lost.
Programming the Remote
If the device does not turn off, repeat steps
3–5, using another code from the Code List for
your device until you find one that works.
R
.
"%#76+10"
"016'"±"
±
.
— Record
çççç
— Stop
''''
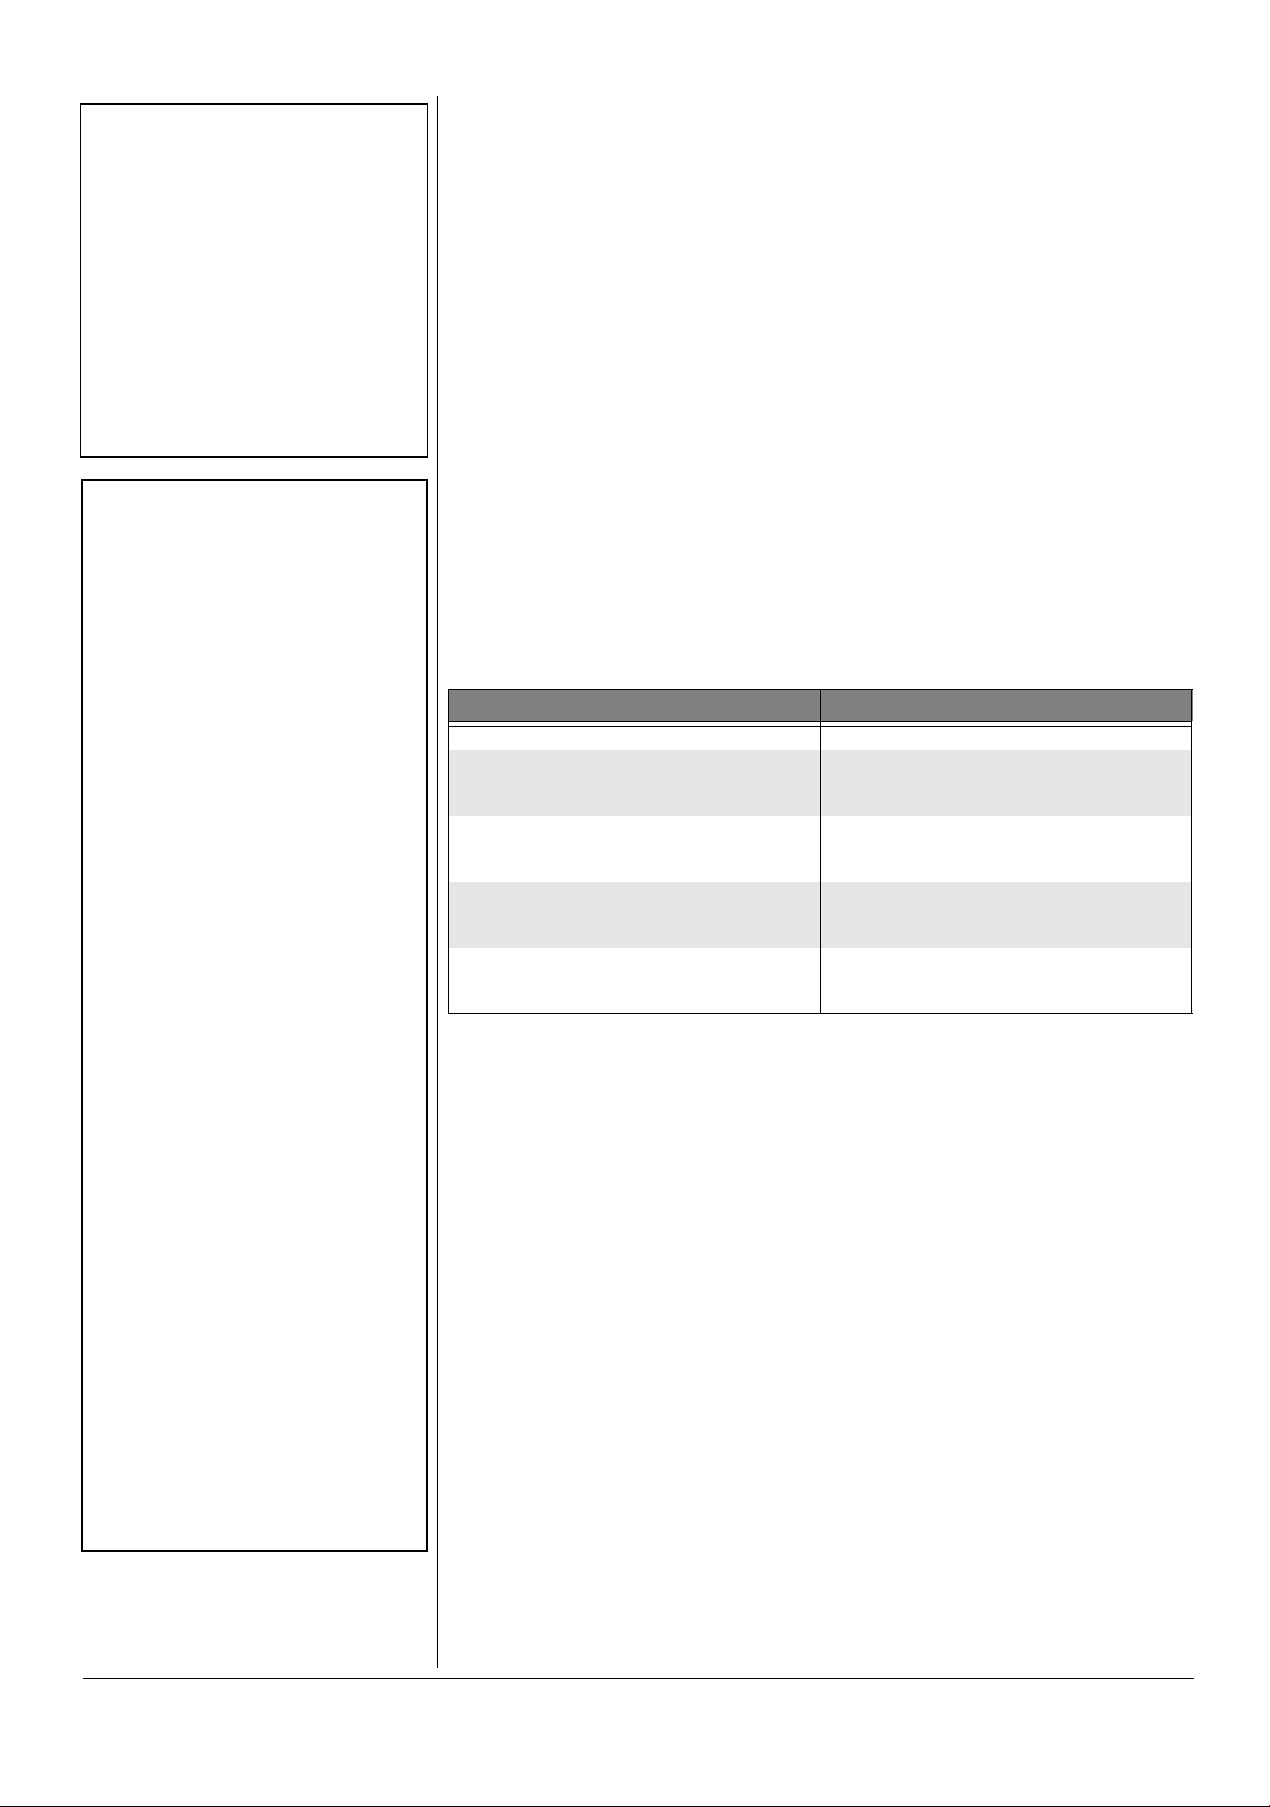
+056#..+0)"
$#66'4+'5
Your remote requires two AA batteries (not
supplied) for power. For the best
performance and longest life, we
recommend RadioShack alkaline
batteries.
1. Unseal the flap on the remote, then pull
out the battery compartment.
2. Use a Phillips screwdriver to loosen the
screw on the battery compartment
cover, then remove the cover.
3. Place two AA alkaline batteries in the
compartment as indicated by the
polarity symbols (+ and –) marked
inside.
Rý
Rý
RýRý
....
— Fast Forward
,,,,
— Pause
ffff
4. Replace the cover and secure it with the
screw.
5. Replace the battery compartment and
seal the flap.
±±±±
241)4#//+0)"6*'"
4'/16'
While programming, make sure to aim the
remote at the device and that the distance
between the remote and device is within 21
feet (7 meters).
1. Refer to the “Code List” on Page 3 and
write down the codes for your device.
2. Manually turn on your TV, VCR, or
cable converter.
3. Press
4. Hold down
5. Enter the 4-digit code. If the code is
6. Aim the remote control at the device
TV, VCR
desired device type. The red LED blinks
once.
twice.
valid, the red LED blinks twice.
and press
off.
±±±±
, or
SET
PWR
to select the
CBL
until the red LED blinks
. The device should turn
2002 RadioShack Corporation.
©
RadioShack and RadioShack.com are trademarks
All Rights Reserved.
used by RadioShack Corporation.
Page 2
"016'"±"
±
• The remote’s function keys works the same
as the function keys on the original remote
control supplied with your device; however,
certain function keys, such as CH+ and
CH–, might not work correctly depending on
the type of device you are using.
• To avoid damaging the video tape, you must
press RECORD twice to begin recording.
• Press each key within 10 seconds after
entering the previous entry. Otherwise, the
remote exits the programming mode.
• If you press SET at any time except before
entering the 4-digit code, the remote exits
programming mode without saving your
entries. You must then start programming
from the beginning.
Limited Ninety-Day Warranty
This product is warranted by RadioShack against
manufacturing defects in material and workmanship
under normal use for ninety (90) days from the date
of purchase from RadioShack company-owned
stores and authorized RadioShack franchisees and
dealers. EXCEPT AS PROVIDED HEREIN,
RadioShack MAKES NO EXPRESS WARRANTIES
AND ANY IMPLIED WARRANTIES, INCLUDING
THOSE OF MERCHANTABILITY AND FITNESS
FOR A PARTICULAR PURPOSE, ARE LIMITED IN
DURATION TO THE DURATION OF THE WRITTEN
LIMITED WARRANTIES CONTAINED HEREIN. EXCEPT AS PROVIDED HEREIN, RadioShack SHALL
HAVE NO LIABILITY OR RESPONSIBILITY TO
CUSTOMER OR ANY OTHER PERSON OR ENTITY WITH RESPECT TO ANY LIABILITY, LOSS OR
DAMAGE CAUSED DIRECTLY OR INDIRECTLY BY
USE OR PERFORMANCE OF THE PRODUCT OR
ARISING OUT OF ANY BREACH OF THIS WARRANTY, INCLUDING, BUT NOT LIMITED TO, ANY
DAMAGES RESULTING FROM INCONVENIENCE,
LOSS OF TIME, DATA, PROPERTY, REVENUE, OR
PROFIT OR ANY INDIRECT, SPECIAL, INCIDENTAL, OR CONSEQUENTIAL DAMAGES, EVEN IF
RadioShack HAS BEEN ADVISED OF THE POSSIBILITY OF SUCH DAMAGES.
Some states do not allow limitations on how long an
implied warranty lasts or the exclusion or limitation of
incidental or consequential damages, so the above
limitations or exclusions may not apply to you.
In the event of a product defect during the warranty
period, take the product and the RadioShack sales
receipt as proof of purchase date to any RadioShack
store. RadioShack will, at its option, unless otherwise
provided by law: (a) correct the defect by product repair without charge for parts and labor; (b) replace
the product with one of the same or similar design; or
(c) refund the purchase price. All replaced parts and
products, and products on which a refund is made,
become the property of RadioShack. New or reconditioned parts and products may be used in the performance of warranty service. Repaired or replaced
parts and products are warranted for the remainder
of the original warranty period. You will be charged
for repair or replacement of the product made after
the expiration of the warranty period.
This warranty does not cover: (a) damage or failure
caused by or attributable to acts of God, abuse, accident, misuse, improper or abnormal usage, failure to
follow instructions, improper installation or maintenance, alteration, lightning or other incidence of excess voltage or current; (b) any repairs other than
those provided by a RadioShack Authorized Service
Facility; (c) consumables such as fuses or batteries;
(d) cosmetic damage; (e) transportation, shipping or
insurance costs; or (f) costs of product removal, installation, set-up service adjustment or reinstallation.
This warranty gives you specific legal rights, and you
may also have other rights which vary from state to
state.
RadioShack Customer Relations, 200 Taylor Street,
6th Floor, Fort Worth, TX 76102
12/99
7. Repeat steps 1–5 for additional
devices.
%1&'"5'#4%*
If you cannot identify the correct code for
6. Hold down
until the LED blinks
SET
twice.
7. Aim the remote at your device and
repeatedly press
until the device
PWR
turns off.
your device from the Code Li st, fo l l ow th ese
steps to search for the correct code.
8. When the device turns off , imm ed i at el y
press the appropriate button for your
1. Manually turn on your TV, VCR, or
cable converter.
2. Press
TV, VCR
, or
to select the
CBL
desired device type. The red LED blinks
once.
3. Hold down
until the red LED blinks
SET
twice.
4. Press
0 1 2 0
0 0 0 0
for TV,
0 0 8 0
for VCR, or
for CBL. The red LED blinks
twice.
5. Press the appropriate button for your
device (
TV, VCR
, or
CBL
).
device (
TV, VCR
code. The red LED blinks twice.
12'4#6+10
1. Point the remote at the device and
press
PWR
2. Press the desired function keys.
3. Press
PWR
device. To turn off other devices, press
the desired device key, then press
±±±±
, or
) to save the
CBL
to turn it on.
to turn off the last selected
PWR
6417$.'5*116+0)
2TQDNGO 5QNWVKQP
The red LED does not blink when you press a key. Replace the batteries or press RESET.
The red LED blinks when you press a key, but your
device does not respond.
The remote does not control the device or the
commands do not work properly.
CH+ and CH– do not work with your RCA TV.
Changing channels does not work properly.
Aim the remote at your device and make sure the
distance between the remote and the device is
within 21 feet.
Try other listed codes for that brand of device.
Make sure all components can be operated with an
infrared remote control.
Due to an RCA design (1983-1987), only the
original remote control can operate these
functions.
The original remote control might require pressing
ENTER to change channels. Press ENTER after
entering a channel number.
%#4'
Keep the remote control dry; if it gets wet, wipe it dry immediately. Use and store the remote
control only in normal temperature environments. Handle the remote control carefully; do not
drop it. Keep the remote control away from dust and dirt, and wipe it with a damp cloth
occasionally to keep it looking new.
If your remote control is not performing as it should, take it to your local RadioShack store for
assistance. Modifying or tampering with the remote control’s internal components can cause a
malfunction and might invalidate its warranty.
52'%+(+%#6+105
Power ............................................................................................................ 2 AA Batteries (not supplied)
Battery Life ....................................................................................................................................6 months
Control Range (IR) ............................................................................................................................21 feet
±30 degrees
7
Dimensions ......................................................................................................... 7
Weight ..............................................................................................................................................10.6 oz
Specifications are typical; individual units might vary. Specifications are subject to change and
improvement without notice. Toy characteristics such as size, shape, color, material, and complexity of
design shall affect the play value of a toy.
/8 × 23/
1
4
16
× 3
/
inches
.
2
Page 3

%1&'".+56
$TCPF %QFGU $TCPF %QFGU $TCPF %QFGU
Televisions
AOC 0003, 0005 Harman/Kardon 0009 Proton 0021
Admiral 0014, 0027 Harvard 0023 Pulsar 0002, 0003
Aiko 0013 Hitachi 0001, 0010, 0015 Quasar 0007, 0025
Akai 0005 Infinity 0009 RCA
Alaron 0022 Inteq 0002 Radio Shack
America Action 0023 JBL 0009 Realistic
Anam 0023 JCB 0000 Runco 0002, 0005
Audiovox 0013, 0023, 0026 JVC 0008 SSS 0003, 0023
Baysonic 0023 KEC 0023 Sampo 0005
Belcor 0003 KTV 0005, 0023 Samsung
Bell & Howel 0001, 0017 Kenwood 0003, 0005 Sansei 0026
Bradford 0023 LG 0010 Sansui 0027
Brockwood 0003 LXI
Broksonic 0024, 0027 Logik 0001 Scimitsu 0003
CXC 0023 Luxman 0010 Scotch 0021
Candle 0005, 0010 MGA 0003, 0005, 0016, 0021 Scott
Carnivale 0005 MTC 0003, 0005, 0010, 0011 Sears
Carver 0009 Magnavox 0005, 0009, 0022 Semivox 0023
Celebrity 0000 Majestic 0001 Semp 0018
Cineral 0013, 0026 Marantz 0005, 0009 Sharp 0014
Citizen 0005, 0010, 0011, 0013 Matsushita 0025 Shogun 0003
Concerto 0010 Megatron 0015, 0021 Signature 0001
Contec 0023 Memorex
Craig 0023 Midland 0002, 0006, 0007 Soundesign 0021, 0022, 0023
Crosley 0009 Minutz 0004 Squareview 0020
Crown 0023 Mitsubishi 0003, 0014, 0016, 0021 Starlite 0023
0001, 0005, 0006, 0007,
Curtis Mathes
Daewoo 0003, 0013, 0026 Multitech 0023 Sylvania 0005, 0009
Daytron 0003 NAD 0018, 0019, 0021 Symphonic 0020
Denon 0015 NEC 0003, 0005, 0010 TMK 0010, 0021
Dumont 0002, 0003 NTC 0013 Tandy 0014
Electroband 0000 Nikko 0005, 0013, 0021 Technics 0007, 0025
Emerson
Envision 0005 Optimus 0017, 0019, 0025 Techwood 0007, 0010
Fisher 0017 Optonica 0014 Teknika
Fujitsu 0022 Orion 0022, 0024, 0027 Telefunken 0010
Funai 0020, 0022, 0023 Panasonic 0007, 0025 Toshiba 0011, 0017, 001 8
Futuretech 0023 Penney
GE
Gibralter 0002, 0003, 0005 Philips 0009 Vidikron 0009
GoldStar 0003, 0005, 0010, 0021 Pilot 0003, 0005 Vidtech 0003, 0021
Gradiente 0008, 0010 Pioneer 0019 Wards
Grunpy 0022, 0023 Portland 0003, 0013 White Westinghouse 0027
Hallmark 0021 Prism 0007 Yamaha 0003, 0005
Harley Davidson 0022 Proscan 0006 Zenith 0001, 0002, 0013, 0027
Admira 0090, 0099 Hitachi 0080, 0086 Proscan 0091
Adventura 0080 Hughes Network Systems 0086 Protec 0093
Aiko 0103 JVC 0092 Pulsar 0085
0009, 0010, 0011, 0014,
0015, 0017, 0019, 0026
0003, 0017, 0021, 0022,
0023, 0024, 0027
0004, 0006, 0007, 0014,
0021, 0026
Motorola 0014 Supreme 0000
Onwa 0023 Technol Ace 0022
Philco
0006, 0009, 0017, 0018,
0021
0001, 0010, 0016, 0017,
0021, 0025, 0027
0003, 0004, 0005, 0006,
0007, 0010, 0011, 0018,
0021
0003, 0005, 0009, 0015,
0027
VCRs
Sanyo 0017
Sony 0000
Vector Research 0005
Victor 0008
0003, 0006, 0007, 0012,
0014, 0028
0003, 0005, 0006, 0010,
0017, 0021, 0023
0003, 0005, 0010, 0017,
0021, 0023
0003, 0005, 0010, 0011,
0021
0003, 0021, 0022, 0023,
0024
0006, 0009, 0010, 0017,
0018, 0020, 0021, 0022
0001, 0003, 0009, 0010,
0011, 00 13, 0016, 0022,
0023
0001, 0003, 0004, 0005,
0009, 0010, 0021, 0022
3
Page 4
$TCPF %QFGU $TCPF %QFGU $TCPF %QFGU
Aiwa 0080, 0084 KEC 0084, 0103 Quasar 0083, 0097, 0104
America Action 0103 KLH 0093 RCA
American High 0083 Kenwood 0092 Radio Shack 0080
Asha 0101 Kodak 0083, 0084 Radix 0084
Audiovox 0084 LXI 0084 Randex 0084
Beaumark 0101 Lloyd’s 0080 Realistic
Bell & Howell 0095 Logik 0093 Runco 0085
Broksonic 0081, 0096, 0098, 0099 MEI 0083 STS 0086
CCE 0093, 0103 MGA 0087, 0101 Samsung 0088, 0101
Calix 0084 MGN Technology 0101 Sanky 0085, 0090
Canon 0083 MTC 0080, 0101 Sansui 0080, 0092, 0099, 0102
Carver 0094 Magnasonic 0103 Sanyo 0089, 0095, 0101
Cineral 0103 Magnavox 0080, 0083, 0085, 0094 Scott 0087, 0088, 0096, 0098
Citizen 0084, 0103 Magnin 0101 Sears
Colt 0093 Marantz 0083, 0094 Semp 0088
Craig
Curtis Mathes 0083, 0091, 0097 Matsushita 0083, 0097 Shintom 0093
Cybernex 0101 Memorex
Daewoo 0088, 0103 Minolta 0086 Singer 0093
Denon 0086 Mitsubishi 0087, 0090, 0092 Sony 0080, 0082, 0083
Dynatech 0080 Motorola 0083, 0090 Sylvania 0080, 0083, 0087, 0094
Electrohome 0084 Multitech 0080, 0093 Symphonic 0080
Electrophonic 0084 NEC 0092, 0095 TMK 0101
Emerex 0082 Nikko 0084 Teac 0080
Emerson
Fisher 0089, 0095 Olympus 0083 Teknika 0080, 0083, 0084
Fuji 0083 Optimus
Funai 0080 Orion 0081, 0098, 0099 Toshiba 0087, 0088
GE 0083, 0090, 0091, 0101 Panasonic 0083, 0097, 0100, 0104 Totevision 0084, 0101
Garrard 0080 Penney 0083, 0084, 0086, 0101 Unitech 0101
GoldStar 0084 Pentax 0086 Vector 0088
Gradiente 0080 Philco 0083, 0099 Video Concepts 0088
HI-Q 0089 Philips 0083, 0094 Videosonic 0101
Harley Davidson 0080 Pilot 0084 Wards
Harman/Kardon 0094 Pioneer 0092 White Westinghouse 0099, 0103
Harwood 0093 Profitronic 0101 XR-1000 0080, 0083, 0093
ABC
Americast 0141 Jasco 0126 Runco 0120
Archer 0138 Jerrold
Bell & Howell 0125 Magnavox 0130 Scientifica Atlanta 0123, 0127, 0135, 0140
Bell South 0141 Memorex 0120 Signal 0126
Contec 0128 Oak 0122, 0128 Starcom 0121, 0126
Emerson 0138 Panasonic 012 0, 0131 Stargate 0126, 0138
Everquest 0126 Paragon 0120 Starquest 0126
Gemini 0126, 0138 Philips 0130 Tocom 0124
General Instrument 0133, 0134, 0139 Pioneer 0132, 01 37 , 0140 Toshiba 0120
Goldstar 0132 Pulsar 0120 Tusa 0126
Goodmind 0138 Quasar 0120 United Artists 0122
Hamlin 0129 RadioShack 0126, 0138 Viewstar 0130
0084, 0089, 0093, 0101,
0102
0080, 0081, 0084, 0087,
0096, 0098, 0099, 0103
0121, 0122, 0123, 0125,
0127
Marta 0084 Sharp 0090
0080, 0083, 0084, 0085,
0089, 0090, 0095, 0099,
0101, 0104
Noblex 0101 Technics 0083, 0097
0084, 0090, 0095, 0097,
0104
Cable Converters
Hytex 0122 Regal 0129
0121, 0124, 0125, 0126,
0133, 0134, 0139
Shogun 0101
Thomas 0080
Zenith 0080, 0085, 0099
Samsung 0132
Zenith 0120, 0136, 0141
0083, 0086, 0090, 0091,
0101
0080, 0083, 0084, 0089,
0090, 0095
0080, 0083, 0084, 0086,
0089, 0095
0080, 0083, 0086, 0089,
0090, 0091, 0093, 0094,
0101
RadioShack Corporation
Fort Worth, Texas 76102
15-2127
06A02
Printed in China
 Loading...