

Page 1
15-1990.fm Page 1 Tuesday, December 14, 1999 12:45 PM
Cat. No. 15-1990
OWNER’S MANUAL
3-in-One Pocket Remote Control
Please read before using this equipment.
Page 2
15-1990.fm Page 2 Tuesday, December 14, 1999 12:45 PM
FEATURES
Your RadioShack 3-in-One P ock et Remo te Control
can replace up to three infrared remote controls.
You can use it to control your TV, VCR, TV/VCR
combination, and cable converter.
Unlike some universal remote controls, the 3-in-One
is preprogrammed with the most commonly used
commands and does not have to learn its commands
from the original remo te contro ls. Al l you hav e to do
is tell it which TV, VCR, TV/VCR combination, or cable converter’s remot e controls you w ant to replace
(by entering 4-digit codes).
This manual incl udes a list of many manufacturers’
4-digit codes for TVs, VCRs, and cable converters.
Your remote control’s features include:
Powerful Infrared Beam
— so you can operat e your
remote-controlled devices from a greater distance
than with many of the original remote controls.
Handy Reference Label
— provides a conv enient
place for you to write down the manufacturers’ codes
for your devices.
Convenient Keypad Design
— each key is posi-
tioned for easy operation.
Toll Free Support
your remote control by calling
Note:
You need two AAA batteries ( not supplied) to
— you can get expert help for
1-888-284-8735
.
power your 3-in-One Pocket Remote Control.
©
1999 Tandy Corporation.
Plug ’n Power and RadioShack are registered trademarks
2
All Rights Reserved.
used by Tandy Corporation .
Page 3

15-1990.fm Page 3 Tuesday, December 14, 1999 12:45 PM
CONTENTS
Introduction .................................................................. 4
Preparation ................................................................... 5
Installing Batteries ................................................... 5
Device Types ........................................................... 6
Setting Up Your Remote Control .............................. 6
To Operate your TV/VCR Combination .................... 8
Operation ...................................................................... 9
Punch-Through ........................................................ 9
Turning Punch-Through Off/On ..................... 10
Manufacturers’ Codes ............................................... 11
Cable Converters ................................................... 11
Televisions ............................................................. 13
VCRs ..................................................................... 19
TV/VCR Combinations .......................................... 25
If You Have Problems ................................................. 27
Manual Code Search ............................................. 27
Determining the 4-Digit Code ........................ 28
Troubleshooting ..................................................... 29
Care ............................................................................. 30
Specifications ............................................................ 31
3
Page 4
15-1990.fm Page 4 Tuesday, December 14, 1999 12:45 PM
INTRODUCTION
Your RadioShack 3 -in-One Pocket Remote Control
was designed to control the most commonly used
functions on your TV, VCR, TV/VCR combination,
and cable converter.
When you set up the remote control, its co mmand
keys work like the keys on your original remote controls. For example, the remote control’s
works like a key on your original remote control
which might be labeled POWER ON/OFF.
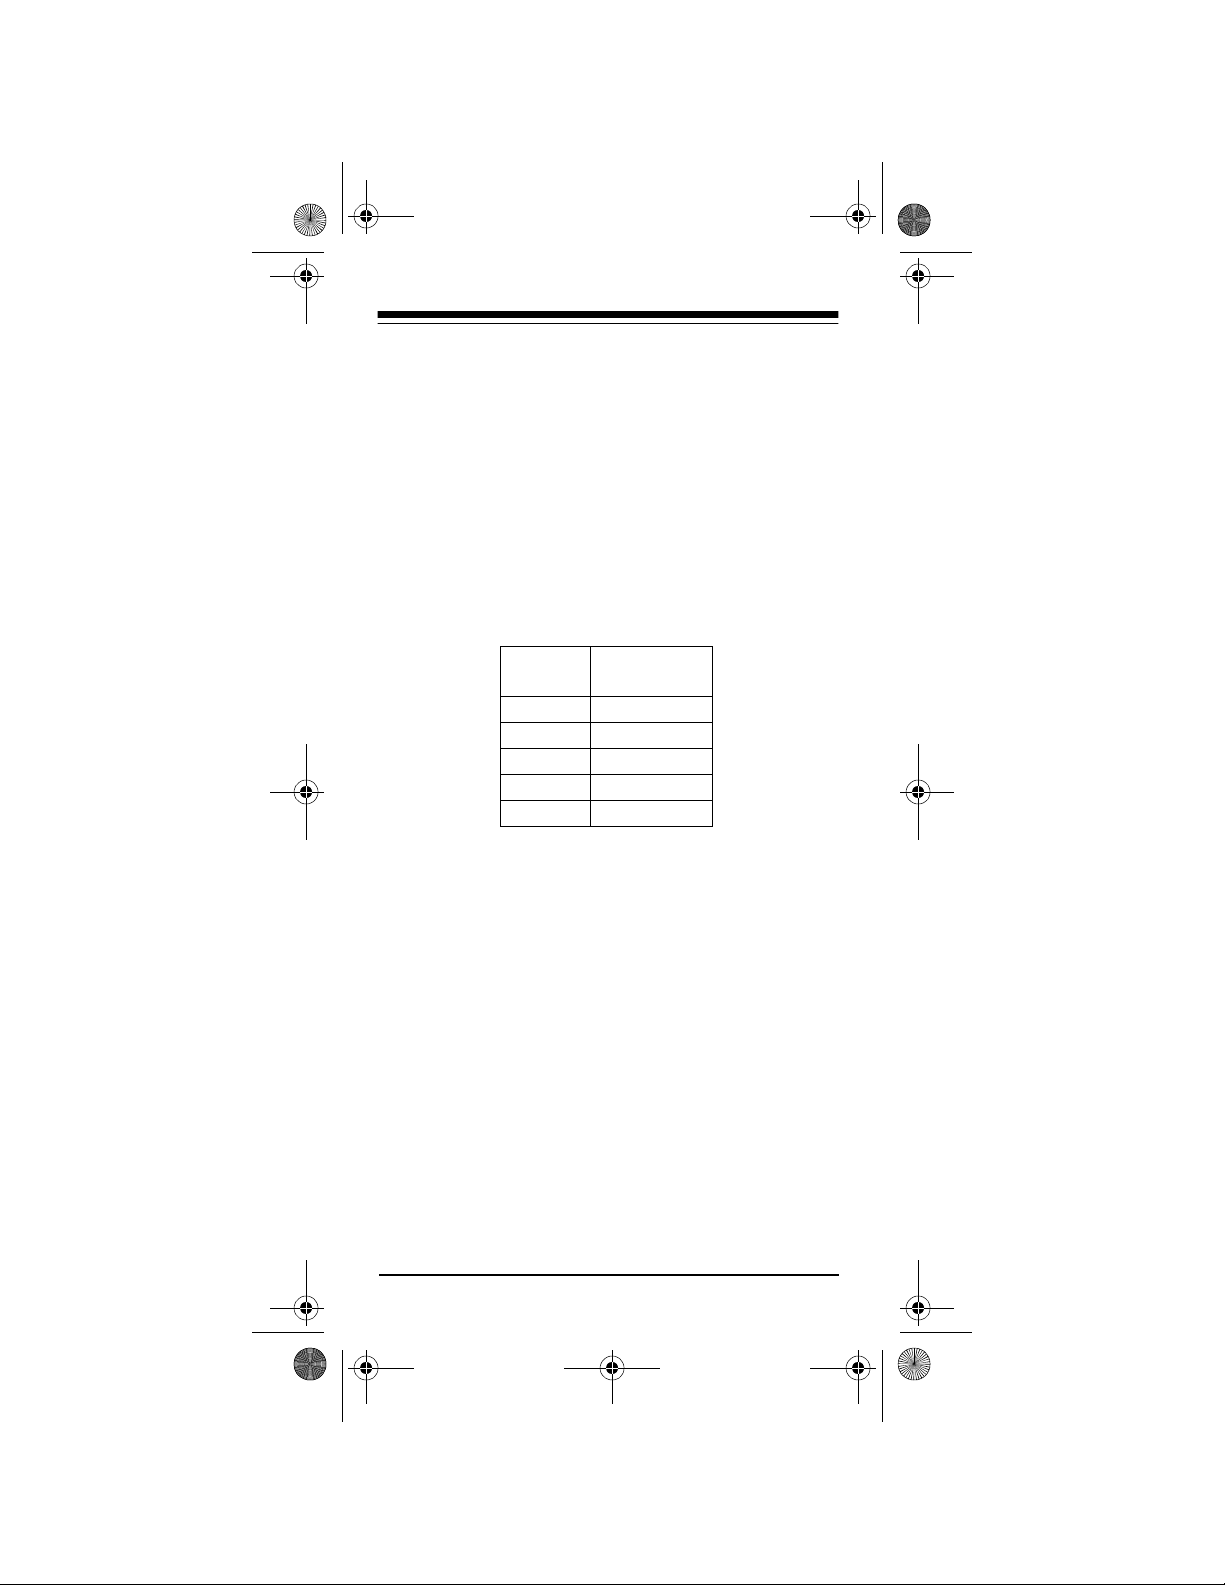
Key Function
P
Used in setting up your devices.
POWER key
POWER, CH +,
CH –, VOL +,
VO L –, MUTE
CBL, VCR, TV
REW , STOP
, FFWD ,
REC , PLAY ,
PAUSE
Operate the same as the corresponding keys on your original
remote control.
Used when you se t up the re mote
control to replace your original
remote controls . Also us ed during
normal operation to tell the
remote control which device you
want to control.
Control VCR functions.
Notes:
• Whenever you use
REC on the remote con-
trol, you must press it twice. This safety feature
helps you avoid accidentally recording over
tapes.
• The remote control might not be able to duplicate some of your original remote control’s
seldom-used functions.
4
Page 5

15-1990.fm Page 5 Tuesday, December 14, 1999 12:45 PM
PREPARATION
INSTALLING BATTERIES
Your remote control r equires two AAA batterie s (not
supplied) for power. F or the best performance and
longest life, we recommend RadioShack alkaline
batteries.
Cautions:
• Use only fresh batteries of the required size and
recommended type.
• Do not mix old and new batteries or different
types of batteries.
• Do not press any of the remote control’s keys
while installing batteries.
Note:
The remote contro l’s built-in memory b ackup
saves any program med codes for abo ut 10 minu tes
after the batteries have been re moved. We recommend you have fresh batteries ready to install as
soon as you remove the old ones.
1. Press the battery com partment cover’s tab and
lift off the cover.
2. Place the batteries in the compart ment as indicated by the polarity symbols (+ and
inside.
3. Replace the cover.
When the remote control’s range decreases or it
stops operating properly, replace the batteries.
Caution:
teries can leak chemicals that can destroy electronic
parts.
Always remove old or weak batteries. Bat-
–
) marked
5
Page 6

15-1990.fm Page 6 Tuesday, December 14, 1999 12:45 PM
Warning:
properly. Do not burn or bury them.
Note:
trol after you have installed the batteries. This c an
press keys for an extended period of time and reduce
battery life.
Dispose of old batteries promptly and
Do not place objects on top of the remote con-
DEVICE TYPES
You can use the remote control’s device keys to control the following general types of devices:
TV — TVs
VCR — VCRs and TV/VCR combinations
CBL — Cable converters
SETTING UP YOUR REMOTE
CONTROL
1. Refer to “Manufacturers’ Codes” on Page 11 and
write down the codes for your brand of device on
the 3-in-One’s label.
Note:
Some manufacturers have several codes
listed. Tr y each until you find the right one. See
“If You Have Problems” on Page 27 if you cannot
find the correct code.
2. Press the device key for the type of remote you
are replacing (
blin ks.
6
TV, VCR, or CBL). The red light
Page 7
15-1990.fm Page 7 Tuesday, December 14, 1999 12:45 PM
3. Hold down P until the red li ght blinks tw ice, then
enter the 4-digit code you wrote down in Step 1
using these keys:
To Enter
Press
VOL +
VOL –
CH +
CH –
MUTE
This Number
1
2
3
4
5
For example, to replace a TV’s remote control
(manufacturer’s code 1432), press
down
P until the red light blinks twice, then press
VOL +, CH –, CH +, and VOL –.
TV, hold
When the red light blinks twice, the remote control has accepted the code.
Note:
If the code you entered is invalid, the red
light blinks.
4. Point the remote control at your device and
press
POWER. Your device should turn off (or
on, if it was off).
If the remote does not operate your device, try
the other codes listed in “Manufacturers’ Codes”
on Page 11 for your brand of TV, VCR, TV/VC R
combination, or cable converter.
5. Repeat Steps 2–4 for additional devices.
7
Page 8
15-1990.fm Page 8 Tuesday, December 14, 1999 12:45 PM
TO OPERATE YOUR TV/VCR
COMBINATION
1. Locate the codes for your TV/VCR combi nation
in “TV/VCR Combinations” on Page 25 and
write down the codes for your brand of device on
the 3-in-One’s label.
2. Press
3. Hold down
VCR. The red light blinks.
P until the red light blinks twice, then
enter the 4-digit code you wrote down in Step 1
using these keys:
To Enter
Press
VOL +
VOL –
CH +
CH –
MUTE
This Number
1
2
3
4
5
When the red light blinks twice, the remote control has accepted the code.
Note:
If the code you ente re d is invalid, the r ed
light blinks.
4. Point the remote control at your TV/VCR combi nation and press
POWER. Your device should
turn off (or on, if it was off).
If the remote does not operate your device, try
the other codes listed in “TV/VCR Combinations” on Page 25 for your TV/VCR combination.
Note:
Some TV/VCR combinations require a
second code to control volume. If you cannot
get the volume to work, use the TV code listed
in “TV VCR Combinations.” If no TV code is
listed, follow the instructions in “Punch-Through”
on Page 9 to control volume.
8
Page 9
15-1990.fm Page 9 Tuesday, December 14, 1999 12:45 PM
OPERATION
1. Press the device key for the device you want to
control.
2. Point the remote control toward the device you
want to control, then press the desired command keys.
3. Repeat Steps 1 and 2 for all other devices you
want to operate.
Note:
The command keys on the remote control
work the same as the keys on the original
remote control; however, the labeling might differ slightly.
4. To turn off the last device you selected, press
POWER. To turn off other devices, press the
device key for the device you want to turn off,
then press
POWER.
PUNCH-THROUGH
The punch-throug h feature lets yo u alternately control two different devices without pressing the device
keys for each one.
A TV is often the o nly device that uses th e volume
keys. Punch-throu gh allows you to control th e TV’s
volume while the 3-in-One is in any device mode.
With punch-through on, if you press
your volume keys, the 3 -in-One wi ll control the TV’s
volume instead of the VCR’s volume.
VCR and use
9
Page 10

15-1990.fm Page 10 Tuesday, December 14, 1999 12:45 PM
Turning Punch-Through Off/On
If your cable converter or VCR has a volume control,
you might want to turn off punch-through so you can
use the cable conve rter or VCR’s vol ume control to
adjust the sound. To turn off punch-through, hold
down
P until the red light blinks twice, then press
MUTE, MUTE, and CH –. The red light blinks four
times.
Now, when you want to control the volume through
your cable converter, press
ume controls. If you want to control the volume
through your VCR, press
ume controls.
CBL before using the vol-
VCR before using the vol-
To turn punch-through back on, hold down
red light blinks twice, then press
CH –. The red light blinks twice.
MUTE, MUTE, and
P until the
10
Page 11

15-1990.fm Page 11 Tuesday, December 14, 1999 12:45 PM
MANUFACTURERS’ CODES
The following list tells you which 4-di gi t co des to e nter to set up the remote control to operate your:
• Cable Converter (see below)
• Television (see Page 13)
• VCR (see Page 19)
• TV/VCR Combination (see Page 25)
Notes:
• The remote contr ol might not have every command of your original remote controls.
• Use the the 3-in-One’s label to record the manufacturers’ codes for your remote-controlled
devices.
• A key on the remote control that has the same
name as a key on your original remote contr ol
might have a slightly different function.
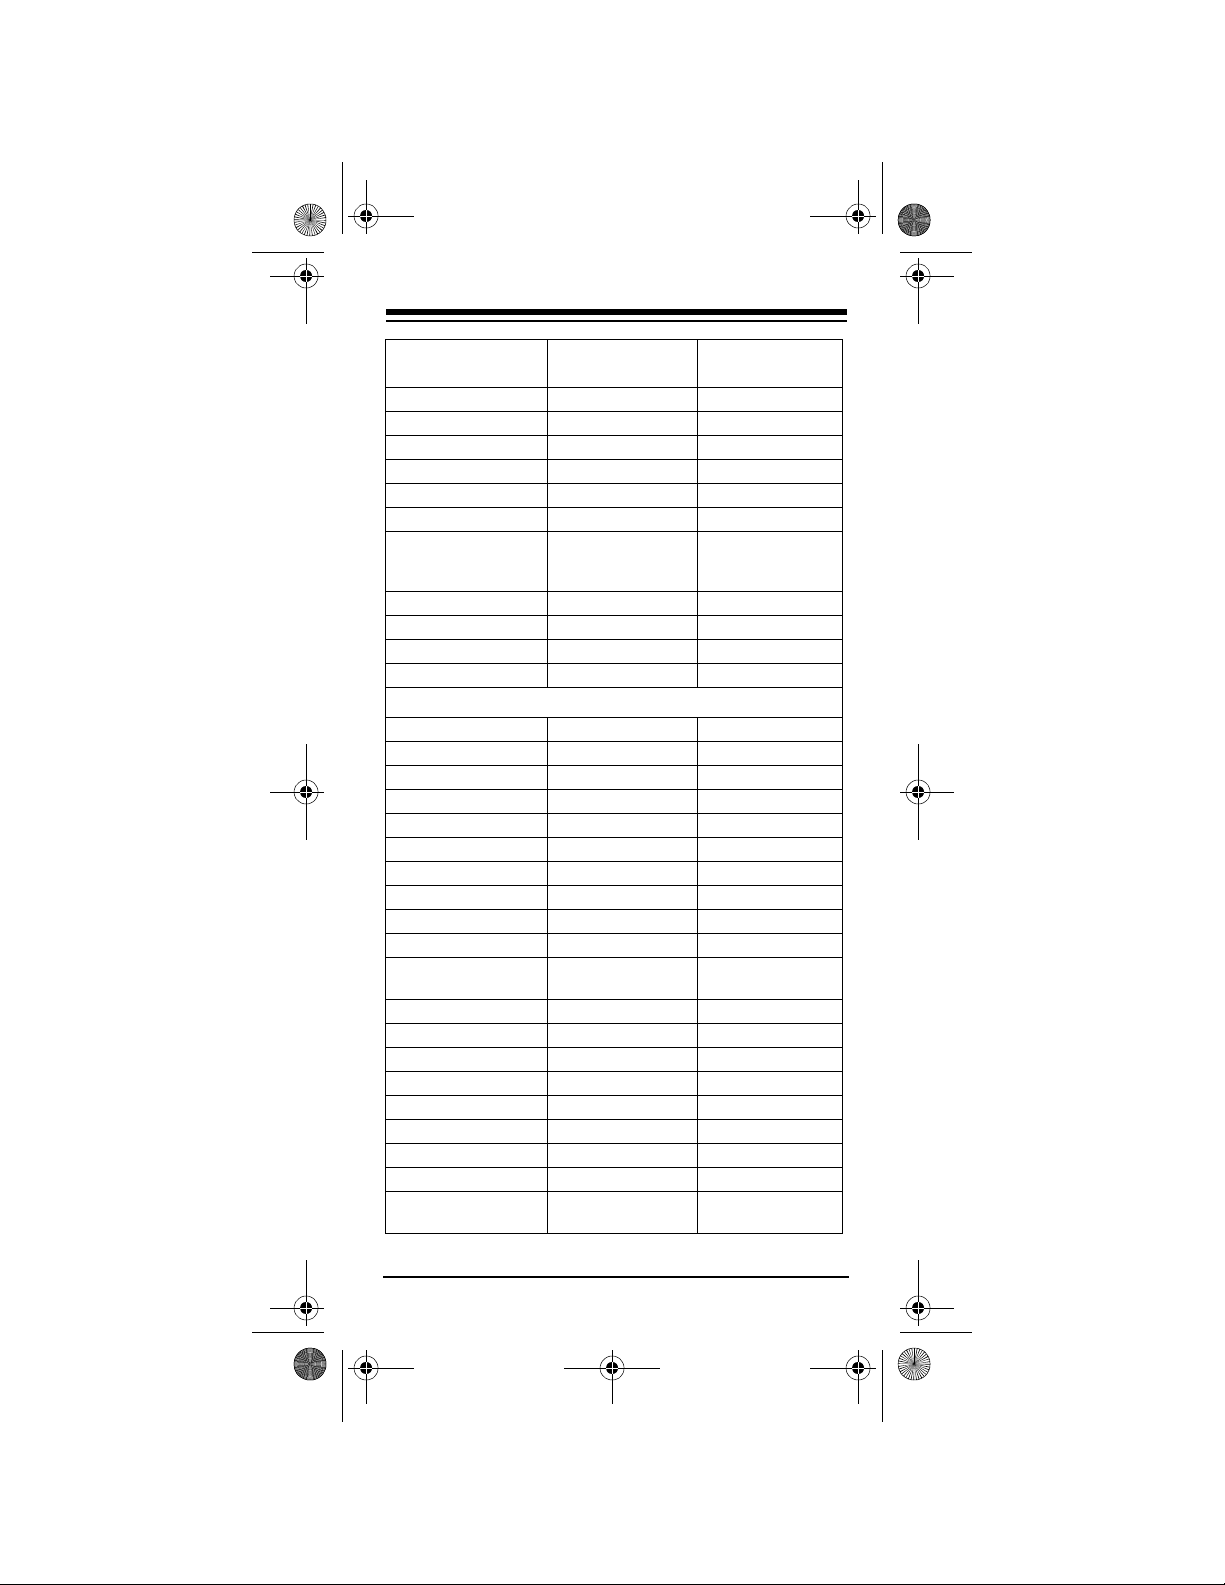
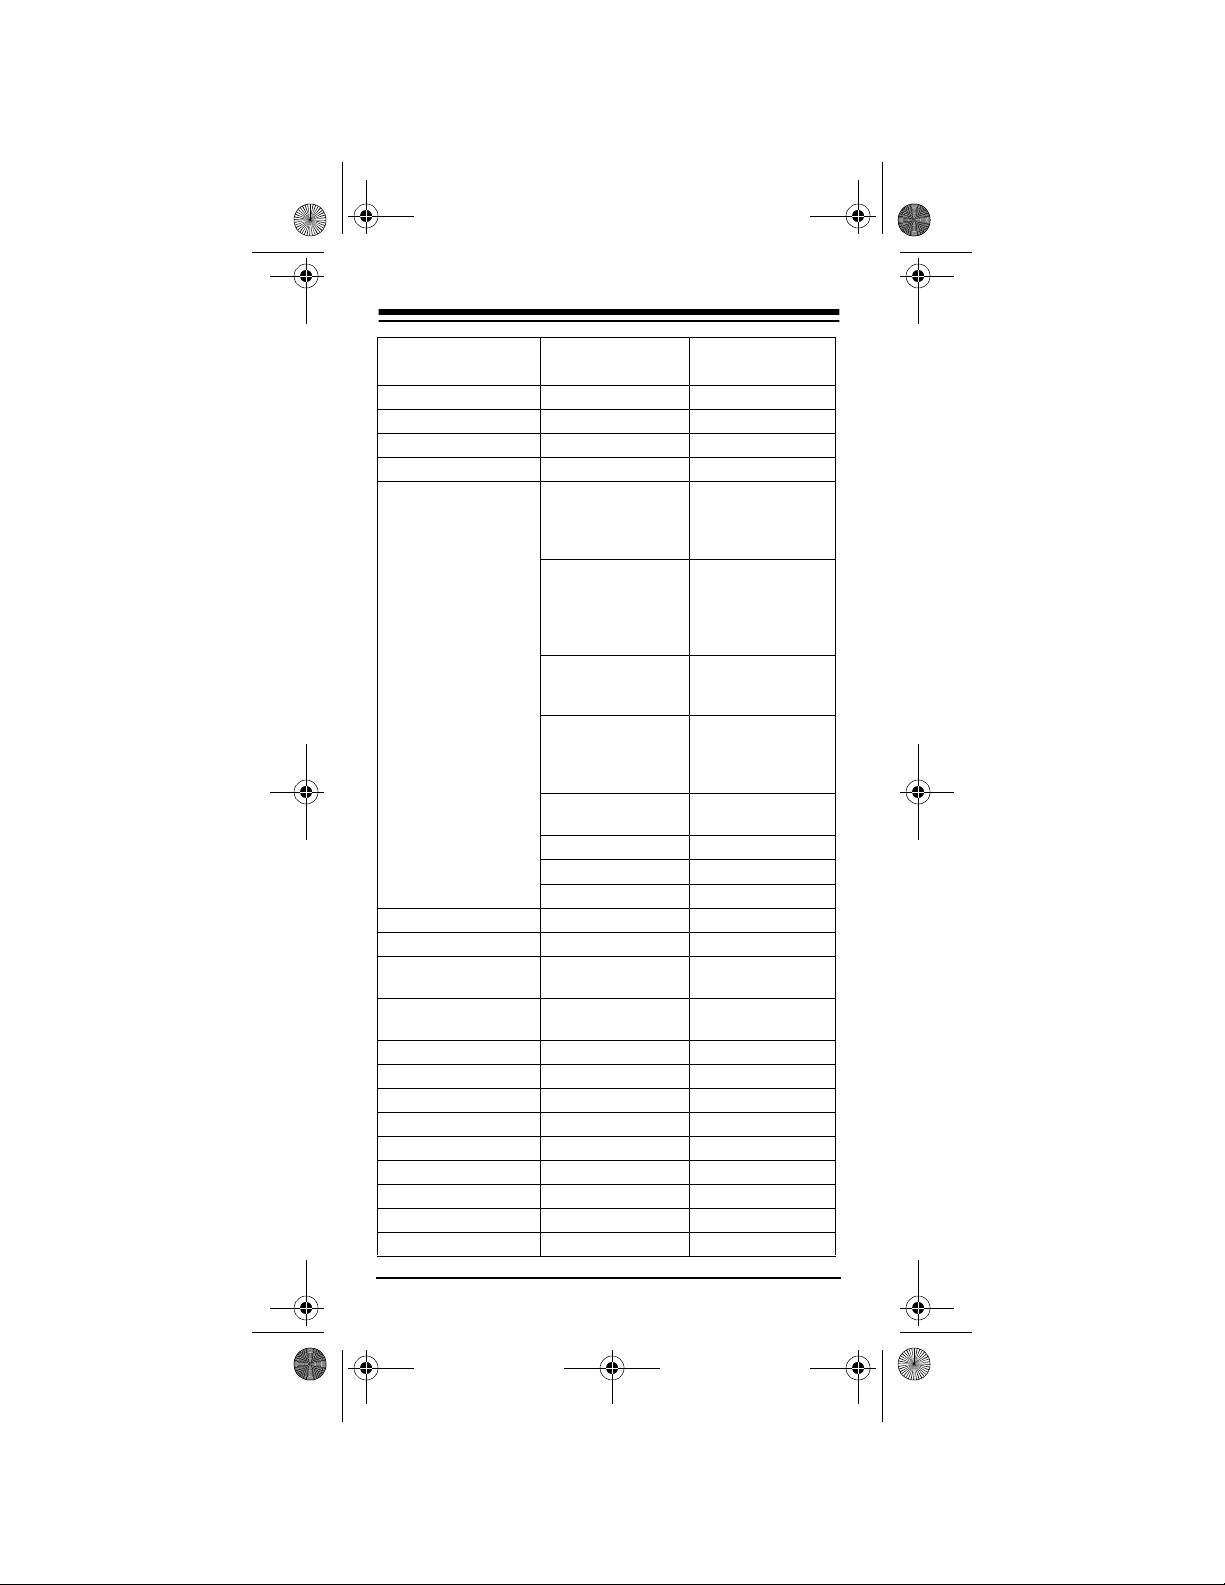
RadioShack
Manufacturer Code(s)
Cable Converters
ABC 1114, 1131, 1143,
1212, 1124, 1134,
1142
Allegro 3232, 1133
Antronix 1223, 4144
Archer 3232 15-1287
1223 15-1285
4144 16-1283
1234 15-1288
Bell & Howell 1143
Cabletenna 1223
Cableview 1223
Century 3232
Citizen 3232, 1133
Comtronics 1331
Contec 1214
Eastern 1113
Cat. No.
11
Page 12

15-1990.fm Page 12 Tuesday, December 14, 1999 12:45 PM
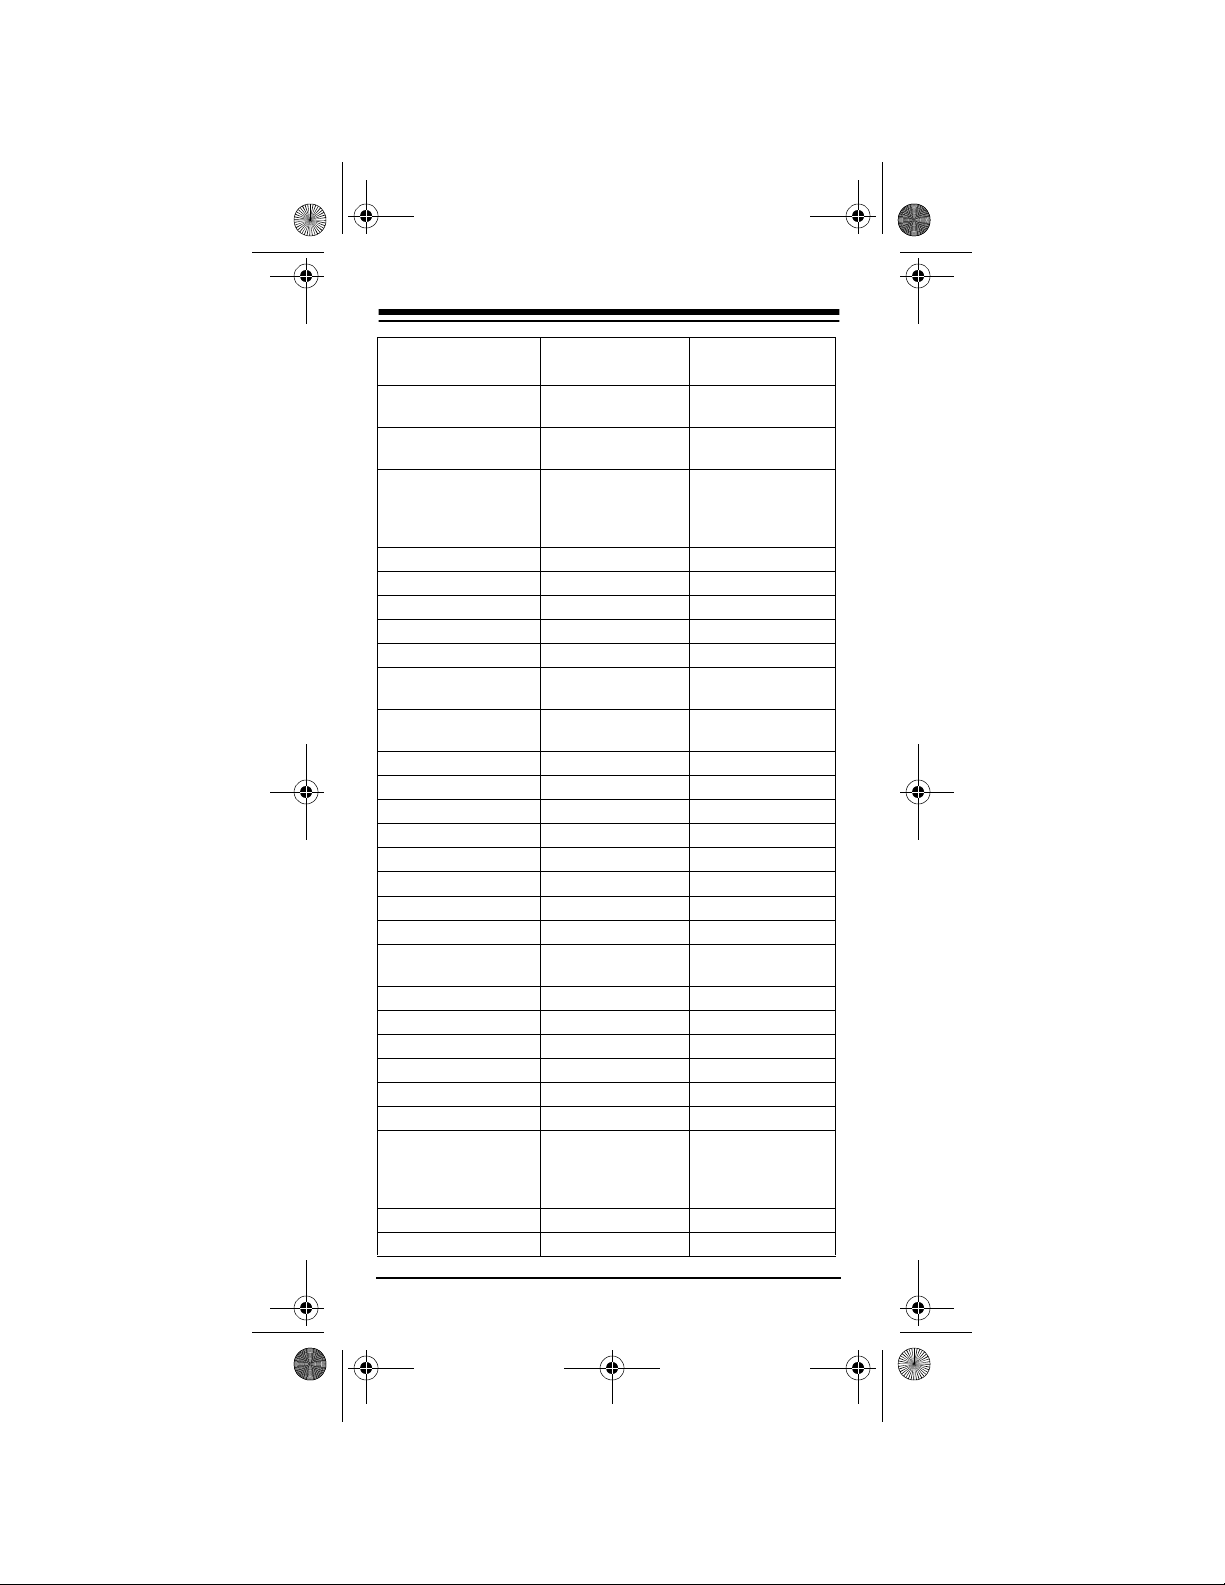
RadioShack
Manufacturer Code(s)
Emerson 1234
Everquest 1144, 1331
Focus 1211
GC Electronics 4144
Garrard 3232
Gemini 1144
General Instrument 1213, 1123, 1134,
1241
GoldStar 3211, 1331
Goodmind 1234
Hamlin 1221, 1122, 1132,
1313
Hitachi 1134
Hytex 1124
Jasco 1144, 3232, 1133
Jerrold 1114, 1141, 1213,
1123, 1143, 1144,
1134, 1241
Memorex 1111
Movie Time 1444
NSC 1444
Oak 1214, 1124
Optimus 1222
Panasonic 1111, 2334, 1222
Paragon 1111
Philips 3232
Pioneer 3211, 1233
Popular Mechanics 1211
Pulsar 1111
Quasar 1111
RCA 1222
RadioShack 1144, 1133, 1234,
1242
Realistic 4144 16-1283, 15-1285A
Recoton 1211
Regal 1221, 1122
Regency 1113
Rembrandt 1134
Cat. No.
12
Page 13

15-1990.fm Page 13 Tuesday, December 14, 1999 12:45 PM
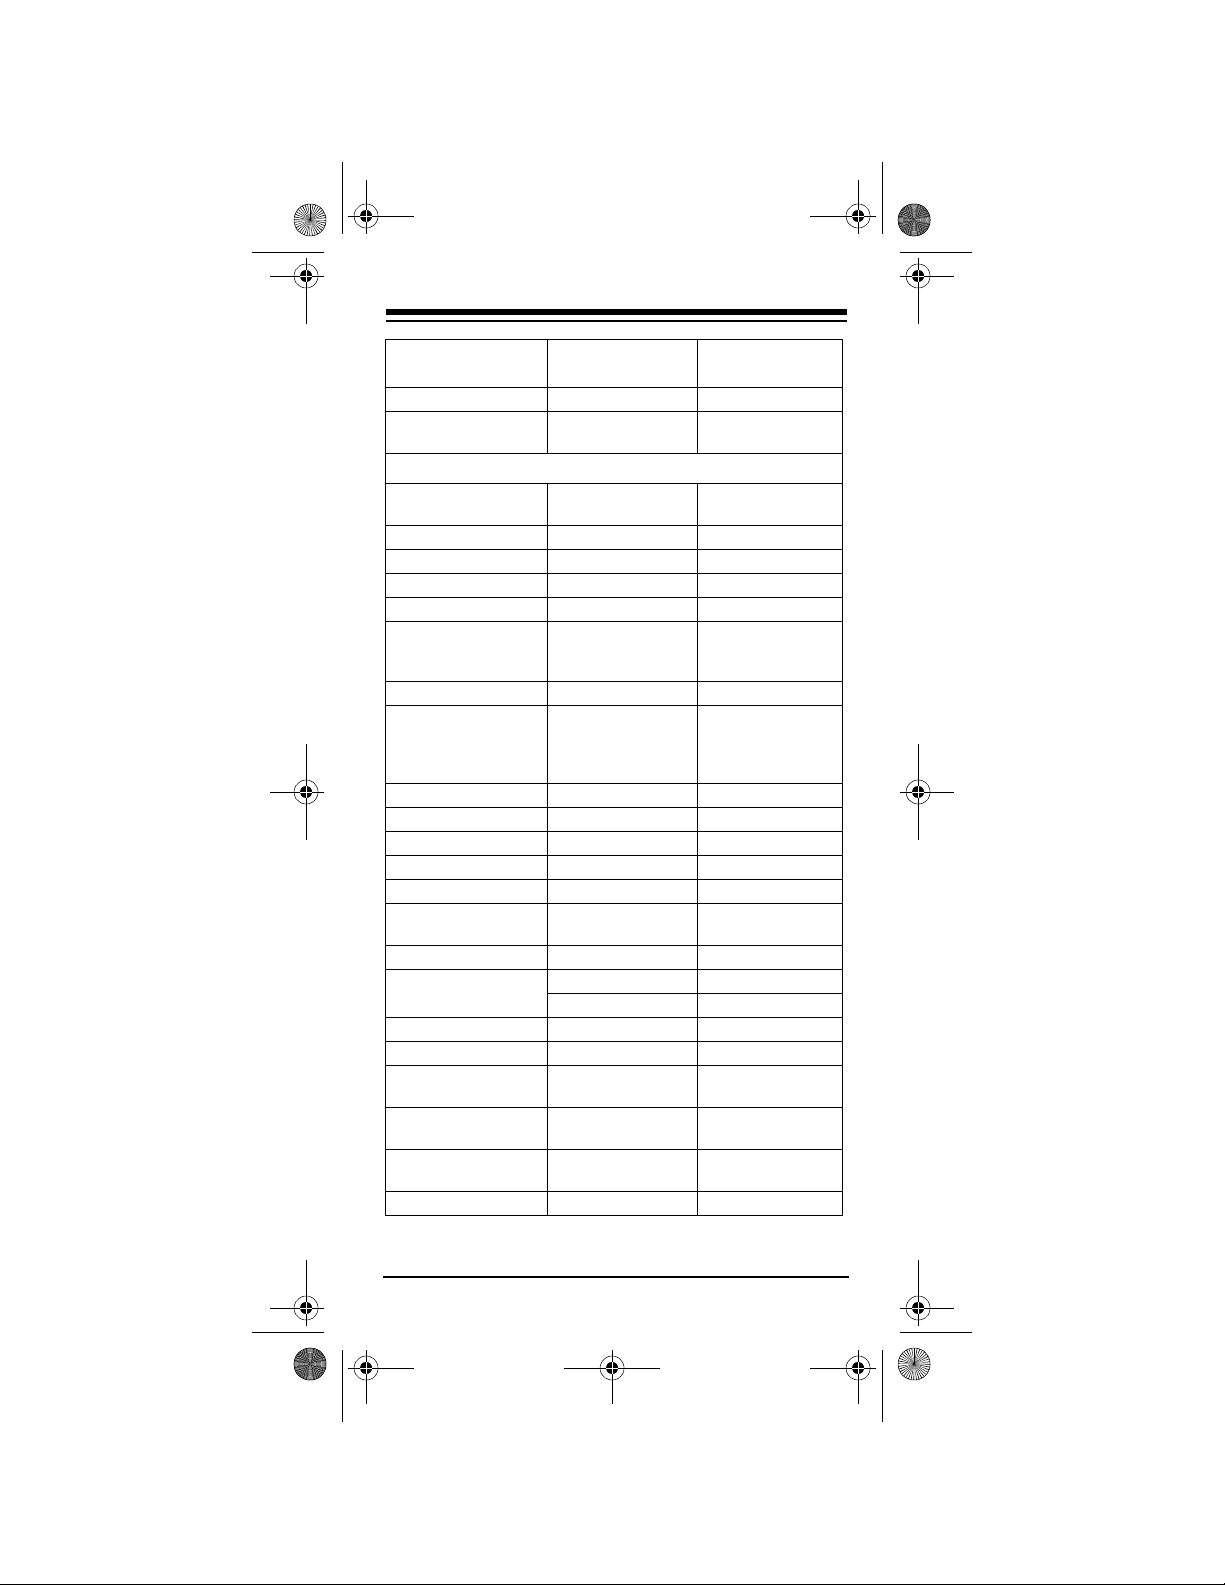
RadioShack
Manufacturer Code(s)
Runco 1111
SL Marx 1331
Samsung 3211, 1331
Scientific Atlanta 1131, 1224, 1212
Signal 1144, 1331
Signature 1134
Sprucer 1222
Starcom 1114, 1144
Stargate 1144, 1331, 1234
Starquest 1144
TV86 1444
Teleview 1331
Tocom 1141, 1142
Toshiba 1111
Tusa 1144
Unika 3232, 1223, 4144
United Artists 1124
Universal 3232, 1223, 3444,
4144
Viewstar 1444
Zenith 1111, 1231
Zentek 1211
Televisions
A-Mark 1114
AOC 1243, 1214, 1114
Abex 1311
Admiral 2242
Adventura 1343
Aiko 2241
Akai 1243
Alaron 3414
Ambassador 3412
Ampro 1134
Anam 3421
Anam National 1424
Archer 1114
Cat. No.
13
Page 14

15-1990.fm Page 14 Tuesday, December 14, 1999 12:45 PM
Manufacturer Code(s)
Audiovox 1121, 3421, 1114,
2241, 1131
Baysonic 3421
Belcor 1214
Bell & Howell 3233, 1211
Bradford 3421
Brockwood 1214
Broksonic 4341, 1122, 1114
CXC 3421
Candle 1243, 1431, 1343
Carnivale 1243
Carver 1423
Celebrity 1111
Cineral 1121, 2241
Citizen 1441, 1243, 1431,
1324, 1343, 2241,
1112
Concerto 1431
Contec 3421
Craig 3421
Crosley 1423
Crown 3421, 1324
Curtis Mathes 1344, 1423, 3233,
1414, 1121, 2242,
1441, 1243, 3212,
1431, 1211, 1324,
3323, 1123
Daewoo 1121, 1214, 1324,
2241, 1131, 1132
Daytron 1214
Denon 32 12
Dumont 1212, 1214
Dwin 1133, 1141
Electroband 1111
Emerson 3233, 4341, 1122,
3421, 1113, 3413,
1214, 3414, 1324,
3412, 1112, 1131,
1132
RadioShack
Cat. No.
14
Page 15

15-1990.fm Page 15 Tuesday, December 14, 1999 12:45 PM
RadioShack
Manufacturer Code(s)
Envision 1243
Fisher 3233, 3244
Fujitsu 3414
Funai 3414, 3334
Futuretech 3421
GE 1344, 1414, 1121,
2242, 1113, 3413,
1222, 1424, 3124
Gibralter 1212, 1243, 1214
GoldStar 1243, 1214, 1431,
1311
Gradiente 1422, 1431
Grunpy 3421, 3414
Hallmark 3413
Harley Davidson 3414
Harman/Kardon 1423
Harvard 3421
Hitachi 3212, 1431, 1311,
3224
Infinity 1423
Inteq 1212
JBL 1423
JCB 1111
JVC 1422
Janeil 1343
KEC 3421
KTV 3421, 1243, 1324,
1112
Kenwood 1243, 1214
Kloss 1343
LG 1431
LXI 1344, 1423, 3233,
3241, 3413
Logik 1211
Luxman 1431
MGA 3223, 1243, 3413,
1214
Cat. No.
15
Page 16

15-1990.fm Page 16 Tuesday, December 14, 1999 12:45 PM
RadioShack
Manufacturer Code(s)
MTC 1441, 1243, 1214,
1431
Magnavox 1423, 1243, 3414,
3434
Majestic 1211
Marantz 1423, 1243
Matsushita 4433
Megatron 3413, 3212, 1114
Memorex 3233, 4433, 3223,
1431, 1211
Midland 1344, 1212, 1414,
1324, 1311, 3124
Minutz 1222
Mitsubishi 2242, 3223, 3413,
1214
Motorola 2242, 1424
Multitech 3421
NAD 3241, 3413, 3323
NEC 1243, 1214, 1431
NTC 2241
Nikko 12 43, 3413, 2241
Noshi 1213
Onwa 3421
Optimus 3233 13-1283
4433
3323 31-3031, 31-3033,
Optonica 2242, 3322
Orion 4341, 1122, 3414
Panasonic 1414, 4433, 1424
Penney 1344, 3241, 1414,
1441, 1243, 3413,
1222, 1214, 1213,
1431, 1324, 1114,
1311, 3124
Philco 1423, 1122, 1243,
3212, 1214
Philips 1423
Pilot 1243, 1214, 1324
Cat. No.
31-3038, 31-3040
16
Page 17

15-1990.fm Page 17 Tuesday, December 14, 1999 12:45 PM
RadioShack
Manufacturer Code(s)
Pioneer 3323
Portland 1214, 1324, 2241
Prism 1414
Proscan 1344
Proton 3413, 1114, 1123
Pulsar 1212, 1214
Quasar 1414, 4433, 3322,
1424
RCA 1344, 1414, 2242,
1214, 1213, 2233,
3124
RadioShack 1344, 3233, 1214,
1324
3322 16-232, 16-233,
3421 16-252, 16-253,
1243 16-254, 16-255,
3413 16-256, 16-263,
1431 16-288
1311 16-230, 16-232,
Realistic 3233 16-229, 16-261,
3322 16-232, 16-233,
3421, 1243, 3413,
1214, 1324, 1311
1431 16-288
Runco 1212, 1243, 1124
SSS 3421, 1214
Sampo 1243, 1324, 1311
Samsung 1441, 1243, 3413,
1214, 1431, 1311
Cat. No.
16-236, 16-250,
16-260
16-262, 16-292
16-256, 16-265
16-268, 16-280,
16-289
16-233, 16-236,
16-250, 16-260
16-299
16-236, 16-250,
16-260
17
Page 18

15-1990.fm Page 18 Tuesday, December 14, 1999 12:45 PM
Manufacturer Code(s)
Samsux 1324
Sansei 1121
Sansui 1122
Sanyo 3233, 3244
Scimitsu 1214
Scotch 3413
Scott 4341, 3421, 3413,
1214, 3414
Sears 1344, 1423, 3233,
3241, 3413, 3414,
1431, 3244, 3334
Semivox 34 21
Semp 3241
Sharp 2242, 3322, 1324
Shogun 1214
Signature 1211
Simpson 3434
Sony 1111
Soundesign 3421, 3413, 3414
Spectricon 1114
Squareview 3334
Starlite 3421
Supre-Macy 1343
Supreme 1111
Sylvania 1423, 1243
Symphonic 3334
TMK 3413, 1431, 3412
Tandy 2242
Tatung 1424, 1114
Technics 1414, 4433
Technol Ace 3414
Techwood 1414, 1431, 1114
Teknika 1423, 3421, 3223,
1441, 1214, 3414,
1431, 1211, 1324,
2241
Telefunken 1431
Toshiba 3233, 3241, 1441
RadioShack
Cat. No.
18
Page 19
15-1990.fm Page 19 Tuesday, December 14, 1999 12:45 PM
RadioShack
Manufacturer Code(s)
Totevision 1324
Vector Research 1243
Victor 1422
Vidikron 1423
Vidtech 3413, 1214
Viking 1343
Wards 1423, 3322, 1243,
3413, 1222, 1214,
3414, 1431, 1211
White Westinghouse 1131, 1132
Yamaha 1243, 1214
Zenith 1212, 1211, 2241
Zonda 1114
VCRs
Admiral 1411
Adventura 1111
Aiko 1122
Aiwa 1322, 1111, 1132
Akai 1332, 1442, 2333
American High 1314
Asha 4411
Audiovox 1322
Beaumark 4411
Bell & Howell 2331
Broksonic 3431, 2432, 4212,
1113, 1141
CCE 2131, 1122
Calix 1322
Canon 1314
Capehart 1221
Carver 2212
Cineral 1122
Citizen 1322, 1122
Colt 2131
Craig 1322, 1344, 4411,
2131, 1121
Cat. No.
19
Page 20
15-1990.fm Page 20 Tuesday, December 14, 1999 12:45 PM
Manufacturer Code(s)
Curtis Mathes 1441, 1314, 1332,
3313
Cybernex 4411
Daewoo 1342, 1122, 1221,
1144
Daytron 1221
Denon 13 33
Dynatech 1111
Electrohome 1322
Electrophonic 1322
Emerex 13 11
Emerson 1322, 3431, 1111,
2432, 1334, 4212,
1113, 1122, 1442,
4211, 4221, 1141,
1144
Fisher 1344, 2331, 1423,
2113
Fuji 1314, 1312
Funai 1111
GE 1441, 1314, 1411,
4411, 4133
Garrard 11 11
Go Video 1133, 1143
GoldStar 1322, 1323
Gradiente 1111, 1131
HI-Q 1344
Harley Davidson 1111
Harman/Kardon 2212, 1323
Harwood 2131
Headquarter 1343
Hitachi 1111, 1333, 1332,
2332
JVC 2114, 1332, 1131
Jensen 1332
KEC 1322, 1122
KLH 2131
Kenwood 2114, 1332, 1323
Kodak 1314, 1322
RadioShack
Cat. No.
20
Page 21

15-1990.fm Page 21 Tuesday, December 14, 1999 12:45 PM
RadioShack
Manufacturer Code(s)
LXI 1322
Lloyd’s 1111, 4211
Logik 2131
MEI 1314
MGA 4411, 1334, 1442
MGN Technology 4411
MTC 4411, 1111
Magnasonic 1122
Magnavox 1314, 1324, 2212,
1111, 3222
Magnin 4411
Marantz 1314, 2212
Marta 1322
Matsushita 1314, 3313, 1134
Memorex 1314 16-705
1322 16-524, 16-706
1411 16-531, 16-618,
1324
1344
1111 16-406, 16-410,
2331 16-412, 16-523,
1343 16-529, 16-530
4411 16-533, 16-655
3313, 1114, 1124,
1132
Minolta 1333, 2332
Mitsubishi 1411, 2114, 1334,
1442
Motorola 1314, 1411
Multitech 1111, 2131
NAD 1433
NEC 2331, 2114, 1332,
1323
Cat. No.
16-622
16-411, 16-517
16-525, 16-526,
16-529, 16-530,
16-619, 16-620,
16-621, 16-623
21
Page 22
15-1990.fm Page 22 Tuesday, December 14, 1999 12:45 PM
RadioShack
Manufacturer Code(s)
Nikko 1322
Nikon 1313
Noblex 4411
Olympus 1314
Optimus 1322 16-413, 16-414,
1411 16-538, 16-539,
2331 16-536, 16-537,
3313 16-547, 16-548,
1134 16-547, 16-548,
1133 16-541
1112
4411 16-541
Optonica 1443
Orion 3431, 1113, 1141
Panasonic 1314, 3313, 4312,
1134, 1112
Penney 1314, 1322, 4411,
1333, 1323, 1423
Pentax 1333, 2332
Philco 1314, 4212, 1141
Philips 1314, 2212, 1443
Pilot 1322
Pioneer 2114, 1433
Portland 1221
Profitronic 4411
Proscan 1441, 4133
Protec 2131
Cat. No.
16-423, 16-419,
16-534, 16-535,
16-624
16-540, 16-542,
16-543, 16-544,
16-546, 16-627,
16-628
16-617, 16-625,
13-1283
16-630, 16-631,
16-640, 16-641,
16-642
16-630, 16-631
22
Page 23

15-1990.fm Page 23 Tuesday, December 14, 1999 12:45 PM
RadioShack
Manufacturer Code(s)
Pulsar 1324
Quarter 1343
Quartz 1343
Quasar 1314, 3313, 1134,
1112
RCA 1441, 1314, 1411,
4411, 1333, 3222,
2332, 2333, 4133
RadioShack 1111 16-417
1132 16-706
Radix 1322
Randex 1322
Realistic 1314 16-472, 16-651
1322 16-408, 16-507
1344 16-506, 16-511,
1111 16-404, 16-505,
2331 16-520, 16-521,
2113 16-503
4411 16-514
1411, 1443
1343 16-600, 16-601
Ricoh 1313
Runco 1324
STS 1333
Samsung 4411, 1342
Sanky 1411, 1324
Sansui 1111, 2114, 1332,
1121, 1141
Cat. No.
16-512, 16-513,
16-515, 16-516,
16-518, 16-613,
16-614, 16-615,
16-652, 16-611,
16-612, 16-616,
16-653, 16-701,
16-702
16-508, 16-510,
16-519, 16-522,
16-703, 16-704
16-563, 16-617
23
Page 24
15-1990.fm Page 24 Tuesday, December 14, 1999 12:45 PM
Manufacturer Code(s)
Sanyo 1344, 4411, 2331,
1343, 1114
Scott 3431, 1342, 2432,
1334, 4221
Sears 1314, 1322, 1344,
1111, 1333, 2331,
1343, 1423, 2113,
2332
Semp 1342
Sharp 1411, 1443
Shintom 2131
Shogun 4411
Singer 2131
Sony 1314, 1311, 1111,
1312, 1313
Sylvania 1314, 2212, 1111,
1334
Symphonic 1111
TMK 4411, 4211
Tandy 1111, 2331
Tatung 1332
Teac 1111, 1332
Technics 1314, 3313
Teknika 1314, 1322, 1111
Thomas 1111
Toshiba 1342, 1334, 2113,
4221
Totevision 1322, 4411
Unitech 4411
Vector 1342
Vector Research 1323
Video Concepts 1342, 1442
Videosonic 4411
Wards 1441, 1314, 1411,
1344, 2212, 4411,
1111, 1333, 2131,
3222, 1443, 4221
White Westinghouse 1122
XR-1000 1314, 1111, 2131
RadioShack
Cat. No.
24
Page 25
15-1990.fm Page 25 Tuesday, December 14, 1999 12:45 PM
RadioShack
Manufacturer Code(s)
Yamaha 1323
Zenith 1324, 1111, 1312,
1313
Cat. No.
TV/VCR Combinations
Brocksonic 1113, 1141 (TV:
Citizen 1122
Colt 2131
Curtis Mathes 1314 (TV: 1414)
Daewoo 1122 (TV: 1132)
Emerson 1113, 1122 (TV:
Funai 1111
GE 4411, 1314 (TV:
Goldstar 1322 (TV: 1431)
Harley Davidson 1111
Hitachi 1111
Lloyds 1111
Magnasonic 1122
Magnavox 1111, 2212 (TV:
Magnin 4411
Memorex 1322 16-412
MGA 4411
Mitsubishi 1411 (TV: 2242)
Optimus 1112 16-421, 16-422,
Orion 1113, 1141 (TV:
Panasonic 1112, 1314 (TV:
RadioShack 1322 16-415
1122)
1132), 1141 (TV:
1122)
1414), 1411 (TV:
2242), 1441 (TV:
1344)
1423)
1112
16-426, 16-427
1122)
1414)
25
Page 26

15-1990.fm Page 26 Tuesday, December 14, 1999 12:45 PM
Manufacturer Code(s)
RCA 4411, 1314 (TV:
1414), 1441 (TV:
1344), 1411 (TV:
2242)
Sansui 1111, 4411, 1141
(TV: 1122)
Sanyo 4411
Sears 1111, 1322 (TV:
1431)
Sharp 1411 (TV: 2242)
Sony 1111, 1311 (TV:
1111)
Sylvania 2212 (TV: 1423)
Symphonic 1111
Thomas 1111
White Westinghouse 1122 (TV: 1132)
Zenith 1111, 1141
RadioShack
Cat. No.
26
Page 27

15-1990.fm Page 27 Tuesday, December 14, 1999 12:45 PM
IF YOU HAVE PROBLEMS
MANUAL CODE SEARCH
If the 3-in-One Poc ket Rem ote Con trol does not o perate your remot e-controlled de vices when you first
set it up, you might have to manually find the correct
code for your devices. You can try all the codes listed
in “Manufacturers ’ Codes” on Page 11 for the brand
of your device, or you can follow these steps to
search the remote control’s entire library.
1. Manually turn on the device you want to set up.
2. Press the corresponding device key (
CBL).
3. Hold down
press
P until the red light blinks twic e, then
MUTE, MUTE, then VOL –. The red light
TV, VCR, or
blinks twice again.
4. Aim the remote control at the device you want to
operate.
5. Repeatedly press
POWER then the device key
until the device turns off.
6. When the device turns off, press
P within 10
seconds to save the code.
Note:
If you do not press
P within 10 seconds,
the remote control does not save the code.
• Because the remote control’s library has so
many codes, this proce dure can take several
minutes.
• If your device turns off during the search, but
does not operate after you lock in the cod e,
begin the search again, pausing longer
between key presses.
If necessary, repeat these steps for each device.
27
Page 28

15-1990.fm Page 28 Tuesday, December 14, 1999 12:45 PM
Note
: If your VCR’s original r emo te do es not h av e a
power key, manually turn on the device, insert a
tape, and repeat Ste ps 1–6, using
POWER. When the device responds, press P. The
PLAY instead of
red light blinks twice.
Determining the 4-Digit Code
After you set up your remote cont rol using the man ual code search, you can find which 4 -digi t c ode the
remote control is set to by following these steps.
1. Press the device key (
TV, VCR, or CBL) you want
to get the manufacturer's code from , then hold
down
P until the red light blinks twice.
2. Press
MUTE, MUTE, then VOL +. The red li ght
blinks twice again.
3. Press
VOL +, then count the number of times the
red light b l ink s . Th is is the firs t di gi t of t he 4 -di git
code.
Note:
If the red light does not blink, the digit is a
0.
4. Press
VOL –, then count the number of times the
red light blinks. This is the second digit of the 4digit code.
5. Press
CH +, then count the number of times the
red light blinks. This i s the third digit of the 4digit code.
6. Press
CH –, then count the number of times the
red light blinks. This is the fourth digit of the 4digit code.
28
Page 29

15-1990.fm Page 29 Tuesday, December 14, 1999 12:45 PM
TROUBLESHOOTING
If the remote control stops working after you have
successfully tested the control fo r each de vice, or i f
you are unable to get th e remote control to work a t
all, check the following:
• Be sure you press the device key for the device
you want to control before you press any other
key.
• Confirm that your remote -controlled devices are
working properly by using the original remote
control or the manual controls.
• If some keys do not function, try a different
device code.
• If some keys do not function for your device, you
might be able to find a better device code.
1-888-284-8735
•Call
for technical support.
29
Page 30

15-1990.fm Page 30 Tuesday, December 14, 1999 12:45 PM
CARE
To enjoy your RadioShac k 3-in -On e Poc k et Rem ote
Control for a long time:
• Keep the remote control dry. If it gets wet, wipe it
dry immediately.
• Use and store the remote co ntrol only in normal
temperature environments.
• Handle the remo te control gently and ca refully.
Don’t drop it.
• Keep the remote control away from dust and
dirt.
• Wipe the remote control with a damp cloth occasionally to keep it looking new.
Modifying or tamperin g with the remote control’ s internal components can cause a malfun ction and invalidate its warranty. If your remote control is not
performing as it should, take it to your local RadioShack store for assistance.
30
Page 31

15-1990.fm Page 31 Tuesday, December 14, 1999 12:45 PM
SPECIFICATIONS
Power ............................................. 2 AAA Batteries
IR Control Range .................................... 26 ft ±30
Dimensions (HWD) .............. 47/8 × 21/8 × 11/4 Inches
(125 × 55 × 31.5 mm)
Weight (Without Batteries) .......................... 4.3 oz.
(121.9 g)
Specifications are typical; individual units might vary.
Specifications are subject to change and improvement without notice.
°
31
Page 32
15-1990.fm Page 32 Tuesday, December 14, 1999 12:45 PM
Limited Ninety-Day Warranty
This product is warrant ed by RadioS hack again st manufactur ing defects in material and workmanship under normal use for ninety (90)
days from the date of purch ase from RadioShack company-owned
stores and authorized RadioShack franchisees and dealers. EXCEPT AS PROVIDED HEREIN, RadioShack MAKES NO EXPRESS
WARRANTIES AND ANY IMPLIED WARRANTIES, INCLUDING
THOSE OF MERCHANTABILITY AND FITNESS FOR A PARTICULAR PURPOSE, ARE LIMITED IN DURATION TO THE DURATION
OF THE WRITTEN LIMITED WARRANTIES CONTAINED HEREIN.
EXCEPT AS PROVIDED HEREIN, RadioShack SHALL HAVE NO
LIABILITY OR RESPONSIBILITY TO CUSTOMER OR ANY OTHER
PERSON OR ENTITY WITH RESPECT TO ANY LIABILITY, LOSS
OR DAMAGE CAUSED DIRECTLY OR INDIRECTLY BY USE OR
PERFORMANCE OF THE PRODUCT OR ARISING OUT OF ANY
BREACH OF THIS WARRANTY, INCLUDING, BUT NOT LIMITED
TO, ANY DAMAGES RESULTING FROM INCONVENIENCE, LOSS
OF TIME, DATA, PROPERTY, REVENUE, OR PROFIT OR ANY INDIRECT, SPECIAL, INCIDENTAL, OR CONSEQUENTIAL DAMAGES, EVEN IF RadioShack HAS BEEN ADVISED OF THE
POSSIBILITY OF SUCH DAMAGES.
Some states do not allow the limitations on how long an implied warranty lasts or the exclusion of incidental or con sequential dama ges,
so the above limitations or exclusions may not apply to you.
In the event of a product defect during the warranty per iod, take the
product and the RadioS hack sales re ceipt as proof of purchase date
to any RadioShack store. RadioShack will, at its option, unless otherwise provided by law: (a) correct th e de fect by produc t rep air wi th ou t
charge for parts and labor ; (b) replace the produ ct with one of the
same or similar design; or (c) refund the purchase price. All replaced
parts and pro ducts, and products on which a refund i s made, become the proper ty of RadioShack. New or recon ditioned part s and
products may be used in the performance of warranty service. Repaired or replac ed pa r ts and p roduct s are warranted for the r emainder of the original warranty period. You will be charged for repair or
replacement of the p rod uct mad e a fte r th e expiratio n o f the warranty
period.
This warranty does not cover : ( a) d am age or failure cau sed by or attributable to acts of God, abuse, acciden t, misuse, improper or abnormal usage, failure to follow instructions, improper installation or
maintenance, alteration, lightni ng or other incidence of excess voltage or current; (b) any rep airs other than those provided by a RadioShack Authorized Service Facility; (c) consumables such as fuses
or batteries; (d) cos met ic damag e; (e) tra nsportation, shipp ing o r insurance costs; or (f) costs of prod uct removal, installation, set-up
service adjustment or reinstallation.
This warranty gives you specific legal r ight s, and you may also have
other rights which vary from state to state.
RadioShack Customer Relat ions, 200 Taylor, 6th Floor, Fort Worth,
TX 76102
We Service W hat We Sell
3/97
RadioShack
A Division of Tandy Corporation
Fort Worth, Texas 76102
04A99 Printed in China
 Loading...