

Page 1
Wireless 5.8 GHz Digital Audio Lin
k
www.radioshack.com
OWNER’S MANUAL —
Please read before using this equipment.
SM
PACKAGE CONTENTS
• Transmitter
• Speaker wire (for transmitter only)
• Receiver
• AC adapter
• Adjustable stand
• Owner’s Manual
• Warranty
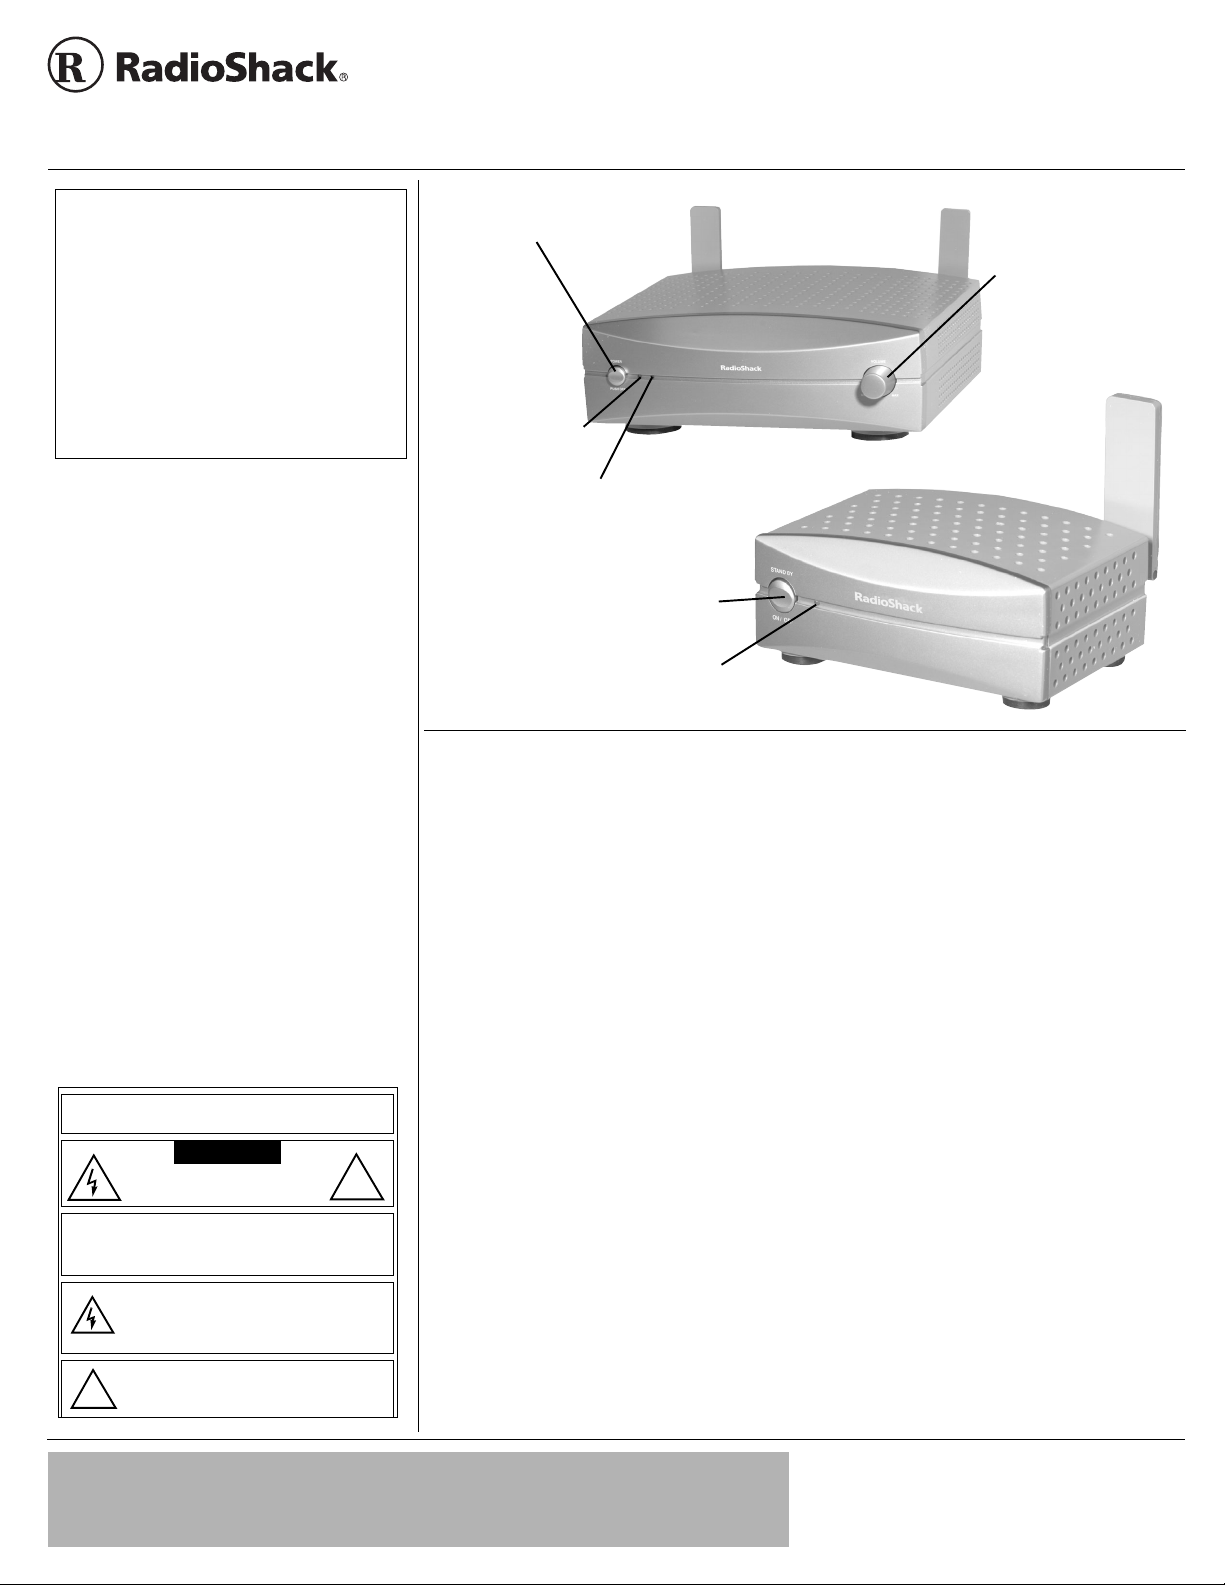
POWER/PUSH OFF —
Press to power the receiver
on or off.
Power LED — Lights
red when the
receiver is powered
on.
Signal LED — This green LED flashes when
the receiver is searching for a signal from the
transmitter. It glows steadier and brighter as
the signal strength increases.
STANDBY / ON/OFF — Press to toggle
between standby mode and power on.
LED — Lights red when the transmitter is
in power on mode, and turns green when
in standby mode.
RECEIVER
15-1974
VOLUME — Turn to
adjust sound level of the
connected surround
speakers. You may
need to adjust your A/V
receiver’s volume for
balance.
TRANSMITTER
WARNING: T o reduce the risk of fi re or shock hazard,
do not expose this product to rain or moisture.
CAUTION
RISK OF ELECTRIC SHOCK
DO NOT OPEN
CAUTION: TO REDUCE THE RISK OF ELECTRIC
SHOCK, DO NOT REMOVE COVER OR BACK. NO USERSERVICEABLE PARTS INSIDE. REFER SERVICING TO
QUALIFIED PERSONNEL.
The lightning symbol is intended to alert you to the
presence of uninsulated dangerous voltage within this
product’s enclosure that might be of sufficient
magnitude to constitute a risk of electric shock. Do not
open the product’s case.
The exclamation symbol is intended to inform you that
important operating and maintenance instructions are
included in the literature accompanying this product.
!
!
This wireless transmi tter and receiver syst em
use the latest 5.8 GHz technology that travels
through walls, floors, ceilings and other
obstacles, delivering high quality sound for
your home theater system’s rear surround
speakers. Using thi s wireless system, you w ill
experience movie theater quality sound in
your own home using your current home
theater surround system. We have designed
this system for use w ith yo ur s urro und so un d
home theater system to enhance the quality
of the sound and balance coming from your
speakers. You can now eliminate running
long speaker wires through your rooms, while
enhancing the sound coming from those
speakers.
How It Works
The transmitter converts the audio signal
from your audio source into a 5.8GHz radio
frequency and transmits it to the receiver.
The receiver will pick up the best signal from
one of its two antennas and convert the
signal back to its original form. Using a
powerful amplifier, the signal is passed to
your connected rear surround speakers. The
result is an enhanced sound quality resulting
in a theater quality surround sound
experience.
This system is compatible with most audio
sources such as televisions, VCRs, stereo
receivers/amplifiers, CD player s, and
personal stereos. This unit allows you to
listen to wired speakers in any room in the
house when a two-channel source is
connected to the transmitter. The audio link
system also tracks the volume setting of your
audio source, so that when you increa se or
decrease the volume on the audio source,
the link’s connected speakers respond
accordingly.
Some of this system’s other features include:
• 6 user-adjustable chann els
• 2 diversity receiver antennas for optimal
audio reception.
• Adjustable speaker and line level input
control
• 256 option personal ID Code
• Ideal for Dolby 5.1 Digital, Pro Logic II,
DTS, SCAD and DVD Audio Systems
• Provides digital transmission for superb
audio clarity
• Immune to interference from microwave
ovens and other popular 2.4GHz
equipment
• Signal range of 30 feet
IMPORTANT
If an icon appears at the end of a paragraph, go to the box on that page with the corresponding icon for
!
pertinent information.
— Warning
o
— Important Ô — Note
!
!
© 2003 RadioShack Corporation.
RadioShack and RadioShack.com are trademarks
All Rights Reserved.
used by RadioShack Corporation.
Page 2

IMPORTANT SAFETY INFORMATION
FOR YOUR SAFETY, READ AND RETAIN ALL SAFETY AND OPERATING
INSTRUCTIONS. HEED ALL WARNINGS IN THIS MANUAL AND ON THE UNIT.
POWER SOURCE
To avoid any malfunctions of the unit, and to protect against electric shock, fire or personal
injury, please observe the following
• This system has been designed to work with 120-volt AC current. Connection to a line
voltage other than tha t may c reate a s afet y and fir e hazard and may da mage th e syst em. If
you are unsure of the type of power supply to your home, consult your local dealer or
power company.
• Hold the plug firmly when connecting or disconnecting the power cord to the wall outlet.
• Do not run power cords under rugs or carpets or place heavy objects on them.
• Damaged or deformed pow er cord s are hazardo us and s hould be replac ed immedi ately by
a qualified service technician.
LOCATION
• Air vents are provided in the cabinet to prevent excessive temperatures inside the unit. Do
not place th is unit in closed spaces, cover it, or otherwise block the vents.
• Do not place this unit in direct sunlight, or near heat sources.
• Keep this unit away from strong magnetic objects.
• Do not use the unit in a car. The operation can not be guaranteed.
CARE
• Do not insert or drop a nything i nto this u nit through the air ve nts as this could ca use serio us
damage, possibly resulting in fire.
• Do not place any obje ct c ontain ing wat er or other liqui ds o n this unit . In th e eve nt tha t liqu id
should enter the cabinet, unplug this unit immediately and contact the retailer or service
center immediately.
• Do not remove the cabinet. Touching parts inside the cabinet could result in electric shock
and damage to the unit.
NONUSE PERIODS
• When the unit is not being used, turn the power off.
• When left unused for a long period of time, the unit should be unplugged from the
household AC outlet.
VOLUME CONTROL
• Do not turn up the volume while listening to a portion with very low level input or no audio
signal. The speaker may be damaged when a peak level portion is played.
CLEANING
• Unplug the unit before cleaning.
• When the system gets dirty, wipe it with a clean, soft cloth. If necessary, wipe it with a soft
cloth, slightly dampened with mild soapy water, then a fresh cloth with clean water. Wipe
dry immediately with a dry cloth.
• Never use benzene, aerosol cleaners, thinner, alcohol or any volatile cleaning agent.
• Do not use abrasive cleaners, as they may damage the finish.
• Avoid spaying insecticide near all components.
SERVICE
• Do not open the cabinet of any compon ents. Th ere are no us er-service able co mpone nts in
this product. Opening the cabinets may present a shock hazard, and any modification to
this product will void your guarantee.
• Do not attempt to service the unit yourself. If water or any metal objects such as paper
clips, wire or staples accidentally fall inside, disconnect the unit from the power source
immediately, and consult an authorized service center.
• Please refer any service to the nearest RadioShack store.
SAVE THESE INSTRUCTIONS
2
Page 3
SET UP OVERVIEW
Your new Digital Audio Link Wireless 5.8GHz is easy to set up using your existing Home
Theater or stereo components. This system is compatible with most audio source. Please take
a few minutes to read this manual before you start.
1. Unpack the wireless system and accessories.
2. Select the best location to set up the transmitter and receiver.
3. Connect the transmitter to your audio source and power it on.
4. Connect the receiver to your rear surround speakers and power it on.
5. Adjust the antennas for best reception.
6. Set the input level on the transmitter for best sound level.
7. Adjust the receiver volume to the desired level.
PLACEMENT
It is best to pl ac e t he tran sm itte r a nd receiver as high as po ss ib le in an area where there will be
the least traffic. Ô
We recommend you place the transmitter on top of your audio source or stereo stand. For use
with a home theater system, hook the receiver up to the rear surround speakers.
CONNECTING THE TRANSMITTER
Connect the transmitter to your audio device using speaker wires or stereo cables. Do not use
both speaker wire and stereo cables. Do not connect speakers to this transmitter. Ô
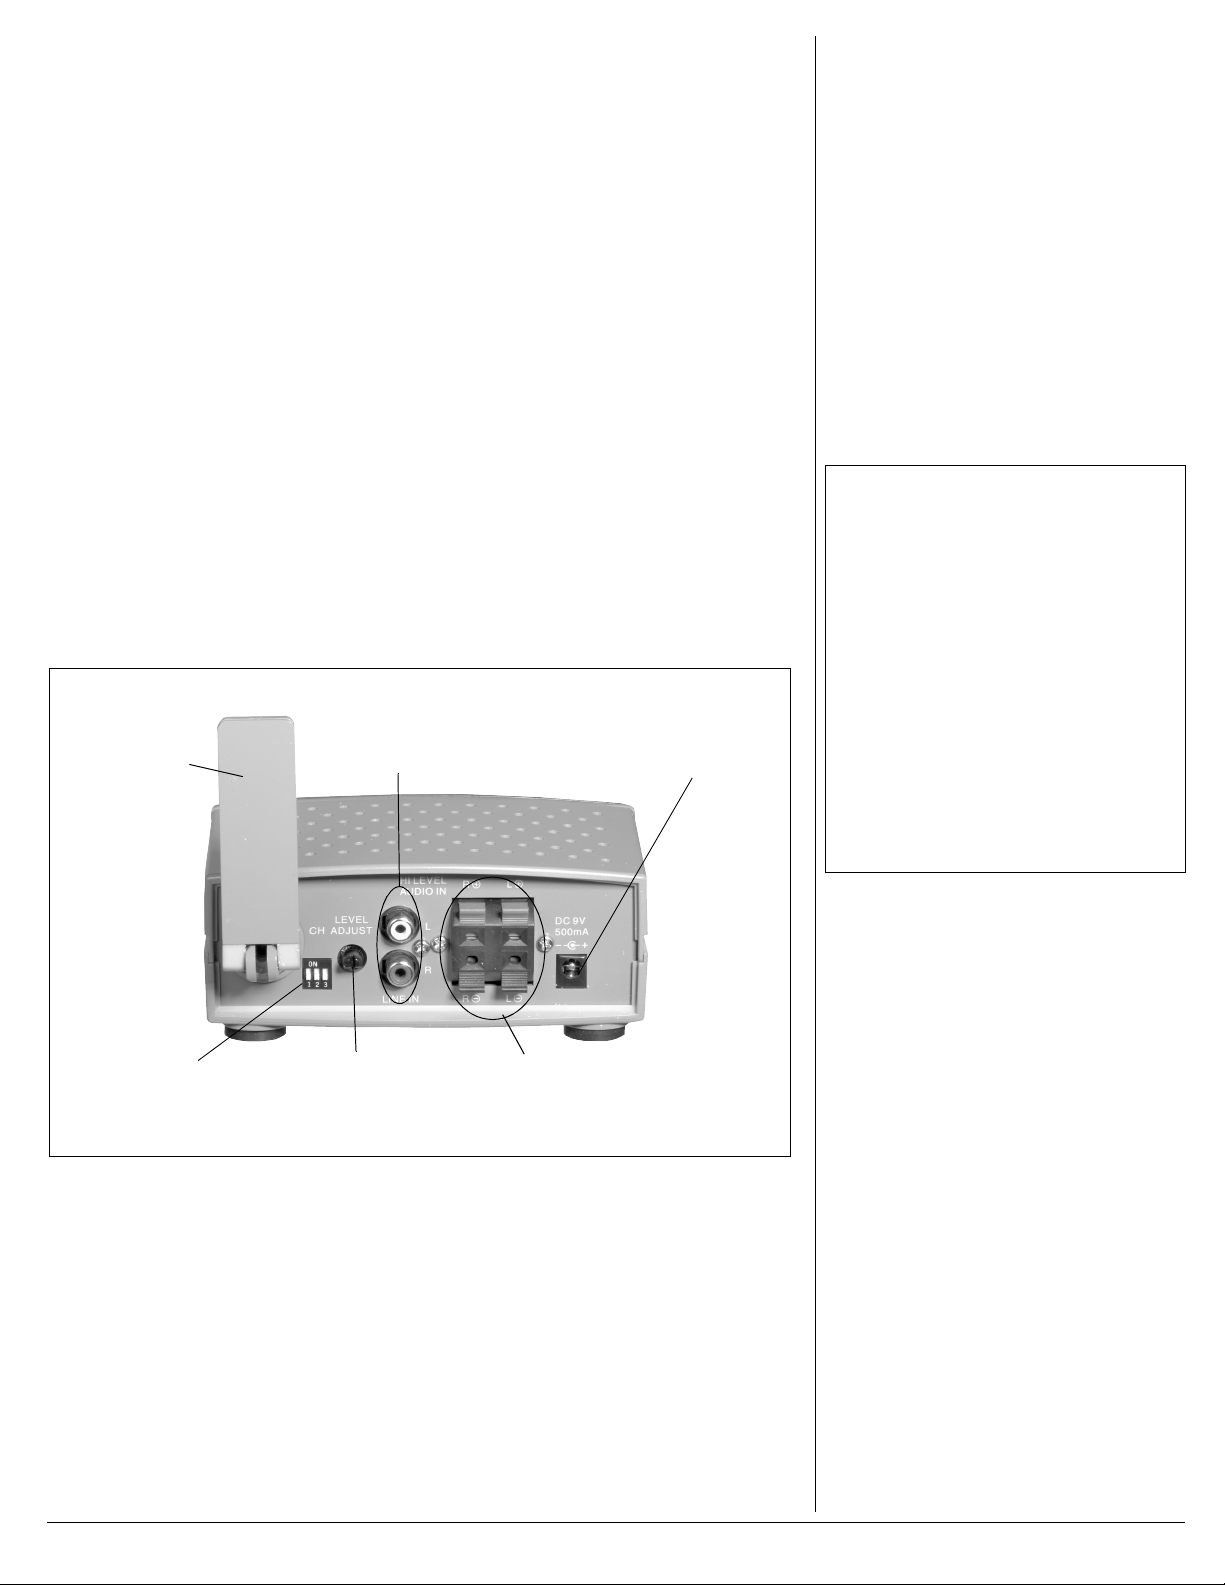
TRANSMITTER REAR VIEW
Antenna — Rotate
180 degrees
horizontally, or tilt
back and forth to
adjust the signal
sent to the receiver.
LINE IN — Connect the LINE OUT
(Left and Right) from an audio source
to these inputs using stereo cables
(not supplied).
DC 9V — Connect the
supplied AC adapter to
the transmitter at this DC
input jack
Ô NOTES Ô
Placement
• We have included a unique, adjustable stand
designed to cradle either unit, both vertically
and horizontally depending on what best
adapts to your environment.
• You may find that reception is improved when
the units are moved closer together, but not
less than three feet apart.
• This system will not work properly from within
an enclosed metal cabinet.
Connecting the Transmitter
• Power off the audio source, A/V receiver or
Home Theater before making any
connections.
• This system is not compatible with 6.1
systems.
CH — Set the switches of
this channel selector to
choose one of six preset
frequencies.
LEVEL ADJUST — Turn to
adjust the sound quality.
HI LEVEL AUDIO IN — Connect the surround
or rear speaker outputs from your audio
source (A/V receiver or Home Theater
system) to these inputs using the supplied
speaker wire.
1. Power off the audio source or A/V receiver before making any connections.
If your audio sour ce ’s output uses ster eo j ac ks connect the Left / Ri ght LINE OUT from the
audio source to the Left / Right
LINE IN on the transm itter w it h s tere o cab les (n ot s up pli ed).
Match Left to Left and Right to Right.
If you use your A/V receiver or Home Theater as the audio source you can connect the
surround (rear) speaker outputs to the transmitter’s
HI LEVEL AUDIO IN with the supplied
speaker wire. Match polarity (+ / –) and Left /Right appropriately.
2. Connect the supplied AC adapter’s barrel-shaped plug into the
DC 9V jack, and then plug
the transformer into a standard AC outlet.
3. Set the level adjust to the minimum.
4. Push
STANDBY / ON /OFF to toggle betw een power on (the LED light s red) and st andby (the
LED lights green).
3
Page 4

CONNECTING THE RECEIVER
RECEIVER
Antennas — Rotate either or both antennae to adjust
reception.
AUDIO OUT — Connect your
surround speakers to these outputs
with speaker wire (not supplied).
Antenna cradles — Fold antennas to rest in these
cradles when they are not in use.
1. Connect your left and right rear surround speakers using speaker wire (not supplied).
2. Set the volume control to low.
AC power cord
REAR VIEW
3. Plug the AC power cord into the nearest wall outlet.
4. Make sure the transmitter is either in standby mode or powered on before turning the
receiver on.
The red LED will be illuminated on both units. The green LED on the receiver will flash
indicating it is sea rching for t he trans mitte r signa l and fl icke r until it finds a cle ar signal from
the transmitter, at which time the receiver’s LED glows solid green.
5. If you have a clear signal, adjust the volume control on the receiver so the audio level
coming from your rear surround speakers is balanced with the rest of your system.
6. If there is noise or distortion of the sound, you will need to adjust the antenna and the
transmitter input level.
ADJUSTING THE ANTENNAS
The transmitter and receiver are provided with diversity antennas that fold up or down and
rotate through a horizontal range of 180 degrees for flawless audio reception and maximum
positioning options, enabling either or both the transmitter and receiver to be positioned
vertically or horizontally. The receiver has two antennas to maximize reception.
• Make sure that the flat si de of the antennas on bot h the tran sm itte r and rec eiv er a re fac in g
toward each other.
• The maximum transmission range (up to 30 feet) is achieved when there is a clear line of
sight between the transmitter and receiver antennas.
• You may wish to position the antennas so they face the ceiling at a 45 degree angle,
reflecting the transmitter signals to the receiver.
SETTING THE INPUT LEVEL
The input level is located on the back panel of the transmitter whi ch can be used to adjus t either
the line input or speak er inpu t to the tran smitt er. The input lev el bala nces low level input s ignals
between the audio sourc e and the transmitte r. If there is disto rtio n from yo ur surroun d spea kers
when you raise the m ai n vo lu me of your system, the i np ut l evel should be adjusted down. If the
input level is set too low , the surround speakers will not get enough pow er to rais e the volum e to
a desired level.
1. Set the front speaker volume level to slightly higher than desired to establish a proper
output signal level for your rear speaker output.
4
Page 5

2. Set the transmitter input level to the minimum setting.
3. Set the receiver volume control to about three quarters the volume level.
4. Adjust the transmitter input level to obtain the highest sound quality without distortion.
5. Adjust the receiver volume control to balance the rear sound with the rest of the speakers.
CHANGING THE CHANNEL FREQUENCY
TRANSMITTER
REAR VIEW
To minimize interference from other 5.8GHz systems such as a 5.8 GHz cordless phone or a
wireless LAN in your environment, this system allows the user to select one of six preset
channels. If you s hou ld e xp erie nc e in terference from another 5.8 GHz sy st em, select a differen t
transmission channel. The channel selector is located on the back panel of the transmitter.Ô
Ô NOTES Ô
• Be sure to turn the transmitter power back on
after you have changed each channel. The
green led on the receiver will also flash when
the transmitter is in standby mode.
• The receiver’s green LED will vary from a
very dim, flickering green when the signal
quality is poor to a bright, steady green when
the signal is strong.
• If the receiver fails to find any of the available
six channels, try cycling the receiver’s power
off and on, and repeating steps 1 through 4.
1. With both the receiver and transmitter plugged in and powered on, push the power button
to put the transmitter in standby mode.
2. Use a pointed object such as a pen or straightened paper clip to set the channel selector
on the transmitter to one of the six available channels.
Channel # Position 1 Position 2 Position 3
1ON ON ON
2 OFF ON ON
3ONOFFON
4 OFF OFF ON
5ON ONOFF
6 OFF ON OFF
3. Press the power but ton again to set the transmitter s o that the unit wil l reset when it powe rs
back on.
4. The receiver w ill autom atica lly searc h for the se lecte d cha nnel. T he gre en LED on th e fr ont
panel of the receiver w ill fla sh to indica te the rec eiver is search ing for the transm itter sig nal.
5. Keep switching channels on the transmitter until the receiver has a clear signal and the
green LED glows brightly.
SETTING A PERSONAL ID CODE
If you should have another unit or system operating in your home, this feature has been added
to ensure that the tran smitted sign al is only receive d by the receiv er set to the same cod e as the
transmitter. In order to receive audio signal only from your transmitter, you have the option of
selecting from 256 po ssibl e comb inatio ns, to se t a persona l ID cod e for your wire less system. If
you have two transmitters setup near each other, you may also need to change the channel
frequency for better reception.
1. Make sure both the transmitter and the receiver are unplugged from the AC power source.
5
Page 6

IMPORTANT
!
!
FCC INFORMATION
This equipment has been tested and found
to comply with the limits for a Class B digital
device, pursuant to Part 15 of the FCC
Rules. These limits are designed to provide
reasonable protection against harmful
interference in a residential installation. This
equipment generates, uses, and can radiate
radio frequency energy and, if not installed
and used in accordance with the
instructions, may cause harmful
interference to radio communications.
However, there is no guarantee that
interference will not occur in a particular
installation. If this equipment does cause
harmful interference to radio or television
reception, which can be determined by
turning the equipment off and on, the user is
encouraged to try to correct the interference
by one or more of the following measures:
• Reorient or relocate the receiving
antenna.
• Increase the separation between the
equipment and receiver.
• Connect the equipment into an outlet
on a circuit different from that to which
the receiver is connected.
• Consult your local RadioShack store or
an experienced radio/TV technician for
help.
• If you cannot eliminate the
interference, the FCC requires that you
stop using your audio link.
Changes or modifications not expressly
approved by RadioShack may cause
interference and void the user’s authority to
operate the equipment.
This device complies with Part 15 of the
FCC Rules. Operation is subject to the
following two conditions: (1) this device may
not cause harmful interference, and (2) this
device must accept any interference
received, including interference that may
cause undesired operation.
Product: Wireless 5.8 GHz
Digital Audio Link
2. Loosen the screw with a screw driver and remove the panel on the bottom of both the
receiver and the transmitter units.
BOTTOM VIEW
3. Use a pen or a pointed object such as a straightened paper clip to move the levers and
change the code on the transmitter.
4. Use a pen or a po in ted object such as a stra igh t en ed p ap er c li p to move the levers and set
the same code on the receiver. Put the panel back on and tighten the screw before
plugging the transmitter and receiver into the AC power source. Plug in and power on the
transmitter, and then plug in and po wer on the rece iver to make s ure the syste m is worki ng
properly.
CARE
Keep the transmitter and receiver dry; if either unit gets wet, wipe it dry immediately. Use and
store the transmitter and receiver only in normal temperature environments. Handle them
carefully; do not dr op them. Ke ep the trans mitter and receiver a way from du st and dirt, and wipe
them with a damp cloth occasionally to keep both looking new.
SERVICE AND REPAIR
If your transmitter or receiver is not performing as it should, take it to your local RadioShack
store for assistance. To locate your nearest RadioShack, use the store locator feature on
RadioShack's website (www.radioshack.com), or call 1-800-The Shack (843-7422) and follow
the menu options. Mo difyi ng o r tamp ering wit h th e transmi tter or re ceive r's i nternal comp onents
can cause a malfunction and might invalidate its warranty and void your FCC authorization to
operate it.
Model: 15-1974
Responsible
Party:
Phone: 817-415-3200
RadioShack
100 Throckmorton
Fort Worth, TX
76102
6
Page 7

TROUBLESHOOTING
Symptom Suggestion
The system does not
power on.
The system is not receiving
a signal.
The audio is distorted.
The system has noise.
No sound from the rear
surround speakers
No sound from one
speaker
5GHz 802.11a WLAN
interference
• Make sure that the AC adapter is plugged into the transmitter and the
wall outlet.
• Make sure that the transmitter power cord is plugged into the wall outlet.
• Make sure both units are powered on and that your audio source is
turned on and operating.
• Make sure that your speakers are hooked up properly.
• Make sure the green LED on the receiver is illuminated. If it is not lit or it
is flickering, adjust the antennas
• If you have set a personal ID Code for your system, make sure that both
units are set to the same code.
• Make sure the audio going to the transmitter is not distorted.
• If your transmitter is hooked up to a Dolby Digital processor or receiver,
try adjusting the input power level.
• Check that the antennas on the transmitter and receiver are in upright
positions with a clear line of sight to each other.
• Move the transmitter and receiver closer together, but make sure they
are placed not less than three feet apart.
• Cordless phones may cause some interference to the receiver. Position
the receiver farther away from these devices or change the channel on
the transmitter.
• Metal objects, such as some building structural supports, can cause
interference. Try positioning antennas to face the ceiling. The signal will
bounce off the ceiling avoiding direct contact with metal.
• Try switching to another frequency channel.
• Check the volume level on the receiver to make sure it is turned up
enough to be in balance with the rest of your system.
• Make sure the transmitter is turned on and the red LED is lit. When the
transmitter is in standby mode, the receiver is searching for a signal.
• Disconnect the audio link’s transmitter and receiver from AC power for
30 seconds. Then reconnect.
• Make sure the speaker is connected to the receiver.
• Check the speaker balance on your audio source.
• Set your 5 GHz WLAN band to 5.15- 5.35 GHz band range. Avoid using
the 5.8 GHz band.
SPECIFICATIONS
TRANSMITTER
Range..................................................................................................................................................30 feet
Audio Input Level (Low)................................................... .... .. .... .. .. ....... .... .. .. .... .. ....... .. .... .. .........................1 V
Audio Input Level (High) ....................................................................... .. .... .. .. .... ..... .... .. .. .... .......................4 V
Audio Input Impedance .....................................................................................................................20Kohms
Operating Current.................................................................................................................................500mA
Antenna × 1, dimension..........................................................................23mm (W) × 81mm (H) × 25mm (D)
Main unit dimension. ............................................................................135mm (W) × 58mm (H) × 117mm (D)
RECEIVER
AC Power Supply.....................................................................................................................................120V
Audio Output Level at 1K Hz..............................................................................................................25W × 2
Antenna × 2, dimension..........................................................................23mm (W) × 81mm (H) × 25mm (D)
Main unit dimension .............................................................................250mm (W) × 90mm (H) × 252mm (D)
Speaker impedance.................................................................................. .. .... .. ......... .. .... .. .................. 6 ohms
7
Page 8

Limited Ninety-Day Warranty
This product is warrante d by RadioShack ag ainst manufactur ing defects in mater ial and workma nship under normal use for ninety (90) days from the date of purchase from Radi oShack companyowned stores and authorized RadioShack franchisees and dealers. EXCEPT AS PROVIDED
HEREIN, RadioShack MAKES NO EXPRESS WARRANTIES AND ANY IMPLIED WARRANTIES,
INCLUDING THOSE OF MERCHANTABILITY AND FITNESS FOR A PARTICULAR PURPOSE,
ARE LIMITED IN DURATION TO THE DURATION OF THE WRITTEN LIMITED WARRANTIES
CONTAINED HEREIN. EXCEPT AS PROVIDED HEREIN, RadioShack SHALL HAVE NO LIABILITY OR RESPONSIBILITY TO CUSTOMER OR ANY OTHER PERSON OR ENTITY WITH RESPECT TO ANY LIABILITY, LOSS OR DAMAGE CAUSED DIRECTLY OR INDIRECTLY BY USE
OR PERFORMANCE OF THE PRODUCT OR ARISING OUT OF ANY BREACH OF THIS WARRANTY, INCLUDING, BUT NOT LIMITED TO, ANY DAMAGES RESULTING FROM INCONVENIENCE, LOSS OF TIME, DATA, PROPERTY, REVENUE, OR PROFIT OR ANY INDIRECT,
SPECIAL, INCIDENTA L, OR CONSEQUENT IAL DAMAGES, EVEN I F RadioShack HAS BEEN ADVISED OF THE POSSIBILITY OF SUCH DAMAGES.
Some states do not allow limitations on how long an implied warranty lasts or the exclusion or limitation of incidental or consequen tial da ma ges , so the above limitations or exclusion s may not ap ply to
you.
In the event of a pr oduct defect during t he warranty perio d, take the product and the RadioSh ack
sales receipt as proof of purchase date to any RadioShack store. RadioShack will, at its option, unless otherwise prov ided by law: (a) correct the defect by product re pair wi th ou t ch arg e for parts a nd
labor; (b) replace the product w ith one of the same or similar design; or (c) refund the purch ase
price. All replaced parts and products, and products on which a refund is made, become the property
of RadioShack. Ne w or recondit ioned parts and p roducts may be used in the performance of warranty service. Repaired or replaced parts and products are warranted for the remainder of the original warranty period. You will be charged for repair or replacement of the pr oduct made after the
expiration of the warranty period.
This warranty does not cove r: (a ) da ma ge or fai lur e caus ed by or attributable to acts of God, abuse,
accident, misuse, improper or abnorm al usa ge, failure to follow i nstruc tions , imprope r installatio n or
maintenance, alterat ion, lightning or other incidence of excess vol tage or current; (b) any repairs
other than those provided by a RadioShack Authorized Service Facility; (c) consumables such as
fuses or batteries; (d) cosmetic da mage; (e) transp ortation, sh ipping or insu rance co sts; or (f) costs
of product removal, installation, set-up service adjustment or reinstallation.
This warranty gives you speci fic legal rights, and you may also have othe r rights which vary from
state to state.
RadioShack Customer Relations, 200 Taylor Street, 6th Floor, Fort Worth, TX 76102
12/99
Printed in China
15-197409A03
 Loading...