

Page 1
4
TH
. D
RAFT
RS Kameleon 8in1 UG 7/9/03 1:02 PM Page 1
Page 2
TABLE OF CONTENTS
Introduction . . . . . . . . . . . . . . . . . . . . . . . . . . . . . . . . . . . . . . . . . . 2
How Kameleon™Works . . . . . . . . . . . . . . . . . . . . . . . . . . . . . . . . 2
Installing Batteries . . . . . . . . . . . . . . . . . . . . . . . . . . . . . . . . . . . . 3
Battery Use And Safety . . . . . . . . . . . . . . . . . . . . . . . . . . . . . . . . 3
About Battery Life . . . . . . . . . . . . . . . . . . . . . . . . . . . . . . . . . . . . 3
Installing Batteries In The Remote . . . . . . . . . . . . . . . . . . . . . . . 3
About The Finder Transmitter . . . . . . . . . . . . . . . . . . . . . . . . . . . 4
A Quick Look At The Controls
. . . . . . . . . . . . . . . . . . . . . . . . . . . . 4
Key Functions . . . . . . . . . . . . . . . . . . . . . . . . . . . . . . . . . . . . . . . 5
Device Table . . . . . . . . . . . . . . . . . . . . . . . . . . . . . . . . . . . . . . . . 9
Adjusting Brightness. . . . . . . . . . . . . . . . . . . . . . . . . . . . . . . . . . . 9
Programming A Device . . . . . . . . . . . . . . . . . . . . . . . . . . . . . . . . 10
Programming A DVD Player/VCR Combo . . . . . . . . . . . . . . . . . 11
Searching For Your Code. . . . . . . . . . . . . . . . . . . . . . . . . . . . . . . 12
Checking The Codes . . . . . . . . . . . . . . . . . . . . . . . . . . . . . . . . . . 13
Using Learning . . . . . . . . . . . . . . . . . . . . . . . . . . . . . . . . . . . . . . 14
Learning Precautions . . . . . . . . . . . . . . . . . . . . . . . . . . . . . . . . 14
Programming A Learning Key . . . . . . . . . . . . . . . . . . . . . . . . . . 14
Deleting A Single Learned Key . . . . . . . . . . . . . . . . . . . . . . . . . . 15
Deleting All Learned Keys In A Specific Mode. . . . . . . . . . . . . . . 16
Changing Volume Lock . . . . . . . . . . . . . . . . . . . . . . . . . . . . . . . . 16
Locking Volume Control To One Mode. . . . . . . . . . . . . . . . . . . . . 16
Unlocking Volume Control For A Single Device. . . . . . . . . . . . . . 17
Unlocking All Volume Control. . . . . . . . . . . . . . . . . . . . . . . . . . . 17
Using Macros . . . . . . . . . . . . . . . . . . . . . . . . . . . . . . . . . . . . . . . . 18
Programming A Favorite Channel Macro . . . . . . . . . . . . . . . . . . 18
Programming A Master Power Macro In
My System Mode . . . . . . . . . . . . . . . . . . . . . . . . . . . . . . . . . . . . 19
Programming The COM MUTE Key . . . . . . . . . . . . . . . . . . . . . . . 19
Clearing A Macro . . . . . . . . . . . . . . . . . . . . . . . . . . . . . . . . . . . 20
Using Keymover . . . . . . . . . . . . . . . . . . . . . . . . . . . . . . . . . . . . . . 20
Programming Keymover . . . . . . . . . . . . . . . . . . . . . . . . . . . . . . 20
Restoring A Single Keymoved Key . . . . . . . . . . . . . . . . . . . . . . . 21
Restoring All Keymoved Keys In A Single Mode . . . . . . . . . . . . . 21
Programming Favorite Channel Scan . . . . . . . . . . . . . . . . . . . . 22
Using Channel Scan . . . . . . . . . . . . . . . . . . . . . . . . . . . . . . . . . . 22
Using My System Mode . . . . . . . . . . . . . . . . . . . . . . . . . . . . . . . . 23
Control Organization . . . . . . . . . . . . . . . . . . . . . . . . . . . . . . . . . 23
Programming My System Mode . . . . . . . . . . . . . . . . . . . . . . . . 23
Reassigning Device Keys . . . . . . . . . . . . . . . . . . . . . . . . . . . . . . 25
Using Commercial Skip. . . . . . . . . . . . . . . . . . . . . . . . . . . . . . . . 25
Using The Default Settings . . . . . . . . . . . . . . . . . . . . . . . . . . . . 25
Programming Commercial Skip. . . . . . . . . . . . . . . . . . . . . . . . . 25
Setting The Tilt Switch . . . . . . . . . . . . . . . . . . . . . . . . . . . . . . . . 26
Disabling The Tilt Switch. . . . . . . . . . . . . . . . . . . . . . . . . . . . . . 26
Enabling The Tilt Switch . . . . . . . . . . . . . . . . . . . . . . . . . . . . . . 27
Setting The Finder Receiver . . . . . . . . . . . . . . . . . . . . . . . . . . . . 27
Disabling The Finder Receiver . . . . . . . . . . . . . . . . . . . . . . . . . . 27
Enabling The Finder Receiver . . . . . . . . . . . . . . . . . . . . . . . . . . 28
Restoring Factory Default Settings . . . . . . . . . . . . . . . . . . . . . . 28
Clearing All Custom Programming . . . . . . . . . . . . . . . . . . . . . . 29
Specifications. . . . . . . . . . . . . . . . . . . . . . . . . . . . . . . . . . . . . . . . 29
About Upgrading . . . . . . . . . . . . . . . . . . . . . . . . . . . . . . . . . . . . . 30
Troubleshooting . . . . . . . . . . . . . . . . . . . . . . . . . . . . . . . . . . . . . . 30
Device Menu Screens. . . . . . . . . . . . . . . . . . . . . . . . . . . . . . . . . . 32
Care . . . . . . . . . . . . . . . . . . . . . . . . . . . . . . . . . . . . . . . . . . . . . . . . 38
Additional Information . . . . . . . . . . . . . . . . . . . . . . . . . . . . . . . . 38
Instruction To The User . . . . . . . . . . . . . . . . . . . . . . . . . . . . . . . . 38
Limited 90-Day Warranty . . . . . . . . . . . . . . . . . . . . . . . . . . . . . . 39
Manual De Deuño . . . . . . . . . . . . . . . . . . . . . . . . . . . . . . . . . . . . 40
Manufacturer’s Codes. . . . . . . . . . . . . . . . . . . . . . . . . . . . . . . . . 80
Setup Codes For Audio Amplifiers . . . . . . . . . . . . . . . . . . . . . . . 80
Setup Codes For Audio Receivers. . . . . . . . . . . . . . . . . . . . . . . . 80
Setup Codes For Cable Boxes . . . . . . . . . . . . . . . . . . . . . . . . . . 80
Setup Codes For CD Players . . . . . . . . . . . . . . . . . . . . . . . . . . . 81
Setup Codes For DVD Players. . . . . . . . . . . . . . . . . . . . . . . . . . . 82
Setup Codes For DVD Player/VCR Combos . . . . . . . . . . . . . . . . . 82
Setup Codes For Home-Theater-in-a-Box Devices . . . . . . . . . . . 83
Setup Codes For PVRs. . . . . . . . . . . . . . . . . . . . . . . . . . . . . . . . 83
Setup Codes For Satellite Receivers. . . . . . . . . . . . . . . . . . . . . . 83
Setup Codes For TVs . . . . . . . . . . . . . . . . . . . . . . . . . . . . . . . . . 83
Setup Codes For TV/DVD Player Combos . . . . . . . . . . . . . . . . . . 85
Setup Codes For TV/VCR Combos . . . . . . . . . . . . . . . . . . . . . . . 86
Setup Codes For VCRs. . . . . . . . . . . . . . . . . . . . . . . . . . . . . . . . 86
Setup Codes For Video Accessories . . . . . . . . . . . . . . . . . . . . . . 88
INTRODUCTION
The RadioShack 8-in-One Remote powered by
Kameleon™ is a revolutionary universal remote
control that uses Universal Electronics’Kameleon
Technology. It is designed to control up to eight
home entertainment devices,including TV, video,
and audio components.
After installing four (4) new AAA alkaline
batteries (not included), you can immediately
use the remote to control an RCA TV,VCR, DVD
Player,and Satellite Receiver, a Motorola Cable
Box,a Tivo PVR (DVR),and a Pioneer CD Player
and Audio Receiver.To control other brands,
please perform the instructions in Programming
A Device on page 10.
HOW KAMELEON™WORKS
The RadioShack 8-in-One Remote Powered By
Kameleon provides the versatility of an LCD
remote control with the feel of a traditional
push button unit.The result is a stunning,
bright display with engaging animation and
touch-sensitive graphics for the user.
2 Table Of Contents/Introduction
8-IN-ONE REMOTE POWERED BY KAMELEON
RS Kameleon 8in1 UG 7/9/03 1:02 PM Page 2
Page 3

The remote control includes convenient Menu
Driven programming.The displays are divided
into two types of interactive screens: Device Menus
for normal remote control use,and Programming
Menus for feature setup.Acting like its namesake,
Kameleon changes the Device Menu for the device
being selected. For example,selecting TV displays
a main menu that contains channel selection,
volume control,and a keypad.However, selecting a
DVD player still displays a menu with those same
keys as the TV, but now navigation keys and
transport controls are added for the DVD device.
Several devices have a second menu that can be
accessed using SCREEN (see Device Menu Screens,
starting on page 32).For example, TV has two
menus: a main menu with extra feature keys for
COM MUTE,+100,ENTER, SLEEP, TV/VCR,and PIP
functions, and a second menu screen that adds
navigation keys but removes the extra feature keys.
This way a user has the flexibility to use any menu
screen that works best for the selected device.
NOTE:Even though SCREEN is displayed in all modes,
only TV, CD,and AUD modes have a second menu screen.
Animated key graphics also provided enhanced
operational feedback,so the user can easily see
what mode is active and when the commands
are communicating with a device.The end result
of Kameleon technology is a simple, elegant, and
intelligent way of organizing a large number of
remote control keys for eight different devices.
INSTALLING BATTERIES
BATTERY USE AND SAFETY
• Use only fresh batteries of the required size
and recommended type.
• Do not mix old and new batteries,different
types of batteries (e.g., standard,alkaline, or
rechargeable),or rechargeable batteries of
different capacities.
• If you do not plan to use the remote for an
extended period, remove the batteries.
They can leak chemicals that can destroy
electronic parts.
WARNING: Dispose of old batteries promptly and
properly.Do not burn or bury them.
ABOUT BATTERY LIFE
As with all battery-operated devices,battery life
will vary depending on use, including frequency
and duration of key presses on the Kameleon
screen. Battery life may be extended by:
• Reducing the brightness level of the display
screen (see Adjusting Brightness on page 9).
• Disabling the Kameleon “tilt on” feature
(see Setting The Tilt Switch on page 26).
• Disabling the Kameleon Finder feature
(see Setting The Finder Receiver on page 27).
INSTALLING BATTERIES IN THE REMOTE
Your remote requires four AAA batteries (not
supplied) for power.
continued on next page...
How Kameleon Works/Installing Batteries 3
OWNER’S MANUAL
❶
❸
❷
RS Kameleon 8in1 UG 7/9/03 1:02 PM Page 3
Page 4
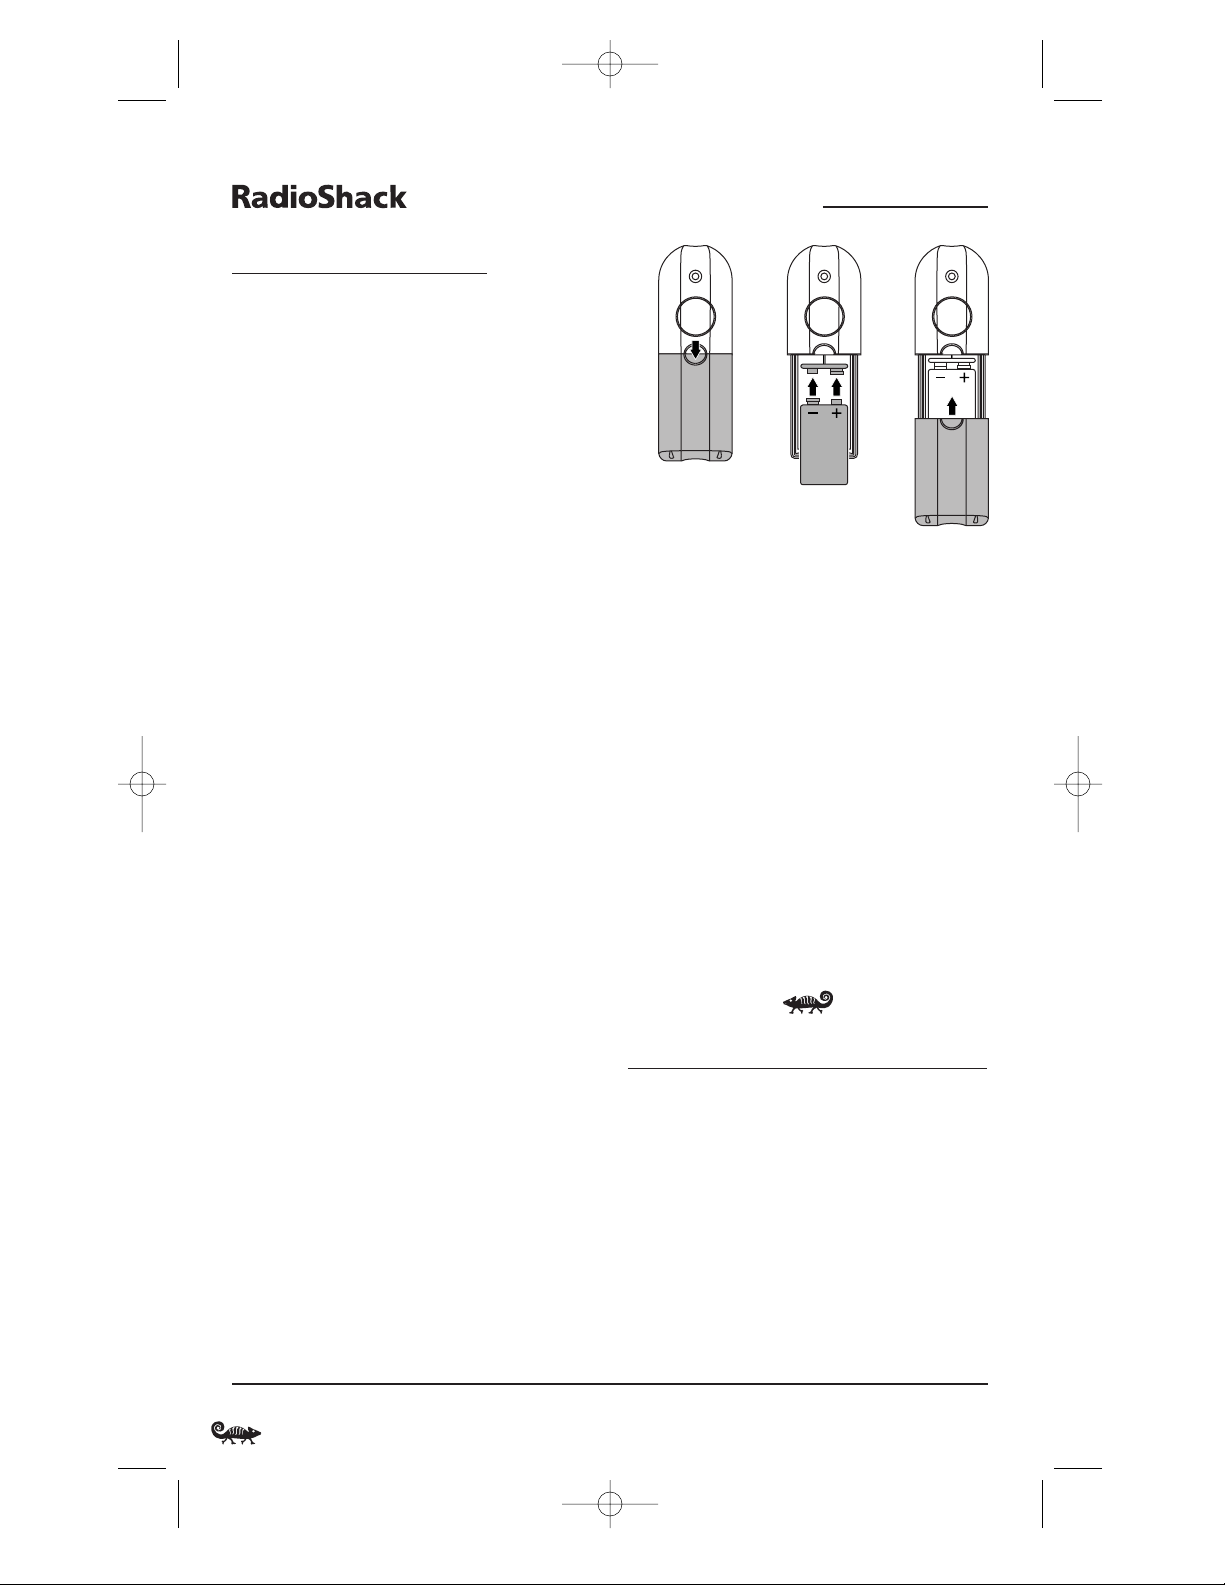
INSTALLING BATTERIES
INSTALLING BATTERIES IN THE REMOTE (CONT’D)
1. Press down on the battery compartment
cover (on the back of the remote) and lift
it off.
2. Slide the AAA batteries into the compartment
as indicated by the polarity symbols (+ and –)
shown above.
3. Align the cover with the compartment
opening and slide it back into place.
4. If batteries are inserted correctly, the display
will turn on and show all keys.If a key is
not pressed after 7 seconds, the display will
turn off.
NOTE: The batteries will need replacement if one of
the following conditions occurs:
1. The top IR segment flashes five times after pressing
a key.
2. The Tilt Switch (if enabled, see page 26) no longer
activates the remote and only pressing a key turns
on the display.
ABOUT THE FINDER TRANSMITTER
NOTE: If you do not plan to use the Finder Transmitter,
store it away for future use and skip this section.
Included in the package is a Finder Transmitter
that you can use to audibly locate a lost or misplaced RadioShack 8-in-One Remote. The unit
also comes with double-sided “hook and loop”
tape for use in mounting it on a TV cabinet side or
other surface.
The Finder Transmitter requires a 9-volt battery
(not supplied) for power. For best performance
and longest life,we recommend using a
RadioShack alkaline battery.
INSTALLING A BAT TERY IN THE FINDER TRANSMITTER
1. Press down on the battery compartment
cover (on the front of the Finder Transmitter)
and slide it off.
2. Locate the snap harness and connect the 9-volt
battery to mating terminals.Then insert the
battery and harness into the compartment.
3. Align the cover with the compartment
opening and slide it back into place.
OPERATING THE FINDER TRANSMITTER
1. Point the Finder Transmitter in the general
direction of the lost RadioShack 8-in-One
Remote.Press and hold its button.
2. The lost RadioShack 8-in-One Remote will
emit an chirping sound to help you find it.
NOTE: If the RadioShack 8-in-One Remote does not
emit a chirping sound, verify the Finder Receiver is
enabled (see page 28) and the battery is fresh.
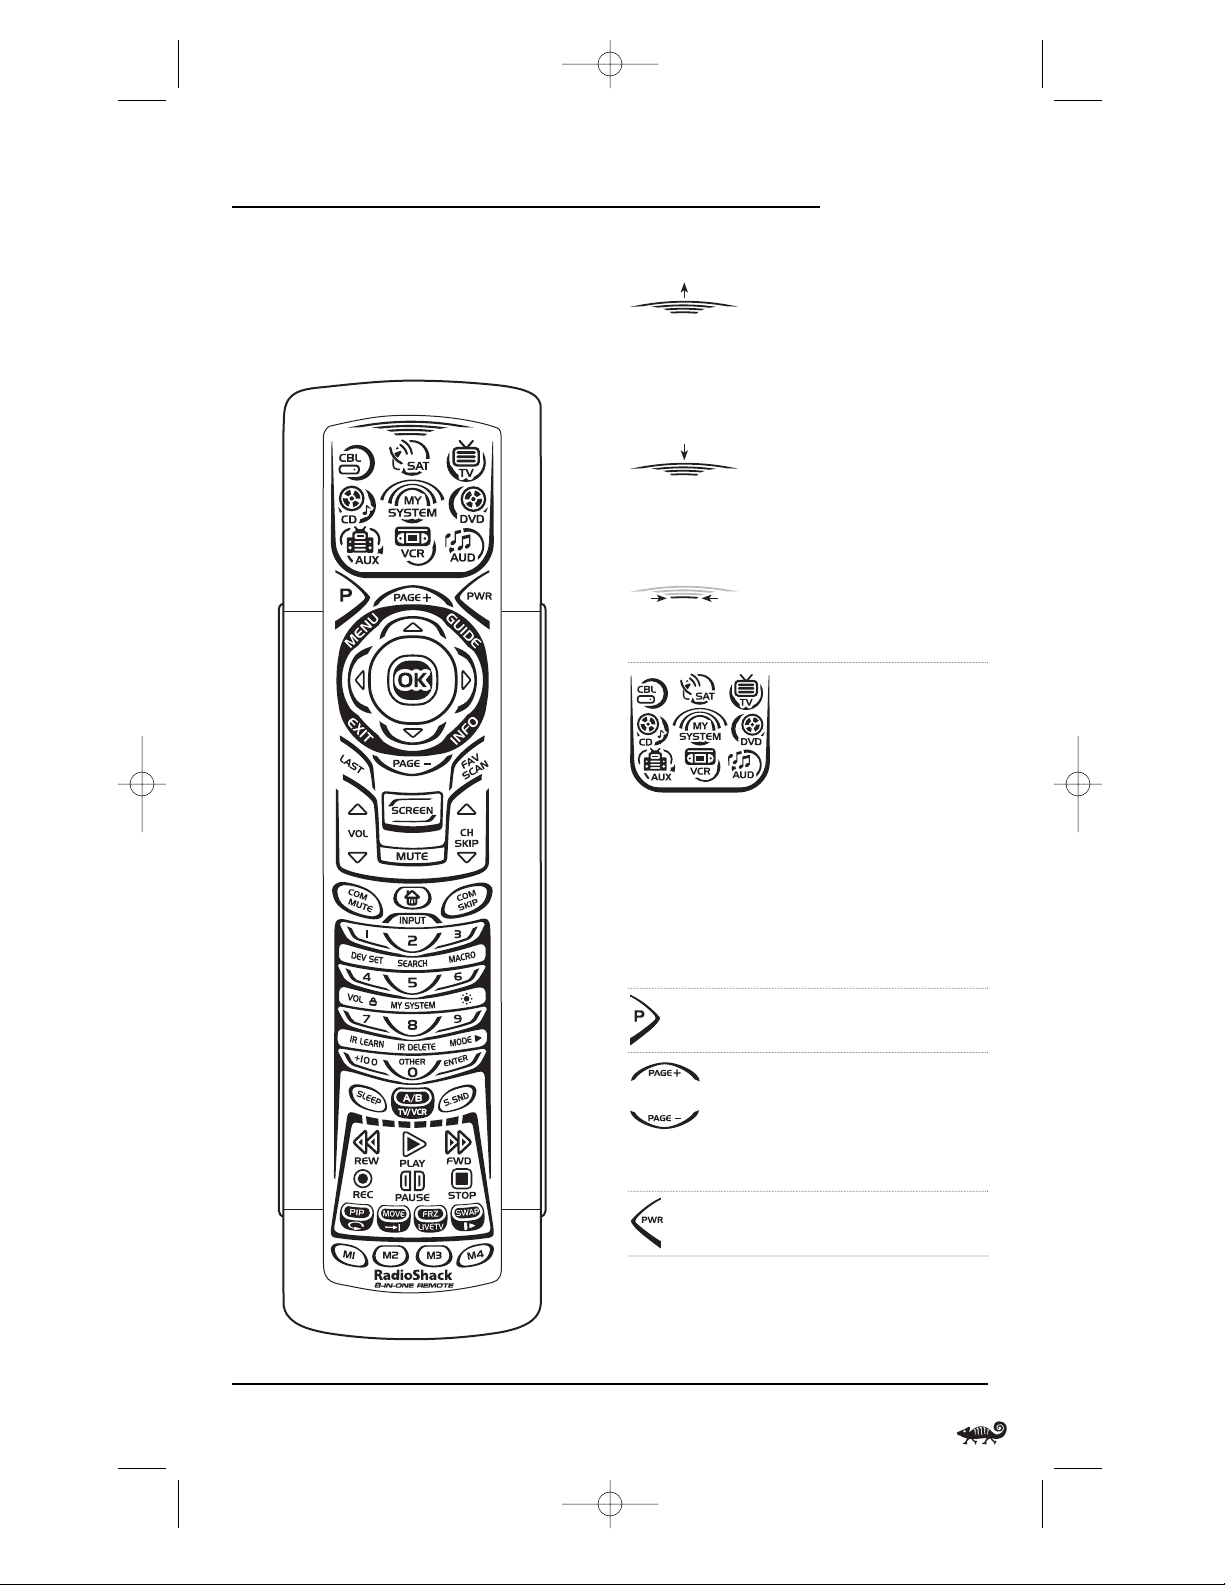
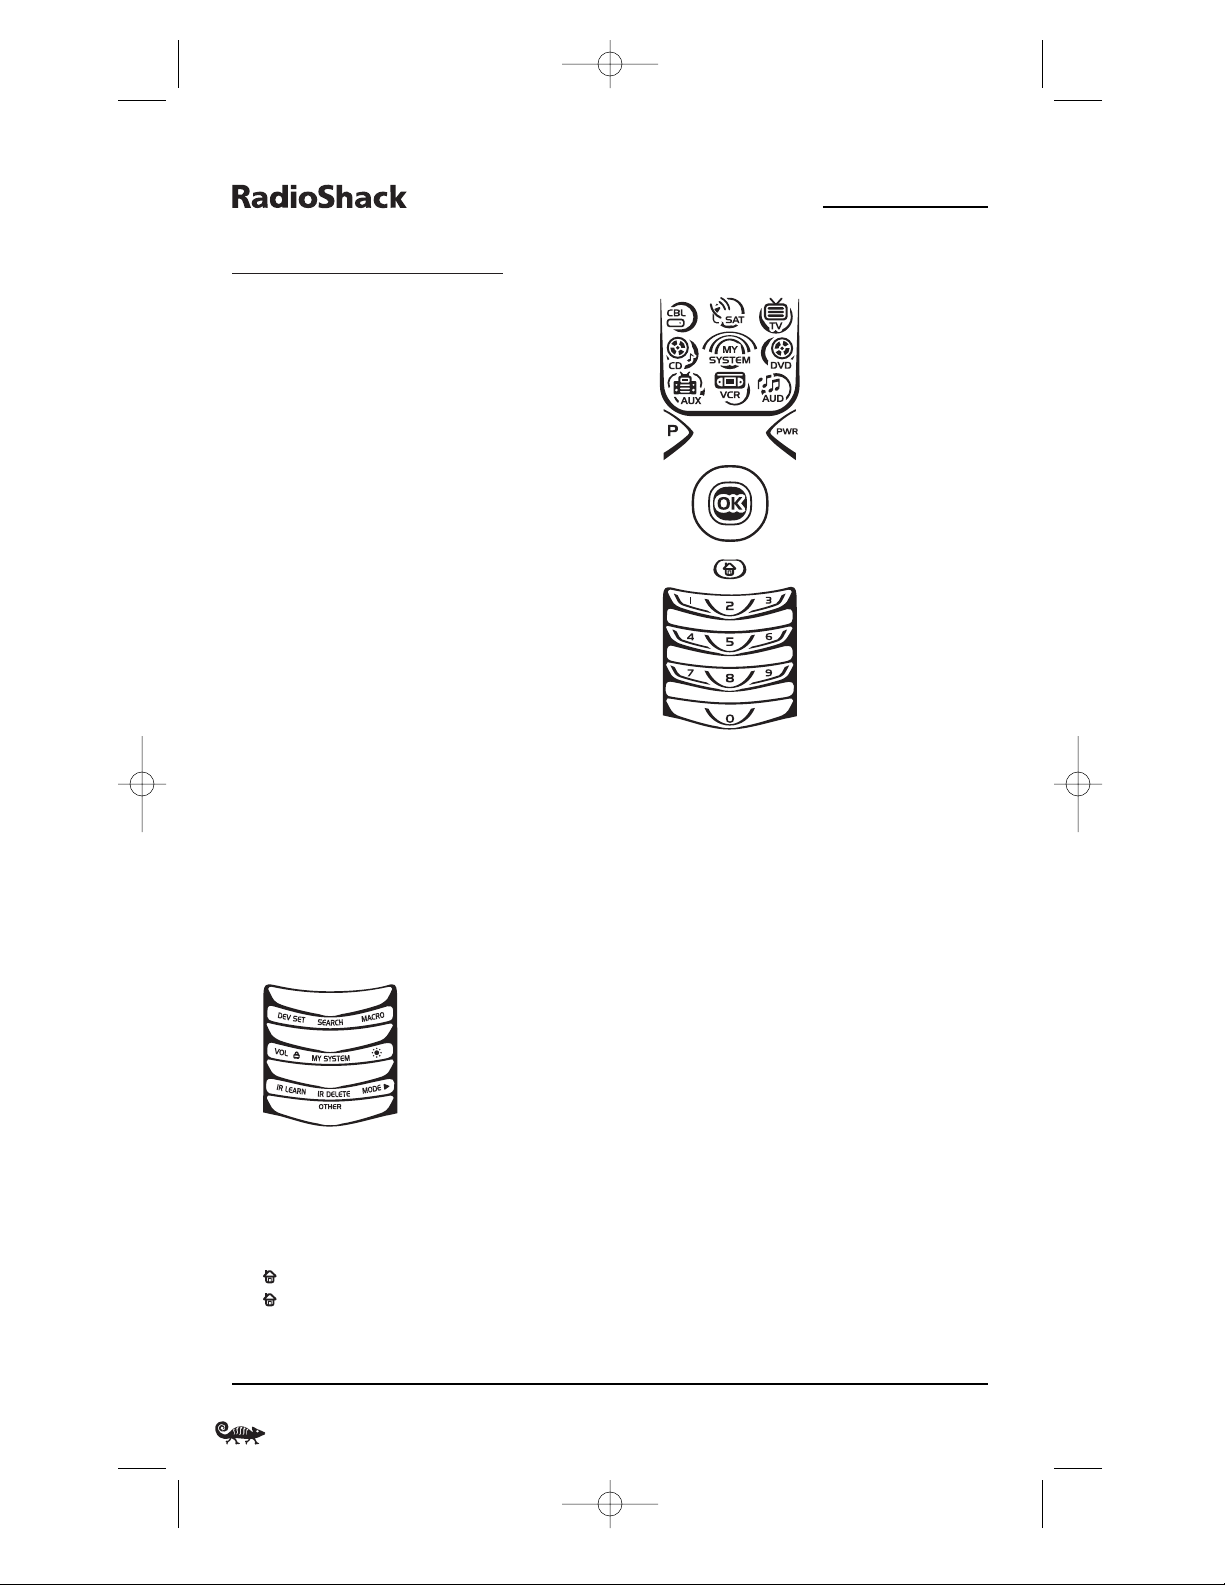
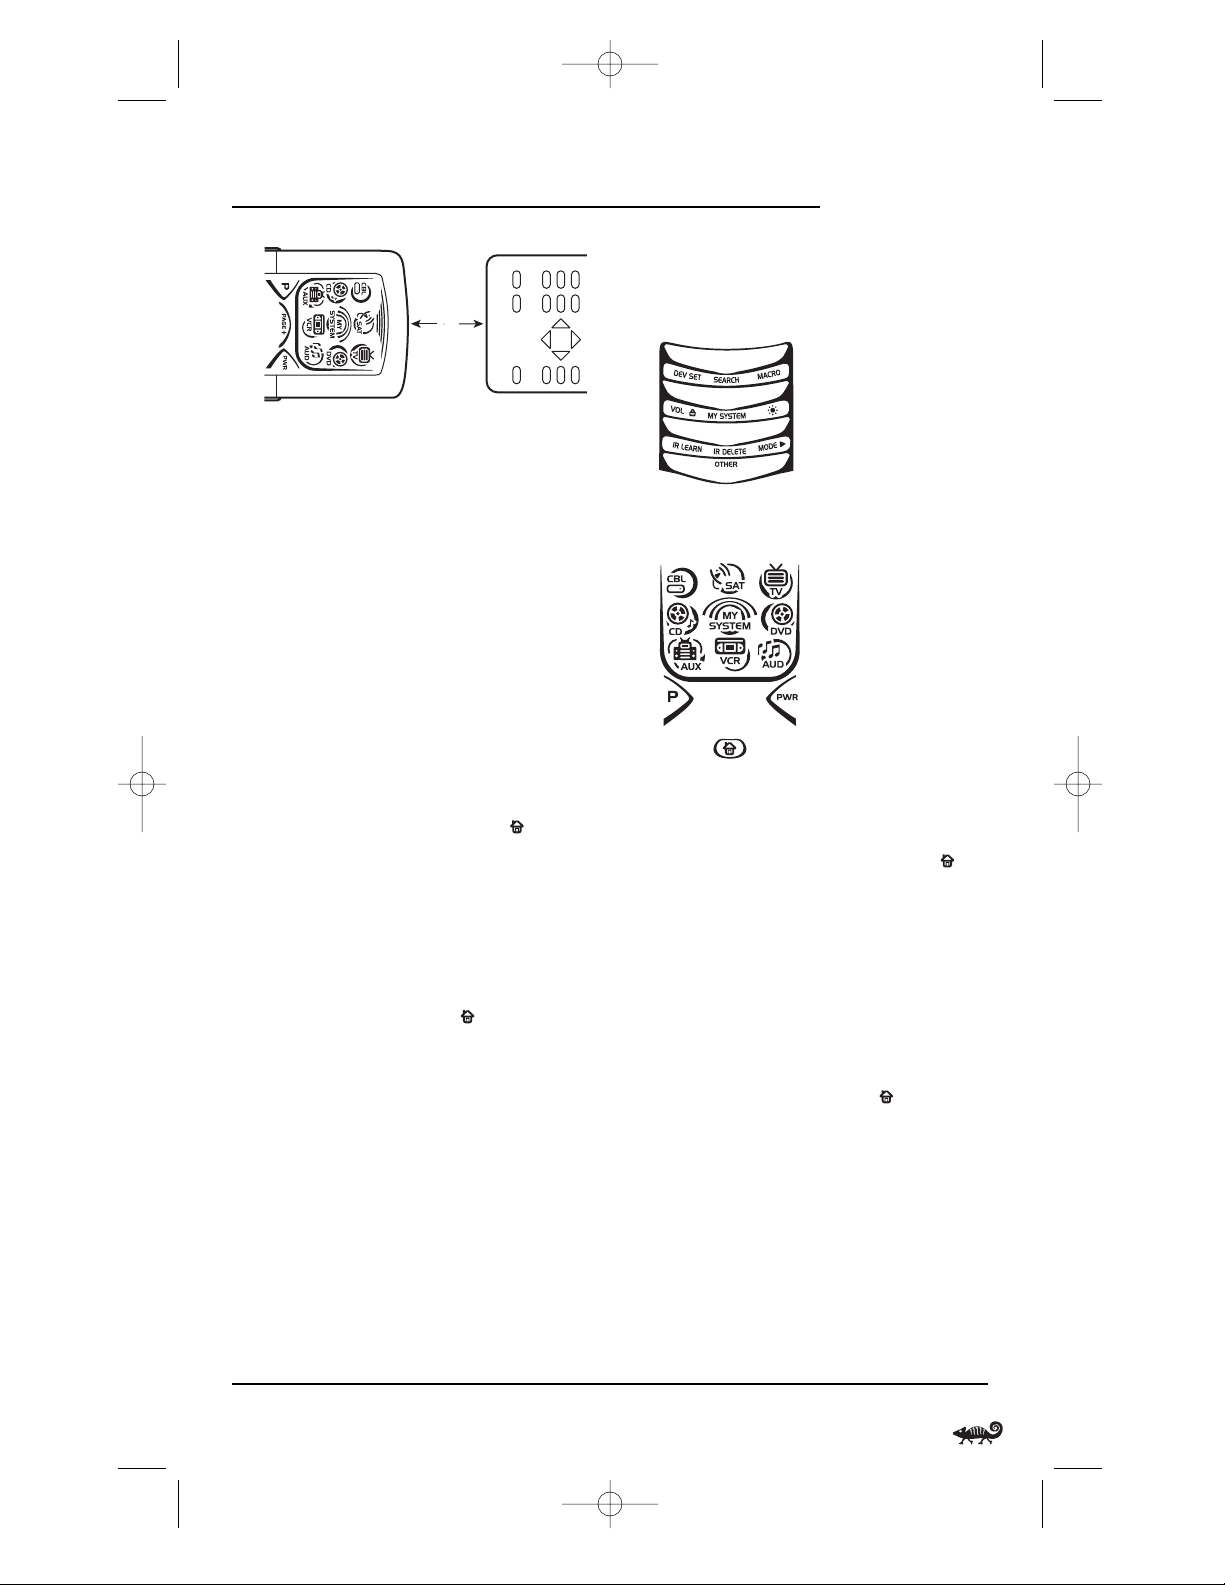
A QUICK LOOK AT THE CONTROLS
Use the illustration on the next page to locate
controls and then study the Key Functions to
learn how they function.
NOTE: The illustration shows all remote control keys.
In actual operation, only active keys used by the selected
device are displayed and non-active keys are hidden.
These controls work like the ones found on your original
remote controls.
To find out what type of devices can be controlled
by each device key after programming,see the
Device Table on page 9.
4 Installing Batteries/A Quick Look At The Controls
8-IN-ONE REMOTE POWERED BY KAMELEON
❶
❸
❷
RS Kameleon 8in1 UG 7/9/03 1:02 PM Page 4
Page 5
To find out what keys appear when the program
mode is activated or when a device is selected,
see the Device Menu Screens section starting on
page 32. Included are brief descriptions of how
the keys work for each displayed screen.
KEY FUNCTIONS
When a key is pressed,the
IR Segments will animate.
Outgoing animation (see
arrow) indicates the remote
is sending IR signals to a
selected device.
Incoming animation
indicates the remote is
receiving IR signals from a
device being learned (see
Using Learning on page 14).
During programming,the
bottom IR segment flashes
to confirm setup actions.
Press CBL,SAT,TV, DVD,
AUD,VCR, AUX,or CD once
to select a device to control.
The selected device key will
animate to indicate it is
currently active.Also see
the Device Table on page 9.
After programming,press
MY SYSTEM once to select
your custom system
controls. See Using My
System Mode on page 23.
Use P to enable the
programming screen.
In the CBL or SAT mode,
use PAGE+ or PAGE- to
page up or page down
through channels in the
program guide.
Press PWR once to turn on
or off a selected device.
continued on next page...
A Quick Look At The Controls 5
OWNER’S MANUAL
RS Kameleon 8in1 UG 7/9/03 1:02 PM Page 5
Page 6
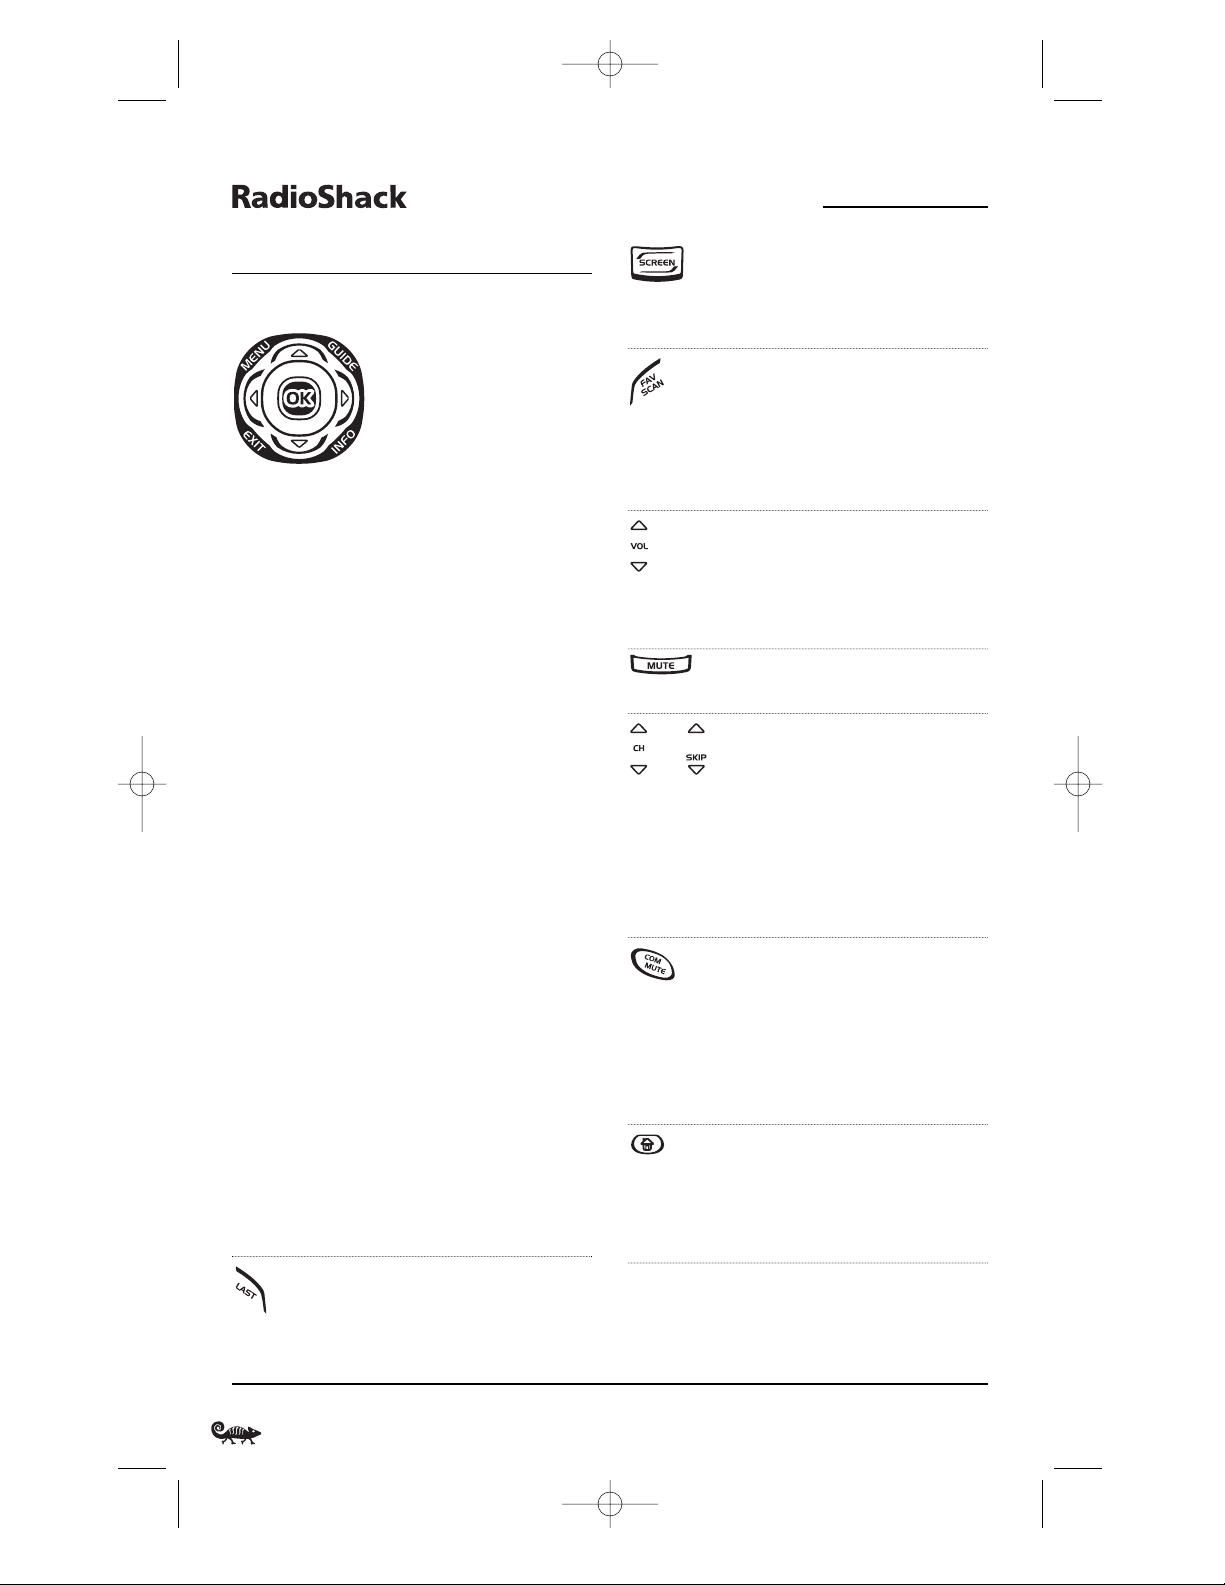
In the TV, CD,or AUD mode,
use SCREEN to view
additional key screens
for the selected device.
In all modes except CD,
DVD,and AUD, use FAV
SCAN to scan through all
channels, or after programming, to scan through 10
favorite channels.
Use VOL
▲ (or VOL ▼)
to raise (or lower) volume
for the selected device
(also see Changing Volume
Lock on page 16).
Press MUTE once to turn
the sound off or on.
In all modes except CD and
DVD, use CH
▲ (or CH ▼)
to select the next higher (or
lower) channel.
In the CD or DVD mode,
use SKIP
▲ (or SKIP ▼)
to select the next (or
previous) track or chapter.
After programming,in the
CBL, SAT,TV,VCR,or AUX
mode use COM MUTE to
drop the volume to preset
level and raise it back to its
original level.See Using
Macros on page 18.
During programming,
the home key will appear.
Use it to exit the program
screen or to return to the
previous device key screen.
or
6 A Quick Look At The Controls
8-IN-ONE REMOTE POWERED BY KAMELEON
A QUICK LOOK AT THE CONTROLS
KEY FUNCTIONS (CONTINUED)
Use the navigation keys
as follows:
Use MENU to display the
your device’s main menu.
In the TV, CD,or AUD mode,
the selected device’s main
menu screen will appear.
Use GUIDE to display your
device’s program guide, or
setup or program menu.
In the TV, CD,or AUD mode,
the selected device’s main
menu screen will appear.
Use INFO to display the
current channel and
program information.
Use EXIT to exit from your
device’s guide or menu.
Use the cursor keys (
▲ , ▼,
, or ) to navigate
through the program guide
and menu screens.
In the CD mode, use
▲ (or
▼) to select the next (or
previous) disc.
In the AUD mode, use
▲
(or ▼) to raise (or lower)
rear channel volume and
use (or ) to balance
audio left (or right).
Use OK to choose options
from your device’s menu
or guide.
Press LAST once to recall
the last channel.
In the CD or AUD mode,use
LAST to repeat the last track.
▲
▲
▲
▲
RS Kameleon 8in1 UG 7/9/03 1:02 PM Page 6
Page 7
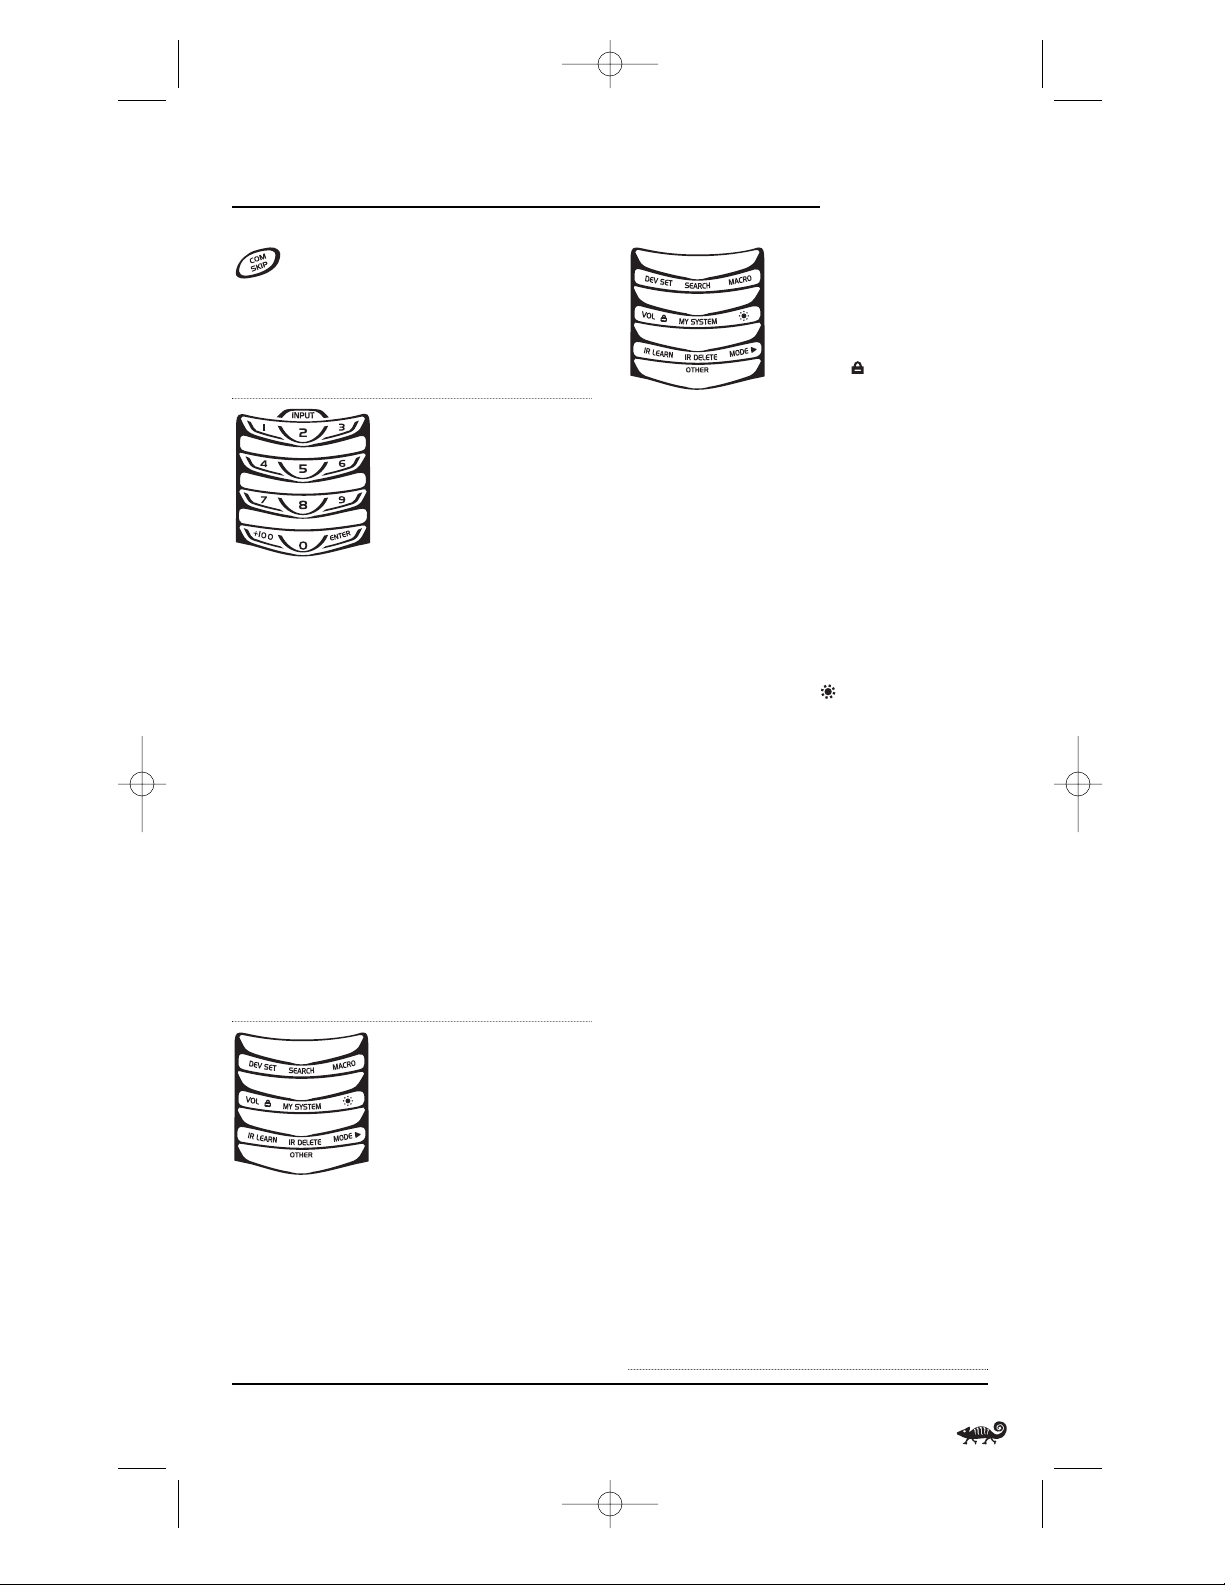
In the CBL, SAT,VCR,or AUX
mode, use COM SKIP to skip
commercials on devices
with PVR capabilities (see
Using Commercial Skip on
page 25).
In all modes except AUD,
use the number keys
(1 ~ 9 and 0) to directly
select channels (e.g., 009
or 031) or enter numbers.
In the AUD mode, INPUT
will appear.Use the number keys to directly select
inputs 1 ~ 9 and 10.
For certain brands in all
modes except CD,press
ENTER once after entering
numbers (if required on
original remote control).
In the TV mode, use +100 to
enter numbers above 100 (if
required on original remote
control). In the CD or DVD
mode, use +100 to access
tracks above 10 (if required
on original remote control).
In the AUD mode, use +100
to change the radio band.
In the program mode,
use the program keys to
personalize the remote
control as follows:
Use DEV SET to program
your device codes. See
Programming A Device on
page 10.
Use SEARCH as an alternate
way to set up a device by
searching available codes.
See Searching For Your Code
on page 12.
Use MACRO to program a
series of commands on five
available macro keys.See
Using Macros on page 18.
Use VOL to set volume
controls for individual or
global device use.See
Changing Volume Lock on
page 16.
Use MY SYSTEM to create a
custom mode with favorite
remote control keys from
different devices in your
home theater system.See
Using My System Mode on
page 23.
Use to adjust the brightness level of the EL display.
See Adjusting Brightness on
page 9.
Use IR LEARN and IR
DELETE to add and delete
key functions learned from
your original device remote
controls. See Usi ng
Learning on page 14.
Use MODE to reassign
an unused device key to
control a second device.
See Reassigning Device Keys
on page 25.
Use OTHER to program
other functions. See Ta b l e
of Contents on page 2 for
sections on Checking The
Codes, Programming
Favorite Channel Scan,
Usi ng Ke ym over ,Programming Commercial Skip,
Upg rading,Restoring
Default Settings,or Clearing
Programming.
▲
A Quick Look At The Controls 7
OWNER’S MANUAL
NOTE: Press above
the title to activate
a desired program.
For OTHER,press
below the title.
NOTE: Press above
the title to activate
a desired program.
For OTHER,press
below the title.
RS Kameleon 8in1 UG 7/9/03 1:02 PM Page 7
Page 8
A QUICK LOOK AT THE CONTROLS
KEY FUNCTIONS (CONTINUED)
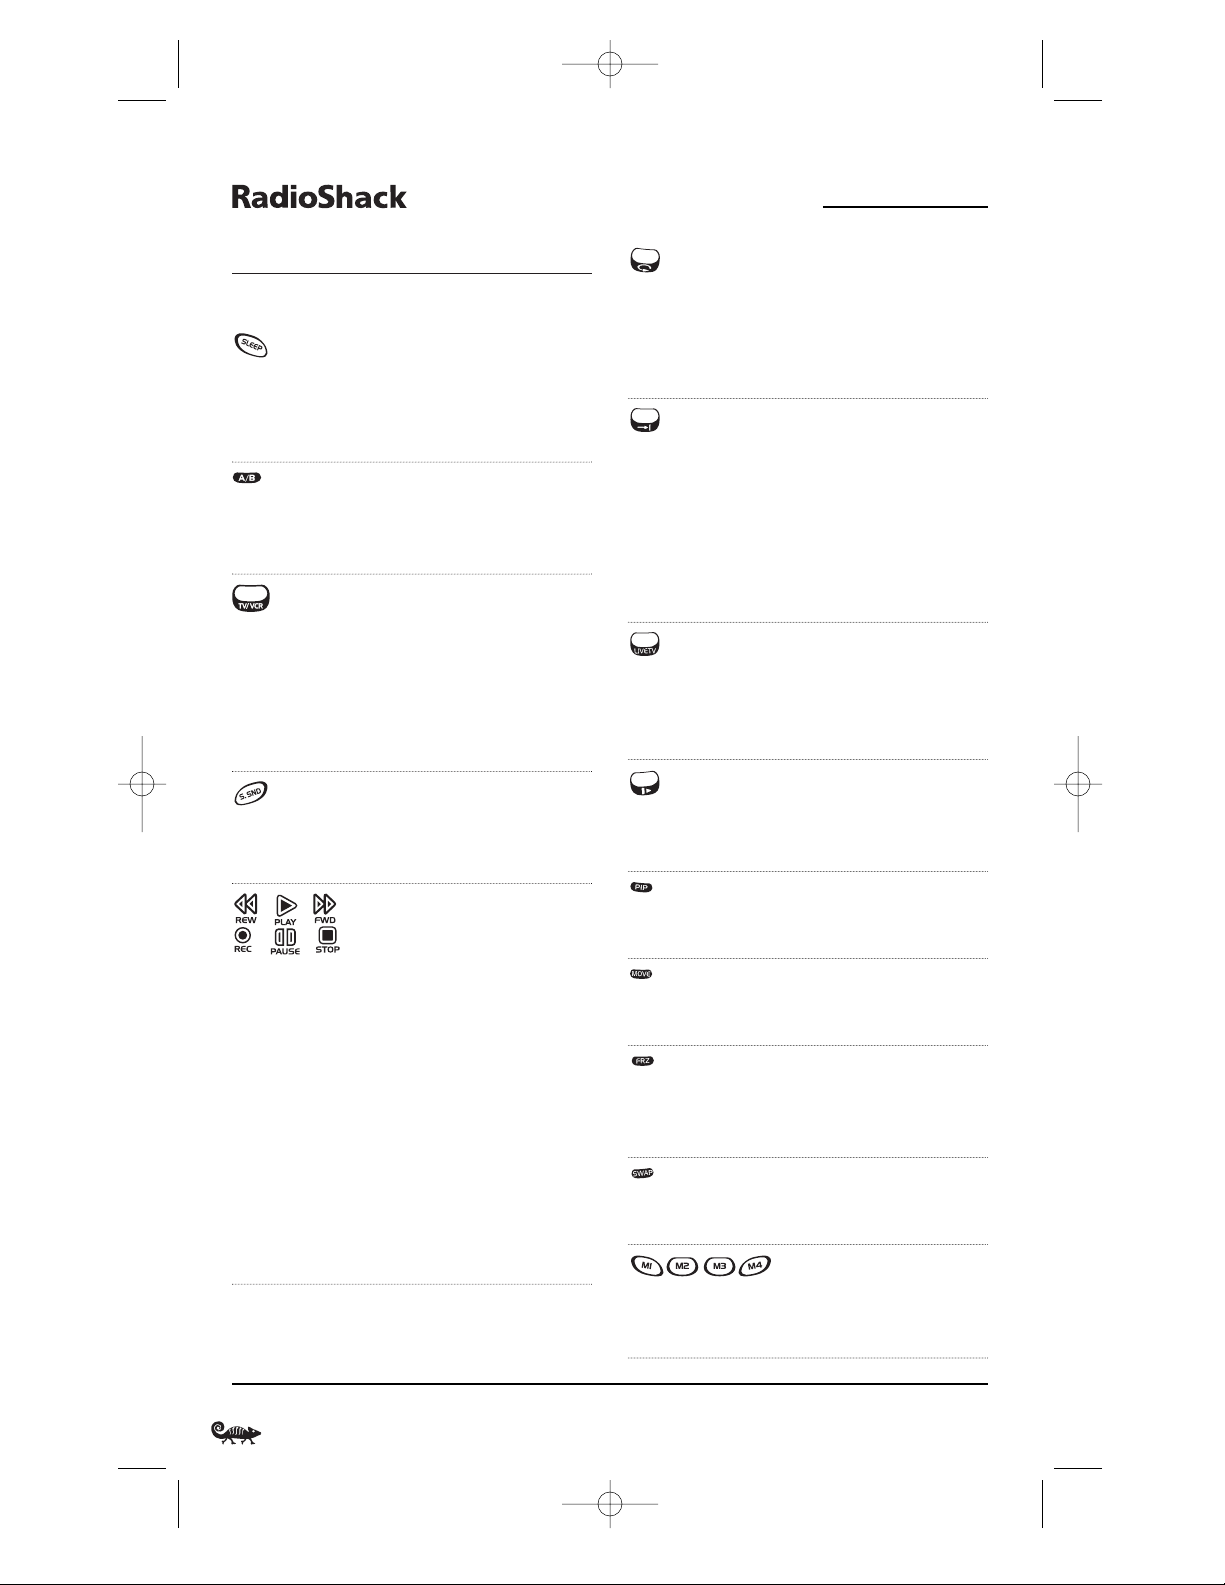
In the CBL, SAT,VCR or
AUX mode, use SLEEP to
activate your device’s sleep
timer (if one is available
for the device).
In the CBL or SAT mode,
use A/B to act as your cable
box’s or satellite receiver’s
A/B switch.
In the TV, VCR,or DVD
mode, use TV/VCR to switch
the TV’s input to view TV
or video programs.
In the AUD mode, use
TV/VCR to switch between
program and input.
In the AUD mode, use
S.SND to turn surround
sound on or off.Also see
cursor keys on page 6.
In the CD, DVD,AUD, VCR,
or AUX mode, use the
transport keys (i.e., REW,
PLAY,FWD,PAUSE,and
STOP) to control the
device’s transport. Press
REC twice to record a program on your device (if the
function is available).
In the CBL or SAT mode,
use the transport keys to
control VOD (Video On
Demand) or PVR, if available on your cable/satellite
service.
In the CBL, SAT,VCR,or
AUX mode, use the replay
key
to instantly replay the
last 7 seconds of a program
you are watching (if feature
is available).
In the CBL, SAT,or AUX
mode, use the advance key
to skip past commercials or
other uninteresting scenes (if
the feature is available).
In the DVD or CD mode, use
the advance key
to change
discs.
In the CBL, SAT,VCR,or
AUX mode, use LIVE TV to
switch between live TV and
vi
deo programming (if
feature is available).
In the CBL, SAT,VCR, DVD,
or AUX mode, use the slow
key
to view slow motion
video (if feature is available).
Use PIP to switch the
Picture-In-Picture feature
on or off.
Use MOVE to move the
window picture to different
places in the main picture.
Press FRZ once to capture
a frame of video in the
main picture. Press it again
to resume normal viewing.
Use SWAP to switch images
and sound between the
main and window pictures.
After programming,press
M1 ~ M4 once to run a
macro (see Using Macros
on page 18).
8 A Quick Look At The Controls
8-IN-ONE REMOTE POWERED BY KAMELEON
RS Kameleon 8in1 UG 7/9/03 1:02 PM Page 8
Page 9
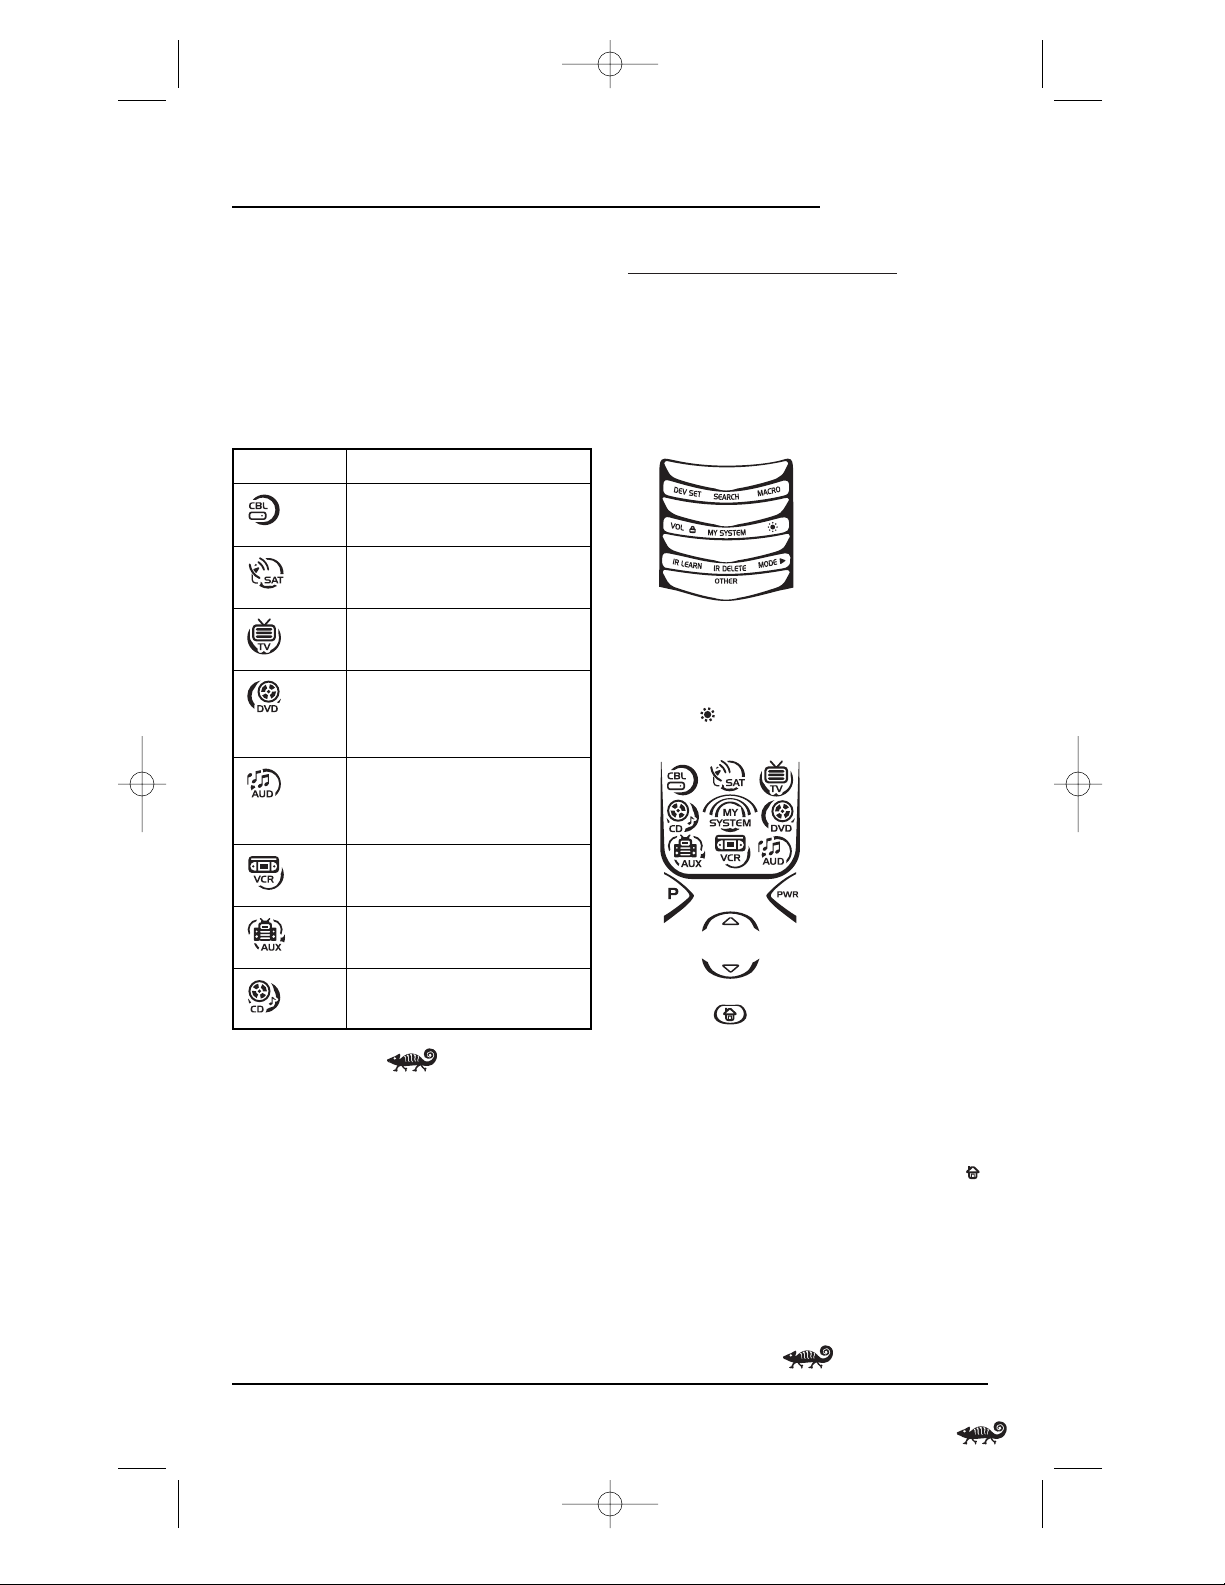
DEVICE TABLE
NOTE: Please refer to the table below when performing
the instructions in “Programming A Device ”on the
next page.
After programming,the RadioShack 8-in-One
Remote will be able to control the following
types of devices:
ADJUSTING BRIGHTNESS
The RadioShack 8-in-One Remote has five
levels of brightness adjustment and is set to the
middle one at the factory. To increase or decrease
the brightness, perform the following steps:
1. Press and hold P until the bottom IR segment
flashes twice. The program keys will appear.
NOTE: If the display turns off because of inactivity,
you will need to start the programming sequence
again by repeating this step.
2. Press once.The Brightness programming
screen will appear:
• To increase brightness, press
▲ one or
more times.
• To decrease brightness, press
▼one or
more times.
3. When desired brightness is achieved,press
twice to exit programming and return to the
last-selected device menu screen.
NOTE: The remote includes a tilt switch that turns
on the display when the unit is moved.If desired,
you can disable this feature.See “Setting The Tilt
Switch” on page 26.
A Quick Look At The Controls/Adjusting Brightness 9
OWNER’S MANUAL
DEVICE KEY CONTROLS THESE DEVICES
Cable Box (Converter) or
Video Accessory
Satellite Receiver or
Satellite/PVR Combo
Tel e v i s i o n
DVD Player, TV/DVD Player
Combo,or DVD/VCR Player
Combo
Aud io Amplifier, Audio
Receiver, or Home-Theater
in-a-Box (HTiB) Device
VCR,TV/VCR Combo,or
PVR (DVR)
PVR (DVR),VCR, or
TV/VCR Combo
CD Player or CD Recorder
RS Kameleon 8in1 UG 7/9/03 1:02 PM Page 9
Page 10
PROGRAMMING A DEVICE
The RadioShack 8-in-One Remote is preset at the
factory to operate the following devices:
•Motorola Cable Box
• RCA TV,VCR,DVD Player, and
Satellite Receiver
• Pioneer CD Player and Audio Receiver
• Philips Tivo PVR (DVR) using the AUX key
To control devices other than the default brands,
perform the following steps; otherwise skip
this section:
NOTE: To control a DVD Player/VCR Combo, perform
the instructions in “Programming A DVD Player/VCR
Combo”on page 11.
1. Turn on a desired device (e.g.,VCR or DVD
player) and,if applicable, insert media (e.g.,
cassette or disc).
NOTE: Please read steps 2 through 9 completely
before proceeding. Before starting step 2, review
the “Manufacturer’s Codes”(starting on page 80).
Brands are listed alphabetically in order of the most
popular codes first. Highlight or write down the
devices and the codes you wish to program.
2. Press and hold P until the bottom IR segment
flashes twice. The program keys will appear:
NOTE: If the display turns off due to inactivity,
the remote control will exit programming and
return to the last-selected device menu screen.
To start programming again,repeat this step.
NOTE: To stop programming at any time, press
once to return to the program keys screen.Press
once more to exit completely.
3. Press DEV SET once. The Device Setup
programming screen will appear:
4. Press a device key once (i.e.,CBL, SAT,TV,DVD,
AUD, VCR,AUX,or CD).The selected device key
will animate.
NOTE: Refer to the “Device Table”on the previous
page when choosing a device key for programming.
5. Use the Manufacturer’s Codes (starting on
page 80) to locate the type of device and
brand name and then use the number keys
to enter the first four-digit code for your
device.If performed correctly, the bottom
IR segment will flash twice.
NOTE: If the bottom IR segment displays one long
flash instead,a mistake has occurred. Try entering
the same code again.
6. Aim the remote at the device and press PWR
once. The device should turn off. If it does
not, repeat steps 5 and 6,trying each code for
your brand until you find one that works.If it
still doesn’t work, try Searching For Your Code
on page 12.
7. If the code works,press OK once. The bottom
IR segment flashes twice.
10 Programming A Device
8-IN-ONE REMOTE POWERED BY KAMELEON
RS Kameleon 8in1 UG 7/9/03 1:02 PM Page 10
Page 11
8. If desired,repeat steps 4 through 7 for each
device you want to control.When finished,
press twice to exit programming and
return to the last-selected device menu screen.
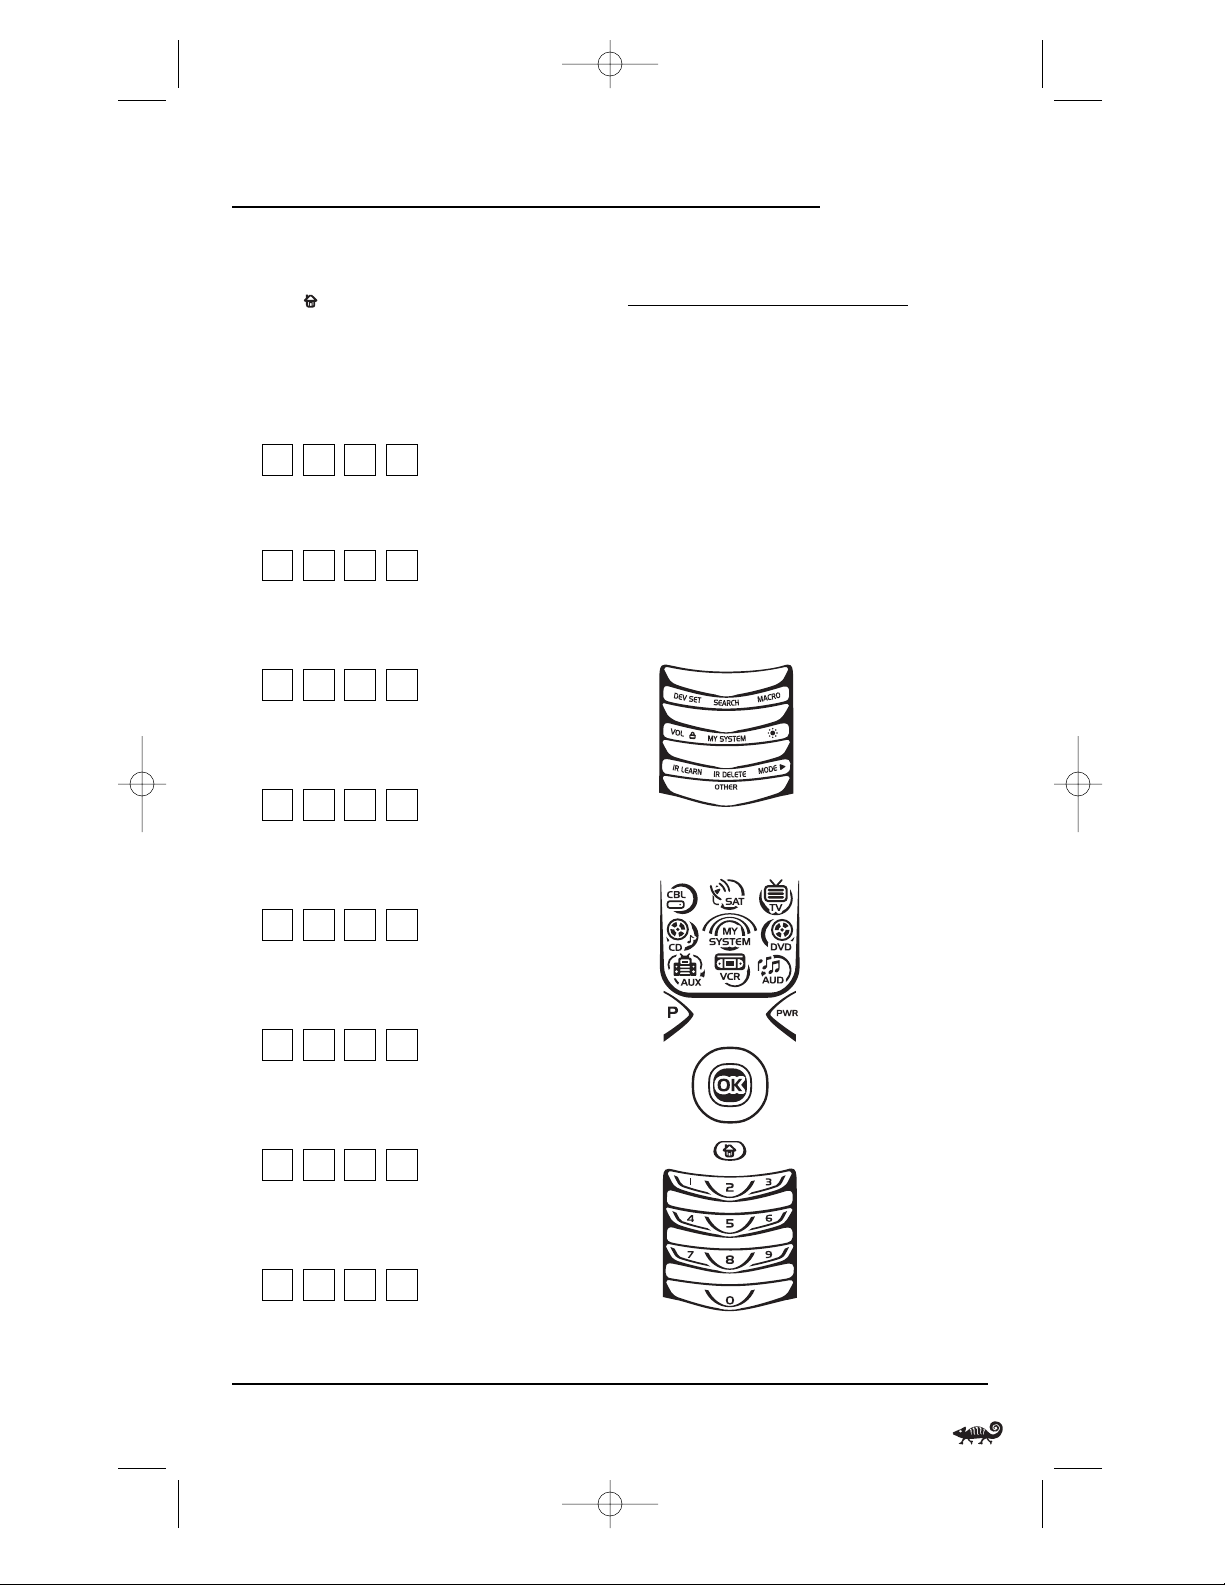
9. For future reference,write down each
working device code in the following boxes:
CBL Code:
Brand Name:_______________________
SAT Code:
Brand Name:_______________________
TV Code:
Brand Name:_______________________
DVD Code:
Brand Name:_______________________
AUD Code:
Brand Name:_______________________
VCR Code:
Brand Name:_______________________
AUX Code:
Brand Name:_______________________
CD Code:
Brand Name:_______________________
PROGRAMMING A
DVD PLAYER/VCR COMBO
NOTE: If you own a Sylvania TV/DVD Player Combo
with a separate TV code (see page 85), use the below steps
to program it with these changes: in step 5 (on the next
page), enter 0675 as the DVD code; in step 8a, substitute
TV for VCR; and in step 8b enter 0171 as the TV code.
1. Turn on the DVD Player/VCR Combo and
insert a DVD.
NOTE: Please read steps 2 to 8 completely before proceeding. Review the “Setup Codes For DVD Player/
VCR Combos” (on page 82). Highlight or write down
the brand and the codes you wish to program.
2. Press and hold P until the bottom IR segment
flashes twice. The program keys will appear:
3. Press DEV SET once. The Device Setup
programming screen will appear:
4. Press DVD once. The key will animate.
continued on next page...
Programming A Device/Programming A DVD Player/VCR Combo 11
OWNER’S MANUAL
RS Kameleon 8in1 UG 7/9/03 1:02 PM Page 11
Page 12

PROGRAMMING A DVD PLAYER/
VCR COMBO (continued)
5. Use the Setup Codes For DVD Player/VCR
Combos (on page 82) to locate the brand name
and use the number keys to enter the fourdigit code for your device.If performed correctly,the bottom IR segment will flash twice.
NOTE: If the bottom IR segment displays one long
flash instead,an error has occurred.Try entering the
same code again.
6. Aim the remote at the device and press PWR
once. The device should turn off. Press OK
once to save the code. The bottom IR segment
flashes twice.
7. (Optional) If you’ve located a setup code that
works,but it also has a separate VCR code as
listed on page 85,you’ll need to program it into
the remote to access VCR controls,as follows:
a. Press VCR once.
b. Using the number keys, enter the four-
digit VCR code for your DVD Player/VCR
Combo.If performed correctly, the
bottom IR segment will flash twice.
c. Press OK once. The bottom IR segment
displays one long flash.
NOTE: If a VCR setup code is not listed,you can use
the VCR key to program a separate VCR or another
device (see “Reassigning Device Keys” on page 25).
8. To exit programming, press twice. The
display returns to the last-selected device
menu screen. For future reference,write the
working code in the below boxes:
DVD Player/VCR Code:
Brand Name:_______________________
VCR Code (if used):
Brand Name:_______________________
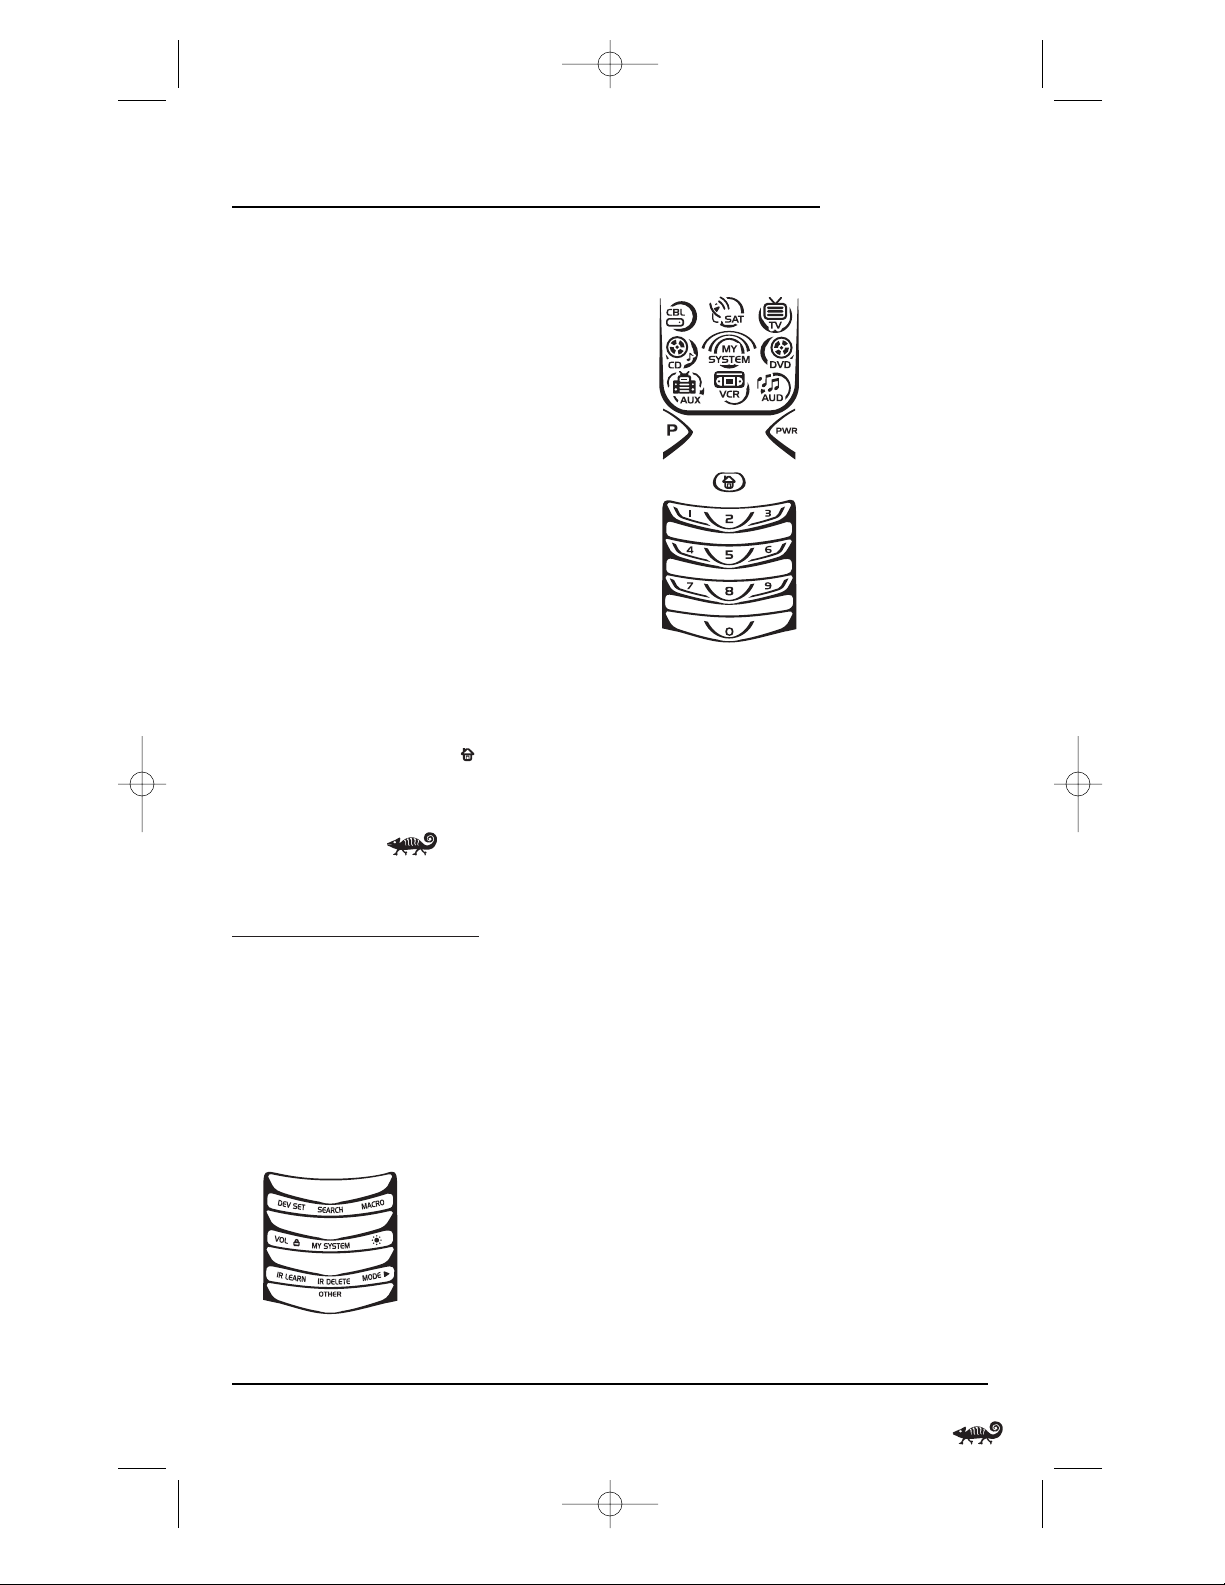
SEARCHING FOR YOUR CODE
If your device does not respond to the
RadioShack 8-in-One Remote after trying all
codes listed for your brand,or if your brand is
not listed at all,try searching for your code.
NOTE: Before performing a code search for a CD or
DVD player or a VCR, turn on the device and insert
the required media.
For example, to search for a code for your TV:
1. Press and hold P until the bottom IR segment
flashes twice. The program keys will appear:
2. Press SEARCH once. The Search Codes
programming screen will appear:
3. Press a device key once (e.g.,TV). The
selected device key will animate.The device’s
Main Menu screen will appear with
still displayed.
4. Press PWR once to select it as the search test
function. The Search Programming screen will
appear again.
NOTE:With PWR as the search test function, a
“Power On” IR command will be sent to the device
12 Programming A DVD Player/VCR Combo/Searching For Your Code
8-IN-ONE REMOTE POWERED BY KAMELEON
RS Kameleon 8in1 UG 7/9/03 1:02 PM Page 12
Page 13
each time a test code is sent. As a confirmation,the
IR segments will display an outgoing animation.
NOTE: If your device or its original remote control
does not have a Power key,select a different test
function in this step (e.g.,CH+,VOL+, PLAY, etc).
5. Aim the remote at the device (e.g.,TV) press ▲
one or more times and stop when a working
code performs the test function selected in
step 4.If desired,use
▼ to try a previous code.
NOTE: In the search mode,the remote control will
send IR codes from its library to the selected device,
starting with the most popular code first.
6. To lock in the code, press OK once. The bottom
IR segment flashes twice.
7. To search for codes of your other devices,
repeat steps 3 to 6,but use the appropriate
device key and test function key for the device
you are searching for.
8. To exit programming, press twice. The
display will return to the last-selected device
menu screen.
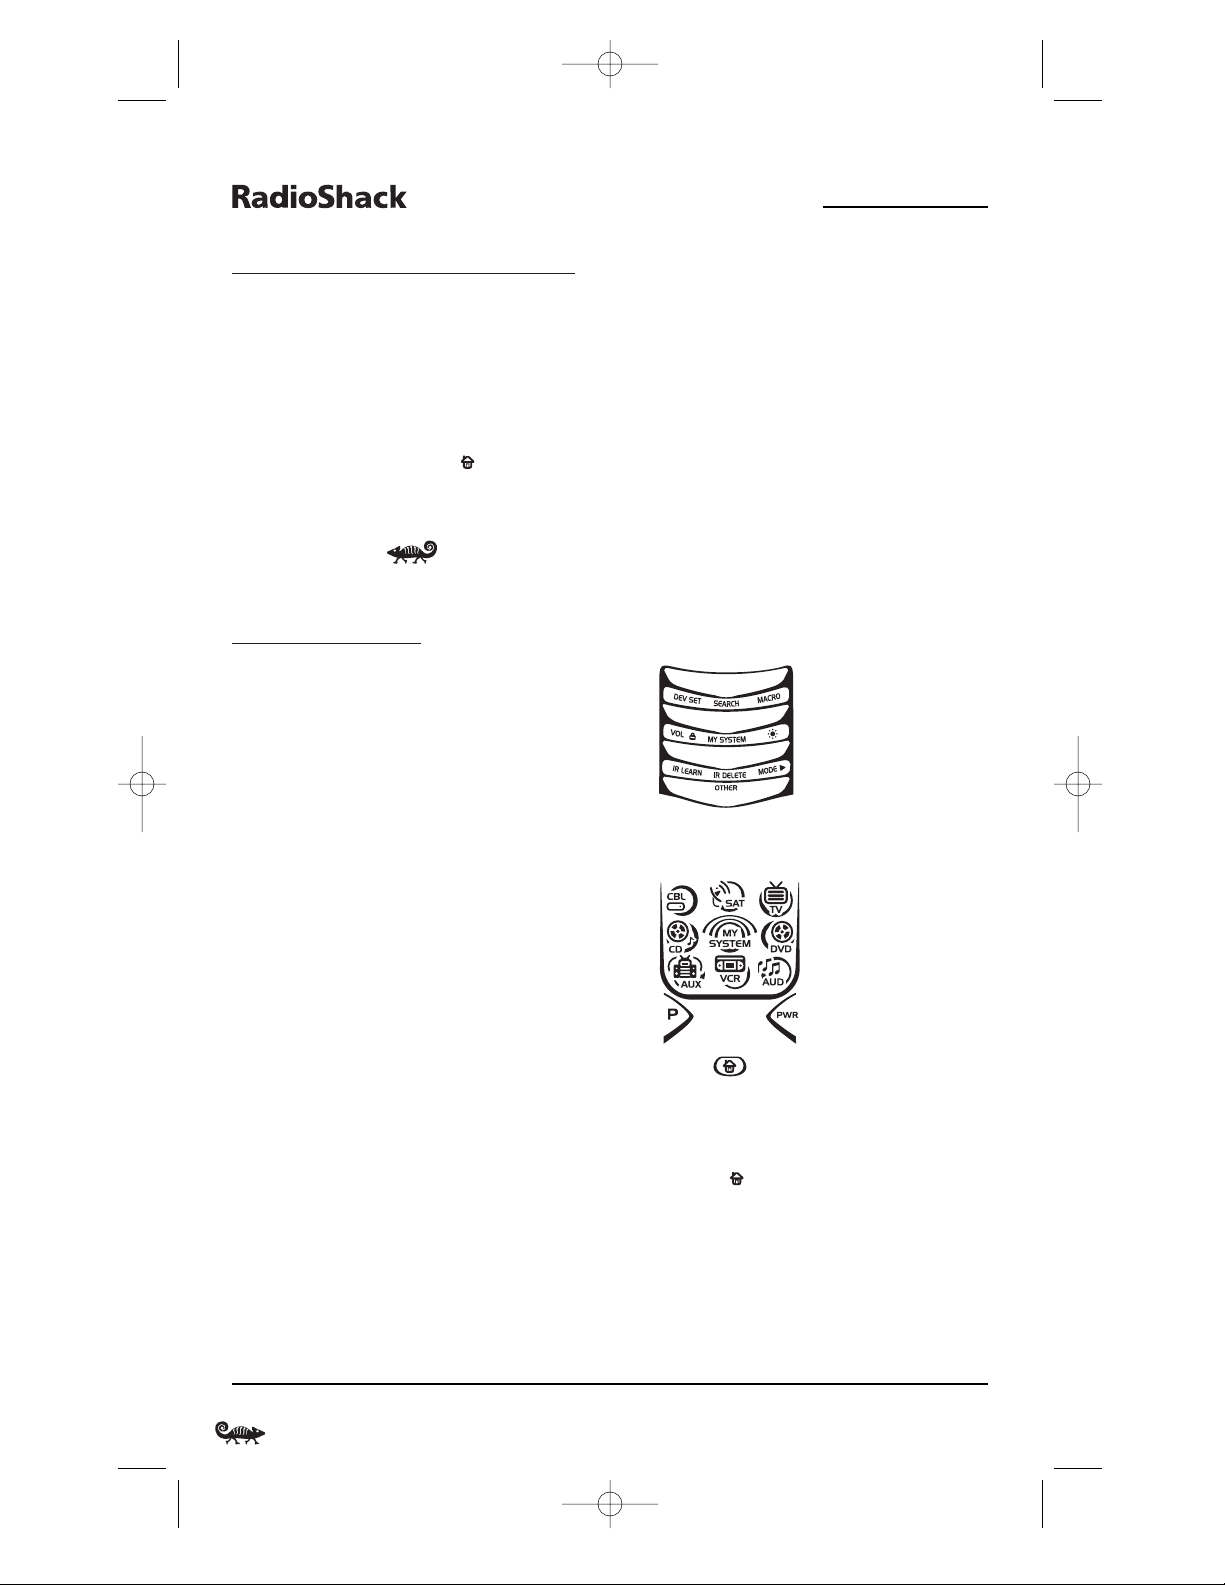
CHECKING THE CODES
If you have set up the RadioShack 8-in-One
Remote using the Searching For Your Code
procedure (on the left),you may need to find
out which four-digit code is operating your
equipment.For example, to find out which code
is operating your TV:
1. Press and hold P until the bottom IR segment
flashes twice. The program keys will appear:
2. Press OTHER once. The Other programming
screen will appear:
3. Using the number keys, enter 9 9 0.The
screen flashes twice and changes to the
Code Verification screen.
4. Press a desired device key once (i.e., CBL, SAT,
TV, DVD,AUD, VCR, AUX,or CD). The selected
device key will animate.
5. To view the code for the first digit,press 1
once.Count the number of times the bottom
IR segment flashes (e.g.,three flashes = 3)
and write down the number in leftmost box
in the TV code boxes on page 11.
NOTE: If a code digit is “0”,the bottom IR segment
will not flash.
6. Repeat step 5 three more times for remaining
digits. Use 2 for the second digit,3 for the
third digit,and 4 for the fourth digit.Write
down the code digits in the remaining TV
code boxes on page 11.
NOTE: If you enter an invalid number (e.g.,7) or
key (e.g., PLAY),the bottom IR segment will display
one long flash and return to the “Other” programming screen.Start again with step 2 above.
continued on next page...
Searching For Your Code/Checking The Codes 13
OWNER’S MANUAL
RS Kameleon 8in1 UG 7/9/03 1:02 PM Page 13
Page 14
CHECKING THE CODES (cont’d)
7. To check for codes of other devices,repeat
steps 4 to 6 (on the previous page),but
substitute the appropriate device key for
each device you are checking.Write down the
device’s code digits in the appropriate code
boxes on page 11.
8. To exit programming, press twice. The
display will return to the last-selected device
menu screen.
USING LEARNING
The RadioShack 8-in-One Remote includes a
Learning feature so you can add functions that
are unique to your home entertainment devices
(e.g.,VCR Tracking Up or Down). However,
there are some considerations:
LEARNING PRECAUTIONS
• Your original remote controls must be in
working order for learning to work properly.
• Learned keys are mode specific,so each one
can store a unique function for each mode.
• Learned keys can be used in macros (see
Using Macros on page 18).
• Do not use the following keys for learning:
P, SCREEN,M1 ~ M4, FAV SCAN,COM SKIP,
COM MUTE, or any Device Key.
• Learning capacity is approximately 16 to 25
keys,depending on the code being learned.
• If both learned and keymoved functions
are assigned to the same key, the last
programmed function will be stored.
• A learned function cannot be used as a
source for Keymover (see Using Keymover on
page 20).
• Certain device codes are not learnable,
including multi-frequency types, some
high-frequency ones, and other unusual
formats.
• For optimum learning, avoid high levels of
ambient light such as natural sunlight or
energy-efficient fluorescent lights.
NOTE: Please have your original remote controls
handy before programming learning. Be sure to press
each teaching key within 5 seconds of the previous
entry. Otherwise, the RadioShack 8-in-One Remote
will exit the programming mode.
PROGRAMMING A LEARNING KEY
1. Press and hold P until the bottom IR segment
flashes twice. The program keys will appear:
2. Press IR LEARN once. The IR Learn
programming screen will appear:
3. Press a device key once (i.e.,CBL, SAT,TV,DVD,
AUD, VCR,AUX,or CD) to assign a mode for
learning. The selected device menu screen,
including ,will be displayed.
4. Place the RadioShack 8-in-One Remote
head-to-head (about 2" apart, as shown on
the next page) from your original remote
control.Also locate the key (on your original
remote control) that will serve as the teaching
function.
14 Checking The Codes/Using Learning
8-IN-ONE REMOTE POWERED BY KAMELEON
RS Kameleon 8in1 UG 7/9/03 1:02 PM Page 14
Page 15
5. On the RadioShack 8-in-One Remote, select
and press a desired key where the learned
function will be stored. The IR segments will
display an incoming animation,continue for
three revolutions,and then the entire display
will turn off.
After the display is off, press and hold the
teaching key (on your original remote control)
until the display (on the RadioShack 8-in-One
Remote) turns on again.The bottom IR
segment will flash twice when the code is
successfully captured.
NOTE: If the bottom IR segment displays one long
flash, a learning error has occurred.Try repeating
this step again until a successful capture occurs.
If the function is still not captured, press twice to
exit programming and review the “Learning
Precautions”on the previous page. If needed, also see
“Troubleshooting”on page 30.After review, start
programming again at step 1.
6. To learn other functions,repeat steps 3
through 5 as desired.
7. To exit programming, press twice. The
display will return to the last-selected device
menu screen.
2"
DELETING A SINGLE LEARNED KEY
1. Press and hold P until the bottom IR segment
flashes twice. The program keys will appear:
2. Press IR DELETE once. The IR Delete
programming screen will appear:
3. Press a device key once (i.e.,CBL, SAT,TV,DVD,
AUD, VCR,AUX,or CD) for the mode where
the learned key to be deleted resides.The
selected device menu screen, including ,
will be displayed.
4. Press the learned key to be deleted twice.
Upon deletion, the bottom IR segment will
flash twice as confirmation.The program keys
will appear again.
5. If desired,repeat steps 2 through 4 to delete
another learned key.
6. Exit programming by pressing once.The
display will return to the last-selected device
menu screen.
Using Learning 15
OWNER’S MANUAL
RS Kameleon 8in1 UG 7/9/03 1:02 PM Page 15
Page 16

USING LEARNING (continued)
DELETING ALL LEARNED KEYS IN A
SPECIFIC MODE
1. Press and hold P until the bottom IR segment
flashes twice. The program keys will appear:
2. Press IR DELETE once. The IR Delete
programming screen will appear:
3. Press a device key once (i.e.,CBL, SAT,TV,DVD,
AUD, VCR,AUX,or CD) for the mode where
the learned keys to be deleted reside.The
selected device menu screen, including ,
will be displayed.
4. Press the same device key (as in step 3) once.
Upon deletion, the bottom IR segment will
flash twice as confirmation.The program keys
will appear again.
5. If desired,repeat steps 2 through 4 to delete
other learned keys from another mode.
6. Exit programming by pressing once.The
display will return to the last-selected device
menu screen.
CHANGING VOLUME LOCK
The RadioShack 8-in-One Remote is set at the
factory for independent volume control of each
selected device.
However,you may change the Volume Lock
setting to Global Volume Lock so that a device’s
volume will be locked to one mode (e.g., to
control TV volume in all other modes).After
that, if desired, you can perform Indiv idual
Volum e U nl ock on a selected device to set its
volume control for independent operation.
LOCKING VOLUME CONTROL TO ONE MODE
(GLOBAL VOLUME LOCK)
1. Press and hold P until the bottom IR segment
flashes twice. The program keys will appear:
2. Press VOL once. TheVo lu me Lo c k
programming screen will appear:
3. Press a device key once (i.e.,CBL, SAT,TV,DVD,
AUD, VCR,AUX,or CD) where you want the
volume controls locked to. The bottom IR
segment will flash twice and the program
keys will appear again.
16 Using Learning/Changing Volume Lock
8-IN-ONE REMOTE POWERED BY KAMELEON
RS Kameleon 8in1 UG 7/9/03 1:02 PM Page 16
Page 17

4. To exit programming, press once. The
display will return to the last-selected device
menu screen.
5. Now, when you press VOL
▲,VOL▼,or MUTE,
the selected device’s volume will be controlled, regardless of the mode selected.
UNLOCKING VOLUME CONTROL FOR A SINGLE
DEVICE (INDIVIDUAL VOLUME UNLOCK)
1. Press and hold P until the bottom IR segment
flashes twice. The program keys will appear:
2. Press VOL once. The Volume L o ck
programming screen will appear:
3. Press VOL
▼ once. Then press a device key once
(i.e., CBL,SAT,TV,DVD, AUD, VCR,AUX,or CD)
where you want the volume controls unlocked.
The bottom IR segment will flash four times
and the program keys will appear again.
4. If desired,repeat steps 1 through 3 (of this
section) for each device that you want volume
to be unlocked.
5. To exit programming, press once. The
display will return to the last-selected device
menu screen.
6. Now, after you select a device that has
volume unlocked, pressing VOL
▲,VOL▼,or
MUTE will control the device’s volume only in
its own mode.
U
NLOCKING ALL VOLUME CONTROL
(RESTORING DEFAULT SETTING)
1. Press and hold P until the bottom IR segment
flashes twice. The program keys will appear:
2. Press VOL once. The Volume L o ck
programming screen will appear:
3. Press VOL
▲ once.The bottom IR segment
will flash four times and the program keys
will appear again.
4. To exit programming, press once. The
display will return to the last-selected device
menu screen.
5. Volume will again be independently
controlled according to its default states
for all programmed devices.
Changing Volume Lock 17
OWNER’S MANUAL
RS Kameleon 8in1 UG 7/9/03 1:02 PM Page 17
Page 18

USING MACROS
The RadioShack 8-in-One Remote includes six
macro keys: M1 through M4, COM MUTE,and
PWR. Each one can be set up to perform a
repetitive,time-consuming operation with the
press of a single key.
NOTE: A macro programmed onto the PWR key can
only be accessed in the MY SYSTEM mode. Pressing it
in any other mode will only send a “Power On/Off”
IR command to the s elected device.
NOTE:The COM MUTE key can be programmed as a
two-state rotating macro. See “Programming The COM
MUTE Key” on the next page.
A macro can be used to control a home theater
operation,to set a favorite channel,or for other
multiple functions you would like to control
with one key press. Moreover,each macro key
can hold up to 15 key presses total.
NOTE: Programming a new macro over an existing
one will erase the original macro.
PROGRAMMING A FAVORITE CHANNEL MACRO
With so many channels available on your cable
or satellite system,you can program a macro
that directly selects a favorite channel with one
key press.
For example, let’s assume your favorite cable
programs are on channel 71.Use the following
instructions to program a macro for direct access
of this channel:
NOTE: The following example assumes all equipment
is turned off and that the TV is connected through the
Cable Box with TV tuning set to channel 3.
1. Press and hold P until the bottom IR segment
flashes twice. The program keys will appear:
2. Press MACRO once. The Macro programming
screen will appear:
3. Press an open macro key (e.g.,M1,M2, M3,
or M4). The last-selected device menu screen,
including ,will be displayed.
4. Enter a desired macro sequence of up to 15
key presses. For this example,press TVonce,
followed by PWR once,and then enter 0 3 for
the TV’s channel number. Next,press CBL
once, followed by PWR once, and then enter
0 7 1 for the Cable Box’s channel number.
NOTE: If there are more than 15 key presses in the
sequence,the bottom IR segment will display a long
flash, denoting an error.The display will return to
the last-selected device menu screen. To program the
macro,start again with step 3.
5. To save the macro,press and hold P until
the bottom IR segment flashes twice.The
program keys will appear again.
6. Exit programming by pressing once.The
display will return to the last-selected device
menu screen
.
7. Now,if you aim the remote at the devices
selected in step 4 and press the programmed
macro key once,the TV will turn on and tune
to channel 3.Then, the Cable Box will turn on
and tune to channel 071.
18 Using Macros
8-IN-ONE REMOTE POWERED BY KAMELEON
RS Kameleon 8in1 UG 7/9/03 1:03 PM Page 18
Page 19

PROGRAMMING A MASTER POWER MACRO IN
MY SYSTEM MODE
A macro can be programmed onto the PWR
key to turn on or off as many as seven home
theater devices.
NOTE: This following example assumes the Home
Theater system contains a Satellite Receiver, a DVD
Player,an Audio Receiver, and a TV.
1. Press and hold P until the bottom IR segment
flashes twice. The program keys will appear:
2. Press MACRO once. The Macro programming
screen will appear:
3. Press PWR once.The last-selected device
menu screen,including ,will be displayed.
4. Enter the macro sequence.For this example,
press SAT once, followed by PWR once. Next,
press DVD once, followed by PWR once. Then
press AUD once, followed by PWR once. Finally,
press TV once, followed by PWR once, and then
MY SYSTEM once.
5. To save the power macro,press and hold P
until the bottom IR segment flashes twice.The
program keys will appear again.
6. Exit programming by pressing once.The
display will return to the last-selected device
menu screen
.
7. To test the power macro, first make sure all
home theater devices selected in step 4 are
turned on.Aim the remote control at the
devices and press MY SYSTEM once, followed
by PWR once. The devices should turn off in
this order: Satellite Receiver,DVD Player,
Audio Receiver, and TV.
To turn on the devices on again in the same
order as above,press PWR once.
PROGRAMMING THE COM MUTE KEY
If desired, a two-state rotating macro can be
programmed onto the COM MUTE key, so a key
press will drop volume (in the CBL,SAT, TV,VCR
or AUX mode) to a preset level during a commercial.When the program resumes, another
key press will raise it back to the original level.
1. Press and hold P until the bottom IR segment
flashes twice. The program keys will appear:
2. Press MACRO once. The Macro programming
screen will appear:
3. Press COM MUTE once.The last-selected
device menu screen, including ,will
be displayed.
4. Enter the first macro sequence by pressing TV
once, then press VOL
▼ four times (to lower
the volume four steps).
continued on next page...
Using Macros 19
OWNER’S MANUAL
RS Kameleon 8in1 UG 7/9/03 1:03 PM Page 19
Page 20

USING MACROS
PROGRAMMING THE COM MUTE KEY (CONT’D)
5. To save the macro,press and hold P until
the bottom IR segment flashes twice.The
program keys will appear again.
6. To program the second macro,repeat steps 4
and 5, but substitute VOL
▲ for VOL ▼ this
time (to raise the level four steps).
7. Exit programming by pressing once.The
display will return to the last-selected device
menu screen
.
CLEARING A MACRO
1. Press and hold P until the bottom IR segment
flashes twice. The program keys will appear:
2. Press MACRO once. The Macro programming
screen will appear:
3. Select the macro key to be cleared and press it
once.The last-selected device menu screen
will be displayed.
4. Press and hold P until the bottom IR
segment flashes twice. The program keys
will appear again.
5. Exit programming by pressing once.The
display will return to the last-selected device
menu screen
.
USING KEYMOVER
The RadioShack 8-in-One Remote includes a
Key mover feature that allows you to map (or
copy) keys from one mode (i.e.,source mode) to
another mode (i.e., destination mode).
NOTE: Do not use any of the Device Keys as a source
or destination key.
PROGRAMMING KEYMOVER
For example, if your DVD player does not have
volume control,you can map those keys (i.e.,
VOL
▲, VOL▼,and MUTE) from the TV mode to
DVD mode as follows:
1. Press and hold P until the bottom IR segment
flashes twice. The program keys will appear:
2. Press OTHER once. The Other programming
screen will appear:
3. Using the number keys, enter 9 9 4.
The bottom IR segment will flash twice.
20 Using Macros/Using Keymover
8-IN-ONE REMOTE POWERED BY KAMELEON
RS Kameleon 8in1 UG 7/9/03 1:03 PM Page 20
Page 21

4. For the source mode,press a desired device
key once (i.e.,CBL,SAT,TV, DVD, AUD,VCR,
AUX,or CD).For this example,press TV once.
The selected source device menu screen,
including ,will be displayed.
5. For the source key, press a key to be moved
once. For this example press VOL
▲ once.
6. For the destination mode, press a desired
device key once (i.e.,CBL,SAT,TV,DVD, AUD,
VCR, AUX,or CD). For this example, press DVD
once. The selected destination device menu
screen,including ,will be displayed.
7. For the destination key,press a key to be
moved once. For this example press VOL
▲
once. Upon keymoving, the bottom IR
segment will flash twice as confirmation.
The program keys will appear again.
8. Repeat steps 3 through 7 two more times to
map the remaining volume control keys,
substituting VOL
▼ and MUTE as source and
destination keys in steps 5 and 7.
9. Exit programming by pressing once.The
display will return to the last-selected device
menu screen
.
Upon completion of the above procedure, you
can now use your RadioShack 8-in-One Remote
to control the TV’s volume and mute in the DVD
mode, as well as in the TV mode.
RESTORING A SINGLE KEYMOVED KEY
1. Press and hold P until the bottom IR segment
flashes twice. The program keys will appear:
2. Press OTHER once. The Other programming
screen will appear:
3. Using the number keys, enter 9 9 4.
The bottom IR segment will flash twice.
4. Press the destination mode once where the
keymoved key is stored. Then press the
destination key twice. Upon key restoration,
the bottom IR segment will flash twice
as confirmation.The program keys will
appear again.
5. If desired,repeat steps 1 and 2 to restore
another key.
6. Exit programming by pressing once.The
display will return to the last-selected device
menu screen
.
RESTORING ALL KEYMOVED KEYS IN A
SINGLE MODE
1. Perform steps 1 through 3 of Programming
Key mover on the previous page.
2. Press the destination mode twice where
the keymoved keys are stored. Upon key
restoration,the bottom IR segment will flash
twice as confirmation.The program keys will
appear again.
3. Exit programming by pressing once.The
display will return to the last-selected device
menu screen
.
Using Keymover 21
OWNER’S MANUAL
RS Kameleon 8in1 UG 7/9/03 1:03 PM Page 21
Page 22

PROGRAMMING
FAVORITE CHANNEL SCAN
In the CBL, SAT,TV, VCR,or AUX mode, the
RadioShack 8-in-One Remote can store a list of
up to 10 favorite channels,in any order,that will
be immediately scanned when you press FAV
SCAN once (see the following section, Using
Channel Scan).
NOTE: Favorite channels can only be programmed
for one mode.After programming, if FAV SCAN is
pressed while in another mode,the remote control will
start a normal channel scan instead (if applicable to
the selected device).
1. Press and hold P until the bottom IR segment
flashes twice. The program keys will appear:
2. Select a Favorite Channel Mode by pressing
CBL, SAT,TV,VCR,or AUX once. The bottom IR
segment flashes once as the selected device
key animates.
3. Press OTHER once. The Other programming
screen will appear:
4. Using the number keys, enter 9 9 6.The
screen will flash twice and display the
Favorite Channel programming screen.
NOTE: If the bottom IR segment displays one long
flash, an error has occurred.Try repeating this step.
5. Using the number keys, enter a favorite
channel number (e.g.,0 1 2). Then press
P once.
NOTE: If the original remote control required
pressing an Enter key to change the channel,also
press the ENTER key after the channel number
(e.g., 0 1 2 ENTER).
6. If desired,repeat step 5 for each channel to be
stored,up to a total of 10 channels.
NOTE: After storing 10 channels,the remote control
will exit the Favorite Channel programming screen
and again display the program keys.
7. To exit programming with less than
10 favorite channels stored, press twice.
The display will return to the last-selected
device menu screen.
USING CHANNEL SCAN
In the CBL, SAT,TV, VCR,or AUX mode, use FAV
SCAN to start a 3-second scan of all favorite
channels (if programmed – see Programming
Favorite Channel Scan in the previous section)
and/or all channels for the selected mode.
1. If Favorite Channel Scan has been set up,skip
to step 2.Otherwise, press CBL, SAT, TV,VCR,
or AUX once. The bottom IR segment flashes
once as the selected device key animates.
2. Press FAV SCAN once. The IR segments will
display outgoing animation as each channel
is changed.
•IfFavorite Channel Scan has been set up,
scanning of favorite channels will start
and cycle through stored channels for
3 minutes or until any key press stops it.
22 Programming Favorite Channel Scan/Using Channel Scan
8-IN-ONE REMOTE POWERED BY KAMELEON
RS Kameleon 8in1 UG 7/9/03 1:03 PM Page 22
Page 23

•IfFavorite Channel Scan has not been set
up,scanning will start with the current
channel, then proceed to the next channel
up and cycle through all channels for
3 minutes or until stopped by pressing
any key.
3. To stop scanning channels at any time,press
any key once.
USING MY SYSTEM MODE
The RadioShack 8-in-One Remote includes a
custom Home Theater mode.After MY SYSTEM is
programmed, it will allow you to access four
groups of remote control keys without having to
change device modes.
CONTROL ORGANIZATION
ABOUT CONTROL GROUPS
For Home Theater programming, the remote’s
keys are grouped by type of control into the
following four control groups:
Video Playback Group: Transport controls
(REW,PLAY,FWD
REC,PAUSE,and
STOP)
Volum e C ontrol s G ro up: VOL
▲, VOL▼,and
MUTE
Channel Controls Group: CH
▲, CH▼,INPUT,
number keys (0 ~ 9),
TV/VCR, FAV SCAN,
ENTER,and LAST
Menu Controls Group: Cursor controls
(
▲, ▼,,and ),
OK, PAGE+, PAGE-,
MENU, INFO,GUIDE,
and EXIT
▲
▲
ABOUT DEVICE MODES
Moreover, the above Control Groups can be used
in the following modes:
Video Playback Group: CBL, SAT,DVD,AUD,
VCR, AUX,and CD
Volum e C ontrol s G ro up: CBL, SAT,TV,DVD,
AUD, VCR,AUX,and
CD
Channel Controls Group: CBL, SAT,TV,DVD,
VCR,and AUX
Menu Controls Group: CBL,SAT,TV,DVD,
AUD, VCR,AUX,and
CD
FACTORY DEFAULT SETTINGS
At the factory,the Control Groups are assigned
the following modes as default settings:
Video Playback Group: DVD
Volum e C ontrol s G ro up: AUD
Channel Controls Group: CBL
Menu Controls Group: CBL
If the default settings fit your needs,you can
skip programming this mode.Otherwise,
perform the steps in the following section to
assign device modes to the Control Groups.
PROGRAMMING MY SYSTEM MODE
1. Press any device key once (i.e.,CBL,SAT,TV,
DVD, AUD,VCR, AUX,or CD).The selected
device key will animate.
2. Press and hold P until the bottom IR segment
flashes twice. The program keys will appear:
continued on next page...
Using Channel Scan/Using My System Mode 23
OWNER’S MANUAL
RS Kameleon 8in1 UG 7/9/03 1:03 PM Page 23
Page 24

USING MY SYSTEM MODE
PROGRAMMING MY SYSTEM MODE (CONT’D)
3. Press MY SYSTEM once. The Video Playback
programming screen will appear:
NOTE: For steps 3 through 7, if a device key is
animated, it is assigned to its respective function
group. To continue programming the My System
mode,you must select a device key,even if it is the
same one that is currently animated.
4. To assign a mode to the Video Playback group,
press a device key once (i.e.,CBL, SAT,TV, DVD,
AUD, VCR,AUX,or CD).Then the Vol u me
Controls programming screen will appear:
5. To assign a mode to the Volume Co ntrol s group,
press a device key once.Then the Channel
Controls programming screen will appear:
6. To assign a mode to the Channel Controls
group,press a device key once.Then the Menu
Controls programming screen will appear:
7. To assign a mode to the Menu Controls group,
press a device key once.Since My System
programming is now complete,the program
keys will appear again.
8. Exit programming by pressing once.The
display will return to the last-selected device
menu screen
.
24 Using My System Mode
8-IN-ONE REMOTE POWERED BY KAMELEON
RS Kameleon 8in1 UG 7/9/03 1:03 PM Page 24
Page 25

REASSIGNING DEVICE KEYS
The RadioShack 8-in-One Remote can be set to
control a second device.For example, to control
a TV, a Cable Box,and two DVD Players, you can
reassign the unused AUX key to operate the
second DVD Player as follows:
1. Press and hold P until the bottom IR segment
flashes twice. The program keys will appear:
2. Press MODE once. The Mode Mover
programming screen will appear:
3. For the source mode,press a device key
once (i.e.,CBL, SAT,TV,DVD, AUD,VCR, AUX,
or CD). For this example,press DVD once.
The selected device menu screen,including ,
will be displayed.
NOTE: Only one device can be assigned to an
unused device key at a time.
4. For the destination mode, press a device key
once (i.e., CBL, SAT,TV,DVD, AUD,VCR, AUX,or
CD). For this example,press AUX once. Upon
reassignment, the bottom IR segment will
flash twice as confirmation.The program keys
will appear again.
5. For this example, the AUX key is now ready to
be set up to control your second DVD player.
See Programming A Device on page 10.
▲
If desired,repeat steps 2 to 5 to reassign
another device.
6. Exit programming by pressing once. The
display will return to the last-selected device
menu screen
.
USING COMMERCIAL SKIP
The RadioShack 8-in-One Remote includes a
unique feature for skipping past commercials
on recorded programs when using a PVR (DVR)
or VCR. This features works in the CBL,SAT,
VCR,or AUX mode and you can use the default
settings or program custom ones.
USING THE DEFAULT SETTINGS
The COM SKIP key is preprogrammed to perform
the Commercial Skip function of your original
remote control (if available).
To use the default setting, simply aim the
remote at the desired device, and press COM
SKIP once for each skip of two commercials.
PROGRAMMING COMMERCIAL SKIP
To customize Commercial Skip settings,perform
the following steps:
1. Turn on a desired device (e.g.,VCR or PVR)
and view the commercials you want to skip.
Then position the media back to the start of
first commercial in the sequence.
2. Press the appropriate assigned device key
once (i.e.,CBL, SAT,VCR,or AUX).The selected
device key will animate.
continued on next page...
Reassigning Device Keys/Using Commercial Skip 25
OWNER’S MANUAL
RS Kameleon 8in1 UG 7/9/03 1:03 PM Page 25
Page 26

USING COMMERCIAL SKIP
PROGRAMMING COMMERCIAL SKIP (CONT’D)
3. Press and hold P until the bottom IR segment
flashes twice. The program keys will appear:
4. Press OTHER once. The Other programming
screen will appear:
5. Using the number keys, enter 9 7 4.The
screen will flash twice and display the
Commercial Skip programming screen.
6. Select a Commercial Skip mode by pressing
CBL, SAT,VCR,or AUX once.
7. Press FFWD once and watch for the end of a
commercial sequence that typically may have
four to six commercials and last 2 to 3 minutes
in real time.As it ends,press PLAYonce.
NOTE:Ifthe time between FFWD and PLAY key
presses exceeds 30 seconds,the program will ignore
your action.The bottom IR segment will display a
long flash to denote the time limit has been
exceeded and the screen will return to the Program
Keys menu.You will need to start again at step 4
and perform this step within 30 seconds.
NOTE:Although FFWD and PLAY keys are used in
programming this step, other keys may be used
depending on how they functioned on the original
remote control.
8. To save the settings, press and hold P until
the bottom IR segment flashes twice.The
program keys will appear again.
9. Exit programming by pressing once. The
display will return to the last-selected device
menu screen
.
SETTING THE TILT SWITCH
The RadioShack 8-in-One Remote contains a
Tilt Switch that activates the display when the
unit is moved.
If desired, you can disable it so
only pressing a key will turn on the display.
NOTE: Disabling the Tilt Switch can help conserve
battery life.
D
ISABLING THE TILT SWITCH
1. Press and hold P until the bottom IR segment
flashes twice. The program keys will appear
(as shown on the next page):
26 Using Commercial Skip/Setting The Tilt Switch
8-IN-ONE REMOTE POWERED BY KAMELEON
RS Kameleon 8in1 UG 7/9/03 1:03 PM Page 26
Page 27

2. Press OTHER once. The Other programming
screen will appear:
3. Using the number keys, enter 9 8 5.The
screen will flash four times,confirming the
Tilt Switch is disabled.The program keys will
appear again.
4. Exit programming by pressing once. The
display will return to the last-selected device
menu screen
.
ENABLING THE TILT SWITCH
1. Perform steps 1 and 2 of the previous section,
Disabling The Tilt Switch.
2. Using the number keys, enter 9 8 5.The
screen will flash twice, confirming the Tilt
Switch is enabled.The program keys will
appear again.
3. Exit programming by pressing once. The
display will return to the last-selected device
menu screen
.
SETTING THE FINDER RECEIVER
The RadioShack 8-in-One Remote comes with
a Finder Transmitter that can be used to quickly
locate the main remote if it is accidentally lost
or misplaced.
At the factory,the Finder Receiver (inside the
remote) is set to wake up every few seconds,
listen for a signal from the Finder Transmitter,
and then emit an audible alert to pinpoint the
location of the main remote. This is a great
feature,but it does use extra battery power.
If you do not plan to use the Finder Transmitter,
we recommend turning off the remote’s Finder
Receiver to conserve battery life.
DISABLING THE FINDER RECEIVER
1. Press and hold P until the bottom IR segment
flashes twice. The program keys will appear:
2. Press OTHER once. The Other programming
screen will appear:
continued next page...
Setting The Tilt Switch/Setting The Finder Receiver 27
OWNER’S MANUAL
RS Kameleon 8in1 UG 7/9/03 1:03 PM Page 27
Page 28

SETTING THE FINDER RECEIVER
DISABLING THE FINDER RECEIVER (CONT’D)
3. Using the number keys,enter 9 7 2.The
screen will flash four times,confirming the
Finder Receiver is disabled. The program keys
will appear again.
4. Exit programming by pressing once. The
display will return to the last-selected device
menu screen
.
ENABLING THE FINDER RECEIVER
1. Perform steps 1 and 2 of the previous section,
Disabling The Finder Receiver (starting on the
previous page).
2. Using the number keys,enter 9 7 2.The
screen will flash twice, confirming the Finder
Receiver is enabled. The program keys will
appear again.
3. Exit programming by pressing once. The
display will return to the last-selected device
menu screen
.
RESTORING FACTORY
DEFAULT SETTINGS
The RadioShack 8-in-One Remote includes an
Setup Code Reset program.You can use it to
restore all your programmed codes to factory
settings and delete all custom programming.
IMPORTANT: Executing this program will erase
all code settings (except upgraded codes) and all
custom settings for My System, Macros, Learned
Keys, Reassigned Device Keys, Keymoved Keys,
Favorite Channels, and all device settings.
1. Press and hold P until the bottom IR segment
flashes twice. The program keys will appear:
2. Press OTHER once. The Other programming
screen will appear:
3. Using the number keys,enter 9 7 7.The
bottom IR segment will flash twice,pause
and flash twice again to confirm restoration.
4. Exit programming by pressing once. The
display will return to the last-selected device
menu screen
.
28 Setting The Finder Receiver/Restoring Factory Default Settings
8-IN-ONE REMOTE POWERED BY KAMELEON
RS Kameleon 8in1 UG 7/9/03 1:03 PM Page 28
Page 29

CLEARING ALL
CUSTOM PROGRAMMING
The RadioShack 8-in-One Remote contains a
Custom Programming Reset program.You can use
it to remove all custom programming,except
your setup codes and reassigned device keys.
IMPORTANT: Executing this program will erase all
custom settings for My System,Macros, Learned
Keys, Keymoved Keys, and Favorite Channels.
1. Press and hold P until the bottom IR segment
flashes twice. The program keys will appear:
2. Press OTHER once. The Other programming
screen will appear:
3. Using the number keys,enter 9 8 0.The
bottom IR segment will flash twice,pause,
and flash twice again to confirm restoration.
4. Exit programming by pressing once. The
display will return to the last-selected device
menu screen
.
SPECIFICATIONS
Remote Power . . . . . . . . . . . . . (4) AAA Batteries
Finder Transmitter Power . . . . . . (1) 9 V Battery
Finder Transmitter to
Remote Range . . . . . . . . . . . . . . . . 40 ft (12.2 m)
Remote Dimensions
(H x W x D). . . . . . . . . . . 9.44 x 2.64 x 1.02 in.
(H x W x D) . . . . . . . . . . . 240 x 67.2 x 26 mm
Finder Transmitter Dimensions
(H x W x D) . . . . . . . . . . . . . . . . . . . ? x ? x ? in.
(H x W x D). . . . . . . . . . . . . . . . . . ? x ? x ? mm
Remote Weight
(no batteries). . . . . . . . . . . . . . . . 0.4 lb (181.4 g)
Finder Transmitter Weight
(no battery). . . . . . . . . . . . . . . . . . . . . . . ? lb (? g)
NOTE: Specifications are typical. Individual units
might vary. Specifications are subject to change and
improvement without notice.
Clearing All Custom Programming/Specifications 29
OWNER’S MANUAL
RS Kameleon 8in1 UG 7/9/03 1:03 PM Page 29
Page 30

ABOUT UPGRADING
Your RadioShack 8-in-One Remote has the
largest infrared code library available and contains
a unique feature that allows new codes to be
added to its memory over the phone.In a matter
of seconds, your remote will quickly and reliably
record the new information without complex
plugs,adapters,or attachments.
This means that as you buy new entertainment
devices in the future,the RadioShack 8-in-One
Remote will never become obsolete. Simply call
our consumer help-line, and one of our customer service representatives will assist you
through the entire process of upgrading your
RadioShack 8-in-One Remote.
Consumer Help-Line: (800) 950-7044
NOTE: RadioShack reserves the right to replace a
returned remote-control with a new one of equal or
superior functionality.
UPGRADE PROCEDURE
1. Call our Consumer Help-Line at:
(800) 950-7044 on any business day,
between 9:00
AM and 5:30 PM,EST.
2. Our customer service agent will ask for
and record the brand name(s) and model
number(s) of your device(s).Then the agent
will lead you through the upgrade procedure
by asking you to place your telephone’s
speaker next to the PWR key on the
RadioShack 8-in-One Remote (see below).
NOTE: Only use a land-line phone for the upgrade
procedure.Do not use a mobile phone,because it
will not transmit the signals correctly.
In a matter of seconds,new setup codes
for your device(s) will be transmitted
through the telephone and stored in your
RadioShack 8-in-One Remote.
3. After your RadioShack 8-in-One Remote has
been successfully upgraded by telephone, stay
on the line.Our customer service agent will
ensure that your unit is working properly
with your device(s) and answer any other
questions you may have.
UPGRADE EXCLUSIONS
• Home entertainment or home automation
devices controlled by radio frequency
(RF/UHF), wired,or ultrasonic remote
controls. Only devices controlled by infrared
remote controls are covered.
• Home entertainment or home automation
devices not controlled by remote controls.
• Broken or defective product.
• Products that operate over 100 kHz.
• Infrared keyboards a nd infrared pointing
devices (such as mouse substitutes).
• All products for sale and/or use outside the
continental United States,Hawaii,Alaska,
or Canada.
TROUBLESHOOTING
PROBLEM: No display at all times.
SOLUTION: Replace batteries with four new
AAA alkaline batteries.
PROBLEM: No display when programming.
SOLUTION: Display has turned off due to
inactivity.Start programming
again and do not pause while
performing instructions.
30 About Upgrading/Troubleshooting
8-IN-ONE REMOTE POWERED BY KAMELEON
RS Kameleon 8in1 UG 7/9/03 1:03 PM Page 30
Page 31

PROBLEM: Remote Finder does not work.
SOLUTION: Replace battery with new 9 V
alkaline battery; also verify
Finder Receiver is enabled (see
page 28).
PROBLEM: During programming,the
bottom IR segment displays a
long flash.
SOLUTION: An invalid entry has occurred.
Check the keys to be pressed
and start program again.
PROBLEM: How do I stop programming?
SOLUTION: Press once to return to the
program keys screen.Press it once
more to exit completely.
PROBLEM: The unit does not control home
entertainment devices or commands are not working properly.
SOLUTION: Try all listed codes for the device
brands being set up. Make sure
they can be operated with an
infrared remote control.
PROBLEM: Tried Searching For Your Code
method and still could not find a
working code.
SOLUTION: Perform Restoring Factory
Default Settings on page 28. Then
repeat Searching For Your Code
on page 12.
PROBLEM: Cannot program a macro onto
M1~ M4,PWR,or COM MUTE keys.
SOLUTION : Make sure the total number of
key presses being programmed is
less than 15.
PROBLEM : Power macro does not work.
SOLUTION : First press MY SYSTEM once, then
press PWR once.
PROBLEM: Favorite channel function does
not work properly.
SOLUTION: Some devices (e.g.,Cable Boxes
or Satellite Receivers) use twodigit channel numbers.During
programming, press ENTER or
OK once after entering a channel
number (e.g., 0 2 ENTERfor
channel 2).See Programming
Favorite Channel Scan on page 22.
PROBLEM: Changing channels does not
work properly.
SOLUTION: If the original remote control
required pressing ENTER to
change channels, then press
ENTER on the remote control
after entering channel numbers.
PROBLEM: No remote control of volume.
SOLUTION: See Changing Volume Lock on
page 16 to lock/unlock volume.
PROBLEM: Bottom IR segment flashes when
pressing a key,but home entertainment device does not respond.
SOLUTION: Make sure the remote is aimed at
your home entertainment device
and is not farther away than 15'.
PROBLEM: CH
▲ and CH ▼ do not work for
your RCA TV.
SOLUTION: Due to RCA design (1983-1987),
only the original remote control
will operate these functions.
PROBLEM: Pressing SCREEN one or more
times in CBL,SAT,DVD, VCR,AUX,
or MY SYSTEM mode does not
display a secondary menu
screen.
SOLUTION: Although SCREEN is displayed,
for these modes,there are no
additional menu screens.
Troubleshooting 31
OWNER’S MANUAL
RS Kameleon 8in1 UG 7/9/03 1:03 PM Page 31
Page 32

DEVICE MENU SCREENS
PROGRAMMING MAIN MENU
Pressing and holding P displays the Programming
Main Menu screen. Use the program keys to
program device control (DEV SET),code search
(SEARCH), home theater mode (MY SYSTEM),
volume lock (VOL ), macros (MACRO), display
brightness ( ), function learning (IR LEARN and
IR DELETE), device key reassignment ( MODE ),
or other functions (OTHER). See the Tab l e of Conte nt s
on page 2 to locate a section of interest.
▲
AUD MAIN MENU
Pressing AUD once displays the AU DIO Ma in Menu
screen.After device programming, use these keys
to remotely control your Audio Receiver’s or
Amplifier’s volume and stations,select source
inputs,operate transport functions on a built-in
CD player (or DVD player, if HTiB device), and
access menu or preset functions.
Pressing SCREEN once will display a secondary
AU D I O menu (as shown on the next page).
32 Device Menu Screens
8-IN-ONE REMOTE POWERED BY KAMELEON
RS Kameleon 8in1 UG 7/9/03 1:03 PM Page 32
Page 33

AUD MENU
Pressi ng SCREEN once (on the AUD IO Ma in Me nu,
as shown on the previous page,right side) displays
a secondary AU D I O Me n u screen. Use these
keys to remotely control your Audio Receiver’s or
Amplifier’s volume,stations,and surround functions.
Pressi ng SCREEN once more returns the display to
the AUDIO Mai n Me nu screen.
AUX MAIN MENU
Pressing AUX once displays the AUX Main Menu
screen.After device programming, use these keys
to remotely control all your device’s common
features,such as volume and channels,and menu,
guide, and navigation functions.
Device Menu Screens 33
OWNER’S MANUAL
RS Kameleon 8in1 UG 7/9/03 1:03 PM Page 33
Page 34

DEVICE MENU SCREENS (cont’d)
CBL MAIN MENU
Pressing CBL once displays the CBL Main Menu
screen.After Cable Box programming,use these
keys to remotely control all your device’s common
features,such as volume and channels,and menu,
guide, and navigation functions.
CD MAIN MENU
Pressi ng CD once displays the CD Main Menu
screen.After device programming, use these keys
to remotely control your CD player’s common
features,such as transport keys and skip,menu,and
random functions.
Pressing SCREEN once will display a secondary
CD menu (as shown on the next page).
34 Device Menu Screens
8-IN-ONE REMOTE POWERED BY KAMELEON
RS Kameleon 8in1 UG 7/9/03 1:03 PM Page 34
Page 35

CD MENU
Pressi ng SCREEN once (on the CD Main Menu,as
shown on the previous page,right side) displays a
secondary CD Menu screen.Use these keys to
remotely control your CD player’navigation
functions.
Pressi ng SCREEN once more returns the display to
the CD Main Menu screen.
DVD MAIN MENU
Pressing DVD once displays the DVD Main Menu
screen.After device programming, use these keys
to remotely control all your DVD player’s common
features,such as transport keys and menu,
navigation,subtitle, and audio functions.
Device Menu Screens 35
OWNER’S MANUAL
RS Kameleon 8in1 UG 7/9/03 1:03 PM Page 35
Page 36

DEVICE MENU SCREENS (cont’d)
MY SYSTEM MAIN MENU
After mode programming,pressing MY SYSTEM
once displays the My System Main Menu screen.
Use these keys to remotely access all common
features and functions of your home theater
system.For details,see Using My System Mode on
page 23.
TV MAIN MENU
Pressing TV once displays the TV Main Menu
screen.After device programming, use these
keys to remotely control all your TV’s common
features,such as volume and channels,and last
channel, menu,and information/display functions.
Pressing SCREEN once will display a secondary
TV menu (as shown on the next page).
36 Device Menu Screens
8-IN-ONE REMOTE POWERED BY KAMELEON
RS Kameleon 8in1 UG 7/9/03 1:03 PM Page 36
Page 37

TV MENU
Pressi ng SCREEN once (on the TV Main Menu,as
shown on previous page,right side) displays a
secondary TV Menu screen.Use these keys to
remotely control all your TV’s common menu
features.
Pressi ng SCREEN once more returns the display to
the TV Main Menu screen.
VCR MAIN MENU
Pressi ng VCR once displays the VCR Main Menu
screen.After device programming, use these keys
to remotely control all your TV’s common features,
such as volume and channels, and last channel,
menu, and information/display functions, and
VCR transport controls.
Device Menu Screens 37
OWNER’S MANUAL
RS Kameleon 8in1 UG 7/9/03 1:03 PM Page 37
Page 38

CARE
• Keep the remote dry.If the remote gets wet,wipe
it dry immediately.
•Handle the remote gently and carefully.Don’t
drop it.
• Use and store the remote only in normal temperature environments.
• Keep the remote away from dust and dirt.
• Wipe the remote with a damp cloth to keep it
looking new.
Modifying or tampering with internal parts can
cause damage and invalidate the warranty. If your
remote is not performing as it should,please contact
us at:
www.radioshack.com
or visit your local RadioShack store for help.
ADDITIONAL INFORMATION
© 2003 Universal Electronics.No part of this publication may be reproduced,transmitted,transcribed,
stored in any retrieval system,or translated to any
language, in any form or by any means, electronic,
mechanical, magnetic, optical, manual,or otherwise,
without the prior written permission of Universal
Electronics Inc. Kameleon is a trademark (registration pending) of Universal Electronics.
© 2002 RadioShack Corporation.All Rights
Reserved. RadioShack and RadioShack.com are
trademarks used by RadioShack Corporation.
The RadioShack 8-in-One Remote Powered By
Kameleon is compatible for use in North America.
This product uses technologies licensed under one or
more of the following U.S.patents: 6,496,135;
6,330,091; 6,195,033; 6,097,309; 6,014,092; 5,959,751;
5,953,144; 5,686,891; 5,638,050; 5,532,463; 5,515,052;
5,481,256; 5,414,761; 5,255,313; 5,228,077; 4,959,810;
and patents pending.
M6123
INSTRUCTION TO THE USER
This equipment has been tested and found to comply
with the limits for a class B digital device,pursuant to
part 15 of the FCC Rules. These limits are designed to
provide reasonable protection against harmful interference in a residential installation.This equipment
generates,uses and can radiate radio frequency energy and if not installed and used in accordance with
the instructions, may cause harmful interference to
radio communications. However,there is no guarantee that interference will not occur in a particular
installation.If this equipment does cause harmful
interference to radio or television reception, which
can be determined by turning the equipment off and
on, the user is encouraged to try to correct the interference by one or more of the following measures:
• Reorient or relocate the receiving antenna.
• Increase the separation between the equipment
and receiver.
• Connect the equipment into an outlet on a
circuit different from that to which the receiver
is connected.
• Consult the dealer or an experienced radio/TV
technician for help.
This equipment has been verified to comply
with the limits for a class B computing device,pursuant to FCC Rules. In order to maintain compliance
with FCC regulations,shielded cables must be used
with this equipment.Operation with non-approved
equipment or unshielded cables is likely to result in
interference to radio and TV reception. The user is
cautioned that changes and modifications made to the
equipment without the approval of manufacturer could
void the user's authority to operate this equipment.
38 Care/Additional Information/Instruction To The User
8-IN-ONE REMOTE POWERED BY KAMELEON
RS Kameleon 8in1 UG 7/9/03 1:03 PM Page 38
Page 39

LIMITED 90-DAY WARRANTY
This product is warranted by RadioShack against
manufacturing defects in material and workmanship
under normal use for ninety (90) days from the date
of purchase from RadioShack company-owned stores
and authorized RadioShack franchisees and dealers.
EXCEPT AS PROVIDED HEREIN, RadioShack
MAKES NO EXPRESS WARRANTIES AND ANY
IMPLIED WARRANTIES, INCLUDING THOSE OF
MERCHANTABILITY AND FITNESS FOR A PARTICULAR PURPOSE,ARE LIMITED IN DURATION TO
THE DURATION OF THE WRITTEN LIMITED
WARRANTIES CONTAINED HEREIN.EXCEPT AS
PROVIDED HEREIN,RadioShack SHALL HAVE NO
LIABILITY OR RESPONSIBILITY TO CUSTOMER OR
ANY OTHER PERSON OR ENTITY WITH RESPECT
TO ANY LIABILITY, LOSS OR DAMAGE CAUSED
DIRECTLY OR INDIRECTLY BY USE OR PERFORMANCE OF THE PRODUCT OR ARISING OUT OF
ANY BREACH OF THIS WARRANTY,INCLUDING,
BUT NOT LIMITED TO,ANY DAMAGES RESULTING
FROM INCONVENIENCE, LOSS OF TIME,DATA,
PROPERTY, REVENUE,OR PROFIT OR ANY INDIRECT,SPECIAL,INCIDENTAL,OR CONSEQUENTIAL
DAMAGES,EVEN IF RadioShack HAS BEEN ADVISED
OF THE POSSIBILITY OF SUCH DAMAGES.
Some states do not allow limitations on how long an
implied warranty lasts or the exclusion or limitation
of incidental or consequential damages,so the above
limitations or exclusions may not apply to you.
In the event of a product defect during the warranty
period, take the product and the RadioShack sales
receipt as proof of purchase date to any RadioShack
store.RadioShack will, at its option, unless otherwise
provided by law: (a) correct the defect by product
repair without charge for parts and labor; (b) replace
the product with one of the same or similar design;
or (c) refund the purchase price.All replaced parts
and products, and products on which a refund is
made, become the property of RadioShack. New or
reconditioned parts and products may be used in the
performance of warranty service. Repaired or
replaced parts and products are warranted for the
remainder of the original warranty period.You will
be charged for repair or replacement of the product
made after the expiration of the warranty period.
This warranty does not cover: (a) damage or failure
caused by or attributable to acts of God, abuse,accident,misuse,improper or abnormal usage,failure to
follow instructions,improper installation or maintenance,alteration,lightning or other incidence of
excess voltage or current; (b) any repairs other than
those provided by a RadioShack Authorized Service
Facility; (c) consumables such as fuses or batteries;
(d) cosmetic damage; (e) transportation, shipping or
insurance costs; or (f) costs of product removal,
installation, set-up service adjustment or reinstallation.
This warranty gives you specific legal rights, and
you may also have other rights which vary from state
to state.
RadioShack Customer Relations,
200 Taylor Street, 6th Floor,
Fort Worth, TX 76102
Cat. No.15-2138 07/02
Fort Worth, Texas 76102
Limited 90-Day Warranty 39
OWNER’S MANUAL
RS Kameleon 8in1 UG 7/9/03 1:03 PM Page 39
Page 40

40 Índice De Materias/Introducción
8-IN-ONE TELECONTROL ACCIONADO POR KAMELEON
<< pages 40 through 79 reserved for
Spanish version of manual>>
RS Kameleon 8in1 UG 7/9/03 1:03 PM Page 40
Page 41

Introducción 41
MANUAL DE DEUÑO
<< pages 40 through 79 reserved for
Spanish version of manual>>
RS Kameleon 8in1 UG 7/9/03 1:03 PM Page 41
Page 42

MANUFACTURER’S CODES
(CÓDIGOS DEL FABRICANTE)
S
ETUPCODESFORAUDIOAMPLIFIERS
(C
ÓDIGOS DECONFIGURACIÓN PARA
A
MPLIFICADORES DEAUDIO
)
GE 0078
Harman/Kardon 0892
JVC 0331
Left Coast 0892
Marantz 0892
Optimus 0395
Philips 0892
Polk Audio 0892
Realistic 0395
Soundesign 0078
Victor 0331
Wards 0078
Yamaha 0354
S
ETUPCODESFORAUDIORECEIVERS
(C
ÓDIGOS DECONFIGURACIÓN PARA
R
ECEPTORES DEAUDIO
)
ADC 0531
Aiwa 1405, 0158, 0189,0121, 1089, 1388
Alco 1390
Anam 1609, 1074
Apex Digital 1257
Audiotronic 1189
Audiovox 1390
Bose 1229, 1253
Capetronic 0531
Carver 1189, 0189, 1089
Classic 1352
Denon 1360
Glory Horse 1263
Harman/Kardon 0110, 0189
Integra 0135, 1298
JBL 0110, 1306
JVC 0074, 1263, 1374,1495
KLH 1390
Kenwood 1313, 1569, 0186, 1027
Koss 1366
Lasonic 1798
Linn 0189
MCS 0039
Magnavox 1189,1269, 0189, 0531, 1089
Marantz 1189, 0039, 0189,1089
Musicmagic 1089
Nikko 0609
Norcent 1389
Onkyo 0135, 0842, 1298
Optimus 1023, 0186, 0531,0670, 1074
Oritron 1366,1380
Panasonic 1518, 0039
Philips 1189, 1269, 0189,1089, 1266
Pioneer 1023, 0014, 0150,0531, 0630, 1384
Polk Audio 0189
Proscan 1254
Quasar 0039
RCA 1023, 1609, 1254, 0531,1074, 1390
RadioShack 1263
Samsung 1295
Sansui 0189, 1089
Sharp 0186
Sharper Image 1385
Sony 1058, 1441, 1258, 0158,1158, 1558,1658,
1758
Soundesign 0670
Stereophonics 1023
Sunfire 1313
Teac 1074
Technics 1308, 1518, 0039,1309
Techwood 0609
Thorens 1189
Venturer 1390
Victor 0074
Wards 0158, 0189, 0014
Yamaha 0176, 0186, 1176,1375
S
ETUPCODESFORCABLEBOXES
(C
ÓDIGOS DECONFIGURACIÓN PARA
C
ONVERTIDORES DECABLE
)
ABC 0003, 0008, 0014
Americast 0899
Bell & Howell 0014
Bell South 0899
80 Manufacturer’s Codes (Códigos Del Fabricante)
8-IN-ONE REMOTE POWERED BY KAMELEON
RS Kameleon 8in1 UG 7/9/03 1:03 PM Page 80
Page 43

S
ETUPCODESFORCABLEBOXES
, C
ONTINUED
(C
ÓDIGOS DECONFIGURACIÓN PARA
C
ONVERTIDORES DECABLE
, C
ONTINUACIÓN
)
Director 0476
General Instrument 0476, 0810,0276,0003
GoldStar 0144
Hamlin 0009, 0273
Jerrold 0476, 0810, 0276,0003, 0014
Memorex 0000
Motorola 0476, 0810, 0276
Pace 0237
Panasonic 0000, 0107
Paragon 0000
Philips 0305, 0317
Pioneer 0877, 1877, 0144,0533
Pulsar 0000
Quasar 0000
Regal 0279, 0273
Runco 0000
Samsung 0144
Scientific Atlanta 0877, 1877, 0477, 0008
Sony 1006
Starcom 0003
Supercable 0276
Torx 0003
Toshiba 0000
Zenith 0000, 0525, 0899
S
ETUPCODESFOR
CD P
LAYERS
(
CÓDIGOS DE CONFIGURACIÓN PARA
REPRODUCTORES DE CDS)
Aiwa 0157
Burmester 0420
California Audio Labs 0029
Carver 0157
Classic 1297
DKK 0000
DMX Electronics 0157
Denon 0873
Garrard 0420
Genexxa 0032
Harman/Kardon 0157
Hitachi 0032
JVC 0072
KLH 1318
Kenwood 0681, 0626, 0028
Krell 0157
Linn 0157
MCS 0029
MTC 0420
Magnavox 0157
Marantz 0626, 0029, 0157
Miro 0000
Mission 0157
NSM 0157
Onkyo 0868
Optimus 1063, 0000, 0032,0420, 1075
Panasonic 0029
Parasound 0420
Philips 0626, 0157
Pioneer 1063, 1062, 0032
Polk Audio 0157
Proton 0157
QED 0157
Quasar 0029
RCA 1062, 0032
RadioShack 1075
Realistic 0420
Rotel 0157,0420
SAE 0157
Sansui 0157
Sharp 0861
Sonic Frontiers 0157
Sony 0490, 0000, 0100
TAG McLaren 0157
TDK 1208
Tascam 0420
Teac 0420
Technics 0029
Victor 0072
Wards 0157
Yamaha 0888, 0036, 1292
Manufacturer’s Codes (Códigos Del Fabricante) 81
OWNER’S MANUAL (MANUAL DE DEUÑO)
RS Kameleon 8in1 UG 7/9/03 1:03 PM Page 81
Page 44

MANUFACTURER’S CODES,
Continued
(CÓDIGOS DEL FABRICANTE,
Continuación)
S
ETUPCODESFOR
DVD P
LAYERS
(C
ÓDIGOS DECONFIGURACIÓN PARA
R
EPRODUCTORES
DVD)
Aiwa 0641
Apex Digital 0672, 0717,0755,0794, 0796,0797, 0830,
1100
Blaupunkt 0717
Blue Parade 0571
Broksonic 0695
Cinevision 0876
CyberHome 0816, 1019, 1023,1024
DVD2000 0521
Daewoo 0784
Denon 0490, 0634
Emerson 0591
Enterprise 0591
Fisher 0670
GE 0522, 0815, 0717
Go Video 0715, 0783
Gradiente 0651
Greenhill 0717
Harman/Kardon 0582, 0702
Hitachi 0573, 0664
Hiteker 0672
IRT 0783
Integra 0627
JBL 0702
JVC 0558, 0623, 0867
KLH 0717
Kenwood 0490, 0534, 0682
Koss 0651
Magnavox 0503, 0675
Marantz 0539
Microsoft 0522
Mintek 0717
Mitsubishi 0521
Nesa 0717
Norcent 0872
Onkyo 0503, 0627
Oritron 0651
Panasonic 0490, 0632, 1362,1490
Philips 0503, 0539, 0646,0854
Pioneer 0525, 0571, 0632
Polk Audio 0539
Proscan 0522
Qwestar 0651
RCA 0522, 0571, 0717, 0822,1022
Rotel 0623
Sampo 0698
Samsung 0573, 0820
Sansui 0695
Sanyo 0670, 0695
Sharp 0630
Sherwood 0633
Shinsonic 0533
Sony 0533, 0864
Sylvania 0675, 0821
Technics 0490
Theta Digital 0571
Toshiba 0503, 0695, 1045
Tredex 0799
Urban Concepts 0503
XBox 0522
Yamaha 0490, 0539, 0545
Zenith 0503, 0591
S
ETUPCODESFOR
DVD P
LAYER
/VCR C
OMBOS
(C
ÓDIGOS DECONFIGURACIÓN PARAAPARATOS
C
OMBINADOSREPRODUCTORES
DVD/V
IDEOGRABADORA
)
Go Video 0715
Hitachi 0664 (for VCR use 0000)
JVC 0867
RCA 0822 (for VCR use 0060)
Samsung 0820
Sansui 0695
Sharp 0630 (for VCR use 0848)
Sony 0864
Sylvania 0675 (for VCR use 0000)
Toshiba 0503
82 Manufacturer’s Codes (Códigos Del Fabricante)
8-IN-ONE REMOTE POWERED BY KAMELEON
RS Kameleon 8in1 UG 7/9/03 1:03 PM Page 82
Page 45

S
ETUPCODESFOR
H
OME-THEATER-IN-A-BOXDEVICES
(C
ÓDIGOS DECONFIGURACIÓN PARA
D
ISPOSITIVOSHOME-THEATER-IN-A-BOX
)
Aiwa 1388
Anam 1609
Apex Digital 1257
Audiovox 1390
Classic 1352
JBL 1306
JVC 1374, 1495
KLH 1390
Koss 1366
Lasonic 1798
Norcent 1389
Onkyo 1298
Oritron 1366
Philips 1266, 1269
Pioneer 1384
RCA 1390, 1609
Samsung 1295
Sony 1558, 1658, 1758
Venturer 1390
Yamaha 1375
S
ETUPCODESFOR
PVR
S
(C
ÓDIGOS DECONFIGURACIÓN PARA
PVRS)
Panasonic 0616
Philips 0618
RCA 0880
ReplayTV 0614, 0616
Sonic Blue 0616, 0614
Sony 0636
Tivo 0618, 0636
S
ETUPCODESFORSATELLITERECEIVERS
(C
ÓDIGOS DECONFIGURACIÓN PARA
R
ECEPTORES DESATÉLITE
)
AlphaStar 0772
Chaparral 0216
Crossdigital 1109
DirecTV 0392, 0566, 0639, 1142, 0247,0749, 1749,
0724, 0819, 1856,1076, 1109
Dish Network System 1005,0775
DishPro 1005,0775
Echostar 1005, 0775
Expressvu 0775
GE 0566
GOI 0775
General Instrument 0869
HTS 0775
Hitachi 0819
Hughes Network Systems 1142,0749, 1749
JVC 0775
Magnavox 0724, 0722
Memorex 0724
Mitsubishi 0749
Motorola 0869
Next Level 0869
Panasonic 0247, 0701
Paysat 0724
Philips 1142, 0749, 1749,0724, 1076, 0722
Proscan 0392, 0566
RCA 0392, 0566, 0855, 0143
RadioShack 0869
SKY 0856
Samsung 1276, 1109
Sony 0639
Star Choice 0869
Toshiba 0749, 1749, 0790
UltimateTV 0392, 0639
Uniden 0724,0722
Zenith 0856, 1856
S
ETUPCODESFORTVS
(C
ÓDIGOS DECONFIGURACIÓN PARA
T
ELEVISORES
)
AOC 0030
Admiral 0093, 0463
Advent 0761
Aiko 0092
Aiwa 0701
Akai 0702, 0030
continued on next page...
(continúa en la siguiente página...)
Manufacturer’s Codes (Códigos Del Fabricante) 83
OWNER’S MANUAL (MANUAL DE DEUÑO)
RS Kameleon 8in1 UG 7/9/03 1:03 PM Page 83
Page 46

MANUFACTURER’S CODES
(CÓDIGOS DEL FABRICANTE)
S
ETUPCODESFORTVS
, C
ONTINUED
(C
ÓDIGOS DECONFIGURACIÓN PARA
T
ELEVISORES
, C
ONTINUACIÓN
)
Alaron 0179
America Action 0180
Ampro 0751
Anam 0180
Apex Digital 0748, 0765
Audiovox 0451, 0180, 0092,0623
Baysonic 0180
Bell & Howell 0154, 0016
Bradford 0180
Broksonic 0236, 0463
CXC 0180
Candle 0030, 0056
Carnivale 0030
Carver 0054
Celebrity 0000
Celera 0765
Changhong 0765
Cineral 0451, 0092
Citizen 0060, 0030, 0056,0092
Clarion 0180
Concerto 0056
Contec 0180
Craig 0180
Crosley 0054
Crown 0180
Curtis Mathes 0047,0054, 0154,0451, 0093, 0060,0702,
0030, 0145, 0166,0016, 0056, 0466, 0747,
1147, 1347
Daewoo 0451, 0092,0623
Denon 0145
Dumont 0017
Dwin 0720, 0774
Electroband 0000
Emerson 0154, 0236, 0463, 0180, 0178,0179, 0623
Envision 0030
Fisher 0154
Fujitsu 0179, 0683, 0809
Funai 0180, 0171, 0179
Futuretech 0180
GE 0047, 0051, 0451,0178, 0021, 0747, 1147,
1347
Gibralter 0017, 0030
GoldStar 0030, 0178
Gradiente 0053, 0056
Grunpy 0180, 0179
Hallmark 0178
Harley Davidson 0179
Harman/Kardon 0054
Harvard 0180
Havermy 0093
Hello Kitty 0451
Hitachi 1145, 0145,0016, 0056
Infinity 0054
Inteq 0017
JBL 0054
JCB 0000
JVC 0463, 0053
Jensen 0761
KEC 0180
KTV 0180, 0030
Kenwood 0030
Konka 0707
LG 0056
LXI 0047, 0054, 0154, 0156,0178, 0747
Logik 0016
Luxman 0056
MGA 0150,0030, 0178
MTC 0060, 0030, 0056
Magnavox 0054, 0030, 1454,0179, 1254
Majestic 0016
Marantz 0054, 0030
Matsushita 0250
Megatron 0178, 0145
Memorex 0154, 0250, 0463, 0150,0178, 0016, 0179
Midland 0047, 0017, 0051, 0747
Minutz 0021
Mitsubishi 0093, 0150, 0178
Motorola 0093
Multitech 0180
NAD 0156, 0178, 0866
NEC 0030, 0056
NTC 0092
Nikko 0030, 0178, 0092
Norcent 0748
84 Manufacturer’s Codes (Códigos Del Fabricante)
8-IN-ONE REMOTE POWERED BY KAMELEON
RS Kameleon 8in1 UG 7/9/03 1:03 PM Page 84
Page 47

S
ETUPCODESFORTVS
, C
ONTINUED
(C
ÓDIGOS DECONFIGURACIÓN PARA
T
ELEVISORES
, C
ONTINUACIÓN
)
Onwa 0180
Optimus 0154, 0250, 0166
Optonica 0093
Orion 0236, 0463, 0179
Panasonic 0250, 0051
Penney 0047, 0156,0051, 0060, 0030, 0178, 0021,
0747, 1347
Philco 0054, 0463, 0030,0145
Philips 0054, 1454, 0690
Pilot 0030
Pioneer 0166, 0679, 0866
Portland 0092
Prima 0761
Princeton 0717
Prism 0051
Proscan 0047, 0747
Proton 0178, 0466
Pulsar 0017
Quasar 0250, 0051
RCA 0047, 1447, 0090, 0679,0747, 1047, 1147,
1247, 1347, 1547
RadioShack 0047, 0154, 0180, 0030, 0178,0056, 0747
Realistic 0154, 0180, 0030, 0178,0056
Runco 0017, 0030, 0603
SSS 0180
Sampo 0030
Samsung 0060, 0702, 0030,0178, 0056
Sansei 0451
Sansui 0463
Sanyo 0154, 0799
Scotch 0178
Scott 0236, 0180, 0178,0179
Sears 0047, 0054, 0154, 0156, 0178,0171, 0056,
0179, 0747
Semivox 0180
Semp 0156
Sharp 0093, 0688, 0689
Sheng Chia 0093
Signature 0016
Sony 1100, 0000
Soundesign 0180, 0178, 0179
Squareview 0171
Starlite 0180
Supreme 0000
Sylvania 0054, 0030, 0171
Symphonic 0180, 0171
TMK 0178, 0056
TNCi 0017
TVS 0463
Tandy 0093
Technics 0250, 0051
Technol Ace 0179
Techwood 0051, 0056
Teknika 0054, 0180, 0150,0060, 0016,0056, 0092,
0179
Telefunken 0702,0056
Toshiba 0154, 0156, 0060, 1256,1356
Vector Research 0030
Victor 0053
Vidikron 0054
Vidtech 0178
Wards 0054, 0030, 0178, 0016, 0021,0056, 0179,
0866
Waycon 0156
White Westinghouse 0463, 0623
Yamaha 0030
Zenith 0017, 0463, 0178, 0016,0092
S
ETUPCODESFOR
TV/DVD P
LAYERCOMBOS
(C
ÓDIGOS DECONFIGURACIÓN PARA APARATOS
C
OMBINADOSTELEVISOR/REPRODUCTORES
DVD)
Apex Digital 0830
Broksonic 0695
Panasonic 1362, 1490
Philips 0854
RCA 1022
Sharp 0630
Sylvania 0821, 0675 (for TV use 0171)
Toshiba 0695, 1045
Manufacturer’s Codes (Códigos Del Fabricante) 85
OWNER’S MANUAL (MANUAL DE DEUÑO)
RS Kameleon 8in1 UG 7/9/03 1:03 PM Page 85
Page 48

MANUFACTURER’S CODES,
Continued
(CÓDIGOS DEL FABRICANTE,
Continuación)
S
ETUPCODESFOR
TV/VCR C
OMBOS
(C
ÓDIGOS DECONFIGURACIÓN PARAAPARATOS
C
OMBINADOSTELEVISOR/VIDEOGRABADORA
)
Broksonic 0002, 0479, 1479
Citizen 1278
Curtis Mathes 1035
Daewoo 1278
Emerson 0002, 0479, 1278, 1479
Funai 0000
GE 1060, 0240, 1035,0760
Goldstar 1237
Harley Davidson 0000
Hitachi 0000
Lloyd’s 0000
Magnasonic 1278
Magnavox 0000, 1781
Magnin 0240
Memorex 0162, 1162, 1237, 0037
MGA 0240
Optimus 0162, 1162
Orion 0002, 0479, 1479
Panasonic 0162, 1035, 1162
Penney 0240, 1035,1237
Quasar 0162, 1035, 1162
RadioShack 0000, 0037
RCA 1060, 0240, 1035, 0760
Sansui 0000, 0479, 1479
Sanyo 0240
Sears 0000, 1237
Sony 0000, 1232
Sylvania 1781
Symphonic 0000
Thomas 0000
Toshiba 0845
White Westinghouse 1278
Zenith 0000, 0479, 1479
S
ETUPCODESFOR
VCR
S
(C
ÓDIGOS DECONFIGURACIÓN PARA
V
IDEOGRABADORAS
)
Admiral 0048, 0209
Adventura 0000
Aiko 0278
Aiwa 0037, 0000
America Action 0278
American High 0035
Asha 0240
Audiovox 0037, 0278
Beaumark 0240
Bell & Howell 0104
Broksonic 0184, 0121, 0209, 0002,0479, 1479
CCE 0278
Calix 0037
Canon 0035
Carver 0081
Cineral 0278
Citizen 0037, 0278, 1278
Craig 0037,0047, 0240
Curtis Mathes 0060,0035, 0162,0760, 1035
Cybernex 0240
Daewoo 0045, 0278,1278
Denon 0042
Dynatech 0000
Electrohome 0037
Electrophonic 0037
Emerex 0032
Emerson 0037, 0184, 0000, 0121, 0043,0209, 0002,
0278, 0479, 1278,1479
Fisher 0047, 0104
Fuji 0035, 0033
Funai 0000
GE 0060, 0035, 0240,0760, 1035, 1060
Garrard 0000
Go Video 0432
GoldStar 0037, 1237
Gradiente 0000
HI-Q 0047
Harley Davidson 0000
Harman/Kardon 0081
Hitachi 0000, 0042
Hughes Network Systems 0042
86 Manufacturer’s Codes (Códigos Del Fabricante)
8-IN-ONE REMOTE POWERED BY KAMELEON
RS Kameleon 8in1 UG 7/9/03 1:03 PM Page 86
Page 49

S
ETUPCODESFOR
VCRS, C
ONTINUED
(C
ÓDIGOS DECONFIGURACIÓN PARA
V
IDEOGRABADORAS
, C
ONTINUACIÓN
)
JVC 0067
KEC 0037, 0278
Kenwood 0067
Kodak 0035, 0037
LXI 0037
Lloyd’s 0000
MEI 0035
MGA 0240,0043
MGN Technology 0240
MTC 0240, 0000
Magnasonic 1278
Magnavox 0035, 0039, 0081,0000, 1781
Magnin 0240
Marantz 0035, 0081
Marta 0037
Matsushita 0035, 0162, 1162
Memorex 0035, 0162, 0037, 0048,0039, 0047, 0240,
0000, 0104, 0209,0479, 1162, 1237
Minolta 0042
Mitsubishi 0067, 0043
Motorola 0035, 0048
Multitech 0000
NEC 0104, 0067
Nikko 0037
Noblex 0240
Olympus 0035
Optimus 0162, 0037, 0048, 0104, 0432,1162
Orion 0184, 0209, 0002, 0479,1479
Panasonic 0035, 0162, 0225,0616, 1035, 1162
Penney 0035, 0037,0240, 0042, 1035, 1237
Pentax 0042
Philco 0035, 0209, 0479
Philips 0035, 0081, 0618,1081, 1181
Pilot 0037
Pioneer 0067
Polk Audio 0081
Profitronic 0240
Proscan 0060, 0760,1060
Pulsar 0039
Quasar 0035, 0162, 1035, 1162
RCA 0060, 0240, 0042, 0760,0880, 1035, 1060
RadioShack 0000
Radix 0037
Randex 0037
Realistic 0035, 0037, 0048, 0047,0000, 0104
ReplayTV 0614, 0616
Runco 0039
STS 0042
Samsung 0240, 0045
Sanky 0048, 0039
Sansui 0000, 0067, 0209,0479, 1479
Sanyo 0047, 0240, 0104
Scott 0184, 0045, 0121,0043
Sears 0035, 0037, 0047, 0000, 0042,0104, 1237
Semp 0045
Sharp 0048, 0848
Shogun 0240
Sonic Blue 0614, 0616
Sony 0035, 0032, 0033, 0000,0636, 1232
Sylvania 0035, 0081, 0000,0043, 1781
Symphonic 0000
TMK 0240
Teac 0000
Technics 0035, 0162
Teknika 0035, 0037, 0000
Thomas 0000
Tivo 0618, 0636
Toshiba 0045, 0043, 0845
Totevision 0037, 0240
Unitech 0240
Vector 0045
Video Concepts 0045
Videomagic 0037
Videosonic 0240
Villain 0000
Wards 0060, 0035, 0048, 0047, 0081,0240, 0000,
0042, 0760
White Westinghouse 0209
XR-1000 0035, 0000
Zenith 0039, 0033, 0000, 0209,0479, 1479
Manufacturer’s Codes (Códigos Del Fabricante) 87
OWNER’S MANUAL (MANUAL DE DEUÑO)
RS Kameleon 8in1 UG 7/9/03 1:03 PM Page 87
Page 50

MANUFACTURER’S CODES,
Continued
(CÓDIGOS DEL FABRICANTE,
Continuación)
S
ETUPCODESFORVIDEOACCESSORIES
(C
ÓDIGOS DECONFIGURACIÓN PARAACCESORIOS
DE
V
ÍDEO
)
Panasonic 1120
Pioneer 1010
Princeton 0113, 0295
Samsung 1190
Sensory Science 1126
Sharp 1010
88 Manufacturer’s Codes (Códigos Del Fabricante)
8-IN-ONE REMOTE POWERED BY KAMELEON
RS Kameleon 8in1 UG 7/9/03 1:03 PM Page 88
 Loading...