

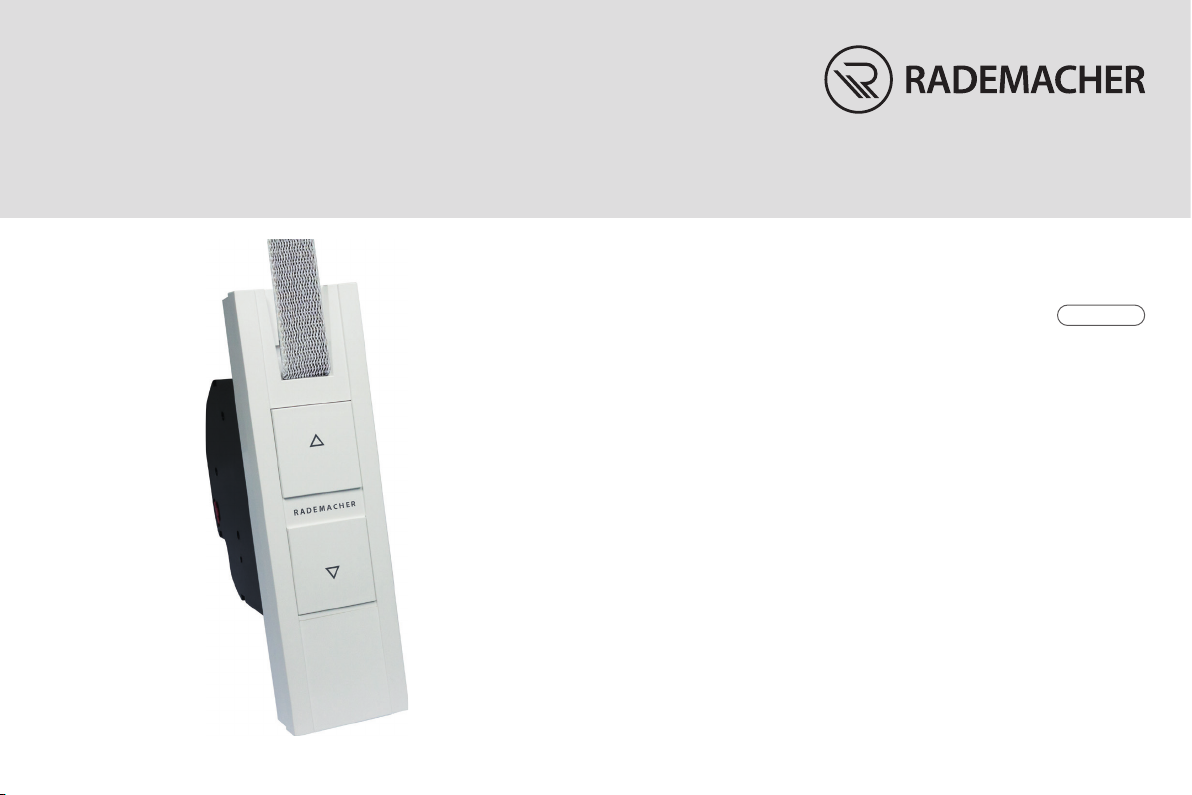
RolloTron DECT
Typ 1213
Artikelnr. 1823 45 13
Montage- und Bedienungsanleitung
Originalanleitung
DE / EN
VBD 709-1-1 (02.21)

Inhaltsverzeichnis
1. Diese Anleitung ... .............................................................................. 3
2. Gefahrensymbole ............................................................................... 4
3. Sicherheitshinweise ........................................................................... 5
3.1 Bestimmungsgemäße Verwendung ................................. 6
3.2 Erforderliches Fachwissen des Installateurs ................... 7
3.3 Fachbegriffe - Begriffserklärung ......................................... 7
4. Lieferumfang........................................................................................8
5. Gesamtansicht .....................................................................................9
5.1 Bedientasten und Kontrollleuchte ...................................10
6. Produktbeschreibung / Verwendungszweck .........................11
6.1 Funktionen ...............................................................................12
7. Technische Daten .............................................................................13
7.1 Abmessungen .........................................................................14
7.2 Zulässige Rollladen-Gurtbänder ......................................15
8. Montage ..............................................................................................16
8.1 Montagevorbereitungen ....................................................17
8.2 Elektrischer Anschluss ..........................................................18
8.3 Das Gurtband einführen und befestigen ......................20
8.4 Den RolloTron DECT einbauen ..........................................22
9. Einstellungen und Bedienung .....................................................23
9.1 Endpunkte einstellen ...........................................................23
9.2 DECT Anmeldung/Abmeldung .........................................26
9.3 Manuelle Bedienung ............................................................27
9.4 Lieblingsposition einstellen ...............................................28
9.5 Den Rollladen bei aktiver Lieblingsposition
schließen ..................................................................................29
9.6 Den RolloTron DECT mit der FRITZ!App Smart
Home oder mit dem FRITZ!Fon steuern ........................29
9.7 Alle Einstellungen löschen - Werkseinstellungen
laden ...........................................................................................30
10. Den RolloTron DECT ausbauen ....................................................31
11. Das Gurtband bei Geräteausfall entfernen .............................33
12. Was tun, wenn ... ? ............................................................................34
13. Wartung und Pflege ........................................................................36
14. Vereinfachte EU-Konformitätserklärung ..................................37
15. Garantiebedingungen ....................................................................38
2
1. Diese Anleitung ...
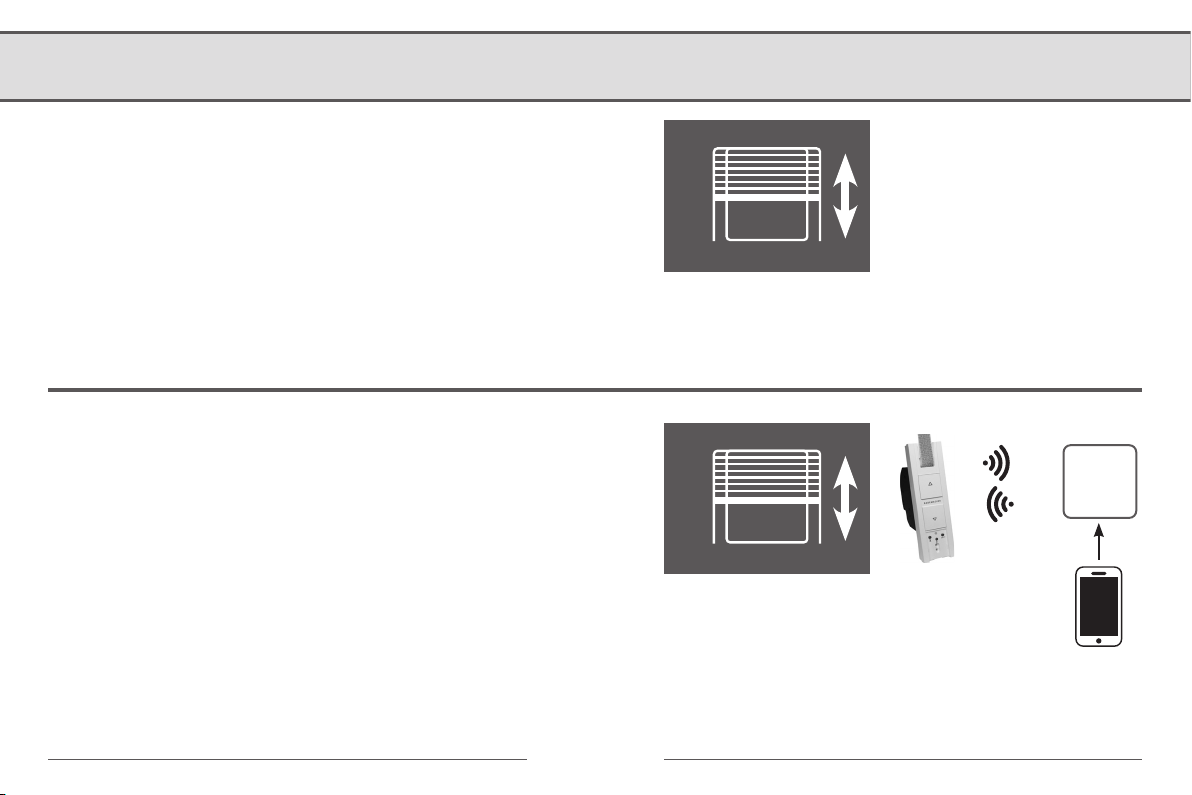
... beschreibt die Montage, den elektrischen Anschluss und die
Bedienung des Rollladen-Gurtwicklers RolloTron DECT.
● Bitte lesen Sie diese Anleitung vollständig durch und
beachten Sie alle Sicherheitshinweise, bevor Sie mit den
Arbeiten beginnen.
● Diese Anleitung ist Teil des Produkts. Bewahren Sie sie gut
erreichbar auf.
● Fügen Sie diese Anleitung bei Weitergabe des RolloTron
DECT an Dritte bei.
● Bei Schäden, die durch Nichtbeachtung dieser Anleitung
und der Sicherheitshinweise entstehen, erlischt die
Garantie. Für Folgeschäden, die daraus resultieren, übernehmen wir keine Haftung.
3
2. Gefahrensymbole
i
Lebensgefahr durch Stromschlag
Gefahrenstelle / gefährliche Situation
Gefahrenstufen und Signalwörter
GEFAHR!
Diese Gefährdung wird zu schweren Verletzungen oder zum
Tode führen, sofern sie nicht vermieden wird.
WARNUNG! WARNUNG!
Diese Gefährdung kann zu schweren Verletzungen oder zum
Tod führen, sofern sie nicht vermieden wird.
VORSICHT!
Diese Gefährdung kann zu geringfügigen bis mittelschweren
Verletzungen führen, sofern sie nicht vermieden wird.
ACHTUNG!
Diese Gefährdung kann zu Sachschäden führen.
Verwendete Darstellungen und Symbole
Darstellung Beschreibung
1. Handlungsschritte
2.
● Aufzählung
(1) oder a) Liste
Lesen Sie die zugehörige Anleitung
Nützliche Informationen
4
3. Sicherheitshinweise
Lebensgefahr durch Stromschlag bei Verwen-
dung des RolloTron DECT im Außenbereich!
Verwenden Sie den RolloTron DECT nur in Gebäuden
und trockenen Räumen.
Bei unsachgemäßem Gebrauch kann es zu Verlet-
zungen oder Beschädigungen kommen. Beachten
Sie die folgenden Sicherheitshinweise:
● Verwenden Sie niemals defekte oder beschädigte
Geräte.
● Unterweisen Sie alle infrage kommenden
Personen, besonders Kinder ab 8 Jahren und
Personen mit verringerten physischen, sensorischen oder mentalen Fähigkeiten im sicheren
Gebrauch des RolloTron DECT.
● Kinder dürfen nicht mit dem Gerät spielen.
● Reinigung und Wartung dürfen nicht von Kindern
ohne Beaufsichtigung durchgeführt werden.
● Halten Sie während der Einstellungen Personen
fern, damit diese nicht die durch plötzliches
Nachrutschen des Rollladens zu Schaden kommen.
● Führen Sie alle Reinigungsarbeiten am Rollladen
im spannungslosen Zustand aus.
● Die Netzsteckdose und der Netzstecker müssen
immer frei zugänglich sein.
● Die maximal zulässige Laufzeit für eine Fahrt darf
im Betrieb nicht überschritten werden. Die
Laufzeitbegrenzung (KB) für eine Fahrt beträgt
vier Minuten.
● Hat die Laufzeitbegrenzung angesprochen, muss
der RolloTron DECT mindestens 12 Minuten lang
abkühlen. Während dieser Zeit blinkt die rote
Kontrollleuchte schnell. Die volle Betriebsbereitschaft
ist nach ca. einer Stunde wieder hergestellt.
● Verwenden Sie das DECT-Funksystem und seine
Komponenten nie zur Fernsteuerung von Geräten
und Anlagen mit erhöhten sicherheitstechnischen Anforderungen oder erhöhter Unfallgefahr.
Dies bedarf zusätzlicher Sicherheitseinrichtungen.
5
3.1 Bestimmungsgemäße Verwendung
i
i
Verwenden Sie den RolloTron DECT nur zum Heben und
Senken von Rollläden mit zulässigem Gurtband.
Mechanische Verriegelungen jeder Art sind für den
automatisierten Betrieb mit diesem Gerät nicht
geeignet.
Verwenden Sie nur Original-Ersatzteile von RADEMACHER
● So vermeiden Sie Fehlfunktionen und Schäden am
RolloTron DECT.
● Als Hersteller übernehmen wir keine Garantie bei der Ver-
wendung herstellerfremder Bauteile und daraus entstehender Folgeschäden.
● Alle Reparaturen am RolloTron DECT dürfen nur vom auto-
risierten Kundendienst durchgeführt werden.
Einsatzbedingungen
● Für den elektrischen Anschluss muss am Einbauort ein
230 V / 50 Hz Stromanschluss mit bauseitiger Freischaltvorrichtung (Sicherung) vorhanden sein.
● Bei Verwendung des beiliegenden Anschlusskabels
mit Eurostecker muss eine frei zugängliche 230 V / 50 Hz
Netzsteckdose vorhanden sein.
● Der Rollladen muss sich leichtgängig heben und senken
lassen. Er darf nicht klemmen.
● Die Montagefläche für den RolloTron DECT muss eben sein.
Funkanlagen, die auf der gleichen Frequenz senden,
können zu Empfangsstörungen führen.
Gefahren bei nicht bestimmungsgemäßer Verwendung
Die Verwendung des RolloTron DECT für andere als den zuvor
genannten Anwendungsbereich ist nicht zulässig.
6
3.2 Erforderliches Fachwissen des Installateurs
Der Anschluss des elektrischen Rollladenantriebs darf nur durch
eine zugelassene Elektrofachkraft nach den Anschlussplänen in
dieser Anleitung erfolgen.
Der Installateur muss sicherstellen, dass die Gesaminstallation den
Normen im Land der Inbetriebnahme entspricht. Besonders die
Normen DIN EN 13659 bzw. DIN EN 12045 sind zu berücksichtigen.
3.3 Fachbegriffe - Begriffserklärung
DECT
Funk-Standard zur Telefonie und Steuerung kompatibler
Produkte.
DECT-Basisstation (FRITZ!Box)
Zentrale Steuereinheit für DECT-Produkte. Alle Geräte eines
DECT-Netzwerks müssen angemeldet sein.
Hinderniserkennung
Trifft der Rollladen bei der AB (tt )-Bewegung auf ein Hindernis,
wird der RolloTron DECT ausgeschaltet, siehe Seite 12.
Überlastsicherung
Blockiert der Antrieb bei der AUF ( ▲▲ )-Bewegung (z. B. durch Verei-
sung) wird der RolloTron DECT ausgeschaltet, siehe Seite 12.
Speziell auf die zu erwartenden Klemmkräfte und auf die daraus
resultierenden Gefahren muss der Kunde durch den Installateur
hingewiesen werden.
Endpunkte
In jede Laufrichtung des Rollladens wird ein Endpunkt eingestellt. Bei Erreichen eines Endpunktes stoppt der RolloTron
DECT automatisch den Rollladen.
Laufzeitbegrenzung - Kurzzeitbetrieb (KB)
Der RolloTron DECT ist nicht für den Dauerbetrieb ausgelegt.
Der Kurzzeitbetrieb definiert die maximal zulässige Laufzeit,
siehe Seite 5 / 35.
7
VBD 709-1 (01.21)
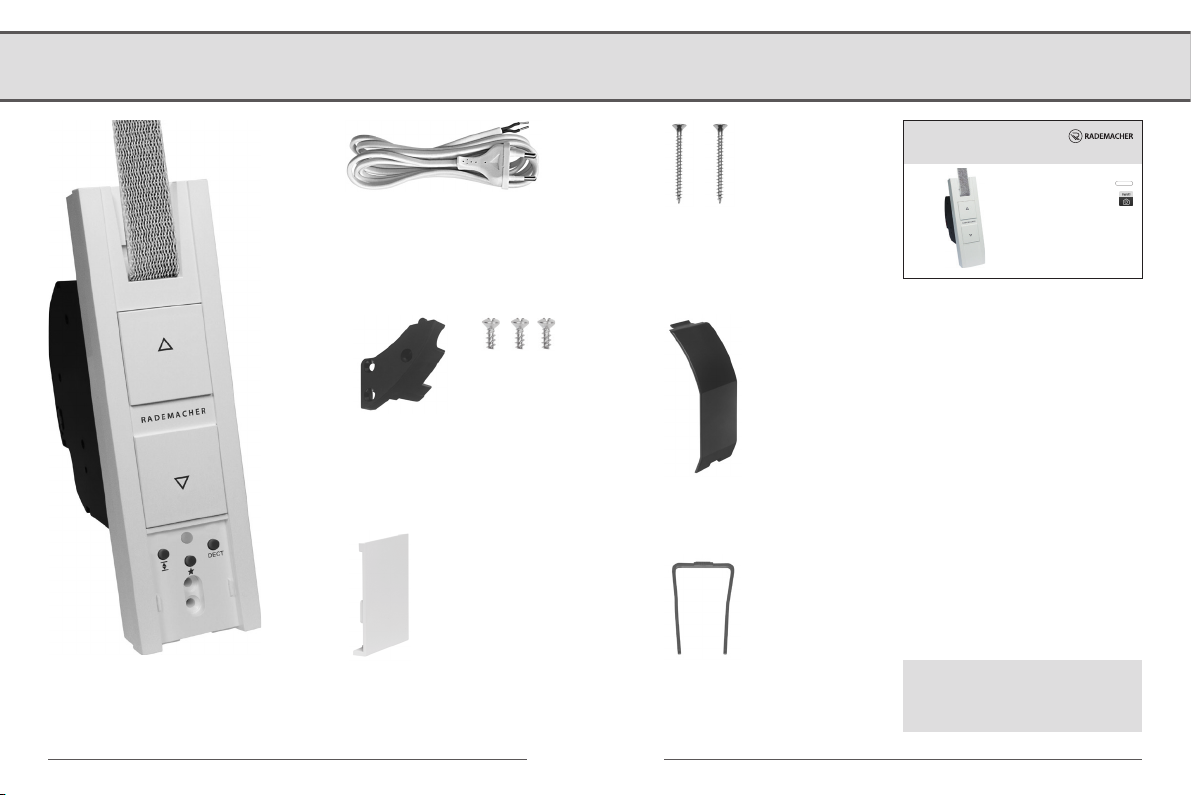
4. Lieferumfang
RolloTron DECT
Typ 1213
Artikelnr. 1823 45 13
Montage- und Bedienungsanleitung
Originalanleitung
DE / EN
RolloTron DECT
Anschlusskabel mit
Eurostecker
Zugentlastung
Abdeckblende
Montageschrauben
(4 x 55 mm)
Montage- und
Bedienungsanleitung
Wickelradfachabdeckung
Prüfen Sie den VerpackungsEntriegelungsklammer
(im Gehäuse)
inhalt auf Unversehrtheit und
Vollständigkeit.
8
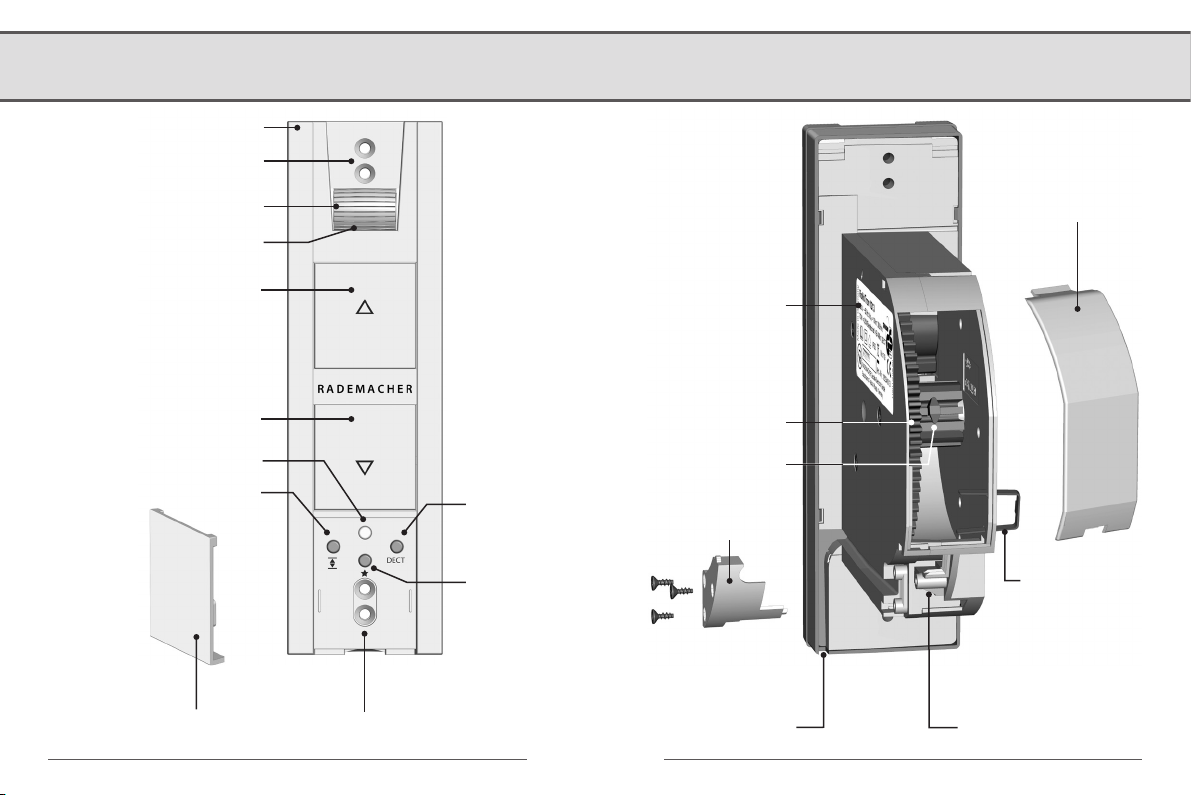
5. Gesamtansicht
Frontblende
Befestigungslöcher
Umlenkrolle
Gurteinlass
Wickelradfach-
abdeckung
Auf-Taste
Ab-Taste
Kontrollleuchte
Endpunkttaste
Abdeckblende
Befestigungslöcher
DECT-Taste
Lieblingsposition
Typenschild
Wickelrad
Befestigungs-
haken
Zugentlastung
Entriegelungsklammer
Kabelkanal
Anschlussklemmen
9

5.1 Bedientasten und Kontrollleuchte
Pos. Symbol Beschreibung
1)
2)
3)
4)
6)
5)
1)
2)
3)
4)
5)
6)
DECT
Auf-/Stopp-Taste + Ab-/Stopp-Taste
Der Rollladen fährt Auf / Ab oder stoppt
Kontrollleuchte / Statusanzeige (rot / grün)
Endpunkttaste
Einstellen der beiden Endpunkte
Lieblingsposition
Einstellen einer beliebigen Position, an der der Rollladen beim
Herunterfahren stoppt.
DECT-Taste
An- und Abmelden an der DECT-Basisstation (FRITZ!Box)
10
6. Produktbeschreibung / Verwendungszweck
Der RolloTron DECT ist ein elektrischer Rollladen-Gurtwickler
für den Innenbereich. Die Montage erfolgt als Unterputzgerät.
Die Stromversorgung erfolgt über das beiliegende
Anschlusskabel mit Netzstecker.
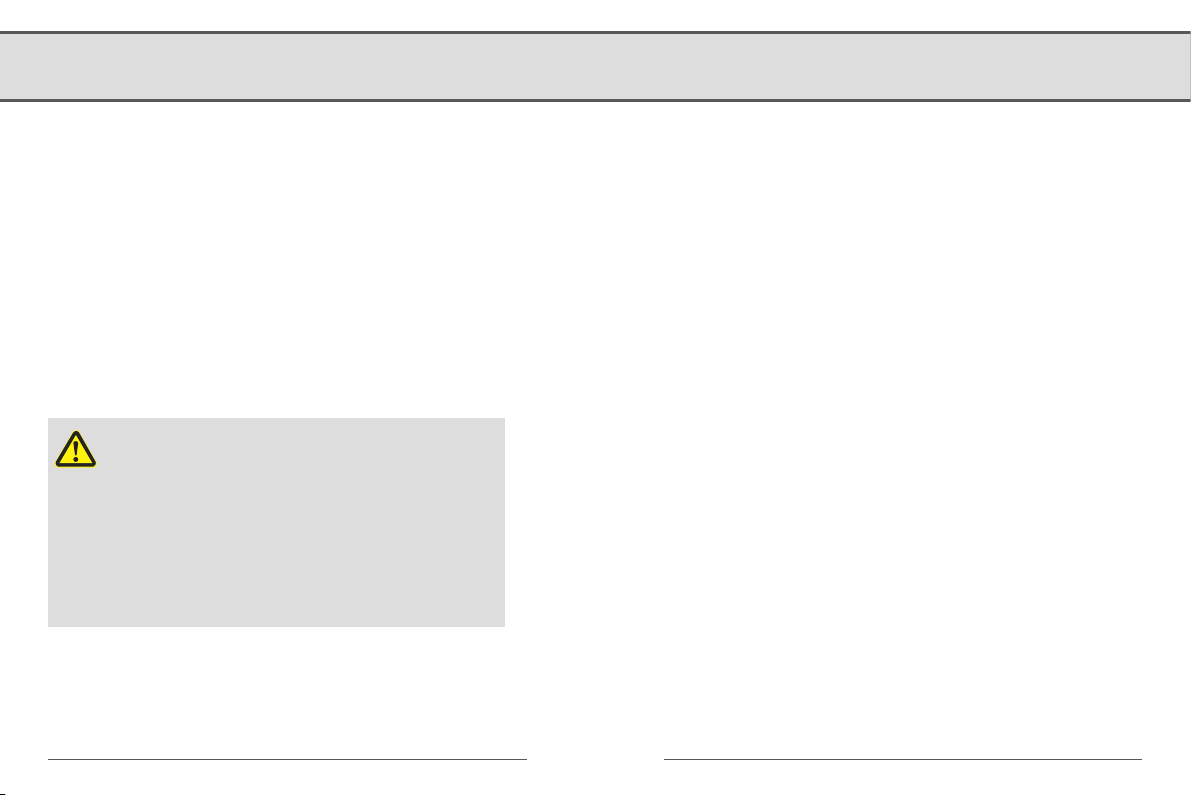
Bequeme Steuerung via DECT-Funkstandard über das Internet, z. B. mit einem Smartphone
Neben der manuellen Bedienung vor Ort kann der RolloTron
DECT per Funk mit einer FRITZ!Box verbunden und mit Hilfe der
FRITZ!App Smart Home bequem von zu Hause oder unterwegs
via Internet gesteuert werden.
FRITZ!BoxFRITZ!Box
11
6.1 Funktionen
● Softstart/Softstopp
Durch sanftes Anfahren und Anhalten wird die Mechanik des
Gurtwicklers und das Gurtband entsprechend geschont.
● Hinderniserkennung
Trifft der Rollladen beim Runterfahren auf ein Hindernis, wird
der RolloTron DECT ausgeschaltet. Danach ist ein Betrieb in die
gleiche Fahrtrichtung nicht mehr möglich.
Lassen Sie den RolloTron DECT in die Gegenrichtung
fahren und entfernen Sie das Hindernis. Danach ist
der Betrieb in die ursprüngliche Fahrtrichtung wieder
möglich.
Bei einem Ausfall der Hinderniserkennung
besteht Verletzungsgefahr.
● Für die sichere Funktion der Hinderniser-
kennung muss das Gurtband möglichst
gleichmäßig aufgewickelt sein.
● Achten Sie nach einem Auslösen der Hinder-
niserkennung unbedingt darauf, dass das
Gurtband bei der nächsten Fahrt möglichst
gerade und gleichmäßig in das Gerät läuft.
● Blockiererkennung / Überlastsicherung
Blockiert der Antrieb beim Öffnen des Rollladens (z. B. durch
Vereisung), wird der Gurtwickler ausgeschaltet.
Beseitigen Sie zuerst die Überlastungsursache.
Danach ist der Betrieb in beide Fahrtrichtungen wieder
möglich.
● Manuelle Bedienung vor Ort oder via
DECT-Basisstation (FRITZ!Box)
Endpunkteinstellung
Manuelle Steuerung (Auf/Ab/Stopp)
Lieblingsposition einstellen und anfahren
Werkseinstellungen laden
12
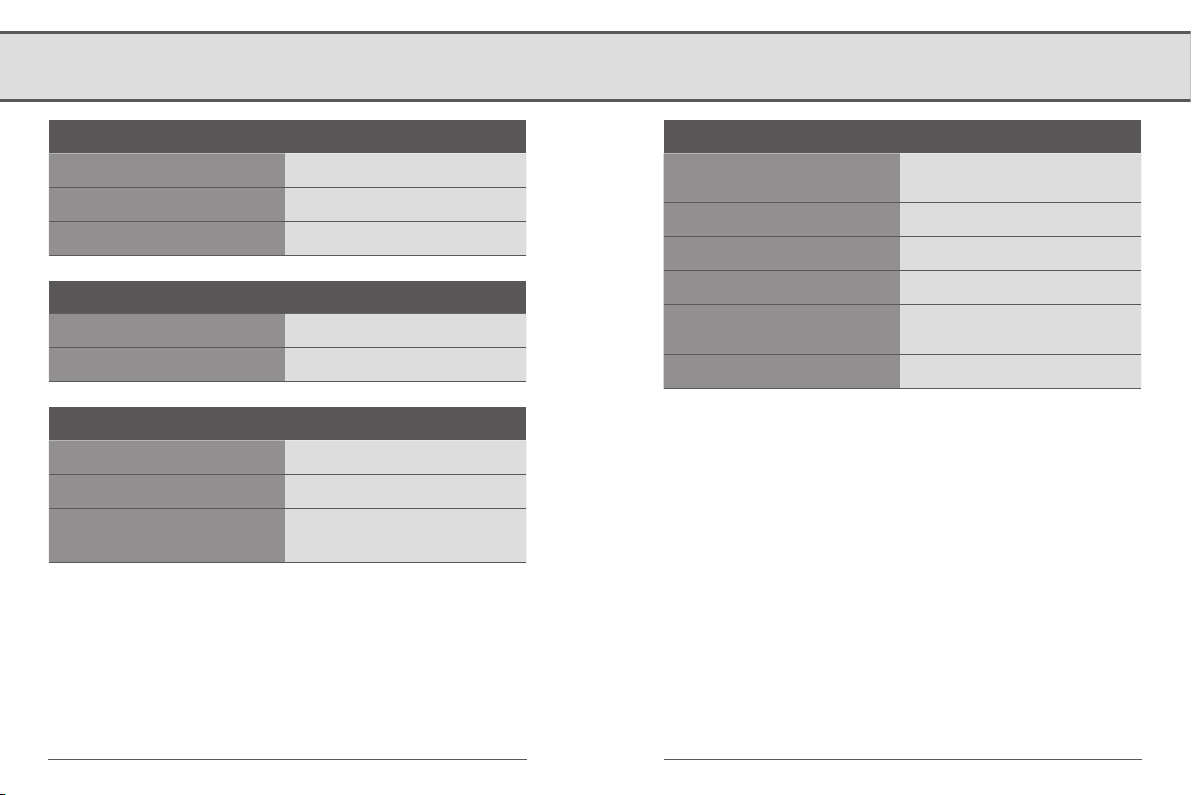
7. Technische Daten
Spannungsversorgung
Versorgungsspannung: 230 V ~ / 50 Hz
Nennleistung: 70 W
Leistungsaufnahme: Stand-by: < 0,5 W
Mechanische Leistung
Nenndrehmoment: 10 Nm
Maximale Drehzahl: 30 U/min
DECT Funkstandard
Sendefrequenz: 1880 - 1900 MHz
Sendeleistung: max. 250 mW
Reichweite: ● im Gebäude bis zu 40 m
● im Freien bis zu 100 m
Betriebsbedingungen
Kurzzeitbetrieb (KB):
Schutzklasse: II
Schutzart: IP20 (nur für trockene Räume)
Netzanschlusskabel: 2 x 0,75 mm2 (H03VVH2-F)
Zulässige Umgebungstemperatur:
Schalldruckpegel (LpA): ≤ 70 dB(A)
4 Minuten
(maximale Laufzeit)
0 °C bis +40 °C
13

7.1 Abmessungen
35
132
139
27
Alle Maßangaben in mm
R A D E M A C H E R
DECT
61
211
185
165
14
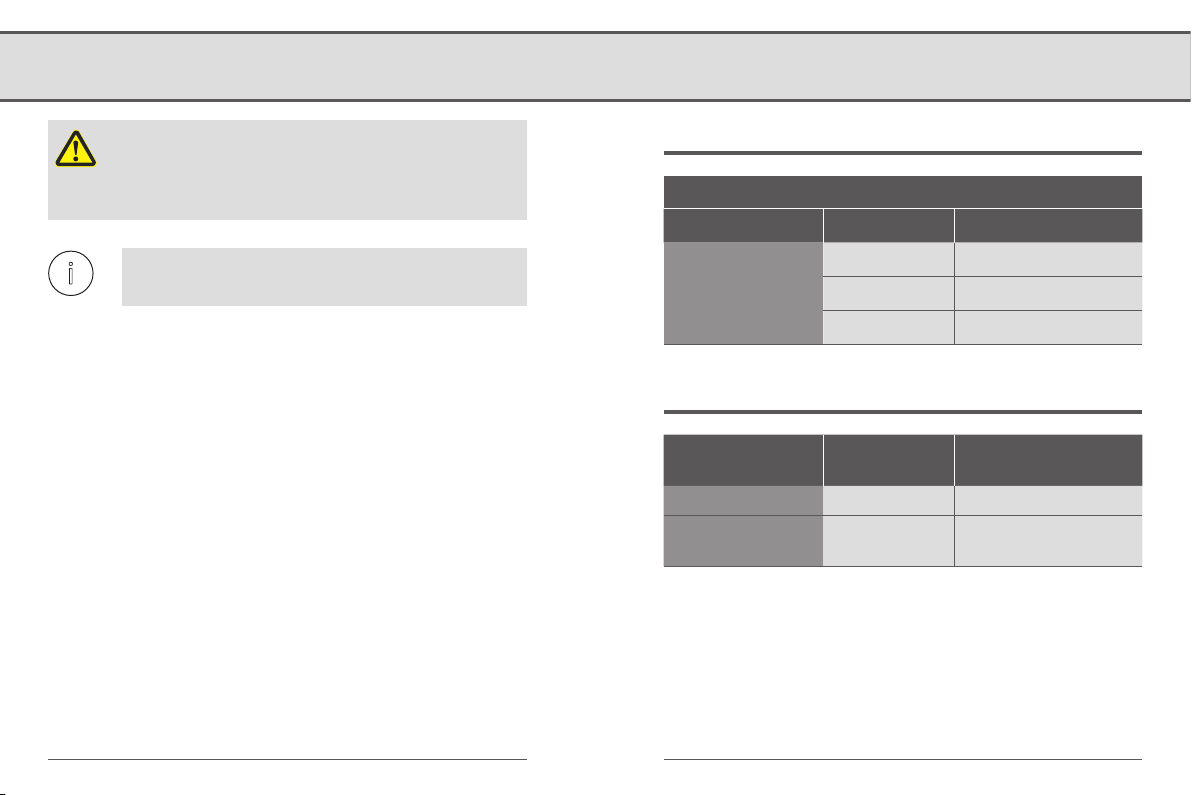
7.2 Zulässige Rollladen-Gurtbänder
i
Die Verwendung zu langer Gurtbänder kann zur
Beschädigung des RolloTron DECT führen.
Verwenden Sie nur Gurtbänder in den zulässigen
Längen.
Die Angaben sind Richtwerte und gelten für eine
ideale Einbausituation.
Zulässige Rollladen-Gurtbänder
RolloTron DECT
Gurtbandbreite: Gurtstärke Maximale Gurtlänge
1,0 mm 7,6 m
23 mm
1,3 mm 6,2 m
1,5 mm 5,2 m
Zulässige Rollladenfläche (m2)
Rollladentyp: Gewicht/m
2
Kunststoffrollläden (4,5 kg/m2) ca. 6 m
Aluminium- und
Holzrollläden
(10,0 kg/m2) ca. 3 m
zulässige
Rollladenfläche (m2)
2
2
15
8. Montage
i
Bei falscher Montage können Sachschäden
entstehen.
● Während des Betriebs sind starke Kräfte wirk-
sam, die eine sichere Montage auf einem festen
Untergrund erfordern.
● Montieren Sie den Gurtwickler so, dass das
Gurtband möglichst senkrecht in das Gerät einläuft, Sie vermeiden dadurch unnötige Reibung
und Verschleiß.
Um einen optimalen Betrieb zu gewährleisten, soll-
ten Sie den RolloTron DECT nicht in der Nähe von
metallischen Gegenständen montieren.
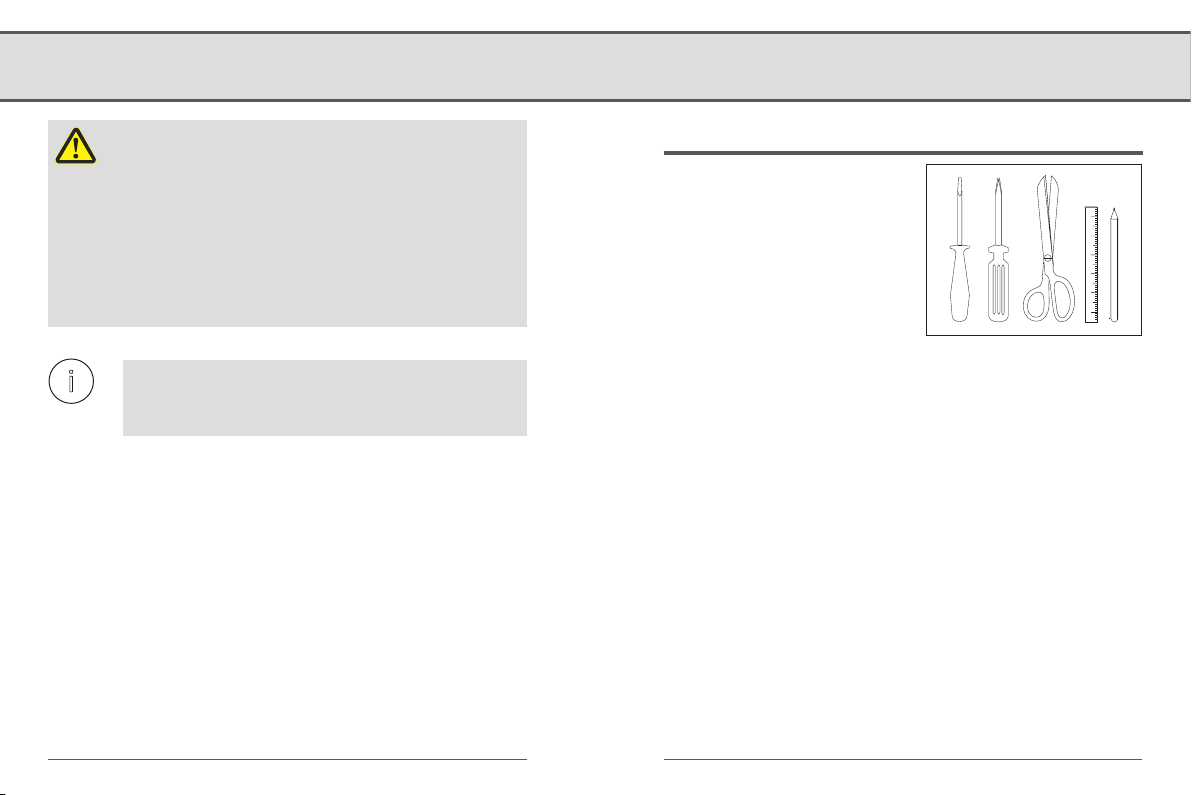
Sie benötigen folgendes Werkzeug
● Schraubendreher
● Schere
● Zollstock oder Maßband
● Stift
1
2
3
4
5
16
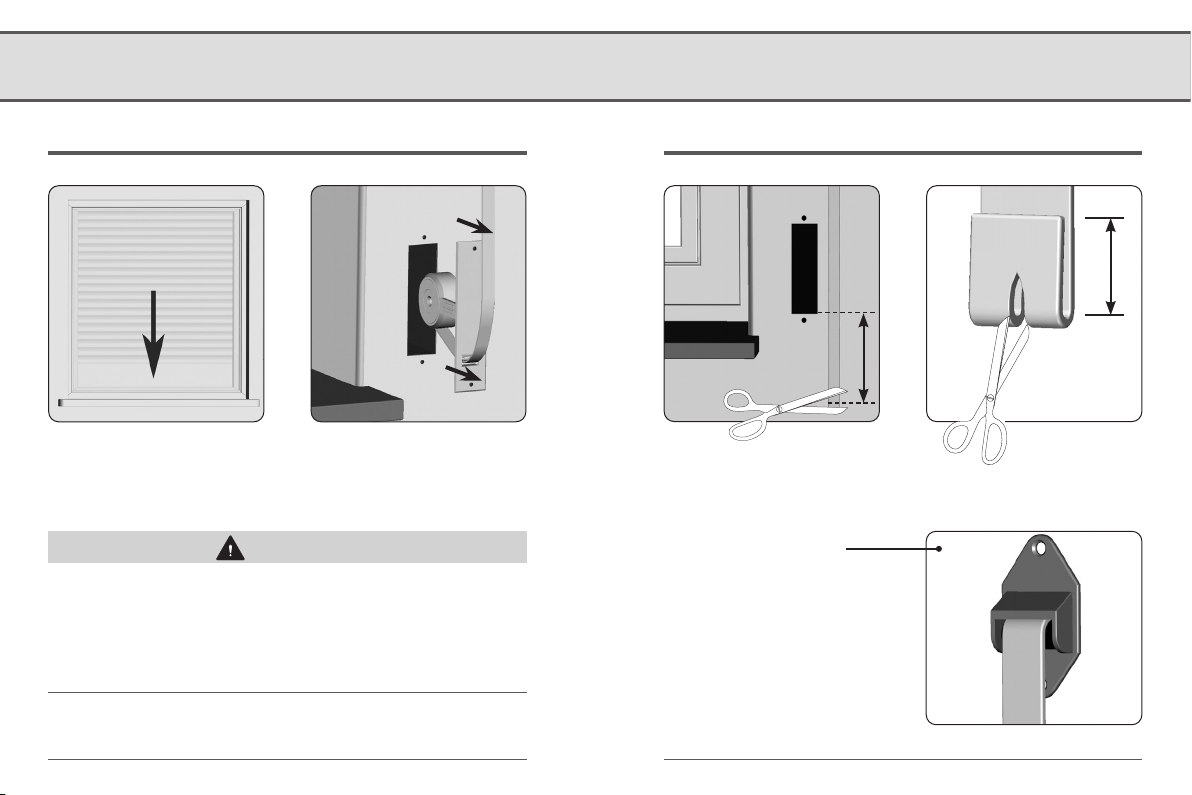
8.1 Montagevorbereitungen
Den alten Gurtwickler ausbauen
Den Rollladen vollständig schließen. Anschließend den Gurtwickler ausbauen und das Gurtband vollständig abwickeln.
VORSICHT!
Durch die vorgespannte Feder des alten Gurtwicklers
besteht Verletzungsgefahr.
Halten Sie die Federdose beim Lösen des Gurtbandes gut fest
und lassen Sie sie langsam zurückdrehen, bis die Federdose
vollständig entspannt ist.
Das Gurtband kürzen und einschneiden
2 cm
20 cm
Empfehlung
Bei schwergängigen Rollläden
eine Umlenkrolle an den Gurtkasten montieren. So vermeiden
Sie Reibung und Verschleiß am
Gurtband.
17
8.2 Elektrischer Anschluss
Der elektrische Anschluss kann sowohl mit dem beiliegenden
Netzkabel als auch über eine vor Ort fest verlegte Zuleitung
erfolgen.
GEFAHR!
Bei Berührung von elektrischen Komponenten besteht
Lebensgefahr durch Stromschlag.
● Führen Sie alle Montage- und Anschlussarbeiten im span-
nungslosen Zustand durch.
● Trennen Sie die Zuleitung allpolig vom Netz und sichern
Sie sie gegen Wiedereinschalten.
● Prüfen Sie die Anlage auf Spannungsfreiheit.
18

8.2 Elektrischer Anschluss
Das Netzkabel anschließen
Anschlussklemmen
Die Farbbelegung ist für diesen Anschluss nicht relevant. Die Zugentlastung mit den beiliegenden Schrauben festschrau-
Das Netzkabel mit der Zugentlastung sichern
Zugentlastung
ben und das Kabel im Kabelkanal verlegen.
WARNUNG! WARNUNG!
Ein beschädigtes Anschlusskabel kann einen Kurzschluss
verursachen.
Das Anschlusskabel darf später beim Anschrauben des
RolloTron DECT nicht gequetscht und beschädigt werden.
19

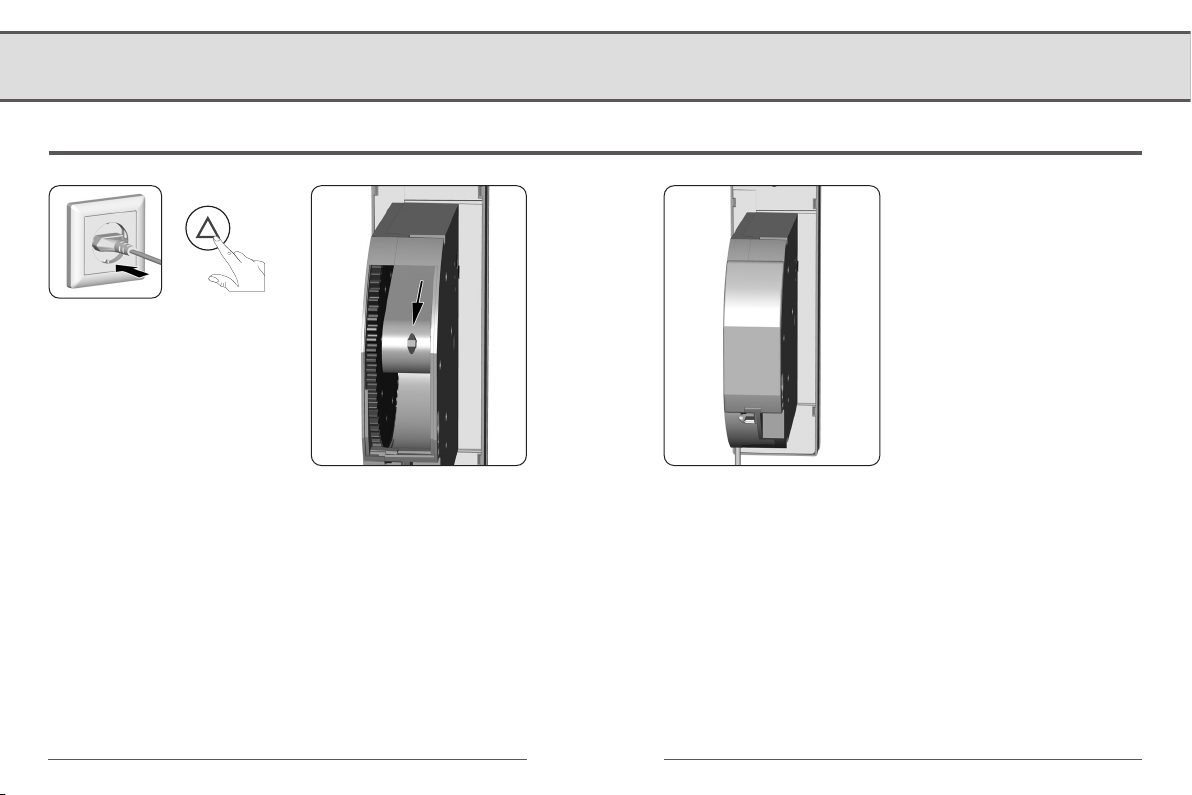
8.3 Das Gurtband einführen und befestigen
Den Befestigungshaken in die richtige Position fahren
Befestigungshaken
1. Den Netzstecker in die Steckdose stecken.
2. Die Auf-Taste solange drücken, bis der Befestigungshaken
im Wickelradfach gut erreichbar ist.
3. Den Netzstecker wieder aus der Steckdose ziehen.
VORSICHT!
Fassen Sie nicht bei laufendem Motor in das Wickelradfach.
Das Gurtband senkrecht von oben einführen
Gurtbandverlauf
im Gerät
Das Gurtband - wie in der Schnittdarstellung gezeigt - durch
das Gerät führen und von oben über den Befestigungshaken
schieben.
20
8.3 Das Gurtband einführen und befestigen
Das Gurtband eine vollständige Umdrehung aufwickeln
1. Den Netzstecker erneut in die Steckdose stecken.
2. Die Auf-Taste solange drücken, bis sich das Gurtband ein-
mal ganz um das Wickelrad gedreht hat.
3. Den Netzstecker wieder aus der Steckdose ziehen.
4. Die Wickelradfachabdeckung auf das Gehäuse stecken.
21
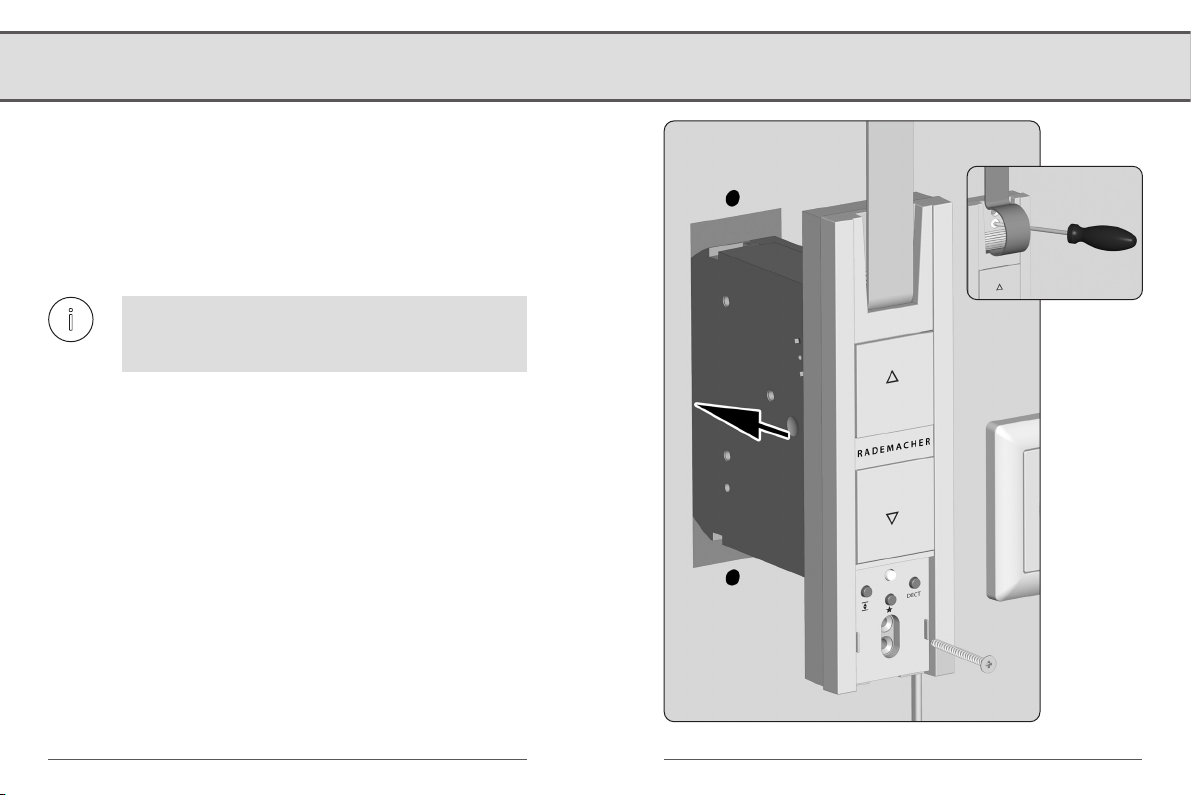
8.4 Den RolloTron DECT einbauen
i
Den RolloTron DECT möglichst gerade einbauen, damit sich das
Gurtband korrekt aufwickeln kann.
Den RolloTron DECT in den Gurtkasten schieben und mit den
beiliegenden Schrauben festschrauben. Anschließend den
Netzstecker in die Steckdose stecken.
Der RolloTron DECT muss frei im Gurtkasten sitzen
und darf nicht am Mauerwerk anliegen, es kann
sonst zur Geräuschbildung kommen.
22

9. Einstellungen und Bedienung
i
9.1 Endpunkte einstellen
Damit der Rollladen oben und unten vor jedem Anschlag stehen
bleibt, müssen die Endpunkte eingestellt werden.
Es müssen unbedingt beide Endpunkte eingestellt
werden, sonst kann es zu Funktionsstörungen
kommen.
Ohne Endpunkteinstellung läuft der RolloTron DECT
nur solange, wie eine der beiden Bedientasten
gedrückt wird.
Ohne Endpunkteinstellung sind die Lieblings-
position und DECT-Fahrbefehle nicht verfügbar.
23

i
9.1 Endpunkte einstellen
Den oberen Endpunkt einstellen
Jeweils beide Tasten gleichzeitig drücken und gedrückt halten. Der Rollladen fährt in die gewünschte Richtung und die Kontrollleuchte blinkt
grün. Beim Loslassen einer Taste stoppt der Rollladen und die erreichte Position wird als Endpunkt gespeichert. Die Kontrollleuchte leuchtet ca.
5 Sekunden durchgängig zur Bestätigung.
ACHTUNG!
Die falsche Einstellung des oberen Endpunktes kann zur
Überlastung bzw. Zerstörung des RolloTron DECT bzw. des
Antriebs führen.
● Stellen Sie den oberen Endpunkt nicht ganz bis zum
Anschlag ein.
● Lassen Sie die Tasten rechtzeitig los und fahren Sie nicht
über den jeweiligen Endpunkt hinaus.
Den unteren Endpunkt einstellen
Bei Erreichen des unteren Endpunktes darf das
Gurtband nicht zu schlaff werden. Straffen Sie
das Gurtband etwas, bis es durch das Rollladengewicht gespannt wird.
24

9.1 Endpunkte einstellen
Einen Endpunkt korrigieren
Den Rollladen in die Mittelstellung fahren. Anschließend den Endpunkt neu einstellen
(Beispiel für den oberen Endpunkt).
25

9.2 DECT Anmeldung/Abmeldung
Den RolloTron DECT anmelden Den RolloTron DECT abmelden
DECT
1.
1 Sekunde
Danach bleibt der Anmeldemodus
DECT
des RolloTron DECT 1 Minute lang
aktiv.
2. In dieser Zeit die DECT-Anmeldung der FRITZ!Box starten.
Die LED "Info" oder "DECT" blinkt.
Kontrollleuchten am RolloTron DECT
● grün blinkend
Der Anmeldemodus ist aktiv
● grün leuchtend (5 Sekunden)
Die Anmeldung war erfolgreich
● rot leuchtend (5 Sekunden)
Die Anmeldung ist fehlgeschlagen
Den Verbindungszustand kontrollieren
DECT
< 1 Sekunde
Die DECT-Taste am RolloTron DECT
kurz antippen.
26
DECT
1 Sekunde
oder
die Abmeldung in der FRITZ!Box
starten.
Kontrollleuchten am RolloTron DECT
● rot blinkend
Der Abmeldemodus ist aktiv
● grün leuchtend (5 Sekunden)
Die Abmeldung war erfolgreich
● rot leuchtend (5 Sekunden)
Die Abmeldung ist fehlgeschlagen
Kontrollleuchte am RolloTron DECT
● grün leuchtend (5 Sekunden)
bei aktiver Verbindung
● rot leuchtend (5 Sekunden)
OHNE Verbindung
DECT

9.3 Manuelle Bedienung
Die Bedienung von Hand ist jederzeit möglich.
Den Rollladen öffnen /schließen
Eine der beiden Tasten kurz drücken. Der Rollladen fährt in die
gewählte Richtung und stoppt am eingestellten Endpunkt.
Bei aktivierter Lieblingsposition
In Abrichtung fährt der Rollladen bis zur eingestellten
Lieblingsposition, siehe Seite 28.
Den Rollladen stoppen
Eine der beiden Tasten erneut kurz drücken.
Öffnen und Schließen durch langes Drücken
Der Rollladen fährt in die gewählte Richtung bis zum Endpunkt
oder stoppt, sobald Sie die jeweilige Taste loslassen.
27

9.4 Lieblingsposition einstellen
Falls der RolloTron DECT sich nicht bis zum unteren Endpunkt
schließen soll, können Sie mit Hilfe dieser Funktion eine beliebige Position (z. B. als Lüftungsposition) festlegen.
Die Lieblingsposition aktivieren/deaktivierenDie Lieblingsposition anfahren und speichern
kurz
2 Sekunden
Taste länger als zwei
Sekunden drücken. Die
grüne Kontrollleuchte
blinkt ca. 5 Sekunden
lang.
DECT
Taste jeweils kurz
DECT
drücken.
Kontrollleuchte
● grün leuchtend (5 Sekunden)
Lieblingsposition ist aktiv
● rot leuchtend (5 Sekunden)
Lieblingsposition ist deaktiviert
28

9.5 Den Rollladen bei aktiver Lieblingsposition schließen
Falls der Rollladen oberhalb oder unterhalb der Lieblingsposition steht ...
oder
Lieblingsposition
... fährt er bis zur eingestellten
Lieblingsposition.
oder
Endpunkt
... fährt er bis zum unteren
Endpunkt.
9.6 Den RolloTron DECT mit der FRITZ!App Smart Home oder mit dem FRITZ!Fon steuern
FRITZ!App Smart Home
Mit der FRITZ!App Smart Home können Sie den an einer
FRITZ!Box angemeldeten RolloTron DECT steuern. Dafür muss
diese App auf Ihrem Smartphone installiert sein und eine
direkte Verbindung zum Heimnetz oder über den Fernzugriff
bestehen. Die FRITZ!App Smart Home können Sie aus dem
AppStore und bei GooglePlay herunterladen.
29
FRITZ!Fon
Mit dem Startbildschirm „Smart Home“ können Sie den
RolloTron DECT fernbedienen.

i
9.7 Alle Einstellungen löschen - Werkseinstellungen laden
DECT
DECT
Die Abdeckblende von den
Einstelltasten abziehen.
4 Sekunden
Alle drei Tasten gleichzeitig 4 Sekunden lang drücken, die rote
LED blinkt dabei. Anschließend leuchtet die rote LED
5 Sekunden lang.
Nach dem Loslassen sind folgende Einstellungen gelöscht:
● Endpunkte
● Lieblingsposition
● DECT-Basisstation (FRITZ!Box)
Danach befindet sich der RolloTron DECT wieder im
Auslieferungszustand.
30

10. Den RolloTron DECT ausbauen
1. Den RolloTron DECT auf die Werkseinstellungen zurück-
setzen.
2. Den Rollladen vollständig schließen und die Ab-Taste
weiter gedrückt halten.
3. Danach das Gurtband soweit wie möglich oben aus dem
RolloTron DECT herausziehen.
4. Den Netzstecker aus der Steckdose ziehen.
5. Die Montageschrauben lösen und den RolloTron DECT
vollständig aus dem Gurtkasten ziehen.
DECT
4 Sekunden
31

10. Den RolloTron DECT ausbauen
6. Die Wickelradfachabdeckung öffnen und die Position des
Befestigungshakens kontrollieren.
7. Falls nötig, den Befestigungshaken in eine leicht zugängli-
che Position fahren.
VORSICHT!
Es besteht Verletzungsgefahr.
● Fassen Sie nicht bei laufendem Motor in das Wickelradfach.
● Ziehen Sie immer den Netzstecker, bevor Sie in das
Wickelradfach fassen.
8. Den Netzstecker wieder aus der Steckdose ziehen.
9. Das Gurtband vom Befestigungshaken lösen und vollstän-
dig vorne aus dem RolloTron DECT herausziehen.
32

11. Das Gurtband bei Geräteausfall entfernen
Sollte der RolloTron DECT einmal ausfallen und der Motor nicht
mehr laufen, können Sie mit Hilfe der Getriebeentriegelung das
Gurtband vollständig aus dem Gurtwickler ziehen, ohne es zerschneiden zu müssen.
1. Den Netzstecker aus der Steckdose ziehen und den
RolloTron DECT demontieren, siehe Seite 31.
WARNUNG! WARNUNG!
Es besteht Verletzungsgefahr, der Rollladen kann ungebremst herunterfallen.
● Sichern Sie den Rollladen gegen Herunterfallen.
● Halten Sie das Gurtband gut fest, damit der Rollladen
nicht ungebremst herunterfällt.
● Lassen Sie sich beim Entriegeln von einer zweiten Person
helfen.
2. Die Entriegelungsklammer in das Getriebefach stecken und
fest gedrückt halten.
3. Das Gurtband soweit wie möglich aus dem RolloTron DECT
herausziehen und vom Befestigungshaken lösen. Danach
das Gurtband vollständig herausziehen.
4. Die Entriegelungsklammer wieder zurück in das
Aufbewahrungsfach stecken.
Getriebe-
entriegelung
Aufbe-
wahrungsfach
33

12. Was tun, wenn ... ?
Störung Mögliche Ursache / Lösung
... der RolloTron DECT keine Funktion zeigt? Überprüfen Sie die Stromversorgung inkl. Anschlusskabel und
Anschlussstecker.
... der Rollladen an den eingestellten Endpunkten nicht
mehr stehen bleibt?
... der Rollladen stehen bleibt, sobald die Bedientaste
losgelassen wird?
... der RolloTron DECT falsch herum läuft? Möglicherweise ist das Gurtband falsch herum auf das Wickelrad aufgelegt,
... der Rollladen im Hochlauf plötzlich stehen bleibt und
die rote Kontrollleuchte blinkt?
Möglicherweise haben sich die Endpunkte durch die Banddehnung verstellt. Stellen
Sie die Endpunkte neu ein, s. Seite 23.
Die Endpunkte sind noch nicht eingestellt, stellen Sie die Endpunkte ein,
s. Seite 23.
s. Seite 20.
a) Der Antrieb ist möglicherweise blockiert, z. B. durch Festfrieren des Rollladens
oder andere Hindernisse.
b) Eventuell ist der Rollladen nicht leichtgängig genug.
Überprüfen Sie den Rollladen bzw. die Rollladenführung.
c) Der Rollladen ist möglicherweise zu schwer. Die maximale
Zugkraft des Gurtwicklers wurde überschritten, s. Seite 37.
34

12. Was tun, wenn ... ?
Störung Mögliche Ursache / Lösung
... der Rollladen im Tieflauf stehen bleibt und die rote
Kontrollleuchte blinkt?
... die Kontrollleuchte blinkt und der RolloTron DECT sich
weder Auf- noch Abfahren lässt?
... der RolloTron DECT manuell oder automatisch nicht
mehr ordnungsgemäß reagiert?
a) Der Rollladen ist eventuell auf ein Hindernis gelaufen.
Fahren Sie den Rollladen wieder hoch und entfernen Sie das Hindernis.
b) Die Lamellen haben sich verschoben.
Fahren Sie, wenn möglich, den Rollladen wieder hoch und richten Sie die
Lamellen aus.
c) Der Rollladen schleift im Rollladenkasten am Fensterrahmen durch fehlende
Andruckrollen oder Dämmmaterial hat sich gelöst und verkeilt den Rollladen.
Öffnen Sie den Rollladenkasten und beseitigen Sie den Fehler. Schmieren
Sie schwergängige Stellen, wenn nötig, mit Gleitwachs ein.
d) Der Rollladen ist möglicherweise zu leicht.
Beschweren Sie den Rollladen, indem Sie z. B. in die unterste Lamelle ein
Flacheisen einschieben.
Die max. Laufzeit des Antriebs wurde überschritten, s. Seite 5/13.
Der Motor ist zu heiß, nach ca. 1 Stunde ist der Gurtwickler wieder voll betriebsbe-
reit.
Der RolloTron DECT ist nicht mehr betriebsbereit. Löschen Sie alle Einstellungen,
siehe Seite 30, und testen Sie den RolloTron DECT mit den Werkseinstellungen.
35

13. Wartung und Pflege
Wartung Pflege
VORSICHT!
Eine mangelhafte Wartung kann zur Gefährdung von
Personen durch Beschädigung des RolloTron DECT und der
Rollladenanlage führen.
● Kontrollieren Sie regelmäßig den RolloTron DECT und alle
Komponenten Ihrer Rollladenanlage auf Beschädigung.
Prüfen Sie den RolloTron DECT auf korrekte Funktion.
Der Behang darf nicht beschädigt sein.
Das Gurtband darf nicht ausfransen.
Die Umlenkrolle am Rollladenkasten muss immer
leichtgängig sein.
Der Wickelteller im Rollladenkasten muss fest und stabil
sein. Er kann nach längerem Einsatz seine Festigkeit
verlieren.
● Lassen Sie beschädigte Komponenten von einem
Rollladenfachbetrieb austauschen.
Sie können den RolloTron DECT mit einem angefeuchteten
Tuch reinigen. Verwenden Sie bitte keine aggressiven oder
scheuernden Reinigungsmittel.
36

14. Vereinfachte EU-Konformitätserklärung
Hiermit erklärt die RADEMACHER Geräte-Elektronik
GmbH, dass der RolloTron DECT den Richtlinien
2006/42/EG (Maschinenrichtlinie) und 2014/53/
EU (Funkanlagenrichtlinie) entspricht.
Der vollständige Text der EU-Konformitätserklärung liegt dem
Produkt bei und ist beim Hersteller hinterlegt.
RADEMACHER Geräte-Elektronik GmbH
Buschkamp 7
46414 Rhede (Deutschland)
37

15. Garantiebedingungen
RADEMACHER Geräte-Elektronik GmbH gibt eine 36-monatige
Garantie für Neugeräte, die entsprechend der Einbauanleitung
montiert wurden. Von der Garantie abgedeckt sind alle
Konstruktionsfehler, Materialfehler und Fabrikationsfehler.
Ihre gesetzlichen Gewährleistungsansprüche bleiben von
dieser Garantie unberührt.
Ausgenommen von der Garantie sind:
● Fehlerhafter Einbau oder Installation
● Nichtbeachtung der Einbau- und Bedienungsanleitung
● Unsachgemäße Bedienung oder Beanspruchung
● Äußere Einwirkungen wie Stöße, Schläge oder Witterung
● Reparaturen und Abänderungen von dritten, nicht autori-
sierten Stellen
● Verwendung ungeeigneter Zubehörteile
● Schäden durch unzulässige Überspannungen
(z. B. Blitzeinschlag )
● Funktionsstörungen durch Funkfrequenzüberlagerungen
und sonstige Funkstörungen
Voraussetzung für die Garantie ist, dass das Neugerät bei einem
unserer zugelassenen Fachhändler erworben wurde. Dies ist
durch Vorlage einer Rechnungskopie nachzuweisen.
Innerhalb der Garantiezeit auftretende Mängel beseitigt
RADEMACHER kostenlos entweder durch Reparatur oder durch
Ersatz der betreffenden Teile oder durch Lieferung eines gleichwertigen oder neuen Ersatzgerätes. Durch Ersatzlieferung
oder Reparatur aus Garantiegründen tritt keine generelle
Verlängerung der ursprünglichen Garantiezeit ein.
38

39

RADEMACHER
Geräte-Elektronik GmbH
Buschkamp 7
46414 Rhede (Deutschland)
info@rademacher.de
www.rademacher.de
Service:
Hotline 01807 933-171*
Telefax +49 2872 933-253
service@rademacher.de
* 30 Sekunden kostenlos, danach 14 ct/Minute
aus dem dt. Festnetz bzw. max. 42 ct/Minute aus
dem dt. Mobilfunknetz.
Technische Änderungen, Druckfehler und Irrtümer
vorbehalten. Abbildungen unverbindlich.

RolloTron DECT
Type 1213
Item no. 1823 45 13
Installation and operating manual
Translation of the german original manual
DE / EN
VBD 709-1-1 (02.21)

Table of Contents
1. This manual... ...................................................................................... 43
2. Hazard symbols ................................................................................. 44
3. Safety instructions ............................................................................ 45
3.1 Intended use ............................................................................ 46
3.2 Required expert knowledge of the installer ................. 47
3.3 Technical terms - definition ................................................ 47
4. Included in delivery.......................................................................... 48
5. General view ....................................................................................... 49
5.1 Operating buttons and indicator light ........................... 50
6. Product description / intended use ........................................... 51
6.1 Features ..................................................................................... 52
7. Technical specifications .................................................................. 53
7.1 Dimensions ............................................................................... 54
7.2 Permissible roller shutter belts .......................................... 55
8. Installation ........................................................................................... 56
8.1 Preparation for installation ................................................. 57
8.2 Electrical connection............................................................. 58
8.3 Drawing in and fastening the belt ................................... 60
8.4 Mounting the RolloTron DECT ........................................... 62
9. Settings and operation ................................................................... 63
9.1 Setting the end points .......................................................... 63
9.2 DECT log-on / log-off ............................................................ 66
9.3 Manual mode ........................................................................... 67
9.4 Setting the favourite position ............................................ 68
9.5 Closing the roller shutter when the favourite
position is active .................................................................... 69
9.6 Controlling the RolloTron DECT with the
FRITZ!App Smart Home or with the FRITZ!Fon ........... 69
9.7 Deleting all settings - loading factory settings............ 70
10. Removing the RolloTron DECT ..................................................... 71
11. Removing the belt in the event of device failure .................. 73
12. What to do if ... ? ................................................................................ 74
13. Maintenance and care ..................................................................... 76
14. Simplified EU declaration of conformity .................................. 77
15. Warranty terms and conditions ................................................... 78
42

1. This manual...
...describes how to install, connect the electrical system and
operate the RolloTron DECT roller shutter belt winder.
● Before you begin, please read this manual through com-
pletely and follow all the safety instructions.
● This manual is part of the product. Please store it in an
easily accessible place.
● When passing the RolloTron DECT on to a third party, this
manual must be passed on as well.
● Damage resulting from non-compliance with this
manual and the safety instructions will void the warranty.
We assume no liability for any consequential damage.
43

2. Hazard symbols
i
Danger of fatal electric shock
Danger area / dangerous situation
Levels of danger and signal words
DANGER!
This hazard will result in serious injury or death if not avoided.
WARNING! WARNING!
This hazard may result in serious injury or death if not avoided.
CAUTION!
This hazard may result in minor or moderate injury if not avoided.
ATTENTION!
This hazard may lead to property damage.
Symbols and depictions used
Depiction Description
1. Steps to be taken
2.
● Itemisation
(1) or a) List
Please read the respective manual.
Useful information
44

3. Safety instructions
Danger of fatal electric shock when using
the RolloTron DECT outside!
Only use the RolloTron DECT indoors and in dry
rooms.
Incorrect use can lead to injuries
or damage. Observe
the following safety instructions:
● Never use defective or damaged devices.
● Instruct all appropriate persons in the safe use
of the RolloTron DECT, especially children from
8 years of age upwards as well as persons with
reduced physical, sensory or mental capacities.
● Children must not play with the device.
● Cleaning and maintenance may not be carried out
by children without supervision.
● Keep other people away from the area whilst con-
figuring the settings to avoid injury in the event
that the shutter suddenly slips.
● Carry out all cleaning work on the roller shutter
whilst the device is disconnected from the mains
power.
● The mains socket and plug must be easily accessi-
ble at all times.
● The maximum permissible running time for a
cycle may not be exceeded when the device is in
operation. The running time limit (KB) for a cycle is
four minutes.
● If the running time limit is triggered, then the
RolloTron DECT must be left for at least 12 minutes
to cool down. During this period, the red indicator
light flashes rapidly. Full operational availability is
re-established after approx. one hour.
● Never use the DECT radio system and its compo-
nents for the remote control of devices and systems with increased safety-relevant requirements
or where there is an accident risk. Applications of
this kind require additional safety equipment.
45

3.1 Intended use
i
i
Only use the RolloTron DECT for opening and closing roller
shutters with a permissible belt.
Mechanical locks of any kind are not suitable for
automated operation with this device.
Only use original spare parts from RADEMACHER
● By doing so, you avoid the risk of malfunctions and damage
to your RolloTron DECT.
● As the manufacturer, we provide no warranty for the use of
third-party components and accept no liability for consequential damage resulting from such.
● All repairs to the RolloTron DECT must be undertaken by
authorised customer service personnel.
Operating conditions
● A 230 V / 50 Hz power supply, together with a site-provided
disconnecting device (fuse, MCB), must be available at the
installation location.
● An easily accessible 230 V / 50 Hz socket must be available
if the enclosed connecting cable with Euro plug is being
used.
● The roller shutter must run up and down smoothly. It
should not jam.
● The mounting surface for the RolloTron DECT must be flat.
Radio systems that transmit on the same frequency
can cause interference.
Dangers in the case of improper use
Using the RolloTron DECT for purposes other than previously
mentioned is impermissible.
46

3.2 Required expert knowledge of the installer
The connection for the electric roller shutter drive may only be
undertaken by an authorised qualified electrician and in accordance with the connection diagrams in this manual.
The installer must ensure that the entire installation complies with
the standards in the country of commissioning. In particular, the
standards DIN EN 13659 and DIN EN 12045 must be taken into
account.
3.3 Technical terms - definition
DECT (digital enhanced cordless telecommunications)
Radio standard for the telephony and control of compatible
products.
DECT base station (FRITZ!Box)
Central control unit for DECT products. All devices in a DECT
network must be logged on.
Obstacle detection
If the roller shutter hits an obstacle in the DOWN (tt) direction,
the RolloTron DECT is switched off, see page 52.
Overload cut-off
If the drive jams in the UP (▲▲) direction (e.g. due to ice), the
RolloTron DECT is switched off, see page 52.
The installer must draw the customer's attention to the
clamping forces to be expected and to the resulting dangers
in particular.
End points
An end point is set in each direction that the roller shutter travels. When an end point is reached, the RolloTron DECT automatically stops the roller shutter.
Running time limit - transient operation (KB)
The RolloTron DECT is not designed for continuous operation.
Transient operation defines the maximum permissible running
time, see page 45 / 75.
47

VBD 709-1 (01.21)
4. Included in delivery
RolloTron DECT
Typ 1213
Artikelnr. 1823 45 13
Montage- und Bedienungsanleitung
Originalanleitung
DE / EN
RolloTron DECT
Connecting cable with
Euro plug
Traction relief
Cover plate
48
Assembly screws
(4 x 55 mm)
Reel compartment
cover
Disengaging bracket
(in housing)
Installation and operating
manual
Check the contents of the
packaging to make sure that
they are complete and intact.

5. General view
Front cover
Fastening holes
Deflection roller
Belt inlet
Reel compartment
cover
Up button
Down button
Indicator light
End point button
Cover plate
Fastening holes
DECT button
Favourite
position
49
Type plate
Reel
Fastening
hook
Traction relief
Cable duct
Disengaging
bracket
Connecting terminals

5.1 Operating buttons and indicator light
Pos. Symbol Description
1)
2)
3)
4)
6)
5)
1)
2)
3)
4)
5)
6)
DECT
Up/Stop button + Down/Stop button
The roller shutter travels up / down or stops
Indicator light / status display (red / green)
End point button
Set both end points
Favourite position
Set any position where the roller shutter stops when it is being lowered.
DECT button
Log on/off at the DECT base station (FRITZ!Box)
50

6. Product description / intended use
The RolloTron DECT is an electric roller shutter belt winder
designed for use inside. The unit is installed as a flush-mounted
device.
The power supply is provided via the enclosed connecting
cable with a mains plug.
Convenient control via the DECT radio standard over the Internet, for example, with a smartphone
In addition to manual operation on site, the RolloTron DECT can
be connected via radio to a FRITZ!Box and can be controlled
over the Internet using the FRITZ!App Smart Home conveniently from home or while out and about.
FRITZ!BoxFRITZ!Box
51

6.1 Features
● Soft-start / soft-stop
A soft-start or soft-stop serves to protect the belt winder mechanism and the belt.
● Obstacle detection
If the roller shutter hits an obstacle when it is being lowered,
the RolloTron DECT is switched off. Then it is no longer possible
to operate the device in the same direction again.
Run the RolloTron DECT in the opposite direction
and remove the obstacle. Then it is possible to operate
the drive in the original direction again.
There is a risk of injury if the obstacle detection
function is not working.
● The belt must be wound on as evenly as possible
to ensure safe and correct functioning of the
obstacle detection function.
● Please ensure that the belt winds as straight and
evenly as possible into the device during its subsequent cycle after the obstacle detection system
has triggered.
● Blockage detection / overload cut-off
If the drive jams when opening the roller shutter (e.g. due to
ice) the belt winder is switched off.
First, remove the cause of the overload.
Then it is possible to operate the drive in both directions
again.
● Manual operation on site or via the
DECT base station (FRITZ!Box)
End point setting
Manual control (Up/Down/Stop)
Set and move to the favourite position
Load factory settings
52

7. Technical specifications
Power supply
Supply voltage: 230 V ~ / 50 Hz
Nominal power: 70 W
Consumption: Standby: < 0.5 W
Mechanical power
Nominal torque: 10 Nm
Maximum speed: 30 rpm
DECT radio standard
Transmission frequency: 1880 - 1900 MHz
Transmission power: max. 250 mW
Range: ● Indoors up to 40 m
● Outdoors up to 100 m
Operating conditions
Transient operation (KB):
Protection class: II
Protection type:
Mains connecting cable: 2 x 0.75 mm2 (H03VVH2-F)
Permissible ambient
temperature:
Sound pressure level (LpA): ≤ 70 dB(A)
4 minutes
(maximum running time)
IP20 (only for use in dry
rooms)
0 °C to +40 °C
53

7.1 Dimensions
35
132
139
27
All dimensions in mm
R A D E M A C H E R
DECT
61
211
185
165
54

7.2 Permissible roller shutter belts
i
The RolloTron DECT may be damaged if excessive-
ly long belts are used.
Only use belts of the permissible lengths.
The specifications are intended for guidance only
and apply to an ideal installation situation.
Permissible roller shutter belts
RolloTron DECT
Belt width: Belt thickness Maximum belt length
1.0 mm 7.6 m
23 mm
1.3 mm 6.2 m
1.5 mm 5.2 m
Permissible shutter surface area (m2)
Roller shutter
type:
Plastic roller
shutters
Aluminium and
wooden roller
Weight/m
2
(4.5 kg/m2) Approx. 6 m
(10.0 kg/m2) Approx. 3 m
Permissible
shutter surface area
(m2)
2
2
shutters
55

8. Installation
i
Incorrect installation can lead to property
damage.
● Strong forces are exerted during operation of the
system which require secure installation on a firm
base.
● Install the belt winder so that the belt runs as
straight as possible into the device in order to
avoid unnecessary friction and wear.
In order to ensure optimal operation, the RolloTron
DECT should not be installed near metal objects.
You will require the following tools
● Screwdriver
● Scissors
● Carpenter's gauge or
measuring tape
● Pen
1
2
3
4
5
56

8.1 Preparation for installation
Removing the old belt winder
Fully close the roller shutter. Then remove the belt winder and
completely unwind the belt.
CAUTION!
The pre-tensioned springs on the old belt winder
may lead to risk of injury.
Hold the spring unit firmly when loosening the belt and allow it
to recoil slowly until the spring unit has completely unwound.
Shortening and cutting the belt
2 cm
20 cm
Recommendation
Fit a deflection roller to the belt
box if the roller shutters are stiff.
By doing so, you avoid the risk
of friction and wear on the belt.
57

8.2 Electrical connection
The electrical connection can be made either with the connecting cable supplied or via a hard-wired cable on site.
DANGER!
There is a risk of fatal electric shock when touching electrical components.
● Carry out all installation and connection work in an isolated
and de-energised state.
● Disconnect all phases of the mains power lead and secure it
to prevent any reconnection.
● Check that the system is de-energised.
58

8.2 Electrical connection
Connecting the power cable
Connecting terminals
The colour coding is irrelevant for this connection. Screw the traction relief in place with the screws supplied and
Securing the power cable with the traction relief
Traction relief
lay the cable in the cable duct.
WARNING! WARNING!
A damaged connecting cable may cause a short circuit.
The connecting cable may not be pinched when subsequently
screwing on the RolloTron DECT as this could lead to damage.
59

8.3 Drawing in and fastening the belt
Moving the fastening hook to the correct position
Fastening hook
1. Insert the mains plug into the socket.
2. Press the Up button until the fastening hook is easily acces-
sible in the reel compartment.
3. Remove the mains plug again from the socket.
CAUTION!
Never reach into the reel compartment when the motor is
running.
Inserting the belt vertically from the top
Belt path
in the device
Feed the belt through the device, as shown in the image, and
slide it over the fastening hook from above.
60

8.3 Drawing in and fastening the belt
Winding the belt a full rotation
1. Insert the mains plug into the socket again.
2. Press the Up button until the belt has fully wound once
around the reel.
3. Remove the mains plug again from the socket.
4. Place the reel compartment cover on the housing.
61

8.4 Mounting the RolloTron DECT
i
Mount the RolloTron DECT as straight as possible so that the
belt can wind correctly.
Slide the RolloTron DECT into the belt box and screw it tight
using the screws provided. Then insert the mains plug into the
socket.
The RolloTron DECT must sit freely in the belt box
and not be in contact with the masonry as this can
generate noise.
62

9. Settings and operation
i
9.1 Setting the end points
The end points must be set in order for the roller shutter to stop
just before the upper and lower end point.
It is imperative that both end points are set, other-
wise malfunctions may occur.
If the RolloTron DECT is operated without an end
point setting, the drive will continue to run for as
long as one of the two control buttons is actuated.
If the end point setting is not configured, the favour-
ite position function and DECT travel commands are
not available.
63

i
9.1 Setting the end points
Setting the upper end point
Simultaneously press and hold both buttons. The roller shutter travels in the desired direction and the indicator light flashes green. When a button
is released, the shutter stops and the position reached is stored as an end point. The indicator light continuously lights up for approx. 5 seconds to
confirm this.
ATTENTION!
Setting the wrong upper end point may lead to overload or
damage the RolloTron DECT or the drive.
● Do not set the upper end point right up to the limit stop.
● Release the button promptly and never allow it to extend
beyond the respective end point.
Setting the lower end point
The belt must not be too loose when it reaches the
lower end point. Tighten the belt slightly until it is
tensioned by the weight of the roller shutter.
64

9.1 Setting the end points
Correcting an end point
Move the roller shutter to the centre position. Then reset the end point
(example showing the upper end point).
65

9.2 DECT log-on / log-off
Logging on the RolloTron DECT Logging off the RolloTron DECT
DECT
1.
1 second
Then the log-on mode of the
DECT
RolloTron DECT remains active for
1 minute.
2. During this time, start the DECT log-on to the FRITZ!Box.
The “Info” or “DECT” LED flashes.
Indicator lights on the RolloTron DECT
● Flashing green
The log-on mode is active
● Flashing green (5 seconds)
The log-on was successful.
● Flashing red (5 seconds)
The log-on has failed
Checking the connection status
DECT
< 1 second
Briefly press the DECT button on the
RolloTron DECT.
66
DECT
1 second
or
start the log-off process on the
FRITZ!Box.
Indicator lights on the RolloTron DECT
● Flashing red
The log-off mode is active
● Flashing green (5 seconds)
The log-off was successful
● Flashing red (5 seconds)
The log-off has failed
Indicator light on the RolloTron DECT
● Flashing green (5 seconds)
When a connection is active
● Flashing red (5 seconds)
NO connection
DECT

9.3 Manual mode
Manual operation is possible at all times.
Opening / closing the roller shutter
Briefly press one of the two buttons. The roller shutter travels in
the chosen direction and stops at the set end point.
When the favourite position function is activated
The roller shutter lowers to the favourite position that has been
set, see page 68.
Stopping the roller shutter
Briefly press one of the two buttons again.
Opening and closing by pressing and holding the button
The roller shutter travels in the chosen direction to the end
point or stops as soon as you release the respective button.
67

9.4 Setting the favourite position
If you do not want the RolloTron DECT to close to the lower
end point, you can use this function to configure an arbitrary
position (e.g. as ventilation position).
Activating / deactivating the favourite positionMoving to and saving the favourite position
Short
2 seconds
Press the button for
more than two seconds. The green indicator light flashes for
approx. 5 seconds.
DECT
Briefly press the button
DECT
each time.
Indicator light
● Flashing green (5 seconds)
Favourite position is active
● Flashing red (5 seconds)
Favourite position is deactivated
68

9.5 Closing the roller shutter when the favourite position is active
If the roller shutter is above or below the favourite position ...
or
Favourite position
... it travels to the set
favourite position.
or
End point
... it travels to the lower end point.
9.6 Controlling the RolloTron DECT with the FRITZ!App Smart Home or with the FRITZ!Fon
FRITZ!App Smart Home
You can control a RolloTron DECT logged on to a FRITZ!Box with
the FRITZ!App Smart Home. This app must be installed on your
smartphone and connected directly to the home network or
remotely. You can download the FRITZ!App Smart Home from
the AppStore and from GooglePlay.
69
FRITZ!Fon
You can control the RolloTron DECT remotely with the “Smart
Home” start screen.

i
9.7 Deleting all settings - loading factory settings
DECT
DECT
Remove the cover plate from
the setting buttons.
4 seconds
Simultaneously press and hold all three buttons for 4 seconds
and the red LED flashes. Then the red LED lights up for
5 seconds.
The following settings are erased after you release the
buttons:
● End points
● Favourite position
● DECT base station (FRITZ!Box)
Then the RolloTron DECT is reset to the default
factory settings.
70

10. Removing the RolloTron DECT
1. Reset the RolloTron DECT to the factory settings.
2. Completely close the roller shutter and continue
to press and hold the Down button.
3. Then pull out the belt as far as possible from the top of the
RolloTron DECT.
4. Remove the mains plug from the socket.
5. Release the assembly screws and pull the RolloTron DECT
completely out of the belt box.
DECT
4 seconds
71

10. Removing the RolloTron DECT
6. Open the reel compartment cover and check the position
of the fastening hook.
7. If necessary, move the fastening hook into an easily accessi-
ble position.
CAUTION!
There is a risk of injury.
● Never reach into the reel compartment when the motor is
running.
● Always remove the mains plug before touching the reel
compartment.
8. Remove the mains plug again from the socket.
9. Release the belt from the fastening hook and completely
remove from the front of the RolloTron DECT.
72

11. Removing the belt in the event of device failure
In the event that the RolloTron DECT device fails and the motor
no longer runs, you can use the disengaging bracket provided in
order to completely remove the belt from the belt winder without
the need for cutting it.
1. Remove the mains plug from the socket and remove
the RolloTron DECT, see page 71.
WARNING! WARNING!
There is a risk of injury as the roller shutter may slam shut in
an uncontrolled manner.
● Secure the roller shutter from falling.
● Hold on to the belt tightly to stop the roller shutter
from slamming shut in an uncontrolled manner.
● Get a second person to help you unlatch the unit.
2. Place the disengaging bracket in the drive compartment
and press and hold tightly.
3. Pull out the belt as far as possible from the RolloTron DECT
and release it from the fastening hook. Then pull out the
belt completely.
4. Place the disengaging bracket back into the storage com-
partment.
Disengaging
bracket
Storage
compartment
73

12. What to do if ... ?
Fault Possible cause / solution
... the RolloTron DECT does not show signs of working? Check the power supply including the connecting cable and plug.
... the roller shutter no longer stops at the set end points? The end points may be displaced due to elongation of the belt. Re-adjust the end
points, see page 63.
... the roller shutter stops as soon as the operating
button is released?
... the RolloTron DECT rotates in the wrong direction? The belt may be wrapped around the reel incorrectly,
... the roller shutter stops suddenly during upward travel
and the red indicator light flashes?
The end points are not yet set, configure the end points,
see page 63.
see page 60.
a) The drive may be jammed, for example, due to the roller shutter freezing up
or other obstacles.
b) The roller shutter may not be running sufficiently smoothly.
Check the roller shutter and roller shutter guide.
c) The roller shutter may be too heavy. The maximum tractive force
of the belt winder has been exceeded, see page 77.
74

12. What to do if ... ?
Fault Possible cause / solution
... the roller shutter stops suddenly during downward
travel and the red indicator light flashes?
... the indicator light flashes and the RolloTron DECT fails
to operate in either direction?
... the RolloTron DECT fails to react properly either
manually or automatically?
a) The roller shutter may have hit an obstacle.
Move the roller shutter back up and remove the obstacle.
b) Slats have shifted out of alignment.
If possible, move the roller shutter back up and realign the
slats.
c) The roller shutter scrapes against the window frame inside the roller shutter
box due to the lack of pinch rollers or insulation material may have come free
and is jamming the roller shutter.
Open the roller shutter box and rectify the fault. Lubricate any stiff areas
with gliding wax if necessary.
d) The roller shutter may be too light.
Increase the weight of the roller shutter by, for example, adding a piece
of flat steel to the bottom slat.
The maximum running time of the drive has been exceeded, see page 45/53.
The motor is too hot. The belt winder will be fully operational again in approx. 1
hour.
The RolloTron DECT is no longer operational. Erase all settings, see page 70, and
test the RolloTron DECT with the factory settings.
75

13. Maintenance and care
Maintenance Care
CAUTION!
A lack of maintenance can lead to personal injury through
damage to the RolloTron DECT and the roller shutter system.
● Check the RolloTron DECT and all of the roller shutter com-
ponents regularly for damage.
Check that the RolloTron DECT is functioning correctly.
The shutter must not be damaged.
The belt may not be frayed.
The deflection roller on the roller shutter box must
always move freely.
The reel plate in the roller shutter box must be fastened
and stable. It may become less stable when used over a
longer period of time.
● Damaged components should be exchanged by a specialist
roller shutter firm.
You can clean the RolloTron DECT using a damp cloth. Please do
not use aggressive or abrasive cleaning agents.
76

14. Simplified EU declaration of conformity
RADEMACHER Geräte-Elektronik GmbH hereby
declares that the RolloTron DECT complies with the
Directives 2006/42/EC (Machinery Directive) and
2014/53/EU (Radio Equipment Directive).
The full text of the EU declaration of conformity is included with
the product and is kept on file by the manufacturer.
RADEMACHER Geräte-Elektronik GmbH
Buschkamp 7
46414 Rhede (Germany)
77

15. Warranty terms and conditions
RADEMACHER Geräte-Elektronik GmbH provides a 36-month
warranty for new systems that have been installed in compliance with the installation manual. All construction faults,
material defects and manufacturing defects are covered by the
warranty.
Your statutory warranty claims remain unaffected by this warranty.
The following are not covered by the warranty:
● Incorrect fitting or installation
● Non-observance of the installation and operating manual
● Improper operation or wear and tear
● External influences, such as impacts, knocks or weathering
● Repairs and modifications by third parties, unauthorised
persons
● Use of unsuitable accessories
● Damage caused by unacceptable excess voltages (e.g.
lightning)
● Operational malfunctions caused by radio frequency over-
lapping and other such radio interference
A prerequisite for the warranty is that the new device must have
been purchased from one of our approved specialist retailers.
Proof of this must be provided by presenting a copy of the
invoice.
RADEMACHER will remedy any defects that occur within the
warranty period free of charge either by repair or by replacement of the affected parts or by supplying a new replacement
unit or one to the same value. There is no general extension of
the original warranty period by delivery of a replacement or by
repair as per the terms of the warranty.
78

79

RADEMACHER
Geräte-Elektronik GmbH
Buschkamp 7
46414 Rhede (Germany)
info@rademacher.de
www.rademacher.de
Service:
Hotline 01807 933-171*
Fax +49 2872 933-253
service@rademacher.de
* 30 seconds free of charge, subsequently 14 cents/minute
from German fixed line networks and max. 42 cents / minute
from German cellular networks.
Subject to technical modifications, misprints
and errors. Illustrations not binding.
 Loading...